

Page 1
PUB. DIE-0364-000xc
HD Camcorder
Instruction Manual
Page 2
Introduction
Important Usage Instructions
WARNING!
WARNING!
CAUTION:
TO REDUCE THE RISK OF ELECTRIC SHOCK AND TO REDUCE ANNOYING INTERFERENCE, USE
THE RECOMMENDED ACCESSORIES ONLY.
CAUTION:
DISCONNECT THE MAINS PLUG FROM THE SUPPLY SOCKET WHEN NOT IN USE.
To reduce the risk of electric shock, do not expose this product to dripping or splashing.
The Mains plug is used as the disconnect device. The Mains plug shall remain readily operable
to disconnect the plug in case of an accident.
While using the compact power adapter, do not wrap it or cover it with a piece of cloth, and do
not place it in confined narrow spaces. Heat may build up, the plastic case may deform and it
could result in electric shock or fire.
CA-570 identification plate is located on the bottom.
TO REDUCE THE RISK OF ELECTRIC SHOCK, DO NOT REMOVE COVER (OR BACK).
NO USER SERVICEABLE PARTS INSIDE. REFER SERVICING TO QUALIFIED
SERVICE PERSONNEL.
TO REDUCE THE RISK OF FIRE OR ELECTRIC SHOCK, DO NOT EXPOSE THIS
PRODUCT TO RAIN OR MOISTURE.
Using any device other than the Compact Power Adapter CA-570 may damage the
camcorder.
2
Page 3
European Union (and EEA) only.
These symbols indicate that this product is not to be disposed of with
your household waste, according to the WEEE Directive (2002/96/EC),
the Battery Directive (2006/66/EC) and/or your national laws
implementing those Directives.
This product should be handed over to a designated collection point, e.g., on an
authorized one-for-one basis when you buy a new similar product or to an authorized
collection site for recycling waste electrical and electronic equipment (EEE) and batteries
and accumulators. Improper handling of this type of waste could have a possible impact
on the environment and human health due to potentially hazardous substances that are
generally associated with EEE. Your cooperation in the correct disposal of this product will
contribute to the effective usage of natural resources.
For more information about the recycling of this product, please contact your local city
office, waste authority, approved scheme or your household waste disposal service or
visit www.canon-europe.com/environment.
(EEA: Norway, Iceland and Liechtenstein)
Trademark Acknowledgements
• SD, SDHC and SDXC logos are trademarks of SD-3C, LLC.
• Microsoft and Windows are trademarks or registered trademarks of Microsoft Corporation in the United States
and/or other countries.
• Macintosh and Mac OS are trademarks of Apple Inc., registered in the U.S. and other countries.
• “x.v.Colour” and the “x.v.Colour” logo are trademarks.
• HDMI, the HDMI logo and High-Definition Multimedia Interface are
trademarks or registered trademarks of HDMI L icensing LLC.
• “AVCHD” and the “AVCHD” logo are trademarks of Panasonic Corporation
and Sony Corporation.
• Manufactured under license from Dolby Labora tories.
“Dolby” and the double-D symbol are trademarks of Dolby Laboratories.
• YouTube is a trademark of Google Inc.
• Other names and products not mentioned above may be trademarks or registered trademarks of their
respective companies.
• This device incorporates exFAT technology licensed from Microsoft.
• ANY USE OF THIS PRODUCT OTHER THAN CONSUMER PERSONAL USE IN ANY MANNER THAT COMPLIES WITH
THE MPEG-2 STANDARD FOR ENCODING VIDEO INFORMATION FOR PACKAGED MEDIA IS EXPRESSLY
PROHIBITED WITHOUT A LICENSE UNDER APPLICABLE PATENTS IN THE MPEG-2 PATENT PORTFOLIO, WHICH
LICENSE IS AVAILABLE FROM MPEG LA, L.L.C., 250 STEELE STREET, SUITE 300, DENVER, COLORADO 80206.
• This product is licensed under AT&T patents for the MPEG-4 standard an d may be used for encoding MPEG-4
compliant video and/or decoding MPEG-4 compl iant video that was encoded only (1) for a personal and noncommercial purpose or (2) by a video provider licensed under the AT&T patents to provide MPEG-4 compliant
video. No license is granted or implied for any other use for MPEG-4 standard.
3
Page 4
Exciting Features and New Functions
1
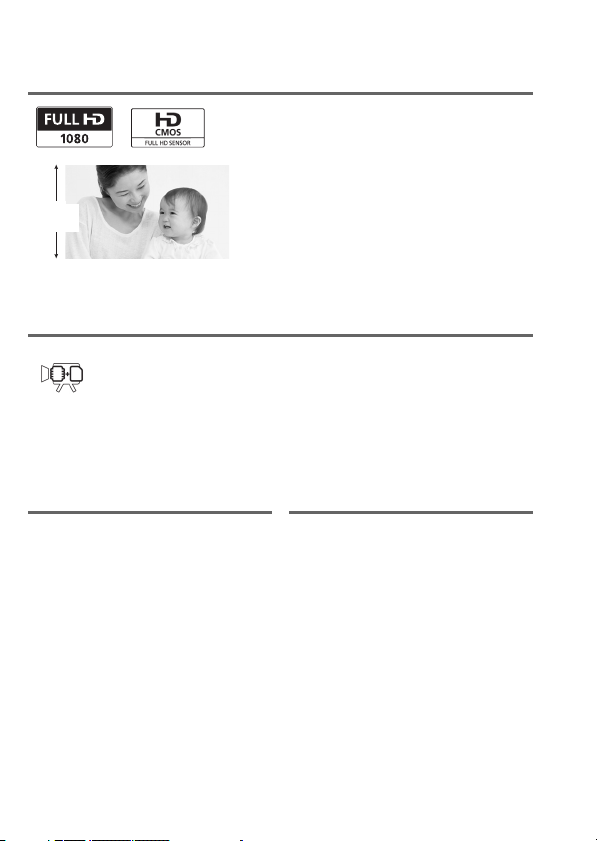
1,080
lines
the special moments in your life with amazing image quality and in lifelike
vibrant colors is easy and fun!
bDual Flash
Memory
You can record in the built-in
memory or on commercially
available memory cards (0 33).
1
“Full HD 1080” refers to Canon camcorders compliant with high-definition video
composed of 1,080 vertical pixels (scanning lines).
2
Video is recorded at this resolution only when the recording mode is set to MXP or
FXP mode. In other recording modes, the picture is recorded at 1,440 x 1,080
pixels.
3
AVCHD is a standard for recording high-definition video. With AVCHD specifications, the video signal is recorded using MPEG-4 AVC/H.264 compression and
the audio signal is recorded in Dolby Digital.
High-Definition Video
Your camcorder’s full high-definition
image sensor (Full HD CMOS) captures
video at a resolution of 1,920 x 1,080
2
. Videos are then recorded in the
pixels
memory in high definition, using AVCHD
specifications
With your new HD camcorder, capturing
3
.
b
Relay Recording
The built-in memory almost full?
Use the memory card slot to keep
on recording video without
interruption (0 36).
3g
4
Page 5
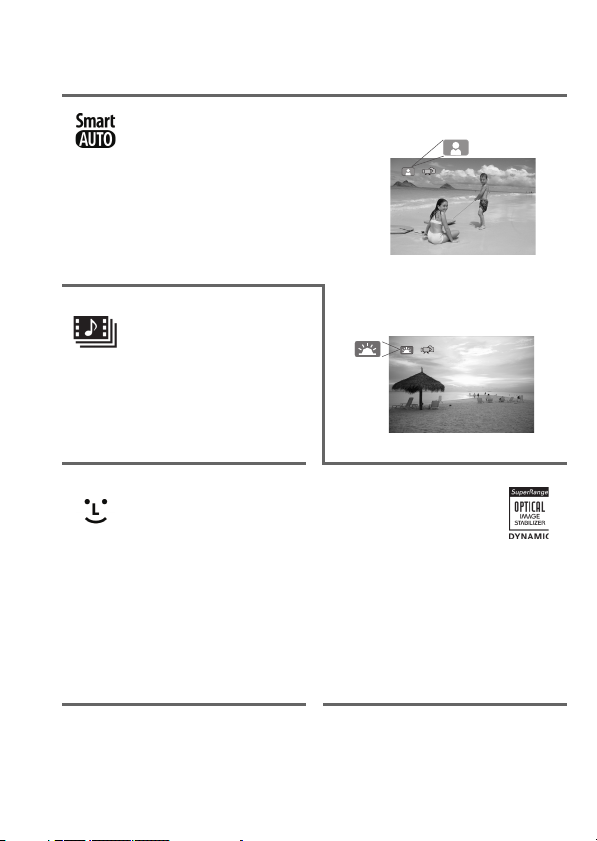
Smart AUTO (0 40)
Smart AUTO automatically selects the best
scene mode for the scene you want to
shoot. You get spectacular recordings
every time without worrying about settings.
Video Snapshot
(0 65)
Shoot or capture short scenes
and arrange them into a video
clip set to your favorite
background music.
Face Detection (0 63) Image Stabilization
Just point the camcorder
and it will automatically
select the best settings for
your subject
The camcorder automatically
detects people’s faces and
adjusts the focus and other
settings accordingly for beautiful
results.
Dynamic IS (0 61)
compensates for camcorder
shake when you shoot video
while walking. Powered IS
(0 62) will produce stable shots
when you zoom in on distant
subjects (full telephoto).
5
Page 6
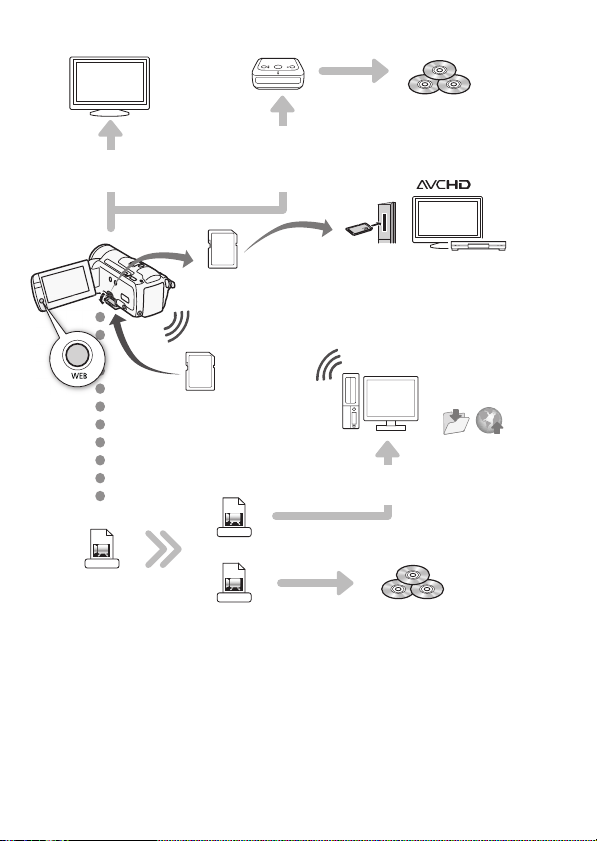
Enjoying your Recordings on Other Devices
Connect the camcorder to
Connect the camcorder
the optional DW-100 DVD
to an HDTV (0 120)
SD
Play video directly
from your recorded
memory card
Eye-Fi
Use an Eye-Fi card (0 140) to
wirelessly upload recordings to your
computer or a video sharing Web site.
High Definition
AVCHD
Standard Definition
Convert your HD movies, in the
camcorder itself, to standard definition
files (0 131, 137).
Burner (0 126, 130)
ImageMixer 3 SE (0 123, 136).
MPEG-2
SD-Video
AVCHD discs
4
Photo DVDs
AVCHD-compatible HDTVs and
digital recorders with an SD
memory card slot
5
.
Save or upload to
the Web.
Use the supplied software
Standard DVDs
4
AVCHD discs containing scenes recorded in MXP mode cannot be created with
the optional DW-100 DVD burner. Use the supplied software ImageMixer 3 SE to
back up such scenes.
5
Refer to the instruction manual of the device. Depending on the device used, correct playback may not be possible even if the device is AVCHD-compatible. In
such case, play back the recordings on the memory card using the camcorder.
6
Page 7

7
Page 8

Table of contents
Introduction
4 Exciting Features and New Functions
12 About this Manual
14 Getting to Know the Camcorder
14 Supplied Accessories and CD-ROMs
16 Names of Parts
Preparations
19 Getting Started
19 Charging the Battery Pack
22 Preparing the Accessories
24 Adjusting the Position and Brightness of the LCD Screen
26 Basic Operation of the Camcorder
26 Using the Touch Screen
27 Operating Modes
28 Using the Menus
31 First Time Settings
31 Setting the Date and Time
32 Changing the Language
32 Changing the Time Zone
33 Using a Memory Card
33 Memory Cards Compatible for Use with the Camcorder
35 Inserting and Removing a Memory Card
35 b Selecting the Memory for the Recordings
36 b Relay Recording of Movies
37 Initializing the Built-in Memory (b only) or
Memory Card
8 Table of contents
Page 9

Dual Shot Mode
39 Basic Recording
39 Shooting Video and Taking Photos in Dual Shot Mode
40 About the Smart AUTO mode
43 Zooming
44 Quick Start Function
Video
46 Basic Playback
46 Playing Back the Video
49 The Index Selection Screen: Selecting the Content to Play
51 3D Flip View
52 Narrowing Down the Scenes Shown in the Index Screen
53 Deleting Scenes
55 Advanced Functions
55 Shooting Video in y Manual Mode
56 Selecting the Video Quality (Recording Mode)
57 Special Scene Recording Programs
60 Cinema Mode: Giving a Cinematic Look to your
61 Advanced Image Stabilization
62 Pre-Recording
63 Face Detection
65 Touch & Track
65 Video Snapshot
66 Digital Effects
67 Manually Setting the Shutter Speed or Aperture
70 Manual Exposure Adjustment
71 Automatic Gain Control (AGC) Limit
71 Manual Focus Adjustment
73 White Balance
74 Image Effects
75 Mini Video Light
77 Self Timer
78 Audio Recording Level
79 Using Headphones
Back
Recordings
Table of contents 9
Page 10

81 Using the Mini Advanced Shoe
81 Using an External Microphone
83 Using a Zoom Remote Controller
84 Selecting the Playback Starting Point
86 Playing Back Scenes Set to Background Music
89 Onscreen Displays and Data Code
90 Playlist and Scene Operations
90 Editing the Playlist: Adding, Deleting, Moving and Playing
92 Capturing Photos and Video Snapshot Scenes from a
94 Dividing Scenes
Back
Movie
Photos
96 Basic Playback
96 Viewing Photos
98 Deleting Photos
100 Additional Functions
100 Taking Photos in y Manual Mode
101 Selecting Photo Size and Quality
103 Flash
104 Drive Mode: Continuous Shooting and Exposure
106 Taking Photos while Recording Movies
107 Light Metering Mode
108 Slideshow
108 Magnifying Photos during Playback
109 Rotating Photos
109 Histogram Display
110 Protecting Photos
112 Printing Photos
112 Printing Photos (Direct Print)
114 Print Orders
Bracketing
(Simultaneous Recording)
10 Table of contents
Page 11

External Connections
116 Terminals on the Camcorder
117 Connection Diagrams
120 Playback on a TV Screen
121 Saving and Sharing Your Recordings
121 b Copying Recordings to a Memory Card
123 Saving Recordings on a Computer
126 Saving Movies onto High-Definition Discs
130 b Saving Movies onto Standard-Definition Discs
134 Saving Photos on Photo DVDs
135 Copying Recordings to an External Video Recorder
136 b Uploading Movies to Video Sharing Web Sites
(AVCHD/Blu-ray Discs)
(DVD)
Additional Information
142 Appendix: Menu Options Lists
142 FUNC. Panel
146 Setup Menus
158 Appendix: Onscreen Icons and Displays
163 Trouble?
163 Troubleshooting
170 List of Messages
180 Do’s and Don’ts
180 Handling Precautions
185 Maintenance/Others
186 Using the Camcorder Abroad
187 General Information
187 Accessories
188 Optional Accessories
193 Specifications
197 Index
Table of contents 11
Page 12

About this Manual
Thank you for purchasing the Canon LEGRIA HF M36 / LEGRIA
HF M306. Please read this manual carefully before you use the camcorder and retain it for future reference. Should your camcorder fail to
operate correctly, refer to Trouble shootin g (0 163).
Conventions Used in this Manual
• IMPORTANT: Precautions related to the camcorder’s operation.
• NOTES: Additional topics that complement the basic operating
procedures.
• POINTS TO CHECK: Restrictions or requirements regarding the
function described.
• 0: Reference page number within this manual.
To complete some operations you will need to refer also to other
instruction manuals. This will be indicated with the following icons:
r Refer to the ‘Photo Applications’ Instruction Manual,
s Refer to the instruction manual of the optional DW-100 DVD
• b : Text that applies only to the model shown in the icon.
• The following terms are used in this manual:
• The photos included in this manual are simulated pictures taken with
included as a PDF file in the supplied Camcorder Supplemental Disc.
Burner.
When not specified as “memory card” or “built-in memory”, the term
“memory” by itself refers to both.
“Scene” refers to one movie unit from the point you press the
g button to start recording until you press again to pause
the recording.
a still camera. Unless indicated otherwise, illustrations and menu
icons refer to the b.
12 Introduction
Page 13
Self Timer
• n appears.
• Repeat, selecting [B Off], to turn off the self timer.
mode: In record pause mode, press g.
The camcorder starts recording after a 10-second countdown*. The
countdown appears on the screen.
mode: Press j, first halfway to activate the autofocus
and then fully.
The camcorder will record the photo after a 10-second countdown*. The
countdown appears on the screen.
* 2 seconds when using the wireless controller.
NOTES
• Once the countdown has begun, any of the following actions will cancel
the self timer.
- Pressing g (when recording movies) or j fully (when
recording photos).
- Turning off the camcorder.
Operating modes:
[FUNC.] 8 [MENU] 8 8 8 [Self Timer] 8
[A On n] 8 [a]
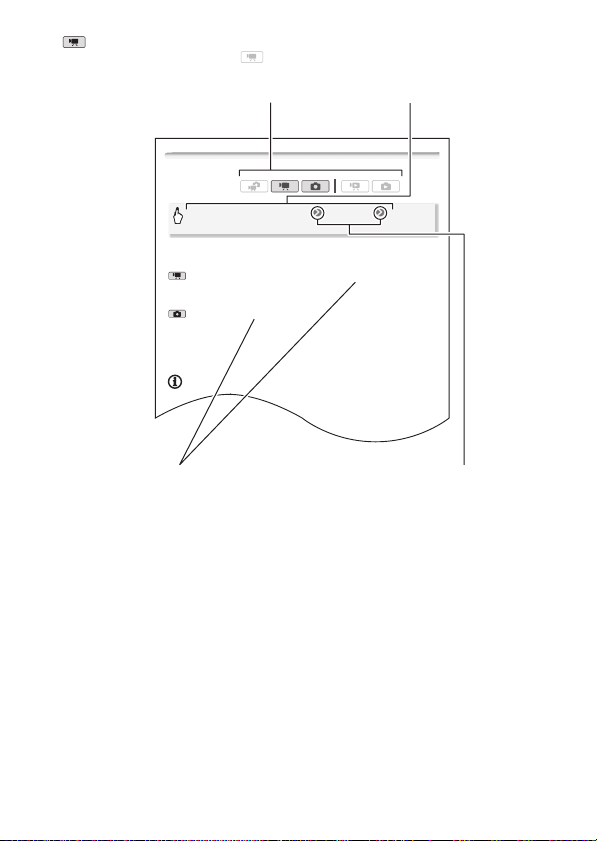
indicates that a function is available in the
operating mode indicated and indicates
that the function is not available. For a detailed
explanation refer to Operating Modes (0 27).
Brackets [ ]are used to refer to control
buttons and menu options you will
touch on the screen and to other
onscreen messages and displays.
The names of physical buttons
and switches on the
camcorder are indicated within
a “button” frame.
For example w.
The 8 arrow is used to abbreviate menu selections.
For a detailed explanation on how to use the menus,
refer to Using the Menus (0 28). For a concise
summary of all available menu options and settings,
refer to the appendix Menu Options Lists (0 142).
Introduction 13
Page 14
Getting to Know the Camcord er
Supplied Accessories and CD-ROMs
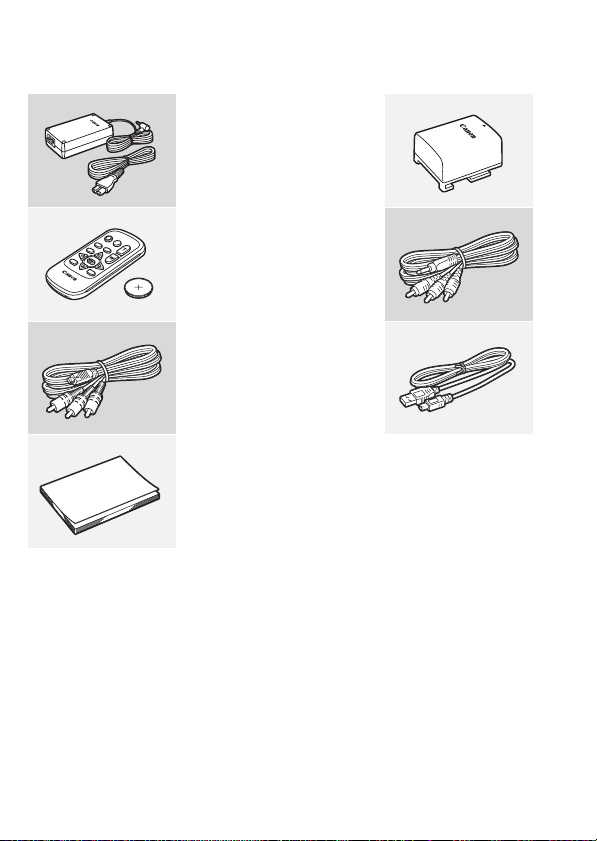
The following accessories are supplied with the camcorder:
XCA-570 Compact Power Adapter
(incl. power cord)
BP-808 Battery PackW
XWL-D89 Wireless Controller
(incl. CR2025 lithium button battery)
STV-250N Stereo Video CableW
Yellow • Red • White plugs
XCTC-100/S Component Cable
Red • Green • Blue plugs
IFC-300PCU USB CableW
XQuick Guide
14 Introduction
Page 15

The following CD-ROMs and software are supplied with the camcorder:
• PIXELA Application - Disc 1 CD-ROM* and ‘PIXELA Applications’
Installation Guide
- ImageMixer 3 SE Transfer Utilities – Software for saving and
transferring movies and music files you can use as background music.
• PIXELA Application - Disc 2 CD-ROM*
- ImageMixer 3 SE Video Tools – Software for managing, editing, and
playing back movies.
• Y Instruction Manual/Photo Applications Ver.34.1*/Music Data
Disc CD-ROM (referred in the manual as the Camcorder Supplemental
Disc). Contains the following components.
- Full-version instruction manual of the camcorder (this PDF file).
- Photo Applications - Software for saving, managing, and printing
photos*.
- Music files that can be used as background music during playback**.
* The CD-ROM includes the instruction manual of the software (on PDF file).
**These music files are for exclusive use with the supplied software ImageMixer 3
SE. The disc cannot be played back on CD players. For more details, refer to
‘ImageMixer 3 SE Software Guide’ on the PIXELA Application Disc 1 CD-ROM.
Introduction 15
Page 16
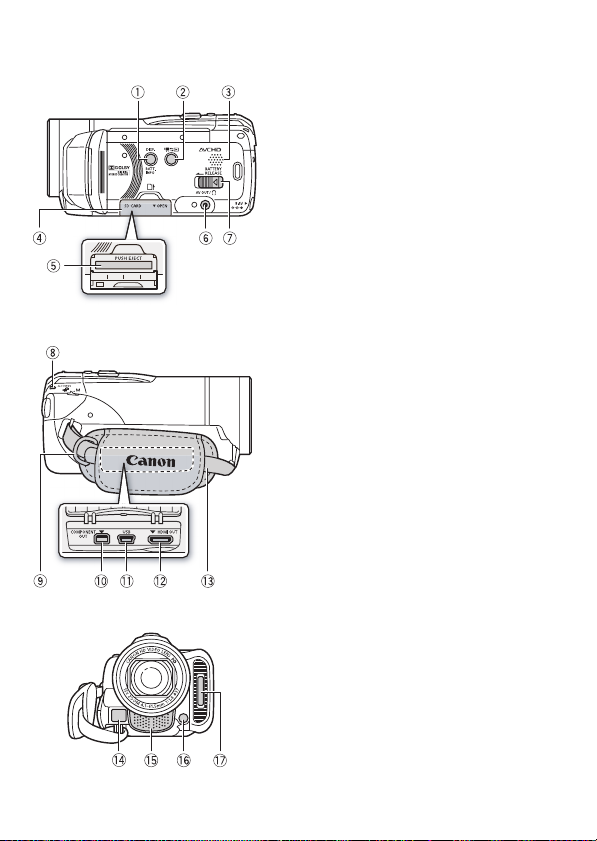
Names of Parts
Left side view
Right side view
Front view
1 DISP. (onscreen display) button
(0 89)/
BATT. INFO button (0 162)
2 2 (camera/play) button (0 27)
3 Speaker (0 48)
4 Memory card slot cover
5 Memory card slot (0 35)
6 AV O UT term in al (0 116, 118)/
X (headphones) terminal (0 79)
7 BATTERY RELEASE switch (0 20)
8 ACCESS indicator (0 39, 55, 100)
9 Strap mount (0 23)
Aq COMPONENT OUT terminal
(0 116, 118)
Aa USB terminal (0 116, 119)
As HDMI OUT terminal (0 116, 117)
Ad Grip belt (0 23)
Af Instant AF sensor (0 147)
Ag Stereo microphone (0 78)
Ah Mini video light (0 75)
Aj Flash (0 103)
16 Introduction
Page 17
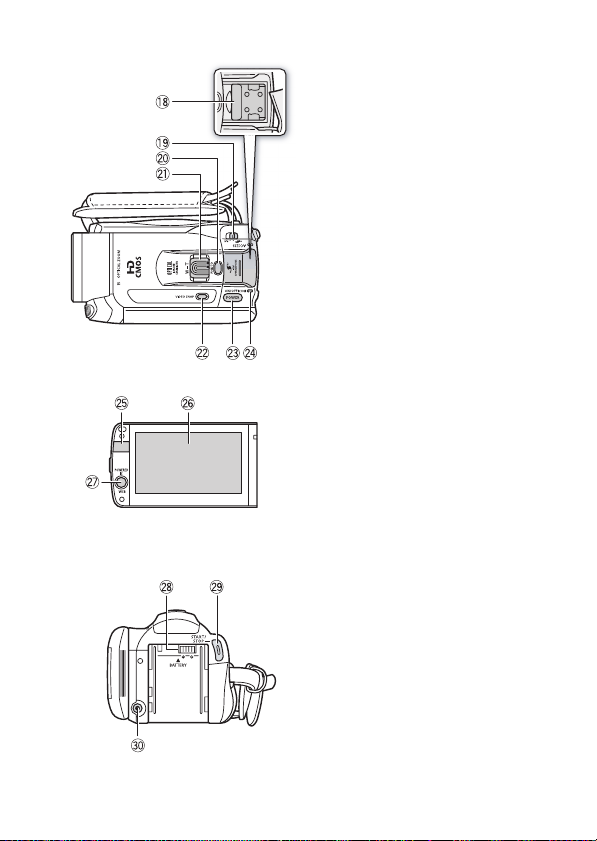
Top vie w
LCD panel
Back view
Ak Mini advanced shoe (0 81)
Al Mode switch (0 27)
Sq PHOTO button (0 39, 100)
Sa Zoom lever (0 43)
Ss VIDEO SNAP (video snapshot) button
(0 65)
Sd POWER button
Sf ON/OFF (CHG) (charge) indicator:
Green – ON
Orange – Standby (0 44)
Red – Charging (0 19)
Sg Remote sensor (0 22)
Sh LCD touch screen (0 24, 26)
Sj POWERED IS button (0 62)/
WEB button* (0 136)
Sk Battery attachment unit (0 19)
Sl START/STOP button (0 39, 55)
Dq DC IN terminal (0 19)
* b only.
Introduction 17
Page 18

B
ottom view
Wireless Controller WL-D89
Da Serial number
Ds Tripod socket (0 181)
1 START/STOP button (0 39, 55)
2 b (index selection) button (0 49)
Press and hold for more than 2
seconds to switch between shooting
and playback mode.
3 MENU button (0 29, 146)
4 DISP. (onscreen display) button
(0 89)
5 SET button
6 B (stop) button (0 46)
7 PHOTO button (0 39, 100)
8 Zoom buttons (0 43)
9 Navigation buttons ( Z/O/y/A )
Aq A/C (play/pause) button (0 46)
18 Introduction
Page 19
Preparations
This chapter describes basic operations, such as using the
touch panel, navigating the menus, and first time settings to
help you learn more about your camcorder.
Getting Started
Charging the Battery Pack
The camcorder can be powered with a battery pack or directly using
the compact power adapter. Charge the battery pack before use.
For approximate charging times and recording/playback times with a
fully charged battery pack, refer to Charging Times (0 189) and
Recording and Playback Times (0 189).
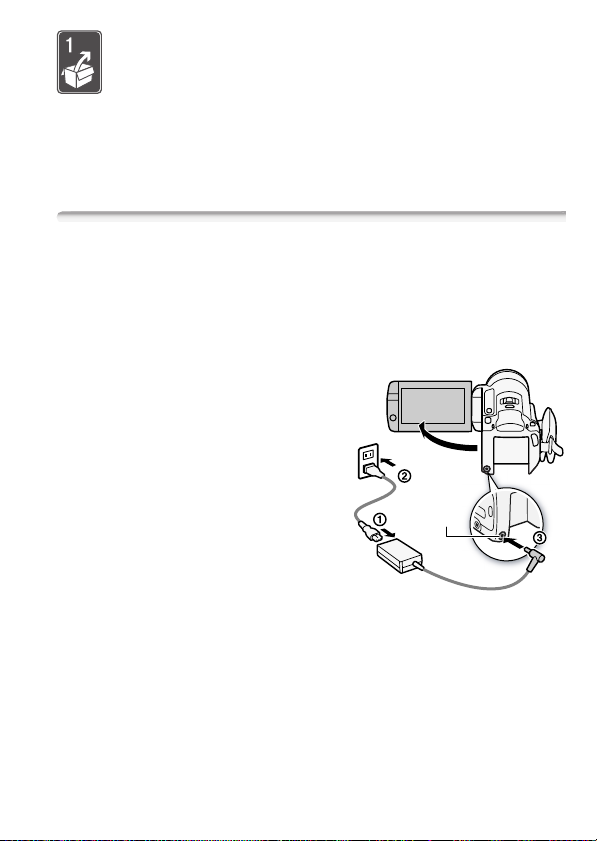
1 Connect the power cord to the
compact power adapter.
2 Plug the power cord into a power
outlet.
3 Connect the compact power
adapter to the camcorder’s DC IN
terminal.
4 Attach the battery pack to the
camcorder.
Press the battery pack softly into the
battery attachment unit and slide it up
until it clicks in place.
DC IN
terminal
Preparations 19
Page 20

5 Charging will start when the
camcorder is turned off.
ON/OFF (CHG) (charge) indicator
• If the camcorder was on, the green
ON/OFF (CHG) indicator will go out
when you turn off the camcorder.
After a moment, the ON/OFF (CHG)
indicator will start flashing in red
(battery pack charging). The red ON/
OFF (CHG) indicator will go out when
the battery pack is fully charged.
• If the indicator flashes quickly, refer to
Troubleshooting (0 163).
To remove the battery pack
1Slide U in the
direction of the arrow and hold it
pressed down.
2 Slide the battery pack down and
then pull it out.
BATTERY RELEASE switch
IMPORTANT
• Turn off the camcorder before connecting or disconnecting the com-
pact power adapter. After pressing x to turn off the camcorder,
important data is updated in the memory. Be sure to wait until the green
ON/OFF (CHG) indicator goes out.
• We recommend charging the battery pack in temperatures between
10 °C and 30 °C. Outside the temperature range of 0 °C to 40 °C,
charging will not start.
• Do not connect to the camcorder’s DC IN terminal or to the compact
power adapter any electrical equipment that is not expressly recommended for use with this camcorder.
20 Preparations
Page 21

• To prevent equipment breakdowns and excessive heating, do not connect the supplied compact power adapter to voltage converters for
overseas travels or special power sources such as those on aircraft and
ships, DC-AC inverters, etc.
NOTES
• The battery pack will be charged only when the camcorder is off.
• If remaining battery time is an issue, you can power the camcorder
using the compact power adapter so the battery pack will not be consumed.
• Charged battery packs continue to discharge naturally. Therefore,
charge them on the day of use, or the day before, to ensure a full
charge.
• We recommend that you prepare battery packs to last 2 to 3 times
longer than you think you might need.
Preparations 21
Page 22

Preparing the Accessories
Wireless Controller
First, insert the supplied CR2025 lithium button battery into the wireless controller.
1 Press the tab in the direction of the
arrow and pull out the battery
holder.
2 Place the lithium button battery with
the + side facing up.
3 Insert the battery holder.
To use the wireless controller
Point the wireless controller at the camcorder’s remote sensor when
you press the buttons.
You can rotate the LCD panel 180 degrees to use the wireless controller
from the front of the camcorder.
Tab
NOTES
• The wireless controller may not work properly when the remote sensor
is situated under strong light sources or direct sunlight.
22 Preparations
Page 23

Grip Belt and Straps
Fasten the grip belt.
Adjust the grip belt so that you can reach
the zoom lever with your index finger, and
the g button with your thumb.
To remove the grip belt
1 Lift the padded handgrip's flap and detach the strap from the Velcro
pad.
2 Pull the strap to remove it first from the front bracket on the
camcorder, then to unthread it from the handgrip and finally to
remove it from the rear bracket on the camcorder.
Preparations 23
Page 24
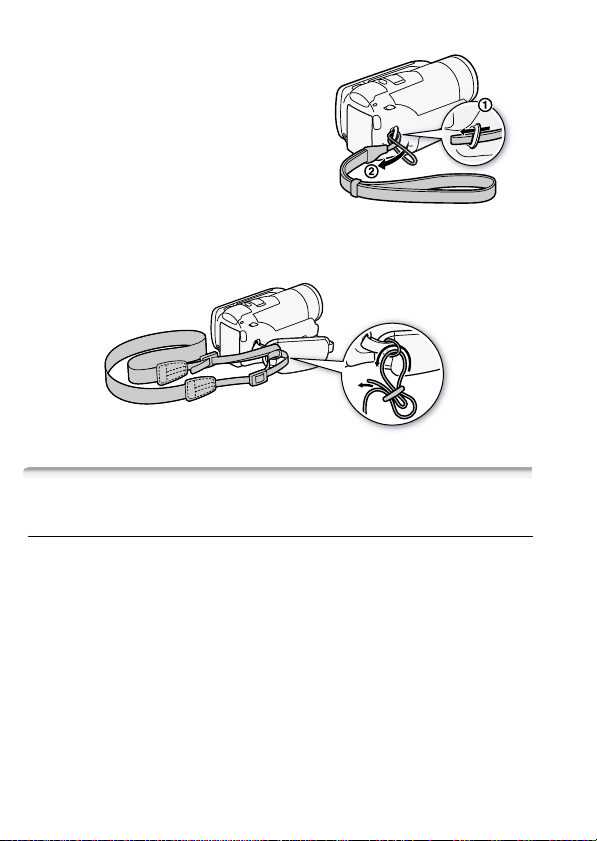
To attach an optional wrist strap
Pass the attaching end of the wrist
strap through the rear bracket on the
camcorder, thread the wrist strap
through the loop and fasten.
You can also attach the wrist strap to the
strap mount on the grip belt to use both
for extra convenience and protection.
To attach an optional shoulder strap
Pass the ends of the shoulder strap through the strap mount on the grip
belt and adjust the length of the strap.
Adjusting the Position and Brightness of the LCD Screen
Rotating the LCD Panel
Open the LCD panel 90 degrees.
• You can rotate the panel 90 degrees downward.
• You can rotate the panel 180 degrees toward the lens. Rotating the
LCD panel 180 degrees can be useful in the following cases:
- To include yourself in the picture when recording with the self timer.
- To allow the camcorder to be operated with the wireless controller
from the front.
24 Preparations
Page 25
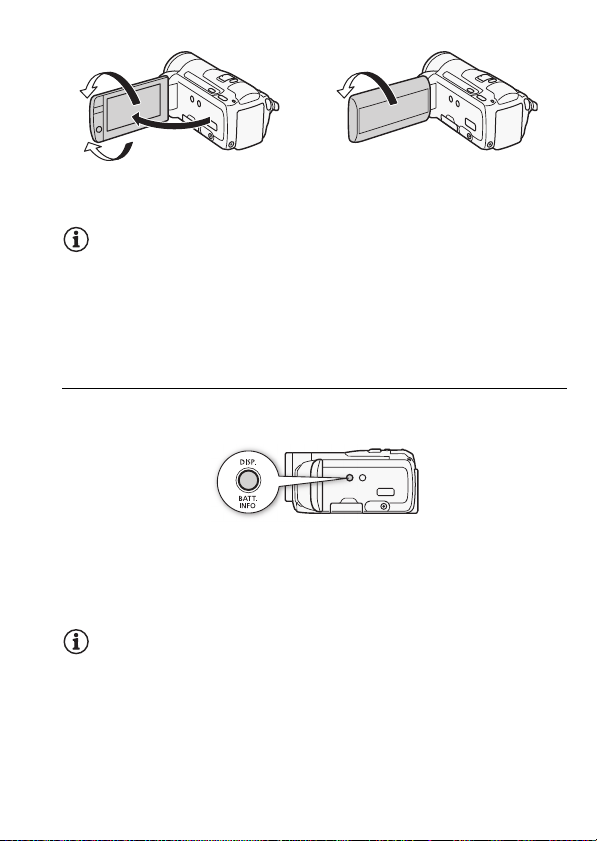
180°
180°
90°
Subject can monitor the LCD screen
NOTES
• About the LCD screen: The screen is produced using extremely high-precision manufacturing techniques, with more than 99.99% of the pixels
operating to specification. Less than 0.01% of the pixels may occasionally misfire or appear as black, red, blue or green dots. This has no
effect on the recorded image and does not constitute a malfunction.
LCD Backlight
When recording in bright places it may be difficult to use the LCD
screen. Turn on the LCD backlight to make it brighter.
With the camcorder on, hold h pressed down for more than 2
seconds.
Repeat this action to switch the LCD backlight between off (normal) and
on (bright).
NOTES
• The LCD backlight does not affect the brightness of the recordings.
• Using the bright setting will shorten the effective usage time of the battery pack.
• You can further adjust the brightness of the LCD screen with the
6 8 [LCD Brightness] setting, or dim it with the 6 8 [LCD
Screen Dimmer] setting to use in places where the light from the LCD
screen can be a nuisance.
Preparations 25
Page 26
Basic Operation of the Camcorder
Using the Touch Screen
The control buttons and menu items that appear on the touch screen
change dynamically depending on the operating mode and the task
you are performing. With the intuitive touch screen interface you have
all the controls at your fingertips.
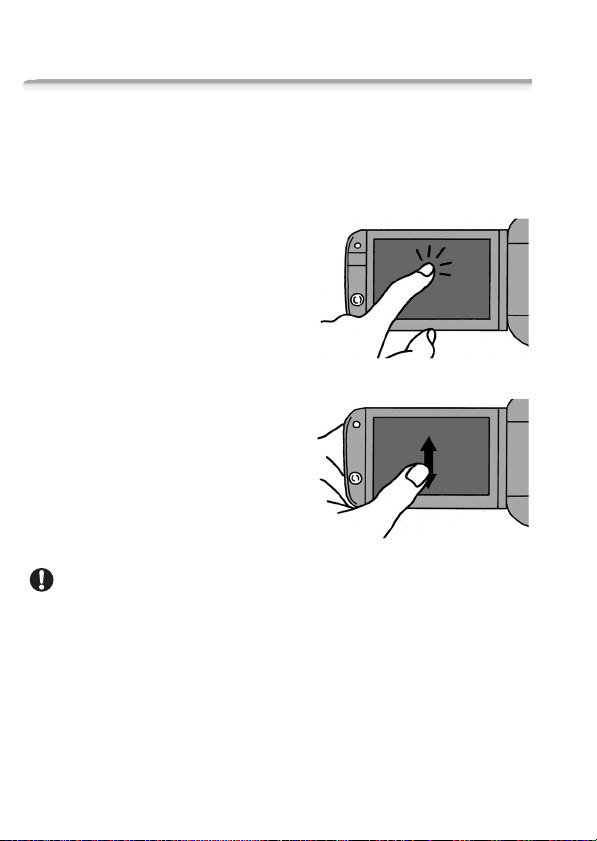
To uc h
Touch a menu item to select it, or a
control button to perform the corresponding action. For some functions,
such as Touch & Track (0 65) and face
detection (0 63), you can touch a subject that appears on the touch screen to
select it and have the camcorder
choose the optimal settings.
Drag
Swipe your finger up and down or left
and right across the screen to scroll
menus, to browse through index screen
pages or to adjust slider controls (for
example, to adjust the volume).
IMPORTANT
• The camcorder uses a pressure-sensitive touch screen. Press firmly
when using touch operations.
• In the following cases, you may not be able to perform touch operations
correctly.
- Operating the touch screen with wet or gloved hands or using your
fingernails or other hard-tipped objects such as ballpoint pens.
- Applying excessive force or forcefully scratching the touch screen.
- Attaching commercially available screen protectors or adhesive film
onto the touch screen's surface.
26 Preparations
Page 27
• For details about how to take care of the touch screen, refer to Handling
Precautions (0 180), Cleaning (0 185).
Operating Modes
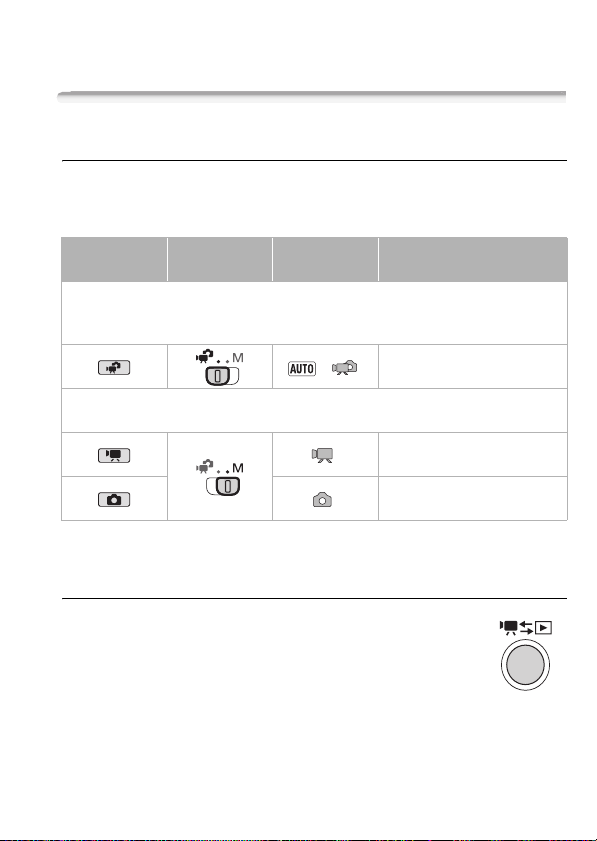
Recording
When recording video or photos, the camcorder’s operating mode is
determined by the position of the mode switch and the onscreen control buttons.
Operating
mode
Dual Sh ot Record video and take photos easily, letting the camcorder take care of all the
settings – Great for beginners or if you just prefer not to bother with detailed camcorder
settings.
Flexible recording Use one of the dedicated recording modes to enjoy full access to the
menus and advanced functions and change the camcorder’s settings to your preference.
* The mode icon displayed will change according to the optimal mode selected by the
Smart AUTO function (0 40).
Mode switch Onscreen icon Operation
*
Easy recording of movies and
photos (0 39).
Touch [4] to record movies
(0 55).
Touch [3] to record photos
(0 100).
Playback
Press the camera/play button S to switch the camcorder between camera (recording) mode and playback
mode. The playback mode you switch into depends on the
initial recording mode.
You can press S when the camcorder is off to turn it
on directly in playback mode.
Preparations 27
Page 28
Initial mode Operating mode Operation
Press S in
or mode.
Press S in mode.
NOTES
• b When switching to a playback mode, the memory selected for
playback will be the same currently used for recording.
• You can also press and hold B on the wireless controller for more
than 2 seconds to switch between recording and playback mode.
Playing back movies
([Original] index screen) (0 46).
Viewing photos
([Photos] index screen) (0 96).
Using the Menus
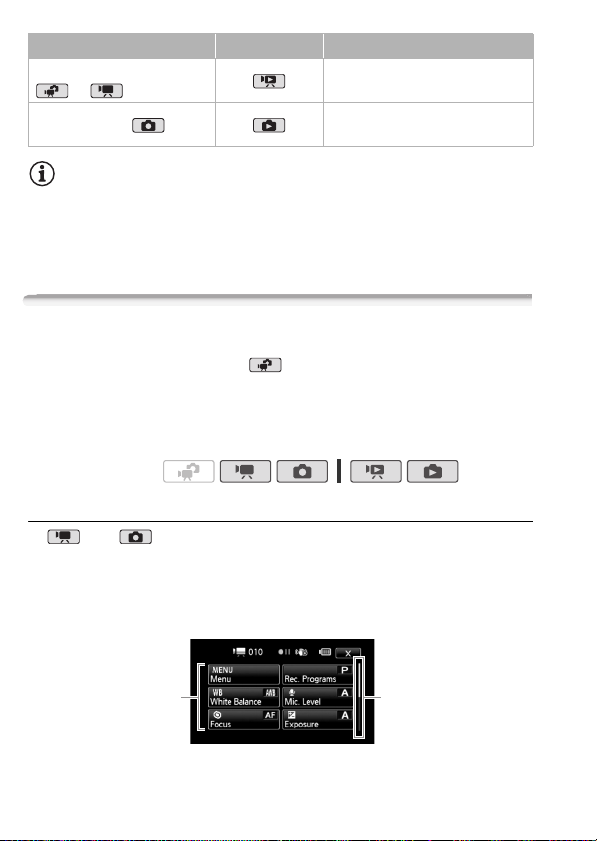
Many of the camcorder’s functions can be adjusted from the FUNC.
panel and the setup menus. In mode, however, menus cannot be
accessed and, except in a few cases, most menu settings will return to
their default values.
For details about the available menu options and settings, refer to the
appendix Menu Options Lists (0 142).
Operating modes:
The FUNC. Panel and Edit Panel
In and mode, the FUNC. panel shows a convenient overview of frequently used shooting functions. Touch [FUNC.] to access
the FUNC. panel and then touch the function you want to set or adjust.
You may need to drag your finger up and down along the scroll bar to
find the control button of the desired function.
Touch the control
button of the
desired function
28 Preparations
Drag your finger up
and down along the
scroll bar to display
the rest of the panel
Page 29
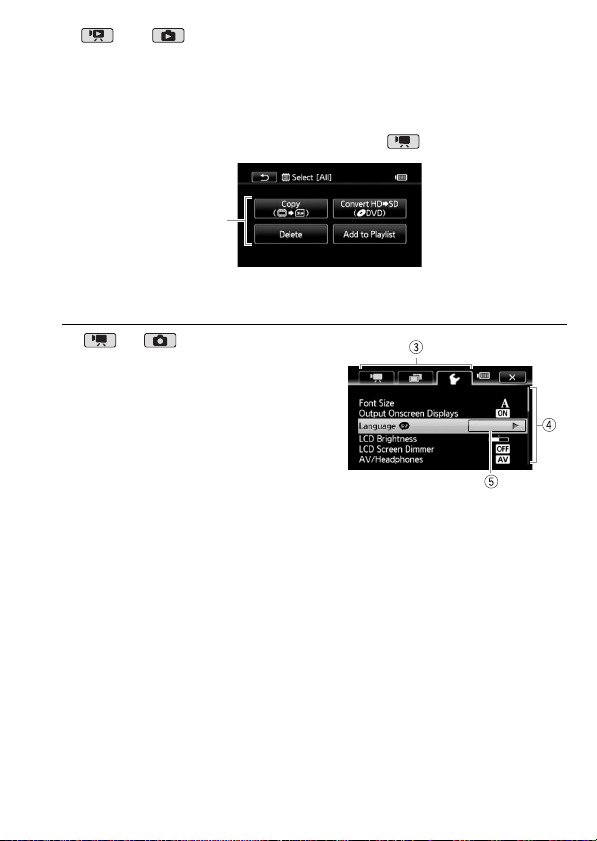
In and mode, touch [Edit] to display a similar panel containing the various operations that are available after selecting one or more
scenes or photos (for example, deleting, adding scenes to the playlist,
protecting photos, etc.). Touch the control button of the desired operation.
Example of the Edit panel in mode
Touch the control
button of the desired
operation
The Setup Menus
1 or mode only: Touch
[FUNC.]
2 Touch [MENU] to open the setup
menus.
You can also press u on the
wireless controller to open the setup
menus.
3 Touch the tab of the desired
menu.
4 Drag your finger up and down along the scroll bar to bring the
setting you want to change into the orange selection bar.
Menu items not available appear grayed out.
5 When the desired menu item is in the orange bar, touch inside the
frame on the right.
6 Touch the desired option and touch [a].
You can touch [a] to close the menu at any time.
Preparations 29
Page 30

NOTES
• A small font size is used in menu screens so you can see the options
currently selected. You can enlarge the font size by setting 6 8
[Font Size] to [A Large] but only the icons of the currently selected
options will appear on the screen.
30 Preparations
Page 31
First Time Settings
Setting the Date and Time
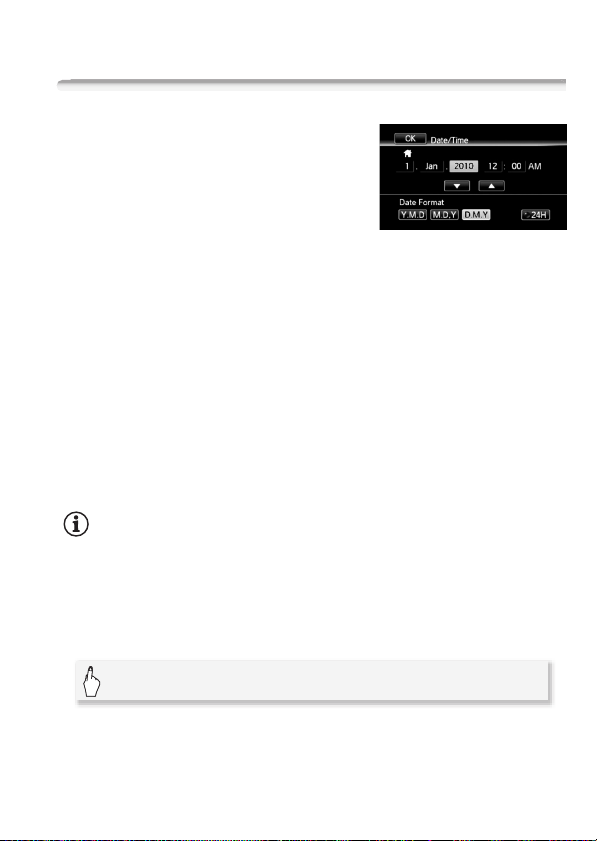
You will need to set the date and time of
the camcorder before you can start
using it. The [Date/Time] screen will
appear automatically when the camcorder’s clock is not set.
When the [Date/Time] screen appears,
the year will be selected.
1 Touch a field you want to change (year, month, day, hours or
minutes).
2Touch [Z] or [O] to change the field as necessary.
3 Set the correct date and time by changing all the fields in the
same way.
4 Touch [Y.M.D], [M.D,Y] or [D.M.Y] to select the date format you
prefer.
5 Touch [24H] to use 24-hour clock or leave this control unchecked
to use 12-hour clock (AM/PM).
6 Touch [OK] to start the clock and close the setup screen.
NOTES
• When you do not use the camcorder for about 3 months, the built-in
rechargeable lithium battery may discharge completely and the date
and time setting may be lost. In such case, recharge the built-in lithium
battery (0 183) and set the time zone, date and time again.
• To change the date and time later on (not during the initial setup), open
the [Date/Time] screen from the setup menus:
[FUNC.]* 8 [MENU] 8 6 8 [Date/Time]
* Only when performing the procedure in a recording mode.
Preparations 31
Page 32
Changing the Language
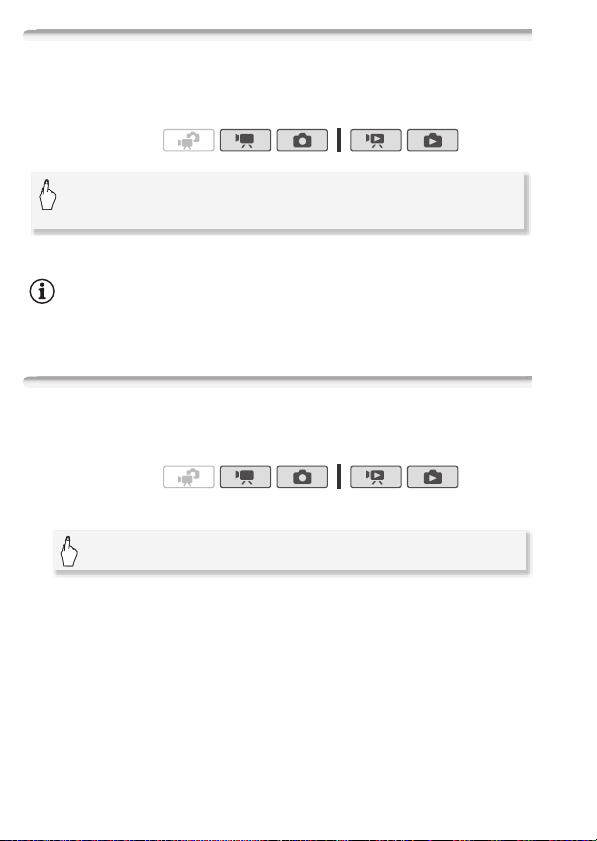
The default language of the camcorder is English. You can set it to one
of 26 other languages.
Operating modes:
[FUNC.]* 8 [MENU] 8 6 8 [Language a] 8
Desired language 8 [a]
* Only when performing the procedure in a recording mode.
NOTES
• Some control buttons, such as [ZOOM], [FUNC.] or [MENU], will appear
in English regardless of the language selected.
Changing the Time Zone
Change the time zone to match your location. The default setting is
Paris.
Operating modes:
1 Open the [Time Zone/DST] screen.
[FUNC.]* 8 [MENU] 8 6 8 [Time Zone/DST]
* Only when performing the procedure in a recording mode.
2Touch [S] to set the home time zone, or [V] to set the time zone
of your destination when you are traveling.
3Touch [Z] or [O] to set the desired time zone. If necessary, touch
[U] to adjust for daylight saving time.
4Touch [a] to close the menu.
32 Preparations
Page 33
Using a Memory Card
Memory Cards Compatible for Use with the Camcorder
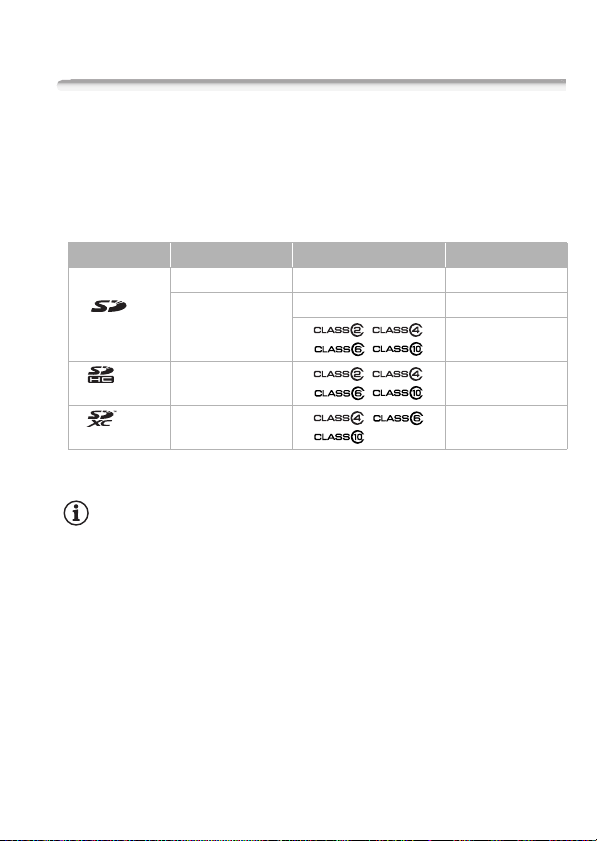
You can use commercially available Secure Digital (SD) cards with this
camcorder. However, depending on the memory card, you may not be
able to record movies. Refer to the table below.
As of May 2010, the movie recording function has been tested using
SD/SDHC memory cards made by Panasonic, Toshiba and SanDisk,
and SDXC memory cards made by Panasonic and Toshiba.
Memory card Capacity SD Speed Class Recording movies
64 MB or less – –
SD
memory cards
SDHC
memory cards
SDXC
memory cards
* Depending on the memory card used, it may not be possible to record movies.
128 MB or more
Over 2 GB
Over 32 GB
NOTES
• About the SD Speed Class: The SD Speed Class is a standard that indicates the minimum guaranteed data transfer speed of SD/SDHC/SDXC
memory cards. When you buy a new memory card, look for the Speed
Class logo on the package.
We recommend using memory cards rated Speed Class 4, 6 or 10.
– N*
N
N
N
Preparations 33
Page 34

SDXC Memory Cards
As of May 2010, SDXC memory cards have been tested to work under
Windows 7. For details on whether your computer's operating system
is SDXC-compatible, check with your computer's manufacturer.
IMPORTANT
• If you use an SDXC memory card with a computer OS that is not SDXCcompatible, you may be prompted to format the memory card. In such
case, cancel the operation to prevent data loss.
• To use an SDXC memory card with external devices, such as card readers or digital recorders, make sure the external device is SDXC-compatible.
• Using the optional DW-100 DVD Burner, discs cannot be created from
recordings on an SDXC memory card. To create discs using the
DW-100, make sure in advance that your recordings are in the built-in
memory or on an SD or SDHC memory card.
If you connect the optional DVD Burner while the index screen is showing the recordings on the SDXC memory card, the DVD Burner may not
operate correctly. In that case, disconnect the USB cable and turn off
the DVD Burner.
• After repeatedly recording, deleting and editing scenes (fragmented
memory), it will take longer to write data on the memory and recording
may stop. Save your recordings and initialize the memory.
Eye-Fi Cards
This product is not guaranteed to support Eye-Fi card functions
(including wireless transfer). In case of an issue with an Eye-Fi card,
please check with the card manufacturer.
Also note that an approval is required to use Eye-Fi cards in many
countries or regions. Without approval, use of the card is not permitted. If it is unclear whether the card has been approved for use in the
area, please check with the card manufacturer.
34 Preparations
Page 35
Inserting and Removing a Memory Card
Make sure to initialize (0 37) all memory cards before using them with
this camcorder.
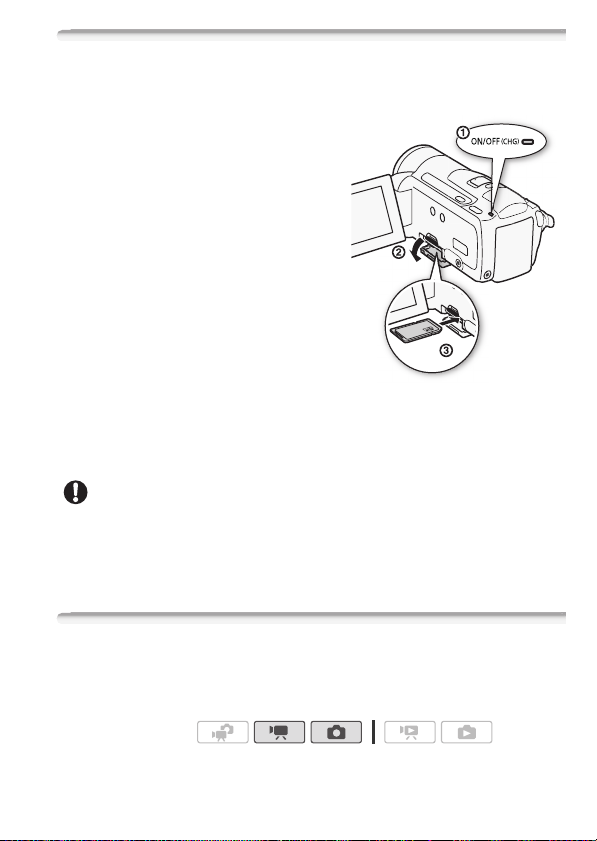
1 Turn off the camcorder.
Make sure the
is off.
2 Open the memory card slot cover.
3 Insert the memory card straight,
with the label facing up, all the way
into the memory card slot until it
clicks.
4 Close the memory card slot cover.
Do not force the cover closed if the
memory card is not correctly inserted.
To remove the memory card
Push the memory card once to release it. When the memory card
springs out, pull it all the way out.
IMPORTANT
• Memory cards have front and back sides that are not interchangeable.
Inserting a memory card facing the wrong direction can cause a malfunction of the camcorder. Be sure to insert the memory card as
described in step 3.
ON/OFF (CHG) indicator
b Selecting the Memory for the Recordings
You can select to record your movies and photos in the built-in memory or on a memory card. The built-in memory is the default memory
for recording both.
Operating modes:
Preparations 35
Page 36
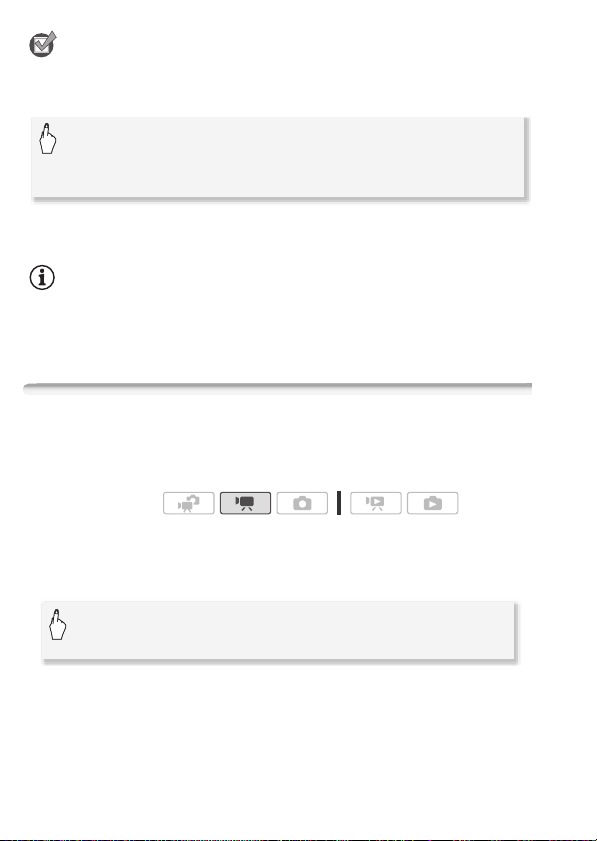
POINTS TO CHECK
• Be sure you understand the information provided in Eye-Fi Cards
(0 34) before using an Eye-Fi card.
[FUNC.] 8 [MENU] 8 8 8
[Rec Media for Movies] or [Rec Media for Photos] 8
[f] (built-in memory) or [g] (memory card)* 8 [a]
* When selecting the memory, you can check the approximate available recording
time/number of photos, based on currently used settings.
NOTES
b Select to record movies in the built-in memory if you later want
to convert the movies to standard definition in order to upload them to
the Web or to create standard DVDs.
b Relay Recording of Movies
You can activate the relay recording so if the built-in memory becomes
full while recording movies, the recording will continue uninterrupted
on the memory card.
Operating modes:
1 Insert a memory card that contains no video recordings into the
camcorder.
2 Activate the relay recording.
[FUNC.] 8 [MENU] 8
f] 8
[Relay Recording] 8[
[
* The approximate available recording time will now reflect the combined space in
the built-in memory and on the memory card.
8
8 [Rec Media for Movies] 8
G
]* 8 [a]
36 Preparations
Page 37
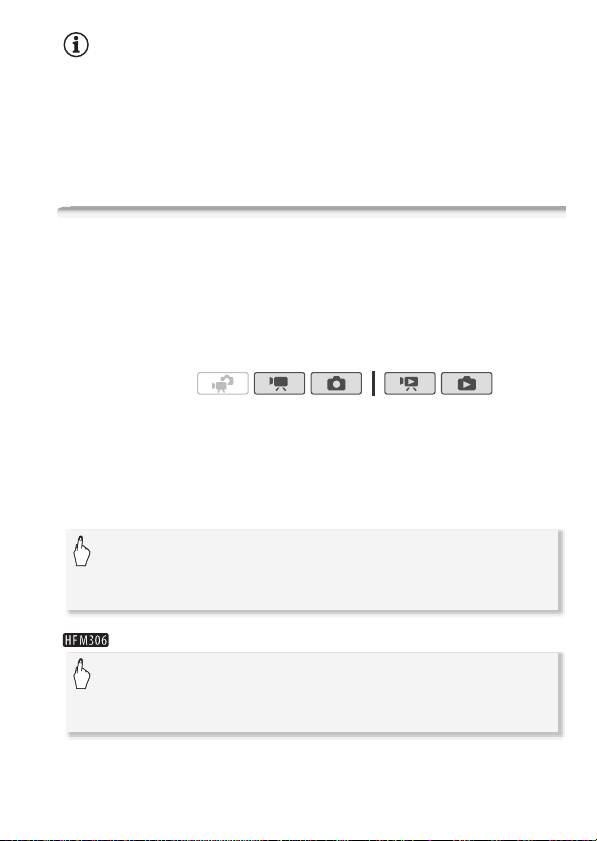
NOTES
• Any of the following actions will deactivate the relay recording function:
- Turning off the camcorder.
- Opening the memory card slot cover.
- Changing the position of the mode switch.
- Changing the camcorder's operating mode.
- Selecting the memory card as the memory for recording movies.
Initializing the Built-in Memory (b only) or Memory Card
Initialize memory cards when you use them with this camcorder for the
first time. You can also initialize a memory card or the built-in memory
(b only) to permanently delete all the recordings it contains.
b At the time of purchase, the built-in memory comes pre-initialized and contains music files for use as background music during playback.
Operating modes:
1 Power the camcorder using the compact power adapter.
Do not disconnect the power source or turn off the camcorder until the
initialization is completed.
2 Initialize the memory.
b
[FUNC.]* 8 [MENU] 8 6 8 [Initialize f/g] 8
[f Built-in Mem.] or [
[Complete Initialization]* 8 [Yes]** 8 [OK] 8 [a]
g Mem. Card] 8 [Initialize] 8
[FUNC.]* 8 [MENU] 8 6 8 [Initialize g] 8
[Initialize] 8 [Complete Initialization]* 8 [Yes]** 8
[OK] 8 [a]
Preparations 37
Page 38

* Touch this option if you want to physically erase all the data rather than just clear
the file allocation table of the memory.
**If you selected the [Complete Initialization] option, you can touch [Cancel] 8 [OK]
to cancel the initialization while it is in progress. All recordings will be erased and
the memory can be used without any problem.
IMPORTANT
• Initializing the memory will permanently erase all recordings. Lost original recordings cannot be recovered. Make sure you save important
recordings in advance using an external device (0 121).
• Initializing a memory card will permanently erase any music files you
may have transferred from the supplied Camcorder Supplemental Disc
to the card. (b The music files that come pre-installed in the built-in
memory will be restored after it is initialized.)
- Windows users: Use the supplied software ImageMixer 3 SE to
transfer music files from the supplied Camcorder Supplemental Disc
to a memory card connected to the computer. For details, refer to the
‘ImageMixer 3 SE Software Guide’ (PDF file).
- Mac OS users: Use Finder to transfer music files from the [MUSIC]
folder on the supplied Camcorder Supplemental Disc to a memory
card connected to the computer. Refer to About the music files
(0 196) for the folder structure of the memory card.
• At the time of purchase, Eye-Fi cards contain the necessary network
configuration software. Be sure to install the software and complete the
required configuration setup before you initialize the Eye-Fi card prior to
using it with this camcorder.
38 Preparations
Page 39
Dual Shot Mode
This chapter covers how to easily record video and photos in
the all-automatic Dual Shot mode, and how to use basic shooting functions like zoom and Quick Start. To enjoy full access to
menus and more advanced functions, refer to the relevant
chapters for video (0 55) and photos (0 100).
Basic Recording
Shooting Video and Taking Photos in Dual Shot Mode
Operating modes:
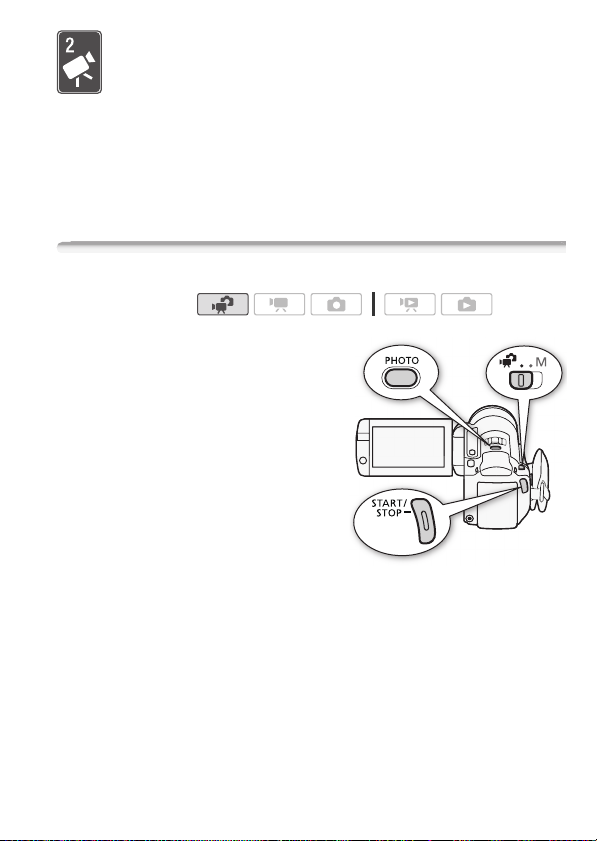
1 Set the mode switch to 5.
2 Turn on the camcorder.
• b By default, movies and
photos are recorded in the built-in
memory. You can select the
memory that will be used to record
movies and photos (0 35).
• Please read the IMPORTANT
section (0 41) before using an
Eye-Fi card.
To record video
g to begin recording.
Press
g again to pause the recording.
Press
To take photos
1Press
2Press
j halfway.
Once the focus is automatically adjusted, h will turn green and one or
more AF frames will appear.
j fully.
The ACCESS indicator will flash as the photo is being recorded.
Dual Shot Mode 39
Page 40

When you have finished recording
1 Make sure that the ACCESS indicator is off.
2 Turn off the camcorder.
3 Close the LCD panel.
About Dual Shot
• Only the following functions are available in mode.
- Zoom (0 43).
- Quick Start (0 44).
- Video snapshot (0 65).
- Advanced image stabilization modes (0 61) to shoot video while
walking or to stabilize the shot while zooming in on faraway
subjects (telephoto).
- Face detection (0 63) to get beautiful shots of people every
time, tracking the subject even if the person moves.
- Touch & Track (0 65) to track other moving subjects, keeping
them in focus and using the best settings to record them.
About the Smart AUTO mode
When shooting in mode, the camcorder will automatically
detect certain characteristics of the subject, background, lighting
conditions, etc. It will then adjust various settings (focus, exposure,
color, image stabilization, image quality, among others), selecting
the best settings for the scene you want to shoot. The Smart AUTO
mode icon will change to one of the following icons.
40 Dual Shot Mode
Page 41
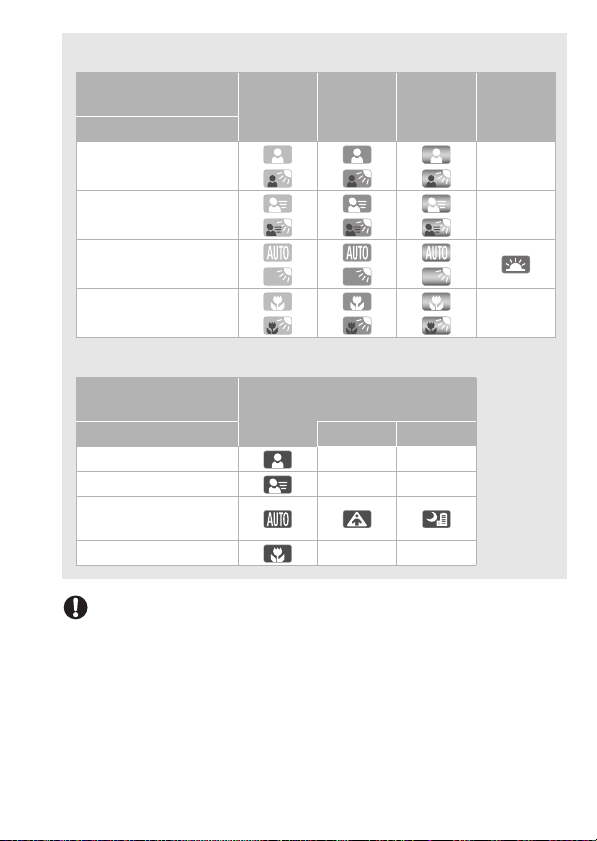
Smart AUTO icons
Background →
(color of the icon)
Subject ↓
People (stationary)
People (moving)
Bright
(grey)
Blue skies
(light blue)
Vivid colors
(green/red)
( ) ( ) ( )
( ) ( ) ( )
Sunsets
(orange)
—
—
Subjects other than people,
such as landscapes
Close objects
The icon in parentheses appears under backlight conditions.
Background →
(color of the icon)
Subject ↓
( ) ( ) ( )
( ) ( ) ( )
Dark
(dark blue)
Spotlight Night scene
—
People (stationary) — —
People (moving) — —
Subjects other than people,
such as landscapes
Close objects — —
IMPORTANT
• Observe the following precautions while the ACCESS indicator is on or
flashing. Failing to do so may result in permanent data loss or damage
to the memory.
- Do not open the memory card slot cover.
- Do not disconnect the power source or turn off the camcorder.
- Do not change the camcorder’s operating mode.
Dual Shot Mode 41
Page 42

• Be sure to save your recordings regularly (0 121), especially after
making important recordings. Canon shall not be liable for any loss or
corruption of data.
• When recording photos on an Eye-Fi card, photos will be uploaded
automatically if you are within the range of a configured network. Always
verify that Eye-Fi cards have been approved in the country/region of
use. See also Using an Eye-Fi card (0 140).
NOTES
• About the Power Save mode: If 6 8 [Power Saving Mode] 8 [Auto
Power Off] is set to [A On], the camcorder will shut off automatically
to save power when it is powered by a battery pack and is left without
any operation for 5 minutes. Press x to turn on the camcorder.
• When recording in bright places, it may be difficult to use the LCD
screen. In such cases, you can turn on the LCD backlight (0 25) or
adjust the brightness of the LCD screen with the 6 8 [LCD Bright-
ness] setting.
• When taking photos:
- If the subject is not suitable for autofocus, h turns yellow. Set the
camcorder to mode and adjust the focus manually (0 71).
- When the subject is too bright, [Overexp.] will flash on the screen. In
such case, use the optional FS-H37U ND filter.
• Under certain conditions, the Smart AUTO icon that appears on the
screen may not match the actual scene. Especially when shooting
against orange or blue backgrounds, the Sunset or one of the Blue
Skies icons may appear and the colors may not look natural. In such
case, we recommend recording in y manual mode (0 55, 100).
• In mode, menus cannot be accessed but the following settings
can be changed in advance, before setting the mode switch to 5.
- 7/8 menu: [AF mode], [Auto Slow Shutter], [POWERED IS
Button].
- 8 menu: [Video Snapshot Length], [Rec Media for Movies]*,
[Recording Mode], [Rec Media for Photos]*, [Photo Quality/Size],
[Simultaneous Recording].
- 6 menu: All settings.
* b only.
42 Dual Shot Mode
Page 43
Zooming
Operating modes:
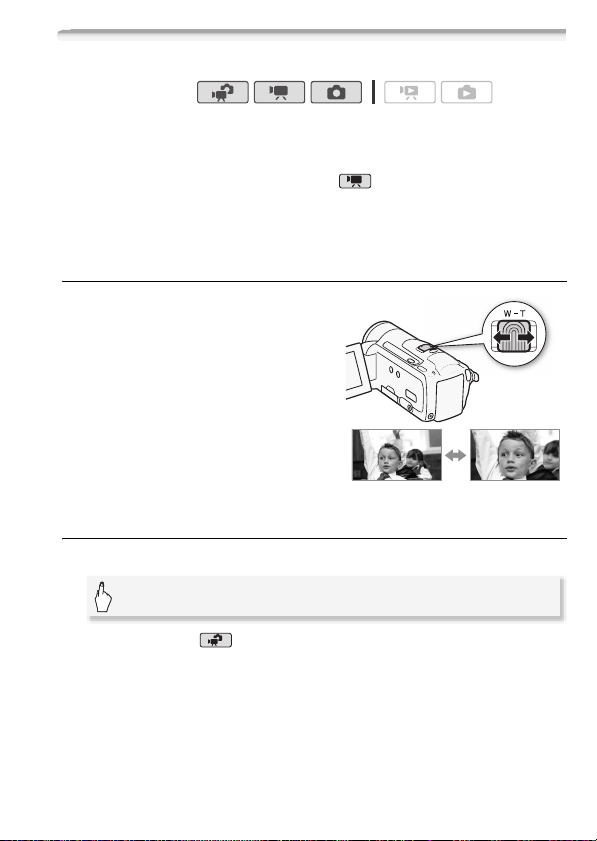
There are three ways you can zoom in and out: using the zoom lever on
the camcorder, using the zoom buttons on the wireless controller or
using the zoom controls on the touch screen.
In addition to the 15x optical zoom*, in mode, you can turn on the
300x digital zoom with the 7 8 [Digital Zoom] setting.
* When [Image Stabilizer] (FUNC. panel) is set to [P Dynamic], you can use the
advanced zoom to magnify the image up to 18x.
Using the Zoom Lever or Wireless Controller
Move the zoom lever toward Q
(wide angle) to zoom out. Move it
toward P (telephoto) to zoom in.
• By default, the zoom lever operates
at a variable speed – press gently for
a slow zoom; press harder for faster
zooms.
• You can also use the zoom buttons
on the wireless controller.
W Zoom out
Using the Touch Screen’s Zoom Controls
1 Display the zoom controls on the touch screen.
[FUNC.]* 8 [ZOOM]
* Not necessary in mode.
• The zoom controls appear on the left side of the screen.
Dual Shot Mode 43
T Zoom in
Page 44
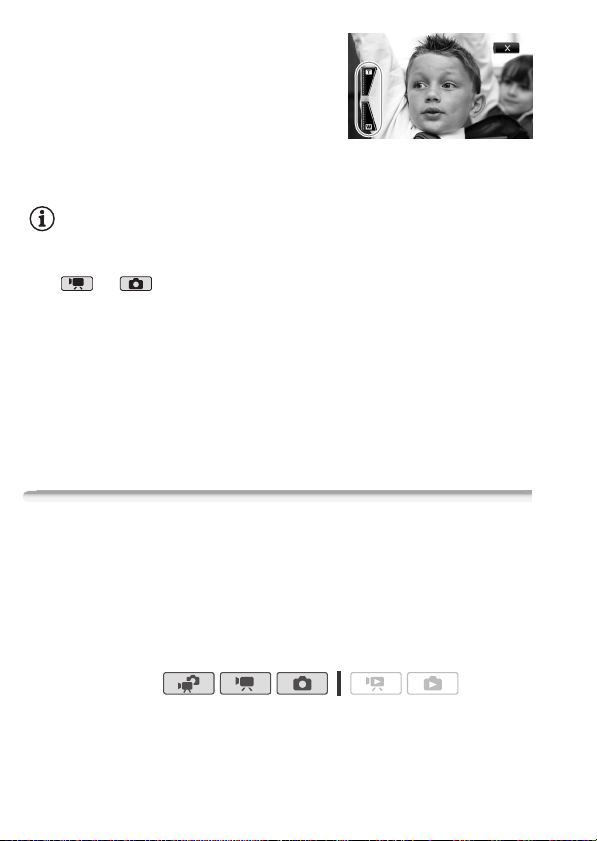
2 Touch the zoom controls to operate
the zoom.
Touch anywhere within the Q area to
zoom out or anywhere within the P area
to zoom in. Touch closer to the center for
a slow zoom ([Speed 1]); touch closer to
the e/d icons for faster zooms ([Speed 3]).
3Touch [a] to hide the zoom controls.
NOTES
• Keep at least 1 m away from the subject. At full wide angle, you can
focus on a subject as close as 1 cm.
• In or mode, you can also set 7/8 8
[Zoom Speed] to one of three constant speeds (3 is the fastest, 1 the
slowest).
• When [Zoom Speed] is set to [I Varia ble]:
- When you use the P and Q buttons on the wireless controller, the
zoom speed will be constant at [J Speed 3].
- The zoom speed will be faster in record pause mode than when
actually recording, except when pre-recording (0 62) is activated.
•See Specifications (0 195) for notes about this function when the
recording program is set to [r Underwater] or [s Surface].
Quick Start Function
When you close the LCD panel with the camcorder on, the camcorder
enters the standby mode. In standby mode the camcorder consumes
only about 1/3 the power used when recording, saving energy when
you are using a battery pack. Additionally, when you open the LCD
panel, the camcorder is ready to start recording in approximately
1 second*, allowing you to record the subject right away.
* The actual time required varies depending on the shooting conditions.
Operating modes:
1 With the camcorder on and in a recording mode, close the LCD
panel.
A beep will sound and the green ON/OFF (CHG) indicator will change
to orange to indicate the camcorder entered standby mode.
44 Dual Shot Mode
Page 45

2 When you wish to resume recording, open the LCD panel.
The ON/OFF (CHG) indicator turns back green and the camcorder is
ready to record.
IMPORTANT
• Do not disconnect the power source during standby mode (while the
ON/OFF (CHG) indicator is lit in orange).
NOTES
• The camcorder will not enter standby mode if the LCD panel is closed
while the ACCESS indicator is on or flashing or while a menu is being
displayed. The camcorder may also not enter standby mode if the LCD
panel is closed while the memory card slot cover is open or when the
battery charge is too low. Check that the ON/OFF (CHG) indicator
changes to orange.
• About standby mode and auto power off:
- The camcorder will power off automatically if left in standby mode for
10 minutes. Press x to turn on the camcorder.
- You can select the length of time until shut-off or turn off the Quick
Start function altogether with the 68 [Power Saving Mode] 8
[Quick Start (Standby)] setting.
- The usual 5-minute auto power off setting of [Power Saving Mode] is
not applicable while the camcorder is in standby mode.
• Changing the position of the mode switch while the camcorder is in
standby mode will reactivate the camcorder in the operating mode
selected.
Dual Shot Mode 45
Page 46
Video
This chapter covers functions related to movies, including playback, advanced shooting, advanced functions and playlist and
scene operations. For details about basic video shooting, refer
to Dual Shot Mode (0 39).
Basic Playback
Playing Back the Video
Operating modes:
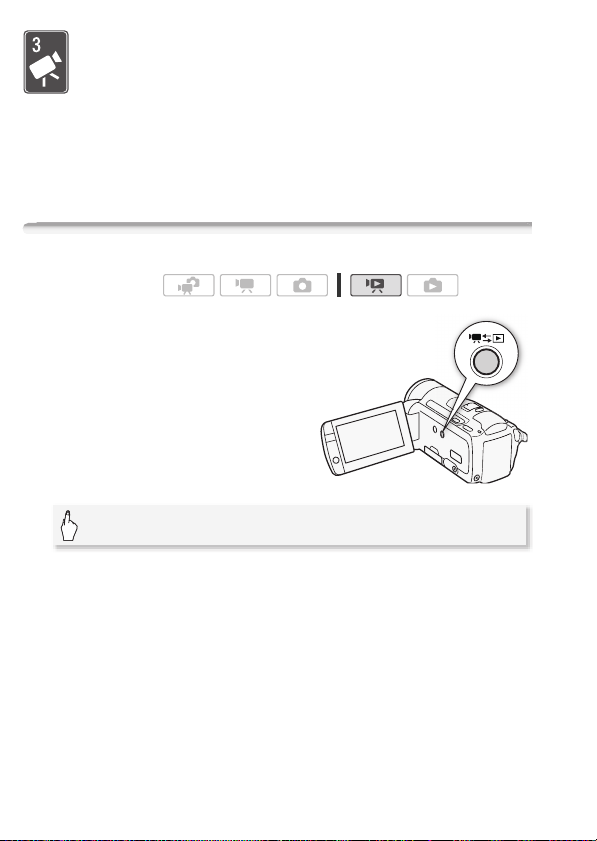
1Press S.
You can also press and hold B
on the wireless controller for more
than 2 seconds to switch between
shooting and playback mode.
2 Open the [Original] index screen, if
it is not displayed.
[b] 8 [Original]
3 Look for the scene you want to play back.
Move the zoom lever toward Q to show 15 scenes per page; move it
toward P to show 6 scenes per page.
46 Video
Page 47
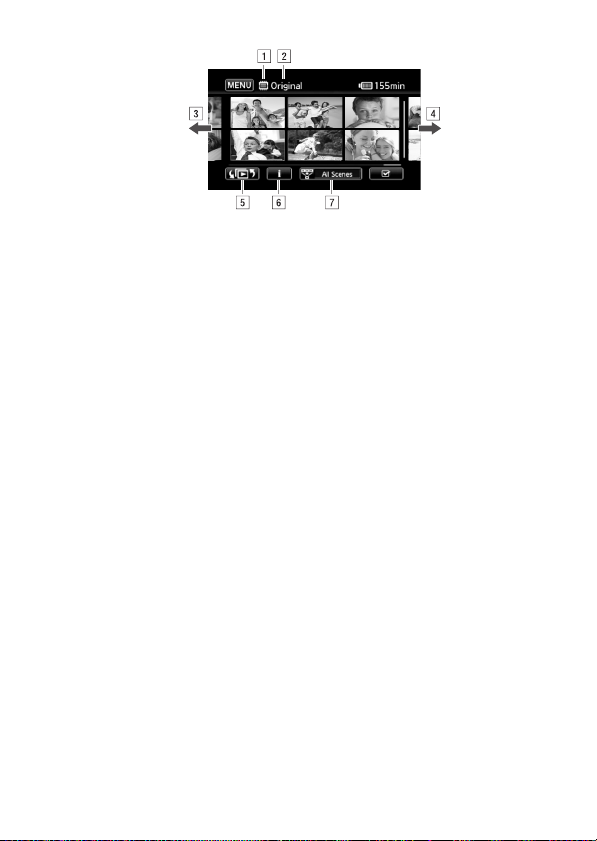
A Memory being read
B Index screen currently displayed
C Drag your finger left for the next index page*
D Drag your finger right for the previous index page*
E Select a different index screen to read different content or
from a different memory (b only) (0 49)
F Scene's timeline (0 84) and recording information
G Narrow down the scenes shown in the index screen
(0 52)
* While browsing through index pages, a scroll bar will appear at the
bottom of the screen for a few seconds. When you have a large
number of scenes it may be more convenient to drag your finger
along the scroll bar.
4 Touch the desired scene to play it back.
• Playback will start from the scene selected and continue until the end
of the last scene in the index screen.
• Touch the screen during playback to display the playback controls.
Video 47
Page 48
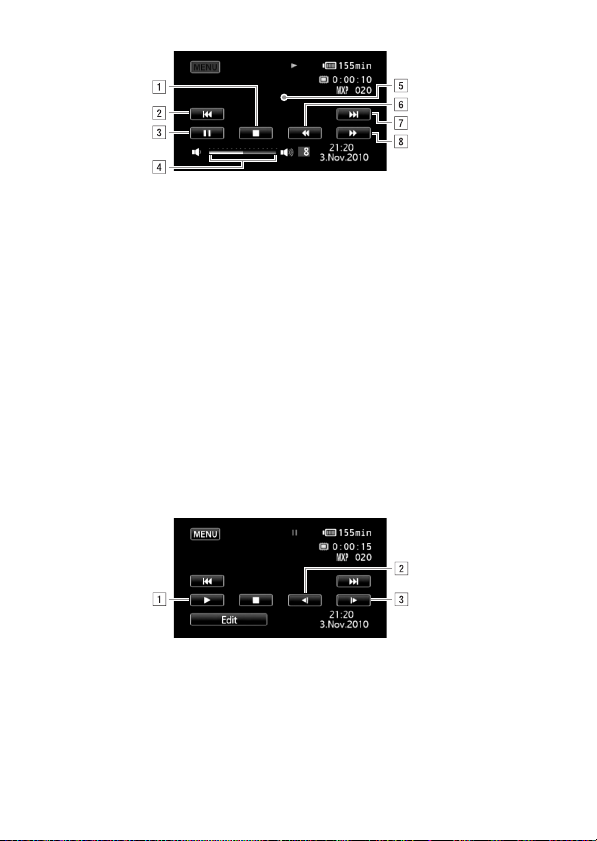
A Stop the playback.
B Jump to the beginning of the scene. Double-tap to jump
to the previous scene.
C Pause the playback.
D Drag your finger left and right along the volume bar to
adjust the volume.
E Touch anywhere else to hide the playback controls.
F Fast playback backward*.
G Jump to the next scene.
H Fast playback forward*.
* Touch several times to increase the playback speed to approxi-
mately 5x → 15x → 60x the normal speed. During fast playback,
touch anywhere on the screen to return to normal playback.
During playback pause:
A Resume playback.
B Slow playback backward*.
C Slow playback forward*.
* Touch several times to increase the playback speed 1/8 → 1/4 the
normal speed. During slow playback, touch anywhere on the
screen to return to playback pause.
48 Video
Page 49
IMPORTANT
• Observe the following precautions while the ACCESS indicator is on or
flashing. Failing to do so may result in permanent data loss.
- Do not open the memory card slot cover.
- Do not disconnect the power source or turn off the camcorder.
- Do not change the camcorder’s operating mode.
• You may not be able to play back with this camcorder movies recorded
on a memory card using another device.
NOTES
• Depending on the recording conditions, you may notice brief stops in
video or sound playback between scenes.
• During fast/slow playback, you may notice some anomalies (blocky
video artifacts, banding, etc.) in the playback picture.
• The speed indicated on the screen is approximate.
• Slow reverse playback will look the same as continuous frame reverse.
The Index Selection Screen: Selecting the Content to Play Back
From the index selection screen you can select the content you want to
play back (original scenes, playlist, or photos, for example). b
only: You can also select the memory from which you want to play
back your recordings.
Operating modes:
In any index screen, touch [b].
During single photo view, touch the screen once to display the controls
then touch [Q] to open the [Photos] index screen.
Video 49
Page 50
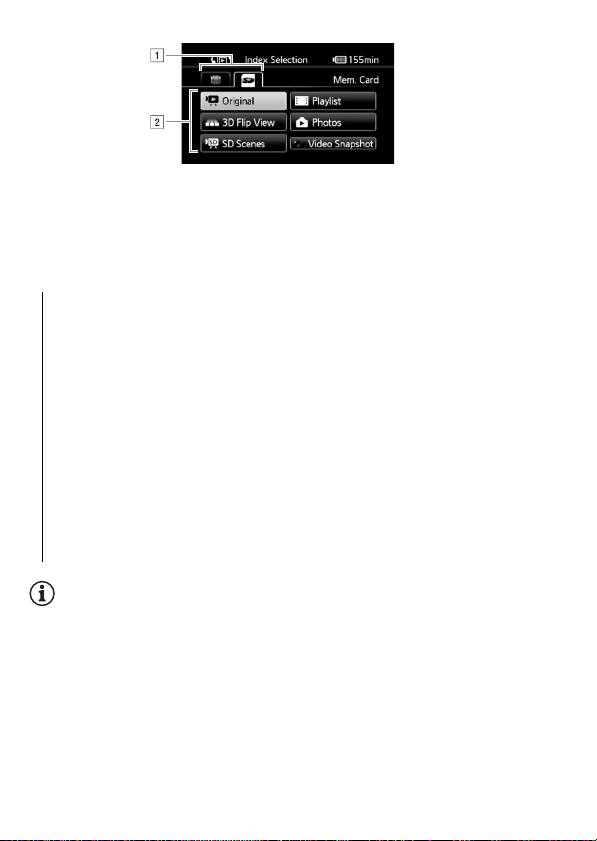
A b Touch the tab of the desired memory: built-in
memory or memory card.
B Touch a control button to select the content you want to
play back.
Options
[Original] Original movies as you recorded them.
[Playlist] Scenes that were added to the playlist (0 90) and may
have been rearranged to your liking.
[3D Flip View] See the following section (0 51).
[Photos] Display the photo index screen.
[SD Scenes] (b Only when the memory card is selected)
Scenes that were converted to standard definition to upload
them to the Web (0 136) or to create standard DVD discs
(0 130). Touch [SD Scenes] and then [For Web (MPEG-2)] or
[For DVD (SD-VIDEO)] as necessary.
[Video Snapshot] To display only video snapshot scenes. Touch
this control button first and then [Original] or [Playlist] as necessary.
NOTES
• Fast/slow playback modes are not available for scenes converted to
standard definition. Scenes in the [SD Scenes] index screens can only
be played back at normal speed.
50 Video
Page 51
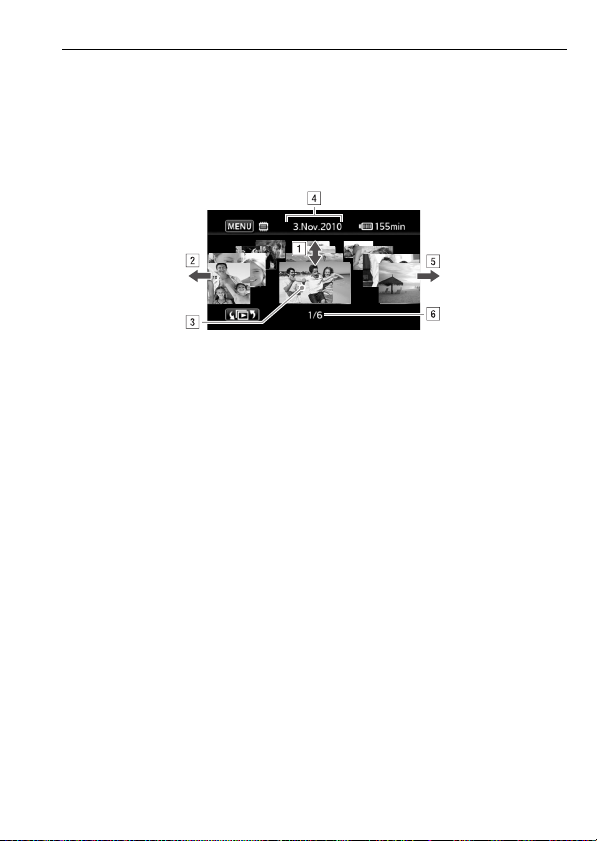
3D Flip View
3D Flip View is a fun way to display your video recordings (original
scenes) in a 3D layout, organized by recording date.
In any index screen, touch [b] 8 [3D Flip View].
During single photo view, touch the screen once to display the controls
then touch [Q] to open the [Photos] index screen.
A Drag your finger up and down to browse through the
scenes recorded in the displayed date.
B Drag your finger left to go to the next date with record-
ings.
C Touch the scene in the front to play it back.
D Currently selected recording date.
E Drag your finger right to go to the previous date with
recordings.
F Current scene / Total number of scenes recorded on the
selected date.
Video 51
Page 52
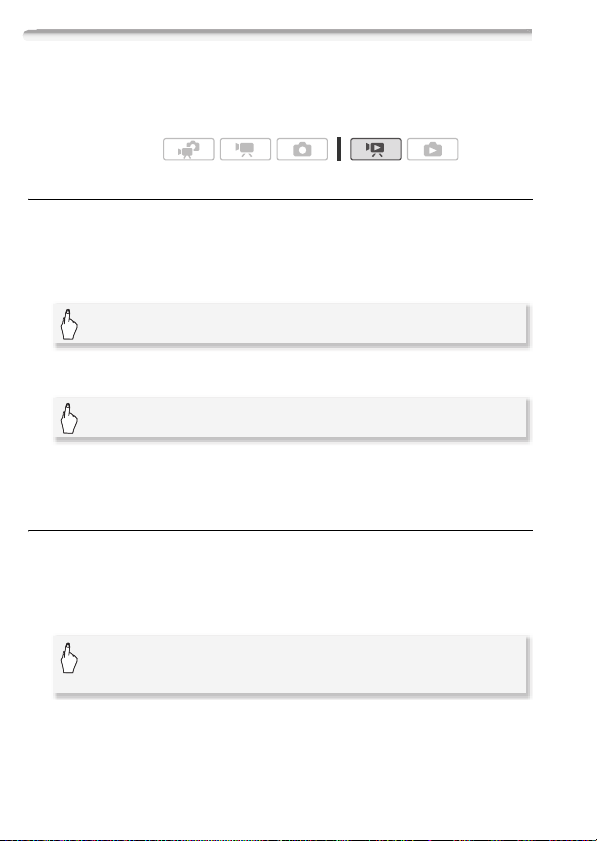
Narrowing Down the Scenes Shown in the Index Screen
From the [Original] index screen, you can narrow down the scenes
shown, leaving only scenes that were recorded on a specific date or
only those scenes in which people's faces were detected.
Operating modes:
Showing Only Scenes that Contain People’s Faces
This will narrow down the scenes shown in the [Original] index screen,
leaving only scenes that were recorded using face detection (0 63)
and in which people's faces were detected.
1 Open the [Original] index screen, if it is not displayed.
[b] 8 [Original]
2 Narrow down the scenes shown.
[y All Scenes] 8 [o Scenes with Faces]
•[o Faces] appears instead of [All Scenes]. To show all scenes again,
touch [y o Faces] and then [All Scenes].
Showing Only Scenes Recorded on a Specific Date
This will narrow down the scenes shown in the [Original] or [Video
Snapshot] → [Original] index screen, leaving only scenes that were
recorded on the date you choose.
1 Open the [Original] or [Video Snapshot] → [Original] index screen.
[b] 8 [Original] or [b] 8 [Video Snapshot] 8
[Original]
52 Video
Page 53
2 Open the calendar screen.
[y All Scenes] 8 [Scenes by Date]
• Dates that contain scenes (that is, movies were recorded on that
date) appear in black against a silver background. Dates without
recordings appear grayed out.
•Touch [y] or [A] to jump to the previous/next calendar month that
contains recordings.
3 Touch the desired date.
The selected date appears instead of [All Scenes]. To show all scenes
again, touch [y (the date displayed on the screen)] and then [All
Scenes].
NOTES
• You can change on what day to start the week for the calendar display
with the 6 8 [Calendar Start Day] setting.
Deleting Scenes
You can delete those scenes that you are not interested in keeping.
Deleting scenes allows you also to free up space on the memory. See
also Deleting Scenes from the Playlist (0 91).
Operating modes:
1 Open the index screen that contains the scenes you want to
delete.
• [Original] or [Video Snapshot] → [Original] index screen: To delete all
the scenes recorded on a specific date, narrow down the scenes
shown to scenes recorded on that date (0 52).
2Touch [a] to open the scene selection screen.
3 Touch on the individual scenes you want to delete.
• A checkmark O will appear on scenes selected. Touch a selected
scene again to remove the checkmark.
Video 53
Page 54

• To select all the scenes at once: Touch [Select All] instead of
touching individual scenes. (Remove in advance any checkmarks
from scenes you may have selected individually.)
4 Delete the scenes.
[Edit] 8 [Delete] 8 [Yes]* 8 [OK]
* Touch [Stop] to interrupt the operation while it is in progress. Some scenes may
be deleted nevertheless.
IMPORTANT
• Be careful when deleting original recordings. Once deleted, original
scenes cannot be recovered.
• Save copies of important scenes before deleting them (0 123).
• Observe the following precautions while the ACCESS indicator is on or
flashing (while scenes are being deleted).
- Do not open the memory card slot cover.
- Do not disconnect the power source or turn off the camcorder.
- Do not change the camcorder’s operating mode.
NOTES
• Deleting a scene from the [Original] index screen also deletes that scene
from the playlist.
• To delete all movies and make all recordable space available again you
may prefer to initialize the memory (0 37).
54 Video
Page 55
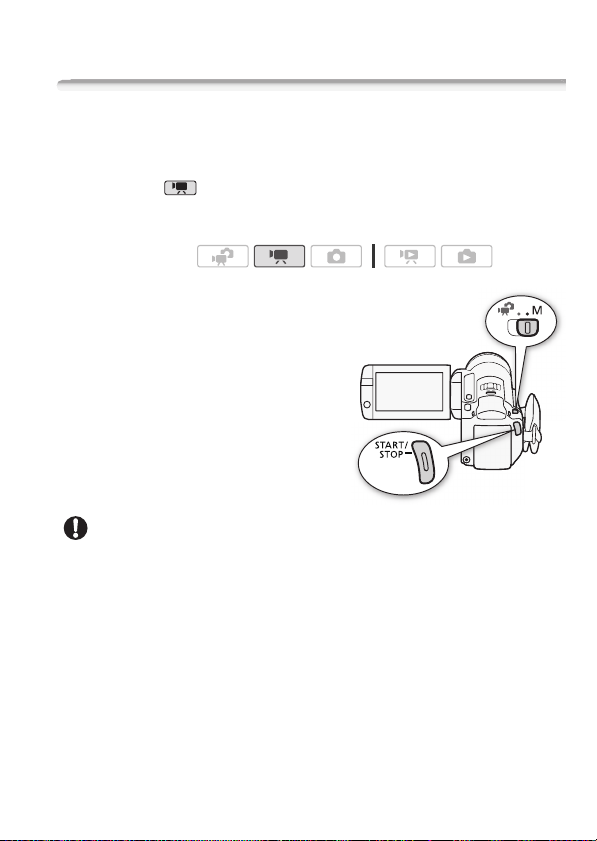
Advanced Functions
Shooting Video in y Manual Mode
When the mode switch is set to y (Manual mode), you can enjoy full
access to the menus and manually adjust the exposure, focus, white
balance and many more of the camcorder's settings to your preference. Even in mode, though, the camcorder can help you with
the settings. For example, by using Special Scene recording programs
(0 57).
Operating modes:
1 Set the mode switch to y.
2 Turn on the camcorder.
b By default, movies are
recorded in the built-in memory. You
can select the memory that will be
used to record movies (0 35).
3Press
• Observe the following precautions while the ACCESS indicator is on or
• Be sure to save your recordings regularly (0 121), especially after
g to begin
recording.
Press
g again to pause the
recording.
IMPORTANT
flashing. Failing to do so may result in permanent data loss or damage
to the memory.
- Do not open the memory card slot cover.
- Do not disconnect the power source or turn off the camcorder.
- Do not change the camcorder’s operating mode.
making important recordings. Canon shall not be liable for any loss or
corruption of data.
Video 55
Page 56
NOTES
• The zoom, Quick Start function, power saving modes, etc. operate the
same way in mode as in mode. For details, refer to Dual
Shot Mode (0 39).
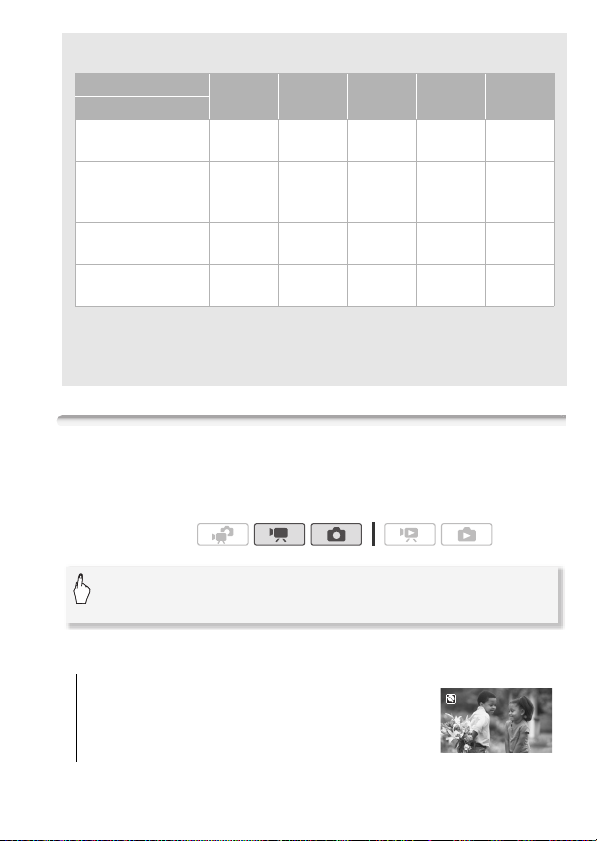
Selecting the Video Quality (Recording Mode)
The camcorder offers 5 recording modes. Changing the recording
mode will change the recording time available on the memory. Select
MXP or FXP mode for better movie quality; select LP mode for longer
recording times. The following table gives approximate recording
times.
Operating modes:
[FUNC.] 8 [MENU] 8 8 8 [Recording Mode] 8
Desired recording mode 8 [a]
NOTES
• Scenes recorded in MXP mode cannot be saved onto AVCHD discs
using the optional DW-100 DVD Burner. Use the supplied software
ImageMixer 3 SE to back up such scenes.
• The camcorder uses a variable bit rate (VBR) to encode video so the
actual recording times will vary depending on the content of the scenes.
• The camcorder retains the last setting used even if you set the camcorder to mode.
56 Video
Page 57
Default value
LP
Approximate recording times
1
Recording mode
→
MXP
FXP
1
XP+ SP
Memory ↓
4 GB
Memory card
8 GB Memory card/
b Built-in
2
memory
16 GB
Memory card
32 GB
Memory card
1
Recorded in 1,920 x 1,080 resolution. Movies recorded using other recording
modes are recorded in 1,440 x 1,080 resolution.
2
b At the time of purchase, the built-in memory contains about 75 MB of
music files.
20 min. 30 min. 40 min. 1 hr.
40 min. 1 hr. 1 hr.
1 hr.
25 min.
2 hr.
55 min.
2 hr.
5 min.
4 hr.
10 min.
25 min.
2 hr.
50 min.
5 hr.
45 min.
10 min.
2 hr.
20 min.
4 hr.
45 min.
9 hr.
35 min.
1 hr.
30 min.
3 hr.
6 hr.
5 min.
12 hr.
15 min.
Special Scene Recording Programs
Recording in a very bright ski resort or capturing the full colors of a
sunset or a fireworks display becomes as easy as selecting a Special
Scene recording program.
Operating modes:
[FUNC.] 8 [Rec. Programs] 8 [F Portrait] 8
Desired recording program 8 [a]
Options
( Default value)
[FPortrait]
The camcorder uses a large aperture, to achieve a sharp focus on the subject
while blurring the background.
Video 57
Page 58
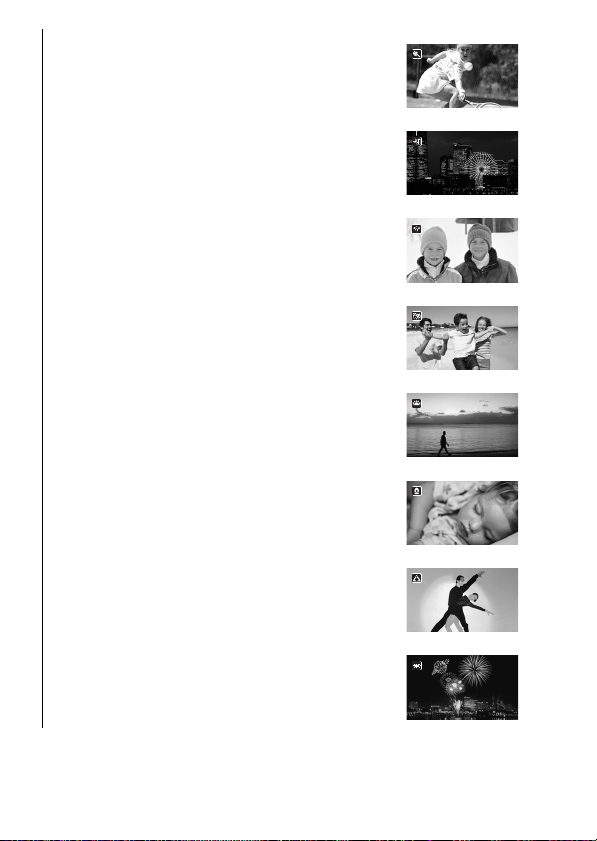
[GSports] To record sports scenes such as
tennis or golf.
[q Night Scene] To record nightscapes with
lower noise.
[ISnow] To record in bright ski resorts without
the subject being underexposed.
[JBeach] To record on a sunny beach without
the subject being underexposed.
[KSunset] To record sunsets in vibrant colors.
[p Low Light] To record in low-light situations.
[LSpotlight] To record spotlit scenes.
[MFireworks] To record fireworks.
58 Video
Page 59
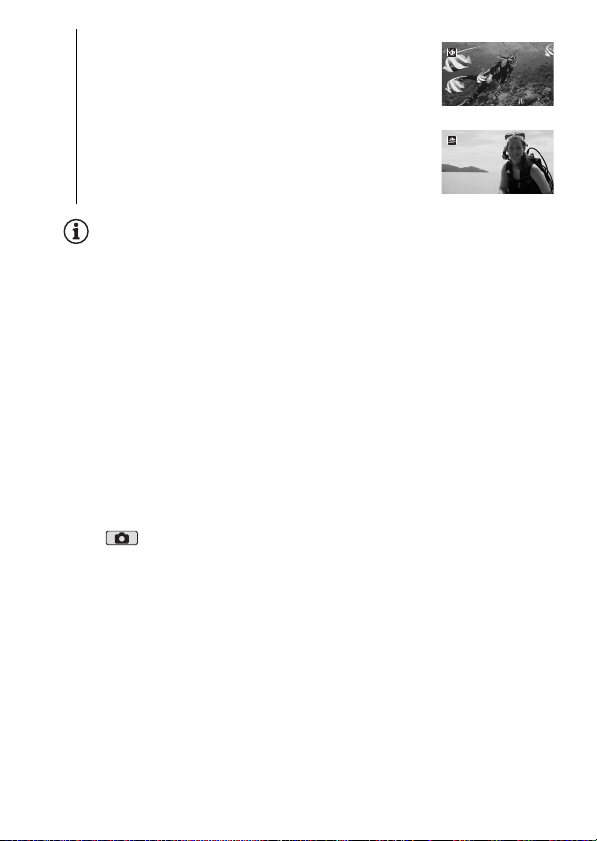
[rUnderwater] To record underwater scenes in
natural colors.
[sSurface] To record after getting out of the
water, such as on a boat after diving.
NOTES
•[F Portrait]/[G Sports]/[I Snow]/[J Beach]: The picture may not
appear smooth during playback.
•[F Portrait]: The blur effect of the background increases the more you
zoom in (P).
•[I Snow]/[J Beach]: The subject may become overexposed on
cloudy days or in shaded places. Check the image on the screen.
•[p Low Light]:
- Moving subjects may leave a trailing afterimage.
- Picture quality may not be as good as in other modes.
- White points may appear on the screen.
- Autofocus may not work as well as in other modes. In such case,
adjust the focus manually.
•[M Fireworks]:
- To avoid camcorder blur (blur due to the camcorder moving) we
recommend using a tripod.
- In mode, slower shu tter speeds are us ed so blur is more l ikely to
occur. Stabilize the camcorder, for example, by mounting it on a
tripod.
•[r Underwater]/[s Surface]:
- Use these recording programs when making recordings while the
camcorder is in the optional WP-V2 Waterproof Case.
-The [r Underwater] recording program is for making recordings
underwater*. When using underwater lighting equipment or making
recordings while on land, we recommend using the [s Surface]
recording program.
- To switch the recording program between [r Underwater] and
[s Surface] while the camcorder is in the waterproof case, turn on
the camcorder while holding
j pressed down.
Video 59
Page 60
- p will appear on the screen when the camcorder's temperature
becomes too high. If this happens, turn off the camcorder, take it out
of the waterproof case and keep it in a cool place until the
temperature goes down. If the camcorder becomes too hot, it will turn
off automatically.
- When making recordings underwater with the [r Underwater]
recording program, the image on the LCD screen will appear redder
than the actual subject. This will not affect the recording.
- When a commercially available wide-converter or other accessory is
attached to the waterproof case, the camcorder may focus on the
accessory. In such case, move the zoom lever toward P to focus on
the subject.
-See Specifications (0 195) for additional notes about the
[r Underwater] and [s Surface] recording programs.
* Underwater is a unique environment that is ever-changing, depending on factors
such as the weather and water conditions. In addition, water absorbs red light,
which causes objects to appear bluer and greener.
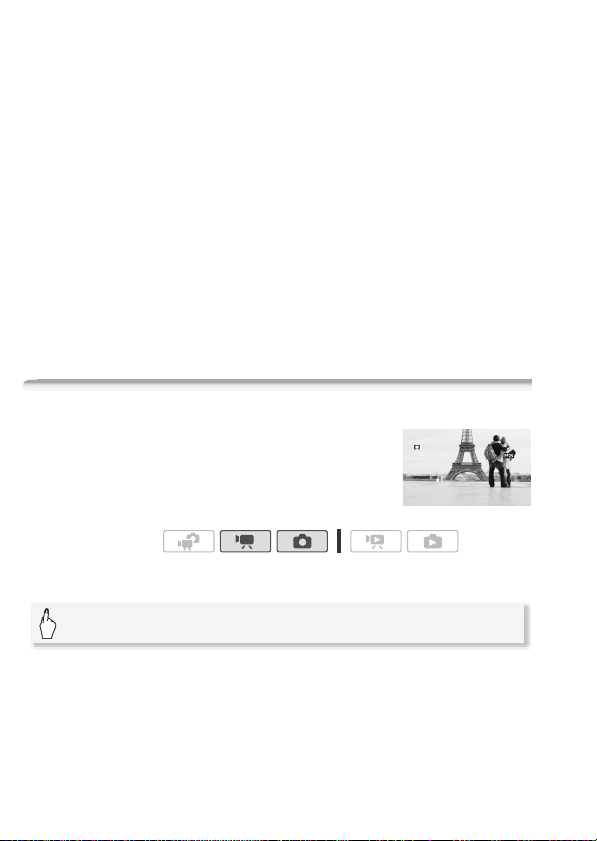
Cinema Mode: Giving a Cinematic Look to your Recordings
Give your recordings a cinematic look by using
the [
D Cine Mode] recording program. Combine
this recording program with the 25 fps progressive
frame rate [D PF25] to get the enhanced effect
of the 25p Cinema Mode.
Operating modes:
To set the [D Cine Mode] recording program
[FUNC.] 8 [Rec. Programs] 8 [D Cine Mode] 8 [a]
60 Video
Page 61
Operating modes:
To change the frame rate
[FUNC.] 8 [MENU] 8 8 8 [Frame Rate] 8
[D PF25] 8 [a]
Advanced Image Stabilization
The image stabilizer reduces camcorder blur (blur due to the camcorder moving) so you can get nice, stable shots. Select the image stabilization mode according to the shooting conditions.
Operating modes:
In mode:
[FUNC.] 8 [Image Stabilizer] 8 Desired IS mode 8 [a]
Options
( Default value in mode)
[P Dynamic]
( mode only) Compensates for a higher
degree of camcorder shake, such as when shooting while walking, and is more effective as the zoom approaches full wide
angle.
[Q Standard]*, [Q On] Compensates for a lower degree of
camcorder shake, such as when shooting while remaining stationary, and is suitable for shooting natural-looking scenes. Use
this setting when recording movies with the optional Wide-converter or Tele-converter.
[j Off]* Use this setting when the camcorder is mounted on a
tripod.
* In mode, if you change the IS mode to one of these settings, you may
notice a slight change in the field of view while zooming in close to the telephoto end.
Video 61
Page 62
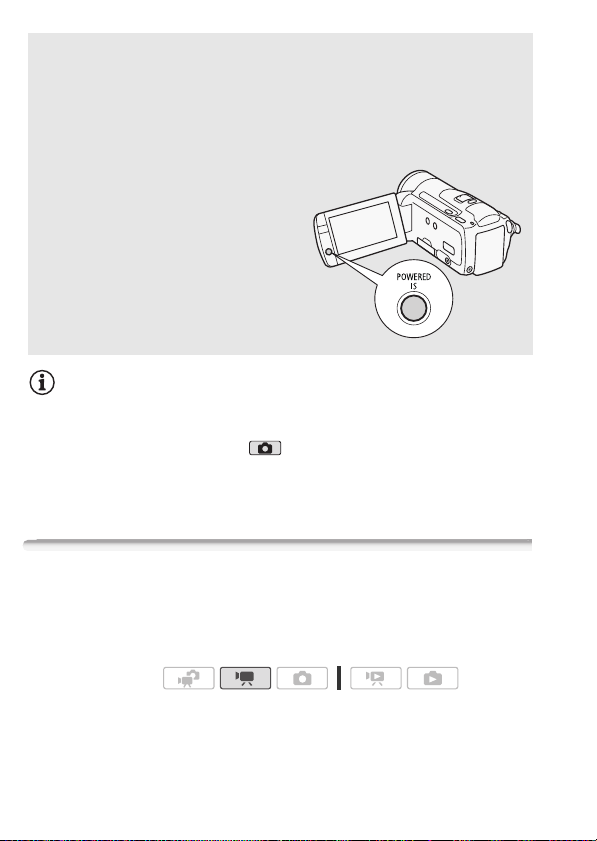
Powered IS
When shooting video, you can use Powered IS to make the image
stabilization even more powerful. Powered IS is most effective when
you are stationary and zooming in on far subjects using high zoom
ratios (the more you approach the telephoto end). Holding the LCD
panel with your left hand will add to the stability of the shot.
Press and hold Y as long as
you want to activate Powered IS.
• Z appears in yellow, while
Powered IS is activated.
• You can change the operation of the
Y button (long press or
toggle on/off) with the
[POWERED IS Button] setting.
NOTES
• If the degree of camcorder shake is too high, the image stabilizer may
not be able to fully compensate.
• Powered IS is not available in mode.
• For surveying and following shots, when you pan the camcorder from
side to side or tilt it up and down, we recommend setting the IS mode
to [P Dynamic] or [Q Standard].
7 8
Pre-Recording
The camcorder will start recording 3 seconds before you press
g, ensuring you do not miss important shooting opportunities. This is especially useful when it is difficult to predict when to start
recording.
Operating modes:
62 Video
Page 63
1 Activate the pre-recording function.
[FUNC.] 8 [d Pre REC] 8 [A On] 8 [a]
• d appears.
• Repeat, selecting [B Off], to turn off pre-recording.
2Press g.
The scene recorded in the memory will start 3 seconds before
g was pressed.
NOTES
• While pre-recording is activated, the camcorder will not emit any notification sounds.
• The camcorder will not record the full 3 seconds prior to pressing
g if the button was pressed within 3 seconds of having
turned on pre-recording or having finished the previous recording.
• Any of the following actions will deactivate the pre-recording function.
- Leaving the camcorder without any operation for 5 minutes.
- Pressing S or z.
- Changing the position of the mode switch.
- Changing the camcorder's operating mode.
- Setting the camcorder to standby mode.
- Changing any of the setup menu settings or changing the following
settings in the FUNC. panel: [Rec. Programs], [White Balance], [AGC
Limit], [Digital Effect] or [Image Stabilizer].
Face Detection
The camcorder automatically detects people’s faces and uses this
information to select the optimal settings for beautiful videos and photos.
Operating modes:
POINTS TO CHECK
• Select a recording program other than [q Night Scene],
[p Low Light], [M Fireworks] or [r Underwater].
Video 63
Page 64
By default, face detection is activated. If the function was turned off, perform the following procedure to turn it on.
[FUNC.] 8 [MENU] 8 7/8 8
[Face Detection & Tracking] 8 [A On o] 8 [a]
To select the main subject
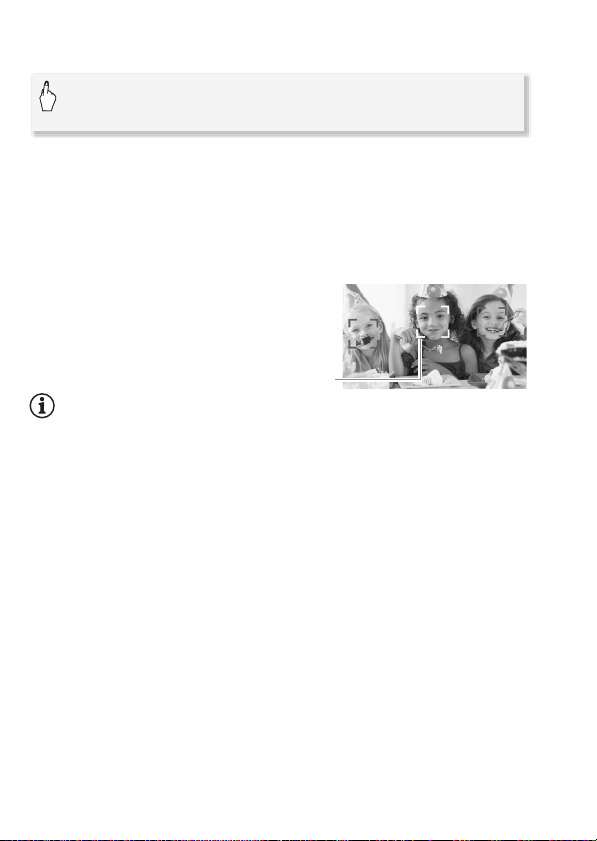
If there is more than one person in the picture, the camcorder will automatically select one person it determines is the main subject. The main
subject is indicated by a white face detection frame and the camcorder
will optimize the settings for that person. Other faces will have gray
frames.
Touch a different face on the
touch screen to optimize the
camcorder's settings for that
person.
Main subject
NOTES
• The camcorder may mistakenly detect the faces of non-human subjects. In such case, turn face detection off.
• In certain cases, faces may not be detected correctly. Typical examples
include:
- Faces extremely small, large, dark or bright in relation to the overall
picture.
- Faces turned to the side, at a diagonal or partially hidden.
• Face detection cannot be used when the shutter speed used is slower
than 1/25 or when the digital zoom is activated at more than 60x zoom
(dark blue area on the zoom bar).
• When face detection is activated, the slowest shutter speed used by the
camcorder is 1/25.
64 Video
Page 65
Touch & Track
When recording people, face detection (0 63) will track the main subject and keep it always in focus. But also when recording other moving
subjects such as your pet, a moving vehicle or people not facing the
camera directly, you can use Touch & Track to keep your subject in
focus at all times.
Operating modes:
1 Make sure face detection is activated (0 63).
2 Point the camcorder at a moving subject and touch the subject on
the touch screen.
• A white double frame will appear around the subject and track it as it
moves.
• Touch [Cancel z] to remove the frame and cancel the tracking.
NOTES
• In certain cases, Touch & Track may not be able to track the subject.
Typical examples include:
- Subjects extremely small or large in relation to the overall picture.
- Subjects too similar to the background.
- Subjects lacking sufficient contrast.
- Fast moving subjects.
- When shooting indoors with insufficient lighting.
Video Snapshot
Record a series of short scenes or capture short scenes from a movie
you have previously recorded. Play your video snapshot scenes set to
your favorite music (0 86) to create your own fun music video. You
will be surprised how by changing the background music, you can give
your scenes an entirely new feel.
Recording Video Snapshot Scenes
Operating modes:
Video 65
Page 66
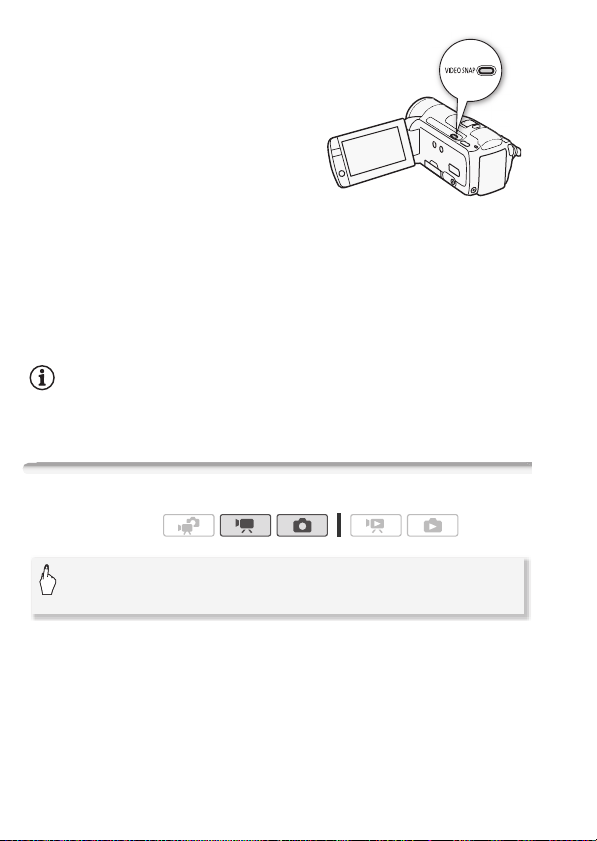
1Press z .
• A blue border appears on the
screen.
• Press z again to return
to normal video recording mode.
2Press
• Changing the camcorder's operating mode will deactivate the video
g.
• By default, the camcorder records
for about 4 seconds (the blue frame
serves as a visual progress bar)
and then automatically returns to record pause mode. You can
change the length of video snapshot scenes with the
[Video Snapshot Length] setting.
• When the camcorder stops recording, the screen will momentarily
turn black as if a camera shutter had released.
• In index screens, video snapshot scenes are indicated with the Z
mark.
NOTES
snapshot mode.
8 8
Digital Effects
Operating modes:
[FUNC.] 8 [O Digital Effects] 8 Desired fader/effect* 8
[a]
* You can preview the digital effect on the screen.
• The icon of the selected digital effect appears in green. Effects are
applied immediately.
66 Video
Page 67
To fade in/out
Press g in record pause mode (M) to start recording with
a fade in. Press g while recording (
N) to fade out and pause
the recording.
[N Off]
( Default value)
Select this setting when you do not intend to use the dig-
Options
ital effects.
[2 Black & White]* Records movies and photos in black and
white.
[3 Sepia]* Records movies and photos in sepia tones for an
“old” look.
0 Fade Trigger/Once], [6 Fade Trigger/Always], [1 Wipe/Once],
[
7 Wipe/Always] Select one of the faders to begin or end a
[
scene with a fade from or to a black screen. You can choose to
activate the fader only once, or every time you press
g to begin or end a scene.
* Only these digital effects are available in mode.
NOTES
• When you apply a fader, not only the picture but also the sound will fade
in or out. When you apply an effect, the sound will be recorded normally.
• Faders cannot be used when recording video snapshot scenes or when
pre-recording is activated.
Manually Setting the Shutter Speed or Aperture
[A Programmed AE] is the default automatic exposure (AE) recording
program; using it, you can change functions like the white balance or
image effects. Select one of the other AE recording programs to control
the shutter speed or aperture.
Operating modes:
Video 67
Page 68

[FUNC.] 8 [Rec. Programs] 8 [B Shutter-Pri. AE] or
[C Aperture-Pri. AE] 8 Drag your finger left and right
along the dial to set the desired shutter speed (B) or
aperture value (C) 8 [a]
Options (
Default value)
[A Programmed AE]
The camcorder automatically adjusts the
aperture and shutter speed to obtain the optimal exposure for
the subject.
[B Shutter-Pri. AE] Set the shutter speed value. The camcorder
automatically sets the appropriate aperture value.
[C Aperture-Pri. AE] Set the aperture value. The camcorder auto-
matically sets the appropriate shutter speed.
NOTES
•[B Shutter-Pri. AE]:
- On screen only the denominator is displayed – [B 250] indicates a
shutter speed of 1/250 second, etc.
- When recording in dark surroundings, you can obtain a brighter
picture by using slow shutter speeds; however, image quality may not
be as good and autofocus may not work well.
- The image may flicker when recording with fast shutter speeds.
•[C Aperture-Priority AE]: The actual range of values available for selec-
tion will vary depending on the initial zoom position.
• When setting a numeric value (aperture or shutter speed), the number
displayed will flash if the aperture value or shutter speed is not appropriate for the recording conditions. In such case, select a different value.
• During exposure lock, the aperture value/shutter speed cannot be
changed. Set the aperture value or shutter speed before manually
adjusting the exposure.
68 Video
Page 69
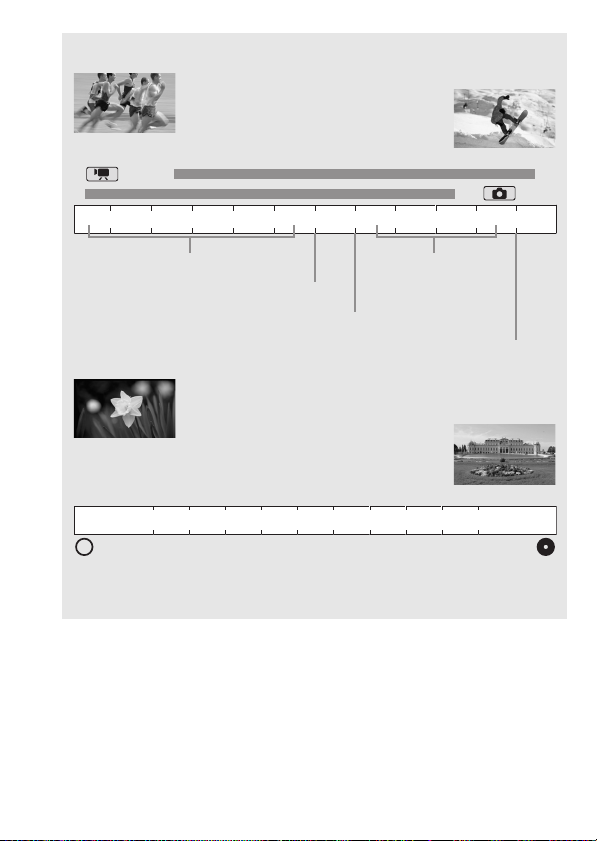
Shutter Speed and Aperture Value Guidelines
A
XWith slower shutter speed you can add a nice
motion blur and sense of movement.
With faster shutter speeds you can “freeze the
action” for powerful images of moving subjects.W
mode
y mode
1/20001/10001/5001/2501/1201/501/251/121/61/31/2
More light
Shallow
Low-light situations
Most ordinary conditions
Indoor sports
XWith small aperture values only the subject is in
focus and the background is softly blurred. Great
for portraits or to isolate a single object.
With large aperture values every part of
the image is clearly in focus. Good
for landscapes and architectural shots.W
F4.0
F3.4
F1.8
F2.0
F2.8
F2.4
y Lens aperture A
y Depth of Field A
Fast moving subjects
or shooting from a
moving car or train
Outdoor sports on sunny days
F5.6
F4.8
F8.0
F6.7
Less light
Video 69
Deep
Page 70
Manual Exposure Adjustment
At times, backlit subjects may appear too dark (underexposed) or subjects under very strong lights may appear too bright or glaring (overexposed). To correct this, you can adjust the exposure manually or use
the Touch AE function to automatically set the optimal exposure for the
subject you select. This is convenient when the brightness of the subject you want to shoot is noticeably brighter/darker than the general
brightness of the image.
Operating modes:
POINTS TO CHECK
• Select a recording program other than [M Fireworks].
1 Open the exposure adjustment screen.
[FUNC.] 8 [e Exposure]
2 Touch a subject that appears inside the e frame.
• The Touch AE mark (P) will flash and the exposure will be adjusted
automatically so the area you touched will be correctly exposed. You
have the option to further adjust the exposure manually as
necessary.
• You can touch [y] instead to adjust the exposure manually without
activating the Touch AE function.
• The manual adjustment dial appears and the adjustment value is set
at ±0.
•Touch [y] again to return the camcorder to automatic exposure.
3 Drag your finger up and down along the dial to set the exposure
adjustment value.
The adjustment range may vary depending on the initial brightness of
the image, and some values may be grayed out.
4Touch [a] to lock the exposure at the selected value.
During exposure lock, e and the selected exposure adjustment value
will appear on the screen.
70 Video
Page 71
NOTES
• If the recording program is changed during exposure lock, the cam-
corder will return to automatic exposure.
• When shooting subjects with a strong light source behind them, the
camcorder automatically corrects for the backlight. You can turn off the
automatic backlight correction with the 7/8 8 [Auto Backlight
Correction] setting.
Automatic Gain Control (AGC) Limit
When recording in dark surroundings, the camcorder will automatically
increase the gain to try to get a brighter picture. However, using higher
gain values may result in more noticeable video noise. You can select
the AGC limit to curb the amount of noise by setting the maximum gain
value to be used. The smaller the AGC limit, the picture will be darker
but will have less the noise.
Operating modes:
[FUNC.] 8 [P AGC Limit] 8 [y Manual]* 8
Drag your finger left and right along the dial to set the AGC
limit 8 [a]
*Touch [z Automatic] to remove the limit for the automatic gain control.
• The AGC limit selected appears on the screen.
Manual Focus Adjustment
Autofocus may not work well on the following subjects. In such case,
focus manually.
• Reflective surfaces
• Subjects with low contrast
or without vertical lines
• Fast moving subjects
• Through wet windows
• Night scenes
Operating modes:
Video 71
Page 72
POINTS TO CHECK
• Adjust the zoom before you start the procedure.
1 Open the manual focus screen.
[FUNC.] 8 [X Focus]
2 Touch a subject that appears inside the X frame.
• The Touch AF mark (P) will flash and the focusing distance will be
adjusted automatically. You have the option to further adjust the
focus manually as necessary.
• You can touch [2] instead to adjust the focus manually without
activating the Touch AF function.
• The manual focus controls and the current focusing distance appear.
•Touch [2] again to return the camcorder to autofocus.
3 Touch and hold [l] or [W] to adjust the focus.
• The center of the screen will be magnified to help you focus more
easily. You can also turn off this function with the 7 8 [Focus
Assistance] setting.
• The focusing distance displayed will change as you adjust the focus.
You can change the units used for the distance display with the
6 8 [Distance Units] setting.
• If you wish to focus on faraway subjects such as mountains or
fireworks, touch and hold [l] until the focusing distance changes to
V.
4Touch [a] to lock the focus at the selected distance.
During manual focus, [MF] will appear on the screen.
NOTES
• While the optional Wide-converter or Tele-converter is attached, the
focusing distance displayed will be incorrect.
72 Video
Page 73
White Balance
The white balance function helps you to accurately reproduce colors
under different lighting conditions so that white objects will always look
truly white in your recordings.
Operating modes:
POINTS TO CHECK
• Select a recording program other than the Special Scene recording programs.
[FUNC.] 8 [m White Balance] 8 Desired option* 8 [a]
* When you select [g Custom WB], set the custom white balance with the follow-
ing procedure before touching [a].
To set the custom white balance
Point the camcorder at a white object, so it fills the whole screen,
and touch [Set WB].
When the adjustment is completed,
The camcorder will retain the custom white balance even if you turn it off.
Options
( Default value)
[Y Automatic]
The camcorder automatically sets the white bal-
ance for natural looking colors.
[a Daylight] To record outdoors on a bright day.
[b Shade] To record in shaded places.
[c Cloudy] To record on a cloudy day.
[e Fluorescent] To record under warm white, cool white or warm-
white-type (3-wavelength) fluorescent lighting.
[f Fluorescent H] To record under daylight or daylight-type
(3-wavelength) fluorescent lighting.
[d Tungsten] To record under tungsten and tungsten-type
(3-wavelength) fluorescent lighting.
[g Custom WB] Use the custom white balance setting to make
white subjects appear white under colored lighting.
g stops flashing and disappears.
Video 73
Page 74
NOTES
• When you select the custom white balance:
-Set 7 8 [Digital Zoom] to [B Off].
- Reset the white balance when you change locations or the lighting or
other conditions change.
- Depending on the light source, g may keep flashing. The result will
still be better than with [Y Automatic].
• Custom white balance may provide better results in the following cases:
- Changing lighting conditions
-Close-ups
- Subjects in a single color (sky, sea or forest)
- Under mercury lamps and certain types of fluorescent lights
• Depending on the type of fluorescent light, optimal color balance may
not be obtained with [e Fluorescent] or [f Fluorescent H]. If the color
looks unnatural, select [Y Automatic] or [g Custom WB].
Image Effects
You can use the image effects to change the color saturation and contrast to record movies and photos with special color effects.
Operating modes:
POINTS TO CHECK
• Select a recording program other than the Special Scene recording programs.
[FUNC.] 8 [MENU] 8 7/8 8 [Image Effects] 8
Desired option* 8 [a]
* When you select [Z Custom Effect], set the custom image effect with the follow-
ing procedure before touching [a ].
To set the custom image effect
1Touch [U], [V] or [W] to set the desired [Color Depth] level.
2Touch [y] or [A] to select [Sharpness], [Contrast] and
[Brightness] and adjust their levels the same way.
74 Video
Page 75
[U Off]
Default value)
Records with no image enhancing effects.
Options (
[V Vivid] Emphasizes the contrast and color saturation.
[W Neutral] Tones down the contrast and color saturation.
[X Low Sharpening] Records subjects with softened outlines.
[Y Soft Skin Detail] Softens the details in the skin tone area for a
more complimentary appearance. To obtain the best effect, use
this setting when recording a person in close-up. Note that areas
similar to the skin color may lack in detail.
[Z Custom Effect] Allows you to adjust the color depth, bright-
ness, contrast, and sharpness of the image.
[Color Depth]:
[Sharpness]:
[Contrast]:
[Brightness]:
(V) Shallower, (U) Richer.
(V) Softer, (U) Sharper.
(V) Softer, (U) Sharper.
(V) Darker, (U) Brighter.
Mini Video Light
You can turn on the mini video light to shoot video or take photos in
dark places.
Operating modes:
POINTS TO CHECK
• Select a recording program other than [r Underwater] or
[s Surface].
[FUNC.] 8 [Y Video Light] 8 [A On] 8 [a]
• Y appears on the screen.
• Repeat, selecting [B Off], to turn off the mini video light.
Video 75
Page 76

NOTES
• We recommend not using the mini video light while the optional Wideconverter or Tele-converter is attached; its shadow can appear on the
screen.
Using an External Video Light
You can use the optional VL-5 Video Light or VFL-2 Video Flash Light
when you need a video light that is stronger than the built-in mini video
light.
Attach the optional video light to the mini advanced shoe.
• Refer to Using the Mini Advanced Shoe (0 81).
• appears when you turn on the optional video light (ON or AUTO).
For details about using the optional video light, refer to the instruction
manual of the accessory used.
NOTES
• When an optional video light is attached to the mini advanced shoe, the
built-in mini video light will be disabled. To use the built-in mini video
light, turn off the optional video light.
76 Video
Page 77
Self Timer
Operating modes:
[FUNC.] 8 [MENU] 8 8 8 [Self Timer] 8
[A On n] 8 [a]
• n appears.
• Repeat, selecting [B Off], to turn off the self timer.
mode: In record pause mode, press g.
The camcorder starts recording after a 10-second countdown*. The
countdown appears on the screen.
mode: Press j, first halfway to activate the autofocus
and then fully.
The camcorder will record the photo after a 10-second countdown*. The
countdown appears on the screen.
* 2 seconds when using the wireless controller.
NOTES
• Once the countdown has begun, any of the following actions will cancel
the self timer.
- Pressing g (when recording movies) or j fully (when
recording photos).
- Turning off the camcorder.
- Changing the camcorder’s operating mode.
- Setting the camcorder to standby mode.
Video 77
Page 78
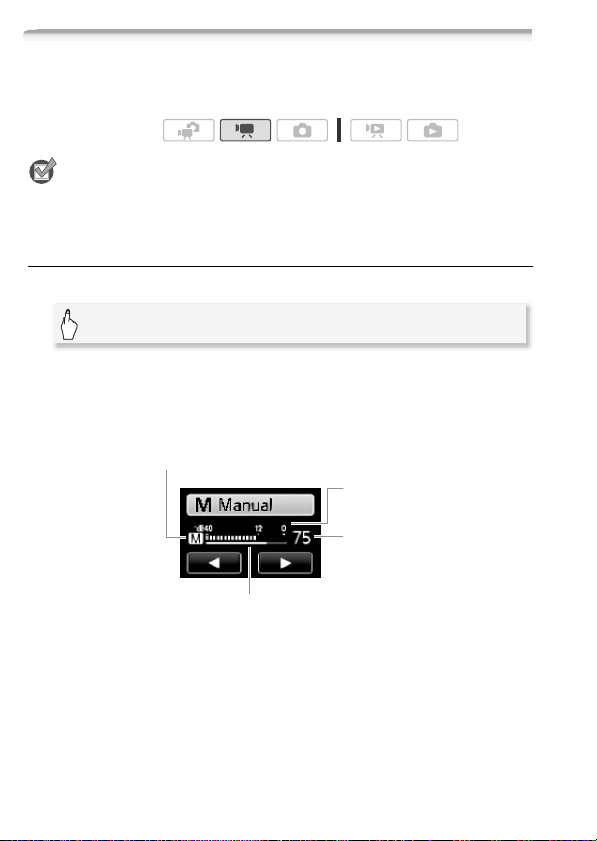
Audio Recording Level
You can adjust the audio recording level of the built-in or an external
microphone. You can display the audio level indicator while recording.
Operating modes:
POINTS TO CHECK
• Select a recording program other than [r Underwater] or
[s Surface].
Manual Adjustment of the Audio Recording Level
1 Open the manual audio recording level adjustment screen.
[FUNC.] 8 [c Mic. Level] 8 [y Manual]
• The audio level indicator and current audio recording level will appear
on the screen.
•Touch [z Automatic] to return the camcorder to automatic audio
recording levels.
Manual audio level adjustment
Audio level indicator
Current audio level
Audio level adjustment bar
2 Touch and hold [y] or [A] to adjust the audio recording level as
necessary.
As a guideline, adjust the audio recording level so that the audio level
meter will go to the right of the -12 dB mark (yellow area) only
occasionally.
3Touch [a] to lock the audio recording level at the current level.
78 Video
Page 79
To display the audio level indicator
Usually, the audio level indicator will be displayed only after activating
the manual adjustment of the audio recording level. You can choose to
display it also when the audio level is adjusted automatically.
[FUNC.] 8 [c Mic. Level] 8 [z Automatic] 8
[Audio Level Indicator] 8 [a]
NOTES
• When the audio level meter reaches the red point (0 dB), the sound may
be distorted.
• If the audio level is too high and the sound gets distorted, activate the
microphone attenuator with the 7 8 [Microphone Attenuator] setting.
• We recommend using headphones to check the sound level while
adjusting the audio recording level or when the microphone attenuator
is activated.
Using Headphones
Use headphones for playback or to check the audio level while recording. The headphones are connected to the AV OUT/X terminal, which
is used for both the headphones and the audio/video output. Before
connecting the headphones, follow the procedure below to change the
function of the terminal from AV output to X (headphones) output.
Operating modes:
* Headphones can be used also in mode but the function of the terminal can-
not be changed in this mode. Change the setting in advance in one of the other
operating modes.
*
Video 79
Page 80
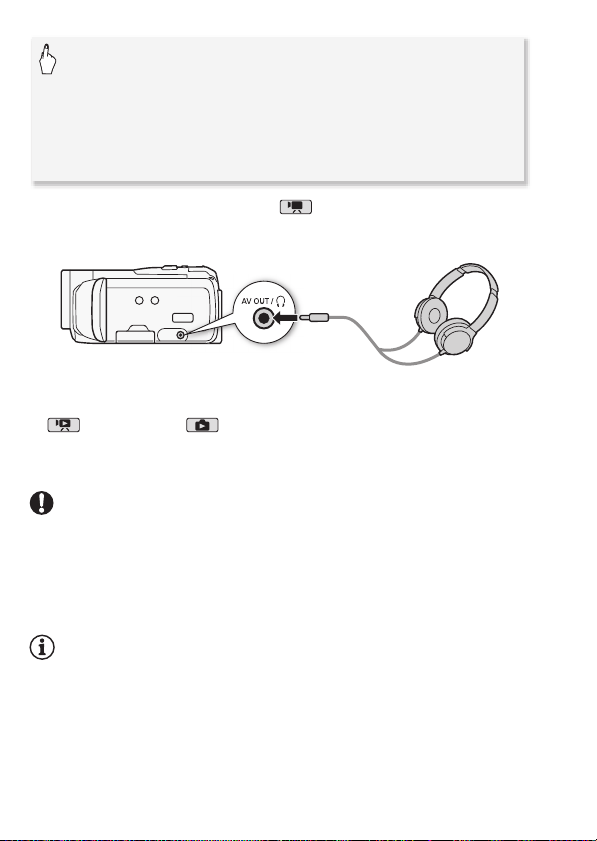
[FUNC.]* 8 [MENU] 8 6 8 [AV/Headphones] 8
[Headphones] 8
To close the menu: 8 [a]
To continue adjusting the volume:
8 [f] 8 [Volume] 8 Drag your finger left and right along
the volume bar to adjust the volume 8 [a]
* Only when performing the procedure in mode.
• J appears.
To adjust the volume during playback
In mode, and in mode during slideshow playback, adjust
the headphones volume the same way you adjust the speaker’s volume (0 48).
IMPORTANT
• When using headphones, make sure to lower the volume to an appropriate level.
• Do not connect the headphones to the AV OUT/X terminal if the J
icon does not appear on the screen. The noise output in such case may
be harmful to your hearing.
NOTES
• Use commercially available headphones with a ∅ 3.5 mm minijack and
a cable no longer than 3 m.
• Even if [AV/Headphones] was set to [J Headphones] in a playback
mode, the function of the AV OUT/X terminal will return automatically to
AV output when you turn off the camcorder.
80 Video
Page 81
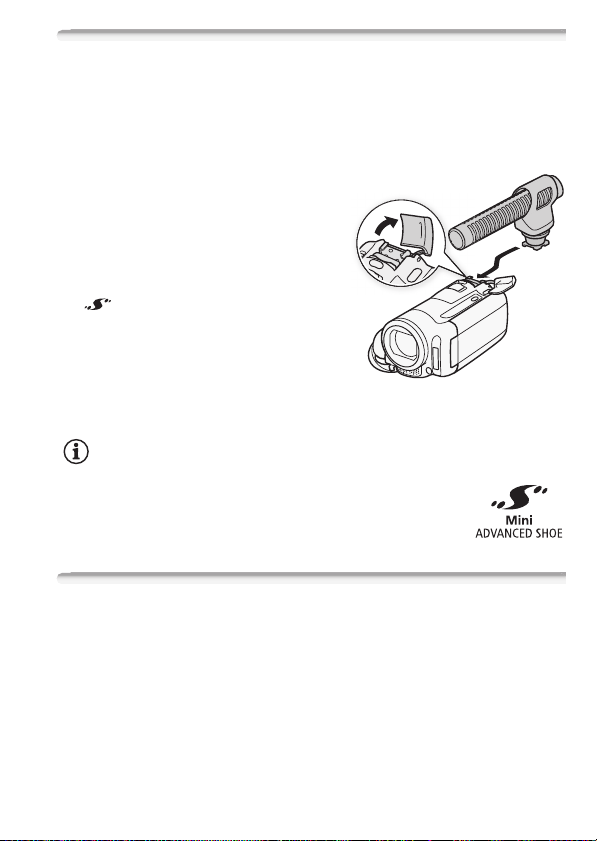
Using the Mini Advanced Shoe
Using the mini advanced shoe, you can attach to the camcorder a
range of optional accessories to expand its functionality. For details
about optional accessories available for use with your camcorder, refer
to Accessories (0 187). For details about how to attach and use the
accessories, refer also to the instruction manual of the accessory used.
1 Retract the mini advanced shoe
cover in the direction of the arrow.
2 Attach the optional accessory to
the mini advanced shoe.
When a compatible accessory is
attached to the mini advanced shoe,
will appear on the screen.
NOTES
• Accessories designed for the Advanced Accessory Shoe
cannot be used with this camcorder. Look for video
accessories bearing this logo to ensure compatibility with
the mini advanced shoe.
*
Example: Attaching an optional DM-100
Directional Stereo Microphone.
Using an External Microphone
When recording in very quiet surroundings, the built-in microphone
may pick up the sound of the camcorder's internal machinery. In such
case, we recommend using an external microphone.
Video 81
Page 82
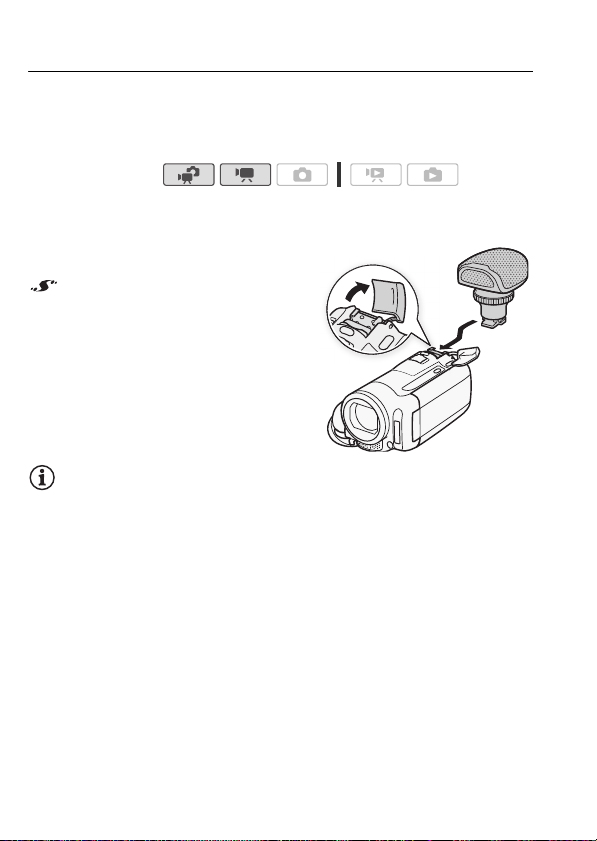
Using the SM-V1 Surround Microphone or DM-100 Directional Stereo
Microphone
Using the SM-V1 you can add a sense of depth and presence to your
recordings with 5.1ch surround sound. Using the DM-100 you can
accurately record audio coming directly from the direction you are
recording.
Operating modes:
Attach the optional SM-V1 Surround Microphone or DM-100
Directional Stereo Microphone to the mini advanced shoe.
Refer to Using the Mini Advanced Shoe
(0 81).
appears. For details about using
the optional external microphone, refer
to the instruction manual of the accessory used.
NOTES
• When using the optional SM-V1 Surround Microphone, change the
microphone's directionality mode with the 7 8 [Surround Mic
Directionality] setting.
• Playing back recordings made with the optional SM-V1 Surround Micro-
phone: You can enjoy 5.1ch surround sound playback on HDTVs compatible with 5.1ch surround sound connected to the camcorder using
an HDMI cable. Audio output from the AV OUT/X terminal (including
headphone output) will be converted to 2ch stereo. The camcorder’s
built-in speaker is monaural.
• When an external microphone is connected to the camcorder, 7
8 [Wind Screen] will automatically be set to [B Off Z].
• If the audio level is too high and the sound gets distorted, adjust the
audio recording level manually (
uator with the 7 8 [Microphone Attenuator] setting.
0 78) or activate the microphone atten-
82 Video
Page 83
Using a Zoom Remote Controller
By attaching the optional RA-V1 Remote Control Adapter to the mini
advanced shoe, you can use the optional ZR-2000 or ZR-1000 Zoom
Remote Controller. Doing so will allow you to use certain functions
while viewing the picture on an external monitor without touching the
camcorder. This is particularly useful while the camcorder is mounted
on a tripod and you want to ensure maximum stability of a shot.
Operating modes:
Attach the optional RA-V1 Remote Control Adapter to the mini
advanced shoe.
Refer to Using the Mini Advanced Shoe (0 81).
appears. For details about using the adapter, refer to the instruction
manual of the RA-V1. For details about using the zoom remote controller,
refer to the instruction manual of the ZR-2000 or ZR-1000.
Functions Available with the Zoom Remote Controller
Using the ZR-2000 or ZR-1000: turning the power on/off, starting/
stopping a recording, zoom, focus adjustment and displaying onscreen displays on an external monitor.
Using the ZR-2000 only: switching between autofocus and manual
focus, Push AF* and focus assistance (MAGNIFYING button).
* The Push AF function allows you to switch to autofocus temporarily during
manual focus.
NOTES
• In mode, the only available functions are turning the power on/off,
starting/stopping a recording, and zoom.
Video 83
Page 84
Selecting the Playback Starting Point
If you have a very long scene, you may want to start playing back the
scene from a certain point. You can use the movie timeline to break the
scene to segments at fixed time intervals ranging from 6 seconds to 6
minutes. If you recorded movies using face detection (0 63), you can
display the scene divided into segments every time the camcorder registered a change in the main subject of the scene.
Operating modes:
1 Open the [Original] or [Playlist] index screen.
2 Open the scene's [Timeline] screen.
[c] 8 the desired scene
The [Timeline] screen appears. The large thumbnail will show the first
frame of the scene. Below it, the timeline ruler shows frames taken
from the scene at fixed intervals.
3 Touch the desired frame in the timeline ruler to start playing back
the scene from that point.
84 Video
Page 85
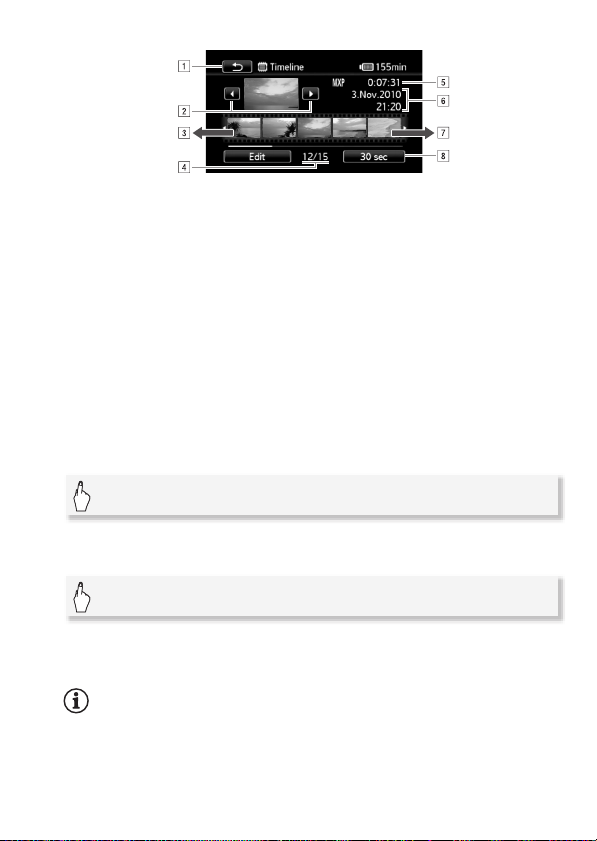
A Touch twice to return to the index screen.
B Previous/next scene.
C Drag your finger left along the ruler to display the next 5
frames.
D Current scene / Total number of scenes.
E Scene's recording mode and length.
F Recording date and time.
G Drag your finger right along the ruler to display the previ-
ous 5 frames.
H Currently selected interval between frames (or
[o Faces]).
To change the interval between frames
[6 sec] 8 Desired interval 8 [f]
To display changes in the scene’s main subject
[6 sec] 8 [o Faces] 8 [f]
• The timeline ruler will show frames taken from the scene every time
the main subject detected by the camcorder changed.
NOTES
• For a single scene, up to 100 changes in main subject will appear in the
[Timeline] screen when [o Faces] is selected.
Video 85
Page 86
Playing Back Scenes Set to Background Music
You can play back video snapshot scenes, scenes in the playlist and
photo slideshows set to background music (instead of the original
sound) using one of the supplied music tracks.
Operating modes:
Using the Supplied Music Tracks as Background Music
The supplied Camcorder Supplemental Disc contains 3 music tracks
you can use as background music. b: The music files comes preinstalled in the built-in memory.
POINTS TO CHECK
• To play back scenes or a slideshow of photos recorded on a memory
card, you will need to transfer, in advance, the music tracks to the memory card when it is connected to a computer.
Windows users: For details, refer to the ‘ImageMixer 3 SE Software
Guide’ (PDF file). Mac OS users: Use Finder to transfer music files from
the [MUSIC] folder on the supplied Camcorder Supplemental Disc.
Refer to About the music files (0 196) for the folder structure on the
memory card.
1 Open the [Playlist], [Video Snapshot] → [Original]/[Playlist] or
[Photos] index screen.
2 Open the music track selection screen.
[MENU] 8
y
/
z 8
[Select Music] 8 [AOn]
[Z] or [O] to select the desired music track* 8 [a]
*Touch [B Off] to play back the scenes with the sound recorded originally or
to play back the photo slideshow without any music.
86 Video
8
Page 87
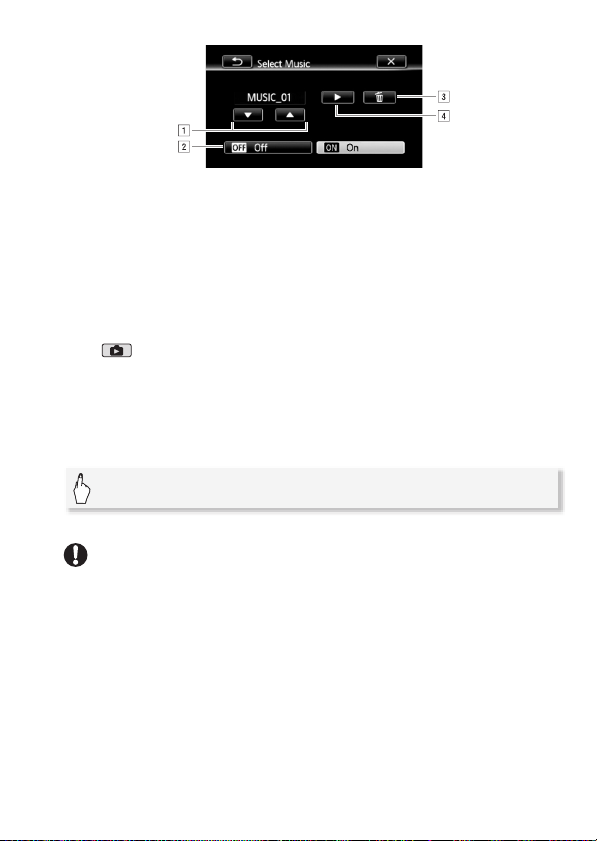
A Select the desired music track.
B Play back the original sound (no background music).
C Delete the music track selected.
D Listen to the music track selected. Touch again (B) to
stop the playback.
3 Back in the index screen, touch a scene to start the playback set
to the selected music track.
In mode, touch a photo to go to single photo view and continue
with the slideshow procedure (0 108).
To delete a music track
In the music track selection screen, touch [Z] or [O] to select the
track you want to delete.
[d] 8 [Yes]
IMPORTANT
• If you use copyrighted songs and music tracks in your video creations,
remember that music under copyright may not be used without permission from the copyright holder, except for cases permitted under applicable laws, such as for personal use. Make sure to follow applicable
laws when using music files.
Video 87
Page 88

NOTES
• You can also add to the playlist just the video snapshot scenes you
want to watch and arrange their playback order.
• Initializing a memory card will permanently erase any music files you
may have transferred from the supplied Camcorder Supplemental Disc
to the card. (b The music files that come pre-installed in the built-in
memory will be restored connected to the computer.)
- Windows users: Use the supplied software ImageMixer 3 SE to
transfer music files from the supplied Camcorder Supplemental Disc
to a memory card connected to the computer. For details, refer to the
‘ImageMixer 3 SE Software Guide’ (PDF file).
- Mac OS users: Use Finder to transfer music files from the [MUSIC]
folder on the supplied Camcorder Supplemental Disc to a memory
card connected to the computer. Refer to About the music files
(0 196) for the folder structure of the memory card.
• Transfer music files from the supplied Camcorder Supplemental Disc to
the memory card that contains the recordings you want to play back
with background music when the memory card is connected to a computer.
88 Video
Page 89
Onscreen Displays and Data Code
You can turn most onscreen displays on or off.
Operating modes:
Repeatedly press h to turn the onscreen displays on/off in the
following sequence:
, mode:
• All displays on
• Most displays off
mode
• All displays on
• Only data code on
• All displays off
1
Pressing h will turn off most of the icons and displays that appear automatically but will not remove onscreen displays that were turned on manually (for
example, onscreen markers or the audio level meter).
2
Touch the screen to display the playback controls.
About the Data Code
With every scene or photo recorded, the camcorder keeps a data code
(date/time of recording, information about the camera setup, etc.). In
mode, this information is displayed within the Exif information
panel while the playback controls are displayed on the screen; in
mode, you can select the information to be displayed with the y
8 [Data Code] setting.
1
2
:
mode2:
• All displays on
• Only recording date
and time on
• All displays off
Video 89
Page 90
Playlist and Scene Operations
Editing the Playlist: Adding, Deleting, Moving and Playing Back
Create a playlist to play back only the scenes you prefer and in the
order of your choice. You can play back the scenes in the playlist using
one of the supplied music tracks as background music (0 86).
Operating modes:
Adding Scenes to the Playlist
1 Open the [Original] or [Video Snapshot] → [Original] index screen.
To add to the playlist all the scenes recorded on a specific date, narrow
down the scenes shown to scenes recorded on that date (0 52).
2Touch [a] to open the scene selection screen.
3 Touch on the individual scenes you want to add to the playlist.
• A checkmark O will appear on scenes selected. Touch a selected
scene again to remove the checkmark.
• To select all the scenes at once: Touch [Select All] instead of
touching individual scenes. (Remove in advance any checkmarks
from scenes you may have selected individually.)
4 Add the scenes to the playlist.
[Edit] 8 [Add to Playlist] 8 [Yes] 8 [OK]
• b Scenes are added to the playlist on the same memory they
are recorded on.
NOTES
• Deleting or moving scenes in the playlist will not affect the original
recordings.
• Scenes that were edited using the supplied software ImageMixer 3 SE
and were then written back to a memory card connected to the computer cannot be added to the playlist.
90 Video
Page 91
• b You can copy scenes from the built-in memory to the memory
card (0 121) to include in the memory card’s playlist also scenes that
were originally recorded in the built-in memory.
Deleting Scenes from the Playlist
Deleting scenes from the playlist will not affect your original recordings.
1 Open the [Playlist] index screen.
You can touch [b] 8 [Video Snapshot] 8 [Playlist] to open the
playlist of video snapshot scenes.
2 To delete a single scene, touch [c] and touch the scene you want
to delete.
• The [Timeline] screen appears.
• This step is not necessary to delete the entire playlist.
3 Delete the scenes from the playlist.
[Edit] 8 [Delete] 8 [Yes]* 8 [OK]
* If you selected to delete all the scenes in the playlist, touch [Stop] to interrupt
the operation while it is in progress. Some scenes will be deleted nevertheless.
Moving Scenes in the Playlist
Move the scenes in the playlist to play them back in the order of your
choice.
1 Open the [Playlist] index screen.
You can touch [b] 8 [Video Snapshot] 8 [Playlist] to open the
playlist of video snapshot scenes.
2Touch [c] and touch the scene you want to move.
The [Timeline] screen appears.
3 Move the scene.
[Edit] 8 [Move] 8 Touch an empty box on the screen to
select the desired position 8 [OK] 8 [Yes]
Video 91
Page 92
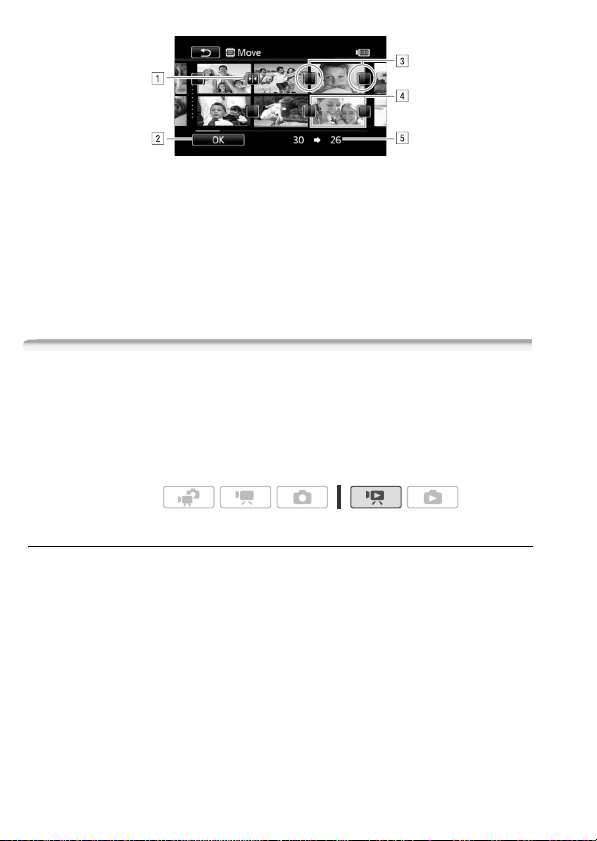
A Destination icon.
B Move the scene to the position indicated by the destina-
tion icon.
C Touch an empty box to select it as the destination.
D Scene selected to be moved.
E Original position of the scene and currently selected des-
tination.
Capturing Photos and Video Snapshot Scenes from a Movie
You can capture video snapshot scenes, single photos or a series of
continuous photos from a previously recorded scene. For example, you
may want to print photos from video recorded at a party or create a
small video clip using video snapshot scenes from the highlights of an
event.
Operating modes:
Capturing a Video Snapshot Scene
1 Open the index screen that contains the scene from which you
want to capture the video snapshot scene.
2 Play back the desired scene.
3Press
4Touch [B] to return to the index screen.
g to capture the video snapshot scene.
The camcorder captures the video snapshot scene for about 4
seconds (the blue frame serves as a visual progress bar), and then
enters playback pause mode. You can change the length of video
snapshot scene you capture with the 8 8 [Video Snapshot
Length] setting.
92 Video
Page 93
NOTES
• A video snapshot scene can be captured only during playback; it cannot be captured during playback pause mode.
• b The captured video snapshot scene is saved to the same memory that contains the source scene.
• Video snapshot scenes cannot be captured from any of the following
types of scenes.
- Scenes shorter than 1 second
- Scenes that were edited using the supplied software ImageMixer 3
SE and were then written back to a memory card connected to the
computer.
• When the source scene is itself a video snapshot scene, you may not
be able to capture a video snapshot scene depending on the length of
the source scene and the length currently selected for video snapshot
scenes.
• When you start capturing a video snapshot scene less than 1 second
from the end of the scene, the video snapshot scene will be captured
starting from the beginning of the following scene.
• During the playback of video snapshot scenes captured from a previously recorded movie, you may notice some anomalies in the picture/
sound at the point where the playback switches to a new scene.
Capturing Photos
You can capture a single photo or a series of photos. The size of the
captured photos will be [H 1920x1080] and it cannot be changed,
but you can select the photo quality.
Please read the IMPORTANT section (094) before using an Eye-Fi card.
Operating modes:
To select the photo capture settings
[MENU] 8 8 8 [Photo Capture from Video] 8
[A Single Photo] or [B Photo Sequence] 8 [f]
Continue from the same menu:
[Photo Capture Quality] 8 Desired photo quality* 8 [a]
* The number displayed indicates the approximate number of photos that can be
recorded with the current quality setting.
Video 93
Page 94

To capture the photos
1 Play back the scene from which you want to capture the photo.
2 Pause the playback at the point you want to capture.
3Press j fully.
To capture a photo sequence, hold j pressed down. The scene
will be played back by frames and each frame captured as a separate
photo.
4Touch [B] to return to the index screen.
IMPORTANT
• When capturing photos on an Eye-Fi card, photos will be uploaded
automatically if you are within the range of a configured network. Always
verify that Eye-Fi cards have been approved in the country/region of
use. See also Using an Eye-Fi card (0 140).
NOTES
• The data code of the photos will reflect the date and time of recording of
the original scene.
• Photos captured from a scene with a lot of fast movement may be
blurred.
• b Photos will be recorded on the memory selected for recording
photos.
•[B Photo Sequence]:
- Up to 100 photos can be captured at a time.
- The photo sequence capture will stop when the end of the
- scene is reached (playback will pause at the beginning of the following
scene).
- Photos will be captured at intervals of 1/25 second.
Dividing Scenes
You can divide scenes (original scenes only) in order to leave out the
best parts and later cut out the rest.
Operating modes:
1 Open the [Original] index screen.
94 Video
Page 95
2 Select the scene you want to divide and touch it to start playing it
back.
3 Pause the playback at the point where you want to divide the
scene.
4 Open the scene division screen.
[Edit] 8 [Divide]
5 Bring the scene to a precise point, if necessary.
• During playback pause: Touch [A] to play back the scene. Touch
[F] or [E] to jump a frame backward/forward.
• During playback: Touch [C] to pause the playback. Touch [J] or
[I] for fast playback backward/forward.
6 Divide the scene.
[A Divide] 8 [Yes]
• The video from the division point to the end of the scene will appear
as a new scene in the index screen.
NOTES
• When advancing/reversing frames while dividing the scenes, the interval
between frames is about 0.5 seconds.
• If the scene cannot be divided at the point where you paused the playback, advance/reverse a frame and then divide the scene.
• During the playback of a scene that was divided, you may notice some
anomalies in the picture/sound at the point where the scene was cut.
• The following scenes cannot be divided:
- Video snapshot scenes and other scenes that are too short (less than
3 seconds).
- Scenes that were edited using the supplied software ImageMixer 3
SE and were then written back to a memory card connected to the
computer.
• Scenes cannot be divided within 1 second from the beginning or the
end of the scene.
Video 95
Page 96
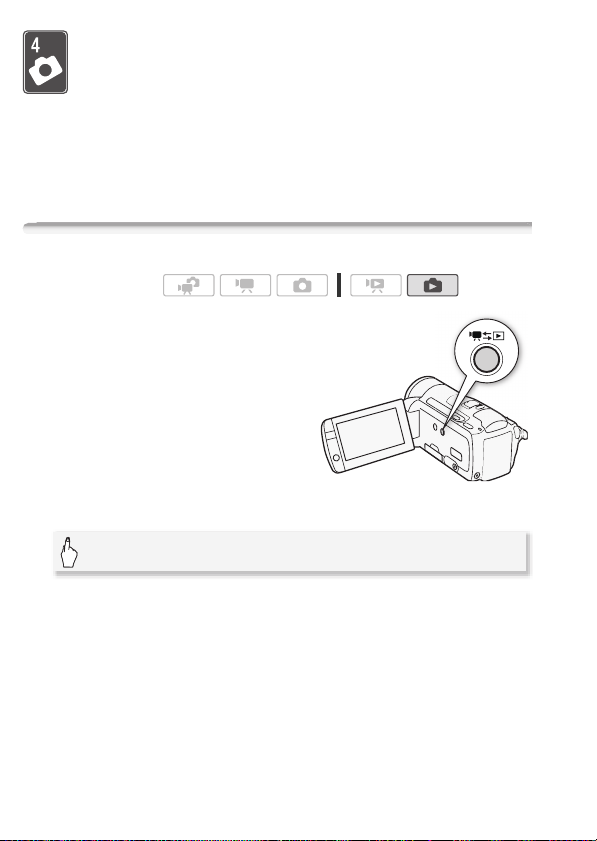
Photos
Refer to this chapter for details on taking photos (advanced
shooting functions), viewing photos and printing them. For
details about basic photo shooting, refer to Dual Shot Mode
(0 39).
Basic Playback
Viewing Photos
Operating modes:
1Press S.
2 Open the [Photos] index screen, if it is not displayed.
[b] 8 [Photos]
3 Look for the photo you want to play back.
Move the zoom lever toward Q to show 15 photos per page; move it
toward P to show 6 photos per page.
96 Photos
Page 97
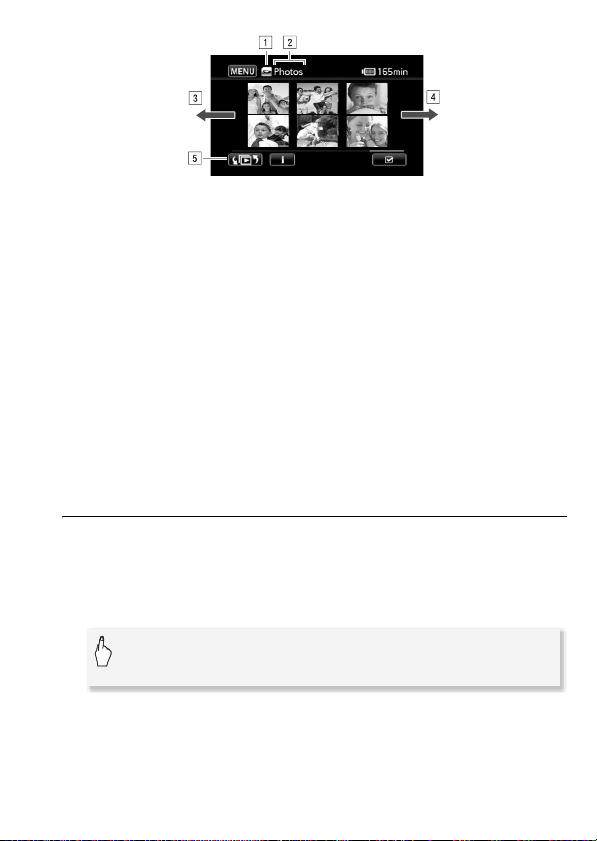
A Memory being read.
B Index screen currently displayed.
C Drag your finger left for the next index page.
D Drag your finger right for the previous index page.
E Select a different index screen to read different content or
from a different memory (b only) (0 49).
4 Touch the photo you wish to view.
• The photo is displayed in single photo view.
• Drag your finger left/right to browse through the photos one by one.
To return to the index screen from single photo view
1 Touch the screen to display the playback controls.
2Touch [Q].
Photo Jump Function
When you have recorded a large number of photos, you can jump easily through the photos using the scroll bar.
1 Touch the screen to display the playback controls.
2 Jump through the photos using the scroll bar.
[g] 8 Drag your finger left and right along the scroll
bar 8 [f]
Photos 97
Page 98
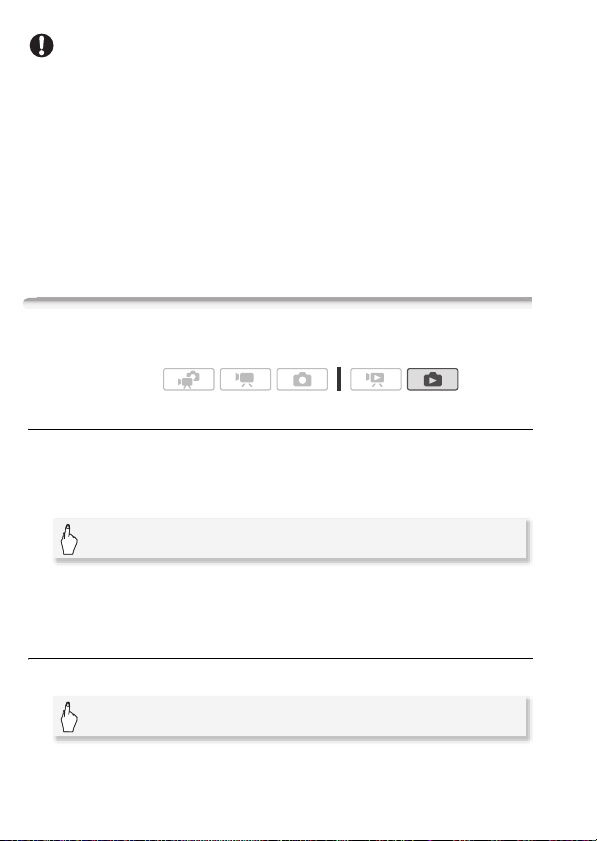
IMPORTANT
• Observe the following precautions while the ACCESS indicator is on or
flashing. Failing to do so may result in permanent data loss.
- Do not open the memory card slot cover.
- Do not disconnect the power source or turn off the camcorder.
- Do not change the camcorder’s operating mode.
• Even if you transfer the following types of image files to a memory card
connected to the computer, the images may not be displayed correctly
on the camcorder.
- Images not recorded with this camcorder.
- Images edited on a computer.
- Images whose file names have been changed.
Deleting Photos
You can delete those photos that you are not interested in keeping.
Operating modes:
Deleting a Single Photo
1 In single photo view, select the photo you want to delete.
2 Touch the screen to display the playback controls.
3 Delete the photo.
[Edit] 8 [Delete] 8 [d Proceed] 8 [Yes]
4 Drag your finger left/right to select another photo to delete or
touch [a].
Deleting Photos from the Index Screen
1 Open the [Photos] index screen.
[b] 8 [Photos]
2Touch [a] to open the photo selection screen.
98 Photos
Page 99

3 Touch on the individual photos you want to delete.
• A checkmark O will appear on photos selected. Touch a selected
photo again to remove the checkmark.
• To select all the photos at once: Touch [Select All] instead of touching
individual photos. (Remove in advance any checkmarks from photos
you may have selected individually.)
4 Delete the photos.
[Edit] 8 [Delete] 8 [Yes]* 8 [OK]
* Touch [Stop] to interrupt the operation while it is in progress. Some photos will
be deleted nevertheless.
IMPORTANT
• Be careful when deleting photos. Deleted photos cannot be recovered.
• Protected photos cannot be deleted.
Photos 99
Page 100
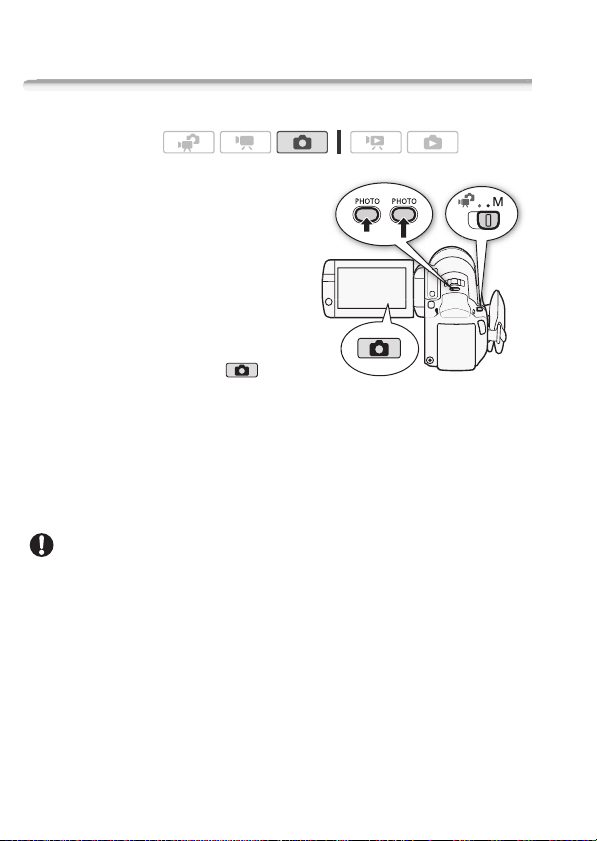
Additional Functions
Taking Photos in y Manual Mode
Operating modes:
1 Set the mode switch to y.
2 Turn on the camcorder.
• b By default, photos are
recorded in the built-in memory.
You can select the memory that will
be used to record photos (0 35).
• Please read the IMPORTANT
section before using an Eye-Fi
card.
3Touch [3] to switch to
mode.
4Press
5Press
• Observe the following precautions while the ACCESS indicator is on or
• When recording photos on an Eye-Fi card, photos will be uploaded
j halfway.
Once the focus is automatically adjusted, h will turn green and one or
more AF frames will appear.
j fully.
The ACCESS indicator will flash as the photo is being recorded.
IMPORTANT
flashing. Failing to do so may result in permanent data loss.
- Do not open the memory card slot cover.
- Do not disconnect the power source or turn off the camcorder.
- Do not change the camcorder’s operating mode.
automatically if you are within the range of a configured network. Always
verify that Eye-Fi cards have been approved in the country/region of
use. See also Using an Eye-Fi card (0 140).
100 Photos
 Loading...