


 Loading...
EOS 5D Mark IV (WG)
Wi-Fi (Wireless Communication) Function
Instruction Manual
ENGLISH
INSTRUCTION MANUAL

Introduction
What You Can Do Using the Wi-Fi (Wireless Communication) Functions
|
(1) Communicate with |
|
|
a smartphone |
|
(CANON iMAGE |
(2) Save images to |
|
GATEWAY) |
||
Canon Connect |
||
(6) Send images to |
Station |
|
|
||
a Web service |
|
(5) Transfer images to |
(3) Operate remotely |
an FTP server |
using EOS Utility |
(4)Print images using a Wi-Fi printer
2

Introduction
(1)qCommunicate with a smartphone (p.29, 59, 83)
Connect the camera to a smartphone or tablet wirelessly and use the dedicated application “Camera Connect” to operate the camera remotely or view images stored in the camera.
In this manual and on the camera’s LCD monitor, “smartphone”
refers to smartphones and tablets.
NFC*-enabled smartphones can be connected by touching them to the camera.
*Near Field Communication
(2)Save images to Connect Station (p.39)
Hold the camera close to Connect Station (sold separately) to connect to and save images to it.
(3)DOperate remotely using EOS Utility (p.43, 59, 99)
Connect the camera to a computer wirelessly and operate the camera remotely using EOS Utility (EOS software).
(4)lPrint images using a Wi-Fi printer (p.49, 59, 103)
Wirelessly connect the camera to a printer supporting PictBridge (Wireless LAN) to print images.
(5)Transfer images to an FTP server (p.75, 113)
Wirelessly connect the camera to an FTP server to transfer captured images.
(6)wSend images to a Web service (p.129)
Share images with your family and friends or share images using various Web services via CANON iMAGE GATEWAY, an online photo service for Canon users (free registration required).
Update the Connect Station firmware to the latest version.
CANON iMAGE GATEWAY Web services are not supported in certain countries and areas. For information on supported countries and areas, refer to the Canon website (www.canon.com/cig).
3

Introduction
Easy Connection Using the NFC Function
This camera can be easily connected to an NFC-enabled smartphone or Connect Station (sold separately) using the NFC function. For details, see page 24.
Note that Canon cannot be held liable for any loss or damage from erroneous wireless communication function settings for using the camera. In addition, Canon cannot be held liable for any other loss or damage caused by use of the camera.
When using wireless communication functions, establish appropriate security at your own risk and discretion. Canon cannot be held liable for any loss or damage caused by unauthorized access or other security breaches.
4

Conventions Used in this Manual 
In this manual, the terms “wireless” and “wireless LAN” are used as general terms for Wi-Fi and Canon’s original wireless communication functions.
The term “access point” indicates wireless LAN terminals (wireless LAN access points, wireless LAN routers, etc.) that relay wireless LAN connection.
Icons in this Manual
<6> : Indicates the Main Dial.
<5> : Indicates the Quick Control Dial. <9> : Indicates the Multi-controller. <0> : Indicates the Setting button.
*In addition to the above, the icons and symbols used on the camera’s buttons and displayed on the LCD monitor are also used in this manual when discussing relevant operations and functionality.
(p.**) : Reference page numbers for more information.
 : Warnings to prevent potential problems during operation.
  : Supplemental information.
5

 Structure of This Manual
This manual consists of the following five sections: “Getting Started”, “Easy Connection”, “Advanced Connection”, “When Connected”, and “Reference”. After preparing to connect in “Getting Started”, follow the diagram below and see the corresponding pages according to your needs.
Getting Started (p.13)
Explains how to register a nickname and the basic operations.
|
Selecting Connection Destination |
|||||
|
|
|
|
|
|
|
Connect Station |
|
|
q Smartphone |
|
r FTP server |
|
|
|
DEOS Utility |
|
|||
|
|
|
w Web service |
|||
|
|
|
l Printer |
|
||
|
|
|
|
|
|
|
|
|
|
|
|
|
|
|
|
|
|
|
|
|
|
|
Select Connection Method |
|
|
||
|
For q, D, or l, you can select the |
|
|
|||
|
connection method. |
|
|
|||
|
|
|
|
|
|
|
Easy Connection (p.27) Explains how to connect the camera
directly to the device via Wi-Fi.
Advanced Connection (p.53) Mainly explains how to connect using a
Wi-Fi access point.
A smartphone or computer can be connected to a camera while maintaining connection to an access point.
When Connected (p.81)
Explains how to use the wireless functions such as sending images after a connection is established.
Reference (p.145)
Describes the solutions to problems and other information. Read as necessary.
6

Chapters
|
Introduction |
2 |
|
|
|
||
Getting Started |
|
|
|
1 |
Preparation and Basic Operation |
15 |
|
|
|||
|
|
|
|
|
|
|
|
Easy Connection |
|
|
|
2 |
Easy Connection to a Smartphone |
29 |
|
|
|||
|
|
|
|
|
|
|
|
3 |
Easy Connection to Connect Station |
39 |
|
|
|||
|
|
|
|
|
|
|
|
4 |
Easy Connection to EOS Utility |
43 |
|
|
|||
|
|
|
|
5 |
Easy Connection to a Printer |
49 |
|
|
|||
|
|
|
|
|
|
|
|
Advanced Connection |
|
|
|
6 |
Using a Wi-Fi Access Point |
59 |
|
|
|||
|
|
|
|
|
|
|
|
7 |
Connecting to an FTP Server |
75 |
|
|
|||
|
|
|
|
|
|
|
|
When Connected |
|
|
|
8 |
Communicating with a Smartphone |
83 |
|
|
|||
|
|
|
|
|
|
|
|
9 |
Operating Remotely Using EOS Utility |
99 |
|
|
|||
|
|
|
|
10 |
Printing Images Using a Wi-Fi Printer |
103 |
|
|
|||
|
|
|
|
|
|
|
|
11 |
Transferring Images to an FTP Server |
113 |
|
|
|||
|
|
|
|
12 |
Sending Images to a Web Service |
129 |
|
|
|||
|
|
|
|
|
|
|
|
13 |
Reconnecting and Adding or Changing Settings |
135 |
|
|
|||
|
|
|
|
|
|
|
|
Reference |
|
|
|
14 |
Troubleshooting Guide |
147 |
|
|
|||
|
|
|
|
|
|
|
|
15 |
Reference |
169 |
|
|
|||
|
|
|
|
|
|
|
|
7

Contents |
|
|
|
Introduction |
2 |
|
What You Can Do Using the Wi-Fi (Wireless Communication) Functions |
... 2 |
|
Conventions Used in this Manual..................................................... |
5 |
|
Structure of This Manual .................................................................. |
6 |
|
Chapters........................................................................................... |
7 |
Getting Started |
13 |
|
|
Operation Flowchart ....................................................................... |
14 |
1 |
Preparation and Basic Operation |
15 |
|
Registering a Nickname ................................................................. |
16 |
|
Basic Operation and Settings......................................................... |
19 |
|
NFC Function ................................................................................. |
24 |
|
Preparation for Smartphones ......................................................... |
26 |
Easy Connection |
27 |
|
|
Wireless Function Operation Flowchart (Easy Connection)........... |
28 |
2 |
Easy Connection to a Smartphone |
29 |
|
Connection Method ........................................................................ |
30 |
|
Connecting to an NFC-enabled Smartphone ................................. |
31 |
|
Connecting with [Easy connection] .............................................. |
34 |
3 |
Easy Connection to Connect Station |
39 |
|
Saving Images................................................................................ |
40 |
8

|
Contents |
|
4 |
Easy Connection to EOS Utility |
43 |
|
Connecting with [Easy connection]............................................... |
44 |
5 |
Easy Connection to a Printer |
49 |
|
Connecting with [Easy connection]............................................... |
50 |
Advanced Connection |
53 |
|
|
Wireless LAN Function Operation Flowchart (Advanced Connection) ... |
54 |
|
Preparation for Web Services ......................................................... |
56 |
|
Preparation of an FTP Server ......................................................... |
58 |
6 |
Using a Wi-Fi Access Point |
59 |
|
Checking the Type of Access Point ................................................ |
60 |
|
Connecting via WPS (PBC Mode) .................................................. |
61 |
|
Connecting via WPS (PIN Mode).................................................... |
65 |
|
Connecting to a Network Manually ................................................. |
69 |
7 |
Connecting to an FTP Server |
75 |
|
Configuring FTP Server Connection Settings ................................. |
76 |
When Connected |
81 |
|
8 |
Communicating with a Smartphone |
83 |
|
Operating the Camera Using a Smartphone................................... |
84 |
|
Sending Images to a Smartphone .................................................. |
87 |
|
Specifying Viewable Images ........................................................... |
94 |
9

Contents |
|
|
9 |
Operating Remotely Using EOS Utility |
99 |
|
Using EOS Utility.......................................................................... |
100 |
10 |
Printing Images Using a Wi-Fi Printer |
103 |
|
Printing ......................................................................................... |
104 |
|
Print Settings ................................................................................ |
107 |
11 |
Transferring Images to an FTP Server |
113 |
|
Transferring Images Individually .................................................. |
114 |
|
Batch Transfer.............................................................................. |
119 |
|
Transferring Images with a Caption ............................................. |
123 |
|
Viewing Transferred Images ........................................................ |
124 |
|
Terminating the Connection ......................................................... |
125 |
|
Changing FTP Server Settings..................................................... |
126 |
12 |
Sending Images to a Web Service |
129 |
|
Sending Images to a Web Service ............................................... |
130 |
13 |
Reconnecting and Adding or Changing Settings |
135 |
|
Reconnecting ............................................................................... |
136 |
|
Registering Multiple Connection Settings..................................... |
138 |
|
Checking, Changing, or Deleting Connection Settings ................ |
140 |
|
Clearing Built-in Wireless Communication Settings ..................... |
143 |
|
View Info Screen .......................................................................... |
144 |
10
|
|
Contents |
Reference |
145 |
|
14 |
Troubleshooting Guide |
147 |
|
Responding to Error Messages .................................................... |
148 |
|
Troubleshooting Guide.................................................................. |
165 |
|
Wireless Function Notes ............................................................... |
166 |
|
Security ......................................................................................... |
167 |
|
Checking Network Settings........................................................... |
168 |
15 |
Reference |
169 |
|
Creating and Registering Captions ............................................... |
170 |
|
Setting up the Network Manually .................................................. |
172 |
|
Setting up the IP Address Manually.............................................. |
174 |
|
Specifications................................................................................ |
176 |
|
Index ............................................................................................. |
178 |
11

12

Getting Started
13

Operation Flowchart
This section explains how to register a nickname (for identification) and the basic operation of the wireless functions.
Follow the procedures below.
Register a nickname. (p.16)
Set the camera’s nickname.
The default nickname (the camera name) can be used.
Be sure to set a nickname as otherwise you cannot set the wireless functions.
Set [Wi-Fi/NFC] to [Enable].
(Steps 1 to 4 on page 19)
Display the [Wi-Fi function] screen.
(Steps 5 and 6 on page 20)
Select a Wi-Fi function and establish a connection.
For further settings, see “Easy Connection” or “Advanced Connection”.
Easy Connection (p.27)
Connect the camera directly to the device.
Advanced Connection (p.53)
Connect using a Wi-Fi access point.
14

1
Preparation and Basic Operation
This chapter describes how to register a nickname (for identification) necessary for using the camera’s wireless functions and the basic operations.
15

Registering a Nickname 
First, set the camera’s nickname (for identification).
When the camera is connected to another device wirelessly, the nickname will be displayed on the device. Be sure to set a nickname as otherwise you cannot set the wireless functions.
1
2
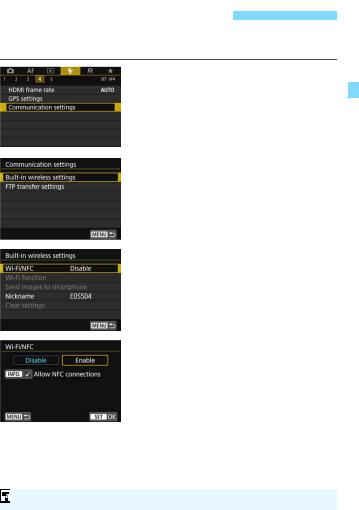
Select [Communication settings].
Press the <M> button, select [Communication settings] under the [54] tab, and press <0>.
Select [Built-in wireless settings].
3Select [Nickname].
When this setting is selected for the first time, a screen to register a nickname is displayed. Press <0> and proceed to step 4.
16

Registering a Nickname
4Enter a nickname.
For instructions on entering characters, see the next page.
When using the default nickname (the camera name), proceed to step 5.
Otherwise, enter any characters between 1 to 10 characters in length.
5Exit the setting.
When you are finished, press the <M> button.
Select [OK] on the confirmation dialog and press <0> to return to the menu screen.
Since the nickname is a required wireless setting, you cannot delete all the characters.
17

Registering a Nickname
Virtual Keyboard Operation
Changing the entry area
Press the <Q> button to toggle between the top and bottom entry areas.
Moving the cursor
Use <5> or <9> in the top area to move the cursor.
Entering text
In the bottom area, use <5> or <9> to select a character, then press <0> to enter it.
You can check how many characters you have entered and how many more can be entered by referring to [*/*] on the upper right of the screen.
Changing the entry mode*
Select [E] at the bottom right of the bottom entry area. Each time you press <0>, the entry mode will change as follows: Lower case 9 Numerals / Symbols 1 9 Numerals / Symbols 2 9 Upper case.
*When [Touch control: Disable] is set, you can enter all characters on one screen.
Deleting a character
Press the <L> button to delete one character.
Finishing the text entry
Press the <M> button to confirm what you have entered and exit. If a confirmation dialog is displayed, select [OK] to exit.
Canceling the text entry
Press the <B> button to cancel text entry and exit. If a confirmation dialog is displayed, select [OK] to exit.
18
Basic Operation and Settings
The basic operation for using the camera’s wireless functions is explained here. Follow the procedures below.
1
2
3
4
Select [Communication settings].
Press the <M> button, select [Communication settings] under the [54] tab, and press <0>.
Select [Built-in wireless settings].
Select [Wi-Fi/NFC].
Select [Enable].
When a nickname (for identification) is not registered, a registration screen is displayed.
See page 16 to register a nickname.
[Wi-Fi function] is now selectable.
You can operate wireless functions also by touching the camera’s screen.
19
Basic Operation and Settings
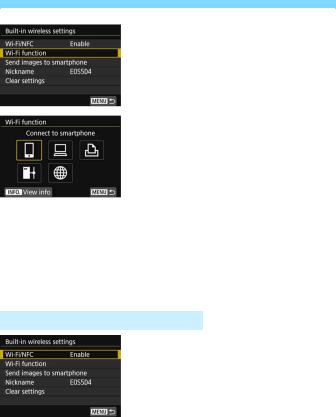
5 Select [Wi-Fi function].
6Select the Wi-Fi function to connect to.
Use <5> or <9> to select an item, then press <0>.
When the connection settings are not registered, the setting screen is displayed.
When the connection settings are already registered, the reconnection screen is displayed (p.136).
For further connection settings, see “Easy Connection” (p.27) or “Advanced Connection” (p.53).
When using the NFC function, see page 24.
[Built-in wireless settings] Screen
The [Built-in wireless settings] screen displayed in step 5 is the portal screen for setting the wireless functions.
Select an item and press <0> to display the setting screen, then specify the settings.
On the [Built-in wireless settings] screen, you can set the following items:
20
Basic Operation and Settings
[Wi-Fi/NFC]
Set whether to [Enable] or [Disable] the wireless functions. You can also set whether to enable or disable the NFC function.
Set to [Enable] to enable the selection of [Wi-Fi function], [Send images to smartphone], and [Clear settings].
When the use of electronic devices and wireless devices is prohibited, such as on board airplanes or in hospitals, set it to [Disable].
[Wi-Fi function]
The following Wi-Fi functions are available:
Connect to smartphone
Remote control (EOS Utility)
Print from Wi-Fi printer
Transfer images to FTP server
Upload to Web service
[Send images to smartphone] (p.87)
While the camera is connected to a smartphone, use this function to send images stored in the camera to the smartphone.
[Nickname] (p.16)
Register or change the nickname.
[Clear settings] (p.143)
Clear all built-in wireless communication settings.
21

Basic Operation and Settings
When multiple exposures or time-lapse movie is set, you cannot select [54: Communication settings].
Interface Cable Connection Cautions
During a wireless LAN connection, you cannot use the camera by connecting it to Connect Station, a computer, a wireless file transmitter, or another device with a cable. Terminate the connection before connecting a cable.
When the camera is connected to Connect Station, a computer, a wireless file transmitter, or another device with a cable, you cannot select [Built-in wireless settings]. Disconnect the cable before changing any settings.
Cards
For [l] and [w], the camera cannot be connected wirelessly if a card with images recorded is not inserted into the camera.
Using the Camera with a Wireless Connection Established
When you want to prioritize the wireless connection, do not operate the power switch, card slot cover, battery compartment cover, or other parts. Otherwise, the wireless connection may be terminated.
Using an Eye-Fi Card
When [Wi-Fi/NFC] is set to [Enable], image transfer using an Eye-Fi card is disabled.
22

Basic Operation and Settings
Wireless Connection Status
Wireless connection status can be checked on the camera’s LCD monitor and LCD panel.
LCD monitor |
LCD panel |
|
|
Quick Control screen |
Information display |
|
|
screen during playback |
|
|
|
Wireless signal strength
Wi-Fi function
Connection status |
LCD monitor |
LCD panel |
|||
Wi-Fi function |
Wireless signal |
Wi-Fi function |
|||
|
|
||||
|
|
strength |
|||
|
|
|
|
||
|
Wi-Fi/NFC: |
|
|
|
|
Not |
Disable |
|
Off |
|
|
connected |
Wi-Fi/NFC: |
|
|
||
|
|
|
|||
|
Enable |
|
|
|
|
Connecting |
|
(Blinking) |
|
(Blinking) |
|
Connected |
|
|
|
|
|
Sending data |
() |
|
|
||
Connection error |
(Blinking) |
|
(Blinking) |
||
Connection to FTP |
|
Off |
|
||
server stopped |
|
|
|||
|
|
|
|||
* is also displayed on the screen for sending images.
*

 is not displayed when the camera is connected with [Easy connection] or [Camera access point mode].
*For the display screen during Live View shooting, refer to the Camera Instruction Manual.
23

NFC Function
Using an NFC-enabled smartphone or Connect Station enables you to do the following:
Touch a smartphone to the camera to easily connect them wirelessly (p.31).
While playing back images on the camera, touch a smartphone to the camera to send a captured image to the smartphone (p.87).
Hold the camera close to Connect Station (sold separately) to easily connect them wirelessly (p.40).
When using the NFC function, follow the steps below to set the camera’s NFC setting.
 1
1
 2 3
2 3
Select [Communication settings].
Under the [54] tab, select [Communication settings], then press <0>.
Select [Built-in wireless settings].
Select [Wi-Fi/NFC].
What is NFC?
NFC (Near Field Communication) is a function that can exchange information by simply bringing two NFC-enabled devices close together. This camera uses the NFC function to exchange the data for wireless connections.
24

NFC Function
4Add [X] to [Allow NFC connections].
Displayed when [Wi-Fi/NFC] is set to [Enable].
Press the <B> button to add or remove [X]. Add [X], then press <0>.
When a nickname (for identification) is not registered, a registration screen is displayed (p.16).
When establishing wireless communications using the NFC function, see the following pages.
Connecting to a smartphone wirelessly: page 31* Sending images to a smartphone: page 87* Connecting to Connect Station: page 40
* When connecting to a smartphone, see pages 26 and 30 as well.
NFC Function Cautions
This camera cannot be connected to other NFC-enabled devices, such as printers, using the NFC function.
A connection cannot be established using the NFC function while shooting with the camera, when there is no card, or while the camera is connected to another device with an interface cable.
To connect the camera to an NFC-enabled smartphone, the smartphone’s Wi-Fi and NFC functions must be enabled.
A connection can be established even when the camera’s power is in the auto power off state. However, if a connection cannot be established, cancel auto power off, then establish a connection.
25

Preparation for Smartphones 
To use [q] (Connect to smartphone), a smartphone on which iOS or Android is installed is necessary. In addition, the dedicated application Camera Connect (free of charge) must be installed on the smartphone.
Camera Connect can be downloaded from the App Store or Google Play.
For the operating system versions supported by Camera Connect, refer to the download site of Camera Connect.
When an NFC-enabled smartphone is touched to the camera before installing Camera Connect, the download screen of Camera Connect will be displayed on the smartphone.
Interface or functions of the camera and Camera Connect are subject to change for firmware update of the camera or application update of Camera Connect, iOS, Android, etc. In such a case, features of the camera or Camera Connect may differ from sample screens or operation instructions in this manual.
26

Easy Connection
27

Wireless Function Operation Flowchart (Easy Connection)
q |
D |
l |
|
Smartphone |
EOS Utility |
Printer |
Connect Station |
|
|
|
|
Set up
Register the camera’s nickname (p.16)
|
Install EOS Utility on a |
|
Set up Connect |
|||
|
|
computer |
|
Station |
||
|
|
|
|
|
|
|
|
|
|
|
|
|
|
Install Camera |
|
Set up a compatible printer |
|
|||
Connect on a |
|
|
||||
|
|
(p.49) |
|
|||
smartphone (p.26) |
|
|
|
|||
|
|
|
|
|
||
|
|
|
|
|
|
|
Connect |
(p.31, 34) |
(p.44) |
(p.50) |
|
|
Register connection destinations to the camera |
Connect via |
||
|
|
|
|
NFC (p.40) |
Operate the camera |
|
Save images |
remotely (p.99) |
|
(p.40) |
|
|
|
Use
Make images viewable
and shoot remotely Print images (p.103) (p.83)
To connect to r(Transfer images to FTP server) or w(Upload to Web service), see “Advanced Connection” (p.53).
28

2
Easy Connection to a Smartphone
Communicating with a smartphone enables you to perform the following:
•View images stored in the camera on a smartphone or save viewed images to a smartphone.
•Operate the camera to take a picture or change camera settings using a smartphone.
•Send images to a smartphone from the camera.
This section explains how to connect the camera directly to a smartphone via Wi-Fi.
Install Camera Connect on the smartphone before setting up a connection (p.26).
To connect using a Wi-Fi access point or connect manually in camera access point mode, see “Advanced Connection” (p.53).
For procedures to send images to an NFC-enabled smartphone, see page 87.
29

Connection Method
When the smartphone is NFC-enabled: See page 31.
You can easily set up a connection using the NFC function.
When the smartphone is not NFC-enabled: See page 34.
Set up a connection by selecting [Easy connection].
Smartphones labeled with the P mark are NFC-enabled. Some smartphones are not labeled with the P mark even if they are NFCenabled; if you do not know whether your smartphone is NFC-enabled, contact the manufacturer of the smartphone.
A connection may not be established with the NFC function even if the smartphone is NFC-enabled. In such a case, establish a connection using the procedure in “Connecting with [Easy connection]” (p.34) or “Advanced Connection” (p.53).
NFC-enabled smartphones can also be connected by selecting [Easy connection] or [Select a network].
30
Loading...