


 Loading...
Wireless Function
Instruction Manual
ENGLISH
INSTRUCTION MANUAL

Introduction
What You Can Do Using the Wireless Functions
By connecting to a Wi-Fi network or other device supporting this camera’s wireless functions, you can perform tasks such as transferring images or controlling the camera.
(1) Connect to a smartphone |
(2) Transfer images |
|
between cameras |
(CANON iMAGE GATEWAY)
(4)Send images to a Web service
(3)Print images using a Wi-Fi printer
CANON iMAGE GATEWAY Web services are not supported in certain countries and areas. For information on supported countries and areas, refer to the Canon website (www.canon.com/cig).
2

Introduction
(1)qConnect to a smartphone (p.23, 59)
Connect the camera to a smartphone or tablet wirelessly and use the dedicated application “Camera Connect” to operate the camera remotely or view images stored in the camera.
In this manual and on the camera’s LCD monitor, “smartphone” refers to smartphones and tablets.
(2)zTransfer images between cameras (p.37)
Transfer images between Canon cameras with built-in wireless functions.
(3)l Print images using a Wi-Fi printer (p.47)
Connect the camera to a wireless printer supporting PictBridge (Wireless LAN) to print images.
(4)m Send images to a Web service (p.75)
Share images with family and friends or share images using a range of Web services via CANON iMAGE GATEWAY, an online photo service for Canon users (free registration required).
3

Structure of This Manual 
This manual consists of the following three sections: “Getting Started”, “Easy Connection”, and “Advanced Connection”.
After preparing to connect in “Getting Started”, follow the diagram below and see the corresponding pages according to your needs.
Getting Started (p.11)
Explains how to register a nickname and the basic operations.
|
Selecting Connection Destination |
||||
|
|
|
|
|
|
zCamera |
|
|
q Smartphone |
|
m Web Service |
|
|
l Printer |
|
||
|
|
|
|
|
|
|
|
|
|
|
|
Select Connection Method
For qor l, you can select the connection method.
Easy Connection (p.21)
Explains how to connect the camera directly to the device via Wi-Fi.
Advanced Connection (p.57)
Mainly explains how to connect using a Wi-Fi access point.
A smartphone or printer can be connected to a camera while maintaining connection to an access point.
4

Chapters
|
Introduction |
2 |
|
|
|
||
|
|
|
|
Getting Started |
|
|
|
1 |
Preparation and Basic Operation |
13 |
|
|
|||
|
|
|
|
Easy Connection |
|
|
|
2 |
Connecting to a Smartphone |
23 |
|
|
|||
|
|
|
|
3 |
Transferring Images Between Cameras |
37 |
|
|
|||
|
|
|
|
4 |
Connecting to a Printer |
47 |
|
|
|||
|
|
|
|
Advanced Connection |
|
|
|
5 |
Connecting by Selecting a Network |
59 |
|
|
|||
|
|
|
|
6 |
Connecting to a Web Service |
75 |
|
|
|||
|
|
|
|
7 |
Checking and Operating Connection Settings |
97 |
|
|
|||
|
|
|
|
8 |
Troubleshooting Guide |
103 |
|
|
|||
|
|
|
|
9 |
Reference |
121 |
|
|
|||
|
|
|
|
5

Contents |
|
|
|
Introduction |
2 |
|
What You Can Do Using the Wireless Functions............................. |
2 |
|
Structure of This Manual .................................................................. |
4 |
|
Chapters........................................................................................... |
5 |
|
Conventions Used in this Manual..................................................... |
9 |
Getting Started |
11 |
|
|
Operation Flowchart ....................................................................... |
12 |
1 |
Preparation and Basic Operation |
13 |
|
Registering a Nickname ................................................................. |
14 |
|
Basic Operation and Settings......................................................... |
17 |
|
Preparation for Smartphones ......................................................... |
20 |
Easy Connection |
21 |
|
|
Wireless Function Operation Flowchart (Easy Connection)........... |
22 |
2 |
Connecting to a Smartphone |
23 |
|
Connecting with Easy Connection.................................................. |
24 |
|
Operating the Camera Using a Smartphone .................................. |
28 |
|
Reconnecting ................................................................................. |
30 |
|
Specifying Viewable Images .......................................................... |
32 |
|
Registering Multiple Connection Settings....................................... |
35 |
6

|
|
Contents |
3 |
Transferring Images Between Cameras |
37 |
|
Connecting to a Camera ................................................................. |
38 |
|
Sending Images .............................................................................. |
40 |
|
Reconnecting .................................................................................. |
44 |
|
Registering Multiple Connection Settings ....................................... |
45 |
4 |
Connecting to a Printer |
47 |
|
Connecting with Easy Connection .................................................. |
48 |
|
Printing............................................................................................ |
51 |
|
Reconnecting .................................................................................. |
54 |
|
Registering Multiple Connection Settings ....................................... |
55 |
Advanced Connection |
57 |
|
|
Wireless LAN Function Operation Flowchart |
|
|
(Advanced Connection) .................................................................. |
58 |
5 |
Connecting by Selecting a Network |
59 |
|
Checking the Type of Access Point ................................................ |
60 |
|
Connecting via WPS (PBC Mode) .................................................. |
61 |
|
Connecting via WPS (PIN Mode).................................................... |
65 |
|
Connecting to a Detected Network Manually.................................. |
69 |
7

Contents |
|
|
6 |
Connecting to a Web Service |
75 |
|
Preparation for Web Services ........................................................ |
76 |
|
Checking the Type of Access Point................................................ |
78 |
|
Connecting via WPS (PBC Mode).................................................. |
79 |
|
Connecting via WPS (PIN Mode) ................................................... |
82 |
|
Connecting to a Detected Network Manually ................................. |
85 |
|
Sending Images to a Web Service ................................................. |
90 |
|
Reconnecting ................................................................................. |
94 |
|
Registering Multiple Connection Settings....................................... |
95 |
7 |
Checking and Operating Connection Settings |
97 |
|
Checking, Changing, or Deleting Connection Settings .................. |
98 |
|
Clearing Wi-Fi Function Settings.................................................. |
101 |
8 |
Troubleshooting Guide |
103 |
|
Responding to Error Messages.................................................... |
104 |
|
Troubleshooting Guide ................................................................. |
117 |
|
Wireless Function Notes .............................................................. |
118 |
|
Security ........................................................................................ |
119 |
|
Checking Network Settings .......................................................... |
120 |
9 |
Reference |
121 |
|
Setting up the Network Manually.................................................. |
122 |
|
Setting up the IP Address Manually ............................................. |
124 |
|
Specifications ............................................................................... |
126 |
|
Index............................................................................................. |
128 |
8

Conventions Used in this Manual 
In this manual, the terms “wireless” and “wireless LAN” are used as general terms for Wi-Fi and Canon’s original wireless functions. The term “access point” indicates wireless LAN terminals (wireless LAN access points, wireless LAN routers, etc.) that relay wireless LAN connection.
The camera does not come with an interface cable.
Icons in this Manual
<6> |
: Indicates the Main Dial. |
<W><X><Y><Z> |
: Indicates the <S> cross keys on the top, |
|
bottom, left, and right. |
<0> |
: Indicates the Setting button. |
*In addition to the above, the icons and symbols used on the camera’s buttons and displayed on the LCD monitor are also used in this manual when discussing relevant operations and functionality.
(p.**) : Reference page numbers for more information.
 : Warnings to prevent potential problems during operation.
  : Supplemental information.
Note that Canon cannot be held liable for any loss or damage from erroneous wireless communication settings for using the camera. In addition, Canon cannot be held liable for any other loss or damage caused by use of the camera.
When using wireless functions, establish appropriate security at your own risk and discretion. Canon cannot be held liable for any loss or damage caused by unauthorized access or other security breaches.
9

10
Getting Started
11

Operation Flowchart
This section explains the basic operation of the wireless functions and how to register a nickname (for identification).
Follow the procedures below.
Set [Wi-Fi] to [Enable].
(Steps 1 and 2 on page 17)
When this setting is selected for the first time, a screen to register a nickname is displayed.
Register a nickname. (p.14)
Set the camera’s nickname.
Be sure to set a nickname as otherwise you cannot go to the wireless function settings screen.
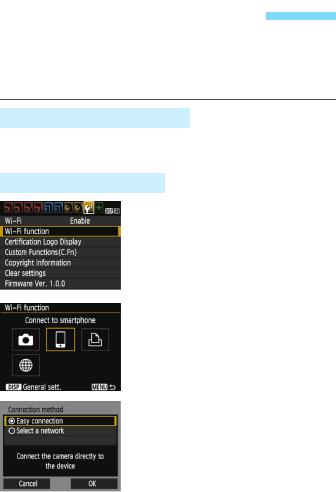
Display the [Wi-Fi function] screen.
(Steps 3 and 4 on page 17-18)
Select a Wi-Fi function and establish a connection.
For further settings, see “Easy Connection” or “Advanced Connection”.
Easy Connection (p.21)
Connect the camera directly to the device.
Advanced Connection (p.57)
Connect using a Wi-Fi access point.
12

1
Preparation and Basic Operation
This chapter describes how to register a nickname (for identification) necessary for using the camera’s wireless functions and the basic operations.
13

Registering a Nickname 
First, set the camera’s nickname (for identification).
When the camera is connected to another device wirelessly, the nickname will be displayed on the device. Be sure to set a nickname as otherwise you cannot set the wireless functions.
1
2
Select [Wi-Fi].
Under the [53] tab, select [Wi-Fi], then press <0>.
Select [Enable].
Press the <Z> key to select [Enable], then press <0>.
When this setting is selected for the first time, a screen to register a nickname is displayed. Press <0> and proceed to step 3.
14

Registering a Nickname
3Enter a nickname.
For instructions on entering characters, see the next page.
When using the default nickname (the camera name), proceed to step 4.
Otherwise, enter any characters between 1 to 10 characters in length.
4Exit the setting.
When you are finished, press the <M> button.
Select [OK] on the confirmation dialog and press <0> to return to the menu screen.
The nickname can be changed later on the [General sett.] screen (p.102).
15

Registering a Nickname
Virtual Keyboard Operation
Changing the entry area
Press the <Q> button to toggle between the top and bottom entry areas.
Moving the cursor
Press the <Y> <Z> keys to move the cursor.
Entering text
In the bottom area, press the <S> cross keys or turn the <6> dial to select a character, then press <0> to enter it.
You can check how many characters you have entered, and how many more can be entered, by referring to [*/*] on the upper right of the screen.
Deleting a character
Press the <L> button to delete one character.
Finishing the text entry
Press the <M> button to confirm what you have entered and exit. If a confirmation dialog is displayed, select [OK] to exit.
Canceling the text entry
Press the <B> button to cancel text entry and exit. If a confirmation dialog is displayed, select [OK] to exit.
16

Basic Operation and Settings 
The basic operation for using the camera’s wireless functions is explained here. Follow the procedures below.
1
2
Select [Wi-Fi].
Under the [53] tab, select [Wi-Fi], then press <0>.
Select [Enable].
Press the <Z> key to select [Enable], then press <0>.
When a nickname (for identification) is not registered, a registration screen is displayed.
See page 14 to register a nickname.
[Wi-Fi function] under the [53] tab is now selectable.
When it is set to [Enable], all connections via the DIGITAL and HDMI terminals will be disabled. [Eye-Fi trans.] will be set to [Disable].
3Select [Wi-Fi function].
Under the [53] tab, select [Wi-Fi function], then press <0>.
17

Basic Operation and Settings
4Select the Wi-Fi function to connect to.
Press the <W> <X> or <Y> <Z> keys to select an item.
When the connection settings are not registered, the setting screen is displayed.
When the connection settings are already registered, the reconnection screen is displayed.
For further connection settings, see the pages that correspond to the device to be connected and connection method.
[Wi-Fi]
Set to [Enable] to enable the selection of [Wi-Fi function] under the [53] tab.
When the use of electronic devices and wireless devices is prohibited, such as on board airplanes or in hospitals, set it to [Disable].
When it is set to [Enable], you cannot use the camera by connecting it to Connect Station, a computer, printer, TV set, or other device with a cable (p.19).
 While a wireless connection is established, do not operate the Mode Dial, card slot/battery compartment cover, or other parts. Doing so may damage the image data, or cause the card or camera to malfunction.
18
Basic Operation and Settings
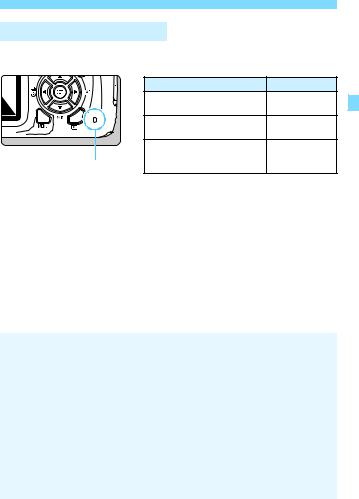
Wireless Connection Status
Wireless connection status can be checked with the camera’s Wi-Fi lamp.
Connection Status |
Wi-Fi Lamp |
|
Connected/Sending data/ |
On* |
|
Receiving data |
||
|
||
Waiting for connection/ |
Blinking |
|
Waiting for reconnection |
||
|
||
Connection error |
Blinking |
|
somewhat |
||
Wi-Fi lamp |
rapidly |
*Lights up intermittently while an image is being written to or read from the card.
 Cable Connection Cautions
When [53: Wi-Fi] is set to [Enable], connection via interface cable or HDMI cable is disabled. Set [53: Wi-Fi] to [Disable] before connecting a cable.
When the camera is connected to Connect Station, a computer, printer, TV set, or any other device via a cable, settings for [Wi-Fi] cannot be changed. Disconnect the cable before changing any settings.
Cards
If there is no card in the camera, it cannot be connected wirelessly. Additionally, for [l] and [m], the camera cannot be connected wirelessly if there are no images saved on the card.
Using an Eye-Fi Card
When [53: Wi-Fi] is set to [Enable], image transfer using an Eye-Fi card is disabled.
19

Preparation for Smartphones 
To use [q] (Connect to smartphone), a smartphone on which iOS or Android is installed is necessary. In addition, the dedicated application Camera Connect (free of charge) must be installed on the smartphone.
Camera Connect can be downloaded from the App Store or Google Play.
For the operating system versions supported by Camera Connect, refer to the download site of Camera Connect.
Interface or functions of the camera and Camera Connect are subject to change for firmware update of the camera or application update of Camera Connect, iOS, Android, etc. In such a case, features of the camera or Camera Connect may differ from sample screens or operation instructions in this manual.
20
Easy Connection
21

Wireless Function Operation Flowchart (Easy Connection)
Set up
q |
z |
l |
Smartphone |
Camera |
Printer |
Register the camera’s nickname (p.14)
Install Camera |
|
Set up a compatible |
|
Set up a compatible |
Connect on a |
|
|
||
|
camera (p.37) |
|
printer (p.47) |
|
smartphone (p.20) |
|
|
||
|
|
|
|
|
|
|
|
|
|
Connect |
Register connection destinations to the camera |
|||
(p.24) |
(p.38) |
(p.48) |
||
|
||||
Use |
Make images viewable |
Exchange images |
|
|
and shoot remotely |
Print images (p.51) |
|||
(p.40) |
||||
|
(p.28) |
|
|
|
To connect to m (Upload to Web service), see “Advanced Connection” (p.57).
22

2
Connecting to a Smartphone
Connecting the camera to a smartphone enables you to do the following:
•View images stored in the camera on a smartphone or save viewed images to a smartphone.
•Operate the camera to take a picture or change camera settings using a smartphone.
Install Camera Connect on the smartphone before setting up a connection (p.20).
To connect using a Wi-Fi access point, see “Advanced Connection” (p.57).
 The camera cannot be connected to a smartphone when the Mode Dial is set to <k>.
23
Connecting with Easy Connection 
The camera and a smartphone can be directly connected wirelessly. Since no access point is necessary for connection, you can establish a wireless connection easily.
To establish connection, operations on the smartphone are required. For details, refer to the smartphone’s instruction manual.
Operation on the Smartphone-1
1Install Camera Connect on the smartphone (p.20).
Operation on the Camera-1
2Select [Wi-Fi function].
Under the [53] tab, set [Wi-Fi] to [Enable], then select [Wi-Fi function] (p.17).
If a screen for setting a nickname (for identification) appears, register a nickname (p.14).
3
4
Select [q].
Select [q] (Connect to smartphone) and press <0>.
The camera’s Wi-Fi lamp will blink.
Select [Easy connection].
Select [Easy connection] and press <0>.
Select [OK] and press <0> to go to the next screen.
24

Connecting with Easy Connection
Operation on the Smartphone-2
Smartphone’s screen
(sample)
Camera’s screen
SSID (network name)
Encryption key (password)
5Operate the smartphone and connect it to the camera.
Activate the smartphone’s Wi-Fi function, then select the SSID (network name) displayed on the camera’s LCD monitor.
For the password, enter the encryption key displayed on the camera’s LCD monitor.
6Start Camera Connect on the smartphone.
When the [Waiting to connect] screen is displayed on the camera’s LCD monitor, start Camera Connect on the smartphone.
If Camera Connect is not installed on the smartphone, see page 20 to install it.
When connecting by selecting [Easy connection], “_Canon0A” is displayed at the end of the SSID.
25

Connecting with Easy Connection
7Select the camera to connect to on the smartphone.
Select and touch the camera to
connect to from [Cameras] on Camera Connect.
Operation on the Camera-2
The device name set on Camera Connect
8Connect to the camera.
When a connection is established, the screen on the left will appear on the camera’s LCD monitor.
To specify viewable images, press the <B> button. See step 5 on page 33 to set them.
Select [OK] and press <0>.
The camera’s Wi-Fi lamp will light up.
After a message is displayed, the camera’s LCD monitor will turn off.
The main window of Camera Connect will be displayed on the smartphone.
26

Connecting with Easy Connection
Operation on the Smartphone-3
9Operate the camera using Camera Connect.
Perform further operations using Camera Connect. See page 28.
The settings for connecting to a smartphone are now complete.
You can check or change the device name on the setting screen of Camera Connect.
While connected, the camera’s auto power off does not function.
27

Operating the Camera Using a Smartphone 
You can use a smartphone with Camera Connect installed to view images stored in the camera and shoot remotely.
Camera Connect Main Window
The main functions of Camera Connect are described below.
[Images on camera]
Images stored in the camera can be viewed.
Images stored in the camera can be saved on a smartphone.
Operations such as deletion can be performed on images stored in the camera.
[Remote live view shooting]
The camera’s Live View image can be viewed using a smartphone.
You can shoot using remote operation.
[Location information]
Not supported on this camera.
[Camera settings]
Camera settings can be changed.
28

Operating the Camera Using a Smartphone
Terminating the Connection
On the smartphone’s Camera
Connect screen, tap [e].
 While connected, a picture cannot be taken even if the camera’s shutter button is pressed.
In remote shooting, the AF speed may become slower.
Depending on the transmission range and connection status, image display may be delayed, images may not be displayed smoothly, shutter release may be delayed, or other problems may occur.
Even if movies are displayed in the list, they cannot be saved to a smartphone.
If you send RAW images to a smartphone, the high ISO speed noise reduction effect of saved images on the smartphone may become smaller. Therefore, if you shoot RAW images, setting the imagerecording quality to 1+73 is recommended.
The connection will also be terminated if you turn the Mode Dial or open the card slot/battery compartment cover.
If you send RAW images to a smartphone, they will be resized to band saved.
While connected, the camera’s auto power off does not function.
While connected, disabling the smartphone’s power saving function is recommended.
The camera’s Wi-Fi lamp will light up intermittently when images stored in the camera are being saved to a smartphone.
29

Reconnecting
The camera can reconnect to a smartphone for which connection settings have been registered.
1
2
3
Select [Wi-Fi function].
Under the [53] tab, set [Wi-Fi] to [Enable], then select [Wi-Fi function].
Select [q].
Select [q] (Connect to smartphone) and press <0>.
Select [Connect].
When settings for multiple connection destinations are registered, select [Choose set.], select the connection destination, then connect to the destination.
Select [Connect] and press <0>.
On the confirmation dialog, select [OK].
30
Loading...