


IT
EN
NL
DE
ES
PT
FR
Installazione - Uso -
Manutenzione
Installation - Use -
Maintenance
Installatie -
Gebruiksaanwijzing
Installation -
Bedienungsanleitung
Instalación - Uso -
Mantenimiento
Instalação - Utilização -
Manutenção
Installation - Usage -
Entretien
2 Lavastoviglie
23 Dishwasher
45 Afwasmachine
65 Geschirrspüler
86 Lavavajillas
107 Máquina de Lavar Loiça
128 Lave-vaisselle

Indice
Prescrizioni di sicurezza |
pag. |
3 |
Messa in opera, Installazione |
pag. |
4 |
Apertura dello sportello |
pag. |
6 |
Impianto di addolcimento dell'acqua |
pag. |
7 |
Regolazione del cesto superiore |
pag. |
9 |
Caricamento delle stoviglie |
pag. 10 |
|
Lavaggio a mezzo carico |
pag. 14 |
|
Informazioni per laboratori di prova |
pag. 15 |
|
Caricamento detersivo e brillantante |
pag. 15 |
|
Pulizia filtri |
pag. 17 |
|
Consigli pratici |
pag. 18 |
|
Pulizia e manutenzione ordinaria |
pag. 19 |
|
Ricerca piccoli guasti |
pag. 21 |
|
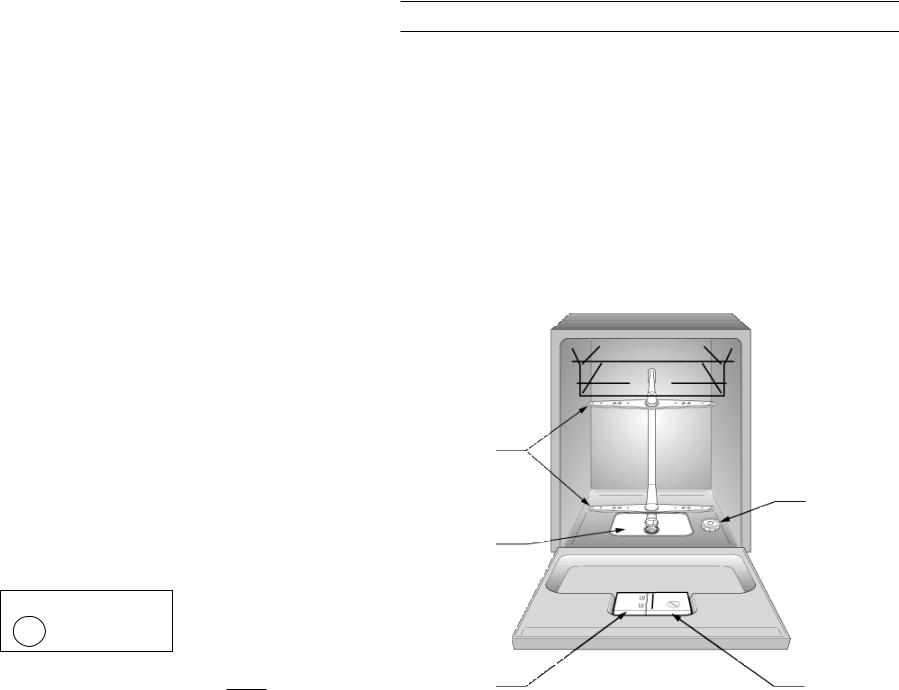
Fig. A
5
1
4
2 |
|
|
|
3 |
|
|
Prescrizioni di sicurezza
La preghiamo di leggere attentamente le avvertenze contenute nel presente libretto
in quanto forniscono importanti indicazioni riguardanti la sicurezza di installazione, d'uso, di manutenzione ed alcuni utili consigli per utilizzare al meglio la propria nuova lavastoviglie.
Conservi con cura questo libretto per ogni ulteriore consultazione.
L'uso di un qualsiasi apparecchio elettrico comporta l'osservanza di alcune regole fondamentali.
In particolare:
–non toccare l'apparecchio con mani o piedi bagnati o umidi
–non usare l'apparecchio a piedi nudi
–non tirare il cavo di alimentazione, o l'apparecchio stesso, per staccare la spina dalla presa di corrente
– non esporre l'apparecchio ad agenti atmosferici (pioggia, sole, ecc.).
–non permettere che l'apparecchio sia usato dai bambini senza sorveglianza
–In caso di incompatibilità tra la presa e la spina dell'apparecchio, fare sostituire la presa con altra di tipo adatto da personale qualificato. Quest'ultimo, in particolare, dovrà anche accertare che la sezione dei cavi della presa sia idonea alla potenza assorbita dall'apparecchio.
–fare attenzione che l'apparecchiatura non schiacci il cavo di alimentazione.
– |
se |
l'abitazione |
è dotata di impianto per addolcire l'acqua non è necessario |
|||
|
aggiungere |
sale |
nell'addolcitore della lavastoviglie. |
|||
– |
la |
lavastoviglie |
è |
progettata per il lavaggio |
di normali utensili domestici: |
|
|
oggetti contaminati da benzina, vernice, avanzi di acciaio o ferro, prodotti chimici |
|||||
|
corrosivi, |
acidi |
o |
alcalini non devono essere |
lavati in lavastoviglie. |
|
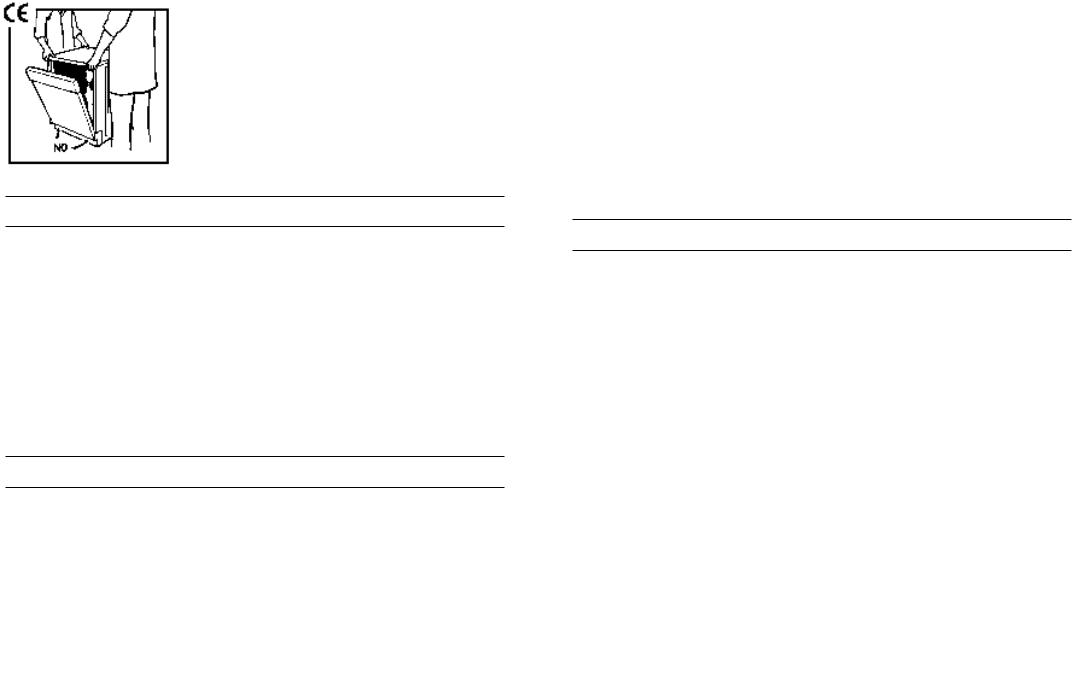
–Volendo eliminare una vecchia lavastoviglie si abbia cura di togliere la chiusura sportello per evitare che i bambini possano chiudersi nella macchina. Dopo aver staccato la spina della presa di corrente è importante tagliare il cavo di alimenta-
zione. |
|
|
– Questo |
apparecchio |
è fabbricato con materiali riciclabili, per permetterne un |
corretto |
smaltimento |
degli stessi. |
–Qualora si rendesse necessaria la sostituzione del cavo di alimentazione dell’apparecchio, rivolgersi al Servizio di Assistenza Tecnica Autorizzato.
–Questo apparecchio dovrà essere destinato solo all’uso domestico.
–In generale è sconsigliabile l'uso di adattatori, prese multiple e/o prolunghe.
In |
caso di guasto e/o di cattivo funzionamento |
dell'apparecchio, |
spegnerlo, |
chiudere il rubinetto dell'acqua e non manomettere l'elettrodomestico. |
|
||
Per |
l'eventuale riparazione rivolgersi solamente ad |
un Centro di |
Assistenza |
Tecnica (GIAS) e richiedere l'utilizzo di ricambi originali.
Il mancato rispetto di quanto sopra può compromettere la sicurezza dell'apparecchio e dell'utilizzatore.
–Non si deve bere l'acqua che rimane nella macchina o sulle stoviglie alla fine dei programmi di lavaggio.
–Appoggiarsi o sedersi sulla porta aperta della lavastoviglie, può causarne il ribaltamento.
– I coltelli e le |
posate ottengono un lavaggio migliore se posti nel cestello con i |
manici in basso, tuttavia, per evitare di ferirvi con le punte o le lame, potete dispor- |
|
li con i manici |
in alto. |
2 |
3 |
INSTALLAZIONE (Notazioni tecniche)
Dopo il |
disimballo verificare che la lavastoviglie sia |
bene in piano regolando i piedini per eliminare una |
|
eventuale |
inclinazione. |
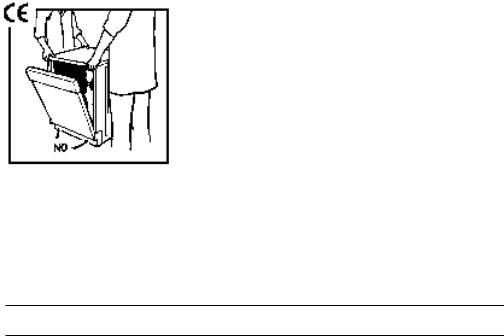
Qualora fosse necessario trasportare manualmente la macchina disimballata non impugnare la porta in basso, ma aprire leggermente la porta e sollevare impugnando il ripiano superiore.
Importante: nel caso si installi la macchina su un pavimento ricoperto da tappeti o con moquette controllare che le aperture di ventilazione alla base del- l'apparecchio non vengano ostruite.
Inoltre la spina dell'apparecchio deve rimanere accessibile anche dopo l'installazione.
Alimentazione elettrica
L'apparecchio è conforme ai requisiti di sicurezza previsti dagli istituti normativi ed è munito di spina tripolare con polo di terra che assicura la completa messa a terra del prodotto.
L'efficacia della sicurezza è comunque subordinata anche alla corretta messa a terra del Vostro impianto. Per la mancanza di un efficiente impianto di terra, si avverte una
lieve dispersione di corrente sulle parti metalliche dell'elettrodomestico per la presenza del filtro antidisturbo radio.
Pertanto, prima di alimentare elettricamente l'elettrodomestico accertarsi:
1.che la presa abbia un corretto collegamento di messa a terra;
2.che la portata amperometrica del contatore elettrico risulti idonea per l'assorbimento indicato dai dati di targa dell'elettrodomestico.
La società costruttrice resta sollevata da ogni responsabilità per eventuali danni a persone o cose, derivanti dal mancato allacciamento della linea di terra.
Apparecchio conforme alle Direttive Europee 89/336/CEE, 73/23/CEE e successive modifiche.
Alimentazione idrica
I tubi di carico e scarico possono essere orientati indifferentemente verso destra o verso sinistra.
La lavastoviglie può essere allacciata all'impianto dell'acqua fredda o calda purchè non superi i 60°C.
La pressione idrica deve essere compresa tra un minimo di 0,08 MPa e un massimo di 0,8 MPa. Per pressioni inferiori consultare il Centro Assistenza Tecnica.
E' necessario un rubinetto a monte del tubo di carico per isolare la macchina dall'impianto idrico quando non è in funzione (fig. 1 B). La lavastoviglie è dotata di un
tubo per la presa d'acqua |
terminante |
con ghiera |
filettata |
3/4" (fig. 2). Il tubo di |
carico “A” deve essere |
avvitato ad un |
rubinetto |
dell'acqua |
“B” con attacco da 3/4" |
assicurandosi che la ghiera sia ben stretta. Se necessario si può allungare il tubo di carico. A tale scopo è disponibile la prolunga art. 9225014, lunga 1,5 m. Qualora l'acqua di rete presentasse dei residui calcarei o sabbia è consigliabile
richiedere presso il Centro Assistenza Tecnica, il filtro accessorio art. 9226085 (fig. 3).
Il filtro “D” va inserito tra la presa d'acqua da 3/4" “B” ed il tubo di carico “A”, ricordando di mettere le guarnizioni “C”.
Se la macchina viene collegata a tubazioni nuove o rimaste inutilizzate per lungo tempo, è consigliabile far scorrere l'acqua per alcuni minuti prima di allacciare il tubo di carico. In tal modo eviterete che depositi di sabbia o di ruggine possano otturare il filtrino di ingresso acqua.
1 |
2 |
3 |
Collegamento allo scarico d'acqua
Infilare il tubo nell'impianto di scarico, senza creare pieghe, (fig. 4).
Lo scarico fisso deve avere il diametro interno di almeno 4 cm, e dev'essere posto ad una altezza minima di 40 cm. Si raccomanda di predisporre il sifone antiodore (fig. 4x).
Se necessario si può allungare il tubo di scarico fino a 2,6 m, tenendolo però ad una altezza massima di 85 cm dal pavimento. A tale scopo è disponibile la prolunga articolo 9269214 e raccordo articolo 9264427.
L'estremità ricurva del tubo di scarico può essere appoggiata al bordo di un lavello (l'estremità non deve rimanere immersa nell'acqua, per evitare il risucchio nell'apparecchio durante il programma di lavaggio. Fig. 4y).
Nel caso di installazione sotto piano continuo la curva deve essere fissata immediatamente sotto il piano nel punto più alto possibile (fig. 4z).
Nell'installare la macchina, controllare che i tubi di carico e scarico non siano piegati.
4
4 |
5 |
Installazione nelle cucine componibili
Per accosto
La lavastoviglie è stata studiata con l'altezza modulare |
di 85 cm e quindi può esse- |
re accostata ai mobili delle moderne cucine componibili di analoga altezza. Per alli- |
|
nearla esattamente, regolare i piedini dell'apparecchio. |
|
Il piano superiore in laminato ad alta resistenza può essere usato senza nessun par- |
|
ticolare riguardo perchè resistente al calore, all'abrasione ed è antimacchia (fig. 5). |
|
Il piano di lavoro è facilmente regolabile in profondità |
fino a 25 mm, mediante spo- |
stamenti di 5 in 5 mm per allinearlo al piano dei mobili adiacenti.
Per la regolazione, svitare le 2 viti posteriori e fissarlo nella posizione voluta (fig. 6).
Per inserimento sottopiano
Le più moderne cucine componibili hanno un piano di lavoro unico sotto il quale vengono inseriti i mobili base e gli elettrodomestici.
In questo caso basta asportare il piano di lavoro, svitando le viti che si trovano sotto di esso nella parte posteriore (fig. 6).
L'altezza si riduce così a 82 cm, come previsto dalle Norme internazionali (ISO) e la lavastoviglie si inserisce perfettamente sotto il piano continuo della cucina (fig. 7).
Pannellabilità |
(solo in alcuni |
modelli) |
|
Le cornici attorno alla porta consentono l'inserimento di pannelli decorativi con spes- |
|
||
sore fino a 5 mm e con le seguenti dimensioni: |
|
||
larghezza |
591 mm ± 1 |
altezza |
597 mm ± 1 |
5 |
|
6 |
7 |
598
556/573
Apertura dello sportello
Inserire la mano nell'incavo e premere verso l'alto.
Se lo sportello viene aperto durante il funzionamento della macchina, una sicurezza elettrica fa si che tutte le funzioni vengano automaticamente interrotte.
Per un corretto funzionamento evitare di aprire lo sportello mentre la lavastoviglie è in funzione.
Per chiudere lo sportello
Inserire i cestelli.
Verificare che entrambe le rampe lavanti possano ruotare e che non ci siano posate, pentole o piatti che ne limitino o impediscano la rotazione.
Chiudere lo sportello e bloccarlo mediante leggera pressione.
Impianto di addolcimento dell'acqua
L'acqua contiene in misura variabile, a seconda delle località, sali calcarei e minerali che si depositano sulle stoviglie lasciando macchie e depositi biancastri.
Più elevato è il contenuto di questi sali maggiore è la durezza dell'acqua.
La lavastoviglie è corredata di un decalcificatore che, utilizzando del sale rigenerante specifico per lavastoviglie, fornisce acqua priva di calcare (addolcita) per il lavaggio delle stoviglie. Il decalcificatore può trattare acqua con durezza fino a 60°fH (gradi francesi) 33°dH (gradi tedeschi) tramite 5 livelli di regolazione.
Potete richiedere il grado di durezza della vostra acqua all'Ente erogatore di zona.
Regolazione decalcificazione con decalcificatore
Nella tabella seguente trovate la corrispondenza tra durezza acqua di rete da trattare e livello di regolazione del decalcificatore.
Livello |
Durezza |
Durezza |
|
|
|
|
dell'acqua |
dell'acqua |
Uso |
Regolazione |
N° |
|
°fH gradi |
°dH gradi |
sale |
del decalci- |
lavaggi |
|
rigenerante |
ficatore |
circa |
||
|
francesi |
tedeschi |
|||
|
|
|
|
||
0 |
0-9 |
0-5 |
NO |
LIBERA |
|
1 |
10-30 |
6-16 |
SI |
posizione N.1 |
50 |
*2 |
31-40 |
17-22 |
SI |
posizione N.2 |
40 |
3 |
41-50 |
23-27 |
SI |
posizione N.3 |
30 |
4 |
51-60 |
28-33 |
SI |
posizione N.4 |
20 |
* Il decalcificatore è regolato sul livello 2 in quanto questo soddisfa la maggior parte |
|
||||
delle utenze. |
|
|
|
|
|
Se la vostra acqua appartiere al livello 0, non è necessario usare il sale rigenerante |
|
||||
né effettuare alcuna regolazione, in quanto è già dolce. |
|
|
|
||
A seconda del livello |
di appartenenza |
|
TIPO 1 |
|
|
della vostra acqua regolare il decalcifica- |
|
|
|
||
tore nel seguente modo: |
|
|
|
|
|
- estrarre il cesto inferiore, svitare |
e |
|
|
|
|
togliere il tappo del contenitore sale |
|
|
|
|
|
rigenerante posto sul fondo della vasca |
|
|
|
|
|
(Fig.A"1"); |
|
|
|
|
|
- ruotare il selettore |
fino ad evidenziare |
|
|
|
|
la posizione desiderata con l'ausilio di |
|
|
|
TIPO 2 |
|
un cacciavite o di un coltello. |
|
|
|
||
N.B.: Per i modelli dotati di programmatore elettronico, consultare l'elenco programmi allegato.
6 |
7 |
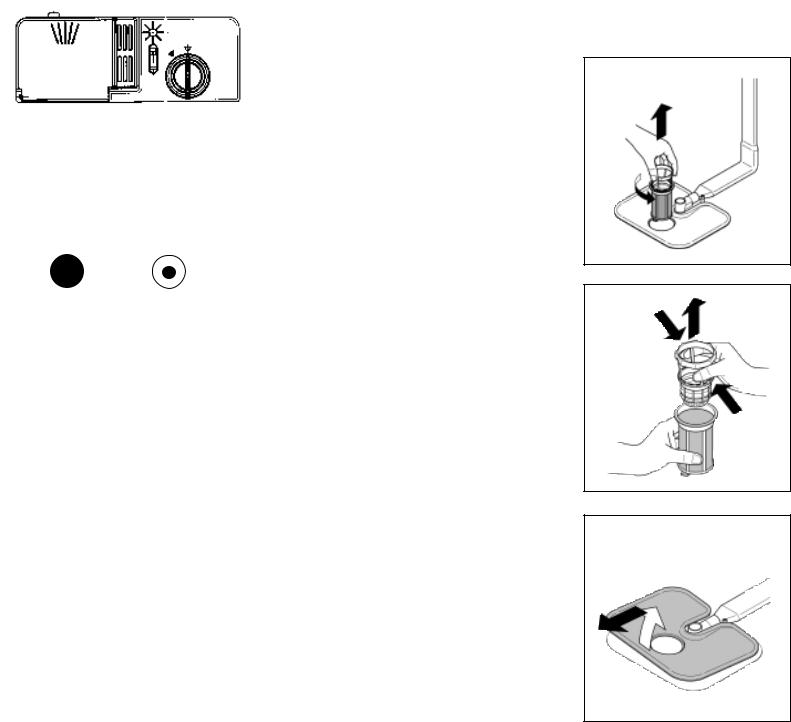
Caricare il sale
|
La lavastoviglie è dotata di un decalcificatore che |
||
|
depura l'acqua dal calcare che potrebbe incro- |
||
|
starla o danneggiarla. |
||
|
Sul fondo della macchina è sistemato il conteni- |
||
|
tore |
del sale che serve a rigenerare l'apparec- |
|
|
chio |
decalcificatore. |
|
|
La massa filtrante dell'impianto di depurazione |
||
|
deve essere riattivata con sale di rigenerazione |
||
|
per decalcificatori |
di lavastoviglie. |
|
|
Altri tipi di sale contengono sensibili percentuali |
||
|
di sostanze insolubili che potrebbero col tempo |
||
|
rendere inefficiente l'impianto di decalcificazione. |
||
|
|||
Per l'introduzione del sale, svitare il tappo del contenitore che si trova sul fondo. |
|||
Durante l'operazione un po' d'acqua trabocca; continuate in ogni caso a versare il |
|||
sale fino al riempimento del contenitore mescolando la miscela con un |
|||
cucchiaio.Ultimata l'operazione, pulire la filettatura |
dai resti di |
sale e riavvitare il |
|
tappo. Se non si deve effettuare alcun lavaggio subito, inserire il programma Prelavaggio freddo in modo che la soluzione salina traboccata venga scaricata dalla macchina. Il contenitore ha una capacità di circa 1,5÷1,8 kg di sale e, per una efficace utilizzazione dell'apparecchio, è necessario riempirlo periodicamente a secondo
della regolazione del proprio impianto di decalcificazione.
Importante: Solo all'installazione della lavastoviglie dopo aver riempito completamente il contenitore del sale è necessario aggiungere dell'acqua, fino al trabocco dal contenitore.
Indicatore di riempimento sale
Alcuni modelli sono dotati di spie di indicazione dell'esaurimento del sale. La segnalazione può
avvenire |
con due sistemi: |
||
- |
spia |
elettrica sul |
cruscotto che si accende |
|
quando diviene necessario provvedere a riem- |
||
|
pire il contenitore del sale; |
||
- |
tappo |
di chiusura con spia mobile di colore |
|
|
verde; questa rimane visibile fino a quando la |
||
|
soluzione salina è sufficiente per la rigenera- |
||
|
zione del depuratore. Se la superficie verde si |
||
|
abbassa nel tappo di chiusura, si deve proce- |
||
|
dere |
al riempimento |
di sale. |
Altri modelli sono forniti con tappo cieco, in tal caso è opportuno controllare periodicamente il livello del sale, a seconda della regolazione del proprio impianto di decalcificazione.
Importante: la comparsa di macchie biancastre sulle stoviglie è generalmente un indice importante di mancanza del sale.
8
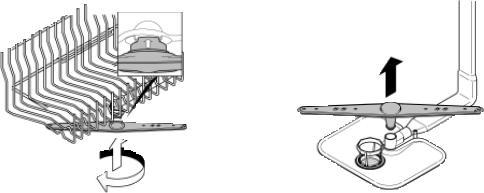
Regolazione del cestello superiore |
(solo nei modelli predisposti) |
Utilizzando abitualmente piatti da 27 cm a 31 cm di diametro, caricarli nel cesto inferiore dopo aver spostato quello superiore nella posizione più alta, procedendo nel seguente modo (a seconda dei modelli):
Tipo “A”:
1) |
Ruotare i fermi anteriori |
A verso l'esterno; |
2) |
Sfilare il cesto e rimontarlo nella posizione più alta; |
|
3) Rimettere i fermi |
A nella posizione originale. |
|
Con questa operazione nel cesto superiore non si possono caricare stoviglie con diametro superiore a 20 cm e non si possono utilizzare i supporti mobili nella posizione alta.
A |
Tipo “B”:
A |
1)Estrarre il cesto superiore;
2)Impugnare il cesto da entrambi i lati e tirarlo verso l’alto (fig. 1).
Con questa operazione nel cesto superiore non si possono caricare stoviglie con diametro superiore a 20 cm e non si possono utilizzare i supporti mobili nella posizione alta.
PER RIPORTARE IL CESTO IN POSIZIONE BASSA:
1)Impugnare il cesto da entrambi i lati e tirarlo leggermente verso l’alto (fig. 2a);
2)Lasciare lentamente ricadere il cesto accompagnandolo (fig. 2b).
N. B. : NON SOLLEVARE O ABBASSARE MAI IL CESTO DA UN SOLO LATO (fig. 3).
Attenzione :
Si consiglia di effettuare la regolazione del cestello prima del carico delle stoviglie.
1 |
2 |
a |
b |
a |
b |
9 |
3 |

Caricamento delle stoviglie
Carico delle stoviglie
Per garantire ottimi risultati di lavaggio nel tempo é opportuno asportare dalle stoviglie i residui più grandi delle pietanze (ossa, lische, stuzzicadenti, avanzi di carne o verdure, bucce di frutta, etc.) per evitare di intasare i filtri, lo scarico e gli spruzzatori dei bracci lavanti, con conseguente riduzione dell'efficacia di lavaggio.
Non è necessario risciacquare le stoviglie prima di collocarle nella macchina. Qualora le pentole e padelle fossero eccessivamente incrostate da residui di cibo bruciati o arrostiti, si consiglia di tenerle in ammollo in attesa del lavaggio.
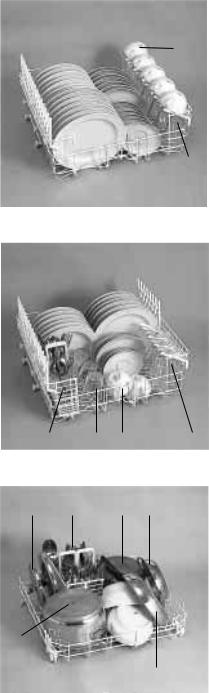
Utilizzo del cesto superiore
Il cesto superiore é dotato di supporti mobili agganciati alla sponda laterale, in grado di assumere due posizioni: alzata e abbassata. Nella posizione abbassata i supporti servono per appoggiarvi tazze da the, caffè, lunghi coltelli e mestoli. Sulle estremità dei supporti stessi si possono, appendere i bicchieri a forma di calice.
Sotto di essi possono prendere posto bicchieri, tazze, sottotazze e piatti da dessert. In posizione rialzata, i supporti permettono l'alloggiamento di piatti piani e fondi. Questi ultimi vanno sistemati in posizione verticale con la parte concava rivolta verso
il lato anteriore, avendo cura di verificare che rimanga sempre uno spazio |
tra un |
|
piatto |
e l'altro, per consentire all'acqua di passare liberamente. |
|
Per sfruttare la massima capienza del cesto si consiglia di raggruppare i |
piatti di |
|
uguale |
forma. |
|
I piatti possono essere caricati su un unica fila (fig. 1) o su entrambe le file (fig. 2). Si consiglia di posizionare i piatti di dimensione maggiore, con un diametro di circa 270 mm, leggermente inclinati verso il lato anteriore in modo da favorire il facile inserimento del cesto all'interno della macchina.
Nel cesto |
superiore possono trovare alloggiamento anche stoviglie quali insalatiere |
e ciotole |
di plastica, che si consiglia di bloccare per evitarne il capovolgimento a |
causa dei |
getti. |
Il cesto superiore è stato studiato al fine di offrire la massima flessibilità di utilizzo. Esso può essere caricato con soli piatti, posizionati in doppia fila sino ad un massimo
di 24 pezzi, con soli bicchieri, su cinque file sino a 30 pezzi, oppure per carichi misti.
Utilizzo del cesto inferiore
Nel cesto inferiore vengono alloggiate pentole, padelle, zuppiere, insalatiere, coperchi, piatti da portata, piatti piani, piatti fondi e mestoli.
Le posate vanno sistemate con il manico verso il basso nell'apposito contenitore in plastica posizionato nel cesto inferiore (fig. 3) assicurandosi che le posate stesse non ostruiscano la rotazione delle rampe.
1
E
A C
B D
F
2
B
A
C
D
H G E F
3
D F A G
E
B
C
Un carico standard giornaliero è rappresentato nelle fig. 1, 2 e 3.
cesto superiore (fig. 1)
A= piatti fondi
B= piatti piani
C= piatti dessert
D= sottotazze
E= tazze
F= bicchieri
cesto superiore (fig. 2)
A= piatti fondi
B= piatti piani
C= piatti dessert
D= sottotazze
E= tazze
F= calici
G= bicchieri
H= semi cesto posate
cesto inferiore (fig. 3)
A= pentola media
B= pentola grande
C= padella
D= coperchi
E= zuppiere, piatti da portata
F= posate
G= tegami, teglie
La disposizione razionale e corretta delle stoviglie è condizione essenziale per un buon risultato di lavaggio.
10 |
11 |

Carico normalizzato 12 coperti internazionali (secondo I.E.C. 436 - EN 50242).
La corretta disposizione del carico è quella indicata nella fig. 4 per il cesto superiore, nella fig. 5 per il cesto inferiore e fig. 6 cesto posate.
4 |
G |
|
|
|
B |
|
|
|
|
|
|
|
||
|
|
|
|
|
|
|
cesto superiore (fig. 4) |
|||||||
|
|
E |
|
|
|
|
|
|
|
|
||||
C |
|
|
|
|
C |
|
|
|
A = 5 + 5 + 2 bicchieri |
|||||
D |
|
|
|
|
|
I |
||||||||
F |
|
|
|
|
B = 12 sotto tazze |
|
||||||||
|
|
|
|
|
|
|
|
|||||||
|
|
|
|
|
|
|
|
|
|
C = 4 + 4 + 4 tazze |
||||
H |
C |
|
|
|
|
|
|
|
|
D |
= coppa piccola |
|
||
|
|
|
|
|
|
|
|
E |
= coppa media |
|
||||
|
|
|
|
|
|
|
|
|
|
|
|
|||
|
|
|
|
|
|
|
H |
|
|
|
F |
= coppa grande |
|
|
|
|
|
A |
|
|
|
|
|
|
G |
= 1 + 1 forchette |
|||
|
|
|
|
|
|
|
|
|
L |
H |
= 1 + 1 cucchiai da servizio |
|||
|
|
|
|
|
|
|
|
|
|
I |
= 3 + 3 + 3 + 3 cucchiai da dessert |
|||
|
|
|
|
|
|
|
|
|
|
|
L = 3 + 3 + 3 + 3 cucchiaini da caffé |
|||
|
|
|
|
|
|
|
|
|
|
|
||||
5 |
Q |
|
|
|
N |
cesto inferiore (fig. 5) |
|
|
||||||
|
|
|
M |
= 8 + 4 piatti fondi |
|
|||||||||
|
|
|
|
|
|
|
|
|
||||||
|
|
|
N |
|
|
|
|
N |
= 11 + 1 piatti piani |
|
||||
M |
|
|
|
|
|
|
O |
= 12 piatti dessert |
|
|
||||
|
|
|
|
|
|
P |
= piatto da portata |
|
|
|||||
|
|
M |
P |
O |
|
|
|
Q = posate |
|
|
|
|
||
6 |
|
|
|
|
|
cesto posate (fig. 6) |
|
|
||||||
|
|
|
|
|
|
|
||||||||
|
|
|
|
|
|
|
||||||||
|
|
|
|
|
|
|||||||||
|
|
|
|
|
|
|
|
|
||||||
|
|
|
|
|
|
|
Nelle |
due |
ribaltine |
abbassate |
inserire |
|||
|
|
|
|
|
|
R |
||||||||
|
|
|
|
|
|
n.° 6 |
+ 6 coltelli (R); nei rimanenti scompar- |
|||||||
|
|
|
|
|
|
|
|
|||||||
|
|
|
|
|
|
|
|
ti |
sistemare |
le posate |
con i manici |
rivolti |
||
|
|
|
|
|
|
|
|
verso il basso, avendo cura di non mettere |
||||||
|
|
|
|
|
|
|
|
più di due posate identiche per scomparto. |
||||||
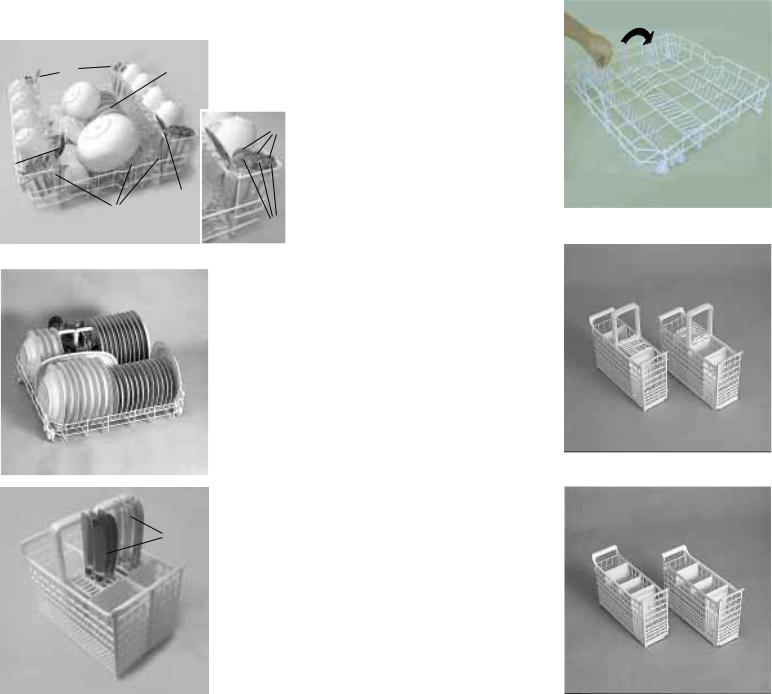
cesto posate privo di ribaltine centrali
Disporre le rimanenti posate avendo cura di non mettere più di due posate identiche per scomparto.
7
1  2
2
8
Attenzione (fig. 7)
Il cesto inferiore ha le due file anteriori di supporti che possono essere abbassate in
modo molto semplice e rapido, consentendo
di caricare più facilmente insalatiere, pentole e coperchi. (Solo nei modelli predisposti)
PER ABBASSARE I SUPPORTI PROCEDERE NEL SEGUENTE MODO :
1)Tirarli leggermente verso l’alto e lasciarli ricadere;
2)Per rialzarli basta riportarli in posizione verticale.
cesto posate (fig. 8)
Il cesto porta posate è formato da due parti divisibili, così da poter offrire diverse possibilità di carico.
La divisione in due del cestello avviene facendo scorrere in senso orizzontale le due
parti l'una rispetto all'altra e viceversa per il riaggancio.
Alcuni modelli sono provvisti del cesto porta posate privo di ribaltine centrali.
12 |
13 |
Lavaggio 1/2 carico cesto superiore |
(solo nei modelli predisposti) |
1
C D H B
E
F
I
L M G A
2
1/2 carico misto (fig. 1)
A= bicchieri
B= tazze
C= piatti fondi
D= piatti piani
E= piatti dessert
F= sottotazze
G= pentola
H= coperchio
I= padella
L= coppa media
M= coppa piccola
C B
D F
E H
I G A
1/2 carico standard (fig. 2)
A= 6 bicchieri
B= 5 + 1 tazze
C= piatto da portata
D= 6 piatti fondi
E= 6 piatti piani
F= 6 piatti dessert
G= 6 sottotazze
H= coppa media
I= coppa piccola
Le posate dovranno essere posizionate nel- l'apposito contenitore posto nel cesto inferiore.
Informazioni per laboratori di prova
Programma comparativo generale
(vedi tabella programmi di lavaggio)
Secondo le norme IEC 436: |
Secondo le norme EN 50242: |
|||
1) |
Posizione cesto superiore: bassa |
1) |
Posizione cesto superiore: bassa |
|
2) |
Carico normalizzato |
|
2) |
Carico normalizzato |
3) Posizione regolatore brillantante 3 |
3) Posizione regolatore brillantante 3 |
|||
4) |
Quantità di detersivo: |
4) |
Quantità di detersivo: |
|
|
– 5 gr per il |
prelavaggio |
|
– 30 gr per il lavaggio. |
|
– 25 gr per il lavaggio. |
|
|
|
Caricamento detersivo e brillantante
Caricare il detersivo
Utilizzare esclusivamente detersivi in polvere, liquidi o in pastiglie specifici per lavastoviglie.
Detersivi non idonei (come quelli per il lavaggio a mano), non contengono gli ingredienti adatti al lavaggio in lavastoviglie ed impediscono il corretto funzionamento della macchina.
Lavaggio normale
La vaschetta per il detersivo del lavaggio è situata all'interno della porta (fig. A "2"). Se il coperchio del contenitore risultasse chiuso,
per aprirlo basta agire sul pulsante di aggancio: al termine di un qualsiasi programma di lavaggio il coperchio risulta sempre aperto, pronto per il successivo impiego.
La dose di detersivo può variare in funzione del grado di sporco e del tipo di stoviglie. Si
consiglia di versare 20 ÷ 30 gr di detersivo nella vaschetta lavaggio (1).
Dopo aver versato il detersivo nel contenitore richiudete il coperchio.
Poichè i detersivi non sono tutti uguali, consultate anche le istruzioni sulle confezioni. Ricordiamo che quantità insufficienti di detersivo provocano una incompleta asportazione dello sporco, mentre un eccesso di detersivo, oltre a non migliorare i risultati di lavaggio, rappresenta uno spreco.
Non eccedere nell'uso di detersivo rappresenta un contributo al contenimento dell'inquinamento ambientale.
Lavaggio con ammollo (solo nei modelli predisposti) |
|
|
Nel caso si imposti il |
programma Intensivo, |
occorre aggiungere nella macchina una |
seconda dose di detersivo, circa 20 grammi (1 cucchiaio da tavola) nella vaschetta |
||
prelavaggio (2). Per il |
programma universale |
aggiungere 5 gr. Questa dose va |
messa direttamente nella vaschetta prelavaggio (2). |
|
|
14 |
15 |
|
4 |
Caricare il brillantante |
|
|
||||
|
Alla destra della vaschetta del detersivo si |
|||||||
|
|
|||||||
|
3 |
trova il contenitore dell'additivo per il risciac- |
||||||
|
quo, la cui capacità è circa 130 ml (Fig. A "3"). |
|||||||
|
|
Ruotare il tappo (3) in senso antiorario e ver- |
||||||
|
|
sare |
il |
liquido, |
che |
servirà |
per |
numerosi |
|
|
lavaggi, sino al livello max indicato. |
|
|||||
|
|
Richiudere il tappo. |
|
|
|
|||
|
|
Questo additivo, che viene immesso auto- |
||||||
|
|
maticamente nell'ultima fase di risciacquo, |
||||||
|
|
favorisce una rapida asciugatura delle stovi- |
||||||
|
|
glie evitando il formarsi di macchie e sedi- |
||||||
|
|
menti |
opachi. |
|
|
|
|
|
PIENO |
VUOTO |
Usare sempre additivi di risciacquo adatti a |
||||||
lavastoviglie automatiche. |
|
|
||||||
|
|
|
|
|||||
|
|
E' possibile controllare il livello del brillantan- |
||||||
|
|
te per mezzo del visualizzatore ottico posto |
||||||
|
|
al centro del distributore (4). |
|
|
||||
|
riflesso chiaro |
|
|
|
|
|
|
|
|
|
Regolazione |
|
|
|
|
||
|
|
del brillantante da 1 a 6 |
|
|
||||
|
3 |
Il regolatore è |
posto |
sotto il |
tappo |
(3) e si |
||
|
può ruotare con una moneta. La posizione |
|||||||
|
|
|||||||
|
|
consigliata è 3. |
|
|
|
|
||
|
|
Il contenuto in calcare dell'acqua influenza |
||||||
|
|
notevolmente sia la presenza di incrostazio- |
||||||
|
|
ni che il grado di asciugatura. |
|
|
||||
|
|
E' perciò importante regolare il dosaggio del |
||||||
|
|
brillantante per ottenere prestazioni sempre |
||||||
|
|
ottimali. |
|
|
|
|
|
|
|
|
Nel caso le stoviglie presentino delle striatu- |
||||||
|
|
re al termine del lavaggio, diminuire la rego- |
||||||
|
|
lazione di una posizione. Nel caso le stovi- |
||||||
|
|
glie presentino macchie o aloni biancastri |
||||||
|
|
aumentare |
la regolazione |
di una posizione. |
||||
Pulizia dei filtri
1
2
3
Il sistema filtrante (fig. A "4") è costituito da: Bicchierino centrale, che trattiene le particelle più grosse di sporco.
Piastra , che filtra continuamente l'acqua di lavaggio.
Microfiltro , posto sotto la piastra, che trattiene anche le particelle di sporco più picco-
le assicurando un'ottimo risciacquo.
Per ottenere sempre ottimi risultati è necessario ispezionare e pulire i filtri prima di ogni lavaggio.
Per estrarre il gruppo dei filtri, basta impugnare il manico e ruotarlo in senso antiorario (fig. 1).
Il bicchierino centrale è asportabile, per facilitare le operazioni di pulizia (fig. 2). Rimuovere la piastra filtro (fig. 3) e lavare il
tutto sotto |
un getto di acqua ed eventual- |
|
|||
mente aiutandosi con uno spazzolino. |
|
||||
Con il |
Microfiltro Autopulente |
, la manuten- |
|||
zione è ridotta e l'ispezione del gruppo filtri |
|||||
può essere effettuata ogni 15 giorni. Tuttavia |
|
||||
è consigliabile controllare dopo ogni lavag- |
|
||||
gio che il bicchierino centrale e la piastra non |
|
||||
siano intasati. |
|
|
|
||
Attenzione: dopo aver pulito i filtri, assi- |
|||||
curarsi |
che |
siano |
fissati |
correttamente |
|
tra loro e che la piastra sia inserita per- |
|
||||
fettamente sul fondo della lavastoviglie. |
|
||||
Avere cura di riavvitare, in senso orario, il |
|
||||
filtro nella piastra perchè un inserimento |
|
||||
impreciso del gruppo filtrante può pre- |
|
||||
giudicare il funzionamento della macchi- |
|
||||
na. |
|
|
|
|
|
Importante: |
non |
usare la |
lavastoviglie |
|
|
senza filtri.
16 |
17 |
Consigli pratici
Scelta del programma
Questa lavastoviglie vi offre un'ampia gamma di programmi di lavaggio che si adattano alle varie esigenze di sporco e stoviglie da trattare.
Consultare "L'ELENCO PROGRAMMI" allegato per la scelta del programma più adatto.
Suggerimenti al termine del programma
Per evitare eventuali sgocciolamenti dal cestello superiore, estrarre prima il cestello inferiore. Se le stoviglie vengono lasciate per qualche tempo nella macchina, aprire leggermente lo sportello, per favorire la circolazione d'aria e migliorare ulteriormente l'asciugatura.
Consigli utili per RISPARMIARE
1)Nel caso si volesse lavare a pieno carico, riponete le stoviglie nella macchina appena terminati i pasti sistemandole in più riprese, effettuando eventualmente il programma PRELAVAGGIO A FREDDO per ammorbidire lo sporco ed eliminare i residui più grossi tra un carico e l'altro in attesa di eseguire il programma di lavaggio completo.
2)In presenza di sporchi poco consistenti o cesti non molto carichi selezionate un programma ECONOMICO seguendo le indicazioni riportate nell'elenco programmi.
Consigli per ottenere ottimi RISULTATI di lavaggio
1)Sistemare le stoviglie con l'apertura rivolta verso il basso.
2)Se possibile evitare che le stoviglie stiano a contatto tra di loro, una corretta sistemazione vi darà migliori risultati di lavaggio.
3)Prima di disporre le stoviglie nella macchina, asportare i residui di cibo (ossicini, lische, avanzi di carne o verdure, residui di caffè, bucce di frutta, cenere di sigaretta ecc.) che potrebbero otturare lo scarico e gli spruzzatori dei bracci lavanti.
4)Dopo aver sistemato le stoviglie, verificare che i bracci lavanti possano girare liberamente.
5)Pentole ed altre stoviglie che presentano residui di cibo molto tenaci o bruciacchiati, dovranno essere messe in ammollo con acqua e detersivo per lavastoviglie.
6)Per il perfetto lavaggio di argenteria è necessario:
a) sciacquarla appena dopo l'uso, sopratutto se è stata impiegata per maionese, uova, pesce, ecc.
b)non cospargerla con detersivo
c)non metterla a contatto con altri metalli
Cosa FARE se
1) Nel caso si debba fermare la macchina ed aprire lo sportello per introdurre altre stoviglie da lavare quando l'apparecchio è nella fase centrale di lavaggio, effettuare l'apertura solo dopo aver disinserito il tasto O/I.
Dopo la chiusura dello sportello, attendere 3 minuti prima di far ripartire la macchina.
Cosa non lavare se
È bene inoltre ricordare che non tutte le stoviglie sono adatte per essere impiegate nella lavastoviglie; evitare di utilizzare pezzi in materiale termoplastico, posate con manici di legno o di plastica, pentole con manici di legno, stoviglie in alluminio, di cristallo o vetro piombato se non specificatamente indicato.
Certe decorazioni possono tendere a sbiadire, pertanto si consiglia di effettuare più
volte il lavaggio |
in macchina di |
un sol pezzo e solo dopo essere certi che non si |
scolori inserire il |
carico totale. |
|
È inoltre consigliabile non lavare posate in argento con posate in acciaio ossidabile per evitare che si verifichi una reazione chimica tra esse.
IMPORTANTE
Quando si |
acquistano nuove stoviglie accertarsi sempre che siano idonee al |
lavaggio in |
lavastoviglie. |
Pulizia e manutenzione ordinaria
La carrozzeria esterna può essere pulita con apposito prodotto per superfici smalta- |
|
|||
te, purchè non abrasivo. |
|
|
|
|
La lavastoviglie non richiede alcuna manutenzione speciale, poichè la vasca |
di |
|||
lavaggio è autopulente. Pulire regolarmente la guarnizione in gomma dello sportello |
||||
con un panno umido, eliminando accuratamente |
eventuali |
tracce di cibo, o |
brillan- |
|
tante. |
|
|
|
|
Per meglio garantire la rimozione di piccoli depositi di calcare o di sporco, si consi- |
||||
glia, periodicamente, di eseguire un lavaggio completo versando preventivamente 1 |
|
|||
bicchiere di aceto sul fondo della macchina ed impostare il programma delicato. |
|
|||
Se malgrado la normale pulizia dei filtri si |
notano stoviglie o pentole |
insufficiente- |
||
mente lavate o sciacquate, controllare che |
tutti gli |
spruzzatori dei |
bracci |
lavanti |
(fig. A "5") siano liberi da residui di sporco. |
|
|
|
|
Se ciò non fosse, procedere alla loro pulizia nel seguente modo: |
|
|
||
Per togliere quello superiore è necessario ruotare il braccio lavante fino a portare in |
|
|
posizione il fermo contrassegnato dalla freccia (fig. 1b). Spingerlo verso l'alto e man- |
|
|
tenendolo premuto svitare in senso orario (fig. 1) |
(per rimontarlo |
ripetere l'opera- |
zione ma ruotare in senso antiorario) |
, mentre quello inferiore si |
estrae tirandolo |
semplicemente verso l'alto (fig. 2). |
|
|
-Lavare i bracci rotanti sotto un getto d'acqua liberando dallo sporco gli spruzzatori otturati.
-Al termine dell'operazione rimettere i bracci lavanti nella identica posizione ricordando per quello superiore di portare in posizione il fermo e di avvitare a fondo.
1 |
1b |
|
2 |
|
|
|
|
18 |
19 |
La resistenza per il riscaldamento dell'acqua è realizzata con uno speciale acciaio inossidabile. Dopo qualche tempo può assumere una diversa colorazione che non influisce affatto sulle sue prestazioni e sulla sua durata trattandosi unicamente di una normale reazione del metallo (nelle macchine con resistenza all'interno della vasca).
Sia la vasca che l'interno dello sportello sono d'acciaio inossidabile. Se tuttavia dovessero riscontrarsi formazioni di macchie di ossido, ciò dovrà essere imputato
solo ad una forte presenza di sali di ferro nell'acqua.
Per togliere le macchie si consiglia l'uso di abrasivo a grana sottile; non usare mai sostanze al cloro, pagliette d'acciaio, ecc.
DOPO L'USO
Dopo ogni lavaggio chiudere il rubinetto dell'acqua, per isolare la lavastoviglie dalla rete idrica di alimentazione e disinserire il tasto di avvio-arresto per isolare la macchina dalla rete elettrica.
Se la macchina deve rimanere ferma a lungo, consigliamo le seguenti operazioni.
1.eseguire un programma di lavaggio senza stoviglie ma con detersivo per sgrassare la macchina.
2.togliere la spina.
3.chiudere il rubinetto dell'acqua.
4.riempire il contenitore del brillantante per risciacqui.
5.lasciare la porta leggermente aperta.
6.lasciare l'interno della macchina pulito.
7.se la macchina viene lasciata in ambienti dove la temperatura è inferiore a 0°C, l'acqua residua nelle condutture può gelare.
Assicurarsi perciò |
che la temperatura sia sopra gli 0°C ed attendere circa 24 ore |
prima di attivare la |
macchina. |
Ricerca piccoli guasti
Attenzione! |
|
Prima di togliere qualsiasi pannello: |
1. Posizionare la manopola in STOP. |
|
2. Staccare la spina. |
Se la Vostra lavastoviglie non funzionasse, prima di chiamare il Servizio Assistenza, fare i seguenti controlli:
|
ANOMALIA |
CAUSA |
RIMEDIO |
|
|
|
Spina corrente elettrica non inserita |
Inserire spina |
|
|
|
nella presa |
|
|
|
|
|
|
|
1 - Non funziona con qualsiasi |
Tasto O/I non inserito |
Inserire tasto |
||
|
|
|||
|
programma |
Sportello aperto |
Chiudere sportello |
|
|
|
|||
|
|
|
|
|
|
|
Manca energia elettrica |
Controllare |
|
|
|
|
|
|
|
|
Vedi cause 1 |
Controllare |
|
|
|
|
|
|
|
|
E’ chiuso il rubinetto acqua |
Aprire il rubinetto acqua |
|
|
|
|
|
|
|
|
Programmatore non |
Posizionare correttamente il pro- |
|
2 - Non carica acqua |
correttamente posizionato |
grammatore |
||
|
|
|||
|
|
Il tubo di carico è piegato |
Eliminate le pieghe del tubo |
|
|
|
|
|
|
|
|
Il filtrino del tubo di carico acqua è |
Pulite il filtrino posto |
|
|
|
intasato |
all’estremità del tubo di carico |
|
|
|
|
|
|
|
|
Filtro sporco |
Pulire filtro |
|
|
|
|
|
|
|
|
Tubo di scarico piegato |
Raddrizzare tubo di scarico |
|
|
|
|
|
|
3 - |
Non scarica acqua |
La prolunga del tubo di scarico non |
Seguite esattamente le |
|
è corretta |
istruzioni per il collegamento |
|||
|
|
|||
|
|
|
del tubo di scarico |
|
|
|
|
|
|
|
|
Lo scarico a muro non ha |
Consultate un tecnico |
|
|
|
lo sfiato in aria |
qualificato |
|
|
|
|
|
|
4 - |
Scarica acqua in continuazione |
Tubo di scarico in posizione troppo |
Alzare il tubo di scarico ad almeno |
|
bassa |
40 cm dal pavimento |
|||
|
|
|||
|
|
|
|
|
|
|
Eccessivo dosaggio di detersivo |
Ridurre dose detersivo. |
|
|
|
|
Utilizzare detersivo specifico |
|
|
|
|
|
|
5 - Se non si sentono ruotare |
Oggetto del carico che impedisce la |
Controllare |
||
rotazione dei bracci |
|
|||
|
i bracci di lavaggio |
|
|
|
|
Piastra filtrante e filtro |
Pulire piastra e filtro |
||
|
|
|||
|
|
eccessivamente sporchi |
|
|
|
|
|
|
|
6 - |
Nelle macchine elettroniche |
Rubinetto dell'acqua chiuso |
Spegnere la macchina. |
|
|
senza visualizzatore spia: "eco" |
|
Aprire il rubinetto. |
|
|
e spia "N°1" lampeggianti con |
|
Reimpostare il ciclo. |
|
|
segnale acustico |
|
|
|
|
|
|
|
|
7 - |
Nelle macchine elettroniche |
Rubinetto dell'acqua chiuso |
Spegnere la macchina. |
|
|
con visualizzatore: "comparsa |
|
Aprire il rubinetto. |
|
|
E1" sul visualizzatore con |
|
Reimpostare il ciclo. |
|
|
segnale acustico |
|
|
|
|
|
|
|
|
20 |
21 |
|
ANOMALIA |
CAUSA |
RIMEDIO |
|
|
Vedi cause 5 |
Controllare |
|
|
|
|
|
|
Fondo di pentole non |
Croste troppo tenaci, da ammorbidire |
|
|
perfettamente lavato |
prima del lavaggio in lavastoviglie |
|
|
|
|
|
|
Bordo di pentole non |
Posizionare meglio la pentola |
|
|
perfettamente lavato |
|
|
|
|
|
|
|
Spruzzatori parzialmente otturati |
Smontare i bracci di lavaggio, |
|
|
|
svitando le ghiere di fissaggio in |
|
|
|
senso orario e lavare il tutto sotto un |
|
|
|
getto d’acqua |
|
|
|
|
|
|
Le stoviglie non sono sistemate bene |
Non addossate troppo le |
|
|
|
stoviglie tra di loro |
|
|
|
|
8 - |
Se il carico viene |
L’estremità del tubo di scarico è |
L’estremità del tubo di scarico non |
|
parzialmente lavato |
immersa nell’acqua |
deve toccare l’acqua scaricata |
|
|
|
|
|
|
Il detersivo non è dosato |
Aumentate la dose in funzione della |
|
|
adeguatamente, è vecchio o |
quantità di sporco o sostituite il |
|
|
indurito |
prodotto |
|
|
|
|
|
|
Il tappo del contenitore sale non è |
Avvitatelo fino in fondo |
|
|
chiuso bene |
|
|
|
|
|
|
|
Il programma di lavaggio scelto è |
Scegliete un programma più |
|
|
troppo blando |
energico |
|
|
|
|
|
|
Stoviglie cesto inferiore non lavate |
Disinserire tasto mezzo carico |
|
|
|
|
|
|
Acqua di rete con eccessiva durezza |
Controllare il livello del sale e del |
9 - |
Presenza di macchie |
|
brillantante e regolarne il dosaggio. |
|
bianche sulle stoviglie |
|
Se l’anomalia persiste, richiedere |
|
|
|
intervento Assistenza Tecnica |
|
|
|
|
10 - |
Rumorosità durante |
Le stoviglie sbattono tra di loro |
Sistematele meglio nei cesti |
|
|
||
|
il lavaggio |
I bracci rotanti sbattono sulle stoviglie |
Sistemate meglio le stoviglie |
|
|
||
|
|
|
|
11 - |
Le stoviglie non sono |
Mancanza di circolazione d’aria |
Lasciate socchiusa la porta della |
|
macchina alla fine del |
||
|
perfettamente asciutte |
|
|
|
|
programma di lavaggio per |
|
|
|
|
favorire l’asciugatura naturale |
|
|
|
|
NOTA BENE: Qualora un inconveniente sopracitato provocasse un cattivo lavaggio o una insufficiente sciacquatura è necessario rimuovere manualmente lo sporco dalle stoviglie in quanto la fase finale di asciugatura provoca l’essicazione dello sporco che un secondo lavaggio in macchina non è in grado di asportare.
Se il malfunzionamento dovesse persistere si rivolga al Centro di Assistenza Tecnica comunicando il modello di lavastoviglie, riportato sulla targhetta posta all’interno dello sportello nella parte superiore o sul foglio di garanzia. Fornendo tali informazioni otterrete un intervento più tempestivo ed efficace.
SERVIZIO ASSISTENZA TECNICA
199. 123. 123
La Ditta costruttrice declina ogni responsabilità per eventuali errori di stampa contenuti nel presente libretto. Si riserva inoltre il diritto di apportare le modifiche che si renderanno utili ai propri prodotti senza comprometterne le caratteristiche essenziali.
Contents
Safety advice |
page |
24 |
Setting up, installation |
page |
25 |
Opening the door |
page |
28 |
Water softener unit |
page |
29 |
Adjusting the upper basket |
page |
31 |
Loading the dishes |
page |
32 |
Half load washing |
page |
36 |
Information for test laboratories |
page |
37 |
Loading the detergent and rinse aid |
page |
37 |
Cleaning the filters |
page |
39 |
Some practical hints |
page |
40 |
Routine cleaning and maintenance |
page |
41 |
Identifying minor faults |
page |
43 |
Fig. A
5
1
4
2 |
|
3 |
|
22 |
23 |
Safety Instructions
Please read the instructions in this booklet carefully because they contain important information on how to install, use and maintain your dishwasher safely as well as containing useful tips on how to make the most of it.
Keep this booklet safe for future reference.
There are certain basic safety rules which are valid for any domestic appliance. They are the following:
-never touch the appliance when your hands or feet are wet or damp
-do not use when your feet are bare
-do not remove the plug from the mains supply socket by pulling the mains cable or the machine itself
- do not leave the appliance exposed to the elements (rain, sun etc)
-do not let children (or others incapable of operating it) use the machine without supervision
-make sure that the plug fitted to the machine is compatible with the power supply socket. If it is not, get a suitably qualified person to fit the correct type, and to make sure that the cables to the mains socket are able to cope with the power rating of
the appliance
-ensure that the dishwasher does not crush power cables
-if there is a water softening device installed in the home there is no need to add
salt to the water softener fitted in the dishwasher
- the dishwasher is designed for normal kitchen utensils.
Objects that have been contamined by petrol, paint, traces of steel or iron, corrosive chemicals, acids or alkalis must not be washed in the dishwasher
-if you wish to dispose of an old dishwasher be careful to remove the door to eliminate the risk of children becoming trapped inside it
-the dishwasher has been made from materials which can be recycled so that it can
|
be disposed of in an environmentally friendly way |
|
|
|
|
- |
in general it is not advisable to use adaptors, |
multiple |
plugs |
and/or |
extension |
|
cables |
|
|
|
|
- |
Water left in the machine or on the dishes at |
the end of |
the |
wash |
programme |
|
should not be swallowed. |
|
|
|
|
- |
Leaning or sitting on the open door of the dishwasher could cause it to tip over. |
||||
-Cutlery is washed best if it is placed in the basket with the handles downwards; however, to avoid any injury from blades or sharp points, it can be placed with the handles upwards.
-Should it be necessary to replace the supply cord, call the Service Department.
-This appliance is be designed for domestic use only.
If the appliance breaks down or stops working properly, switch it off, turn off the water supply and do not tamper with it. Repair work should only be carried out by an approved service agent and only genuine spare parts should be fitted. Any failure to
follow the above advice may have serious consequences for the safety of the appliance.
INSTALLATION (Technical notes)
After unpacking, adjust the height of the dishwasher.
For the dishwasher to work correctly it must be level. Adjust the feet so that the machine does not tilt by more
than 2 degrees. If it you need to move the machine after removing the packaging, do not try to lift it by the bottom of the door. Follow the instructions in figure. Open the door slightly and lift the machine by holding on the top.
Important: when the appliance is located on a carpet floor, attention must be paid to ensure that there is no obstruction to the bottom vents.
Make sure that the plug on the appliance remains accessible after installation.
This appliance complies with Directives 89/336/EEC, 73/23/EEC and following changes.
Electrical connection
This appliance complies with all the international safety standards and is fitted with a 3 pin plug with earth connection to ensure complete earthing of the product.
In the absence of adequate earthing you will notice that when touching the metal parts of your appliance an electrical dispersion can be felt due to the presence of a radio interference suppressor.
Before connecting the appliance to the mains supply it is important to ensure:
–That the supply socket is properly earthed.
–That your electricity supply is capable of meeting the consumption requirements listed on the rating plate of your appliance.
Important: manufacturer declines all responsibility for any damages due to nonearthing of the machine.
24 |
25 |

For U.K. only
Plug your dishwasher into the power socket. If the plug we supply does not fit
• CUT IT OFF AND DESTROY IT!
You can't use it on other appliances, and the exposed wires could be dangerous if anyone plugged it in.
• Fit a suitable plug, as follows:
Connect |
to the terminal in the plug |
green and yellow wire |
marked with the letter E, |
|
OR marked with the Earth symbol, |
|
OR coloured green, |
|
OR coloured green and yellow. |
blue wire |
marked N |
|
OR coloured black. |
brown wire |
marked L |
|
OR coloured red. |
|
|
"WARNING"
THIS APPLIANCE MUST BE EARTHED
Fuses and plugs
This appliance should be used only on a socket with a minimum rating of 13 Amp.
Our ready-fitted plug is already equipped
with a 13 amp fuse which is BS 1362 ASTA approved. Any replacement should be exactly the same.
If the fuse cover is lost, do not use the plug until it is replaced. A correct replacement fuse cover (obtainable from your dealer
or Electricity Board) |
must |
be |
the same colour as shown or |
named on the insert on the |
base |
of |
the plug. |
Water connection
The inlet and drain hoses can be directed to left or right.
The dishwasher can be connected to either cold or hot water, as long as it is no hotter than 60 °C.
Water pressure must be between 0,08 MPa and 0,8 MPa. If the pressure is below the minimum consult our service department for advice.
The inlet hose must be connected to a tap so that the water supply can be cut off when the machine is not in use (fig.1 B).
The dishwasher is fitted with 3/4" threaded connector (fig. 2).
Connect inlet hose |
A to water tap |
B with a 3/4" attachment making sure that it has |
||
been properly tightened. |
|
|
|
|
If |
it is necessary to lengthen the inlet pipe, an extension pipe can be fitted. |
|||
If |
limescale deposits or sand are present |
in the water, it is advisable to obtain the |
||
appropriate filter, art. 9226085, from |
the Service Centre (fig. 3). |
|||
The filter |
D |
must be inserted between the tap |
B and the inlet hose |
A , remembering |
to fit the washer |
C. |
|
|
|
If the dishwasher is connected to new pipes or to pipes which have not been in use for a long time run water through for a few minutes before connecting the inlet hose. In this way no deposits of sand or rust will clog up the water inflow filter.
1 |
2 |
3 |
Connecting the outlet hose
The outlet hose should disharge into a standpipe, making sure that there are no kinks (fig. 4).
The standpipe must be at least 40 cm above floor level and it must have an internal diameter of at least 4 cm. It is advisable to fit an anti-odour air trap (fig. 4 x).
If necessary the outlet hose can be extended up to 2,6 m, provided that it is kept at a maximum height of 85 cm above floor level.
The hose can be hooked over the side of the sink (it must not be immersed in water, in order to prevent water from being syphoned back to the machine when this is in operation) (fig. 4 y).
When installing the appliance under a worktop the hose pipe clamp must be attached to the wall in the highest possible position under the worktop (fig. 4 z). Check that there are no kinks in the inlet and outlet hoses.
4
26 |
27 |

Installation in fitted kitchens
Fitting between existing cabinets
The height of the dishwasher, 85 cm, has been designed in order to allow the machine
to be fitted between existing cabinets of the same height in modern fitted kitchens. The feet can be adjusted so that correct height is reached.
The laminated top of the machine does not require any particular care since it is heatproof, scratchproof and stainproof (fig. 5).
The work top can be easily adjusted to line it with the top of existing cabinets; this is done by moving it by 5 mm each time up to a maximum of 25 mm.
To adjust it, unscrew the two screws at the back and fix the top in the position required (fig. 6).
Underneath existing work top (when fitting beneath a work top)
In most modern fitted kitchens there is only one single work top under which cabinets and electrical appliances are fitted.
In this case remove the work top of the dishwasher by unscrewing the screws under
the rear edge of the top (fig. 6). |
|
|
|
The height will then be reduced to 82 cm, |
as scheduled by the International |
||
Regulations (ISO) and the dishwasher will fit perfectly under the kitchen working top |
|||
(fig. 7). |
|
|
|
Fitting panels (some models only) |
|
|
|
The frames around the door, allow decorative panels to be fitted, up to 5 mm thick, |
|||
and with the following dimensions: |
|
|
|
width 591 mm |
± 1 |
height |
597 mm ± 1 |
5 |
6 |
|
7 |
598
556/573
Opening the door
Put your hand into the recess and push upwards.
If the machine comes open while it is working, an electrical safety device automatically switches everything off.
For the machine to work properly, the door should not be opened while it is in operation.
Closing the door
Place the baskets in the machine.
Make sure that both the spray arms are free to rotate and are not obstructed by cutlery, crockery or pans. Close the door, pressing on it to make sure it is firmly shut.
Water softener unit
Depending on the source of the supply, water contains varying amounts of limestone and minerals which are deposited on the dishes leaving whitish stains and marks. The higher the level of these minerals present in the water, the harder the water is.
The dishwasher is fitted with a water softener unit which, through the use of special regenerating salt, supplies softened water for washing the dishes. The softener unit can treat water with a hardness of up to 60°fH (French grading) or 33°dH (German grading) through five different settings.
The degree of hardness of your water can be obtained from your water supply company.
Regulating the water softener
The table below lists different degrees of water hardness with the corresponding |
|
|
setting |
||||||
for the softener unit. |
|
|
|
|
|
|
|
||
|
|
|
|
|
|
|
|
|
|
|
Level |
Water |
Water |
|
|
|
|
|
|
|
|
|
hardness |
hardness |
Use of |
Water |
|
N° |
|
|
|
|
°fH |
°dH |
regenerating |
softener |
|
of |
|
|
|
|
salt |
setting |
|
washes |
|
||
|
|
|
(french) |
(German) |
|
|
|||
|
|
|
|
|
|
|
|
||
|
|
|
|
|
|
|
|
|
|
|
0 |
|
0-9 |
0-5 |
NO |
FREE |
|
|
|
|
1 |
|
10-30 |
6-16 |
YES |
position |
N.1 |
50 |
|
|
*2 |
|
31-40 |
17-22 |
YES |
position |
N.2 |
40 |
|
|
3 |
|
41-50 |
23-27 |
YES |
position |
N.3 |
30 |
|
|
4 |
|
51-60 |
28-33 |
YES |
position |
N.4 |
20 |
|
-*The water softener unit is set in the factory at level 2, as this is suitable for the majority
of users. |
TYPE 1 |
If your water is at level 0, you need not use |
|
any regenerating salt, nor need you make |
|
any adjustment, as your water is soft. |
|
According to the degree of hardness of |
|
your water, regulate the softener unit in the |
|
following way: |
|
- remove the lower rack. Unscrew and remove |
|
the cap from the salt dispenser located in |
TYPE 2 |
the bottom of the tub (Fig. A “1”); |
-Turn the selector screw to the required position with a screwdriver or a knife.
N.B.: For models fitted with electronic programmer refer to the programme list enclosed.
28 |
29 |

Loading the salt
The dishwasher is fitted with a softener which clears the water of lime which could cause scale
and damage the dishwasher.
On the bottom of the machine there is a container for the salt for regenerating the softener.
The filter medium of the softening plant must be reactivated with dishwasher water softener regenerating salt.
Other types of salt contain small quantities of insoluble particles which over a long period of time may affect and deteriorate the softener performance.
To add salt, unscrew the cap of the container on the bottom and then refill the container.
During this operation a little water will overflow; but keep adding salt until the container is full. When the container is full, clean the thread of salt residue and retighten the tap.
If the dishwasher is not required straightaway, set the Prewash programme so that the salt solution which has overflowed is discharged from the washing tank.
The salt dispenser has a capacity of between 1.5 and 1.8 kg and, for efficient use of the appliance, it should be refilled from time to time according to the regulation of the water softener unit.
Important: it is necessary to add water until the container overflows. Only install the dishwasher after completely filling the salt container.
Salt loading indicator
Some models are provided with an indicator light which signals salt consumption. The signal will appear according to one of two systems:
|
|
– an indicator light on the control |
panel |
which |
|
|
will light up when it is necessary to reload the |
||
|
|
salt container; |
|
|
|
|
– the salt container cap with a green mobile light |
||
|
|
which remains visible as long |
as |
there is |
|
|
enough salt for regeneration purposes. When |
||
|
|
the green surface is depressed inside the cap, |
||
|
|
more salt must be loaded. |
|
|
|
|
|
|
|
Other models are provided with a blind cap. In this case, the salt level must be |
|
|
||
checked periodically, according to the regulation of the water softener unit. |
|
|
||
Important: |
the appearance of white stains on dishes is generally an important sign |
|
|
|
that the salt container needs filling. |
|
|
||
|
30 |
|
|
|
Adjustment of the upper basket |
(some models only) |
If 27 cm to 31 cm plates are normally used, load them onto the lower basket after the upper basket has been placed in its upper position and proceed as detailed below (According to the models):
Type “A”:
1) |
Turn the front stops |
A |
outwards; |
2) |
Take out the basket and remount it in the upper position; |
||
3) Replace the blocks |
A |
in their original position. |
|
Dishes that are bigger than |
20 cm in diameter can no longer be loaded onto the |
||
upper basket and the mobile |
supports cannot be used when the basket is in the |
||
upper position. |
|
|
|
A |
Type “B”:
A |
1)Pull out the upper basket;
2)Then grasp the basket from both sides and lift it upwards (fig. 1).
Dishes that are bigger than 20 cm in diameter can |
no longer be loaded onto the |
|
upper |
basket and the mobile supports cannot be used |
when the basket is in the |
upper |
position. |
|
ADJUST BASKET TO THE LOWER POSITION:
1)Grasp the basket from both sides and lift slightly upwards (fig. 2a);
2)Then slowly release into the correct position (fig. 2b) .
N. B. : NEVER LIFT OR LOWER THE BASKET BY ONE SIDE ONLY (fig.3).
Attention :
It is advisable to adjust the basket before loading the dishes.
1 |
2 |
a |
b |
a |
b |
31 |
3 |
Loading dishes
To load dishes
For good wash performance remove any debris from the dishes (bones, tooth picks, the remains of meat and vegetables) to avoid blocking the filters, water outlet and washing arm nozzles and, as a result, reducing washing efficiency.
Try not to rinse the dishes before loading them into the dishwasher.
If saucepans and oven dishes are encrusted with the remains of burnt or roast food, it is advisable to leave them to soak before washing.
Using the upper basket
The upper basket is provided with mobile racks hooked to the sides of the basket which can be regulated in two positions: upright and lowered. In the lowered position the racks may be used for tea and coffee cups, kitchen knives and ladles. Glasses with stems may be safely hung on the ends of the racks.
Glasses, cups, saucers and dessert plates may be loaded under the racks.
Soup plates and ordinary plates may be loaded with the rack in the upright position.
Plates should be loaded vertically with the underside of the plate towards the back of the dishwasher with a space between each plate to allow water to pass freely.
It is advisable to load plates of the same size together in order to utilize maximum basket capacity.
Plates may be loaded in a single row (Fig. 1) or on both rows (Fig. 2).
It is advisable to load large plates (approx. 27 or more cm) slightly tilted towards the rear to facilitate introduction of the basket into the machine.
Salad bowls and plastic bowls may also be loaded on the upper basket. It is advisable to block these in place so that the jets of water do not make them overturn.
The upper basket has been designed to offer maximum flexibility in use and can be loaded with up to 24 plates on two rows, up to 30 glasses on five rows or a mixed load.
Using the lower basket
Saucepans, oven dishes, tureens, salad bowls, lids, serving dishes, dinner plates, soup plates and ladles can be loaded on the lower basket.
Place the cutlery in the plastic cutlery holder with the handles pointing upwards. Place the cutlery holder on the lower basket (fig. 3), making sure that the cutlery does not get in the way of the rotating arms.
1
E
A C
B D
F
2
B
A
C
D
H G E F
3
D F A G
E
B
C
A standard daily load is represented in Figs. 1, 2 and 3.
Upper basket (Fig. 1)
A= soup plates
B= dinner plates
C= dessert plates
D= saucers
E= cups
F= glasses
Upper basket (Fig. 2)
A= soup plates
B= dinner plates
C= dessert plates
D= saucers
E= cups
F= glasses with stems
G= glasses
H= single section cutlery basket
Lower basket (Fig. 3)
A= medium-sized saucepan
B= large saucepan
C= frying pan
D= lids
E= tureens, serving dishes
F= cutlery
G= oven dishes
Please load the dishwasher sensibly to ensure the best wash results.
32 |
33 |
12 international place load (Ref. I.E.C. 436 - EN 50242).
Correct loading for the upper basket is indicated in Fig. 4 and for the lower basket in Fig. 5. Fig. 6 cutlery basket.
4 |
|
G |
|
B |
|
|
|
|
|
|
|
Upper basket (Fig. 4) |
|||
|
|
E |
|
|
|
||
|
C |
|
C |
|
A |
= 5 + 5 + 2 glasses |
|
|
D |
|
I |
||||
|
F |
B = 12 saucers |
|||||
|
|
|
|
|
C = 4 + 4 + 4 cups |
||
H |
|
C |
|
|
|
D |
= small bowl |
|
|
|
|
E |
= medium bowl |
||
|
|
|
|
|
|
||
|
|
|
|
H |
|
F |
= large bowl |
|
|
|
A |
|
G |
= 1 + 1 forks |
|
|
|
|
|
L |
H |
= 1 + 1 serving spoons |
|
|
|
|
|
|
I |
= 3 + 3 + 3 + 3 dessert spoons |
|
|
|
|
|
|
|
|
|
L = 3 + 3 + 3 + 3 teaspoons |
5 |
Q |
|
|
N |
Lower basket (Fig. 5) |
|||
|
|
M |
= 8 + 4 soup plates |
|||||
|
|
|
|
|
|
|
N |
= 11 + 1 dinner plates |
|
M |
|
N |
|
O |
= 12 dessert plates |
||
|
|
|
P |
= serving dish |
||||
|
|
|
Q = cutlery |
|||||
|
|
M |
P |
|
|
|
||
|
|
O |
|
|
|
Cutlery basket (fig. 6) |
||
|
|
|
|
|
||||
|
|
|
|
|
||||
|
|
|
|
|||||
|
|
|
|
|
|
|
||
6 |
|
|
|
|
|
|
Place the side racks in the lower position |
|
|
|
|
|
|
|
|
and fill with 6 + 6 knives(R); in the spaces |
|
R |
left insert cutlery with the handles down. |
|
|
|
Take care not to load more than two different |
|
types of cutlery in the same compartment. |
|
Cutlery basket without side racks |
|
Insert the remaining cutlery, taking care not |
|
to load more than two different types of |
|
cutlery in the same compartment. |
7
1  2
2
8
Important (fig. 7)
The lower basket has two rows of racks at the front that can be lowered in a very simple
and rapid way to allow easier loading of salad bowls, saucepans and lids.
(Some models only)
TO LOWER THE RACKS :
1)Lift the racks slightly upward and let them drop to the correct position;
2) Lifting |
again is |
enough them to bring |
them to |
a vertical |
position. |
Cutlery basket (fig. 8) |
|
The cutlery basket is made with two |
deta- |
chable parts which will enable various loa- |
|
ding options. |
|
The two parts can be detached by sliding the |
|
left section away from the right section. |
|
On some models the cutlery basket does not have central dividers.
34 |
35 |

Half load wash upper basket |
(some models only) |
1
C D H B
E
F
I
L M G A
2
1/2 mixed load (fig. 1)
A= glasses
B= cups
C= soup plates
D= dinner plates
E= dessert plates
F= saucers
G= saucepan
H= lid
I= Irying pan
L= medium bowl
M= small bowl
C B
D F
E H
I G A
1/2 load standard (fig. 2)
A= 6 glasses
B= 5 + 1 cups
C= serving dish
D= 6 soup plates
E= 6 dinner plates
F= 6 dessert plates
G= 6 saucers
H= medium bowl
I= small bowl
Place the cutlery in the plastic cutlery holder on the lower basket.
Information for the test laboratories.
General programme comparison
(see programmes selection)
Ref. IEC 436 Standards: |
Ref. EN 50242 Standards: |
||||
1) |
Upper basket position: low |
1) |
Upper basket position: low |
||
2) |
Normal load |
|
2) |
Normal load |
|
3) Shine setting: 3 |
|
3) Shine setting: 3 |
|||
4) |
Amount of detergent: |
|
4) |
Amount of detergent: |
|
|
– |
5 gr for pre- |
wash |
|
– 30 gr for wash. |
|
– |
25 gr for wash. |
|
|
|
Loading the detergent and the rinse aid.
Filling the detergent container
It is essential to use a detergent that is specifically designed for dishwashers either in powder, liquid or tablet form.
Unsuitable detergents (like those for washing up by hand) do not contain the proper ingredients for use in a dishwasher and stop the dishwasher from working correctly.
Normal wash |
|
The detergent container is inside the |
door |
(fig. A “2”). If the lid of the container is closed |
|
press the button to open. |
|
At the end of every wash cycle the lid is |
|
always open and ready for the next time the |
|
dishwasher is used. |
|
The amount of detergent to be used varies |
|
according to how dirty the dishes are and on |
|
the type of dishes to be washed. |
|
We advise using 20-30 gr of detergent in the |
|
wash section of detergent compartment (1). |
|
After pouring the detergent into |
the |
container close the lid. |
|
Since not all detergents are the same the instructions on the boxes of detergent can
vary. We should just like to remind users that too little detergent does not clean the dishes properly whilst too much detergent will not produce better results and is also
a waste. Do not use an excessive amount of detergent and help limit damage to the environment at the same time.
Wash with soaking cycle (some models only) |
|
||
(Prewash) |
intensive |
wash programme |
|
If setting the |
, a second dose of about 20 gr of |
||
detergent (1 table-spoon) must be added to the machine in the prewash section of |
|||
detergent compartment (2). |
|
|
|
For normal programme |
|
add 5 gr. This dose should be placed directly in the prewa- |
|
sh section of detergent compartment (2).
36 |
37 |
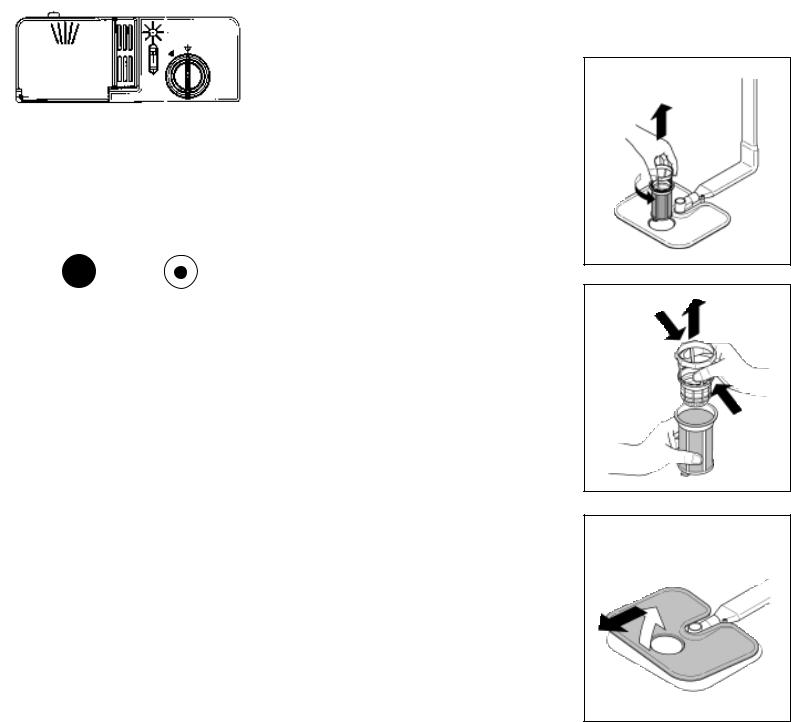
Filling the rinse aid container
4
|
|
The rinse aid container can be found to the |
||||
|
3 |
right |
of |
the |
detergent container: |
it has a |
|
capacity of about 130 ml (Fig A "3"). Turn the |
|||||
|
|
cap (3) anticlockwise and pour enough liquid |
||||
|
|
to last several washes, up to the maximum |
||||
|
|
level shown. Replace the cap. |
|
|||
|
|
The |
rinse |
aid, which is |
automatically |
|
|
|
released during the last rinsing cycle, helps |
||||
|
|
the dishes to dry quickly and prevents spots |
||||
|
|
and stains |
forming. |
|
||
|
|
It is always advisable to use rinse aid. |
||||
|
|
Check the rinse aid level through the indicator |
||||
FULL |
EMPTY |
eye which is situated in the centre of the |
||||
dispenser (4). |
|
|
||||
|
|
|
|
|||
light
Regulating the rinse aid from 1 to 6
3 |
The regulator is placed under the cap (3) and |
|
can be turned using a coin. The recommended |
||
|
position is |
3. |
|
The limestone content of the water considerably |
|
|
affects the formation of limescale and the |
|
|
drying performance. |
|
|
It is therefore important to regulate the |
|
|
quantity |
of rinse aid to achieve good |
|
washing results. |
|
|
If, after |
the wash, streaks occur on the |
|
dishes, decrease the amount by one position. |
|
|
If whitish spots occur, increase the amount |
|
|
by one position. |
|
Cleaning the filters
1
2
3
The filter system (fig.A “4”) consists of: |
|
|||||||||
a |
central |
|
|
container |
|
that |
traps |
the |
larger |
|
particles. |
|
|
|
|
|
|
|
|
|
|
a |
flat |
gauze |
|
that |
continuously filters |
the |
||||
wash water |
|
|
|
|
|
|
|
|||
a |
micro |
filter |
, |
located |
beneath |
the |
gauze, |
|
||
that traps the tiniest particles ensuring |
a |
|
||||||||
perfect rinse. |
|
|
|
|
|
|
|
|||
To achieve excellent results every time, the |
|
|||||||||
filters should be checked and cleaned after |
|
|
||||||||
each wash. |
|
|
|
|
|
|
|
|
||
To |
remove |
the |
filter |
unit, |
simply |
turn |
the |
|
||
handle anticlockwise (fig. 1). |
|
|
|
|||||||
For ease of cleaning, the central container is |
|
|||||||||
removable (fig. 2). |
|
|
|
|
|
|
||||
Remove the gauze filter (fig.3) and wash the |
|
|
||||||||
whole unit under a jet of water. If necessary |
|
|||||||||
a small brush can be used. |
|
|
|
|
|
|||||
With the |
|
Self-cleaning Micro filter |
|
|
, mainte- |
|||||
nance is reduced and the filter unit need only |
|
|
||||||||
be checked every two weeks. Nevertheless, |
|
|||||||||
after each wash it is advisable to check that |
|
|||||||||
the central container and the gauze filter are |
|
|
||||||||
not clogged. |
|
|
|
|
|
|
|
|
||
NB: after cleaning the filters, make sure |
|
|||||||||
that they are correctly reassembled and |
|
|
||||||||
that the gauze filter is properly positioned |
|
|
||||||||
at the bottom of the dishwasher. |
|
|
|
|||||||
Make sure that the filter is screwed back, |
|
|||||||||
clockwise, |
into |
the |
gauze, |
as |
poor |
|
||||
seating of the filter unit could have an |
|
|
||||||||
adverse effect on the efficiency of the |
|
|
||||||||
appliance. |
|
|
|
|
|
|
|
|
||
Warning: |
never use |
the |
dishwasher |
|
|
|||||
without the filters.
38 |
39 |
Practical hints
Selecting the programme
This dishwasher offers you a wide range of wash programmes so that you can choose the most suitable according to the type of dishes and how dirty they are. Refer to the PROGRAMME LIST to choose the most suitable programme.
Useful hints
In order to avoid any dripping from the top rack, remove the lower rack first.
If the dishes are to be left in the machine for some time, leave the door ajar, to let some air circulate and to improve the drying performance.
How to make SAVINGS
1) If you want the dishwasher to give a complete wash, place the dishes in the dishwasher at the end of each meal and if necessary turn on the COLD PRE-WASH cycle to soften the food remains and remove bigger particles of food from the new
load of dishes. When the dishwasher is full start the complete wash cycle programme.
2) If the dishes are not very dirty or if the baskets are not very full select an ECONOMY programme, following the instructions in the program list.
How to get really good wash RESULTS
1)Place the dishes face downwards.
2)Try to place the dishes in such a way that they are not touching one another. If they are loaded properly you will get better results.
3)Before placing the dishes in the dishwasher remove any remaining food (bones,
shells, pieces of meat or vegetables, coffee grounds, skin of fruit, cigarette ash etc. that could clog up the outflow and the washing arm jets.
4)After loading the dishes check that the washing arms can rotate freely.
5)Pans and other dishes that have particularly stubborn food particles or remnants of burnt food should be left to soak in water with dishwasher detergent.
6)To wash silver properly:
a)rinse the silver immediately after use, especially if it has been used for mayonnaise, eggs, fish etc.
b)do not sprinkle detergent onto it
c)keep it separate from other metals
What to DO if
1) You want to stop the dishwasher to put in more dishes whilst it is in the middle of a wash.
Open the door only after pressing the O/I button so that the dishwasher is in OFF. After closing the door, wait 3 minutes before starting up the machine again.
What not to wash
It should also be remembered that not all dishes are suitable for washing in a dishwasher.
We advise against using the dishwasher to wash items in thermoplastic, cutlery with wooden or plastic handles, saucepans with wooden handles, items in aluminium, crystal, leaded glass unless otherwise stated.
Certain decorations may fade. It is therefore a good idea before loading the whole
batch to wash just one of the items first so as to be sure that others like it will not fade. It is also a good idea not to put silver cutlery with non-stainless steel handles into the dishwasher as there could be a chemical reaction between them.
IMPORTANT
When buying new crockery or cutlery always make sure that they are suitable for washing in a dishwasher.
Cleaning and maintenance
The outside of the cabinet can be cleaned with a non-abrasive cleaning agent suitable for a gloss finish.
The dishwasher does not require special maintenance, because the tank is selfcleaning. Regularly wipe the door gasket with a damp cloth to remove any food remains or rinse aid. It is advisable to remove limestone deposits or dirt periodically, by doing an empty wash; pour a glass of vinegar on the bottom of the tank and select the light wash.
If, in spite of the routine cleaning of the filters, you notice that the dishes or pans are not properly washed or rinsed, check that all the spray heads on the rotor arms (fig. A “5”) are clear.
If they are blocked, clean them in the following way:
To remove the upper rotor arm, turn it until it lines up with the stop marked by the arrow (fig. 1b). Push it upwards and, keeping it pushed in, unscrew it in a clockwise direction. To reassemble it repeat the same operation, but turn it anticlockwise.
The lower rotor arm can be removed simply by pulling it upwards (fig. 2).
•wash the rotor arms under a jet of water to clear any blockage in the spray heads.
•When you have finished, refit the rotor arms in the same position, remembering to
re-align the arrow and screw into position.
1 |
1b |
|
2 |
|
|
|
|
40 |
41 |
The water heater element is made of a special stainless steel which after a while may change colour; this does not in any way affect its performance or its working life. Both the door lining and the tank lining are in stainless steel; however, should spots caused by oxidation occur, this is probably due to a high level of iron salts presents in the water. The spots can be removed with a mild abrasive agent; never use chlorine based materials, steel wool, etc.
WHEN CYCLE IS FINISHED
After every wash it is essential to turn off water supply and to switch off the machine by pressing the On/Off button to the off position. If the machine is not going to be used for some time, it is advisable to follow these rules:
1.do an empty wash with detergent in order to clean the machine of any deposits.
2.pull out the electric plug.
3.turn off the water tap.
4.fill the rinse aid container.
5.Ieave the door ajar.
6.Keep the inside of the machine clean.
7.If the machine is left in places where the temperature is below 0°C any water left inside the pipes may freeze. Wait until the temperature rises above zero and then
wait for about 24 hours before starting up the dishwasher.
42
Identifying minor faults
Warning! |
|
|
|
|
|
|
|
|
Before removing any panel: |
|
1. Turn the knob to STOP. |
|
|||||
|
|
|
|
|
2. Pull the electric plug out. |
|
||
Should the dishwasher fail to |
operate, before contacting the Service Centre, make the |
|
||||||
following checks: |
|
|
|
|
|
|
|
|
|
FAULT |
|
|
CAUSE |
REMEDY |
|||
|
|
|
|
|
|
|
|
|
|
|
|
|
|
|
Plug is not connected to wall |
|
Connect electric plug |
|
|
|
|
|
|
socket |
|
|
1 - Machine completely dead |
|
|
O/I button has not been pressed |
|
Press button |
|||
|
|
|
|
|
||||
|
|
Door is open |
|
Close door |
||||
|
|
|
|
|
|
|
||
|
|
|
|
|
|
|
|
|
|
|
|
|
|
|
No electricity |
|
Check the fuse in the plug and |
|
|
|
|
|
|
|
|
the electricity supply |
|
|
|
|
|
|
See causes for no. 1 |
|
Check |
|
|
|
|
|
|
|
|
|
|
|
|
|
|
|
Water tap is turned off |
|
Turn water tap on |
|
|
|
|
|
|
|
|
|
2 - Machine does not |
|
|
|
|
Programme selector is not at |
|
Turn programme selector to |
|
draw water |
|
|
|
|
correct position |
|
correct position |
|
|
|
|
|
|
|
The inlet hose is bent |
|
Eliminate the bends in the hose |
|
|
|
|
|
|
|
|
|
|
|
|
|
|
|
The inlet hose filter is not |
|
Clean the filter at the end of the |
|
|
|
|
|
|
correctly connected |
|
hose |
|
|
|
|
|
|
Filter is dirty |
|
Clean filter |
|
|
|
|
|
|
|
|
|
|
|
|
|
|
|
Outlet hose is kinked |
|
Straighten outlet hose |
|
|
|
|
|
|
|
|
|
3 - Machine does not |
|
|
|
|
The outlet hose extension is |
|
Follow the instructions for |
|
discharge water |
|
|
|
|
not correctly connected |
|
connecting the outlet hose |
|
|
|
|
|
|
|
|
|
carefully |
|
|
|
|
|
|
The outlet connection on the |
|
Call a qualified technician |
|
|
|
|
|
|
wall is pointing downwards not |
|
|
|
|
|
|
|
|
upwards |
|
|
4 - Machine discharges water |
|
|
Position of outlet hose is too |
|
Lift outlet hose to at least 40 cm |
|||
continuously |
|
|
|
|
low |
|
above floor level |
|
|
|
|
|
|
|
|
|
|
|
|
|
|
|
|
Excessive amount of detergent |
|
Reduce amount of detergent |
|
|
|
|
|
|
|
|
Use suitable detergent |
5 - Spray arms |
are |
not |
heard |
|
|
|
|
|
|
|
Item prevents arms from rotating |
|
Check |
||||
to rotate |
|
|
|
|
|
|
||
|
|
|
|
|
|
|
|
|
|
|
|
|
|
Plate and cup filter very dirty |
|
Clean plate and cup filter |
|
|
|
|
|
|
|
|
||
|
|
|
|
|
|
|
||
6 - On electronic |
appliances |
|
|
Water inlet tap turned off |
|
Switch off the appliance. |
||
without a display: “eco”indi- |
|
|
|
Turn on the tap. |
||||
cator light |
and indicator light |
|
|
|
|
Re-set the cycle. |
||
“No.1” |
with |
audible |
signal |
|
|
|
|
|
are heard. |
|
|
|
|
|
|
|
|
|
|
|
|
|
|
|
||
7 - On electronic |
appliances with |
|
|
Water inlet tap turned off |
|
Switch off the appliance. |
||
a display: “E1” appears on the |
|
|
Turn on the tap. |
|||||
|
|
|
||||||
display with audible signal. |
|
|
|
Re-set the cycle. |
||||
|
|
|
||||||
|
|
|
|
|
43 |
|
|
|

FAULT |
CAUSE |
|
|
REMEDY |
|
|
See causes for no. 5 |
Check |
|
||
|
|
|
|||
|
Bottom of saucepans have not |
Burnt on food remains must |
|||
|
been washed well |
be soaked before putting pans |
|||
|
|
in dishwasher |
|||
|
|
|
|||
|
Edge of saucepans have not |
Reposition saucepans |
|||
|
been washed well |
|
|
|
|
|
|
|
|||
|
Spray arms are partially blocked |
Remove spray arms by |
|||
|
|
unscrewing ring nuts clockwise |
|||
|
|
and wash under running water |
|||
|
|
|
|||
8 - Load of dishes is only |
The dishes have not been |
Do not place the dishes too |
|||
partially washed |
properly loaded |
closely together |
|||
|
|
|
|||
|
The end of the outlet hose is in |
The end of the outlet hose |
|||
|
the water |
must not come into contact |
|||
|
|
with the outflow water |
|||
|
|
|
|||
|
The incorrect amount of |
Increase the measure |
|||
|
detergent has been measured |
according to how dirty the |
|||
|
out; the detergent is old and hard |
dishes are and change detergent |
|||
|
|
|
|||
|
The wash programme is not |
Choose a more vigorous |
|||
|
thorough enough |
programme |
|
||
|
|
|
|||
|
The lower basket dishes have |
Depress half load button |
|||
|
not been washed |
|
|
|
|
|
Water is too hard |
Check salt and rinse aid level |
|||
9 - Presence of white spots |
|
and regulate amount. |
|||
on dishes |
|
Should the fault persist, |
|||
|
|
Contact Service Centre |
|||
|
The dishes knock against one |
Load dishes better onto the |
|||
10 - Noise during wash |
another |
basket |
|
||
|
|
|
|
||
The revolving arms knock against |
Load dishes better |
||||
|
|||||
|
the dishes |
|
|
|
|
|
|
|
|
|
|
11 - The dishes are not |
Inadequate air flow |
Leave |
the |
dishwasher door ajar |
|
|
at the |
end |
of the wash program |
||
completely dry |
|
||||
|
to allow the dishes to dry naturally |
||||
|
|
||||
|
|
|
|
|
|
N.B.:Should any of the |
situations occur |
and should the |
machine |
give a |
bad |
wash performance, |
|
it is necessary to remove the deposits from the dishes by hand since the final drying cycle hardens the |
|
||||||
deposits which a second wash in the machine would not be able to remove. |
|
|
|
|
|||
If the malfunction continues |
contact a Service |
Centre quoting |
the serial |
number |
of |
the dishwasher. |
|
This is found on the plaque on the inside of the dishwasher door at the top or on the guarantee. |
|
||||||
This information will make it possible to take more effective action more quickly. |
|
|
|||||
The manufacturers decline any responsability for any printing mistakes in this instruction booklet. They also reserve the right |
to modify their |
||||||
own appliances as necessary without altering the essential characteristics. |
|
|
|
|
|
||
Inhoud
Veiligheidsvoorschriften |
pagina |
46 |
Opzet en installatie |
pagina |
47 |
Openen van de deur |
pagina |
49 |
Wateronthardingssysteem |
pagina |
50 |
Instellen van het bovenrek |
pagina |
52 |
Laden van de vaatwasser |
pagina |
53 |
Halfgeladen wassen |
pagina |
57 |
Informatie voor de testlaboratoria |
pagina |
58 |
Invoeren van wasmiddel en spoelmiddel |
pagina |
58 |
Schoonmaak van de filters |
pagina |
60 |
Algemene aanwijzingen |
pagina |
61 |
Regelmatige schoonmaak en onderhoud |
pagina |
62 |
Herkennen van kleine fouten |
pagina |
64 |
Fig. A
5
1
4
2 |
|
|
|
3 |
|
|
44 |
45 |
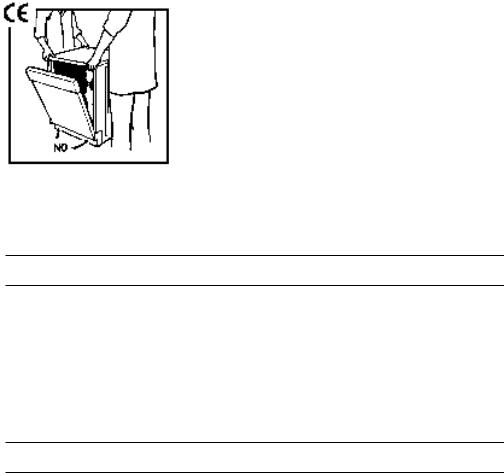
Veiligheidsvoorschriften
Wilt u de instructies in deze gebruiksaanwijzing zorgvuldig doorlezen, want het bevat niet alleen aanwijzingen m.b.t. veiligheid bij installatie, gebruik en onderhoud, maar ook een aantal belangrijke tips voor het dagelijks gebruik van de machine.
Bewaar daarom dit boekje zorgvuldig.
Bij het gebruik van ongeacht welk elektrisch huishoudelijk apparaat moet een aantal elementaire veiligheidsvoorschriften in acht worden genomen:
- Zorg altijd voor een goed geïsoleerde ondergrond als u het apparaat bedient.
-Stel de machine nooit in werking op een natte bodem.
-Geen verlengsnoeren en meervoudige contactdozen gebruiken, zeker niet in vochtige ruimtes. Indien dit onvermijdelijk is wees dan extra voorzichtig.
-Als u de stekker uit het stopcontact wilt halen, trekt u dan wel aan de stekker zelf. Nooit aan de kabel trekken! Probeer nooit de stekker eruit te trekken door de machine te verplaatsen.
-De machine dient op een veilige plaats te staan. Niet aan extreme dingen blootstellen zoals sterke zonneschijn of regen.
-Controleer of het apparaat niet op elektriciteitskabels staat.
- Als uw woning is uitgerust met een waterontharder of de waterhardheid is laag, dan is het niet nodig waterontharder toe te voegen.
-De afwasautomaat is ingesteld op gebruikelijke huishoudelijke chemicaliën. Voorwerpen die in aanraking zijn gekomen met petroleum, verf of alkalische zuren mogen niet in de afwasmachine gewassen worden.
-De afwasautomaat is samengesteld uit materialen die gerecycled kunnen worden
zodat deze bij afdanking op een milieuvriendelijke manier kunnen worden verwerkt. - Kinderen buiten bereik van de machine houden.
Als u de elektrische aansluiting wilt veranderen kunt u dat alleen door gekwalificeerde vakmensen laten verrichten.
-U mag alleen reinigingsmiddel gebruiken dat geschikt is voor een afwasautomaat.
-Uw automaat is alleen geschikt voor het wassen van afwas van huishoudelijke aard, u kunt uw afwasautomaat niet ergens anders voor gebruiken!
-Controleer of de op het apparaat aangegeven waarden voor netspanning en frequentie overeenkomen met de netspanning en frequentie in uw huis.
- De reinigingsmiddelen die u voor uw afwasautomaat gebruikt zijn niet geschikt voor inwendig gebruik. Houd ook daarom deze middelen ver weg van kinderen.
-De machine en de afwas aan het eind van het programma behoren niet doordrenkt te zijn van water.
-Leunen of zitten op de open deur van de vaatwasser is niet aan te raden, de deur kan afbreken.
-Bestek wordt het best gewassen wanneer het met het handvat naar beneden in het bestekrekje wordt geplaatst. Om verwondingen van scherpe messen en punten te voorkomen kan het betreffende bestek met het handvat naar boven worden geplaatst.
Indien het nodig is de aanvoerslang te vervangen, dient u contact op te nemen met
de service afdeling.In geval van storing of niet goed functioneren: machine uitschakelen en waterkraan afsluiten. Doet u zelf verder niets maar neem contact op met onze service dienst!
Raadpleeg bij storingen altijd de service dienst. Alleen dan bent u verzekerd van de nodige deskundigheid en het gebruik van originele onderdelen.
Wij verzoeken u vriendelijk de bovenstaande regels zorgvuldig in acht te nemen omdat anders de veiligheid bij het gebruik van de machine nadelig beinvloed zou kunnen worden.
INSTALLATIE (Technische beschrijving)
Stel na het verwijderen van de verpakking de juiste hoogte in.
Voor een goede werking is het belangrijk dat de afwasmachine vlak staat opgesteld: dit doet u door de
beide voorpootjes zo af te stellen dat de machine niet meer dan 2 graden naar één kant helt.
Indien het nodig is om de onverpakte machine met de hand te verplaatsen, grijp de deur dan niet onderaan beet, maar doe zoals aangegeven in fig.; open de deur
een stukje en til de afwasmachine op aan het bovenblad.
Als u het apparaat op een ondergrond met een hoogpolig tapijt zet, controleer dan of de opening aan de onderkant vrij blijft.
Zorg ervoor dat de stekker van het apparaat toegankelijk blijft na de installatie.
Elektrische aansluiting
De machine moet worden aangesloten op een wandcontactdoos met randaarde, gezekerd conform de waarden aangegeven op het typeplaatje van de machine. Raadpleeg, in geval van twijfel, uw elektricïen of installateur.
Let op: de fabrikant kan niet aansprakelijk worden gesteld voor schade en storingen aan het apparaat of andere goederen die ontstaan door het niet nakomen van de installatievoorschriften.
Dit apparaat voldoet aan de EEC richtlijnen 89/336, 73/23 en eventuele wijzigingen.
Watertoevoer
De aan-en afvoerbuizen voor het water kunt u naar keuze naar rechts of links draaien.
De afwasmachine mag naar keuze worden aangesloten op eenkoude of een warme leiding, mits de temperatuur niet boven de 60°C komt.
De waterdruk moet liggen tussen minimaal 0,08 MPa en maximaal 0,8 MPa. Als de waterdruk onder het minimum zakt, raadpleeg dan onze technische dienst.
Tussen de waterleiding en de afwasmachine moet zich een kraan bevinden, zodat
de toevoer kan worden afgesloten wanneer de afwasmachine niet in werking is (fig. 1 B). De afwasmachine is voorzien van een "druk-vaste" waterslang "A" met een 3/4 aansluitnippel voor aansluiting op de afsluitkraan "B" (fig. 2).
Bevestig de toevoerslang "A" aan de waterkraan "B" en controleer of deze goed vastzit. Indien het nodig is de toevoerslang te verlengen is er een slang verkrijgbaar, art. 9225014. De lengte is 1,5 m.
46 |
47 |
 Loading...