


BT PaperJet 40 UG – Issue 2 – Edition 2 – 18.03.04 – 6026
User Guide
BT PAPERJET 40
BT PaperJet 40 UG – Issue 2 – Edition 2 – 18.03.04 – 6026
Welcome…
to your BT PaperJet 40 multifunctional fax machine.
functions.
Send and receive faxes. Easy controls let you adjust the resolution and contrast for fine details, drawing and photographs.
Enlarge, reduce and make multiple copies of original documents.
Quickdial directory lets you dial your 10 most important or frequently used numbers by pressing just two buttons.
50 Name and number directory makes it simple to store and dial numbers for faxing and phoning.
Redial any of the last 5 numbers, stored in the redial list.

BT PaperJet 40 UG – Issue 2 – Edition 2 – 18.03.04 – 6026
This User Guide provides you with all the information you need to get the most from your fax machine.
You must first set up your machine before you can use it. This doesn’t take long as it is easy to do. Just follow the simple instructions on the next few pages or see the Quick Start guide enclosed.
 Need help?
If you have any problems setting up or using your BT PaperJet 40 please contact the Helpline on 0870 241 6538.
Alternatively, you may find the answer on the web at
www.bt.com/fax or in ‘Help’ at the back of this guide.
Got everything?
BT PaperJet 40 machine Handset
Curly handset cable
Mains power cable
Telephone line cord
Quick Start Guide
User Guide
Starter ink film (pre-installed)

BT PaperJet 40 UG – Issue 2 – Edition 2 – 18.03.04 – 6026
4In this guide
Getting started
Location . . . . . . . . . . . . . . . . . . . . . . . . . . . . . . 6 Setting up . . . . . . . . . . . . . . . . . . . . . . . . . . . . . 6 Connect any additional devices . . . . . . . . . . . . . . 8
Getting to know your fax
Fax machine. . . . . . . . . . . . . . . . . . . . . . . . . . . . 10 Control panel . . . . . . . . . . . . . . . . . . . . . . . . . . . 11 Display screen . . . . . . . . . . . . . . . . . . . . . . . . . . 12
Using the phone
Making calls. . . . . . . . . . . . . . . . . . . . . . . . . . . . 13 Handsfree . . . . . . . . . . . . . . . . . . . . . . . . . . . . . 13 Redial . . . . . . . . . . . . . . . . . . . . . . . . . . . . . . . . 13 Delete a number in the redial list . . . . . . . . . . . . . 13 Quickdial directory . . . . . . . . . . . . . . . . . . . . . . . 14 Store a Quickdial entry . . . . . . . . . . . . . . . . . . . . 14 Call a Quickdial phone or fax number. . . . . . . . . . 14 Edit a Quickdial entry . . . . . . . . . . . . . . . . . . . . . 14 Delete a Quickdial entry . . . . . . . . . . . . . . . . . . . 15 Main directory . . . . . . . . . . . . . . . . . . . . . . . . . . 15 Store a Directory entry . . . . . . . . . . . . . . . . . . . . 15 Call a Directory entry . . . . . . . . . . . . . . . . . . . . . 15 Edit Directory entry . . . . . . . . . . . . . . . . . . . . . . 16 Delete a Directory entry . . . . . . . . . . . . . . . . . . . 16 Print Directories . . . . . . . . . . . . . . . . . . . . . . . . . 16
Faxing
Inserting documents . . . . . . . . . . . . . . . . . . . . . . 17 Resolution . . . . . . . . . . . . . . . . . . . . . . . . . . . . . 18 Contrast . . . . . . . . . . . . . . . . . . . . . . . . . . . . . . 18 Sending faxes. . . . . . . . . . . . . . . . . . . . . . . . . . . 18 Receiving faxes. . . . . . . . . . . . . . . . . . . . . . . . . . 18 Receiving a fax via an external phone. . . . . . . . . . 19
Receiving faxes into the memory . . . . . . . . . . . . . 19 Memory indicator . . . . . . . . . . . . . . . . . . . . . . . . 19 Fax mode. . . . . . . . . . . . . . . . . . . . . . . . . . . . . . 19 Manual reception . . . . . . . . . . . . . . . . . . . . . . . . 19 Automatic reception . . . . . . . . . . . . . . . . . . . . . . 20 To set the number of rings. . . . . . . . . . . . . . . . . . 20 Groups . . . . . . . . . . . . . . . . . . . . . . . . . . . . . . . 21 Create a group . . . . . . . . . . . . . . . . . . . . . . . . . . 21 View entries in a group . . . . . . . . . . . . . . . . . . . . 21 Delete an entry or the whole group . . . . . . . . . . . 22 Broadcast faxing. . . . . . . . . . . . . . . . . . . . . . . . . 22 Broadcast to individual numbers . . . . . . . . . . . . . 22 Broadcast to a group . . . . . . . . . . . . . . . . . . . . . 23 Delayed sending. . . . . . . . . . . . . . . . . . . . . . . . . 23 Polling . . . . . . . . . . . . . . . . . . . . . . . . . . . . . . . . 24 Quick polling . . . . . . . . . . . . . . . . . . . . . . . . . . . 24 Polling with a code . . . . . . . . . . . . . . . . . . . . . . . 24 Set a document for polling . . . . . . . . . . . . . . . . . 24 Timer mode . . . . . . . . . . . . . . . . . . . . . . . . . . . . 25 Switch day/night timer on/off. . . . . . . . . . . . . . . . 25 Change day and night periods . . . . . . . . . . . . . . . 25 Change day/night settings. . . . . . . . . . . . . . . . . . 25 Silent operation . . . . . . . . . . . . . . . . . . . . . . . . . 26 Reports and print-outs . . . . . . . . . . . . . . . . . . . . 27 Transmission report . . . . . . . . . . . . . . . . . . . . . . 27 Fax journal . . . . . . . . . . . . . . . . . . . . . . . . . . . . . 27 Dialling list. . . . . . . . . . . . . . . . . . . . . . . . . . . . . 27 Speed . . . . . . . . . . . . . . . . . . . . . . . . . . . . . . . . 28 Received fax size . . . . . . . . . . . . . . . . . . . . . . . . 28
Copying
Copy a document . . . . . . . . . . . . . . . . . . . . . . . . 29 Make up to 15 copies . . . . . . . . . . . . . . . . . . . . . 29 Zoom . . . . . . . . . . . . . . . . . . . . . . . . . . . . . . . . 29
BT PaperJet 40 UG – Issue 2 – Edition 2 – 18.03.04 – 6026
|
|
|
In this guide |
5 |
|
|
|
|
|
|
|
Caller Display |
|
Technical information |
|
|
|
Caller Display. . . . . . . . . . . . . . . . . . . . . . . . . . . |
30 |
How many fax machines/telephones |
|
|
|
Caller information not available . . . . . . . . . . . . . . |
30 |
can you have . . . . . . . . . . . . . . . . . . . . |
. . . . . . . 50 |
|
|
Calls list. . . . . . . . . . . . . . . . . . . . . . . . . . . . . . . |
31 |
Switchboard compatibility . . . . . . . . . . . |
. . . . . . . 50 |
|
|
View and dial entries in the calls list . . . . . . . . . . . |
31 |
Switchboard external line access code . . . |
. . . . . . 50 |
|
|
Delete entries from the calls list. . . . . . . . . . . . . . |
31 |
Set access code . . . . . . . . . . . . . . . . . . . |
. . . . . . 50 |
|
|
Copy a number from the calls list to the |
|
R&TTE . . . . . . . . . . . . . . . . . . . . . . . . . |
. . . . . . 51 |
|
|
directory . . . . . . . . . . . . . . . . . . . . . . . . . . . . . . |
31 |
|
|
|
|
Copy a number from the calls list to the |
|
|
|
|
|
Quickdial directory . . . . . . . . . . . . . . . . . . . . . . . |
32 |
|
|
|
|
Additional settings
Print list of original settings. . . . . . . . . . . . . . . . . 33
Help button . . . . . . . . . . . . . . . . . . . . . . . . . . . . 33
Time and date . . . . . . . . . . . . . . . . . . . . . . . . . . 33
Header number . . . . . . . . . . . . . . . . . . . . . . . . . 33
Header name . . . . . . . . . . . . . . . . . . . . . . . . . . . 34
Ringer melody . . . . . . . . . . . . . . . . . . . . . . . . . . 34
Ringer volume . . . . . . . . . . . . . . . . . . . . . . . . . . 34
Loudspeaker volume. . . . . . . . . . . . . . . . . . . . . . 34
Connecting a telephone answering machine . . . . . 35
Installing a new ink film
Ink level indicator . . . . . . . . . . . . . . . . . . . . . . . . 36
Plug ‘n’ Print card indicator. . . . . . . . . . . . . . . . . 36
Install a new ink film . . . . . . . . . . . . . . . . . . . . . . 36
Help . . . . . . . . . . . . . . . . . . . . . . . . . . . . . . . . . 40
General information
Safety . . . . . . . . . . . . . . . . . . . . . . . . . . . . . . . . 45
General . . . . . . . . . . . . . . . . . . . . . . . . . . . . . . . 45
Cleaning . . . . . . . . . . . . . . . . . . . . . . . . . . . . . . 46
Guarantee . . . . . . . . . . . . . . . . . . . . . . . . . . . . . 48
BT PaperJet 40 UG – Issue 2 – Edition 2 – 18.03.04 – 6026
6Getting started
WARNING
Do not place your BT PaperJet 40 in the bathroom or other humid areas.
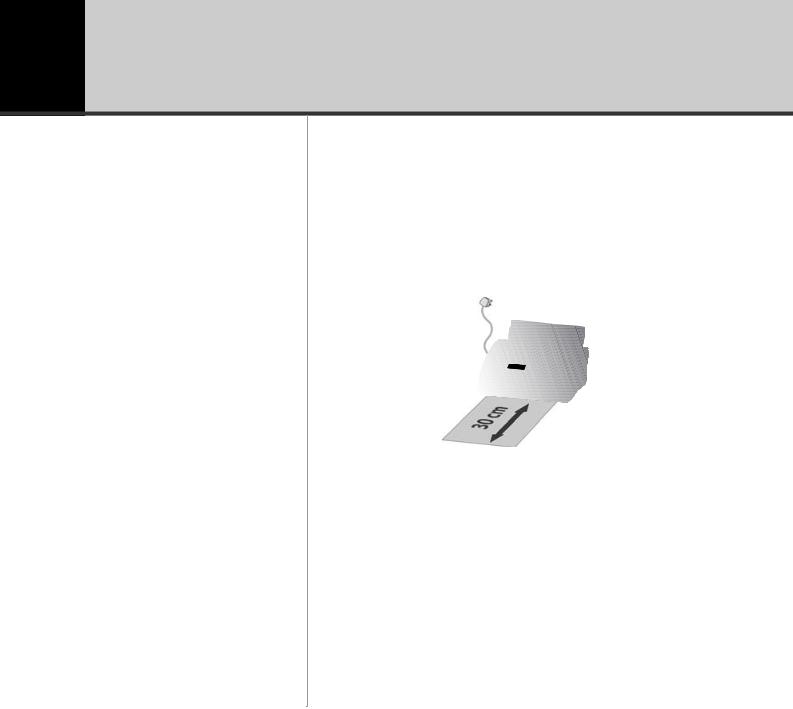
Location
You need to place your BT PaperJet 40 close enough to mains power and telephone sockets so that the cables will reach. Make sure it is at least 10cm away from other electrical appliances.
Always choose a smooth, flat, horizontal surface. Avoid soft surfaces such as carpets.
As documents come out at the front, make sure there are no obstructions in front of the machine.
Avoid direct sunlight as the ink film is heat sensitive .
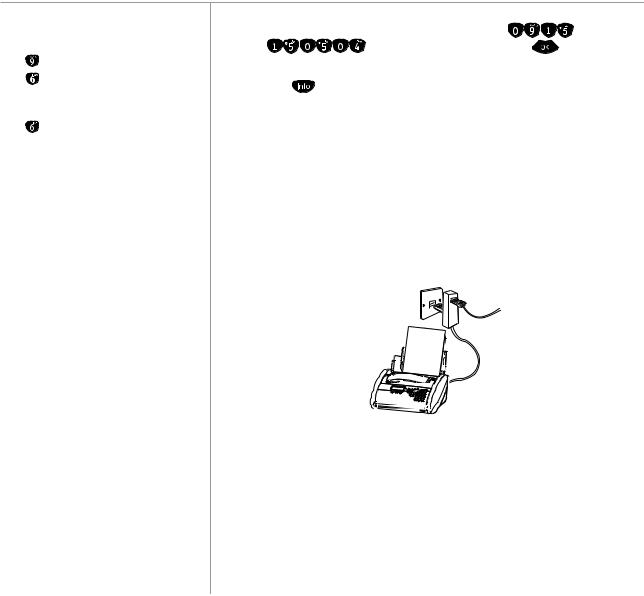
Setting up
1.Plug the telephone line cord into the LINE socket on the side of your BT PaperJet 40 and plug the other end into the telephone wall socket.

BT PaperJet 40 UG – Issue 2 – Edition 2 – 18.03.04 – 6026
Getting started |
7 |
2.Connect one end of the curly cable into the telephone handset and the other end into the socket marked  . Place the handset in the cradle.
3.Your BT PaperJet 40 can hold up to 15 sheets of 80g/m2 paper.
To prevent several sheets being drawn into the machine together, always fan out the paper first, then tap it down on a flat surface before inserting it into the paper tray.
Lift the top flap and rotate the paper support arm up-wards, pull the paper feed flap forward, load the paper and close the flap.
4.Plug the mains power cable into the machine, and the other end into the mains power socket.
5.Your BT PaperJet 40 display will now alternate between ENTER TIME and the default settings.
BT PaperJet 40 UG – Issue 2 – Edition 2 – 18.03.04 – 6026
8Getting started
Entering names |
Using the keypad, enter the time and date, e.g. |
= 9:15am |
||
For example to enter the name TOM. |
and |
= 15th May 2004, then press |
. |
|
Press once to enter T. |
6. To enter your name and fax number, open the Easy Install option by |
|||
Press three times to enter O (or 7 times |
||||
pressing |
for at least two seconds. Your BT PaperJet 40 prints the |
|||
for lower case o). |
||||
one page Easy Install instructions. |
|
|||
Use to move the cursor to the right. |
|
|||
|
|
|
||
Press once to enter M (or 5 times for |
Now follow the on-screen prompts together with the printed instructions. |
|||
lower case m). |
|
|
|
|
You can enter up to 20 characters.
Connect any additional devices
The following letters and characters are available.
If you enter a wrong digit or character, press  or
or  to move the cursor, and press
  to delete.
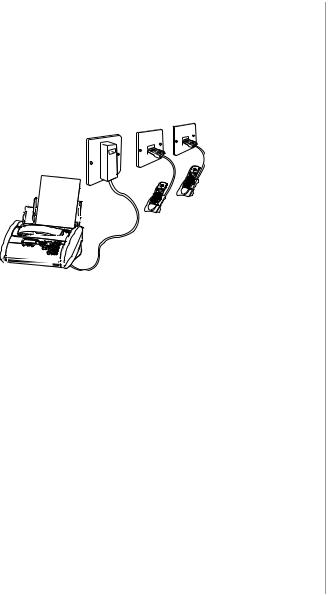
…To the same socket
You can connect an answering machine to the same telephone socket as your BT PaperJet 40. Make sure your machine is the first device connected to the telephone wall socket. Your machine can then control the other devices.
You can connect additional devices as long as the Ringer Equivalence Number (REN) does not exceed 4. The REN of your BT PaperJet 40 is 1. For more information, see page 50.
BT PaperJet 40 UG – Issue 2 – Edition 2 – 18.03.04 – 6026
|
Getting started |
9 |
|
|
|
…To separate sockets |
Connecting to a switchboard? |
|
You can also connect other devices to the same line even if they are |
To set up switchboard/PBX connection, see |
|
page 50. |
|
|
in different rooms, but you will not be able to use certain functions, |
|
|
for example, being able to transfer a call from your BT PaperJet 40 |
|
|
to a telephone. |
|
|

BT PaperJet 40 UG – Issue 2 – Edition 2 – 18.03.04 – 6026
10 Getting to know your fax
Fax Machine
Paper feed flap
Mains cable
Top flap
Control panel
Handset
Scanner cover |
Printer roller |
Plug ‘n’ pring card slot |
Rear ink roll compartment |
Front ink roll compartment

BT PaperJet 40 UG – Issue 2 – Edition 2 – 18.03.04 – 6026
Getting to know your fax |
11 |
Control panel
LEFT/RIGHT
Lets you select options, move the cursor and adjust the volume.
Red indicator
When flashing read the message in the display screen.
Res (Fine/Photo)
Use to select the scan resolution for faxing and copying.
Clr
Clr is used to delete numbers and letters.
M/OK
M & OK let you open the menu and confirm options.
CLOCK
Press to switch between modes (SUN) & (MOON). Press and hold to switch mode on or off.
Info
Press to select help pages. Press and hold to start automatic installation of your fax machine and to print out the Easy Install instructions.
DIRECTORY 0-9 |
DIRECTORY A-Z |
Press to select a |
Press to open the directory |
quickdial number |
Press and hold to begin storing an |
for dialling |
entry. |
Press and hold |
|
to begin storing |
Redial |
a quickdial |
Press to select any of the last 5 |
number. |
numbers you have dialled |
|
Press and hold to display a list of |
|
your most recent callers. |
|
R |
|
Used to access switchboard functions |
|
and with some BT Calling Features. |
|
Dial |
|
Lets you make calls using the built in |
|
loudspeaker. |
Stop
Press to stop current action and eject the documents.
Start
Press to send a fax
Press and hold to poll a fax.
Copy
Press to copy a document.
Press and hold to select multiple copies.
BT PaperJet 40 UG – Issue 2 – Edition 2 – 18.03.04 – 6026
12Getting to know your fax
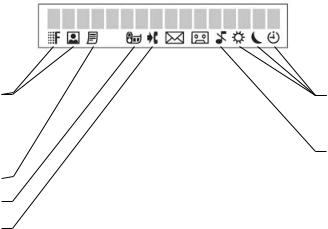
Display screen
Fine and Photo Resolution options |
|
(CLOCK) (SUN) (CRESCENT |
|
||
for faxing and copying. If no symbol |
|
MOON) Timer – lets you choose |
is displayed, the standard resolution |
|
different settings for day time and |
for normal text documents is set. |
|
night time. |
|
|
Ringer is switched off for fax and |
|
|
phone calls. |
Faxes are stored in the memory. |
|
|
Ink roll capacity. |
|
|
Unviewed calls in the calls log. |
|
|

BT PaperJet 40 UG – Issue 2 – Edition 2 – 18.03.04 – 6026
|
Using the phone |
13 |
|
|
|
|
|
|
|
|
|
Making calls
1.Enter the number. It is displayed. Lift the handset and the number is dialled.
2.To end the call, replace the handset.
Handsfree
Dial a number without picking up the handset:
1.Press  Display shows DIAL NUMBER. Enter the number.
2.Lift the handset when the display shows LIFT HANDSET.
3.To end the call, replace the handset.
Redial
You can redial up to the last 5 numbers called.
1.Press  then
then  or
or  or repeatedly press
  to scroll through the last five numbers.
2.Press  and lift the handset or press
  .
.
Delete a number in the redial list
1.Press  then
then  or
or  to scroll to the number you want.
2.Press  to delete then press
  to confirm.
3.Press  to exit.
If you enter a wrong digit, press  to delete.
BT PaperJet 40 UG – Issue 2 – Edition 2 – 18.03.04 – 6026
14 Using the phone
Entering names
For example to enter the name TOM. Press  once to enter T.
Press  three times to enter O (or 7 times for lower case o).
Use  to move the cursor to the right.
Press  once to enter M (or 5 times for lower case m).
You can enter up to 20 characters.
The following letters and characters are available.
Button Character
space . - 0 + ? / : * % ! ( ) [ ] ,,
1
A B C 2 a b c Ä Å ÆÇ ä å æç
D E F 3 d e f
G H I 4 g h i
J K L 5 j k l
M N O6 mn o Ñ Öñ ö
P QR S 7 pq r s
T U V 8 t u v Ü ü
W X Y Z 9 w x y z
Quickdial directory
You can use the keypad to store up to 10 numbers which can be dialled by pressing just 2 buttons. Numbers stored in the Quickdial directory will also appear in the main directory.
Store a Quickdial entry
1.Press and hold  for two seconds then press a number between
  -
- under which you want to store the Quickdial number. You are prompted to enter a name.
2.Use the keypad to type the name, then press  .
.
3.Enter the telephone number you want to store and press  .
.
Call a Quickdial phone or fax number
If sending a fax, load the document to be sent.
1.Press  then the
  -
- button under which the number you want is stored. The name is displayed.
2.Lift the handset to dial or press  if sending a fax.
Edit a Quickdial entry
1.Press  then the
  -
- button under which the number you want is stored. The name is displayed.
2.Press and hold  for 2 seconds and a cursor will appear to the right of the name.
3.Press  or
or  to move the cursor and
  to delete. The character to
the left |
cursor will be deleted. |
4. Enter any new characters and press  . The number is displayed.
BT PaperJet 40 UG – Issue 2 – Edition 2 – 18.03.04 – 6026
Using the phone |
15 |
5. Press |
or to move the cursor and |
to delete. The number to |
the left |
cursor will be deleted. |
|
6. Enter any new numbers and press  to confirm.
Delete a Quickdial entry
1.Press  then the
  -
- button under which the number you want is stored.
2.Press  then
then  to confirm.
Main directory
You can store up to 50 names and numbers in the main directory.
Store a Directory entry
1.Press  for two seconds.
2.Use the keypad to type the name, using  to move the cursor to the right, then press
  .
.
3.Enter the telephone number you want to store and press  .
.
Call a Directory entry
If sending a fax, load the document.
1.Press  . The entries are displayed in alphabetical order. Press
  or
or  to scroll to the entry you want.
2.Lift the handset or, if sending a fax, press  .
.
You can store a number during a phone conversation by following these steps.
If you have a lot of names and numbers stored, you can jump near to the name you want using the keypad. For example, to go quickly to Richard, press  then press
 . The first name starting with P will be displayed. Press
  to scroll to Richard.
BT PaperJet 40 UG – Issue 2 – Edition 2 – 18.03.04 – 6026
16 Using the phone
|
Edit a Directory entry |
|
|
|||
1. |
Press |
then |
or |
to display the entry you want. |
||
2. |
Press and hold |
|
two seconds. Press |
or |
to move the cursor |
|
|
and |
to delete. The character to the |
of |
cursor will be deleted. |
||
3.Enter any new characters and press  to confirm. The number is displayed.
4.Press  or
or  to move the cursor and
  to delete. The number to the
left of |
will be deleted. |
5. Enter any new numbers and press  to confirm.
Delete a Directory entry
1.Press  then
then  or
or  to display the entry you want.
2.Press  then press
  to confirm.
Print Directories
You can print out a list of your quickdial and main directories. Press 
 ,
,  then
then  .
.
 Loading...