BT 1500 User Manual
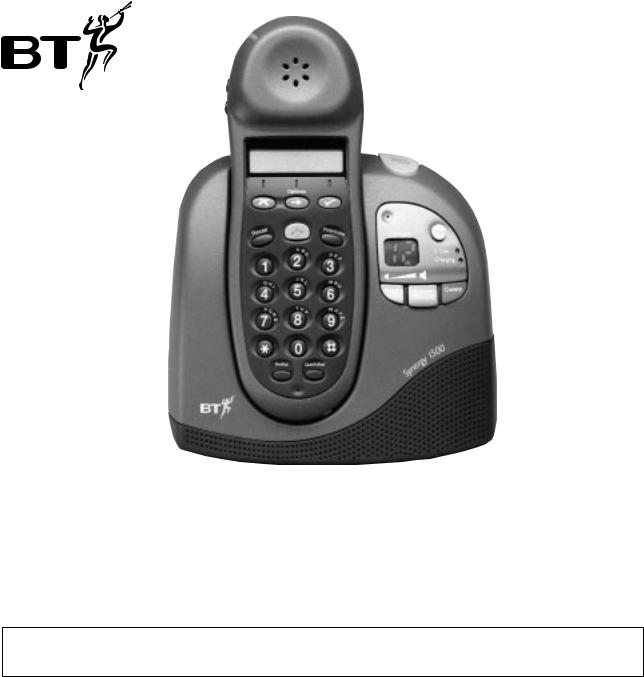
Synergy1500
Digital cordless telephone answering machine
User guide
This equipment is not designed for making emergency telephone calls when the power fails. Alternative arrangements should be made for access to emergency services.

Please open this page for a further ‘at a glance’
guide to your Synergy 1500.
Check that your Synergy 1500 is complete.
When you unpack you should have:
•Synergy 1500 handset.
•Synergy 1500 base station.
•Power adaptor.
•Comprehensive user guide.
•Wall plugs and screws for wall-mounting.
•Wall bracket.
•Ni-Cad battery pack.
•Line cord
If anything is missing, please contact your place of purchase immediately.
For your records
Date of purchase:
Place of purchase:
Serial number:
(on the underside of the telephone base station)
Purchase price:
For warranty purposes, proof of purchase is required, so please keep your receipt.
My PIN is:
See page 38 for more information about your PIN.
Please open this page for an ‘at a glance’ guide to
your Synergy 1500.
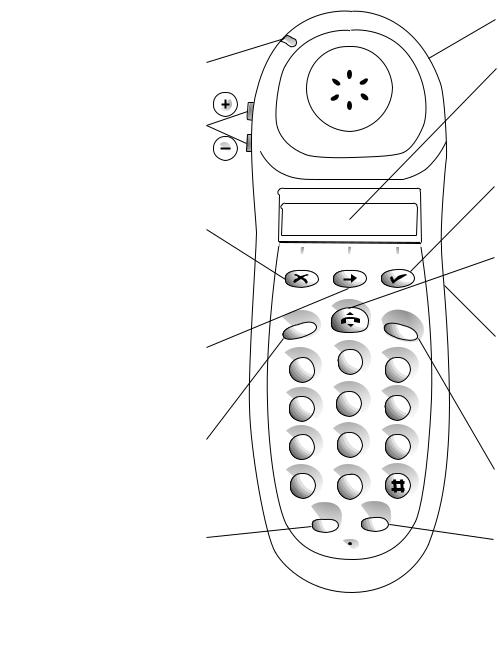
At a glance
Calls light
Flashes to indicate an
Volume
Turns the volume of the earpiece up or down during a call. Turns the handset ringer off and on.
See page 10
Undo
Deletes the last digit entered. Changes the menu setting.
By pressing and holding the X button for 2 seconds you are taken back to e.g. Handset 1. (Standby)
Options
Opens the main menu. Scrolls through menu options. Inserts a pause when storing a number.
Recall
Used to access BT Select Services, switchboards and PBXs.
See page 50
Redial
Press to dial the last number you dialled. Also allows you to view the last number.
See page 10
|
|
|
Options |
|
|
|
|||
Recall |
|
|
|
|
|
Intercom |
|||
|
|
|
A |
B |
D |
|
|
||
|
|
|
2 |
C |
E |
|
|||
|
|
|
|
|
|||||
|
|
|
|
|
F |
||||
1 |
|
|
|
|
3 |
||||
|
|
|
|
|
|||||
G |
H |
|
J |
K |
L |
M N |
O |
||
I |
5 |
||||||||
|
|
6 |
|||||||
4 |
|
|
|||||||
|
|
|
|
||||||
|
|
|
|
|
|
||||
P |
Q |
|
T |
UV |
W X |
|
|||
|
|
|
|||||||
|
R |
8 |
|
|
Y |
||||
7 |
S |
|
9 |
Z |
|||||
|
|
0 |
|
|
|
|
|||
|
|
Redial |
|
|
Quickdial |
|
|
|
|
Belt clip
On back of handset.
LCD
Clear display that shows the status of your call and the number you have dialled.
If the answering machine is on the message counter will be displayed.
Select
Confirms the setting you want from the menu. During a call, acts as the secrecy button.
Talk
Press to make a call, answer a call and end a call.
See page 9
Headset socket
Lets you plug in your headset (available separately) enabling you to keep your hands free.
See page 38.
Warning: Cover includes small parts – possible choking hazard for small children.
Intercom
Enables you to make calls between handsets.
See page 45.
Quickdial
Enables you to store and dial up to 10 numbers in the memory for shared use and up to 10 for personal use.
See page 11
1
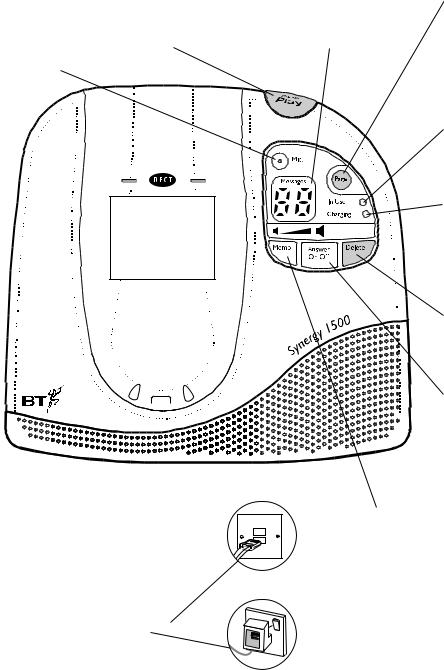
Play/Pause
Press to play back or pause messages.
See page 26
Microphone
This equipment is not designed for making emergency telephone calls when the power fails. Alternative arrangements should be made for access to emergency services.
Display screen/Message counter |
Page |
Shows number of messages and answering machine status.
Pages all handsets registered to the base station. Used to register additional handsets. Also used to reset your base station to it’s original settings.
See pages 10, 35 & 43.
In Use light
Lights up during an external call or if you are registering a handset.
See pages 9 and 43
Charging light
Lights up when a handset is placed on the base station. We recommend that you charge the handset for at least 16 hours before its use.
See page 7
Delete
Deletes recorded messages and memos
See page 26
Answer On/Off
Switches answering machine on and off.
Used to increase volume during message playback.
Also used to restore messages that have been selected for deletion.
See page 19
Memo
Press to record a memo. Used to decrease volume during playback.
See page 22
2
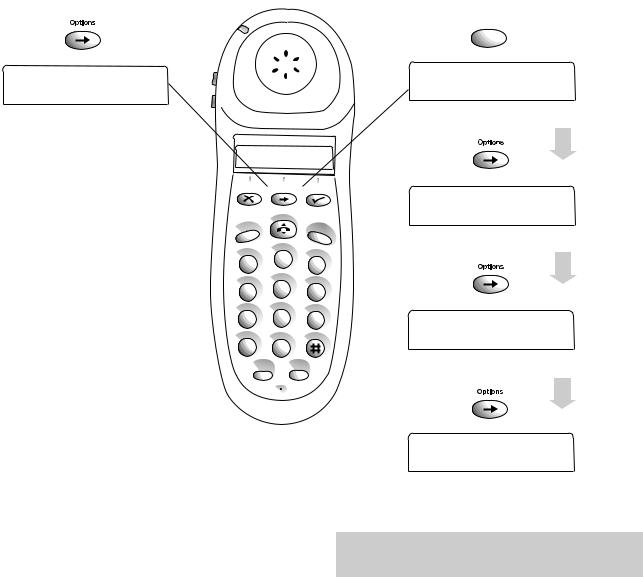
Menu options
Answering machine
First press
A N S P H O N E
See page 14.
Answer phone allows you to change the original settings of your answering machine e.g. time and day settings, outgoing messages. See Using your Synergy answering machine page 13. It also allows you to access your answering machine from your Synergy handset to playback messages etc. see page 16.
Options
Recall |
|
|
|
|
Intercom |
|||
|
|
A |
B |
D |
|
|
||
|
|
2 |
C |
E |
||||
|
|
|
||||||
|
|
|
|
|||||
1 |
|
|
3 |
F |
||||
|
|
|
|
|||||
|
J |
|
|
|
||||
G H |
|
K |
L |
M N |
|
|||
I |
5 |
O |
||||||
4 |
|
6 |
|
|||||
|
|
|
|
|||||
P Q |
|
T |
UV |
W X |
|
|||
|
|
|
||||||
R |
8 |
|
9 |
Y |
||||
7 |
S |
|
|
Z |
||||
|
|
0 |
|
|
|
|
||
|
Redial |
|
|
Quickdial |
|
|
|
|
Telephone
Second 
 press
press 
C A L L D I V E R T
See page 39.
Third press
F R I E N D S F A M
See page 41.
Fourth press
C A L L M Y B I L L
See page 41.
Set-up allows you to change the original settings of your telephone e.g. handset ringer volume, melodies. See optional settings page 32. It also allows you to register your handset, see page 43. And allows you to register Additional Handsets, see page 43.
Fifth press
S E T - U P
Please open this page for a further ‘at a glance’
guide to your Synergy 1500.

In this guide
At a glance |
1 |
Introduction |
4 |
Setting up |
6 |
Using your Synergy 1500 |
|
telephone |
9 |
Using the Quickdial memory |
11 |
Using your Synergy 1500 |
|
answering machine |
13 |
Remote Access |
28 |
Remote access quick guide |
31 |
Optional settings |
32 |
Additional features |
36 |
Using Select Services |
39 |
Using additional handsets |
43 |
Operating with additional |
|
base stations |
48 |
Connecting to a switchboard |
50 |
Wall-mounting |
51 |
Maintenance |
52 |
Help |
53 |
Technical information |
56 |
Technical specification |
57 |
Index |
58 |
Hints and tips boxes
In this user guide, we’ve included helpful tips and useful hints. They are shown in a grey box.
3
Introduction your Synergy 1500 is designed for ease of use and made to the high standards set by BT.
Please read the instructions carefully before use and retain this user guide for future reference.
DECT
By purchasing the Synergy 1500 you now own a product which combines the advantages of cordless operation with the performance of a high quality corded telephone. It complies with the Digital Enhanced Cordless Telecommunications (DECT) standard and offers unparalleled quality and features.
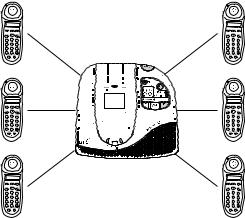
Building up a phone system
You can use up to 6 handsets with your Synergy 1500 base station.
1 |
2 |
3 |
1 |
2 |
3 |
4 |
5 |
6 |
4 |
5 |
6 |
7 |
8 |
9 |
7 |
8 |
9 |
|
0 |
|
|
0 |
|
|
|
|
This equipment is not |
|
|
|
|
|
designed for making |
|
|
|
|
|
emergency telephone calls |
|
|
|
|
|
when the power fails. |
|
|
|
|
|
Alternative arrangements |
|
|
|
|
|
should be made for access |
|
|
|
|
|
to emergency services. |
|
|
1 |
2 |
3 |
1 |
2 |
3 |
4 |
5 |
6 |
4 |
5 |
6 |
7 |
8 |
9 |
7 |
8 |
9 |
|
0 |
|
|
0 |
|
1 |
2 |
3 |
1 |
2 |
3 |
4 |
5 |
6 |
4 |
5 |
6 |
7 |
8 |
9 |
7 |
8 |
9 |
|
0 |
|
|
0 |
|
This user guide applies to both single and multiple handset systems. The intercom call functions described in this guide apply only to Synergy 1500 base stations with more than one Synergy handset connected.
4

Warning
1. Use only the approved battery pack supplied. Spare batteries – Item Code: 871285 are available from BT Shops and the Synergy Helpline
0845 650 20 20.
2.Do not try to use any power supply except the one provided, otherwise you may permanently damage your Synergy 1500. It may also invalidate approval of this apparatus. To get a replacement Synergy 1500 base station power supply unit (Item Code: 871343) contact the Synergy Helpline 0845 650 20 20.
3.There is a slight chance that your phone could be damaged by an electrical storm. We recommend that you unplug your Synergy 1500 from the mains power and telephone line socket during storms.
4.If you wear a hearing aid, please note that the Synergy 1500 works by sending radio signals between the base station and handset. These signals can interfere with hearing aids, causing a humming noise.
5.Synergy 1500 can interfere with other electrical equipment, e.g. answering machines, TV and radio sets, clock radio/alarms and computers if placed too close. It is recommended that you place your Synergy 1500 at least one metre away from such appliances to avoid any risk of interference.
The Synergy 1500 system has a range of up to 300 metres outdoors and up to 50 metres indoors. It is possible that the range may be affected by being near water (e.g. large ponds, lakes, the sea) and large metal objects (e.g. radiators, steel girders and metal partition walls).
6.The Synergy 1500 will produce a certain amount of heat during operation. Equally, the handset as well as any additional chargers you purchase can also become warm during charging.
7.We advise against placing these products on antique, veneered or wooden surfaces as damage may occur.
8.Do not use the Synergy 1500 in damp, humid conditions such as bathrooms. Do not expose the equipment or batteries to fire or water.
9.Do not dispose of used batteries with general household rubbish and do not burn them.
10.Do not use the handsets in places where there are explosive hazards.
11.Make sure you connect the power and telephone lines to the correct sockets in the base station.
12.Clean the handset and base station with a damp (not wet) cloth or antistatic wipe.
Never use a dry cloth as this may cause a static shock. Never spray cleaning fluid directly onto the telephone.
5
Setting up follow these steps to get your Synergy 1500 ready for use.
Plan where you will put your Synergy 1500 base station. It should be within 2 metres of
a power socket and phone socket otherwise extension cables will be required. You can mount your Synergy 1500 on the wall or leave it free standing. To wallmount your Synergy 1500, see page 51.
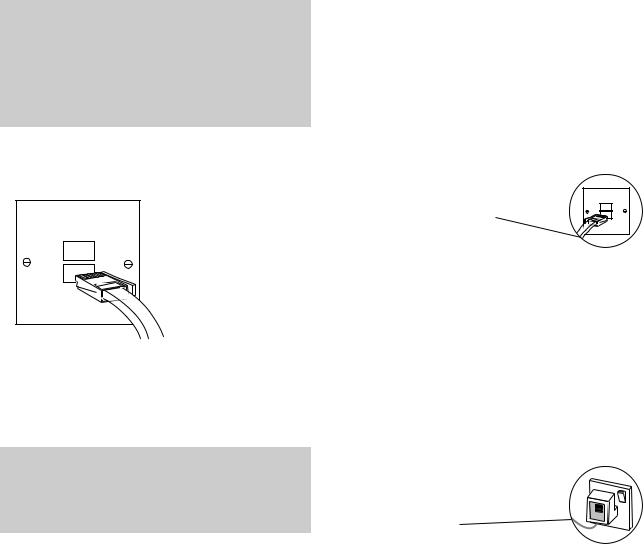
1. Connect the telephone line cord
If you do not have modern phone sockets, call Freefone 0800 800 150 and ask for a BT engineer to come and fit the correct type. This is a chargeable service.
Please note
Take care that the telephone line cord and power cable plugs are connected to the correct sockets. Incorrect placement could damage the unit.
2. Connect the telephone line cord to the Synergy 1500 base station
Plug the line cord into the line socket on the underside of your Synergy 1500.
3. Connect the power cable
Plug the power cable into the power socket on the underside of your Synergy 1500. When the power is switched on, the base station CHARGING light comes on and the answering machine will announce the day and time setting.
6
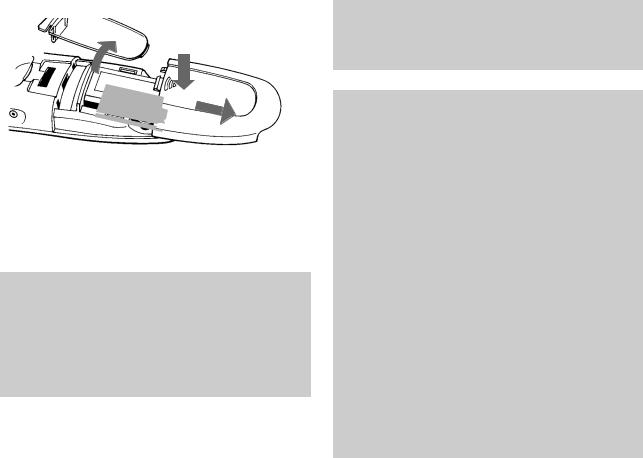
4. Install the rechargeable battery in the handset
The Synergy 1500 handset uses a nickel cadmium (NiCad) battery pack supplied. Hold the handset with the keypad facing down, remove the clear plastic directory label cover and memo card and press and slide open the battery compartment.
Push
The CHARGING light comes on. Your handset should come pre-registered to the base station as HSET1. If the display shows REG, you will need to register the handset manually by following the simple steps on page 43, “To register a handset”.
To keep your battery in the best condition, leave the handset off the base station for a few hours at a time. (after the initial 16 hour charge)
BATTERY |
Slide |
|
Insert the battery pack inside the battery compartment and slide the battery compartment cover shut. Replace the memo card and the directory label cover.
WARNING
It is recommended that the line cord is not connected until the handset is fully charged. This will prevent the risk of the phone being answered prior to the battery being fully charged and therefore not working to its optimum capacity.
5. Charge the handset battery for at least 16 hours
Before you use your Synergy 1500 for the first time it is important to have the handset battery fully charged. We recommend that you leave the Synergy 1500 Handset on charge for at least 16 hours. Place the handset on the base station.
Battery performance
After charging your Synergy 1500 for the first time, subsequent charging time for the handset batteries is approximately 4-5 hours. Batteries and case may become warm during charging. This is normal and not dangerous.
Under ideal conditions, the handset battery should give about 6 hours talktime or 60 hours standby on a single charge. Please note, however, that the new NiCad battery, does not reach its full capacity until it has been in normal use for several days.
Please note that while NiCad rechargeable batteries can be expected to give years of service they do not last forever. Their actual lifespan depends on how heavily they are used but over time, their capacity to recharge will begin to diminish and they will eventually need replacing.
7
Battery low warning
Your handset display will show the status of your battery:
•When the charge is low, the battery icon
 is displayed.
•When the charge is almost out, you will also hear a warning beep every 10 seconds (during a call) in the earpiece. This indicates that the handset is about to switch off.
6. To wall mount your product
(See ‘Wall-mounting’, page 51.)
7. To plan the location of the base station
Your Synergy 1500 works by sending and receiving radio signals between the base station and the handset.
The strength of the signal depends on where you site the base station. The higher the base station is located, the better. An upstairs room is ideal. The following points should be considered:
•It should be within easy reach of a mains socket and a telephone socket.
•Try to avoid locations near metallic obstructions or electrical appliances, such as TV sets, fridges, computers, fluorescent lights, radiators, metal pipes and metal window frames.
8

Using your Synergy1500 telephone
Making and receiving calls
To make a call
•Press the TALK button to get a line. Display shows  . The IN-USE light on the base station comes on.
•Enter the number you want and it is dialled.
Or to preview the number before you call
•Enter the number you want. Display shows the number entered. If you make a mistake
you can change the number by pressing thebutton to delete individual digits.
•Press the TALK button. The number is dialled.
To end a call
•Press the TALK button.
Or
•Place the handset back on the base station.
To receive a call
When the phone rings, both the call light on the handset and the in-use light on the base station flash. Display shows  and SCREEN.
•Press the TALK button.
Or
•Pick up the handset from the base station. Display shows  and the IN-USE light remains on.
Secrecy
While on a call, this allows you to talk to someone close by without your caller hearing the conversation.
During your call:
•Press the button. Display shows Secrecy icon flashing  and SEC. You can now talk without the person on the other end of the line hearing you.
•To talk to your caller again, press the button.
9
To redial the last number
Redial
•Press the TALK button.
•Press the REDIAL button. The number is dialled. Display shows the number.
Or
•Press the REDIAL button. Display shows the
last number called. The number can be edited by pressing the button to delete individual digits.
•Press the TALK button. The number is dialled.
To adjust the earpiece volume
You can adjust the volume at any time during a call or whenever you get an external line and hear the dial tone.
•Press the VOLUME buttons + or – on the side of the handset to increase or decrease the volume. Display shows the level by a series of vertical bars. I = min. I I I I I = max.
Please note
If the volume – button is pressed whilst the handset is in standby mode the handset volume is set to SILENT. To deselect this option press the – button again. For more information see ‘Optional Settings’, page 32.
To page the handset
•Press and release the blue PAGE button on the base station.
The handset rings for about 10-12 seconds. Display shows PAGE and the  flashes. Paging is useful to help you find a misplaced handset. You cannot hold a conversation between the handset and the base station.
If you hit the page button by accident or want to cancel it, press and release the button quickly.
If you have more than one handset registered to the base station, all the handsets will ring.
10
Using the quickdial memory
Shared and personal quickdials
You can store up to 20 numbers on your Synergy 1500.
Shared telephone numbers
10 numbers can be stored in your shared memory. These numbers can be quick dialled by any Synergy handset registered with the base station.
Personal telephone numbers
A further 10 numbers can be stored in your personal memory. These numbers can only be used to quickdial from the handset they are stored in.
To select shared or personal quickdial numbers
Your Synergy is set to SHARED quickdials. You can switch between SHARED and PERSONAL
Quickdial
•Press and hold the QUICKDIAL button for at least 2 seconds.
•Handset beeps and LCD shows SHARED or PERSONAL depending on the current setting.
•Press to switch between the 2 options.
•When required option is displayed on LCD press to confirm.
•Handset LCD reverts to HSET 1
To store a quickdial number
Quickdial
0-9
Once you have selected either your ‘Personal’ or ‘Shared’ QUICKDIAL store:
•Press and release the QUICKDIAL button
•Display shows 1 if no number stored or 1 followed by the number stored in the memory.
•Press the button to scroll through the memory locations
•When the required memory location displayed press and hold the QUICKDIAL button for at least 2 seconds or until a beep is heard.
•Enter the phone number you want.
•The display shows the location and the phone number.
•Press the or QUICKDIAL button to store the number. You hear a confirmation beep and the display shows STORED
You may find it useful to keep a note of the location number (0-9) you set for quickdial numbers. Use the directory label on the back of the handset.
PULL
1
2
3
4
5
6
7
8
9
0
No.
11
To view a quickdial memory number
You can scroll through the quickdial numbers and see any available locations. You can then change or add a number.
First, confirm that the handset is searching in the correct memory (i.e. SHARED or PERSONAL), if it is not, change it by following the steps on page 11.
Quickdial
0-9
•Press and release the QUICKDIAL button.
•Display shows the first quickdial location plus the number stored under that location.
•Press the button to scroll through the other quickdial numbers.
Press the button to reverse one step of the instructions. Or press it and hold for 2 seconds to revert quickly to standby.
To edit a quickdial memory number
First, confirm that the handset is searching in the correct memory (i.e. SHARED or PERSONAL), if it is not, change it by following the steps on page 11.
Quickdial
•Press and release the QUICKDIAL button.
•Display shows the first quickdial location plus the number stored under that location.
•Press the button to move to the stored number that you want to edit.
•Press the QUICKDIAL button for a few seconds or until a beep is heard.
•Press the button to delete the existing digits from the right. When the memory is empty, key in the new number.
•Press the button to store the new number. The display shows STORED and the handset beeps.
To dial a quickdial number
This dials from the quickdial memory, SHARED or PERSONAL, which is currently selected.
Quickdial
0-9
•Press the TALK button.
•Press the QUICKDIAL button.
•Press the location 0-9 where the quickdial number you want is stored. The number is dialled.
Or
To view then dial a quickdial number
You can display the number before dialling.
Quickdial
•Press the QUICKDIAL button.
•Display shows the first location and the number stored.
•Press the button to scroll through the quickdial list until you display the number you want.
•Press the TALK button. The number is dialled.
12

Using your Synergy1500 answering machine
When you are unable to answer the phone, your Synergy 1500 answering machine will take messages.
You can also leave your own recorded messages (see Memos page 22). The Synergy 1500 can record up to 15 minutes of messages.
You can skip backwards and forwards through your messages and memos and, using your handset, delete or save some or all of them.
The answering machine can be operated from any Synergy handset or any other external phone, provided it is a Touchtone™ phone.
Outgoing messages
The Synergy 1500 contains a number of pre-recorded announcements, including two different outgoing messages which you can replace with a recording in your own style and voice.
Of these two, one announcement invites callers to leave a message. The other enables you to leave an announcement, but does not allow callers to leave a message.
This applies when the message memory is full or if you have chosen to set the answering machine to Answer Only mode.
Please note:
Deleting your recorded outgoing messages will automatically reinstate the original
pre-recorded message. It is not possible to delete any of the pre-recorded messages.
Recording time limit
The Synergy 1500 also has its own pre-recorded concluding announcement. This cuts in automatically to warn callers that they are about to, or have run out of time for recording their message. Incoming messages are restricted to a maximum of 3 minutes. Outgoing messages are restricted to a maximum of 30 seconds.
If a period of silence in excess of 8 seconds occurs during the recording of incoming messages the Synergy answering machine will stop recording and return to standby.
Mains power failure
If the mains power fails, your Outgoing Messages and any Incoming Messages or Memos that have been recorded will be saved. However, if the mains power fails you will need to reset the time and day announcement.
13

Setting up your Synergy 1500 answering machine
You will need to use your Synergy handset to set up the answering machine’s basic functions.
To set Day and Time
Your Synergy 1500 is supplied with factory-set defaults for day and time: Sat 12:01 pm.
•Press button once. Display shows ANS PHONE
•Press button. Display shows ANS ON OFF or PLAY, if there are messages.
•Press button several times until ANS SET-UP is displayed.
•Press button. Display shows REC OGM.
•Press button several times until DAY is displayed.
•Press button. Display flashes. Shows DAY = MON (or whichever day of the week is currently set).
•Press button to scroll through the days of the week until the required day is shown.
•Press button. A confirmation tone sounds. Display stops flashing and shows TIME.
•Press button again.
The time can now be set.
•Display shows TIME=0000 (0000 is the first display shown on connection to the mains, or the current time if set previously).
•The first 0 on the left flashes, indicating that it is the first digit to be changed or confirmed (confirm by pressing the same digit on the button pad).
•Using the 24 hour clock, enter the time in hours and minutes, starting from the left.
•After you have entered the first digit it will stop flashing. The next digit then starts flashing. Repeat the process until the correct time shows.
•Press button. Confirmation tone sounds.
•Display shows time set and returns to TIME.
•Press the button to return to standby.
To set Time only:
If required, TIME can be set without the need to set DAY.
•Press button once. Display shows ANS PHONE.
•Press the button.
•Display shows ANS ON OFF or PLAY, if there are messages.
•Press button several times until ANS SET-UP is displayed.
•Press button. Display shows REC OGM.
•Press button several times until TIME is displayed.
•Press button again.
The time can now be set.
•Display shows TIME=0000 (0000 is the first display shown on connection to the mains, or the current time if set previously).
•The first 0 on the left flashes, indicating that it is the first digit to be changed or confirmed (confirm by pressing the same digit on the button pad).
•Using the 24 hour clock, enter the time in hours and minutes, starting from the left.
14

•After you have entered the first digit it will stop flashing. The next digit then starts flashing. Repeat the process until the correct time shows.
•Press button. Confirmation tone sounds.
•Display shows time set and returns to TIME.
•Press and hold the button to return to standby.
Please note:
At the end of any procedure press button once to move back to the top of the current menu option. Press and hold button to return to standby immediately, otherwise wait 20 seconds, and it will return automatically.
Please note:
If you stop any procedure before it is completed your Synergy handset will return to standby after 20 seconds.
Outgoing messages
Your Synergy 1500 is supplied with 3 pre-set outgoing messages. Of these, messages 1 & 2 can be replaced by your own recorded messages. You can choose to use either of these, depending on how you wish to use your call answering facility (see To set the Answer Mode page 20).
The pre-set announcements are as follows:
Message 1: ‘Hello, your call cannot be taken at the moment, so please leave your message after the tone’. The message will play when the answer phone is set to ON and Answer and Record.
Message 2: ‘Hello, your call cannot be taken at the moment and you cannot leave a message, so please call later’. This message plays when the answer phone is set to ON and Answer Only.
Message 3: ‘Hello, your call cannot be taken at the moment, so please call later’. This message plays when the answer phone is set to ON and Answer and Record, but the memory is full.
Reminder
You may record your own versions of Messages 1 & 2.
To record your own outgoing messages
These may be recorded via the Synergy cordless handset or remotely, using a Touchtone™ telephone.
Message length is limited to 30 seconds.
We recommend that you write down your message first, then practice it before recording. It should be brief, polite and to the point. Examples:
Message 1: ‘Jack and Jill cannot take your call at the moment, so please leave a message after the tone. We will get back to you as soon as possible. Thank you for calling.’
Message 2: ‘Jack and Jill cannot take your call at this time. Please call back later. Thank you for calling.’
Please note:
Recording outgoing messages from a Touchtone™ phone is covered in ‘Remote Access’ (See page 28).
15
 Loading...