


Freestyle 320 Plus
User guide

Please turn this page for the “At a glance ” guide to
your Freestyle 320 Plus


Freestyle 320 Plus base unit
At a glance
Telephone line cord |
8V AC socket/line |
||||||||||
Connects base unit to |
Connects your Freestyle 320 Plus to the |
||||||||||
phone socket. |
mains via the power adaptor supplied. |
||||||||||
|
|
|
|
|
|
|
|
|
|
|
|
|
|
|
|
|
|
|
|
|
|
|
|
|
|
|
|
|
|
|
|
|
|
|
|
|
|
|
|
|
|
|
|
|
|
|
|
|
|
|
|
|
|
|
|
|
|
|
|
|
|
|
|
|
|
|
|
|
|
|
|
|
|
|
|
|
|
|
|
|
|
|
|
|
|
|
|
|
|
|
|
|
|
|
|
Freestyle 320 plus
 Power
Power
In Use
Intercom
Charging
Battery charging contacts |
Charging indicator |
Contact to handset to allow |
Lights up when phone is |
automatic charging of batteries. |
charging. |
Extendible aerial
Power indicator
Lights up when phone is connected to mains.
In use indicator
Lights up when phone is being used.
Intercom button
Allows you to use the handset and base unit as an intercom.
Intercom microphone
2

Contents
In this guide
At a glance |
1 |
Introduction |
4 |
Setting up |
5 |
How to use your Freestyle 320 Plus |
12 |
Additional features |
20 |
Freestyle Plus Additional Handsets |
25 |
Help |
28 |
Technical information |
31 |
Index |
33 |
Hints and tips boxes
In this user guide, we’ve included helpful tips and useful notes. They are shown in a grey box.
3

Introduction
Introduction Your Freestyle 320 is designed for ease of use and made to the high standards set by
We thank you for making the right choice and expect that you will have many years of quality service from your Freestyle 320 Plus.
Please read this User Guide carefully before use, and keep it for future reference.
For your records
Date of purchase:
Place of purchase:
Serial number (on base of telephone):
Purchase price:
(for warranty purposes, proof of purchase is required, so please keep your receipt)
The Homepoint Plus logo (shown below) on your Freestyle 320 Plus means that you can buy and use up to three extra handsets displaying the same logo to extend your phone system whenever you want, without needing to install extension sockets at each location. Please see additional handsets on page 25 and refer to the instructions supplied with each additional handset.
Homepoint Plus
4

Setting up
Setting upFollow these steps and your Freestyle 320 Plus will be ready for use.
Important: Before you use your Freestyle 320 Plus
As this product is rechargeable, it is normal that a certain amount of heat will be produced in its day- to-day operation. Whilst this is entirely safe we would advise against placing this product on antique, veneered or wooden surfaces as damage may occur.
Plan the location of the base unit. The following points should be considered:
•The base unit should be within two metres of a power socket and the phone socket. A new-style phone line socket is needed for this product.
If you do not have one, call us free on FREEfone 0800 800 150.
•There should be enough room for the telescopic aerial to be fully extended, ideally vertically.
•Ensure that the base unit and the aerial are away from TV sets, fridges, computers, GSM telephones, fluorescent lights, radiators, metal pipes and metal window frames.
•If your Freestyle 320 Plus is your only phone, you must fit back-up batteries in case of power cuts. The required battery type is a PP3 Alkaline 9V (not supplied).
•The back up battery must be fitted before attaching the base unit to the mounting bracket.
Check that your Freestyle 320 Plus is complete. When you unpack you must have:
•base unit with telescopic aerial and telephone line cord attached;
•handset;
•13 amp mains power adaptor plug;
•stand/wall-mounting bracket;
•two screws and wall plugs for wall-mounting;
•spare directory label.
5
Setting up
Like all cordless phones, the Freestyle 320 Plus 3 Insert battery (for back up only) handset must be charged for 24 hours before
first use.
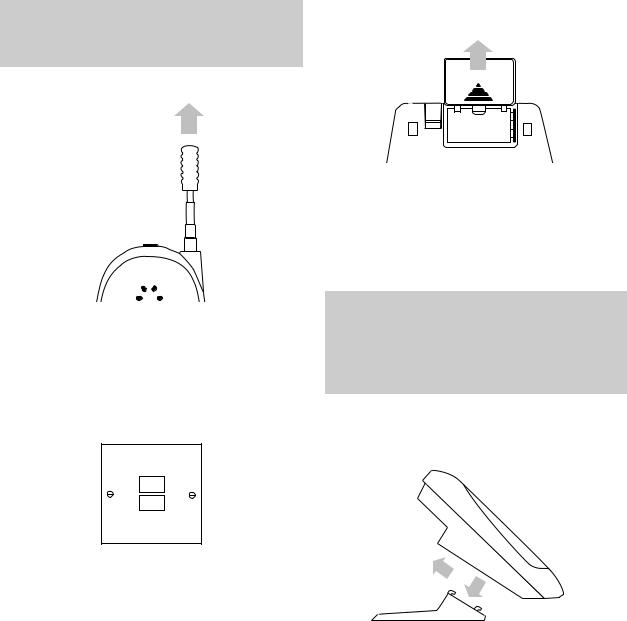
1 Handset aerial
BATTERY
Pull
Your Freestyle 320 Plus uses |
aerial. |
When using the handset pull |
the aerial to |
ensure the best possible |
reception. |
2 Check your telephone wall socket
If you do not have a modern socket, call BT on Freephone 0800 800 150 and ask for an engineer to come and fit the right socket within two metres of a mains socket. This is a chargeable service.
Open the panel underneath the base unit.
Fit a PP3 Alkaline 9 volt battery (not supplied) and replace the panel. The battery will only be connected and functioning when the cover is closed.
The battery provides back-up power to ensure that your Freestyle 320 Plus will work in the event of a mains power failure. We strongly advise you to fit a battery if a cordless phone is the only phone in your home.
4 Clip the base unit onto the stand
6
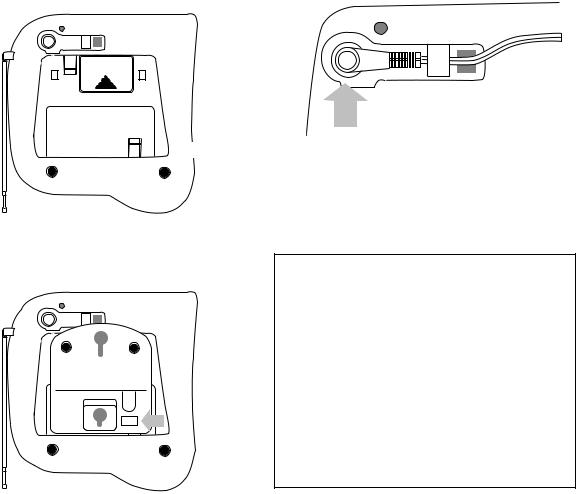
Your Freestyle 320 Plus features a safety clip on the underside of the base which prevents the stand coming away from the unit accidentally.
8V AC
LINE
 SAFETY CLIP
When attaching the stand make sure that it snaps securely into position over the clip.
8V AC
LINE
If you prefer to mount your Freestyle 320 Plus on the wall, see page 9.
Setting up
5 Plug the power cable into the base unit
8V AC
LINE
Plug the power cable into the socket located underneath the base unit. Thread the cable under the clip to make sure it cannot be pulled out accidentally.
Cautions
1.Do not use any power adaptor except the one supplied, as this may cause irreparable damage to your Freestyle 320 Plus.
2.Your Freestyle 320 Plus is mains powered and should not be installed in wet or damp conditions, for example in a bathroom.
Also, the handset should not be left out in the rain.
3.There is a slight chance that your phone could be damaged by an electrical storm. We recommend that you unplug the unit from the mains during such storms.
7
Setting up
6 Now connect the 3-pin adaptor into a convenient mains socket
When the power is switched on, the red POWER light comes on.
 Power
Power
7 Place the handset onto the base unit
Your Freestyle 320 Plus handset can be placed onto the base unit either face up or face down.
Charging
The base unit’s red CHARGING light comes on. The handset displays HSET 1.
8 Leave the handset to charge for 24 hours
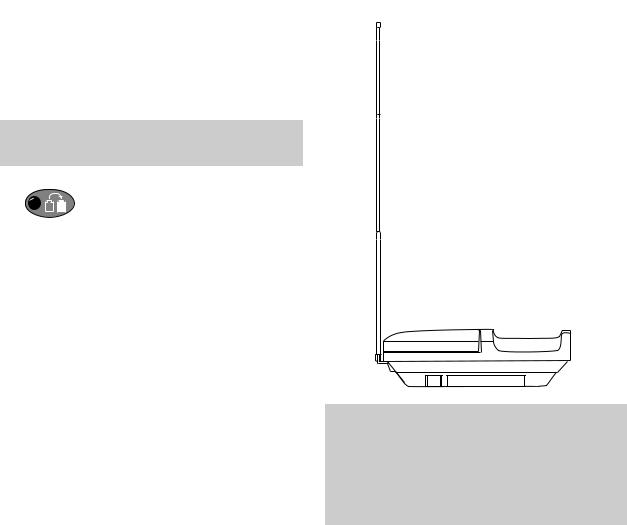
8 Extend the base unit telescopic aerial
Extend the base unit telescopic aerial on your Freestyle 320 Plus (as shown below) to ensure the best possible signal and reception.
For best reception
Try to avoid putting the telescopic aerial near other electrical appliances, fluorescent lights and large metallic objects such as cookers, radiators and garage doors as these may cause interference and reduce the quality of your calls.
8
10 Plug into the phone socket
You can now use the phone, store numbers in the memory and change some of the settings as desired.
Using the inductive coupler
Your Freestyle 320 Plus is fitted with an inductive coupler in its handset to improve sound quality for people using
hearing aids. Switch your hearing aid to T and adjust the position of the handset until you obtain the best sound.
Setting up
11 Wall mounting your Freestyle
320 Plus (optional)
Your Freestyle 320 Plus can be wall mounted by using the stand/bracket provided.
Use the stand/bracket as a template to mark where you will put the screws into the wall.
Before you wall-mount your Freestyle 320 Plus, check:
•That the wall can support the weight of the base unit and handset.
•That the position you choose leaves enough space around the mounting bracket so that the base unit (which is larger than the bracket) is clear of anything on the wall, such as a shelf or cupboard.
•That the position you choose leaves enough space for the base unit telescopic aerial to be fully extended.
9
 Loading...