


CONVERSE
User Guide
BT CONVERSE 1300
■ 200 Name and number directory.
■ Nine pre-set BT Calling Feature numbers giving easy
access to, directory enquiries, Call Diversion, Call Waiting
and the 1571 BT answering service.
■ Headset socket lets you make and receive calls privately
while keeping your hands free.
■ Handsfree button lets you make and receive calls using
the built in loudspeaker and microphone.
■ Secrecy lets you talk to someone else close by without
your caller hearing.
■ Redial the last 5 numbers.
■ Adjust the volume of your caller’s voice.
■ Providing you are connected to a compatible
switchboard, or are a 1571 user, the voice mail indicator
lets you know if you have messages on your network’s
answering service.
■ Data Port lets you connect a modem or similar products.
Welcome…
to your BT Converse 1300 corded
telephone

Section
This User Guide provides you with all
the information you need to get the
most from your phone.
Before you make your first call you will
need to set up your phone. Follow the
simple instructions in ‘Getting Started’,
on the next few pages.
■ Hearing aid friendly
The BT Converse 1300 is fitted with an inductive coupler
so it is compatible with hearing aids.
Got everything?
■ BT Converse 1300
telephone
■ Handset and cord
■ Telephone line cord
■ Power supply unit
■ Stand for desk-mounting
(fitted)
■ Wall mounting plugs
and screws

Getting started
Location . . . . . . . . . . . . . . . . . . . . . . .5
Setting up . . . . . . . . . . . . . . . . . . . . . .5
Getting to know your phone
Buttons . . . . . . . . . . . . . . . . . . . . . . . .8
Using the phone
Making and ending calls . . . . . . . . . . .10
Receiving a call . . . . . . . . . . . . . . . . . .10
Headset . . . . . . . . . . . . . . . . . . . . . . .10
Handsfree . . . . . . . . . . . . . . . . . . . . . .11
Volume . . . . . . . . . . . . . . . . . . . . . . . .12
Redial . . . . . . . . . . . . . . . . . . . . . . . . .12
Secrecy . . . . . . . . . . . . . . . . . . . . . . . .12
Message Waiting . . . . . . . . . . . . . . . . .13
Recall . . . . . . . . . . . . . . . . . . . . . . . . .13
Directory
Store a number in the directory . . . . . .14
Dial a number in the directory . . . . . . .14
Edit a directory entry . . . . . . . . . . . . . .16
Delete a directory entry . . . . . . . . . . .16
Delete all directory entries . . . . . . . . .16
Menu
Ringer volume . . . . . . . . . . . . . . . . . . .17
Ringer tone . . . . . . . . . . . . . . . . . . . . .17
Time & Date . . . . . . . . . . . . . . . . . . . .18
Contrast . . . . . . . . . . . . . . . . . . . . . . .18
BT Calling Features . . . . . . . . . . . . . .19
Caller Display . . . . . . . . . . . . . . . . . . .19
Calls list . . . . . . . . . . . . . . . . . . . . . . .20
View an entry in the Calls list . . . . . . . .20
Dial an entry in the Calls list . . . . . . . .20
Save an entry from the Calls list
to the directory . . . . . . . . . . . . . . . . . .21
Delete an entry in the Calls list . . . . . .21
Delete all entries in the Calls list . . . . .22
Menu options . . . . . . . . . . . . . . . . . . .23
BT Answer 1571 . . . . . . . . . . . . . . . . .23
118 500/118 707 . . . . . . . . . . . . . . . .23
Call Divert . . . . . . . . . . . . . . . . . . . . . .24
Reset your phone . . . . . . . . . . . . . . . .25
Connecting to a switchboard . . . . . . . .25
Help . . . . . . . . . . . . . . . . . . . . . . . . . .27
General information
Safety . . . . . . . . . . . . . . . . . . . . . . . . .28
Cleaning . . . . . . . . . . . . . . . . . . . . . . .28
Environmental . . . . . . . . . . . . . . . . . . .28
Guarantee . . . . . . . . . . . . . . . . . . . . . .29
Returning your phone . . . . . . . . . . . . .30
Accessories and replacement items . . .30
How many telephones can you have? . .30
Switchboard compatibility . . . . . . . . . .31
R&TTE Directive . . . . . . . . . . . . . . . . .31
Wall mounting your phone . . . . . . . . .32
4
In this guide
Location
You need to place your BT Converse 1300 within 3
metres of a telephone and mains power socket so that
the cables will reach.
Your BT Converse 1300 can be wall mounted, see ‘Wall
mounting your phone’ page 32.
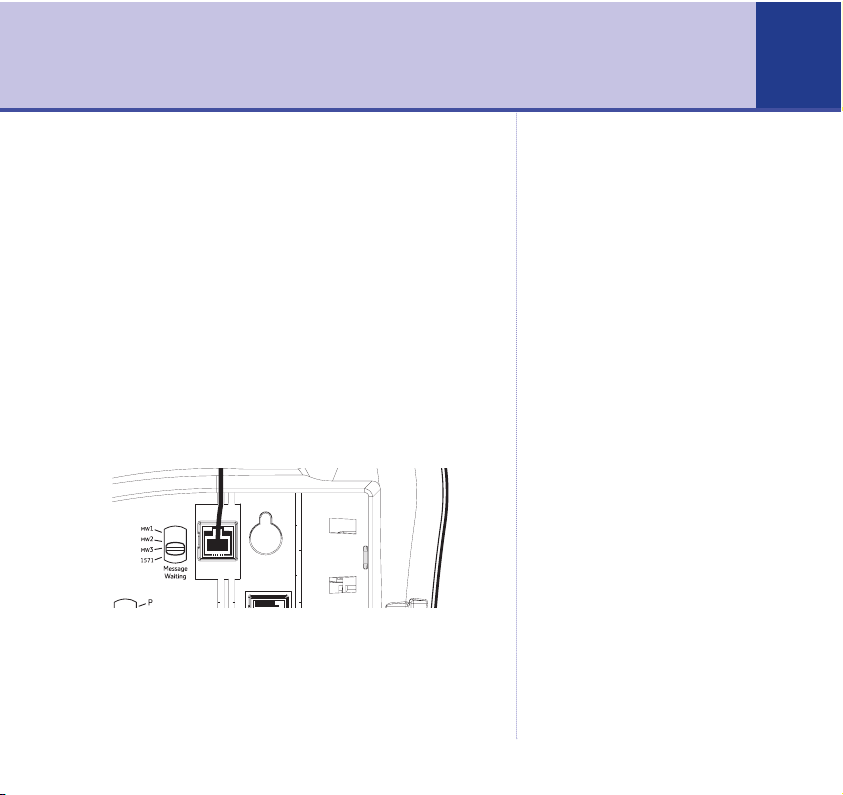
Setting up
Connect the mains power supply
1. Plug the lead of the mains power cable into the POWER
socket on the underside of the phone and route the cable
as shown.
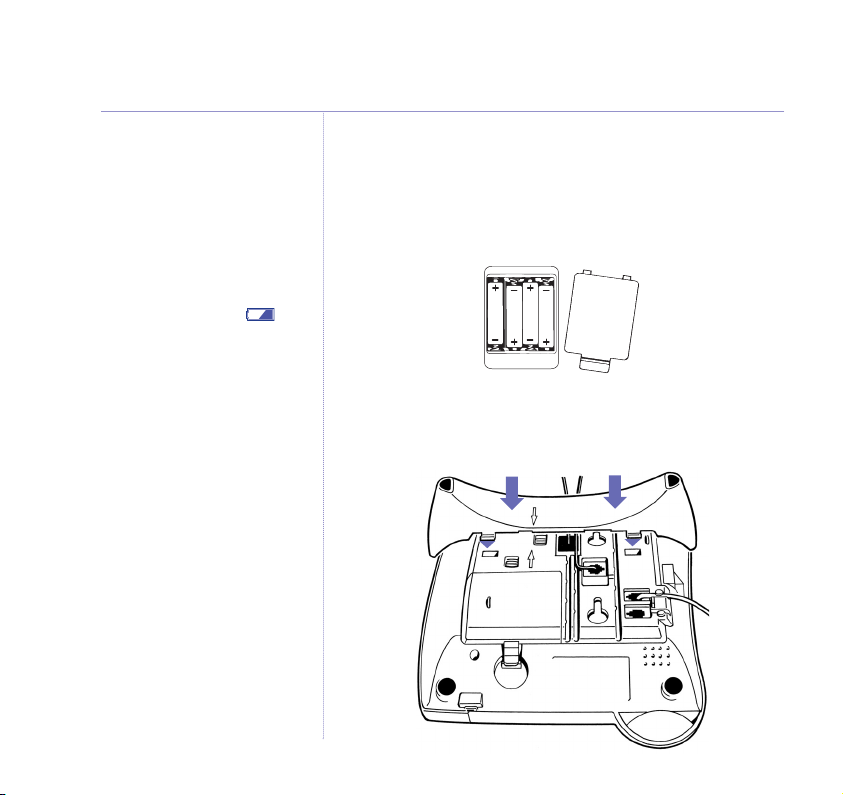
Optional
2. Your BT Converse 1300 is designed to run from a
power supply or batteries. Batteries are not supplied
with the unit, but if you want to fit them follow the
instructions below.
Getting started
5
POWER
LINE 1
6
If you are not using the power supply provided, batteries
are required for the message waiting feature to work.
Turn the phone over and remove the battery
compartment cover. Insert 4 x AA batteries as shown
and replace the cover.
3. Fit the desk mounting plinth if required by positioning
the plinth over the lugs and pushing it down into place,
as shown by the blue arrows.
Getting started
Battery low indicator
If you have batteries fitted and
they need replacing, the will
flash in the display.
4. Plug the mains power adaptor into the wall socket and
switch on.
5. Plug the telephone line cord into the wall socket.
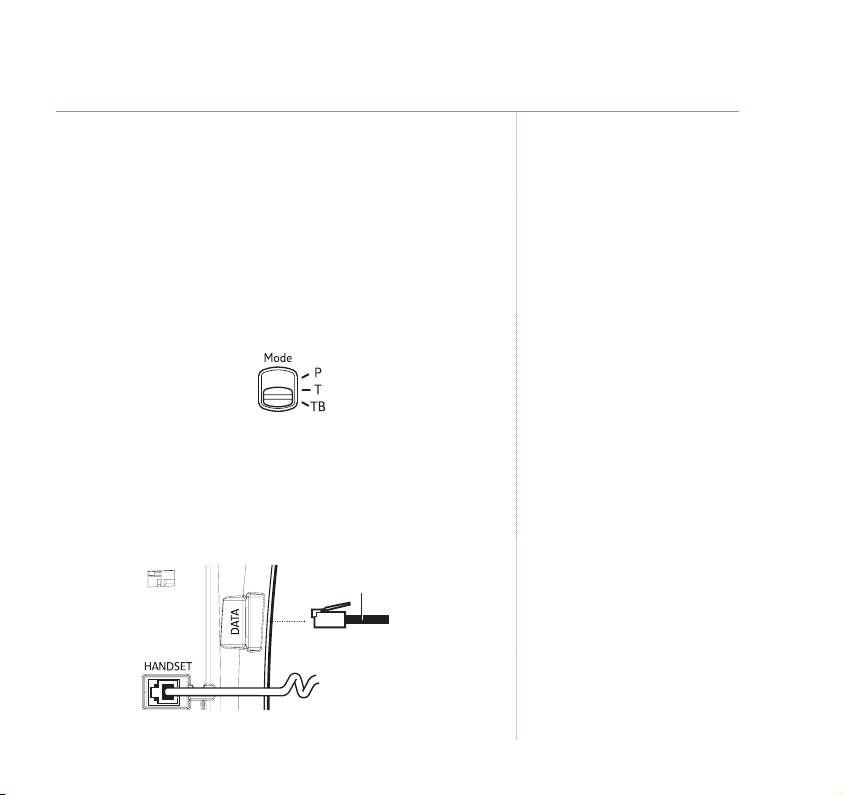
6. Check the dial mode setting.
The Mode switch on the underside of your BT Converse
1300 is pre-set to TB for tone dialling with timed break
recall. If your phone does not work, try setting the
dialling mode to P or T.
If you are not sure which setting to use, please contact
your service provider or switchboard manager.
7. Your BT Converse 1300 has a data socket so you can
connect another product such as a modem. If required,
connect the device to the DATA port on the side of the
phone.
Your BT Converse 1300 is now ready for use.
7Getting started
Data cable
P = Pulse dialling with earth recall.
T = Tone dialling with earth recall.

Getting to know your phone
8
Handset park
If the phone is wall-mounted, you can
hang the handset here if you need to
leave the phone during a call.
UP/DOWN
Lets you scroll through options in the
display, e.g. when you have pressed the
menu or phonebook buttons.
(X) Clear
Deletes characters and numbers from
the directory and redial list.
Recall
For use with a switchboard and some BT
Calling Features, page 14.
Handsfree
Make and receive calls via the built-in
loudspeaker, page 11.
Volume + –
Adjust the volume
of your caller’s
voice, page 12.
Low battery indicator
Flashes when the back-up
battery is low.
Buttons
12.18PM
01/01/05
Menu
Calls
Redial

9
Call indicator
Flashes when you have an incoming call.
Message waiting indicator
Flashes when you have voice mail, page 14.
Directory
Opens the directory, page 15.
Menu
Use the access BT Services and set-up options.
(TICK) Select
Selects and confirms displayed options and entries.
Dials the number entered.
Calls
Use to access the Calls list.
Dialling mode (underneath the phone)
Lets you set the dialling mode, page 7.
Secrecy & indicator
During a call, lets you talk to someone else close by
without your caller hearing you.
When active, the light is illuminated, page 13.
Headset
Lets you make and receive calls when using a headset.
When active, the light illuminates, page 10.
Redial
View and dial any of the last 5 numbers called, page 12.
Microphone
For use when using handsfree.
Display icons
Battery low
icon displayed
if you have
batteries fitted
and they need
replacing.
Ringer’s
switched off
but Call
Indicator
light will still
flash.
Handset
in use.
More than one
call from the
same number
displayed.
Missed call.
12.18PM
01/01/05

Making and ending calls
1. Lift the handset and wait for the dial tone. Dial the
number you want.
2. Replace handset to end the call.
Receiving a call
1. When the phone rings the call indicator light will also
flash. Simply pick up the handset.
Headset
Headsets are not supplied with your BT Converse 1300.
However, you can buy headsets (with RJ11 jack plug) by
calling 0870 240 522 or online at
www.withandwithoutwires.com
Making a headset call
1. Plug the headset (not supplied) into the socket marked
HEADSET on the underside of the base.
2. Press and dial the number. When the headset is in
use, the headset indicator light is illuminated.
3. Press to end the call.
Using the phone
10
 Loading...