


Freestyle 1200
User guide

Please open this page for an ‘At a
glance’ guide to your Freestyle 1200.
At a glance
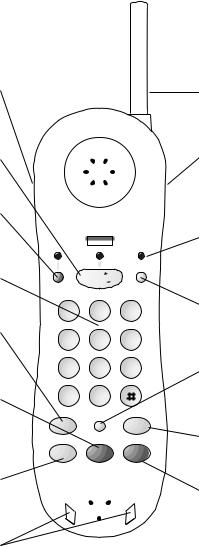
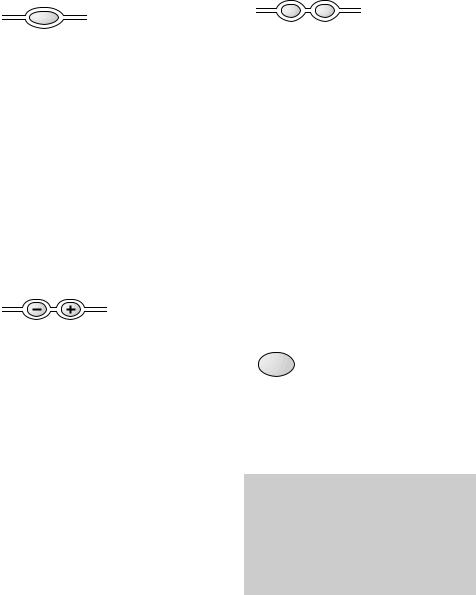
Volume control buttons
Adjusts the handset ringer volume and earpiece speech volume. see page 11
Talk button (and light)
For making and receiving calls. see page 10
Intercom button (and light)
Enables communication between the handset and base unit. see page 14
Keypad
Allows you to operate the answering machine from the handset.
Quickdial button
Allows you to store and dial up to 10 numbers in the memory. see page 12
Call Return (1471) button
Lets you hear the telephone number of the last person who called you. see page 32
Secrecy button
When pressed, it stops the caller hearing you. see page 14
Charging contacts
TALK 
INTERCOM
PL
A
AB Y
1 |
|
|
2 |
C |
ß |
|
|
|
|
I |
|
|
|
|
|
|
I |
|
ßS |
|
|
DE |
|
G |
K |
|
L |
||
|
I |
JK |
T |
||
H |
P |
5 |
L |
|
|
4 |
I |
|
|
E |
|
PQ |
|
TU |
|
||
7 |
R |
|
8 |
V |
|
|
S |
|
|
|
|
0
QUICKDIAL R
SECRECY 1471
BATT
LOW
SCREEN
DE |
|
|
3 |
F |
|
|
S |
|
|
KI |
|
MN |
ß |
|
6 |
P |
|
O |
|
|
WX |
|
|
9 |
Y |
|
|
Z |
|
REDIAL
 Call
Call
Waiting
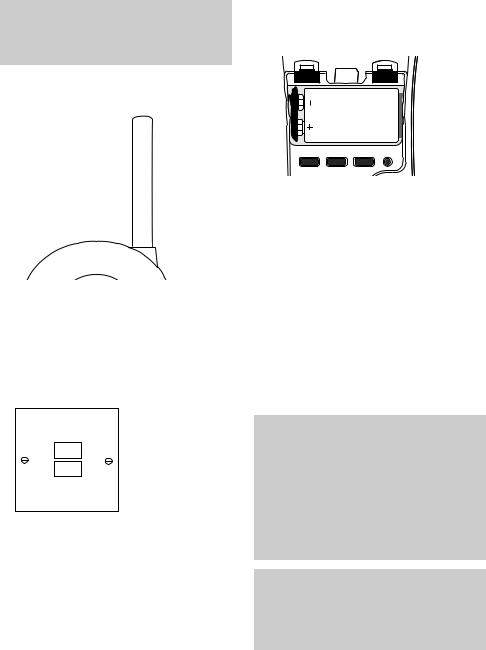
Aerial
Does not extend, do not pull out.
Channel seeker button
Selects the best alternative radio frequency if interference occurs during a call.
see page 11
Battery low light
Flashes when the handset battery is low.
see page 8
Screen button
Allows you to listen to a caller’s message without answering the call. see page 27
Recall button
For use with PBXs and BT Select Services.
see page 17
Redial button
Redials the last number dialled. see page 11
Call Waiting button
Lets you switch between two callers when Call Waiting has been ordered from BT Select Services. see page 32
1

Day/hour/min
buttons
Sets the answering machine’s internal clock. see page 21
Code/Set button
Sets the security code for remote access and sets the day and time. see page 28
Back-up battery
compartment see page 6
Intercom button
and light
Press to make or answer an intercom call. Light flashes when an intercom call is ringing and stays on during the call. see page 14
In use indicator
Lights up when the handset is in use. see page 10
Skip backwards/
forwards and Stop
buttons
Used to stop, skip backward or skip forward during playback of messages. see page 24
Answer on/off
button
Switches the answer machine on or off. see page 22
2
DAY |
HOUR |
MIN |
RESET |
CODE/SET OGM
INTERCOM
DELETE
Freestyle 1200
MAILBOX 1 MEMO MAILBOX 2 |
|
VOLUME |
|
INTERCOM |
|
MESSAGES |
DELETE |
|
|
IN USE |
CHARGING |
|
STOP |
ANSWER |
PAUSE |
ON/OFF |
PLAY |
|
|
Play/pause button Microphone Plays back and pauses
your messages. see page 23
Reset button
Resets the answering machine settings. see page 26
OGM button
Used to record and play your outgoing message.
see page 20
Memo button
Allows you to leave memos for other members of your family. see page 22
Mailbox buttons
Gives callers two additional options as to where messages are left. For example, business messages in mailbox 1 and personal messages in mailbox 2. see page 23
Volume control
button
Adjusts the volume of playback, voice prompts see page 26
Delete button
Deletes messages see pages 20 and 24
Charging indicator
Lights up when the handset batteries are being charged.
see page 7
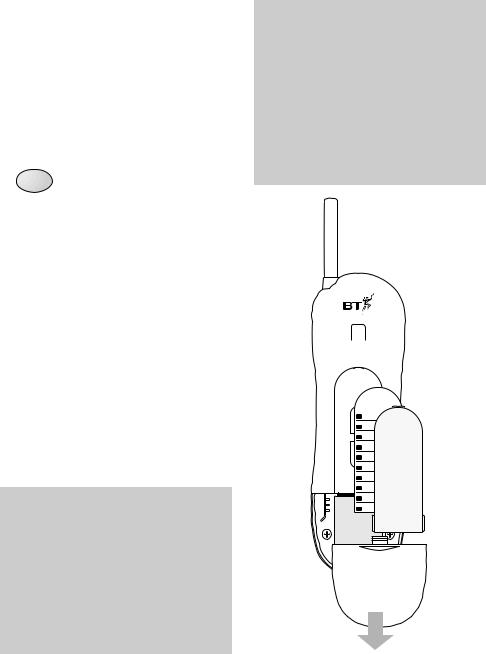
Base unit
telescopic aerial

In this guide
At a glance |
1 |
Introduction |
4 |
Setting up |
5 |
Using your Freestyle 1200 |
|
telephone |
10 |
Using your Freestyle 1200 |
|
answering machine |
18 |
Remote access |
29 |
BT Select Services |
32 |
Freestyle 90/130/1200 |
|
Additional Handsets |
34 |
Help |
37 |
Technical information |
41 |
Maintenance |
44 |
Index |
47 |
Wall mounting |
49 |
Hints and tips boxes
In this user guide, we’ve included helpful tips and useful notes. They are shown in a grey box.
3

Introduction Your Freestyle 1200 has been designed for ease of use and made to the very high
standards set by BT.
We thank you for making the right choice and expect that you will have many years of quality service.
Please read the instructions carefully before use and keep this user guide for future reference.
For your records
Date of purchase:
Place of purchase:
Serial number:
(on the underside of the machine)
Purchase price:
For warranty purposes, proof of purchase is required, so please keep your receipt.
Emergency calls
The emergency services can be contacted in the UK by dialling 999. You may also dial 112, which is valid in any country that is a member of the European Community.
As the Freestyle 1200 is a mainspowered cordless telephone, in certain situations you may not be able to make an emergency call:
•If there is severe radio interference.
•If the handset batteries fail.
•If there is a power cut and there is no back-up battery in the base unit.
If your Freestyle 1200 is connected to a PBX (switchboard), you may have to dial an access number before 999 to contact the emergency services.
Some switchboards cannot dial out during a power failure.
4

Setting up Follow these steps to get your Freestyle 1200 ready for use.
Important
As this product is rechargeable, it is normal that a certain amount of heat will be produced in its day-to-day operation. While this is entirely safe, we advise against placing this product on antique, veneered or wooden surfaces as damage may occur.
Plan where you will put your
Freestyle 1200.
•It should be within two metres of a power socket and the phone socket.
•You need enough room for the base unit’s telescopic aerial to be fully extended.
•For the best operating conditions, try to place the base unit away from large metal objects and other electrical appliances.
Check that your Freestyle 1200 is complete. When you unpack, you should have:
•Freestyle 1200 handset.
•Freestyle 1200 base unit with telephone line cord attached.
•Mains power adaptor plug.
•Wall mounting bracket with screws.
•Remote access quick reference card.
•Spare Quickdial directory label.
Electrical storm warning
1 During periods of electrical storm, you are advised to disconnect your apparatus because damage may occur.
2 If a fault occurs during the 12-month warranty period and it is due to accidental or wilful damage (including lightning and electrical damage), BT will not replace or repair free of charge.
5
Setting up
Like all cordless phones, your Freestyle 1200 handset will need charging for 24 hours before initial use.
1 Handset aerial
Your Freestyle 1200 uses a compact aerial which does not pull out.
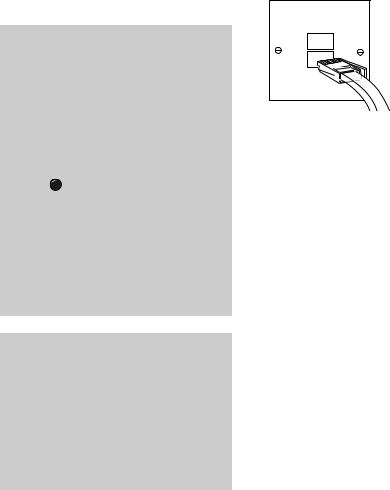
2 Check your telephone wall socket
If you do not have a modern phone socket, call BT on Freefone 0800 800 150 and ask for an engineer to come and fit the right socket within two metres of a mains socket.
DAY |
HOUR |
MIN |
RESET |
To fit the back-up battery, release the retaining clips, lift off the battery compartment cover and insert one new PP3 alkaline battery (not supplied) as shown in the diagram above. Replace the battery compartment cover.
A good quality, fresh battery should last about six months. To ensure constant battery back-up, replace it every six months.
If your Freestyle 1200 is your only phone, you should fit a back-up battery in the base unit so that your phone can always be used in emergencies.
If the power fails, the back-up battery will give you up to one hour talktime or seven hours on standby.
Note
If the power fails during a call, you will only be able to end the call by pressing the green TALK button.
6
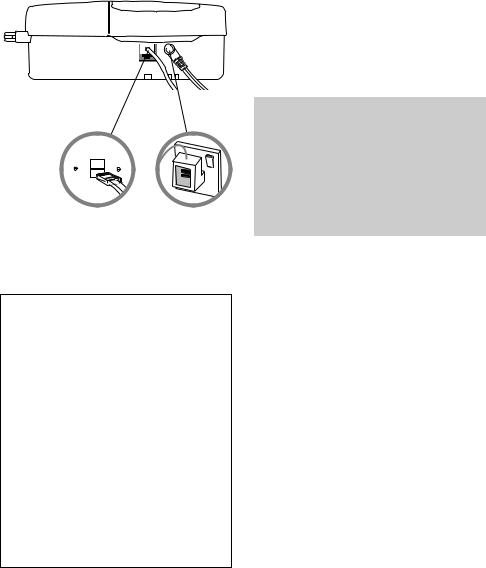
4 Plug the power cable into the back of the base unit
PHONE
|
|
|
|
|
|
|
|
|
|
|
|
|
|
|
|
|
|
Plug the |
|
|
into the |
|||||
socket on |
|
your |
||||||
Freestyle |
|
|
|
|
|
|
|
|
Warnings
1 Do not try to use any power supply other than the one provided. This may permanently damage your Freestyle 1200.
2 Your Freestyle 1200 should not be fitted in wet or damp conditions, for example in a bathroom. Also, the handset should not be left out in the rain.
3 There is a slight chance that your phone could be damaged by an electrical storm. We recommend that you unplug the base unit from the mains during storms.
Setting up
5 Connect the base unit three-pin adaptor to a power socket
The unit will alternatively display -- and C L flashing slowly. The internal clock will automatically be set to Saturday 12:01pm. To change the day and time, see page 21.
Mains power adaptor
The Freestyle 1200 must only be used with the adaptor supplied.
Using any other adaptor will result in non-compliance with EN60950:1992, and will invalidate the approval given to this apparatus.
6 Charge the handset
When you first use your Freestyle 1200, the rechargeable battery in the handset needs charging for 24 hours.
•Make sure you have connected your Freestyle 1200 to the mains power supply; see steps 4 and 5.
•Place the handset on the base unit, ensuring the contacts are touching. The red CHARGING light comes on.
•The CHARGING light remains on while the handset is on the base unit.
•When sufficiently charged for use, the CHARGING light turns green.
7
Setting up
As a rule, placing the handset on the base unit overnight will keep the battery fully charged for all normal use.
When fully charged and in good condition, the handset battery will provide up to 5 hours continuous talk time or 72 hours standby.
If the handset battery is running low, the BATT LOW light will flash every 10-15 seconds.
BATT
LOW
If you are making a call and the handset battery is running low, the phone will beep every 10-15 seconds.
Place the handset on the base unit to recharge.
Battery care
The battery cannot be overcharged. However, leaving the handset on the base unit all the time can deteriorate a rechargeable battery. To get the longest possible life from your battery, take the handset off the base for a few hours each day.
7 Plug the phone into the BT socket
You can now use the phone, store numbers in the memory and change some of the settings as desired.
8
8 Extend the base unit telescopic aerial
Extend the base unit telescopic aerial on your Freestyle 1200 (as shown below) to ensure the best possible signal and reception.
PHONE
For the best reception
Try to avoid putting the telescopic aerial near other electrical appliances, fluorescent lights and large metallic objects such as cookers, radiators and garage doors as these may cause interference and reduce the quality of your calls.
Setting up
9 To wall mount your product
(See ‘Wall mounting’, page 49.)
To plan the location of the base unit
Your Freestyle 1200 works by sending and receiving radio signals between the base unit and the handset.
The strength of the signal depends on where you site the base unit and how the aerial is deployed. The higher the base unit is located,
the better. An upstairs room is ideal. The following points should be considered:
•It should be within easy reach of a mains socket and a telephone socket. A new-style telephone socket is needed for this product. If you do not have one, call us on
Freefone 0800 800 150.
•Try to avoid locations near metallic obstructions or electrical appliances, such as TV sets, fridges, computers, fluorescent lights, radiators, metal pipes and metal window frames.
•The Freestyle 1200 can be wall mounted by using the bracket and screws supplied; see page 49.
9

Using your Freestyle1200 telephone
Making and receiving calls
The handset range is up to 250 metres from the base unit in ideal conditions. If you start to go out of range while using the phone, you will hear warning beeps. If you do not come back in range, your call will be disconnected.
To make a call
TALK 
•Lift the handset off the base. Press the TALK button. The TALK light comes on and the handset buttons illuminate. The IN USE light on the base unit comes on.
•Listen for the dialling tone.
•Dial the number you want.
If you do not hear a dialling tone after pressing the TALK button, wait a few seconds. On a few exchanges, there may be a delay.
To end a call
TALK 
• Press the TALK button.
Or
• Replace the handset on the base.
To receive a call
When the phone rings:
•If your handset is on the base unit, simply pick it up to answer the call.
Or
TALK 
•If your handset is off the base, press the TALK button to answer the call.
 An Inductive Coupler has been built into the handset to improve sound quality for people using hearing aids. Switch your hearing aid to T and adjust the position of the handset until you get the best reception.
10
|
|
Using your Freestyle 1200 telephone |
||||
To use the channel seeker button |
To adjust the speech volume |
|||||
CHANNEL |
|
|
VOLUME |
|||
SEEKER |
|
|
|
|
|
|
|
|
|
|
|
|
|
|
|
|
|
|
|
|
Your Freestyle 1200 automatically scans the available radio channels for quality of reception, and selects the best one to use.
If you experience interference during your call, press the
CHANNEL SEEKER button (on the side of the handset) to select a different channel.
To adjust the handset ringer volume
VOLUME
When the handset is not in use you can adjust the ringer volume:
•Press the + button (on the side of the handset) to increase the handset ringer volume. The handset rings once to indicate the volume.
•Press the - button to decrease the handset ringer volume.
The lowest setting will turn the handset ringer off.
During a conversation you can adjust the volume of the incoming caller:
•Press the + button (on the side of the handset) to increase the speech volume.
•Press the - button to decrease the speech volume.
Last number redial
Freestyle 1200 remembers the last number called and enables easy redialling.
To redial the last number called
 REDIAL
•Press the TALK button and wait for a dialling tone.
•Press the REDIAL button. The number is dialled automatically.
If the length of the last number called is more than 32 digits, then the whole number will not be redialled.
If REDIAL is not the first button pressed in sequence, it will then function as a PAUSE button.
11
Using your Freestyle 1200 telephone
Using the memory to store and dial numbers
Your Freestyle 1200 handset can store up to ten separate phone numbers. You can then dial each number by pressing just two buttons.
To store a number in the memory
QUICKDIAL
•Press the QUICKDIAL button.
•Press one of the 0-9 buttons to set the location code under which the phone number will be stored.
•Dial the number you want to store. A maximum of 20 digits can be stored in each location.
•Press the QUICKDIAL button. You hear a confirmation beep. The number is stored.
Repeat these steps for any other numbers you want to store, using a different 0-9 location code for each one.
Storing a number in the memory automatically overwrites any previous number stored under the same location code.
Stored numbers can include switchboard and network services that use the and # buttons as well as PAUSE and RECALL functions.
Quickdial directory label
Use the handset’s Quickdial directory label to keep a record of which 0-9 location code you have used for each number.
You can take out the label by removing the handset battery compartment cover and sliding out the label’s clear plastic cover.
HANDSET
MEMORY
1
MEMORY
2
MEMORY
3
MEMORY
4
MEMORY
5
MEMORY
6
MEMORY
7
MEMORY
8
MEMORY
9
MEMORY
0
12
To dial a stored number
QUICKDIAL
•Press the TALK button.
•Press the QUICKDIAL button.
•Press the 0-9 location code under which the number you want is stored. The number is dialled automatically.
To store a number of more than 20 digits
QUICKDIAL
•Press the QUICKDIAL button.
•Press one of the 0-9 buttons to set the location code under which your phone number will be stored.
•Dial the first 20 digits.
•Press the QUICKDIAL button. You hear a confirmation beep. The number is stored.
•Press the QUICKDIAL button again.
•Press another 0-9 button to select a second location code under which to store the remaining digits.
•Dial the remaining digits.
•Press the QUICKDIAL button. You hear a confirmation beep. The rest of the number is stored.
Using your Freestyle 1200 telephone
To dial a stored number of more than 20 digits
QUICKDIAL
•Press the TALK button.
•Press the QUICKDIAL button, then the first 0-9 location code number. The number begins dialling automatically.
•When the first part of the number has been dialled, press the QUICKDIAL button again, then the second 0-9 location code number. The rest of the number is dialled.
You can mix manual and memory dialling as required. For example, you can dial the area code 0181 380 from the memory and then complete the number manually.
To change a stored number
Any existing number stored in the memory can be overwritten by entering a new number under the same location code. Simply follow the steps shown in ‘To store a number in the memory’, page 12.
To clear a stored number
•Press the QUICKDIAL button.
•Press the 0-9 location code.
•Press the QUICKDIAL button again.
•You hear a confirmation beep.
13

Using your Freestyle 1200 telephone
Using the Secrecy button
During a call, you may want to say something to another person nearby without your caller hearing you.
SECRECY
•Press the SECRECY button. The TALK light flashes. You can hear the caller, but they cannot hear you.
•Every 7 seconds the handset beeps to let you know there is a call on hold.
•Press the SECRECY button again to resume your conversation. The TALK light stops flashing.
Using the Intercom
Your Freestyle 1200 lets you hold a conversation between the handset and base unit.
To call the base unit from the handset
At the handset:
INTERCOM
•Press the INTERCOM button on the handset. The INTERCOM light and the backlit keypad come on and flash. The base unit INTERCOM light flashes and both the handset and base unit ring.
If the base unit does not reply to an intercom call, press the INTERCOM button again to cancel the call.
At the base unit:
INTERCOM
•Press the INTERCOM button and speak into the microphone. The INTERCOM light stops flashing but stays on.
14
Ending an intercom call
•Press the INTERCOM button on the handset or base unit. Both INTERCOM lights on the handset and base unit go out.
To call the handset from the base unit
At the base unit:
INTERCOM
•Press the INTERCOM button on the base unit. The base unit INTERCOM light flashes and both the handset and base unit ring.
If the handset does not reply to an intercom call, press the INTERCOM button again to clear the call. You cannot make an intercom call if the handset is busy.
At the handset:
INTERCOM
•Press the INTERCOM button and speak. The INTERCOM light stops flashing but stays on.
Using your Freestyle 1200 telephone
Ending an intercom call:
•Press the INTERCOM button on the handset or base unit. Both INTERCOM lights on the handset and base unit go out.
You cannot use the intercom while a call is in progress. The intercom will beep for 60 seconds and then automatically cut off if not answered.
To adjust the INTERCOM loudspeaker volume at the base unit
VOLUME
•Press the left-hand side of the VOLUME switch to lower the volume.
•Press the right-hand side of the VOLUME switch to raise the volume.
If there is an incoming call when using the intercom, the base unit and handset will ring. To take the call, press the TALK button on the handset. The intercom call is cut off automatically.
15
 Loading...