


BT Converse 425 ~ Issue 3 ~ 2nd Edition ~ 23rd July ’03 ~ 5528
User Guide
BT CONVERSE 425
This product is intended for connection to analogue public switched telephone networks and private switchboards in the United Kingdom.

BT Converse 425 ~ Issue 3 ~ 2nd Edition ~ 23rd July ’03 ~ 5528
Please open this page for an ‘At a glance’ guide to your BT Converse 425.

BT Converse 425 ~ Issue 3 ~ 2nd Edition ~ 23rd July ’03 ~ 5528
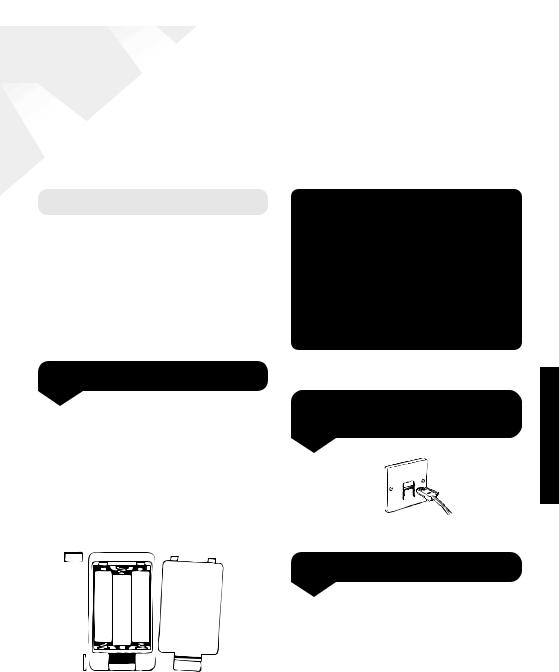
At a glance
Handset park
When the phone is wall mounted you can hang the handset here if you need to leave the phone during a call.
Next
Inserts a space in a number when storing numbers in the memory.
Clear
Used to edit numbers when pre-dialling or when storing or editing numbers in the memory.
Handset hook
Rotates to hold the handset in place when wall mounted.
Volume
Used with the Navigator wheel to adjust the volume of the dial tone and your caller’s voice.
Secrecy button (and light)
Allows you to talk to someone in the same room without your caller being able to hear the conversation.
Handsfree button (and light)
Allows you to talk to callers without lifting the handset.
Hearing aid compatible
Your Converse handset is hearing aid  compatible.
BT Converse 425 ~ Issue 3 ~ 2nd Edition ~ 23rd July ’03 ~ 5528
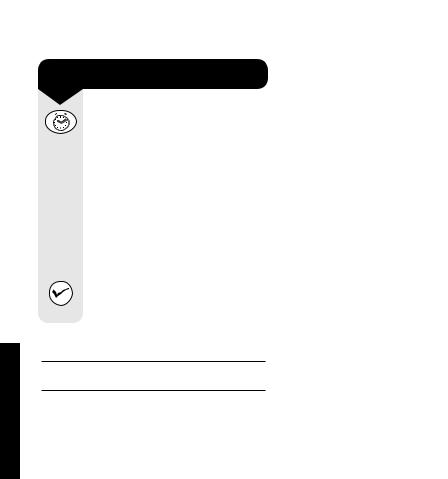
Display |
Call indicator light |
Shows 24 hour clock, battery low |
Flashes to indicate you have an |
indicator, phone numbers, and names. |
incoming call. |
BT Converse 425
Headset (and light) button
Used when there is a headset connected.
Message Waiting indicator
(for compatible switchboard users only). Flashes when there is Voice Mail.
Call timer
Used to time the duration of a call.
Recall
For use with a switchboard/PBX, e.g. to transfer calls and some BT Calling Features.
Redial
Redials the last number.
Repeat dials a number when the line is engaged.
Also lets you enter a Pause in a stored number.
Calculator button
Switches the calculator on and off.
Navigator Wheel
Quick access to the directory. Adjusts the volume of the caller’s voice.
Displays range of calculator functions.
(Tick Button) Select
Dials telephone numbers displayed on the screen.
Also confirms options displayed on the screen in the directory and used to store entries in the directory and selects calculator functions.
Directory
Lets you store up to 75 names and numbers including pre-set BT Calling Features:- 1471 Call Return, Call Diversion,
Reminder Call and 1571 – Call Minder/ BT Answer.
1 |
2 |

BT Converse 425 ~ Issue 3 ~ 2nd Edition ~ 23rd July ’03 ~ 5528
In this guide
At a glance |
1 |
Introduction |
4 |
Unpacking your Converse 425 |
4 |
For your records |
4 |
Safety information |
4 |
Setting up |
5 |
Using the telephone |
7 |
Secrecy |
8 |
Last number redial |
8 |
Handsfree talking |
9 |
Directory |
10 |
Using the calculator |
13 |
Data port |
14 |
Using BT Calling Features |
15 |
1471 Call Return |
15 |
Call Diversion |
16 |
1571 – Call Minder/BT Answer |
16 |
Reminder Call |
17 |
Other services |
17 |
General information |
18 |
Guarantee |
18 |
Technical information |
19 |
Switchboard compatibility |
19 |
R&TTE Directive |
19 |
Wall-mounting |
20 |
Index |
21 |
Hints and tips boxes
In this user guide, we’ve included helpful tips and important notes. They are shown in boxes like this.
3

INTRODUCTION
BT Converse 425 ~ Issue 3 ~ 2nd Edition ~ 23rd July ’03 ~ 5528
Introduction
Your Converse 425 has been designed for ease of use and made to the high standards set by BT.
Please read the instructions carefully before use and keep this User Guide for future reference.
Unpacking your
Converse 425
If anything is missing, please contact your place of purchase immediately.
Converse 425 telephone with telephone line attached.
Screws, wall plugs and plinth for wall-mounting.
For your records
Date of purchase:
Place of purchase:
Serial number
(on the underside of the base unit):
Purchase price:
For guarantee purposes, proof of purchase is required, so please keep your receipt.
3 x AAA batteries
Safety information
General
Simply clean your Converse 425 with a damp (not wet) cloth, or an antistatic wipe.
Never use household polish as this may damage the product.
Never use a dry cloth as this may cause static shock.
Do not open the Converse 425. This could expose you to high voltages or other risks.
Never dispose of batteries in a fire. There is a serious risk of explosion and/or the release of highly toxic chemicals.
Environmental
Do not expose to direct sunlight.
We recommend that you do not place the product on antique/veneered wood to avoid damage.
Do not stand your product on carpets or other surfaces which generate fibres, or place it in locations preventing free flow of air over its surfaces.
Do not submerge any part of your product in water and do not use it in damp or humid conditions, such as in bathrooms.
Do not expose your product to fire, explosive or other hazardous conditions.
4
BT Converse 425 ~ Issue 3 ~ 2nd Edition ~ 23rd July ’03 ~ 5528
Setting up
Plan the location
Situate your Converse 425 close enough to a phone socket so that the line cord will reach.
Your Converse 425 can be wall-mounted. See ‘Wall-mounting’, on page 20.
Note
When your batteries are within about two weeks of total exhaustion, BATT LOW will appear in the display. If you do not replace the batteries and
they become totally discharged your Converse 425 will not display anything on the screen.
1 Install the batteries
The display on your Converse 425 is powered by 3 x AAA alkaline batteries.
Make sure the phone is not plugged into the phone socket. Open the battery compartment cover.
Insert batteries as shown.
+- +
-+ -
Close the lid and replace the compartment cover.
2Plug your Converse 425 into the phone socket
3 Check the dialling mode
Your Converse 425 should be pre-set to T-TB which gives you TONE dialling.
This ensures the phone will work with all modern digital exchanges.
If your phone does not work when you dial a number, try setting the dialling mode to T or P.
UP SETTING
5
BT Converse 425 ~ Issue 3 ~ 2nd Edition ~ 23rd July ’03 ~ 5528
4 Set the time
Press and hold the Clock button until the display shows
TIME.
Release the Clock button.
Display shows 00-00.
Enter the current time using the 24 hour clock,
eg. 0 9 3 0 = 9.30am, 1 5 3 0 = 3.30pm.
Press the button.
The time is set and displayed.
Your Converse 425 is now ready for use.
SETTING UP
6
 Loading...