


DCP-T300
Table of contents
 Loading...
Basic User’s Guide
DCP-T300
DCP-T500W
DCP-T700W
!CAUTION Before using this product, read carefully
these instructions for correct operation.
Keep the User's Guide in a secure place for future
reference.
Version A
CHN-ENG

To create a better environment
IMPORTANT
Please cooperate
Firstly, thank you very much indeed for using our Brother products!
Brother focuses on the earth environment concerned. And make a basic policy which is to concern
about the earth environment, including any workflow from product development to discard. The
local citizen should be responsible for local society and its environment during these environment
protection activities.
Therefore, we hope you'll take part in this environment plan, and pay attention to environment
protection points as below while discarding used consumables.
1 Please deliver the used package materials to relevant waste disposal office for recycle.
2 When you discard used consumables, please follow and carry on relevant local regulations
properly.
3 When the machine need replacing parts for the maintenance and repair, please discard used
circuit boards, used electrical parts and products as disposed electrical materials.
4 Some parts in the machine can be used on the same series model machines which produced
by the same factory.
Note: If you want to replace the parts, please contact your local Brother repair station.
Register your product on-line at
http://www.brother.com/registration
Brother Numbers
For technical and operational assistance, call the call center in mainland China.
To seach Frequently asked questions (FAQs)/ASCs/Driver/Manuals, etc, please visit our service
website:
http://www.95105369.com
To search where to purchase consumables, please visit the official website of BROTHER (CHINA)
LTD.:
http://www.brother.cn
© 2015 Brother Industries, Ltd. All rights reserved.

User's Guides and where do I find them?
Which Guide? What's in it? Where is it?
Product Safety Guide Read this Guide first. Please read the Safety
Instructions before you set up your machine. See
this Guide for trademarks and legal limitations.
Quick Setup Guide Follow the instructions for setting up your machine
and installing the drivers and software for the
operating system and connection type you are
using.
Basic User’s Guide Learn the basic Copy and Scan operations, and how
to replace supplies. See troubleshooting tips.
Advanced User’s Guide Learn more advanced operations: Copy, printing
reports and performing routine maintenance.
Software and Network
User’s Guide
1
This Guide provides instructions for Scanning,
Printing and other operations that can be performed
by connecting your Brother machine to a computer.
You can also find useful information about using the
Brother ControlCenter utility, using your machine in
a network environment, and frequently used terms.
Printed / In the box
Printed / In the box
PDF file / CD-ROM
(Windows
®
) /
Brother Solutions
Center
2
(Macintosh)
PDF file / CD-ROM
®
(Windows
) /
Brother Solutions
Center
2
(Macintosh)
HTML / CD-ROM
(Windows
®
) /
Brother Solutions
Center
2
(Macintosh)
Google Cloud Print
Guide
3
Mobile Print/Scan Guide
for Brother iPrint&Scan
This Guide provides details on how to use Google
Cloud Print™ services for printing over the Internet.
This Guide provides useful information about
3
printing from your mobile device and scanning from
your Brother machine to your mobile device when
connected to a Wi-Fi network.
1
Network features are not supported by the DCP-T300.
2
Visit us at www.95105369.com.
3
DCP-T500W and DCP-T700W only.
PDF file / Brother
Solutions Center
PDF file / Brother
Solutions Center
2
2
i

Table of Contents
(Basic User’s Guide)
1 General information 1
Using the documentation .......................................................................................1
Symbols and conventions used in the documentation ....................................1
About Brother Utilities (Windows
Accessing the Advanced User’s Guide and Software and
Network User’s Guide.........................................................................................3
Viewing User’s Guides ....................................................................................3
How to access Guides for Advanced Features......................................................4
Accessing Brother Support (Windows
Accessing Brother Support (Macintosh) ................................................................5
Control panel overview ..........................................................................................6
Warning LED indications .................................................................................8
LCD display ...........................................................................................................8
LCD Contrast...................................................................................................8
LCD Language ................................................................................................8
Auto Power Off ......................................................................................................9
®
) .......................................................................2
®
)................................................................5
2 Loading paper 10
Loading paper and other print media...................................................................10
Loading envelopes ........................................................................................13
Unprintable area ............................................................................................15
Paper settings......................................................................................................16
Paper Type ....................................................................................................16
Paper Size .....................................................................................................16
Acceptable paper and other print media..............................................................17
Recommended print media ...........................................................................17
Handling and using print media .....................................................................17
Choosing the right print media.......................................................................19
3 Loading documents 20
How to load documents .......................................................................................20
Using the ADF (DCP-T700W) .......................................................................20
Using the scanner glass ................................................................................21
Unscannable area .........................................................................................22
4 Making copies 23
How to copy .........................................................................................................23
Stop copying..................................................................................................23
Copy settings .......................................................................................................23
Paper Options................................................................................................24
5 How to print from a computer 25
Printing a document.............................................................................................25
ii

6 How to scan to a computer 26
Before scanning...................................................................................................26
Scanning a document as a PDF file using ControlCenter4 (Windows
How to change the machine’s SCAN mode settings for PDF scanning using
ControlCenter4 (Windows
How to scan a document as a PDF file using the control panel
(Windows
®
and Macintosh) ..............................................................................32
®
) .............................................................................30
®
) .............26
A Routine maintenance 33
Refilling the ink tanks...........................................................................................33
Cleaning and checking the machine....................................................................36
Cleaning the scanner glass ...........................................................................36
Cleaning the print head .................................................................................37
Checking the print quality ..............................................................................37
Checking the print alignment .........................................................................38
Setting the date and time.....................................................................................39
B Troubleshooting 40
Identifying the problem ........................................................................................40
Error and maintenance messages.......................................................................41
Document jam (DCP-T700W)........................................................................46
Printer jam or paper jam ................................................................................47
If you are having difficulty with your machine ......................................................55
Machine Information ............................................................................................63
Checking the serial number...........................................................................63
Checking the firmware version ......................................................................63
Reset functions..............................................................................................63
How to reset the machine..............................................................................63
C Settings and features tables 64
Using the Settings tables.....................................................................................64
Menu keys ...........................................................................................................64
Menu table...........................................................................................................66
Entering Text .......................................................................................................77
Entering numbers, letters and symbols ........................................................77
Inserting spaces ............................................................................................77
Making corrections ........................................................................................77
iii

D Specifications 78
General ................................................................................................................78
Print media...........................................................................................................80
Copy ....................................................................................................................81
Scanner ...............................................................................................................82
Printer ..................................................................................................................83
Interfaces .............................................................................................................84
Network (DCP-T500W and DCP-T700W) ...........................................................85
Computer requirements .......................................................................................86
Supply Specifications...........................................................................................87
E Index 88
iv

Table of Contents
(Advanced User’s Guide)
The Advanced User’s Guide explains the following features and operations.
You can view the Advanced User’s Guide on the CD-ROM.
1 General setup
IMPORTANT NOTE
Memory Storage
Sleep Mode
LCD
Mode Timer (MFC models only)
2 Security features
(MFC models only)
TX Lock
3 Sending a fax
(MFC models only)
Additional sending options
Additional sending operations
4 Receiving a fax
(MFC models only)
A Routine maintenance
Cleaning and checking the machine
Packing and shipping the machine
B Glossary
CIndex
Memory Receive
Additional receiving operations
5 Dialling and storing numbers
(MFC models only)
Additional dialling operations
Additional ways to store numbers
6 Printing reports
Fax reports (MFC models only)
Reports
7 Making copies
Copy options
v

vi

General information 1
1
Using the documentation
Thank you for buying a Brother machine!
Reading the documentation will help you
make the most of your machine.
Keep the User's Guide in a secure place for
future reference.
Symbols and conventions used in the documentation 1
The following symbols and conventions are
used throughout the documentation.
1
WARNING
1
WARNING indicates a potentially
hazardous situation which, if not avoided,
could result in death or serious injuries.
CAUTION
CAUTION indicates a potentially hazardous
situation which, if not avoided, may result in
minor or moderate injuries.
IMPORTANT
IMPORTANT indicates a potentially
hazardous situation which, if not avoided,
may result in damage to property or loss of
product functionality.
Bold Bold typeface identifies
specific buttons on the
machine’s control panel, or on
the computer screen.
Italics Italicized typeface
emphasizes an important
point or refers you to a related
topic.
Courier
New
Text in the Courier New font
identifies messages on the
LCD of the machine.
NOTE
NOTE specifies the operating environment,
conditions for installation, or special
conditions of use.
Electrical Hazard icons alert you to
possible electrical shocks.
1

Chapter 1
About Brother Utilities
®
(Windows
Brother Utilities is an application launcher
that offers convenient access to all Brother
applications installed on your device.
a (Windows
Windows
and Windows Server
Click (Start) / All Programs /
Brother, and (Brother Utilities).
(Windows
2012
Tap or click (Brother Utilities)
either on the Start screen or the
desktop.
(Windows
2012 R2
Move your mouse to the lower left
®
®
®
1
)
®
1
)
) 1
XP, Windows Vista®,
7, Windows Server® 20031
8 and Windows Server®
8.1 and Windows Server®
®
20081)
b Select your machine.
c Choose the function you want to use.
corner of the Start screen and click
(if you are using a touch-based device,
swipe up from the bottom of the Start
screen to bring up the Apps screen).
When the Apps screen appears, tap or
click (Brother Utilities).
1
DCP-T500W and DCP-T700W only
2
General information
NOTE
Accessing the Advanced User’s Guide and Software and Network User’s Guide
This Basic User’s Guide does not contain all
the information about the machine, such as
how to use the advanced Copy, Printer,
Scanner, and Network features. When you
are ready to learn detailed information about
these operations, you can read the
Advanced User’s Guide and Software and
Network User’s Guide in HTML format.
Viewing User’s Guides 1
(Windows®) 1
c If the language screen appears, click
your language. The CD-ROM
Top Menu will appear.
1
1
d Click User’s Guides.
e Click User’s guides on the CD-ROM.
If the country screen appears, choose
your country. After the list of User’s
Guides appears, choose the guide you
want to read.
Launch (Brother Utilities). Click
Support in the left navigation bar, and then
click User’s Guides.
If you have not installed the software, you can
find the documentation on the CD-ROM by
following these instructions:
a Turn on your PC. Insert the Brother
CD-ROM into your CD-ROM drive.
If the Brother screen does not appear, go
to Computer or My Computer.
®
(For Windows
1
2012
then go to Computer (This PC).)
Double-click the CD-ROM icon, and then
double-click start.exe.
1
/ Windows Server® 2012 R21: Click
(File Explorer) on the taskbar, and
DCP-T500W and DCP-T700W only
8 and Windows Server®
(Macintosh) 1
Visit Brother Solutions Center:
solutions.brother.com/manuals
.
How to find Scanning instructions 1
There are several ways you can scan
documents. You can find the instructions as
follows:
Software and Network User’s Guide
Scan
ControlCenter
b If the model name screen appears, click
your model name.
3

Chapter 1
How to find Network setup instructions (DCP-T500W and DCP-T700W)
Your machine can be connected to a wireless
network.
Basic network setup instructions
(See Quick Setup Guide.)
The wireless access point or router
supports Wi-Fi Protected Setup™ or
AOSS™
(See Quick Setup Guide.)
More information about network setup
(See Software and Network User’s
Guide.)
How to access Guides
1
for Advanced Features
You can view and download these Guides
from the Brother Solutions Center at:
solutions.brother.com/manuals
.
Google Cloud Print Guide
(DCP-T500W and DCP-T700W)
This Guide provides details on how to use
Google Cloud Print™ services for printing
over the Internet.
Mobile Print/Scan Guide for Brother
iPrint&Scan
(DCP-T500W and DCP-T700W)
This Guide provides useful information about
printing from your mobile device and
scanning from your Brother machine to your
mobile device when connected to a Wi-Fi
network.
1
1
1
®
4

General information
Accessing Brother
®
Support (Windows
You can find all the contacts you will need,
such as web support (Brother Solutions
Center) on the CD-ROM.
Click Brother Support on the Top Menu.
The following screen will appear:
) 1
Accessing Brother Support (Macintosh)
You can find all the contacts you will need,
such as web support (Brother Solutions
Center).
Double-click the Brother Support icon.
The following screen will appear:
1
1
To access our website, click
Brother Home Page.
For the latest news and product support
information, click
Brother Solutions Center.
To visit our website for original Brother
Supplies, click Supplies Information.
To access the Brother CreativeCenter for
FREE photo projects and printable
downloads, click
Brother CreativeCenter.
To return to the top menu, click Back or if
you have finished, click Exit.
To register your machine from the Brother
Product Registration Page, click
On-Line Registration.
For the latest news and product support
information, click
Brother Solutions Center.
To visit our website for original Brother
Supplies, click Supplies Information.
5
Chapter 1
NOTE
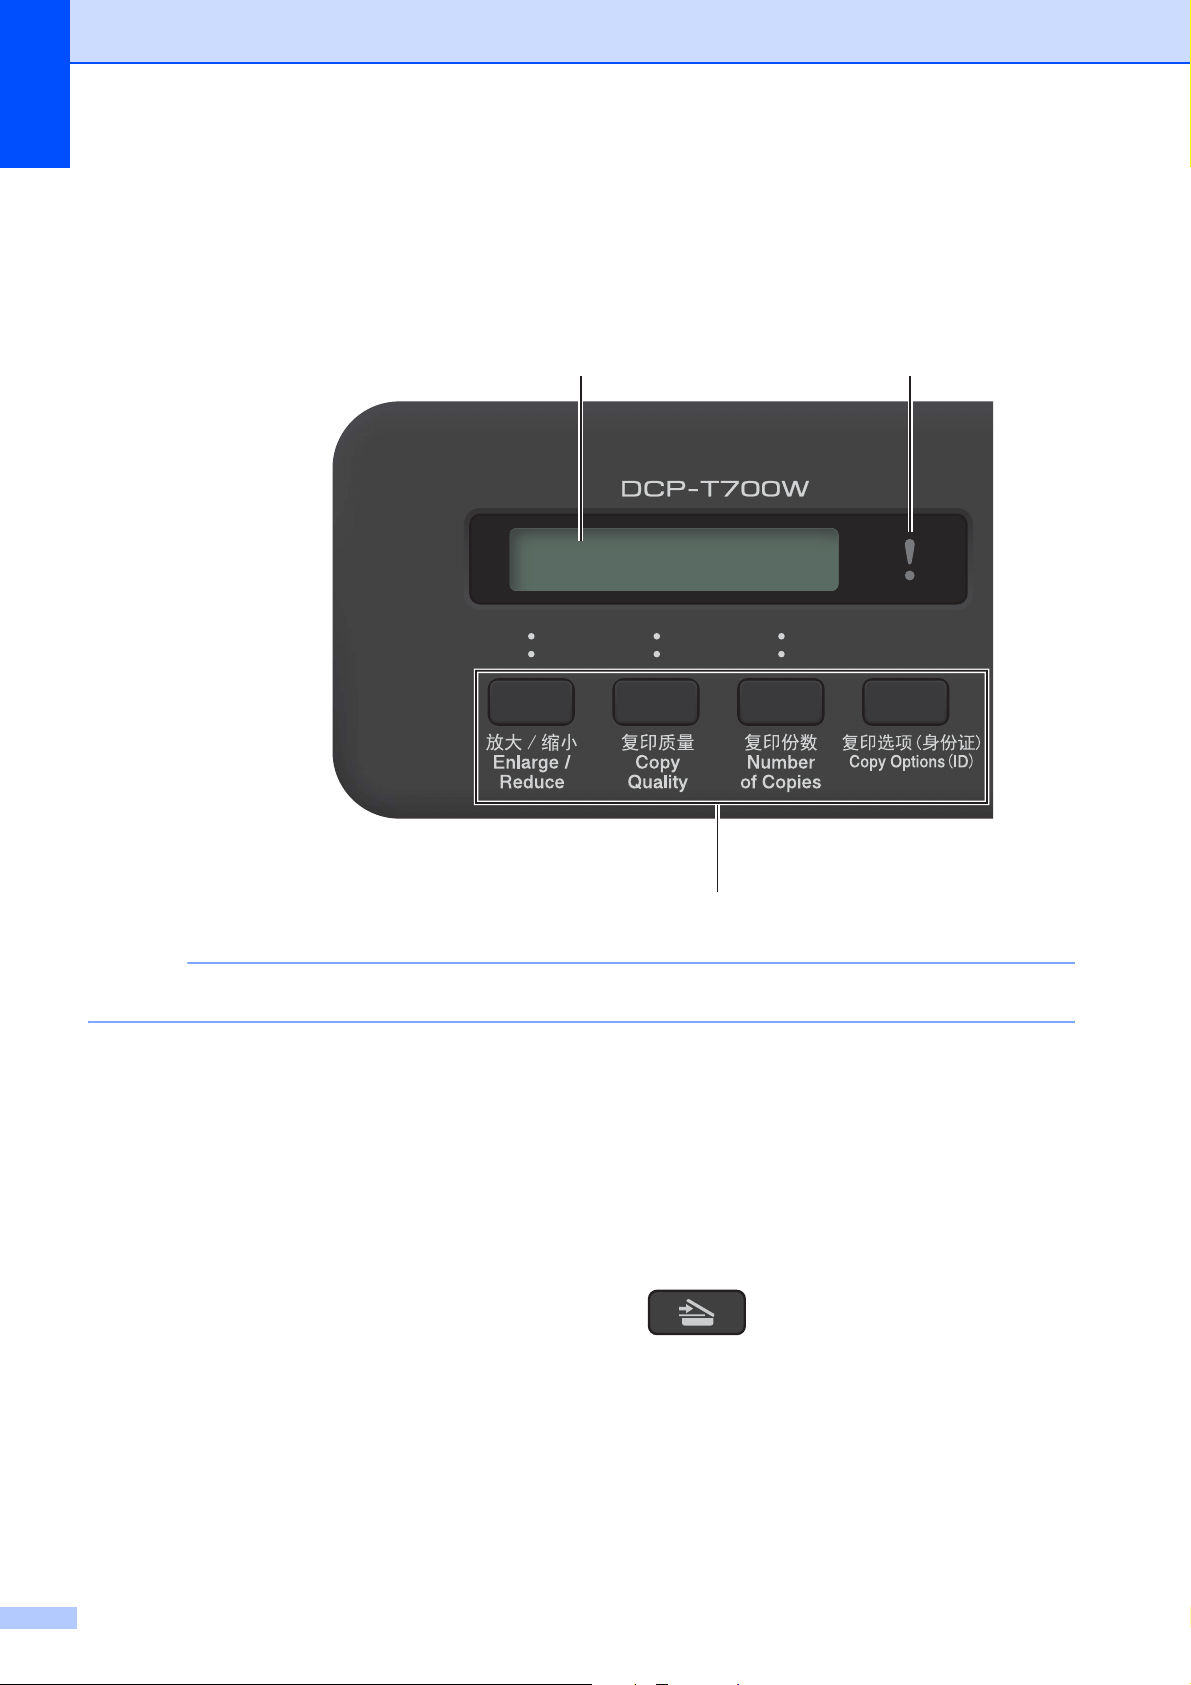
Control panel overview
The DCP-T300, DCP-T500W and DCP-T700W have the same control panel keys.
87
100% Normal 01
1
1
Most of the illustrations in this User’s Guide show the DCP-T700W.
1 Copy keys:
You can temporarily change the copy settings
when in copy mode.
Enlarge/Reduce
Lets you enlarge or reduce size of copies
depending on the ratio you select.
Copy Quality
Use this key to temporarily change the
quality of your copies.
Number of Copies
Use this key to make multiple copies.
Copy Options
You can quickly and easily select
temporary settings for copying.
2 Menu keys:
Menu
Lets you access the main menu.
+a or -b
Press to scroll through the menus and
options.
OK
Lets you select a setting.
3 SCAN
Lets you access Scan mode.
6
General information
2
6
3 4
5
1
4 Start keys:
Mono Start
Lets you start making copies in
monochrome. Also lets you start a
scanning operation (in color or mono,
depending on the scan setting in the
ControlCenter software).
Color Start
Lets you start making copies in full color.
Also lets you start a scanning operation (in
color or mono, depending on the scan
setting in the ControlCenter software).
5
You can turn the machine on and off.
If you turn the machine off, it will still
periodically clean the print head to maintain
print quality. To prolong print head life, provide
the best ink economy, and maintain print
quality, you should keep your machine
connected to the power at all times.
6 Stop/Exit
Stops an operation or exits from a menu.
7 Warning LED
Blinks in orange when the LCD displays an
error or an important status message.
8 LCD (Liquid Crystal Display)
Displays messages on the screen to help you
set up and use your machine.
7

Chapter 1
Warning LED indications 1
The Warning LED (Light Emitting Diode) is a
light that shows the DCP status. The LCD
shows the current machine status when the
machine is idle.
LED DCP
status
Ready The machine is ready for
Off
Cover open The cover is open. Close
Orange
Cannot
print
Paper error Put paper in the tray or
Other
messages
Description
use.
the cover. (See Error
and maintenance
messages on page 41.)
Refill the ink tank.
When you refill the ink
tank, fill the ink up to the
upper line, or fill with all
of the ink in the bottle if it
does not exceed the
upper line.
(See Refilling the ink
tanks on page 33.)
clear the paper jam.
Check the LCD
message. (See If you are
having difficulty with your
machine on page 55.)
Check the LCD
message. (See Error
and maintenance
messages on page 41.)
LCD display
LCD Contrast 1
You can adjust the LCD contrast for a sharper
and more vivid display. If you are having
difficulty reading the LCD, try changing the
contrast setting.
a Press Menu.
b Press a or b to choose
0.Initial Setup.
Press OK.
c Press a or b to choose
2.LCD Contrast.
Press OK.
d Press a or b to choose Light or Dark.
Press OK.
e Press Stop/Exit.
LCD Language
You can change the LCD Language.
a Press Menu.
b Press a or b to choose
0.Initial Setup.
Press OK.
c Press a or b to choose
0.Local Language.
Press OK.
1
1
d Press a or b to choose English or
Chinese.
Press OK.
e Press Stop/Exit.
8

General information
NOTE
Auto Power Off
The Auto Power Off feature will turn off the
machine after it has been in Sleep Mode for
the number of hours you set. When this
feature is Off, the machine will remain in
Sleep Mode and not turn itself off.
The default setting is Off.
To turn on the machine after the Auto Power
Off feature has turned it off, press Power
On/Off.
(DCP-T500W and DCP-T700W)
The machine will not power off
automatically when:
• the machine is connected to a wireless
network
• WLAN Enable is set to On.
1
1
a Press Menu.
b Press a or b to choose
0.Initial Setup.
Press OK.
c Press a or b to choose
5.Auto Power Off.
Press OK.
d Press a or b to choose 1hour, 2hours,
4hours, 8hours or Off.
Press OK.
e Press Stop/Exit.
9
2
NOTE
2
1
Loading paper 2
Loading paper and other print media
Load only one size of paper and one type of
paper in the paper tray at any time.
(For more information about paper size,
weight and thickness, see Choosing the right
print media on page 19.)
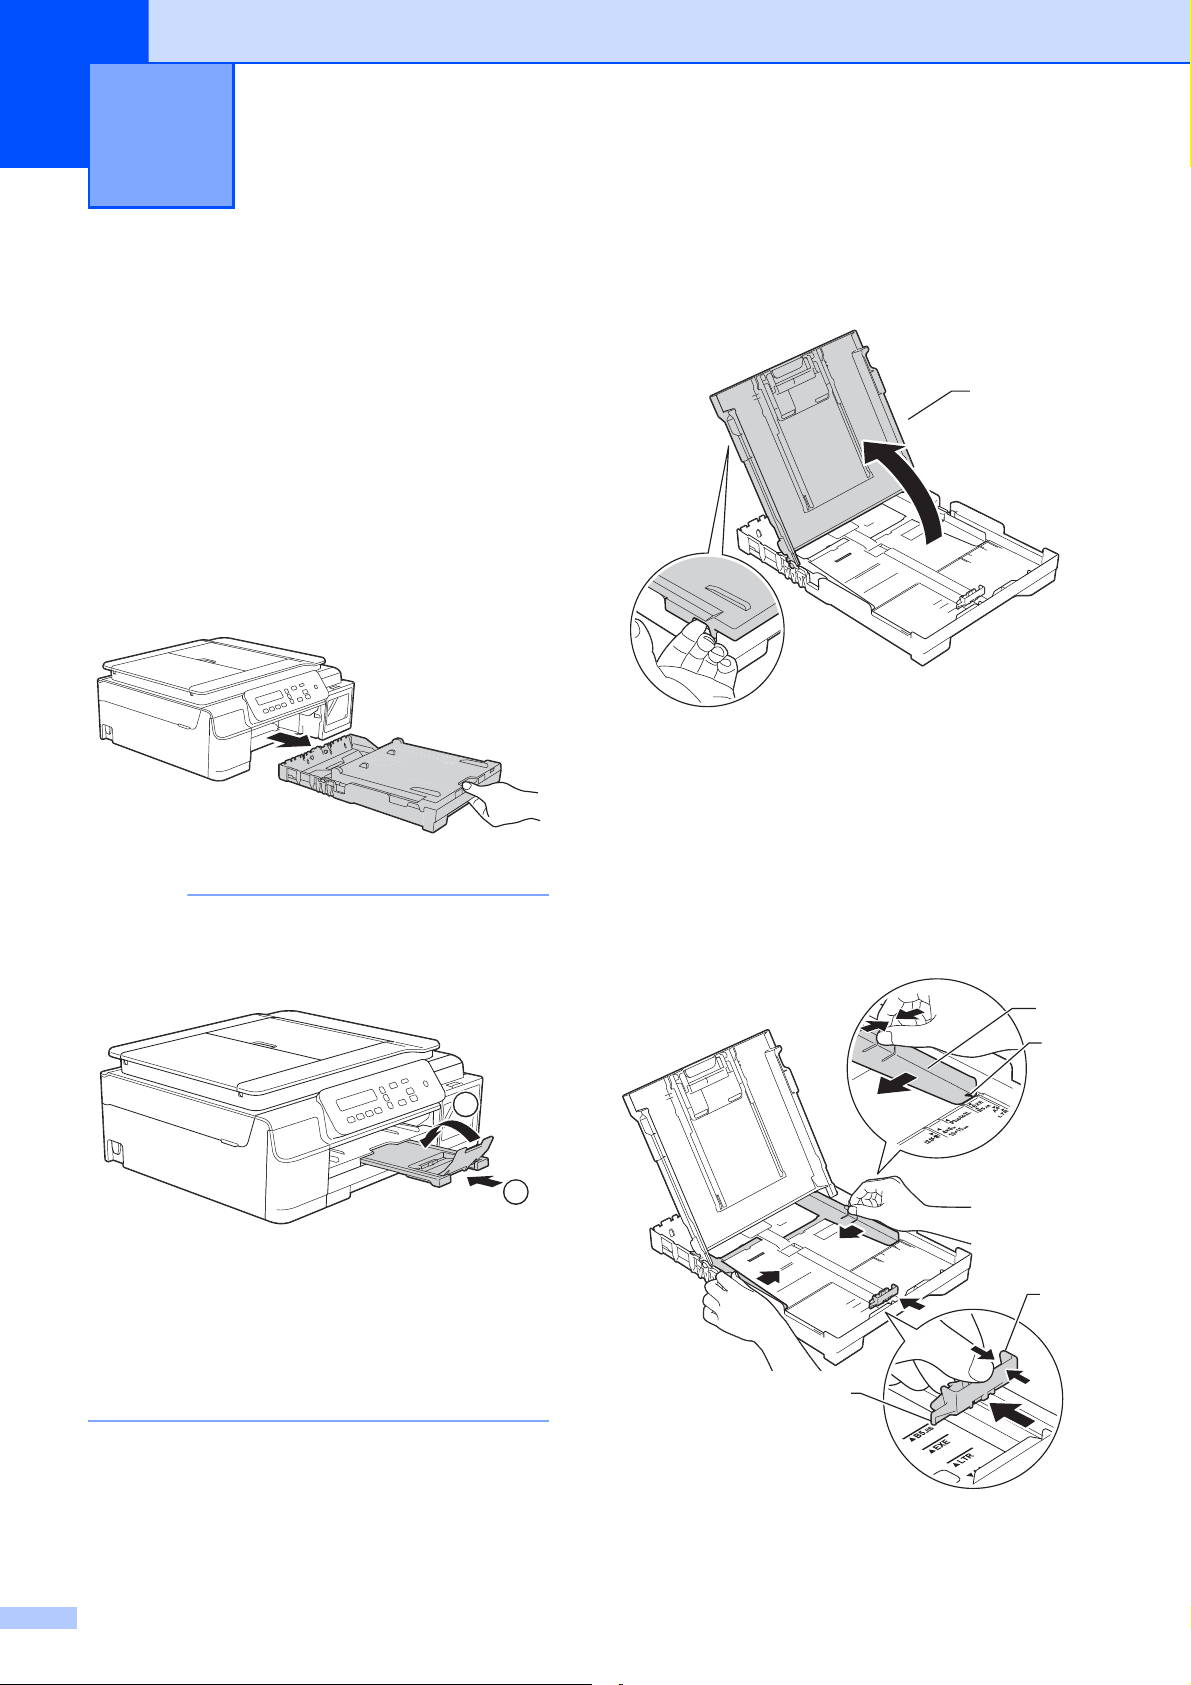
a Pull the paper tray completely out of the
machine.
• If the paper support flap (1) is open, close
it, and then close the paper support (2).
b Lift the output paper tray cover (1).
2
1
c Gently press and slide the paper width
guides (1) and then the paper length
guide (2) to fit the paper size.
Make sure that the triangular marks (3)
on the paper width guides (1) and paper
length guide (2) line up with the marks
for the paper size you are using.
1
• When you load a different paper size in
the tray, you will need to change the
Paper Size setting in the menu of the
machine at the same time.
(See Paper Size on page 16.)
10
3
2
3
Loading paper
NOTE
IMPORTANT
NOTE
d Fan the stack of paper well to avoid
paper jams and misfeeds.
Always make sure that the paper is not
curled or wrinkled.
e Gently put the paper into the paper tray
print side down and top edge in first.
Check that the paper is flat in the tray.
2
Be careful not to push the paper in too far;
it may lift at the back of the tray and cause
paper feed problems.
If you want to add paper before the tray is
empty, remove the paper from the tray
and combine it with the paper you are
adding. Always fan the stack of paper well
before loading it in the tray. If you add
paper without fanning the stack, the
machine may feed multiple pages.
11
Chapter 2
1
2
1
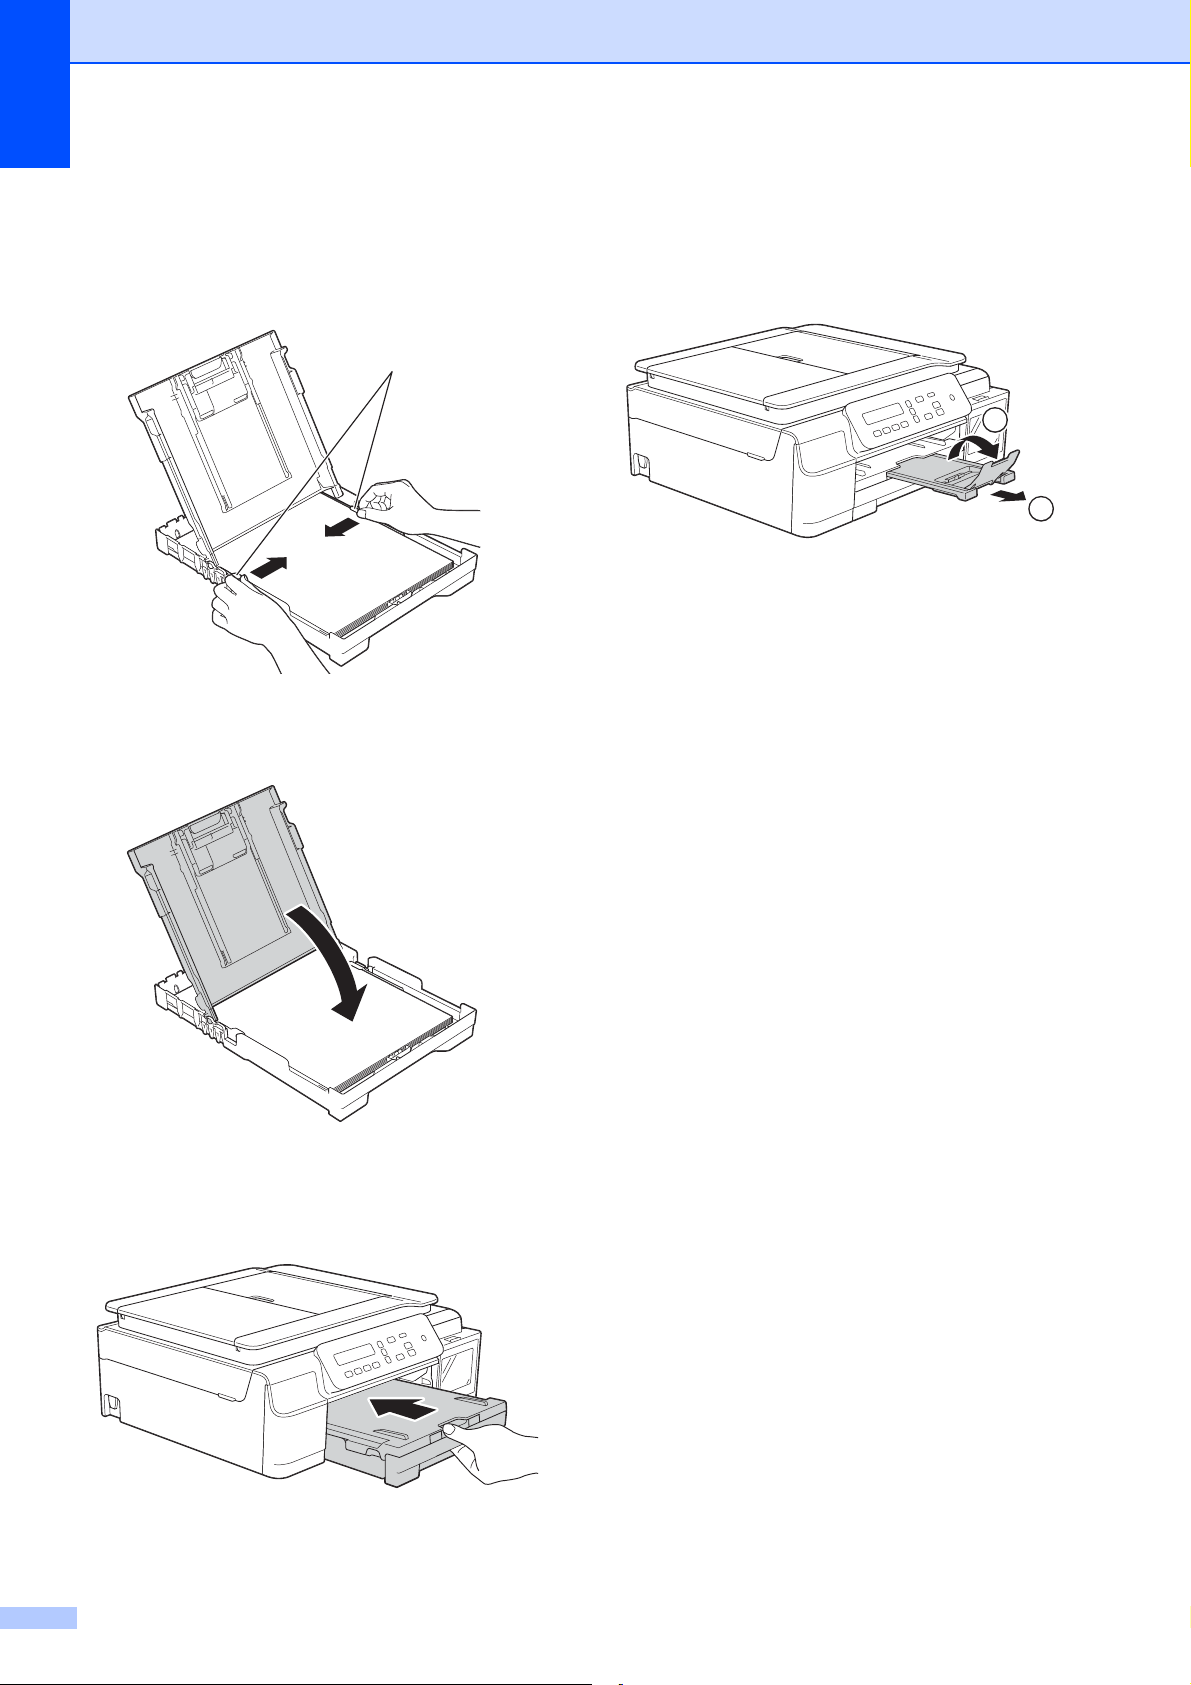
f Gently adjust the paper width guides (1)
to fit the paper.
Make sure the paper width guides lightly
touch the sides of the paper.
g Close the output paper tray cover.
i While holding the paper tray in place,
pull out the paper support (1) until it
locks into place, and then unfold the
paper support flap (2).
h Slowly and firmly push the paper tray
completely into the machine.
12
Loading paper
IMPORTANT
IMPORTANT
Loading envelopes 2
About envelopes 2
Use envelopes that weigh between 80 to
95 g/m
Some envelopes need margin settings to
be set in the application. Make sure you
do a test print first before printing multiple
envelopes.
DO NOT use the following types of
envelopes, as they will not feed correctly:
2
.
• That are of a baggy construction.
• That have windows.
• That are embossed (have raised
writing on them).
• That have clasps or staples.
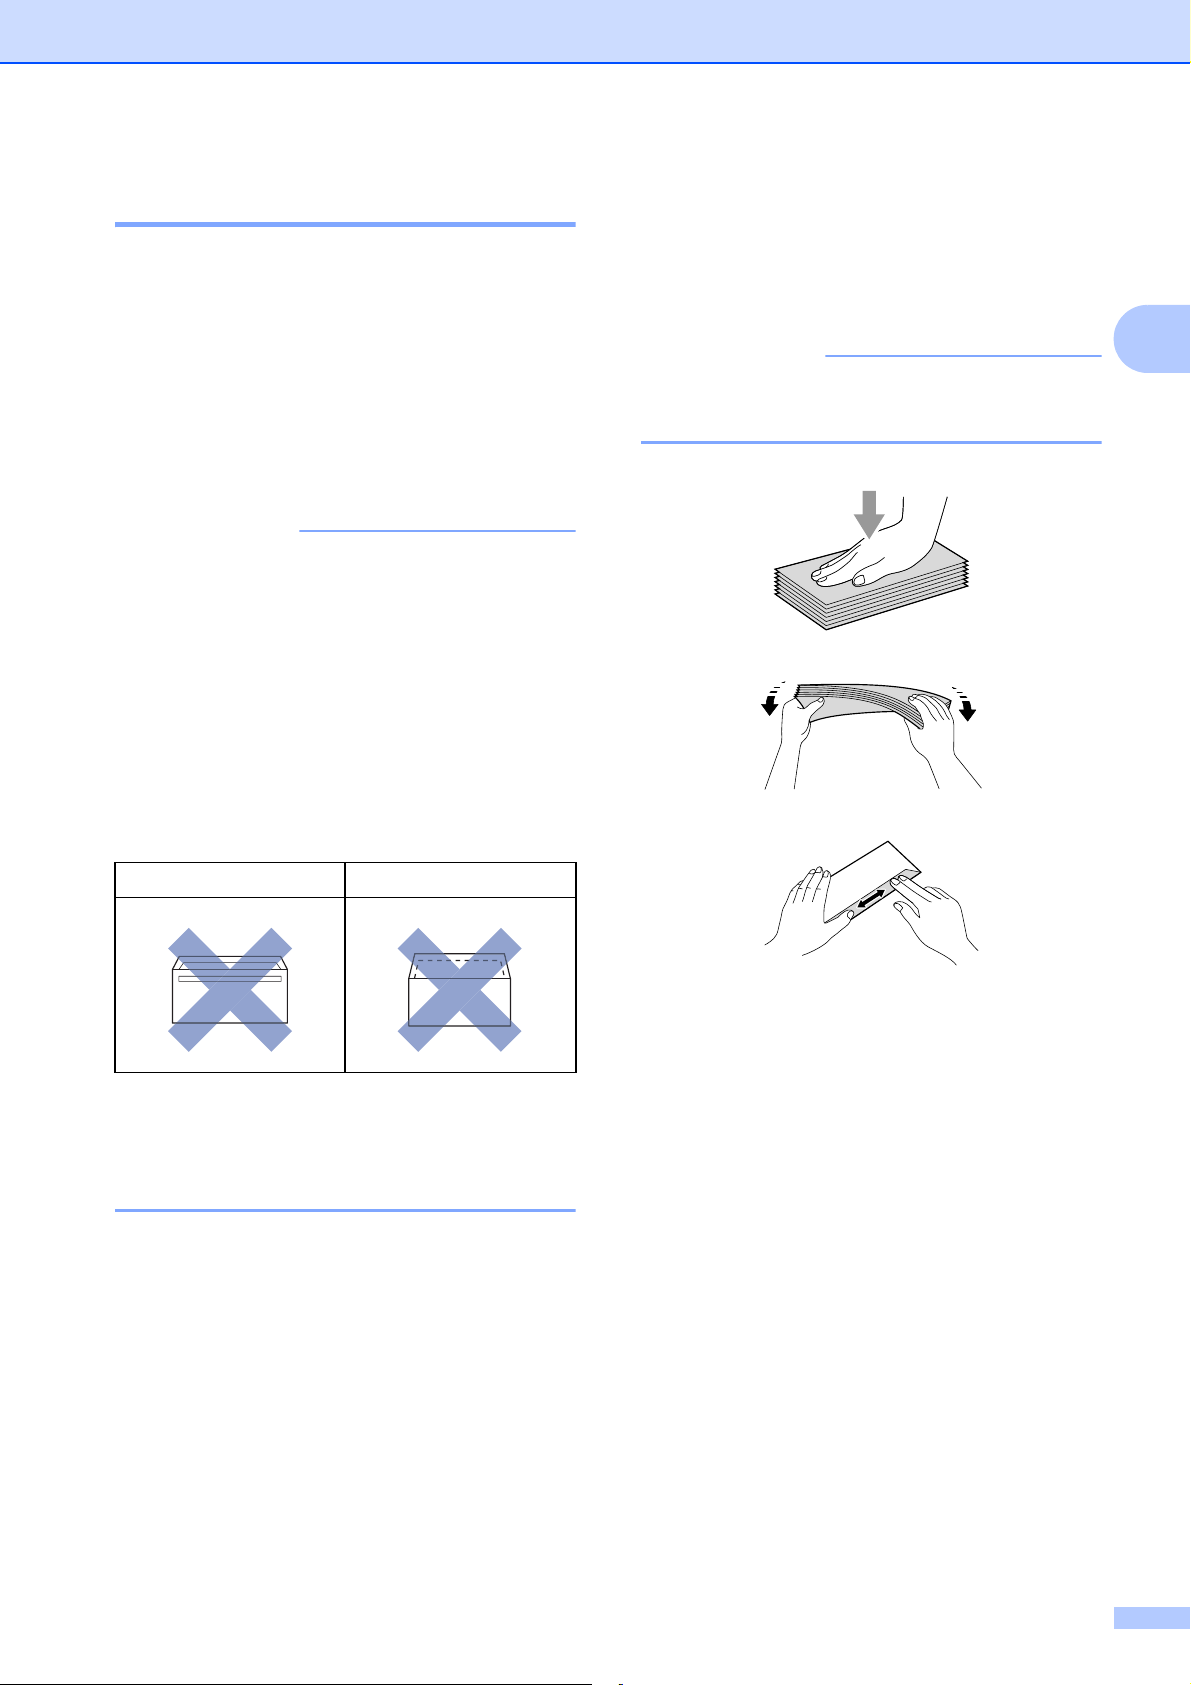
Loading envelopes 2
a Before loading, press the corners and
sides of envelopes to make them as flat
as possible.
2
If envelopes are “double-feeding”, put one
envelope in the paper tray at a time.
• That are pre-printed on the inside.
Glue Double flaps
Occasionally you may experience paper
feed problems caused by the thickness,
size and flap shape of the envelopes you
are using.
13

Chapter 2
1
2
b Put envelopes in the paper tray with the
address side down. If the envelope flaps
are on the long edge, load the
envelopes in the tray with the flap on the
left, as shown in the illustration. Gently
press and slide the paper width
guides (1) and paper length guide (2) to
fit the size of the envelopes.
If you have problems printing on
envelopes with the flap on the short edge,
try the following:
a Open the envelope flap.
b Put the envelope into the paper tray with
the address side down and the flap
positioned as shown in the illustration.
2
c Select Reverse Print (Windows
Reverse page orientation (Macintosh)
in the printer driver’s dialog box, and
then adjust the size and margins in your
application.
(See Software and Network User’s
Guide.)
®
) or
c Select Reverse Print (Windows
Reverse page orientation (Macintosh)
in the printer driver’s dialog box, and
then adjust the size and margins in your
application.
(See Software and Network User’s
Guide.)
®
) or
14
Loading paper
NOTE
1
3
24
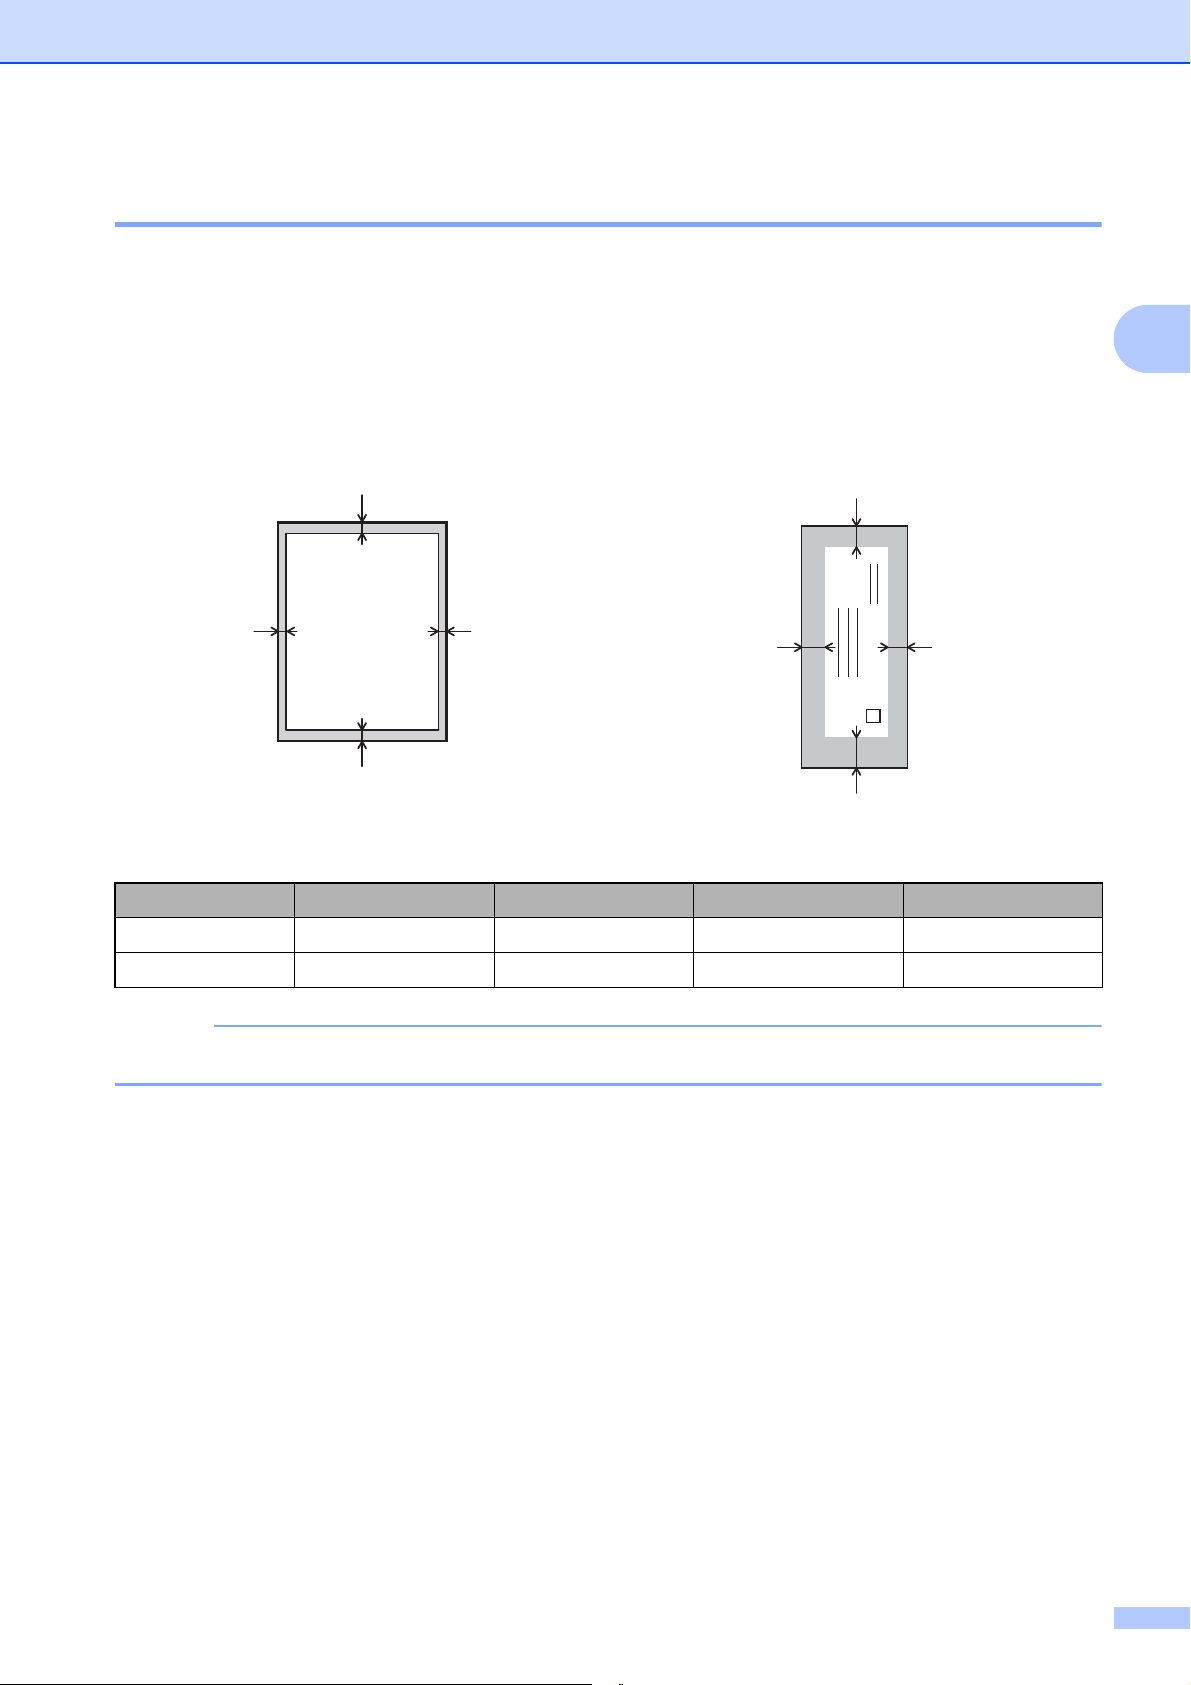
Unprintable area 2
The printable area depends on the settings in the application you are using. The figures show the
unprintable areas on cut-sheet paper and envelopes. The machine can print in the shaded areas
of cut-sheet paper when the Borderless print feature is available and turned on.
(See Software and Network User’s Guide.)
Cut-Sheet Paper Envelopes
1
42
2
3
Top (1) Left (2) Bottom (3) Right (4)
Cut-Sheet 3mm 3mm 3mm 3mm
Envelopes 22 mm 3 mm 22 mm 3 mm
The Borderless print feature is not available for envelopes and 2-sided printing.
15

Chapter 2
NOTE
Paper settings
Paper Type 2
To get the best print quality, set the machine
for the type of paper you are using.
Press Menu.
a
b Press a or b to choose 2.Copy.
Press OK.
c Press a or b to choose 1.Paper Type.
Press OK.
d Press a or b to choose Plain Paper,
Inkjet Paper, Brother BP71 or
Other Glossy.
Press OK.
e Press Stop/Exit.
2
Paper Size 2
You can use the following sizes of paper for
copies: A4, A5, Photo (10 × 15 cm), and
Letter. When you change the size of paper
you load in the machine, you will need to
change the Paper Size setting at the same
time.
a Press Menu.
b Press a or b to choose 2.Copy.
Press OK.
c Press a or b to choose 2.Paper Size.
Press OK.
d Press a or b to choose A4, A5, 10x15cm
or Letter.
Press OK.
e Press Stop/Exit.
The machine ejects paper with the printed
surface face up onto the paper tray at the
front of the machine. When you use glossy
paper, remove each sheet at once to
prevent smudging or paper jams.
16

Loading paper
Acceptable paper and other print media
The print quality can be affected by the type
of paper you use in the machine.
To get the best print quality for the settings
you have chosen, always set the Paper Type
to match the type of paper that is loaded in
the tray.
You can use plain paper, inkjet paper (coated
paper), glossy paper and envelopes.
We recommend testing various paper types
before buying large quantities.
For best results, use Brother paper.
When you print on inkjet paper (coated
paper) and glossy paper, be sure to
choose the correct print media in the
printer driver’s Basic tab or the machine’s
Paper Type setting.
(See Paper Type on page 16.)
When you print on Brother Photo paper,
load one extra sheet of the same photo
paper in the paper tray. An extra sheet has
been included in the paper package for
this purpose.
When using photo paper, remove each
sheet at once to prevent smudging or
paper jams.
Recommended print media 2
2
To get the best print quality, we suggest using
the Brother paper in the table.
If Brother paper is not available in your
country, we recommend testing various
papers before purchasing large quantities.
Brother paper
Paper Type Item
A4 Plain BP60PA
A4 Glossy Photo BP71GA4
A4 Inkjet (Matte) BP60MA
10 × 15 cm Glossy
Photo
BP71GP
2
Handling and using print media 2
Store paper in its original packaging and
keep it sealed. Keep the paper flat and
away from moisture, direct sunlight and
heat.
Avoid touching the shiny (coated) side of
the photo paper. Load photo paper with
the shiny side facing down.
Avoid touching the printed surface of the
paper immediately after printing; the
surface may not be completely dry and
may stain your fingers.
17

Chapter 2
IMPORTANT
1
1
DO NOT use the following kinds of paper:
• Damaged, curled, wrinkled, or
irregularly shaped paper
1 2 mm or greater curl may cause jams
to occur.
• Extremely shiny or highly textured
paper
• Paper that cannot be arranged
uniformly when stacked
• Short grain paper
Paper capacity of the output paper tray cover
Up to 50 sheets of 80 g/m2 A4 paper.
Photo paper must be picked up from the
output paper tray cover one page at a time
to avoid smudging.
2
18

Loading paper
Choosing the right print media 2
Paper type and size for each operation 2
Paper Type Paper Size Usage
Copy Printer
Cut-Sheet A4 210 × 297 mm (8.3 × 11.7 in.) Yes Yes
Letter 215.9 × 279.4 mm (8 1/2 × 11 in.) Yes Yes
Executive 184 × 267 mm (7 1/4 × 10 1/2 in.) – Yes
JIS B5 182 × 257 mm (7.2 × 10.1 in.) – Yes
A5 148 × 210 mm (5.8 × 8.3 in.) Yes Yes
A6 105 × 148 mm (4.1 × 5.8 in.) – Yes
Cards Photo 10 × 15 cm (4 × 6 in.) Yes Yes
Photo 2L 13 × 18 cm (5 × 7 in.) – Yes
Index Card 127 × 203 mm (5 × 8 in.) – Yes
Envelopes C5 Envelope 162 × 229 mm (6.4 × 9 in.) – Yes
DL Envelope 110 × 220 mm (4.3 × 8.7 in.) – Yes
Com-10 105 × 241 mm (4 1/8 × 9 1/2 in.) – Yes
Monarch 98 × 191 mm (3 7/8 × 7 1/2 in.) – Yes
Paper weight, thickness and capacity 2
2
Paper Type Weight Thickness No. of
sheets
Cut-Sheet Plain Paper
Inkjet Paper
Glossy Paper
Cards Photo Card
Index Card
Envelopes
1
Up to 100 sheets of 80 g/m2paper.
2
BP71 (260 g/m2) paper is especially designed for Brother inkjet machines.
64 to 120 g/m
64 to 200 g/m
Up to 220 g/m
Up to 220 g/m
Up to 120 g/m
80 to 95 g/m
2
2
2
2
2
2
0.08 to 0.15 mm
100
0.08 to 0.25 mm 20
Up to 0.25 mm
Up to 0.25 mm
20
20
Up to 0.15 mm 30
Up to 0.52 mm 10
2
2
1
19

3
IMPORTANT
IMPORTANT
Loading documents 3
How to load documents
You can make copies or scan from the ADF1
(automatic document feeder) and from the
scanner glass.
1
DCP-T700W only
Using the ADF (DCP-T700W) 3
The ADF can hold up to 20 pages and feeds
each sheet individually. Use paper that is
within the sizes and weights shown in the
table. Always fan the edges of the pages
before placing them in the ADF.
Document Sizes and Weights 3
a Unfold the ADF Document Support (1).
3
1
b Fan the pages well.
c Adjust the paper guides (1) to fit the
width of your documents.
Length: 148 to 355.6 mm
Width: 148 to 215.9 mm
Paper weight:
64 to 90 g/m
2
How to load documents 3
• DO NOT pull on the document while it is
feeding.
• DO NOT use paper that is curled,
wrinkled, folded, ripped, stapled, paper
clipped, glued or taped.
• DO NOT use cardboard, newspaper or
fabric with the ADF. Instead use the
scanner glass.
Make sure documents written with ink or
modified with correction fluid are completely
dry.
1
d Place your documents face down, top
edge first in the ADF underneath the
guides until you feel them touch the feed
rollers.
The screen will display ADF Ready.
20
DO NOT leave thick documents on the
scanner glass. If you do this, the ADF may
jam.
Loading documents
NOTE
IMPORTANT
1
e After using the ADF, close the ADF
Document Support. Push down on the
upper-left portion of the ADF Document
Support to close it completely.
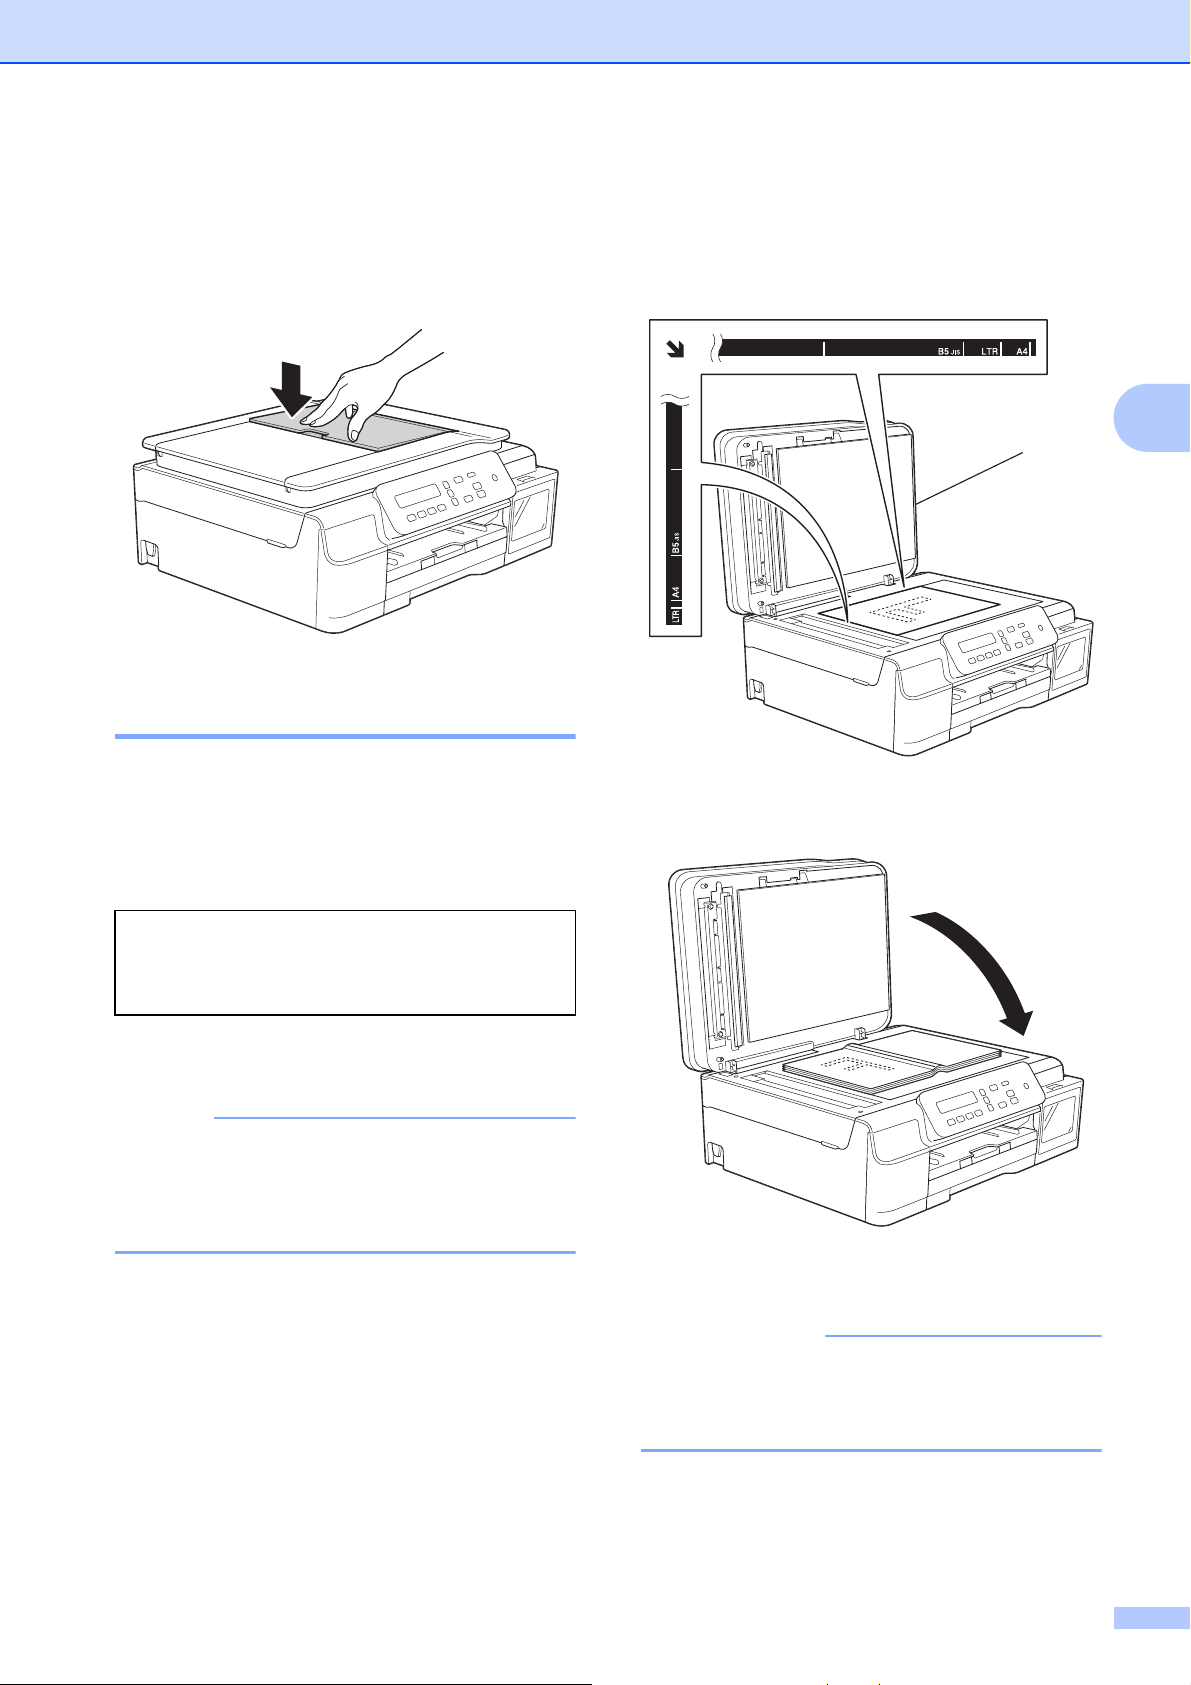
Using the scanner glass 3
You can use the scanner glass to copy, or
scan single pages or pages of a book.
b Using the document guidelines on the
left and top, place the document
face down in the upper left corner of the
scanner glass.
1 document cover
3
Document sizes supported 3
Length: Up to 297 mm
Width: Up to 215.9 mm
Weight: Up to 2 kg
How to load documents 3
To use the scanner glass, the ADF1 must
be empty.
1
DCP-T700W only
a Lift the document cover.
c Close the document cover.
If you are scanning a book or thick
document, DO NOT slam the cover down
or press on it.
21

Chapter 3
1
3
24
Unscannable area 3
The scannable area depends on the settings
in the application you are using. The figures
show the unscannable areas.
Usage Document
Size
Copy All paper
Scan 1 mm 1 mm
sizes
Top (1)
Bottom (3)
3mm 3mm
Left (2)
Right (4)
22
Loading...