


 Loading...
Reference Guide
Brief explanations for routine operations
DCP-T310
DCP-T510W
DCP-T710W
MFC-T810W
Brother recommends keeping this guide next to your Brother machine for quick reference.
Online User's Guide
For more advanced instructions, information, and product specifications, see the Online User's Guide at support.brother.com/manuals
User's Guides and Where to Find Them
Which Guide? |
What's in It? |
Where Is It? |
Product Safety Guide |
Read this Guide first. Please read the Safety |
Printed / In the box |
|
Instructions before you set up your machine. |
|
|
See this Guide for trademarks and legal |
|
|
limitations. |
|
|
|
|
Quick Setup Guide |
Follow the instructions for setting up your |
Printed / In the box |
|
machine, and installing the drivers and |
|
|
software for the operating system and |
|
|
connection type you are using. |
|
|
|
|
Reference Guide |
Learn the basic PC-Print, Scan, Copy and |
Printed or on Brother |
|
Fax operations and basic machine |
Installation Disc / In |
|
maintenance. See troubleshooting tips. |
the Box |
|
|
|
Online User's Guide |
This guide includes the additional contents of |
Brother Solutions |
|
the Reference Guide. |
Center 2 |
|
In addition to information about the PC-Print, |
|
|
Scan, Copy, Fax, Internet services, Mobile |
|
|
Functions and Brother ControlCenter |
|
|
operations, useful information is included |
|
|
about using the machine on a network. 1 |
|
1 Network features are not available for some models.
2Visit support.brother.com/manuals.
For the Latest Driver Updates
Go to your model's Downloads page on the Brother Solutions Center at support.brother.com to download drivers. To keep your machine’s performance up-to-date, check there for the latest firmware upgrades.
©2017 Brother Industries, Ltd. All rights reserved.
1
Questions or Problems? Take a Look at our FAQs, Solutions, and Videos Online.
Go to your model's FAQs & Troubleshooting page on the Brother Solutions Center at support.brother.com
•Provides several ways to search
•Displays related questions for more information
•Receives regular updates based on customer feedback
Important Note
•This documentation is for both MFC and DCP models. Where it says 'MFC' in this User's Guide, read 'MFC-xxxx' as 'DCP-xxxx'. DCP models are not equipped with a fax function.
2
1General Information
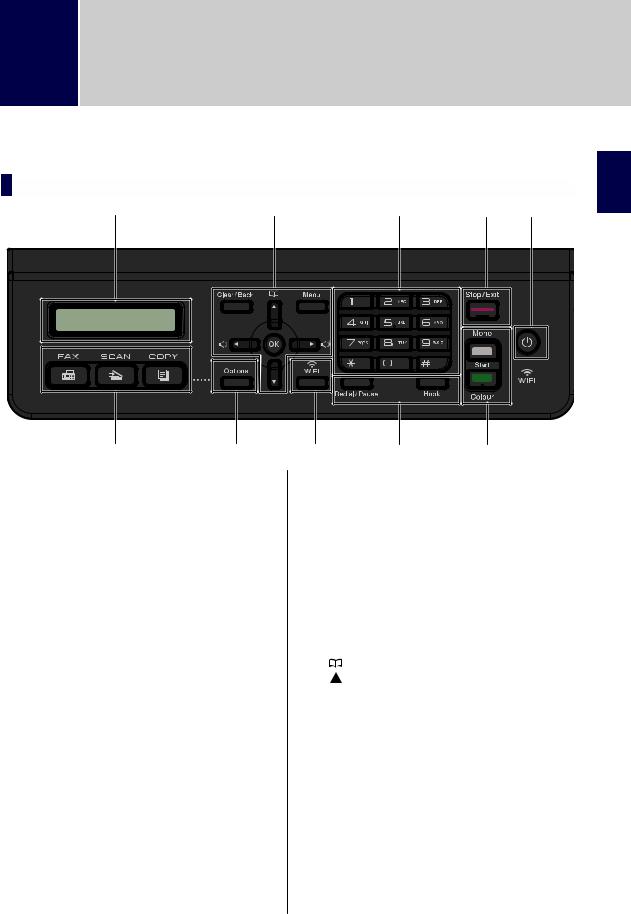
Control Panel Overview
MFC-T810W |
|
|
|
|
|
1 |
1 |
|
3 |
6 |
8 |
10 |
|
|
Information General |
|||||
|
|
|
|
|
|
|
2 |
4 |
5 |
7 |
9 |
|
|
1.Liquid Crystal Display (LCD)
Displays messages to help you set up and use the machine.
2.Mode buttons
 FAX
FAX
Press to switch the machine to Fax mode.
 SCAN
SCAN
Press to switch the machine to Scan mode.
 COPY
COPY
Press to switch the machine to Copy mode.
3. Menu buttons Clear/Back
Press to delete characters or to go back to the previous menu level.
Menu
Press to access the main menu.
OK
Press to select a setting.
 d or c

Press to adjust the ring volume while the machine is idle.
•Press to store Speed Dial and Group numbers in the machine's memory.
•Press to look up and dial numbers that are stored in the machine's memory.
a or b
Press to scroll through the menus and options.
d or c
Press to move the cursor left or right on the LCD.
3

4.Options
Press to access temporary settings for copying, scanning or faxing.
5.WiFi
Press to configure the wireless settings while the machine is idle.
6.Dial Pad
•Use to dial fax and telephone numbers.
•Use as a keyboard to enter text or characters.
7.Telephone buttons Redial/Pause
•Press to select and redial the numbers from the Outgoing Call history or Caller ID history.
•Press to insert a pause when dialling numbers.
Hook
If the machine is in Fax/Tel (F/T) mode and you pick up the handset of an external telephone during the F/T ring (pseudo/double-ring), press Hook to talk.
8. Stop/Exit
•Press to stop an operation.
•Press to exit from a menu.
9.Start buttons  Mono Start
•Press to start sending faxes in monochrome.
•Press to start making copies in monochrome.
•Press to start scanning documents (in colour or monochrome depending on the scan setting).
 Colour Start
•Press to start making copies in full colour.
•Press to start scanning documents (in colour or monochrome depending on the scan setting).
10.  Power On/Off
Press  to turn the machine on.
Press and hold down  to turn the
machine off. The LCD displays
[Shutting Down] and stays on for a few seconds before turning itself off. If you have connected an external telephone or TAD, it is always available.
If you turn the machine off using  , it
, it
will still clean the print head periodically to maintain print quality. To prolong print head life, provide better ink efficiency, and maintain print quality, keep your machine connected to a power source at all times.
4
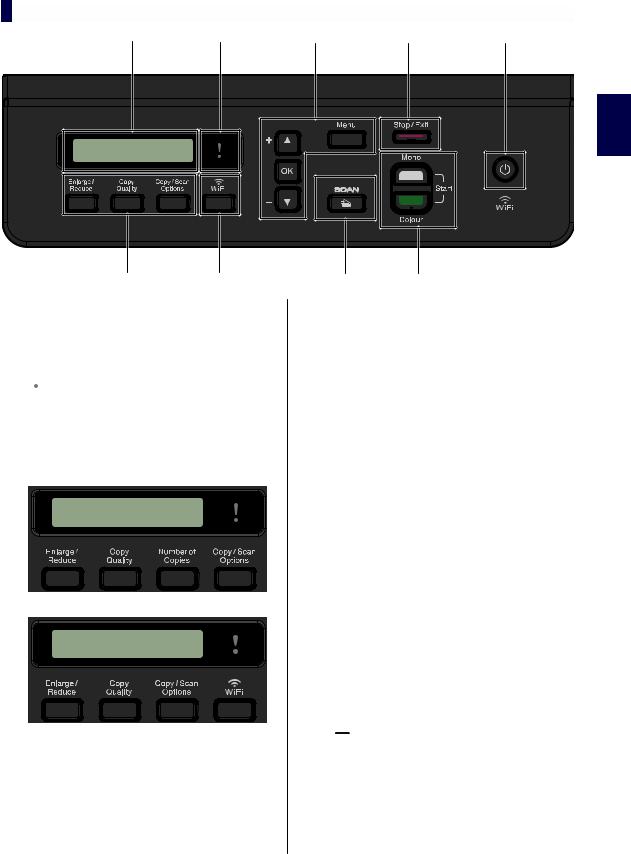
DCP-T310/DCP-T510W/DCP-T710W
1 |
2 |
5 |
7 |
9 |
34
1.Liquid Crystal Display (LCD)
Displays messages to help you set up and use the machine.
2. Warning LED
Blinks in orange when the LCD displays an error or an important status message.
3.Copy buttons (DCP-T310)
(DCP-T510W/DCP-T710W)
•Enlarge / Reduce
Press to enlarge or reduce copies.
•Copy Quality
Press to temporarily change the quality of your copies.
•Number of Copies (DCP-T310)
6 8
Press to make multiple copies.
•Copy / Scan Options
Press to access temporary settings for copying or scanning.
4.WiFi (DCP-T510W/DCP-T710W)
Press to configure the wireless settings while the machine is idle.
5.Menu buttons Menu
Press to access the main menu. a or b
Press to scroll through the menus and options.
OK
Press to select a setting.
6. SCAN
SCAN
Press to switch the machine to Scan mode.
7. Stop/Exit
•Press to stop an operation.
•Press to exit from a menu.
Information General 1
5

8.Start buttons  Mono Start
•Press to start making copies in monochrome.
•Press to start scanning documents (in colour or monochrome depending on the scan setting).
 Colour Start
•Press to start making copies in full colour.
•Press to start scanning documents (in colour or monochrome depending on the scan setting).
9. Power On/Off
Press  to turn the machine on.
Press and hold down  to turn the
machine off. The LCD displays
[Shutting Down] and stays on for a few seconds before turning itself off.
If you turn the machine off using  , it
, it
will still clean the print head periodically to maintain print quality. To prolong print head life, provide better ink efficiency, and maintain print quality, keep your machine connected to a power source at all times.
6
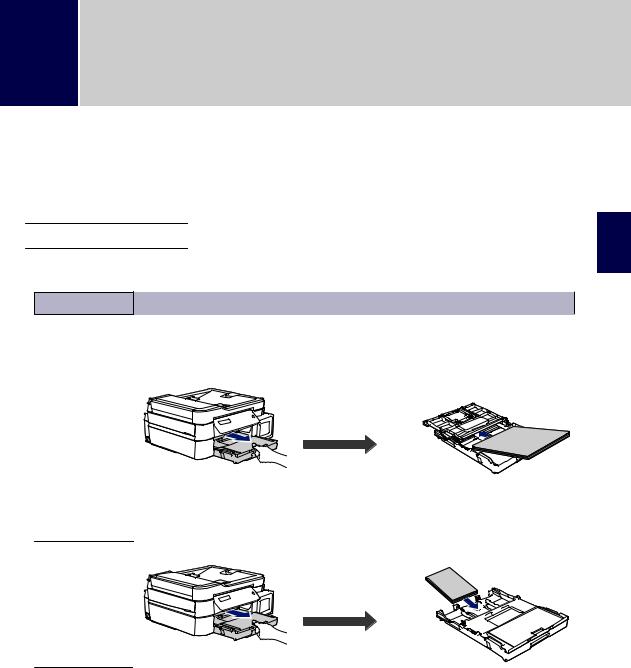
2Paper Handling
Load Paper
1 Load the paper in the paper tray as follows.  Fan the stack of paper well.
The paper size determines the orientation when loading paper.
Tray #1 |
How to Load Paper |
|
A4/Letter |
|
|
Legal/Folio |
|
|
Mexico Legal 1 |
|
|
India Legal 1 |
Printing surface: Face down |
|
Executive |
Adjust the paper |
|
guides. |
||
B5/B6 (JIS) 1 |
||
|
||
A5/A6 |
|
|
Photo 2L |
|
|
Index card |
|
|
Envelopes |
|
|
Photo |
Printing surface: Face down |
|
|
Adjust the paper |
|
|
guides. |
Handling Paper 2
1Supported only in some countries.
7
Manual Feed Slot 1 |
How to Load Paper |
|
A4/Letter |
|
|
Legal/Folio |
Printing surface: Face |
|
Mexico Legal 2 |
||
up |
||
India Legal 2 |
|
|
Executive |
Adjust the paper guides. |
|
B5/B6 (JIS) 2 |
||
|
||
A5/A6 |
|
|
Photo |
|
|
Photo L/2L |
|
|
Index card |
|
|
Envelopes |
|
1You can load only one sheet of paper into the manual feed slot at a time.
2Supported only in some countries.
For more detailed information, see the Online User's Guide: Load Paper.
2Unfold the paper support flap. Change the paper size setting in the machine's menu, if needed.


 2
2
 1
1
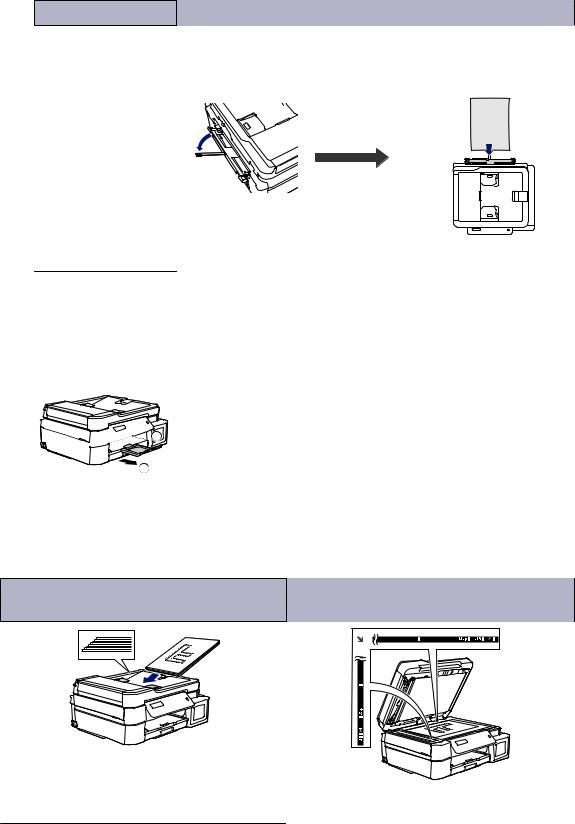
Load Documents
Place the document in the ADF or on the scanner glass as shown in the illustration.
Automatic Document Feeder (ADF)
Scanner Glass
(DCP-T710W/MFC-T810W)
Place your document face down in the ADF.
Place the document face down in the upper left corner of the scanner glass.
8
Loading...