


 Loading...
Online User's Guide
DSmobile DS-635
DSmobile DS-640
DSmobile DS-740D
DSmobile DS-940DW
© 2019 Brother Industries, Ltd. All rights reserved.

Home > Table of Contents |
|
Table of Contents |
|
Before You Use Your Brother Machine ............................................................................................... |
1 |
Definitions of Notes ........................................................................................................................................ |
2 |
Trademarks .................................................................................................................................................... |
3 |
Important Note ............................................................................................................................................... |
4 |
Introduction to Your Brother Machine................................................................................................. |
5 |
About This Machine ....................................................................................................................................... |
6 |
Control Panel Overview ................................................................................................................................. |
9 |
Charge the Battery ....................................................................................................................................... |
13 |
Paper Handling.................................................................................................................................... |
14 |
Document Specifications.............................................................................................................................. |
15 |
Acceptable Documents ...................................................................................................................... |
16 |
Unacceptable Documents .................................................................................................................. |
18 |
Carrier Sheet Recommendations ....................................................................................................... |
19 |
Notes for Using Carrier Sheets .......................................................................................................... |
20 |
Load Documents .......................................................................................................................................... |
21 |
Load Standard Size Document .......................................................................................................... |
22 |
Load a Plastic Card ............................................................................................................................ |
23 |
Load Non-standard Size Document ................................................................................................... |
24 |
Use the Output Guide......................................................................................................................... |
26 |
Scan...................................................................................................................................................... |
28 |
Before Scanning........................................................................................................................................... |
29 |
Scan Using the Scan Functions on Your Brother Machine .......................................................................... |
30 |
Save Scanned Documents on Your Computer................................................................................... |
31 |
Save Scanned Documents to a Memory Card ................................................................................... |
32 |
Web Services for Scanning on Your Network (Windows 7, Windows 8.1 and Windows 10) ............. |
34 |
Restrict Scan Functions from External Devices ................................................................................. |
37 |
Scan from Your Computer (Windows) ......................................................................................................... |
38 |
Scan Using Nuance™ PaperPort™ 14SE or Other Windows Applications......................................... |
39 |
Scan Using Windows Photo Gallery or Windows Fax and Scan........................................................ |
45 |
Scan Using Kofax Power PDF Standard v3 ....................................................................................... |
49 |
Scan Using Brother iPrint&Scan (Windows) ...................................................................................... |
50 |
Scan from Your Computer (Mac).................................................................................................................. |
51 |
Scan Using Brother iPrint&Scan (Mac) .............................................................................................. |
52 |
Scan Using Apple Image Capture (ICA Driver) .................................................................................. |
53 |
Scan Using Kofax Power PDF Standard for Mac v3 .......................................................................... |
57 |
Using AirPrint Scanning ..................................................................................................................... |
58 |
Scan Using Brother iPrint&Scan for Mobile ................................................................................................. |
61 |
Brother iPrint&Scan for Mobile Devices ............................................................................................. |
62 |
Scan Using Presto! BizCard......................................................................................................................... |
63 |
Network ................................................................................................................................................ |
64 |
Supported Basic Network Features ............................................................................................................. |
65 |
Network Management Software and Utilities ............................................................................................... |
66 |
Learn about Network Management Software and Utilities ................................................................. |
67 |
Additional Methods of Configuring Your Brother Machine for a Wireless Network ...................................... |
68 |
|
i |

Home > Table of Contents |
|
Before Configuring Your Brother Machine for a Wireless Network..................................................... |
69 |
Configure Your Machine for a Wireless Network Using the One-Push Method of Wi-Fi Protected |
|
Setup™ (WPS).................................................................................................................................... |
70 |
Configure Your Machine for a Wireless Network Using the PIN Method of Wi-Fi Protected |
|
Setup™ (WPS).................................................................................................................................... |
71 |
Use Wireless Direct ............................................................................................................................ |
73 |
Use Infrastructure Mode ..................................................................................................................... |
76 |
Advanced Network Features........................................................................................................................ |
80 |
Synchronize Time with the SNTP Server Using Web Based Management ....................................... |
81 |
Security ................................................................................................................................................ |
86 |
Network Security Features........................................................................................................................... |
87 |
Manage Your Network Machine Securely Using SSL/TLS................................................................. |
88 |
Brother iPrint&Scan for Windows and Mac...................................................................................... |
99 |
Brother iPrint&Scan Overview.................................................................................................................... |
100 |
Troubleshooting ................................................................................................................................ |
101 |
Error and Maintenance Indications ............................................................................................................ |
102 |
Service Call Indications .................................................................................................................... |
105 |
Document Jam ........................................................................................................................................... |
106 |
If You Are Having Difficulty with Your Machine .......................................................................................... |
108 |
Scanning and Other Problems ......................................................................................................... |
109 |
AirPrint Scanning Problems ............................................................................................................. |
115 |
Network Problems ............................................................................................................................ |
116 |
Check the Serial Number ........................................................................................................................... |
124 |
Reset Your Brother Machine ...................................................................................................................... |
125 |
Routine Maintenance ........................................................................................................................ |
127 |
Clean Your Brother Machine ...................................................................................................................... |
128 |
Clean the Outside of the Machine .................................................................................................... |
129 |
Clean the Scanner and Rollers ........................................................................................................ |
130 |
Calibrate Your Brother Machine ................................................................................................................. |
132 |
Supplies ..................................................................................................................................................... |
134 |
Pack and Ship Your Brother Machine ........................................................................................................ |
135 |
Remove and Dispose the Battery .............................................................................................................. |
136 |
Machine Settings............................................................................................................................... |
138 |
Change Machine Settings from Your Computer......................................................................................... |
139 |
Change Machine Settings Using Web Based Management ............................................................ |
140 |
Change the Machine Settings Using Remote Setup ........................................................................ |
144 |
Appendix............................................................................................................................................ |
153 |
Specifications ............................................................................................................................................. |
154 |
Brother Help and Customer Support.......................................................................................................... |
159 |
ii

 Home > Before You Use Your Brother Machine
Before You Use Your Brother Machine
•Definitions of Notes
•Trademarks
•Important Note
1

 Home > Before You Use Your Brother Machine > Definitions of Notes
Definitions of Notes
We use the following symbols and conventions throughout this User's Guide:
CAUTION |
CAUTION indicates a potentially hazardous situation which, if not avoided, may |
result in minor or moderate injuries. |
|
|
|
IMPORTANT |
IMPORTANT indicates a potentially hazardous situation which, if not avoided, may |
|
|
|
result in damage to property or loss of product functionality. |
|
|
NOTE |
NOTE specifies the operating environment, conditions for installation, or special |
|
|
|
conditions of use. |
|
|
|
Tips icons indicate helpful hints and supplementary information. |
|
|
Bold |
Bold style identifies buttons on the machine's control panel or computer screen. |
|
|
Italics |
Italicized style emphasizes an important point or refers you to a related topic. |
|
|
Related Information
• Before You Use Your Brother Machine
2

 Home > Before You Use Your Brother Machine > Trademarks
Trademarks
Brother is either a trademark or a registered trademark of Brother Industries, Ltd.
Microsoft, Windows, Windows Server, Internet Explorer, Word, Excel, PowerPoint and Microsoft Edge are either registered trademarks or trademarks of Microsoft Corporation in the United States and/or other countries.
Apple, AirPrint, App Store, Mac, Safari, iPad, iPhone, iPod touch and macOS are trademarks of Apple Inc., registered in the United States and other countries.
Kofax, PaperPort and Power PDF, are trademarks or registered trademarks of Kofax in the U.S. and/or other countries. All other trademarks are the trademarks or registered trademarks of their respective owners.
Wi-Fi® and Wi-Fi Alliance® are registered trademarks of Wi-Fi Alliance®.
WPA™, WPA2™, Wi-Fi Protected Setup™ and Wi-Fi Protected Setup™ logo are trademarks of Wi-Fi Alliance®. Android and Google Play are trademarks of Google LLC.
microSD Logo is a trademark of SD-3C LLC.
The Bluetooth® word mark is a registered trademark owned by the Bluetooth SIG, Inc. and any use of such marks by Brother Industries, Ltd. and related companies is under license. Other trademarks and trade names are those of their respective owners.
Each company whose software title is mentioned in this manual has a Software License Agreement specific to its proprietary programs.
Any trade names and product names of companies appearing on Brother products, related documents and any other materials are all trademarks or registered trademarks of those respective companies.
Related Information
• Before You Use Your Brother Machine
3

 Home > Before You Use Your Brother Machine > Important Note
Important Note
•The latest manuals are available at support.brother.com/manuals.
•Check support.brother.com for Brother driver and software updates.
•To keep your machine performance up to date, check support.brother.com for the latest firmware upgrade. Otherwise, some of your machine's functions may not be available.
•Do not use this product outside the country of purchase as it may violate the wireless telecommunication and power regulations of that country.
•Not all models are available in all countries.
•In this User's Guide, illustrations of the DSmobile DS-940DW are used, unless otherwise specified.
•The screens in this User's Guide are for illustration purposes only and may differ from the actual screens.
•Unless otherwise specified, the screens in this manual are from Windows 10 and macOS v10.12.x. Screens on your computer may vary depending on your operating system.
•The contents of this guide and the specifications of this product are subject to change without notice.
Related Information
• Before You Use Your Brother Machine
4

 Home > Introduction to Your Brother Machine
Introduction to Your Brother Machine
•About This Machine
•Control Panel Overview
•Charge the Battery
5

 Home > Introduction to Your Brother Machine > About This Machine
About This Machine
>>DSmobile DS-635/DSmobile DS-640
>>DSmobile DS-740D
>>DSmobile DS-940DW
DSmobile DS-635/DSmobile DS-640

 1 6
1 6 

2 |
7 |
|
5
4
3
1.Top Cover
2.Control Panel
3.USB 3.0 (Micro) Port (for connecting to a computer)
4.Document Guide
5.Feeder Slot
6.Left Edge of the Feeder Slot
7.Paper Output Slot
6

DSmobile DS-740D
3
2
1
4
8
5
6
7
1.Top Cover
2.Output Guide
3.Control Panel
4.Document Guide
5.Feeder Slot
6.Left Edge of the Feeder Slot
7.USB 3.0 (Micro) Port (for connecting to a computer)
8.Paper Output Slot
DSmobile DS-940DW
1
2
|
|
|
|
9 |
8 |
|
|
3 |
12 |
|
|
|
||
|
|
|
|
|
|
|
|
|
11 |
|
7 |
|
|
10 |
|
|
|
|
|
|
|
6 |
|
4 |
|
|
|
|
|
|
|
|
5 |
|
1.Top Cover
2.Output Guide
7
3.Control Panel
4.WPS Button
5.Mode Select Switch
•microSD Mode 
•USB Mode 
•Wi-Fi Mode 
6.Document Guide
7.Feeder Slot
8.Left Edge of the Feeder Slot
9.Paper Output Slot
10.Memory Card Slot
11.Reboot Button
12.USB 3.0 (Micro) Port (for connecting to a computer)
Related Information
• Introduction to Your Brother Machine
8
 Home > Introduction to Your Brother Machine > Control Panel Overview
Control Panel Overview
>>DSmobile DS-635/DSmobile DS-640/DSmobile DS-740D
>>DSmobile DS-940DW
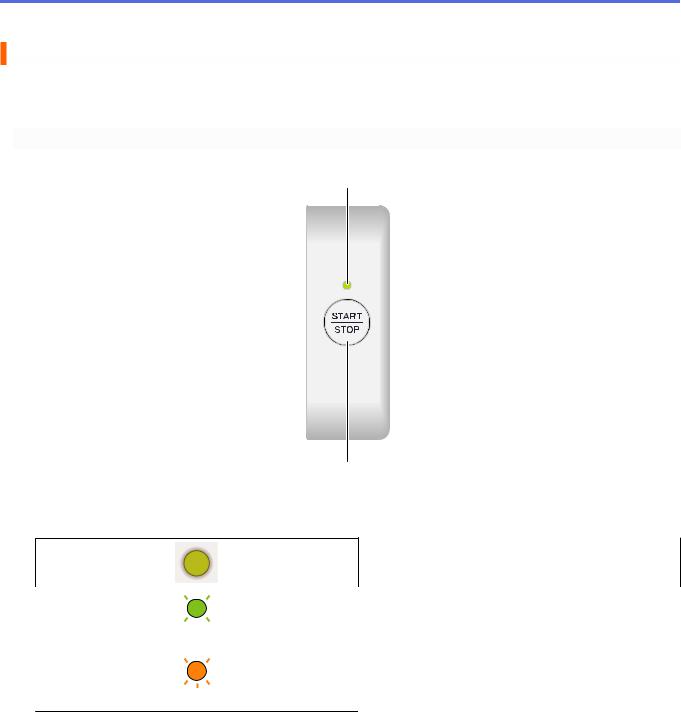
DSmobile DS-635/DSmobile DS-640/DSmobile DS-740D
1
2
1.Power/Scan LED
Indicates the machine's status.
|
|
|
|
|
|
The machine is in Ready Mode. |
|
|
|
|
|
|
|
|
|
|
|
|
|
|
|
• The machine is scanning. |
|
|
|
|
|
|
|
||
|
|
|
|
|
|
||
|
|
|
|
|
|
• |
Remote Setup is in progress. |
|
|
|
|
|
|
||
(blinking) |
• |
The machine is starting up. |
|||||
|
|
|
|
|
|
|
|
|
|
|
|
|
|
An error has occurred. |
|
|
|
|
|
|
|
||
|
|
|
|
|
|
||
(blinking)
2.START/STOP Button
Press to start or stop scanning.
9
DSmobile DS-940DW
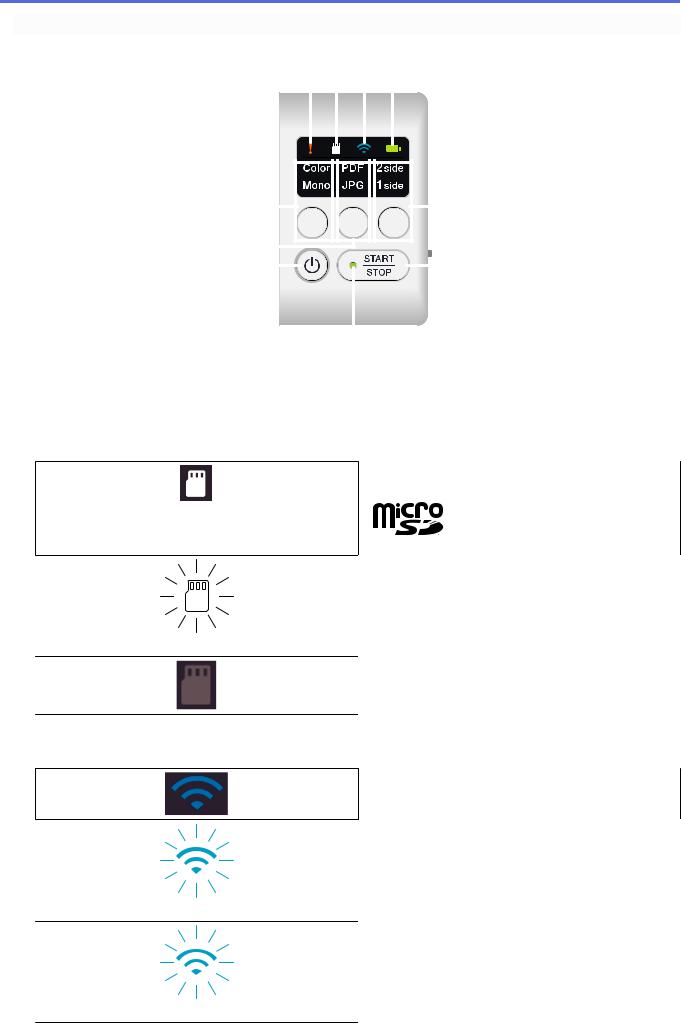
1 2 3 4
12, 13 |
|
|
|
|
|
|
|
|
|
|
|
|
|
|
5, 6 |
|
|
|
|
|
|
|
|
|
|
|
|
|
|
||
|
|
|
|
|
|
|
|
|
|
|
|
|
|
||
|
|
|
|
|
|
|
|
|
|
|
|
|
|
||
|
|
|
|
|
|
|
|
|
|
|
|
|
|||
|
|
|
|
|
|
|
|
|
|
|
|
|
|||
10, 11 |
|
|
|
|
|
|
|
|
|
|
|
|
|
|
|
|
|
|
|
|
|
|
|
|
|
|
|
|
|
||
|
|
|
|
|
|
|
|
|
|
|
|
|
|
|
|
9 |
|
|
|
|
|
|
|
|
|
|
|
|
|
|
7 |
|
|
|
|
|
|
|
|
|
|
|
|
|
|||
|
|
|
|
|
|
|
|
|
|
|
|
|
|||
|
|
|
|
|
|
|
|
|
|
|
|
|
|
|
|
|
|
|
|
|
|
|
|
|
|
|
|
|
|
|
|
|
|
|
|
|
|
|
|
|
|
|
|
|
|
|
|
8
1.Error LED
Blinks when the machine detects an error.
2.SD Card LED
Indicates the microSD memory card status when the machine is in microSD Mode.
microSD memory card is inserted.
microSD memory card is not inserted.
(blinking)
The machine is not in microSD Mode.
3.Wi-Fi LED
Indicates the wireless network status when the machine is in Wi-Fi Mode.
Wireless network is connected.
Your machine is connecting to the wireless network.
(blinking)
Wi-Fi settings are not configured.
(blinking slowly)
10
The machine is not in Wi-Fi Mode.
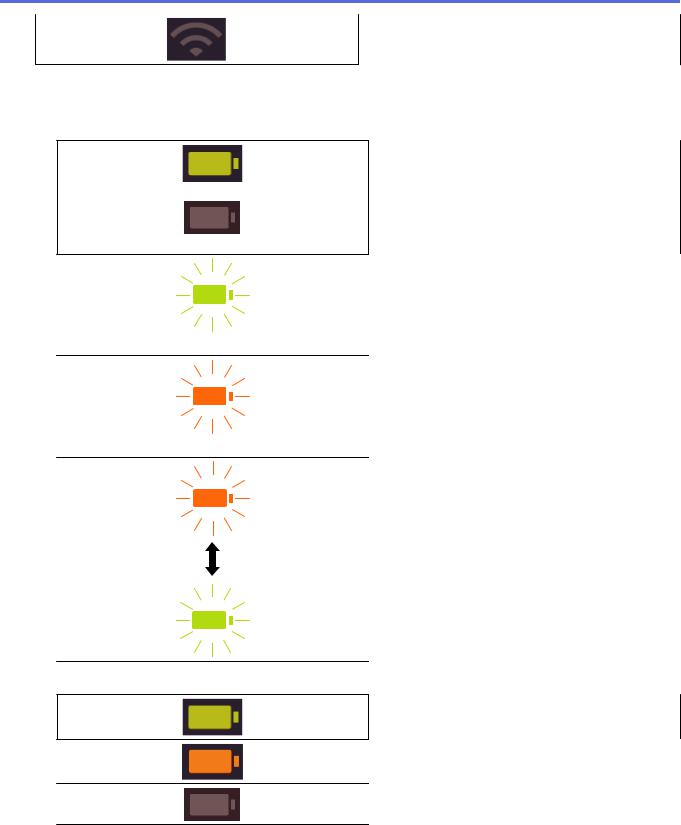
4.Battery LED
Indicates the rechargeable Li-ion battery status.
• When the machine is connected to the computer using a USB cable
Battery is fully charged.
(When the machine is turned on.)
(When the machine is turned off.)
The machine is charging the battery.
(blinking)
Battery Low. The machine is charging the battery.
(blinking)
A battery error has occurred.
•When the machine is not connected to the computer using a USB cable (The battery does not charge)
The machine is turned on and the battery power is consumed.
Battery Low. The machine is turned on and the battery power is consumed.
The machine is turned off or the battery has no remaining power.
11

A battery error has occurred.
5.2side/1side LED
Indicates the scan option selected in microSD Mode.
6.2side/1side Switching Button
Press to change the scan mode (2-sided Scan or single-sided Scan) in microSD Mode.
7.START/STOP Button
Press to start or stop scanning.
8.Power/Scan LED
Indicates the machine's status.
|
|
|
|
|
|
The machine is in Ready Mode. |
|
|
|
|
|
|
|
|
|
|
|
|
|
• The machine is scanning. |
|
|
|
|
|
|
|
|
|
|
|
|
|
|
|
|
|
|
|
|
• Remote Setup is in progress. |
|
|
|
|
|
|
|
(blinking) |
• The machine is preparing to charge the battery. |
|||||
|
|
|
|
|
|
• The machine is starting up. |
|
|
|
|
|
|
• The machine is shutting down. |
|
|
|
|
|
|
|
9.Power Button
Press  to turn on the machine.Press and hold
  to turn off the machine.
 If the machine is connected to the computer using a USB cable and the battery is not fully charged, the machine turns off and goes into Battery Charge Mode when you press and hold
  . (The Battery LED blinks.)
The machine turns off after the battery is fully charged or when the USB cable is disconnected from the machine or computer.
10.PDF/JPEG LED
Indicates the scan option selected in microSD Mode.
11.PDF/JPEG Switching Button
Press to change the scanning file format (PDF or JPEG) in microSD Mode.
12.Color/Mono LED
Indicates the scan option selected in microSD Mode.
13.Color/Mono Switching Button
Press to change the scan mode (color or black and white) in microSD Mode.
Related Information
• Introduction to Your Brother Machine
12

 Home > Introduction to Your Brother Machine > Charge the Battery
Charge the Battery
Related Models: DSmobile DS-940DW
The scanner charges the rechargeable Li-ion battery when it is powered on, but will charge the battery faster when the scanner powered off.
1.Make sure that your computer is on.
2.Connect the USB cable to your scanner's USB port.
3.Connect the USB cable to your computer. The battery starts charging automatically.
The Battery LED blinks in green or orange while the battery is charging, and turns off or lights in green when charging is complete.
 • Charging stops if the temperature is higher than the recommended operating temperature. For more information, see Related Information: Specifications.
•If you do not use the scanner for a long period, fully charge the battery at least once every three months to prolong the battery life.
•If you do not use the scanner for a long period, store it in a cool, dry place at a consistent temperature.
Related Information
•Introduction to Your Brother Machine
Related Topics:
•Specifications
13

 Home > Paper Handling
Paper Handling
•Document Specifications
•Load Documents
14

 Home > Paper Handling > Document Specifications
Document Specifications
•Acceptable Documents
•Unacceptable Documents
•Carrier Sheet Recommendations
•Notes for Using Carrier Sheets
15

 Home > Paper Handling > Document Specifications > Acceptable Documents
Acceptable Documents
Standard Paper
Size |
DSmobile DS-635/DSmobile DS-640: |
||
|
• 3.4 in. x 2.0 in. to 72 in. x 8.5 in. (86.4 mm x 50.8 mm to 1828.8 mm x 215.9 mm) |
||
|
DSmobile DS-740D/DSmobile DS-940DW: |
||
|
• Single-sided Scan |
|
|
|
|
3.4 in. x 2.0 in. to 72 in. x 8.5 in. (86.4 mm x 50.8 mm to 1828.8 mm x 215.9 mm) |
|
|
• |
2-sided Scan |
|
|
|
3.4 in. x 2.0 in. to 16 in. x 8.5 in. (86.4 mm x 50.8 mm to 406.48 mm x 215.9 mm) |
|
|
• |
Output Guide |
|
|
|
4.13 in. x 2.91 in. to 11.69 in. x 8.5 in. (105 mm x 74 mm to 297 mm x 215.9 mm) |
|
|
|
|
|
Weight |
9.3 lb to 72 lb (35 g/ to 270 g/ ) |
||
|
Output Guide (DSmobile DS-740D/DSmobile DS-940DW): 13.9 lb to 21.3 lb (52 g/ to 80 g/ ) |
||
|
|
|
|
Thickness |
1.58 mil to 11.02 mil (0.04 mm to 0.28 mm) |
||
|
To scan thinner documents, use the Carrier Sheet (not included). |
||
|
|
|
|
Maximum Number |
1 page (1 sheet) |
|
|
of Pages |
|
|
|
|
|
|
|
Standard Paper |
A4 |
|
8.3 in. x 11.7 in. (210 mm x 297 mm) |
Size |
|
|
|
A5 |
|
5.8 in. x 8.3 in. (148 mm x 210 mm) |
|
|
|
||
|
|
|
|
|
A6 |
|
4.1 in. x 5.8 in. (105 mm x 148 mm) |
|
|
|
|
|
B5 |
|
7.2 in. x 10.1 in. (182 mm x 257 mm) |
|
|
|
|
|
B6 |
|
5 in. x 7.2 in. (128 mm x 182 mm) |
|
|
|
|
|
Legal |
8.5 in. x 14 in. (215.9 mm x 355.6 mm) |
|
|
|
|
|
|
Mexican Legal |
8.5 in. x 13.38 in. (215.9 mm x 339.9 mm) |
|
|
|
|
|
|
India Legal |
8.46 in. x 13.58 in. (215 mm x 345 mm) |
|
|
|
|
|
|
Letter |
8.5 in. x 11 in. (215.9 mm x 279.4 mm) |
|
|
|
|
|
|
Executive |
7 1/4 in. x 10 1/2 in. (184.1 mm x 266.7 mm) |
|
|
|
|
|
|
Folio |
8 1/2 in. x 13 in. (215.9 mm x 330.2 mm) |
|
|
|
|
|
|
Index Card |
5 in. x 8 in. (13 cm x 20 cm) |
|
|
|
|
|
|
Business Card |
3.5 in. x 2.4 in. (90 mm x 60 mm) |
|
|
|
|
|
Non-standard Size Paper
Photo |
4 in. x 6 in. (10 cm x 15 cm) |
|
|
Photo L |
3.5 in. x 5 in. (9 cm x 13 cm) |
|
|
Photo 2L |
5 in. x 7 in. (13 cm x 18 cm) |
|
|
Plastic Card
Size (ISO) |
3.37 in. x 2.13 in. (85.6 mm x 53.98 mm) |
|
|
Material |
Plastic (PET) |
|
|
Type |
Plastic card such as a store card. |
|
|
Thickness |
Up to 0.05 in. (1.24 mm) (with embossing) |
|
Up to 0.04 in. (1 mm) (without embossing) |
|
|
Maximum Number of Cards |
One card |
|
|
16

 Certain types of embossed cards may not scan correctly.
Related Information
•Document Specifications
Related Topics:
•Supplies
17
 Home > Paper Handling > Document Specifications > Unacceptable Documents
Unacceptable Documents
The following types of documents may not be scanned successfully:
•Documents with paper clips or staples
•Documents with wet ink
•Fabrics, metallic sheets, or overhead projector sheets
•Glossy or mirrored media
•Documents that exceed recommended thicknesses
IMPORTANT
The damage caused by using any unacceptable documents with your Brother machine may not be covered under warranty.
Related Information
• Document Specifications
18

 Home > Paper Handling > Document Specifications > Carrier Sheet Recommendations
Carrier Sheet Recommendations
Brother recommends using a Carrier Sheet (not included) to scan the following documents:
•Documents with a carbon sheet attached
•Documents written in pencil
•Documents narrower than 2 in. (50.8 mm)
•Documents shorter than 3.4 in. (86.4 mm)
•Pages thinner than 1.57 mil (0.04 mm)
•Documents of uneven thickness, such as envelopes
•Documents with large wrinkles or curls
•Bent or damaged documents
•Documents that use tracing paper
•Documents that use coated paper
•Photographs (photographic paper)
•Documents printed on perforated paper
•Documents printed on unusually-shaped paper (not square or rectangle)
•Documents with photos, notes, or stickers attached to them
•Documents that use carbonless paper
•Documents that use loose-leaf paper or any paper with holes in it
CAUTION
To avoid cutting yourself, do not slide or scrape your hand or fingers along the edge of the Carrier Sheet.
IMPORTANT
•To avoid warping the Carrier Sheet, do not place the Carrier Sheet in direct sunlight or in an area subject to high temperatures and high humidity.
•To avoid damaging the Carrier Sheet, do not bend or pull it. Do not use a damaged Carrier Sheet, as it may produce incorrect scan results.
Related Information
•Document Specifications
Related Topics:
•Supplies
19

 Home > Paper Handling > Document Specifications > Notes for Using Carrier Sheets
Notes for Using Carrier Sheets
•To avoid document jams, do not load the Carrier Sheet (not included) upside down. See the instructions printed on the Carrier Sheet itself for more information.
•To avoid document jams, do not put several small documents into the Carrier Sheet at the same time. Insert only one document into the Carrier Sheet at a time.
•Do not write on the Carrier Sheet, as the writing may be seen in scanned documents. If the Carrier Sheet becomes dirty, wipe it with a dry cloth.
•Do not leave documents in the Carrier Sheet for extended periods of time; the printing on the documents may bleed through onto the Carrier Sheet.
•If you use any of the Unacceptable Documents and damage your Brother machine, it may not be covered under warranty.
Related Information
•Document Specifications
Related Topics:
•Supplies
20

 Home > Paper Handling > Load Documents
Load Documents
IMPORTANT
•Insert only one page into the scanner at a time. Insert the next page only after the first one is completely scanned. Inserting more than one page at a time may cause your scanner to malfunction.
•Make sure documents with ink or correction fluid are completely dry.
•DO NOT pull on the document while it is feeding.
•DO NOT use paper that is curled, wrinkled, folded, ripped, stapled, paper-clipped, pasted, or taped.
•DO NOT use cardboard or fabric.
 • Make sure there is enough space behind the Paper Output Slot. The scanned document is ejected from the rear of the scanner.
•(DSmobile DS-740D/DSmobile DS-940DW) To eject the paper from the top of the scanner, open the Output Guide.
•Load Standard Size Document
•Load a Plastic Card
•Load Non-standard Size Document
•Use the Output Guide
21
 Home > Paper Handling > Load Documents > Load Standard Size Document
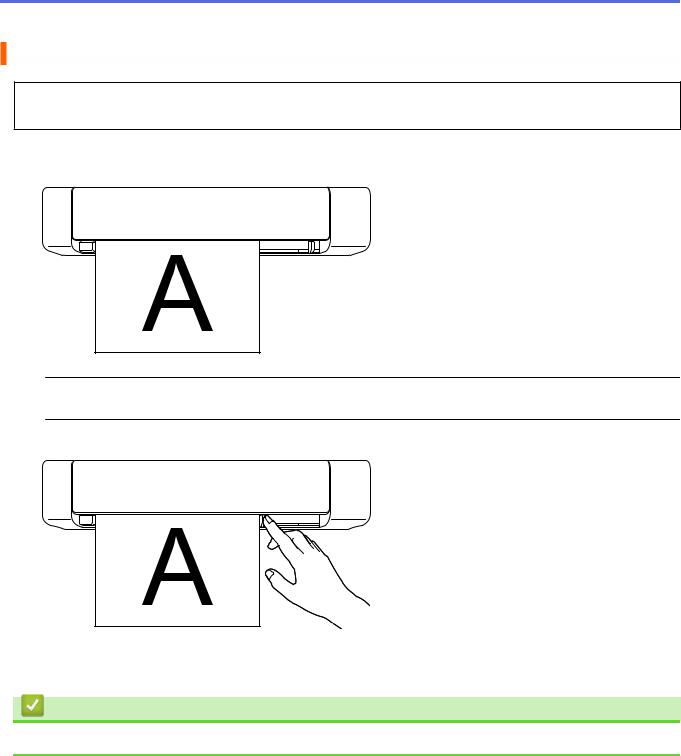
Load Standard Size Document
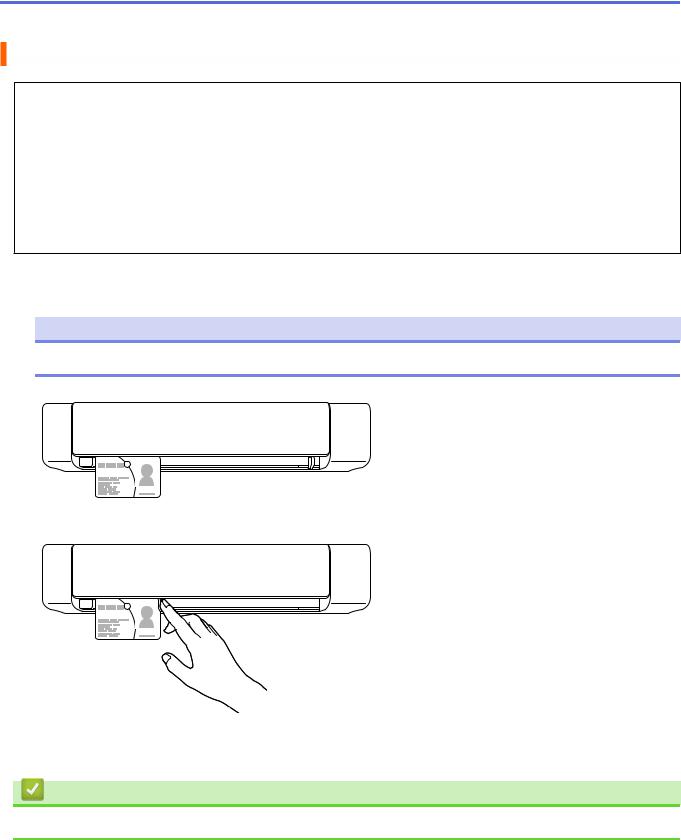
(DSmobile DS-740D/DSmobile DS-940DW) If you scan the index card or business card, confirm the Output Guide is closed.
1.Set your document face up in the Feeder Slot and align the left edge of the page with the Left Edge of the Feeder Slot.
 (DSmobile DS-740D/DSmobile DS-940DW) When you perform 2-sided scanning, insert the first page face up into the Feeder Slot.
2. Slide the Document Guide until it touches the right side of the document.
3.Gently insert the document until you feel its top edge touch the inside of the scanner. (DSmobile DS-940DW) When the machine is in microSD Mode, scanning begins automatically.
Related Information
• Load Documents
22
 Home > Paper Handling > Load Documents > Load a Plastic Card
Load a Plastic Card
•Load only one plastic card at a time.
•Load the plastic card long edge first.
•Certain types of plastic cards may be scratched when scanned. To prevent damage to the card, we recommended using the Carrier Sheet.
•If the surface of the card is dirty with grease marks (for example, fingerprints) or similar, wipe the dirt off before scanning.
•Certain types of embossed cards may not scan correctly.
•(DSmobile DS-740D/DSmobile DS-940DW) Confirm the Output Guide is closed.
1.Set the card top edge first into the Feeder Slot and align the left edge of the card with the Left Edge of the Feeder Slot.
NOTE
If you insert an embossed card, make sure to insert it embossed side up into the Feeder Slot.
2. Slide the Document Guide until it touches the right side of the card.
3.Gently insert the card until you feel its top edge touch the inside of the scanner.
(DSmobile DS-940DW) When the machine is in microSD Mode, scanning begins automatically.
Related Information
• Load Documents
23
 Home > Paper Handling > Load Documents > Load Non-standard Size Document
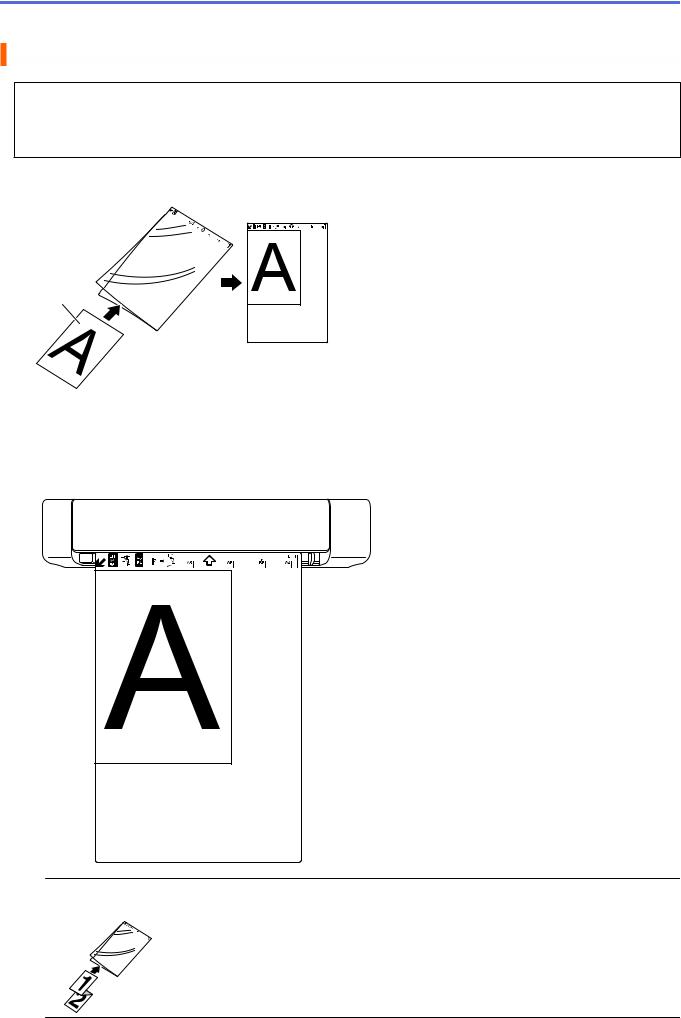
Load Non-standard Size Document
•Make sure documents with ink or correction fluid are completely dry.
•Non-standard documents can include receipts, newspaper clippings, and photos.
•(DSmobile DS-740D/DSmobile DS-940DW) Confirm the Output Guide is closed.
1.Set the document you want to scan in the left corner of the Carrier Sheet and align the top of the document with the top left corner of the Carrier Sheet.
B 


A
a.Document is Face Up
b.Carrier Sheet Header is Face Up
2.Set the Carrier Sheet, face up with the header first in the Feeder Slot and align the left edge of the Carrier Sheet with the Left Edge of the Feeder Slot.
 If the receipt is longer than the Carrier Sheet, you can fold the receipt in two places so that it overlaps when you insert it into the Carrier Sheet.
24
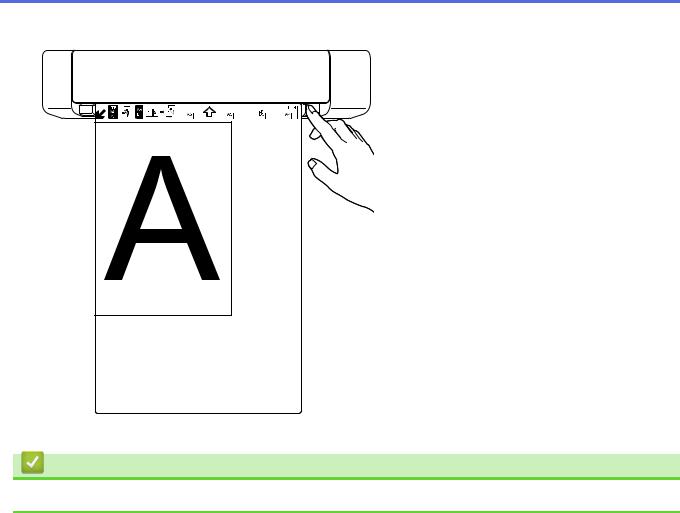
3. Slide the Document Guide until it touches the right side of the Carrier Sheet.
4. Gently insert the Carrier Sheet until you feel its top edge touch the inside of the scanner.
Related Information
• Load Documents
25
 Home > Paper Handling > Load Documents > Use the Output Guide
Use the Output Guide
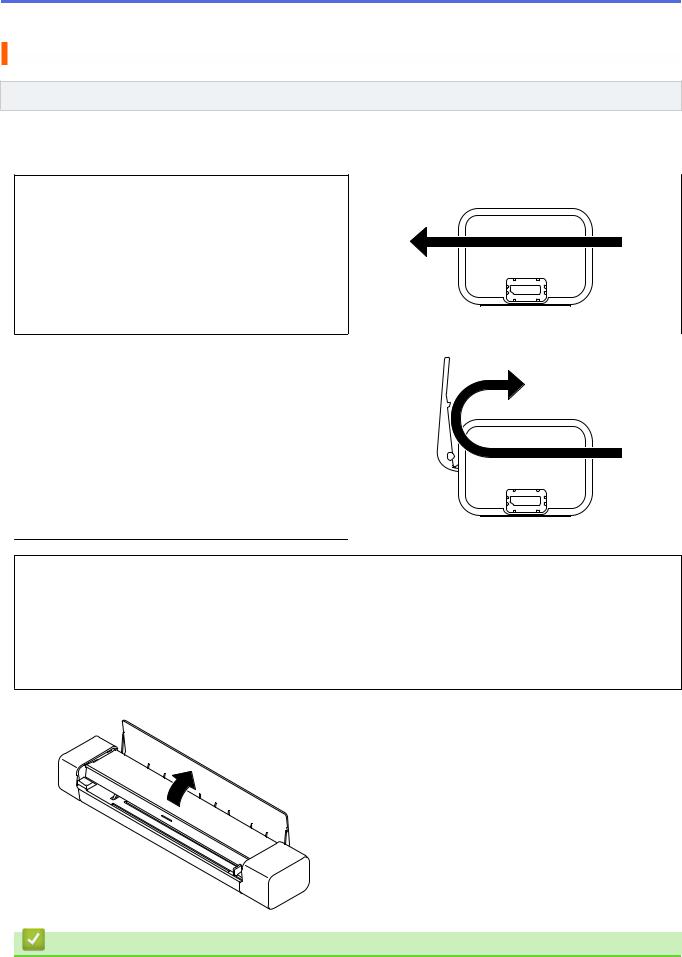
Related Models: DSmobile DS-740D/DSmobile DS-940DW
Use the Output Guide if there is not enough space behind the scanner.
The scanned document is ejected as follows:
When the Output Guide is closed.
When the Output Guide is open.
•Confirm the paper size and weight can be used to scan documents using the Output Guide. See Related Information: Acceptable Documents.
•Do not use the Carrier Sheet with the Output Guide.
•Do not scan plastic cards using the Output Guide.
•For better scan results, when scanning documents in high or low temperatures and humidity, we recommend not using the Output Guide.
•Open the Output Guide to support scanned documents.
Related Information
• Load Documents
26

Related Topics:
• Acceptable Documents
27
Loading...