


TRASH COMPACTOR
SERVICE MANUAL
MODELS |
MODEL |
1050-J & 1051-J |
1052-B |
This service manual is only for compactor models shown.
Service manuals for additional compactor models are available from your Broan representative.
Broan-NuTone LLC, 926 West State Street, Hartford, WI 530271 (1-800-637-1453)
CONTENTS |
|
Safety Precautions ................................................................... |
2 |
Model and Serial No. Identification ......................................... |
2 |
Transporting Compactor .......................................................... |
2 |
Manually Raising and Lowering Ram ...................................... |
2 |
Troubleshooting Guide ...................................................... |
3 & 4 |
Component Replacement ............................................... |
5, 6 & 7 |
Greasing Compactor Mechanism ............................................. |
7 |
Wiring Diagrams ...................................................................... |
8 |
Parts Lists .................................................................... |
9 thru 12 |
SAFETY PRECAUTIONS |
|
ALWAYS UNPLUG COMPACTOR FROM WALL OUTLET BEFORE SERVICING.
The service information is intended for use by a service technician who is familiar with proper and safe procedures to be followed when repairing electrical appliances and who is equipped with proper tools and testing devices. Repairs attempted or made improperly can result in personal injury or property damage. Hazards may develop from improper assembly or adjustments. While making repairs, persons not having the proper background may subject themselves to the risk of injury or electrical shock which can be serious or even fatal.
IMPORTANT - NOTE TO THE CONSUMER
If you perform service on your own Broan products, you must assume responsibility for personal injury or property damage which may result.
MODEL AND SERIAL NO. IDENTIFICATION
The specification label with model and serial numbers is located on the inside of the cabinet. It is visible after opening the drawer.
TRANSPORTING COMPACTOR
When transporting compactor, the ram should be electrically or manually extended down into the drawer, preferably against a load of stacked newspapers or other suitable material. If this is not done, damage to the trunnion nut may occur.
Never transport compactor on its back or front. Damage to the gearbox may occur. If it cannot be transported upright, it is preferable to place it on its side.
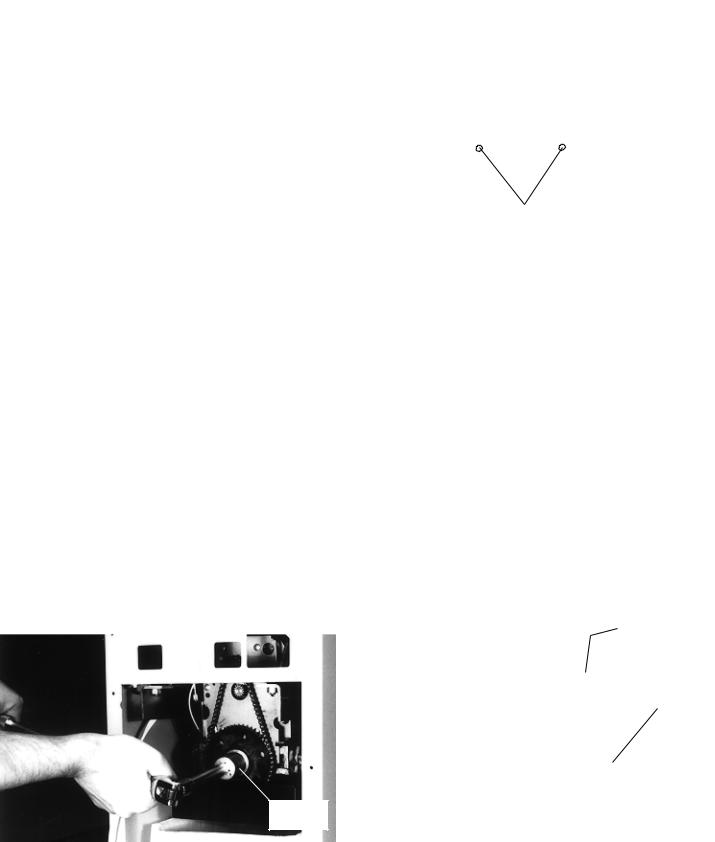
MANUALRAISINGAND LOWERING OF RAM
Unplug compactor cord from wall socket. Remove back panel. The ram may be raised or lowered manually by using a 15/16" socket to turn the drive screw nut. Clockwise will lower ram, counterclockwise will raise it.
15/16” SOCKET
2
BAG INSTALLATION
DO NOT use plastic bags other than those which have been designed for use in this compactor. Unauthorized bags can become caught in the mechanism.
With the drawer extended to the second stop, release the container latch and swing open door. Slide bag into drawer from front to back. Fold bag over top rim of drawer on all sides.
PREPUNCHED HOLES
Press bag into all corners of the drawer. Smooth and shape the bag carefully - this will prevent the bag from being torn by the ram during compaction.
DRAWER BUTTONS
Using buttons on side of drawer, button bag in place by using prepunched holes in side of bag. NOTE: If you have difficulty installing bag, move drawer to second stop by lifting front of drawer slightly and pulling forward (place on rug or other surface to protect floor). This
will clear back of container from housing for easier bag installation.
Swing door shut and latch it. Bag is locked between door flange and drawer. When door is closed and latched properly, door guide “V” will be snug in “V” groove in drawer flange. Bag should be captured in “V” guide. Failure to align “V” properly or to latch drawer to door will cause the compactor to function improperly.
“V” GROOVE
CONTAINER
LATCH

TROUBLESHOOTING GUIDE
Condition |
|
Possible Cause |
|
Correction |
I. Will not run. Dead - |
Not plugged in securely. |
|
Insert plug securely into |
|
no sound. (Turn key |
|
|
outlet. |
|
to start, if unit hums, |
Circuit breaker or fuse |
|
Check for condition |
|
go to section III. |
|
|||
|
|
open. |
|
causing circuit breaker |
|
|
|
|
or fuse to open. Correct |
|
|
|
|
condition, then reset |
|
|
|
|
circuit breaker or replace |
|
|
|
|
fuse. |
|
|
Drawer not closed. |
|
Push drawer to close. |
|
|
Loose connection. |
|
Repair. |
|
|
Defective key switch. |
|
Replace. |
|
|
Defective motor. |
|
Test motor - replace if |
|
|
|
|
necessary. |
II. Runs continuously, |
Sprocket broken. |
|
Replace. |
|
will not shut off. |
Chain derailed. |
|
Reinstall chain. |
|
|
|
|
||
|
|
Gearbox broken. |
|
Replace. |
|
|
Trunnion nut stripped. |
|
Replace. |
|
|
Key switch incorrectly |
|
Reconnect correctly. |
|
|
connected. |
|
|
|
|
Defective upper limit |
|
Replace. |
|
|
switch. |
|
|
Special Notes
Compactor should be on separate 15 ampere circuit (time-delay fuse of circuit breaker recommended.) Do not use an extension cord with this appliance.
See section on motor replacement for test procedure.
See note in section covering chain derailment.
Inspect trunnion nut for any evidence of damage. If nut displays signs of thread destruction, replace nut, clean drive screw and regrease.
III. Will not run - hums |
Defective upper limit |
Replace. |
|
when key held in |
switch. |
|
|
start position. |
Loose connection. |
Repair. |
|
|
|
||
|
Defective motor. |
Test motor - replace if |
See section on motor |
|
|
necessary. |
replacement for test |
|
|
|
procedure. |
|
Plastic bag caught in |
Remove plastic bag. |
See section on removing |
|
trunnion nut. |
|
bags from tunnion nut. |
|
|
|
Do not use bags other |
|
|
|
than the compactor trash |
|
|
|
bag designed and sold |
|
|
|
by Broan for use in this |
|
3 |
|
compactor. |
TROUBLESHOOTING GUIDE
Condition |
|
Possible Cause |
|
Correction |
|
Special Notes |
IV. Starts and reverses |
|
Defective upper limit |
|
Replace. |
It is not necessary to |
|
immediately. Will not |
|
switch. |
|
Try again. |
replace motor. |
|
go down into drawer. |
|
Didn’t hold key long |
|
|
||
Rhythmic buzzing. |
|
enough. |
|
|
|
|
V. Thermal cutout on |
|
Defective upper limit |
|
Replace. |
|
|
motor trips. (Com- |
|
switch. |
|
|
|
|
pactor may appear to |
|
Defective centrifugal |
|
Replace. |
|
|
start by itself several |
|
|
|
|||
minutes after last |
|
switch on motor. |
|
|
|
|
use.) Smells hot. |
|
|
|
|
|
|
VI. Drawer does not |
|
Worn rollers. |
|
Replace. |
Roller tracks should be |
|
open smoothly after |
|
Bent roller mounting |
|
Straighten bracket. |
kept clean to keep glass |
|
compactor is leveled. |
|
|
particles from wearing |
|||
|
|
bracket. |
|
|
|
out rollers. |
|
|
Tight roller track on |
|
Bend top rail on track to |
|
|
|
|
base. |
|
adjust. |
|
|
|
|
Latch binding on side of |
|
Bend to adjust. |
|
|
|
|
cabinet. |
|
|
|
|
|
|
Defective drawer track. |
|
Replace drawer. |
|
|
|
|
Loose roller(s). |
|
Tighten. |
Apply Locktite® to |
|
|
|
|
|
|
|
threads. |
VII. Does not compact |
|
Insufficient amount of |
|
|
|
Ram does not travel to |
cans. Lacks pres- |
|
trash in drawer. |
|
|
|
bottom of drawer. Ex- |
sure. |
|
|
|
|
|
tends to 6" from bottom |
|
|
|
|
|
|
of basket. As more trash |
|
|
|
|
|
|
is deposited and unit is |
|
|
|
|
|
|
operated, compaction |
|
|
|
|
|
|
will take place. |
|
|
Bottles and/or cans are |
|
|
|
Bottles and cans should |
|
|
arranged too uniformly. |
|
|
|
be placed randomly in |
|
|
|
|
|
|
center of drawer. Cans |
|
|
|
|
|
|
and bottles neatly |
|
|
|
|
|
|
arranged are capable of |
|
|
|
|
|
|
supporting a tremendous |
|
|
|
|
|
|
amount of pressure. |
|
Lacking grease. |
Grease drive screw and |
|
|
trunnion bearing using |
|
|
wheel bearing grease. |
|
Worn rear trunnion |
Replace trunnion bear- |
|
bearing. |
ing. |
VIII. Bags pulled down |
Using bags designed for |
Use Broan compactor |
into drawer. |
another manufacturer”s |
bags. |
|
compactor. |
|
|
Improper installation of |
Install bag correctly. |
|
bag. |
4 |
|
|
See section on greasing mechanism.
Bag should be captured in “V” groove on right front of drawer.
 Loading...