


 Loading...
Register |
your |
||
new |
|
||
|
|
||
device |
|||
MyBosch |
|
on |
|
now |
|||
|
|||
getfree |
|
and |
|
benefits: |
|||
bosch |
|
|
|
-home |
|||
|
.com/ |
||
welcome |
|||
Washing machine
WAX32EH0BY
[en] User manual and assembly instructions
en |
|
Table of contents |
|
Safety............................................... |
4 |
General information.......................... |
4 |
Intended use..................................... |
4 |
Restriction on user group................. |
5 |
Safe installation ................................ |
5 |
Safe use ........................................... |
7 |
Safe cleaning and maintenance....... |
9 |
Preventing material damage ........ |
11 |
Environmental protection and |
|
saving energy................................ |
12 |
Disposing of packaging ................. |
12 |
Save energy and conserve re- |
|
sources........................................... |
12 |
Energy saving mode ...................... |
13 |
Installation and connection.......... |
13 |
Unpacking the appliance ............... |
13 |
Contents of package...................... |
14 |
Requirements for the installation |
|
location ........................................... |
14 |
Removing the transit bolts ............. |
15 |
Removing the transport struts........ |
16 |
Connecting the appliance .............. |
17 |
Aligning the appliance.................... |
18 |
Familiarising yourself with |
|
your appliance............................... |
20 |
Appliance ....................................... |
20 |
Detergent drawer............................ |
21 |
Controls .......................................... |
21 |
Operating logic............................... |
22 |
Display ........................................... |
23 |
Buttons .......................................... |
26 |
Programmes .................................. |
29 |
Accessories................................... |
38 |
Before using for the first time ...... |
38 |
Starting an empty washing cycle ... |
38 |
Laundry.......................................... |
39 |
Preparing the laundry..................... |
39 |
Sorting laundry ............................... |
40 |
Degrees of soiling .......................... |
40 |
Care symbols on the care labels ... |
40 |
Detergents and care products...... |
41 |
Detergent recommendation ........... |
41 |
Detergent dosage .......................... |
42 |
Basic operation ............................. |
42 |
Switching on the appliance ............ |
42 |
Setting a programme ..................... |
43 |
Adjusting the programme set- |
|
tings................................................ |
43 |
Saving the programme settings ..... |
43 |
Loading laundry.............................. |
44 |
Adding detergent and care |
|
product ........................................... |
44 |
Starting the programme ................. |
44 |
Soaking laundry ............................. |
45 |
Adding laundry ............................... |
45 |
Cancelling the programme ............ |
45 |
Resuming the programme when |
|
the programme status is Rinse |
|
Hold ................................................ |
45 |
Unloading the laundry .................... |
45 |
Switching off the appliance ............ |
46 |
Childproof lock.............................. |
46 |
Activating the childproof lock......... |
46 |
Deactivating the childproof lock..... |
46 |
Intelligent dosing system ............. |
46 |
Filling the dispenser ....................... |
47 |
Dispenser contents ........................ |
47 |
Basic dosage ................................. |
48 |
Home Connect .............................. |
48 |
Home Connect settings.................. |
48 |
Connecting the appliance to a |
|
WLAN home network (Wi-Fi) |
|
with WPS function .......................... |
48 |
2
Connecting the appliance to a |
|
WLAN home network (Wi-Fi) |
|
without WPS function ..................... |
49 |
Connecting your appliance to |
|
the Home Connect app.................. |
50 |
Connecting the appliance to the |
|
energy manager ............................. |
50 |
Activating Wi-Fi on the appliance... |
51 |
Deactivating Wi-Fi on the appli- |
|
ance................................................ |
51 |
Software update ............................. |
51 |
Resetting the appliance network |
|
settings ........................................... |
51 |
Remote diagnostics ....................... |
52 |
Data protection............................... |
52 |
Declaration of Conformity............... |
52 |
Basic settings................................ |
53 |
Overview of the basic settings ....... |
53 |
Changing the basic settings .......... |
53 |
Cleaning and servicing................. |
54 |
Tips on appliance care................... |
54 |
Cleaning the drum.......................... |
54 |
Cleaning the detergent drawer ...... |
54 |
Descaling........................................ |
56 |
Cleaning the drain pump................ |
56 |
Cleaning the water outlet hose |
|
at the siphon................................... |
59 |
Cleaning the water inlet filter.......... |
59 |
Troubleshooting............................ |
61 |
Error code / Fault display / Sig- |
|
nal................................................... |
61 |
Malfunctions ................................... |
63 |
Noise .............................................. |
66 |
Problem with results....................... |
67 |
Home Connect problem................. |
69 |
Leakage.......................................... |
69 |
Odours............................................ |
69 |
Emergency release ........................ |
70 |
Transportation, storage and |
|
disposal ......................................... |
70 |
Removing the appliance ................ |
70 |
|
en |
Inserting the transit bolts................ |
70 |
Using the appliance again ............. |
71 |
Disposing of old appliance ............ |
71 |
Customer Service.......................... |
72 |
Product number (E-Nr.) and pro- |
|
duction number (FD) ...................... |
72 |
AQUA-STOP guarantee .................. |
72 |
Consumption values..................... |
74 |
Technical specifications............... |
74 |
3

en Safety


 Safety
Please read the safety information to ensure that you use the appliance safely.
General information
You can find general information about this instruction manual here.
¡Read this instruction manual carefully. Only this will ensure you use the appliance safely and efficiently.
¡This manual is intended for the installer and the user of the appliance.
¡Follow the safety instructions and warnings.
¡Keep the instruction manual and the product information safe for future reference or for the next owner.
¡Check the appliance after unpacking it. Do not connect the appliance if it has been damaged in transit.
Intended use
Read the information on intended use to ensure that you use the appliance correctly and safely.
Only use this appliance:
¡According to this installation and instruction manual.
¡For washing machine-washable fabrics and hand-washable wool in accordance with the care label.
¡With tap water and commercially available detergents and care products suitable for washing machines.
¡In private households and in enclosed spaces in a domestic environment.
¡Up to an altitude of max. 4000 m above sea level.
4

Safety en
Restriction on user group
Avoid risks to children and vulnerable persons.
This appliance may be used by children aged 8 or over and by people who have reduced physical, sensory or mental abilities or inadequate experience and/or knowledge, provided that they are supervised or have been instructed on how to use the appliance safely and have understood the resulting dangers.
Children must not play with the appliance.
Cleaning and user maintenance must not be performed by children unless they are being supervised.
Keep children under the age of 3 years and pets away from the appliance.
Safe installation
Take note of the safety instructions when installing the appliance.
WARNING ‒ Risk of electric shock!
¡Improper installation is dangerous.
Connect and operate the appliance only in accordance with the specifications on the rating plate.
Connect the appliance to a power supply with alternating current only via a properly installed socket with earthing.
The protective conductor system of the domestic electrical installation must be properly installed. The installation must have a sufficiently large cross section.
When using a residual current circuit breaker, only use a type with the  mark.
mark.
Never equip the appliance with an external switching device, e.g. a timer or remote control.
When the appliance is installed, the mains plug of the power cord must be freely accessible. If free access is not possible, an all-pole isolating switch must be installed in the permanent electrical installation according to the installation regulations.
When installing the appliance, check that the power cable is not trapped or damaged.
5

en Safety
¡If the insulation of the power cord is damaged, this is dangerous.
Never let the power cord come into contact with hot appliance parts or heat sources.
Never let the power cord come into contact with sharp points or edges.
Never kink, crush or modify the power cord.
WARNING ‒ Risk of fire!
It is dangerous to use an extended power cord and non-ap- proved adapters.
Do not use extension cables or multiple socket strips.
If the power cord is too short, contact Customer Service.
Only use adapters approved by the manufacturer.
WARNING ‒ Risk of injury!
¡The high weight of the appliance may result in injury when lifted.
Do not lift the appliance on your own.
¡If this appliance is not correctly installed in a washer-dryer stack, the installed appliance may fall.
Only stack the dryer on a washing machine using the connection kit from the dryer manufacturer . No other installation method is permitted.
Do not install the appliance in a washer-dryer stack if the dryer manufacturer does not offer a suitable connection kit.
Do not install appliances from different manufacturers and with varying depths and widths in a washer-dryer stack.
Do not install a washer-dryer stack on a platform; the appliances may tip over.
WARNING ‒ Risk of suffocation!
Children may put packaging material over their heads or wrap themselves up in it and suffocate.
Keep packaging material away from children.
Do not let children play with packaging material.
6

Safety en
CAUTION ‒ Risk of injury!
¡The appliance may vibrate or move when in use.
Place the appliance on a clean, even, solid surface.
Align the appliance using the appliance feet and a spirit level.
¡If hoses and power cords have been laid incorrectly, this causes a tripping hazard.
Lay hoses and power cords in such a way that there is no risk of tripping.
¡If the appliance is moved by holding onto protruding components, such as the appliance door, the parts may break off.
Do not move the appliance by holding onto protruding parts.
CAUTION ‒ Risk of cutting!
Touching sharp edges on the appliance may lead to cuts.
Do not touch the sharp edges on the appliance.
Wear protective gloves when installing and transporting the appliance.
Safe use
Follow these safety instructions when using the appliance.
WARNING ‒ Risk of electric shock!
¡If the appliance or the power cord is damaged, this is dangerous.
Never operate a damaged appliance.
Never pull on the power cord to unplug the appliance. Always unplug the appliance at the mains.
If the appliance or the power cord is damaged, immediately unplug the power cord or switch off the fuse in the fuse box and turn off the water tap.
"Call Customer Service." → Page 72
Repairs to the appliance should only be carried out by trained specialist staff.
¡An ingress of moisture can cause an electric shock.
Only use the appliance in enclosed spaces.
7

en Safety
Never expose the appliance to intense heat or humidity.
Do not use steamor high-pressure cleaners, hoses or sprays to clean the appliance.
WARNING ‒ Risk of harm to health!
Children can lock themselves in the appliance, thereby putting their lives at risk.
Do not install the appliance behind a door as this may obstruct the appliance door or prevent it from opening.
With redundant appliances, unplug the power cord. Then cut through the cord and damage the lock on the appliance door beyond repair so that the appliance door will no longer close.
WARNING ‒ Risk of suffocation!
Children may breathe in or swallow small parts, causing them to suffocate.
Keep small parts away from children.
Do not let children play with small parts.
WARNING ‒ Risk of poisoning!
Detergents and care products may result in poisoning if consumed.
If accidentally swallowed, seek medical advice.
Keep detergents and care products out of the reach of children.
WARNING ‒ Risk of explosion!
Laundry that has been pretreated with cleaning agents that contain solvents may cause an explosion in the appliance.
Rinse pretreated laundry thoroughly with water before washing.
CAUTION ‒ Risk of injury!
¡The covering plate may break if you stand on or climb onto the appliance.
Do not stand on or climb onto the appliance.
8

Safety en
¡The appliance may tip over if you sit on or lean against the open door.
Do not sit on or lean against the appliance door.
Do not place any objects on the appliance door.
¡Reaching into the drum while it is still turning may cause hand injuries.
Wait for the drum to come to a complete stop before reaching inside.
CAUTION ‒ Risk of burns!
When washing at high temperatures, the glass in the appliance door becomes hot.
Do not touch the appliance door when it is hot.
Keep children away from the appliance door when it is hot.
CAUTION ‒ Risk of scalding!
When you wash at high temperatures, the detergent solution gets hot.
Do not touch the hot detergent solution.
CAUTION ‒ Risk of chemical burns!
If the detergent drawer is opened, detergent and care products may spray out from the appliance. Contact with eyes or skin may cause irritation.
Rinse eyes and/or skin thoroughly with clean water if they come into contact with detergents or care products.
If accidentally swallowed, seek medical advice.
Keep detergents and care products out of the reach of children.
Safe cleaning and maintenance
Take note of the safety instructions when cleaning and performing maintenance work on the appliance.
WARNING ‒ Risk of electric shock!
¡Improper repairs are dangerous.
Repairs to the appliance should only be carried out by trained specialist staff.
9

en Safety
Only use genuine spare parts when repairing the appliance.
If the power cord of this appliance is damaged, it must be replaced by the manufacturer, the manufacturer's Customer Service or a similarly qualified person in order to prevent any risk.
¡An ingress of moisture can cause an electric shock.
Do not use steamor high-pressure cleaners, hoses or sprays to clean the appliance.
WARNING ‒ Risk of injury!
The use of non-original spare parts and non-original accessories is dangerous.
Only use the manufacturer's original spare parts and original accessories.
WARNING ‒ Risk of poisoning!
Poisonous fumes may be given off if you use cleaning agents that contain solvents.
Do not use cleaning agents that contain solvents.
10
Preventing material damage
Follow these instructions to avoid material damage and damage to the appliance.
ATTENTION!
¡The functionality of the appliance may be impaired if you use the wrong quantity of fabric softener, detergent, care product or cleaning agent.
Follow the dosage recommendations from the manufacturer.
¡Exceeding the maximum load capacity impairs the function of the appliance.
Observe the "maximum load capacity" → Page 29 for each programme and do not exceed it.
¡The appliance is secured for transportation using transit bolts. Transit bolts which have not been removed may result in material damage and damage to the appliance.
Before starting up the appliance, remove the transit bolts completely and keep them in a safe place.
Before transport, fit the transit bolts fully in order to prevent damage in transit.
¡Material damage may be caused if the water inlet hose is connected incorrectly.
Tighten the screw connections on the water inlet until they are hand-tight.
Ideally, connect the water inlet hose directly to the water tap, without any additional connecting elements such as adapters, extensions, valves or similar.
Preventing material damage en
Make sure that the valve housing for the water inlet hose does not come into contact with its surroundings and is not subjected to any external forces.
Ensure that the inner diameter of the water tap is at least 17 mm.
Make sure that the length of the thread on the connection to the water tap is at least 10 mm.
¡If the water pressure is too high or too low, the appliance may not be able to operate properly.
Make sure that the water pressure in the water supply system is min. 100 kPa (1 bar) and max. 1000 kPa (10 bar).
If the water pressure exceeds the maximum value specified, a pressure-reducing valve must be installed between the drinking water connection and the hose set of the appliance.
Do not connect the appliance to the mixer tap of an unpressurised hot-water boiler.
¡Modified or damaged water hoses may result in material damage and damage to the appliance.
Never kink, crush, modify or cut through water hoses.
Only use the water hoses supplied with the appliance or genuine spare hoses.
Never re-use water hoses that have been used before.
¡Operating the appliance using water that is dirty or too hot may cause material damage.
Only operate the appliance with cold mains water.
¡Unsuitable cleaning products may damage the surfaces of the appliance.
Do not use harsh or abrasive detergents.
11

en Environmental protection and saving energy
Do not use cleaning products with a high alcohol content.
Do not use hard scouring pads or cleaning sponges.
Clean the appliance with nothing but water and a soft, damp cloth.
Remove all detergent residue, spray residue or other residues immediately if they come into contact with the appliance.
Environmental protection and saving energy
Help protect the environment by using your appliance in a way that conserves resources and by disposing of reusable materials properly.
Disposing of packaging
The packaging materials are environmentally compatible and can be recycled.
Sort the individual components by type and dispose of them separately.
Information about current disposal methods are available from your specialist dealer or local authority.
Save energy and conserve resources
If you follow these instructions, your appliance will use less electricity and less water.
Choose programmes with low temperatures and longer wash times and use "maximum load capacity"
→ Page 29.
 Energy consumption and water consumption is most efficient.
Use the economy programme settings.
 If you adjust the programme settings for a programme, the display shows the expected consumption.
"Add " → Page 42 detergent based on the laundry's degree of soiling.
 For light to normal soiling, a smaller amount of detergent is sufficient. Observe the dosage recommendation from the detergent manufacturer.
Reduce the washing temperature for lightly and normally soiled laundry.
 At low temperatures, the appliance consumes less energy. For light to normal soiling, lower temperatures than indicated on the care label are also sufficient.
Set the maximum spin speed if you want to dry the laundry in a tumble dryer afterwards.
 The drier the laundry, the shorter the programme duration when drying which, in turn, reduces energy consumption. A higher spin speed reduces the residual moisture in the laundry and increases the volume of the spin noise.
Wash the laundry without prewash.
 Washing with prewash increases the programme duration and increases energy and water consumption.
The appliance has a continuous automatic load adjustment function.
 Depending on the type of fabric and load capacity, the continuous automatic load adjustment function optimally adjusts the water consumption and programme duration.
12

The appliance comes with an AquaSensor.
 During the rinse cycle, the AquaSensor checks the degree of turbidity of the rinsing water, and adjusts the duration and number of rinse cycles accordingly.
Energy saving mode
If you do not use the appliance for an extended period, it automatically switches to energy-saving mode. All displays go out and Start / Re-
load  flashes.
Energy-saving mode ends when you use the appliance again, e.g. if you open or close the door.
If you do not use the appliance for an extended period, the appliance switches off automatically.
Installation and connection
You can find out where and how best to install your appliance here. You will also learn how to connect the appliance to the water and power supply.
Unpacking the appliance
Note: Please read the information in the "Safety" → Page 4 and "Preventing material damage" → Page 11 sections to ensure that you use the appliance safely.
Installation and connection en
ATTENTION!
Objects remaining in the drum that are not designed for operation with the appliance may cause material damage and damage to the appliance.
Remove these objects, along with all supplied accessories, from the drum before starting the appliance.
1.Remove any packaging and protective covers completely from the appliance.
For the environmentally friendly disposal of the packaging materials, observe the information on the topic of
→"Disposing of packaging", Page 12.
2.Check the appliance for visible damage.
3.Open the door.
→"Basic operation", Page 42
4.Remove the accessory from the drum.
5.Close the door.
13
en Installation and connection
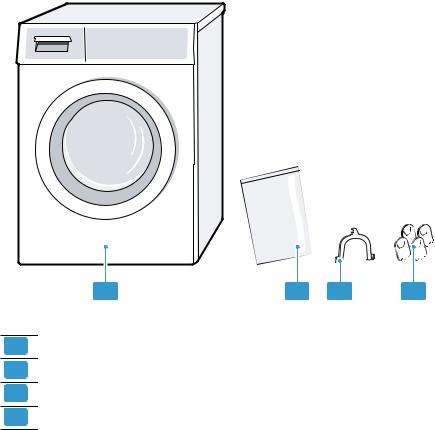
Contents of package
After unpacking all parts, check for any damage in transit and completeness of the delivery.
1 |
2 |
3 |
4 |
1 |
Washing machine |
2 |
Accompanying documents |
3 |
Elbow for fixing the water outlet hose |
4 |
Cover caps |
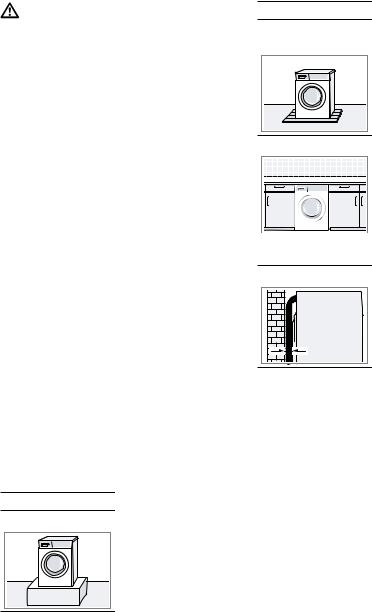
Requirements for the installation location
The appliance may "wander" when it spins. Observe the instructions for the installation location.
Note: Please read the information in the "Safety" → Page 4 and "Preventing material damage" → Page 11 sections to ensure that you use the appliance safely.
14
WARNING
Risk of electric shock!
The appliance contains live parts. Touching live parts is dangerous.
Do not operate the appliance without a cover cap.
 WARNING Risk of injury!
When using the appliance on a base, the appliance may tip over.
Always secure the feet of the appliance to a base using the manufacturer's "fixing brackets"
→ Page 38 before using the appliance for the first time.
ATTENTION!
¡If the appliance is installed in areas exposed to frost or outdoors, frozen residual water may damage the appliance and frozen hoses may crack or split.
Do not install or operate this appliance anywhere that is liable to experience frost and/or outdoors.
¡The appliance underwent a function test before leaving the factory and may, therefore, contain residual water. This residual water may leak out if the appliance is tilted at an angle greater than 40°.
Tilt the appliance carefully.
Installation location |
Requirements |
On a base |
Secure the appliance |
|
with "fixing brackets" |
|
→ Page 38. |
Installation and connection en
Installation location |
Requirements |
On a wooden joist |
Place the appliance |
floor |
on a water-resistant |
|
wooden board which |
|
is screwed tightly to |
|
the floor. The wooden |
|
board should be at |
|
least 30 mm thick. |
In a kitchen unit
¡A niche width of 60 cm is required.
¡Only install the appliance underneath a continuous worktop that is securely connected to adjacent cabinets.
On a wall |
Do not trap the hoses |
|
between the wall and |
|
the appliance. |
Removing the transit bolts
The appliance is secured for transportation using transit bolts on the rear of the appliance.
Notes
¡Please read the information in the "Safety" → Page 4 and "Preventing material damage" → Page 11 sections to ensure that you use the appliance safely.
¡Keep the transit bolts, screws and sleeves in a safe place for future "transport" → Page 70.
1. Pull the hoses out of the holders.
15

en Installation and connection
2.Unscrew  and remove
  all four screws for the transit bolts with a WAF 13 wrench.
3.Pull the power cord out of the holder.
5. Put on the four cover caps.
6.Press down on the four cover caps.
4. Remove the four sleeves.
Removing the transport struts
Note: Please read the information in the "Safety" → Page 4 and "Preventing material damage" → Page 11 sections to ensure that you use the appliance safely.
16
1.Unscrew and remove the screws in the vertical transport struts using a T20 screwdriver.
2. Remove the transport struts.
3.Undo and remove the screws in the horizontal transport strut using a T20 screwdriver.
4. Remove the transport strut.
Installation and connection en
Connecting the appliance
Connect your appliance to the power supply, water inlet and water outlet.
Connecting the water inlet hose
Note: Please read the information in the "Safety" → Page 4 and "Preventing material damage" → Page 11 sections to ensure that you use the appliance safely.
WARNING
Risk of electric shock!
The appliance contains live parts. Touching live parts is dangerous.
Do not immerse the electrical AquaStop valve in water.
1.Connect the water inlet hose to a tap (26.4 mm = 3/4").
2.Open the water tap carefully and check that the connection points are tight.
17
en Installation and connection
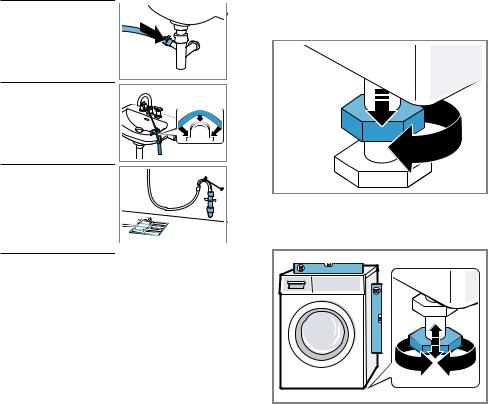
Water outlet connection types
This information is intended to help you to connect this appliance to the water outlet.
Note: Please read the information in the "Safety" → Page 4 and "Preventing material damage" → Page 11 sections to ensure that you use the appliance safely.
ATTENTION!
When draining, the water outlet hose is subject to water pressure and may come loose from the installed connection point.
Secure the water outlet hose against unintentional loosening.
Drainage into a siphon.
Secure the connection point with a (24– 40 mm) hose clamp.
Drainage into a wash basin.
Fix and secure the water outlet hose with an elbow.
Drainage into a plastic pipe with rubber sleeve or into a gully. Fix and secure the water outlet hose with an elbow.
Connecting the appliance to the electricity supply
Note: Please read the information in the "Safety" → Page 4 and "Preventing material damage" → Page 11 sections to ensure that you use the appliance safely.
1.Insert the mains plug of the appliance's power cable in a socket nearby.
The connection details of the appliance can be found under "Technical data" → Page 74.
2.Check the mains plug is inserted properly.
Aligning the appliance
In order to reduce noise and vibration and to prevent the appliance from moving, align the appliance correctly.
Note: Please read the information in the "Safety" → Page 4 and "Preventing material damage" → Page 11 sections to ensure that you use the appliance safely.
1.Loosen the lock nuts using a WAF 17 wrench by turning it in a clockwise direction.
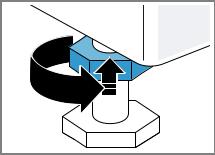
2.To align the appliance, turn the appliance feet. Check that the appliance is level using a spirit level.
18
Installation and connection en
All appliance feet must stand firmly on the ground.
3.Screw the lock nuts tightly against the housing using a WAF 17 wrench.
In doing so, hold the foot tight and do not adjust its height.
19
en Familiarising yourself with your appliance
Familiarising yourself with your appliance
Familiarise yourself with the parts of your appliance.
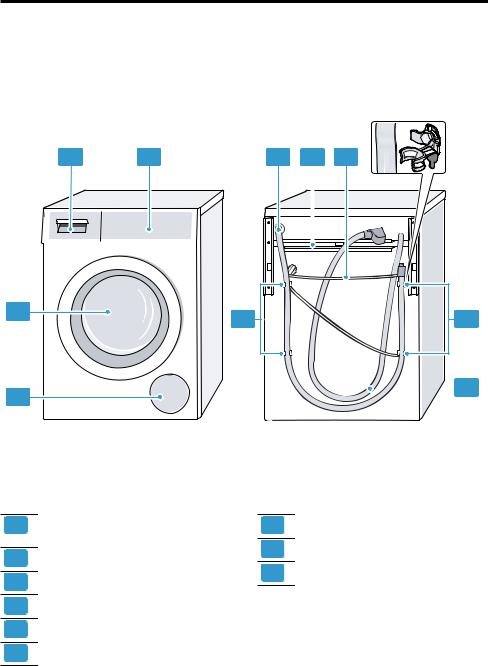
Appliance
You can find an overview of the parts of your appliance here.
3 |
4 |
5 |
6 |
7 |
|
|
|
|
|
|
|
2 |
8 |
8 |
|
 9
9
1
On certain models, specific details such as the colour and shape may differ from those pictured.
1 |
"Maintenance flap for the drain pump" |
7 |
"Power cord" → Page 18 |
|
2 |
→ Page 56 |
8 |
"Transit bolts" → Page 15 |
|
Door |
||||
9 |
"Water inlet hose" → Page 17 |
|||
3 |
"Detergent drawer" → Page 21 |
|||
|
|
|||
4 |
"Controls" → Page 21 |
|
|
|
5 |
"Water outlet hose" → Page 18 |
|
|
|
6 |
"Transport struts" → Page 16 |
|
|
20
|
Familiarising yourself with your appliance en |
Detergent drawer |
1 Manual dosing compartment |
Below is an overview of the structure of the detergent drawer.
2 |
/ : Dispenser for fabric softener or |
|
detergent |
3 |
: Dispenser for detergent |
1 2 3
Controls
The controls are used to configure all functions of your appliance and to obtain information about the operating status.
2 |
|
3 |
|
|
|||
|
|
|
|
|
|
|
|
|
|
|
|
|
|
|
|
|
|
|
|
|
|
|
|
|
|
|
|
|
|
|
|
|
|
|
|
|
|
|
|
1 |
1 |
4 |
|
|
|
3 |
1 |
"Programmes" → Page 29 |
4 "Display" → Page 23 |
2 |
"Programme selector" → Page 42 |
|
3 |
"Buttons" → Page 26 |
|
21

en Familiarising yourself with your appliance
Operating logic
In addition to the actual functions of the buttons on the display, you can also use these buttons to select programme settings in the main menu and settings in the sub-menus. The buttons are then marked by symbols in the display.
Main menu
To select programme settings, press the buttons above or below the symbols.
The selected programme setting is shown in the middle of the display.
Sub-menu
To select the settings you require, press the buttons below the symbols until the required setting is selected in the display.
To select the settings you require, press the buttons below the symbols until the required setting is selected in the display.
If a setting is activated, the display shows  . The selection does not need to be confirmed again.
The sub-menu closes automatically after a few seconds.
22

Display en
Display
The display shows the current settings, options or relevant information.
Example: Display
Display |
Designation |
Description |
0:40 h 1 |
Programme duration/ |
Approximate expected programme duration or pro- |
|
programme time re- |
gramme time remaining. |
|
maining |
|
10 h 1 |
"Ready in" time |
The programme end has been set and the remaining |
|
|
number of hours is displayed. |
|
|
→ "Buttons", Page 26 |
10 kg 1 |
Recommended load |
The maximum load capacity for the selected pro- |
|
|
gramme in kg. |
0 - 1600 |
Spin speed |
Set spin speed in rpm. |
|
|
→ "Buttons", Page 27 |
|
|
0: No spin cycle, draining only |
– 90 °C |
Temperature |
Set temperature in °C. |
|
|
→ "Buttons", Page 26 |
|
|
(cold) |
|
Navigation |
Selecting settings. |
|
|
→ "Operating logic", Page 22 |
|
Other programme set- |
Activate, deactivate or adjust other programme set- |
|
tings |
tings. |
|
|
→ "Buttons", Page 27 |
1 Example |
|
|
23
Loading...