Black&decker JS10, JS20 User Manual [ru]
UA RU TR EN
|
JS10 |
www.blackanddecker.com |
JS20 |
ENGLISH |
(Original instructions) |
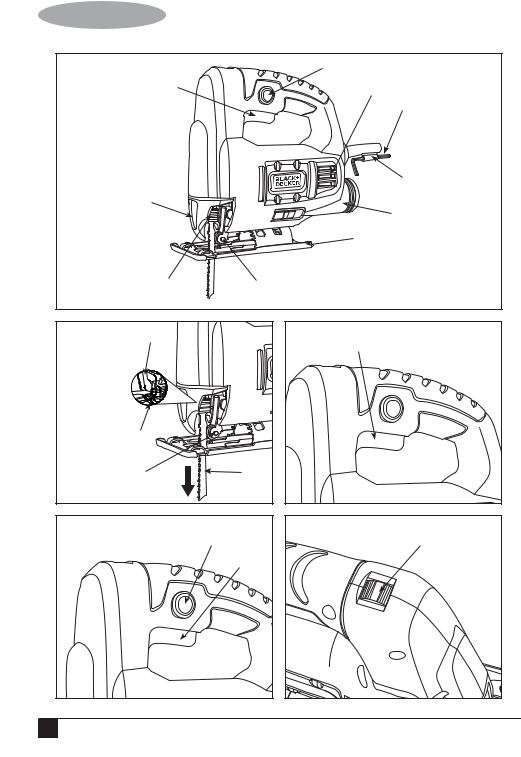
FIG. A |
2 |
|
1 |
|
3 |
|
|
|
|
4 |
|
|
|
|
5 |
|
|
10 |
|
6 |
|
|
|
|
|
|
|
|
|
7 |
|
|
9 |
8 |
|
|
FIG. B |
10 |
FIG. C |
1 |
|
|
|
|
|
|
|
9 |
|
|
|
|
8 |
11 |
|
|
FIG. D |
2 |
FIG. E |
12 |
JS20 only |
|
|
|
||
|
|
1 |
|
|
2

(Original instructions) |
ENGLISH |
FIG. F |
FIG. G |
|
13 |
FIG. H |
|
14 |
15 |
FIG. J |
FIG. I |
|
|
16 |
17 |
18 |
3
ENGLISH |
(Original instructions) |
Intended use
Your BLACK+DECKERTM JS10 and JS20 jigsaw has been designed for sawing wood, plastics and sheet metal. This tool is intended for consumer use only.
GENERAL SAFETY RULES
Warning! Read and understand all instructions. Failure to follow all instructions listed below, may result in electric shock, fire and/or serious personal injury.
SAVE THESE INSTRUCTIONS
SAFETY INSTRUCTIONS
General power tool safety warnings.
Warning! Read all safety warnings and all instructions.
Failure to follow the warnings and instructions listed below may result in electric shock, fire and/or serious injury.
Save all warnings and instructions for future reference. The term “power tool” in all of the warnings listed below refers to your mains operated (corded) power tool or battery operated (cordless) power tool.
1. Work Area Safety
a.Keep work area clean and well lit.
Cluttered and dark areas invite accidents.
b.Do not operate power tools in explosive atmospheres, such as in the presence of flammable liquids, gases or dust. Power tools create sparks which may ignite the dust or fumes.
c.Keep children and bystanders away while operating a power tool.
Distractions can cause you to lose control.
2. Electrical Safety
a.Power tool plugs must match the outlet. Never modify the plug in any way. Do not use any adapter plugs with earthed (grounded) power tools. Unmodified plugs and matching outlets will reduce risk of electric shock.
b.Avoid body contact with earthed or grounded surfaces such as pipes, radiators, ranges and refrigerators.
There is an increased risk of electric shock if your body is earthed or grounded.
c.Do not expose power tools to rain or wet conditions. Water entering a power tool will increase the risk of electric shock.
d.Do not abuse the cord. Never use the cord for carrying, pulling or unplugging the power tool. Keep cord away from heat, oil, sharp edges or moving parts.
Damaged or entangled cords increase the risk of electric shock.
e.When operating a power tool outdoors, use an extension cord suitable for outdoor use. Use of a cord suitable for outdoor use reduces the risk of electric shock.
f.If operating a power tool in a damp location is unavoidable, use a residual current device (RCD) protected supply.
Use of an RCD reduces the risk of electric shock.
3. Personal Safety
a.Stay alert, watch what you are doing and use common sense when operating a power tool. Do not use a power tool while you are tired or under the influence of drugs, alcohol or medication. A moment of inattention while operating power tools may result in serious personal injury.
b.Use personal protective equipment. Always wear eye protection. Protective equipment such as dust mask, non-skid safety shoes, hard hat, or hearing protection used for appropriate conditions will reduce personal injuries.
c.Prevent unintentional starting. Ensure the switch is in the o -position before connecting to power source and/or battery pack, picking up or carrying the tool. Carrying power tools with your finger on the switch or energising power tools that have the switch on invites accidents.
d.Remove any adjusting key or wrench before turning the power tool on. A wrench or a key left attached to a rotating part of the power tool may result in personal injury.
4

(Original instructions) |
ENGLISH |
e.Do not overreach. Keep proper footing and balance at all times. This enables better control of the power tool in unexpected situations.
f.Dress properly. Do not wear loose clothing or jewellery. Keep your hair, clothing and gloves away from moving parts. Loose clothes, jewellery or long hair can be caught in moving parts.
g.If devices are provided for the connection of dust extraction and collection facilities, ensure these are connected and properly used. Use of these devices can reduce dust related hazards.
4. Power Tool Use and Care
a.Do not force the power tool. Use the correct power tool for your application.
The correct power tool will do the job better and safer at the rate for which it was designed.
b.Do not use the power tool if the switch does not turn it on and o . Any power tool that cannot be controlled with the switch is dangerous and must be repaired.
c.Disconnect the plug from the power source and/or the battery pack from the power tool before making any adjustments, changing accessories, or storing power tools. Such preventive safety measures reduce the risk of starting the power tool accidentally.
d.Store idle power tools out of the reach of children and do not allow persons unfamiliar with the power tool or these instructions to operate the power tool.
Power tools are dangerous in the hands of untrained users.
e.Maintain power tools. Check for misalignment or binding of moving parts, breakage of parts and any other condition that may a ect the power tools operation. If damaged, have the power tool repaired before use. Many accidents are caused by poorly maintained power tools.
f.Keep cutting tools sharp and clean.
Properly maintained cutting tools with sharp cutting edges are less likely to bind
and are easier to control.
g.Use the power tool, accessories and tool bits etc., in accordance with these instructions, taking into account the working conditions and the work to be performed. Use of the power tool for operations di erent from those intended could result in a hazardous situation.
5. Service
a.Have your power tool serviced by a qualified repair person using only identical replacement parts. This will ensure that the safety of the power tool is maintained.
ADDITIONAL SAFETY WARNINGSFOR JIGSAWS AND RECIPROCATING SAWS
a.Hold power tool by insulated gripping surfaces, when performing an operation where the cutting accessory may contact hidden wiring or its own cord. Cutting accessory contacting a “live” wire may make exposed metal parts of the power tool “live” and could give the operator an electric shock.
b.Use clamps or another practical way to secure and support the workpiece to a stable platform. Holding the work by
hand or against your body leaves it unstable and may lead to loss of control.
c.Keep hands away from cutting area.
Never reach underneath the work piece any reason. Do not insert fingers or thumb into the vicinity of the reciprocating blade and blade clamp. Do not stabilize the saw by gripping the shoe.
d.Keep blades sharp. Dull or damaged blades may cause the saw to swerve or stall under pressure. Always use the appropriate type of saw blade for the workpiece material and type of cut.
e.When cutting pipe or conduit, make sure that they are free from water, electrical wiring, etc.
f.Do not touch the workpiece or the blade immediately after operating the tool.
They can become very hot.
5
ENGLISH |
(Original instructions) |
g.Be aware of hidden hazards, before cutting into walls, floors or ceilings, check for the location of wiring and pipes.
h.The blade will continue to move after releasing the switch. Always switch the tool o and wait for the saw blade to come to a complete standstill before putting the tool down.
Warning! Contact with, or inhalation of dusts arising from cutting applications may endanger the
health of the operator and possible bystanders. Wear a dust mask specifically designed for protection against dust and fumes and ensure that persons within or entering the work area are also protected.
i.The intended use is described in this instruction manual. The use of any accessory or attachment or performance of any operation with this tool other than those recommended in this instruction manual may present a isk of personal injury and/or damage to property.
List of Contents
1 Jigsaw
1 Hex key
Position of date barcode
The Date Code, which also includes the year of manufacture, is printed into the housing. Example:
2017 XX JN Year of manufacturing
Safety of others
•This appliance is not intended for use by persons (including children) with reduced physical, sensory or mental capabilities, or lack of experience and knowledge, unless they have been given supervision or instruction concerning use of the appliance by a person responsible for their safety.
Electrical safety
Your tool is double insulated; therefore no earth wire is required. Always check that the main voltage corresponds to the voltage on the rating plate.
Warning! If the power cord is damaged, it must be replaced by the manufacturer, authorized BLACK+DECKER Service Center or an equally qualified person in order to avoid damage or injury. If the power cord is replaced by an equally qualified person, but not authorized by BLACK+DECKER, the warranty will not be valid.
Labels on tool
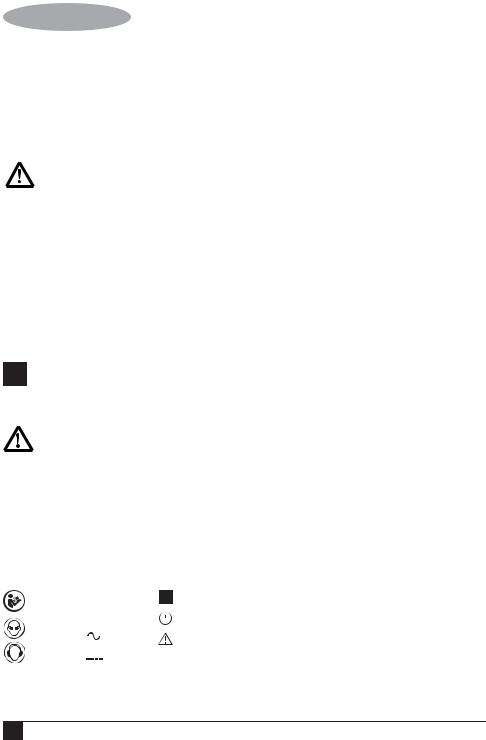
The label on your tool may include the following symbols:
Read
Instructions
Manual
Use Eye
Protection
Use Ear
Protection
V ........ |
Volts |
A ........ |
Amperes |
Hz ....... |
Hertz |
...... |
Class II |
||||
W ........ |
Watts |
|
|
|
Construction |
||
.... |
|
||||||
min ..... |
minutes |
Earthing |
|||||
|
|
|
Terminal |
||||
|
|
|
|||||
|
|
|
|
|
|
|
|
..... |
Alternating |
.... |
Safety Alert |
||||
|
|
|
Current |
||||
|
|
|
|
|
|
Symbol |
|
|
|
|
|
|
|
|
|
|
|
..... |
Direct |
.../min.. |
Revolutions |
||
|
|||||||
|
|
|
Current |
||||
|
|
|
|
|
|
or Recipro- |
|
|
|
|
|
|
|
|
|
|
|
|
|
|
|
|
cation per |
n0 ....... |
No-Load |
|
|
|
minute |
||
|
|
|
|
||||
|
|
|
Speed |
|
|
|
|
•Children should be supervised to ensure that they do not play with the appliance.
Residual risks
Additional residual risks may arise when using the tool which may not be included in the enclosed safety warnings. These risks can arise from misuse, prolonged use etc.
Even with the application of the relevant safety regulations and the implementation of safety devices, certain residual risks can not be avoided. These include:
•Injuries caused by touching any rotating/moving parts.
•Injuries caused when changing any parts, blades or accessories.
•Injuries caused by prolonged use of a tool. When using any tool for prolonged periods ensure you take regular breaks.
•Impairment of hearing.
•Health hazards caused by breathing dust developed when using your tool (example: working with wood, especially oak, beech and MDF.)
6
(Original instructions) |
ENGLISH |
FEATURES (Fig. A)
1.Trigger switch
2.Lock-On button
3.Motor vents
4.3 mm Hex key
5.Hex key holder
6.Dust port
7.Tilting sole plate
8.Blade roller
9.Blade screws
10.Chip guard
ASSEMBLY & OPERATION
Warning! Before attempting any of the following operations, make sure that the tool is switched o and
unplugged and that the saw blade has stopped. Used saw blades may be hot.
Warning! Always disconnect your jigsaw from the power source when replacing blades, tilting the sole
plate, cleaning or when the tool is not in use. Disconnecting the jigsaw will prevent accidental starting that could cause serious personal injury.
Blade options
Your jigsaw is designed to permit the use of many di erent saw tooth configurations.
Installing blades (not included)
1.Unplug your jigsaw from the power source.
Warning! Failure to unplug your jigsaw from the power source could result in accidental starting causing serious injury.
2.Insert the slotted screwdriver through the access hole in the chip shield (10).
Note: Use the slotted screwdriver (not supplied) to loosen screws.
3.Loosen both blade clamp screws (9) and insert the saw blade (11) as far as possible into the slot in the blade clamp.
Notes:
a)Ensure the blade is nested in the groove in the support roller (8).
b)The holes in universal fitting saw blades are not designed for alignment with the screw holes in the blade clamp.
4.Tighten both blade clamp screws (9) securely against the blade.
To remove the jigsaw blade:
1.Unplug your jigsaw.
2.Loosen blade clamp screws (9) using the slotted screwdriver.
3.Remove the blade.
On/O trigger switch (Fig. C)
To turn your jigsaw ON, depress the trigger switch (1). To turn the saw OFF, release the trigger switch.
Lock-on button (Fig. D)
Your jigsaw is equipped with a lock-on feature, which is convenient when continuous cutting for extended periods of time is required. To lock the switch ON, depress the trigger switch (1), push in and hold the lock-on button (2), then release the trigger. Release the lock-on button and your jigsaw will continue running. Depress and release the trigger switch to release lock.
Note: The lock-on button can be accessed from left side of the handle.
Variable speed control (Fig. E) (only JS20)
Set the jigsaw speed by rotating the variable speed control wheel (12) to the appropriate speed. Rotating the variable speed control wheel toward the rear of the jigsaw will result in slower speeds. Position the speed control dial at “1” for the slowest speed, “3” for medium speed and at “6” for the highest speed.
7

ENGLISH |
(Original instructions) |
Vacuum port switch (Fig. F)
During normal use without the vacuum connected, the vacuum port switch (13) must be slid toward the rear of the tool . This will allow the internal motor fan to continuously blow the sawdust away from the cutting mark. When the vacuum is connected, the vacuum port switch must be slid toward the front of the tool. This positions the internal ba e to divert the sawdust through the vacuum port so it can be evacuated by the workshop vacuum.
OPERATION
Warning! Never use the tool when the saw shoe plate is loose or removed.
General cutting
Warning! Keep hands and fingers away from the space between the motor housing and the blade clamp. Do not reach underneath workpiece while the saw is running.
Rest the front of the sole plate on the workpiece and align the cutting edge of the blade with the cutting line on your workpiece (Fig. G). Make sure the power cord is out of your way and not in the path the blade will follow. Start your saw and move it toward the workpiece. Apply enough downward pressure to keep the saw steady and only enough forward pressure to keep the blade cutting freely.
Warning! Do not force the saw. Forcing the saw may overheat the motor and break saw blades.
Bevel cutting
Bevel cutting angles may be adjusted from zero to 45° either left or right. To adjust the bevel angle:
1.Loosen both sole plate pivot screws (14) until the sole plate (15) can be rotated (Fig. H).
Note: Use the 3 mm hex key supplied.
2.Bevel angles (17) are marked on a scale located on the side of the sole plate (Fig. I).
3.Slide the sole plate back. Align the edge
of the motor housing (18) with the desired angle mark (17) on the side of the base, then slide the sole plate forward to engage the notches (16) into the motor housing pin.
Note: Angle marks on the sides of the jigsaw base are for reference only. Operator should use a protractor to verify angles.
4.Once the desired bevel angle is obtained, lock the sole plate by tightening the sole plate pivot screws.
5.Make a test cut in a scrap piece of material and measure the bevel angle. Adjust bevel angle if necessary.
HINTS FOR OPTIMUM USE
Sawing laminates
When cutting laminates, splintering may occur which can damage the presentation surface. The most common saw blades cut on the upward stroke, therefore if the shoe plate is sitting on the presentation surface either use a saw blade that cuts on the downward stroke or:
•Use a fine-tooth saw blade.
•Saw from the back surface of the workpiece.
•To minimise splintering, clamp a piece of scrap wood or hardboard to both sides of the workpiece and saw through this sandwich.
Sawing metal
Warning! Do not use a vacuum when cutting metal. Metal filings will be hot and may cause fire. Be aware that sawing metal takes much more time than sawing wood.
•Use a saw blade suitable for sawing metal.
•When cutting thin sheet metal, clamp a piece of scrap wood to the back surface of the workpiece and cut through this sandwich.
•Spread a film of oil along the intended line of cut.
8

(Original instructions) |
ENGLISH |
Plunge cutting
Warning! To avoid loss of control, broken blades or damage to the workpiece, always use extreme caution when making plunge cuts. It is not recommended to plunge cut any material other than wood. Wherever possible, drill a 3/8” (8 mm) or bigger pilot hole in the area to be cut out and start cutting with the blade in the pilot hole. This will avoid the need to plunge cut.
Note: Use only blades with 7 teeth per inch for plunge cutting.
1.To plunge cut an inside hole, clearly mark the cutting line on the workpiece.
2.Set the bevel angle at 0° then lock the sole plate.
3.Tilt the saw forward so it rests on the front edge of the sole plate and in a position so the blade will NOT touch the workpiece when the switch is turned ON (Fig. J).
Note: Make sure the saw blade is inside the area to be cut.
4.Start the saw and slowly lower the blade onto the workpiece while making sure the front of the sole plate remains in contact with the workpiece. Allow the blade to cut through the wood.
5.Continue lowering the blade into the workpiece until the sole plate rests flat on the workpiece. Continue sawing toward the cutting line and complete the cut as required.
Metal cutting
Many types of metal can be cut with your jigsaw. When cutting any kind of material, be careful not to twist or bend the blades.
Do not force the blade. If the blade chatters or vibrates excessively, use a finer tooth blade. If the blade heats excessively, reduce speed of cutting. If the blade teeth become clogged when cutting soft metals such as aluminum, use a coarser blade with fewer teeth per inch. Clamp all work firmly and saw as close as possible to the clamping point to eliminate any vibration of the work being cut.
When cutting conduit, pipe or angle iron, clamp work in a vise if possible and saw close to the vise. To cut thin sheet materials, “sandwich” the material between hardboard or plywood and clamp the layers to eliminate material vibration and tearing. By doing this, the material will be cut smoothly. Lay out your pattern or cutting lines on top of the “sandwich”.
MAINTENANCE
General
Warning! Do not at any time allow solvents such as brake fluids, gasoline, petroleum-based products, penetrating oils, etc. to come in contact with plastic parts. They contain chemicals that can damage, weaken or destroy plastic. Use a clean dry cloth to remove dirt, dust, oil, grease, etc.
Warning! Use safety goggles when using an air jet to blow dust out of the jigsaw. Using this jigsaw for cutting fiberglass, wallboard or plaster will result in accelerated wear due to the abrasive nature of these materials. It is important that you clean the jigsaw frequently when cutting these materials.
DO NOT abuse power tools. Abusive practices can damage the tool as well as the workpiece.
Warning! DO NOT attempt to modify this jigsaw or create accessories not recommended for this jigsaw. Any such alteration or modification is misuse and could result in a hazardous condition leading to possible serious injury. It will also void the warranty.
Your BLACK+DECKER tool has been designed to operate over a long period of time with a minimum of maintenance. Continuous satisfactory operation depends upon proper tool care and regular cleaning.
•Regularly clean the ventilation slots in your tool using a soft brush or dry cloth.
•Regularly clean the motor housing using a damp cloth. Do not use any abrasive or solvent-based cleaner. Never let any liquid get inside the tool and never immerse any part of the tool into liquid.
9

ENGLISH |
(Original instructions) |
Important! To assure product SAFETY and RELIABILITY, repairs, maintenance and adjustment (other than those listed in this manual) should be performed by authorized service centers or other qualified service personnel, always using identical replacement parts.
LUBRICATION
All of the bearings in this jigsaw are lubricated with a su cient amount of highgrade lubricant for the life of the unit under normal conditions. Therefore, no further lubrication is required.
Protecting the environment
Separate collection. This product must not be disposed of with normal
household waste.
Should you find one day that your
BLACK+DECKER product needs replacement, or if it is of no further use to you, do not dispose of it with household waste.
Make this product available for separate collection.
Separate collection of used products
and packaging allows materials to be recycled and used again. Reuse of
recycled materials helps prevent environmental pollution and reduces the demand for raw materials.
Local regulations may provide for separate collection of electrical products from the household, at municipal waste sites or by the retailer when you purchase a new product.
BLACK+DECKER provides a facility for the collection and recycling of BLACK+DECKER products once they have reached the end of their working life. To take advantage of this service please return your product to any authorised repair agent who will collect them on our behalf.
You can check the location of your nearest authorised repair agent by contacting your local BLACK+DECKER o ce at the address indicated in this manual. Alternatively, a list of authorised BLACK+DECKER repair agents and full details of our after-sales service and contacts are available on the Internet at: www.2helpU.com.
SERVICE INFORMATION
BLACK+DECKER o ers a full network of company-owned and authorized service locations. All BLACK+DECKER Service Centers are sta ed with trained personnel to provide customers with e cient and reliable power tool service. For more information about our authorized service centers and if you need technical advice, repair, or genuine factory replacement parts, contact the BLACK+DECKER location nearest you, or visit us at www.blackanddecker.com
NOTE
•BLACK+DECKER’s policy is one of continuous improvement to our products and, as such, we reserve the right to change product specifications without prior notice.
•Standard equipment and accessories may vary by country.
•Product specifications may di er by country.
•Complete product range may not be available in all countries. Contact your local BLACK+DECKER dealers for range availability.
SPECIFICATIONS
|
JS10 |
JS20 |
Power |
400W |
400W |
Blade speed |
3000/min |
1000-3000/min |
Stroke length |
18 mm |
18 mm |
Cutting depth @ 90° |
65 mm in wood |
65 mm in wood |
|
6 mm in steel |
6 mm in steel |
Sole plate tilt |
0–45° |
0–45° |
|
|
|
Level of sound pressure according to EN 60745:
Sound pressure (LpA) 87,0 dB(A), uncertainty (K) 3 dB(A) Sound power (LWA) 98,0 dB(A), uncertainty (K) 3 dB(A)
10
(Original instructions) |
ENGLISH |
Vibration total values (triax vector sum) according to EN 60745:
Cutting sheet metal (ah,M) 9,3 m/s2, uncertainty (K) 1.5 m/s2
Cutting boards (ah,B) 11,5 m/s2, uncertainty (K) 1.5 m/s2
EC declaration of conformity
MACHINERY DIRECTIVE
JS10, JS20 - Jig Saw
BLACK+DECKER declares that these products described under "Technical data" are in compliance with: 2006/42/EC,
EN 60745-1:2009 + A11:2010, EN 60745-2-11:2010
These products also comply with Directive 2014/30/EU and 2011/65/EU.
For more information, please contact BLACK+DECKER at the following address or refer to the back of the manual.
The undersigned is responsible for compilation of the technical fi le and makes this declaration on behalf of BLACK+DECKER.
R. Laverick
Engineering Manager
BLACK+DECKER Europe, 210 Bath Road,
Slough,
Berkshire, SL1 3YD
United Kingdom
03.2017
Guarantee
BLACK+DECKER is confident of the quality of its products and o ers an outstanding guarantee. This guarantee statement is in addition to and in no way prejudices your statutory rights.
If a BLACK+DECKER product becomes defective due to faulty materials, workmanship or lack of conformity, within 24 months from the date of purchase, BLACK+DECKER guarantees to replace defective parts, repair products subjected to fair wear and tear or replace such products to make sure of the minimum inconvenience to the customer unless:
•The product has been used for trade, professional or hire purposes.
•The product has been subjected to misuse or neglect.
•The product has sustained damage through foreign objects, substances or accidents.
•Repairs have been attempted by persons other than authorised repair agents or Black + Decker service sta .
To claim on the guarantee, you will need to submit proof of purchase to the seller or an authorised repair agent. You can check the location of your nearest authorised repair agent by contacting your local BLACK+DECKER o ce at the address indicated in this manual. Alternatively, a list of authorised BLACK+DECKER repair agents and full details of our aftersales service and contacts are available on the Internet at: www.2helpU.com
11
TÜRKÇE |
(Çevirisi orijinal talimatlardan yapılmı tır) |
Kullanım amacı
BLACK+DECKER™ JS10 ve JS20 dekupaj testereniz ah ap, plastik ve sac metal kesimi için tasarlanmı tır.Bu alet sadece hafif hizmet ve hobi kullanımı içindir.
GENEL GÜVENLİK KURALLARI
Deği tirilmemi fi ler ve uygun prizler elektrik çarpması riskini azaltacaktır.
b.Borular, radyatörler, ocaklar ve buzdolapları gibi topraklanmamı yüzeylerle vücut temasından kaçının.
Vücudunuzun topraklanması halinde yüksek bir elektrik çarpması riski vardır.
Uyarı! Bütün güvenlik uyarılarını ve talimatlarını okuyun ve anlayın. A ağıda belirtilen tüm talimatların herhangi birisine uyulmaması elektrik çarpması, yangın ve/veya ciddi yaralanma riskine neden olabilir.
BU TALİMATLARI SAKLAYIN
GÜVENLİK TALİMATLARI
Genel elektrikli alet güvenlik uyarıları
Uyarı! Bütün güvenlik uyarılarını ve talimatlarını mutlaka okuyun.
A ağıda yer alan uyarılar ve talimatların herhangi birisine uyulmaması elektrik çarpması, yangın ve/veya ciddi yaralanma riskine neden olabilir.
Bütün uyarı ve güvenlik talimatlarını ileride bakmak üzere saklayın. A ağıda yer alan uyarılardaki «elektrikli alet» terimi ebeke elektriğiyle (kablolu) veya akü/pille ( arjlı) çalı an elektrikli aletinizi ifade etmektedir.
1. Çalı ma Alanının Güvenliği
a.Çalı ma alanını temiz ve aydınlık tutun.
Karı ık ve karanlık alanlar kazaya davetiye çıkartır.
b.Elektrikli aletleri, yanıcı sıvılar, gazlar ve tozların bulunduğu yerler gibi yanıcı ortamlarda çalı tırmayın. Elektrikli aletler, toz veya dumanları ate leyebilecek kıvılcımlar çıkartır.
c.Bir elektrikli aleti çalı tırırken çocuklardan ve etraftaki ki ilerden uzak tutun. Dikkatinizi dağıtıcı eyler kontrolü kaybetmenize neden olabilir.
2. Elektrik Güvenliği
a.Elektrikli aletlerin fi leri prizlere uygun olmalıdır. Fi üzerinde kesinlikle hiçbir deği iklik yapmayın. Topraklı elektrikli aletlerde hiçbir adaptör fi i kullanmayın.
c.Elektrikli aletleri yağmura maruz bırakmayın veya ıslatmayın. Elektrikli alete su girmesi elektrik çarpması riskini arttıracaktır.
d.Elektrik kablosunu uygun olmayan amaçlarla kullanmayın. Elektrikli aleti kesinlikle kablosundan tutarak ta ımayın, çekmeyin veya prizden çıkartmayın. Kabloyu sıcaktan, yağdan, keskin kenarlardan veya hareketli parçalardan uzak tutun. Hasarlı veya dola mı kablolar elektrik çarpması riskini arttırır.
e.Elektrikli bir aleti açık havada çalı tırıyorsanız, açık havada kullanıma uygun bir uzatma kablosu kullanın. Açık havada kullanıma uygun bir kablonun kullanılması elektrik çarpması riskini azaltır.
f.Eğer bir elektrikli aletin nemli bir bölgede çalı tırılması zorunluysa, bir artık akım aygıtı (RCD) korumalı bir kaynak kullanın. Bir RCD kullanılması elektrik oku riskini azaltır. Not: «Artık Akım Aygıtı (RCD)» tanımı, «Kaçak Akım Koruma Cihazı (GFCI)» veya «Toprak Kaçağı Devre Kesici (ELCB)» tanımları ile deği tirilebilir.
3. Ki isel Güvenlik
a.Elektrikli bir aleti kullanırken her zaman dikkatli olun, yaptığınız i e yoğunla ın ve sağduyulu davranın. Elektrikli bir aleti yorgunken veya ilaç ya da alkolün etkisi altındayken kullanmayın. Elektrikli aletleri kullanırken bir anlık dikkatsizlik ciddi ki isel yaralanmayla sonuçlanabilir.
b.Ki isel koruyucu ekipmanları mutlaka kullanın. Daima koruyucu gözlük takın.
Ko ullara uygun toz maskesi, kaymayan güvenlik ayakkabıları, baret veya kulaklık gibi koruyucu donanımların kullanılması ki isel yaralanmaları azaltacaktır.
12
 Loading...