


BXVC15PE |
BXVC20PE |
BXVC20XE |
|
BXVC20PTE |
BXVC20XTE |
||
|
BXVC25PDE
BXVC30PDE |
BXVC30XDE |
BXVC30PTDE |
BXVC30XTDE |
BXVC15PE
BXVC20PE - BXVC20PTE
BXVC20XE - BXVC20XTE
BXVC25PDE
BXVC30PDE - BXVC30PTDE
BXVC30XDE - BXVC30XTDE
cod. 93241 - BP |
www.blackanddecker.eu |
|
|
SL RO PT PL NO NL HU HR FR FI ES EL DE IT EN

EN
IT
DE
EL
ES
FI
FR
HR
HU
NL
NO
PL
PT
RO
SL
Please read these instructions carefully before use. Please retain these instructions for future reference. In case of problems or difficulties, please contact the consumer helpline:
www.2helpu.com
Leggere attentamente queste istruzioni prima dell’uso. Conservare queste istruzioni per future consultazioni. In caso di problemi o difficoltà, contattate l’helpline consumatori:
www.2helpu.com
Lesen Sie bitte diese Bedienungsanleitung vor Gebrauch aufmerksam durch. Bewahren Sie diese Bedienungsanleitung sorgfältig auf, damit Sie sie auch später zu Rate ziehen können. Wenden Sie sich im Falle von Problemen bitte an die Verbraucher-Hotline: www.2helpu.com Seite: 25-33
Διαβάστε προσεκτικά αυτές τις οδηγίες πριν από τη χρήση. Φυλάξτε αυτές τις οδηγίες για μελλοντικές αναφορές. Σε περίπτωση προβλημάτων ή δυσκολιών, επικοινωνήστε με τη γραμμή helpline υποστήριξης καταναλωτών:
www.2helpu.com
Leer atentamente estas instrucciones antes de usar el equipo. Guardar estas instrucciones para poder consultarlas en el futuro. En caso de problemas o dificultades, ponerse en contacto con el servicio de asistencia al cliente:
www.2helpu.com
Lue ohjeet huolellisesti ennen käyttöä. Säilytä ohjeet huolellisesti tulevaa käyttöä varten. Jos kohtaat ongelmia, ota yhteys kuluttajien helpline-palveluun:
www.2helpu.com
Lire attentivement ces instructions avant emploi. Conserver ces instructions pour toute consultation à venir. En cas de problèmes ou de difficultés, contacter l’assistance consommateur :
www.2helpu.com
Molimo vas da prije uporabe pažljivo pročitate ovaj priručnik. Sačuvajte ove upute za buduće korištenje. Ako naiđete na kakve probleme ili poteškoće, molimo vas da se obratite službi za podršku korisnicima:
www.2helpu.com
A készülék használatba vétele előtt gondosan olvassa el az útmutatót. A későbbi hivatkozások érdekében őrizze meg az útmutatót. Kérdés vagy probléma esetén forduljon ügyfélszolgálatunkhoz:
www.2helpu.com
Lees deze gebruiksaanwijzing vóór het gebruik aandachtig door. Bewaar deze gebruiksaanwijzing voor latere raadpleging. Contacteer bij problemen of moeilijkheden de hulplijn voor de gebruikers:
www.2helpu.com
Les disse instruksjonene nøye før bruk. Ta vare på instruksjonene for senere bruk. Ved problemer eller vanskeligheter, kontakt kundeservice:
www.2helpu.com
Przed użyciem należy uważnie przeczytać niniejszą instrukcję obsługi. Instrukcję należy zachować na przyszłość.
W razie jakichkolwiek problemów lub trudności można skontaktować się z działem pomocy technicznej pod adresem: www.2helpu.com Strona: 108-117
Leia atentamente estas instruções antes de utilizar o aparelho. Conserve estas instruções para consultas futuras. Em caso de problemas ou dificuldades, contacte a helpline de atendimento aos consumidores:
www.2helpu.com
Vă rugăm să citiţi cu atenţie aceste instrucţiuni înainte de utilizare. Vă rugăm să păstraţi aceste instrucţiuni pentru consultarea pe viitor. În caz de probleme sau dificultăţi, vă rugăm să contactaţi linia de asistenţă a clienţilor:
www.2helpu.com
Pred uporabo pazljivo preberite ta navodila. Ta navodila shranite za prihodnjo uporabo. Če naletite na težave, se obrnite na službo za pomoč kupcem:
www.2helpu.com

1 |
|
BXVC15PE |
BXVC25PDE |
|
E3 |
|
E1 |
|
|
|
|
|
|||||
|
|
BXVC20PE |
BXVC30PDE |
|
|
|
|
|
|
|
BXVC20XE |
BXVC30PTDE |
|
|
|
|
|
|
|
BXVC20PTE |
BXVC30XDE |
|
|
|
|
|
|
|
BXVC20XTE |
BXVC30XTDE |
|
|
|
|
|
|
|
|
|
|
BXVC20PTE |
C1 |
A1 |
|
|
|
|
|
|
BXVC20XTE |
|
|
|
|
|
|
|
B3 |
|
|
|
|
|
|
|
|
A1 |
|
A4 |
A6 |
|
|
|
|
|
|
|
|
A7 |
|
|
|
|
|
A10 |
|
|
|
|
|
|
|
|
|
|
|
|
|
|
D1-D2-D3-D4 |
|
A2 |
|
|
|
|
|
|
|
|
|
|
|
|
||
|
|
B5 |
|
|
|
|
|
|
|
|
|
B10 |
|
|
|
|
A8 |
|
|
|
|
|
A11 |
|
|
|
|
|
|
|
A9 |
|
|
|
|
|
|
|
|
|
|
|
|
|
|
|
B6 |
|
|
|
|
|
B8 |
|
|
|
|
|
B7 |
|
|
|
|
BXVC25PDE |
B5 |
|
|
B11 |
B1 |
|
|
|
|
|
|
|
|
B2 |
||
|
|
|
|
|
|
|
|
|
|
|
|
|
|
|
A5 |
|
|
|
|
A12 |
|
|
|
A3 |
|
|
|
|
|
|
|
|
|
|
|
|
BXVC30PDE |
|
B5 |
BXVC30PTDE |
C1 |
A1 |
||
|
BXVC30XDE |
|
BXVC30XTDE |
|||||
|
|
|
|
|
|
|||
|
|
|
|
|
|
B9 |
|
|
|
|
|
|
|
|
B5 |
|
|
|
A12 |
|
B9 |
A12 |
|
|
|
|
|
|
|
|
|
|
|
||
|
|
|
|
|
|
|
|
3 |
2 |
A10 |
B1 |
3 |
|
|
|
|
B2 |
|
|
|
A6 |
A8 |
|
|
|
|
|
|
4 |
|
A |
B3 |
A |
|
|
|||
|
|
|
|
A |
|
B3 |
|
A |
|
|
|
A2 |
|
A3 |
|
|
|
|
|
5 |
|
|
B5 |
|
|
|
B3 |
B5 |
|
|
|
|
|
|
|
|
|
|
B9 |
6 |
|
|
|
|
|
|
|
|
A7 |
7 |
|
|
B3 |
|
|
|
|
|
|
|
C1 |
|
|
|
|
|
|
|
A2 |
|
|
|
|
BXVC20PTE |
|
|
|
B3 |
BXVC20XTE |
|
|
|
BXVC30PTDE |
|
|
|
|
B4 |
BXVC30XTDE |
4 |
|
|
|
|

8 |
|
A1 |
|
|
|
|
|
A1 |
A1 |
A1 |
A1 |
|
|
|
|
|
O |
|
I |
|
|
|
|
9 |
B10 |
B11 |
|
B5 B5 |
|
|
|
|
|
|
B9 |
|
|
|
|
|
|
|
B7 |
B5 |
|
B3 |
A2 |
|
|
|
B8 |
|
|||
|
|
|
|
|
|
||
|
|
|
|
B6 |
|
|
|
10 |
B11 |
|
|
B5 B5 |
|
|
|
B10 |
|
B9 |
|
|
|
|
|
|
|
|
|
|
|
|
|
|
|
|
B7 |
B5 |
|
B3 |
A2 |
|
|
|
B8 |
|
|||
|
|
|
|
|
|
||
|
|
|
|
B6 |
|
|
|
115 |
|
|
|
|
|
|
|
|
|
C1 |
|
|
|
|
|
BXVC20PTE |
|
|
|
|
A2 |
|
|
BXVC20XTE |
|
|
B3 |
|
|||
BXVC30PTDE |
|
|
|
|
|||
|
|
|
|
|
|
||
BXVC30XTDE |
|
|
|
|
|
|
|
125 |
B5 |
|
|
|
|
|
|
|
|
|
|
|
|
|
|
B5 |
B5 |
|
|
|
|
|
|
|
B8 |
B3 |
A3 |
|
|
|
|
|
|
|
|
|
|
||
13 |
|
|
|
14 |
|
|
|
|
A7 |
|
|
A7 |
A12 |
|
|
|
|
|
|
BXVC25PDE |
|
|
|
|
|
|
|
BXVC30PDE |
|
|
|
|
|
|
|
BXVC30PTDE |
|
|
|
|
|
|
|
BXVC30XDE |
|
|
|
|
|
|
|
BXVC30XTDE |
|
|
|
|
|
|
|
|
|
|
5 |

15 |
|
|
B1 |
A1 |
|
|
|
|
|
B2 |
|
|
O |
|
|
|
|
|
|
A1 |
|
|
A6 |
|
|
A7 |
|
|
|
B1 |
|
|
|
B2 |
|
|
|
|
B2 |
|
|
|
B2 |
16 |
|
B10 |
B10 |
|
|
|
17 |
B11 |
B11 |
|
||
|
|
18
|
B5 |
A7 |
|
B9 |
B6 |
B3 |
|
|
B7 |
A11 |
B8 |
6
Dear Customer,
Please read these original instructions before using the appliance for the first time, comply with the information they provide and keep them in a safe place for future use or to be handed on to any subsequent owners.
1 SAFETY INSTRUCTIONS
1.1The appliance you have purchased is a technologically advanced product designed by one of the leading European manufacturers. This appliance is intended for use as a multi-purpose vacuum cleaner, in compliance with the descriptions and safety precautions contained in these instructions.This information is provided to enable you to get the best from your appliance; please
read it carefully and always comply with its recommendations. During connection, use and servicing of the appliance, take all possible precautions to protect your own safety and that of the people in the immediate vicinity. Read the safety regulations carefully and comply with them on all occasions; failure to do so may put health and safety at risk or cause expensive damage.
(Original instructions) |
ENGLISH |
2 SAFETY SIGNS |
EN |
2.1Comply with the instructions provided by the safety signs fitted to the appliance and to those contained in
this manual.
The appliance and manual only feature the symbols relevant to the model purchased. Check that the symbols and signs affixed to the appliance are always present and legible; otherwise, fit replacements in the original positions. (Contact the Service Centre).
 Warning - danger!
Please read these instructions carefully before use.
 Symbol E3 (if the symbol appears in fig. 1) - Indicates that this appliance is designed for household use only and must not be utilised for industrial or commercial
purposes.
0 Switch “OFF” position I Switch “ON” position
 Automatic vacuuming setting II Automatic vacuuming setting
7

EN
ENGLISH |
(Original instructions) |
This product is rated in insulation class II. This means that it has reinforced or double insulation (only if the symbol appears
on the appliance).
This produce is rated in insulation class I. This means that it is equipped with a protective earthing conductor (only if the symbol
appears on the appliance).

 The product complies with the relevant European directives.
 Symbol E1 - Recycling the appliance. Make the old appliance unusable immediately.
Unplug the appliance. Cut the power cable.
Do not dispose of electrical equipment together with household waste. AccordingtotheprovisionsofDirective 2012/19/EC concerning waste electrical and electronic equipment (WEEE), electrical component must be collected separately and recycled in an environment-friendly manner. For further information, contact the relevant local authority department or your dealer.
 Wear ear defenders.
 Wear a protective mask.
 Wear respiratory protection.
 Wear protective gloves.
 Wear safety footwear.
 Wear safety clothing.
8

(Original instructions) |
ENGLISH |
3 SAFETY RULES/RESIDUAL RISKS
3.1SAFETY “DO NOTS”
3.1.1Warning. DO NOT allow the appliance to be used by children less than 8 years of age or persons with impaired physical, sensory or mental capabilities, or who do not have the necessary experience and knowledge, unless they are suitably supervised and have been instructed in the safe use of the appliance and the risks involved..
3.1.2Warning. Children MUST NOT use the appliance as a toy. Supervise children to ensure that this does not occur.
3.1.3Cleaning and user maintenance must NOT be carried out by children or incompetent persons unless properly supervised.
3.1.4Keepthepackagingfilmoutofreachofchildren.Suffocationhazard!
3.1.5Warning. The appliance MUST NOT be operated by children or anyone who has not read and understood the instructions.
3.1.6Warning. NEVER use the appliance with flammable or toxic liquids, or liquids with characteristics incompatible with its proper operation. Use of the appliance in a potentially flammable or explosive atmosphere is forbidden.
3.1.7Warning. Some substances may combine with the air sucked in to form explosive vapours and mixtures. NEVER suck in the following substances:
-Explosiveorflammablegases,liquidsordust(reactivedust).
-Powdered reactive metals (e.g. aluminium, magnesium or zinc) together with strong alkaline and acid detergents.
-Pure acid and alkaline solutions.
-Organic substances (e.g. petrol, paint thinners, acetone or diesel fuel).
These substances may also corrode the materials from which the appliance is made.
3.1.8Switch off the appliance after each use and before all cleaning/maintenance.
3.1.9Firehazard.NEVERsuckupburningorredhotmaterials.
3.1.10Warning. NEVER use the appliance outdoors in the rain.
3.1.11Warning. DO NOT touch the plug and/or socket with wet hands.
3.1.12Warning. NEVER use the appliance if the power cable is damaged. If the power cable is damaged, it must be replaced by the manufacturer, one of its Service Centres or similarly qualified persons in order to avoid a safety hazard.
EN
9
ENGLISH (Original instructions)
EN |
3.1.13 |
Warning. Check that the appliance is fitted with its data plate; contact your dealer if it is missing. |
|
|
Appliances without data plate must NOT be used, since they cannot be identified and are potentially |
|
3.1.14 |
hazardous. |
|
Warning. NEVER move the appliance by pulling on the POWER CABLE. |
|
|
3.1.15 |
Warning. The use of non-original accessories and any other accessories not specifically intended |
|
|
for the model in question is prohibited. All modifications to the appliance are prohibited. Any |
|
|
modifications made to the appliance shall render the Declaration of Conformity null and void and |
|
|
relieve the manufacturer of all liability under civil and criminal law. |
|
3.2 |
SAFETY “MUSTS” |
|
3.2.1 |
Warning. All electrical conductors MUST BE PROTECTED from jets or splashes of water. |
|
3.2.2 |
Warning. The electric supply connection must be made by a qualified electrician and comply with |
|
|
IEC 60364-1.Either a residual current device that will cut off the power supply if the leakage current |
|
3.2.3 |
to earth exceeds 30 mA for 30 ms or a ground fault interrupt device must be installed. |
|
Warning. DURING start-up, the appliance may generate interference on the electrical system. |
|
|
3.2.4 |
Warning. Use only approved electrical extension leads with suitable conductor cross-section. |
|
3.2.5 |
Warning. Always turn off the switch when leaving the appliance unattended. |
|
3.2.6 |
|
Warning. The air flow may cause parts to rebound: wear all the protective clothing and equipment (PPE) needed to ensure the operator’s safety.
3.2.7Warning. Switch the appliance off and disconnect it from the power source before any assembly, maintenance, storage and transport operations.
3.2.8Warning. Maintenance and/or repair of electrical components MUST be carried out by qualified staff.
3.2.9Warning. Before each use, and periodically, CHECK that screws are tight and all appliance components are in good condition; inspect for broken or worn parts.
3.2.10Warning. To ensure the appliance’s safety, only use the manufacturer’s genuine parts, or other parts which carry its approval.
3.2.11Warning. Unsuitable extension cords can be dangerous. If an extension cable is used, it must be suitable for outdoor use, and the connection must be kept dry and off the ground. Use of a power cable reel which keeps the socket at least 60 mm above the ground is strongly recommended.
10
4 GENERAL INFORMATION (PAGE 3)
4.1 Use of the manual
This manual forms an integral part of the appliance and should be kept for future reference. Please read it carefully before installing/using the unit. If the appliance is sold, the seller must pass on this manual to the new owner along with the appliance.
4.2 Delivery
The appliance is delivered partially assembled in a cardboard box.
The supply package is illustrated in fig.1.
4.2.1Documentation supplied with the appliance D1 Use and maintenance manual
D2 Safety instructions
D3 Declaration of conformity
D4 Warranty regulations
4.3Disposing of packaging
The packaging materials are not environmental pollutants but must still be recycled or disposed of in compliance with the relevant legislation in the country of use.
5 TECHNICAL INFORMATION (PAGE 3)
5.1 Intended use
|
The appliance is intended for use as a multi-purpose vacuum |
|||
|
cleaner, in compliance with the descriptions and safety |
|||
|
precautions contained in these instructions. |
|||
|
This appliance is designed for household use only and must not |
|||
|
|
be utilised for industrial or commercial purposes. |
||
|
The appliance conforms to the IEC 60335-1 and IEC 60335-2-2 |
|||
5.2 |
standards. |
|
|
|
Operator |
|
|
||
|
The symbol shown in fig. 1 identifies the appliance’s intended operator |
|||
|
(professional or non-professional). |
|
|
|
5.3 |
Main components: |
|
|
|
|
A1 |
Starter device |
|
|
|
A2 |
Suction connection |
|
|
|
A3 |
Blower connection |
|
|
|
A4 |
Handle |
|
|
|
A5 |
Power cable stowing hook (where featured) |
||
|
A6 |
Catches |
|
|
|
A7 |
Power cable with plug |
|
|
|
A8 |
Castor wheels |
|
|
|
A9 |
Tank< |
|
|
|
A10 |
Cover with motor |
|
|
|
A11 |
Accessories holder (where featured) |
||
|
A12 |
Liquid drain plug (where featured) |
|
|
|
C1 |
Power tool socket (where featured) |
||
|
5.3.1 Accessories (see fig. 1 |
for details of models - supply |
||
|
|
package is as shown on the cardboard box) |
||
|
B1 |
Filter holder |
B8 |
Crevice nozzle |
|
B2 |
Sponge filter |
B9 |
Round brush |
|
B3 |
Hose |
B10 |
Fabric filter bag |
|
B4 |
Adaptor for power tools |
B11 |
Paper filter bag |
|
|
(optional) |
|
|
|
B5 |
Tube |
|
|
|
B6 |
Floor brush |
|
|
|
B7 |
Carpet - upholstery brush |
|
|
(Original instructions) |
ENGLISH |
5.4Safety devices
-Starter device (A1)
The starter device prevents accidental use of the appliance.
6 INSTALLATION (PAGE 4)
Warning - danger!
All installation and assembly operations must be performed with the appliance
disconnected from the mains power supply. The assembly sequence is illustrated on page 4.
6.1 Assembly
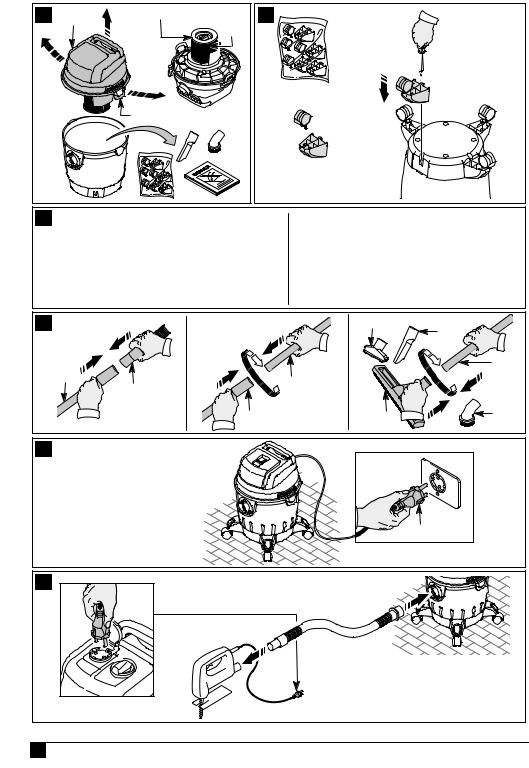
When unpacking, check for any missing accessories or damage to the contents. If damage caused in transit is found, notify your dealer at once. Lift the cover with the motor (A10) off the appliance, releasing the catches (A6) and take out the accessories supplied, checking that the
filter(B2)isfittedcorrectly.
See fig. 2
The assembly sequence is illustrated on page 4.
6.2 Fitting the castor wheels
Turn the vacuum cleaner tank (A9), with the cover off, upside down on a firm horizontal surface. Fit the castor wheel hubs (A8) into the holes provided and press fully down to secure the wheels in the correct position.
See fig. 3
6.3 Fitting the accessories
Connect the hose (B3) to the suction (A2) or the blower connection (A3) depending on the type of operation required.
See fig. 4
Then complete the sequence with the accessories required for the type of cleaning job planned. Use the tubes (B5) and the brushes (B6-B7-B8-B9) depending on the type of cleaning and the surface to be cleaned. The brushes (B6-B7-B8-B9) can be fitted straight onto the hose (B3).
See fig. 5
6.4 Electrical connection
 Warning - danger!
Check that the electricity supply voltage and frequency (V/Hz)
correspond to those specified on the data plate. See fig.6
6.4.1 Use of extension cables
Use cables and plugs with "IPX4" protection level.
The cross-section of the extension cable should be proportionate to its length; the longer it is, the greater its cross-section should be.
6.5 Power tool socket (where featured)
Connect the hose (B3) to the power tool’s suction connection. If the two connections are not compatible, use the adaptor for power tools (B4) (where featured) cutting off the surplus.
Operate the power tool using the additional socket (C1) (for models with this feature).
See fig. 7
7 INFORMATION ON USE OF THE APPLIANCE (PAGE 5)
7.1 Controls
- Starter device (A1). See fig. 8.
Set the starter device switch on (ON/I).
If there is a pilot light on the starter device, it should light up. Set the starter device switch on (OFF/0) to stop the appliance. If there is a pilot light on the starter device, it should go out.
EN
11

EN
ENGLISH (Original instructions)
 Warning - danger!
During operation the appliance must be positioned as shown on a
firm, stable surface. See fig. 8.
7.2 Start-up
7.2.1 Dry suction. See fig. 9.
Onlyworkwiththefilters(B2-B10)dry!Beforeusingthem, checkthefiltersfordamageandreplacethemifnecessary. Tosuckupdrydirt,adjustthefloorbrushasappropriateand fitthecorrespondingaccessories(usebrushB6).
When sucking up dry dirt, if necessary an additional filter bag, which may be in fabric (B10) or in paper (B11), may be used.
Filter bag guidelines:
- The level to which the filter bag is filled depends on the type of dirt being collected.
-Forfinedust,sand,etc.,replacethefilterbagoften.
- A worn filter bag may burst, so it should be replaced in goodtime!
 Warning - danger!
Only suck in cold ash.
7.2.2Sucking in liquids See fig.10.
 Warning - danger!
Iffoamformsorliquidoverflows,switchtheapplianceoffat once or disconnect the mains plug! Do not use a filter bag (eitherpaperorfabric)!
 Warning
Whenthetankisfull,afloatswitchshutsoffthesuctioninlet and the motor starts to race. Switch the appliance off at once and empty the tank.
To suck up damp or dry dirt, adjust the floor brush as appropriate and fit the corresponding accessories (use brush B6).
7.2.3Working with power tools. See fig 11.
The assembly sequence is illustrated in fig.11.
Switch on the appliance (automatic vacuuming switch turned
left to  or 2 button switch on II) and start working. Warning: As soon as the power tool switches on, the suction fan starts up after a 0.5 second delay.
When the power tool is switched off, the suction fan keeps running for about a further 6 seconds to suck up the dirt left in the suction hose.
7.2.4Blower function. See fig 12.
For cleaning inaccessible points or where suction is not possible, such as removing leaves from gravel.
Fit the suction hose to the connection provided. The blower function is now active.
For more effective blowing, use of the crevice nozzle (B8) is recommended.
7.3Stopping operation (Pauses)
Switch off the appliance. See fig. 8.
Connectthefloorbrushinthestowedposition.
7.4Finishing work
Switch off the appliance. See fig. 8. Disconnect the plug.
7.5Empty the tank
Fordrydirtanddust:removethenozzlefromtheapplianceandempty the tank. See fig 13.
For liquids: use the drain screw if featured (see fig. 14).
8 MAINTENANCE (PAGE 6)
 Warning - danger!
All installation and assembly operations must be performed with the appliance
disconnected from the mains power supply. The assembly sequence is illustrated on page 6.
Always switch the appliance off and disconnect the plug before any servicing or maintenance work. Repairs and work on electrical systems may only be carried out by the Service Centre.
 Warning - danger!
Never use abrasive detergents, glass detergents or universal detergents!
Never immerse the cover with motor (A10) in water. Clean the appliance and plastic accessories with a standard synthetic material detergent. Rinse
the tank and accessories with water if necessary and dry them before reuse.
8.1 Cleaning the sponge filter (B2). See fig 15.
Open the vacuum-cleaner by releasing the catches (A6). Turn the cover of the appliance (A10) upside down and remove the filter.
Rinse carefully under running water and leave to dry. Do not
reassemble until dry.
8.2 Cleaning the fabric filter bag (B10). See fig 16.
Open the vacuum-cleaner by releasing the catches (A6). Remove the filter bag (B10). Empty the filter bag, rinse carefully under
running water and leave to dry. Do not reassemble until dry.
8.3 Replacing the paper filter bag (B11). See fig 17.
Open the vacuum-cleaner by releasing the catches (A6).
Removethefullfilterbag(B11),throwitawayandfitanewone.
9 END-OF-SEASON STORAGE (PAGE 6)
 Warning - danger!
All installation and assembly operations must be performed with the appliance disconnected from the mains power supply.
After finishing work, clean the appliance and then put it and the accessories away as shown in fig.18.
Store the appliance in a dry place.
12

|
|
(Original instructions) |
ENGLISH |
|
10 TROUBLESHOOTING |
|
|
|
|
|
|
|
|
|
Problems |
Probable causes |
|
Remedies |
|
|
|
|
|
|
|
No electrical power |
|
Check that the plug is firmly in the socket and that the mains |
|
The appliance does not switch on |
|
voltage supply is present (*) |
|
|
|
|
|
||
|
Problems with the electric-electronic circuit |
|
Contact the Service Centre |
|
The appliance does not suck in |
Accessories fouled |
|
Check and clean the nozzles, extensions or hoses |
|
Filters dirty |
|
Clean the filters |
|
|
material, or sucks only weakly |
Filter bags full |
|
Empty / change filter bags |
|
|
Tank full |
|
Empty the tank |
|
Power tool does not start (where power |
Power tool plug not fitted into vacuum cleaner socket correctly |
|
Fit the plug properly |
|
tool socket is featured) |
Switch off or turned to I |
|
Turn switch to power tool/II position |
|
Dust comes out of appliance |
Filter not fitted |
|
Fit the filter |
|
Filter damaged |
|
Replace the worn filter with a new one |
|
|
|
Hose or connections damaged |
|
Replace damaged parts |
|
Bad smells from appliance when in |
Filters/ filter bags dirty |
|
Replace filters/filter bags |
|
operation |
|
|
||
|
|
|
|
|
(*) If the motor stops and does not restart during operation contact the Service Centre.
EC Declaration of conformity
We, Annovi Reverberi S.p.A, of Bomporto (Modena), Italy, declare that the following Black+Decker appliance(s): |
|
|
||||
Designation of appliance: Wet&dry vacuum cleaner |
BXVC20PE |
BXVC20XE |
|
BXVC30PDE |
BXVC30XDE |
|
|
|
|
||||
Model No.: |
BXVC15PE |
BXVC20PTE |
BXVC20XTE |
BXVC25PDE |
BXVC30PTDE |
BXVC30XTDE |
Rated power: |
1.2 kW |
1.2 kW |
1.4 kW |
1.2 kW |
1.6 kW |
1.6 kW |
is (are) compliant with the following European directives:
2006/95/EC – Directive to be replaced by 2014/35/EU from April 20, 2016,
2004/108/EC – Directive to be replaced by 2014/30/EU from April 20, 2016, 2011/65/EU, 2005/32/EC, 2012/19/EU. and was (were) produced in compliance with the following norms or standardised documents:
EN 60335-1; EN 60335-2-2; EN 55014-1; EN 55014-2; EN 61000-3-2; EN 61000-3-3; EN 62233; EN 50581; Reg.1275/2008. Name and address of the person responsible for issuing the technical file: Stefano Reverberi / AR Managing Director
Via ML King, 3 - 41122 Modena, Italy
Date: 10.02.2016 |
|
MODENA (I) |
|
Stefano Reverberi |
Managing Director |
EN
13

EN
ENGLISH |
(Original instructions) |
WARRANTY
The validity of the warranty is in accordance with the relevant legislation in the country where the product is sold (unless otherwise stated by the producer). The warranty covers materials, construction and conformity defects during the warranty period, during which time the manufacturer will replace defective parts and repair the product if not excessively worn, or replace it.
Thewarrantydoesnotcovercomponentssubjecttonormalwearandtear(filters,bags,oraccessoriessuchasthehose,brushes,wheels,etc.);
The warranty does not cover defects caused by or arising from:
-improper use, misuse, negligence,
-professional use or hire, if the product was sold for domestic use,
-failure to comply with the maintenance instructions provided in this manual,
-repair by unauthorised staff or centres,
-use of non-genuine parts or accessories,
-damage caused by transport, by dirt or foreign bodies, accidents,
-storage or warehousing problems.
Proof of purchase must be submitted to obtain warranty cover.
Technical Data |
Unit |
BXVC15PE |
BXVC20PE |
BXVC20XE |
BXVC25PDE |
BXVC30PDE |
BXVC30XDE |
||||||||||||||||||||||
BXVC20PTE |
BXVC20XTE |
BXVC30PTDE |
BXVC30XTDE |
||||||||||||||||||||||||||
|
|
|
|
||||||||||||||||||||||||||
Voltage |
V/Hz |
220-240 V ~ 50/60Hz |
220-240 V ~ 50/60Hz |
220-240 V ~ 50/60Hz |
220-240 V ~ 50/60Hz |
220-240 V ~ 50/60Hz |
220-240 V ~ 50/60Hz |
||||||||||||||||||||||
Power |
kW |
1,2 |
1,2 |
|
|
|
1,4 |
|
|
|
|
|
|
1,2 |
1,6 |
|
|
|
|
|
|
1,6 |
|
|
|
|
|
|
|
Tank capacity |
l |
14,5 |
19 |
|
|
|
20 |
|
|
|
|
|
|
25 |
30 |
|
|
|
|
|
|
30 |
|
|
|
|
|
|
|
Maximum suction pressure |
kPa |
17 |
17 |
|
|
|
18 |
|
|
|
|
|
|
17 |
19 |
|
|
|
|
|
|
19 |
|
|
|
|
|
|
|
Maximum vacuum |
mbar |
170 |
170 |
|
|
|
180 |
|
|
|
|
|
|
170 |
190 |
|
|
|
|
|
|
190 |
|
|
|
|
|
|
|
Maximumairflow |
l/s |
28 |
28 |
|
|
|
33 |
|
|
|
|
|
|
28 |
37 |
|
|
|
|
|
|
37 |
|
|
|
|
|
|
|
No. of motors |
- |
1 |
1 |
|
|
|
1 |
|
|
|
|
|
|
1 |
1 |
|
|
|
|
|
|
1 |
|
|
|
|
|
|
|
Accessory Ø |
mm |
35 |
35 |
|
|
|
35 |
|
|
|
|
|
|
35 |
35 |
|
|
|
|
|
|
35 |
|
|
|
|
|
|
|
Power cable |
m |
5 |
5 |
|
|
|
5 |
|
|
|
|
|
|
5 |
5 |
|
|
|
|
|
|
5 |
|
|
|
|
|
|
|
Protection class |
- |
|
/ |
|
|
|
/ |
|
|
|
|
|
|
|
/ |
|
|
|
|
|
|
/ |
|
|
|
|
|
|
|
|
|
|
|
|
|
|
|||||||||||||||||||||||
|
|
|
|
|
|
|
|
|
|
|
|
|
|
|
|
|
|
|
|
||||||||||
Motor insulation |
Class |
F |
F |
F |
F |
F |
F |
||||||||||||||||||||||
Motor protection |
- |
IPX4 |
IPX4 |
IPX4 |
IPX4 |
IPX4 |
IPX4 |
||||||||||||||||||||||
Net weight |
kg |
5,7 |
6,0/6,5 |
|
|
7,0/7,5 |
|
|
|
|
6,4 |
6,9/7,4 |
|
|
|
|
7,2/7,7 |
|
|
|
|
||||||||
Gross weight |
kg |
6,7 |
7,0/7,5 |
|
|
9,5/10,0 |
|
|
7,9 |
8,4/8,9 |
|
|
|
|
9,8/10,3 |
|
|
||||||||||||
Subject to technical modification!
14

Gentile cliente,
Prima di utilizzare l’apparecchio per la prima volta, leggere le presenti istruzioni originali, seguirle e conservarle per un uso futuro o in caso di rivendita dell’apparecchio.
1 ISTRUZIONI PER LA SICUREZZA
1.1L’apparecchio da Voi acquistato è un prodotto ad alto contenuto tecnologico
realizzato da una delle più esperte ditte europee. Questo apparecchio,
in |
conformità |
alle |
descrizioni e |
alle |
avvertenze |
di |
sicurezza date |
in queste istruzioni per l’uso, è destinato per essere utilizzato come aspiratore multiuso. Per ottenere il meglio delle prestazioni, abbiamo compilato queste righe da leggere attentamente ed osservare ad ogni utilizzo. In fase di allacciamento, uso e manutenzione dell'apparecchio adottare tutte le precauzioni possibili per salvaguardare la propria incolumità e quella delle persone nelle immediate vicinanze.
Leggere attentamente e rispettare le prescrizioni di sicurezza poiché se trascurate possono mettere a rischio la salute e la sicurezza delle persone o provocare danni economici.
(Istruzioni originali) |
ITALIANO |
2 SEGNALAZIONI DI INFORMAZIONE
2.1Rispettare le segnalazioni dettate dalle targhe e dai simboli applicati
sull'apparecchioesuquesteistruzioni. Sono presenti sull'apparecchio e sul libretto solo i simboli opportuni per l'apparecchio acquistato. Verificare che simboli e targhe applicati sull'apparecchio siano sempre integri e leggibili; in caso contrario, sostituirli applicandoli nella posizione originale (Rivolgersi al Centro Assistenza).
 Attenzione - Pericolo
Leggere attentamente queste istruzioni prima dell’uso.
 Icona E3 (se il simbolo è presente in fig. 1) - Indica che questo apparecchio è concepito per il solo uso domestico e non deve essere adibito ad uso commerciale o
industriale.
0 Posizione interruttore spento I Posizione interruttore acceso
 Posizione interruttore automatico II Posizione interruttore automatico
IT
15

IT
ITALIANO |
(Istruzioni originali) |
Questo prodotto è in classe di isolamento II. Ciò significa che è equipaggiato con un isolamento
rinforzato o con un doppio isolamento
(solo se il simbolo è presente sull'apparecchio).
Questo prodotto è in classe di isolamento I. Ciò significa che è equipaggiato di un conduttore di protezione di messa a terra (solo se il simbolo è presente sull'apparecchio).

 Questo prodotto è conforme con le direttive Europee applicabili in
materia.
 Icona E1 - Riciclo dell'apparecchio. Rendere immediatamente inutilizzabile l'apparecchio a fine vita.
Staccare la spina dall'alimentazione elettrica.
Tagliare il cavo elettrico.
Non smaltire apparecchi elettrici insieme ai rifiuti domestici. Secondo quanto specificato nella direttiva WEEE 2012/19/CE sugli apparecchi elettrici ed elettronici a fine vita, i componenti elettrici devono essere raccolti separatamente e riciclati
in maniera ecologica. Per ulteriori informazioni, contattare gli uffici competenti o il rivenditore di zona.
 Utilizzare cuffie di protezione.
 Utilizzare maschera di protezione.
 Utilizzaredispositividiprotezione
dell’apparato respiratorio.
 Utilizzare guanti protettivi.
 Utilizzarescarpeantiinfortunistiche.
Utilizzare abbigliamento di protezione.
16
(Istruzioni originali) |
ITALIANO |
3 PRESCRIZIONI DI SICUREZZA/RISCHI RESIDUI
3.1 |
AVVERTENZE: NON FARE |
|
3.1.1 |
Attenzione. NON permettere l’uso dell'apparecchio a bambini di età inferiore ad 8 anni e a persone |
IT |
|
con limitate capacità fisiche, sensoriali o mentali o con poca esperienza e/o conoscenza, a meno |
|
|
|
|
|
che non vengano debitamente sorvegliati e abbiano ricevuto istruzioni su come usare l’apparecchio |
|
3.1.2 |
in sicurezza e indicazioni relative ai pericoli da esso derivanti.. |
|
Attenzione. I bambini NON devono usare l'apparecchio come giocattolo. Sorvegliare i bambini per |
|
|
3.1.3 |
assicurarsi che questo non accada.. |
|
La pulitura e la manutenzione utente NON devono essere eseguiti da bambini o da incapaci senza |
|
|
3.1.4 |
sorveglianza. |
|
Tenerelepellicolediimballaggiofuoridallaportatadeibambini.Rischiodiasfissia! |
|
|
3.1.5 |
Attenzione. L'apparecchio NON può essere azionato da coloro che non abbiano letto e compreso |
|
3.1.6 |
le istruzioni. |
|
Attenzione. NON utilizzare l'apparecchio con fluidi infiammabili, tossici o aventi caratteristiche non |
|
|
|
compatibili con il corretto funzionamento dell'apparecchio stesso. È vietato utilizzare l'apparecchio |
|
3.1.7 |
in atmosfera potenzialmente infiammabile od esplosiva. |
|
Attenzione. Determinate sostanze possono formare insieme all’aria di aspirazione vapori e miscele |
|
|
|
esplosivi. NON aspiraremaileseguentisostanze: |
|
|
–Gasesplosivioinfiammabili,liquidiepolveri(polverireattive). |
|
|
– Polveri di metallo reattive (ad es. alluminio, magnesio, zinco) insieme a detergenti fortemente |
|
|
alcalini ed acidi. |
|
–Acidiesoluzionialcalineallostatopuro.
–Soluzioniorganiche(ades.benzina,diluentipervernici,acetoneogasolio). Questesostanzepossonoinoltrecorrodereimaterialidell’apparecchio.
3.1.8Disattivarel’apparecchiodopoogniimpiegoeprimadiognipulizia/manutenzione.
3.1.9Pericolo d’incendio. NON aspirare oggetti brucianti o ardenti.
3.1.10Attenzione. NON utilizzare l'apparecchio all’aperto in caso di pioggia.
3.1.11Attenzione. NON toccare la spina e/o la presa con le mani bagnate.
3.1.12Attenzione. NON utilizzare l'apparecchio col cavo elettrico danneggiato. Se il cavo elettrico è danneggiato, deve essere sostituito dal produttore, da un suo Centro Assistenza o da persone ugualmente qualificate, per evitare pericoli per la sicurezza.
17

ITALIANO (Istruzioni originali)
3.1.13 Attenzione. Controllare che l'apparecchio sia provvisto della targhetta caratteristiche, se sprovvisto avvertire il rivenditore. Gli apparecchi sprovvisti di targhetta NON devono essere usati, essendo anonimi e potenzialmente pericolosi.
IT |
3.1.14 Attenzione. NON spostare l'apparecchio tirando il CAVO ELETTRICO. |
|
|
|
3.1.15 Attenzione. È vietato utilizzare accessori non originali e non specifici per il modello. È vietato |
|
eseguire modifiche all'apparecchio; l’esecuzione di modifiche fa decadere la Dichiarazione di |
|
Conformità ed esonera il costruttore da responsabilità civili e penali. |
3.2AVVERTENZE: DA FARE
3.2.1Attenzione. Tutte le parti conduttrici di corrente DEVONO ESSERE PROTETTE contro getti o spruzzi d’acqua.
3.2.2Attenzione. Il collegamento elettrico dovrà essere eseguito da un elettricista qualificato in conformità alla norma IEC 60364-1. Si raccomanda di prevedere un interruttore differenziale che interrompa l’alimentazione elettrica alla presente macchina se la corrente di dispersione verso terra supera i
30 mA per 30 ms, oppure un dispositivo di controllo del circuito di terra.
3.2.3Attenzione. DURANTE la fase di avviamento, l'apparecchio può generare disturbi in rete.
3.2.4Attenzione. Utilizzaresoloprolungheelettricheautorizzateeconsezionediconduzioneappropriata.
3.2.5Attenzione. Disinserire sempre l’interruttore quando si lascia l'apparecchio incustodito.
3.2.6
Attenzione. Il flusso d'aria può causare il rimbalzo di parti, usare tutti quegli indumenti e protezioni (PPE) che consentano la messa in sicurezza e l’incolumità dell’operatore.
3.2.7Attenzione. Spegnerel'apparecchioescollegarlodallasorgentedialimentazioneprimadieffettuare operazioni di montaggio, pulizia, regolazione, manutenzione, stoccaggio e trasporto.
3.2.8Attenzione. La manutenzione e/o la riparazione dei componenti elettrici DEVE essere effettuata da personale qualificato.
3.2.9Attenzione. CONTROLLARE prima di ogni utilizzo e periodicamente il serraggio delle viti ed il buon stato delle parti componenti l'apparecchio, guardare se ci sono parti rotte od usurate.
3.2.10Attenzione. Per garantire la sicurezza dell'apparecchio, utilizzare soltanto ricambi originali del fabbricante o approvati dal medesimo.
3.2.11Attenzione. I cavi di prolunga inadeguati possono risultare pericolosi. Se s’impiega un cavo di prolunga, scegliere un tipo idoneo per l’uso all’aperto e accertarsi che il collegamento resti asciutto e distante dal terreno. Si raccomanda di utilizzare a tale scopo un avvolgicavo, che mantenga la presa ad almeno 60 mm di distanza dal terreno.
18

4 INFORMAZIONI GENERALI (PAGINA 3)
4.1 Uso del manuale
Il presente manuale è parte integrante dell'apparecchio; conservare perfutureconsultazioni.Leggereattentamenteprimadell’installazione/ uso. In caso di passaggi di proprietà il cedente ha l’obbligo di consegnare il manuale al nuovo proprietario.
4.2 Consegna
L'apparecchio è consegnato all’interno di un imballo di cartone, parzialmente smontato.
Per la composizione della fornitura vedere fig.1.
4.2.1Documentazione a corredo
D1 Manuale di uso e manutenzione
D2 Istruzioni per la sicurezza
D3 Dichiarazione di conformità
D4 Regole garanzia
4.3Smaltimento degli imballi
I materiali costituenti l’imballo non sono inquinanti per l’ambiente, tuttavia devono essere riciclati o smaltiti secondo la normativa vigente nel paese di utilizzo.
5 INFORMAZIONI TECNICHE (PAGINA 3)
5.1 Uso previsto
|
L’apparecchio, in conformità alle descrizioni e alle avvertenze |
|||
|
di sicurezza date in queste istruzioni per l’uso, è destinato ad |
|||
|
essere utilizzato come aspiratore multiuso. |
|||
|
Questo apparecchio è concepito per il solo uso domestico e |
|||
|
non deve essere adibito ad uso commerciale o industriale. |
|||
5.2 |
L'apparecchio è conforme alla norma IEC 60335-1 e IEC 60335-2-2. |
|||
Operatore |
|
|
||
|
Peridentificarel’operatoreaddettoall’usodell'apparecchio(professionale |
|||
|
o non professionale) vedere l’icona rappresentata in fig. 1. |
|||
5.3 |
Parti principali: |
|
|
|
|
A1 |
Dispositivo d' avviamento |
|
|
|
A2 |
Raccordo di aspirazione |
|
|
|
A3 |
Raccordo di soffiatura |
|
|
|
A4 |
Manico |
|
|
|
A5 |
Gancio portacavo (dove previsto) |
||
|
A6 |
Ganci di chiusura |
|
|
|
A7 |
Cavo elettrico con spina |
|
|
|
A8 |
Ruotine pivottanti |
|
|
|
A9 |
Contenitore |
|
|
|
A10 |
Coperchio con motore |
|
|
|
A11 |
Porta accessori (dove previsto) |
|
|
|
A12 |
Tappo svuotamento liquidi (dove previsto) |
||
|
C1 |
Presa aggiuntiva per elettroutensile (dove previsto) |
||
|
5.3.1 Accessori (vedere fig. 1 |
con |
indicazioni dei modelli - la |
|
|
|
fornitura prevede quanto illustrato sull'imballo di cartone) |
||
|
B1 |
Portafiltro |
B7 |
Spazzola per tappeti - |
|
B2 |
Filtro spugna |
|
poltrone |
|
B3 |
Tubo flessibile |
B8 |
Bocchetta per fessure |
|
B4 |
Adattatore elettroutensile |
B9 |
Spazzola tonda |
|
|
(optional) |
B10 |
Sacchetto filtro in tessuto |
|
B5 |
Tubo rigido |
B11 |
Sacchetto filtro in carta |
|
B6 |
Spazzola per pavimenti |
|
|
(Istruzioni originali) |
ITALIANO |
5.4Dispositivi di sicurezza
-Dispositivo di avviamento (A1)
Il dispositivo di avviamento evita l’uso accidentale dell'apparecchio.
6 INSTALLAZIONE (PAGINA 4)
Attenzione - pericolo!
Tutte le operazioni d’installazione e montaggio devono essere effettuate con
l'apparecchio scollegato dalla rete elettrica. Per la sequenza di montaggio vedere pag.4.
6.1 Montaggio
Duranteildisimballaggiocontrollarel’eventualemancanzadiaccessori olapresenzadidannidelcontenuto.Nelcasoincuisiriscontrinodanni dovuti al trasporto, informare immediatamente il proprio rivenditore.
Alzare il coperchio con motore (A10) dell'apparecchio, aprendo i ganci di chiusura (A6) ed estrarre gli accessori forniti, verificando che il filtro
(B2) sia montato correttamente.
Vedere fig.2
Per la sequenza di montaggio vedere pag.4.
6.2 Montaggio delle ruotine pivottanti
Capovolgere il contenitore (A9) senza coperchio su di un piano orizzontale solido. Infilare i mozzi delle ruotine pivottanti (A8) negli appositi fori e premere a fondo fino alla battuta, per il corretto posizionamento e fissaggio delle ruotine.
Vedere fig.3
6.3 Montaggio degli accessori
Infilare il tubo flessibile (B3) nel raccordo di aspirazione (A2) o di soffiatura (A3) a seconda del tipo di operazione desiderata.
Vedere fig.4
Completare poi la sequenza con gli accessori necessari per il tipo di puliziachedoveteeffettuare.Utilizzandoitubirigidi(B5)ele spazzole (B6-B7-B8-B9) a seconda del tipo di pulizia e di superficie da pulire. Si possono montare le spazzole (B6-B7-B8-B9) direttamente sul tubo flessibile (B3).
Vedere fig.5
6.4 Collegamento elettrico
 Attenzione - pericolo!
Verificarechelareteelettricacorrispondaalvoltaggioeallafrequenza
(V/Hz) riportata sulla targa di identificazione. Vedere fig.6
6.4.1 Utilizzo dei cavi di prolunga
Utilizzare cavi e spine con grado di protezione “IPX4”.
Lasezionedeicavidiprolungadeveessereproporzionataalla sualunghezza;piùèlunga,maggioredeveesserelasezione.
6.5 Presa aggiuntiva per elettroutensile (dove previsto)
Infilare il tubo flessibile (B3) nel raccordo di aspirazione dell'elettroutensile. Nel caso in cui questi non siano compatibili utilizzare l'apposito adattatore elettroutensile (B4) (dove previsto), tagliandone le parti in eccesso.
Alimentare l'elettroutensile utilizzando la presa aggiuntiva (C1) (per i modelli che ne sono equipaggiati).
Vedere fig.7
7 INFORMAZIONI D'USO (PAGINA 5)
7.1 Comandi
- Dispositivo di avviamento (A1). Vedere fig.8.
Mettere il dispositivo di avviamento in pos. (ON/I).
Se il dispositivo di avviamento è dotato di spia, questa si deve accendere. Mettere il dispositivo di avviamento in pos. (OFF/0) per arrestare il funzionamento dell'apparecchio.
Se il dispositivo di avviamento è dotato di spia, questa si deve spegnere.
IT
19
IT
ITALIANO (Istruzioni originali)
 Attenzione - pericolo!
L'apparecchio deve funzionare appoggiato su di un piano sicuro e
stabile, posizionato come indicato. Vedere fig.8.
7.2 Avviamento
7.2.1 Aspirazione a secco. Vedere fig.9.
Lavoraresoloconfiltri(B2-B10)asciutti!Primadiutilizzarli, verificare se i filtri presentano danneggiamenti e sostituirli senecessario.Perl’aspirazionedisporcosecco,osservare la corretta regolazione della spazzola per pavimenti e collegareaccessoricorrispondenti(usarelaspazzolaB6). Per l’aspirazione di sporco secco, all’occorrenza può essere utilizzato aggiuntivamente un sacchetto filtro che può essere in tessuto (B10) o in carta (B11).
Indicazioniriguardoalsacchettofiltro:
– Il livello di riempimento del sacchetto filtro dipende dallo sporco che viene aspirato.
– Nel caso di polveri fini, sabbia, ecc. sostituire spesso il sacchettofiltro.
– Il sacchetto filtro usurato può scoppiare, pertanto va sostituitointempo!
Attenzione - pericolo!
Aspirare ceneri fredde.
7.2.2Aspirazione liquidi Vedere. fig.10.
 Attenzione - pericolo!
In caso di formazione di schiuma o fuoriuscita di liquido, spegnere immediatamente l’apparecchio o staccare la spina di rete! Non utilizzare il sacchetto filtro (né in carta néintessuto)!
 Attenzione
Se il contenitore è pieno, un galleggiante chiude l’apertura di aspirazione e l’apparecchio gira con maggiore velocità.
Spegnere subito l’apparecchio e svuotare il contenitore.
Per l’aspirazione di umidità o bagnato, osservare la corretta regolazione della spazzola per pavimenti e collegare accessoricorrispondenti(usarelaspazzolaB6).
7.2.3Lavori con utensili elettrici. Vedere fig 11.
Perlasequenzadimontaggiovederefig.11.
Accendere l’apparecchio (interruttore girevole a SX in
posizione  o interruttore a 2 pulsanti in posizione II) e procedere con il lavoro.
Avviso: Non appena l’utensile elettrico si accende, la turbina diaspirazioneparteconunritardodi0,5secondi.
Quando l’utensile elettrico viene spento, la turbina di aspirazione continua a funzionare per altri 6 secondi circa per consentire di aspirare lo sporco residuo nel tubo di aspirazione.
7.2.4Funzione di soffiatura. Vedere fig 12.
Pulizia di punti difficilmente accessibili o in cui l’aspirazione non è possibile, ad es. foglie dal letto di ghiaia.
Inserireiltuboflessibilediaspirazionenell’appositoattacco. Inquestomodolafunzionedisoffiaggioèattivata.
Per una maggiore efficacia dell'effetto soffiante si consiglia di usare la bocchetta per fessure (B8).
7.3Interrompere il funzionamento (Sosta)
Spegnere l’apparecchio. Vedere fig.8.
Agganciarelaspazzolaperpavimentinellaposizionediparcheggio.
7.4Fine lavoro
Spegnere l’apparecchio. Vedere fig.8. Staccare la spina.
7.5Svuotare il contenitore
Per sporco secco e polveri: rimuovere la testa dell’apparecchio e svuotare il contenitore. Vedere fig.13.
Per liquidi: usare la vite di scarico ove presente (vedere. fig.14.), oppure procedere come sopra.
8 MANUTENZIONE (PAGINA 6)
 Attenzione - pericolo!
Tutte le operazioni d’installazione e montaggio devono essere effettuate con
l'apparecchio scollegato dalla rete elettrica. Per la sequenza di montaggio vedere pag.6.
Prima di ogni intervento di cura e di manutenzione, spegnere l’apparecchio e staccarelaspina.Lavoridiriparazioneelavorisugliimpiantielettricipossono essereeffettuatisolodalCentroAssistenza.
 Attenzione - pericolo!
Non usare detergenti abrasivi, detergenti per il vetro o detergenti universali!
Non immergere mai il coperchio con motore (A10) in acqua. Pulire l’apparecchio e gli accessori in plastica con un normale detergente per materiale sintetico. Sciacquare all’occorrenza il contenitore e gli accessori
conacquaedasciugarliprimadellororiutilizzo.
8.1 Pulizia filtro spugna (B2). Vedere fig.15
Aprire l'aspiratore agendo sui ganci (A6). Rovesciare il coperchio con motore (A10) e smontare il filtro.
Sciacquare con cura sotto acqua corrente e lasciare asciugare.
Rimontarlo da asciutto.
8.2 Pulizia sacchetto filtro in tessuto (B10). Vedere fig.16
Aprire l'aspiratore agendo sui ganci (A6). Smontare il sacchetto filtro (B10). Svuotare il sacchetto filtro, sciacquare con cura sotto acqua corrente e lasciare asciugare. Rimontarlo
da asciutto.
8.3 Sostituzione sacchetto filtro di carta (B11). Vedere fig.17
Aprirel'aspiratoreagendosuiganci(A6).Smontareilsacchetto filtro (B11) pieno, gettarlo e rimontarne uno nuovo.
9 RIMESSAGGIO (PAGINA 6)
 Attenzione - pericolo!
Tutte le operazioni d’installazione e montaggio devono essere effettuate con l'apparecchio scollegato dalla rete elettrica.
A lavori ultimati, dopo aver pulito l'apparecchio, riporre lo stesso e gli accessori cone indicato in fig.18.
Conservare l’apparecchio in luoghi asciutti.
20
|
|
(Istruzioni originali) |
ITALIANO |
|
10 INFORMAZIONI SUI GUASTI |
|
|
|
|
|
|
|
|
|
Inconvenienti |
Probabili cause |
Rimedi |
|
|
|
|
|
|
|
|
Mancanza di tensione |
Verificare la presenza di tensione nella rete e controllare che la |
|
|
L'apparecchio non si accende |
spina sia inserita correttamente (*) |
|
|
|
Problemi al circuito elettrico-elettronico |
|
IT |
||
|
Rivolgersi al CentroAssistenza |
|
||
|
|
|
|
|
|
|
|
|
|
L'apparecchio non aspira oppure aspira |
Accessori otturati |
Verificare e pulire bocchette prolunghe o tubi |
|
|
Filtri sporchi |
Pulire i filtri |
|
|
|
debolmente |
Sacchetti filtro pieni |
Svuotare / sostituire i sacchetti filtro |
|
|
|
Contenitore pieno |
Svuotare il contenitore |
|
|
L'elettroutensile non si mette in |
Inserimento non corretto della spina elettroutensile alla presa |
Inserire correttamente la spina |
|
|
funzione (dove prevista presa |
sull'aspiratore |
|
|
|
elettroutensile) |
L'interruttore è spento od in posizione I |
Posizionare interruttore in posizione utensile/ II |
|
|
Fuoriesce polvere |
Il filtro non è stato montato |
Montare il filtro |
|
|
Il filtro è danneggiato |
Sostituire il filtro usato con uno nuovo |
|
|
|
|
Il tubo od i suoi attacchi sono danneggiati |
Sostituire le parti danneggiate |
|
|
Durante il funzionamento l'apparecchio |
Filtri/sacchetti filtro sporchi |
Sostituire filtri/sacchetti filtro |
|
|
emana cattivi odori |
|
|
|
|
(*) Se durante il funzionamento il motore si ferma e non riparte contattare il CentroAssistenza.
Dichiarazione di conformità CE
Noi di Annovi Reverberi S.p.A., Bomporto (Mo), Italia, dichiariamo che la(e) seguente(i) macchina(e) Black+Decker: |
|
|
||||
Denominazionedell'apparecchio:Aspiratoreperpolverieliquidi |
|
|
|
|
||
|
|
BXVC20PE |
BXVC20XE |
|
BXVC30PDE |
BXVC30XDE |
N. modello: |
BXVC15PE |
BXVC20PTE |
BXVC20XTE |
BXVC25PDE |
BXVC30PTDE |
BXVC30XTDE |
Potenza assorbita: |
1,2 kW |
1,2 kW |
1,4 kW |
1,2 kW |
1,6 kW |
1,6 kW |
è(sono) conforme(i) alle seguenti direttive europee:
2006/95/CE - Direttiva che sarà sostituita dalla 2014/35/UE a partire dal 20 aprile 2016,
2004/108/CE - Direttiva che sarà sostituita dalla 2014/30/UE a partire dal 20 aprile 2016, 2011/65/EU, 2005/32/CE, 2012/19/EU. edè(sono)prodotta(e)nelrispettodelleseguentinormeodeiseguentidocumentistandardizzati:
EN 60335-1; EN 60335-2-2; EN 55014-1; EN 55014-2; EN 61000-3-2; EN 61000-3-3; EN 62233; EN 50581; Reg.1275/2008.
Nome e indirizzo della persona incaricata di rilasciare il fascicolo tecnico: Stefano ReverberII /AR Managing Director
Via ML King, 3 - 41122 Modena, Italia
Data : 10.02.2016
MODENA (I)
Stefano Reverberi
21

IT
ITALIANO |
(Istruzioni originali) |
GARANZIA
Lavaliditàdellagaranziaèregolamentatadallenormativevigentinelpaeseincuiilprodottovienecommercializzato(salvodiverseindicazionidelproduttore). Se il prodotto risulta difettoso per qualità del materiale, della costruzione o per mancata conformità durante il periodo di validità della garanzia il fabbricante garantiscelasostituzionedellepartidifettose,provvedeallariparazionedeiprodottiseragionevolmenteusuratioppureallalorosostituzione.
Lagaranzianoncoprecomponentisoggettianormaleusura(filtri,sacchetti,accessoricometubirigidi,tubofllessibile,spazzole,ruote,ecc.); Lagaranzianoncopredifetticausatidaorisultatida:
-usoscorretto,usononammesso,negligenza,
-noleggio o uso professionale qualora il prodotto sia stato venduto per uso domestico,
-mancataosservazionedellenormedimanutenzioneprevistenell’appositolibretto,
-riparazionieseguitedapersonaleocentrinonautorizzati,
-impiego di ricambi o accessori non originali,
-dannicausatidaltrasporto,daoggettiosostanzeestranee,sinistro,
-problemidiimmagazzinaggioostoccaggio.
Perattivarelagaranziaènecessarioesibirelaprovad’acquisto.
Dati Tecnici |
Unità |
BXVC15PE |
BXVC20PE |
BXVC20XE |
BXVC25PDE |
BXVC30PDE |
BXVC30XDE |
||||||||||||||||||||||
BXVC20PTE |
BXVC20XTE |
BXVC30PTDE |
BXVC30XTDE |
||||||||||||||||||||||||||
|
|
|
|
||||||||||||||||||||||||||
Tensione |
V/Hz |
220-240 V ~ 50/60Hz |
220-240 V ~ 50/60Hz |
220-240 V ~ 50/60Hz |
220-240 V ~ 50/60Hz |
220-240 V ~ 50/60Hz |
220-240 V ~ 50/60Hz |
||||||||||||||||||||||
Potenza |
kW |
1,2 |
1,2 |
|
|
|
1,4 |
|
|
|
|
|
|
1,2 |
1,6 |
|
|
|
|
|
|
1,6 |
|
|
|
|
|
|
|
Capacità contenitore |
l |
14,5 |
19 |
|
|
|
20 |
|
|
|
|
|
|
25 |
30 |
|
|
|
|
|
|
30 |
|
|
|
|
|
|
|
Pressioneaspirazionemassima |
kPa |
17 |
17 |
|
|
|
18 |
|
|
|
|
|
|
17 |
19 |
|
|
|
|
|
|
19 |
|
|
|
|
|
|
|
Depressione massima |
mbar |
170 |
170 |
|
|
|
180 |
|
|
|
|
|
|
170 |
190 |
|
|
|
|
|
|
190 |
|
|
|
|
|
|
|
Aria aspirata massima |
l/s |
28 |
28 |
|
|
|
33 |
|
|
|
|
|
|
28 |
37 |
|
|
|
|
|
|
37 |
|
|
|
|
|
|
|
N° motori |
- |
1 |
1 |
|
|
|
1 |
|
|
|
|
|
|
1 |
1 |
|
|
|
|
|
|
1 |
|
|
|
|
|
|
|
Ø accessori |
mm |
35 |
35 |
|
|
|
35 |
|
|
|
|
|
|
35 |
35 |
|
|
|
|
|
|
35 |
|
|
|
|
|
|
|
Cavoalimentazione |
m |
5 |
5 |
|
|
|
5 |
|
|
|
|
|
|
5 |
5 |
|
|
|
|
|
|
5 |
|
|
|
|
|
|
|
ClasseProtezione |
- |
|
/ |
|
|
|
/ |
|
|
|
|
|
|
|
/ |
|
|
|
|
|
|
/ |
|
|
|
|
|
|
|
|
|
|
|
|
|
|
|||||||||||||||||||||||
|
|
|
|
|
|
|
|
|
|
|
|
|
|
|
|
|
|
|
|
||||||||||
Isolamento Motore |
Classe |
F |
F |
F |
F |
F |
F |
||||||||||||||||||||||
ProtezioneMotore |
- |
IPX4 |
IPX4 |
IPX4 |
IPX4 |
IPX4 |
IPX4 |
||||||||||||||||||||||
Peso netto |
kg |
5,7 |
6,0/6,5 |
|
|
7,0/7,5 |
|
|
|
|
6,4 |
6,9/7,4 |
|
|
|
|
7,2/7,7 |
|
|
|
|
||||||||
Peso lordo |
kg |
6,7 |
7,0/7,5 |
|
|
9,5/10,0 |
|
|
7,9 |
8,4/8,9 |
|
|
|
|
9,8/10,3 |
|
|
||||||||||||
Con riserva di modifiche tecniche!
22
Sehr geehrte Kundin, sehr geehrter Kunde, lesen Sie vor der ersten Benutzung Ihres
Gerätes diese Bedienungsanleitung, handeln Sie danach und bewahren Sie sie für den späteren Gebrauch oder für Nachbesitzer auf.
1 SICHERHEITSANWEISUNGEN
1.1Sie haben ein Gerät mit einem hohen technologischen Gehalt erworben, das von einem der erfahrensten europäischen Hersteller entwickelt wurde. Dieses Gerät ist entsprechend der in dieser Bedienungsanleitung gegebenen Beschreibungen und den Sicherheitshinweisen zur Verwendung als Mehrzwecksauger bestimmt. Lesen Sie die vorliegende Bedienungsanleitung aufmerksam durch und befolgen Sie bei jedem Gebrauch des Geräts alle in ihr enthaltenen Anweisungen, um alle Leistungsmerkmale des Geräts nutzen zu können. Beim Anschließen, beim Gebrauch und bei der Wartung
des Geräts sind alle erforderlichen
Vorsichtsmaßnahmen zu treffen, um die eigene Sicherheit und die der in unmittelbarer Nähe befindlichen
Personen zu gewährleisten. Lesen Sie die Sicherheitsvorschriften aufmerksam durch und beachten Sie sie genau, da andernfalls die Gefahr von Personenund Sachschäden besteht.
(Übersetzung der Originalanleitung) |
DEUTSCH |
2 SCHILDER UND SICHERHEITSZEICHEN
2.1Die Schilder und Sicherheitszeichen beachten, die am Gerät angebracht und in dieser Bedienungsanleitung
abgebildet sind.
Es sind nur die Sicherheitszeichen am Gerät angebracht bzw. in der
Bedienungsanleitung abgebildet, die für seinen sicheren Gebrauch zweckdienlich sind. Darauf achten, dass die am Gerät angebrachten
Schilder und Sicherheitszeichen stets unversehrt und gut lesbar sind. Andernfalls sind sie durch neue Schilder bzw. Zeichen zu ersetzen, die an den ursprünglichen Stellen anzubringen sind (ein Kundendienstzentrum kontaktieren).
 Achtung - Gefahr
Diese Bedienungsanleitung vor Gebrauch aufmerksam
durchlesen.
 Symbol E3 (falls das Symbol in Abb. 1 abgebildet ist) - Es weist darauf hin, dass dieses Gerät nur für den Gebrauch im Haushalt und nicht
im Gewerbe konzipiert ist.
0 |
AUS-StellungdesGeräteschalters |
I |
EIN-Stellung des Geräteschalters |
|
Ein/Ausschaltautomatik |
II |
Ein/Ausschaltautomatik |
DE
23

DE
DEUTSCH |
(Übersetzung der Originalanleitung) |
Dieses Gerät hat die Schutzklasse II. Das heißt, dass es eine verstärkte und doppelte
Isolierung hat (nur wenn das entsprechende Zeichen am Gerät angebracht ist).
Dieses Gerät hat die Schutzklasse I. Das heißt, dass es mit einem Schutzleiter versehen
ist (nur wenn das entsprechende
Zeichen am Gerät angebracht ist).

 Dieses Gerät entspricht den einschlägigen europäischen
Richtlinien.
 Symbol E1 - Recycling des Geräts. Das Gerät muss am Ende seines Lebenszyklus unverzüglich unbrauchbar gemacht werden.
Den Netzstecker aus der Steckdose ziehen.
Das Netzkabel durchtrennen.
Elektrogeräte dürfen nicht mit dem Hausmüll entsorgt werden. Nach den Bestimmungen der WEEERichtlinie 2002/96/EG über Elektround Elektronik-Altgeräte müssen die elektrischen Bauteile getrennt gesammeltunddemumweltgerechten
Recycling zugeführt werden. Weitere
Informationen erhält man bei den zuständigen Behörden oder beim
Gebietshändler.
 Gehörschutz benutzen.
 Gesichtsschutz benutzen.
 Atemschutz benutzen.
 Handschutz benutzen.
 Fußschutz benutzen.
 Schutzkleidung benutzen.
24
(Übersetzung der Originalanleitung) |
DEUTSCH |
3 SICHERHEITSVORSCHRIFTEN/RESTRISIKEN
3.1 |
WARNHINWEISE: VERBOTE |
|
3.1.1 |
Achtung. Kindern unter 8 Jahren und Personen mit eingeschränkten körperlichen, sensorischen |
|
|
odergeistigenFähigkeitenbzw.mangelnderErfahrungundKenntnisdürfendasGerätNURUNTER |
|
|
AUFSICHTunderstdannbenutzen,nachdemsieinseinensicherenGebraucheingewiesenwurden |
|
3.1.2 |
und die mit seinem Gebrauch verbundenen Gefahren nachweislich verstanden haben. |
DE |
Achtung. Kindern darf NICHT erlaubtwerden,dasGerätalsSpielzeugzuverwenden.Kindersollten |
|
|
3.1.3 |
beaufsichtigtwerden,umsicherzustellen,dassdiesnichtgeschieht.. |
|
Reinigung und Pflege des Geräts dürfen von Kindern und Personen mit eingeschränkten geistigen |
|
|
3.1.4 |
Fähigkeiten NUR UNTER AUFSICHT ausgeführt werden. |
|
DieVerpackungsfoliendürfennichtindieReichweitevonKinderngelangen.Erstickungsgefahr! |
|
|
3.1.5 |
Achtung. Das Gerät darf NICHT von Personen verwendet werden, die die Bedienungsanleitung |
|
3.1.6 |
nicht gelesen und verstanden haben. |
|
Achtung. Das Gerät NICHT mit entzündbaren, giftigen bzw. mit solchen Flüssigkeiten betreiben, |
|
|
|
die seinen ordnungsgemäßen Betrieb beeinträchtigen könnten. Es ist verboten, das Gerät in |
|
3.1.7 |
entzündlicher oder explosiverAtmosphäre zu betreiben. |
|
Achtung. Bestimmte Stoffe können zusammen mit der angesaugten Luft explosive Dämpfe und |
|
Gemische bilden. NIEMALS die folgenden Stoffe aufsaugen:
–ExplosiveoderentzündlicheGase,FlüssigkeitenundStäube(reaktiveStäube).
–ReaktiveMetallstäube(z.B.Aluminium,MagnesiumoderZink)inVerbindungmitstarkalkalischen oder sauren Reinigungsmitteln.
– Reine Säuren und Laugen.
–OrganischeLösungsmittel(z.B.Benzin,Farbverdünner,AcetonoderHeizöl). DieseStoffekönnenüberdiesdieMaterialiendesGerätsangreifen.
3.1.8Das Gerät nach jedem Gebrauch und vor der Ausführung von Reinigungsund Wartungsarbeiten ausschalten.
3.1.9Brandgefahr. Keine brennenden oder glimmenden Gegenstände aufsaugen.
3.1.10Achtung. Das Gerät NICHT bei Regen im Freien betreiben.
3.1.11Achtung. Den Stecker bzw. die Steckdose NIEMALS mit nassen Händen anfassen.
25
DEUTSCH |
(Übersetzung der Originalanleitung) |
|
3.1.12 |
Achtung. Das Gerät NICHT in Betrieb nehmen, wenn sein Netzkabel beschädigt ist. Wenn das |
|
|
Netzkabel beschädigt ist, muss man es vom Hersteller, einem autorisierten Kundendienstzentrum |
|
|
oder einem Fachmann austauschen lassen, damit der sichere Betrieb des Geräts gewährleistet |
|
3.1.13 |
bleibt. |
|
Achtung. Kontrollieren, ob das Typenschild am Gerät angebracht ist. Andernfalls den Händler |
||
DE |
hiervon unterrichten. Geräte ohne Typenschild dürfen NICHT in Betrieb genommen werden, da |
|
3.1.14 |
sie als nicht vorschriftsmäßig gekennzeichnete Geräte eine potenzielle Gefahrenquelle darstellen. |
|
Achtung. Das Gerät NICHT am NETZKABELziehen. |
||
3.1.15 |
Achtung. Es ist verboten, anderes als das für das jeweilige Modell bestimmte Originalzubehör |
|
|
zu verwenden. Es ist verboten, am Gerät irgendwelche Änderungen vorzunehmen. Unbefugte |
|
|
Änderungen führen zumErlöschen derKonformitätserklärungundbefreiendenHersteller vonjeder |
|
|
zivilund strafrechtlichen Verantwortung. |
|
3.2 |
WARNHINWEISE: GEBOTE |
|
3.2.1 |
Achtung. Sämtliche stromführenden Teile SIND gegen Strahlund Spritzwasser ZU SCHÜTZEN. |
|
3.2.2 |
Achtung. Der elektrische Anschluss muss von einem Fachmann in Einklang mit der Norm IEC 60364-1 |
|
|
ausgeführt werden. Es sollte ein FI-Schalter installiert werden, der die Stromversorgung unterbricht, |
|
|
wenn der Fehlerstrom gegen Erde 30 mA für die Dauer von 30 ms überschreitet. Alternativ kann ein |
|
3.2.3 |
Gerät zur Schutzleiterüberwachung installiert werden. |
|
Achtung. BEIMANLAUF kann das Gerät Netzstörungen verursachen. |
||
3.2.4 |
Achtung. Ausschließlich vorschriftsmäßige Verlängerungskabel mit einem angemessenen |
|
3.2.5 |
Querschnitt verwenden. |
|
Achtung. Stets den Geräteschalter ausschalten, wenn das Gerät unbeaufsichtigt gelassen wird. |
||
3.2.6 |
|
|
Achtung. Durch den Luftstrom können Teile zurückprallen. Daher muss die Bedienungsperson die zu ihrem Schutz erforderliche Schutzkleidung und Schutzausrüstung (PSA) tragen.
3.2.7Achtung. DasGerätvorderAusführungvonArbeitenzurMontage,Reinigung,Einstellung,Wartung, Lagerung und zum Transport ausschalten und vom Stromnetz trennen.
3.2.8Achtung. Die Wartung bzw. Reparatur der elektrischen Bauteile DARF NUR DURCH
FACHPERSONAL erfolgen.
26

|
(Übersetzung der Originalanleitung) |
DEUTSCH |
|
3.2.9 |
Achtung. Vor jedem Gebrauch sowie in regelmäßigen Zeitabständen den Festsitz der Schrauben |
|
|
3.2.10 |
und Muttern kontrollieren und die Komponenten des Geräts auf Bruch bzw. Verschleiß überprüfen. |
|
|
Achtung. Zur Gewährleistung der Sicherheit des Geräts ausschließlich Originalersatzteile des |
|
||
3.2.11 |
Herstellers oder vom Hersteller zugelassene Ersatzteile verwenden. |
|
|
Achtung. Ungeeignete Verlängerungskabel können zur Entstehung von Gefahren führen. Nur für |
|
||
|
die Verwendung im Freien geeignete Verlängerungskabel verwenden und sicherstellen, dass die |
DE |
|
|
Kupplung vom Boden angehoben und gegen Feuchtigkeit geschützt ist. Es wird empfohlen, eine |
|
|
Kabeltrommel zu verwenden, die gewährleistet, dass sich die Steckdose mindestens 60 mm über dem Boden befindet.
27

DE
|
DEUTSCH |
(Übersetzung der Originalanleitung) |
4 ALLGEMEINE INFORMATIONEN (SEITE 3) |
||
4.1 |
Gebrauch der Bedienungsanleitung |
|
|
Die vorliegende Bedienungsanleitung ist ein wesentlicher |
|
|
Bestandteil des Geräts und muss sorgfältig aufbewahrt werden, |
|
|
damit sie auch später jederzeit zu Rate gezogen werden kann. |
|
|
Die Bedienungsanleitung vor der Installation und dem Gebrauch |
|
|
aufmerksam durchlesen. Der Eigentümer ist verpflichtet, die |
|
|
Bedienungsanleitung im Falle der Veräußerung des Geräts dem |
|
4.2 |
neuen Eigentümer zu übergeben. |
|
Lieferung |
|
|
Das Gerät wird teilweise zerlegt in einen Karton verpackt geliefert.
Der Lieferumfang ist in Abb. 1 dargestellt.
4.2.1Beiliegende Dokumentation
D1 Bedienungsund Wartungsanleitung
D2 Sicherheitsanweisungen
D3 Konformitätserklärung
D4 Garantiebedingungen
4.3Entsorgung der Verpackung
Die Verpackungsmaterialien sind nicht umweltschädlich, müssen jedoch in jedem Fall in Einklang mit den im Verwendungsland geltenden Bestimmungen entsorgt bzw. recycelt werden.
5 TECHNISCHE INFORMATIONEN (SEITE 3)
5.1 Vorgesehener Gebrauch
Das Gerät ist entsprechend der in dieser Bedienungsanleitung gegebenen Beschreibungen und den Sicherheitshinweisen zur Verwendung als Mehrzwecksauger bestimmt.
Das Gerät ist nur für den Gebrauch im Haushalt bestimmt und
|
darf nicht im Gewerbe eingesetzt werden. |
|||
5.2 |
Das Gerät entspricht den Normen IEC 60335-1 und IEC 60335-2-2. |
|||
Bedienungsperson |
|
|
||
|
Die Anforderungen an die Bedienungsperson hängen davon ab, ob |
|||
|
das Gerät für den gewerblichen oder den nicht gewerblichen Gebrauch |
|||
|
bestimmt ist. Siehe hierzu das entsprechende Symbol in Abb. 1. |
|||
5.3 |
Wichtigste Teile: |
|
|
|
|
A1 |
Geräteschalter |
|
|
|
A2 |
Sauganschluss |
|
|
|
A3 |
Blasanschluss |
|
|
|
A4 |
Griff |
|
|
|
A5 |
Kabelhalter (falls vorgesehen) |
|
|
|
A6 |
Clip-Verschlüsse |
|
|
|
A7 |
Netzkabel mit Stecker |
|
|
|
A8 |
Lenkrollen |
|
|
|
A9 |
Behälter |
|
|
|
A10 |
Gerätekopf |
|
|
|
A11 |
Zubehöraufbewahrung (falls vorgesehen) |
||
|
A12 |
Ablassschraube zum Ablassen des Schmutzwassers (falls vorgesehen) |
||
|
C1 |
Steckdose für Elektrowerkzeuge (falls vorgesehen) |
||
|
5.3.1 Zubehör(sieheAbb.1mitAngabederModelle-DerLieferumfang |
|||
|
entspricht den Abbildungen auf dem Verpackungskarton) |
|||
|
B1 |
Filterhalter |
B6 |
Bodendüse |
|
B2 |
Schwammfilter |
B7 |
Teppichund Polsterdüse |
|
B3 |
Schlauch |
B8 |
Fugendüse |
|
B4 |
Adapter für Elektrowerkzeug |
B9 |
Rundbürste |
|
|
(Optional) |
B10 |
Stofffilterbeutel |
|
B5 |
Rohr |
B11 |
Papierfilterbeutel |
5.4Sicherheitsvorrichtungen
-Geräteschalter (A1)
Der Geräteschalter verhindert den unbeabsichtigten Betrieb des Geräts.
6 INSTALLATION (SEITE 4)
 Achtung - Gefahr!
Das Gerät muss zurAusführung aller Installationsund Montagearbeiten vom
Stromnetz getrennt sein.
Für die Reihenfolge der Montagearbeiten siehe S. 4.
6.1 Montage
Beim Auspacken den Inhalt der Verpackung auf fehlendes Zubehör oder Beschädigungen prüfen. Im Falle von Transportschäden unverzüglichdenHändlerhiervoninKenntnissetzen.
Die Clip-Verschlüsse (A6) öffnen und den Gerätekopf (A10) anheben, um das Zubehör herausnehmen zu können. Hierbei kontrollieren, ob
derFilter(B2)richtigeingesetztist.
Siehe Abb. 2
Für die Reihenfolge der Montagearbeiten siehe S. 4.
6.2 Montage der Lenkrollen
Den Behälter (A9) ohne Gerätekopf umdrehen und auf eine stabile waagrechte Unterlage stellen. Die Zapfen der Lenkrollen (A8) in die hierfür vorgesehenen Öffnungen einführen und bis zum Anschlag niederdrücken, damit sie richtig und fest sitzen.
Siehe Abb. 3
6.3 Montage des Zubehörs
Den Schlauch (B3) je nach der auszuführenden Arbeit in den Sauganschluss (A2) bzw. den Blasanschluss (A3) einstecken.
Siehe Abb. 4
Dann das weitere Zubehör montieren, das zur auszuführenden
Reinigung erforderlich ist. Die Rohre (B5) und Düsen/Bürsten (B6-B7-
B8-B9) verwenden, die sich für die auszuführende Reinigung und die zu reinigende Oberfläche am besten eignen. Die Düsen/Bürsten (B6-B7-B8-B9) können direkt am Schlauch (B3) angebracht werden.
Siehe Abb. 5
6.4 Elektrischer Anschluss
 Achtung - Gefahr!
Sicherstellen, dass Netzspannung und -frequenz den Angaben auf
dem Typenschild (V-Hz) entsprechen. Siehe Abb. 6
6.4.1 Gebrauch von Verlängerungskabeln
Kabel und Stecker mit Schutzart IPX4 verwenden.
Der Querschnitt des Verlängerungskabels muss proportional zu seiner Länge sein. Je länger es ist, umso größer muss der Querschnitt sein.
6.5 Steckdose für Elektrowerkzeuge (falls vorgesehen)
Den Schlauch (B3) in den Sauganschluss des Elektrowerkzeugs einführen.Fallssienichtzusammenpassen,denhierfürvorgesehenen Adapter für Elektrowerkzeug (B4) (falls vorgesehen) verwenden. Den zu langen Teil abschneiden.
Für die Stromversorgung des Elektrowerkzeugs die Steckdose (C1) verwenden (falls vorgesehen).
Siehe Abb. 7
7 INFORMATIONEN ZUM GEBRAUCH (SEITE 5)
7.1 Bedieneinrichtungen
- Geräteschalter (A1). Siehe Abb. 8.
Den Geräteschalter in die Schaltstellung (ON/I) schalten.
Wenn der Geräteschalter über eine Kontrolllampe verfügt, muss diese Kontrolllampe aufleuchten.
Den Geräteschalter in die Schaltstellung (OFF/0) schalten, um das Gerät auszuschalten.
28
Wenn der Geräteschalter über eine Kontrolllampe verfügt, muss diese
Kontrolllampe dann erlöschen.
|
Achtung - Gefahr! |
|
|
Das Gerät muss für den Betrieb wie angegeben auf einem sicheren |
|
7.2 |
und festen Untergrund stehen. Siehe Abb. 8. |
|
Einschalten |
|
|
|
7.2.1 Trockensaugen. Siehe Abb. 9. |
|
|
Nur mit trockenen Filtern (B2 - B10) arbeiten! |
Die Filter |
|
vor Gebrauch auf Beschädigungen prüfen und bei Bedarf |
|
|
austauschen. Zum Aufsaugen von trockenem |
Schmutz |
|
auf die richtige Einstellung der Bodendüse achten und das |
|
|
entsprechendeZubehöranschließen(dieDüseB6verwenden). |
|
Zum Aufsaugen von trockenem Schutz kann bei Bedarf zusätzlich ein Filterbeutel aus Stoff (B10) oder Papier (B11) eingesetztwerden.
HinweisezumFilterbeutel:
–Der Füllgrad des Filterbeutels ist abhängig vom aufgesaugten
Schmutz.
–Bei Feinstaub, Sand usw. sollte der Filterbeutel häufiger ausgetauscht werden.
–Ein abgenutzter Filterbeutel kann platzen und sollte daher rechtzeitigausgewechseltwerden!
Achtung - Gefahr!
Nur kalte Asche aufsaugen.
7.2.2Nasssaugen Siehe Abb. 10.
 Achtung - Gefahr!
Bei Schaumbildung oder Flüssigkeitsaustritt das Gerät unverzüglich ausschalten oder den Netzstecker abziehen!
Keinen Filterbeutel verwenden (weder aus Papier noch aus
Stoff)!
 Achtung
Ist der Behälter voll, schließt ein Schwimmer die SaugöffnungunddasGerätläuftmiterhöhterDrehzahl.Das
Gerät dann sofort ausschalten und den Behälter entleeren.
ZumAufsaugenvonFeuchtigkeitbzw.Nässeaufdierichtige
Einstellung der Bodendüse achten und das entsprechende
Zubehöranschließen(dieDüseB6verwenden).
7.2.3Arbeiten mit Elektrowerkzeugen. Siehe Abb. 11.
Für die Reihenfolge der Montagearbeiten siehe Abb. 11.
Das |
Gerät einschalten |
(Drehschalter |
nach |
links in |
die |
Schaltstellung |
oder Taster |
II des |
Ein-Aus- |
Druckschalters),ummitderArbeitzubeginnen.
Hinweis: Wenn das Elektrowerkzeug eingeschaltet wird, läuft die Saugturbine mit einer Verzögerung von 0,5
Sekunden an.
Wird das Elektrowerkzeug wieder ausgeschaltet, läuft die Saugturbine noch ca. 6 Sekunden nach, um den
RestschmutzimSaugschlaucheinzusaugen.
7.2.4Blasfunktion. Siehe Abb. 12.
ZumReinigenvonschwererreichbarenStellenoderwodas Saugennichtmöglichist,z.BLaubausdemKiesbeet.
Den Schlauch in den Blasanschluss einstecken. Die Blasfunktion ist damit aktiviert.
DiegrößteBlaswirkungerzieltmanmitderFugendüse(B8).
(Übersetzung der Originalanleitung) |
DEUTSCH |
7.3Betrieb unterbrechen (Arbeitspause)
Das Gerät ausschalten. Siehe Abb. 8.
Die Bodendüse in die Parkposition einhängen.
7.4Betrieb beenden
Das Gerät ausschalten. Siehe Abb. 8.
DenNetzsteckerabziehen.
7.5Den Behälter entleeren.
Bei trockenem Schmutz und Stäuben: Den Gerätekopf abnehmen und den Behälter entleeren. Siehe Abb. 13.
Bei Flüssigkeiten: Die Ablassschraube verwenden, falls das Gerät darüber verfügt (siehe Abb. 14.), oder wie oben beschrieben verfahren.
8 PFLEGE UND WARTUNG (SEITE 6)
 Achtung - Gefahr!
DasGerätmusszurAusführungallerInstallations-undMontagearbeitenvom
Stromnetz getrennt sein.
Für die Reihenfolge der Montagearbeiten siehe S. 6.
Vor allen Pflege– und Wartungsarbeiten das Gerät ausschalten und den Netzstecker abziehen. Reparaturarbeiten und Arbeiten an elektrischen BauteilendürfennurvomKundendienstzentrumdurchgeführtwerden.
 Achtung - Gefahr!
KeineScheuermittel,Glas-oderAllzweckreinigerverwenden!DenGerätekopf (A10) keinesfalls in Wasser eintauchen. Das Gerät und die Zubehörteile aus Kunststoff mit einem handelsüblichen Kunststoffreiniger säubern.
Den Behälter und das Zubehör bei Bedarf mit Wasser spülen und vor der |
|
Wiederverwendung trocknen. |
|
8.1 |
Reinigung des Swammfilters (B2). Siehe Abb. 15 |
|
DieClip-Verschlüsse(A6)lösen,umdenSaugerzuöffnen.Den |
|
Gerätekopf (A10) umdrehen und den Filter herausnehmen. |
|
Den Filter unter fließendem Wasser gründlich spülen |
|
und trocknen lassen. Wenn er trocken ist, kann er wieder |
8.2 |
eingesetzt werden. |
Reinigung des Stofffilterbeutels (B10). Siehe Abb. 16 |
|
|
DieClip-Verschlüsse(A6)lösen,umdenSaugerzuöffnen.Den |
|
Filterbeutel (B10) herausnehmen. Den Filterbeutel entleeren, |
|
unter fließendem Wasser gründlich spülen und trocknen |
8.3 |
lassen.Wennertrockenist,kannerwiedereingesetztwerden. |
Auswechseln des Papierfilterbeutels (B11). Siehe Abb. 17 |
|
Die Clip-Verschlüsse (A6) lösen, um den Sauger zu öffnen.
Den vollen Filterbeutel (B11) herausnehmen und entsorgen und dann einen neuen Filterbeutel einsetzen.
9 LAGERUNG (SEITE 6)
 Achtung - Gefahr!
DasGerätmusszurAusführungallerInstallations-undMontagearbeitenvom Stromnetz getrennt sein.
Das Gerät nach beendeter Arbeit reinigen und wie in Abb. 18 gezeigt mit dem Zubehör lagern.
Das Gerät an einem trockenen Ort lagern.
DE
29

|
DEUTSCH |
(Übersetzung der Originalanleitung) |
|
|
|
10 INFORMATIONEN ZU BETRIEBSSTÖRUNGEN |
|
||
|
|
|
|
|
|
Störungen |
Wahrscheinliche Ursachen |
Abhilfe |
|
|
|
|
|
|
|
|
Versorgungsspannung fehlt. |
Kontrollieren, ob die Netzspannung vorhanden ist und ob der |
|
|
Das Gerät lässt sich nicht einschalten. |
Netzstecker richtig in die Steckdose eingesteckt ist. (*) |
||
|
|
|||
|
|
Probleme bei der elektrischen-elektronischen Schaltung |
Ein Kundendienstzentrum kontaktieren. |
|
|
|
Zubehör verstopft. |
Düsen, Verlängerungen und Rohre kontrollieren und bei Bedarf |
|
|
Gerät saugt nicht oder nur mit geringer |
säubern. |
||
|
|
|||
|
Filter verschmutzt. |
Filter reinigen. |
||
DE |
Saugleistung. |
|
|
|
Filterbeutel voll. |
Filterbeutel entleeren bzw. auswechseln. |
|||
|
||||
|
|
Behälter voll. |
Den Behälter entleeren |
|
|
Das Elektrowerkzeug schaltet |
Der Netzstecker des Elektrowerkzeugs ist nicht richtig in die |
Den Netzstecker richtig einstecken. |
|
|
sich nicht ein (bei Geräten mit der |
Steckdose des Saugers eingesteckt. |
|
|
|
entsprechenden Steckdose). |
Der Schalter ist ausgeschaltet oder in Schaltstellung I. |
Den Schalter in die Schaltstellung Elektrowerkzeug/II schalten. |
|
|
Aus dem Gerät tritt Staub aus. |
Der Filter wurde nicht eingesetzt. |
Den Filter einsetzen. |
|
|
Der Filter ist beschädigt. |
Den alten Filter durch einen neuen ersetzen. |
||
|
|
Das Rohr oder seine Anschlüsse sind beschädigt. |
Die beschädigten Teile auswechseln. |
|
|
Beim Betrieb treten unangenehme |
Filter/Filterbeutel verschmutzt. |
Filter/Filterbeutel auswechseln. |
|
|
Gerüche aus dem Gerät aus. |
|||
|
|
|
||
(*) Wenn sich der Motor während des Betriebs ausschaltet und nicht wieder einschaltet, das Kundendienstzentrum kontaktieren.
EG-Konformitätserklärung
Die Firma Annovi Reverberi S.p.A., Bomporto (MO), Italien, erklärt, dass das/die folgende/n Gerät/e Black+Decker: |
|
|
||||
BezeichnungdesGeräts:Nass-undTrockensauger |
BXVC20PE |
BXVC20XE |
|
BXVC30PDE |
BXVC30XDE |
|
|
|
|
||||
Modellnr: |
BXVC15PE |
BXVC20PTE |
BXVC20XTE |
BXVC25PDE |
BXVC30PTDE |
BXVC30XTDE |
Leistungsaufnahme: |
1,2 kW |
1,2 kW |
1,4 kW |
1,2 kW |
1,6 kW |
1,6 kW |
den folgenden europäischen Richtlinien entspricht/entsprechen:
2006/95/EG-DieRichtliniewirdabdem20.April2016durchdieRichtlinie2014/35/EUersetzt.,
2004/108/EG-DieRichtliniewirdabdem20.April2016durchdieRichtlinie2014/30/EUersetzt.,2011/65/EU,2005/32/EG,2012/19/EU. undgemäßdenfolgendenNormenodervereinheitlichtenDokumentenhergestelltwurde/n:
EN 60335-1; EN 60335-2-2; EN 55014-1; EN 55014-2; EN 61000-3-2; EN 61000-3-3; EN 62233; EN 50581; Reg.1275/2008.
Name undAnschrift der für die Zusammenstellung der technischen Unterlagen bevollmächtigten Person: Stefano Reverberi /AR Managing Director
Via ML King, 3 - 41122 Modena, Italien
Datum: 10.02.2016
MODENA (I)
Stefano Reverberi
30
 Loading...