


INSTRUCTION MANUAL
MODE D’EMPLOI
MANUAL DE INSTRUCCIONES
20V MAX* 3 IN 1 CORDLESS VACUUM ASPIRATEUR SANS FIL 3 EN 1 20 V MAX* ASPIRADORA INALÁMBRICA 3 EN 1 20V MÁX*
BSV2020
BSV2020A
BSV2020P
Please read before returning this product for any reason.
À lire avant de retourner ce produit pour quelque raison que ce soit. Lea el manual antes de devolver este producto por cualquier motivo.

English
English (original instructions) |
1 |
Français (traduction de la notice d’instructions originale) |
12 |
Español (traducido de las instrucciones originales) |
24 |
Thank you for choosing BLACK+DECKER!
If you have a question or experience a problem with your BLACK+DECKER purchase, go to: http://www.blackanddecker.com/instantanswers
If you can’t find the answer or do not have access to the Internet, call 1-800-544-6986 from 8 a.m. to 5 p.m. EST Mon. – Fri. to speak
with an agent. Please have the CATALOG NUMBER available when you call.
To register your new product, visit www.BlackandDecker.com/NewOwner
Consulter le site Web www.BlackandDecker.com/NewOwner pour enregistrer votre nouveau produit.
Visite www.BlackandDecker.com/NewOwner para registrar su nuevo producto.

English
DEFINITIONS: SAFETY ALERT SYMBOLS AND WORDS
This instruction manual uses the following safety alert symbols and words to alert you to hazardous situations and your risk of personal injury or property damage.
DANGER:Indicates an imminently hazardous situation which, if not avoided, will result in death
or serious injury.
WARNING:Indicates a potentially hazardous situation which, if not avoided, could result in
death or serious injury.
CAUTION:Indicates a potentially hazardous situation which, if not avoided, may result in minor
(Used without word) Indicates a safety related message.
NOTICE:Indicates a practice not related to personal injury which, if not avoided, may result in property damage.or moderate injury.
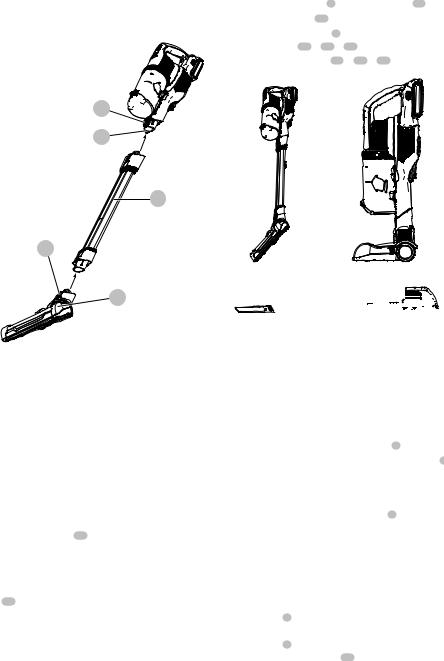
Fig. A |
|
19 |
2 |
1 |
|
|
3 |
||
18 |
|
|
4 |
|
|
|
|
||
|
|
|
9 |
17 |
|
21 |
|
10 |
|
|
|
|
|
|
20 |
|
|
|
16 |
|
|
|
5 |
6 |
|
|
|
|
8 |
7
13
14
8
11


 15 12
15 12 


1 |
ON/OFF button |
12 |
LED worklight |
2 |
Variable power switch |
13 |
Small crevice tool |
3 |
Main handle |
14 |
6 brush tool |
4 |
Floor brush ON/OFF button |
15 |
Pet hair tool |
5 |
Vacuum inlet |
16 |
Battery pack |
6 |
Charge port |
17 |
Battery release button |
7 |
Extension tube |
18 |
Charger |
8 |
Accessory release latch |
19 |
Cup Charger |
9 |
Filter agitator wheel |
20 |
Charging station |
10 |
Lift away dust canister |
21 |
Retaining tabs |
11 |
Floor brush |
|
|
1

English
WARNING!Read all safety warnings and all instructions. Failure to follow the warnings and instructions may result in electric shock, fire and/ or serious injury.
WARNING:To reduce the risk of injury, read the instruction manual.
IMPORTANT SAFETY INSTRUCTIONS
When using an electrical appliances, basic precautions should always be followed, including the following:
READ ALL
INSTRUCTIONS BEFORE USING THIS APPLIANCE.
WARNING:Read all safety warnings and all instructions. Failure to follow the warnings and instructions listed below may result in electric shock, fire and/or serious injury.
WARNING:Some household dust contains chemicals known to the State of California to cause cancer, birth defects or other reproductive harm such as asbestos and lead in lead based paint.
WARNING:repair the appliance. Do not attempt to modify or
WARNING:Do not charge the battery at ambient temperatures below 39 °F (4 °C) or above 104 °F (40 °C). Follow all charging instructions and do not charge the appliance outside of the temperature range specified in the instructions. Charging improperly or at temperatures outside of the specified range may damage the battery and increase risk
of fire.
WARNING:To reduce the risk of fire, electrical shock or injury:
•Shock Hazard. To protect against risk of electrical shock, do not put charging base in water or other liquid.
•Do not allow to be used as a toy. Close attention is necessary when used by or near children.
•Use only as described in this manual. Use only manufacturer’s recommended attachments.
•Do not use with damaged cord or plug. If appliance is not working as it should, has been dropped, damaged, left outdoors, or dropped into water, return it to a service center.
•Do not pull or carry by cord, use cord as a handle, close a door on cord, or pull cord around sharp edges or corners. Do not run appliance over cord. Keep cord away from heated surfaces.
•Do not unplug by pulling on cord. To unplug, grasp the plug, not the cord.
•Do not handle charger, including charger plug, and charger terminals with wet hands.
•Do not put any object into openings. Do not use with any opening blocked; keep free of dust, lint, hair, and anything that may reduce air flow.
•Keep hair, loose clothing, fingers, and all parts of body away from openings and moving parts.
•Use extra care when cleaning on stairs.
•Do not use to pick up flammable or combustible liquids, such as gasoline, or use in areas where they may
be present.
•Do not pick up anything that is burning or smoking, such as cigarettes, matches, or hot ashes.
•Do not use without dust bag and/or filters in place.
•Do not charge the unit outdoors.
•Use only the charger supplied by the manufacturer to recharge.
•Do not incinerate the appliance even if it is severely damaged. The batteries can explode in a fire.
•This appliance is intended for household use only and not for commercial or industrial use.
•Do not allow the cord to hang over the edge of a table or counter or touch hot surfaces. The unit should be placed or mounted away from sinks and hot surfaces.
•Plug the charger directly into an electrical outlet.
•Use the charger only in a standard electrical outlet (120V/60Hz).
•Unplug the charger from outlet before any routine cleaning or maintenance.
•Do not look into the air vents when the unit is switched on, as sometimes there is a possibility of small debris being discharged from the air vents, especially after cleaning
/ replacement of the filters as debris inside the unit can
be disturbed.
•Leaks from battery cells can occur under extreme conditions. If the liquid, which is a 20-35% solution of potassium hydroxide, gets on the skin (1) wash quickly with soap and water or (2) neutralize with a mild acid such as lemon juice or vinegar. If the liquid gets into the eyes, flush them immediately with clean water for a minimum of 10 minutes. Seek medical attention.
ADDITIONAL SAFETY WARNINGS
a ) Prevent unintentional starting. Ensure the switch is in the off-position before picking up or carrying the appliance. Carrying the appliance with your finger on the switch or energizing appliance that have the switch on invites accidents.
b ) Disconnect the battery pack from the appliance before making any adjustments, changing accessories, or storing appliance. Such preventive safety measures reduce the risk of starting the appliance accidentally.
2
c ) Recharge only with the charger specified by the manufacturer. A charger that is suitable for one type of battery pack may create a risk of fire when used with another battery pack.
d ) Use appliance only with specifically designed battery packs. Use of any other battery packs may create a risk of injury and fire.
e ) When battery pack is not in use, keep it away from other metal objects, like paper clips, coins, keys, nails, screws or other small metal objects, that can make a connection from one terminal to another. Shorting the battery terminals together may cause burns or a fire.
f ) Under abusive conditions, liquid may be ejected from the battery; avoid contact. If contact accidentally occurs, flush with water. If liquid contacts eyes, additionally seek medical help.
Liquid ejected from the battery may cause irritation or burns.
g ) Do not use a battery pack or appliance that is damaged or modified. Damaged or modified
batteries may exhibit unpredictable behavior resulting in fire, explosion or risk of injury.
h ) Do not expose a battery pack or appliance to fire or excessive temperature. Exposure to fire or temperature above 266 °F (130 °C) may cause explosion.
i ) Follow all charging instructions and do not charge the battery pack or appliance outside of the temperature range specified in the instructions. Charging improperly or at
temperatures outside of the specified range may damage the battery and increase the risk of fire.
j ) Have servicing performed by a qualified repair person using only identical replacement parts.
This will ensure that the safety of the product is maintained.
k ) Do not modify or attempt to repair the appliance or the battery pack except as indicated
in the instructions for use and care.
SAVE THESE
INSTRUCTIONS
Important Safety Instructions for All Battery Packs
WARNING:Read all safety warnings and all instructions for the battery pack, charger and power tool. Failure to follow the warnings and instructions may result in electric shock, fire and/or serious injury.
•Do not charge or use the battery pack in explosive atmospheres, such as in the presence of flammable liquids, gases or dust. Inserting or removing the battery pack from the charger may ignite the dust or fumes.
•NEVER force the battery pack into the charger. DO NOT modify the battery pack in any way to fit into a non-compatible charger as battery pack may rupture causing serious personal injury. Consult
English
the chart at the end of this manual for compatibility of batteries and chargers.
•Charge the battery packs only in designated BLACK+DECKER chargers.
•DO NOT splash or immerse in water or other liquids.
•Do not store or use the tool and battery pack in locations where the temperature may reach or exceed 104 °F (40 °C) (such as outside sheds or metal buildings in summer). For best life store battery packs in a cool, dry location.
NOTE: Do not store the battery packs in a tool with the trigger switch locked on. Never tape the trigger switch in the ON position.
•Do not incinerate the battery pack even if it is severely damaged or is completely worn out. The battery pack can explode in a fire. Toxic fumes and materials are created when lithium ion battery packs are burned.
•If battery contents come into contact with the skin, immediately wash area with mild soap and water. If battery liquid gets into the eye, rinse water over the open eye for 15 minutes or until irritation ceases. If medical attention is needed, the battery electrolyte is composed of a mixture of liquid organic carbonates and lithium salts.
•Contents of opened battery cells may cause respiratory irritation. Provide fresh air. If symptoms persist, seek medical attention.
WARNING:Burn hazard. Battery liquid may be flammable if exposed to spark or flame.
WARNING:Fire hazard. Never attempt to open the battery pack for any reason. If the battery pack case is cracked or damaged, do not insert into the charger. Do not crush, drop or damage the battery pack. Do not use a battery pack or charger that has received a sharp blow, been dropped, run over or damaged in any way (e.g., pierced with a nail, hit with a hammer, stepped on). Damaged battery packs should be returned to the service center for recycling.
Transportation
WARNING:Fire hazard. Do not store or carry the battery pack so that metal objects can contact exposed battery terminals. For example, do not place the battery pack in aprons, pockets, tool boxes, product kit boxes, drawers, etc., with loose
nails, screws, keys, etc. Transporting batteries can possibly cause fires if the battery terminals inadvertently come in contact with conductive
materials such as keys, coins, hand tools and the like. The US Department of Transportation Hazardous Material Regulations (HMR) actually prohibit transporting batteries in commerce or on airplanes in carry-on baggage UNLESS they are properly protected from short circuits. So when transporting individual battery packs, make sure that the battery terminals are protected and well insulated from materials that could contact them and cause a short circuit.
3

English
The RBRC® Seal
The RBRC® (Rechargeable Battery
Recycling Corporation) Seal on the nickel cadmium, nickel metal hydride or lithium-ion batteries (or battery packs)
indicates that the costs to recycle these batteries (or battery packs) at the end of their useful life have already been
paid by BLACK+DECKER. In some areas, it is illegal to place spent nickel cadmium, nickel metal hydride or lithium-ion batteries in the trash or municipal solid waste stream and the Call 2 Recycle® program provides an environmentally conscious alternative.
Call 2 Recycle, Inc., in cooperation with BLACK+DECKER and other battery users, has established the program in the United States and Canada to facilitate the collection of spent nickel cadmium, nickel metal hydride or lithiumion batteries. Help protect our environment and conserve natural resources by returning the spent nickel cadmium,
nickel metal hydride or lithium-ion batteries to an authorized BLACK+DECKER service center or to your local retailer for recycling. You may also contact your local recycling center for information on where to drop off the spent battery. RBRC® is a registered trademark of Call 2 Recycle, Inc.
Important Safety Instructions for All Battery Chargers
WARNING:Read all safety warnings and all instructions for the battery pack, charger and power tool. Failure to follow the warnings and instructions may result in electric shock, fire and/or serious injury.
•DO NOT attempt to charge the battery pack with any chargers other than the ones in this manual.
The charger and battery pack are specifically designed to work together.
•These chargers are not intended for any uses other than charging BLACK+DECKER rechargeable batteries. Any other uses may result in risk of fire, electric shock or electrocution.
•Do not expose the charger to rain or snow.
•Pull by the plug rather than the cord when disconnecting the charger. This will reduce the risk of damage to the electric plug and cord.
•Make sure that the cord is located so that it will not be stepped on, tripped over or otherwise subjected to damage or stress.
•Do not use an extension cord unless it is absolutely necessary. Use of improper extension cord could result in risk of fire, electric shock or electrocution.
•When operating a charger outdoors, always provide a dry location and use an extension cord suitable for outdoor use. Use of a cord suitable for outdoor use reduces the risk of electric shock.
•An extension cord must have adequate wire size (AWG or American Wire Gauge) for safety. The smaller the gauge number of the wire, the greater the capacity
of the cable, that is, 16 gauge has more capacity than 18 gauge. An undersized cord will cause a drop in line voltage resulting in loss of power and overheating. When using
more than one extension to make up the total length, be sure each individual extension contains at least the
minimum wire size. The following table shows the correct size to use depending on cord length and nameplate ampere rating. If in doubt, use the next heavier gauge. The lower the gauge number, the heavier the cord.
Minimum Gauge for Cord Sets
Volts |
Total Length of Cord in Feet |
|||||
|
|
(meters) |
|
|||
|
|
|
|
|
||
120 V |
25 (7.6) |
|
50 (15.2) |
100 (30.5) |
150 (45.7) |
|
Ampere Rating |
|
|
|
|
|
|
More |
Not |
|
American Wire Gauge |
|||
Than |
More |
|
||||
|
|
|
|
|
||
|
Than |
|
|
|
|
|
0 |
6 |
18 |
|
16 |
16 |
14 |
6 |
10 |
18 |
|
16 |
14 |
12 |
10 |
12 |
16 |
|
16 |
14 |
12 |
12 |
16 |
14 |
|
12 |
Not Recommended |
|
•Do not place any object on top of the charger or place the charger on a soft surface that might block the ventilation slots and result in excessive internal heat. Place the charger in a position away from any heat source. The charger is ventilated through slots in the top and the bottom of the housing.
•Do not operate the charger with a damaged cord or plug.
•Do not operate the charger if it has received a sharp blow, been dropped or otherwise damaged in any way. Take it to an authorized service center.
•Do not disassemble the charger; take it to an authorized service center when service or repair is required. Incorrect reassembly may result in a risk of electric shock, electrocution or fire.
•Disconnect the charger from the outlet before attempting any cleaning. This will reduce the risk of electric shock.
Removing the battery pack will not reduce this risk.
•NEVER attempt to connect 2 chargers together.
•The charger is designed to operate on standard 120V household electrical power. Do not attempt to use it on any other voltage. This does not apply to the vehicular charger.
WARNING:Shock hazard. Do not allow any liquid to get inside the charger. Electric shock may result.
WARNING:Burn hazard. Do not submerge the battery pack in any liquid or allow any liquid to enter the battery pack. Never attempt to open the battery pack for any reason. If the plastic housing of the battery pack breaks or cracks, return to a service center for recycling.
CAUTION:Burn hazard. To reduce the risk of injury, charge only BLACK+DECKER rechargeable battery packs. Other types of batteries may overheat and burst resulting in personal injury and property damage.
4

NOTICE: Under certain conditions, with the charger plugged into the power supply, the charger can be shorted by foreign material. Foreign materials of a conductive nature, such as, but not limited to, grinding dust, metal chips, steel wool, aluminum
foil or any buildup of metallic particles should be kept away from the charger cavities. Always unplug the charger from the power supply when there is no battery pack in the cavity. Unplug the charger before attempting to clean.
Charging a Battery
BLACK+DECKER chargers are designed to charge BLACK+DECKER battery packs.
NOTE: To ensure maximum performance and life of lithium ion battery packs:
•Charge the battery pack fully before first use.
•Recharge discharged batteries as soon as possible after every use.
•Do not discharge batteries fully.
The supplied charger offers three possible ways to charge your battery.
-- Cup charging
-- Wall mounted cup charging -- Unit wall mounted charging
Standard cup charging (Fig. B)
1.Plug the charger into an appropriate outlet before inserting the battery pack 16 .
2.Insert the battery pack into the cup charger 19 .
3.The green LED will flash indicating that the battery is being charged.
4.The completion of charge is indicated by the green LED remaining on continuously. The pack is fully charged and may be used at this time or left on the charger.
Wall mounted battery charging (Fig. B)
1.Mark the location of the charging station screw holes on the wall (within reach of an electrical outlet for charging the vacuum while it is on the charging station 20 .
2.Secure the charging station 20 to the wall using appropriate screws and plugs for the type of wall, and weight of the appliance.
3.Install the cup charger into the charging station (Fig. B). Ensure it is locked into place before proceeding. NOTE: To remove the cup charger from the charging base pull out on the retaining tabs 21 and lift the cup charger 19 out.
4.Plug the charger into an appropriate outlet before inserting the battery pack.
5.Slide the battery pack 16 onto the charging station.
English
Fig. B
|
19 |
20 |
|
|
|
16 |
|
21 |
|
|
Wall mounted vacuum storage and battery charging (Fig. C)
The product can be attached to a wall to provide a convenient storage and charging point for the appliance. When mounting to a wall, make sure the mounting method is suitable for the wall type and is appropriate to the weight of the appliance.
1.Mark the location of the charging station screw holes on the wall (at a height that allows the unit to hang without hitting the floor and within reach of an electrical outlet for charging the vacuum while it is on the charging station 20 .
2.Fix the charging station 20 to the wall using appropriate screws and plugs for the type of wall, and weight of the appliance.
3.Install the cup charger 19 into the charging station (Fig C.). Ensure it is locked into place before p roceeding. NOTE: To remove the cup charger from the charging base pull out on the retaining tabs 21 and lift the cup charger out.
4.Plug the charger into an appropriate outlet.
5.With the battery 16 installed on the vacuum slide the charge port 6 ,located on the vacuum base, onto the slots 33 of the charging station.
6.The white LED on the vaccum will flash indicating that the battery is being charged.
7.The white LEDs will illuminate in segments, displaying the state of chargein the battery
8.The completion of charge is indicated by the white LEDs will turn off. The pack is fully charged and may be used
at this time or left on the charger. Fig. C
16
6
33
19
20
21
5

English
Leaving the battery in the charger
The charger and battery pack can be left connected indefinitely.
Charger Cleaning Instructions
WARNING:Shock hazard. Disconnect the charger from the AC outlet before cleaning. Dirt and grease may be removed from the exterior of the charger using a cloth or soft non-metallic brush. Do not use water or any cleaning solutions.
Important Charging Notes
1.Longest life and best performance can be obtained if the battery pack is charged when the air temperature is between 65 °F and 75 °F (18 ° – 24 °C). DO NOT charge the battery pack in an air temperature below +40 °F (+4.5 °C), or above +104 °F (+40 °C). This is important and will prevent serious damage to the battery pack.
2.The charger and battery pack may become warm to the touch while charging. This is a normal condition, and does not indicate a problem. To facilitate the cooling of the battery pack after use, avoid placing the charger or battery pack in a warm environment such as in a metal shed or an uninsulated trailer.
3.If the battery pack does not charge properly:
a.Check operation of receptacle by plugging in a lamp or other appliance;
b.Check to see if receptacle is connected to a light switch which turns power off when you turn out the lights;
c.Move the charger and battery pack to a location where the surrounding air temperature is approximately 65 °F – 75 °F (18 ° – 24 °C);
d.If charging problems persist, take the tool, battery pack and charger to your local service center.
4.The battery pack should be recharged when it fails to produce sufficient power on jobs which were easily done previously. DO NOT CONTINUE to use under these conditions. Follow the charging procedure. You may also charge a partially used pack whenever you desire with no adverse effect on the battery pack.
5.Foreign materials of a conductive nature such as, but not limited to, grinding dust, metal chips, steel wool, aluminum foil, or any buildup of metallic particles should be kept away from charger cavities. Always unplug the charger from the power supply when there is no battery pack in the cavity. Unplug the charger before attempting to clean.
6.Do not freeze or immerse the charger in water or any other liquid.
Storage Recommendations
1.The best storage place is one that is cool and dry, away from direct sunlight and excess heat or cold.
2.For long storage, it is recommended to store a fully charged battery pack in a cool dry place out of the charger for optimal results.
NOTE: Battery packs should not be stored completely depleted of charge. The battery pack will need to be recharged before use.
SAVE THESE INSTRUCTIONS FOR
FUTURE USE
SYMBOLS
The label on your tool may include the following symbols. The symbols and their definitions are as follows:
V............................... |
volts |
||||
A................................... |
amperes |
||||
Hz................................ |
hertz |
||||
W................................. |
watts |
||||
min............................. |
minutes |
||||
|
|
|
or AC................. |
alternating current |
|
|
|
|
|
or DC |
direct current |
|
|
|
|
||
|
|
|
............................... |
|
no load speed |
|
|
|
..............................(grounded) |
Class I Construction |
|
|
|
|
earthing terminal |
||
|
|
|
|
|
|
|
|
|
............................... |
|
|
|
|
|
|
|
|
|
|
|
............................. |
|
safety alert symbol |
|
|
|
............................... |
|
Class II Construction |
|
|
|
(double insulated) |
||
.../min or rpm. |
revolutions or reciprocation |
||||
|
|
|
per minute |
|
|
Wh.............................. |
Watt Hours |
||||
Assembly
WARNING:repair the appliance. Do not attempt to modify or
Intended use
Your BLACK+DECKER 20V Max* cordless 3 in 1 stick vacuum cleaner has been designed for dry vacuuming purposes. This appliance is intended for household use only.
Assembly (Fig. D)
1.Align the top of the extension tube 7 with the vacuum inlet 5 as shown in Fig. D.
2. Push the extension tube 7 onto the vacuum inlet 5 so it locks into position.
3.Align the bottom of the extension tube 7 with the floor brush 11 as shown in Fig. D.
4.Push the bottom of the extension tube 7 onto the floor brush 11 so it locks into position.
5.To remove an accessory, press the accessory release latch 8 located on the vacuum inlet or the bottom of the extension tube and gently pull the connected accessory off.
6
WARNING:When not in use position the unit with the rear of the vacuum facing a wall so that any inadvertent fall of the unit would contact a wall and not people or pets.
Fig. D
8
5
7
8
11
Operation
WARNING:To reduce the risk of serious personal injury, turn unit off and disconnect it from power source remove the battery pack before making any adjustments or removing/installing attachments or accessories.
An accidental start-up can cause injury.
Installing and Removing the Battery Pack (Fig. A)
NOTE: For best results, make sure your battery pack is fully charged.
To install the battery pack 16 into the tool handle, align the battery pack with the rails inside the tool’s handle and slide it into the handle until the battery pack is firmly seated in the tool and ensure that it does not disengage.
To remove the battery pack from the tool, press the release button 17 and firmly pull the battery pack out of the tool handle. Insert it into the charger as described in the charger section of this manual.
English
Use
This vacuum cleaner can be used in one of four ways.
• |
With the extension tube |
7 |
|
and the floor brush |
|
. (Fig. E) |
||||||||||||
|
11 |
|||||||||||||||||
• |
With the floor brush |
|
|
|
. (Fig. F) |
|||||||||||||
11 |
||||||||||||||||||
• |
With the extension tube |
7 |
and an |
|||||||||||||||
|
accesssory tool |
|
, |
|
, |
|
|
|
. (Fig. G) |
|||||||||
|
13 |
14 |
15 |
|||||||||||||||
• |
With an accesssory tool |
|
|
|
, |
|
, |
|
. (Fig. H) |
|||||||||
|
13 |
14 |
15 |
|||||||||||||||
|
Fig. E |
|
|
Fig. F |
||||||||||||||
Fig. G
Fig. H
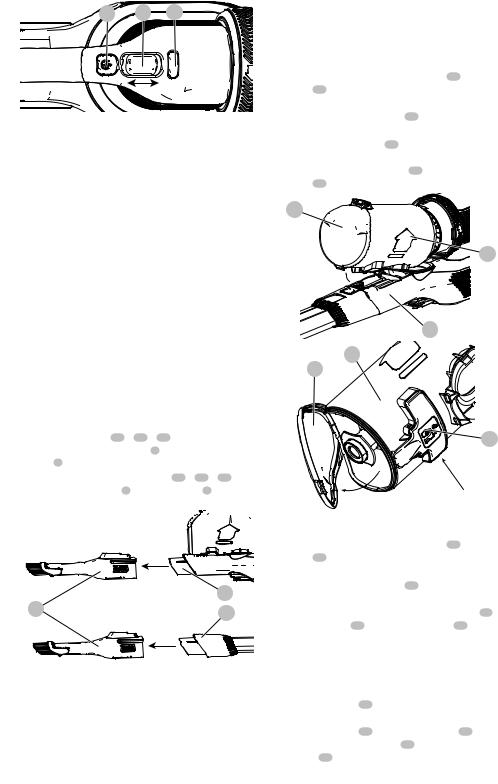
Switching ON and OFF (Fig. A, I)
•To switch ON, press the ON/OFF button 1 .
•For increased power, slide the variable power switch 2
forward.
NOTE: The state of charge indicator LEDs will illuminate while the vacuum is ON.
• To switch OFF, press the ON/OFF button 1 a second time.
•Return the product to the charger immediately after use so that it will be ready and fully charged for the next use. Ensure that the product is fully engaged with the charger plug.
Switching the floor brush OFF and ON (Fig. I)
•To switch the floor brush OFF, press the Floor brush ON/ OFF button 4 .
•To switch the floor brush ON, press the floor brush ON/ OFF button 4 a second time.
NOTE: The LED worklights 12 will illuminate whenever the floor brush is switched ON.
7
English |
|
|
Fig. I |
2 |
4 |
1 |
State of charge indicator
This appliance includes a state of charge indicator which consists of three white LED lights that indicate the level of charge remaining in the battery. This feature is only activated when the vacuum is powered on or during a charge cycle.
The state of charge indicator is an indication of approximate levels of charge remaining in the battery pack according to the following indicators:
The LED battery indicator displays the remaining charge and warns you when the battery is low. The final LED will flash continuously when there is only 1 minute of runtime remaining. All LEDs will flash when the unit is discharged.
NOTE: The state of charge indicator is only an indication of the charge left on the battery. It does not indicate tool functionality and is subject to variation based on product components, temperature and end-user application.
Using an Accessory tool (Fig. J)
Your vacuum may come with some of the following tools. -- Small crevice tool.
-- 6 Brush tool. -- Pet hair tool.
•The accessory tool 13 , 14 , 15 can be fitted either
directly to the extension tube 7 or to the vacuum inlet 5 as shown in Fig. J.
•Align the top of the accessory tool 13 , 14 , 15 with the vacuum inlet 5 or extension tube 7 and push
into place so it locks into position as shown in Fig. J. Fig. J 


5
13 |
7 |
|
Cleaning and emptying the vacuum
WARNING:Projectile/Respiratory Hazard: Never use the vac without its filter.
NOTE: The filter is re-usable, do not confuse it with a disposable dust bag, and do not throw it away when the
product is emptied. We recommend that you replace the filter every 6–9 months depending on frequency of use.
There are two methods of cleaning the canister, a quick empty method and a thorough clean method.
To empty the dust canister (Fig. K, L)
•Lift and remove the lift away dust canister 10 from the
chassis 23 as shown in Figure K.
•Place the dust canister over a trash bin and press the dust canister lid release button 24 to empty the dust canister as shown in Figure L.
•Close the dust canister lid 25 , until it clicks firmly into position.
•Install the lift away dust canister 10 back onto the
chassis 23 . Fig. K
25
10
23
Fig. L
10
25
24
Removing pre-filter (Fig. K, L, M)
•Lift and remove the lift away dust canister 10 from the
chassis 23 as shown in Figure K.
•Place the dust canister over a trash bin and press the dust canister lid release button 24 to empty the dust canister as shown in Figure L.
•Use your index finger and thumb to pinch the pre-filter 26 , pull the pre-filter 26 from the dust canister 10 as shown in Fig. M.
NOTE: The filter housing fits snuggly in the dust canister and may be difficult to remove at first.
•Empty the dust canister into a trash bin.
NOTE: It is recommended that you agitate the filter when the pre-filter 26 is removed. See Filter Agitator section for instructions.
•Install the pre-filter 26 into the dust canister 10 ensuring the dust canister tab 27 aligns with the prefilter slot 28 as shown in Fig. M.
8
•Install the dust canister onto the vacuum, until it clicks
firmly into position. Fig. M
26
28
27
10
Filter Agitator (Fig. K, L, N)
•Lift and remove the lift away dust canister 10 from the
chassis 23 as shown in Figure K.
•Place the dust canister over a trash bin and press the dust canister lid release button 24 to empty the dust canister as shown in Figure L.
•Use your index finger and thumb to pinch the pre-filter 26 , pull the pre-filter 26 from the dust canister 10 as shown in Fig. M.
NOTE: The filter housing fits snuggly in the dust canister and may be difficult to remove at first.
•Rotate the filter agitator wheel 9 five to ten revolutions over a trash bin to remove excessive dust from the filter.
•Empty the dust canister into a trash bin.
•Install the pre-filter 26 into the dust canister 10 ensuring the dust canister tab 27 aligns with the pre-
filter slot 28 as shown in Fig. M.
•Install the dust canister onto the vacuum, until it clicks firmly into position.
IMPORTANT: Maximum dust collection will only be obtained with clean filters and an empty dust canister. If dust begins to fall back out of the product after it is
switched off, this indicates that the dust canister is full and requires emptying.
Fig. N |
9 |
|
|
23 |
|
English
Removing filter (Fig. K, L, O)
•Lift and remove the lift away dust canister 10 from the
chassis 23 as shown in Figure K.
•Place the dust canister over a trash bin and press the dust canister lid release button 24 to empty the dust canister as shown in Figure L.
•Grasp the agitator wheel housing 29 and pull up to remove.
• Remove the filter 30 , from the agitator wheel housing 29 as shown in Fig. O.
•Shake off or lightly brush any loose dust from the filter.
• Install the the filter 30 , into the agitator wheel housing 29 .
•Install the agitator wheel housing 29 onto the dust canister, until it clicks firmly into position.
Fig. O
29
30
10
Cleaning the filters
•Once the filter and pre-filter are removed from the dust
canister shake off or lightly brush any loose dust from the pre-filter 26 and filter 30 .
• Rinse out the dust canister 10 with warm soapy water.
•Wash the filters with warm soapy water.
•Ensure the filters are completely dry before refitting.
•Follow instructions in the Removing pre-filter and Removing filter sections for assembly instructions.
•IMPORTANT: Maximum dust collection will only be obtained with clean filters and an empty dust canister. If dust begins to fall back out of the product after it is switched off, this indicates that the dust canister is full and requires emptying.
•Wash the filters regularly using warm, soapy water and ensure that it is completely dry before using again. The cleaner the filter is, the better the product will perform.
•It is very important that the filters are completely dry and correctly in position before use.
9

English
Removing and cleaning the rotary brushes (Fig. P)
CAUTION:To reduce the risk of injury from moving parts, disconnect lift away canister before cleaning or servicing.
•To remove the rotary brush 31 from the floor brush 11
Depress the release button 32 as shown in Figure P.
• The rotary brush 31 can now be removed.
•Clean rotary brush, and reinstall. Ensure it is secured in
its locked position before operating. Fig. P
31
32
11
Replacing the filters
The filters should be replaced every 6 to 9 months and whenever worn or damaged. Replacement filters are
available from your BLACK+DECKER dealer.
Visit www.blackanddecker.com to locate dealers.
•Remove the old filters as described in Cleaning the Filters.
•Fit the new filters as described in Cleaning the Filters. (cat. no: BSVF1, BSVFA for allergy vacs)
Maintenance
Use only mild soap and damp cloth to clean the vac. Never let any liquid get inside the vac; never immerse any part of the vac into a liquid.
WARNING: Make sure the vacuum is completely dry before using it.
IMPORTANT: To assure product SAFETY and RELIABILITY, repairs, maintenance and adjustment (other than those listed in this manual) should be performed by authorized service centers or other qualified service organizations, always using identical replacement parts.
Troubleshooting
If the product does not work, check the following:
•The charger was correctly plugged in for recharge. (It feels slightly warm to the touch.)
•The charger cord is not damaged and is correctly attached.
•The charger is plugged into a working electrical outlet.
If vacuum performance is poor, check the following:
•Clean the filters. (See Cleaning and Emptying the vacuum section.)
•Empty the dust canister. (See Cleaning and Emptying the vacuum section.)
•Clean the rotary brushes. (See Removing and Cleaning the rotary brushes section.)
•The LED flashes continuously, plug in the charger and
perform a recharge cycle
For assistance with your product, visit our website www.blackanddecker.com for the location of the service center nearest you or call the BLACK+DECKER help line at
1–800–544–6986.
Accessories
Recommended accessories for use with your appliance are available from your local dealer or authorized service center. If you need assistance regarding accessories, please call:
1-800-544-6986.
WARNING:The use of any accessory not recommended for use with this appliance could be hazardous.
Repairs
The charger and battery pack are not serviceable.
WARNING: To assure product SAFETY and RELIABILITY, repairs, maintenance and adjustment (including brush inspection and replacement, when applicable) should be performed by a BLACK+DECKER factory service center or a BLACK+DECKER authorized service center. Always use identical replacement parts.
Service Information
All BLACK+DECKER Service Centers are staffed with trained personnel to provide customers with efficient and reliable power tool service. Whether you need technical advice, repair, or genuine factory replacement parts, contact the BLACK+DECKER location nearest you. To find your local service location, call: 1-800-544-6986 or visit www.blackanddecker.com
10
 Loading...