


Washing Machine
User Manual
WTE10734XDOSN1
Document Number : 2820528640_EN/ 21-01-21.(17:09)
Dear Customer,
Please read this user manual first!
Thank you for preferring a Beko product. We hope that you get the best results from our product which has been manufactured with high quality and state-of-the-art technology. Therefore, please read this entire user manual and all other accompanying documents carefully before using the product and keep it as a reference for future use.
If you handover the product to someone else, give the user manual as well. Follow all warnings and information in the user manual.
You can see the user's manual at www.beko.com.
Explanation of symbols
DANGER!
•A hazard with a high level of risk which, if not avoided, will result in death or serious injury.
WARNING!
•A hazard with a medium level of risk which, if not avoided, will result in death or serious injury.
CAUTION!
•A hazard with a low level of risk which, if not avoided, will result in small or medium injury.


 NOTE
NOTE
Useful information or hints about usage.
This product was manufactured using the latest technology in environmentally friendly conditions.

CONTENTS |
|
1.General safety instructions |
5 |
1.1 Children's safety ........................................................................................................................... |
5 |
1.2 Product safety .............................................................................................................................. |
6 |
1.3 Electrical safety............................................................................................................................ |
6 |
1.4Hot surface safety........................................................................................................................ |
7 |
1.5 Other .................................................................................................................................................. |
7 |
2.Instructions for environmental protection |
8 |
2.1 Compliance with WEEE Directive.......................................................................................... |
8 |
2.2 Disposing of the waste product............................................................................................ |
8 |
2.3 Package information.................................................................................................................. |
8 |
2.4 What you can do for energy saving..................................................................................... |
8 |
3 Intended use |
9 |
4.Your product |
10 |
4.1 Overview....................................................................................................................................... |
10 |
4.2 Package contents...................................................................................................................... |
11 |
4.3 Control panel............................................................................................................................... |
12 |
4.4 Screenshot ................................................................................................................................. |
13 |
5.Technical specifications |
14 |
6. Installation |
15 |
6.1 Appropriate installation location........................................................................................ |
15 |
6.2 Removing packaging reinforcement................................................................................ |
16 |
6.3 Removing transportation safety bolts............................................................................ |
16 |
6.4 Connecting water supply...................................................................................................... |
17 |
6.5 Connecting the water draining hose to the drain....................................................... |
18 |
6.6 Adjusting the feet.................................................................................................................... |
19 |
6.7 Electrical connection............................................................................................................... |
20 |
7. Initial use |
21 |
7.1 Drum cleaning............................................................................................................................. |
21 |
8. Preparing to wash |
22 |
8.1 Sorting the laundry................................................................................................................... |
22 |
8.2 Preparing laundry for washing............................................................................................ |
23 |
8.3 Loading and removing the laundry................................................................................... |
23 |
8.4 Using detergent and softener............................................................................................ |
23 |
8.4.1 Detergent drawer................................................................................................................................. |
23 |
8.4.2 Detergent, softener and other cleaning agents..................................................................... |
24 |
8.4.3 Auto dosing............................................................................................................................................. |
25 |
8.4.4 Dose selection and cancellation or powder detergent use................................................ |
26 |
8.4.5 When the detergent and/or softener run(s) out:................................................................... |
27 |
8.4.6 Adding detergent or softener to the wrong compartment:............................................... |
28 |
8.4.7 Choosing the detergent type.......................................................................................................... |
28 |
Washing Machine / User’s Manual |
EN / 3 |

8.4.8 Adjusting detergent amount.......................................................................................................... |
28 |
8.4.9 Using tablet and capsule liquid detergents.............................................................................. |
28 |
8.4.10 Using starch......................................................................................................................................... |
28 |
8.4.11 Using limescale remover................................................................................................................. |
29 |
8.4.12 Using bleaches.................................................................................................................................... |
29 |
8.5 Tips for energy and water saving...................................................................................... |
29 |
8.6 Displayed Program Time........................................................................................................ |
29 |
9. Programmes and Auxiliary Functions |
30 |
9.1 Programme selection............................................................................................................... |
30 |
9.2 Programmes................................................................................................................................ |
30 |
9.3 Programme table....................................................................................................................... |
36 |
9.4 Auxiliary function selection................................................................................................ |
38 |
9.4.1 Auxiliary functions............................................................................................................................... |
39 |
9.4.2 "Functions/Programmes Selected by Pressing the Function Buttons for 3 |
|
Seconds".................................................................................................................................................... |
40 |
10. Programme setting |
43 |
10.1 Temperature selection........................................................................................................ |
43 |
10.2 Spin speed selection............................................................................................................ |
43 |
10.3 Quick Wash Setting (Fast+).............................................................................................. |
44 |
10.4 Starting the programme...................................................................................................... |
45 |
10.5 Programme steps................................................................................................................... |
45 |
11. Programme options |
46 |
11.1 Setting the end time............................................................................................................. |
46 |
10.6 End of programme................................................................................................................ |
46 |
11.1.1 Cancelling the end time setting.................................................................................................... |
48 |
11.2 Switching the machine to standby mode and adding laundry........................... |
48 |
11.3 Cancelling the programme................................................................................................. |
49 |
12. Additional features |
49 |
12.1 Activating and deactivating the audio warning........................................................ |
49 |
12.2 Loading door lock.................................................................................................................... |
50 |
12.2.1 Opening the loading door in case of power failure:............................................................. |
50 |
12.3 Drum Illumination................................................................................................................... |
51 |
13. Maintenance and cleaning |
51 |
13.1 Cleaning the detergent drawer......................................................................................... |
51 |
13.1.1 When to clean........................................................................................................................................ |
51 |
13.1.2. Cleaning:................................................................................................................................................ |
52 |
13.2 Cleaning the loading door................................................................................................... |
53 |
13.3 Cleaning the body and control panel.............................................................................. |
53 |
13.4 Cleaning the water intake filters..................................................................................... |
53 |
13.5 Cleaning the pump filter...................................................................................................... |
54 |
13.5.1 Cleaning dirty filters.......................................................................................................................... |
55 |
14. Troubleshooting |
56 |
EN / 4 |
Washing Machine / User’s Manual |

1. General safety instructions
1.1 Children's safety
•Children under the age of 3 should be kept away unless continuously supervised.
•This product can be used by children at and WARNING! above 8 years old and by persons whose physical, sensory or mental capabilities were not fully developed or who lack experience and knowledge provided that they are supervised or trained on the safe usage of the product and
the risks it brings out.
•Childrenundertheageof8shouldbeprevented from accessing and tinkering with the product.
•Cleaning and user maintenance works should not be performed by children unless they are supervised by someone.
•Electrical products are dangerous for the children.
•Use child lock to prevent children from intervening with the product.
•Do not forget to close the loading door when leaving the room where the product is located.
•Packaging materials are dangerous to children.
Washing Machine / User’s Manual |
EN / 5 |

1.2 Product safety
• Unplug the product when not in use.
• Always have the installation and repairing procedures carried out by the Authorised
WARNING! Service Agent.
•Do not force open the locked loading door. The door will open immediately after the washing cycle has ended. If the door does not open, apply the solutions provided for "Loading door cannotbeopened."errorintheTroubleshooting section. In case of forcing the loading door to open, the door and the lock mechanism may get damaged.
•Never open the loading door or remove the filter while there is still water in the drum. Otherwise, risk of flooding and injury from hot water will occur.
•The water supply and draining hoses must be securely fastened and remain undamaged.
1.3 Electrical safety
•Do not operate faulty products until repaired by an Authorised Service Agent.
•Do not try to reach interior parts of the product DANGER! other than the parts stated in maintenance
instructions.
•Never wash the product by spreading or pouring water onto it!
•Never touch the power cable plug with wet hands!
EN / 6 |
Washing Machine / User’s Manual |

1.4 Hot surface safety
• The glass of the loading door gets too hot while washing at high temperatures. Therefore, especially do not allow children touch the glass
WARNING! while washing.
1.5 Other
•Do not use combustible, flammable and other similar chemicals for product cleaning or other purposes.
• Do not step or stand on the product.
•Do not place heavy objects on the product.
•If you will place a dryer on to the washing machine, secure it with the suitable connection apparatus that you can obtain from the Authorised Service Agent.
•Unplug the product, turn the tap off and contact your Authorised Service Agent without tampering with the product if the product has been damaged.
•Keep your pets away from the washing machine.
Washing Machine / User’s Manual |
EN / 7 |
2. Instructions for environmental protection
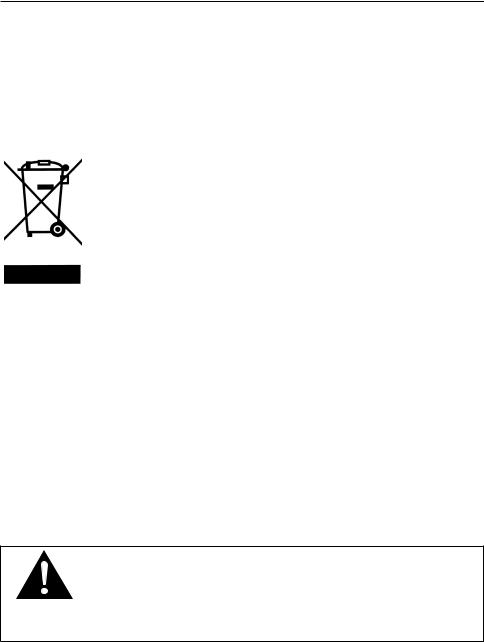
2.1 Compliance with WEEE Directive
This product does not contain harmful and forbidden materials described in the "Regulation on the Control of the Waste Electrical and Electronic Equipment" issued by T.R. Ministry of Environment and Urbanization. It complies with the WEEE Directive.
2.2 Disposing of the waste product
This product has been manufactured with high quality parts and materials which can be reused and are suitable for recycling. Therefore, do not dispose the product with normal domestic waste at the end of its service life.
Take it to a collection point for the recycling of electrical and electronic equipment. Please consult your local authorities to learn the nearest collection point. Help protect the environment and natural resources by recycling used products.
For children's safety, cut the power cable and break the locking mechanism of the loading door so that it will be non-functional before disposing of the product.
Compliance with RoHS Directive:
The product you have purchased complies with EU RoHS Directive (2011/65/EU). It does not contain harmful and prohibited materials specified in the Directive.
2.3 Package information
Packaging materials of the product are manufactured from recyclable materials in accordance with our National Environment Regulations. Do not dispose of the packaging materials together with the domestic or other wastes. Take them to the packaging material collection points designated by the local authorities.
2.4 What you can do for energy saving
• Comply with the information in the programme and consumption table section.
- If the washing machine is overloaded, its washing CAUTION! performance will drop.
- Moreover, noise and vibration problems may occur.
EN / 8 |
Washing Machine / User’s Manual |

Following information will help you use the product in an ecological and energy-efficient manner.
a)Operate the product in the highest load capacity allowed for the programme you have selected, but do not overload. See, “Programme and consumption table”.
b)Follow the recommended temperatures in the programme and consumption table.
c)Wash slightly soiled laundry at low temperatures.
d)Select faster programmes for small quantities of lightly soiled laundry.
e)Do not use prewash and high temperatures for laundry that is not heavily soiled or stained.
f)If you plan to dry your laundry in a dryer, select the highest spin speed recommended during washing process.
g)Do not use detergent in excess of the amount recommended on the detergent package.
3Intended use
a)This product has been designed for domestic use.
b)It is not suitable for commercial use and it must not be used for anything other than its intended use.
c)Suitable for textile washable in washing machines.
d)The manufacturer waives any responsibility arisen from incorrect usage or transportation.
e)Do not wash the items such as carpets, rugs and etc. in the machine. Permanent damage occurs in the machine.
f)This appliance is intended to be used in household and similar applications such as:
–staff kitchen areas in shops, offices and other working environments;
–farm houses;
–by clients in hotels, motels and other residential type environments;
–bed and breakfast type environments;
–areas for communal use in blocks of flats or in launderettes.
g)The service life of your product is 10 years. During this period, original spare parts will be available to operate the product properly.
Washing Machine / User’s Manual |
EN / 9 |

4. Your product
4.1 Overview
1


 2 8
2 8 


 3
3 


 4
4
5
6
7
1- Power cable
2- Upper table
3- Control panel
4- Water discharge hose
5- Loading door
6- Filter cap
7- Adjustable feet
8- Detergent drawer
EN / 10 |
Washing Machine / User’s Manual |
4.2 Package contents
Power cable
Water discharge hose
Transportation safety bolts
Mains water inlet hose
User manual
Plastic plug assembly
|
|
|
• Figures in this manual are schematic and may not match |
|
|
|
|
||
|
|
|
the product exactly. |
|
NOTE |
||||
|
||||
Washing Machine / User’s Manual |
EN / 11 |
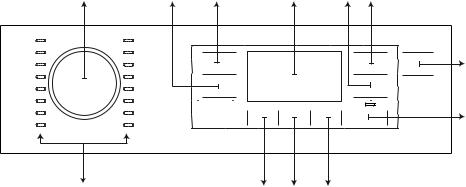
4.3 Control panel |
|
|
|
|
|
|
1 |
2 |
3 |
|
4 |
5 |
6 |
|
|
|
|
|
|
7 |
|
|
|
|
|
|
8 |
12 |
|
|
11 |
10 |
9 |
|
1 - Programme selection knob
2- Spin level adjustment button
3- Temperature level adjustment button
4- Display
5- End Time adjustment button
6- Quick Wash setting button
7- On/Off button
8- Start/Pause button
9- Auxiliary function button 3
10- Auxiliary function button 2
11- Auxiliary function button 1
12- Programme selection lights
EN / 12 |
Washing Machine / User’s Manual |
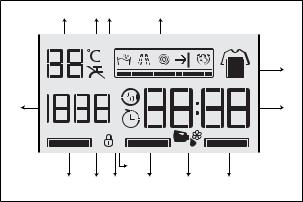
4.4 Screenshot |
|
|
|
|
|
1 |
2 |
3 |
|
4 |
|
|
|
|
|
|
5 |
14 |
|
|
|
|
6 |
|
|
|
10 |
|
|
13 |
12 |
11 |
9 |
8 |
7 |
1 - Temperature indicator
2 - Temperature symbol
3 - No water symbol
4 - Programme follow-up indicator
5 - Quick wash indicator
6 - Duration information
7- Auxiliary functions light 1
8- Dosing symbols
9- Auxiliary functions light 2
10- Delayed start enabled symbol
11- Door lock is engaged symbol
12- Child lock enabled symbol
13- Auxiliary functions light 3
14- Spin speed selection indicator
Washing Machine / User’s Manual |
EN / 13 |

5.Technical specifications
Supplier name or trademark |
Beko |
|
Model name |
WTE10734XDOSN1 |
|
7163345400 |
||
|
||
Rated capacity (kg) |
10 |
|
Maximum spin speed (rpm) |
1400 |
|
Built-in |
No |
|
Height (cm) |
84 |
|
Width (cm) |
60 |
|
Depth (cm) |
64 |
|
Single Water inlet / Double Water inlet |
• / - |
|
• Available |
||
|
||
Electrical input (V/Hz) |
230 V / 50Hz |
|
Total current (A) |
10 |
|
Total power (W) |
2200 |
|
Main model code |
9814 |
NOTE |
SUPPLIER’S NAME |
MODEL IDENTIFIER |
(*) |
|
A |
A |
|
•The model information as stored in the product database can be reached by entering following website and searching for your model identifier (*) found on energy label.
https://eprel.ec.europa.eu/
Symbols Table
Prewash |
Fast |
Fast+ |
Extra |
Extra |
|
Anti |
Pet Hair |
Steam |
Night |
Soaking |
Rinse |
Steeping |
AutoDose |
Liquid |
Softener |
|||
|
|
|
Rinse |
Water |
Crease |
Removal |
|
|
Modu |
|
Hold |
|
|
|
Detergent |
Selection |
||
|
|
|
|
|
|
|
|
|
|
|
|
|
|
|
|
|
Selection |
|
Rinse |
Spin+Drain |
Drain |
Temperature |
|
Spin |
|
No |
Tap |
|
No |
Time |
Door |
Child |
On/Off |
Start / |
Soil Level |
Add |
Downloaded |
|
|
|
|
|
|
|
Spin |
Water |
|
Water |
Delay |
Lock |
Lock |
|
Pause |
|
Garment |
Program |
|
|
|
|
|
|
|
|
(Cold) |
|
|
|
|
|
|
|
|
|
|
Wash |
Ok |
Cancel |
AntiCrease+ |
Drying |
Extra |
Cupboard |
Iron |
Timed |
Clean& |
|
|
|
|
|
||||
|
(End) |
|
|
|
|
|
Dry |
Dry |
|
Dry |
Drying |
Wear |
|
|
|
|
|
|
EN / 14 |
|
|
|
|
|
|
|
|
|
|
|
Washing Machine / User’s Manual |
||||||
6. Installation
6.1 Appropriate installation location
•Damaged products cause risks for your safety.
-Prior to installation, visually check if the product has any defects on it.
WARNING! - If so, do not have it installed.
•Do not place the product on a floor without sufficient capacity to carry the load.
- Otherwise, the product or the floor may be damaged.
CAUTION! |
- Total weight of the washing machine and the dryer -with |
|
full loadwhen they are placed on top of each other is |
|
approx. 180 kilograms. |
•Do not install the product in places where there is the risk of freezing.
-Otherwise, your product will be damaged and your house will be under risk of flood.
|
|
|
• Preparation of the location and electrical, tap water and |
|
|
|
|
||
|
|
|
waste water installations at the place of installation is |
|
NOTE |
||||
under customer's responsibility. Refer to the nearest |
||||
|
|
|
Authorised Service Agent for installation of the product |
|
|
|
|
after those preparations are complete. |
|
|
|
|
• Make sure that the water inlet and drain hoses as well as |
|
|
|
|
the power cable are not folded, pinched or crushed while |
|
|
|
|
pushing the product into its place after installation or |
|
|
|
|
cleaning procedures. |
|
|
|
|
• Manufacturer shall not be held liable for damages that may |
|
|
|
|
arise from procedures carried out by unauthorised persons. |
|
|
|
|
a) Place the product on a rigid, flat and level surface. |
|
|
|
|
b) Never place the product on a carpet-covered floor. |
|
|
|
|
c) Leaving a gap at the sides of the machine is suggested to reduce |
|
|
|
|
vibration and noise |
|
|
|
|
d) Do not place the product on any platform. |
|
|
|
|
e) Do not place heat sources such as Hobs, Irons, Ovens, etc. on the |
|
|
|
|
washing machine and do not use them on the product. |
|
Washing Machine / User’s Manual |
EN / 15 |
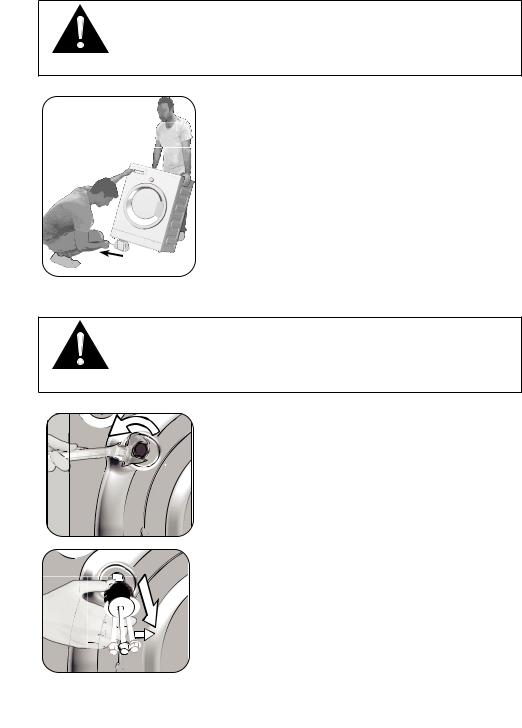
6.2 Removing packaging reinforcement
• Seek someone's help for this procedure. - Risk of getting injured.
CAUTION!
To remove the packaging reinforcement;
a)Tilt the product backwards.
b)Remove the packaging reinforcement by pulling the ribbon.
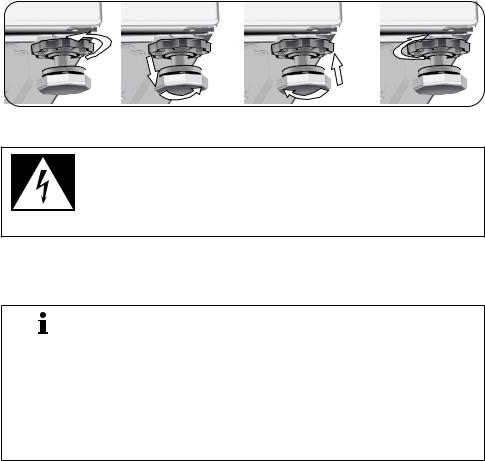
6.3 Removing transportation safety bolts
•Remove the transportation safety bolts before operating the product!
- Otherwise, the product will be damaged.
CAUTION!
a) Loosen all transportation safety bolts with an appropriate wrench until they turn freely.
b) Remove transportation safety bolts by turning them gently.
EN / 16 |
|
Washing Machine / User’s Manual |
|
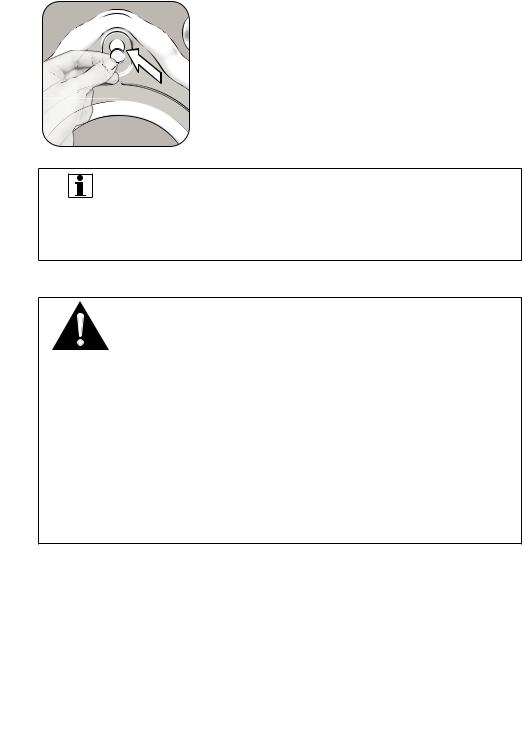
c) After removing bolts, close the holes with plugs provided in the user manual bag.
• Keep the transportation safety bolts in a safe place for reuse when the product needs to be moved again in the
NOTE future.
•Before moving the product, install the transportation safety bolts in reverse order of the disassembly procedure.
6.4 Connecting water supply
•The water supply pressure required to run the product is between 1 to 10 bars (0.1 – 1 MPa). (It is necessary to have 10 – 80 litres of water flowing from the fully open tap per
CAUTION! minute.)
- Attach a pressure reducing valve if water pressure is higher.
• Do not use old or used water inlet hoses on the new product.
- It may cause stains on your laundry.
• Do not plug the product's cold water inlet to hot water outlet.
- Your laundry may get damaged or the product will switch to protection mode and will not operate.
Washing Machine / User’s Manual |
EN / 17 |
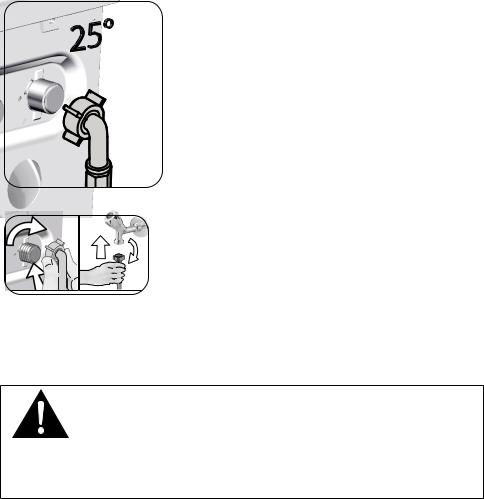
a) Connect the straight end of the mains inlet hose provided with the product to the cold water tap and the warped end to the water inlet on the back of the product as shown in the figure.
b)Tighten all hose nuts by hand securely. Never use a tool when tightening the nuts.
c)Open the taps completely after making the hose
connection to check for water leaks at the connection
points. If any leaks occur, turn off the tap and remove the nut. Retighten the nut carefully after checking the seal. Turn the tap on and repeat the checks.
d) Keep the taps closed when the product is not in use.
6.5 Connecting the water draining hose to the drain
•Attach the end of the drain hose directly to waste water drain, washbasin or bathtub.
•Do not contact the discharged water. Risk of being burnt as CAUTION! the water may be hot.
•Fix the water drain hose end completely to prevent risk of dislocation.
a)Connect the water drain hose to a minimum height of 40 cm and a maximum height of 100 cm.
b)The product may fail if water drain hose is at or close to floor level (under 40 cm) as it would take water in and out continuously.
c)The product may fail if water drain hose is placed higher than 100 cm as it cannot discharge water and water stays inside the product.
Therefore, follow the heights described in the figure.
EN / 18 |
Washing Machine / User’s Manual |
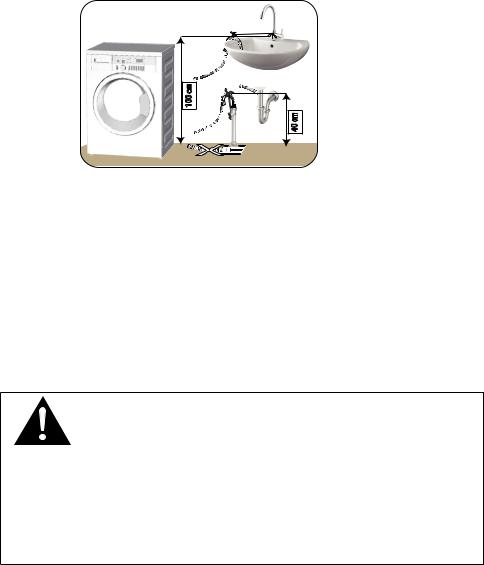
<![endif]>100 cm 40 cm
d)To prevent the waste water to go back into the product again and to ensure easy drainage, do not immerse the end of the hose into the waste water or do not insert it into the drain for more than 15 cm. If it is too long, cut it short.
e)The end of the hose should not be bent, it should not be stepped on and the hose must not be pinched between the drain and the product.
f)If the length of the hose is too short, use it by adding an original extension hose. Total length of the hose may not be longer than 3.2 m. Otherwise, the product may fail as it would take water in and out continuously.
6.6 Adjusting the feet
•Adjust feet so that the product will be balanced on the location it will be used.
- Balance the machine by adjusting the feet.
CAUTION! |
- Check for any play by pressing the product from upper |
|
diagonal edges. |
-Otherwise, the product may move from its place and cause crushing and vibration problems.
•Do not use any tools to loosen the lock nuts. Otherwise, the lock nuts may get damaged.
Washing Machine / User’s Manual |
EN / 19 |
a)Loosen the lock nuts on the feet by hand.
b)Adjust the feet until the product stands level and balanced.
c)Tighten all lock nuts again by hand.
6.7 Electrical connection
• Damaged power cables must be replaced by the Authorised Service Agents.
DANGER!
a) Connect the product to a grounded outlet protected by a 16 A fuse.
|
|
|
• Our company shall not be liable for any damages that |
|
|
|
|
||
|
|
|
will arise when the product is used without grounding in |
|
NOTE |
||||
accordance with the local regulations. |
||||
|
|
|
||
•If the current value of the fuse or breaker in the house is less than 16 Amps, have a qualified electrician install a 16 Amp fuse.
•Do not make connections via extension cables or multiplugs.
b)Connection must comply with national regulations.
c)The wiring for the electrical outlet circuit must be sufficient to meet the appliance requirements. Use of a Groud Fault Circuit Interrupter (GFCI) is recommended.
d)Power cable plug must be within easy reach after installation.
e)The voltage specified in the “(5.) Technical specifications" section must be equal to your mains voltage.
EN / 20 |
Washing Machine / User’s Manual |
 Loading...