


Instructions Manual
Bedienungsanleitung
Manuel d’Instructions
Руководство по эксплуатации
Naudojimosi instrukcija
Gebruiksaanwijzing
Brugsvejledning
Εγχειρίδιο οδηγιών
Manual de Instruções
Instrukcja Obslugi
Libret de Instrucţiuni
CTB 6407

Instructions Manual |
|
INDEX |
|
RECOMMENDATIONS AND SUGGESTIONS .................................................................................................................... |
13 |
CHARACTERISTICS............................................................................................................................................................ |
14 |
INSTALLATION .................................................................................................................................................................... |
15 |
USE....................................................................................................................................................................................... |
17 |
MAINTENANCE.................................................................................................................................................................... |
18 |
EN |
|
2 |
|
2 |

Bedienungsanleitung |
|
INHALTSVERZEICHNIS |
|
EMPFEHLUNGEN UND HINWEISE.................................................................................................................................... |
19 |
CHARAKTERISTIKEN.......................................................................................................................................................... |
20 |
MONTAGE............................................................................................................................................................................ |
21 |
BEDIENUNG......................................................................................................................................................................... |
23 |
WARTUNG............................................................................................................................................................................ |
24 |
DE |
|
3 |
|
3 |

Manuel d’Instructions |
|
SOMMAIRE |
|
CONSEILS ET SUGGESTIONS .......................................................................................................................................... |
25 |
CARACTERISTIQUES ......................................................................................................................................................... |
26 |
INSTALLATION .................................................................................................................................................................... |
27 |
UTILISATION........................................................................................................................................................................ |
29 |
ENTRETIEN.......................................................................................................................................................................... |
30 |
FR |
|
4 |
|
4 |

Руководство по эксплуатации |
|
УКАЗАТЕЛЬ |
|
СОВЕТЫ И РЕКОМЕНДАЦИИ........................................................................................................................................... |
31 |
ХАРАКТЕРИСТИКИ............................................................................................................................................................. |
32 |
УСТАНОВКА........................................................................................................................................................................ |
33 |
ЭКСПЛУАТАЦИЯ................................................................................................................................................................. |
35 |
УХОД.................................................................................................................................................................................... |
36 |
RU |
|
5 |
|
5 |

Naudojimosi instrukcija |
|
TURINYS |
|
PATARIMAI IR NUORODOS................................................................................................................................................ |
37 |
PRIETAISO APRAŠYMAS ................................................................................................................................................... |
38 |
MONTAVIMAS...................................................................................................................................................................... |
39 |
NAUDOJIMAS ...................................................................................................................................................................... |
41 |
VALYMAS IR PRIEŽIŪRA.................................................................................................................................................... |
42 |
LT |
|
6 |
|
6 |

Gebruiksaanwijzing |
|
INHOUDSOPGAVE |
|
ADVIEZEN EN SUGGESTIES ............................................................................................................................................. |
43 |
EIGENSCHAPPEN............................................................................................................................................................... |
44 |
INSTALLATIE ....................................................................................................................................................................... |
45 |
GEBRUIK.............................................................................................................................................................................. |
47 |
ONDERHOUD ...................................................................................................................................................................... |
48 |
NL |
|
7 |
|
7 |

Brugsvejledning |
|
INDHOLD |
|
RÅD OG ANVISNINGER...................................................................................................................................................... |
49 |
APPARATBESKRIVELSE .................................................................................................................................................... |
50 |
INSTALLATION .................................................................................................................................................................... |
51 |
BRUG.................................................................................................................................................................................... |
53 |
VEDLIGEHOLDELSE ........................................................................................................................................................... |
54 |
DK |
|
8 |
|
8 |

Εγχειρίδιο οδηγιών |
|
ΠΕΡΙΕΧΟΜΕΝΑ |
|
ΣΥΜΒΟΥΛΕΣ ΚΑΙ ΣΥΣΤΑΣΕΙΣ............................................................................................................................................. |
55 |
ΧΑΡΑΚΤΗΡΙΣΤΙΚΑ................................................................................................................................................................ |
56 |
ΕΓΚΑΤΑΣΤΑΣΗ..................................................................................................................................................................... |
57 |
ΧΡΗΣΗ.................................................................................................................................................................................. |
59 |
ΣΥΝΤΗΡΗΣΗ........................................................................................................................................................................ |
60 |
GR |
|
9 |
|
9 |

Manual de Instruções |
|
ÍNDICE |
|
CONSELHOS E SUGESTÕES ............................................................................................................................................ |
61 |
CARACTERÍSTICAS ............................................................................................................................................................ |
62 |
INSTALAÇÃO ....................................................................................................................................................................... |
63 |
UTILIZAÇÃO......................................................................................................................................................................... |
65 |
MANUTENÇÃO .................................................................................................................................................................... |
66 |
PT |
|
1 |
|
10 |
Instrukcja Obslugi |
|
SPIS TREŚCI |
|
UWAGI I SUGESTIE............................................................................................................................................................. |
67 |
WŁAŚCIWOŚCI TECHNICZNE............................................................................................................................................ |
68 |
INSTALACJA ........................................................................................................................................................................ |
69 |
UŻYTKOWANIE.................................................................................................................................................................... |
71 |
KONSERWACJA .................................................................................................................................................................. |
72 |
PL |
|
1 |
|
11 |

Libret de Instrucţiuni |
|
CUPRINS |
|
RECOMANDĂRI ŞI SUGESTII............................................................................................................................................. |
73 |
CARACTERISTICI................................................................................................................................................................ |
74 |
INSTALAREA........................................................................................................................................................................ |
75 |
UTILIZARE............................................................................................................................................................................ |
77 |
ÎNTREŢINERE ...................................................................................................................................................................... |
78 |
RO |
|
1 |
|
12 |
RECOMMENDATIONS AND SUGGESTIONS
 The Instructions for Use apply to several versions of this appliance. Accordingly, you may find descriptions of individual features that do not apply to your specific appliance.
INSTALLATION
• The manufacturer will not be held liable for any damages resulting from incorrect or improper installation.
•The minimum safety distance between the cooker top and the extractor hood is 650 mm.
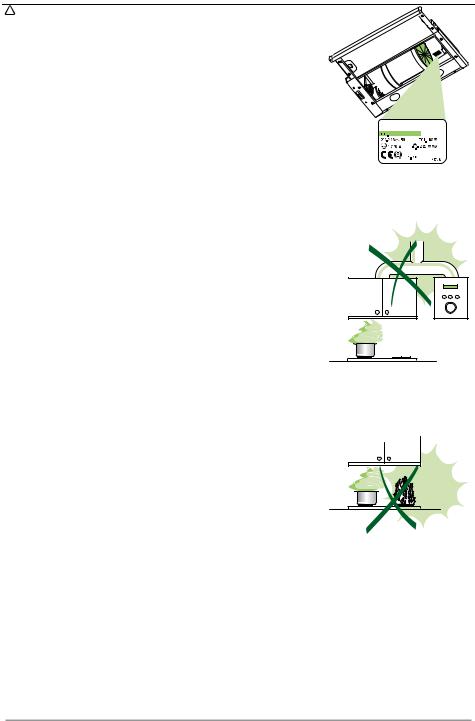
• Check that the mains voltage corresponds to that indicated on the rating plate fixed to the inside of the hood.
•For Class I appliances, check that the domestic power supply guarantees adequate earthing.
Connect the extractor to the exhaust flue through a pipe of minimum diameter 120 mm. The route of the flue must be as short as possible.
•Do not connect the extractor hood to exhaust ducts carrying combustion fumes (boilers, fireplaces, etc.).
•If the extractor is used in conjunction with non-electrical appliances (e.g.
gas burning appliances), a sufficient degree of aeration must be guaranteed in the room in order to prevent the backflow of exhaust gas. The kitchen must have an opening communicating directly with the open air in order to guarantee the entry of clean air.
USE
• The extractor hood has been designed exclusively for domestic use to eliminate kitchen smells.
•Never use the hood for purposes other than for which it has ben designed.
•Never leave high naked flames under the hood when it is in operation.
•Adjust the flame intensity to direct it onto the bottom of the pan only, making sure that it does not engulf the sides.
•Deep fat fryers must be continuously monitored during use: overheated oil can burst into flames.
•Do not flambè under the range hood; risk of fire
• This appliance is not intended for use by persons (including children) with reduced physical, sensory or mental capabilities, or lack of experience and knowledge, unless they have been given supervision or instruction concerning use of the appliance by a person responsible for their safety.
•Children should be supervised to ensure that they do not play with the appliance
MAINTENANCE
•Switch off or unplug the appliance from the mains supply before carrying out any maintenance work.
•Clean and/or replace the Filters after the specified time period.
•Clean the hood using a damp cloth and a neutral liquid detergent.
EN |
|
1 |
|
13 |

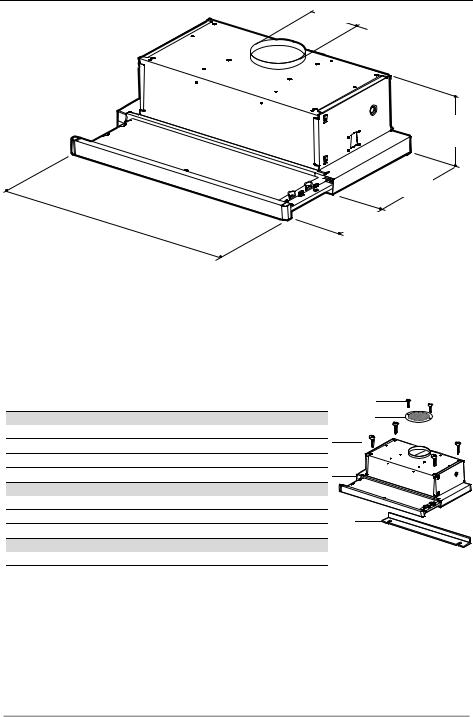
CHARACTERISTICS
598 - 898
 ø 120
ø 120
175
280
0÷152
|
|
Components |
12e |
|
|
|
8 |
||
Ref. |
Q.ty |
Product Components |
||
|
||||
1 |
1 |
Hood Body, complete with: Controls, Light, Blower, Filters |
12a |
|
8 |
1 |
Directional Air Outlet grille |
||
|
||||
20 |
1 |
Closing element |
1 |
|
|
|
|
||
Ref. |
Q.ty |
Installation Components |
|
|
12a |
4 |
Screws 4,2 x 44,4 |
|
|
12e |
2 |
Screws 2,9 x 9,5 |
20 |
|
|
Q.ty |
Documentation |
|
|
|
1 |
Instruction Manual |
|
EN |
|
1 |
|
14 |
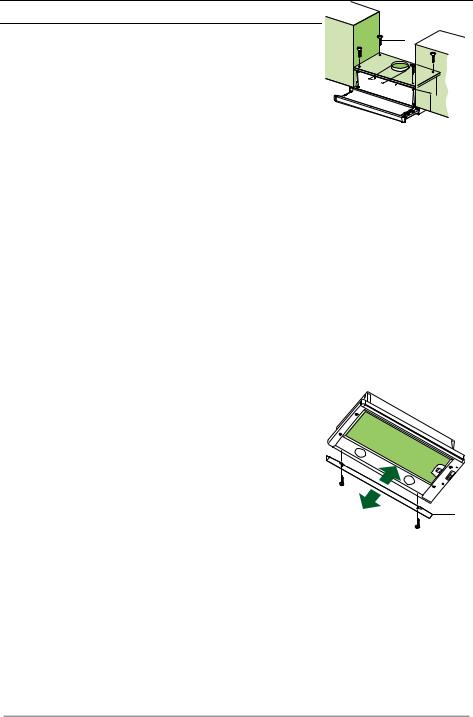
INSTALLATION
Drilling the Support surface and Fitting the Hood
SCREW FITTING
•The hood support surface must be 135 mm above the bottom surface of the wall units.
•Drill the support with a ø 4,5 mm drill bit, using the drilling template provided.
•Cut a hole ø 125 mm in size on the support surface, using the drilling template provided.
•Fix using the 4 screws 12a (4,2 x 44,4) provided.
CLOSING ELEMENT
•The space between the edge of the hood and the rear wall can be closed by applying the element 20 provided, using the screws supplied for this purpose.
12a
125 |
135 |
20
EN |
|
1 |
|
15 |
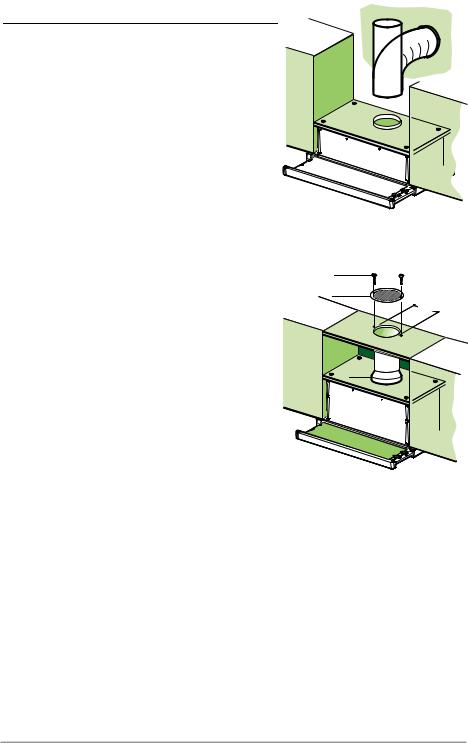
Connections
DUCTED VERSION AIR EXHAUST SYSTEM |
|
When installing the ducted version, connect the hood to |
|
the chimney using either a flexible or rigid pipe ø120 |
ø 120 |
mm, the choice of which is left to the installer. |
• Fix the pipe in position using sufficient pipe clamps (not supplied).
• Remove any activated charcoal filters.
RECIRCULATION VERSION AIR OUTLET
•Cut a hole ø 125 mm in any shelf that may be positioned over the hood.
•Connect the flange to the outlet on the shelf over the hood using a flexible or rigid pipe ø120 mm.
•Fix the pipe in position using sufficient pipe clamps (not supplied).
•Fix the directional grille 8 on the recirculation air outlet using the 2 screws 12e (2,9 x 9,5) provided.
•Ensure that the activated charcoal filters have been inserted.
12e |
8 |
125 |
9 |
ELECTRICAL CONNECTION
•Connect the hood to the mains through a two-pole switch having a contact gap of at least 3 mm.
•When opening the sliding carriage for the first time after installing the hood, pull it out briskly until it clicks.
EN |
|
1 |
|
16 |

USE
Control panel
0 1
L
M - V
M-V
0 |
|
1 |
2 |
|
3 |
L
L |
Light |
Switches the lighting system |
L |
Light |
Switches the lighting system |
||
|
|
on and off. |
|
|
on and off. |
||
M |
Motor |
Switches the extractor motor |
M |
Motor |
Switches the extractor motor |
||
|
|
on and off. |
|
|
on and off. |
||
V |
Speed |
Sets the operating speed of |
V |
Speed |
Sets the operating speed of |
||
|
|
the extractor: |
|
|
the extractor: |
||
|
|
1. |
Low speed, used for a |
|
|
1. |
Low speed, used for a |
|
|
|
continuous and silent air |
|
|
|
continuous and silent air |
|
|
|
change in the presence of |
|
|
|
change in the presence of |
|
|
|
light cooking vapour. |
|
|
|
light cooking vapour. |
|
|
2. |
Medium speed, suitable |
|
|
2. |
Medium speed, suitable |
|
|
|
for most operating condi- |
|
|
|
for most operating condi- |
|
|
|
tions given the optimum |
|
|
|
tions given the optimum |
|
|
|
treated air flow/noise |
|
|
|
treated air flow/noise |
|
|
|
level ratio. |
|
|
|
level ratio. |
3. Maximum speed, used for eliminating the highest cooking vapour emission, including long periods.
EN |
|
1 |
|
17 |
MAINTENANCE
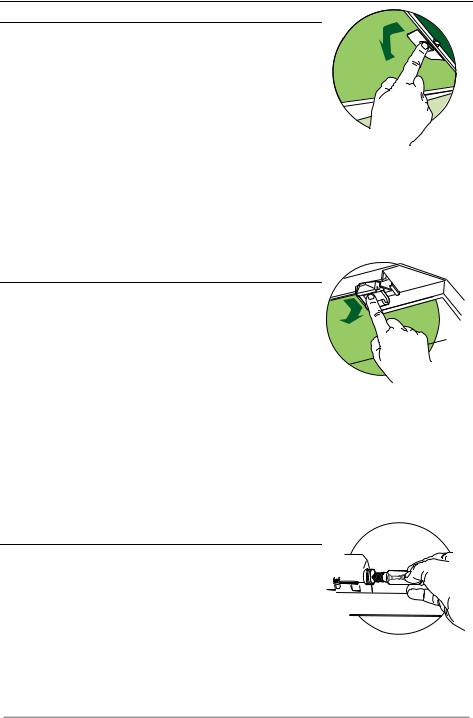
Grease filters
CLEANING METAL CASSETTE GREASE FILTERS
•The filters must be cleaned every 2 months, or more frequently in case of particularly heavy use of the hood. Filters can be washed in a dishwasher.
•Pull out the sliding suction panel.
•Remove the filters one by one, after having disconnected the relative fastening elements.
•Wash the filters, taking care not to bend them. Let them get dry before refitting them. (The colour of the filter surface may change throughout the time but this has no influence to the filter efficiency).
•When refitting the filters, make sure that the handle is visible on the outside.
•Close the sliding suction panel.
Charcoal filter (Recycling version)
REPLACING CHARCOAL FILTERS
•These filters are not washable and cannot be regenerated, and must be replaced approximately every four months or more frequently by particularly heavy use.
•Pull out the sliding suction panel.
•Remove the grease filters.
•Remove the saturated carbon filter by releasing the fixing hooks
•Replace the grease filters.
•Close the sliding suction panel.
Lighting
LIGHT REPLACEMENT
40 W incandescent light.
•Remove the metal grease filters.
•Unscrew the bulbs and replace them with new ones having the same characteristics.
•Replace the metal grease filters.
EN |
|
1 |
|
18 |

EMPFEHLUNGEN UND HINWEISE
 Diese Gebrauchsanleitung gilt für mehrere Geräte-Ausführungen. Es ist möglich, dass einzelne Ausstattungsmerkmale beschrieben sind, die nicht auf Ihr Gerät zutreffen.
MONTAGE
•Der Hersteller haftet nicht für Schäden, die auf eine fehlerhafte und unsachgemäße Montage zurückzuführen sind.
•Der minimale Sicherheitsabstand zwischen Kochmulde und Haube muss 650 mm betragen.
•Prüfen, ob die Netzspannung mit dem Wert auf dem im Haubeninneren angebrachten Schild übereinstimmt.
•Bei Geräten der Klasse I ist sicherzustellen, dass die elektrische Anlage des Wohnhauses über eine vorschriftsmäßige Erdung verfügt.
•Das Anschlussrohr der Haube zur Luftaustrittsöffnung muss einen Durchmesser von 120 mm oder darüber aufweisen. Der Rohrverlauf muss so kurz wie möglich sein.
•Die Haube darf an keine Entlüftungsschächte angeschlossen werden, in die Verbrennungsgase (Heizkessel, Kamine usw.) geleitet werden.
•Werden im Raum außer der Dunstabzugshaube andere, nicht elektrisch betriebene (z.B. gasbetriebene) Geräte verwendet, muss für eine ausreichende Belüftung gesorgt werden. Sollte die Küche diesbezüglich nicht entsprechen, ist an einer Aussenwand eine Öffnung anzubringen, die Frischluftzufuhr gewährleistet.
BEDIENUNG
•Die Dunstabzugshaube ist ausschließlich zum Einsatz im privaten Haushalt und zur Beseitigung von Küchengerüchen vorgesehen.
•Unsachgemäßer Einsatz der Haube ist zu unterlassen.
•Große Flammen bei eingeschalteter Haube niemals unbedeckt lassen.
•Die Intensivität der Flamme ist so zu regulieren, dass sie den Topfboden nicht überragt.
•Frittiergeräte müssen während des Gebrauchs stets beaufsichtigt werden: überhitztes Öl kann sich entzünden.
•Keine flambierten Speisen unter der Abzugshaube zubereiten: Brandgefahr.
•Dieses Gerät darf nicht von Personen, auch Kindern, mit verminderten psychischen, sensorischen und geistigern Fähigkeiten, oder von Personen ohne Erfahrung und Kenntnisse benutzt werden, sofern sie nicht von für ihre Sicherheit verantwortlichen Personen beaufsichtigt und beim Gebrauch des Geräts angeleitet werden.
•Kinder dürfen sich nicht unbeaufsichtigt in der Nähe des Geräts aufhalten und auf keinen Fall mit dem Gerät spielen.
WARTUNG
•Bevor Wartungsarbeiten durchgeführt werden, muss die Stromzufuhr zur Haube unterbrochen werden, indem der Stecker gezogen oder der Hauptschalter abgeschaltet wird.
•Bei der Filterwartung müssen die vom Hersteller empfohlenen Zeiträume zum Austauschen der Filter genauestens eingehalten werden.
•Zur Reinigung der Haubenflächen Wir empfehlen ein feuchtes Tuch und ein mildes Flüssigreinigungsmittel.
DE |
|
1 |
|
19 |
CHARAKTERISTIKEN
598 - 898
 ø 120
ø 120
175
280
0÷152
|
|
Komponenten |
12e |
|
|
|
8 |
||
Pos. |
St. |
Produktkomponenten |
||
|
||||
1 |
1 |
Haubenkörper mit Schaltern, Beleuchtung, Gebläsegruppe, Filter |
12a |
|
8 |
1 |
Luftleitgitter Luftaustritt |
||
|
||||
20 |
1 |
Abdeckprofil |
1 |
|
|
|
|
||
Pos. |
St. |
Montagekomponenten |
|
|
12a |
4 |
Schrauben 4,2 x 44,4 |
|
|
12e |
2 |
Schrauben 2,9 x 9,5 |
20 |
|
|
St. |
Dokumentation |
|
|
|
1 |
Bedienungsanleitung |
|
DE |
|
2 |
|
20 |
MONTAGE
Bohren der Trägerplatte und Montage der Dunstabzugshaube
MONTAGE MIT SCHRAUBEN
•Die Hauben-Trägerplatte muss 135 mm oberhalb der Ober- schrank-Unterfläche positioniert werden.
•Mit Hilfe des beiliegenden Bohrplanes Löcher ø 4,5 mm in die Trägerplatte bohren.
•Mit Hilfe des beiliegenden Bohrplanes ein Loch ø 125 mm in die Trägerplatte bohren.
•Mit 4 der mitgelieferten Schrauben 12a (4,2 x 44,4) fixieren.
ABDECKPROFIL
•Der Bereich zwischen Haubenkante und Rückwand kann mit Hilfe des mitgelieferten Abdeckprofils 20 und der für diesen Zweck vorgesehenen Schrauben geschlossen werden.
12a
125 |
135 |
20
DE |
|
2 |
|
21 |

Anschlüsse
ANSCHLUSS IN ABLUFTVERSION |
|
Bei Abluftbetrieb kann die Haube vom Installateur |
|
wahlweise mittels Rohr oder Schlauch (ø120 mm) an |
ø 120 |
die Außenrohrleitung angeschlossen werden. |
• Das Rohr mit geeigneten Rohrschellen fixieren. Das hierzu erforderliche Material wird nicht mitgeliefert.
• Eventuell vorhandene Aktivkohlefilter entnehmen.
ANSCHLUSS IN UMLUFTVERSION
•In das eventuell über der Haube vorhandene Bord ein Loch ø 125 mm bohren.
•Den Flansch beim Luftaustritt am Bord oberhalb der Haube mittels Rohr oder Schlauch ø120 mm anschließen.
•Das Rohr mit geeigneten Rohrschellen fixieren. Das hierzu erforderliche Material wird nicht mitgeliefert.
•Das Luftleitgitter 8 mit Hilfe von 2 der mitgelieferten Schrauben 12e (2,9 x 9,5) beim Austritt der rückzuführenden Luft fixieren.
•Sicherstellen, dass der Aktivkohle-Geruchsfilter vorhanden ist.
12e |
8 |
125 |
9 |
ELEKTROANSCHLUSS
•Bei Anschluss der Haube an das Stromnetz muss ein zweipoliger Schalter mit einem Öffnungsweg von mindestens 3 mm zwischengeschaltet werden.
•Nach Montage der Haube muss beim ersten Mal der Auszug energisch geöffnet werden, bis bei Erreichen des Endanschlages ein Klicken zu hören ist.
DE |
|
2 |
|
22 |

BEDIENUNG
Bedienfeld
0 1
L
M - V
M-V
0 |
|
1 |
2 |
|
3 |
L
L Beleucht. Schaltet die Beleuchtung ein und aus.
M Motor Schaltet den Gebläsemotor ein und aus.
V Geschw. bestimmt die Gebläsegechwindigkeit und steuert folgende Geschwindigkeitsstufen:
1.geringste Gebläsestufe, diese Stufe ist für einen ständigen und besonders leisen Luftaustausch bei geringer Kochdunstentwicklung geeignet.
2.mittlere Gebläsestufe, eignet sich aufgrund des guten Verhältnisses zwischen Fördervolumen und Geräuschentwicklung für die meisten Anwendungssituationen.
3.höchste Gebläsestufe, eignet sich für starke Kochdunstentwicklung, auch über längere zeithin.
L Beleucht. Schaltet die Beleuchtung ein und aus.
M Motor Schaltet den Gebläsemotor ein und aus.
V Geschw. bestimmt die Gebläsegechwindigkeit und steuert folgende Geschwindigkeitsstufen:
1.geringste Gebläsestufe, diese Stufe ist für einen ständigen und besonders leisen Luftaustausch bei geringer Kochdunstentwicklung geeignet.
2.mittlere Gebläsestufe, eignet sich aufgrund des guten Verhältnisses zwischen Fördervolumen und Geräuschentwicklung für die meisten Anwendungssituationen.
DE |
|
2 |
|
23 |

WARTUNG
Fettfilter
REINIGUNG DER METALLFETTFILTER
•Die Filter können im Geschirrspüler gereinigt werden und müssen nach spätestens zwei Monaten Betriebszeit oder, bei besonders intensiver Nutzung, häufiger gereinigt werden.
•Den Wrasenleitschirm herausziehen.
•Die Verriegelung des Fettfilters zuerst nach hinten, dann nach unten herausnehmen.
•Die Filter im Geschirrspüler bei stärkstem Reinigungsprogramm und höchster Temperatur, mindestens 65°C, reinigen und vor dem Wiedereinsetzen trocknen lassen, dabei nicht knicken. (Eine eventuelle Verfärbung der Filteroberfläche, zu der es im Laufe der Zeit kommen kann, beeinträchtigt die Funktion des Filters keinesfalls.)
•Die Filter wieder einsetzen, dabei darauf achten, dass die Verriegelung sichtbar ist.
•Den Wrasenleitschirm wieder einschieben.
Aktivkohlefilter (Umluftbetrieb)
FILTERWECHSEL
•Die Filter lassen sich nicht reinigen oder regenerieren und müssen spätestens nach vier Monaten Betriebszeit oder, bei besonders intensiver Nutzung, häufiger ersetzt werden.
•Den Wrasenleitschirm herausziehen.
•Die Fettfilter entnehmen
•Die entsprechenden Haken lösen und den gesättigten Aktivkohlefilter entnehmen.
•Die Fettfilter wieder einsetzen.
•Den Wrasenleitschirm wieder einschieben.
Beleuchtung
AUSWECHSELN DER LAMPEN
Glühlampen 40W
•Die Metallfettfilter entfernen.
•Die Lampen ausschrauben und durch gleichwertige ersetzen.
•Die Metallfettfilter wieder montieren.
DE |
|
2 |
|
24 |
 Loading...