


CVA34110
GB
ES
Instruction for use
Instrucciones de uso
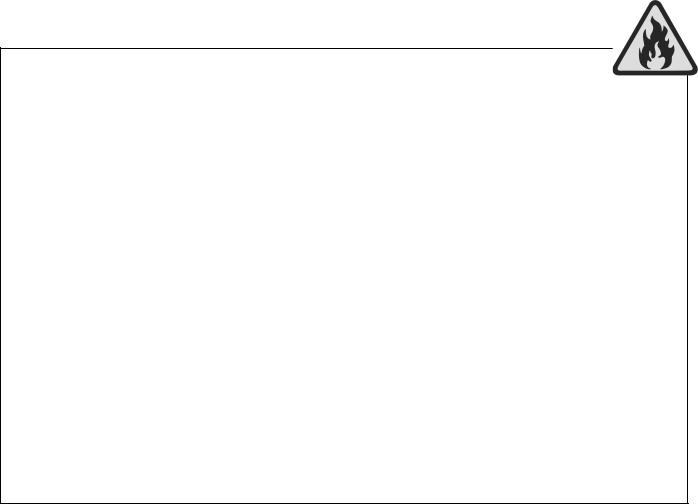
WARNING!
In order to ensure a normal operation of your refrigerating appliance, which uses a completely environmentally friendly refrigerant the R 600a (flammable only under certain conditions) you must observe the folloving rules:
Do not hinder the free circulation of the air around the appliance.
Do not use mechanic devices in order to accelerate the defrosting, others than the ones recommended by the manufacturer.
Do not destroy the refrigerating circuit.
Do not use electric appliances inside the food beeping compartment, others than those that might have been reccommended by the manufacturer.
ADVERTENCIA
Con el fin de garantizar un funcionamiento normal de su frigorífico, que utiliza un refrigerante totalmente respetuoso con el medio ambiente, el R 600a (inflamable sólo en ciertas condiciones), se deben observar las pautas siguientes:
No impedir la libre circulación del aire alrededor del electrodoméstico.
Para acelerar el deshielo no se deben utilizar dispositivos mecánicos que no sean aquellos recomendados por el fabricante.
No destruir el circuito de refrigeración.
No utilizar aparatos eléctricos dentro del compartimento de aviso de alimentos que no sean los que pudiera haber recomendado el fabricante.

GB Index
Safety comes first ! /1 Transport instructions /2 Disposal /2
Appliance Setup /2 Electrical connections /2
Get to know your appliance /3 Prior to startup /3
Setting the operating temperature /3-5 Cooling /6
Defrosting of the appliance (Fresh Food) /6 Freezing /7
Defrosting of the appliance (Frozen Food) /7 Replacing the interior light bulb /8
Cleaning and care /8 Practical tips and notes /9 Examples of use /10 Normal operating noises /10 What, if.... /11
Reversing the doors /12 Thechnical data /13
ES Índice
La seguridad es lo primero /14 Instrucciones de transporte /15 Eliminación /15
Ajuste del electrodoméstico /15 Conexiones eléctricas / 15 Detalles del electrodoméstico /16 Antes de empezar /16
Ajuste de la temperatura de funcionamiento /16-19 Refrigeración /19
Deshielo del electrodoméstico (alimentos frescos) /19 Congelación /20
Deshielo del electrodoméstico (alimentos congelados) /20 Sustitución de la bombilla interior /21
Conservación y limpieza /21 Notas y consejos útiles /22 Ejemplos de utilización /23
Ruidos normales de funcionamiento /23 Resolución de problemas /24
Inversión de las puertas /25 Datos técnicos /26
1
2

3
4 |
5 |
7
6
8 |
9 |
10

GB |
Instruction for use |
|
|
Congratulations on your choice of our product which will certainly provide you with many years of good service.
Safety comes first!
Please read this Instruction Manual carefully. It contains important information on how to use your new appliance. If instructions are not adhered to, you may lose your right to service at no charge during the warranty period. Please keep this manual in a safe place and pass it on to later users if applicable.
•Do not connect your appliance to the power supply until all packing and transit protectors have been removed.
•Leave to stand upright for at least 4 hours before switching on to allow the system to settle if transported horizontally.
•This appliance must only be used for its intended purpose, i.e. the storing and freezing of edible foodstuff.
•We do not recommend use of this appliance in an unheated, cold room e.g. garage, conservatory, annex, shed, outdoors, etc. See ‘Location’.
•On delivery, check to make sure that the product is not damaged and that all the parts and accessories are in perfect condition.
•Do not operate a damaged appliance; if in doubt, check with your dealer.
•Do not allow children to play with the appliance.
•Do not sit or stand on or let the children sit or stand on the appliance or on the pull-out parts.
•Do not hang on the appliance door.
•Your appliance contains no fluoridated coolants (CFC/HFC), but isobutane (R 600 a), a natural gas which is highly compatible with the environment.
(R 600 a) is easily flammable. Therefore, be sure that the cooling circuit is not damaged either during transport or during operations.
In the event of damage;
•Avoid any open flame, sources of sparks and flammable substances.
•Immediately air the room in which the appliance is located.
•In case the coolant spraying out contacts your eyes it may cause eye injuries.
•The space in the room where the appliance is installed must not be smaller than 10 cubic metres.
•Do not dispose of the appliance in a fire. Your appliance contains non CFC substances in the insulation which are flammable.
•Please contact the local authority in your region for information on disposal methods and facilities available.
 Warning - Keep ventilation openings on the appliance enclosure or in the built-in structure, clear of obstruction.
Warning - Do not use mechanical devices or other means to accelerate the defrosting process, other than those recommended by the manufacturer.
Warning - Do not damage the refrigerant circuit.
Warning - Do not use electrical devices inside the food storage compartments of the appliance, unless they are of the type recommended by the manufacturer.
•Avoid touching the metal condenser wiring on the backside of the appliance; there is risk of injury.
•In the event of a possible malfunction, disconnect the appliance from the power supply first.
•Prior to cleaning the appliance always unplug the appliance or switch off the circuit breaker. Do not pull from the power cable. Pull from the plug.
•Repairs to the electrical equipment may only be made by qualified experts. If the power cable is damaged, the manufacturer or customer service must replace it in order to avoid danger.
1

GB |
Instruction for use |
|
|
Transport instructions
The appliance should be transported only in upright position.
The packing as supplied must be intact during transportation.
If the appliance is transported in the horizontal position, it must be placed vertically and left in this position for 4 hours before taking into operation.
The appliance must be protected against rain, moisture and other atmospheric influences. The manufacturer assumes no liability if safety instructions are disregarded.
 Disposal
Make the appliance unusable immediately. Pull out the mains plug and cut the power cable. Remove or destroy snap or latch locks before disposing of the appliance. In this manner you prevent children from locking themselves in and endangering their lives.
Appliance setup
•Do not operate your appliance in a room where the temperature is likely to fall below 10 °C at night and/or especially in winter. At lower temperatures the appliance may not operate, resulting in a reduction in the storage life of the food.
•The climate class rate of your appliance is given on the rating label located inside the appliance. It specifies the appropriate operating ambient temperatures as explained below.
Climatic class Ambient temperatures
SN........................... |
+10 °C to 32 °C |
N ............................ |
+16 °C to 32 °C |
ST .......................... |
+18 °C to 38 °C |
T.............................. |
+18 °C to 43 °C |
SN-ST..................... |
+10 °C to 38 °C |
SN-T ...................... |
+10 °C to 43 °C |
2
Location
Only place the appliance, as shown in the illustration in dry rooms which can be aired.
Avoid direct sunlight or direct heat sources such as a stove or a heater.
If this cannot be avoided, the following minimum distances should be maintained: Electric stoves: 3,00 cm
Heater: 3,00 cm Cooling devices: 2,50 cm
•Ensure sufficient air circulation for your device.
•Make sure that sufficient room is provided around the appliance to ensure free air circulation (Item 3).
Fit the two plastic wall spacers supplied with the appliance rotating 1/4 turn to the condenser at the back of the appliance (Item 4).
•The appliance should be located on a smooth surface. The two front feet can be adjusted as required (Item 5). To ensure that your appliance is standing upright adjust the two front feet by turning clockwise or counter-clockwise, until the product is in firm contact with the floor.
Correct adjustment of feet avoids excessive vibration and noise.
Electrical connections
Warning
This appliance must be grounded.
•Check whether the power type and voltage in your region corresponds to the one stated on the rating label inside the appliance.
•The electrical safety of the appliance is only assured when the grounding system in the house is installed in accordance with regulations.
•When placing the appliance, do not let the power cable get stuck under it; otherwise the cable will be damaged.
•Ensure that the plug remains readily accessible. Do not use a multiple adapter bar or an extension cable.
•The electrical specifications of your appliance is given on the rating label located inside the appliance.
•Route power cable to allow easy connection and disconnection after installation.
•A contact separator should be used if the power cable is not accessible. (for built-in models)
GB |
Instruction for use |
|
|
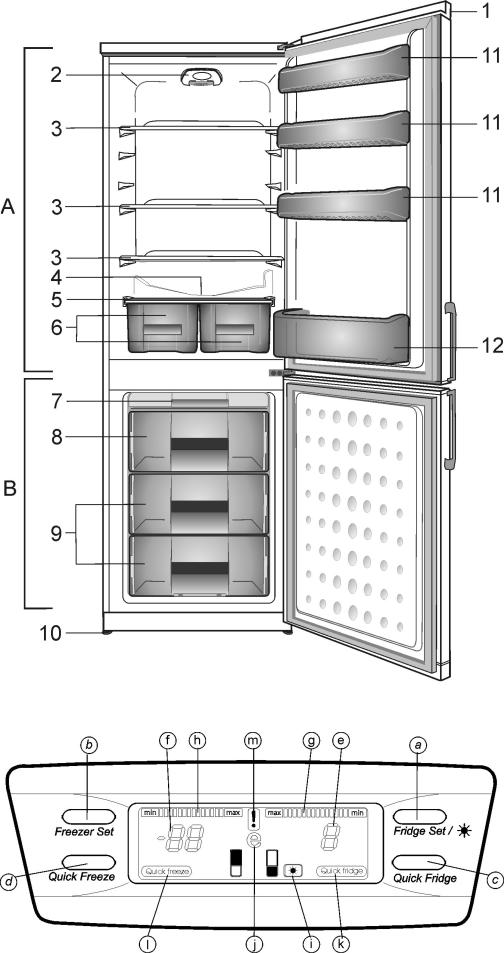
Get to know your appliance
Item 1
A)Fridge compartment
B)Freezer compartment
1.Control panel
2.Interior light
3.Adjustable Cabinet shelves
4.Defrost water collection channel - Drain tube
5.Crisper cover
6.Crispers
7.Ice tray support & ice tray
8.Fast freeze compartment
9.Freezer compartment
10.Adjustable front feet
11. Adjustable door shelves
12. Bottle shelf
Prior to startup
Before you begin operating your appliance, the following points should be re-checked for safety:
•Is the appliance standing properly on the floor?
•Is there sufficient space for good air circulation?
•Is the interior clean? (Also see the section “Cleaning and care”)
•Now connect the appliance to the mains.
The compressor is turned on; the interior light comes on when the Fridge door is opened.
Do not place foodstuff into the refrigerator until the temperature has reached the desired level.
Setting the operating temperature
(Item 2)
Control Panel:
Control Functions
Considering Item 2, the following functions are implemented on the appliance.
a)Fridge Set and Vacation
b)Freezer Set
c)Quick Fridge
d)Quick Freeze
e)Actual Fridge Temperature
f)Actual Freezer Temperature
g)Fridge Bar Graphs
h)Freezer Bar Graphs
i)Vacation Icon
j)Economy Icon
k)Quick Fridge Icon
l)Quick Freeze Icon
m)Alarm Icon
3
GB |
Instruction for use |
|
|
Description of the Control Functions a) Fridge Set and Vacation
The desired fridge temperature of the appliance can be adjusted by using fridge set button. To change the fridge set temperature press the fridge set button. The first time the button is pressed the current set temperature is shown on the display then afterwards, each time the button is pressed the new fridge set temperature will be displayed in sequence: 4, 2, 8, 6, 4, …
The fridge set temperature will blink on the display for 5 seconds only. Then the actual fridge temperature will be shown.
Vacation: The fridge compartment temperature can be adjusted around 13°C. When the fridge compartment is empty, vacation function can be activated if desired. The use of this function will save some power.
In order to preserve temperature inside the fridge compartment, the fridge door should be kept closed during vacation function. Otherwise, the door open alarm will be active within a minute and the interior light of the fridge compartment will light on.
To activate vacation function, it is enough to press the fridge set button for about 3 seconds. Then the vacation icon on the display will light on.
To deactivate vacation function, it is enough to press Quick Fridge or Fridge Set buttons.
b) Freezer Set
The desired freezer temperature of the appliance can be adjusted by using freezer set button. To change the freezer set temperature press the freezer set button. The first time the button is pressed the current set temperature is shown on the display then afterwards, each time the button is pressed the new freezer set temperature will be displayed in sequence: -18, -20, -22, -24, -18,…
The freezer set temperature will blink on the display for 5 seconds only. Then the actual freezer temperature will be shown.
4
c) Quick Fridge
This button is designed for fast cooling of the fridge. Press quick fridge button to start the function. The quick fridge icon will light on when the function is activated. Each time the quick fridge function is activated, “1” blinks on the display for 5 seconds only. Then the actual fridge temperature will be shown. Quick fridge function lasts for maximum 3 hours. When the quick fridge function is completed, quick fridge icon will light off automatically and the previous fridge set temperature will be recalled.
Quick fridge function terminates automatically in 3 hours. To deactivate quick fridge function manually, it is enough to press quick fridge button once more or fridge set button. Quickfreeze and quick fridge functions cannot be active at the same time. Therefore, pressing quick freeze button also deactivates quick fridge function.
The electronic control system incorporates a safety protection so that if the quick fridge button is pressed more than once in a short time, then the compressor will not run immediately.
d) Quick Freeze
This button is designed for fast cooling of the freezer. Press quick freeze button to start the function. The quick freeze icon will light on when the function is activated. Each time the quick freeze function is activated, “-27” blinks on the display for 5 seconds only. Then the actual freezer temperature will be shown. Quick freeze function lasts for maximum 32 hours. When the quick freeze function is completed, quick freeze icon will light off automatically and the previous fridge set temperature will be recalled.
Quick freeze function terminates automatically in 32 hours. To deactivate quick-freeze function manually, it is enough to press quick freeze button once more or freeze set button. Quickfreeze and quick fridge functions cannot be active at the same time. Therefore, pressing quick fridge button also deactivates quick freeze function.
GB |
Instruction for use |
|
|
If large amounts of fresh food is going to be frozen, push the quick freeze button 8 hrs. before putting the fresh food in the freezer compartment.
The electronic control system incorporates a safety protection so that if the quick freeze button is pressed more than once in a short time, then the compressor will not run immediately.
e) Actual Fridge Temperature
The average temperature of the packages inside the fridge compartment is shown here. Accordingly, this temperature is not sensitive to instantaneous temperature changes. The fridge set temperature blinks here for 5 seconds when the fridge set temperature is adjusted.
When quick fridge button is pressed, “1” is displayed also here.
This part is not active when the vacation function is running.
f) Actual Freezer Temperature
The average temperature of the packages inside the freezer compartment is shown here. Accordingly, this temperature is not sensitive to instantaneous temperature changes. The freezer set temperature blinks here for 5 seconds when the freezer set temperature is adjusted.
When quick freeze button is pressed, “-27” is displayed also here.
g) Fridge Bar Graphs (Item 2/g)
The number of bars lighting on the fridge bar graphs are determined considering the fridge set temperature.
If the fridge set temperature is 2; then all the fridge bars light on.
If the fridge set temperature is 4; then min icon and 12 bars light on.
If the fridge set temperature is 6; then min icon and 10 bars light on.
If the fridge set temperature is 8; then min icon and 6 bars light on.
If quick fridge is active; then all fridge bars light on also.
h) Freezer Bar Graphs (Item 2/h)
The number of bars lighting on the freezer bar graphs are determined considering the freezer set temperature.
If the freezer set temperature is -24; then all the freezer bars light on.
If the freezer set temperature is -22; then min icon and 12 bars light on.
If the freezer set temperature is -20; then min icon and 10 bars light on.
If the freezer set temperature is -18; then min icon and 6 bars light on.
If quick freeze is active; then all freezer bars light on also.
i) Vacation Icon
The vacation icon indicates that the vacation function is running. The vacation icon lights on when the appliance running in vacation mode.
j) Economy Icon
The economy icon indicates that the appliance is running in the most economical power consumption mode. The economy icon lights on when the fridge set temperature is adjusted to –18.
When the quick freeze or quick fridge function is activated, this icon lights off.
k) Quick Fridge Icon
The quick fridge icon indicates that the quick fridge function is running. The quick fridge icon lights on when the appliance running in quick fridge mode.
l) Quick Freeze Icon
The quick freeze icon indicates that the quick freeze function is running. The quick-freeze icon lights on when the appliance running in quick-freeze mode.
m) Alarm Icon
The alarm icon indicates that there is something wrong with the appliance wiring connection or cooling.
Please check the What if... section.
5
 Loading...