


 Loading...
Product Manual
X AIR
XR18/X18/XR16/XR12
Digital Mixer Series for iPad/Android Tablets with Programmable MIDAS Preamps, Integrated Wifi Module and USB

2 X AIR User Manual
Table of Contents
Important Safety Instructions |
....................................... 3 |
6.5 EQ............................................................................................ |
21 |
|
Legal Disclaimer.............................................................. |
3 |
6.6 Dynamics............................................................................. |
22 |
|
Limited warranty............................................................ |
3 |
6.7 Sends..................................................................................... |
22 |
|
1. Introduction................................................................ |
4 |
6.8 Main....................................................................................... |
22 |
|
2. Callouts....................................................................... |
5 |
6.9 Meters.................................................................................... |
23 |
|
2.1 X18/XR18 Callouts............................................................... |
5 |
6.10 Effect Rack.......................................................................... |
23 |
|
2.2 |
XR16/XR12 Callouts............................................................. |
6 |
6.11 Snapshots........................................................................... |
23 |
3. Hookup........................................................................ |
7 |
6.12 Scenes and Shows........................................................... |
23 |
|
3.1 X18/XR18 Hookups.............................................................. |
7 |
6.13 Routing................................................................................ |
23 |
|
3.2 |
XR16/XR12 Hookups......................................................... |
11 |
6.14 Setup.................................................................................... |
24 |
4. Network Connection................................................ |
14 |
7. X AIR for PC................................................................ |
25 |
|
4.1 IP Address and DHCP....................................................... |
14 |
7.1 Main View and Mixer Tab................................................ |
25 |
|
4.2 |
Ethernet/LAN...................................................................... |
14 |
7.2 Channel Tab......................................................................... |
25 |
4.3 |
Wifi Client............................................................................. |
14 |
7.3 Input Tab............................................................................... |
26 |
4.4 |
Access Point......................................................................... |
15 |
7.4 Gate Tab................................................................................ |
26 |
4.5 |
Getting Started.................................................................. |
15 |
7.5 EQ Tab.................................................................................... |
26 |
5. X AIR for iPad............................................................ |
16 |
7.6 Comp Tab............................................................................. |
27 |
|
5.1 Main Screen......................................................................... |
16 |
7.7 Sends Tab.............................................................................. |
27 |
|
5.2 |
Input...................................................................................... |
16 |
7.8 Main Tab................................................................................ |
27 |
5.3 |
Sends..................................................................................... |
16 |
7.9 FX Tab..................................................................................... |
27 |
5.4 |
Gate........................................................................................ |
17 |
7.10 Meter Tab............................................................................ |
28 |
5.5 |
Dynamics............................................................................. |
17 |
7.11 Setup Menu........................................................................ |
28 |
5.6 |
Channel EQ.......................................................................... |
18 |
7.12 Snapshot Page.................................................................. |
29 |
5.7 Insert...................................................................................... |
18 |
7.13 Utilities................................................................................. |
29 |
|
5.8 |
Presets................................................................................... |
18 |
7.14 Auto Mix.............................................................................. |
30 |
5.9 Output................................................................................... |
18 |
8. MIDI........................................................................... |
31 |
|
5.10 Meters.................................................................................. |
18 |
9. Specifications........................................................... |
32 |
|
5.11 Shows................................................................................... |
18 |
9.1 X18/XR18 Specifications.................................................. |
32 |
|
5.12 Routing................................................................................ |
19 |
9.2 XR16/XR12 Specifications............................................... |
34 |
|
5.13 Effects.................................................................................. |
19 |
10. Effect Descriptions................................................. |
35 |
|
5.14 Setup.................................................................................... |
19 |
11. Instructional Videos............................................... |
42 |
|
5.15 Main EQ............................................................................... |
19 |
12. Block Diagrams....................................................... |
43 |
|
6. X AIR for Android...................................................... |
20 |
12.1 X18/XR18 Block Diagram.............................................. |
43 |
|
6.1 Main View............................................................................. |
20 |
12.2 XR16/XR12 Block Diagram........................................... |
44 |
|
6.2 |
Input...................................................................................... |
20 |
|
|
6.3 |
Config.................................................................................... |
21 |
|
|
6.4 |
Gate........................................................................................ |
21 |
|
|

3 X AIR User Manual
Important Safety
Instructions
Terminals marked with this symbol carry electrical current of sufficient magnitude to constitute risk of electric shock.
Use only high-quality professional speaker cables with ¼" TS or twist-locking plugs pre-installed. All other installation or modification should be performed only by qualified personnel.
This symbol, wherever it appears,
alerts you to the presence of uninsulated dangerous voltage inside the
enclosure - voltage that may be sufficient to constitute a risk of shock.
This symbol, wherever it appears, alerts you to important operating and maintenance instructions in the
accompanying literature. Please read the manual.
Caution
To reduce the risk of electric shock, do not remove the top cover (or the rear section).
No user serviceable parts inside. Refer servicing to qualified personnel.
Caution
To reduce the risk of fire or electric shock, do not expose this appliance to rain and moisture. The apparatus shall not be exposed to dripping
or splashing liquids and no objects filled with liquids, such as vases, shall be placed on the apparatus.
Caution
These service instructions are for use by qualified service personnel only.
To reduce the risk of electric shock do not perform any servicing other than that contained in the operation instructions. Repairs have to be performed by qualified service personnel.
1.Read these instructions.
2.Keep these instructions.
3.Heed all warnings.
4.Follow all instructions.
5.Do not use this apparatus near water.
6.Clean only with dry cloth.
7.Do not block any ventilation openings. Install in accordance with the manufacturer’s instructions.
8.Do not install near any heat sources such as radiators, heat registers, stoves, or other apparatus (including amplifiers) that produce heat.
9.Do not defeat the safety purpose of the polarized or grounding-type plug. A polarized plug has two blades with one wider than the other. A grounding-type plug has two blades and a third grounding prong. The wide
blade or the third prong are provided for your safety. If the provided plug does not fit into your outlet, consult an electrician for replacement of the obsolete outlet.
10.Protect the power cord from being walked on or pinched particularly at plugs, convenience receptacles, and the point where they exit from the apparatus.
11.Use only attachments/accessories specified by
the manufacturer.
12. Use only with the cart, stand, tripod, bracket,
or table specified by the
manufacturer, or sold with the apparatus. When a cart is used, use caution when
moving the cart/apparatus combination to avoid
injury from tip-over.
13.Unplug this apparatus during lightning storms or when unused for long periods of time.
14.Refer all servicing to qualified service personnel. Servicing is required when the apparatus has been damaged in any way, such as power supply cord or plug is damaged, liquid has been spilled or objects have fallen into the apparatus, the apparatus has been exposed
to rain or moisture, does not operate normally, or has been dropped.
15.The apparatus shall be connected to a MAINS socket outlet with a protective earthing connection.
16.Where the MAINS plug or an appliance coupler is used as the disconnect device, the disconnect device shall remain readily operable.
17.Correct disposal of this product: This symbol indicates that this product must not be disposed of with household
waste, according to the WEEE Directive (2012/19/EU) and your national law. This product
should be taken to a collection center licensed for the recycling of waste electrical and electronic equipment (EEE). The mishandling of this type of waste could have a possible negative impact on the environment and human health due to potentially hazardous substances that are generally associated with EEE. At the same time, your cooperation in the correct disposal of this product will contribute to the efficient use of natural resources. For more information about where you can take your waste equipment for recycling, please contact your local city office, or your household waste collection service.
18.Do not install in a confined space, such as a book case or similar unit.
19.Do not place naked flame sources, such as lighted candles, on the apparatus.
20.Please keep the environmental aspects of battery disposal in mind. Batteries must be disposed-of at a battery collection point.
21.Use this apparatus in tropical and/or
moderate climates.
LEGAL DISCLAIMER
MUSIC Group accepts no liability for any loss which may be suffered by any person who relies either wholly or in part upon any description, photograph, or statement contained herein. Technical specifications, appearances and other information are subject to change without notice. All trademarks are the property of their respective
owners. MIDAS, KLARK TEKNIK, LAB GRUPPEN, LAKE, TANNOY, TURBOSOUND, TC ELECTRONIC, TC HELICON, BEHRINGER, BUGERA and DDA are trademarks
or registered trademarks of MUSIC Group IP Ltd. © MUSIC Group IP Ltd. 2016 All rights reserved.
LIMITED WARRANTY
For the applicable warranty terms and conditions and additional information regarding MUSIC Group’s
Limited Warranty, please see complete details online at music-group.com/warranty.

4X AIR User Manual
1.Introduction
Congratulations on your purchase of the new Behringer X AIR series digital mixer. These mixers offer plenty of analog I/O for most performances in a very compact form factor that is easy to transport, but doesn’t sacrifice any mixing power.
With high-end features taken from the flagship X32 mixer, such as MIDASdesigned preamps, high-quality effects, P-16 monitoring on the X18/XR18, and USB recording capability, these consoles far outperform their size.
Mixing live shows can now be done from anywhere in the venue thanks to the wireless control options that allow all software functions to be controlled from an iPad*, Android* tablet or PC. While a dedicated external router can be used, it is not necessary thanks to the integrated Wifi module. This allows monitors to be adjusted while standing on stage, and the main mix to be perfected from anywhere in the crowd.
In addition to dedicated aux buses for monitoring, the X AIR has 4 studio-quality stereo effects processors. In fact, these are the same great effects found in the acclaimed X32 mixer, including legendary reverb, echo and chorus algorithms.
Not just a live sound tool, the X18 and XR18 feature an 18x18 USB audio/MIDI interface, and the XR12 and XR16 allow 2-track stereo recording. This makes for a great mobile recording device, home studio interface, and enables live performances to be multitracked for later mixing.
Continue through this manual to learn all about the functionality of your mixer, as well as the X AIR software.
*iPad is a trademark of Apple Inc. Android is a trademark of Google Inc. iPad and Android tablet are not included.

5 X AIR User Manual |
|
|
2. Callouts |
(1) |
(2) (3) (4) |
2.1 X18/XR18 Callouts
(5) |
|
|
|
|
|
|
|
|
(6) |
(7) |
(8) |
(9) |
(10) |
(11) (12) |
(13) |
|
(14) |
|
(15) |
|
|
|
ETHERNET |
|
OUT |
IN |
PERSONAL |
|
|
|
|
|
|
|
|
MONITORING |
5 |
3 |
1 |
|
|
|
|
ACCESS |
|
|
|
|||
|
|
|
|
|
|
|
|
|
|
|
|
|
POINT |
|
|
|
|
|
|
|
|
|
WIFI CLIENT |
|
|
|
6 |
4 |
2 |
|
USB |
REMOTE |
MIDI |
|
ULTRANET |
AUX SENDS |
|
||
(10) |
(12) (11) |
(13) |
(9) |
(14) |
(1) |
(16) |
|
|
|
|
(7) |
(15) |
(2) |
(6) |
(8) |
(1)INPUTS accept balanced and unbalanced XLR and ¼" plugs. Inputs 1 and 2 have high-impedance preamps for direct connection of guitars and basses.
(2)OUT L & R jacks send the main mix signal to PA or monitor speakers via XLR cables.
(3)RCA IN jacks (X18 only) accept unbalanced RCA cables for connecting MP3 players, external mixers, iPad, etc. These inputs have limited processing compared to the other input channels.
(4)RCA OUT jacks (X18 only) send either the main mix signal or headphone signal via unbalanced RCA cables to a pair of active studio monitors.
(5)CONTROL ROOM button (X18 only) determines whether the main mix or headphone/solo signal is routed to the RCA OUT jacks.
(6)HEADPHONE jack accepts a ¼" TRS plug for connecting a pair of headphones.
(7)PHONES LEVEL knob determines the output of the headphones jack.
(8)POWER switch turns the power on and off . The LED on the main input panel will light when the unit is powered on.
(9)USB port (type B) accepts a USB cable for connection to a computer for multi-channel audio and MIDI recording. Up to 18 audio channels can be simultaneously recorded, and 18 channels are available for playback. The mixer application allows assignment of channels for recording and playback. 16 channels of MIDI I/O can also be transmitted on the same
USB connection. Check the product page on music-group.com to download
the required Windows* multi-channel driver. The interface is compatible with CoreAudio on Mac* computers, and to ALSA/Jack on Linux* computers.
(10)ETHERNET port allows the mixer to be controlled via LAN or connected Wifi router.
(11)RESET button resets the console to default network parameters when held for 2 seconds. When held for 10 seconds, all console functions are reset to factory default status.
(12)REMOTE switch selects between Ethernet, Wifi client, or Access Point. See the Network Connection chapter for details.
(13)MIDI IN/OUT jacks send and receive MIDI signals to and from external equipment. See the MIDI Implementation chart for details.
(14)ULTRANET port allows connection of BEHRINGER P16-M personal monitoring mixers or P16-D distribution hubs.
(15)AUX SEND jacks send your monitor mixes to active stage monitors or headphone mixers. The XR18 uses XLR connectors, while the X18 uses balanced ¼" jacks.
(16)Inputs 17 and 18 (XR18 only) accept balanced ¼ " cables for connecting line-level sources. These inputs have limited processing compared to the other input channels.
*Mac is a trademark of Apple Inc. Windows is either a registered trademark or trademark of Microsoft Corporation in the United States and/or other countries. Linux is the registered trademark of Linus Torvalds in the U.S. and other countries

6X AIR User Manual
2.2XR16/XR12 Callouts
(1) |
(2) |
(3) |
(4) |
(5) |
(6)
(7)

|
|
|
|
|
|
|
|
|
|
|
|
|
|
|
|
|
|
|
|
|
|
|
|
|
|
|
|
|
|
|
|
|
|
|
|
|
|
|
|
|
|
|
|
|
|
|
|
|
|
(8) |
(9) |
(10) |
(11) |
|
|
||||
|
|
|
|
|
|
|
|
|
|
|
|
|
|
|
|
|
|
|
|
(1) |
(2) |
(3) |
(4) |
(5) |
(9) |
(6)

(11)
(10)
(7) |
(8) |
(12) |
(1)ETHERNET port allows the mixer to be controlled via LAN or connected Wifi router.
(2)REMOTE switch selects between Ethernet, Wifi client, or Access Point. See the Network Connection chapter for details.
(3)RESET button resets the console to default network parameters when held for 2 seconds. When held for 10 seconds, all console functions are reset to factory default status.
(4)MIDI IN/OUT jacks send and receive MIDI signals to and from external equipment. See the MIDI Implementation chart for details.
(5)USB port (type A) accepts a flash drive for file storage, stereo recordings and playback. The red LED next to it indicates file access. Do not remove the USB flash drive while it is lit!
(6)XLR COMBO jacks accept balanced and unbalanced XLR and ¼" plugs.
(7)¼" inputs accept balanced or unbalanced ¼" plugs. Channel 15 and 16 on the XR16 (channel 11 and 12 on the XR12) accept high impedance sources for direct connection of guitars and basses.
(8)AUX SEND jacks send your monitor mixes to stage monitors or headphone mixers. The XR16 uses XLR connectors while the XR12 uses balanced
¼" jacks.
(9)MAIN L/R jacks send the main mix signal to PA or monitor speakers via XLR cables.
(10)HEADPHONE jack accepts a ¼" TRS plug for connecting a pair of headphones.
(11)PHONES LEVEL knob determines the output of the headphones jack.
(12)POWER switch turns the mixer on and off . The front panel LED will light when the unit is powered on.
7X AIR User Manual
3.Hookup
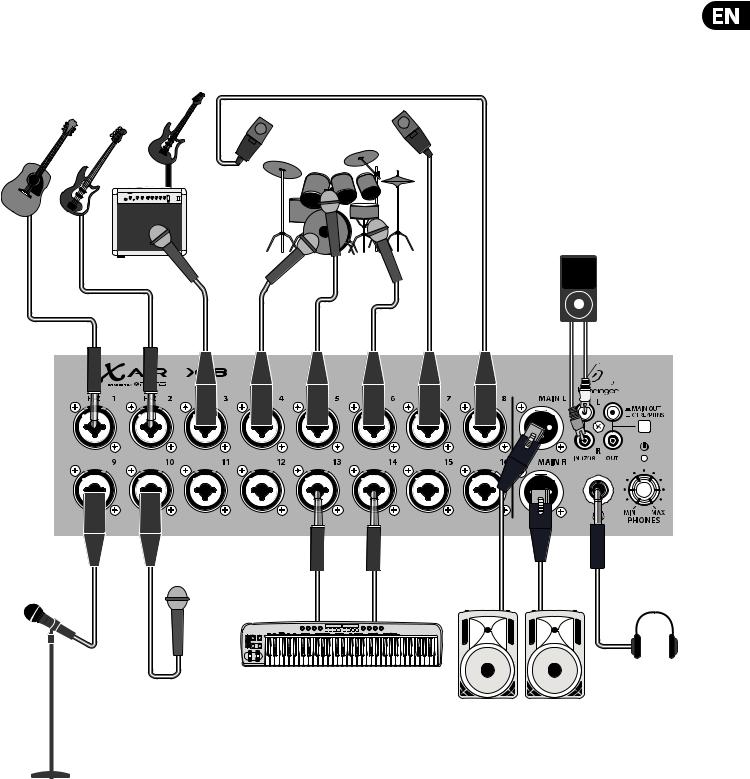
3.1 X18/XR18 Hookups
3.1.1 X18 recording with iPad
MP3 Player
BUGERA V22
<![if ! IE]><![endif]>TRS
XM8500
HPS3000
Keyboard
B215D active loudspeakers

8 X AIR User Manual
Laptop for additional remote control
F1320D active monitors
|
|
|
|
|
|
|
|
|
|
|
|
|
|
|
|
|
|
|
|
|
iPad for remote control |
|
|
|
|
|
|
Wireless router (optional) |
|||||||||||||
|
|
|
|
|
|
|
|
|
|
|
|
|
|
|
|
|
|
|
|
|
|
|
|
|
|
|
|
|
|
|
|
|
|
|
|
|
|
|
|
|
|
|
|
|
|
|
|
|
|
|
|
|
|
|
|
|
|
|
|
|
|
|
|
|
|
|
|
|
|
|
|
|
|
|
|
|
|
|
|
|
|
|
|
|
|
|
|
|
|
|
|
|
|
|
|
|
|
|
|
|
|
|
|
|
|
|
|
|
|
|
|
|
|
|
|
|
|
|
|
|
|
|
|
|
|
|
|
|
|
|
<![if ! IE]> <![endif]>TRS |
<![if ! IE]> <![endif]>TRS |
<![if ! IE]> <![endif]>TRS |
E |
OUT |
IN |
PERSONAL |
|
|
|
|
T |
|
MONITORING |
5 |
3 |
1 |
||
|
ACCESS |
|
|
|
|||
|
|
|
|
|
|
|
|
|
POINT |
|
|
|
|
|
|
|
WIFI CLIENT |
|
|
|
6 |
4 |
2 |
|
REMOTE |
MIDI |
UL |
ET |
AUX SENDS |
|
|
P16-D
iPad with camera connection kit for multi-track recording
up to 18 tracks
P16-M |

9X AIR User Manual
3.1.2XR18 live performance
P16-D

 iPad for wireless control BUGERA V22
P16-M |
XM8500
TRS
HPX6000
B215D active loudspeakers
|
|
|
|
|
|
F1320D Active Monitors |
Keyboard |
||||
10X AIR User Manual
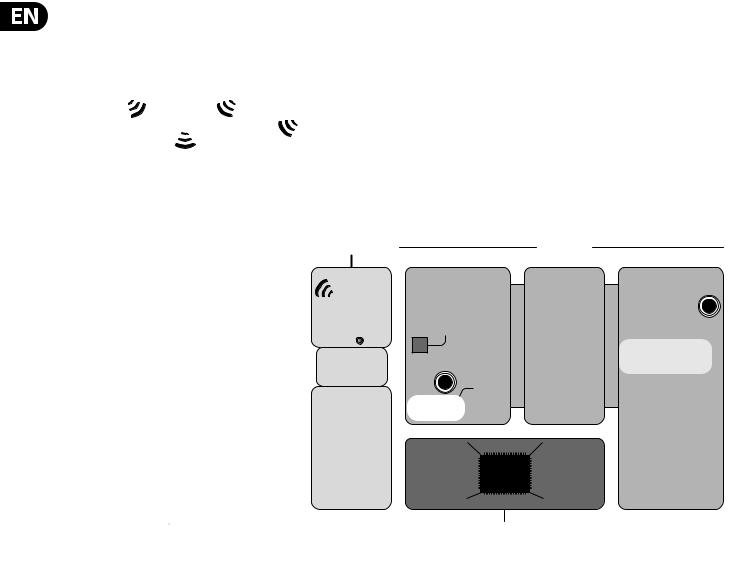
3.1.3X18/XR18 System Overview
WIFI CLIENT mode (Mobile Devices with Wifi) |
ACCESS POINT mode (Mobile Devices with Wifi) |
||||||
|
|
|
|
|
|
|
|
|
|
|
|
|
|
|
|
Router |
iOS/Android |
|
|
iOS/Android |
Android |
||
|
|||
Mac/Win/Linux |
|
Mac/Win/Linux |
|
|
|
P16-M |
or |
|
|
P16-D |
|
ETHERNET mode
Computer with Ethernet port
CAT-5 cable
Mac/Win/Linux
or
Mobile Devices with Wifi
 iOS/Android
CAT-5 cable
Router
or any other MIDI /
Mackie Control


 compatible Controller X-TOUCH
MIXER CONTROL |
|
|
AUDIO I/O |
WIRELESS CONTROL |
|
AUDIO INPUTS |
USB AUDIO |
|
|
|
|
|
|
MIC/LINE IN |
AUDIO IN/OUT |
|
|
CH. 1-16 |
CH. 1-18 |
WIFI |
|
|
|
CLIENT* |
|
|
|
ACCESS |
|
|
ADCs |
POINT* |
|
|
|
|
Hi-Z |
CH.1-2 |
|
|
|
|
|
ACCESS POINT |
|
LINE IN |
|
WIFI CLIENT |
|
CH. 17-18 |
|
ETHERNET |
|
|
|
|
XR18: |
ADCs |
|
WIRED CONTROL |
X18: |
|
|
|
|
|
|
ETHERNET |
|
|
|
|
DSP-MIXER CH. |
DSP-MIXER BUSES |
|
|
MONO IN 1-16 |
AUX / |
|
MIDI I/O |
USB/AUX IN (STEREO) |
GROUP SEND 1-6 |
|
FX RETURN 1-4 (STEREO) |
|
||
|
|
|
DSP |
|
4 STEREO FX SLOTS |
RTA METER |
|
*WIFI CLIENT mode: |
|
|
|
- available channels: 1-11 |
|
|
DSP ENGINE |
*ACCESS POINT mode: |
|
|
|
|
|
|
|
-available channels: 1-11
-max. 4 Wifi clients
-performance limited by Wifi bandwidth
AUDIO OUTPUTS
PHONES STEREO
DACs
LEVEL
CTRL/PHONES

 X18:
X18:
MAIN OUT L/R
MAIN OUT L-R
DACs
AUX SEND 1-6
DACs
ULTRANET OUT
CH. 1-16
X18/XR18
11X AIR User Manual
3.2XR16/XR12 Hookups
3.2.1 XR16 club performance
Laptop for wired or wireless control
FCB1010 MIDI Controller
USB
Flash Drive
Keyboard
XM8500 |
<![endif]>TRS
HPX6000
BUGERA V22
F1320D Active Monitors |
B215D active loudspeakers |

12X AIR User Manual
3.2.2XR12 with Sub Mixer
Wireless router (optional)
B215D active loudspeakers
iPad for remote control
<![if ! IE]><![endif]>TRS
Keyboard |
HPX6000 |
|
|
Keyboard |
QX2222USB |
|
|
|
F1320D active monitors |
E-Drums

13X AIR User Manual
3.2.3XR16/XR12 System Overview
WIFI CLIENT mode (Mobile Devices with Wifi)
ACCESS POINT mode (Mobile Devices with Wifi)
Router |
iOS/Android |
|
|
iOS/Android |
Android |
||
|
|||
Mac/Win/Linux |
|
Mac/Win/Linux |
ETHERNET mode
Computer with Ethernet port
CAT-5 cable
Mac/Win/Linux
or
Mobile Devices with Wifi
 iOS/Android
Router
X-TOUCH
MIXER CONTROL |
AUDIO I/O |
WIRELESS
CONTROL
WIFI
CLIENT*
ACCESS
POINT*
ACCESS POINT
WIFI CLIENT
ETHERNET
WIRED CONTROL
ETHERNET
CAT-5 cable
MIDI I/O
AUDIO INPUTS
MIC/LINE IN
XR16: CH. 1-8
XR12: CH. 1-4

 ADCs
ADCs
LINE IN
XR16: CH. 9-16
XR12: CH. 5-12 
ADCs
Hi-Z
XR16: CH. 15-16
XR12: CH. 11-12
DSP-MIXER CH.
MONO IN 1-16* USB/AUX IN (STEREO)
FX RETURN 1-4 (STEREO)
DSP
USB RECORDER |
AUDIO OUTPUTS |
|
STEREO REC |
PHONES STEREO |
|
(VARIOUS SOURCES) |
DACs |
|
|
||
STEREO PLAY |
|
|
(SPECIFIC“USB” |
LEVEL |
|
STEREO |
||
|
||
INPUT CHANNEL) |
MAIN OUT L-R |
|
|
||
|
DACs |
|
|
XR16: |
|
|
AUX SEND 1-4 |
|
DSP-MIXER BUSES |
DACs |
|
PRE-DEFINED AS SUBGROUPS* |
|
|
XR12: BUSES 3/4/5/6 |
XR12: |
|
XR16: BUSES 5/6 |
||
|
AUX SEND 1-2 |
or any other MIDI / Mackie Control compatible Controller
4 STEREO FX SLOTS |
||
*WIFI CLIENT mode: |
|
|
|
|
|
- available channels: 1-11 |
DSP ENGINE |
|
*ACCESS POINT mode: |
*XR12: |
|
- available channels: 1-11 |
CH. 13-16 fed by any IN 1-12 |
|
- max. 4 Wifi clients |
(Signal Split, e.g. for |
|
- bandwidth limited by Wifi adapter |
monitoring with different EQ) |
|
RTA METER |
|
*PRE-DEFINED BUSES |
XR16/XR12 |
Also used for monitoring |
|

14X AIR User Manual
4.Network Connection
The X AIR mixers offer convenient digital control of the various mixing functions in three different ways - via Ethernet LAN, or wirelessly as a Wifi Client or as an Access Point. Selection is made with the REMOTE switch. You may view or change the network preferences for these on any of the X AIR remote control applications on the ’Setup/Network’ page.
4.1 IP Address and DHCP
Depending on the connection scenario, the X AIR mixers offer up to 3 options for connecting a tablet or PC for software control – DHCP Client, DHCP Server, and fixed IP operation. Connection is achieved differently depending on which option you choose:
DHCP Client mode is available in Ethernet LAN or Wifi Client operation. The mixer will automatically request an IP lease from the DHCP server that owns the IP addresses in the network to which you are trying to connect.
DHCP Server (DHCPS) is optionally available for Ethernet LAN connections and is standard in Access Point operation. The mixer will own the IP addresses and provide IP leases to devices requesting access to that network. The mixer will always use IP address 192.168.1.1 and assign IP addresses 192.168.1.101 –
192.168.1.132 to its clients.
Static IP is available for Ethernet LAN and Wifi Client operation. The mixer will use the fixed (static) IP address, subnet mask and gateway that you specify for registering on the network. Make sure that the addresses you specify manually are not conflicting with any other addresses on the same network. We generally recommend using the DHCP mode, unless you have a very specific reason to set it up manually.
Note: Changing parameters of the currently selected connection mode will disconnect the software from the console. If the console is erroneously configured for a fixed IP address that is incompatible with the network it is connected to, the console will be inaccessible. In this case, one of the other
two connection modes can be used to regain access and amend the settings. If that does not work, hold the Reset button for 2 seconds to return to default network settings.
Wifi Client setup screen
4.3 Wifi Client
This mode supports DHCP Client (default) and fixed IP operation. The X AIR mixers can support WEP, WPA and WPA2 security mechanisms in Wifi Client mode and works on Wifi channels 1-11.
Correct SSID (network name) and password need to be supplied to connect to an existing network. WEP passwords have to be either 5 characters or 13 characters long. If the supplied SSID and password are incorrect, the mixer cannot be accessed. In this case the networking parameters have to be reset and another connection mode has to be used to regain access.
The Ethernet connection mode may be used for configuration of the
Wifi Client mode. While being connected in Ethernet mode, the X AIR mixer can scan the available wireless networks and display their SSID network names, field strength and security method. By selecting the preferred wireless network, this information can be copied to the applications’ Wifi Client setup page automatically. You will then be prompted to fill in the security password of that network. After switching from Ethernet to Wifi Client mode, the mixer should connect to the selected wireless network automatically, and will be displayed by remote applications on any device connected to the same network.
Mixer name and Ethernet setup screen |
|
4.2 Ethernet/LAN |
Access Point setup screen |
|
This mode supports DHCP Client (default), DHCP Server, and fixed IP operation. Note that if the mixer is connected to a network where no DHCP server is present, the mixer will generate an automatic IP address (range 169.254.1.0 – 169.254.254.255). There are no security options for LAN connections,
so any device in that network may take control of connected X AIR consoles. When connecting via LAN/Ethernet to a Wifi router, make sure the security settings of that router prevent unauthorized access.
Loading...