


 Loading...
User Manual
BASS V-AMP LX1B/BASS V-AMP PRO LX1B PRO
The Ultimate Tone Toolbox for Bass/Acoustic/Electric Guitar and Keyboard Amp Modeling

2 BASS V-AMP LX1B/BASS V-AMP PRO LX1B PRO User Manual
Table of Contents |
|
|
Important Safety Instructions....................................... |
3 |
|
Legal Disclaimer.............................................................. |
3 |
|
Limited warranty............................................................ |
3 |
|
1. Introduction................................................................ |
4 |
|
1.1 Before you get started....................................................... |
4 |
|
2. Control Elements........................................................ |
4 |
|
2.1 Unit top/front side.............................................................. |
4 |
|
2.2 |
Rear panel of the BASS V-AMP PRO ............................. |
6 |
2.3 |
BASS V-AMP connectors (side)....................................... |
7 |
3. Application Examples/Operating Modes................. |
7 |
|
3.1 Selecting an operating mode (CONFIGURATION)... |
7 |
|
3.2 |
Standard setup..................................................................... |
7 |
3.3 |
Recording situation............................................................ |
8 |
3.4 Live setup with a connection to an |
|
|
external bass amplifier.............................................................. |
8 |
|
4. Presets of the BASS V-AMP/BASS V-AMP PRO........ |
8 |
|
4.1 Recalling presets.................................................................. |
8 |
|
4.2 |
Editing presets..................................................................... |
8 |
4.3 |
Saving user presets............................................................ |
9 |
4.4 Overriding edits/Restoring single factory presets..... |
9 |
|
4.5 |
Restoring all factory presets........................................... |
9 |
5. Amp/Speaker Simulation.......................................... |
9 |
|
5.1 Amp descriptions................................................................ |
9 |
|
5.2 |
Speaker descriptions........................................................ |
11 |
5.3 |
Denoiser and compressor.............................................. |
12 |
6. Effects Processor...................................................... |
12 |
|
6.1 Pre-amp effects.................................................................. |
12 |
|
6.2 |
(OVER)DRIVE simulations................................................ |
13 |
6.3 |
Post-amp effects................................................................ |
13 |
7. Tuner.......................................................................... |
14 |
|
7.1 Tuning instruments........................................................... |
14 |
|
7.2 Setting up the “a” reference tone................................ |
14 |
|
8. Installation................................................................ |
14 |
|
8.1 Rack mounting (BASS V-AMP PRO)............................. |
14 |
|
8.2 |
Voltage (BASS V-AMP PRO)............................................ |
14 |
8.3 |
Audio connections........................................................... |
15 |
8.4 |
MIDI connections.............................................................. |
15 |
8.5 |
AES/EBU and S/PDIF standards ................................... |
16 |
9. Specifications........................................................... |
16 |
|
10. Appendix................................................................. |
18 |
|
3 BASS V-AMP LX1B/BASS V-AMP PRO LX1B PRO User Manual
Important Safety
Instructions
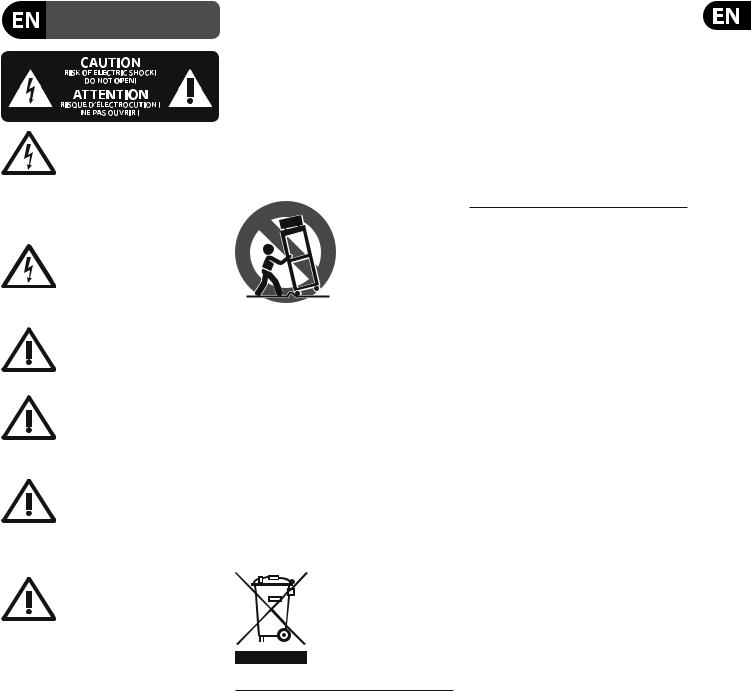
Terminals marked with this symbol carry electrical current of sufficient magnitude to constitute risk of electric shock.
Use only high-quality professional speaker cables with ¼" TS or twist-locking plugs pre-installed. All other installation or modification should be performed only by qualified personnel.
This symbol, wherever it appears,
alerts you to the presence of uninsulated dangerous voltage inside the
enclosure - voltage that may be sufficient to constitute a risk of shock.
This symbol, wherever it appears, alerts you to important operating and maintenance instructions in the
accompanying literature. Please read the manual.
Caution
To reduce the risk of electric shock, do not remove the top cover (or the rear section).
No user serviceable parts inside. Refer servicing to qualified personnel.
Caution
To reduce the risk of fire or electric shock, do not expose this appliance to rain and moisture. The apparatus shall not be exposed to dripping
or splashing liquids and no objects filled with liquids, such as vases, shall be placed on the apparatus.
Caution
These service instructions are for use by qualified service personnel only.
To reduce the risk of electric shock do not perform any servicing other than that contained in the operation instructions. Repairs have to be performed by qualified service personnel.
9.Do not defeat the safety purpose of the polarized or grounding-type plug. A polarized plug has two blades with one wider than the other. A grounding-type plug has two blades and a third grounding prong. The wide
blade or the third prong are provided for your safety. If the provided plug does not fit into your outlet, consult an electrician for replacement of the obsolete outlet.
10.Protect the power cord from being walked on or pinched particularly at plugs, convenience receptacles, and the point where they exit from the apparatus.
11.Use only attachments/accessories specified by
the manufacturer.
12. Use only with the cart, stand, tripod, bracket,
or table specified by the
manufacturer, or sold with the apparatus. When a cart is used, use caution when
moving the cart/apparatus combination to avoid
injury from tip-over.
13.Unplug this apparatus during lightning storms or when unused for long periods of time.
14.Refer all servicing to qualified service personnel. Servicing is required when the apparatus has been damaged in any way, such as power supply cord or plug is damaged, liquid has been spilled or objects have fallen into the apparatus, the apparatus has been exposed
to rain or moisture, does not operate normally, or has been dropped.
15.The apparatus shall be connected to a MAINS socket outlet with a protective earthing connection.
16.Where the MAINS plug or an appliance coupler is used as the disconnect device, the disconnect device shall remain readily operable.
1.Read these instructions.
2.Keep these instructions.
3.Heed all warnings.
4.Follow all instructions.
5.Do not use this apparatus near water.
6.Clean only with dry cloth.
7.Do not block any ventilation openings. Install in accordance with the manufacturer’s instructions.
8.Do not install near any heat sources such as radiators, heat registers, stoves, or other apparatus (including amplifiers) that produce heat.
LEGAL DISCLAIMER
TECHNICAL SPECIFICATIONS AND APPEARANCES ARE SUBJECT TO CHANGE WITHOUT NOTICE AND ACCURACY IS NOT GUARANTEED. BEHRINGER, KLARK TEKNIK, MIDAS, BUGERA, AND TURBOSOUND
ARE PART OF THE MUSIC GROUP (MUSIC-GROUP.COM). ALL TRADEMARKS ARE THE PROPERTY OF THEIR RESPECTIVE OWNERS. MUSIC GROUP ACCEPTS NO LIABILITY FOR ANY LOSS WHICH MAY BE SUFFERED BY ANY PERSON WHO RELIES EITHER WHOLLY OR
IN PART UPON ANY DESCRIPTION, PHOTOGRAPH OR STATEMENT CONTAINED HEREIN. COLORS AND
SPECIFICATIONS MAY VARY FROM ACTUAL PRODUCT. MUSIC GROUP PRODUCTS ARE SOLD THROUGH AUTHORIZED FULLFILLERS AND RESELLERS ONLY. FULLFILLERS AND RESELLERS ARE NOT AGENTS OF MUSIC GROUP AND HAVE ABSOLUTELY NO AUTHORITY
TO BIND MUSIC GROUP BY ANY EXPRESS OR IMPLIED
UNDERTAKING OR REPRESENTATION. THIS MANUAL IS COPYRIGHTED. NO PART OF THIS MANUAL MAY BE REPRODUCED OR TRANSMITTED IN ANY FORM OR BY ANY MEANS, ELECTRONIC OR MECHANICAL,
INCLUDING PHOTOCOPYING AND RECORDING OF ANY KIND, FOR ANY PURPOSE, WITHOUT THE EXPRESS WRITTEN PERMISSION OF MUSIC GROUP IP LTD.
ALL RIGHTS RESERVED.
© 2013 MUSIC Group IP Ltd.
Trident Chambers, Wickhams Cay, P.O. Box 146, Road Town, Tortola, British Virgin Islands
LIMITED WARRANTY
For the applicable warranty terms and conditions and additional information regarding MUSIC Group’s
Limited Warranty, please see complete details online at www.music-group.com/warranty.

4BASS V-AMP LX1B/BASS V-AMP PRO LX1B PRO User Manual
1.Introduction
Congratulations! By purchasing the BASS V-AMP/BASS V-AMP PRO, you have selected a modern virtual bass amplifier that sets new standards in the world of bass preamps. Our primary goal was to achieve the classic sound of bass amps by using “Physical Modeling” and implementing the newest DSP effects. Following the tremendous success of our V-AMP and its successor V-AMP 2, with the BASS V-AMP/BASS V-AMP PRO we are finally able to offer bass players the same diversity of sound.
However, we went a step further and expanded the concept to include items of interest to keyboarders and electric/acoustic guitar players. Those who have already used the V-AMP or the V-AMP 2 will appreciate the BASS V-AMP/ BASS V-AMP PRO as a terrific improvement.
We wanted to create two devices that would stir conversations in years to come: the BASS V-AMP/BASS V-AMP PRO is universally usable and offers authentic amp and even speaker sounds—all this without having to transport heavy equipment! Additionally, the most modern multi-effects processors assure unprecedented tonal freedom. In short, the BASS V-AMP/BASS V-AMP PRO gives you a “sound machine” sporting the hottest features of the day.
Future EPROM updates will make sure your BASS V-AMP/BASS V-AMP PRO always has the latest software and features.
BEHRINGER is a company in the field of professional audio studio technology. We have been successfully developing products for live and studio applications for years. Among those are microphones and 19" gear of all kinds (compressors, enhancers, noise gates, tube processors, headphone amplifiers,
digital effects units etc.), monitoring and PA loudspeakers as well as professional live and recording mixing consoles. Our entire technical know-how has gone into creating your BASS V-AMP/BASS V-AMP PRO.
To top it all, we worked together with professional bass players, whose sound suggestions led to the creation of original artist presets. Just a single glance at the separate preset sheet will be enough to completely amaze you.
Flexibility is what matters most in the music industry. Bass players should be able to offer a wide array of different sounds, and should also be able to temporarily adjust to the demands of home recording, studio and live applications. Bulky amp combinations are out of sync with today’s times precisely because of this reason. The BASS V-AMP/BASS V-AMP PRO offers you a maximum set of features in a compact unit that can be figured out in no time.
But enough talking: Nothing will convince you more than the shear joy of what you will hear and feel the first time you play with your BASS V-AMP/BASS V-AMP PRO. You will experience a latest-generation virtual bass amplifier with fascinating features:
• Extreme sound variety and flexible output routing options for bass players
• Multi effects, amp and loudspeaker simulations for keyboard players
• Remarkably clean, high-gain sound and acoustic simulations for electric guitars
• Sound enhancer for acoustic guitar sound pickup
• Uncompromising loop/sampler function, super-phat analog bass synth and the best distortion pedal simulations.
1.1 Before you get started
The BASS V-AMP/BASS V-AMP PRO was carefully packed at the assembly plant to assure its secure transport.
Should the condition of the cardboard box suggest that damage may have taken place, please inspect the unit immediately and look for physical indications
of damage.
◊Damaged units should NEVER be sent directly to us. Please inform the dealer from whom you acquired the unit immediately as well as the transportation company from which you took delivery.
Otherwise, all claims for replacement/repair may be rendered invalid.
Please make sure the unit is provided with sufficient ventilation, and never place the BASS V-AMP/BASS V-AMP PRO on top of an amplifier or in the vicinity of a heater to avoid the risk of overheating.
◊Before plugging the unit into a power socket, please make sure you have selected the correct voltage!
Power is supplied via the cable included with the unit. All requiered safety precautions have been adhered to. When you hook up your BASS V-AMP/ BASS V-AMP PRO to the mains, the unit is automatically turned on.
◊Please make sure that the unit is grounded at all times. For your own protection, you should never tamper with the grounding of the cable or the unit itself.
MIDI connections (IN, OUT/THRU) use standard DIN plug-in connectors. Data transfer takes place via the dry-contact optical couplers. Additional information can be found in chapter 8 (“INSTALLATION”).
1.1.1 Online registration
Please register your new BEHRINGER equipment right after your purchase by visiting http://behringer.com and read the terms and conditions of our warranty carefully.
Should your BEHRINGER product malfunction, it is our intention to have it repaired as quickly as possible. To arrange for warranty service, please contact the BEHRINGER retailer from whom the equipment was purchased. Should your BEHRINGER dealer not be located in your vicinity, you may directly contact
one of our subsidiaries. Corresponding contact information is included in the original equipment packaging (Global Contact Information/European Contact Information). Should your country not be listed, please contact the distributor nearest you. A list of distributors can be found in the support area of our website (http://behringer.com).
Registering your purchase and equipment with us helps us process your repair claims more quickly and efficiently.
Thank you for your cooperation!
2. Control Elements
An illustration of all control elements is located on the separate sheet included with this user’s manual. The controls on both devices are numbered the same way. How the two versions differ is clearly marked by using the designations
“BASS V-AMP only” or “BASS V-AMP PRO only.” Connections on both versions are covered in a separate chapter in this user’s manual.
2.1 Unit top/front side
(1)Turn your BASS V-AMP PRO on using the POWER switch. The POWER switch should always be in the “Off“ position (depressed) whenever you first connect the unit to the mains.
◊Please note: Merely switching the unit off does not mean that it is fully disconnected from the mains (BASS V-AMP PRO only). When not using the unit for prolonged periods of time, please unplug the unit’s power cord from the wall.
(2)The GAIN control determines level and saturation charac-teristics of the amp simulation.
(3)The VOLUME control governs the volume of the selected preset.
(4)The BASS control on the EQ section lowers or elevates bass frequencies.

5BASS V-AMP LX1B/BASS V-AMP PRO LX1B PRO User Manual
◊When the TAP button (11) is depressed, the BASS control changes its function to DEEP control, which influences the sound in the lower frequency segment.
(5) The MID control lowers or elevates the mid frequencies.
◊MID-SHIFT/SHAPE: When you select an amp simulation using the AMPS control, press the TAP button to use the MID control to adjust the mid frequency range (SHIFT). With amp simulations that don’t originally have such a function, pressing the TAP button as described above activates the BEHRINGER SHAPE filter instead.
(6)The TREBLE control regulates the upper frequency range of an activated preset.
◊Pressing the TAP button (11) changes the function of the TREBLE control to PRESENCE control. This enables lowering/elevating upper frequency range values of a filter selected for the amp model active at this time.
This filter simulates the frequency-dependent coupling of tube amps.
◊Please pay attention to the special functions (described under ( 8 ) ) of the following points: ( 2 ) , ( 3 ) and ( 5 ) !
(7)The AMPS control lets you select one of the 32 amp simulations. 16 LEDs surround this control, whereby 1 LED is assigned to 2 amp types. You select one of the first 16 amp types (white lettering) by simply turning the control.
To select the next 16 amps (17 - 32, grey lettering), keep the TAP button pressed as you turn the AMPS control.
◊The “17 - 32” LED in the lower left corner of the DISPLAY lights up when one of the amp simulations numbered 17 - 32 is selected.
Additionally, you have the option to activate a PREAMP BYPASS via the TUNER (9) and TAP (11) key combi-nation. When PREAMP BYPASS feature is activated, no AMPS control LED is on. To disengage the PREAMP BYPASS feature, either select an amp model of your choice or press the TUNER and TAP keys again.
(8)These five keys are used (among other things) for preset selection of the presets bank shown in the display.
In EDIT mode (activated by simultaneously pressing the arrow keys described under (10) ), the function of individual keys is indicated by the print located directly above the respective button:
• A: Activates the MIDI function. By utilizing the arrow keys, the MIDI channel used for sending and receiving (1 to 16) can be set up.
After selecting a MIDI function via the A key, pressing the TAP key relays the MIDI out connector to MIDI Thru. When in this mode, the unit sends no MIDI information of its own; instead, it merely passes on the data received at the MIDI In.
• B: Switches the DRIVE function on and off. When DRIVE is enabled, the controls (2), (3) and (5) take up the following functions:
• GAIN regulates the distortion degree (“DRIVE”).
• The VOLUME control regulates an additional volume control (“BOOST”).
• Use the MID control like the tone control on a simulated distortion pedal (“TONE”).
Well-known floor effects units are simulated with these setups.
◊When the DRIVE function is activated, turning the EFFECTS MIX controls lets you also set up the WahWah. The LEDs surrounding the EFFECTS MIX control show the position of the pedal. When the LED is not on, the Wah-Wah is inactive.
◊When the Auto Wah/P-Funk’n is activated, the WahWah cannot be used.
• C: This key activates the CABINETS mode. Use the arrow keys to select a type of loudspeaker or a combination of loudspeakers. You can also completely switch off the speaker simulation (“-”). Additional information is available in chapter 5.2.
• D: Activates the X-OVER function. Use the arrows to regulate the cut-off frequency between high-pass and low-pass filter. This is done in 50 gradients (please also see chapter 6.3).
• E: Activates the DENOISER function. You may change the threshold of the expander by using the arrow keys. The EFFECTS control regulates the sensitivity of the noise reduction system, while pressing TAP changes the function of the EFFECTS control so that it regulates the frequency range of the noise reduction system (also see ch. 5.3).
◊After preset editing, press the TUNER/EXIT button to quit (the EDIT MODE LED dies out).
◊DIGITAL OUT: The digital output on the BASS V-AMP PRO can be configured by pressing buttons A and B simultaneously. The display shows “SP” for S/PDIF or “AE” for AES/EBU format. Alternating between the two formats is done by using the TAP key. The LEDs let you see the respective sample rate (internal synchronization and sampling rates of
44.1, 48 or 96 kHz or external wordclock synchronization; see table 2.1).
To select the most appropriate sampling rate for the receiving unit, please use the arrow keys. Press the TUNER/EXIT key to quit.
◊CONFIGURATION: By pressing the D and E keys simultaneously on your BASS V-AMP PRO, you can select the global operating mode (keys B and D on your BASS V-AMP), so that an adjustment to diverse studio and live situations is possible (see chapter 3). Please press the TUNER/EXIT key to quit.
(9)The TUNER key engages the tuner. Additionally, you can exit the EDIT mode by pressing this key (see chapter 7).
(10)Both arrow keys are used to select the next preset bank (BANK DOWN und BANK UP). Keeping the keys pressed lets you quickly jump through the preset banks. Pressing both arrow keys at the same time engages the EDIT mode. When you press one of the A - E buttons ((8)) afterwards, each arrow key takes over an edit function.
(11)The TAP key has eight functions:
• “Tap”: Tap the TAP key in the rhythm of a tune, and the selected effect adjusts automatically to the appropriate speed.
• “Deep”: By keeping the TAP key pressed, the BASS control assumes the function of a DEEP control, so that it regulates the sound in the deep bass end of the spectrum.
• “Mid-Shift/Shape”: When an amp simulation is selected using the AMPS control, keep the TAP key pressed and use the MID control to regulate the middle portion of the frequency range (SHIFT).
Our BEHRINGER SHAPE filter is automatically activated with amp simulations that do not have such a function (as described above) in the original.
• “Presence”: Keep the TAP key pressed to use the TREBLE control to regulate PRESENCE in a particular amp simulation.
• “2nd parameter”: The second effect parameter (regulated by the EFFECTS control) is accessed by keeping the TAP button pressed (see chapter 6).
• “Amp models 17 - 32”: Keep the TAP key pressed and select the desired simulation by using the AMPS control.
• “MIDI Thru”: The MIDI Out connector can be set to MIDI Thru (see (8) A).
• “Compressor”: The compressor control regulates the attack time when the TAP key is kept pressed (see (14) ).
6BASS V-AMP LX1B/BASS V-AMP PRO LX1B PRO User Manual
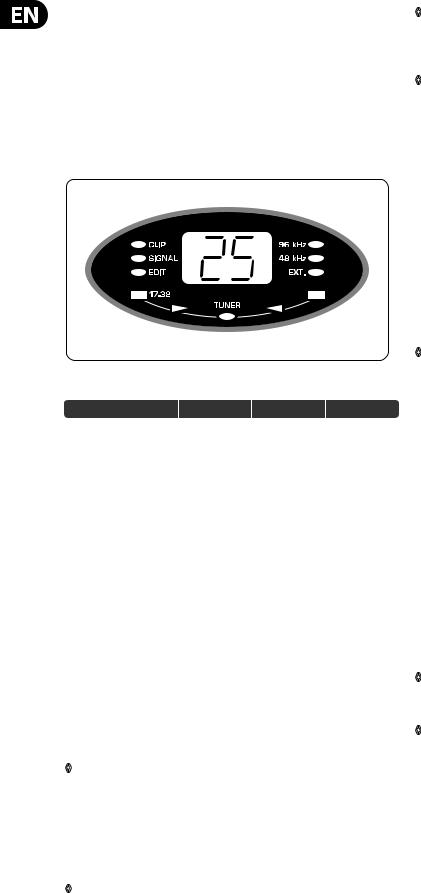
(12)DISPLAY shows the selected effects bank and gives information about the changes occurring while editing. When the tuner is enabled, the display shows the tuning of the connected instrument. When one of the amp simulations numbered 17 - 32 is selected, the LED located in the lower left corner of the DISPLAY lights up.
The display on the BASS V-AMP PRO gives additional information about the digital format and the sample rate of the unit, and indicates that the BASS V-AMP PRO should be synchronized to an external wordclock
signal. Connec-ted input signals are displayed with the green SIGNAL LED; distorted signals are marked with the red CLIP LED.
Fig. 2.1: BASS V-AMP PRO display |
|
|
|
|
|
|
Clock |
|
LED ext. |
|
LED 48 kHz |
|
LED 96 kHz |
internal 44.1 kHz |
|
— |
|
— |
|
— |
|
|
|
||||
internal 48 kHz |
|
— |
|
|
|
— |
internal 96 kHz |
|
— |
|
— |
|
|
external (any frequency) |
|
|
|
— |
|
— |
|
|
|
|
|
|
|
Tab. 2.1: Output formats and LED allocation in the diplay (BASS V-AMP PRO only)
(13)The EFFECTS control lets you select an effects preset or a combination of several effects. This continuously turnable control is surrounded by a circle of 16 LEDs. Each effect has a corresponding LED.
(14)The COMPRESSOR control lets you compress or limit your sound. When you turn the COMPRESSOR control as far left as possible without triggering
off a LED, the dynamic characteristics of the signal are not changed. The compressor on the BASS V-AMP/BASS V-AMP PRO controls two important functions:
• You set the compression sensitivity by turning the COMPRESSOR control. The more you turn the control, the more pronounced the compression. When the last LED lights up while turning the control to the right, the effect acts as a limiter.
• Turning the COMPRESSOR control while keeping the TAP key pressed lets you set the attack parameter of the com-pressor.
◊More detailed information about how a compressor works can be found in chapter 5.3.
(15)When an effect is selected using the EFFECTS control (13) , the proportion with which this effect influences the entire sound is regulated using the EFFECTS MIX control. As long as no LED lights up while turning the
control leftwards, no effect is mixed in. This is also called an effect bypass, and mutes all effects accross the board.
◊When the TAP key is kept pressed, a second effects parameter can be regulated using the EFFECTS control (see tables 6.1 and 6.2).
(16)The MASTER control regulates the overall volume of your BASS V-AMP/ BASS V-AMP PRO.
◊In addition to the AUX LEVEL control on the BASS V-AMP, this is the only non-programmable control of the BASS V-AMP/BASS V-AMP PRO. All additional controls are infinitely turnable, and their positions can be saved in a preset.
◊The LED circles surrounding the VOLUME, BASS, MID, TREBLE, GAIN, EFFECTS MIX and COMPRESSOR controls each have nine LEDs. Either one LED or two adjacent LEDs light up in each LED circle at any one time. This occurs when the control is in an in-between position. This way,
a total of 17 positions can be displayed.
(17)The connector labeled INPUT is the 1/4" TS jack input of the BASS V-AMP/ BASS V-AMP PRO, which is where an electric bass, an acoustic guitar,
a keyboard etc. can be connected. Use a common 1/4” mono jack cable for this purpose.
(18)The LINE IN switch regulates which signal source of the BASS V-AMP PRO is processed. When the switch is not pressed, this refers to the the signal connected to the input connector (e.g. electric bass). When the switch is depressed, the line signal connected to the PRE DSP INSERT (LINE IN, (20) ) is routed to the processor (par-ticularly useful for keyboards).
(19)You can connect standard headphones to the PHONES connector of your
BASS V-AMP/BASS V-AMP PRO.
◊When headphones are connected to your BASS V-AMP/BASS V-AMP PRO, studio mode 1 (S1) is automatically activated. If you opted not to select a loudspeaker type in your setup and then connect a set of headphones, your BASS V-AMP/BASS V-AMP PRO automatically selects
a speaker simulation. This improves the subjective listening impression while using headphones. To look up which speaker simulation is paired to which amp, please see table 5.1. However, you can deactivate a simulation while listening to headphones by selecting “-” in CABINETS mode. Conversely, it is possible to freely select the global output configuration when a set of headphones is connected, so that you can for example check the effect various modes have on your sound.
2.2 Rear panel of the BASS V-AMP PRO
(20)You can insert external effects into the serial insert loop featured on the BASS V-AMP PRO. The SEND/LINE OUT connector is connected to the input of your effects unit for this purpose. The SEND/LINE OUT output is tapped into directly before the digital signal processor (PRE DSP). This connector is therefore ideal for recording “dry” signals (i.e. without the effects portion).
Please connect the RETURN/LINE IN connector with the output of your external effects processor or recorder.
◊When using the serial insert loop, please make sure that your effects processor is not set to 100% effect signal (“wet”), because otherwise the direct signal is missing.
◊Pressing the LINE IN switch (22) routes the signal connected to the RETURN/LINE IN connector to your BASS V-AMP PRO. This function may be of use when for example listening to a “dry” recording of a guitar signal on your BASS V-AMP PRO before running it through the effects.
(21)The stereo signal of the BASS V-AMP PRO without analog speaker simulations can be taken at the ANALOG LINE OUTPUTS. For example, this is how you connect an external stage amp when performing live.
(22)The POST DSP INSERT RETURN (IN) stereo jack pair is used for connecting to the outputs of your external stereo effects processor. The signal taken at the POST DSP SEND (OUT) outputs (25) is brought back into these jacks.
(23)The ground connection on the DI OUT outputs (24) can be interrupted with the GROUND LIFT switch. This way, rumble noise and ground loops can be avoided. The ground connection is interrupted when the switch is depressed (LIFT).

7BASS V-AMP LX1B/BASS V-AMP PRO LX1B PRO User Manual
(24)The balanced stereo signal of your BASS V-AMP PRO can be taken at the
DI OUT. This output should be connected to two balanced channel inputs on your mixing console. The signal level is set at +4 dBu in studio modes and at -10 dBu for live modes.
(25)The connection to the inputs of an external stereo effects unit can be made using the POST DSP SEND (OUT) stereo output. The signal present at this output is identical to the signal at the digital outputs. In contrast to the SEND/LINE OUT connector (20), the signal is POST DSP here. In case both of the respective RETURN (IN) connectors (22) are not in use, the identical signal can be taken at the ANALOG LINE OUTPUTS (21) .
(26)BASS V-AMP PRO’s signal can be digitally taken at the S/PDIF output.
(27)The digital output signal of the BASS V-AMP PRO in AES/EBU format is found at the AES/EBU output (XLR connector), provided AES/EBU has been selected as output signal format (please adhere to the second note under (8) E).
(28)Devices used to externally synchronize your BASS V-AMP PRO should be connected at the WORDCLOCK connector. This is a high-impedance connector, meaning that it has no internal terminal resistor (75 Ohm).
(29)This is the MIDI OUT/THRU connector of the BASS V-AMP PRO.
The connector is preconfigured in the MIDI Out setting at the assembly plant, but it can be switched to MIDI Thru (see (8) A).
(30)A MIDI foot pedal, for example the BEHRINGER MIDI FOOT CONTROLLER FCB1010, can be connected at the MIDI IN connector. Please also read chapter 8.4.
(31)SERIAL NUMBER.
(32)FUSE RETAINER/VOLTAGE SELECTOR. Please make sure that the voltage indicated in the voltage selector maches the local voltage before you connect the unit to the mains. Always replace blown fuses with fuses of the same type. Some units feature a fuse retainer in which a selection between 230 V and 120 V is possible. Please beware: When using
your unit outside of Europe on 120 V, a higher fuse rate is required (see chapter 8 “INSTALLATION”).
(33)Power is supplied via an IEC connector. The matching cable is provided with the unit.
2.3 BASS V-AMP connectors (side)
(21)The stereo output signal of your BASS V-AMP can be taken at the balanced LINE OUT connectors.
(29)This is the MIDI OUT/THRU connector of the BASS V-AMP. The connector is configured to MIDI Out at the assembly plant, but it can be reconfigured to MIDI Thru (see (8) A).
(30)A MIDI foot pedal (e.g. the BEHRINGER MIDI FOOT CONTROLLER FCB1010) can be connected to the MIDI IN connector. More on this subject in chapter 8.4.
(33)Connect the power supply unit via the AC IN connector. When you plug the power supply unit in the mains, your BASS V-AMP is automatically switched on.
(34)Connect the stereo jack of your footswitch FS112V to the FOOTSWITCH connector. This will enable you to alternate between different presets within a preset bank. When you keep the DOWN button on the footswitch pressed for longer than two seconds, this automatically powers up the tuner. Doing the same again alternately turns the tuner off.
(35)The volume of the signal fed into the AUX IN input is adjusted by using the
AUX LEVEL control.
(36)By using the AUX IN jack input, you can feed an additional stereo signal into your BASS V-AMP. This way, you can play along to a drum computer or a playback.
3. Application Examples/ Operating Modes
To optimally adapt your BASS V-AMP/BASS V-AMP PRO to various studio and/ or live situations, you may choose between six different operating modes (CONFIGURATION, keys B and D in the case of BASS V-AMP as well as keys D and E in the case of BASS V-AMP PRO). These operating modes function independently from the settings already selected on the unit itself (i.e. how the output signal of your BASS V-AMP/BASS V-AMP PRO is taken). This way, the left and the right output signals can be used entirely differently. The table on the following
page explains in full detail how you can tap into the signal at the output of your BASS V-AMP/BASS V-AMP PRO with or without a speaker simulation/EQ. Additionally, the effects signal at the output does not necessarily have to be identical for both sides (see table 3.1).
3.1 Selecting an operating mode (CONFIGURATION)
Your BASS V-AMP/BASS V-AMP PRO is set to studio 1 (S1) operating mode when it leaves the assembly plant. To change this setting, select the CONFIGURATION mode. Please press the B and D keys at the same time (BASS V-AMP) or D and
E (BASS V-AMP PRO). By using the arrow keys, you select between different operating modes. To exit this mode, press TUNER once.
Various operating modes are described on the following pages in greater detail. To adjust the output level of your instrument, use a specific level control located at the beginning of the signal path. This way, it is possible to adjust the input sensitivity by +12/-6 dB (middle value = 0 dB): Please select the CONFIGURATION mode and adjust the desired sensitivity level by keeping the TAP key pressed and turning the GAIN control.
◊A change in input gain has an effect on all presets. Therefore, use it with caution to allow for example an adjustment to instruments with strongly vary-ing signal levels.
3.2 Standard setup
To use your BASS V-AMP/BASS V-AMP PRO at the practice room, connect the unit as described in fig. 1.4. and 2.3 of the included appendix. Instead of a bass, you can of course connect other musical instruments. Connect your headphones to the PHONES connector. By using the FS112V footswitch delivered with your BASS V-AMP/BASS V-AMP PRO, you can alternate between the five presets contained in a preset bank, or you can power up the tuner.
Live modes L1 and L2 featured in figures 1.4, 1.5 and 2.4 are particularly well suited for more demanding live or practice room applications. By using a MIDI foot controller (fig. 1.4 and 2.5), you can alternate between different presets, banks and amps, the tuner etc. An additional stereo signal can be fed into your BASS V-AMP/BASS V-AMP PRO at the aux in (see fig. 1.3 and 1.5).
Naturally, your BASS V-AMP/BASS V-AMP PRO is in its best shape when its bass parts are immortalized on an analog or digital recording medium. Its advantages are most apparent when used in recording situations. Your BASS V-AMP/
BASS V-AMP PRO gives you unsurpassed flexibility because you can simply take it with you into the control room and forget all about having to use speakers. This way, you have the best control of the sound of your BASS V-AMP/ BASS V-AMP PRO at all times.
If you realize that you have to change the signal on the mixing console, you can work with the tone engineer on your sound so that the recording is done optimally, capturing your sound the way you want it. Simply put: no annoying back-and-forth trips between studio and control room.
Loading...