

Page 1
BeoSound 1
Guide
Page 2
Legal Notice for the US market: For the Canadian market only!
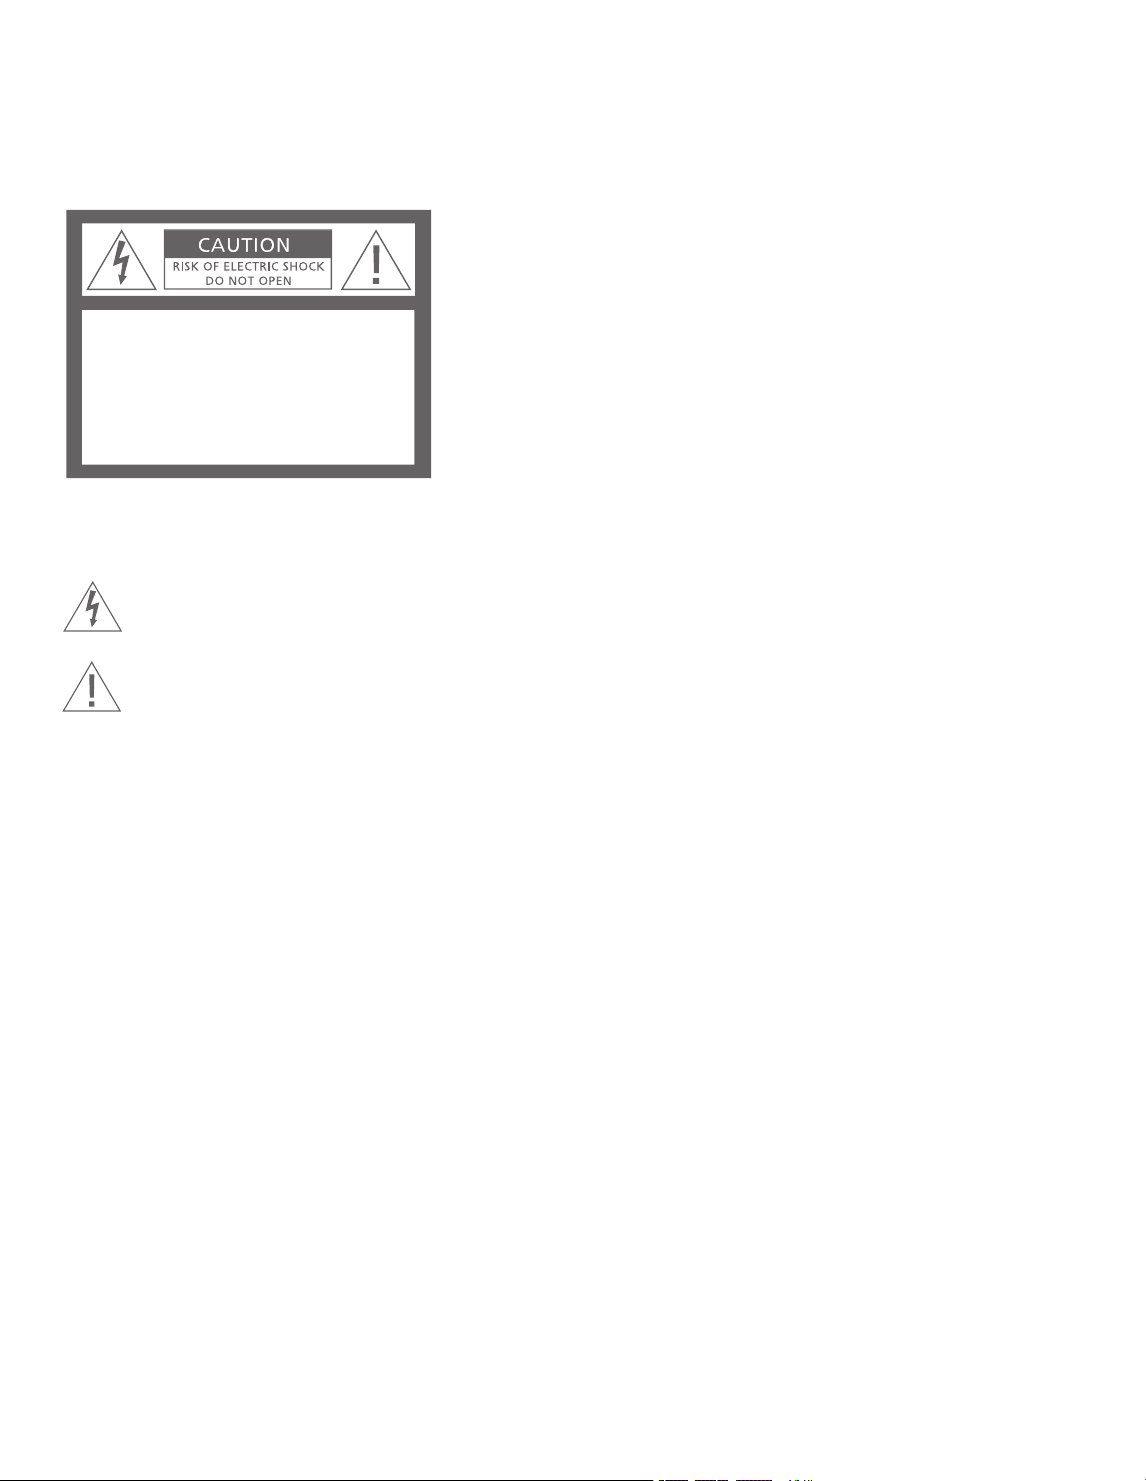
CAUTION: To prevent electric shock do not use
the polarized plug, attached to this apparatus,
with an extension cord, receptacle or other
outlet unless the blades can be fully inserted
to prevent blade exposure.
CAUTION: To reduce the risk of
electric shock, do not remove
cover (or back).
No User-serviceable parts inside.
Refer servicing to qualified
service personnel.
WARNING : To prevent fire or electric
shock, do not expose this appliance to
rain or moisture.
This symbol indicates that a dangerous
voltage constituting a risk of electric
shock is present within this unit.
This symbol indicates that there are
important operating and maintenance
instructions in the literature
accompanying this unit.
Page 3

A movable music centre
Place your BeoSound 1 where you like.
The compact design enables you to
bring it with you anywhere.
BeoSound 1 gives you an excellent
sound experience no matter how near
or far you are from the speakers. The
sound is optimised and no additional
settings are required.
Connect BeoSound 1 to the mains and
press a button to listen to sound of your
choice – it’s as simple as that.
3
Page 4
4
(A)
AUX
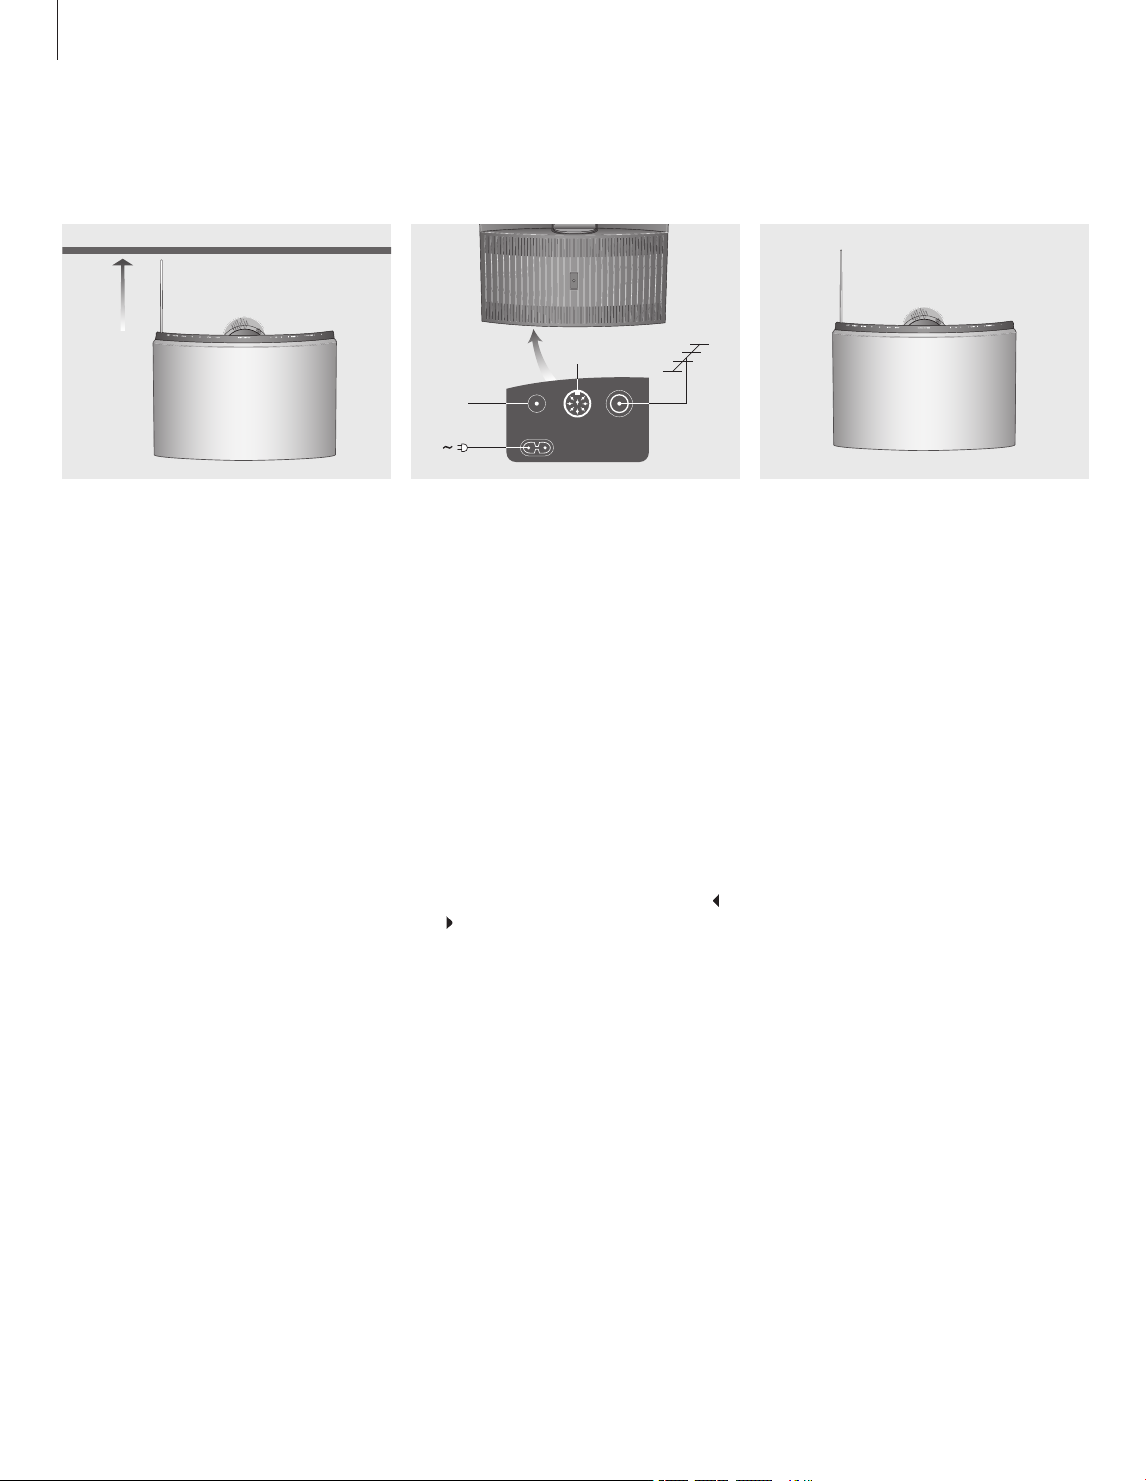
Before you start…
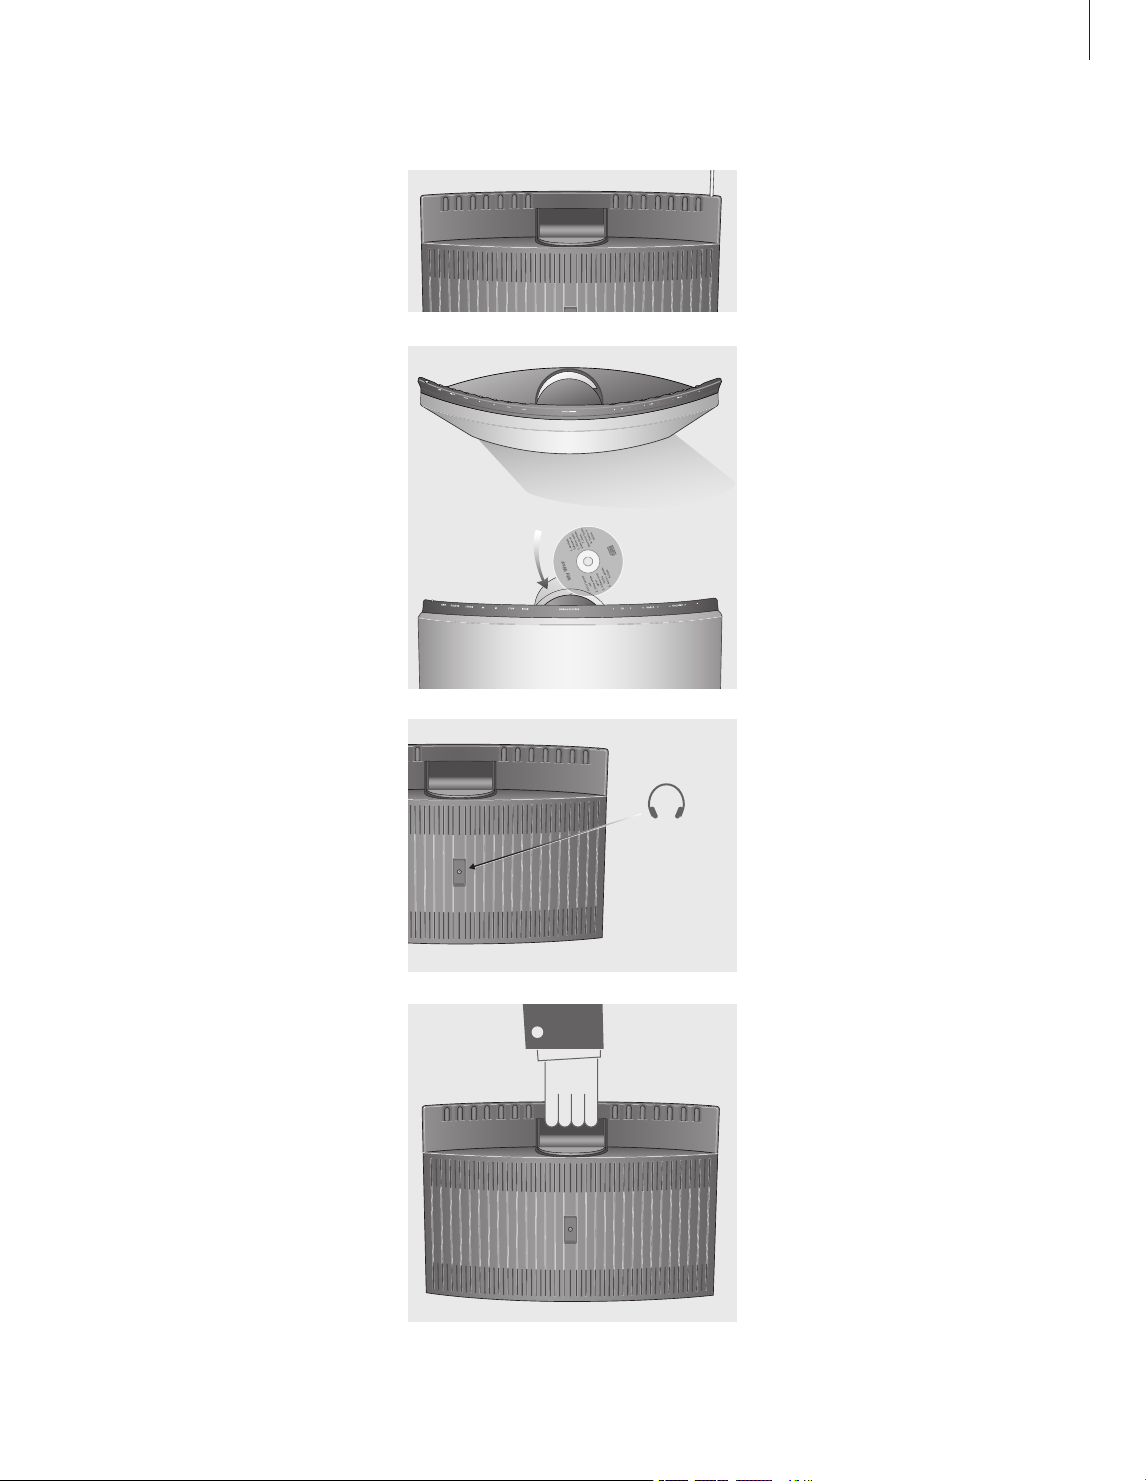
Placement
Allow enough space above the BeoSound 1 to
enable the built-in aerial to extend and the CD
compartment to raise.
Make sure that the BeoSound 1 is always
placed on a firm, stable surface.
The BeoSound 1 is designed for indoor use
in dry, domestic environments only, and for
use within a temperature range of 10–40°C
(50–105°F).
If you connect external sources to the
BeoSound 1, do not switch on the mains until
you have made all connections.
Connections
The socket panel is located underneath the
BeoSound 1. The socket panel contains mains,
aerial and AUX sockets.
Auxiliary equipment…
Use the AUX socket to connect auxiliary
equipment, e.g. an audio tape recorder or
a mini disc player. Please consult a Bang &
Olufsen retailer for details.
If a recorder is connected to your BeoSound 1
you can make recordings from the radio and
CD player. Please refer to the user’s guide
supplied with the recorder.
However, if you operate the BeoSound 1 while
such a recording is in progress, the recording
will be disrupted.
The AUX socket is activated by pressing both
CD simultaneously.
,
Maintenance
Do not use alcohol or other solvents to clean any
part of the BeoSound 1. We do not recommend
using special cleaning CDs in the BeoSound 1.
Before you clean the BeoSound 1, we
recommend that you disconnect it from the
mains to prevent inadvertent operation.
Clean dusty surfaces using a dry, soft cloth.
If necessary remove grease stains or persistent
dirt with a lint-free, firmly wrung cloth,
dipped in a solution of water containing
only a few drops of mild detergent, such as
washing–up liquid.
The front may also be cleaned with a soft
brush mounted on a vacuum cleaner set to the
lowest level.
External aerial…
If you wish to connect an external aerial to
BeoSound 1, move the built-in aerial plug
to the position marked
external one to the socket instead.
(A)
, and connect the
Page 5

Contents of the Guide
5
Key to using this guide
Use this Key to identify what a button
or a display looks like in an instruction
sequence.
RADIO
VOLUME
STOP
Pr 4
Buttons on the BeoSound 1
close-up operation panel or
on the Beo4 remote control
Display on BeoSound 1
BeoSound 1
6 Buttons on the close-up operation panel
Basic daily operations
8 Switch on the radio
8 Switch on the CD player
9 Adjust volume
9 What you see in the display
9 Changing the display mode or light
Making the radio stop at a specific
time
10 Setting a Stop Timer
Set the time
11 Set the time for the built-in clock
Making the radio or CD player start
at a specific time
Use the PIN code system
20 Enter a PIN code
20 Switch on the PIN code
21 Change the PIN code
21 Switch off the PIN code
21 Using a Master code
12 Setting a Wake-up Timer
Playing favourite CD tracks only
14 Choose tracks to listen to
Tuning in radio stations
16 Automatic tuning
17 Manual tuning
17 Delete a radio station
Remote control operation
18 Operating BeoSound 1 with Beo4
Page 6
6
Your key to using BeoSound 1
Operation is easy. The buttons essential
to daily operation are on the right-hand
side, while those on the left-hand side have
secondary functions.
Just press a single button to listen to sound of
your choice. The display will show your choice.
AERIAL is used to extend and retract the built-in aerial
DELETE is used to delete station settings and to omit
CD tracks from playback
STORE is used to store radio stations, volume level,
clock and Wake-up Timer
and are used for searching through a CD, for
tuning in radio stations and for programming the
clock and setting a Wake-up Timer
STOP is used to pause and stop the CD player, for
programming Stop Timers and tuning in radio stations
LOAD is used to open and close the CD compartment
AERIAL
DELETE
STORE
STOP
LOAD
CD
RADIO
VOLUME
STAND BY
Is used to switch on the CD player.
backwards and forwards through tracks. Pressing
both buttons at the same time activates the AUX
socket
Is used to switch on the radio. and steps
backwards and forwards through radio stations
Is used to adjust volume. and turns the
volume down and up.
Press simultaneously to mute the speakers.
Press one of the buttons to recall sound
Switches BeoSound 1 to standby
and steps
Page 7
7
BeoSound 1 presents essential audio
sources in a compact and easily
operated way.
The compact design and the built-in
handle lets you to take the music with
you.
The radio finds the first available station
the first time you press the RADIO
button. Press AERIAL to extend or
retract the built-in aerial. You can also
push the aerial down manually.
If no CD is loaded when you press
CD, the CD compartment raises
automatically, ready to be loaded with
your favourite CD.
All buttons are located at the back of the operation
panel.
The CD compartment is located behind the
operation panel.
• Press LOAD to raise the CD compartment.
• When the CD compartment is raised, slip the CD
into the slot provided.
Always load the CD with the CD label facing
you.
• Press LOAD again to lower the compartment or
just press CD to play your CD.
Remove the cover at the back of BeoSound 1 and
connect the headphones to the socket.
The speakers will be muted when headphones are
connected.
Just use the handle when moving BeoSound 1.
Page 8
8
Daily operation of radio and CD player
To listen to the radio, just press one of
the radio buttons, the radio will start
playing on the radio station you last
listened to.
You extend the built-in aerial by
pressing the AERIAL button. You can
store up to 59 different radio stations
in your BeoSound 1 (see page 12). To
step between stored radio stations, the
program number or frequency must be
shown in the display.
If no CD is loaded when you press one
of the CD buttons, the CD compartment
raises, ready for you to load a CD.
When the CD has stopped playing and
no commands have been received for
30 minutes, BeoSound 1 switches to
standby.
You can adjust and store the volume
level at any time.
The display will keep you informed of
what you have chosen and you can set
the display light to the level suitable
for you. Also, choose the display mode
you prefer for radio stations; program
number or frequency.
Switch on the radio
When you press RADIO before any radio
stations have been stored, the radio will find
the first available station.
RADIO
Pr 12
RADIO
STAND BY
AERIAL
Note: When the program number is shown, press
or to check the frequency for the current radio
program number.
Press RADIO to switch on the
radio
The program number or
frequency is shown in the
display
to step down and to
Press
step up through the stored
stations. Keep the button
pressed down to ‘search’
through stored stations
Press to switch BeoSound 1 to
standby
Press AERIAL to extend or retract
the built-in aerial
Switch on the CD player
When you search through a CD, searching
will continue as long as you keep the button
pressed down. The CD resumes playing, when
the button is released.
CD
CD 1
CD
STOP
STOP
LOAD
Press CD to switch on the CD
player
The track number is shown in
the display
to step to the previous
Press
track. Press
track
Press
through the CD
Press
through the CD
Press STOP to pause the CD
Press STOP again to resume
playback
Press LOAD to open or close the
CD compartment
to step to the next
to search backwards
to search forwards
Page 9

9
Adjust volume
You can turn the volume up and down at
any time. If you store a volume level, the
BeoSound 1 starts at this level next time it is
switched on. The maximum volume level is 72,
but the maximum level that can be stored is 60.
Press
VOLUME
32
STORE
VOLUME
to turn the volume
down
to turn the volume up
Press
The volume level is shown in the
display
Press STORE twice to store
the volume level shown in the
display
Press both
simultaneously to mute the
speakers.
Press one of the buttons to
recall the sound
and
Reading the display
The luminous display will keep you informed
of the source you have chosen, and what the
system is doing.
Pr13
88.9
Cd 1
Cd--
2.33
32
Pr13 indicates the present radio
program
88.9 indicates the radio
frequency
Cd 1 indicates that track
number one on the CD is
playing
Cd-- indicates that the CD is
paused
2.33 indicates the time when
searching through a CD
32 indicates the volume
Changing the display
Change the display mode or light, three
different light settings are available.
BeoSound 1 remembers ypur mode or light
setting until you change it again.
Change the display mode…
RADIO
RADIO
Change the display light…
STORE
VOLUME
and at the same time to
Press
change from program number
to frequency
To change back to program
number, pres
the same time
Keep the STORE button pressed
down
Press
and press
display light
and again at
to dim the display light
to brighten the
– –
45
20.15
AU
Pin
•
– – indicates that the speakers
are muted
45 indicates the number of
minutes for a Stop Timer
20.15 indicates the time
AU indicates that a the AUX
socket is activated
Pin indicates the PIN code
system
BeoSound 1 is in standby
Page 10

10
Make BeoSound 1 stop at a specific time
You can decide in advance how
long you want to listen to the radio.
BeoSound 1 can switch automatically to
standby when you are done.
You set the number of minutes – 15,
30, 45, 60, 90, 120 or 00 – that you
would like the radio to play before it
switches to standby.
Make a Stop Timer
You can set how long the radio is to play
before it switches to standby. The BeoSound 1
can of course be switched to standby before
this Stop Timer is carried out.
RADIO
STOP
15
STOP
30
Press RADIO to switch on the
radio
Press STOP to set a Stop Timer
The number of minutes before
the radio will switch to standby
is shown in the display
Press STOP again to change the
number of minutes
The number of minutes is shown
in the display
Wait 5 seconds with the time
shown in the display, then the
Stop Timer is stored
Note: The Stop Timer can be cancelled by pressing
CD or STANDBY before the Stop Timer settings are
stored. Also choosing 00 is the same as cancelling
the Stop Timer.
NOTE: The Stop Timer function can only be used
if at least one radio station is stored.
Page 11

Set the right time
11
The BeoSound 1 has a built-in 24 hour
clock. You must set the clock yourself.
If you want to make use of the
Wake-up Timer function described on
the next page, you must first make sure
that the built-in clock in the BeoSound 1
has been set correctly. If BeoSound 1
has been disconnected from the mains
for approximately 30 minutes, the clock
must be set again.
Set the built-in clock
You must set the built-in clock manually while
BeoSound 1 is in standby.
20.00
--,--
14.25
STORE
15.00
While BeoSound 1 is in standby,
and simultaneously
press
and hold until the time is shown
in the display. Both the digits
and the dot are blinking
If no time is set, the display will
show lines instead of digits
or to find the correct
Press
time. Holding down or
will accelerate the change in
numbers
Press STORE to store the correct
time. The time is briefly shown
in the display
See the stored time
The stored time can be shown briefly in the
display.
14.25
STANDBY
14.25
NOTE! Pressing the red button on the Beo4 remote
control will show the time in the display
Press both and shorty. The
time is shown briefly in the
display, the dot is blinking
While BeoSound 1 is in standby,
press the STANDBY button to
see the time in the display
Page 12

12
Wake-up Timer
You can make BeoSound 1 wake you up
in the morning.
The Wake-up Timer is a once-only
Timer. Like an alarm clock it is deleted
once it has been executed.
While the Timer is executed, the time is
shown in the display, when you operate
or switch off your BeoSound 1, the
display returns to the mode you have
chosen.
Once you have made one Wake-up Timer,
BeoSound 1 automatically suggests the
time you entered for the latest Wake-up
Timer in the display when you enter a
new one.
Wake-up Timers can of course also be
deleted again.
Enter a Wake-up Timer
When you choose radio as your source, the
radio will start playing on the station you last
listened to. If you choose CD as your source,
make sure that a CD is loaded. If you do not
choose a source, the radio will be used for
your Wake-up Timer.
While BeoSound 1 is in standby,
or until the
6.25
7.10
RADIO
Pr
STORE
7.10
press and hold
time for the latest Wake-up
Timer is shown in the display,
the digits are blinking
or to find the time
Press
you want the BeoSound 1 to
start playing. Holding down
or will accelerate the change
in numbers
Press the button of the source
you want to use for your Wakeup Timer; RADIO or CD. Pr or
Cd is shown in the display
Press STORE to store the time
you want. The time for the
Wake-up Timer is briefly shown
in the display
Using Beo4
You can also use the Beo4 remote control to
enter a Wake-up Timer.
MENU
6.25
1 – 9
7.10
RADIO
Pr
GO
7.10
While BeoSound 1 is in standby,
press the MENU button on
Beo4. The time for the latest
Wake-up Timer is shown in the
display, the digits are blinking
Key in the time you want
BeoSound 1 to start playing
Press the button of the source
you want to use for your
Wake-up Timer, RADIO or CD.
Pr or Cd is shown in the display
Press GO to store your
Wake-up Timer. The Wake-up
time is shown briefly in the display
NOTE! If the clock has not been set, or BeoSound 1
has been disconnected from the mains for
approx. 30 minutes, it is not possible to set a
Wake-up Timer. The clock must be set first, refer
to the previous page.
Page 13

Check or delete a Wake-up Timer
You can call up the settings for the Wake-up
Timer in the display to check the time or to
delete the Wake-up Timer.
While BeoSound 1 is in standby,
or until the
7.10
press and hold
time for the Wake-up Timer is
shown in the display, the digits
are blinking
13
STORE
7.10
DELETE
-,--
Press STORE to confirm your
Wake-up Timer, or…
press DELETE to delete the
Wake-up Timer. -,-- is shown in
the display
Page 14

14
Play favourite CD tracks only
If you only like some tracks on a CD,
you can set BeoSound 1 to ignore the
ones you do not like.
You make this selection by “deleting”
the tracks you do not want to listen to.
The CD player remembers your selection
as long as you leave the CD in the CD
compartment. Once the CD compartment
has been opened, it is again possible to
listen to all the tracks on the CD.
Omit tracks from playback
When you ‘delete’ a track on a CD, the next
track starts playing.
CD
Cd 1
DELETE
CD
Press CD to switch on the CD
player
The track number is shown in
the display
Press DELETE to ‘delete’ the
track you are listening to
to step to the next, and
Press
to step to the previous track,
and continue ‘delete’ the tracks
you do not want to listen to
Page 15

15
Page 16

16
Tune in radio stations
You can let the radio find the available
radio stations for you, and then store
them on a program number of your
own choice.
You can also tune the radio manually
and find specific stations yourself.
To tune in stations, the frequency must
be shown in the display.
Any stored radio station can be deleted
again.
Search tuning
During search tuning all available stations
producing an acceptable signal are found.
However, this may include empty channels
which should not be stored.
RADIO
92.3
92.8
STORE
Pr 12
STORE
Note: If you do not wish to store a found station,
you resume search tuning by pressing
Press RADIO to switch on the
radio
or to see the
Press
frequency in the display
or again to start the
Press
search tuning function
During tuning, the frequency is
shown in the display
Press STORE when the requested
station is found
The first available program
number will blink in the display
or to change the
Press
program number, if you like
Press STORE to store the station
on the displayed program
number
or twice to resume
Press
search tuning and repeat the
procedure when the station you
want is found
or .
Manual tuning
When search tuning does not produce a specific
radio station, you can perform manual tuning
to store the specific station.
RADIO
92.3
92.8
STOP
92.9
STORE
Pr 4
STORE
Press RADIO to switch on the
radio
or to see the
Press
frequency in the display
Press again to start the search
tuning function
During tuning, the frequency is
shown in the display
Press STOP during search tuning
to perform manual tuning
Keep or pressed down to
tune up or down the frequency
band
The frequency is shown in the
display and the last digit is
blinking
Press STORE when the requested
station is found
The first available program
number is displayed
or to change the
Press
program number, if you like
Press STORE to store the radio
station on the displayed program
number
NOTE! When performing search tuning in areas
with many empty channels in the frequency band,
it might be an advantage not to extend the builtin aerial, BeoSound 1 will then skip most empty
or weak channels.
Page 17

Delete radio stations
You can delete the stored radio stations any
time.
17
RADIO
RADIO
DELETE
Press RADIO to switch on the
radio
or to find the requested
Press
radio station
Press DELETE twice to delete the
radio station playing. The display
will blink and the radio will switch
to the next program number
Page 18

18
TV LIGHT RADIO
SAT D VD CD
V TAPE RECORD A TAPE
7 8 9
4 5 6
TEXT
0
MENU
1 2 3
LIST EXIT
STOP
GO
Although designed primarily for closeup operation, the BeoSound 1 can
also be operated from a distance. The
Beo4 remote control operates all the
primary functions in your BeoSound 1.
With Beo4, you can switch on or off,
select radio programs or CD tracks
and adjust sound.
If your BeoSound 1 is used together
with other Bang & Olufsen products,
please turn to the User’s guides
delivered with these products for
further explanation on their operation.
Beo4 remote control
RADIO
Press RADIO to switch on the radio
CD
A TAPE
0 – 9
MENU
STOP
GO
Press CD to switch on the CD player
Press A TAPE to activate any extra equipment
connected to the AUX socket
Use the number buttons to key in the exact radio
program number or CD track number
Press to program a Wake-up Timer
Press to step through your radio programs, or
tracks on a CD
Press and hold down to search through a CD
Press STOP to pause playback any time
Press GO to resume playback of a CD or store a
Wake-up Timer
Press the red button to see the time in the
BeoSound 1 display
Press the green button to extend or retract the
built-in aerial
Press the yellow button to open or close the CD
compartment
Press to raise or lower volume
Press in the middle to mute sound
•
Press to switch the BeoSound 1 to standby
Page 19

19
Page 20

20
Use the PIN code system
It is your own choice whether or not to
activate the PIN code system. However,
if you choose to activate the system,
your BeoSound 1 is protected against
theft with a fourdigit PIN code.
The use of a PIN code means that if your
BeoSound 1 is disconnected from the
mains for more than 30 minutes, the
system can only be activated again by
keying in your own personal PIN code.
If the PIN code is not entered, the
BeoSound 1 automatically switches to
standby after 3 minutes.
If a wrong PIN code is entered, you get
five attempts to key in the code, after
which the system is switched off and
cannot be switched on for 3 hours.
Should you forget your PIN code, please
contact a retailer who can assist you in
receiving a Master code from Bang &
Olufsen. You need the Master code to
reactivate your BeoSound 1.
Enter the PIN code
If the PIN code system is activated and your
BeoSound 1 is disconnected from the mains,
you are requested to key in the four-digit PIN
code when the system is first switched on.
Pin
oooo
_ _ _
3
STORE
_ _ _
o
STORE
Pr 8
The cue Pin is displayed shortly.
The display changes to four
squares
or to reveal digits
Press
The squares change to
underscores and the first digit is
shown in the display
Press STORE to store the
displayed digit and proceed to
the next
The digit is replaced by a square
and the next underscore will
blink
Press STORE when the last digit
is displayed
BeoSound 1 switches on to the
last used source. If radio was
used last, the program number
is shown in the display
Activate the PIN code system
The PIN code system is easily activated, and
you choose the four-digit code yourself.
Press twice when the set is in
standby
STOP
Pin
_ _ _ _
_ _ _
3
STORE
_ _ _
o
STORE
_ _ _ _
Press STOP to key in a four-digit
PIN code of your own choice
Pin appears briefly, and then
four underscores appear
or repeatedly to reveal
Press
digits
The digits are shown in the
display
Press STORE to accept the
displayed digit and proceed to
the next
The digit is replaced by a square
and the next underscore will
blink
Press STORE when the last digit
is displayed
The display returns to four
underscores and you must
confirm the PIN code by
entering it again
NOTE: If a wrong code is entered the second
time, the cue Err appears in the display, and you
must enter and confirm the code again.
NOTE: If you accidentally store a wrong digit,
pressing STOP will delete all digits again, and you
can enter new ones.
Page 21

21
Change your PIN code
You can change your PIN code at any time.
However, for security reasons it is only possible
to change the PIN code five times within a
period of 3 hours. You must enter your current
PIN code before changing the code.
Press twice when the set is in
standby
STOP
Pin
oooo
_ _ _
3
STORE
_ _ _
o
STORE
Pin
_ _ _ _
Press STOP to key in the
fourdigit PIN code
Pin appears briefly, and then
four squares appear
or repeatedly to reveal
Press
digits
The squares changes to
underscores and the first digit is
shown in the display
Press STORE to accept the
displayed digit and proceed to
the next
The digit is replaced by a square
and the next underscore will
blink
Press STORE when the last digit
is entered
Pin appears briefly, then the
display returns to four underscores
and you must enter a new PIN
code and confirm it
Deactivate the PIN code system
You can deactivate the PIN code system at any
time. All you need to do is enter your PIN code
first and then you can deactivate the system.
Press twice when the set is in
standby
STOP
Pin
oooo
_ _ _
3
STORE
_ _ _
o
STORE
Pin
_ _ _ _
DELETE
dEL
STORE
Press STOP to key in the
fourdigit PIN code
Pin appears briefly, and then
four squares appear
or repeatedly to reveal
Press
digits
The squares changes to
underscores and the first digit is
shown in the display
Press STORE to accept the
displayed digit and proceed to
the next
The digit is replaced by a square
and the next underscore will
blink
Press STORE when the last digit
is entered
Pin appears briefly, then the
display returns to four
underscores
Press DELETE to deactivate the
PIN code system
DEL appears in the display
Press STORE to deactivate the
PIN code system
If you have forgotten your PIN code
If you have forgotten your PIN code, you must
contact a retailer who then requests a fivedigit
Master code from Bang & Olufsen. Once you
have keyed in this code, your BeoSound 1 is
operational again and the PIN code system is
deactivated.
Pin
oooo
_ _ _
9
= = = =
3
= = =
STORE
o
= = =
STORE
=
STORE
dEL
The cue Pin is displayed shortly
The display changes to four
squares
Press for 3 seconds to open for
Master code input
The squares changes to
underscores and the first digit is
shown in the display
Then the display changes to two
rows of lines
or repeatedly to reveal
Press
digits
The first digit is shown in the
display
Press STORE to accept the
displayed digit and proceed to
the next
The digit is replaced by a square
and the next underscore will
blink
Press STORE to accept the fourth
digit when it is displayed
The display changes and a fifth
digit can be entered
Enter the fifth digit and press
STORE
DEL appears in the display
indicating that the PIN code
system is deactivated
Page 22

22
For your information…
Your needs as a user are given careful
consideration during the design and
development process of a Bang & Olufsen
product and we strive to make our products
easy and comfortable to operate.
Therefore, we hope that you will take the
time to tell us about your experiences with
your Bang & Olufsen product. Anything which
you consider important – positive or negative
– may help us in our efforts to refine our
products.
Thank you!
To contact us, visit our web-site on:
www.bang-olufsen.com
or write to:
BeoCare
Peter Bangs Vej 15
DK–7600 Struer
or fax:
BeoCare
+45 9785 3911 (fax)
Bang & Olufsen a/s
Bang & Olufsen
3508523 0709
Page 23

NOTE: This equipment has been tested and found
to comply with the limits for a class B digital
device, pursuant to part 15 of the FCC Rules.
These limits are designed to provide reasonable
protection against harmful interference in a
residential installation.
This equipment generates, uses and can radiate
radio frequency energy and, if not installed
and used in accordance with the instructions,
may cause harmful interference to radio
communications. However, there is no guarantee
that interference will not occur in a particular
installation. If this equipment does cause harmful
interference to radio or television reception, which
can be determined by turning the equipment off
and on, the user is encouraged to try to correct
the interference by one or more of the following
measures:
– Reorient or relocate the receiving antenna
– Increase the separation between the equipment
and receiver
– Connect the equipment into an outlet on a
circuit different from that to which the receiver is
connected
– Consult the retailer or an experienced radio/TV
technician for help
This class B digital apparatus meets all
requirements of the Canadian Interference-Causing
Equipment Regulations.
This product fulfils the conditions stated in the EEU
directives 89/336 and 73/23.
CLASS 1
LASER PRODUCT
The black and yellow label on the compact disc
player serves as a warning that the apparatus
contains a laser system and is classified as a class 1
laser product. In case any difficulties arise with
the compact disc player, please contact a Bang &
Olufsen retailer. The apparatus must be opened by
qualified service personnel only.
CAUTION: The use of any controls, adjustments or
procedures other than those specified herein may
result in hazardous radiation exposure.
23
Page 24

www.bang-olufsen.com
 Loading...