

Page 1
APRum_MOJ50_150#02_####.book Page 1 Tuesday, June 6, 2006 5:29 PM
part# 852317
Page 2

APRum_MOJ50_150#02_####.book Page 2 Tuesday, June 6, 2006 5:29 PM
© 2006 aprilia s.p.a. - Noale (VE)
First edition: June 2006
Reprint:
Produced and printed by:
VALLEY FORGE DECA
Ravenna, Modena, Torino
DECA S.r.l.
Registered Main Office
Via Vincenzo Giardini, 11
48022 Lugo (RA) - Italy Tel. 0545 - -216611
Fax 0545-216610
www.vftis.com
deca@vftis.spx.com
For:
Piaggio & C. S.p.A.
Viale Rinaldo Piaggio, 25
56025 Pontedera (PI) - Italy
FOREWORD
NOTE This manual is an important and
integral part of your vehicle. Keep it with
your vehicle at all times, even if your
vehicle is resold.
aprilia has prepared this manual to supply
you, the user, with correct and current
information. However, since aprilia
constantly improves the design of its
vehicles, there may be slight discrepancies
between your vehicle and the material
given in this manual. If you have any
questions about your vehicle, contact your
Local aprilia Dealer, as he will have the
very latest technical information available
from the factory.
For tests and repairs not expressly
described in this manual, to purchase
aprilia genuine spare parts, accessories,
and other products, and for help with
specific problems, please contact your
Local aprilia Dealer or service center.
These professionals will be able to assist
you promptly and accurately.
Thank you for choosing aprilia. Have a
great ride!
This manual is copyrighted in all countries,
and reproduction of any part thereof or the
complete manual by any print or electronic
means is strictly prohibited.
INTRODUCTION
This manual is divided into sections, chapters
and paragraphs, by subject. The procedures
described are laid out by single operation, and
each operation is indicated by a ♦.
The numbered parts shown in the figures are
identified in the text by the number in
parentheses or the symbol representing them.
Example (the following text is generic and
does not refer to this specific vehicle):
section
chapter
safety
warning
paragraph
operation To lock the steering:
position (2)
symbol “ ”
MAIN INDEPENDENT CONTROLS
STEERING LOCK
Never attempt to place the ignition
switch in the locked “ ” (LOCK)
position while the vehicle is moving.
OPERATION
♦ Turn the handlebar completely to the
left or to the right.
♦ Turn the key (2) to position ≈
♦ Press the key and turn it to position ≈
♦ Remove the key.
WARNING
∆.
+∆.
use and maintenance Mojito 50 - 150
2
USA
Page 3
APRum_MOJ50_150#02_####.book Page 3 Tuesday, June 6, 2006 5:29 PM
SAFETY WARNINGS
The following precautionary warnings are
used throughout this manual in order to
convey the following messages:
Safety Warning: When you see
this symbol on the vehicle or in
the manual, pay particular attention to
the potential risk of personal injury or
death.
Failure to comply with the instructions
given in the warning messages
preceded by this symbol may result in
grave risk for your and other people’s
safety and for the vehicle.
WARNING
Indicates a potential hazard which may
result in serious injury or even death.
WARNING
Indicates a potential hazard which may
result in personal injury or damage to
the vehicle or other property.
NOTE The word ≈NOTE∆ in this manual
precedes important information or
instructions.
GENERAL SAFETY RULE
CARBON MONOXIDE
If it is necessary to run the engine in order to
carry out maintenance operation, make sure
that the area in which you are operating is
properly ventilated. Never run the engine in
enclosed spaces.
If it is necessary to work indoors, use an
exhaust evacuation system.
WARNING
The exhaust fumes contain carbon
monoxide, a poisonous gas that can
cause loss of consciousness and even
death.
WARNING
Carbon monoxide is both colorless and
odorless, and cannot be detected by
smell, vision, or any other sense. Avoid
breathing exhaust fumes under any
circumstances.
GASOLINE
Keep gasoline away from children. Gasoline
is also poisonous. Never attempt to siphon
gasoline using your mouth. Never allow
gasoline to contact your skin. If you should
accidentally spill gasoline on yourself, change
your clothes immediately and wash the area
upon which the gasoline was splashed
thoroughly with hot water and soap. Should
you accidentally swallow gasoline, do not
induce vomiting. Drink large quantities of clear
water or milk and immediately seek
professional medical assistance. Should you
accidentally get gasoline get your eyes, flush
with large quantities of cool, clear water and
immediately seek professional medical
assistance.
WARNING
Gasoline is extremely flammable and
becomes explosive under certain
conditions.
KEEP GASOLINE AWAY FROM
CHILDREN.
HOT COMPONENTS
WARNING
The engine and all parts of the exhaust
system, as well as the braking system,
become very hot and remain hot for some
time after the vehicle and the engine are
stopped. Before handling any component
of your vehicle after riding, make sure that
it has cooled sufficiently to be safe to
handle.
USED ENGINE OIL
WARNING
Use latex gloves for maintenance
operations that require contact with used
oil. Used engine oil may cause skin cancer
if repeatedly left in contact with the skin for
prolonged periods. Although this is
unlikely unless you handle used oil on a
daily basis, it is advisable to thoroughly
wash your hands with soap and water
after handling used oil.
KEEP OIL AWAY FROM CHILDREN.
use and maintenance Mojito 50 - 150
USA
3
Page 4
APRum_MOJ50_150#02_####.book Page 4 Tuesday, June 6, 2006 5:29 PM
BRAKE FLUID
WARNING
Brake fluid is extremely poisonous. Do
not ever allow brake fluid to be ingested
or swallowed. Should brake fluid
accidentally be swallowed, drink large
quantities of milk or clear water and
immediately seek professional medical
assistance. Brake fluid is highly
destructive of skin and eye tissue.
Should you accidentally spill brake fluid
on yourself, remove the contaminated
clothing, wash your body with soap and
warm water immediately and
immediately seek professional medical
assistance. Should you accidentally
splash brake fluid into your eyes, flush
with a large quantity of cool, clear water
and immediately seek professional
medical assistance.
KEEP BRAKE FLUID AWAY FROM
CHILDREN.
COOLANT
In certain conditions, the ethylene glycol
contained in the engine coolant is
flammable: its flame is invisible, but you
can be burned anyway.
WARNING
Avoid spilling the engine coolant on the
exhaust system or on the engine
components. They may be hot enough
to cause the coolant to ignite and burn
without a visible flame.
The coolant (ethylene glycol) can cause
skin irritation and is poisonous if
swallowed.
Coolant and coolant/water mixtures are
sweet to the taste and brightly colored,
therefore are highly attractive to pets
and children. Take extra precautions to
keep new and used coolant out of reach
of children and animals.
KEEP COOLANT AWAY FROM
CHILDREN.
Risk of burns.
Do not remove the radiator cap when
the engine is hot. Wait until the engine
has completely cooled down. The
coolant is under pressure and may
splash out and cause burns.
BATTERY HYDROGEN GAS AND ELECTROLYTE
WARNING
The battery gives off noxious and
explosive gases; keep cigarettes, flames
and sparks away from the battery.
Provide adequate ventilation when
operating or recharging the battery.
During recharging and use, make sure
that the room is properly ventilated and
avoid inhaling the gases released during
the recharging.
The battery contains sulfuric acid
(electrolyte). Contact with the skin or
eyes may cause serious burns. Always
wear protective clothing, rubber gloves,
and tight fitting goggles or a face shield
when working around the battery,
especially when filling the battery with
either water or electrolyte.
In case of contact with the skin, flush
immediately with plenty of water. In case
of contact with the eyes, flush with
plenty of water for at least 15 minutes.
Immediately consult a health
professional.
The electrolyte is poisonous.
If the electrolyte is accidentally
swallowed, drink large quantities of
water or milk and then milk of magnesia
or vegetable oil. Immediately consult a
health professional.
KEEP BATTERIES AND ELECTROLYTE
AWAY FROM CHILDREN.
use and maintenance Mojito 50 - 150
4
USA
Page 5
APRum_MOJ50_150#02_####.book Page 5 Tuesday, June 6, 2006 5:29 PM
WARNING - PRECAUTIONS GENERAL ADVICE
Before starting the engine, read this manual
carefully, and in particular the chapters
≈WARNINGS - PRECAUTIONS - GENERAL
ADVICE∆ and ≈SAFE DRIVE∆ see p. 19.
Your safety and that of those around you
depends not only on your skill as a rider, but
also your knowledge about your vehicle and
about riding safely. Therefore it is essential
that you not operate your vehicle on public
streets or highways until you have received
instructions from a qualified safety
organization such as the Motorcycle Safety
Foundation, and are properly trained and
licensed.
REPORTING OF DEFECTS THAT AFFECT SAFETY
If you have any questions regarding your
warranty rights and responsibilities, you
should contact Piaggio Group Americas, Inc.,
140 East 45th Street, 17th Floor New York,
NY 10017, or the U.S. Enviromental
Protection Agency, 2000 Traverwood Ann
Arbor, MI 48105, or the California Air
Resources Board at P.O. Box 8001, 9528
Telstar Avenue, El Monte, CA 91734-8001.
If you believe that your vehicle has a defect
which could cause a crash or could cause
injury or death, you should immediately inform
the National Highway Traffic Safety
Administration (NHTSA) in addition to
notifying aprilia. If NHTSA receives similar
complaints, it may open an investigation, and
if it finds that a safety defect exists in a group
of vehicles, it may order a recall and remedy
campaign. However, NHTSA cannot become
involved in individual problems between you,
your dealer, or aprilia. To contact NHTSA,
you may either call the Auto Safety Hotline
toll free at 1-800-424-9393 (or 366-0123 in the
Washington, D.C. area) or write to: NHTSA,
U.S. Department of Transportation,
Washington, D.C. 20590.
You can also obtain other information about
motor vehicle safety from the Hotline.
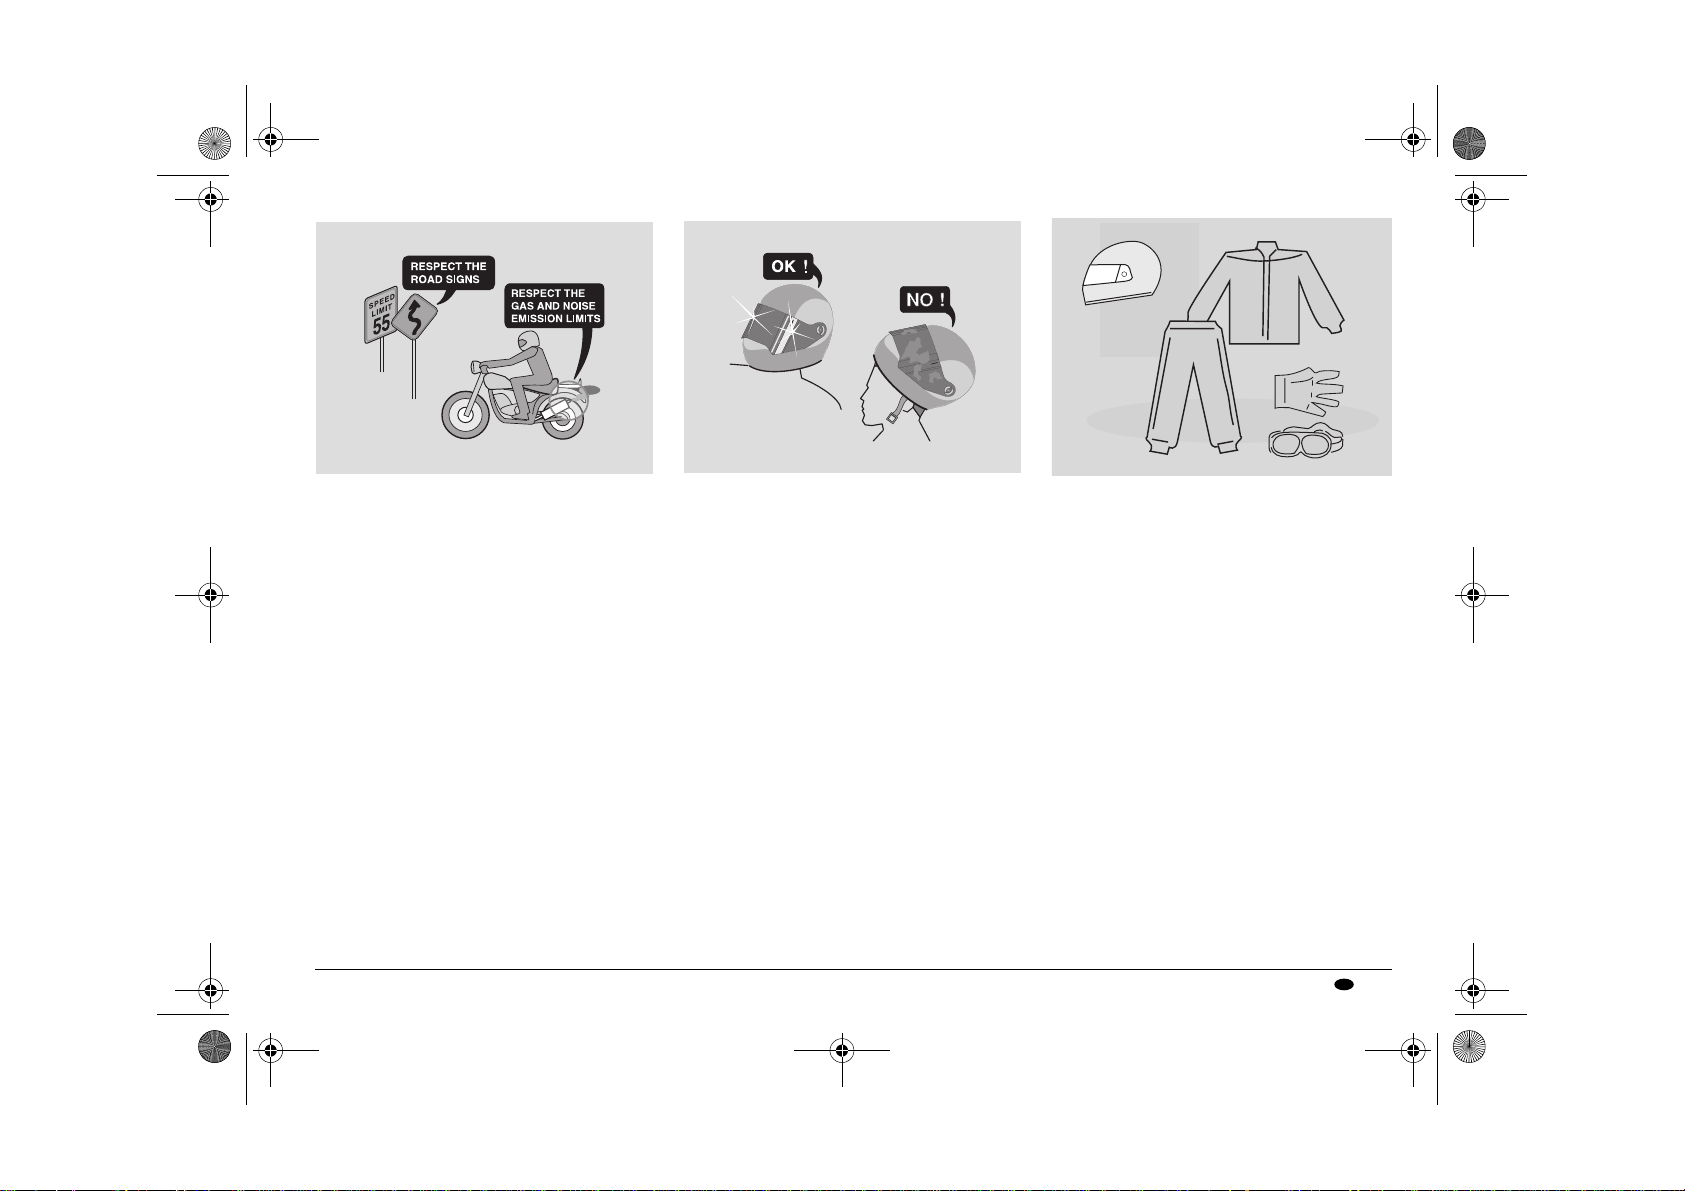
ROAD REGULATIONS AND USE OF THE VEHICLE
Rules of the road vary from country to country.
It is essential that you understand in advance
the rules of the road of the country in which
your vehicle will be used.
WARNING
This vehicle has been designed and
produced for use only on paved roads. It is
not designed to be used on even smooth
graded dirt roads, or trails. It is not
designed for off road competition, or for
cross country riding. Do not use this
vehicle on rough or unimproved surfaces,
or in other off road areas. Failure to heed
this warning could lead to an upset with
subsequent injury and even death.
NOISE EMISSION WARRANTY
aprilia s.p.a. warrants that this exhaust
system, at the time of sale, meets all
applicable U.S. EPA Federal noise standards.
This warranty extends to the first person who
buys this exhaust system for purposes other
than resale, and to all subsequent buyers.
Warranty claims should be directed to:
Piaggio Group Americas, Inc.
140 East 45th Street, 17th Floor
New York, NY 10017 U.S.A.
INFORMATION ON THE NOISE AND EXHAUST GAS EMISSION CONTROL SYSTEM
ORIGIN OF THE EMISSIONS
The combustion process produces
carbon monoxide and hydrocarbons. The
control of hydrocarbons is very important,
because under certain conditions they
react to exposure to sunlight and produce
photochemical smog.
Carbon monoxide does not react in the
same way, but it is toxic and poisonous.
aprilia utilizes “lean” carburetor settings
and other systems to reduce the
production of carbon monoxide and
hydrocarbons.
use and maintenance Mojito 50 - 150
USA
5
Page 6
APRum_MOJ50_150#02_####.book Page 6 Tuesday, June 6, 2006 5:29 PM
TAMPERING WARNING
Tampering with the noise control system is
prohibited. Federal law prohibits the following
acts or causing thereof:
a) The removal or rendering inoperative by
any person other than for purposes of
maintenance, repair, or replacement, of
any device or element of design
incorporated into any new vehicle for the
purpose of noise control prior to its sale or
delivery to the ultimate purchaser or while
it is in use, or
b) The use of the vehicle after such device or
element of design has been removed or
rendered inoperative by any person.
Among those acts presumed to constitute
tampering are the acts listed below:
a) Removal of, or puncturing the muffler,
baffles, header pipes or any other
component which conducts exhaust
gases.
b) Removal or puncturing of any part of the
intake system.
c) Lack of proper maintenance.
d) Replacing any moving part of the
vehicle, or parts of the exhaust or intake
system, with parts other than those
specified by the manufacturer.
CAUTION
This product should be checked for
repair or replacement if the vehicle
noise has increased significantly
through use. Otherwise, the owner may
become subject to penalties under state
and local ordinances.
use and maintenance Mojito 50 - 150
6
USA
PROBLEMS THAT MAY AFFECT THE VEHICLE EMISSIONS
If any of the following symptoms are
observed, immediately have your vehicle
inspected and repaired by your Local
aprilia Dealer.
Symptoms:
√ Difficult starting or stalling after starting.
√ Irregular idle.
√ Misfiring or backfiring during
acceleration.
√ After-burning (backfiring).
√ Poor engine performance, degraded
handling, or poor fuel economy.
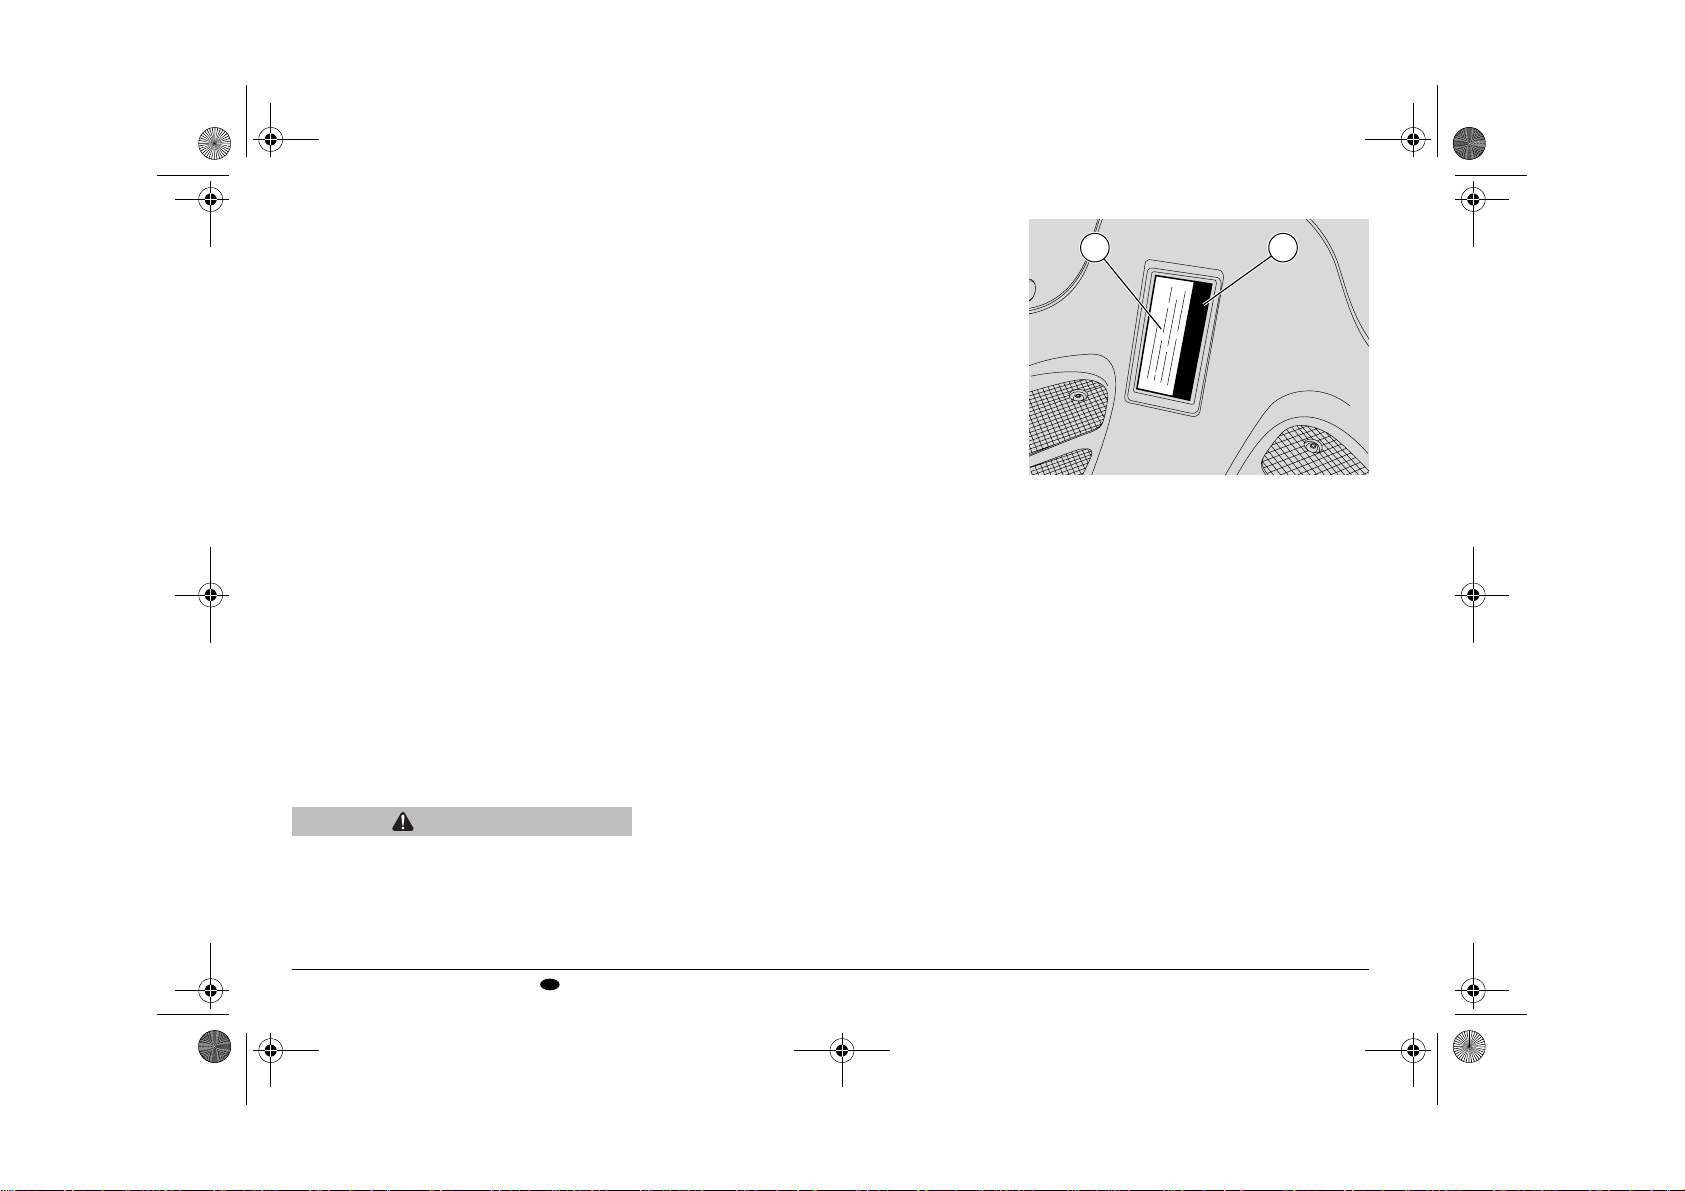
B A
VEHICLE IDENTIFICATION NUMBER (V.I.N.) (FRAME NUMBER)
Every vehicle produced by aprilia receives
a vehicle identification number (V.I.N.)
stamped:
√ on the steering head of the frame (A), as
shown above;
and also:
√ on the data plate (B) placed on the
steering head.
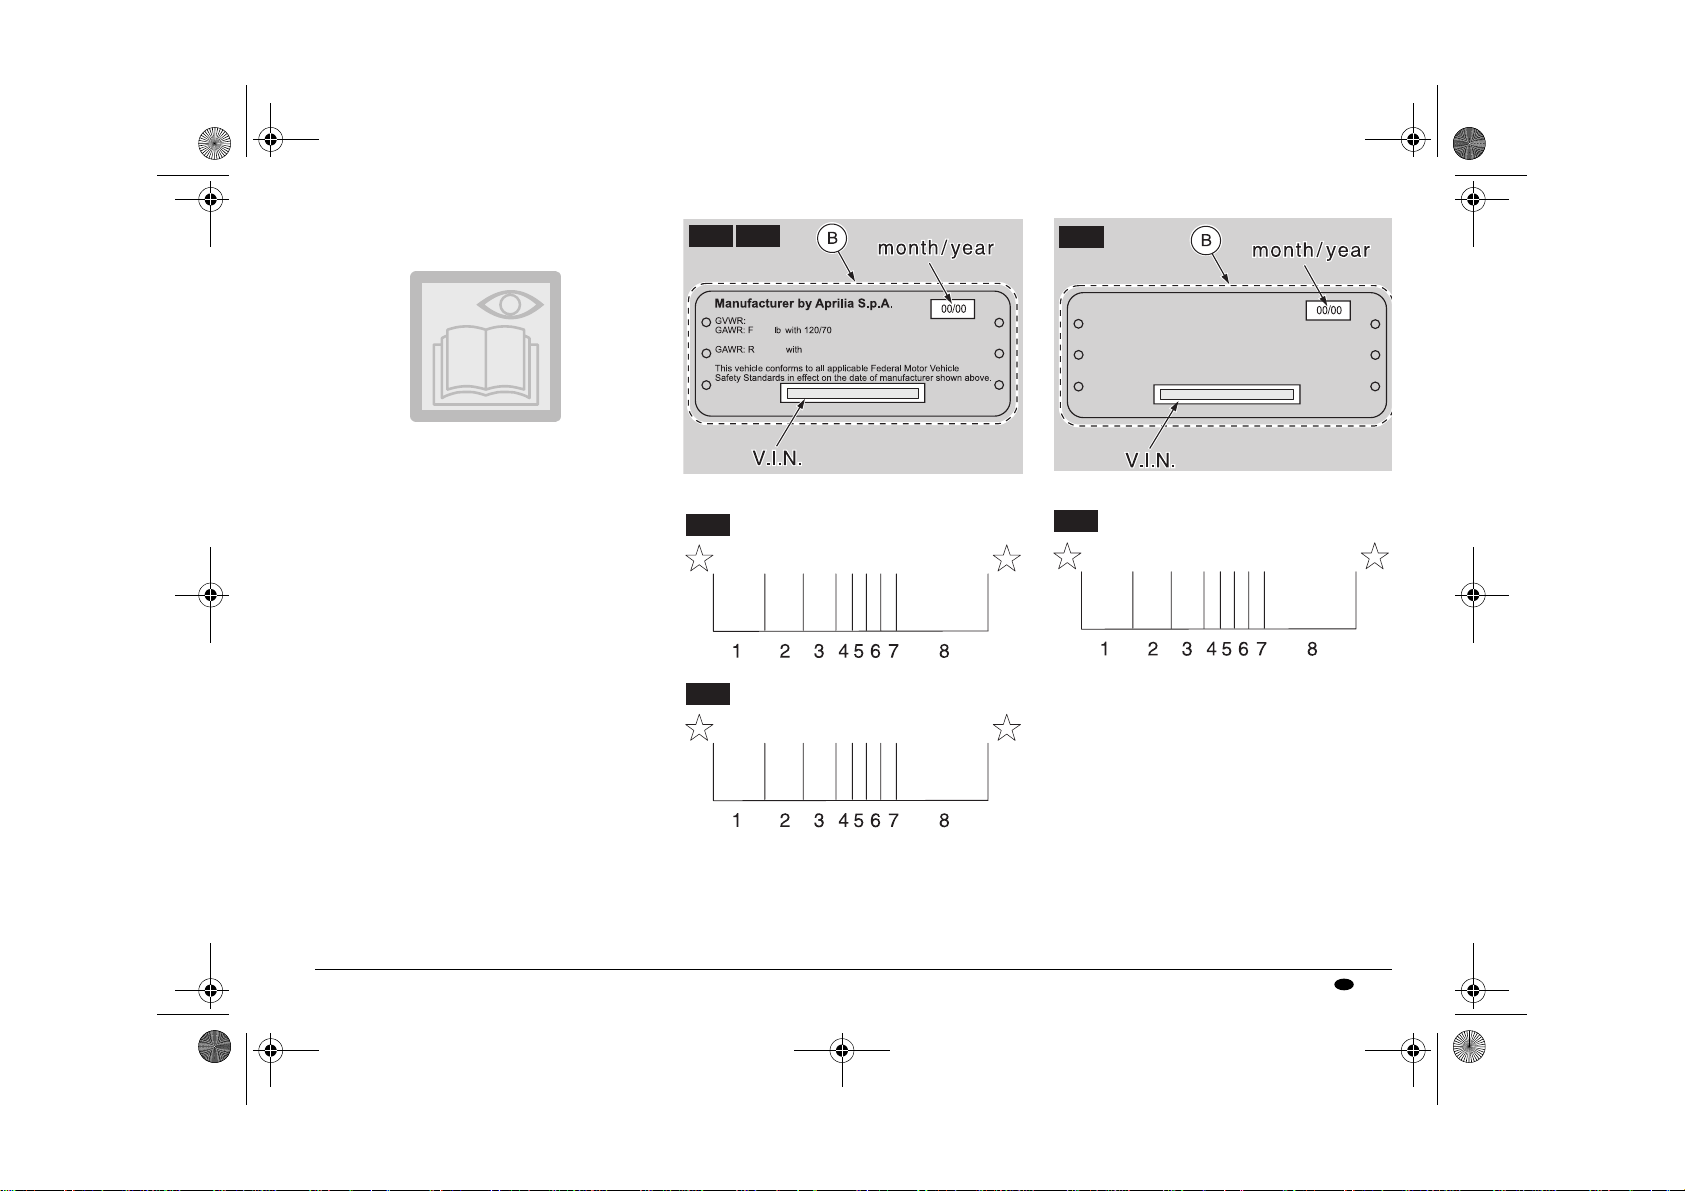
INFORMATION CONTAINED IN THE VEHICLE IDENTIFICATION NUMBER
Description of the vehicle identification
number (V.I.N.), stamped on the steering
head of the frame (A).
Page 7
APRum_MOJ50_150#02_####.book Page 7 Tuesday, June 6, 2006 5:29 PM
DIGIT MEANING
1) Manufacturer»s identification
alphanumeric code.
2) Vehicle type.
3) Model.
4) Country for which the vehicle is
intended.
5) #= Check digit number.
6) Model year.
7) Assembling factory designation
(N = NOALE-VE- ,
S = SCORZÉ -VE- ,
0 = NOT SPECIFIED).
8) Sequential serial number.
MC50 M50
611 lbs.
194 - 12" 51J tire
E - 12 x 3.00 - DOT D rim at 27.6 psi COLD
E - 10 x 3.50 - DOT D rim at 30.5 psi COLD
H50
M50
417 lb
MOTOR DRIVEN CYCLE
130/70 - 10" 59J tire
ZD4PKU00#4#000000
MC50
ZD4PKU10#5#000000
-PKU-
MC150
MANUFACTURED BY APRILIA DIVISION
OF PIAGGIO & C. S.p.A.
GVWR: 300 KG (661 LB)
GAWR: F. 100 KG (220 LB)
WITH 120/70 - 12" 51P TIRE, 12"x 3.00 - DOT-D RIM. AT 170 KP A (25 PSI) COLD
GAWR: R. 200 KG (441 LB)
WITH 130/70 - 10" 59P TIRE, 10"x 3.50 - DOT-D RIM. AT 210 KP A (31 PSI) COLD
THIS VEHICLE CONFORMS TO ALL APPLICABLE U .S . FEDERAL MOTOR
VEHICLE SAFETY STANDARDS IN EFFECT ON THE DATE OF
MANUFACTURE SHOWN ABO VE
MOTORCYCLE
MC150
ZD4RYC10###000000
-RYC-
use and maintenance Mojito 50 - 150
USA
7
Page 8

APRum_MOJ50_150#02_####.book Page 8 Tuesday, June 6, 2006 5:29 PM
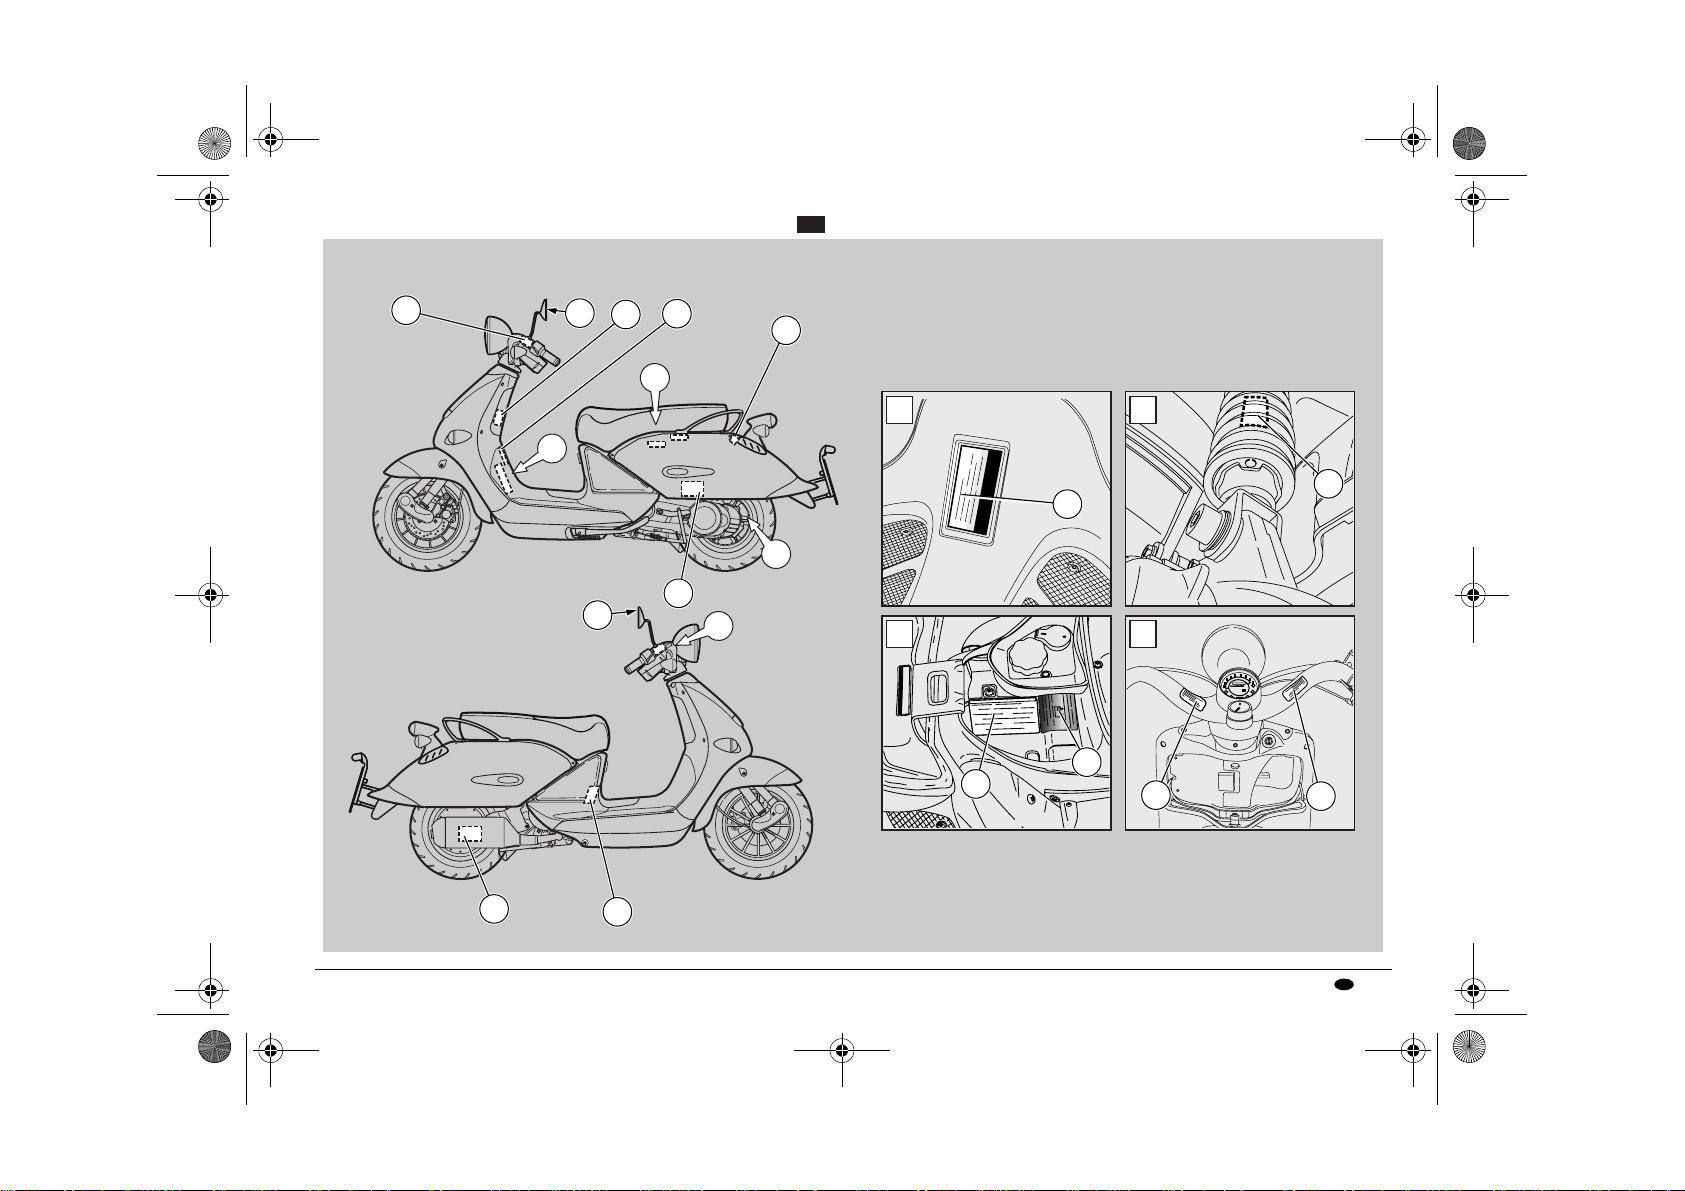
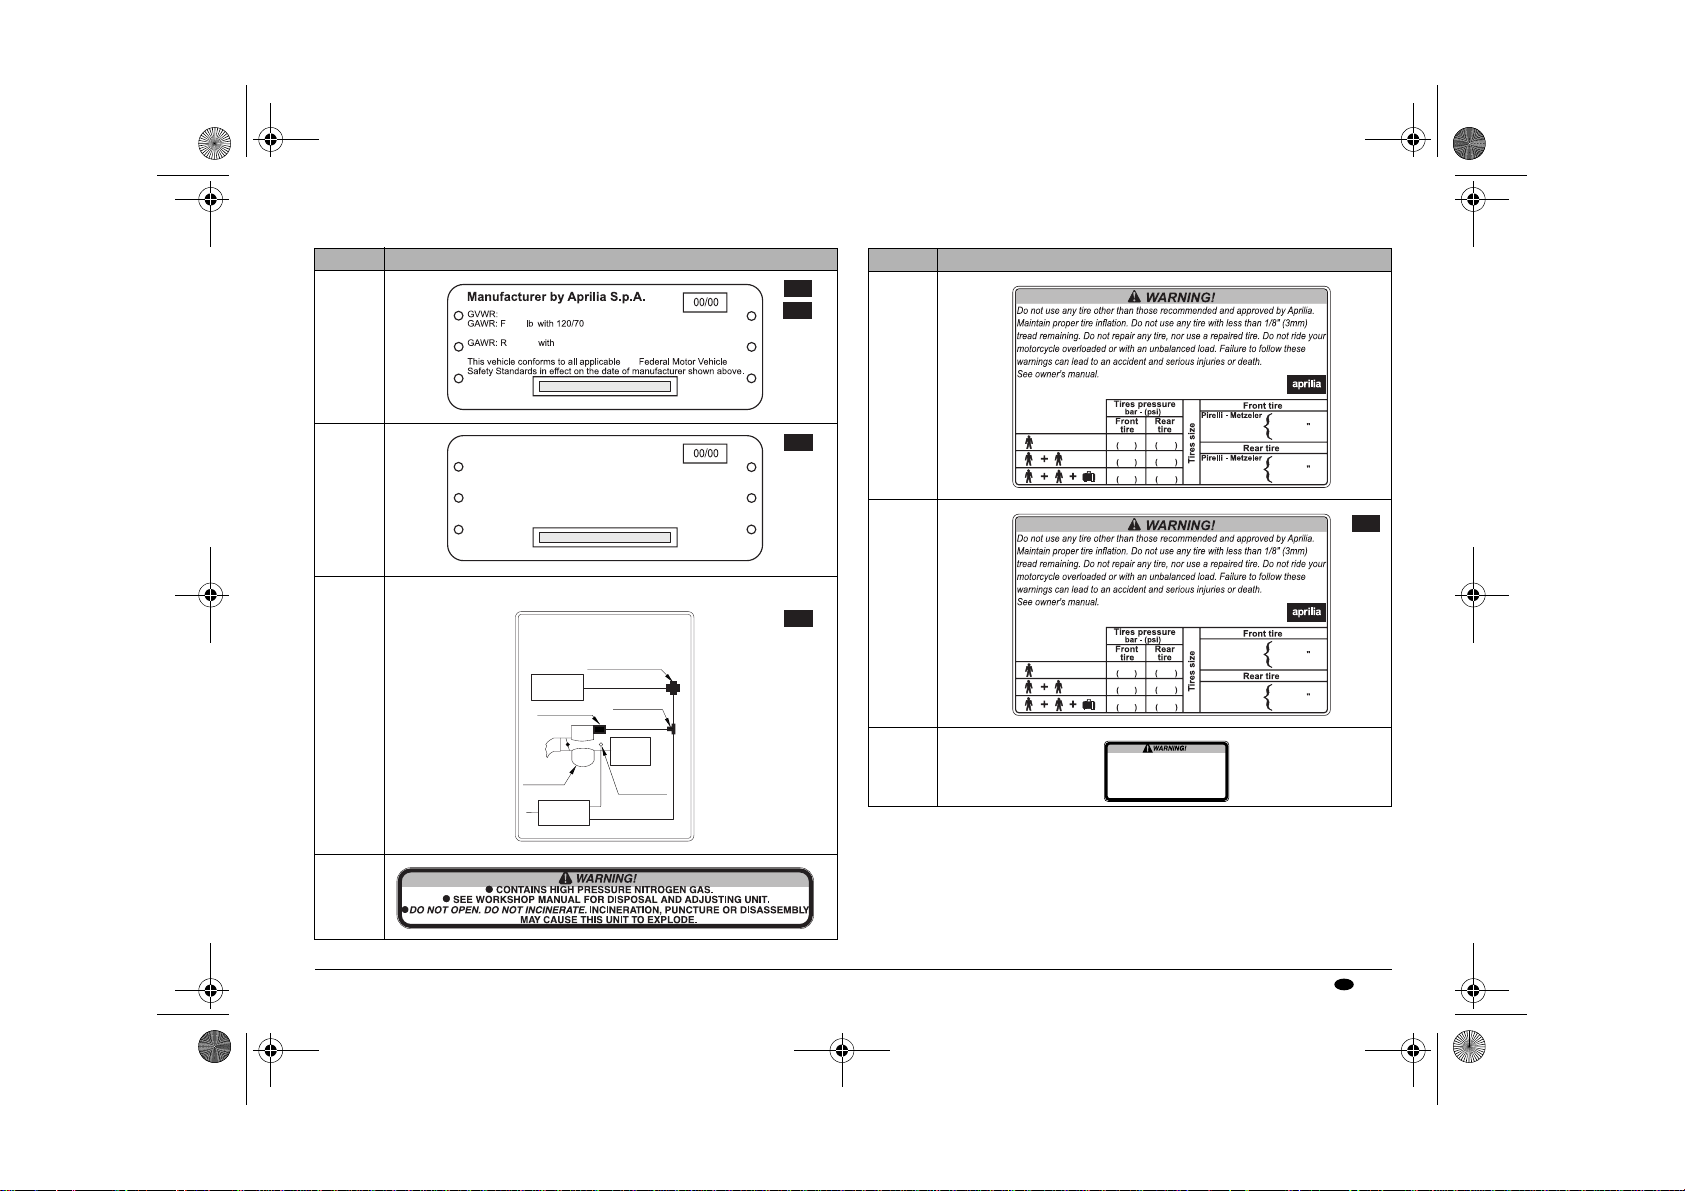
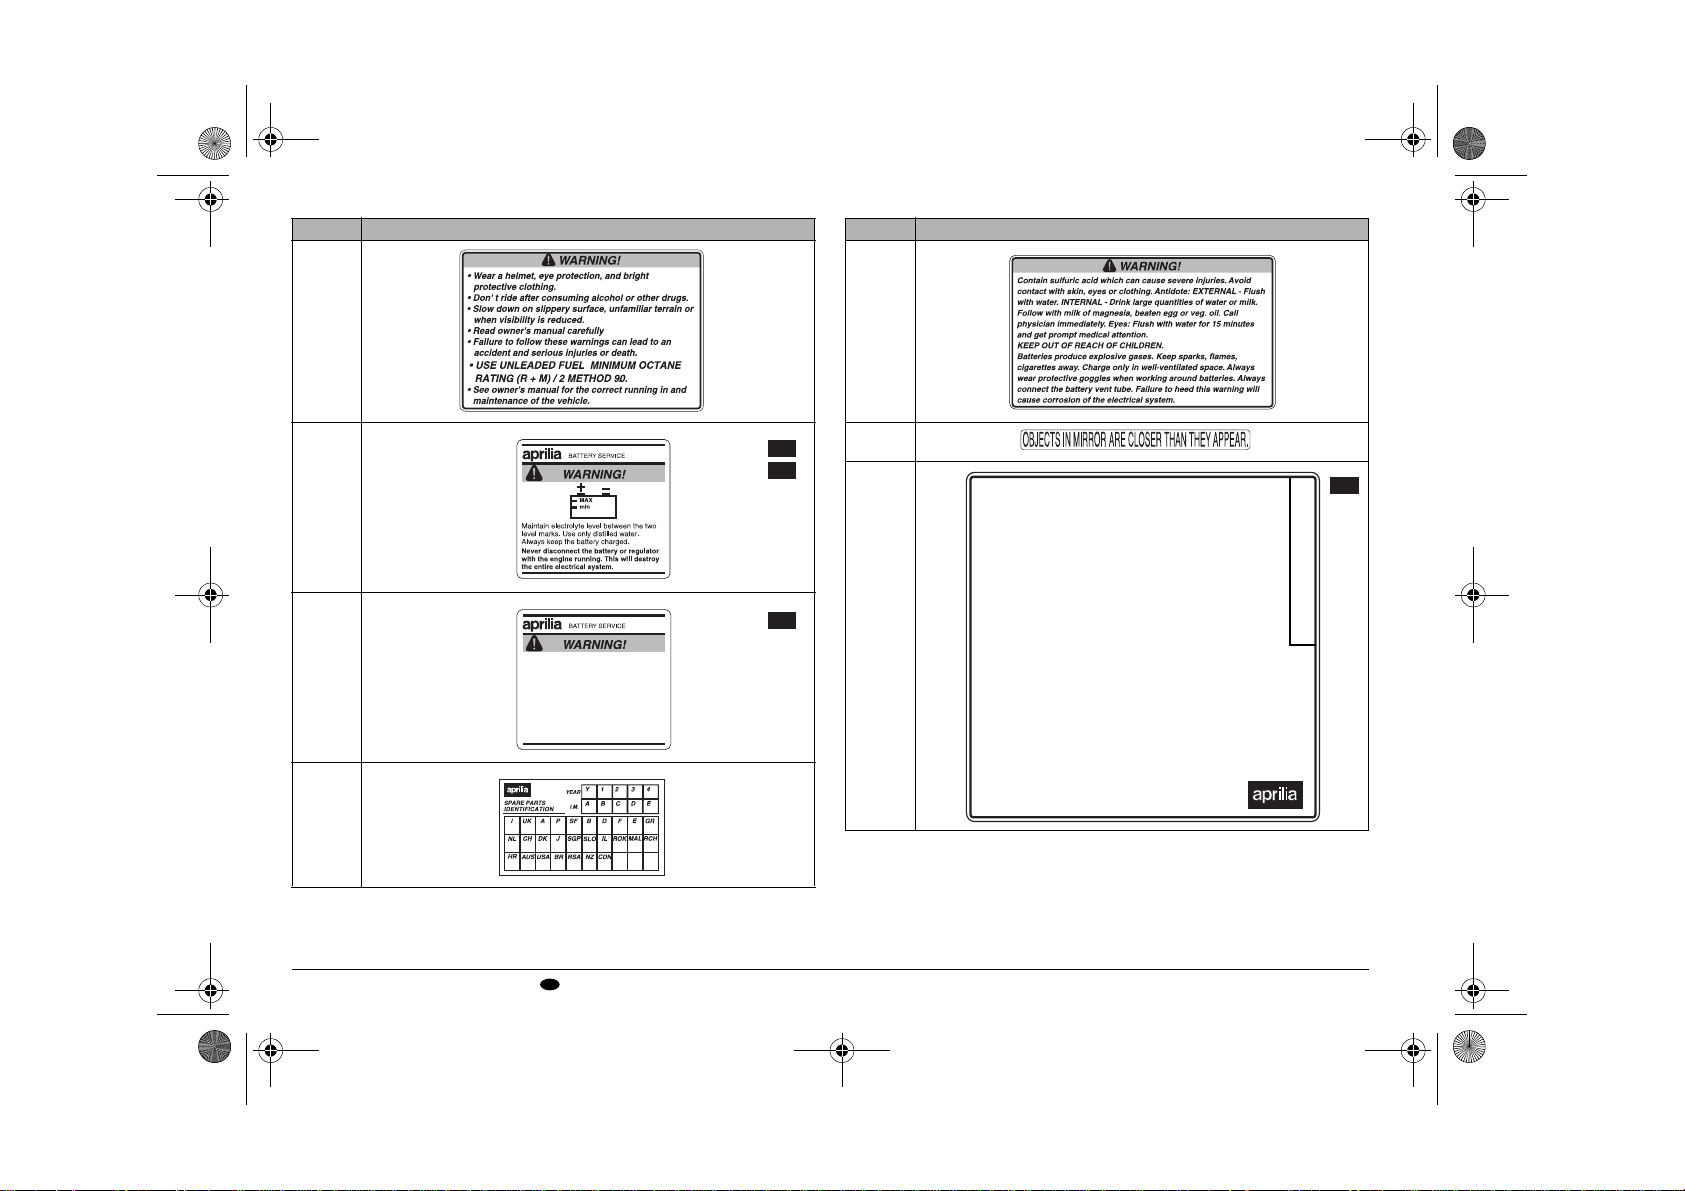
POSITION OF THE WARNING ADHESIVE LABELS
12
D
C
B
E
A
4
10
17
M50
A B
3
C D
70
60
80
50
90
40
3
0
0
0
0
100
30
110
20
120
0
15
6
12
5
E
9
7
10
1
use and maintenance Mojito 50 - 150
8
13
8
USA
Page 9
APRum_MOJ50_150#02_####.book Page 9 Tuesday, June 6, 2006 5:29 PM
POSITION OF THE WARNING ADHESIVE LABELS
12
10
5
6
17
C
A
B
4
10
D
M50MC50
A
1
C D
7
9
B
3
00003
12
15
13
8
use and maintenance Mojito 50 - 150
USA
9
Page 10
APRum_MOJ50_150#02_CAP01i01.fm Page 10 Thursday, June 8, 2006 11:41 AM
POSITION OF THE WARNING ADHESIVE LABELS
10
12a
5
3
A
B
4a
10
C
63
17
MC150
A B
14
00003
15
1a
7 7a
9
16
3
11
use and maintenance Mojito 50 - 150
10
13
2
8
USA
Page 11
APRum_MOJ50_150#02_####.book Page 11 Tuesday, June 6, 2006 5:29 PM
WARNING ADHESIVE LABELS CHART
Ref. Description
611 lbs.
194 - 12" 51J tire
1a
1
E - 12 x 3.00 - DOT D rim at 27.6 psi COLD
E - 10 x 3.50 - DOT D rim at 30.5 psi COLD
MANUFACTURED BY APRILIA DIVISION
OF PIAGGIO & C. S.p.A.
GVWR: 300 KG (661 LB)
GAWR: F. 100 KG (220 LB)
WITH 120/70 - 12" 51P TIRE, 12"x 3.00 - DOT-D RIM. AT 170 KP A (25 PSI) COLD
GAWR: R. 200 KG (441 LB)
WITH 130/70 - 10" 59P TIRE, 10"x 3.50 - DOT-D RIM. AT 210 KP A (31 PSI) COLD
THIS VEHICLE CONFORMS TO ALL APPLICABLE U .S . FEDERAL MOTOR
VEHICLE SAFETY STANDARDS IN EFFECT ON THE DATE OF
MANUFACTURE SHOWN ABO VE
417 lb
MOTOR DRIVEN CYCLE
130/70 - 10" 59J tire
U.S.
MOTORCYCLE
-PKU-
-RYC-
M50
MC50
MC150
Ref. Description
4
1.9
1.7
24.7
27.6
1.9
2.1
27.6
30.6
1.9
2.1
27.6
30.5
Michelin
Eurosawatech
Cheng Shiin
Michelin
Eurosawatech
Cheng Shiin
-PKU-
120/70 12 51J
130/70 10 59J
MC150
FOR STATE OF CALIFORNIA ONLY.
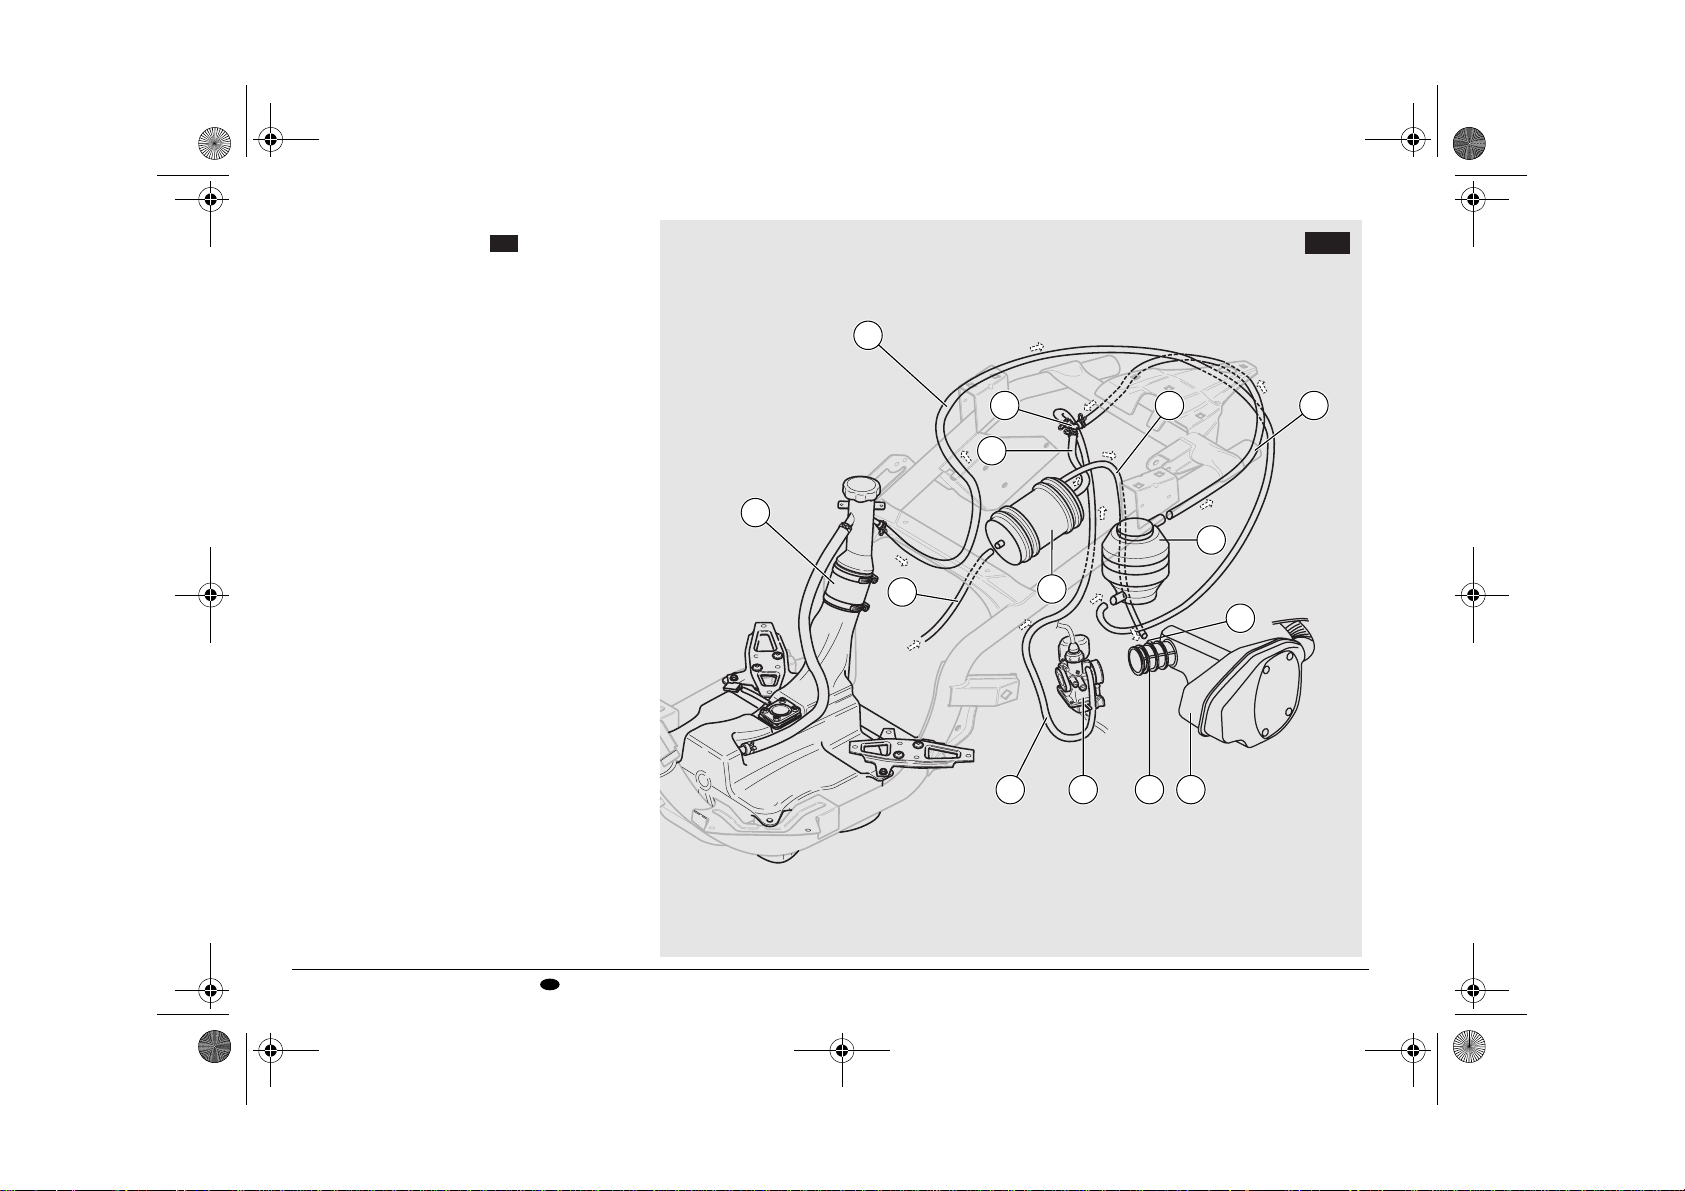
HOSE ROUTING DIAGRAM
EVAP FAMILY: 7PVME0024RYC
APRILIA DIVISION OF
PIAGGIO & C. S.p.A.
FUEL TANK
2
FLOAT BOWL VENT
CARBURETOR
CARBON
CANISTER
3
-RYC-
ROLL-OVER/PURGE VALVE
"T" THREE WAY
CONNECTOR
AIR BOX
PORTED
VACUUM PORT
MC150
4a
-RYC-
Pirelli
120/70 12 51P
1.9
1.7
27.6
24.7
2.1
1.7
30.5
24.7
1.7
2.1
24.7
30.5
5
THE CERTIFICATION LABEL IS
UNDER THE PLASTIC PANEL.
TO REMOVE THE PANEL
SEE OWNER'S MANUAL
Sava
Pirelli
Sava
130/70 10 59P
Follow X
use and maintenance Mojito 50 - 150
USA
11
Page 12
APRum_MOJ50_150#02_####.book Page 12 Tuesday, June 6, 2006 5:29 PM
Ref. Description
6
7
This battery is completely sealed.
Do not attempt to remove the cap.
7a
Replace with sealed battery only.
Always keep the battery charged
(see Owner's Manual).
Never disconnect the battery or regutaltor
with the engine running. This will destroy
the entire electrical system.
8
M50
MC50
MC150
Ref. Description
9
10
VEHICLE EMISSION CONTROL INFORMATION
ENGINE DISPLACEMENT: 150cc
ENGINE FAMILY: 7PVMC0.15RYC
THIS VEHICLE CONFORMS TO U.S. EPA AND CALIFORNIA
REGULATIONS APPLICABLE TO 2007 MODEL YEAR NEW
MOTORCYCLES AND IS CERTIFIED TO 1.0 HC G/KM
ENGINE FAMILY EXHAUST EMISSION STANDARD.
ENGINE EXHAUST CONTROL SYSTEM: EM
ENGINE TUNE UP SPECIFICATIONS
11
IGNITION TIMING: 5˚± 2˚ AT 1500 RPM
IDLE SPEED: 1600 ± 100 RPM
VALVE CLEARENCE: INLET 0.0039 inch (0.10 mm)
SPARK PLUG: NGK CR7EB, NGK CR8EB, CHAMPION RG4HC,
FUEL: MINIMUM OCTANE RATING (M+R)/2 METHOD 90
OIL: ENGINE OIL VISCOSITY SAE 15W-50
APRILIA DIVISION OF PIAGGIO & C. S.p.A.
V.le Rinaldo Piaggio, 25
5625 Pontedera (PI) ITALY
OUTLET 0.0059 inch (0.15 mm)
CHAMPION RG6YC
MC150
PIAGGIO GROUP AMERICAS, Inc.
-RYC-
Follow X
use and maintenance Mojito 50 - 150
12
USA
Page 13
APRum_MOJ50_150#02_####.book Page 13 Tuesday, June 6, 2006 5:29 PM
Ref. Description
2005 ASPKU0049 B1112
12
12a
Muffler stamping.
13
14
6413
-PKU-
2007 ASPRYC0150 B-1106
7125
-RYC-
June 03
EX03-3
15
Warm the engine up before using the vehicle.
See owner's manual.
70
80
-RYC-
M50
MC50
MC150
MC150
Ref. Description
MC150
16
17
ATTENTION! STARTING PROCEDURE
Set on brakes and push START button.
See owner's manual.
Never install accessories or replacement parts not
approved by Aprilia as original equipment. This can
degrade the handling and safety of your motorcycle,
and can cause an upset with subsequent accident and
serious injury or even death. The stability and safety
of any motorcycle is adversely affected by the addition
of any load carrying accessory. See awner's manual.
PART 575.6, CONSUMER INFORMATION
140 East 45th Street, 17th Floor New York, NY 10017 U.S.A.
If you believe that your vehicle has a defect which could cause a crash or could cause
injury or death, you should immediately inform the National Highway Traffic Safety
Administration (NHTSA) in addition to notifying Piaggio Group Americas, Inc.
If NHTSA receives similar complaints, it may open an investigation, and if it finds that a
safety defect exists in a group of vehicles, it may order a recall and remedy campaign.
However, NHTSA cannot become involved in any individual problems between you, your
dealer, or
Piaggio Group Americas, Inc.
To contact NHTSA you may either call the Auto Safety Hotline toll-free at 1-888-327-4236
or write to:
NHTSA
U.S. DEPARTMENT of TRANSPORTATION
400 7th Street SW, (NVS-223) Washington, DC 20590
You can also obtain other information about motor vehicle safety from the Hotline.
Piaggio Group Americas, Inc.
Reporting Safety Defects
use and maintenance Mojito 50 - 150
USA
13
Page 14
APRum_MOJ50_150#02_####.book Page 14 Tuesday, June 6, 2006 5:29 PM
CALIFORNIA EVAPORATIVE EMISSION SYSTEM
MC150
FOR STATE OF CALIFORNIA ONLY.
1) Fuel tank
2) Fuel tank breathes line (to valve)
3) Purge/roll over valve
4) Breathes line (tee)
5) Tee
6) Breathes line (to canister)
7) Float bowl breathes line
8) Carbon canister
9) Carbon canister vent
10) Drain line
11) Manifold Air box
12) Manifold ported vacuum port
13) Air box
14) Carburetor
MC150
2
5 10 4
6
1
3
9
8
12
7 14 11 13
use and maintenance Mojito 50 - 150
14
USA
Page 15
APRum_MOJ50_150#02_####.book Page 15 Tuesday, June 6, 2006 5:29 PM
aprilia s.p.a. - EMISSION CONTROL SYSTEM WARRANTY STATEMENT
YOUR WARRANTY RIGHTS
AND OBLIGATIONS
The California Air Resources Board and
aprilia s.p.a. (hereinafter ≈aprilia∆) are
pleased to explain the emission control
system warranty on your 1999 and later
motorcycle. In California new motor
vehicles must be designed, built and
equipped to meet the State»s stringent antismog standards. aprilia must warrant the
emission control system on your
motorcycle for the periods of time listed
below provided there has been no abuse,
neglect or improper maintenance of your
motorcycle.
Your emission control system may include
parts such as the carburetor or fuel
injection system, the ignition system,
catalytic converter and engine computer.
Also included may be hoses, belts,
connectors and other emission-related
assemblies.
Where a warrantable condition exists,
aprilia will repair your motorcycle at no cost
to you, including diagnosis, parts and
labor.
MANUFACTURER»S EMISSIONS
SYSTEM WARRANTY COVERAGE
Class I motorcycles (50 √ 169 cm
3
): for a
period of use of five (5) years or 12,000
kilometers (7,456 miles), whichever first
occurs.
Class II motorcycles (170 √ 279 cm3): for a
period of use of five (5) years or 18,000
kilometers (11,185 miles), whichever first
occurs.
Class III motorcycles (280 cm3 and larger):
for a period of use of five (5) years or
30,000 kilometers (18,641 miles),
whichever first occurs.
If an emission-related part on your
motorcycle is defective, the part will be
repaired or replaced by aprilia. This is your
emission control system DEFECTS
WARRANTY.
OWNER»S WARRANTY
RESPONSIBILITIES
√ As the motorcycle owner, you are
responsible for the performance of the
required maintenance listed in your
owner»s manual. aprilia recommends
that you retain all receipts covering
maintenance on your motorcycle, but
aprilia cannot deny warranty solely for
the lack of receipts or for your failure to
ensure the performance of all scheduled
maintenance.
√ You are responsible for presenting your
motorcycle to an aprilia dealer as soon
as a problem exists. The warranty
repairs should be completed in a
reasonable amount of time, not to
exceed 30 days.
√ As the motorcycle owner, you should be
aware that aprilia may deny your
warranty coverage if your motorcycle or
a part has failed due to abuse, neglect,
improper maintenance or unapproved
modifications.
If you have any questions regarding your
warranty rights and responsibilities, you
should contact Piaggio Group Americas,
Inc. 140 East 45th Street, 17th Floor New
York, NY 10017 U.S.A., or the California
Air Resources Board at P.O. Box 8001,
9528 Telstar Avenue, El Monte, CA 91734-
8001.
use and maintenance Mojito 50 - 150
USA
15
Page 16
APRum_MOJ50_150#02_####.book Page 16 Tuesday, June 6, 2006 5:29 PM
aprilia s.p.a. - LIMITED WARRANTY ON EMISSION CONTROL SYSTEM
Piaggio & C. S.p.A., Viale Rinaldo
Piaggio, 25, 56025 Pontedera (PI) Italy
(hereinafter ≈aprilia∆) warrants that each
new 1999 and after aprilia motorcycle, that
includes as standard equipment a
headlight, taillight and stoplight, and is
street legal:
A. is designed, built and equipped so as to
conform at the time of initial retail
purchase with all applicable regulations
of the United States Environmental
Protection Agency, and the California
Air Resources Board; and
B. is free from defects in material and
workmanship which cause such
motorcycle to fail to conform with
applicable regulations of the United
States Environmental Protection
Agency or the California Air Resources
Board for a period of use, depending on
the engine displacement, of 12,000
kilometers (7,456 miles), if the
motorcycle»s engine displacement is
less than 170 cubic centimeters; of
18,000 kilometers (11,185 miles), if the
motorcycle»s engine displacement is
equal to or greater than 170 cubic
centimeters but less than 280 cubic
centimeters; or of 30,000 kilometers
(18,641 miles), if the motorcycle»s
engine displacement is 280 cubic
centimeters or greater; or 5 (five) years
from the date of initial retail delivery,
whichever first occurs.
use and maintenance Mojito 50 - 150
16
USA
I. COVERAGE. Warranty defects shall be
remedied during customary business
hours at any authorized aprilia
motorcycle dealer located within the
United States of America in compliance
with the Clean Air Act and applicable
regulations of the United States
Environmental Protection Agency and
the California Air Resources Board. Any
part or parts replaced under this
warranty shall become the property of
aprilia.
In the State of California only, emission
related warranted parts are specifically
defined by the state»s Emission Warranty
Parts List. These warranted parts are:
carburetor and internal parts; intake
manifold; fuel tank; fuel injection system;
spark advance mechanism; crankcase
breather; air cutoff valves; fuel tank cap
for evaporative emission controlled
vehicles; oil filler cap; pressure control
valve; fuel/vapor separator; canister;
igniters; breaker governors; ignition
coils; ignition wires; ignition points;
condensers, and spark plugs if failure
occurs prior to the first scheduled
replacement; and hoses, clamps, fittings
and tubing used directly in these parts.
Since emission related parts may vary
from model to model, certain models
may not contain all of these parts and
certain models may contain functionally
equivalent parts.
In the State of California only, Emission
Control System emergency repairs, as
provided for in the California
Administrative Code, may be performed
by other than an authorized aprilia
dealer. An emergency situation occurs
when an authorized aprilia dealer is not
reasonably available, a part is not
available within 30 days, or a repair is
not complete within 30 days. Any
replacement part can be used in an
emergency repair. aprilia will reimburse
the owner for the expenses, including
diagnosis, not to exceed aprilia»s
suggested retail price for all warranted
parts replaced and labor charges based
on aprilia»s recommended time
allowance for the warranty repair and the
geographically appropriate hourly labor
rate. The owner may be required to keep
receipts and failed parts in order to
receive compensation.
II. LIMITATIONS. This Emission Control
System warranty shall not cover any of
the following:
A. Repair or replacement required as a
result of
(1) accident,
(2) misuse,
(3) repairs improperly performed or
replacements improperly installed,
(4) use of replacement parts or
accessories not conforming to aprilia
specifications which adversely affect
performance and/or
(5) use in competitive racing or related
events.
Page 17

APRum_MOJ50_150#02_####.book Page 17 Tuesday, June 6, 2006 5:29 PM
B. Inspections, replacement of parts and
other services and adjustments
required for required maintenance.
C. Any motorcycle on which the odometer
mileage has been changed so that
actual mileage cannot be readily
determined.
III. LIMITED LIABILITY
A. The liability of aprilia under this
Emission Control System Warranty is
limited solely to the remedying of
defects in material or workmanship by
an authorized aprilia motorcycle dealer
at its place of business during
customary business hours. This
warranty does not cover inconvenience
or loss of use of the motorcycle or
transportation of the motorcycle to or
from the aprilia dealer.
aprilia SHALL NOT BE LIABLE FOR
ANY OTHER EXPENSES, LOSS OR
DAMAGE, WHETHER DIRECT,
INCIDENTAL, CONSEQUENTIAL OR
EXEMPLARY ARISING IN
CONNECTION WITH THE SALE OR
USE OF OR INABILITY TO USE THE
aprilia MOTORCYCLE FOR ANY
PURPOSE. SOME STATES DO NOT
ALLOW THE EXCLUSION OR
LIMITATION OF ANY INCIDENTAL OR
CONSEQUENTIAL DAMAGES, SO
THE ABOVE LIMITATIONS MAY NOT
APPLY TO YOU.
B. NO EXPRESS EMISSION CONTROL
SYSTEM WARRANTY IS GIVEN BY
aprilia EXCEPT AS SPECIFICALLY
SET FORTH HEREIN. ANY EMISSION
CONTROL SYSTEM WARRANTY
IMPLIED BY LAW, INCLUDING ANY
WARRANTY OF MERCHANTABILITY
OR FITNESS FOR A PARTICULAR
PURPOSE, IS LIMITED TO THE
EXPRESS EMISSION CONTROL
SYSTEM WARRANTY TERMS
STATED IN THIS WARRANTY. THE
FOREGOING STATEMENTS OF
WARRANTY ARE EXCLUSIVE AND IN
LIEU OF ALL OTHER REMEDIES.
SOME STATES DO NOT ALLOW
LIMITATIONS ON HOW LONG AN
IMPLIED WARRANTY LASTS SO THE
ABOVE LIMITATIONS MAY NOT
APPLY TO YOU.
C. No dealer is authorized to modify this
aprilia Limited Emission Control
System Warranty.
IV.LEGAL RIGHTS. THIS WARRANTY
GIVES YOU SPECIFIC LEGAL
RIGHTS, AND YOU MAY ALSO HAVE
OTHER RIGHTS WHICH VARY FROM
STATE TO STATE.
V. THIS WARRANTY IS IN ADDITION TO
THE aprilia LIMITED MOTORCYCLE
WARRANTY.
VI.ADDITIONAL INFORMATION. Any
replacement part that is equivalent in
performance and durability may be
used in the performance of any
maintenance or repairs. However,
aprilia is not liable for these parts. The
owner is responsible for the
performance of all required
maintenance. Such maintenance may
be performed at a service
establishment or by any individual. The
warranty period begins on the date the
motorcycle is delivered to an ultimate
purchaser.
Piaggio & C. S.p.A.
Viale Rinaldo Piaggio, 25
56025 Pontedera (PI) Italy
Piaggio Group Americas, Inc.
140 East 45th Street, 17th Floor
New York, NY 10017 U.S.A.
use and maintenance Mojito 50 - 150
USA
17
Page 18
APRum_MOJ50_150#02_####.book Page 18 Tuesday, June 6, 2006 5:29 PM
GENERAL INSTRUCTIONS
The operations preceded by this
symbol must be repeated also on
the opposite side of the vehicle.
If not expressly indicated otherwise, for the
reassembly of the units repeat the
disassembly operations in reverse order.
The terms ≈right∆ and ≈left∆ are referred to
the rider seated on the vehicle in the
normal riding position.
NOTE Soon after purchasing the
vehicle, write down the identification data
provided in the SPARE PARTS
IDENTIFICATION LABEL in the table
below. This label is positioned on the left
part of the frame; to be able to read it,
remove the left inspection cover, see page
69 (REMOVING THE RIGHT AND LEFT
INSPECTION COVERS).
These data indicate:
√ YEAR = year of manufacture (Y, 1, 2,
º);
√ I.M. = modification code (A, B, C, º);
√ COUNTRY CODE = country of
homologation (I, UK, A, º).
and are to be supplied to the Local aprilia
Dealer as reference data for the purchase
of spare parts or specific accessories of
the model you have acquired.
In this manual the various versions are
indicated by the following symbols:
OPT
optional
M50
Mojito 50 Retro
MC50
Mojito 50 Custom
MC150
Mojito 150 Custom
VERSION:
Italy Singapore
I
United
UK
Kingdom
Austria Israel
A
Portugal South Korea
P ROK
Finland Malaysia
SF
Belgium Chile
B
Germany Croatia
D
France Australia
F
Spain United States
E
Greece Brazil
GR
Holland South Africa
NL
Switzerland New Zealand
CH
Denmark Canada
DK
Japan
J
SGP
SLO
IL
MAL
RCH
HR
AUS
USA
BR
RSA
NZ
CDN
Slovenia
of America
use and maintenance Mojito 50 - 150
18
USA
Page 19
APRum_MOJ50_150#02_####.book Page 19 Tuesday, June 6, 2006 5:29 PM
CONTENT
FOREWORD...................................................2
INTRODUCTION............................................ 2
SAFETY WARNINGS .....................................3
GENERAL SAFETY RULE.............................. 3
CARBON MONOXIDE....................................................3
HOT COMPONENTS .....................................................3
USED ENGINE OIL ........................................................3
BRAKE FLUID.................................................................4
COOLANT .......................................................................4
BATTERY HYDROGEN GAS AND ELECTROLYTE..4
WARNING - PRECAUTIONS - GENERAL
ADVICE .........................................................5
REPORTING OF DEFECTS THAT AFFECT
SAFETY...........................................................................5
ROAD REGULATIONS
AND USE OF THE VEHICLE.........................................5
NOISE EMISSION WARRANTY ...................................5
INFORMATION ON THE NOISE AND EXHAUST
GAS EMISSION CONTROL SYSTEM .........................5
TAMPERING WARNING................................................5
PROBLEMS THAT MAY AFFECT THE VEHICLE
EMISSIONS.....................................................................6
VEHICLE IDENTIFICATION NUMBER (V.I.N.)
(FRAME NUMBER) ........................................................6
INFORMATION CONTAINED IN THE VEHICLE
IDENTIFICATION NUMBER..........................................6
DIGIT MEANING.............................................................7
POSITION OF THE WARNING ADHESIVE
LABELS ...........................................................................8
POSITION OF THE WARNING ADHESIVE
LABELS ...........................................................................9
POSITION OF THE WARNING ADHESIVE
LABELS .........................................................................10
WARNING ADHESIVE LABELS CHART ...................11
CALIFORNIA EVAPORATIVE EMISSION SYSTEM 14
APRILIA S.P.A. - EMISSION CONTROL SYSTEM
WARRANTY STATEMENT..........................................15
MANUFACTURER»S EMISSIONS
SYSTEM WARRANTY COVERAGE ..........................15
OWNER»S WARRANTY RESPONSIBILITIES...........15
APRILIA S.P.A. - LIMITED WARRANTY
ON EMISSION CONTROL SYSTEM..........................16
GENERAL INSTRUCTIONS ......................... 18
CONTENT.....................................................................19
BASIC SAFETY RULES ..............................................22
CLOTHING....................................................................27
ACCESSORIES............................................................28
LOAD .............................................................................28
ARRANGEMENT OF THE MAIN
ELEMENTS ................................................. 30
ARRANGEMENT OF THE MAIN ELEMENTS34
ARRANGEMENT OF THE CONTROLS /
INSTRUMENTS AND INDICATORS............. 36
INSTRUMENT AND INDICATOR TABLE .................. 37
MAIN INDEPENDENT CONTROLS ............. 38
CONTROLS ON THE LEFT SIDE OF THE
HANDLEBAR ................................................................38
CONTROLS ON THE RIGHT SIDE OF THE
HANDLEBAR ................................................................39
MAIN INDEPENDENT CONTROLS ............. 40
CONTROLS ON THE LEFT SIDE OF THE
HANDLEBAR ................................................................40
CONTROLS ON THE RIGHT SIDE OF THE
HANDLEBAR ................................................................41
IGNITION SWITCH.......................................................42
STEERING LOCK.........................................................42
AUXILIARY EQUIPMENT ............................ 43
UNLOCKING / LOCKING THE SADDLE ...................43
CRASH HELMET / GLOVE COMPARTMENT..........43
ANTI-THEFT HOOK.....................................................43
TOOL KIT ......................................................................44
BAG HOOK ...................................................................44
GLOVE COMPARTMENT ...........................................44
MAIN COMPONENTS .................................. 45
FUEL..............................................................................45
LUBRICANTS ...............................................................46
2 STROKE OIL ...........................................................46
BRAKE FLUID √ RECOMMENDATIONS ..................47
FRONT DISC BRAKE ..................................................48
REAR DRUM BRAKE ..................................................49
TYRES...........................................................................50
CATALYTIC SILENCER ..............................................51
EXHAUST SILENCER .................................................52
INSTRUCTIONS FOR USE .......................... 53
PRELIMINARY CHECKING OPERATIONS.............. 53
STARTING.................................................................... 54
DEPARTURE AND DRIVE.......................................... 57
RUNNING-IN ................................................................ 59
STOPPING....................................................................60
PARKING...................................................................... 61
POSITIONING THE VEHICLE ON THE STAND....... 62
SUGGESTIONS TO PREVENT THEFT ....................62
MAINTENANCE........................................... 63
REGULAR SERVICE INTERVALS CHART ............ 64
REGULAR SERVICE INTERVALS CHART ............. 66
IDENTIFICATION DATA.............................................. 68
CHECKING THE ENGINE OIL LEVEL
AND TOPPING UP ...................................................... 69
AIR CLEANER ............................................................ 70
AIR CLEANER ............................................................. 71
CHECKING THE BRAKE PAD WEAR....................... 72
CHECKING THE BRAKE SHOE WEAR.................... 73
INSPECTING THE FRONT AND REAR
SUSPENSIONS............................................................ 73
CHECKING THE STEERING...................................... 74
CHECKING THE ENGINE FULCRUM AXLE............ 74
REMOVING THE FRONT COVER............................. 75
REMOVING THE LOWER HANDLEBAR COVER .. 76
REMOVING THE HEADLIGHT METAL RING ........ 76
PARTIAL REMOVAL OF THE UPPER
HANDLEBAR COVER ................................................ 77
REMOVING THE REAR-VIEW MIRRORS................ 78
PARTIAL REMOVAL OF THE DASHBOARD ......... 78
REMOVING THE CENTRAL INSPECTION COVER 79
REMOVING THE RIGHT AND LEFT INSPECTION
COVERS....................................................................... 79
REMOVING THE BATTERY COVER ...................... 79
REMOVING THE PASSENGER GRAB RAIL .........80
REMOVING THE REAR COVER ............................. 80
CHECKING THE STAND ............................................ 82
CHECKING THE SWITCHES..................................... 82
IDLING ADJUSTMENT................................................ 83
ADJUSTING THE ACCELERATOR CONTROL....... 84
SPARK PLUG............................................................... 84
BATTERY...................................................................... 86
LONG INACTIVITY OF THE BATTERY..................... 86
CHECKING AND CLEANING THE TERMINALS...... 87
REMOVING THE BATTERY ..................................... 87
use and maintenance Mojito 50 - 150
USA
19
Page 20

APRum_MOJ50_150#02_####.book Page 20 Tuesday, June 6, 2006 5:29 PM
REMOVING THE BATTERY ...................................... 88
CHECKING THE ELECTROLYTE LEVEL ............... 89
RECHARGING THE BATTERY..................................89
CHECKING THE ELECTROLYTE LEVEL ................ 89
INSTALLING THE BATTERY .................................... 90
INSTALLING THE BATTERY ..................................... 90
CHANGING THE FUSES ............................................ 91
ADJUSTING THE VERTICAL HEADLIGHT BEAM .. 92
ADJUSTING THE HORIZONTAL LIGHT BEAM....... 92
BULBS...........................................................................93
CHANGING THE HEADLIGHT BULBS...................... 93
CHANGING THE HEADLIGHT BULBS .................... 94
CHANGING THE FRONT AND REAR DIRECTION
INDICATOR BULBS..................................................... 95
REPLACING THE DASHBOARD BULBS ................. 96
CHANGING THE DASHBOARD BULBS ................. 97
CHANGING THE REAR LIGHT BULB....................... 98
CHANGING THE NUMBER PLATE LIGHT............... 99
TRANSPORT ............................................. 100
CLEANING ................................................101
PERIODS OF EXTENDED STORAGE.................... 102
TECHNICAL DATA .................................... 104
LUBRICANT CHART ................................................108
LUBRICANT CHART .................................................109
WIRING DIAGRAM - .................................................110
WIRING DIAGRAM KEY - ........................................111
CABLE COLOURS..................................................... 111
WIRING DIAGRAM - .................................................112
WIRING DIAGRAM KEY - ........................................113
WIRING DIAGRAM - .................................................114
WIRING DIAGRAM KEY - ........................................115
use and maintenance Mojito 50 - 150
20
USA
Page 21
APRum_MOJ50_150#02_####.book Page 21 Tuesday, June 6, 2006 5:29 PM
safe driving
Page 22
APRum_MOJ50_150#02_####.book Page 22 Tuesday, June 6, 2006 5:29 PM
BASIC SAFETY RULES
The instructions given below cover normal
operation of your vehicle and must be
carefully observed. By following these
rules you will enhance your own safety and
the safety of those around you. You will
also maximize the life and utility of your
vehicle.
Two wheeled vehicles obviously do not
provide some of the protection provided by
automobiles, therefore it is essential that
you wear appropriate protective clothing.
Especially, never operate your vehicle
without wearing your helmet, gloves, eye
protection, a heavy jacket, sturdy footwear,
and sturdy full length pants.
However, do not assume that even the
best clothing and helmet will protect you in
the event of an upset or a crash with
another vehicle. At best, this gear provides
some protection from scrapes and
scratches, but very little, if any, impact
protection.
Be sure that you meet all the requirements
prescribed by local law, including driver»s
license, minimum age, training, insurance,
taxes, vehicle registration, license plate,
etc.
When you first receive your vehicle,
practice by riding in areas where there is
little traffic. Do not attempt to ride in heavy
traffic until you are thoroughly experienced
and riding your vehicle has become
second nature to you.
Although this vehicle is legal for operation
on freeways and expressways, it is
advisable to not ride on these high speed
highways until you are thoroughly familiar
with your vehicle, and have attained a high
degree of skill in its operation.
A new vehicle must be carefully broken in,
see p.54 (BREAKING-IN).
Before starting the engine, make sure that
the brakes, clutch, transmission and
throttle controls function properly and that
the fuel and oil supply is adequate.
The exhaust system, brakes, and some
other parts of the vehicle become very hot
during operation. Do not touch any of these
parts.
Some medicines or drugs, illegal or
prescription, and alcohol significantly
increase the risk of accidents. Do not ride
while you are under the influence of
alcohol or drugs, be they illicit or
prescription.
Make sure you are in good physical
condition and not ill before riding your
vehicle. Do not ride your vehicle when you
are particularly tired or fatigued. Alcohol,
drugs and fatigue are leading causes of
vehicle accidents.
Many accidents are caused by the rider»s
inexperience and lack of training. Do not
ride your vehicle until you have received
training from a recognized training
organization such as the Motorcycle Safety
Foundation. Remember that riding a two
wheeled vehicle, though easy and fun, is
quite different from driving a car. Do not
assume that you can operate your vehicle
safely just because you are a competent
automobile driver.
Never lend your vehicle to others unless
you are sure that they are competent and
properly licensed vehicle operators.
use and maintenance Mojito 50 - 150
22
USA
Page 23

APRum_MOJ50_150#02_####.book Page 23 Tuesday, June 6, 2006 5:29 PM
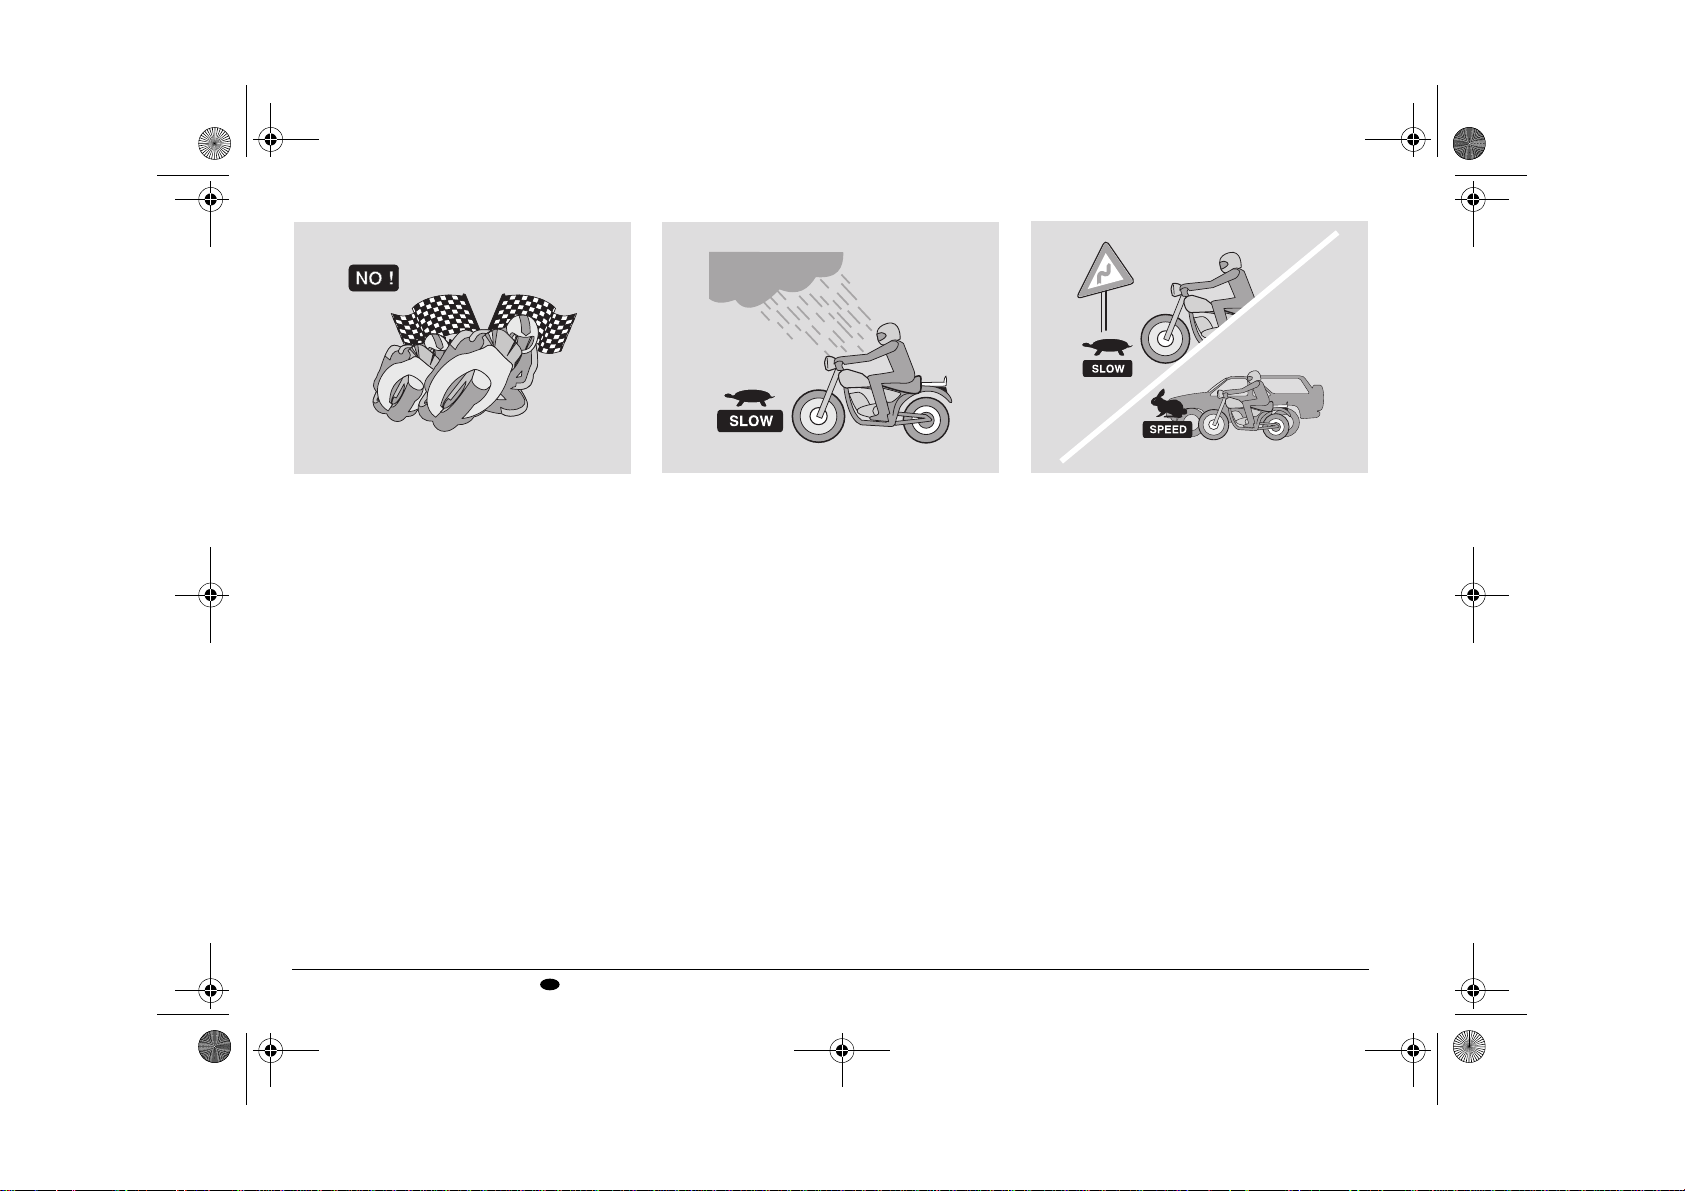
Observe all rules of the road. Particularly
pay attention to all warning, regulatory and
informational signs.
Avoid showing off (i.e., popping wheelies).
Especially observe speed limits, remember
that road conditions change with the
weather and wet and icy pavements are
particularly dangerous for vehicles,
especially if you are riding too fast.
Remember that automobile drivers have a
hard time seeing two wheeled vehicles, so
always give the automobile the right of
way, even if it is legally yours.
Before changing lanes, look over your
shoulder to make sure that the way is
clear. Do not rely exclusively on the rearview mirror: you may miscalculate the
distance and speed of a vehicle, or you
may even not see it at all.
Avoid obstacles that could damage the
vehicle or make you lose control.
Do not tailgate, do not attempt to increase
your gas mileage by following in the slip
stream of cars or trucks in front of you.
In case of accident motorcycles, scooters
and mopeds do not provide the same
degree of protection ensured by
automobiles. The legs, in particular, are
exposed the risk of being injured.
However, the additional installation of leg
guards may actually increase the risk of
injuries and their seriousness in case of
accident.
Do not install leg guards available on the
market of spare parts and accessories.
Non-compliance with these instructions
may result in serious injuries or even
death.
Always ride with both hands on the
handlebars and feet on the footrests.
Never shift gear without using the clutch, if
the vehicle is so equipped. Do not operate
the shift lever or the other controls
suddenly or abruptly. Such misuse can
damage the internal components of the
vehicle and consequently cause seizure,
loss of control, accidents and serious
injuries or even death.
Remain in the seat when you are riding. Do
not stand up or attempt to stretch while you
are riding your vehicle. If you need to rest,
pull over to the side of the road when it can
be safely done.
use and maintenance Mojito 50 - 150
USA
23
Page 24
APRum_MOJ50_150#02_####.book Page 24 Tuesday, June 6, 2006 5:29 PM
COOLER
OIL
It is very important to your safety that you
give full attention to the riding task. Watch
what you are doing, do not allow yourself to
be distracted by other cars, people or
things on the roadside, etc. Never smoke,
eat, drink, read, etc. while riding your
vehicle. If you must consult a map, pull
over when it can be done safely.
Use only the vehicle»s specific fuels and
lubricants indicated in the ≈LUBRICANT
CHART∆; check the oil, fuel and coolant
levels regularly.
If the throttle sticks open, it may cause a
collision with another vehicle, or an upset.
If the throttle sticks, kill the engine with the
engine stop switch located on the right
handlebar.
Do not attempt to restart the engine until
the throttle has been repaired and works
perfectly. Failure to obey this warning can
lead to a runaway with seriously injuries or
even death.
use and maintenance Mojito 50 - 150
24
USA
WARNING
In the event of a throttle sticking
emergency, always kill the engine using
the engine stop switch located near the
throttle grip on the right handlebar.
Never use your vehicle if the throttle
does not automatically fully return to
the idle position when the throttle grip
is released. Contact your Local aprilia
Dealer for repairs. Failure to heed this
warning can lead to a serious accident
and subsequent injury or even death.
If you and your vehicle are involved in an
accident, insure that there has been no
damage to the control levers, tubes, wires,
braking system and other vital parts. If your
vehicle is involved in an accident, take it
immediately to your Local aprilia Dealer
who has the equipment and knowledge to
check for accidental damage which may
compromise your safety.
Your aprilia dealer is ready and able to
help you with any safety problems that you
might have, but of course it is necessary
for you to report any malfunctions to your
mechanic in order for him to help you.
Do not use your vehicle if it is damaged. A
damaged vehicle may become unstable or
present other problems which can increase
the risk of accident, and therefore of
serious injury or even death.
Page 25
APRum_MOJ50_150#02_####.book Page 25 Tuesday, June 6, 2006 5:29 PM
A12
345
ONLY ORIGINALS
Do not attempt to modify the position,
angle or color of your license plate. Do not
cover it with even a clear plastic covering.
Do not modify any of the safety equipment
of your vehicle, especially such safety
related items as directional indicators, rear
view mirrors, lights or horns.
Any modification to your vehicle will
invalidate the warranty.
Do not modify your engine in an attempt to
increase the horsepower. This can result in
irreparable damage to the engine, as well
as degradation of the performance and
handling of the vehicle which could lead to
an upset, and serious injury or even death.
Have your vehicle repaired only with
original parts, and use only original aprilia
or aprilia approved accessories. The use
of aftermarket accessories and parts can
seriously compromise the safety of your
vehicle as well as its performance and
serviceability. Any modification which
affects performance or safety voids your
warranty completely.
Tampering with the emissions or noise
control systems on your vehicle is against
the law, and can be punished by large
fines.
In some jurisdictions, it can even lead to
the confiscation of your vehicle.
This vehicle was not designed to be
equipped with a sidecar or to be used to
tow trailers or other vehicles.
aprilia does not manufacture sidecars or
trailers and therefore cannot predict the
effects of such accessories on the
manoeuvrability or stability of the vehicle: it
can only warn that such effects may be
negative and that any damage to the
vehicle components caused by the use of
such accessories will not be covered by
the warranty.
use and maintenance Mojito 50 - 150
USA
25
Page 26
APRum_MOJ50_150#02_####.book Page 26 Tuesday, June 6, 2006 5:29 PM
Never race other vehicles with your
vehicle.
Brake with both the front and rear brakes.
The use of one brake only for sudden
braking may cause the vehicle to skid or
make the rider lose control of the vehicle
itself.
When riding down a steep hill, use the
engine as a brake by selecting the same
gear, or a lower gear, than you would use
to climb the hill. Use front and rear brakes
sparingly.
use and maintenance Mojito 50 - 150
26
USA
Always ride at the appropriate speed and
avoid unnecessary hard acceleration. This
not only is safer, but also reduces fuel
consumption and increases the life of the
vehicle.
If you must ride your vehicle in rainy
weather, or on loose surfaces, remember
that traction is greatly reduced. Under
these conditions, all handling of the vehicle
must be done gradually and smoothly.
Sudden acceleration, braking or turning
may make you lose control of your vehicle.
When traction is reduced, accelerate and
slow using your vehicle»s engine braking
insofar as possible. Avoid rapid, harsh
application of the brakes.
Gradually open and close the throttle, to
avoid spinning or skidding the rear wheel.
On rough road surfaces, slow down and
ride with particular care.
Try to avoid wide open throttle
accelerations, unless they are necessary
for such things as passing.
Don»t allow your engine to ≈lug,∆ that is, run
at too low an rpm. Shift down to a lower
gear. Also, don»t over-rev the engine.
Observe the redline on the tachometer.
Remember that excessively aggressive
cornering can cause your vehicle»s tires to
lose sideways traction, which can result in
an upset and serious injury or even death.
Page 27
APRum_MOJ50_150#02_####.book Page 27 Tuesday, June 6, 2006 5:29 PM
Always observe posted and statutory
speed limits, but do not assume that you
can ride as fast as the speed limit under all
road conditions. Slowing down a little can
greatly increase your safety under all road
conditions.
Do not ride your vehicle off road.
Do not tamper with the muffler system or
the emissions control system of your
vehicle. This is not only bad for the
environment, it can subject you to serious
penalties.
CLOTHING
Before riding your vehicle, ensure that your
riding gear is in good condition. To be
effective, your helmet must fit properly, and
the visor or other eye protection must be
clean.
Both research and experience have shown
that drivers of other vehicles often do not
see vehicles or riders. In order to make
yourself more conspicuous to these
drivers, wear bright reflective clothing,
such as a reflective vest, or clothing with
reflective sections sewn into the jacket,
pants and gloves. Be particular aware of
approaching automobiles and trucks that
might be trying to turn left in front of you.
Many vehicle accidents are caused by an
opposing automobile driver making a left
turn without warning in front of the vehicle.
Inevitably, the driver will look right at you,
and yet swear that they did not see you
before they turned directly into your path.
Ride alert!
Wear protective clothing, preferably in light
and/or reflecting colors. In this way you will
make yourself more visible to the other
drivers, thus notably reducing the risk of
being knocked down, and you will be more
protected in case of fall.
Always wear your crash helmet. Many
accidents are fatal because of injuries to
the head.
This clothing should be very tight-fitting
and fastened at the wrists and ankles.
Strings, belts and ties should not be
hanging loose; prevent these and other
objects from interfering with driving by
getting entangled with moving parts or
driving mechanisms.
use and maintenance Mojito 50 - 150
USA
27
Page 28
APRum_MOJ50_150#02_####.book Page 28 Tuesday, June 6, 2006 5:29 PM
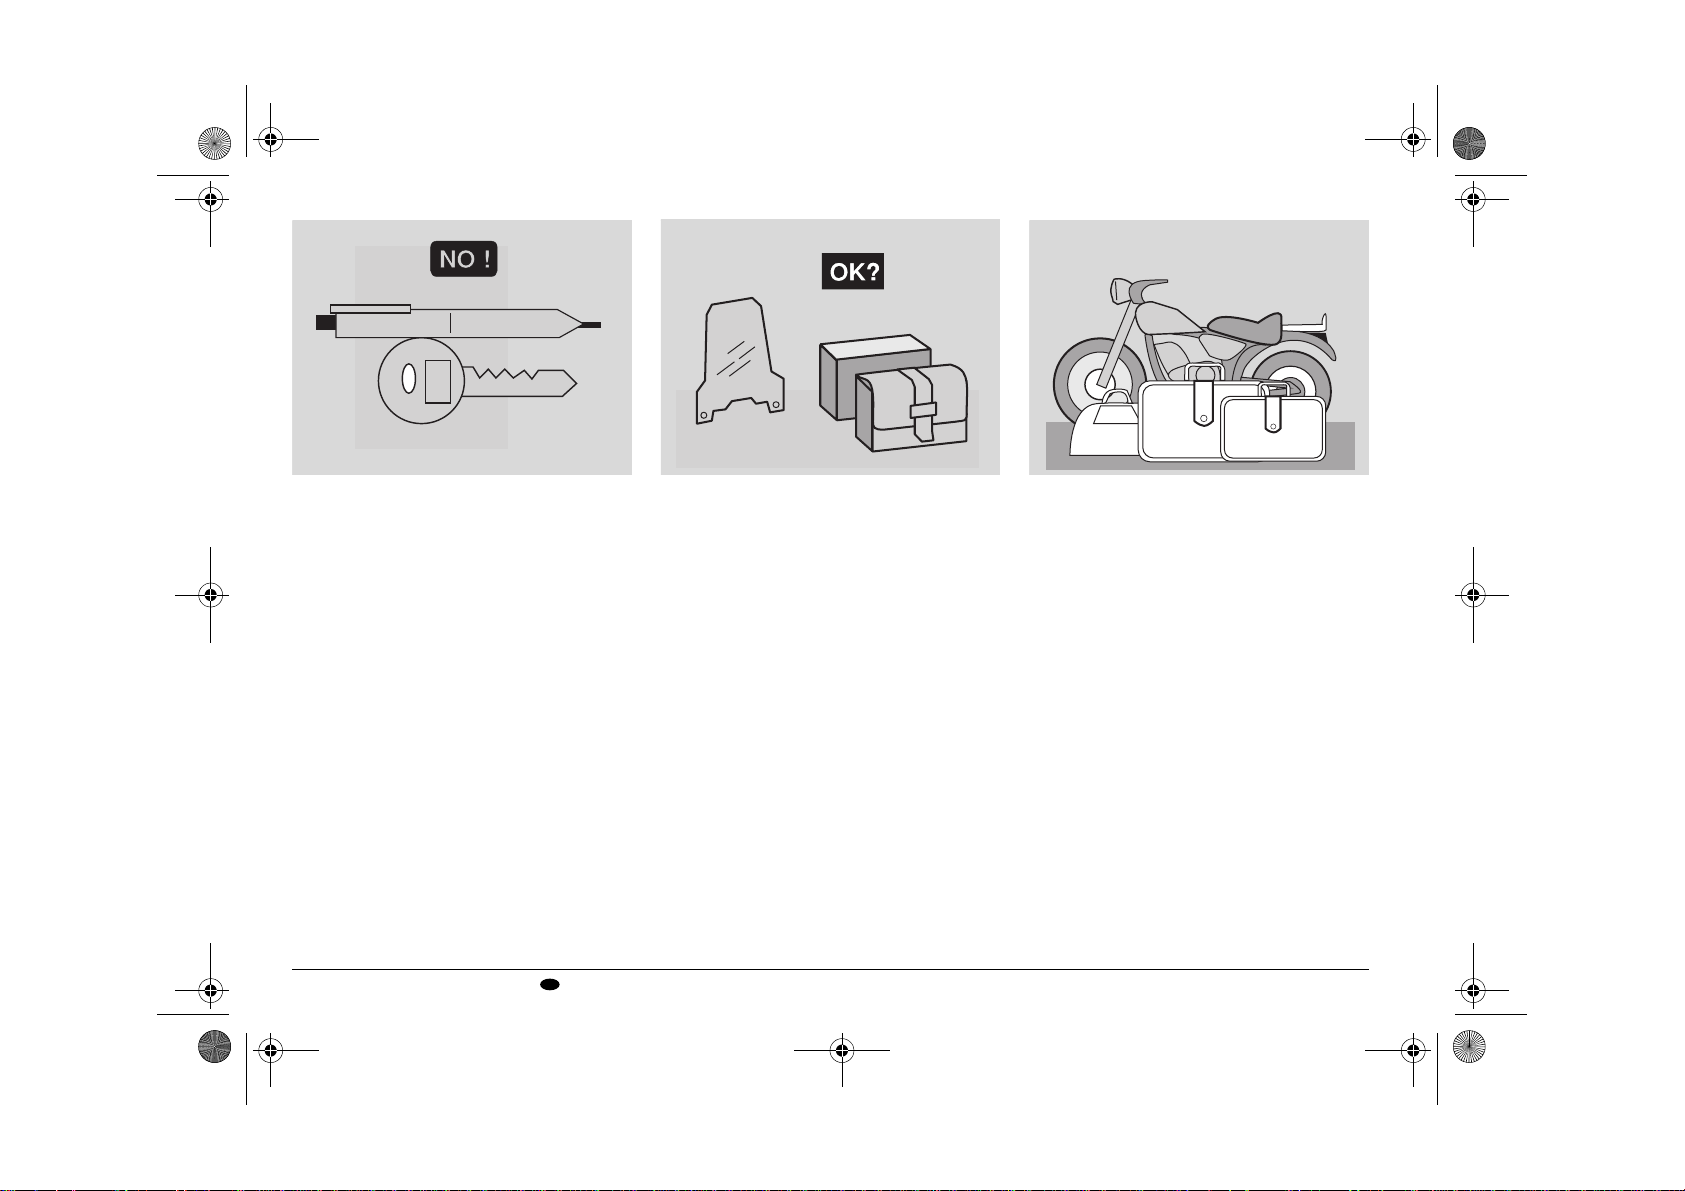
Do not carry sharp objects in your pockets
that could be dangerous in case of an
upset, for example, pens or mechanical
pencils, etc. Also, make sure that your
passengers follow this recommendation.
ACCESSORIES
The owner of the vehicle is responsible for
the choice, installation and use of any
accessory.
The installation of inappropriate
accessories or the overloading of the
vehicle may result in the instability of the
vehicle itself and cause accidents with
consequent risk of serious injuries or even
death. Windshields could be particularly
dangerous, as they can break and injure or
cut the rider in case of accident. In case of
doubts with regard to any accessory you
would like to install or any load you would
like to carry, previously consult your Local
aprilia Dealer.
use and maintenance Mojito 50 - 150
28
USA
Avoid installing accessories that cover
horns or lights or that could impair their
functions, limit the suspension stroke and
the steering angle, hamper the operation of
the controls and reduce the distance from
the ground and the angle of inclination in
turns.
Avoid using accessories that hamper
access to the controls, since this can
prolong reaction times during an
emergency.
Fairings and windshields installed on the
vehicle may produce aerodynamic forces
that will affect the stability of the vehicle
during use, especially at high speeds.
Make sure that anything you carry on your
vehicle is securely attached, and cannot
come lose and jam the wheels, forks, etc.
Do not install any electrical accessories,
and do not modify the electrical system of
your vehicle. Anything that could cause an
electrical overload or other fault could
cause the vehicle to suddenly stop, the
lights to dim or quit, or the horn and other
safety accessories not to work. Use only
genuine aprilia accessories.
LOAD
Do not overload your vehicle. Attach
luggage or packages as close as possible
to the center of your vehicle and distribute
the load from side to side as evenly as
possible, to keep imbalance to a minimum.
Remember that loads tend to loosen with
riding, so frequently check the security of
your load.
Page 29
APRum_MOJ50_150#02_####.book Page 29 Tuesday, June 6, 2006 5:29 PM
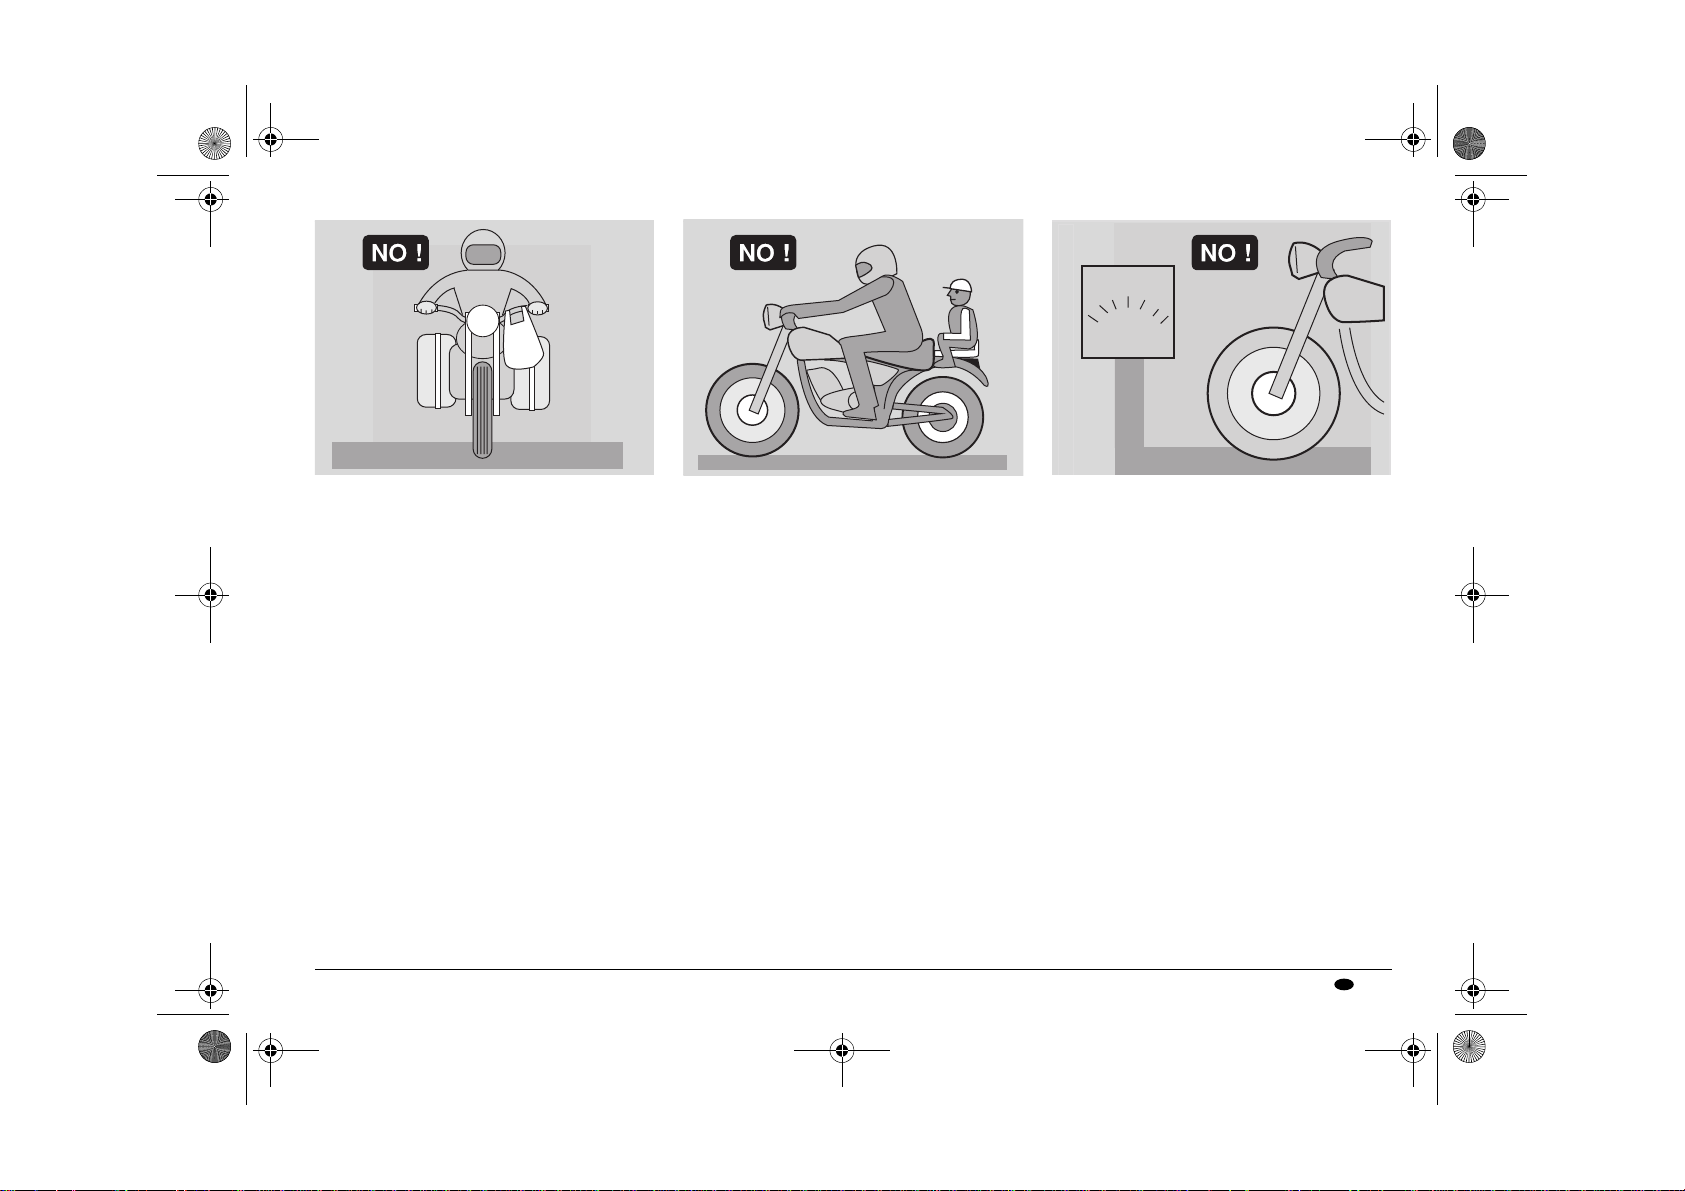
KG!
Do not hang anything from your vehicle
handlebars, fenders, or forks, because this
will upset the handling of your vehicle, and
could prevent you from avoiding an
accident. Failure to heed this warning can
lead to an upset with subsequent serious
injury or even death.
Do not ride with your crash helmet hung
from the strap because it could easily foul
the wheels, fenders, or forks, causing an
upset and subsequent serious injury or
even death.
Carry a passenger only if your vehicle is
equipped with passenger footrests,
handgrips for the passenger to hold on to,
and a passenger saddle.
When carrying a passenger, remember
that your vehicle»s handling is degraded,
that the brakes are less efficient, and the
center of gravity is higher and further to the
rear.
This makes it more likely that the front
wheel will come up off the ground,
especially on acceleration. Therefore, you
should avoid hard acceleration and hard
braking. Many accidents are caused by
inexperienced riders carrying passengers.
Remember that allowance must be made
for the extra weight of the passenger for all
driving maneuvers.
Avoid abrupt and excessive acceleration.
Always slow down in time and calculate
longer stopping and manoeuvring
distances. Non-compliance with these
instructions may lead to the overturning of
the vehicle or to other accidents with
consequent serious injuries or even death.
Never carry loosely packaged items, make
sure that everything that you carry on your
vehicle is carefully secured.
Do not carry packages which protrude from
the luggage rack or which cover any of the
signal lights, the headlight, or the horn.
Never carry animals or children on the
glove compartment or on the luggage rack.
Never exceed the labeled maximum load
for each saddlebag.
Overloading your vehicle seriously reduces
its stability and maneuverability and can
lead to an upset with subsequent serious
injury or death.
use and maintenance Mojito 50 - 150
USA
29
Page 30
APRum_MOJ50_150#02_####.book Page 30 Tuesday, June 6, 2006 5:29 PM
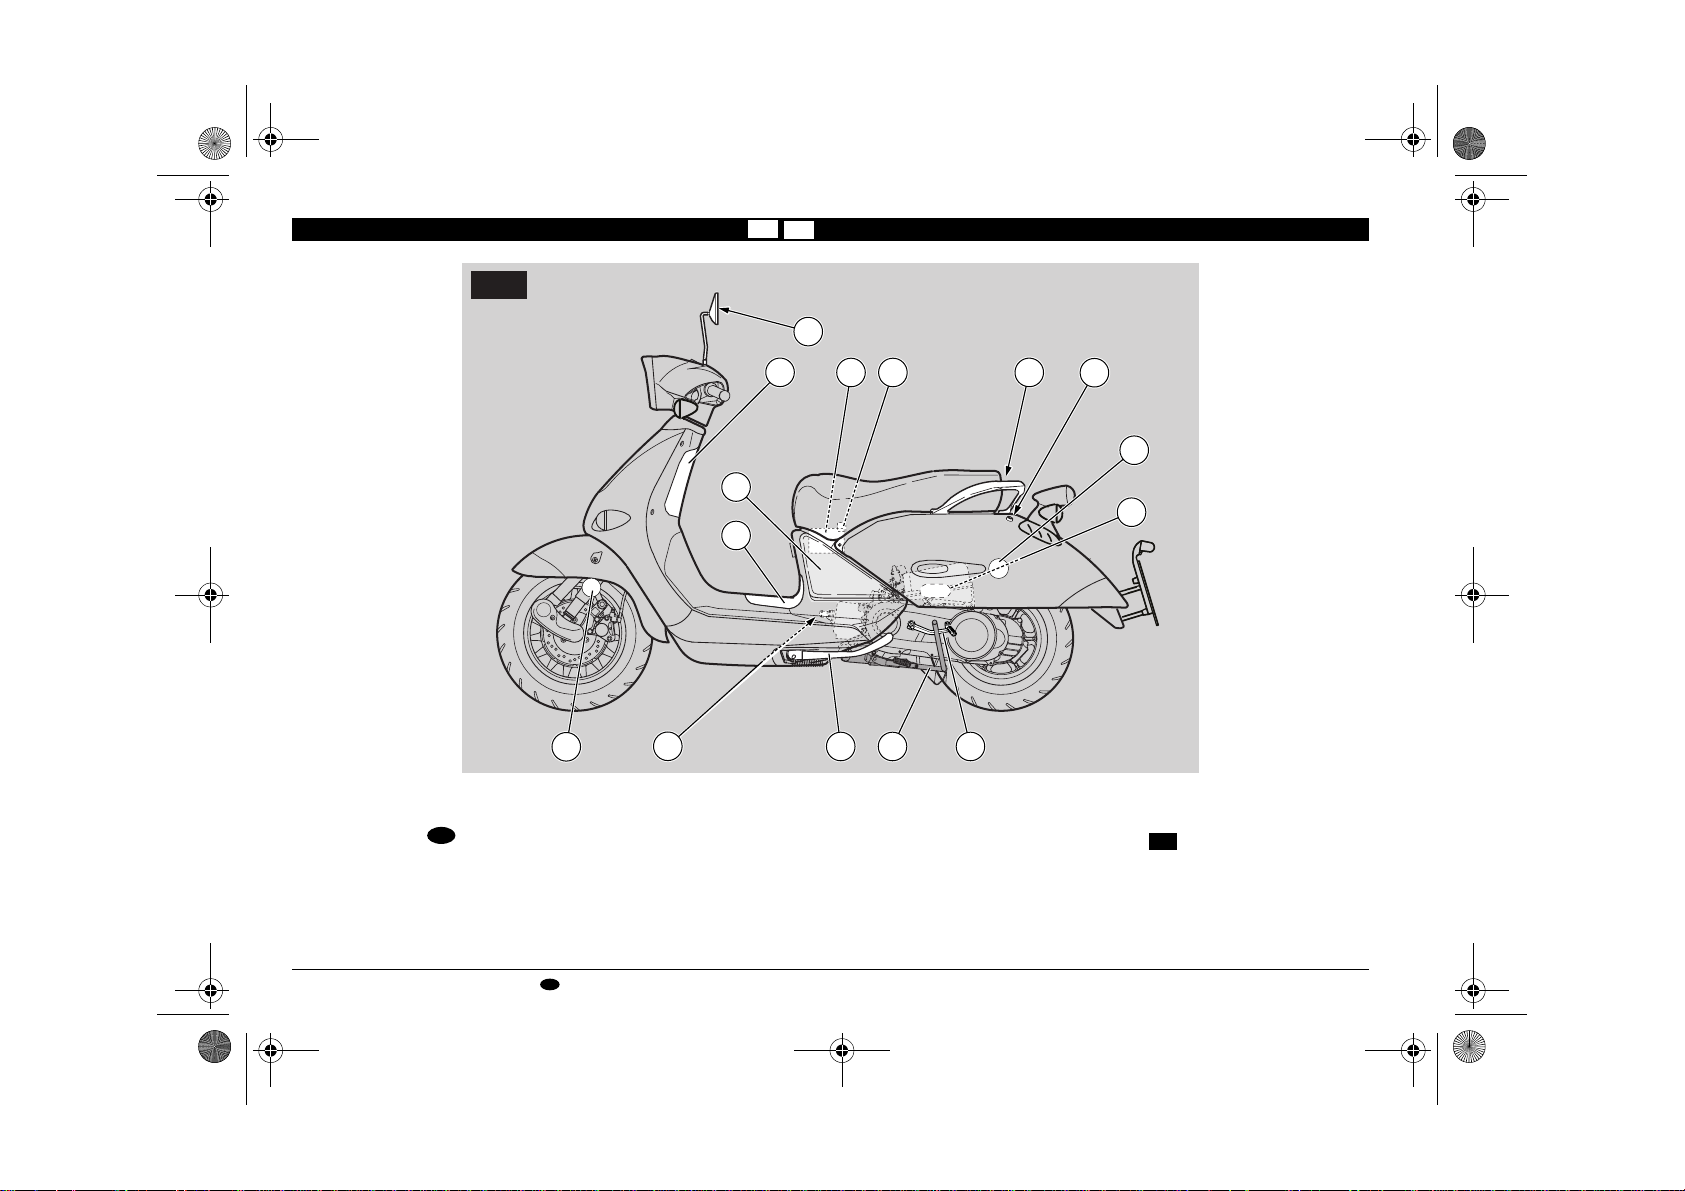
ARRANGEMENT OF THE MAIN ELEMENTS
M50
M50
MC50
1
KEY
1) Left rear-view mirror
(not present )
UK
2) Left inspection cover
3) Central inspection cover
4) Glove compartment
5) Battery
15
4
2
3
14
6) Fuse carrier
7) Passenger grab rail
8) Saddle lock
9) Air cleaner
10) Left rear reflector
11) Kick starter
5 6
7 8
10
9
111213
12) Centre stand
13) Side stand
OPT
14) Spark plug
15) Left front reflector
use and maintenance Mojito 50 - 150
30
USA
Page 31

APRum_MOJ50_150#02_####.book Page 31 Tuesday, June 6, 2006 5:29 PM
M50
14 13 11 10
KEY
1) Crash helmet / glove compartment
2) 2 stroke oil tank plug
3) Fuel tank plug
4) Ignition switch / steering lock
5) Bag hook
6) Right inspection cover
7
3
2
1
4
12
7) Right rear-view mirror
(in the countries where required)
8) Brake fluid reservoir (front brake)
9) Horn
10) Right front reflector
11) Fuel tank
8
9
5
6
12) Anti-theft hook (for the aprilia
OPT
≈Body-Guard∆ armored cable)
13) 2 stroke oil tank
14) Right rear reflector
use and maintenance Mojito 50 - 150
USA
31
Page 32

APRum_MOJ50_150#02_####.book Page 32 Tuesday, June 6, 2006 5:29 PM
MC50
1
4
5 6
7
8
10
2
3
9
KEY
1) Left rear-view mirror
2) Left inspection cover
3) Central inspection cover
4) Glove compartment
5) Battery
use and maintenance Mojito 50 - 150
32
USA
14
6) Fuse carrier
7) Passenger grab rail
8) Saddle lock
9) Air cleaner
10) Left rear reflector
11121315
11) Kick starter
12) Centre stand
13) Side stand
14) Spark plug
15) Left front reflector
OPT
Page 33

APRum_MOJ50_150#02_####.book Page 33 Tuesday, June 6, 2006 5:29 PM
MC50
1
8
7
3
2
14 10
KEY
1) Crash helmet / glove compartment
2) 2 stroke oil tank plug
3) Fuel tank plug
4) Ignition switch / steering lock
5) Bag hook
6) Right inspection cover
4
5
6
13 11
12
7) Right rear-view mirror
8) Brake fluid reservoir (front brake)
9) Horn
10) Right front reflector
11) Fuel tank
9
12) Anti-theft hook (for the aprilia
≈Body-Guard∆ armored cable)
13) 2 stroke oil tank
14) Right rear reflector
use and maintenance Mojito 50 - 150
USA
OPT
33
Page 34

APRum_MOJ50_150#02_####.book Page 34 Tuesday, June 6, 2006 5:29 PM
ARRANGEMENT OF THE MAIN ELEMENTS
MC150
2
3
4
13
KEY
1) Left rear-view mirror
2) Glove compartment
3) Left inspection cover
4) Central inspection cover
5) Air cleaner
6) Passenger grab rail
7) Saddle lock
8) Left rear reflector
9) Centre stand
10) Engine oil filler plug
MC150
10
1
5 6 7
8
912 1114
11) Passenger left footpeg
12) Side stand
OPT
13) Battery
14) Left front reflector
use and maintenance Mojito 50 - 150
34
USA
Page 35

APRum_MOJ50_150#02_####.book Page 35 Tuesday, June 6, 2006 5:29 PM
MC150
1 2
7
3
8
KEY
1) Crash helmet / glove compartment
2) Right inspection cover
3) Fuel tank plug
4) Ignition switch / steering lock
5) Bag hook
6) Fuse carrier
15 14
4
5
13
12
11
7) Right rear-view mirror
8) Brake fluid reservoir (front brake)
9) Horn
10) Right front reflector
11) Fuel tank
9
6
10
12) Anti-theft hook (for the aprilia
OPT
≈Body-Guard∆ armored cable)
13) Spark plug
14) Passenger right footpeg
15) Right rear reflector
use and maintenance Mojito 50 - 150
USA
35
Page 36

APRum_MOJ50_150#02_####.book Page 36 Tuesday, June 6, 2006 5:29 PM
ARRANGEMENT OF THE CONTROLS / INSTRUMENTS AND INDICATORS
M50
KEY
1) Electrical controls on the left side of the handlebar
2) Rear brake lever
3) Instruments and indicators
4) Throttle grip
5) Front brake lever
6) Electrical controls on the right side of the handlebar
7)Ignition switch / steering lock (--)
8) Speedometer
use and maintenance Mojito 50 - 150
36
USA
MC50
MC150
9) Total kilometers odometer
10) Green low beam and parking light warning light ( )
11) Blue high beam warning light ( )
12) Fuel level indicator ( )
13) Green direction indicator warning light ( )
14) Amber low fuel warning light ( )
M50 MC50
15) Red 2 stroke oil reserve warning light ( )
MC150
16) Red engine oil pressure warning light ( )
Page 37

APRum_MOJ50_150#02_####.book Page 37 Tuesday, June 6, 2006 5:29 PM
INSTRUMENT AND INDICATOR TABLE
Description Function
Right direction indicator warning light
It blinks when the direction indicators are on.
()
2 stroke oil reserve warning light
()
It comes on when the ignition switch is in position ≈∆ and the start push button ≈∆ is pressed, thus
checking the proper functioning of the bulb. If the light does not come on during the starting, provide for
replacing the bulb.
If the warning light comes on and does not go out after the start push button “ ”
has been released, or if it comes on during normal functioning, this means that:
M50 MC50
CAUTION
the 2 stroke oil reserve is being used; in this case, top up the 2 stroke oil tank, see page 46 (2
STROKE OIL);
MC150
the engine oil pressure in the circuit is insufficient. In this case stop the engine immediatly and
contact on Aprilia Official Dealer.
It comes on every time the ignition switch is brought to position
the correct operation of the bulb. If during this phase the lamp does not turn on, it must be replaced.
MC150
Engine oil pressure warning light
()
The warning light must go off when the engine is running.
CAUTION
If the warning light comes on during the normal running of the engine, this
means that the oil pressure in the circuit is insufficient. In this case,
immediately stop the engine and contact your aprilia Official Dealer.
Total kilometres odometer
Speedometer
Parking light and low beam warning light
It indicates the total number of kilometres covered.
It indicates the driving speed.
It comes on when the lights are on.
()
High beam warning light ( )
It comes on when the headlight is in high beam position.
Low fuel warning light ( ) It comes on when the quantity of fuel left in the tank is about 0.5gal (2
Fuel level indicator( ) It indicates the approximate fuel level in the tank.
and the engine is not running, thus testing
≈∆
).
use and maintenance Mojito 50 - 150
USA
37
Page 38

APRum_MOJ50_150#02_####.book Page 38 Tuesday, June 6, 2006 5:29 PM
MAIN INDEPENDENT CONTROLS
M50
CONTROLS ON THE LEFT SIDE OF THE HANDLEBAR
NOTE The electrical parts work only when the ignition switch is
in position
≈∆.
NOTE The lighting system works only when the engine is
running.
1) HORN PUSH BUTTON ( )
The horn is activated when the push button is pressed.
2) DIMMER SWITCH ( - )
Position ≈∆ actuates: the parking lights, dashboard light
and low beam light.
Position ≈∆ actuates the high beam light.
NOTE The lights can be switched off only by stopping the
engine.
3) DIRECTION INDICATOR SWITCH( )
To indicate the turn to the left, move the switch to the left; to
indicate the turn to the right, move the switch to the right.
To turn off the direction indicator, press the switch.
M50
use and maintenance Mojito 50 - 150
38
USA
Page 39

APRum_MOJ50_150#02_####.book Page 39 Tuesday, June 6, 2006 5:29 PM
M50
CONTROLS ON THE RIGHT SIDE OF THE HANDLEBAR
NOTE The electrical parts work only when the ignition switch is
in position ≈∆.
NOTE The lighting system works only when the engine is
running.
NOTE The lights can be switched off only by stopping the
engine.
1) ENGINE STOP SWITCH ( - )
(in the countries where required)
CAUTION
Never operate the engine stop switch “ - ” while driving.
It is a safety/emergency device.
When the switch is set to ≈∆, the engine can be started; pressing
it to ≈∆, stops the engine.
CAUTION
With stopped engine and ignition switch in position “ ” the
battery may run down.
When the vehicle has come to a halt, stop the engine and
move the ignition switch to position “ ”.
2) START PUSH BUTTON ( )
When the start push button is pressed and one of the brake
levers (front or rear) is activated at the same time, the starter
makes the engine run.
For the starting procedure, see page 54 (STARTING).
use and maintenance Mojito 50 - 150
USA
39
Page 40

APRum_MOJ50_150#02_####.book Page 40 Tuesday, June 6, 2006 5:29 PM
MAIN INDEPENDENT CONTROLS
MC50 MC150
CONTROLS ON THE LEFT SIDE OF THE HANDLEBAR
The electrical parts work only when the ignition switch is in position
≈∆.
NOTE The lighting system works only when the engine is
running.
1) HORN PUSH BUTTON ( )
The horn is activated when the push button is pressed.
2) DIMMER SWITCH ( - - )
Position ≈∆ actuates: the parking lights, dashboard light
and low beam light.
Position ≈∆ actuates the high beam light.
Press the dimmer switch ( --) to (A) ( ) to flash the
high beam light.
NOTE When the dimmer switch is released, the high beam
signaller is disconnected.
NOTE The lights can be switched off only by stopping the
engine.
3) DIRECTION INDICATOR SWITCH( )
To indicate the turn to the left, move the switch to the left; to
indicate the turn to the right, move the switch to the right.
To turn off the direction indicator, press the switch.
MC50 MC150
use and maintenance Mojito 50 - 150
40
USA
Page 41

APRum_MOJ50_150#02_####.book Page 41 Tuesday, June 6, 2006 5:29 PM
MC50 MC150
CONTROLS ON THE RIGHT SIDE OF THE HANDLEBAR
NOTE The electrical parts work only when the ignition switch is
in position ≈∆.
NOTE The lighting system works only when the engine is
running.
NOTE The lights can be switched off only by stopping the
engine.
1) ENGINE STOP SWITCH ( - )
(in the countries where required)
CAUTION
Never operate the engine stop switch “ - ” while driving.
It is a safety/emergency device.
When the switch is set to ≈∆, the engine can be started; pressing
it to ≈∆, stops the engine.
CAUTION
With stopped engine and ignition switch in position “ ” the
battery may run down.
When the vehicle has come to a halt, stop the engine and
move the ignition switch to position “ ”.
2) START PUSH BUTTON ( )
When the start push button is pressed and one of the brake
levers (front or rear) is activated at the same time, the starter
makes the engine run.
For the starting procedure, see page 54 (STARTING).
use and maintenance Mojito 50 - 150
USA
41
Page 42

APRum_MOJ50_150#02_####.book Page 42 Tuesday, June 6, 2006 5:29 PM
IGNITION SWITCH
STEERING LOCK
The ignition switch is positioned on the
right side, near the steering column.
NOTE The key (1) operates the ignition
switch / steering lock, the glove
compartment and the saddle lock.
Two keys are supplied together with the
vehicle (one spare key).
NOTE Do not keep the spare key on the
vehicle.
Never turn the key to position “ ” in
running conditions, in order to avoid
losing control of the vehicle.
OPERATION
To lock the steering:
u Turn the handlebar completely leftwards.
u Turn the key to position ≈∆.
u Press the key and rotate it to position
≈∆.
u Extract the key.
WARNING
Position Function Key removal
It is possible
to remove the
key.
It is possible
to remove the
key.
It is not
possible to
remove the
key.
Steering lock
The steering
is locked.
It is neither
possible to
start the
engine, nor to
switch on the
lights.
Neither the
engine, nor
the lights can
be switched
on.
The engine
and the lights
can be
switched on.
use and maintenance Mojito 50 - 150
42
USA
Page 43

APRum_MOJ50_150#02_####.book Page 43 Tuesday, June 6, 2006 5:29 PM
AUXILIARY EQUIPMENT
UNLOCKING / LOCKING THE SADDLE
To unlock and lift the saddle:
u Position the vehicle on the stand.
u Insert the key in the saddle lock (1).
u Rotate the key counterclockwise and lift
the saddle (2).
NOTE Before lowering and locking the
saddle, make sure that you have not left
the key in the crash helmet / glove
compartment.
u To lock the saddle, lower and press it
(without exerting too much pressure),
thus making the lock snap shut.
WARNING
Before leaving, make sure that the
saddle is properly locked.
CRASH HELMET / GLOVE COMPARTMENT
Thanks to the crash helmet/ glove
compartment, you no longer have to carry
the crash helmet or other objects with you
every time you park the vehicle.
The compartment is positioned under the
saddle and can contain a ≈JET∆ helmet.
To reach it:
u
Lift the saddle (2), see beside
(UNLOCKING / LOCKING THE SADDLE).
NOTE
Position the helmet with the opening
facing downwards, as indicated in the figure.
WARNING
Do not load the crash helmet / glove
compartment too much.
Maximum allowed weight: 5.5 lb (2.5 Kg)
ANTI-THEFT HOOK
The anti-theft hook (3) is positioned on the
right side of the vehicle, near the rider»s
footboard.
To prevent the vehicle from being stolen, it
is advisable to secure it with the aprilia
OPT
≈ Body-Guard∆ armored cable (4),
available at any aprilia Official Dealer.
WARNING
Do not use the hook to lift the vehicle or
for any purpose other than securing the
vehicle once it has been parked.
use and maintenance Mojito 50 - 150
USA
43
Page 44

APRum_MOJ50_150#02_####.book Page 44 Tuesday, June 6, 2006 5:29 PM
TOOL KIT
The tool kit is positioned inside the crash
helmet / glove compartment.
To reach it, proceed as follows:
u
Lift the saddle, see page 43 (UNLOCKING
/ LOCKING THE SADDLE).
u Take the tool kit (1).
The tool kit (1) includes:
√ n° 1 tool case;
M50 MC50
√ n° 1 21 mm spark plug socket
spanner;
MC150
√ n° 1 16 mm spark plug socket
spanner;
√ n° 1 socket spanner rod;
√ n° 1 8-10 mm socket spanner;
√ n° 1 double-ended, cross-/cut headed-
screwdriver type PH size 2;
√ n° 1 screwdriver handle;
√ n° 1 3 mm hexagon spanner;
√ n° 1 4 mm hexagon spanner;
MC150
√ n° 1 5 mm hexagon spanner;
use and maintenance Mojito 50 - 150
44
USA
BAG HOOK
WARNING
Do not hang excessively bulky bags or
parcels to the hook, as this may
seriously compromise the
manoeuvrability of the vehicle or the
movement of your feet.
The bag hook (2) is positioned under the
front part of the saddle.
Maximum allowed weight: 3.31 lb (1.5
kg).
3
4
GLOVE COMPARTMENT
It is positioned under the handlebar, on the
inner part of the shield.
To reach it:
u Introduce the ignition key (3) in the lock.
u Turn the key clockwise, pull it and open
the door (4).
WARNING
Before locking the door, make sure that
you have not left the key in the glove
compartment.
To lock the door (4), lift and press it. It is
not necessary to use the key.
Maximum allowed weight: 3.31 lb (1.5
kg).
Page 45

APRum_MOJ50_150#02_####.book Page 45 Tuesday, June 6, 2006 5:29 PM
MAIN COMPONENTS
FUEL
WARNING
The fuel used for internal combustion
engines is extremely inflammable and
in particular conditions it can become
explosive. It is important to carry out
the refuelling and the maintenance
operations in a well-ventilated area,
with the engine off. Do not smoke while
refuelling or near fuel vapors, in any
case avoid any contact with naked
flames, sparks and any other heat
source to prevent the fuel from catching
fire or from exploding.
Further, prevent fuel from flowing out of
the fuel filler, as it could catch fire when
getting in contact with the red-hot
surfaces of the engine.
In case some fuel has accidentally been
spilt, make sure that the area is
completely dry before starting the
vehicle.
Since petrol expands under the heat of
the sun and due to the effects of sun
radiation, never fill the tank to the brim.
Screw the plug carefully after refilling.
Avoid any contact of the fuel with the
skin and the inhalation of vapors; do
not swallow fuel or pour it from a
receptacle into another by means of a
tube.
MC50 M50
ALWAYS DISPOSE OF FUEL IN
COMPLIANCE WITH ENVIRONMENTAL
REGULATIONS.
KEEP OUT OF REACH OF CHILDREN.
Use only unleaded gasoline with a
minimum octane rating of 91 (RON) or 81
(MON).
MC150
To refuel, proceed as follows:
u
Lift the saddle, see page 43 (UNLOCKING
/ LOCKING THE SADDLE).
u Unscrew and remove the fuel tank plug
(1).
FUEL TANK CAPACITY (reserve
included):
M50 MC50
√ 2 US gal (7.5
MC150
√ 2.1 US gal (8 )
)
TANK RESERVE: 0.5 US gal (2 ).
u Refuel.
WARNING
After refuelling, put back the plug (1) in
the correct position.
u Put back the plug (1).
use and maintenance Mojito 50 - 150
USA
45
Page 46

APRum_MOJ50_150#02_####.book Page 46 Tuesday, June 6, 2006 5:29 PM
LUBRICANTS
WARNING
Oil can cause serious damage to the
skin if handled every day or for long
periods.
Wash your hands carefully after using
oil.
In case any maintenance operation has
to be carried out, it is advisable to use
latex gloves.
KEEP AWAY FROM CHILDREN.
DO NOT DISPOSE OF OIL IN THE
ENVIRONMENT.
CAUTION
Proceed with care.
Do not spill the oil!
Take care not to smear any component,
the area in which you are working and
the surrounding area.
Carefully remove any trace of oil.
In case of leakages or malfunctions,
contact an aprilia Official Dealer.
M50 MC50
2 STROKE OIL
Top up the 2 stroke oil tank every 312 mi
(500 km).
The vehicle is provided with a separate
mixer that makes it possible to mix petrol
with oil for the lubrication of the engine, see
page 108 (LUBRICANTS CHART ).
M50 MC50
The reserve is indicated by the coming on
of the 2 stroke oil reserve warning light
≈∆ positioned on the dashboard,see
page 36 and 37 (ARRANGEMENT OF THE
CONTROLS / INSTRUMENTS AND
INDICATORS).
CAUTION
The use of the vehicle without 2 stroke
oil causes serious damages to the
engine.
If you run out of oil in the 2 stroke oil
tank or if the 2 stroke oil pipe has been
removed, it is necessary to contact an
aprilia Official Dealer, who will provide
for bleeding the circuit.
This operation is indispensable, since
the operation of the engine with air in
the 2 stroke oil system may cause
serious damages to the engine itself.
MC50 M50
To top up the 2 stroke oil tank, proceed
as follows:
u Lift the saddle, see page 43
(UNLOCKING / LOCKING THE
SADDLE).
u Remove the plug (1).
2 STROKE OIL TANK CAPACITY: 0.4 US
gal (1.4
TANK RESERVE: 0.1 US gal (0.4
u Top up the 2 stroke oil tank.
).
)
CAUTION
After refuelling, put back the plug (1) in
the correct position.
u Put back the plug (1).
use and maintenance Mojito 50 - 150
46
USA
Page 47

APRum_MOJ50_150#02_####.book Page 47 Tuesday, June 6, 2006 5:29 PM
MC150
ENGINE OIL
TRANSMISSION OIL
Always check the engine oil level before
starting the vehicle, see page 69
(CHECKING THE ENGINE OIL LEVEL
AND TOPPING UP ).
MC150
Have the transmission oil level checked
every 2500 mi (4000 km).
It is necessary to have the transmission oil
changed after the first 312 mi (500 km) and
NOTE Use high-quality oils, see
page 109 (LUBRICANT CHART ).
MC150
CAUTION
When topping up the engine oil, never
exceed the “MAX” level.
It is necessary to have the engine oil
changed after the first 625 mi (1000 km)
and successively every 1875 mi (3000 km).
successively every 7500 mi (12000 km).
Have the transmission oil level checked
every 7500 mi (12000 km).
It is necessary to have the transmission oil
changed after the first 625 mi (1000 km)
and successively every 15000 mi (24000
km).
For the oil change, contact an aprilia
Official Dealer.
To check the oil level and to change the oil,
contact an aprilia Official Dealer.
M50 MC50
MC150
BRAKE FLUID √ recommendations
WARNING
Sudden resistance or clearance
problems on the brake lever may be due
to troubles in the hydraulic system.
For any doubt regarding the perfect
functioning of the braking system and
in case you are not able to carry out the
usual checking operations, contact
your aprilia Official Dealer.
Pay special attention to the brake disk
and friction material, making sure that
they are neither dirty nor oily, especially
after maintenance operations or
inspections.
Make sure that the brake pipe is neither
twisted nor worn out.
DO NOT DISPOSE OF THE FLUID IN
THE ENVIRONMENT.
KEEP AWAY FROM CHILDREN.
use and maintenance Mojito 50 - 150
USA
47
Page 48

APRum_MOJ50_150#02_####.book Page 48 Tuesday, June 6, 2006 5:29 PM
FRONT DISC BRAKE
WARNING
The brakes are the parts that most
ensure your safety and for this
reason they must always be perfectly
working; check them before every trip.
A dirty disc soils the pads, with
consequent reduction of the braking
efficiency. Dirty pads must be replaced,
while dirty discs must be cleaned with a
high-quality degreaser.
The brake fluid must be changed every
two years at an aprilia Official Dealer.
For any doubt regarding the perfect
functioning of the braking system and
in case you are not able to carry out the
usual checking operations, contact
your aprilia Official Dealer.
This vehicle is provided with front hydraulic
disc brake.
When the disc pads wear out, the level of
the fluid decreases to automatically
compensate for their wear.
The brake fluid reservoir (1) is positioned
near the front brake lever coupling.
Periodically check the brake fluid level in
the reservoir (1) and the pad wear, see
page 72 (CHECKING THE BRAKE PAD
WEAR).
MC50 MC150
WARNING
Do not use the vehicle if the braking
system leaks fluid.
CHECKING
To check the brake fluid level, proceed as
follows:
NOTE Position the vehicle on firm and
flat ground.
u Position the vehicle on the centre stand.
u Rotate the handlebar, so that the fluid
contained in the brake reservoir is
parallel to the ≈MIN∆ mark stamped on
the glass gauge (2).
u Make sure that the fluid contained in the
reservoir exceeds the ≈MIN∆ mark
stamped on the glass gauge (2).
MIN = minimum level.
If the fluid does not reach at least the ≈MIN∆
mark:
MC50 MC150
CAUTION
When the disc pads wear out, the level
of the fluid decreases progressively to
compensate for their wear.
u Check the brake pad wear, see see
page 72 (CHECKING THE BRAKE PAD
WEAR).
If the pads and / or the disc do not need
replacing:
u Contact an aprilia Official Dealer, who
will provide for topping up.
CAUTION
Check the braking efficiency.
In case of excessive stroke of the brake
lever or reduced efficiency of the
braking system, contact an aprilia
Official Dealer, since it may be
necessary to bleed the system.
use and maintenance Mojito 50 - 150
48
USA
Page 49

APRum_MOJ50_150#02_####.book Page 49 Tuesday, June 6, 2006 5:29 PM
0,4 inc
0,4 inc
(10 mm)(10 mm)
REAR DRUM BRAKE
WARNING
The brakes are the parts that most
ensure your safety and for this
reason they must always be perfectly
working; check them before every trip.
For any doubt regarding the perfect
functioning of the braking system and
in case you are not able to carry out the
usual checking operations, contact
your aprilia Official Dealer.
MC50 M50
ADJUSTING THE BRAKE
u Measure the distance covered by the
lever before the brake starts its braking
action. The idle stroke at the end of the
brake lever must be about 0.4 in (10
mm).
To adjust the clearance, proceed as
follows:
u Force the spring (1) to reach the seat (2)
of the threaded rod.
u Lock the rotation of the threaded rod by
acting on the appropriate seat (2) with a
spanner.
u Act on the adjuster (3).
u Put on the brake repeatedly and make
sure that the wheel turns freely after the
brake has been released.
u Check the braking efficiency.
MC150
The fact that the adjuster (3) can be
tightened completely or the indicator (4)
is positioned beyond the reference
tooth (5) indicates that the brake shoes
are worn; in this case, see page 73
(CHECKING THE BRAKE SHOE WEAR).
4
5
use and maintenance Mojito 50 - 150
USA
49
Page 50

APRum_MOJ50_150#02_####.book Page 50 Tuesday, June 6, 2006 5:29 PM
TYRES
This vehicle is provided with tubeless tires.
WARNING
Periodically check the tire inflation
pressure at room temperature, see
page 104 (TECHNICAL DATA).
If the tires are hot, the measurement is
not correct.
Carry out the measurement especially
before and after long rides.
If the inflation pressure is too high, the
ground unevenness cannot be
If, on the contrary, the inflation pressure
is too low, the tire sides (1) are under
greater stress and the tire itself may slip
on the rim or it may become loose, with
consequent loss of control of the
vehicle.
In case of sudden braking the tires
could even get out of the rims.
Further, the vehicle could skid while
turning.
Check the surface and the wear of the
tires, since tires in bad conditions can
impair both the grip and the
controllability of the vehicle.
dampened and is therefore transmitted
to the handlebar, thus compromising
the driving comfort and reducing road
holding turns.
Some types of tires homologated for
this vehicle are provided with wear
indicators.
There are several kinds of wear
indicators.
For more information on how to check
the wear, contact your Dealer.
Visually check if the tires are worn and
1
in this case have them changed.
If the tires are hold, even if not
completely worn out, they may become
hard and may not ensure good road
holding.
In this case, have the tires changed.
Change the tire when it is worn out or in
case of puncture on the tread side, if the
puncture is larger than 5 mm.
After repairing a tire, have the wheels
balanced.
Use only tires in the size suggested by
the Manufacturer, see page 104
(TECHNICAL DATA).
Do not install tires with air tube on rims
for tubeless tires, and viceversa.
use and maintenance Mojito 50 - 150
50
USA
Page 51

APRum_MOJ50_150#02_####.book Page 51 Tuesday, June 6, 2006 5:29 PM
Make sure that the tires always have
their valve sealing caps (2) on, to
prevent them from suddenly going flat.
Change, repair, maintenance and
balancing operations are very important
and should be carried out by qualified
technicians with appropriate tools.
For this reason, it is advisable to have
the above mentioned operations carried
out by an aprilia Official Dealer or by a
qualified tire repairer.
If the tires are new, they may still be
covered by a slippery film: drive
carefully for the first miles. Do not oil
the tires with unsuitable fluids.
MINIMUM TREAD DEPTH LIMIT (3)
front ...................................0.12 in (3 mm).
rear ..................................0.12 inc (3 mm).
M50 MC50
CATALYTIC SILENCER
Avoid parking the vehicle catalytic
version near dry brush wood or in
places easily accessible to children, as
the catalytic silencer becomes
extremely hot during use; be very
careful and avoid any kind of contact
before it has completely cooled down.
The catalytic vehicle is fitted with a silencer
with metal catalytic converter of the
≈platinum-rhodium bivalent∆ type.
This device provides for the oxidation of
the CO (carbon monoxide) and of the HC
(unburned hydrocarbons) contained in the
exhaust gases, changing them into carbon
dioxide and steam, respectively.
use and maintenance Mojito 50 - 150
USA
51
Page 52

APRum_MOJ50_150#02_####.book Page 52 Tuesday, June 6, 2006 5:29 PM
Due to catalytic reaction, the high
temperature reached by the exhaust gases
makes for the burning of the oil particles,
thus keeping the silencer clean and
eliminating exhaust fumes.
To have the catalytic converter function
correctly and for long time and to reduce
possible problems regarding the soiling of
the thermal unit and of the exhaust, it is
necessary to avoid covering long distances
with the engine running at constantly low
rpm.
It is sufficient to alternate these periods
with periods in which the engine runs at
relatively high rpm, even if only for a few
seconds, but rather frequently.
What has been stated above assumes
particular importance for the cold starting
of the engine: in this case, in order to reach
a rpm regime sufficient to enable the
≈priming∆ of the catalytic reaction, just
make sure that the temperature of the
thermal unit has reached at least 122 °F
(50 °C); which generally occurs a few
seconds after starting the engine.
CAUTION
Do not use leaded petrol, since it
causes the destruction of the catalytic
converter.
√ the use of the vehicle after such device
or element of design has been removed
or rendered inoperative by any person.
Check the exhaust silencer and the
silencer pipes, making sure that there are
neither signs of rust nor holes, and that the
exhaust system works effectively.
If the noise produced by the exhaust
system increases, immediately contact
your aprilia Official Dealer.
EXHAUST SILENCER
WARNING
Tampering with the noise control
system is prohibited.
Owners are warned that the law may
prohibit:
√ the removal or rendering inoperative by
any person, other than for purposes of
maintenance, repair or replacement, of
any device or element of design
incorporated into any new vehicle √ for
the purpose of noise control √ prior to its
sale or delivery to the ultimate purchaser
or while it is in use; and
use and maintenance Mojito 50 - 150
52
USA
Page 53

APRum_MOJ50_150#02_####.book Page 53 Tuesday, June 6, 2006 5:29 PM
INSTRUCTIONS FOR USE
WARNING
Before departure, always carry out a
preliminary checking of the vehicle, to
make sure that it functions correctly
and safely, see the following table
PRELIMINARY CHECKING
OPERATIONS.
The non-performance of these checking
operations can cause severe personal
injuries or damages to the vehicle.
Do not hesitate to consult your aprilia
Official Dealer in case there is
something you do not understand
about the functioning of some controls
or in case you suspect or discover
some irregularities.
It does not take long to carry out a
check-up and this operation ensures
you much more safety.
PRELIMINARY CHECKING OPERATIONS
Component Check Page
Front brake Check the functioning, the fluid level and make sure there are
Rear drum brake Check the functioning, the idle stroke and the control lever
Accelerator Make sure that it works smoothly and can it is possible to
M50 MC50
2 stroke oil
MC150
Engine oil Check and top up, if necessary.
Wheels / tyres Check the tyre surface, the inflation pressure, wear and tear
Brake levers Make sure that they work smoothly.
Steering Make sure that the steering rotates smoothly, without any
Centre stand, side stand Make sure that they work smoothly and that the spring
OPT
Fastening elements Make sure that the fastening elements are not loose. If
Fuel tank Check the fuel level and top up, if necssary.
Engine stop switch ( -
)
Lights, warning lights,
horn and electric devices
no leaks. Check the wear of the pads.
Top up, if necessary.
conditions . If the clearance is not correct, adjust it.
open and close it completely, in all steering positions. If
necessary, adjust and/or lubricate it.
Check and top up, if necessary.
and any damage.
If necessary, lubricate the articulations .
clearance or slackering.
tension brings it back to its normal position.
If necessary, lubricate joints and hinges.
necessary, adjust or tighten them.
Make sure there are no leaks or occlusions in the circuit.
Make sure that it functions correctly.
Check the proper functioning of all the devices.
Change the bulbs or intervene in case of failure.
47, 48,
72
49, 73
84
46
47, 69
50, 51
48, 49
74
82
-
45
39, 41
86 - 99
use and maintenance Mojito 50 - 150
USA
53
Page 54

APRum_MOJ50_150#02_####.book Page 54 Tuesday, June 6, 2006 5:29 PM
M50
STARTING
WARNING
Exhaust gases contain carbon
monoxide, which is extremely noxious if
inhaled.
Avoid starting the vehicle in closed or
badly-ventilated rooms. Failure to
observe this precaution can result in
loss of consciousness and death by
asphyxiation.
Do not sit on the vehicle when starting.
Do not start the vehicle while it is on the
side stand.
ELECTRIC STARTING
u Position the vehicle on the centre stand.
u Set the engine stop switch (1) to ≈∆
(where required by local legislation).
u Make sure the dimmer switch (2) is set to
≈∆.
MC50 MC150M50
2
2
1
5
u Turn the key (3) and set the ignition
switch to ≈∆.
CAUTION
MC150
At this time the engine oil pressure
warning light “ ” on the dashboard
will light up, and stay on until the
engine is started.
u Lock at least one wheel with one of the
brake levers (4). This sends electrical
power to the start relay to turn over the
starter motor.
NOTE If the vehicle has not been used
for a long time, proceed as indicated in
page 56 (STARTING AFTER A LONG
PERIOD OF INACTIVITY).
3
4
NOTE To avoid the excessive wear of
the battery, do not hold down the start push
button ≈∆ for more than five seconds (ten
if starting after long disuse). If in this time
the engine does not start, wait for ten
seconds and press the star push button
≈∆ again.
u Press the start push button “” (5)
without accelerating, and release it as
soon as the engine starts.
CAUTION
M50 MC50
When the start push button is
pressed “ ”, the 2 stroke oil reserve
warning light “ ” lights up. When the
engine starts, release the start push
button “ ”, and the 2 stroke oil reserve
warning light “ ” should turn off; if it
stays on, top up the 2 stroke oil as
indicated at page 46 ( 2
STROKE OIL).
M50 MC50
use and maintenance Mojito 50 - 150
54
USA
Page 55

APRum_MOJ50_150#02_####.book Page 55 Tuesday, June 6, 2006 5:29 PM
CAUTION
Do not press the start push button “ ”
(6) when the engine is running: this can
damage the starter.
MC150
u If the engine does not start in three or
four seconds, turn the throttle grip (6)
slightly (Pos. A), while holding down the
start push button ≈∆ (5).
CAUTION
When the engine starts, the engine oil
pressure warning light “j” should turn
off. If the light stays on, or turns on
during normal operation, there is
insufficient oil pressure in the circuit. In
this case, stop the engine immediately
and contact an aprilia Official Dealer.
Do not use the vehicle with insufficient
engine oil, as this damages the engine.
u Do not accelerate with the brake levers
held down before starting.
For starting, see page 57 (DEPARTURE
AND DRIVE).
KICK START
To kick start the vehicle, proceed as
follows:
M50
6
5
u Position the vehicle on the centre stand.
u Stand at the left side of the vehicle.
u Set the engine stop switch (1) to ≈∆
(where required by local legislation).
u Make sure that the dimmer switch (2) is
in position ≈∆.
u Turn the key (3) and set the ignition
switch to ≈∆.
u To avoid losing control during starting,
lock both wheels with the brake levers
(4).
CAUTION
Do not operate the kick start pedal
when the engine is running.
u Kick down on the pedal with your right
foot (7), and release it immediately.
Repeat until the engine starts.
MC50 MC150
6
5
M50 MC50
7
use and maintenance Mojito 50 - 150
USA
55
Page 56

APRum_MOJ50_150#02_####.book Page 56 Tuesday, June 6, 2006 5:29 PM
STARTING
WITH FLOODED ENGINE
The engine may flood due to a faulty start
or due to excess fuel in the intake ducts.
To purge a flooded engine:
u Press the start push button ≈∆ (5) for a
few seconds (this runs the engine under
no load) with the throttle grip (6)
completely turned to (Pos. A).
STARTING WITH COLD ENGINE
If the ambient temperature is very low
(near to or below 0°C) it may be difficult to
start the engine at the first attempt.
If this occurs:
u Hold down the start push button for five
seconds ≈∆ (5) with the accelerator
grip turned to (Pos. A) (6).
If the engine starts.
u Release the throttle grip (6).
u If the idling rpm is unstable, turn the
throttle grip (6) repeatedly by a small
amount.
M50
6
5
If the engine does not start.
Wait for a few seconds and repeat the
STARTING WITH COLD ENGINE
procedure.
u If necessary, remove the spark plug, see
page 84 (SPARK PLUG) and check for
humidity.
u Clean and dry it off if necessary.
Before refitting:
NOTE Place a clean cloth on the
cylinder next to the spark plug seat, to
protect against oil.
u Press the start push button ≈∆ (6) and
run the starter for about 5 seconds
without accelerating.
MC50 MC150
6
5
STARTING
AFTER A LONG PERIOD OF INACTIVITY
If the vehicle has not been used for a long
time, it is possible that starting fails due to
a partially drained fuel supply.
In this case:
u Press the start push button ≈∆ (5) for
around 10 seconds to allow the
carburetor float chamber to fill.
use and maintenance Mojito 50 - 150
56
USA
Page 57

APRum_MOJ50_150#02_####.book Page 57 Tuesday, June 6, 2006 5:29 PM
MC50 M50
DEPARTURE AND DRIVE
NOTE Before departure, read the ≈Safe
Drive∆ guide on page 5 (SAFE DRIVE).
CAUTION
If, while driving the vehicle, the
dashboard low fuel warning light “ ”
lights up, this means that the fuel is in
the reserve area.
Refuel the vehicle as soon as possible,
see page 45 (FUEL).
WARNING
M50 MC50
Mentions of driving with pillion
passenger are only applicable to
countries where this allowed by local
legislation.
MC150
WARNING
When riding without a pillion
passenger, make sure the passenger
footrests are folded.
When riding the vehicle, keep your
hands on the handlebars and feet on
the footrests.
NEVER RIDE IN ANY POSITION OTHER
THAN THOSE INDICATED.
If riding with a pillion passenger, make
sure the passenger knows how to
behave so as not to create handling
difficulties.
Before departure, make sure the stand
or stands are completely up.
To leave:
u Release the throttle grip (Pos. A),
operate the rear brake and move the
vehicle off its stand.
u Sit on the saddle and keep at least one
foot on the ground to stabilize the
vehicle.
u Adjust the rear-view mirrors.
WARNING
Get used to adjusting and using the
rear-view mirrors while the vehicle is
stationary.
To move off, release the brake lever, and
accelerate with the throttle grip (Pos. B);
the vehicle will move off.
use and maintenance Mojito 50 - 150
USA
57
Page 58

APRum_MOJ50_150#02_####.book Page 58 Tuesday, June 6, 2006 5:29 PM
WARNING
Before entering a curve, reduce your
speed and brake, then ride through the
curve at constant speed or slightly
accelerating; do not brake fully: this will
very likely lead to skidding.
Using the brakes continuously on
downhills can overheat the brake pads
and reduce braking performance.
Exploit engine compression by using
both brakes intermittently. Do not ride
downhill with the engine off.
CAUTION
Do not move off quickly when the
engine is cold.
To reduce polluting emissions and fuel
consumption, warm up the engine by
riding at a moderate speed for the first
few kilometers.
u Do not accelerate and decelerate
repeatedly as this can lead to losing
control of the vehicle.
use and maintenance Mojito 50 - 150
58
USA
WARNING
When braking, operate both brakes for
even deceleration, with a gradual
pressure on the brake levers.
Using only the front or rear brake
reduces braking performance, and may
lock up a wheel and lose road holding.
If stopping on an uphill, decelerate
completely and use the brake to hold
the vehicle stationary.
Using the engine to hold the vehicle
steady can overheat the speed variator.
WARNING
On a wet or slippery surface (snow, ice,
mud, etc.), ride at a low speed, without
sudden braking or turns which could
cause the vehicle to skid and fall over.
Pay attention to obstacles or variations
in the road surface.
Loose surfaces, tracks, manhole
covers, painted road signals, metal
plates used on construction sites, all
become slippery in the rain, and should
be approached with caution, driving
evenly and with the vehicle as upright
as possible.
Page 59

APRum_MOJ50_150#02_####.book Page 59 Tuesday, June 6, 2006 5:29 PM
WARNING
Always indicate lane changes or turns
with the provided equipment and in
advance, and avoid sudden, potentially
dangerous manoeuvres.
Switch off indicators immediately after
turning.
Take care when overtaking or being
overtaken.
In the rain, the mist produced by large
vehicles reduces visibility; the
turbulence produced by large vehicles
can cause loss of control of the vehicle.
MC50 M50
CAUTION
M50 MC50
If the 2 stroke oil reserve
warning light “ ” turns on when
riding in normal conditions, the 2 stroke
oil is in reserve; top up as soon as
possible, see page 46 ( 2
M50 MC50
STROKE OIL).
RUNNING-IN
WARNING
M50 MC50
After the first 312 mi (500 km)
of driving, run the checks indicated in the
“After running-in” column in the
REGULAR SERVICE INTERVALS CHART
M50 MC50
, see page 64, to avoid injury to
yourself and others and damage to the
vehicle.
MC50
M50
MC150
WARNING
MC150
After the first 625 mi (1000 km) of
driving, run the checks indicated in the
“After running-in” column in the
REGULAR SERVICE INTERVALS
CHART , see page 66, to avoid
MC150
injury to yourself and others and
damage to the vehicle.
Proper running-in is essential to long
engine life and functioning. Twisty roads
and gradients are ideal to break in engine,
suspension and brakes effectively.
NOTE Only after running-in can the best
performance be obtained from the vehicle
in terms of acceleration and speed.
use and maintenance Mojito 50 - 150
USA
59
Page 60

APRum_MOJ50_150#02_####.book Page 60 Tuesday, June 6, 2006 5:29 PM
MC50 M50
M50 MC50
For the first 312 mi (500 km) of driving,
observe the following limits:
u 0-62 mi (0-100 Km)
During the first 62 mi (100 Km) operate
the brakes only with care, and avoid
sudden or lengthy braking manoeuvres.
This wears in the disc brake pads and
the rear drum brake shoes.
u 0-187 mi (0-300 Km)
Do not hold the throttle grip more than
half open for long periods of time.
u 187-312 mi (300-500 Km)
Do not hold the throttle grip more than
open for long periods of time.
MC150
MC150
Observe the following precautions:
u Do not turn the throttle grip fully at low
engine speeds, before or after runningin.
u 0-62 mi (0-100 Km)
During the first 62 mi (100 Km) operate
the brakes only with care, and avoid
sudden or lengthy braking manoeuvres.
This wears in the disc brake pads and
the rear drum brake shoes.
u 0-312 mi (0-500 Km)
Do not hold the throttle grip more than
half open for long periods of time.
u 312-625 mi (500-1000 Km)
During the first 625 mi (625 Km) do not
ride the vehicle at more than 80% of the
maximum speed.
u Do not ride at constant speed for long
periods.
u After the first 625 mi (1000 Km),
gradually increase speed to the
maximum.
STOPPING
WARNING
Avoid sudden stopping, repeated
deceleration and hard braking.
u Release the throttle grip (Pos. A) and
squeeze the brake levers gradually to
stop the vehicle.
u When stopped temporarily, hold at least
on brake locked.
use and maintenance Mojito 50 - 150
60
USA
Page 61

APRum_MOJ50_150#02_####.book Page 61 Tuesday, June 6, 2006 5:29 PM
MC50 MC150MC50 MC150
PARKING
WARNING
Park the vehicle on firm and flat ground
to avoid tipping over.
Do not lean the vehicle against walls or
lay it on the ground.
Make sure that the vehicle, and in
particular its hot components, are no
danger to children or other persons.
Do not leave the vehicle unguarded with
the engine running or the key in the
ignition switch.
Do not sit on the vehicle when it is on its
stand.
u Stop the vehicle, see page 60
(STOPPING).
u Set the engine stop switch (1) to ≈∆.
CAUTION
Leaving the engine stopped and the
ignition switch in position “ ” drains
the battery.
u Turn the key (2) and set the ignition
switch to ≈∆ (3).
u Place the vehicle on its stand, see
page 62 (POSITIONING THE VEHICLE
ON THE STAND).
NOTE When the vehicle is stationary
there is no need to close the fuel tap
because it is equipped with an automatic
closing system.
CAUTION
Do not leave the key in the ignition
switch.
u Lock the steering, see page 42
(STEERING LOCK) and remove the key
(2).
use and maintenance Mojito 50 - 150
USA
61
Page 62

APRum_MOJ50_150#02_####.book Page 62 Tuesday, June 6, 2006 5:29 PM
POSITIONING THE VEHICLE ON THE STAND
Carefully read page 61 (PARKING).
SIDE STAND
u Grasp the left handgrip and the
passenger grab rail (1).
CENTRE STAND
u Grasp the left handgrip and the
passenger grab rail (1).
u Push down on the stand lever (2).
Danger of falling or tipping over.
As soon as the vehicle is moved to the
upright, from the parked to the riding
position, the stand automatically stows
itself.
u Push the stand down with the right foot
to its full extent (3).
u Lean the vehicle until the stand is resting
on the ground.
u Steer the handlebars completely to the
left.
Make sure the vehicle is stable.
OPT
WARNING
WARNING
SUGGESTIONS TO PREVENT THEFT
CAUTION
Do not use any "brake lock" devices.
Failure to heed this warning can
seriously damage the braking system
and lead to an accident thus provoking
serious injuries or death
NEVER leave the ignition key in the switch
and always use the steering lock function.
Park the vehicle in a safe and secure
place, if possible in a garage or supervised
area. Whenever possible, use the special
aprilia ≈Body-Guard∆ armored cable
OPT
or accessory lock. Check that all
documents and road taxes are in order and
up to date. Write your personal data and
telephone number on this page as an aid to
identifying the vehicle in case of recovery
after theft.
SURNAME:................................................
NAME:........................................................
ADDRESS:.................................................
...................................................................
TELEPHONE NO.:.....................................
NOTE In many cases, stolen vehicles
are successfully identified using the
information given in the use/maintenance
manual.
use and maintenance Mojito 50 - 150
62
USA
Page 63

APRum_MOJ50_150#02_####.book Page 63 Tuesday, June 6, 2006 5:29 PM
MAINTENANCE
WARNING
Fire hazard.
Do not handle fuel and other flammable
substances in the vicinity of the
vehicle’s electrical componentry.
Before servicing or inspecting the
vehicle, stop the engine and remove
the key, wait for the engine and exhaust
to cool down, and raise the vehicle with
appropriate equipment, on firm and flat
ground.
Before proceeding, make sure the
working area is adequately ventilated.
Take special care with hot parts of the
engine and exhaust: burn hazard.
Do not hold mechanical or other parts
of the vehicle in your mouth: None of
the motorcycle components is edible.
Some components are harmful to the
human body or toxic.
CAUTION
If not otherwise indicated, parts are
reassembled by reversing the order of
disassembly.
In case any maintenance operation has
to be carried out, it is advisable to use
latex gloves.
Routine service operations can usually be
done by the owner, although some
operations may require the use of special
tools and technical skills.
If you need assistance or technical advice,
contact your aprilia Official Dealer for
prompt, accurate service.
Always ask the aprilia Official Dealer to
test the vehicle on the road after repairs or
scheduled service.
And always run the Preliminary Checking
operations after a service in person, as
given in page 53 (PRELIMINARY
CHECKING OPERATIONS).
use and maintenance Mojito 50 - 150
USA
63
Page 64

APRum_MOJ50_150#02_####.book Page 64 Tuesday, June 6, 2006 5:29 PM
REGULAR SERVICE INTERVALS CHART
M50 MC50
TO BE DONE BY THE aprilia Official
Dealer (WHICH CAN BE CARRIED OUT
EVEN BY THE USER).
Key
= check and clean, adjust, lubricate or
replace as required;
= clean;
= replace;
= adjust.
NOTE Service the vehicle more
frequently when riding in rainy, dusty
conditions or on bad road surfaces.
Components
Battery √ Terminal fastening √ Electrolyte
level
Spark plug
Carburettor - idling
Air cleaner
Accelerator operation
Brake locking operation
Light systems
Stop light switches
Brake fluid
2 stroke oil every 312 mi (500 Km):
Headlight beam direction - operation
Wheels/tyres and inflation pressure every month:
Battery terminal clamp tightness
Front brake shoe wear
After running-in
[312 mi (500 Km)]
√
√
√
Every 2500 mi
(4000 Km) or 12
months
every 1250 mi (2000 Km):
Every 5000 mi
(8000 Km) or 24
months
√
√
√
√
√
√
√
√
√
√
use and maintenance Mojito 50 - 150
64
USA
Page 65

APRum_MOJ50_150#02_####.book Page 65 Tuesday, June 6, 2006 5:29 PM
OPERATIONS TO BE CARRIED OUT BY
THE aprilia Official Dealer.
Key
= check and clean, adjust, lubricate or
replace as required;
= clean;
= replace;
= adjust.
NOTE Service the vehicle more
frequently when riding in rainy, dusty
conditions or on bad road surfaces.
Components
Rear shock absorber
Transmission cables and controls
Variator belt
Steering tube bearings and steering slack
Wheel bearings
Brake disc
Piston rings every 7500 mi (12000 Km):
General running of the vehicle
Braking systems / brake discs
Electric start transmission pin greasing
Rear brake cam pin greasing
Brake fluid every 2 years:
Exhaust silencer/exhaust terminal
2 stroke / accelerator operation
Transmission oil
Rear pulley pins every 7500 mi (12000 Km):
Front shock absorber pumping element
Movable/fixed front pulley every 7500 mi (12000 Km):
Variator front pins and guides every 3750 mi (6000 Km): / every 7500 mi (12000 Km):
Wheels/tyres and inflation pressure
Nut, bolt, screw tightening
Battery terminal clamp tightness
2 stroke oil reserve warning light
Cylinder head and cylinder
Fuel pipe every 2500 mi (4000 Km): / every 4 years:
Braking system pipe every 2500 mi (4000 Km): / every 4 years:
2 stroke oil pipe
Clutch wear
Rear brake shoe wear
After running-in
[312 mi (500 Km)]
√√
√
√√
√
√
√
√√
√√
Every 2500 mi
(4000 Km) or 12
months
every 7500 mi (12000 Km):
Every 5000 mi
(8000 Km) or 24
months
every 7500 mi
(12000 Km):
every 2 years:
√
√
√
√
√
√
√
√
√
√
√
√
√
use and maintenance Mojito 50 - 150
USA
65
Page 66

APRum_MOJ50_150#02_####.book Page 66 Tuesday, June 6, 2006 5:29 PM
REGULAR SERVICE INTERVALS CHART
MC150
OPERATIONS TO BE CARRIED OUT BY
THE aprilia Official Dealer (WHICH
CAN BE CARRIED OUT BY THE USER).
Key
= check and clean, adjust, lubricate or
replace as required;
= clean;
= replace;
= adjust.
NOTE Service the vehicle more
frequently when riding in rainy, dusty
conditions or on bad road surfaces.
After running-in
Components
Battery √ Terminal fastening
Spark plug
Carburettor - idling
Air cleaner
Accelerator operation
Brake locking operation
Light systems
Stop light switches
Brake fluid
Engine oil at every start:
Headlight beam direction - operation
Spark plug cap
Wheels/tyres and inflation pressure every month:
Battery terminal clamp tightness
Front brake shoe wear
[625 mi
(1000 Km)]
√
√
√
√
√
Every 3750 mi
(6000 Km) or 12
months
every 1250 mi (2000 Km):
Every 7500 mi
(12000 Km) or 24
months
√
√
√
√
√
√
√
√
√
√
use and maintenance Mojito 50 - 150
66
USA
Page 67

APRum_MOJ50_150#02_####.book Page 67 Tuesday, June 6, 2006 5:29 PM
OPERATIONS TO BE CARRIED OUT BY
THE aprilia Official Dealer.
Key
= heck and clean, adjust, lubricate or
replace as required;
= clean;
= replace;
= adjust.
NOTE Service the vehicle more
frequently when riding in rainy, dusty
conditions or on bad road surfaces.
After running-in
Components
Rear shock absorber
Fuel √ CO value
Transmission cables and controls
Variator belt
Steering tube bearings and steering slack
Wheel bearings
Brake disc
Engine oil filter
General running of the vehicle
Valves clearance
Variator grease
Braking systems
Brake fluid every 2 years:
Exhaust silencer/exhaust terminal
Engine oil
Transmission oil
Front shock absorber pumping element
Variator rollers and plastic guides
Wheels/tyres √ inflation pressure
Nut, bolt, screw tightening
Cylinder head nut fastening and silencer-
exhaust manifold fastening
Battery terminal clamp tightness
Engine oil pressure warning light
(operation)
Fuel pipe
Braking system pipe
Clutch wear
Rear brake shoe wear
[625 mi
(1000 Km)]
√√
√
√√
√√
√
√
√
√
√
Every 3750 mi
(6000 Km) or 12
months
every 1875 mi (3000 Km):
every 11250 mi (18000 Km):
every 1875 mi (3000 Km):
every 7500 mi (12000 Km): /
every 15000 mi (24000 Km):
√√
every 1250 mi (2000 Km):
Every 7500 mi
(12000 Km) or 24
months
every 4 years:
every 4 years:
√
√
√
√
√
√
√
√
√
√
√
√
√
use and maintenance Mojito 50 - 150
USA
67
Page 68

APRum_MOJ50_150#02_####.book Page 68 Tuesday, June 6, 2006 5:29 PM
M50 MC50
IDENTIFICATION DATA
We recommend writing down the frame
and engine serial numbers in the spaces
reserved for the purpose in this booklet.
The frame number can be used when
ordering spare parts.
NOTE Altering the vehicle»s
identification numbers is punishable by law
with heavy fines and penalties;
furthermore, altering the frame number
voids the guarantee.
use and maintenance Mojito 50 - 150
68
USA
FRAME NUMBER
The frame number is stamped on the
central frame tube. To read it, it is
necessary to remove the cover (1).
NOTE The cover (1) can only be fitted in
a single orientation. The part with two
tangs (2) fits lowermost.
Frame no.
MC150
ENGINE NUMBER
The engine number is stamped on the rear
of the engine near to the rear brake
adjuster.
Engine no.
Page 69

APRum_MOJ50_150#02_####.book Page 69 Tuesday, June 6, 2006 5:29 PM
CHECKING THE ENGINE OIL LEVEL AND TOPPING UP
MC150
Carefully read page 46 (LUBRICANTS),
page 63 (MAINTENANCE) and page 109
(LUBRICANTS CHART ).
MC150
Check the engine oil level whenever
starting the vehicle.
CHECKING
NOTE Place the vehicle on firm and flat
ground.
u Place the vehicle on its centre stand.
WARNING
The engine and exhaust components
become hot when the engine is running
and will stay hot for some time after the
engine has been stopped. Wear
insulating gloves before handling these
components or allow for the engine and
exhaust system to cool down before
proceeding.
u Stop the engine and allow it to cool so
that the oil in the oil pan can drain and
cool off.
NOTE Failure to observe the following
precautions risks mistaking the engine oil
level.
u Unscrew and remove th engine oil filler
plug (2) and check the oil level with the
dipstick.
MAX = maximum level;
MIN = minimum level.
The difference between the ≈MAX∆ and
≈MIN∆ marks is about 18.3 inc3 (300
3
).
cm
The correct level is just around the ≈MAX∆
mark.
CAUTION
Do not fill beyond the “MAX” and do not
allow the level to drop below the “MIN”
mark, as this can seriously damage the
engine.
u Top up if necessary.
TOPPING UP
u Unscrew and remove the engine oil filler
plug (2).
u Pour a small quantity of oil into the filling
hole (3) and wait about a minute for the
oil to flow into the oil pan.
u Check the oil level and top up again if
necessary.
u Add small amounts of oil at a time until
the recommended level is reached.
MC150
CAUTION
After topping up, put back the plug (1)
in the correct position.
u Screw in and tighten down the engine oil
filler plug (2).
WARNING
Do not use the vehicle if insufficiently
lubricated or with contaminated or
improper lubricants, as this will wear
moving parts and cause irreparable
damage to the engine.
use and maintenance Mojito 50 - 150
USA
69
Page 70

APRum_MOJ50_150#02_####.book Page 70 Tuesday, June 6, 2006 5:29 PM
2
1
AIR CLEANER
M50 MC50
Carefully read page 63
(MAINTENANCE).
The air cleaner should be cleaned and
checked once a month or every 2500 mi
(4000 Km), depending on use.
If the vehicle is used on wet or dusty roads,
the cleaning/replacement should be done
more frequently.
The filtering element must be removed
from the vehicle for cleaning.
use and maintenance Mojito 50 - 150
70
USA
2
REMOVAL
u Position the vehicle on its centre stand.
u Remove the rear cover, see page 80
(REMOVING THE REAR COVER).
u Loosen and remove the six screws (1).
u Turn the filtering element (2).
CLEANING
u Remove the grid (4) from its mount (5).
u Remove the filtering element (6).
WARNING
Do not wash the filter with petrol or
other flammable solvents –
explosion/fire hazard.
u Wash the filtering element (6) with clean,
non-flammable solvent, or with solvent
with a high flash point, and dry it off
carefully and completely.
u Apply a filter-specific oil over the entire
surface.
Page 71

APRum_MOJ50_150#02_####.book Page 71 Tuesday, June 6, 2006 5:29 PM
MC150
2
1
1
AIR CLEANER
MC150
Carefully read page 63 (MAINTENANCE).
The air cleaner should be cleaned and
checked every month or every 3750 mi
(6000 Km), depending on use.
If the vehicle is used on wet or dusty roads,
the cleaning/replacement should be done
more frequently.
The filtering element must be removed
from the vehicle for cleaning.
MC150
2 3
REMOVAL
u Position the vehicle on its centre stand.
u Remove the rear fairing, see page 80
(REMOVING THE REAR COVER).
u Unscrew the four screws (1) and remove
the airbox cover (2).
u Remove the filtering element (3).
CAUTION
Check that the filtering element (3),
airbox cover (2) and gasket (4) are
correctly positioned when refitting.
MC150
4
2
CLEANING
WARNING
Do not wash the filter with petrol or
other flammable solvents –
explosion/fire hazard.
u Wash the filtering element (3) with clean,
non-flammable solvent, or with solvent
with a high flash point, and dry it off
carefully and completely.
u Apply a filter-specific oil over the entire
surface.
use and maintenance Mojito 50 - 150
USA
71
Page 72

APRum_MOJ50_150#02_####.book Page 72 Tuesday, June 6, 2006 5:29 PM
MC150
CHECKING THE BRAKE PAD WEAR
Carefully read page 47 (BRAKE FLUID –
recommendations), page 48 (FRONT
DISC BRAKE) and page 63
(MAINTENANCE).
M50 MC50
Check the wear of the brake
pads after the first 312 mi (500 Km) and
every 1250 mi (2000 Km) thereafter.
MC150
Check the wear of the brake pads
after the first 625 mi (1000 Km) and every
1250 mi (2000 Km) thereafter.
Disc brake pad wear depends on use,
driving style and type of road. Wear is
greatest when the vehicle is ridden on dirty
or wet roads.
use and maintenance Mojito 50 - 150
72
USA
WARNING
Check the brake pads for wear before
every trip.
To run a quick brake pad wear check,
proceed as follows:
u Place the vehicle on its centre stand.
u Remove the brake caliper cover (1).
u Visually check the brake disc and pads.
WARNING
The excessive wear of the friction
material would cause the contact of the
pad metal support with the disc, with
consequent metallic noise and
production of sparks from the caliper;
braking efficiency, safety and
soundness of the disc would thus be
negatively affected.
u If the braking surface thickness (even of
a single pad) is down to around 0.06 in
(1.5 mm) ( or if even one of the wear
MC150
indicators is no longer visible), replace
both pads.
WARNING
Have the replacement done by an
aprilia Official Dealer.
Page 73

APRum_MOJ50_150#02_####.book Page 73 Tuesday, June 6, 2006 5:29 PM
CHECKING THE BRAKE SHOE WEAR
Carefully read page 49 (REAR DRUM
BRAKE) and page 63 (MAINTENANCE).
M50 MC50
Have an aprilia Official Dealer
check the wear of the rear brake shoes
after the first 312 mi (500 Km) and every
1250 mi (2000 Km) thereafter.
MC150MC150
Have an aprilia Official Dealer check the
wear of the rear brake shoes after the first
625 mi (1000 Km) and every 1250 mi
(2000 Km) thereafter.
In any case:
WARNING
If the rear brake shoe wear indicator (3)
is on or over the lower mark (5) contact
an aprilia Official Dealer for
replacement of the rear brake shoes.
M50 MC50
2
1
INSPECTING THE FRONT AND REAR SUSPENSIONS
Carefully read page 63
(MAINTENANCE).
Check the fastening of all parts and
operation of the front and rear suspension
joints:
M50 MC50
√ after the first 312 mi (500 Km)
and every 2500 mi (4000 Km) thereafter;
MC150
√ after the first 625 mi (1000 Km) and
every 3750 mi (6000 Km) thereafter.
3
CAUTION
If you notice irregularities in their
operation or specialized help is
required, contact an aprilia Official
Dealer.
use and maintenance Mojito 50 - 150
USA
73
Page 74

APRum_MOJ50_150#02_####.book Page 74 Tuesday, June 6, 2006 5:29 PM
CHECKING THE STEERING
Carefully read page 63
(MAINTENANCE).
Check the steering slack from time to time.
Proceed as follows:
Place the vehicle on its centre stand.
NOTE Provide a support 7.29 in (185
mm) high with base 7.87 x 7.87 in. (200 x
200 mm)
Place the support under the vehicle with
a spongy cloth over it, in such as way as
to allow the front wheel to turn freely
while the vehicle is secure against falling
over.
use and maintenance Mojito 50 - 150
74
USA
WARNING
Make sure the vehicle is stable.
Rock the forks in the drive direction.
NOTE Rocking the fork too powerfully
can move the stand, thus exaggerating the
steering slack.
Repeat the above operation several times.
If considerable slack is evident, contact
an aprilia Official Dealer, to have the
problem fixed.
CHECKING THE ENGINE FULCRUM AXLE
Carefully read page 63
(MAINTENANCE).
Periodically check the slack between the
engine pin bushings and the axle itself.
Proceed as follows:
Place the vehicle on its centre stand.
Rock the wheel sideways.
If there is any slack, contact an aprilia
Official Dealer to have the problem fixed.
Page 75

APRum_MOJ50_150#02_####.book Page 75 Tuesday, June 6, 2006 5:29 PM
M50
REMOVING THE FRONT COVER
Carefully read page 63
(MAINTENANCE).
Place the vehicle on its centre stand.
Unscrew and remove the screw (1).
Unscrew and remove the screw (2)
CAUTION
Work carefully.
Do not damage the tangs or their
matching recesses.
Handle the plastic and painted parts
with care, to avoid scratching or
damaging them.
Free the couplings (3) and (4) from their
recesses and remove the two collars (5)
and (6).
Unscrew and remove the two lower
screws (7).
MC50 MC150
Remove the spoiler (8).
Unscrew and remove the upper screw
(9), taking care to retain the washer.
NOTE To free the front cover (10) from
its side couplings, proceed as follows at
the same time.
Press in ≈A∆ and pull out ≈B∆.
Press in ≈A∆ and pull out ≈C∆.
MC50 MC150
use and maintenance Mojito 50 - 150
USA
75
Page 76

APRum_MOJ50_150#02_####.book Page 76 Tuesday, June 6, 2006 5:29 PM
M50
7
REMOVING THE LOWER HANDLEBAR COVER
M50
Carefully read page 63
(MAINTENANCE).
Place the vehicle on its centre stand.
Unscrew and remove the headlight
metal ring screw (1).
Remove the headlight metal ring (2).
Unscrew and remove the screw (3).
Unscrew and remove the three screws
(4).
Unscrew and remove the screw (5).
CAUTION
Work with care.
Do not damage the tangs or their
matching recesses.
Handle plastic and painted parts with
care, to avoid scratching or damaging
them.
M50
Unscrew and remove the screw (7).
Carefully lower the lower handlebar
cover (6).
CAUTION
Work with care. Do not force the electric
cables.
NOTE When refitting, check that the
reflector (8) and lower handlebar cover (6)
are correctly fitted together.
MC150MC50
REMOVING THE HEADLIGHT METAL RING
MC150
MC50
Carefully read page 63
(MAINTENANCE).
Place the vehicle on its centre stand.
Unscrew and remove the screw (11).
Remove the headlight metal ring (12).
NOTE When refitting, make sure the
tang (13) fits fully into its seat.
use and maintenance Mojito 50 - 150
76
USA
Page 77

APRum_MOJ50_150#02_####.book Page 77 Tuesday, June 6, 2006 5:29 PM
PARTIAL REMOVAL OF THE UPPER HANDLEBAR COVER
M50
Carefully read page 63
(MAINTENANCE).
CAUTION
Partial removal of the upper handlebar
cover is a complex process and may
cause difficulties for an inexpert
mechanic.
In case of need, contact an aprilia
Official Dealer.
If you wish to do the work yourself,
proceed as follows:
Remove the lower handlebar cover, see
page 76 (REMOVING THE LOWER
HANDLEBAR COVER ).
M50
M50
Remove the rear-view mirrors, see
page 78 (REMOVING THE REAR-VIEW
MIRRORS).
Raise the rubber ring (1) to free it from
the odometer control coupling (2).
CAUTION
Work with care. Do not damage the
snap-on tangs and matching recesses.
Use a spanner to extract the odometer
control coupling (2) from its recess in the
dashboard.
M50
CAUTION
The upper handlebar cover (3)
(complete with switches, instruments
and indicators) remains connected to
the electrical cables, so that it cannot
be completely removed.
Work with care to avoid damaging the
parts.
Do not force the electrical cables.
Moderately lift the upper handlebar
cover (3) and turn it towards the saddle.
use and maintenance Mojito 50 - 150
USA
77
Page 78

APRum_MOJ50_150#02_####.book Page 78 Tuesday, June 6, 2006 5:29 PM
MC50 MC150M50
REMOVING THE REAR-VIEW MIRRORS
Carefully read page 63
(MAINTENANCE).
The following information refers to a single
rear-view mirror, but applies to both
M50
( in countries where a second rearview mirror is obligatory).
Place the vehicle on its centre stand.
Raise the dust cover (1).
Completely slacken off the nut (2).
Unscrew and remove the rear-view
mirror (3).
M50
Retain the plastic washer (4).
MC50 MC150
PARTIAL REMOVAL OF THE DASHBOARD
MC50 MC150
Carefully read page 63
(MAINTENANCE).
Unscrew and remove the three nuts (5).
CAUTION
Work with care.
Do not force cables.
Handle plastic and painted parts with
care to avoid damaging or scratching
them.
Partially remove the dashboard (6).
MC50 MC150
To access the dashboard bulbs, proceed
as follows:
Unscrew and remove the two screws
(7).
Remove the upper cover (8).
Remove the glass (9) together with its
mount.
Lower the lower cover (10).
Raise the rubber ring (11) to free it from
the odometer control coupling (12).
WARNING
Work with care. Do not damage the
snap-on tangs and matching recesses.
Use a spanner to extract the odometer
control coupling (12) from its recess in
the dashboard.
use and maintenance Mojito 50 - 150
78
USA
Page 79

APRum_MOJ50_150#02_####.book Page 79 Tuesday, June 6, 2006 5:29 PM
MC50 M50
REMOVING THE CENTRAL INSPECTION COVER
Carefully read page 63
(MAINTENANCE).
CAUTION
Handle the painted parts with care to
avoid scratching or damaging them.
Place the vehicle on its centre stand.
Unscrew and remove the screw (1).
Remove the central inspection cover (2).
NOTE When refitting, make sure the two
tangs fit fully into their recesses.
REMOVING THE RIGHT AND LEFT INSPECTION COVERS
Carefully read page 63
(MAINTENANCE).
CAUTION
Handle the painted parts with care to
avoid scratching or damaging them.
Lift the saddle, see page 43
(UNLOCKING / LOCKING THE
SADDLE).
Unscrew and remove the upper screw
(3).
Unscrew and remove the side screw (4).
Remove the side inspection cover (5).
NOTE When refitting, fit the recesses
onto their matching tangs.
REMOVING THE BATTERY COVER
M50 MC50
NOTE Place the vehicle on firm and flat
ground.
Place the vehicle on its centre stand.
Make sure the ignition switch is set to
≈∆.
Lift the saddle, see page 43
(UNLOCKING / LOCKING THE
SADDLE).
Unscrew and remove the screw (6).
Remove the battery cover (7).
NOTE When refitting make sure the
tang (8) fits fully into its recess.
use and maintenance Mojito 50 - 150
USA
79
Page 80

APRum_MOJ50_150#02_####.book Page 80 Tuesday, June 6, 2006 5:29 PM
01
01
2
1
REMOVING THE PASSENGER GRAB RAIL
MC150
Lift the saddle, see page 43
MC50
(UNLOCKING / LOCKING THE
SADDLE).
Unscrew and remove the five screws (1)
Remove the passenger grab rail (2) from
the rear engine cover.
CAUTION
Handle the chrome-plated parts with
care to avoid scratching or damaging
them.
3
3
REMOVING THE REAR COVER
Remove the passenger grab rail see
MC50 MC150
beside (REMOVING THE PASSENGER
GRAB RAIL).
Unscrew and remove the two screws
(3) securing the upper rear cover (5).
Unscrew and remove the two screws
(4) securing the rear cover (5) at the
front.
NOTE Before completely removing the
rear cover (5) disconnect the rear light
cabling connector.
CAUTION
Handle the painted parts with care to
avoid scratching or damaging them.
NOTE Before refitting the rear cover (5),
reconnect the rear light cabling connector.
use and maintenance Mojito 50 - 150
80
USA
Page 81

APRum_MOJ50_150#02_####.book Page 81 Tuesday, June 6, 2006 5:29 PM
7
8
6
Unscrew and remove the two screws (6)
securing the indicator support at the
bottom end.
Unscrew and remove the two screws (7)
securing the indicator support at the top
end.
Remove the indicator support (8).
9
Unscrew and remove the screw (9)
securing the rear light support.
Remove the rear light and indicator
support.
Remove the rear cover from the vehicle.
use and maintenance Mojito 50 - 150
USA
81
Page 82

APRum_MOJ50_150#02_####.book Page 82 Tuesday, June 6, 2006 5:29 PM
M50
MC50
MC150
CHECKING THE STAND
Carefully read page 63
(MAINTENANCE).
WARNING
FOR THE SIDE STAND ONLY .
Danger of falling over or tipping.
When moving the vehicle into the
upright position, from the parked to the
riding position, the stand automatically
stows.
OPT
NOTE The following information refers
to a single stand, but applies to both.
The stand (1) must be free to move without
blockage.
M50
Carry out the following checks:
The springs (2) must not be damaged,
worn, rusted or weakened.
The stand must move freely, if
necessary grease the joint, see page
108 (LUBRICANT CHART ) or
page 109 (LUBRICANT CHART ).
M50 MC50
MC150
CHECKING THE SWITCHES
Carefully read page 63
(MAINTENANCE).
The vehicle is equipped with two switches:
√ Stoplight switch on the rear brake control
lever (3).
√ Stoplight switch on the front brake
control lever (4).
MC50 MC150
To access the switches:
M50
Partially remove the upper
handlebar cover, see page 77 (PARTIAL
REMOVAL OF THE UPPER
HANDLEBAR COVER ).
M50
Periodically carry out the following checks:
Check that the switch is free of dirt and
mud; the pin must move freely and
return to its starting position.
Check that the cables are correctly
connected.
use and maintenance Mojito 50 - 150
82
USA
Page 83

APRum_MOJ50_150#02_####.book Page 83 Tuesday, June 6, 2006 5:29 PM
IDLING ADJUSTMENT
Carefully read page 63
(MAINTENANCE).
M50 MC50
Adjust the idling after the first
312 mi (500 Km) and whenever it is
irregular.
MC150
Adjust the idling after the first
625 mi
(1000 Km) and whenever it is irregular.
Proceed as follows:
Ride for a few miles to reach normal
running temperature, then stop the
engine.
M50 MC50
Remove the central inspection
cover, see page 79 (REMOVING THE
CENTRAL INSPECTION COVER).
MC150
Remove the right inspection cover,
see page 79 (REMOVING THE RIGHT
AND LEFT INSPECTION COVERS).
Connect an electronic revolution counter
to the spark plug cable.
MC50 M50
WARNING
Before proceeding, make sure the
working area is adequately ventilated.
Start the engine.
The idling speed should be around 1600 ±
200 rpm; at this speed the rear wheel is not
driven by the engine.
Remove the rear cover, see page 80
(REMOVING THE REAR COVER).
Working from the vehicle right-hand
side, adjust the carburetor adjusting
screw (1).
NOTE Do not adjust the air adjusting
screw (3), to avoid upsetting the carburetor
balancing.
2
MC150MC150
Lift the saddle, see page 43
(UNLOCKING / LOCKING THE
SADDLE).
Remove the carburetor access cover
inside the compartment.
Adjust the adjusting screw (2).
TURN CLOCKWISE
to increase the rpm;
TURN COUNTERCLOCKWISE
to decrease the rpm.
Twist the throttle grip to accelerate and
decelerate several times to check its
operation and that the idling speed
remains constant.
NOTE If necessary, contact an aprilia
Official Dealer.
use and maintenance Mojito 50 - 150
USA
83
Page 84

APRum_MOJ50_150#02_####.book Page 84 Tuesday, June 6, 2006 5:29 PM
M50 MC50 MC150
ADJUSTING THE ACCELERATOR CONTROL
Carefully read page 63
After the adjustment:
Tighten the nut (2) to lock the adjuster
(3) and refit the dust cover (1).
(MAINTENANCE).
The accelerator control must have slack of
around 0.06 - 0.12 in (2 - 3 mm), relative to
the handlebar.
To adjust the slack:
Place the vehicle on its centre stand.
Extract the dust cover (1).
Slacken off the nut (2).
Adjust the adjuster (3) located at the
After the adjustment, make sure that the
rotation of the handlebar does not
modify the engine idling rpm and that
the throttle grip returns smoothly and
automatically to its original position
after being released.
accelerator control cable entry point.
WARNING
SPARK PLUG
Carefully read page 63
(MAINTENANCE).
M50 MC50
Check the spark plug after the
first 312 mi (500 Km), and replace it every
2500 mi (4000 Km).
MC150
Check the spark plug after the first
625 mi (1000 Km), and every 3750 mi
(6000 Km) thereafter; replace it every 7500
km (12000 Km).
Periodically disassemble the spark plug,
clean off carbon deposits and replace if
necessary.
To access the spark plug:
M50 MC50
Remove the central inspection
cover, see page 79 (REMOVING THE
CENTRAL INSPECTION COVER).
MC150
Remove the right inspection cover,
see page 79 (REMOVING THE RIGHT
AND LEFT INSPECTION COVERS).
use and maintenance Mojito 50 - 150
84
USA
Page 85

APRum_MOJ50_150#02_####.book Page 85 Tuesday, June 6, 2006 5:29 PM
MC50 M50
To remove and clean it:
Take the cap off the plug (1).
Clean all dirt off the base of the spark
plug, then unscrew it with the provided
wrench and extract it from its seat, taking
care to prevent dust or other substances
from getting inside the cylinder.
Make sure that there are neither carbon
deposits, nor corrosion marks on the
electrodes and on the insulating
material; if necessary, clean them with
the special spark plugs cleaners and/or
a metal brush.
Blow the spark off with compressed air
to prevent the removed dirt from getting
into the engine.
If the spark plug has cracks on the
insulating material, corroded electrodes
or excessive deposits, it must be
changed.
MC150
Check the electrode gap with a
thickness gauge.
This must be as follows:
M50 MC50
√ 0.024 - 0.028 in
(0.6 √ 0.7 mm);
MC150
√ 0.028 - 0.031 in (0.7 √ 0.8 mm);
adjust the spark plug gap if necessary
by carefully bending the earth
electrode.
Make sure the washer is in good
condition. Fit the washer and screw the
spark plug finger-tight to avoid damaging
the thread.
Tighten the spark plug onto the washer
with the provided wrench by turning it
half a turn.
Spark plug driving torque:
M50 MC50
– 14.46 ftlb (20 Nm);
MC150
– 8.68 – 10.13 ftlb (12-14 Nm).
MC50 M50
MC150
0.024 - 0.028 inc0.024 - 0.028 inc
0.028 - 0.031 inc0.028 - 0.031 inc
CAUTION
The spark plug must be well tightened,
otherwise the engine may overheat and
be seriously damaged.
Only use recommended spark plugs,
see page 104 (TECHNICAL DATA); use
of incorrect spark plugs can reduce
performance and engine life.
Refit the spark plug cap (1).
Refit the inspection cover.
use and maintenance Mojito 50 - 150
USA
85
Page 86

APRum_MOJ50_150#02_####.book Page 86 Tuesday, June 6, 2006 5:29 PM
BATTERY
Carefully read page 43
(MAINTENANCE).
WARNING
Fire hazard.
Do not handle fuel and other flammable
substances in the vicinity of the
vehicle's electrical componentry.
WARNING
Never invert the battery cables.
Connect and disconnect the battery
with the ignition switch set to “ ” to
avoid damaging the vehicle’s
componentry.
First connect the positive cable (+) and
then the negative one (–).
Disconnect in reverse order.
M50 MC50
After the first 312 mi (500 Km) and every
2500 mi (4000 Km) or 12 months
thereafter, check the electrolyte level and
the tightness of the terminal clamps.
WARNING
Battery electrolyte fluid is toxic and
caustic. It contains sulfuric acid and
can cause burns if spilled on the skin.
Always wear protective clothes, a mask
and/or safety goggles when handling
this fluid.
If any battery fluid gets on your skin,
rinse the affected area with abundant
fresh water.
If battery fluid is spilled into your eyes,
flush with abundant water for fifteen
minutes and contact an eye specialist
immediately.
If battery fluid is swallowed
accidentally, drink abundant water or
milk. Seek medical attention
immediately and keep drinking milk of
magnesia or vegetable oil in the
meantime.
The battery gives off explosive gases.
Keep the battery well away from any
sources of ignition, such as flames,
sparks, or any heat sources.
When refilling or using the battery,
ensure the area is well ventilated and
avoid inhaling any fumes.
KEEP AWAY FROM CHILDREN.
Take care not to lean the vehicle too far,
to avoid spilling the battery fluid.
Disconnect in reverse order.
Battery fluid is corrosive.
Do not spill it, especially onto plastic
parts.
MC150MC150
CAUTION
This vehicle is provided with a
maintenance-free battery and no
operation is necessary, excepting
occasional checks and the recharge
when required.
NOTE If you need assistance or
technical advice, contact your aprilia
Official Dealer for prompt, accurate
service.
LONG INACTIVITY OF THE BATTERY
If the vehicle is left unused for more than
fifteen days, the battery must be recharged
to prevent sulphation, seepage 89
(RECHARGING THE BATTERY).
In the winter or when the vehicle is left
unused, check the battery charge from
time to time to prevent deterioration
(around once a month).
Completely recharge the battery with a
standard charger, see page 89
(RECHARGING THE BATTERY).
M50 MC50
If the battery is left on the
vehicle, disconnect the cables from the
terminal clamps.
use and maintenance Mojito 50 - 150
86
USA
Page 87

APRum_MOJ50_150#02_####.book Page 87 Tuesday, June 6, 2006 5:29 PM
MC50 M50
CHECKING AND CLEANING THE TERMINALS
Carefully read page 86 (BATTERY).
M50 MC50
Remove the battery cover, see
page 79 (REMOVING THE BATTERY
COVER ).
MC150
Partially remove the battery, see
M50 MC50
page 87 (REMOVING THE BATTERY
MC150
).
Check that the cable terminals (1) and
battery clamps (2) are:
√ in good condition (and not corroded or
covered with deposits);
√ covered with special grease or
vaseline.
MC150
If necessary:
Make sure the ignition switch is set to
≈∆.
First disconnect the negative cable (–)
and then the positive cable (red) (+).
Use a wire brush to clean any corrosion
off.
Reconnect the positive cable first (red)
(+) and then the negative cable (–).
Re-apply the special grease or vaseline
to the terminals and clamps.
Finally:
M50 MC50
Put back the battery cover,
see page 79 (REMOVING THE
BATTERY COVER ).
MC150
Re-install the battery, see page 90
(INSTALLING THE BATTERY ).
M50 MC50
MC150
REMOVING THE BATTERY
M50 MC50
Carefully read page 86 (BATTERY).
Remove the battery cover, see page 79
(REMOVING THE BATTERY COVER
M50 MC50
).
Make sure the ignition switch is set to
≈∆.
Disconnect first the negative cable (–)
and then the positive one (red) (+).
Remove the battery breather pipe.
Extract the battery from its mount place it
on a flat surface in a dry, cool area.
WARNING
Keep the battery in a safe place away
from children.
Refit the battery cover, see page 79
(REMOVING THE BATTERY COVER
M50 MC50
).
use and maintenance Mojito 50 - 150
USA
87
Page 88

APRum_MOJ50_150#02_####.book Page 88 Tuesday, June 6, 2006 5:29 PM
1 2
REMOVING THE BATTERY
MC150
MC150
Carefully read page 86 (BATTERY).
PARTIAL REMOVAL
Open the glove compartment, page 46
(GLOVE COMPARTMENT).
Unscrew the two screws (1) securing the
battery cover (2).
Remove the battery cover (2).
CAUTION
Work with care. Do not damage the
snap-on tangs and matching recesses.
3
Extract the battery (3) from its mount.
MC150
CAUTION
The battery is attached to the electrical
cables. Do not force the electric cables.
MC150
3
COMPLETE REMOVAL
Disconnect first the negative cable (-)
and then the positive one (red) (+).
Place the battery on a flat surface, in a
dry, cool area.
WARNING
Keep the battery in a safe place away
from children.
use and maintenance Mojito 50 - 150
88
USA
Page 89

APRum_MOJ50_150#02_####.book Page 89 Tuesday, June 6, 2006 5:29 PM
MC50 M50
CHECKING THE ELECTROLYTE LEVEL
M50 MC50
Carefully read page 86 (BATTERY).
Remove the battery from its mount, see
page 87 (REMOVING THE BATTERY
M50 MC50
).
Check that the fluid level is between the
two ≈MIN∆ and ≈MAX∆ marks stamped on
the side of the battery.
If not so:
Unscrew and remove the element caps.
CAUTION
Use only distilled water to top up the
battery fluid. Do not fill above the
"MAX" mark as the level increases
during recharging.
Top up with distilled water only.
CAUTION
After topping up, refit the element caps.
Refit the element caps.
RECHARGING THE BATTERY
Carefully read page 86 (BATTERY).
Remove the battery from its mount, see
page 87 (REMOVING THE BATTERY
M50 MC50
).
Unscrew and remove the element caps.
Check the level of the battery fluid, see
page 89 (CHECKING THE
ELECTROLYTE LEVEL ).
After recharging, check the battery fluid
M50 MC50
level again and top up if necessary with
distilled water.
Tighten down the element caps.
CAUTION
Allow 5-10 minutes to pass after
recharging before re-installing the
battery, inasmuch as it continues
producing gas for a while after
recharging.
CHECKING THE ELECTROLYTE LEVEL
MC150
Carefully read page 86 (BATTERY). The
vehicle is equipped with a maintenancefree battery, which does not require any
check of the electrolyte level.
use and maintenance Mojito 50 - 150
USA
89
Page 90

APRum_MOJ50_150#02_####.book Page 90 Tuesday, June 6, 2006 5:29 PM
MC150
3
INSTALLING THE BATTERY
M50 MC50
Carefully read page 86 (BATTERY).
Remove the battery cover, see page 79
(REMOVING THE BATTERY COVER
M50 MC50
).
Place the battery in its mount.
Connect the breather pipe.
CAUTION
Always connect the breather pipe to
prevent the sulphuric acid fumes coming
out of the pipe corroding the electrical
plant, painted surfaces, rubber parts and
gaskets.
Connect first the positive cable (red) (+) and
then the negative one (–).
Re-apply the special grease or vaseline to
the terminals and clamps.
Refit the battery cover, see page 79
(REMOVING THE BATTERY COVER
M50 MC50
).
3
INSTALLING THE BATTERY
MC150
MC150
Carefully read page 86 (BATTERY).
Connect first the positive cable (red) (+)
and then the negative one (–).
Re-apply the special grease or vaseline
to the terminals and clamps.
CAUTION
When re-installing, ease the electrical
cables into place to avoid crimping
them.
Place the battery in its mount.
Fit the battery cover (2).
1 2
MC150
CAUTION
Work with care. Do not damage the
snap-on tangs and matching recesses.
NOTE When refitting, make sure the two
tangs fit fully into their recesses.
Tighten down the screws (1) securing
the battery cover (2).
Close the glove compartment, page 46
(GLOVE COMPARTMENT).
use and maintenance Mojito 50 - 150
90
USA
Page 91

APRum_MOJ50_150#02_####.book Page 91 Tuesday, June 6, 2006 5:29 PM
CHANGING THE FUSES
carefully read page 43
(MAINTENANCE).
CAUTION
Do not repair damaged or defective
fuses.
Do not use fuses other than those
specified.
This can damage the electrical plant or
even start a fire in case of short circuit.
NOTE If a given fuse blows freqently,
there is probably a short circuit or overload
in the electrical plant. In this case contact
an aprilia Official Dealer.
If you notice failure or incorrect operation
of an electrical component, or if the engine
does not start, first check the fuses.
Proceed as follows:
Set the ignition switch to ≈∆ to prevent
a short circuit.
M50 MC50
Remove the battery cover,
page 79 (REMOVING THE BATTERY
COVER ).
MC150
Remove the battery cover, see
page 87 (REMOVING THE BATTERY) .
M50 MC50
Extract one fuse at a time and check
whether the filament is burnt out.
Before replacing the blown fuse, try to
resolve the cause.
Replace the blown fuse with one of the
same amp rating.
NOTE If you use the spare fuse, fit a
new one in its place.
M50 MC50
Refit the battery cover, see
page 79 (REMOVING THE BATTERY
COVER ).
MC150
Refit the right inspection cover, see
page 79 (REMOVING THE RIGHT AND
LEFT INSPECTION COVERS).
M50 MC50
MC50 MC150M50
3
1
ARRANGMENT OF THE FUSES
7.5 A fuse (1) √ Ignition keyswitch to:
√ start relay and circuit;
√ fuel level sensor and circuit;
√ horn;
√ parking lights and instrument lighting;
M50 MC50
√ direction indicators and circuit;
M50 MC50
√ stop light and circuit;
M50 MC50
√ 2 stroke oil reserve sensor and
circuit;
MC150
√ engine oil pressure sensor and
circuit.
M50 MC50
10 A fuse (2) √ Battery to ignition
keyswitch, voltage regulator.
MC150
15 A fuse (3) √ Battery to ignition
keyswitch, generator.
use and maintenance Mojito 50 - 150
USA
91
Page 92

APRum_MOJ50_150#02_####.book Page 92 Tuesday, June 6, 2006 5:29 PM
MC50 MC150M50
ADJUSTING THE VERTICAL HEADLIGHT BEAM
To quickly check the headlight beam, place
the vehicle ten metres from a wall on flat
ground.
Switch on the low beam, sit on the vehicle
and check that the beam spot on the wall is
just below the horizontal (around 9/10 of
the height of the lamp from the ground).
2
1
M50
To adjust the headlight beam:
Adjust the screw (1) with a screwdriver.
SCREWING IT IN (clockwise) lowers the
beam.
UNSCREWING IT (counterclockwise)
raises the beam.
MC50 MC150
To adjust the headlight beam:
Slacken off the nut (2).
Adjust the headlight angle (3).
Tighten down the nut (2).
Check that the nut really is tight (2).
Finally, check the beam angle once
more (3).
4
3
ADJUSTING THE HORIZONTAL LIGHT BEAM
M50
Slacken off the screws (1) securing the
headlight (2).
Press on the edge of the headlight lens
(2) to adjust the beam horizontally.
Tighten down the screws (2) securing
the headlight.
Check that the headlight (2) angle is
correct.
use and maintenance Mojito 50 - 150
92
USA
Page 93

APRum_MOJ50_150#02_####.book Page 93 Tuesday, June 6, 2006 5:29 PM
MC50 MC150
Remove the two clips (3), page
(Removing the front cover).
Slacken off the two screws (4) securing
the headlight mount.
Rotate the headlight mount to adjust the
beam angle horizontally.
Check that the headlight angle is correct.
BULBS
Carefully read page 63
(MAINTENANCE).
WARNING
Fire hazard.
Do not handle fuel and other flammable
substances in the vicinity of the
vehicle's electrical componentry..
WARNING
Before replacing a bulb, place the
vehicle on its centre stand and turn the
ignition switch to “m”, and wait for a
few minutes while the bulb cools down.
Wear clean gloves or use a dry, clean
cloth to handle the bulb itself.
Do not leave fingerprints on the bulb,
since these may cause its overheating
and consequent breakage.
If you touch the bulb with bare hands,
remove any fingerprint with alcohol, in
order to avoid any damage.
DO NOT FORCE THE ELECTRIC
CABLES.
M50
CHANGING THE HEADLIGHT BULBS
M50
Carefully read page 93 (BULBS).
The headlight contains:
√ a parking light bulb (1);
√ a low/high beam bulb / (2) (halogen).
use and maintenance Mojito 50 - 150
USA
93
Page 94

APRum_MOJ50_150#02_####.book Page 94 Tuesday, June 6, 2006 5:29 PM
M50
To access the bulbs:
Remove the lower handlebar cover, see
page 76 (REMOVING THE LOWER
HANDLEBAR COVER ).
Move aside the dust cover by hand (3).
M50
To replace:
PARKING LIGHT BULB
CAUTION
To extract the bulb socket, do not pull
the electric wires.
Grip the bulb socket (4), and pull it out of
its seat.
Extract the parking light bulb (1) and
replace it with one of the same type.
M50
LOW/HIGH BEAM BULB (HALOGEN)
CAUTION
To extract the bulb electric connector,
do not pull its wires.
Grasp the bulb connector (5), pull it and
disconnect it from the bulb (6).
Release the clip (7) securing the bulb
(6).
Extract the bulb from its seat.
To refit:
NOTE Fit the bulb into its socket,
making sure the locators coincide.
Fit a bulb of the same type.
Refit the clip (7).
Connect the bulb connector (5).
MC50 MC150
CHANGING THE HEADLIGHT BULBS
MC50 MC150
Carefully read page 93 (BULBS).
The headlight contains:
√ a parking light bulb (1);
√ a low/high beam bulb / (2) (halogen
MC150
).
use and maintenance Mojito 50 - 150
94
USA
Page 95

APRum_MOJ50_150#02_####.book Page 95 Tuesday, June 6, 2006 5:29 PM
MC50 MC150
To access the bulbs:
Remove the headlight metal ring, see
page 76 (REMOVING THE HEADLIGHT
METAL RING ).
MC50 MC150
CAUTION
Work with care.
Do not force the electrical cables.
Partially remove the reflector (3).
To replace:
PARKING LIGHT BULB
CAUTION
To extract the bulb socket, do not pull
the electric wires.
Grip the bulb socket (4), and pull it out of
its seat.
Extract the parking light bulb (1) and
replace it with one of the same type.
MC50 MC150
LOW/HIGH BEAM BULB (HALOGEN)
CAUTION
To extract the bulb electric connector,
do not pull its wires.
Grasp the bulb connector (5), pull it and
disconnect it from the bulb (6).
Release the clip (7) securing the bulb
(6).
Extract the bulb from its seat.
To refit:
NOTE Fit the bulb into its socket,
making sure the locators coincide.
Fit a bulb of the same type.
Refit the clip (7).
Connect the bulb connector (5).
CHANGING THE FRONT AND REAR DIRECTION INDICATOR BULBS
Carefully read page 93 (BULBS).
NOTE Before replacing bulb,
M50 MC50
check the fuses, see page 91 (CHANGING
THE FUSES).
To replace:
Unscrew and remove the screw (1).
NOTE When removing the protection
screen, make sure not to damage or break
the snap tangs (2).
Remove the protection screen (3).
NOTE When refitting, make sure the two
tangs (2) fit fully into their recesses.
use and maintenance Mojito 50 - 150
USA
95
Page 96

APRum_MOJ50_150#02_####.book Page 96 Tuesday, June 6, 2006 5:29 PM
M50
Retain the metal ring (4).
Press the bulb in with moderate
pressure (5) and turn it
counterclockwise.
Extract the bulb from its seat.
NOTE To fit: Insert the bulb in the bulb
socket, making the two bulb pins coincide
with the relevant guides on the socket.
use and maintenance Mojito 50 - 150
96
USA
Fit a bulb of the same type.
To refit:
NOTE Carefully tighten the screw (1)
with moderate pressure to avoid damaging
the protection screen (3).
REPLACING THE DASHBOARD BULBS
M50
Carefully read page 93 (BULBS).
NOTE Before replacing a bulb check the
fuses, see page 91 (CHANGING THE
FUSES).
The dashboard contains:
√ indicator light bulbs;
√ dashboard lights.
To replace:
WARNING LIGHT BULBS
Partially remove the upper handlebar
cover, see page 77 (PARTIAL
REMOVAL OF THE UPPER
HANDLEBAR COVER ).
M50
NOTE Extract one bulb mount at a time
to avoid refitting them in the wrong order.
Page 97

APRum_MOJ50_150#02_####.book Page 97 Tuesday, June 6, 2006 5:29 PM
Extract the bulb mount in question:
Pos. Warning light Colour
M50
1
1
2
3
4 High beam ( ) blue
5
Extract and replace the bulb with
2 stroke oil reserve
()
MC150
Engine oil pressure
()
Low fuel
()
Direction indicators
()
Parking lights and low
beam ( )
red
red
amber
green
green
another of the same type.
M50
DASHBOARD LIGHTING BULBS
NOTE To replace the two upper
dashboard lights, simply remove the lower
handlebar cover.
Remove the lower handlebar cover, see
page 76 (REMOVING THE LOWER
HANDLEBAR COVER ).
M50
NOTE Extract one bulb mount at a time
to avoid refitting them in the wrong order.
Extract the bulb mount from the part of
the dashboard which is not being
illuminated:
Pos. Lit part
6 Upper right part
7 Upper left part
Extract and replace the bulb with
another of the same type.
MC50
CHANGING THE DASHBOARD BULBS
MC50 MC150
Carefully read page 93 (BULBS).
NOTE Before replacing a bulb check the
fuses, see page 91 (CHANGING THE
FUSES).
The dashboard contains:
√ indicator light bulbs;
√ dashboard lights.
To replace:
Partially remove the dashboard, see
page 78 (PARTIALLY REMOVING THE
DASHBOARD ).
MC50 MC150
WARNING LIGHT BULBS
NOTE Extract one bulb mount at a time
to avoid refitting them in the wrong order.
use and maintenance Mojito 50 - 150
USA
97
Page 98

APRum_MOJ50_150#02_####.book Page 98 Tuesday, June 6, 2006 5:29 PM
MC150
Extract the bulb mount in question:
Pos. Warning light Colour
MC50
1
1
2
3
4 High beam ( ) blue
5
2 stroke oil reserve
()
MC150
Engine oil pressure
()
Low fuel
()
Direction indicators
()
Parking lights and low
beam ( )
red
red
amber
green
green
MC50 MC150
Extract and replace the bulb with
another of the same type.
DASHBOARD LIGHTING BULBS
NOTE Extract one bulb mount at a time
to avoid refitting them in the wrong order.
Extract the bulb mount from the part of
the dashboard which is not being
illuminated:
Pos. Lit part
6 Upper central part
7 Upper right part
Extract and replace the bulb with
another of the same type.
CHANGING THE REAR LIGHT BULB
Carefully read page 93 (BULBS).
M50 MC50
NOTE Before replacing a bulb check the
fuses, see page 91 (CHANGING THE
FUSES) and the operation of the STOP
light switches, see page 82 (CHECKING
THE SWITCHES).
use and maintenance Mojito 50 - 150
98
USA
Page 99

APRum_MOJ50_150#02_####.book Page 99 Tuesday, June 6, 2006 5:29 PM
To replace:
Position the vehicle on the stand.
Unscrew and remove the two screws (1).
Remove the protection screen (2).
NOTE When reassembling, fit the
protection screen into its seat.
The shaped profile fits lowermost.
CAUTION
Tighten the two screws (1) cautiously
and moderately to avoid damaging the
protection screen.
Press the bulb in with moderate
pressure (3) and turn it
counterclockwise.
Extract the bulb from its seat.
NOTE Insert the bulb in the bulb socket,
making the two bulb pins coincide with
the relevant guides on the socket.
Fit a bulb of the same type.
M50 MC50
NOTE If removed, fit the license plate
light screen (4) correctly.
The shaped profile is to the front.
MC150MC150
NOTE If removed, fit the transparent
screen (4) correctly.
The shaped profile is to the front.
CHANGING THE NUMBER PLATE LIGHT
Carefully read page 93 (BULBS).
To replace:
Place the vehicle on its centre stand.
Unscrew and remove the screw (1).
Remove the light unit (2).
CAUTION
To extract the bulb socket, do not pull the
electric wires.
Grip the bulb socket (3), and pull it out of its
seat.
Extract the bulb (4) from its seat.
Fit a bulb of the same type.
CAUTION
When refitting, position the electric cable
in the groove at the right side of the lamp
assembly (2).
use and maintenance Mojito 50 - 150
USA
99
Page 100

APRum_MOJ50_150#02_####.book Page 100 Tuesday, June 6, 2006 5:29 PM
TRANSPORT
CAUTION
Never drain the fuel tank, either partially
or completely. This may cause damage
to the inner components of the fuel
tank, or to other parts of the fuel
system.
Always ensure that the fuel filler cap is
correctly closed.
use and maintenance Mojito 50 - 150
100
USA
WARNING
Never attempt to tow your vehicle with
another vehicle.
WARNING
While your vehicle is being transported,
it must be kept in a vertical position,
firmly tied down, and with the wheels
blocked.
Transport your vehicle in neutral gear
only.
Failure to heed this warning could
cause serious damage to the
transmission due to vibration of the
transport truck.
CAUTION
Never drain the fuel tank, either partially
or completely. This may cause damage
to the inner components of the fuel
tank, or to other parts of the fuel
system.
Always ensure that the fuel filler cap is
correctly closed.
 Loading...