

Page 1

Welcome to Mac OS X
Page 2

1
Welcome to Mac OS X,
the world’s most advanced
operating system.
This book helps you start
using Mac OS X.
First install the software,
then discover how easy
it is to use.
2 Installing Mac OS X
4 Aqua
6 The Dock
8 The Finder
10 Customization
12 Applications
14 Classic
16 Users
18 Changing Settings
20 Getting Connected
22 iTools
24 Using Mail
26 Printing
28 Troubleshooting
Page 3
Step 1: Upgrade to Mac OS 9.1 using the CD included with Mac OS X
Step 2: Get information you need to set up
To use your current iTools account, have your member name and password available. To use your
current network settings, look in these Mac OS 9.1 control panels.
Settings In Mac OS 9
TCP/IP TCP/IP control panel
Internet and mail Internet control panel
Dial-up connection (PPP) Remote Access and Modem control panels
If you can’t find this information, look in the applications you use to get email or browse the Web.
If you don’t know the information, contact your Internet service provider or system administrator.
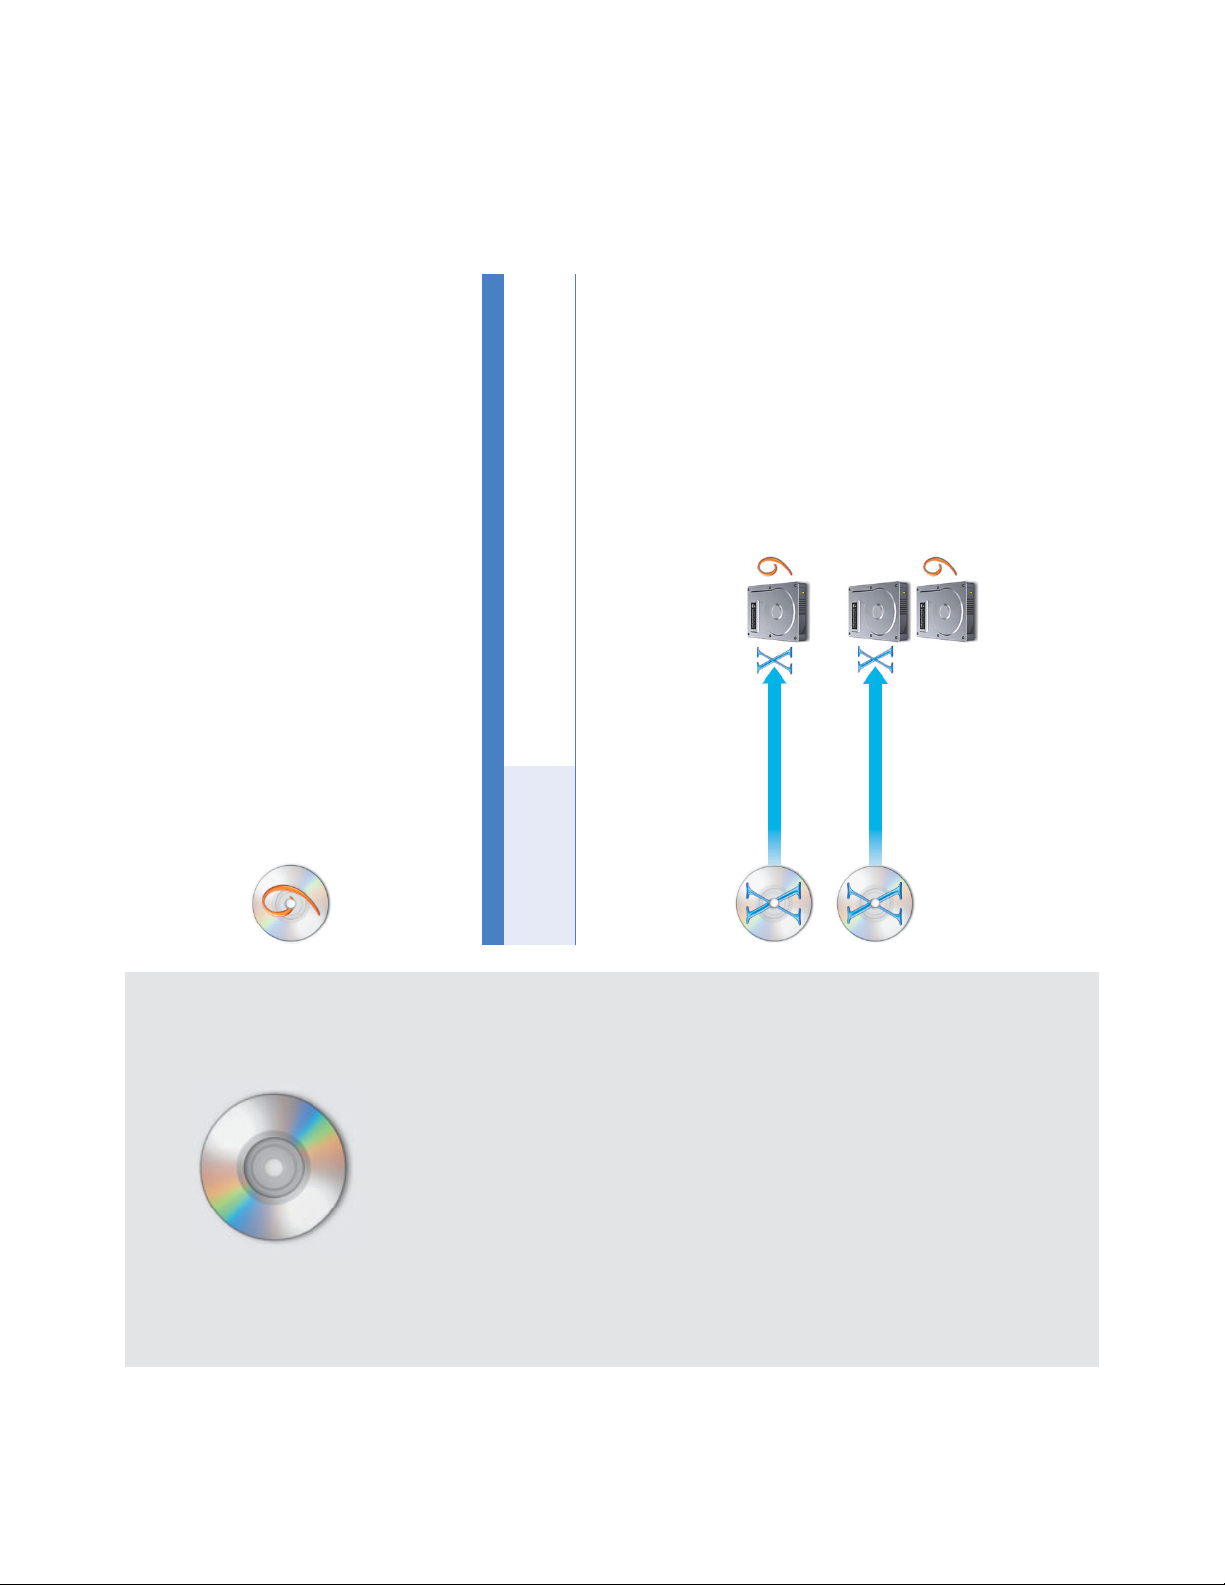
Step 3: Decide where you want to install Mac OS X
On the same disk
Install Mac OS X on the same disk
or disk partition as Mac OS 9.
‚ Do not format the disk.
If your computer already has
Mac OS 9.1 installed, you
can skip this step.
Or a different disk
Install Mac OS X on a different disk
or disk partition from Mac OS 9.
Installing
Mac OS X
2
Page 4
Step 4: Insert the Mac OS X CD, then double-click Install Mac OS X
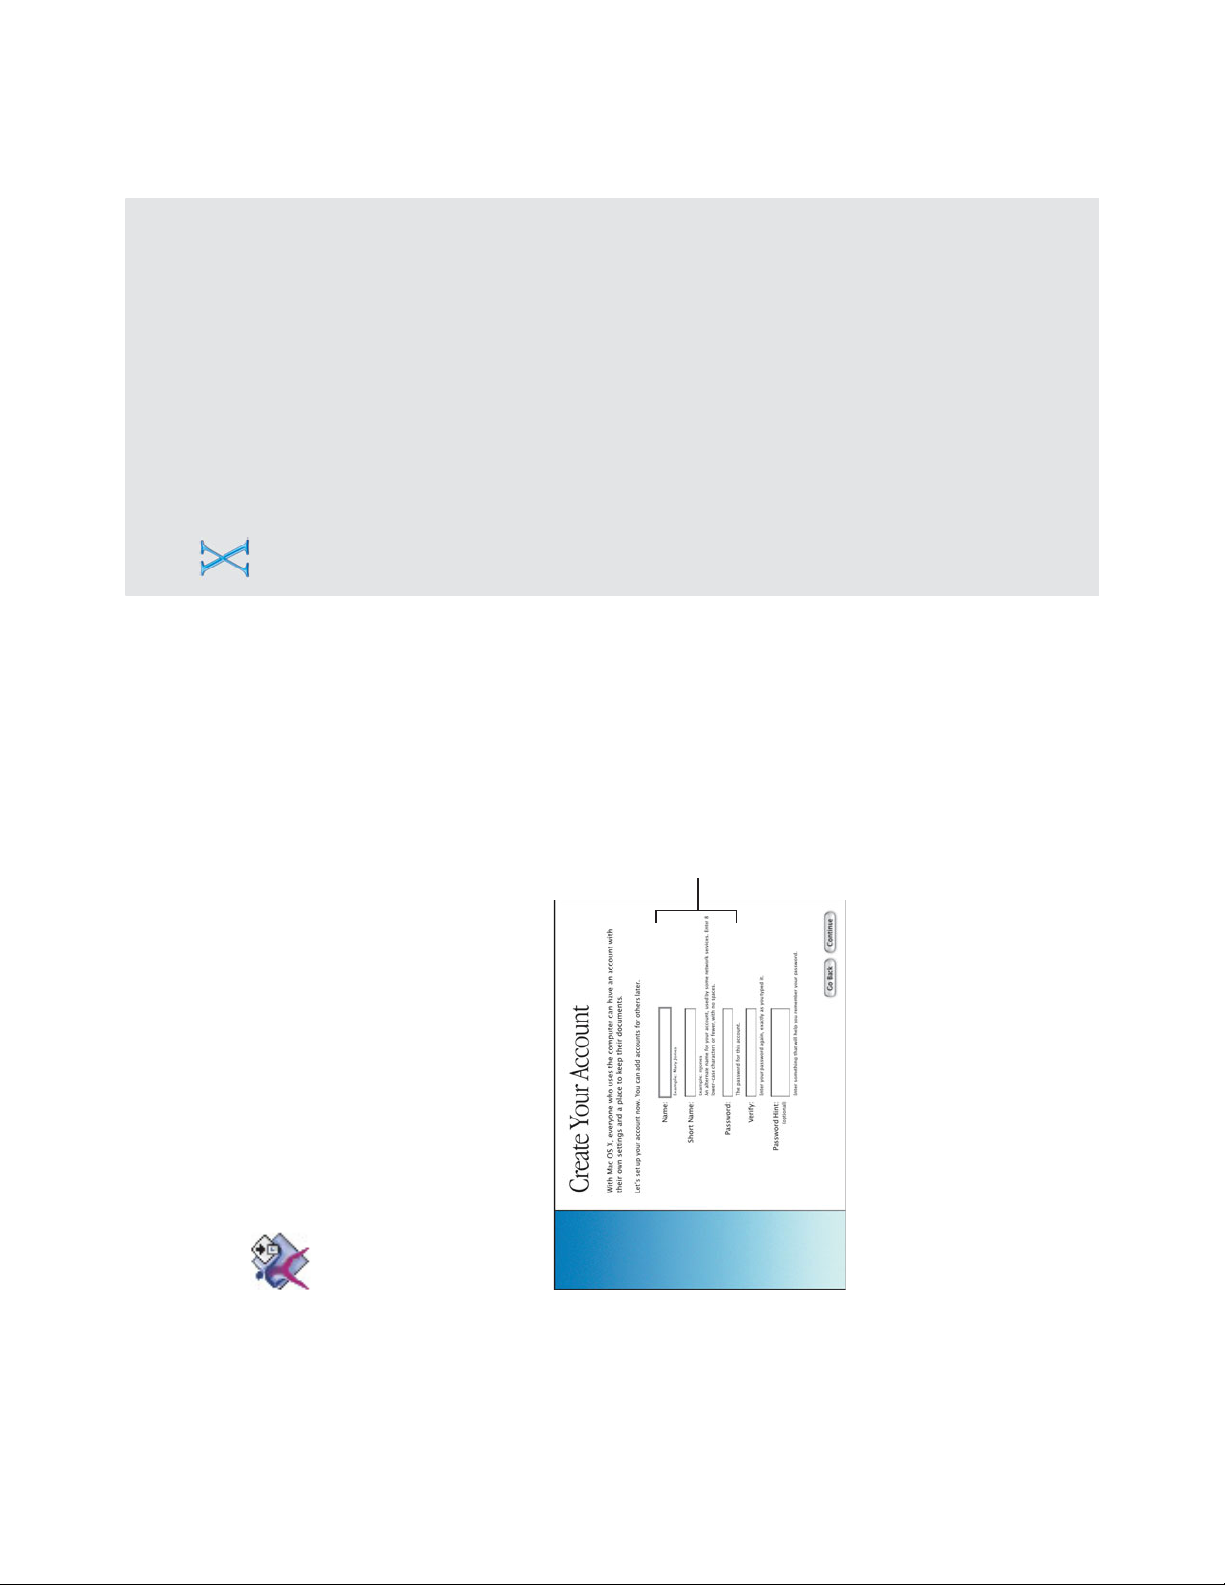
Step 5: Set up and register Mac OS X
When you set up Mac OS X, you create a user account. This user is an administrator. As an
administrator, you can add user accounts, set up Mac OS X for multiple users, change certain
system settings, and have greater access to the computer.
If you set up Mac OS X for several users, you need to type a user name and password to gain
access to Mac OS X. To administer your computer you need to log in as the user you created when
you set up Mac OS X, so you should remember this user name and password.
3
Installation tips
Why you need Mac OS 9.1 installed
Mac OS X provides Classic so that you can use
your Classic Mac OS applications. When you open
a Classic Mac OS application, Classic starts using
an available Mac OS 9.1 system.
Read before you install
Be sure to open the READ BEFORE YOU INSTALL
document on the Mac OS X CD. If you are using
Mac OS 9, you can open this document using
Acrobat
™
Reader, available on the CD. If you are
using Mac OS X, you can open the document
using Preview.
If you have trouble
If you have trouble installing Mac OS X, setting it
up, or logging in, see “Troubleshooting” at the end
of this book. You will also find information about
installing Mac OS X if you already use Mac OS X.
Starting up with Mac OS 9 again
See “Troubleshooting” to learn how to start up with
Mac OS 9 after you start up in Mac OS X.
Installing developer software
The Developer Tools CD contains software and
documentation for developing applications on
Mac OS X. For information about installing and
using this software, see the document “About
Developer Tools” on the CD. Only install this
software if you are a programmer or intend to
develop applications.
Getting more information
For more information about Mac OS X, visit the
Mac OS X Web site:
www.apple.com/macosx
You need to type this
name and password
exactly the same way
if you set up Mac OS X
for multiple users.
Page 5
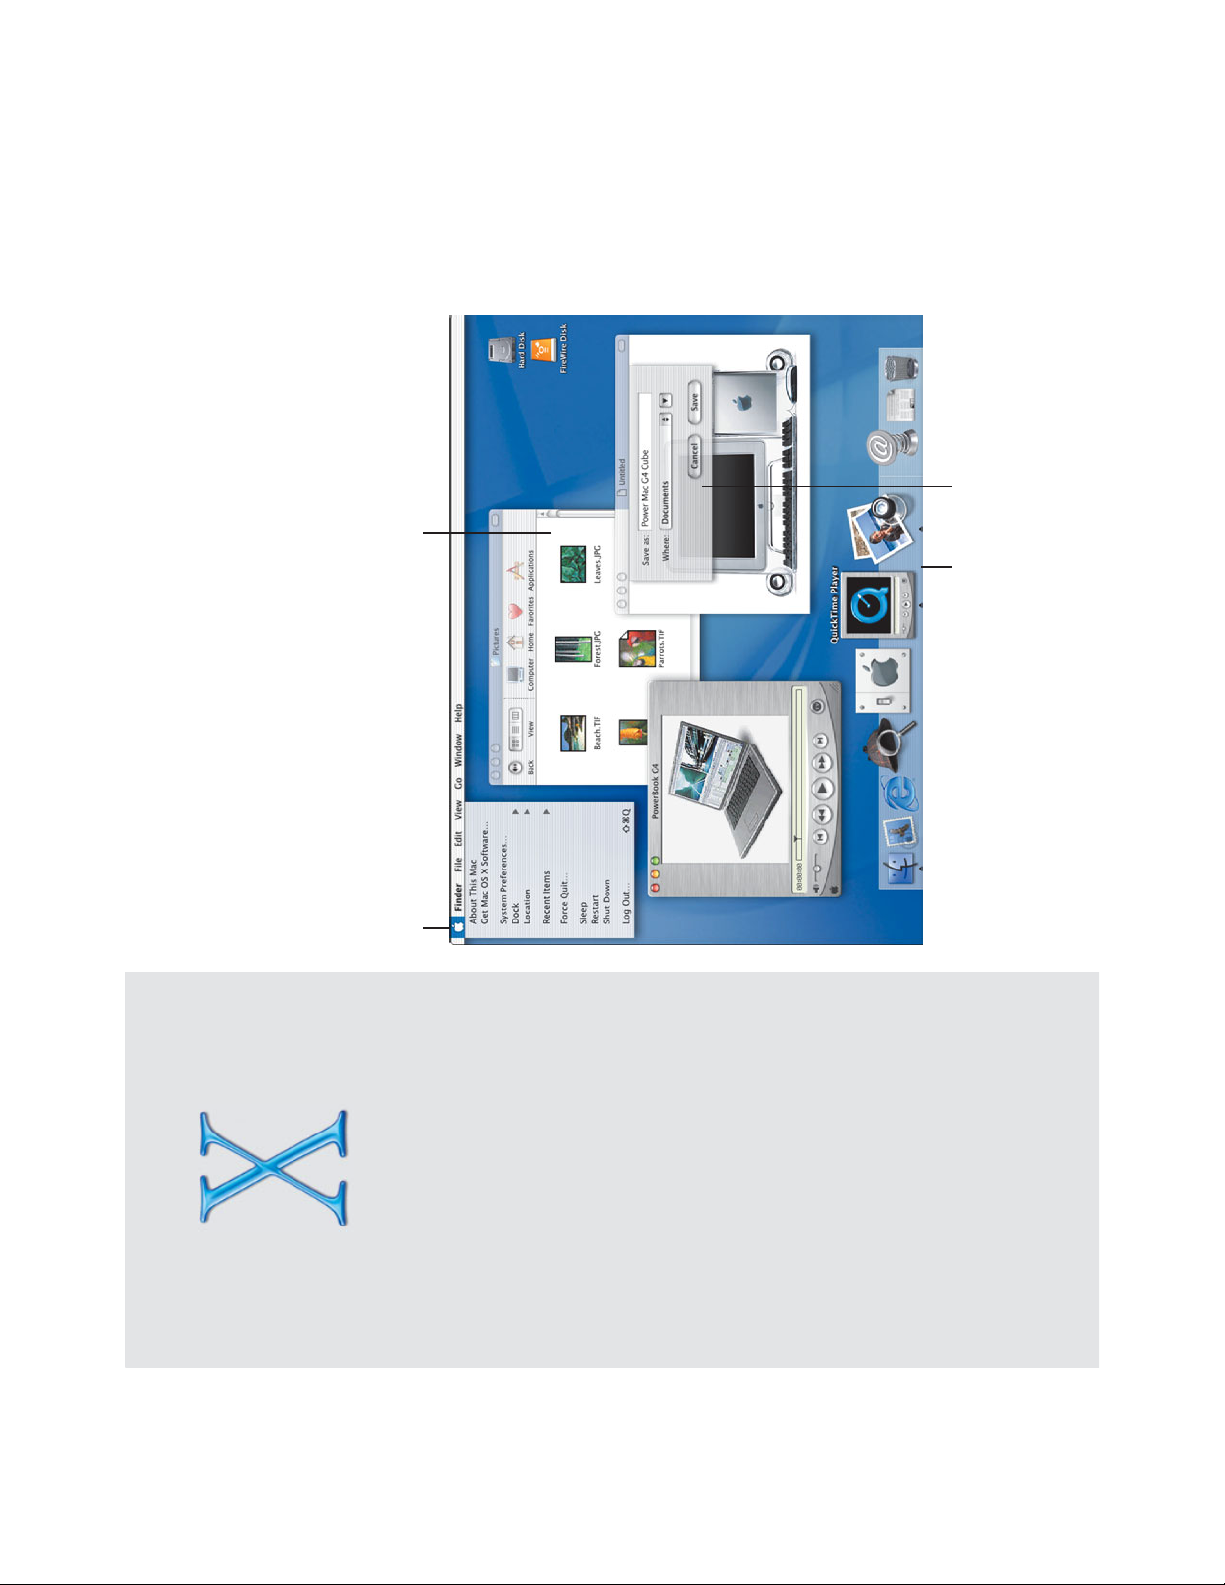
Aqua makes using your Mac easier than ever. Its color, depth, and
motion guide you through your tasks, while the Finder and Dock provide
easy access to your computer and network.
4
Aqua
Use the Apple menu to change settings,
get Mac OS X software, open recent items,
and restart or shut down your computer.
The Finder shows document icons in
several ways, including large, detailed
icons that preview document contents.
Sheets for saving and printing
attach to windows making these
tasks even simpler.
The Dock keeps handy your disks, folders, applications,
documents, minimized windows, QuickTime movies, digital
images, links to Web sites, or just about anything else.
Page 6
Finder windows
When you first start Mac OS X, the Finder window shows your “home,” your personal space on
your computer for documents, applications, fonts, and other software.
If you set up several users, each user has a home for a secure place to keep their documents.
Buttons
Colorful, animated buttons make it clear what to do.
Here’s how to use the three window buttons.
5
For the experienced
Mac OS user
What is my “home?”
Your home is a secure place to keep your
documents if your computer is connected to a
network or you set up several users.
Changing computer settings
Choose System Preferences from the Apple menu
to change settings for your computer, instead of
using control panels.
Mac OS X tips
Getting help
Throughout this book, you’ll see questions like the
one below. To get answers to these questions,
choose Mac Help from the Help menu, type the
question, and click Ask. Then click an answer.
Click to minimize the
window, which puts it in
the Dock.
Click to close
the window.
Click to enlarge or reduce
the window.
Click Home to see
your personal space.
Folders in your home help you
organize your documents,
pictures, and movies.
Searching Mac Help
How do I use Help?
Type t he
question
here, then
click Ask.
If a button pulses, you can
press the Enter or Return key
instead of clicking it.
Page 7
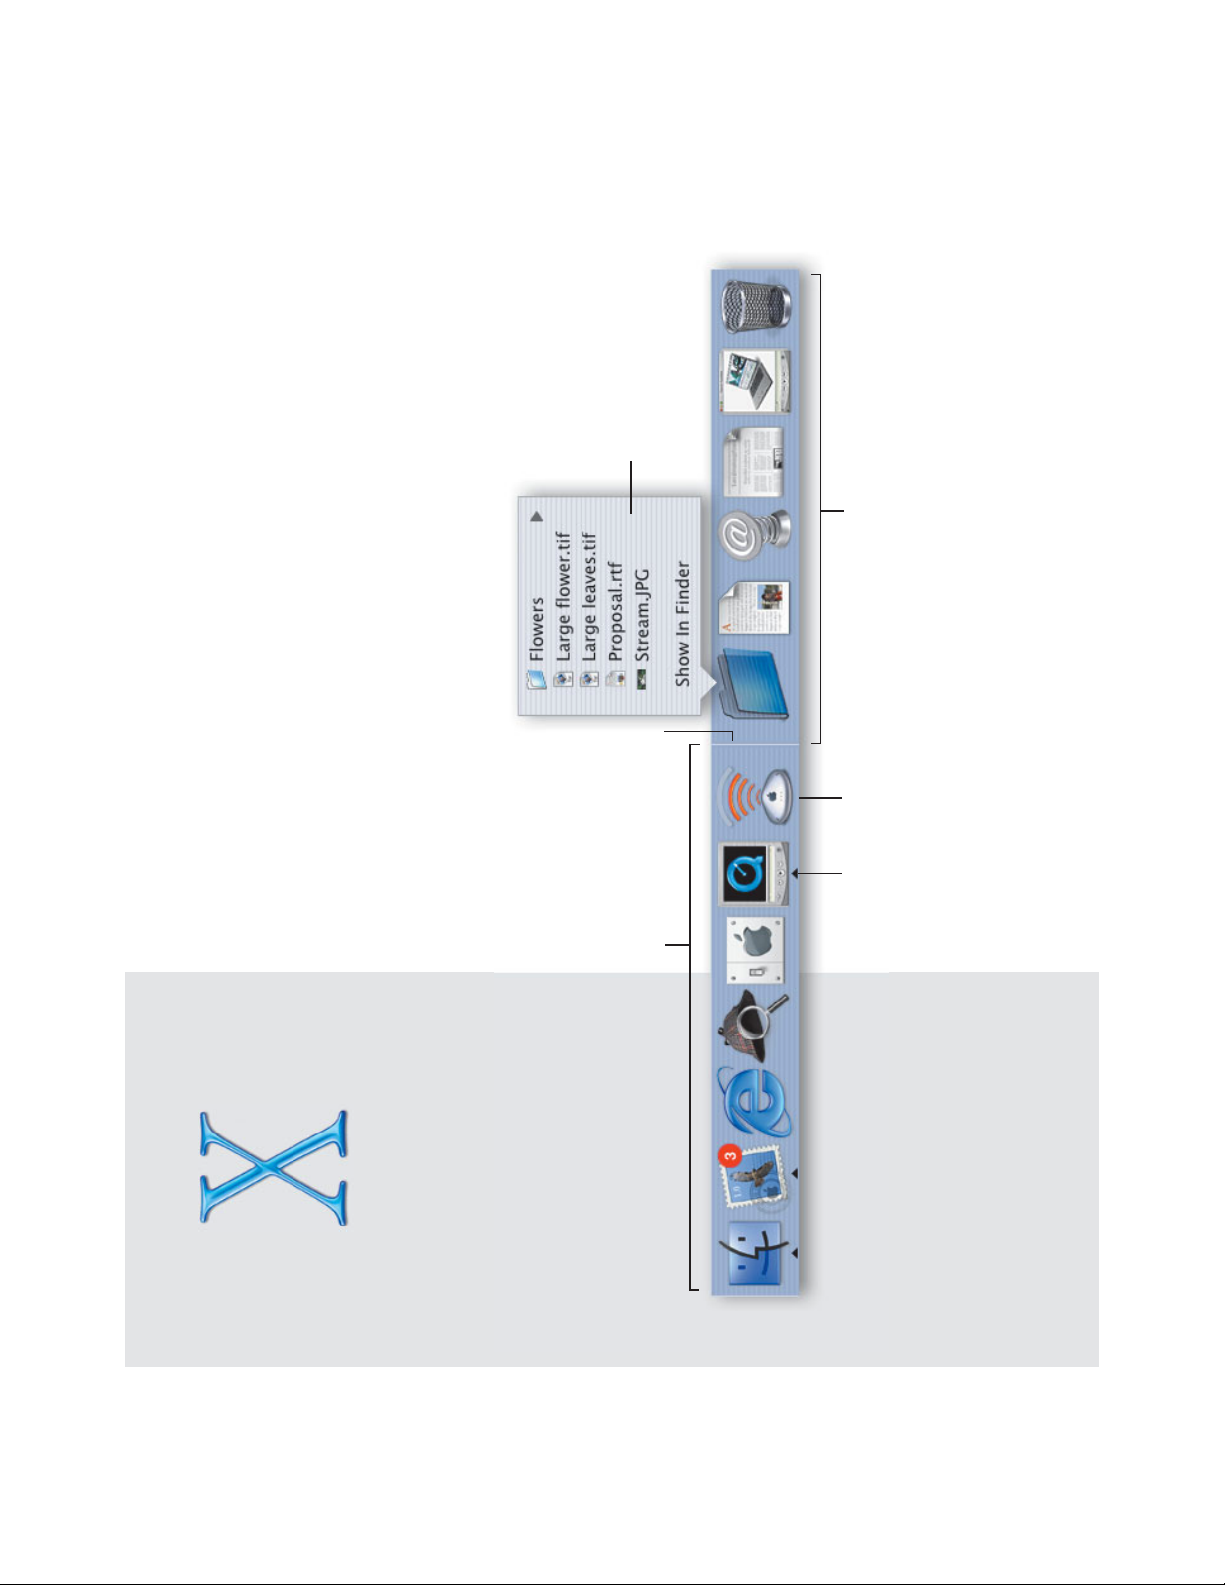
The Dock makes it easy to open applications, documents, and other
items you use frequently. To open an item in the Dock or make it active,
click its icon. To see a pop-up menu, press the icon.
6
The
Dock
Drag this bar
up or down to
resize the Dock.
Press a folder icon
to see its contents
and open items in it.
The triangle
indicates the
application
is open.
This icon
shows the
status of the
Dock Extra.
This side of the Dock
shows everything else.
This side of the
Dock shows
application
icons.
Page 8
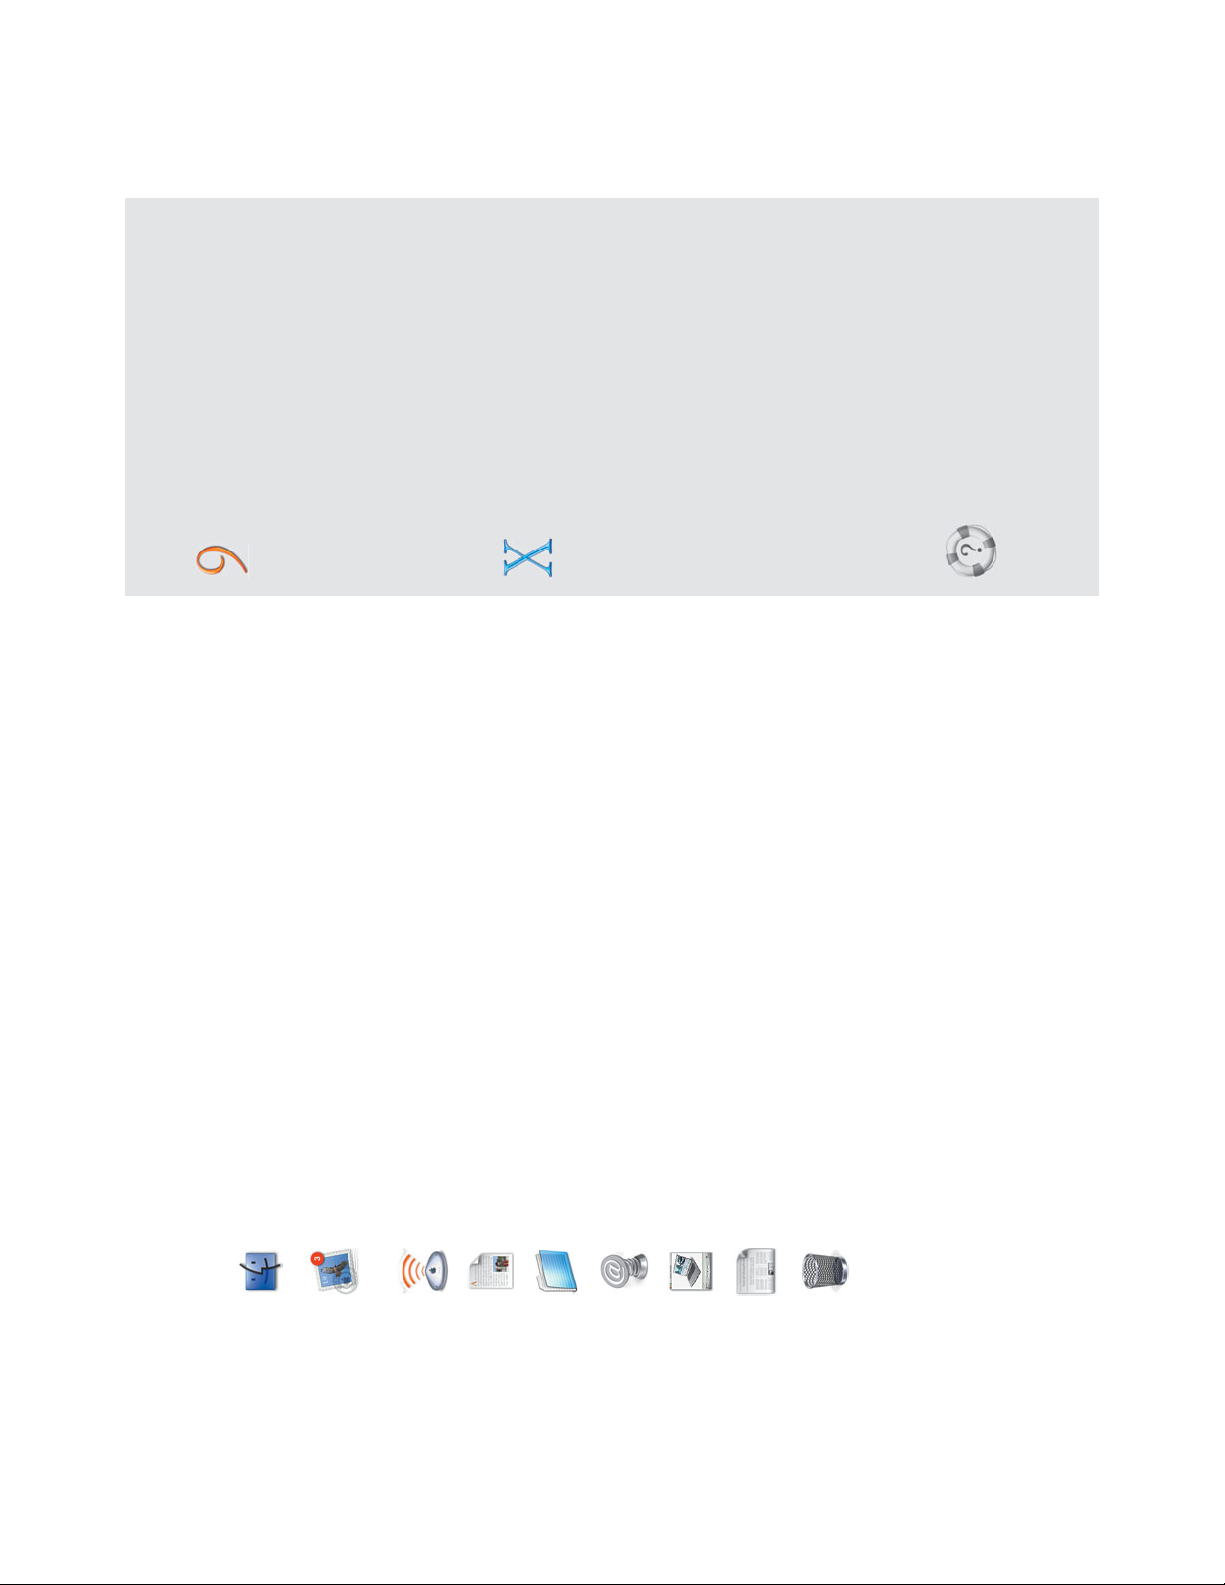
What’s in the Dock
Finder
Click to see a Finder window and menus.
Mail
One of the applications included in the Dock. The number shows how many messages
you have to read.
Dock Extra
Press the icon to change settings.
Document
A document added to the Dock. Click to open it.
Folder
Press the icon to see the contents of the folder and choose items to open them.
Web site
A Web site added to the Dock. Click to open the Web site in your browser.
Minimized window
Yo u can put any window in the Dock. Click to open the window.
Late-Breaking News
Click this icon to get up-to-date information about Mac OS X.
Trash
Drag files here to throw them away.
7
For the experienced
Mac OS user
What’s the Dock for?
Instead of using the Apple menu, keep items
you use regularly in the Dock. Click items in the
Dock to make them active, rather than the
application switcher.
Opening a document
Drag the document’s icon to the application’s
icon in the Dock.
Ejecting disks
To eject a disk, drag its icon to the Trash.
Mac OS X tips
Adding icons to the Dock
To add an item to the Dock, drag its icon to the
Dock. To remove an item, drag its icon from the
Dock. (This does not change the item.)
Adding disk icons to the Dock
Add disk icons to the Dock, then press the icon to
see the contents. Choose items from the pop-up
menu to open them.
Changing how the Dock works
To change the way the Dock looks and works,
choose Dock from the Apple menu, then choose
Dock Preferences.
Switching between applications
Press the Apple key, then press the Tab key until
you select the application you want to use. Release
both keys to make the application active.
Searching Mac Help
How do I use the Dock?
Page 9
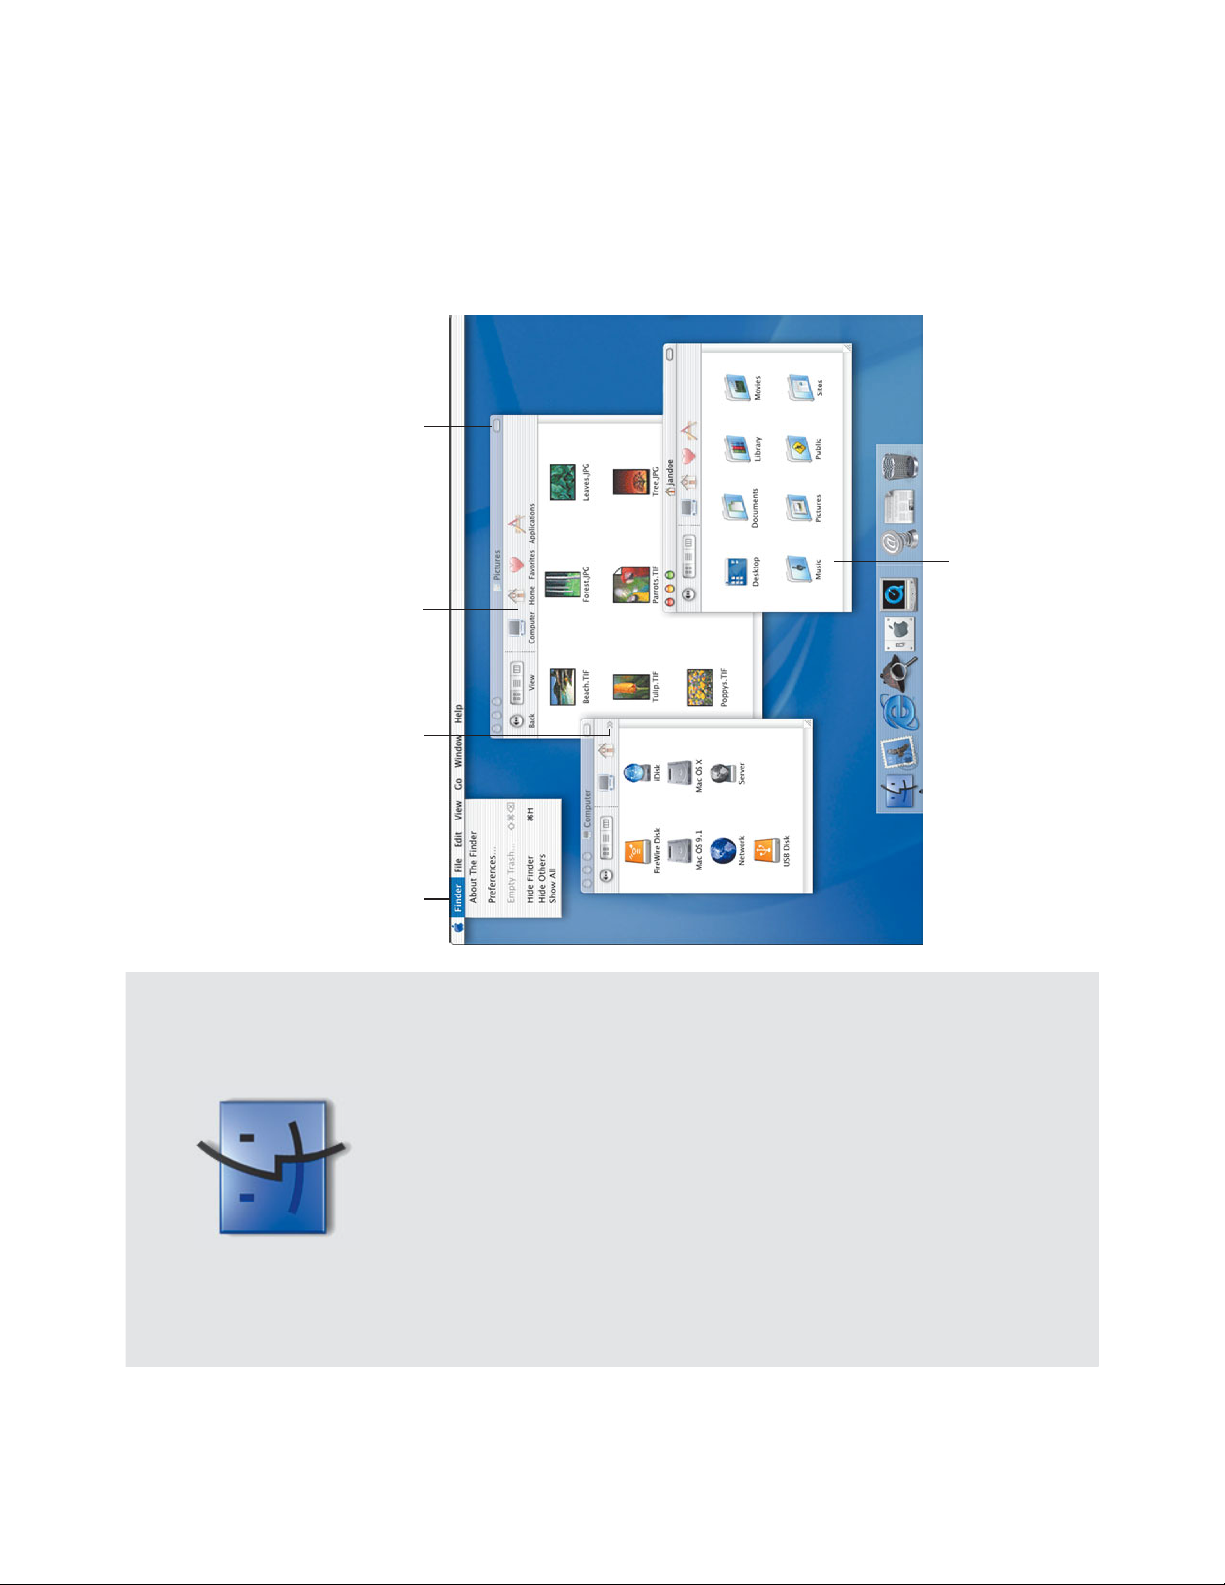
The Finder is the gateway to your computer and network. Use the
Finder to access disks, connect to servers, and open your documents.
8
The
Finder
Your home contains your documents.
Turn on file sharing to let others
access your Public folder.
Press here to
choose toolbar
items that are
hidden.
Click toolbar
buttons to open
your home and
other places.
Click here to show
or hide the toolbar.
Use the Finder
application
menu to set
preferences.
Page 10
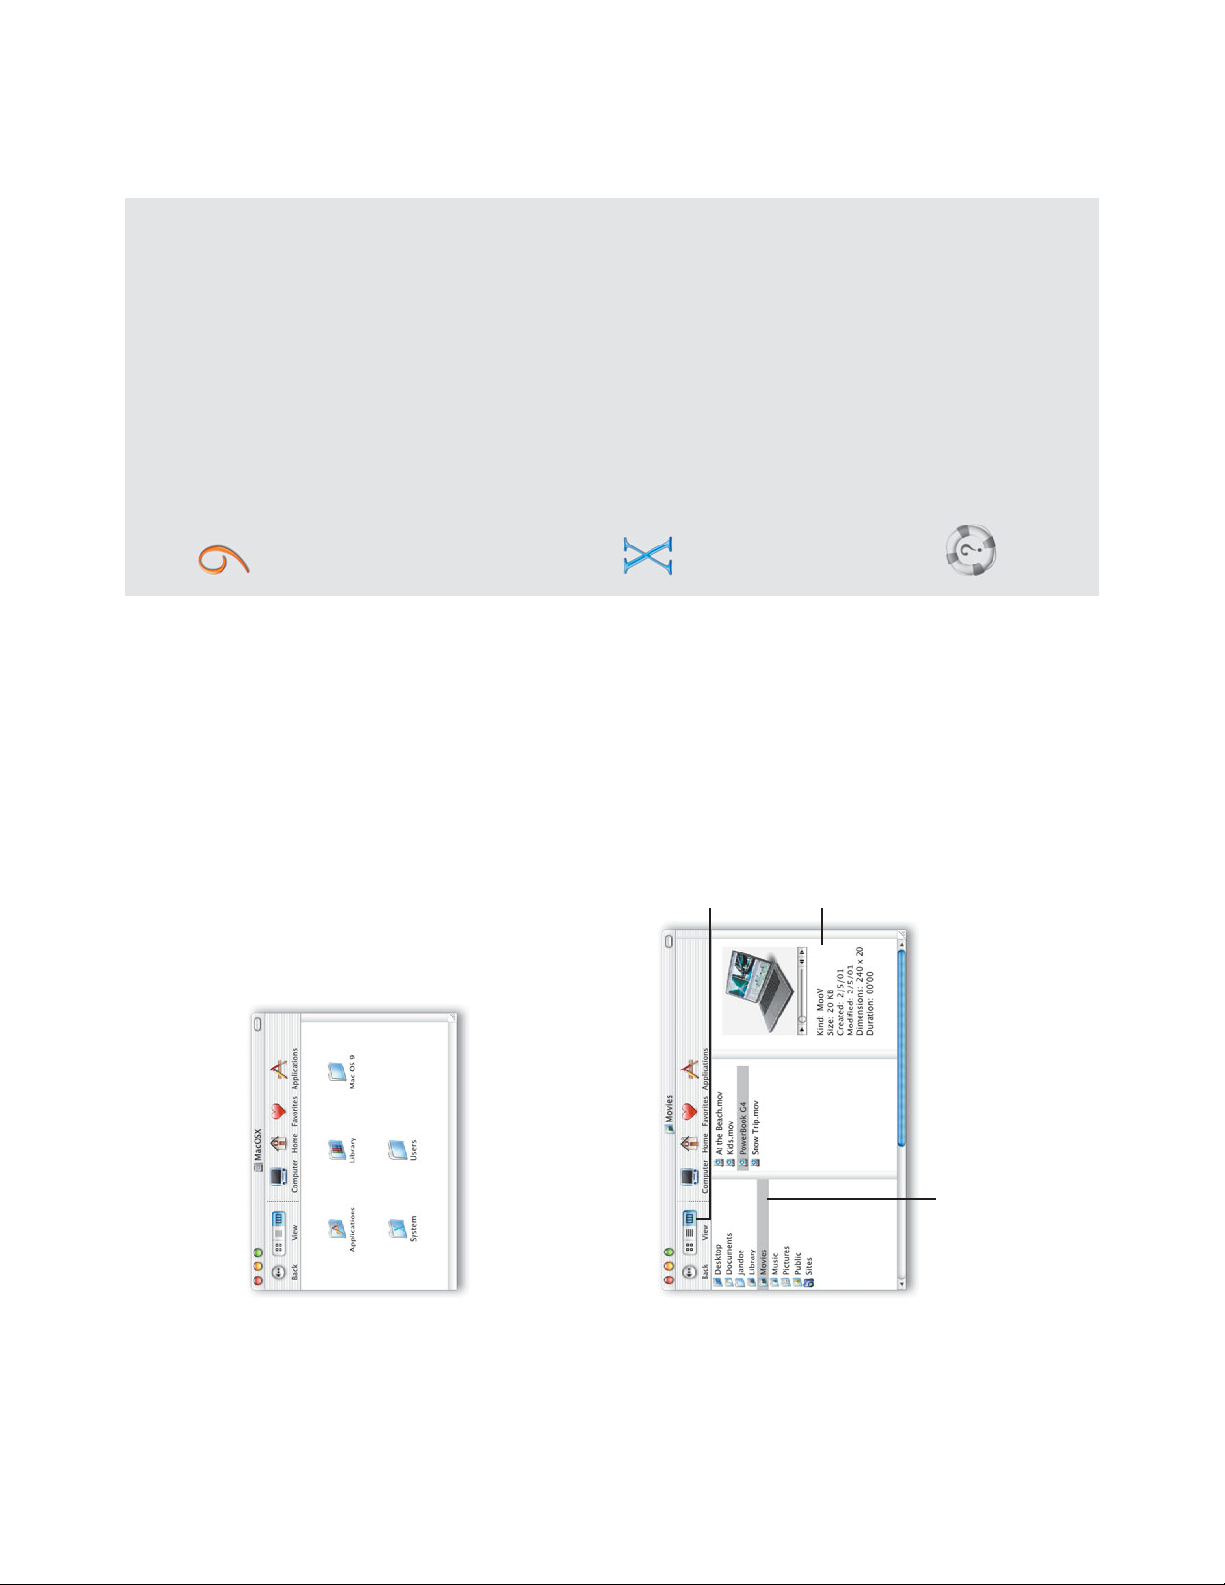
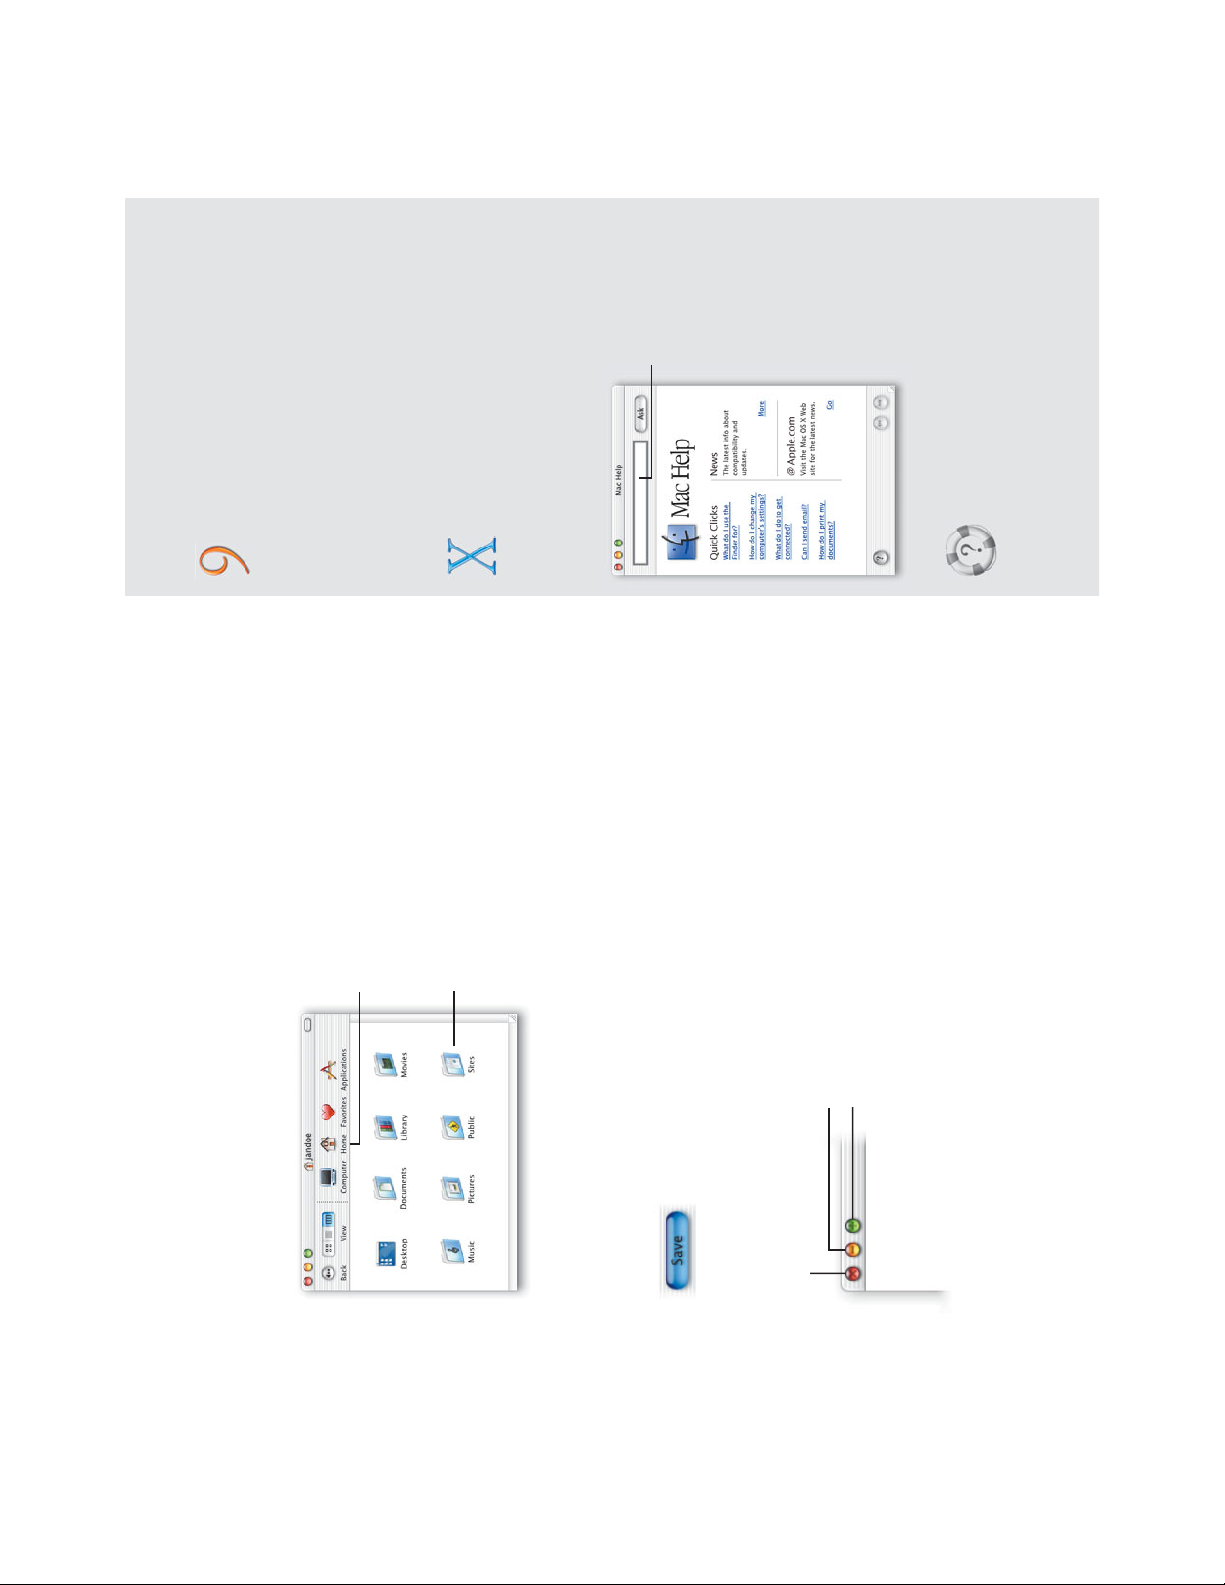
How your Mac OS X disk is organized
If you set up Mac OS X for several users, you need to log in as an administrator, such as the one
you created when you set up Mac OS X, to add items to the Applications and Library folders.
Finder views
View Finder windows in icon, list, or column view. Column view lets you quickly see where items
are located.
9
The Applications folder contains the Mac OS X
applications available to all users of your computer.
The Utilities folder in it contains utility applications.
Library contains fonts, plug-ins, Internet search sites,
and other items available to all users of your computer.
Users contains your home.
System contains the Mac OS X software. You cannot
change it.
You’ll see Applications (Mac OS 9) and System Folder if
you install Mac OS X on the same disk with Mac OS 9.
Click here to change the view.
This area shows information
about the item. If it’s a picture,
you see a preview. If it’s a
movie, you can play it.
For the experienced
Mac OS user
Using Library folders
Put fonts, Internet plug-ins, and other items in the
Library folder. Items in the main Library folder are
available to all users. Keep items for your personal
use in the Library folder in your home. The Library
also stores your preferences.
Opening recent items
To open recent applications and documents, use
the Recent Items command in the Apple menu. To
open recent folders, use the Go menu. You can
also open recent items using the pop-up menu in
the Open, Save, and Connect To Server dialogs.
Opening folders
If the toolbar is showing and you double-click a
folder, the folder opens in the same window. If you
press the Apple key or the toolbar is hidden, a
separate window opens.
Mac OS X tips
Opening another Finder window
To open another Finder window, choose New
Finder Window from the File menu.
Finding anything on your computer
To find anything on your computer, choose Find
from the File menu to open Sherlock.
Using favorites
To add an item to your Favorites, select it and
choose Add To Favorites from the File menu.
Searching Mac Help
How is my hard disk organized?
Click a folder to
see its contents.
Page 11

Mac OS X gives you many ways to customize the way it looks
and works so that it’s best for you. Here are some ways you can
customize the Finder.
10
Customization
To select a picture for the
desktop, choose Preferences
from the Finder menu and
click Select Picture.
Change the toolbar
to make it look the
way you want it.
To use a picture or color for
a folder background, choose
Show View Options from the
View menu in the Finder.
Page 12

Changing the Finder window toolbar
To set up the toolbar the way you want it, choose Customize Toolbar from the View menu.
Here are some other things you can do to customize the toolbar:
m To add a disk, server, or folder to the toolbar, drag its icon from a Finder window or desktop to
the toolbar.
m Drag items in the toolbar to arrange them.
m To remove an icon, press the Apple key and drag it from the toolbar.
11
These buttons open folders
in your home.
Drag this to the toolbar to use
the default toolbar again.
Click this when you’re finished.
Choose how to display
the toolbar here.
For the experienced
Mac OS user
What’s the Finder toolbar for?
Put folders, servers, and disks that you want to
open frequently in the Finder toolbar.
Changing appearance settings
To change the colors used by Mac OS X and the
highlight color, open the General preferences pane.
Changing the size of icons
To change the size of icons in icon view, open the
View Options window and drag the slider.
Mac OS X tips
Changing global view options
By default, Finder windows use global view
options. To change these, choose Show View
Options and click Global.
Changing view options for a window
If you want to set view options for a window that
are different from the global view options, choose
Show View Options, click WIndow, and uncheck
Use Global View Preferences.
Seeing the path to a folder
Add the Path pop-up menu to the toolbar to see
the folders that contain the current folder. You can
also press the Apple key and click the name of the
folder in the window title bar.
Seeing a folder’s status
To see the number of items in a folder and your
privileges to change the folder, choose Show
Status Bar from the View menu.
Searching Mac Help
How do I use Finder windows?
Page 13

Here are some of the specially designed applications included with
Mac OS X that you will use most frequently.
Finder
Open your applications and documents, connect to servers, and access disks and
servers.
Microsoft Internet Explorer 5.1 Preview
Use Microsoft Internet Explorer to browse the Web.
Mail
Send and receive email messages that include pictures and movies. Set up to get
your Mac.com mail automatically.
Sherlock
Find what you’re looking for on your disks, your network, or the Internet.
System Preferences
Change computer settings such as Internet preferences.
QuickTime Player
Play movies, view pictures, listen to music, watch QuickTime TV.
12
Applications
Page 14

More applications
Here are some other applications you’ll find in the Applications and Utilities folders.
Internet Connect
Use Internet Connect to connect to the Internet using a modem or AirPort.
Address Book
Keep all your email addresses and other information about people in one place.
Preview
Open PDF and graphics files, preview documents before you print them, and save
them in PDF format.
TextEdit
Create documents with formatted text and pictures.
Disk Utility
Erase disks, test and repair disks, and partition disks.
Built for Mac OS X
Look for this symbol to purchase software specially designed for Mac OS X.
13
For the experienced
Mac OS user
Using the Applications folder
Applications in the Applications folder are available
to all users of your computer. Keep applications for
your personal use in your home.
Installing applications
If you set up several users, you must log in as
an administrator user to install software in the
Applications or Library folder. The user you created
when you set up Mac OS X is an administrator.
The application menus
Each application has an application menu next to
the Apple menu that contains commands such as
Preferences and Quit.
Mac OS X tips
Updating your software
To update your software, open System Preferences
and click Software Update.
Checking the iDisk Applications folder
Check the Applications folder on your iDisk for new
Apple applications, updates to current applications,
and demonstrations of applications from other
developers.
Forcing an application to quit
If you can’t quit an application, choose Force Quit
from the Apple menu. You can also press the
Option key, click the application’s icon in the Dock,
then choose Force Quit from the pop-up menu.
Searching Mac Help
How do I use my applications?
Page 15

Mac OS X includes Classic so you can continue to use your Classic
Mac OS 9 applications. To use a Classic application, just double-click it.
Classic starts automatically.
14
Classic
Windows and dialogs
have the Classic Mac OS
appearance.
Commands, such as Quit
and Preferences, remain in
the Classic menus.
When it starts, which takes some time,
a Classic icon appears in the Dock, then
disappears when it’s ready.
Page 16

Starting Classic applications
When Classic starts it uses an available Mac OS 9.1 system. If you have Mac OS 9.1 installed on
more than one disk, use Classic preferences to choose the one Classic uses. You can also start
Classic or have it start automatically when Mac OS X starts.
Finding your Classic software and documents
If you install Mac OS X on the same disk or disk partition as your Mac OS 9 system, your Classic
applications and documents are in the same folders where they were located before you installed
Mac OS X.
15
For the experienced
Mac OS user
Classic requires Mac OS 9.1
To use Classic, you must have Mac OS 9.1
installed on your computer. Use the Mac OS 9.1
CD provided with Mac OS X to upgrade.
Setting memory for a Classic application
To set the memory used by a Classic application,
choose Show Info from the File menu, then choose
Memory from the Show pop-up menu.
Printing from Classic applications
To print from a Classic application, you select
printers to use the same way you do in Mac OS 9,
for example by using the Chooser.
Mac OS X tips
Forcing Classic applications to quit
If you can’t quit a Classic application, choose
Force Quit from the Apple menu. Select the
application and click Force Quit.
Restarting Classic
If you need to restart Classic, click Restart in the
Classic preferences pane. You will be able to save
changes to documents before Classic restarts.
Forcing Classic to quit
In some cases you may need to force Classic to
quit. Open the Classic preferences pane and click
Force Quit. This also quits Classic applications
without saving changes to your documents.
Searching Mac Help
How do I use Classic
applications?
Select this checkbox to start Classic
automatically when Mac OS X starts.
Click here to start Classic
immediately.
Page 17

Mac OS X lets several people use the computer so that their documents
and software are secure. You can easily set up your computer for
several people by adding user accounts and requiring users to log in.
16
Users
Use the Users pane in
System Preferences to
add user accounts.
Finder, Dock, iTools, Mail and other
preferences are kept for each user in the
user’s home, so users can customize
Mac OS X the way they want it.
Each user has access
to the Shared folder.
Each user has
a home with the
name of the user.
To give access to the Public
folder, a user can turn on file
sharing in Sharing preferences.
Page 18

Requiring users to log in
To require users to enter their user name and password to log in, you must turn off automatic
login. You can do so when you create a new user or use the Login Window preferences.
If you turn off automatic login, you see the login window when you start your computer.
Setting up iTools accounts for new users
When you create a new user, go to the iTools Web site to create an iTools account for the user. Give
the user the iTools member name and password to enter in the Internet preferences pane. This
will set up Mail to get the user’s Mac.com email automatically.
17
Click to uncheck
this option to require
users to log in.
Type a user name
and password here,
then click Log In.
Searching Mac Help
How do I work as an
administrator?
For the experienced
Mac OS user
Multiple users
As with Multiple Users in Mac OS 9, you can
require Mac OS X users to log in; users who are
not administrators will have restricted access to
the computer.
Mac OS X tips
Administrator users
The user you created when you set up Mac OS X
is an administrator. You can create other
administrators. An administrator can create other
users, change settings, and install software in the
Applications and Library folders.
Keeping your computer secure
When you log in as an administrator you have
greater access to the computer, so you may not
want to leave your computer unattended.
To secure your computer, set Screen Saver
preferences to require a password. For the
most security, log in as a user who is not an
administrator.
Logging in from a Mac OS X network
If you use a Mac OS X network, your home is on a
server. Log in from any computer on the network
to see your home and use your settings. If you
have questions, see your system administrator.
Page 19

Use the System Preferences application to change your computer
settings. Choose System Preferences from the Apple menu,
then click a button.
18
Changing
Settings
Click here
to see all the
preferences.
Drag buttons for preferences
you use frequently to the
toolbar, then click them to
change the settings.
Page 20

Important settings panes
Internet
Enter settings for your iTools account, email and Web browser. You can also sign up for
your iTools account here.
Network
Enter settings to connect to your network. Set up multiple network connections and
create “locations” — collections of network settings.
Sharing
Tu rn on file sharing so that other people on the network can access your Public folder.
Tu rn on Web sharing to publish your personal Web site.
Software Update
Get updates to your Mac OS X applications and software.
Startup Disk
Select a startup disk for your computer. You can start up using Mac OS 9 or Mac OS X.
Screen Saver
Select the screen saver you want to use and if you want to require a password to wake
the screen saver.
19
For the experienced
Mac OS user
Where are the control panels?
Use System Preferences to change computer
settings instead of the control panels in Mac OS 9.
Changing the alert sound
Use the Sound preferences pane to select a
different alert sound and set the volume.
Setting QuickTime preferences
Use QuickTime preferences to register for
QuickTime Pro and select your QuickTime
connection speed.
Mac OS X tips
Adding items to the toolbar
To add an item to the System Preferences toolbar,
click Show All and drag the icon to the toolbar. To
remove an item, drag it from the toolbar.
Using a different language
To work in a different language, open International
preferences and drag the language you want to
use to the top of the list. If you use a special
keyboard for your language, click the Keyboard
Menu tab and select it from the list. Log in again to
see menus and dialogs in the language you chose.
Choose your keyboard from the Keyboard menu
(the one with the flag).
Gaining access to settings
If the settings in a pane are dimmed and the lock
icon is locked, click the lock and enter a name and
password for an administrator to change the
settings.
Searching Mac Help
How do I change computer
settings?
Page 21

Mac OS X provides integrated Internet and network access, which you
set up when you set up Mac OS X. You can set up other network
connections, turn on Web and file sharing, and access network servers.
20
Getting
Connected
Use Internet Connect to
connect to the Internet
using AirPort or a modem.
Use Network preferences to
set up each of the network
connections you use.
Choose New Location here to
name a collection of network settings.
To choose the settings, choose
Location from the Apple menu.
This indicates that
you are connected.
Page 22

Accessing network servers
When you choose Connect To Server from the Go menu (in the Finder), this dialog appears.
Mac OS X lets you connect to many types of servers:
m Mac OS X shared Public folders
m Yo ur iDisk (type “iDisk.mac.com”)
m Web-based file sharing servers ( WebDAV)
m Mac OS X Servers
m Any file server that supports AFP over TCP/IP
m Mac OS 9 Web Sharing sites
m Mac OS 9 file sharing folders over TCP/IP
After you connect to a server, an icon for the server appears on the desktop and a Finder window
opens. You can also see servers when you click the Computer button in a Finder window toolbar.
21
For the experienced
Mac OS user
Connecting to servers
To connect to servers in Mac OS X, you use
Connect To Server rather than the Chooser or
Network Browser.
Creating and using locations
You can create collections of network settings for
different places you use your computer. To create
a location, open Network preferences and choose
New Location from the Location pop-up menu.
To use a location, choose Location from the
Apple menu.
Turning on Web and file sharing
To turn on Web sharing and file sharing, open
System Preferences and click Sharing.
Mac OS X tips
Using multiple network connections
Mac OS X lets you use several network
connections simultaneously.
Disconnecting servers
To disconnect from a server, select it in the Finder
and choose Eject from the File menu.
Searching Mac Help
How do I connect to
the Internet?
Choose a recent server from
this pop-up menu.
Click a network neighborhood,
then click a server. Items that
appear here are set up by your
system administrator.
Type the name of a server here.
Page 23

From setup to email to publishing on the Web, Mac OS X makes it easy
to communicate with your friends, family, and colleagues using iTools.
22
iDisk
Now your iDisk is just a click away. Store movies, pictures, and documents on
your iDisk, then share them with others.
Mac.com
Provides complete email service that works with your favorite email program.
If you use Mail, it’s set up to use your Mac.com account.
iCards
Create personalized iCards using photos on your iDisk. Send notices to
colleagues or pictures of the kids to the folks.
HomePage
Build a personal Web site in three easy steps. Create a photo album, publish
an iMovie, post your résumé, and share your iDisk Public folder.
iTools
Page 24

Setting up a new iTools account
When you set up Mac OS X, your iTools account is set up automatically. If you set up other users
for your computer, go to the iTools Web site to set up iTools accounts for them, then give each user
a member name and password to enter in the iTools pane of the Internet preferences. New users
can also sign up for their iTools accounts using the iTools preferences pane.
Using iDisk to share your files with others
Other members who know your iTools member name can easily view and copy anything in your
Public folder. However, no one but you can add or change anything in this folder. If you prefer, you
can publish your photos, movies, and documents on the Web so that anyone can access them,
regardless of the computer they are using.
23
Click this button to sign up for
a new iTools account.
For the experienced
Mac OS user
Accessing your iDisk
Your iDisk is permanently available so you don’t
have to go to the iTools Web site to open it. Just
click the iDisk icon in a Finder window toolbar or
choose iDisk when you open or save a document.
Mac.com stores your mail
Mac.com now stores your email on the Apple
server so it’s always available to you and you can
access it from different computers. If you need mail
when you are offline, save it in a local folder.
Mac OS X tips
Using Mail to get your Mac.com mail
The Mail application is set up to check your
Mac.com mail account automatically.
Learning more about iTools
Visit the iTools Web site and click Help to learn
more about using iTools.
Searching Mac Help
How do I use my iDisk?
Page 25

Use Mail to send and receive email. Your email can include pictures,
sounds, and movies as well as text. And, Mail is set up to check your
Mac.com mail automatically.
24
Using
Mail
Click Mailbox to
see this drawer.
Use the Address Book to
store information about
friends and colleagues.
Click here to search an
address directory for
an email address.
To change the toolbar,
choose Customize Toolbar
from the View menu.
Page 26

Sending email
To send email, click the Compose button, type the address, and write your message.
Using the Address Book
Click New in the Address Book toolbar to add information about someone.
25
To change the toolbar, choose
Customize Toolbar from the View menu.
As you type, Mail selects matching
addresses from your address book.
To select one, press the Tab key.
To add a picture, sound, or movie
to your message, drag it from the
Finder to your message.
To see a picture in email you
receive from this person, drag
the picture here.
Mail will enter this email address
when you type the person’s name
in the To or Cc fields of a message.
Searching Mac Help
How do I send and receive
email?
For the experienced
Mac OS user
Using Mail for your email
Mail works with your Internet preferences and the
Address Book application. If your iTools member
name and password are in the iTools preferences
pane, Mail gets your Mac.com mail automatically.
Mac OS X tips
Setting up mail
When you set up Mac OS X, you also set up how
to send and receive your email. To change settings
or add other accounts, choose Preferences from
the Mail menu.
Setting up for a new user
If you create a new user, the first time you log in as
that user and open Mail a dialog appears to set up
Mail. If you put an iTools member name and
password in the iTools preferences pane, Mail
automatically checks for Mac.com mail.
Using several Mac.com accounts
If you have several iTools accounts, you can use
Mail to check Mac.com for each one. Choose
Mac.com from the Account Type pop-up menu
when you create the mail account.
Page 27

Choose Print from the File menu to print a document. If you use a USB
printer, it’s already selected. Use the Print Center to select network
printers you want to use.
26
Printing
Click here to see how the document
will look before you print it.
Use the default printer or
choose a different printer here.
Printers and applications can
add settings to the Print sheet.
Page 28

Selecting printers using Print Center
Mac OS X provides built-in support for some of the most popular USB printers so that they are set
up automatically. Before you print a document to a network printer, use Print Center to add it to
the Printer List.
Creating a PDF
To create a PDF of a document, choose Print, then choose Output Options from the pop-up menu
and select the “Save as PDF File” checkbox, then click Save. You can also click Preview, then save
the document as a PDF from the Preview application.
27
This printer is the default. To change
the default printer, select a printer in
the list and choose Make Default
from the Printers menu.
Choose the type of connection
for the printer here.
Select a printer if a list appears
or enter information to connect
to the printer.
Click here to add a printer.
For the experienced
Mac OS user
Where is the Chooser?
You use Print Center to select and set up printers
(rather than the Chooser). Mac OS X does not have
desktop printers; you can select a printer right in
the Print dialog.
Printing a Finder window
If you want to print a Finder window or the
desktop, first set it up the way you want. Use Grab
to take a screen shot of the window, then print the
screen shot.
Mac OS X tips
Selecting a default printer
When you print a document, your default printer is
selected automatically. To change the default
printer, select a printer in Print Center and choose
Make Default from the Printers menu.
Setting up a document to print
Before you print a document, choose Page Setup
from the File menu to select page options.
Searching Mac Help
How do I print my documents?
Page 29

Installing Mac OS X
You want to install Mac OS X and you are using Mac OS X.
If you already have Mac OS X installed, you cannot start the installation by double-clicking the
Install Mac OS X icon on the CD. Instead, insert the Mac OS X CD and restart your computer while
pressing the C key.
The Installer doesn’t appear.
If you double-click Install Mac OS X and the Installer doesn’t appear, insert the CD and restart your
computer while pressing the C key. If the Installer still doesn’t appear, select the Mac OS X CD as
your startup disk. If you are using Mac OS X, use Startup Disk preferences. If you are using Mac OS
9, copy the Startup Disk control panel on the Mac OS X CD to the System Folder and use it to
select the CD.
You see a message about updating your computer’s firmware.
If you see a message that you need to update your computer’s firmware, do so before you install
Mac OS X. Updaters are available on your Mac OS X CD. You can also check the Apple software
updates Web site (asu.info.apple.com).
The Installer cannot repair your hard disk.
If you see a message that the Installer cannot repair the disk, you may need to reformat it. Restart
using the Mac OS X CD and click “Prepare My Hard Disk for Installation” when the Installer
appears.
28
Troubleshooting
Page 30

The Installer cannot update the hard disk driver.
The Installer cannot update non-Apple hard disks. Use the disk utility recommended by the
manufacturer of your hard disk to update your drivers before installing Mac OS X. Make sure to use
a version of the utility that is compatible with Mac OS X.
Installing Mac OS X was interrupted and now you can’t restart your computer.
If this happens and you have Mac OS 9.1 installed on your computer, try restarting your computer
while pressing the Option key to start up using Mac OS 9.1. If you cannot start up this way, insert
the Mac OS 9.1 CD in your computer and press the C key while restarting your computer. Open
the Startup Disk control panel and select your Mac OS 9.1 disk.
Logging in to Mac OS X
You can’t log in to your computer.
First, make sure you are entering your password with the same capitalization and punctuation that
you used originally. If you still can’t log in, log in as an administrator, open the Multiple Users
application, and change your name or password.
If you cannot log in to your NetInfo account, you can log in to your computer as the local user
“Administrator.” Use your NetInfo account password.
You forgot your password.
If you forget the password for your computer, insert the Mac OS X CD and restart your computer
while pressing the C key. When the Installer appears, choose Reset Password from the Installer
menu and follow the onscreen instructions.
29
Troubleshooting X tips
Getting support
For information about the support available for this
product see the Apple Software Services and
Support Guide included with Mac OS X.
Getting help
To search for solutions to problems you are having
with Mac OS X, open Mac Help, type a question,
and click Ask.
Getting news about Mac OS X
Click the Late-Breaking News icon in the Dock
to get the latest information about Mac OS X,
Mac OS X applications, hardware and Classic
compatibility.
Searching Mac Help
What’s the latest news
about Mac OS X?
Page 31

Using Mac OS X
Network services don’t seem to be working.
If network services aren’t available, make sure your computer is connected to the network and that
your network settings are correct (in System Preferences). See your system administrator to make
sure the service is available or if you have questions about the settings you should be using.
You can’t quit an application.
If you can’t quit an application, choose Force Quit from the Apple menu, select the program in the
list, and click Force Quit. ( You do not need to restart your computer.)
Important When you force an application to quit, any unsaved changes to documents are lost.
You need to start up your computer using Mac OS 9.
To s tart up using Mac OS 9, open System Preferences and click Startup Disk. Select your
Mac OS 9 disk and restart your computer.
You want to start up in Mac OS X after starting up in Mac OS 9.
If you start up your computer with Mac OS 9.1, then want to start up with Mac OS X, use the
Startup Disk control panel to select your Mac OS X disk. If you are using Mac OS 9, use the Startup
Disk control panel provided on the Mac OS X CD. To use the control panel, drag it to the System
Folder on your Mac OS 9.1 disk.
30
Page 32

© 2001 Apple Computer, Inc. All rights reserved.
Apple, the Apple logo, AppleShare, AppleTalk, Mac, Macintosh, the Mac OS logo, QuickTime, the QuickTime logo, and Sherlock are trademarks of
Apple Computer, Inc., registered in the U.S. and other countries. AirPort, Aqua, Disk First Aid, Finder, and iMovie are trademarks of Apple Computer, Inc.
Acrobat is a trademark of Adobe Systems Incorporated. Digital imagery
®
copyright 2001 PhotoDisc, Inc. Acknowledgements: Portions of Mac OS X utilize
third-party copyrighted material. Acknowledgements, licensing terms, and disclaimers for such material are contained in the electronic documentation.
034-1068-A Printed in U.S.A.
www.apple.com
 Loading...