

Page 1

Final Cut Server
Setup and
Administration Guide
Page 2

K
Apple Inc.
Copyright © 2008 Apple Inc. All rights reserved.
Your rights to the software are governed by the
accompanying software license agreement. The owner
or authorized user of a valid copy of Final Cut Server
software may reproduce this publication for the purpose
of learning to use such software. No part of this
publication may be reproduced or transmitted for
commercial purposes, such as selling copies of this
publication or for providing paid for support services.
The Apple logo is a trademark of Apple Inc., registered
in the U.S. and other countries. Use of the “keyboard”
Apple logo (Shift-Option-K) for commercial purposes
without the prior written consent of Apple may
constitute trademark infringement and unfair
competition in violation of federal and state laws.
Every effort has been made to ensure that the
information in this manual is accurate. Apple is not
responsible for printing or clerical errors.
Note:
Because Apple frequently releases new versions
and updates to its system software, applications, and
Internet sites, images shown in this book may be slightly
different from what you see on your screen.
Apple Inc.
1 Infinite Loop
Cupertino, CA 95014–2084
408-996-1010
www.apple.com
Apple, the Apple logo, Final Cut, Final Cut Pro,
Final Cut Studio, FireWire, Mac, Macintosh, Mac OS,
QuickTime, Tiger, Xsan, and Xserve are trademarks of
Apple Inc., registered in the U.S. and other countries.
Finder, Leopard, and Spotlight are trademarks of Apple Inc.
AppleCare is a service mark of Apple Inc., registered in
the U.S. and other countries.
Intel, Intel Core, and Xeon are trademarks of Intel Corp.
in the U.S. and other countries.
PowerPC is a trademark of International Business
Machines Corporation, used under license therefrom.
Java and all Java-based trademarks and logos are
trademarks or registered trademarks of Sun
Microsystems, Inc. in the U.S. and other countries.
UNIX is a registered trademark of The Open Group.
Other company and product names mentioned herein
are trademarks of their respective companies. Mention
of third-party products is for informational purposes
only and constitutes neither an endorsement nor a
recommendation. Apple assumes no responsibility with
regard to the performance or use of these products.
Ducati and the Ducati logo are registered trademarks of
Ducati Motor Holding S.p.A. Used by permission.
Production stills from the film “Koffee House Mayhem”
provided courtesy of Jean-Paul Bonjour. “Koffee House
Mayhem” © 2004 Jean-Paul Bonjour. All rights reserved.
http://www.jbonjour.com
Production stills from the film “Les Poupets”
provided courtesy of Jean-Paul Bonjour. “Les Poupets”
© 2006 Jean-Paul Bonjour. All rights reserved.
http://www.jbonjour.com
Page 3

1
Contents
Preface 7 Welcome to Final Cut Server Administration
7
Welcome to Final Cut Server
8
Resources for Learning About Final Cut Server
10
Contacting AppleCare Support
Part I Installation and Configuration
Chapter 1 13 Overview of Final Cut Server
13
About Servers and Clients
15
Building a Final Cut Server System
16
Storage Device Strategy
17
Basic Final Cut Server Administration Tasks
Chapter 2 19 Using the Installer
19
About Installing and Setting Up Final Cut Server
21
Using the Final Cut Server Installer
29
About the Customer Profiles
32
About Final Cut Server and Compressor
35
Updating Your License
37
Registering Final Cut Server
Chapter 3 39 Configuring System Preferences
39
Introduction to Final Cut Server System Preferences
40
General Pane Settings
42
Group Permissions Pane Settings
43
Devices Pane Settings
44
Automations Pane Settings
45
Backup Pane Settings
3
Page 4

Chapter 4 47 Adding Users and Groups
47
About Users and Groups
49
Using the Accounts Pane of System Preferences
53
Using Mac OS X Server Workgroup Manager
56
Adding Groups to Final Cut Server
57
About the Permission Sets
Chapter 5 59 Using Device Setup Assistant
59
Introduction to Devices
60
About Creating Devices
61
About the Default Devices
62
Adding a Device
68
Device Type Configurations
73
Editing an Existing Device
74
Deleting an Existing Device
Chapter 6 77 Using Automation Setup Assistant
77
About Creating Automations
78
About the Default Automations
79
Creating Automations
88
Editing an Existing Automation
89
Deleting an Existing Automation
Chapter 7 91 Backing Up Final Cut Server
91
Introduction to Backing Up Your System
92
Backup Strategies
94
Backing Up Your Final Cut Server Catalog
95
About the Backup Files
96
Restoring Your Final Cut Server Catalog
Chapter 8 99 Installing Final Cut Server Clients
Introduction to the Final Cut Server Client
99
10 0
Using Java Web Start
10 3
About the Java Web Start Client Files
4
Contents
Page 5

Part II General Administration
Chapter 9 107 General Settings and Preferences
10 7
Final Cut Server Administration Overview
113
Working with the Administration Window
11 5
Preference Settings in the Final Cut Server Client Administration Window
121
User-Configurable Preference Settings
12 2
Administrator-Only Client Functions
12 4
About Unicode Support
Chapter 10 125 Groups and Permissions
12 5
About Groups and Permissions
12 5
Adding Groups to Final Cut Server
12 7
Adding and Managing Permission Sets
Chapter 11 135 Managing Metadata
13 5
Introduction to Metadata
13 8
Metadata Fields
14 3
Metadata Groups
14 8
Metadata Mapping
151
Metadata Lookups
15 4
Managing Metadata Sets
15 6
Metadata Synchronization Policy
15 8
Using Metadata to Configure the User Interface
160
About QuickTime Metadata
Chapter 12 163 Managing Devices
163
About Devices
164
Adding a Device Using the Administration Window
167
Editing a Device Using the Administration Window
168
Deleting an Existing Device Using the Administration Window
169
About Specialized Devices
174
Device Type Details
18 2
Searching Devices
Chapter 13 187 Managing Transcode Settings
187
About Transcode Settings
18 8
Adding Transcode Settings
19 0
Assigning Transcode Settings to Devices
Contents
5
Page 6

Chapter 14 193 Managing Automations
19 3
About Final Cut Server Automation
19 5
General Automation Tips
19 6
Response Pane and Window
212
Watcher Pane and Window
215
Subscription Pane and Window
217
Schedule Pane and Window
Chapter 15 219 About Jobs and Logs
219
Viewing Final Cut Server Status
220
About Jobs and the Search All Jobs Window
225
About the Log Pane
226
About the Log Window
Glossary 227
Index 233
6
Contents
Page 7

Welcome to Final Cut Server
Administration
This chapter covers the following:
Welcome to Final Cut Server (p. 7)
Â
Â
Resources for Learning About Final Cut Server (p. 8)
Â
Contacting AppleCare Support (p. 10)
Welcome to Final Cut Server
Final Cut Server is powerful media asset management and workflow automation
software. Final Cut Server makes it easy to manage large collections of media files. Its
capabilities also extend to tracking job status, orchestrating reviews and approvals, and
automating complex sequences of tasks—all in a single product designed to work
seamlessly with Final Cut Pro.
Installing Final Cut Server also installs Compressor. This powerful transcoding
application provides Final Cut Server with a large variety of preconfigured transcode
settings that you can use when uploading or copying media files to Final Cut Server
devices. You can also create custom settings in Compressor that you can add to the
Final Cut Server transcode settings list.
Preface
7
Page 8

Resources for Learning About Final Cut Server
There are a variety of resources for you to use when learning about your
Final Cut Server system.
Final Cut Server Printed Documentation
This guide is one of two printed documents that are included with Final Cut Server.
Â
Final Cut Server Setup and Administration Guide:
configure, and administer most components of the Final Cut Server system. It does
not describe day-to-day use of the system, such as browsing assets and managing
jobs, productions, and orders, which are described in the
Important:
assumed in the
Â
Final Cut Server User Manual:
Final Cut Server client for the day-to-day use of the system, such as browsing assets,
managing jobs, and managing productions.
An understanding of the material in the
Final Cut Server Setup and Administration Guide.
The user manual describes how to use the
Final Cut Server Onscreen Manuals
Onscreen versions of each of the printed documents are also available while using or
administering Final Cut Server.
Â
From the Final Cut Server client:
users from the client’s Help menu. The
Guide
is also available from the client’s Help menu if you are logged in with
administration privileges.
Â
From the Final Cut Server server’s System Preferences:
Administration Guide
Preferences by clicking the question mark located in the lower-right corner.
can be accessed from the server’s Final Cut Server System
The
Final Cut Server User Manual
Final Cut Server Setup and Administration
This guide describes how to install,
Final Cut Server User Manual.
Final Cut Server User Manual
is available for all
The
Final Cut Server Setup and
is
The content of the onscreen versions of this documentation is identical to the printed
versions. The onscreen versions, however, are fully hyperlinked and enhanced with
many features that make locating information quick and easy:
Â
The access page provides quick access to various features, including the index and
other relevant documents and websites.
Â
A comprehensive bookmark list allows you to quickly choose what you want to see
and takes you there as soon as you click the link.
8 Preface
Welcome to Final Cut Server Administration
Page 9

In addition to these navigational tools, the onscreen documents give you other means
to locate information quickly:
 All cross-references in the text are linked. You can click any cross-reference and jump
immediately to that location. Then, you can use the Preview Back button to return to
where you were before you clicked the cross-reference.
 The table of contents and index are also linked. If you click an entry in either of these
sections, you jump directly to that section of the document.
 You can use the Find dialog to search the text for specific words or phrases.
Apple Websites
There are a variety of Apple websites that you can visit to find additional information.
Final Cut Server Website
Go here for general information and updates as well as the latest news on
Final Cut Server.
To access the Final Cut Server website, go to:
http://www.apple.com/finalcutserver
Â
There are also a variety of discussion boards, forums, and educational resources related
to Final Cut Server on the web.
Apple Service and Support Website
Go here for software updates and answers to the most frequently asked questions for all
Apple products, including Final Cut Server. You’ll also have access to product specifications,
reference documentation, and Apple and third-party product technical articles.
To access the Apple Service and Support webpage, go to:
 http://www.apple.com/support
To access the Final Cut Server support page, go to:
 http://www.apple.com/support/finalcutserver
To access the Apple discussion pages, go to:
 http://discussions.info.apple.com
Preface
Welcome to Final Cut Server Administration
9
Page 10

Contacting AppleCare Support
Information about the support options available from Apple is included in your
Final Cut Server box. Several levels of support are available.
Whatever your issue, it’s a good idea to have the following information immediately
available when you contact Apple for support. The more of this information you have
to give to the support agents, the faster they will be able to address your issue.
 The Final Cut Server Support ID number found on the front of the serial number
sheet included in your Final Cut Server box.
Note: The 11-digit Support ID number is different from the product serial number
used to install Final Cut Server.
 The version of Leopard or Leopard Server you have installed. To find the version,
choose Apple menu > About This Mac.
 The version of Final Cut Server you have installed that you have a question about. To
find the version of Final Cut Server on your computer, choose Final Cut Server >
About Final Cut Server.
 The model of computer you are using.
 The amount of RAM installed in your computer. You can determine this by choosing
Apple menu > About This Mac.
 What other third-party hardware is connected to or installed in the computer, and
who the manufacturers are. Include hard drives, graphics cards, and so on.
To access AppleCare Support for Final Cut Server, go to:
http://www.apple.com/support/finalcutserver
Â
There is also an item in each Final Cut Server client’s Help menu that will take you
directly to the AppleCare website.
To go to the AppleCare website from within a Final Cut Server client:
m Choose Help > Final Cut Server Support.
10 Preface Welcome to Final Cut Server Administration
Page 11

Part I: Installation
and Configuration
This part of the manual contains the information you need
to install and configure Final Cut Server for a basic system.
Chapter 1 Overview of Final Cut Server
Chapter 2 Using the Installer
Chapter 3 Configuring System Preferences
Chapter 4 Adding Users and Groups
Chapter 5 Using Device Setup Assistant
Chapter 6 Using Automation Setup Assistant
Chapter 7 Backing Up Final Cut Server
I
Chapter 8 Installing Final Cut Server Clients
Page 12

Page 13

1 Overview of Final Cut Server
1
This chapter covers the following:
 About Servers and Clients (p. 13)
 Building a Final Cut Server System (p. 15)
 Storage Device Strategy (p. 16)
 Basic Final Cut Server Administration Tasks (p. 17)
This chapter provides a general overview of Final Cut Server, including information on
storage strategies and basic administration tasks.
About Servers and Clients
Final Cut Server is based on a client/server model. This allows many people using
Final Cut Server clients to simultaneously access the Final Cut Server catalog (which
contains all media files and information about the assets and productions
Final Cut Server is managing). Clients can lock and check out assets used in
productions (which are collections of assets and Final Cut Pro projects), preventing
others from making unexpected changes.
13
Page 14
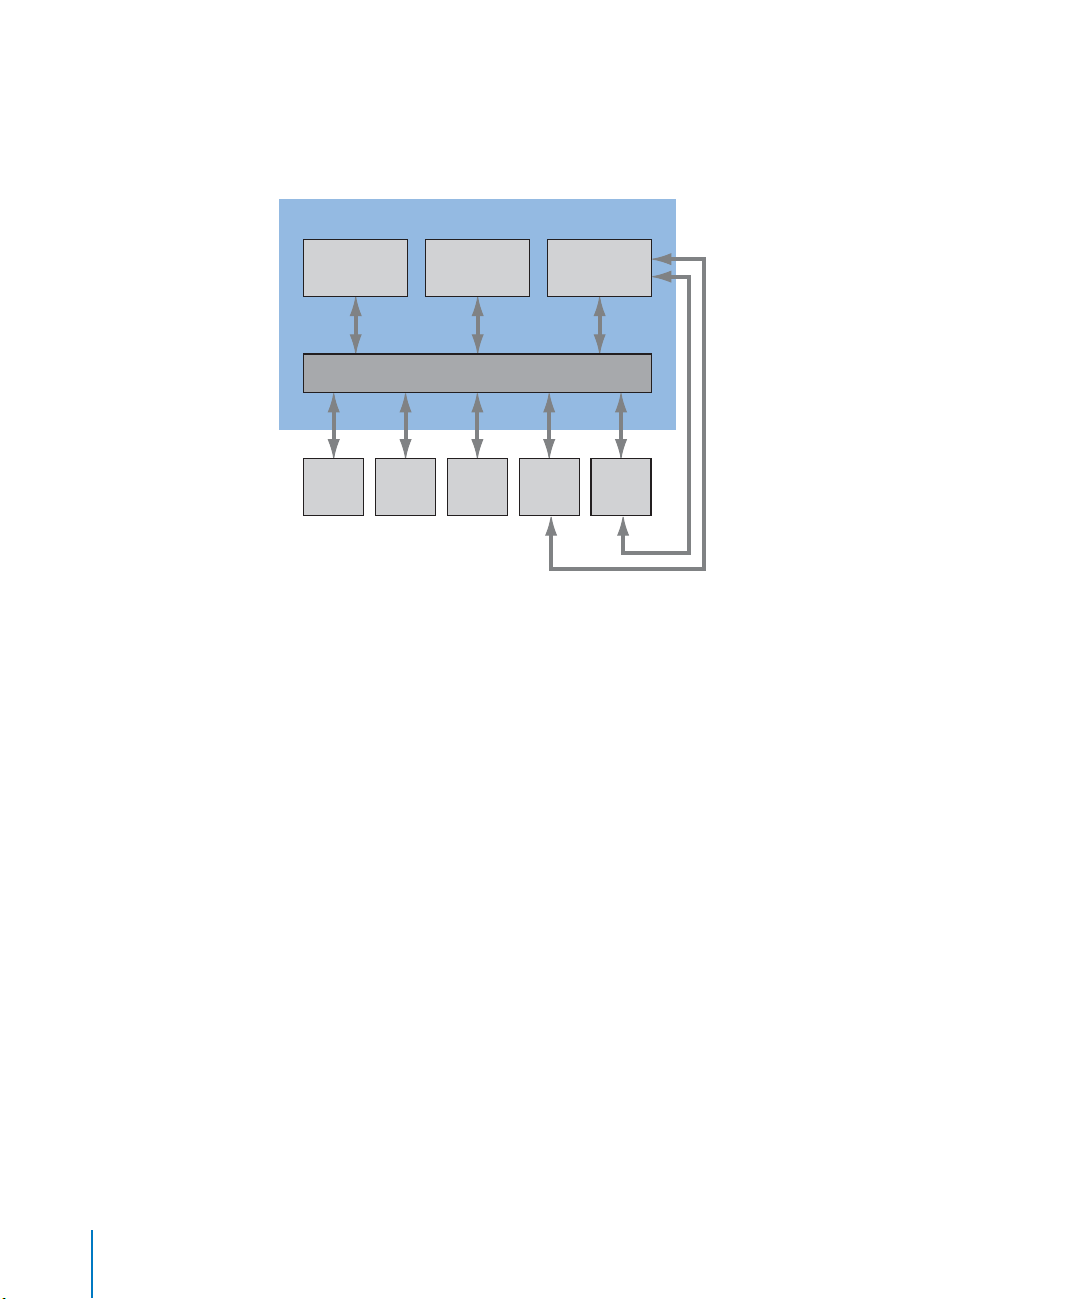
The computer used as the server for Final Cut Server needs to have Mac OS X v10.5
Leopard or Mac OS X Server v10.5 Leopard or later installed. This computer can be used
to store your assets and productions, or it can be connected to a variety of external
devices that contain the assets, such as media servers or an Apple Xsan volume.
Final Cut Server system
FireWire
device
Client1Client2Client3Client4Client
Media server
device
Final Cut Server computer
Xsan
volume
Clients 1, 2, and 3 do not have
direct access to the Xsan volume
5
and must access the Xsan indirectly
through Final Cut Server. Clients 4
and 5 do have direct access and
can take advantage of edit-in-place
performance improvements.
Because the Final Cut Server client is a Java-based application, the client computers can
be of a wide variety of types. Also, depending on what the user needs to do with the
client (for example, using Final Cut Studio with a direct connection to an Xsan or only
using the client to review assets), the client computers do not have to be as powerful
as the server computer. Clients can be installed on operating systems other than
Mac OS X—Final Cut Server clients are also compatible with Windows XP and
Windows Vista operating systems.
There are two versions of Final Cut Server: one that supports up to 10 clients logged in
at one time and another that supports an unlimited number of clients logged in at the
same time. In all other ways, the two versions of Final Cut Server are identical, and this
manual applies to both.
14 Part I Installation and Configuration
Page 15

I
Building a Final Cut Server System
A Final Cut Server system requires a Macintosh computer, such as an Intel-based Xserve
or a Mac Pro computer, with Mac OS X v10.5 Leopard or Mac OS X Server v10.5
Leopard Server or later installed. In general, while Leopard provides sufficient
administration tools for smaller Final Cut Server systems, Leopard Server is
recommended for most installations. This is because it has many more administration
tools and is better suited for providing for general server needs.
For the best performance, the computer used as the server should not be used for
other duties. Managing assets, particularly transcoding the assets and creating the
proxy files (low resolution versions of the original asset), can require significant
computer resources. You can, however, use the server computer for other tasks,
including using the Final Cut Studio applications, if needed. You just need to keep in
mind that the computer’s performance is affected by any Final Cut Server activity.
Additionally, you may find that configuring Spotlight to avoid searching the folders you
are using as devices can improve your performance. This is especially true for the
Proxies and Edit Proxies devices, which can have a lot of activity, causing Spotlight to
spend a lot of time trying to keep up with the changes. You can use the Spotlight pane
in System Preferences to identify which folders and volumes to make private.
The media that Final Cut Server manages requires access to a large amount of storage
space. You can use the computer’s internal and external drives as well as many
supported network devices and file formats for this purpose. Larger facilities may use
an Apple Xsan storage area network (SAN) for asset and production storage. See
Storage Device Strategy,” next, for more information.
“
You can run Final Cut Server clients on the following computers and operating systems:
 Any computers with Mac OS X v10.4 or later installed
 Any computers with Microsoft Windows XP or Windows Vista installed
See Part I of this manual, “Installation and Configuration,” for details on installing and
setting up your Final Cut Server system. Also see the Before You Install Final Cut Server
document, located on the Final Cut Server installation disc, for details on supported
computers and operating systems.
Chapter 1 Overview of Final Cut Server 15
Page 16

Storage Device Strategy
Before you install Final Cut Server, you need to decide how you want to store your media.
About Devices
Final Cut Server uses the term devices to refer to media storage locations that you
configure Final Cut Server to use. Devices can be folders on the computer’s boot hard
disk, a second hard disk, a FireWire drive, or on a network-connected volume.
When you install Final Cut Server, several default devices are created. Once the installer
finishes, you can also configure other devices. These can include existing folders on
volumes that already contain media that you would like to include in the
Final Cut Server catalog. Using Device Setup Assistant, you can configure a scan
automation that will add a device’s existing media to the Final Cut Server catalog.
One thing to keep in mind is that using separate hard disks for some devices can be
more efficient. For example, when you upload assets to the catalog, a variety of proxy
files are created and placed in the Proxies device that the installer created. Having the
Proxies device on a different physical hard disk than the device the asset is stored on
(not just on a different partition on the same hard disk) can make the proxy
transcoding process more efficient—one hard disk can focus on reading the asset and
the other can focus on writing the proxy (as opposed to the same hard disk jumping
back and forth between reading and writing).
About RAIDs and SANs
While Final Cut Server can use a wide variety of local and network volumes as devices
for storing and working with your media, a couple of storage solutions work
particularly well with Final Cut Server.
A Redundant Array of Independent Disks (RAID) can have some advantages:
 Increased performance: One of the primary limiting factors in transferring large media
files is the hard disk’s input/output speed. By splitting the data among several hard
disks, you can reduce the impact of this limitation.
 Increased reliability: Hard disks have the potential to fail at any time. RAIDs can be
configured to supply protection against a hard disk failure, making it possible to
recover the media lost when a hard disk fails.
Having a fast reliable RAID connected directly to the Final Cut Server computer allows
that computer to take advantage of the RAID’s performance, but that does not benefit
the Final Cut Server clients, which must still get the video data over an Ethernet cable.
This is where a SAN can help.
16 Part I Installation and Configuration
Page 17

I
A storage area network (SAN) allows multiple computers to connect to a storage device
as if it was a locally connected device. This allows you to use the media on the storage
device (typically a RAID) exactly as if it was on a local hard disk.
Final Cut Server includes the ability to configure a storage device that is part of a SAN
as an edit-in-place device. Clients that are directly connected to edit-in-place devices
have the advantage of direct access to the device’s media—the clients do not need to
cache a local copy of an asset before being able to use it in a Final Cut Pro project. This
can be a huge advantage when working with large video files.
Note:
SAN-connected devices are not the only ones that can be configured as edit-inplace devices. However, they are the most common types of devices that can support
the high performance required.
Apple has available a set of products that can be easily configured to provide these
features. These include Xserve, Xserve RAID, and Xsan. See
xserve for more information.
See “Using the Final Cut Server Installer” on page 21 for more information on creating
the default devices using the Final Cut Server installer, Chapter 5, “Using Device Setup
Assistant,” on page 59 for information on creating devices using Final Cut Server
System Preferences, and Chapter 12, “Managing Devices,” on page 163 for information
on creating devices using the Administration window of the Final Cut Server client.
http://www.apple.com/
Basic Final Cut Server Administration Tasks
An administrator must configure a variety of settings in Final Cut Server before the
system can be used. Additionally, other settings need to be changed as additional
users, resources, and productions are added to your workflow. These include settings
that relate to the following tasks:
Â
Installing and setting up Final Cut Server:
and Configuration,” for details on installing and setting up Final Cut Server.
Â
Managing users and groups:
groups based on Mac OS X Open Directory to validate users. You use either the
Accounts pane in System Preferences or the Mac OS X Server Workgroup Manager to
add users and groups to the computer. You then import the groups into
Final Cut Server, applying a suitable permission set to each group to define its level of
access to the Final Cut Server catalog. See Chapter 4, “Adding Users and Groups,” on
page 47 and Chapter 10, “Groups and Permissions,” on page 125 for more information.
Â
Managing devices:
productions in its catalog. Devices can be as simple as folders on the computer’s
internal hard disk or they can be from a wide variety of networked computers. See
Chapter 12, “Managing Devices,” on page 163 for more information.
Chapter 1
Overview of Final Cut Server
Final Cut Server uses devices to store all the assets and
Final Cut Server can use either local users and groups or
See Part I of this manual, “
Installation
17
Page 18

 Managing metadata and metadata sets: A very powerful feature of Final Cut Server is
its ability to use metadata to help manage a large collection of assets and
productions. You can work with default metadata formats as well as add custom
fields and create custom groups of metadata fields. See Chapter 11, “Managing
Metadata,” on page 135 for more information.
 Managing watch and respond behaviors: Final Cut Server includes a variety of features
that help automate your workflow. These include the ability to set up watch folders
that have their contents automatically added to the catalog. Final Cut Server also
includes scheduling, subscription, and response features. See Chapter 14, “Managing
Automations,” on page 193 for more information.
You use four main areas to administer your Final Cut Server system. The one you use
depends on what you need to change. In some cases, you can perform the same
administration task using more than one area.
 Accounts pane of System Preferences: When running Final Cut Server on Leopard or
Leopard Server you can use the user and group settings that you configure here.
 Mac OS X Server Workgroup Manager: When running Final Cut Server on
Leopard Server you can use the user and group settings that you configure here.
 Final Cut Server System Preferences: These panes allow you to configure the most
common Final Cut Server settings. These panes also include several setup assistants
to make it easy to add devices and automation.
 Final Cut Server Administration window: This window, accessible from a Final Cut Server
client when you are logged in as an administrator, contains extremely detailed
settings and configurations covering all aspects of Final Cut Server. You should need
to access this window only for your more complex configurations.
See Chapter 9, “
General Settings and Preferences,” on page 107 for more information
about using these areas.
18 Part I Installation and Configuration
Page 19

2 Using the Installer
This chapter covers the following:
 About Installing and Setting Up Final Cut Server (p. 19)
 Using the Final Cut Server Installer (p. 21)
 About the Customer Profiles (p. 29)
 About Final Cut Server and Compressor (p. 32)
 Updating Your License (p. 35)
 Registering Final Cut Server (p. 37)
About Installing and Setting Up Final Cut Server
The first step in installing Final Cut Server is to use the Final Cut Server installer.
Before you use the Final Cut Server installer, be sure to familiarize yourself with the
application’s system requirements. You can read about them in the Before You Install
Final Cut Server document, located on the Final Cut Server installation disc.
2
Important: Final Cut Server can only be installed on a system with
Mac OS X Server v10.5 Leopard or Mac OS X v10.5 Leopard installed.
Note: The installation disc contains the files required to install Final Cut Server on either
PowerPC-based or Intel-based Macintosh computers that have Leopard or
Leopard Server installed. The installation process is identical for both.
19
Page 20

You should also familiarize yourself with all of the chapters in this part (Part I) of the
Final Cut Server Setup and Administration Guide. In general, you should install and set up
Final Cut Server in the following order:
Step 1: Use the installer
This installs Final Cut Server on your system. It also configures Final Cut Server to match
the customer profile you select. This profile customizes the installation so that
Final Cut Server automatically includes the items best suited to your workflow needs
and leaves out those that are not necessary. See “About the Customer Profiles” on
page 29 for details about the customer profiles from which you can choose.
Important: Be sure you know which profile you want to use before you start the
Final Cut Server installer. You cannot change this profile selection later. However, you
can manually make changes and additions to the installed Final Cut Server application
after the installer has finished, allowing you to combine attributes from the profiles.
Step 2: Configure System Preferences
Once the Final Cut Server installer has finished, you can configure the Final Cut Server
System Preferences panes. These panes include:
 General: This pane includes a variety of general Final Cut Server settings.
 Permissions: This pane is where you add Mac OS X groups to Final Cut Server. See
Chapter 4, “
Adding Users and Groups,” on page 47 for more information.
 Devices: This pane includes an automated assistant to step you through the process
of adding devices to your Final Cut Server system. These devices include a variety of
popular file storage systems. See Chapter 12, “Managing Devices,” on page 163 for
more information.
 Automations: This pane includes an automated assistant to step you through the
process of configuring watch folders and respond behaviors. See Chapter 14,
“Managing Automations,” on page 193 for more information.
See Chapter 3, “Configuring System Preferences,” on page 39 for more information
about all of the Final Cut Server System Preferences settings.
Step 3: Add users and groups
Final Cut Server uses the user and group accounts you configure in the Accounts pane
of System Preferences or in Leopard Server Workgroup Manager. You also assign each
group a permission set. By creating groups of users and applying different permission
sets to each group, you can control the level of access for the users. See Chapter 4,
“Adding Users and Groups,” on page 47 for more information.
20 Part I Installation and Configuration
Page 21

I
Step 4: Install Final Cut Server clients on other computers
Once you have configured Final Cut Server System Preferences and added users and
groups, you are ready to install the Final Cut Server client software on your users’
computers. You install the client across a network connection. See Chapter 8, “Installing
Final Cut Server Clients,” on page 99 for more information.
Using the Final Cut Server Installer
Once you are ready to install Final Cut Server, you can insert the Final Cut Server
Installation disc into the computer you are using as the server for Final Cut Server.
Note: You must install Final Cut Server directly on the computer you are using as its
server. You cannot remotely install the application onto a different computer.
Important: The Final Cut Server installer enables the computer’s web services (when
installing on Mac OS X Server v10.5) and web sharing (when installing on Mac OS X v10.5)
if they are not already enabled.
About the Final Cut Server Installation Disc
The Final Cut Server Installation disc contains:
 Before You Install Final Cut Server: This document provides system requirements and
things to do before you install Final Cut Server and its accompanying content.
Important: To ensure that your system meets the minimum requirements, be sure to
read this document before you begin the installation process.
 Final Cut Server installer: Double-click the Final Cut Server installer icon to begin the
installation process.
 Documentation folder: The folder contains the Final Cut Server Setup and
Administration Guide (a PDF of this document) and the Final Cut Server User Manual.
Before You Install Final Cut Server
Before you install Final Cut Server, you must make sure you have the latest versions of
Leopard or Leopard Server and QuickTime installed.
Important: Even if you bought and installed Leopard or Leopard Server to use
Final Cut Server, you should still run Software Update to ensure that your computer has
the latest version.
Chapter 2 Using the Installer 21
Page 22
To update Leopard or Leopard Server and QuickTime:
1 Choose Apple menu > Software Update.
A dialog appears showing new or updated software available for your computer.
2 Follow the onscreen instructions to update Leopard or Leopard Server and QuickTime
to the latest versions.
It is also a good idea to install and update Final Cut Studio and other applications if you
intend to use them on the computer you are using as your Final Cut Server server.
Did You Upgrade Your Computer from Tiger Server to Leopard Server?
When you upgrade a computer from Tiger Server to Leopard Server, Apache is not
upgraded automatically. You can verify its version and manually upgrade it if needed.
Important: You must have Apache version 2.2 installed on a computer using
Leopard Server before installing Final Cut Server. If not, you will not be able to install
any Final Cut Server clients.
Note: If you are installing Final Cut Server onto a non-server version of Leopard, you
can skip this section.
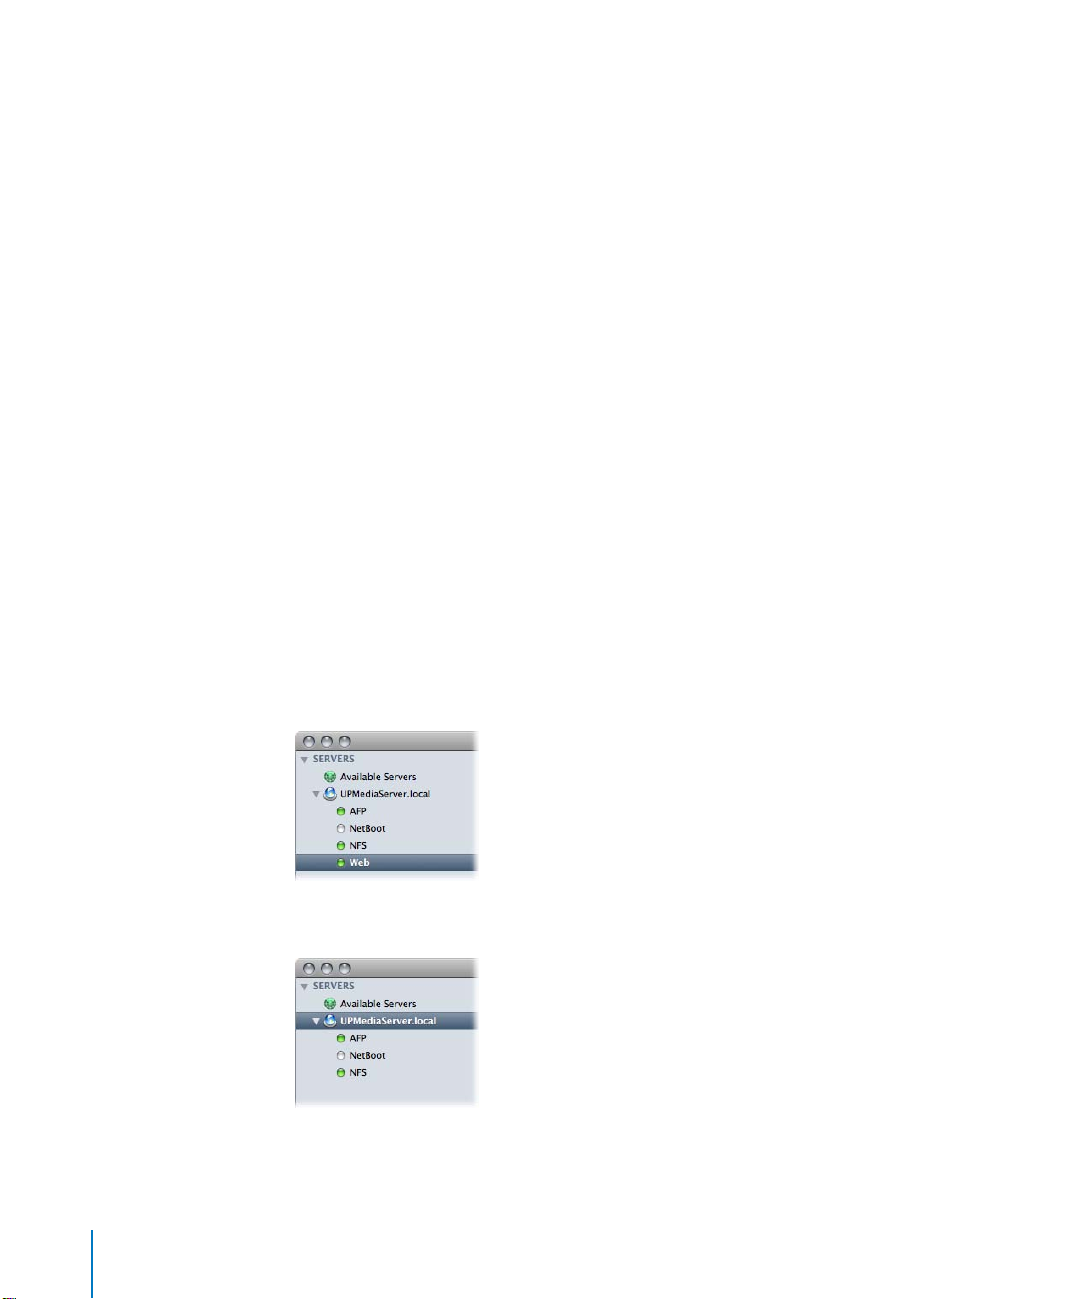
To verify and upgrade Apache on a Leopard Server computer:
1 Open the Server Admin application.
2 Click the disclosure triangle next to the computer’s name, look on the left side of the
window to see if an item named Web is listed, then do one of the following:
 If Web is listed, skip to step 4.
 If Web is not listed, go to the next step.
22 Part I Installation and Configuration
Page 23
I
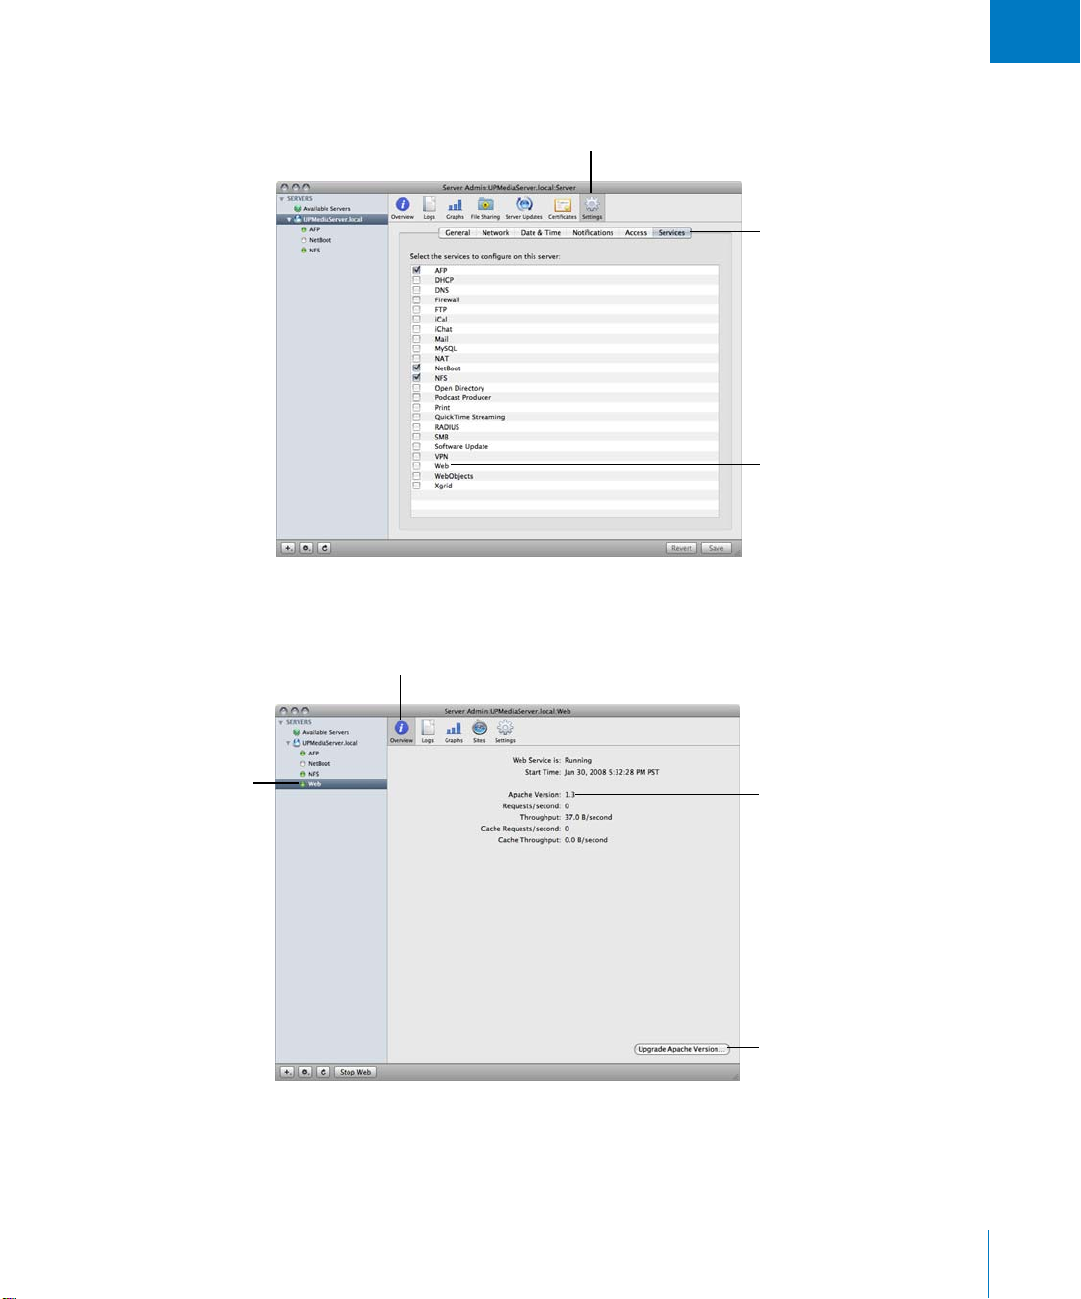
3 To get the Web item to appear, click the Settings icon, open the Services pane, and
select the Web item.
Click the Settings icon.
Click Services to display the
Services pane.
Select Web to configure
web services.
The Web item appears on the left side of the window.
4 Select the Web item, then click the Overview icon.
Click Web to configure
the web service settings.
Click the Overview icon.
Verify the Apache version. It
should be version 2.2.
Click Upgrade Apache
Version if your current
version is 1.3.
The version of Apache is listed. If it is version 1.3 you need to upgrade it by clicking the
Upgrade Apache Version button. If it is 2.2, you can proceed with installing
Final Cut Server.
Chapter 2 Using the Installer 23
Page 24
Starting the Final Cut Server Installer
When you install Final Cut Server, it is installed and configured based on the customer
profile you choose.
Important: Refer to the Before You Install Final Cut Server document on the
Final Cut Server installation disc for a list of minimum system requirements for
Final Cut Server.
Note: Before you can install the software, you need to log in to your computer with a
computer administrator account, using an administrator password. See Mac Help for
more information.
Important: Do not remove the administrator’s user account that you use to install
Final Cut Server from the server computer. Final Cut Server requires this account to
continue to be available on the computer. To reduce the chances of this user account
being deleted (for example, due to personnel changes), you can create a local special
user account that has administration privileges to use when installing Final Cut Server.
To enter the serial number and install Final Cut Server:
1 Insert the Final Cut Server installation disc into your computer’s DVD drive.
2 Double-click the Install Final Cut Server icon, then follow the onscreen instructions.
3 The installer performs a system requirements check to determine if Final Cut Server can
be installed. Click Continue.
4 Read the Welcome information, then click Continue.
5 Read the Software License Agreement, click Continue, then (if you agree) click Agree.
6 Select the startup disk, then click Continue.
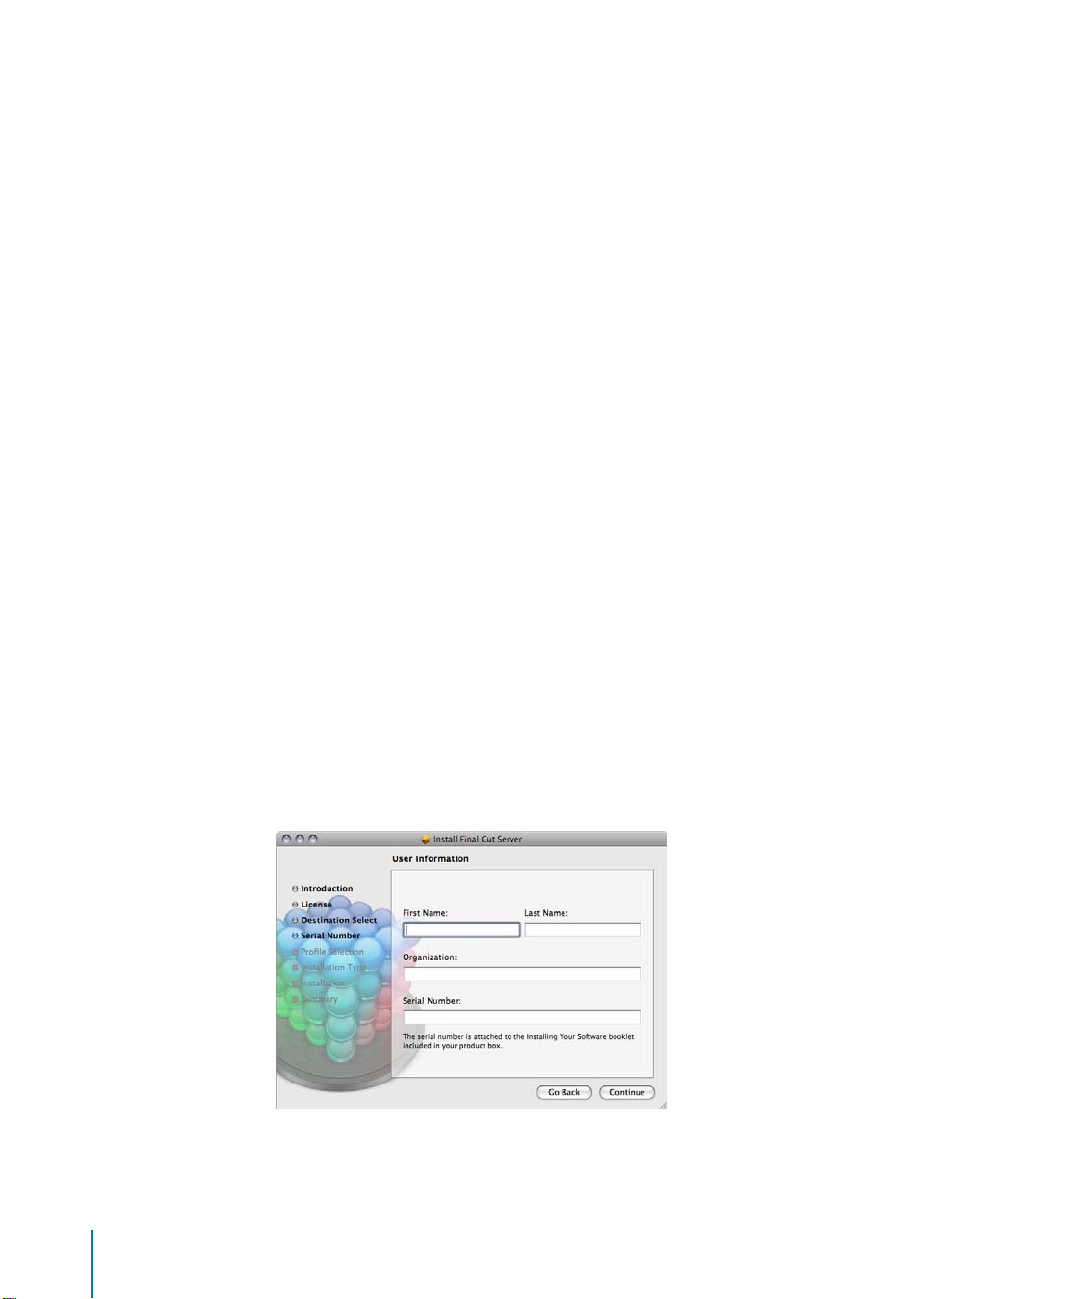
7 In the User Information pane, enter your first and last name. Entering an organization
is optional.
24 Part I Installation and Configuration
Page 25
I
8 In the Serial Number field, enter the Final Cut Server serial number printed on the
Software Serial Number label attached to the serial number sheet included in your
Final Cut Server box, then click Continue.
Following are some tips for entering your serial number correctly:
 Make sure you are copying the original serial number that is on the front of the serial
number sheet.
 Make sure you enter the software serial number, not the Support ID number.
 Make sure you enter a zero and not an O, a 1 and not a lowercase L, where appropriate.
 Include dashes in the serial number.
 Don’t enter spaces before or after the serial number.
 Verify that you have typed the serial number correctly.
Important: After three incorrect serial number entries, the installer quits. To begin the
installation process again, return to step 2.
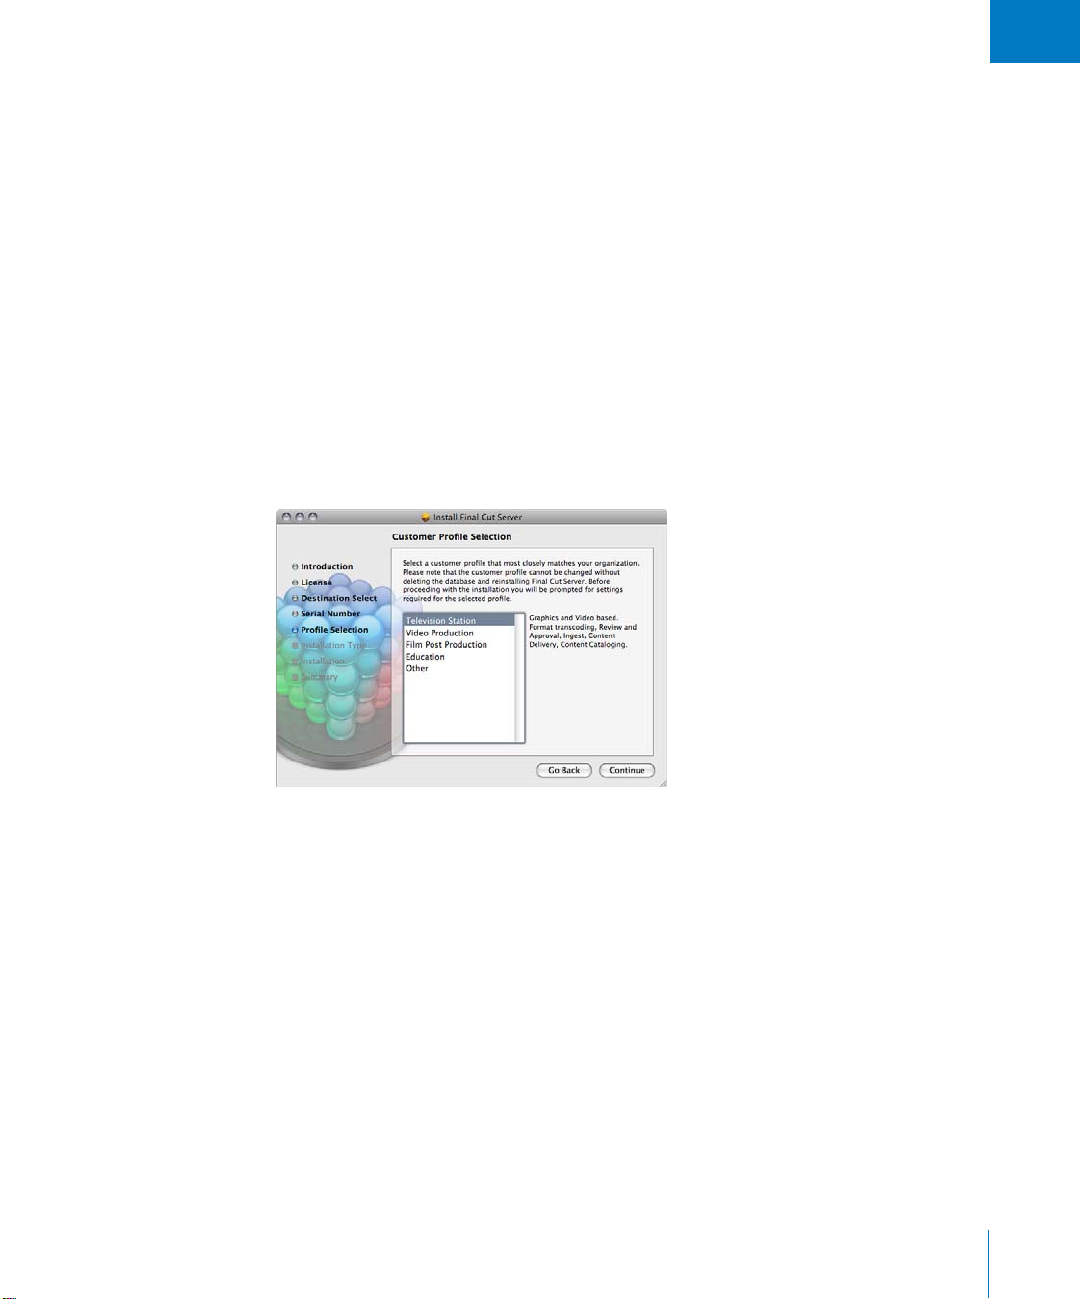
The Customer Profile Selection pane appears.
Chapter 2 Using the Installer 25
Page 26
9 Select one of the customer profiles, then click Continue.
See “About the Customer Profiles” on page 29 for details on the available customer
profiles.
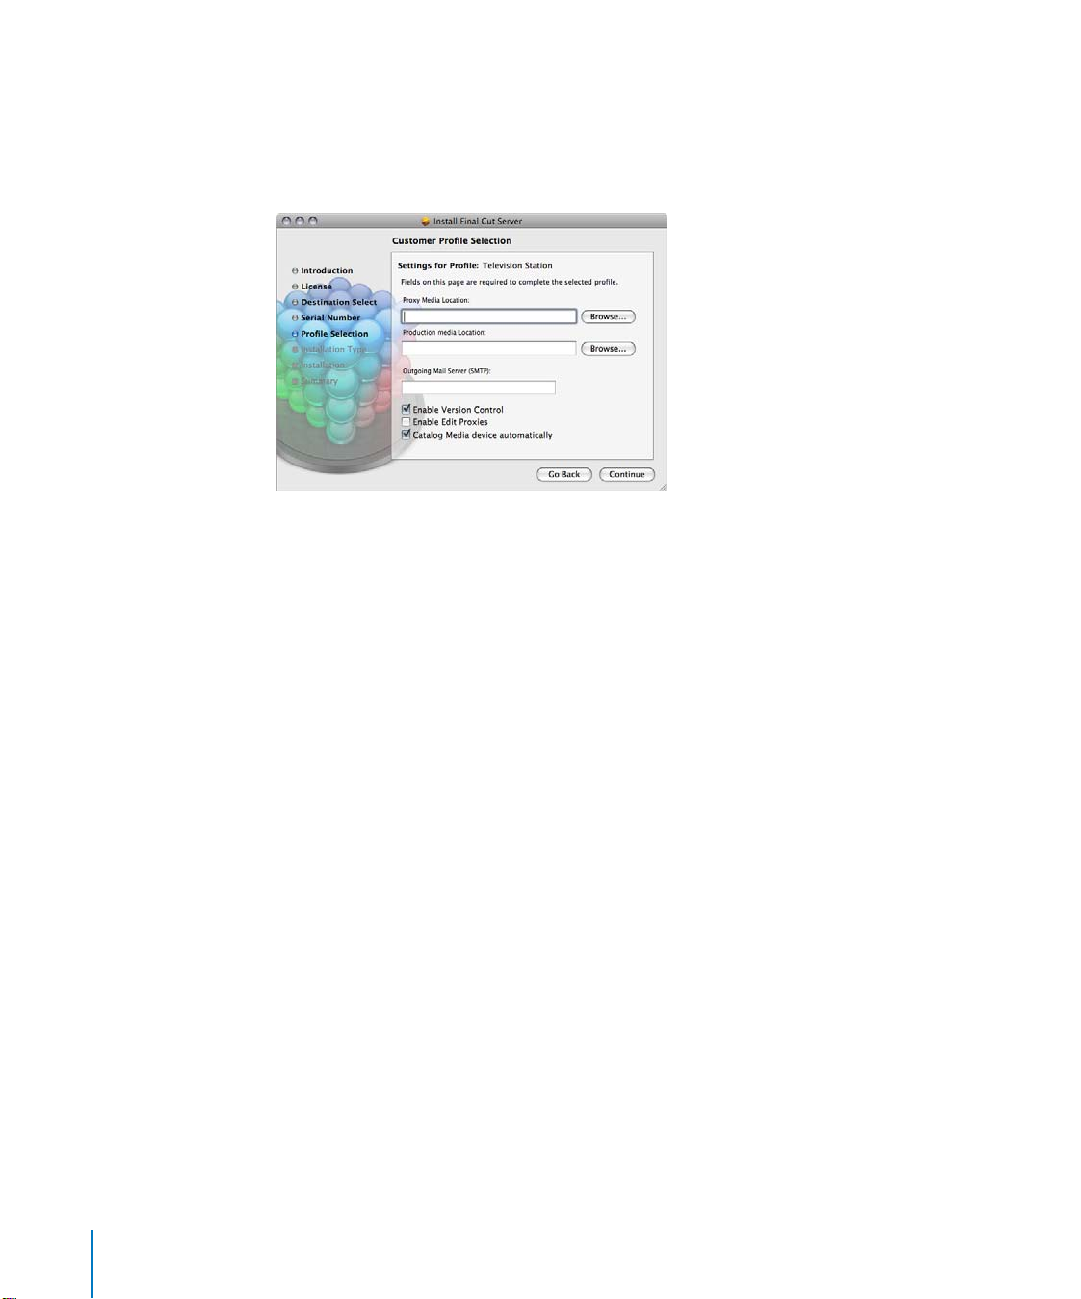
The Settings for Profile pane appears.
10 Enter the following information, then click Continue when finished.
 Proxy Media Location: Enter the location to store the proxy files created for the media
assets. While the proxy files are generally much smaller than the original media files,
this location contains the proxy files from all devices. Be sure to choose a location
with plenty of hard disk space.
Important: It is strongly suggested that you do not choose a location on the server
computer’s startup disk. The devices created by this setting and the Production Media
Location contain large media files and can use all of the available disk space on their
hard disk, which causes serious issues if that hard disk is also the startup disk.
Storage Device Strategy” on page 16 for more information on choosing
See “
locations for both of these settings.
 Production Media Location: Enter the location to store your production media. This
can be a folder on this computer or a networked device, such as an Xsan or Xserve
RAID. The installer creates the following devices based on this location: Library,
Watchers, Media, Edit Proxies, and Version.
Note: Although it is not typical or suggested, you can make the proxy and
production media locations the same place. Keep in mind that the production media
location can require a large amount of disk space. Also, you can add more locations
for the storage of media once the installer has finished.
Important: You cannot easily change the proxy and production media locations later.
26 Part I Installation and Configuration
Page 27

I
 Outgoing Mail Server (SMTP): Enter the outgoing email server address. You can
change this in Final Cut Server System Preferences later.
Note: If left blank, this setting defaults to “localhost,” which you can use if this
computer has Mac OS X Server v10.5 and is configured as an SMTP email server.
 Enable Version Control: Select this checkbox to configure Final Cut Server to
automatically enable version tracking of assets and Final Cut Pro projects uploaded
to the Final Cut Server catalog.
Important: This setting does not apply to assets and Final Cut Pro projects added to
the catalog by a scan response created with Final Cut Server System Preferences. See
“About Scan Responses” on page 200 for more information. Also see “Setting Up the
Version Device” on page 170 for more information about setting up a version device.
 Enable Edit Proxies: Select this checkbox to have Final Cut Server automatically
generate Apple ProRes 422 codec proxy files (in addition to the normal proxy files
stored at the proxy media location) whenever a Final Cut Pro project is added as an
asset. Due to the potentially large size of the files, the Apple ProRes 422 codec files
are stored in a special device named Edit Proxies at the production media location.
In general, this option is most useful when you are working with Final Cut Pro
projects using uncompressed SD or HD content since the Apple ProRes 422 codec
can provide significantly smaller file sizes at nearly the original media quality.
You are able to change this setting in the Preferences pane of the Final Cut Pro
client’s Administration window. See “
more information.
 Catalog Media device automatically: Select this checkbox to have Final Cut Server
automatically configure and enable a schedule automation that includes a full and
add only scan of the Media device. If this checkbox is not selected, the schedule and
responses are not created; however, you can use Device Setup Assistant in the
Final Cut Server System Preferences or the Final Cut Pro client’s Administration
window to create these automations. See “Editing an Existing Device” on page 73 for
information on using Device Setup Assistant and Chapter 14, “Managing
Automations,” on page 193 for information on using the Administration window.
Important: If you are installing Final Cut Server as part of a recovery process where
you will restore the system from a previous backup, be sure to not select this
checkbox. This will prevent the automation from trying to scan an empty Media
device, which can lead to issues with proxies and the Final Cut Server catalog. See
Chapter 7, “Backing Up Final Cut Server,” on page 91 for more information.
Proxies Preference Settings” on page 117 for
Chapter 2 Using the Installer 27
Page 28
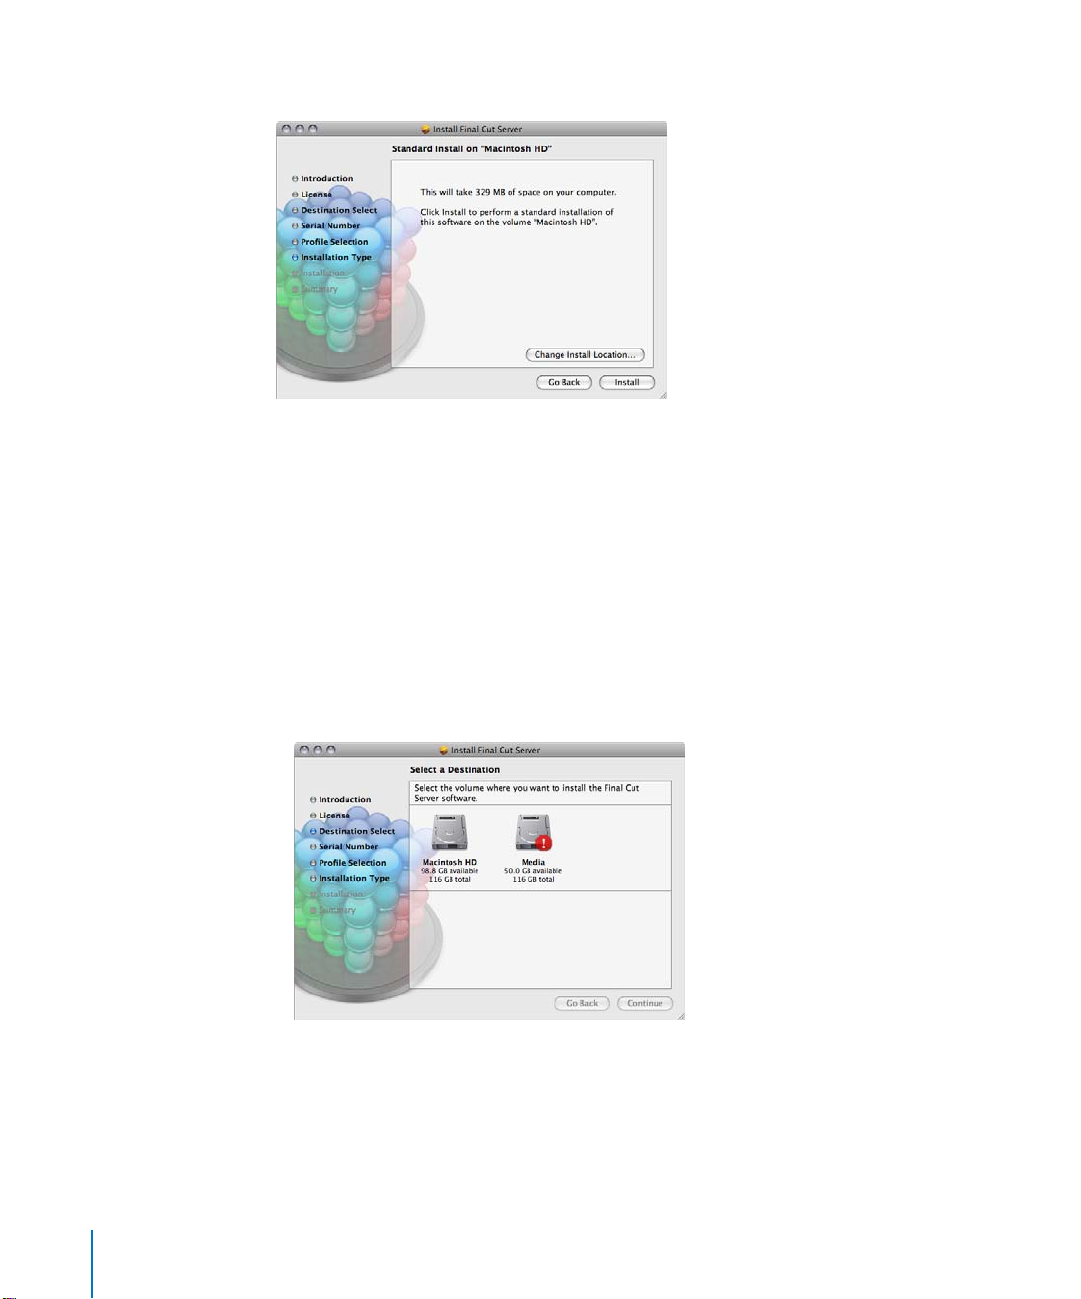
The Standard Install pane appears.
11 Do one of the following:
 Click Install or Upgrade.
This automatically installs Final Cut Server on the computer’s startup disk.
Important: You may see the Upgrade option even on computers that do not have
previous versions of Final Cut Server installed. This is because the installer has
detected at least one file on your system in common with the files it installs; this is
considered normal.
 Click Change Install Location.
This opens a pane that allows you to choose the volume on which to install
Final Cut Server. This volume must be this computer’s startup disk.
28 Part I Installation and Configuration
Page 29
I
12 A dialog appears requiring you to authenticate yourself by typing your name and
password. Click OK when finished.
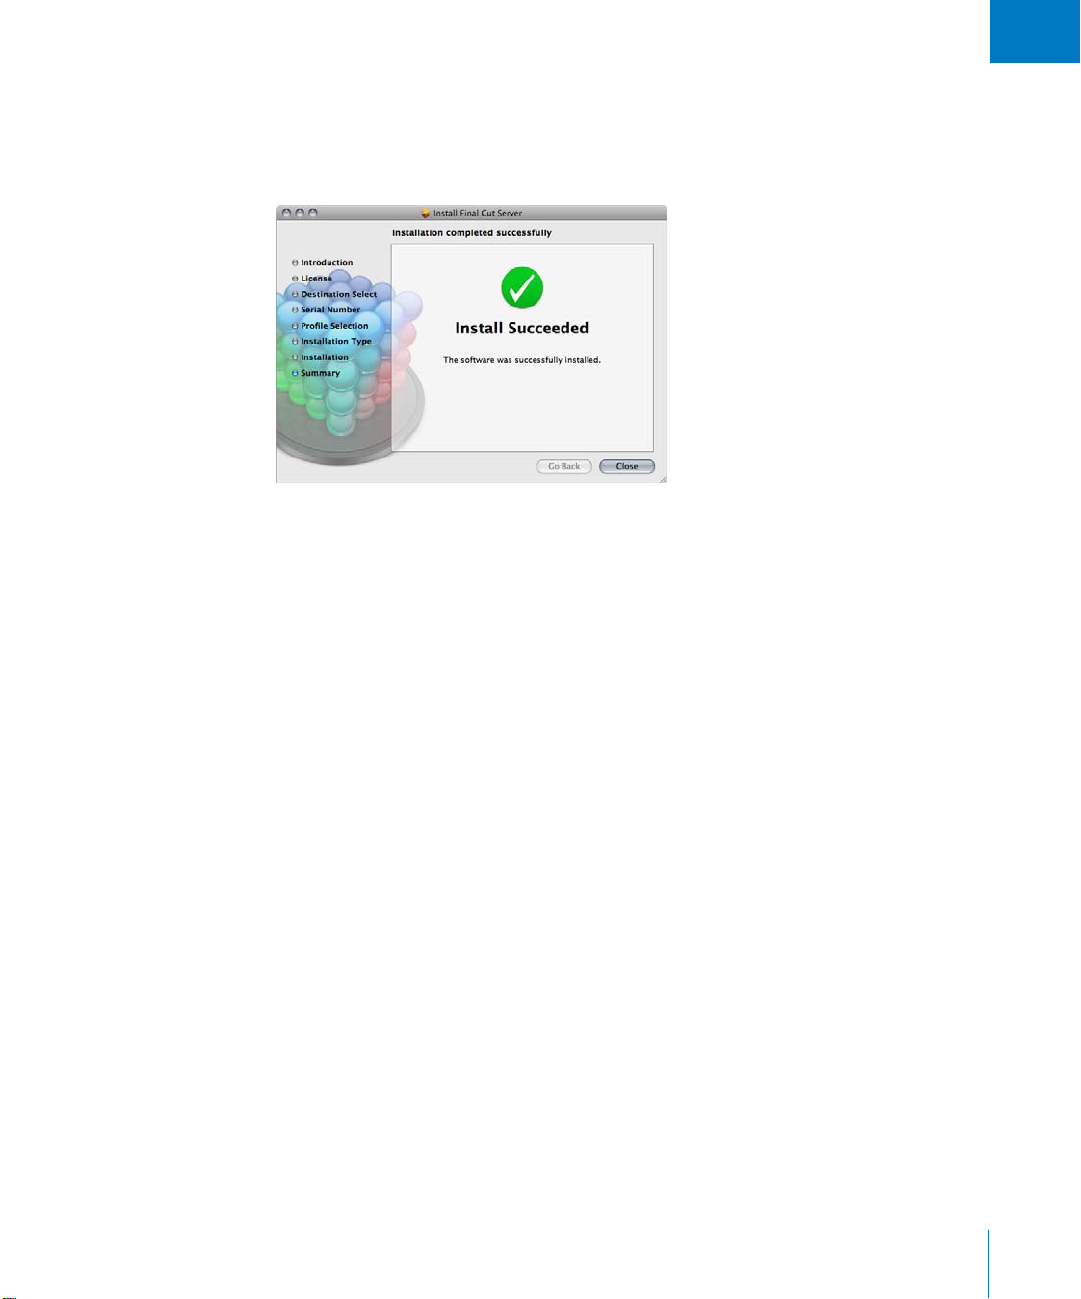
The installer displays a progress bar to indicate its status. Once the installer finishes, a
pane appears that confirms the installation was successful.
13 Click Close to close the installer.
After you have finished the installation, you are ready to begin configuring
Final Cut Server System Preferences. See Chapter 3, “
on page 39 for more information.
Configuring System Preferences,”
About the Customer Profiles
During the installation process, you must select a customer profile that best describes
your intended use of Final Cut Server. These customer profiles are intended to
customize your Final Cut Server installation by adding items (metadata sets, permission
sets, and automations) you are most likely to need and eliminating those you won’t.
Important: You cannot later select a different profile; however, you can manually
customize Final Cut Server, once the installation finishes, to contain any specialized
settings you need.
Chapter 2 Using the Installer 29
Page 30

Following is a list of the five customer profiles to choose from, including a list of the
production metadata sets used by each (see “About the Production Metadata Sets,”
next, for more information about the production metadata sets):
 Television Station: This profile is graphics and video based. It includes provisions for
format transcoding, review and approval, content delivery, and content cataloging.
The Television Station profile uses the Show, Promotion, Commercial, and Package
production metadata sets.
 Video Production: This profile is video based. It includes provisions for asset
creation, review and approval, application integration, content cataloging, and
archiving. The Video Production customer profile uses the Show and Package
production metadata sets.
 Film Post Production: This profile is video and still sequence based. It includes
provisions for asset creation, production creation, application integration, review and
approval, still sequence conversion, and content cataloging. The Film Post Production
customer profile uses the Trailer and Package production metadata sets.
 Education: This profile is video based. It includes provisions for asset creation,
production creation, application integration, review and approval (assessment), still
sequence conversion, archiving, offlining, and content cataloging. The Education
customer profile uses the Commercial and Package production metadata sets.
 Other: This profile is for general cataloging. It includes provisions for asset creation,
production creation, and application integration. The Other customer profile uses the
Article, Commercial, and Package production metadata sets.
About the Production Metadata Sets
The primary difference between the customer profiles is the production metadata sets
they offer. All other aspects, such as devices, automations, permission sets, and the
asset metadata sets are identical.
There are six possible production metadata sets that the installer can create. Each
production metadata set is made up of one or more metadata groups. All of the
metadata groups are installed on all Final Cut Server systems, regardless of which
customer profile you choose. This means that you can easily create any of these
production sets and add the appropriate metadata groups to them. Additionally, you
can create your own custom production metadata sets and groups as needed. See
“Managing Metadata Sets” on page 154 for details on creating metadata sets.
Note: Many of the metadata group names are used multiple times. Be sure you match
the metadata group ID (for example, PA_GRP_CUST_PRODUCTION_RIGHTS) to ensure
you are using the correct metadata group name when attempting to match any of
these metadata sets.
30 Part I Installation and Configuration
Page 31

I
Package Production Metadata Set
The Package production metadata set is available in all five customer profiles. It
includes two metadata groups:
 Production (PA_GRP_CUST_PRODUCTION_PACKAGE)
 Rights (PA_GRP_CUST_PRODUCTION_RIGHTS)
Show Production Metadata Set
The Show production metadata set is available in the Television Station and Video
Production customer profiles. It includes two metadata groups:
 Show (PA_GRP_CUST_PRODUCTION_SHOW)
 Rights (PA_GRP_CUST_PRODUCTION_RIGHTS)
Promotion Production Metadata Set
The Promotion production metadata set is used only by the Television Station
customer profile. It includes two metadata groups:
 Promotion (PA_GRP_CUST_PRODUCTION_PROMOTION)
 Rights (PA_GRP_CUST_PRODUCTION_RIGHTS)
Commercial Production Metadata Set
The Commercial production metadata set is used by the Television Station, Education,
and Other customer profiles. It includes one metadata group:
 Commercial (PA_GRP_CUST_PRODUCTION_COMMERCIAL)
Trailer Production Metadata Set
The Trailer production metadata set is used only by the Film Post Production customer
profile. It includes two metadata groups:
 Trailer (PA_GRP_CUST_PRODUCTION_TRAILER)
 Rights (PA_GRP_CUST_PRODUCTION_RIGHTS)
Article Production Metadata Set
The Article production metadata set is used only by the Other customer profile. It
includes one metadata group:
 Article (PA_GRP_CUST_PRODUCTION_ARTICLE)
Chapter 2 Using the Installer 31
Page 32

About Final Cut Server and Compressor
Final Cut Server relies on Compressor for most of its transcoding needs. These include
obvious jobs like converting a video file to a format with a smaller file size that is easier
to review. However, these transcoding needs also include a variety of other jobs that
happen in the background, such as creating the clip proxy files used to preview an asset.
For this reason, it is important to make sure Final Cut Server and Compressor are
configured to work together efficiently and reliably.
The Final Cut Server installer installs Final Cut Server, Compressor, and Apple Qmaster
on the computer. Once the installation is complete, there are two approaches you can
take in preparing to use Final Cut Server with Compressor:
 Use the This Computer cluster: Compressor creates a cluster named This Computer
when it is installed, and by default, this is the cluster that Final Cut Server uses. For
some installations, this will be sufficient; however, there are several shortcomings to
using the This Computer cluster. See “
more information.
 Create a Final Cut Server-specific QuickCluster: This method requires you to use the
Apple Qmaster System Preferences pane to create a custom QuickCluster. While
involving a bit more time during the initial configuration of your Final Cut Server system,
this method greatly reduces the chances of unexpected issues causing problems later
on. See “About Creating a Custom QuickCluster” on page 33 for more information.
About the This Computer Cluster,” next, for
About the This Computer Cluster
The This Computer cluster that Compressor creates when it is installed is used by
default by Final Cut Server. There are several issues with using it that you need to be
aware of.
 Potential permission issues: When you install Final Cut Server, it remembers and
operates using the name of the user that was logged in when it was installed. For this
reason, it is strongly recommended that you create a local special user account that
has administration privileges to use when installing Final Cut Server. This is to reduce
the chances of this account being removed due to personnel changes later on.
The This Computer cluster operates using the name of the current user that is logged
in to the computer. This means that it is possible that there will be times when
Final Cut Server and Compressor will not have the same access permissions for a
folder or file, which could result in issues such as Compressor being unable to access
a file that Final Cut Server needs to have transcoded.
If you intend to use the This Computer cluster with Final Cut Server, it is
recommended that you always log in to the server computer using the same account
that was used when you installed Final Cut Server.
32 Part I Installation and Configuration
Page 33

I
 The This Computer cluster requires you to log in: Since the This Computer cluster
operates using the name of the current user that is logged in, it cannot be used until a
user logs in. This means that if your server computer is restarted, for example, after a
power interruption, Final Cut Server will not be able to use Compressor. If you create a
custom QuickCluster, as described next, the cluster uses the name of the person who
created it, meaning that it can be used even if no one is logged in to the computer.
 The This Computer name can be confusing: You actually choose the cluster to use with
Final Cut Server in the Compressor Preferences pane of the client’s Administration
window. The name of this cluster is always This Computer, no matter which computer
you are currently using to choose the cluster. The This Computer cluster always refers
to the computer Final Cut Server is installed on. See “Compressor Preference
Settings
About Creating a Custom QuickCluster
Creating a custom QuickCluster in Apple Qmaster avoids the issues that exist with the
This Computer cluster. Creating a QuickCluster requires you to open the Apple Qmaster
pane of System Preferences once you have completed installing Final Cut Server.
Important: Install Final Cut Server before going through this procedure.
Note: The following steps describe a simple procedure for configuring a cluster to use
with Final Cut Server. You can create much more sophisticated clusters that include
password protection and other features. See the Distributed Processing Setup document,
available from the Compressor Help menu, for more information.
” on page 117 for more information.
Chapter 2 Using the Installer 33
Page 34

Select the Managed
checkboxes.
To create a custom QuickCluster:
1 Log in to the server computer using the same user account that was used to install
Final Cut Server.
Important: For this new QuickCluster to have the same permissions as Final Cut Server,
it is important that you log in as the same user that installed Final Cut Server.
2 Open System Preferences, then click the Apple Qmaster icon, located in the Other
section at the bottom of the window.
The Apple Qmaster System Preferences pane appears.
Enter a new name for
this QuickCluster if
needed.
Click Start Sharing to
make this QuickCluster
available to
Final Cut Server.
3 To make sure that the cluster services will only be used by this computer, select the
Managed checkboxes for Compressor and Rendering.
4 Enter the name you want this cluster to use in the “Identify this QuickCluster as” field.
This is the name that will appear in the Compressor Preferences pane of the
Final Cut Server client’s Administration window. The default name is based on your
computer’s name in the Sharing pane of System Preferences.
5 Click Start Sharing.
The custom QuickCluster is now available in the Compressor Preferences pane of the
Final Cut Server client’s Administration window. You can now set this QuickCluster as
the one that Final Cut Server uses.
Important: While this QuickCluster defaults to the permissions of the user that
configured it, it will change those permissions to any user that manually starts the
QuickCluster later. If you need to restart this QuickCluster, be sure to log in using the
same user account that was used to install Final Cut Server.
34 Part I Installation and Configuration
Page 35

I
To choose the custom QuickCluster in Final Cut Server:
1 In a Final Cut Server client, choose Administration from the Server pop-up menu (the
pop-up menu in the Final Cut Server main window that appears when you click the
Server button) to open the Administration window.
Important: You must be logged in as a user with administrator privileges for the
Administration item to appear in the Server pop-up menu.
2 Click Preferences in the column on the left to open the Preferences pane.
3 Click Compressor to open the Compressor pane.
Choose the new
QuickCluster from the
pop-up menu.
4 Choose the new QuickCluster from the Compressor Cluster Name pop-up menu.
5 Click the Save button to save the changes.
See “
Preference Settings in the Final Cut Server Client Administration Window” on
page 115 for more information on setting Final Cut Server preferences.
Updating Your License
There are two versions of Final Cut Server available: one that supports up to 10 clients
and one that supports unlimited clients. If your situation changes, you may find that
you need to change your system from one type to the other. For example, if you
originally installed the 10 client version, you can update to the unlimited license version
by purchasing the appropriate upgrade and entering the new serial number provided
with the upgrade.
Updating your Final Cut Server license is done through Final Cut Server System Preferences
and does not involve the Final Cut Server Installation disc or using the installer.
Chapter 2 Using the Installer 35
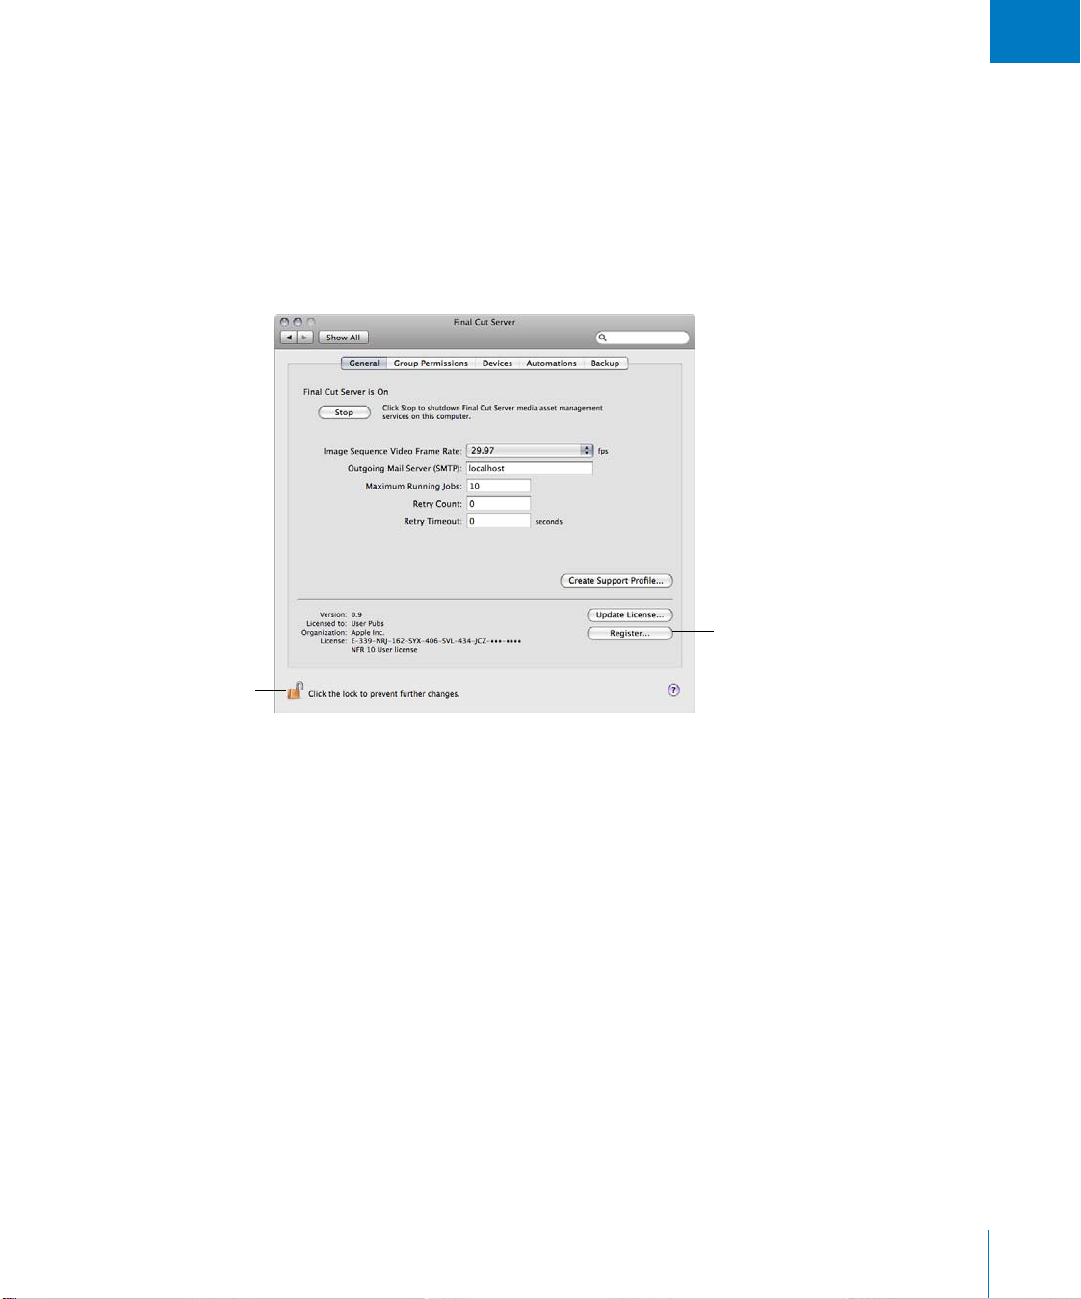
Page 36

You must click the lock
and authenticate yourself
to make changes to any
of these panes.
To update your Final Cut Server license:
1 Open System Preferences on the computer with Final Cut Server installed.
2 Click the Final Cut Server item in the Other section.
The Final Cut Server System Preferences pane appears.
Click Update License to
enter a new serial number.
3 Select the General pane (if necessary).
4 Click the lock in the lower-left corner and authenticate yourself.
5 Click the Update License button.
A pane appears for you to enter your name, organization, and the new serial number.
6 Enter the information and click OK.
36 Part I Installation and Configuration
Page 37
I
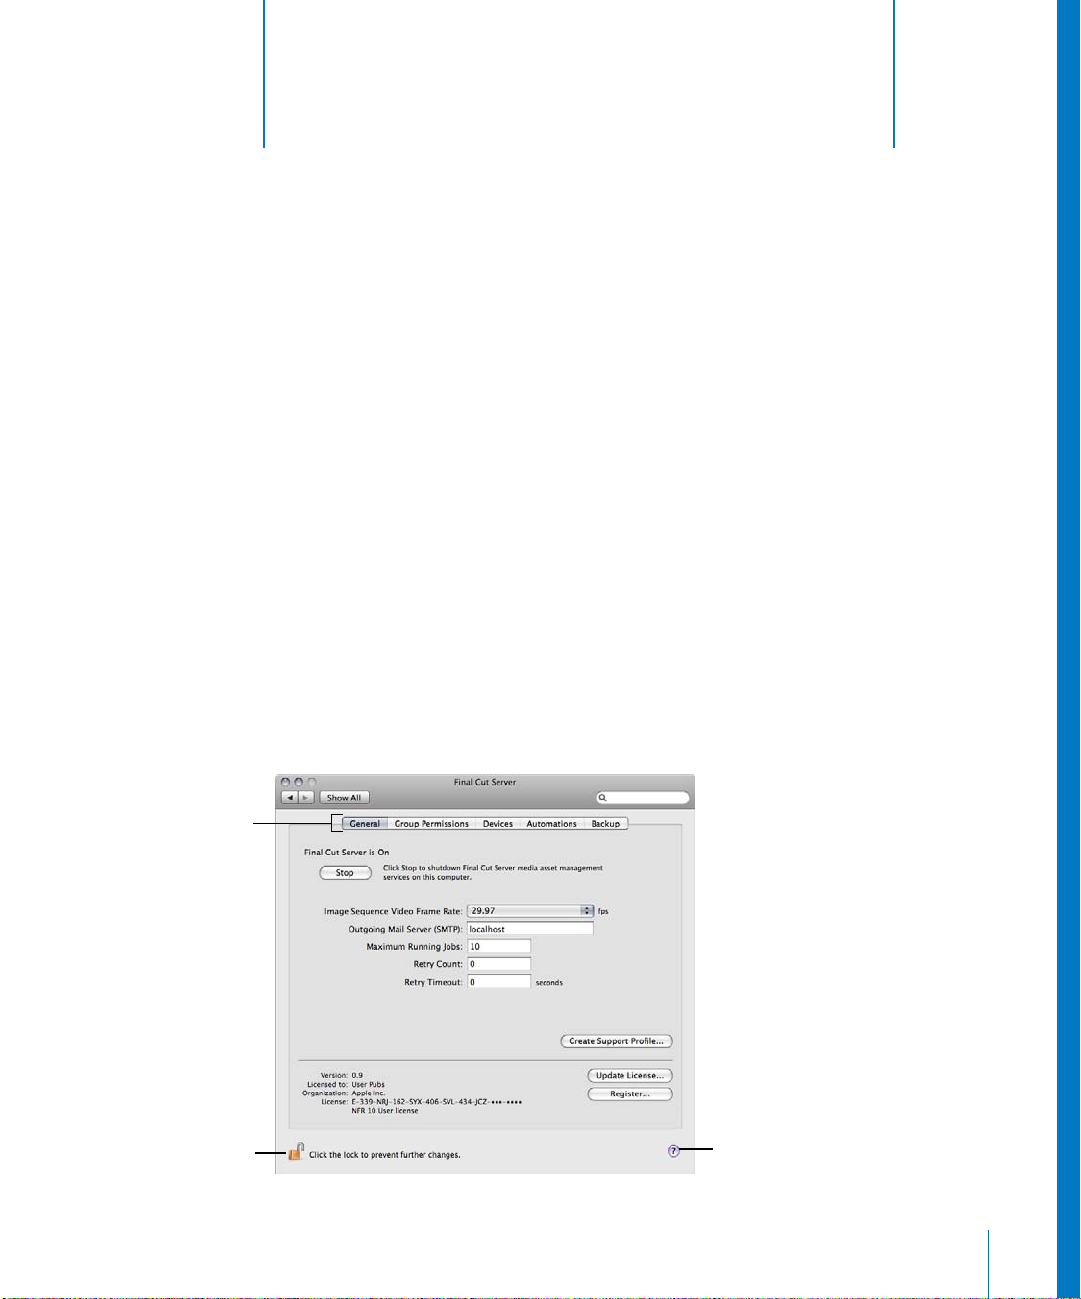
Registering Final Cut Server
Once you have installed Final Cut Server, you should register it. Registering your
Final Cut Server installation is done through Final Cut Server System Preferences.
To register your Final Cut Server installation:
1 Open System Preferences on the computer with Final Cut Server installed.
2 Click Final Cut Server in the Other section.
The Final Cut Server System Preferences pane appears.
You must click the lock
and authenticate yourself
to make changes to any
of these panes.
Click Register to open the
registration dialog.
3 Select the General pane (if necessary).
4 Click the lock in the lower-left corner and authenticate yourself.
5 Click the Register button.
The Registration Information dialog opens.
6 Enter your name, organization, address, and email information. By default, the Me card
information in your Address Book is automatically entered in the appropriate fields.
7 If you want information about Apple news and software updates sent to your email
account, select the checkbox.
8 If you want to review the Apple Privacy Policy, click Privacy Policy.
9 When you have finished, click Register Now.
Final Cut Server is now registered.
Chapter 2 Using the Installer 37
Page 38

Page 39
3 Configuring System Preferences
3
This chapter covers the following:
 Introduction to Final Cut Server System Preferences (p. 39)
 General Pane Settings (p. 40)
 Group Permissions Pane Settings (p. 42)
 Devices Pane Settings (p. 43)
 Automations Pane Settings (p. 44)
 Backup Pane Settings (p. 45)
Once you have installed Final Cut Server, you can continue its setup by configuring
Final Cut Server System Preferences.
Introduction to Final Cut Server System Preferences
After you have installed Final Cut Server, a Final Cut Server item is added to the Other
section of System Preferences. Clicking this item shows the General pane (or the last
pane that was selected) of Final Cut Server System Preferences.
Click these buttons to
select the pane to
configure.
Click the lock and
authenticate yourself to
make changes to any of
these panes.
Click the question mark
to view a PDF version of
this manual.
39
Page 40

The top of the pane includes buttons to select which Final Cut Server panes to
configure. The lower-right corner includes a question mark button that opens the
onscreen version of this manual as a PDF file. The lower-left corner includes the lock
that you use to authenticate yourself. You must do this before you can make any
changes to the Final Cut Server settings.
The Final Cut Server installer configures the settings in these panes to defaults that you
may need to change. Be sure to verify these settings before opening any
Final Cut Server clients.
General Pane Settings
The General pane includes a variety of basic Final Cut Server settings.
Note: Most of these settings are also available from the client’s Administration window.
The exceptions are the Stop/Start, Update License, and Register buttons.
40 Part I Installation and Configuration
Page 41

I
Following are the General pane settings:
 Stop/Start button: Click the Stop button to shut down Final Cut Server services. The
button changes to Start, which you can click to start Final Cut Server services.
Note: You cannot make any changes to Final Cut Server while its services are shut down.
 Image Sequence Video Frame Rate: Choose the frame rate to use when working with
still-image sequences.
 Outgoing Mail Server (SMTP): Enter the name of the outgoing SMTP server used to
send all emails. This setting is also configured during the Final Cut Server installation
process. If this was left blank during installation, this setting defaults to “localhost,”
which you can use if this computer has Mac OS X Server v10.5 and is configured as
an SMTP email server.
Final Cut Server can be configured to send email notifications for a variety of reasons,
such as a set of assets being ready for review. See “
page 209 for more information.
 Maximum Running Jobs: Enter the maximum number of jobs that can run
concurrently on Final Cut Server. Most facilities will set this to no more than 20 jobs.
 Retry Count: Enter the maximum number of times to retry a failed job.
 Retry Timeout: Enter the period (in seconds) to wait before retrying a failed job.
 Create Support Profile: In certain support situations, AppleCare may require
information about both your computer and how this particular application is
configured. Clicking Create Support Profile creates a file that contains the necessary
information and can be emailed to AppleCare.
Note: You would not normally use this feature unless directed to by an AppleCare
representative.
 Update License: Click this button to update the Final Cut Server license information
entered during the initial installation. For example, if you are upgrading to an
unlimited client license, you can click this button to enter the new serial number.
 Register: Click this button to enter your registration information.
About Email Responses” on
Chapter 3 Configuring System Preferences 41
Page 42

Group Permissions Pane Settings
You use the Group Permissions pane to choose the Mac OS X groups that can access
Final Cut Server. You also assign permission sets to each group, allowing you to control
the areas of Final Cut Server to which each group has access.
By default, the group of “admin” is added with the default “admin” permission set. If you
have already configured local groups using the Accounts pane of System Preferences or
Leopard Server Workgroup Manager, or if this server is on an Open Directory network,
you can add groups and assign permission sets. Otherwise, see Chapter 4, “
Users and Groups,” on page 47 for more information on managing Final Cut Server
users and groups.
To add a group and assign a permission set to it:
1 Click the Add (+) button.
Note: If necessary, click the lock and authenticate yourself first.
A list of groups appears.
2 Choose the group to add.
The group appears in the Group Permissions pane list.
3 Click in the Permission Set area next to the group name in the list, and choose a
permission set to assign to the group.
See “About the Customer Profiles” on page 29 for information on the permission sets
created by the installer for the customer profile you selected. See Chapter 4, “Adding
Users and Groups,” on page 47 for information about using Workgroup Manager and
creating permission sets.
Adding
42 Part I Installation and Configuration
Page 43

I
Devices Pane Settings
Devices are storage locations where Final Cut Server can interact with assets and
productions. When you installed Final Cut Server, you entered a production media
location. By default, Final Cut Server creates three devices at that location: Library,
Watchers, and Media.
The Devices pane of System Preferences includes a Device Setup Assistant that you can
use to modify these default devices or add additional devices. See Chapter 5, “
Device Setup Assistant,” on page 59 for detailed information on adding and managing
additional devices.
Chapter 3 Configuring System Preferences 43
Using
Page 44

Automations Pane Settings
The Automations pane allows you to create, edit, and enable watchers and subscriptions.
 Watchers are Final Cut Server items that you configure to monitor a device. When an
event occurs that it is watching for, such as a media file being added to the device or
removed from it, the watcher executes a response, such as copying the media file to
another location or sending an email.
 Subscriptions are Final Cut Server items that you configure to monitor metadata
changes. When an event occurs that the subscription is watching for, such as an asset
having its current status changed to Ready for Review, the subscription executes a
response such as sending an email to the reviewer.
There are two types of automations you can configure with the Automation pane’s
Automation Setup Assistant: a file system watcher that responds to any file changes
to a specified location and a metadata subscription that responds to specific
metadata changes.
In each case, the response of the watcher or subscription can be to copy a file to
another location, send an email to specified addresses, or archive a file.
44 Part I Installation and Configuration
Page 45
I
The installer creates default watchers and subscriptions based on the customer profile
you selected. Following are two examples:
 Media to Library [Copy] watcher: This file system watcher monitors the Watchers
device’s Media folder (created by the installer) and automatically copies any new
assets in it to the Library device with no conversion.
 Assets Ready for Review [Email] subscription: This metadata subscription monitors all
assets in the catalog and sends an email whenever any of the assets have their
metadata changed to the Ready for Review state. This subscription (and any others
using email responses) uses the email addresses you enter or email addresses
entered as an asset’s required reviewers.
You can modify or delete the default automations or create new ones using
Automation Setup Assistant. You can control whether these automations are active or
not with their On checkboxes.
See Chapter 6, “
on editing these automations and creating new ones.
Using Automation Setup Assistant,” on page 77 for detailed information
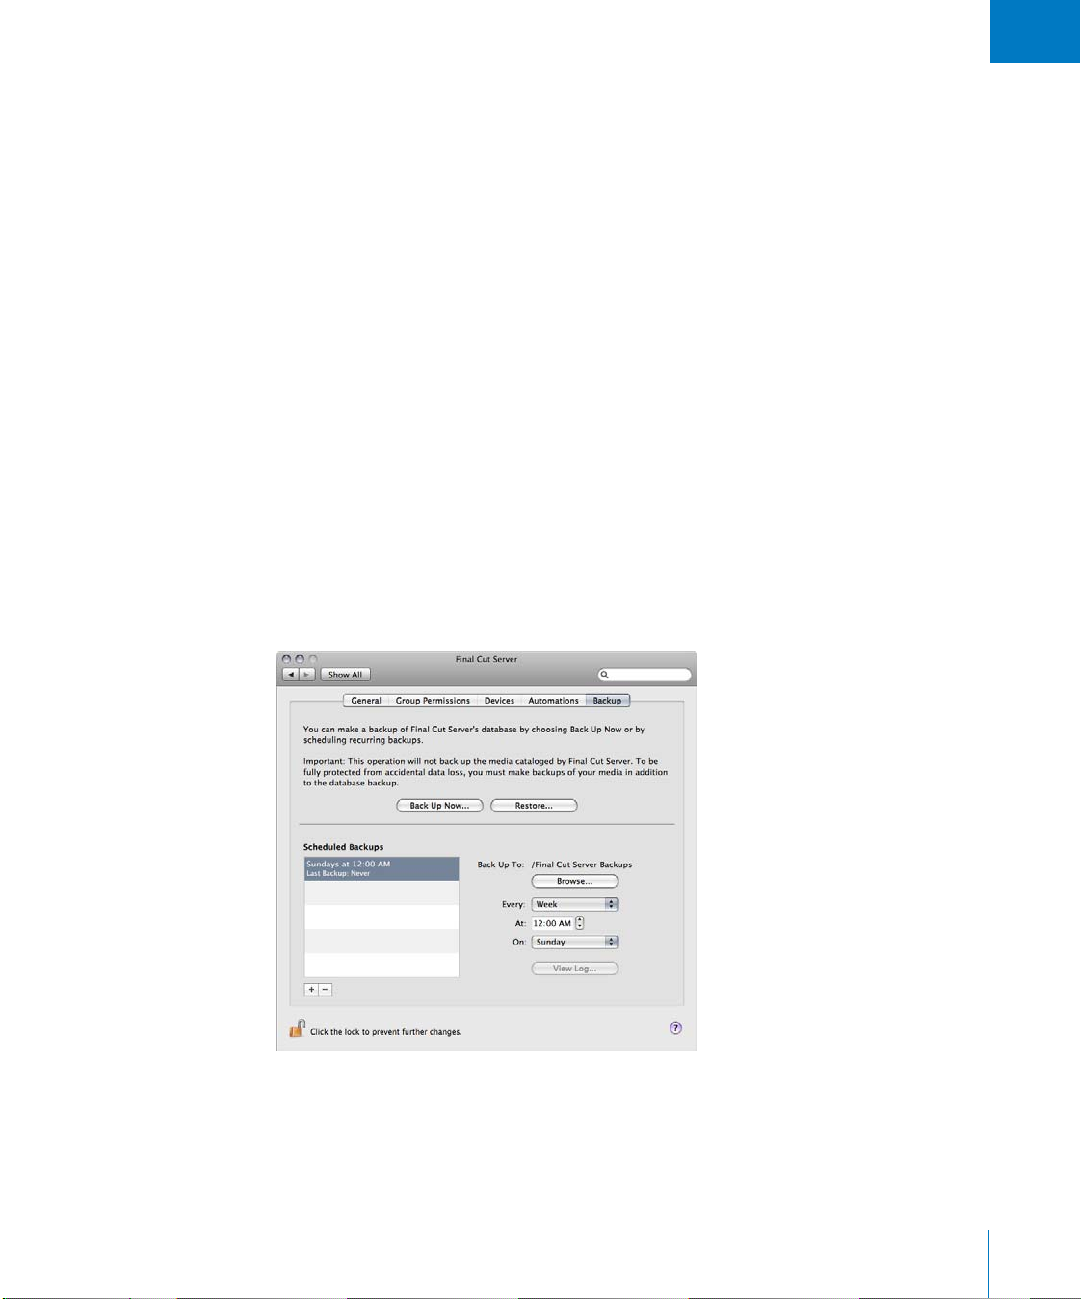
Backup Pane Settings
The Backup pane allows you to create backup files containing all of the information from
your Final Cut Server catalog, including preferences and system configuration information.
See Chapter 7, “
Backup pane.
Chapter 3 Configuring System Preferences 45
Backing Up Final Cut Server,” on page 91 for information on using the
Page 46

Page 47

4 Adding Users and Groups
This chapter covers the following:
 About Users and Groups (p. 47)
 Using the Accounts Pane of System Preferences (p. 49)
 Using Mac OS X Server Workgroup Manager (p. 53)
 Adding Groups to Final Cut Server (p. 56)
 About the Permission Sets (p. 57)
About Users and Groups
To use Final Cut Server, you usually need to add at least one group with at least one
user. In most cases, you will create several groups, each configured with different
permissions and then add the appropriate users to each group.
4
The Final Cut Server installer automatically adds the computer’s Administrators group,
named “admin,” and applies the default “admin” permission set to it.
The actual creation of the groups and users can be done on a separate server
computer using Open Directory or on the computer you installed Final Cut Server on
using either the Accounts pane of System Preferences or using Mac OS X Server
Workgroup Manager (if installed on Leopard Server). In Final Cut Server, you choose the
groups to use, create permission sets, and assign the permission sets to each group.
47
Page 48

Final Cut Server supports both locally created groups and users and Open
Directory-based groups and users. If you have a smaller facility, it is easiest to create one
or more local groups and local users. If you have a larger facility already using the
Mac OS X Server Open Directory architecture, Final Cut Server can easily use that as the
basis for configuring users and groups.
Important: If you use another computer as your Open Directory server, it must use
Mac OS X Server v10.5 and not Mac OS X Server v10.4.
Groups enable asset security to be controlled in several ways. You can:
 Define filters restricting the assets and productions viewable by a group
 Control access to media on devices connected to Final Cut Server
 Control access to functions in the user interface
Note: A user can belong to multiple groups, each with its own permission set. The
permission set with the highest priority determines the user’s ability to access items
within Final Cut Server. See “
About the Permission Sets” on page 57 for more
information.
Creating groups and users for Final Cut Server involves these steps:
Step 1: Create users in the Accounts pane of System Preferences
or in Workgroup Manager
You can either create local users or skip this step if you already have user accounts set
up using Open Directory.
Step 2: Create groups in the Accounts pane of System Preferences
or in Workgroup Manager
You need to create one or more groups using the Accounts pane of System Preferences
or Workgroup Manager. You may skip this step if suitable groups have already been
created using Open Directory.
Step 3: Add users to the groups in the Accounts pane of System Preferences
or in Workgroup Manager
Once you have created the groups, you can add users to them. You can mix local and
Open Directory users.
Step 4: Add the groups to Final Cut Server
Once the groups have been created and users added to them, you need to add the
groups to Final Cut Server.
48 Part I Installation and Configuration
Page 49

I
Step 5: Create custom permission sets for the groups (if necessary)
Based on the profile selected during Final Cut Server installation, your system will
already have several permission sets. These permission sets define a wide variety of
permission settings, allowing you to control access to the Final Cut Server catalog. You
can create additional permission sets if necessary. See “Adding and Managing
Permission Sets” on page 127 for more information.
Step 6: Assign permission sets to groups
Assigning permission sets to the groups is the last step in making Final Cut Server
available to your users.
This chapter covers the most common tasks in adding and configuring groups. See
Chapter 10, “Groups and Permissions,” on page 125 for details about creating
permission sets and using the client’s Administration window to manage permissions.
Using the Accounts Pane of System Preferences
The Accounts pane of System Preferences contains all that you need to create and
manage local groups and users. This method is available to Leopard and
Leopard Server users.
To open the Accounts pane of System Preferences:
1 Do one of the following:
 Choose Apple menu > System Preferences.
 Click System Preferences in the Dock.
The System Preferences window opens.
Click Accounts to open
the Accounts pane.
Chapter 4 Adding Users and Groups 49
Page 50

2 Click the Accounts button in the System category.
The Accounts pane appears.
Accounts list
The account currently
logged in
Local user accounts
Local groups
Click the Add button
to add local users
and groups.
Click the lock to
authenticate yourself.
Note: To make any changes to the Accounts pane, you must first authenticate
yourself by clicking the lock and entering the name and password of a user with
administration permissions.
50 Part I Installation and Configuration
Page 51

I
Creating Users
Creating local users in the Accounts pane requires you to enter the user name and
password and make a few basic choices about that user.
To create a local user account:
1 Click the Add ( + ) button.
2 Choose the type of account to create from the New Account pop-up menu in the
dialog that appears.
 Administrator: An administrator can create and delete accounts, install software,
change system settings, and change the settings of other users.
 Standard: A regular user account. A standard user can only install software for the
user account, can’t make changes to locked System Preferences, and can’t create
accounts.
 Managed with Parental Controls: An account with limited privileges that are managed
by Parental Controls.
 Sharing Only: Can only access files in a specified location. Cannot change files on the
computer or log in at the login window.
 Group: An account that consists of selected users. See “
Their Membership,” next, for more information about this option.
In most cases you will create Standard accounts.
Chapter 4 Adding Users and Groups 51
Creating Groups and Setting
Page 52

3 Enter the name and password.
The short name is automatically created; however, you can change it in this dialog
if necessary.
Note: You cannot change the short name once the account is created.
4 Set other attributes as needed.
5 Click Create Account.
The new user appears in the accounts list. You can modify an existing user account by
selecting it in the accounts list.
Creating Groups and Setting Their Membership
Creating local groups in the Accounts pane requires you to enter a group name.
To create a local group account:
1 Click the Add ( + ) button.
2 Choose Group from the New pop-up menu in the dialog that appears.
Note: The New pop-up menu may be named New Account, depending on the type of
account created last.
3 Enter the name.
4 Click Create Group.
The new group appears in the accounts list. You can modify an existing group by
selecting it in the accounts list.
52 Part I Installation and Configuration
Page 53

I
To set the members of a group:
1 Click the group’s name in the accounts list.
2 Select the checkboxes of all user accounts and groups that you want to be associated
with this group.
Change this group’s
name (if necessary).
Select the accounts
and groups to make
members of this group.
Click the globe to select
a directory domain.
Users button
Accounts list
Using Mac OS X Server Workgroup Manager
Mac OS X Server Workgroup Manager is located in the Applications/Server/ folder of
Leopard Server. Workgroup Manager contains all that you need to create and manage
local and Open Directory–based groups and users.
Groups button
Important: This manual covers only basic Workgroup Manager workflows and assumes
you have a working knowledge of Workgroup Manager. It also assumes you have
administrator privileges. See the Mac OS X Server documentation for detailed procedures.
Chapter 4 Adding Users and Groups 53
Page 54

Creating Users
Creating local users in Workgroup Manager requires you to enter the user name and
password and make a few basic choices about that user.
To create a local user account:
1 Click the Accounts button in the Toolbar.
2 Click the globe, located below the Admin button in the Toolbar, to select the local
directory domain.
3 Click the Users button, located above the accounts list.
The accounts list shows all local users already on the server.
4 Click the New User button in the Toolbar.
5 Enter the name and password.
6 Set other attributes as needed.
7 Click Save.
The new user appears in the accounts list. You can modify an existing user account by
selecting it in the accounts list.
Note: You can also create local user accounts in the Accounts pane of System Preferences.
Creating Groups
Creating local groups in Workgroup Manager requires you to enter a group name.
To create a local group account:
1 Click the Accounts button in the Toolbar.
2 Click the globe to select the local directory domain.
3 Click the Groups button, located above the accounts list.
The accounts list shows all local groups already on the server.
4 Click the New Group button in the Toolbar.
5 Enter the name.
6 Set other attributes as needed.
7 Click Save.
The new group appears in the accounts list. You can modify an existing group by
selecting it in the accounts list.
54 Part I Installation and Configuration
Page 55

I
Adding Users to a Group
Once you have created user and group accounts, you can add users to the groups.
To add users to a group:
1 Select the group in the accounts list.
Click the Groups button. Click Members.
Click the Add button
Select a group.
2 Click the Members button.
3 Click the Add (+) button.
A drawer opens with a list of user accounts.
to add members
to the group.
Click the globe to select
a directory domain.
You can click the drawer’s globe to select a different directory domain. This makes it
possible to add both local and other users to a group.
4 Do one of the following to add users from the drawer to the group’s member list:
 Drag a user’s name from the drawer to the group member list.
 Double-click the name in the drawer.
5 Click Save.
Chapter 4 Adding Users and Groups 55
Page 56

Adding Groups to Final Cut Server
Once you have finished setting up your groups, you are ready to add the groups to
Final Cut Server.
You can add the groups using the server’s Final Cut Server System Preferences or you
can use the client’s Administration window.
Note: See “Adding Groups to Final Cut Server” on page 125 for information about using
the client’s Administration window to manage permissions. See “Adding and Managing
Permission Sets” on page 127 for more information about permission sets.
To add a group to Final Cut Server using System Preferences:
1 Open System Preferences on the Final Cut Server computer.
2 Click the Final Cut Server icon in the Other area.
The Final Cut Server pane appears.
3 Click Group Permissions to see the group settings.
Click the Add button to
add a group.
The left side lists the current Final Cut Server groups. The right side lists the permission
set assigned to each group.
4 If the lock (in the lower-left corner) is closed, click it and authenticate yourself.
5 Click the Add (+) button.
A list of all groups, local and Open Directory, appears.
56 Part I Installation and Configuration
Page 57

I
6 Choose the group to add from the pop-up menu that appears.
Note: If the list is long, you can type the first few letters of its name to jump to its part
of the list.
The group is added to the Group list.
The added group
Click the group’s default
permission set (admin) to
choose a new permission
set.
7 Click in the Permission Set area of the new group and choose a permission set from the
pop-up menu.
About the Permission Sets
The Final Cut Server installer automatically creates six permission sets.
 admin: This is the only permission set that includes access to the Final Cut Server
client’s Administration window. It provides access to all aspects of the
Final Cut Server system. It should only be assigned to groups of users that are
capable of administering all aspects of the Final Cut Server system.
 artist, manager, and editor: These permission sets are all identical and provide access
to all aspects of the Final Cut Server system except for those that are specific to the
admin permission set.
The intention of these three permission sets is to give you a starting point for
creating specific permission sets for different groups of users. For example, you might
want to modify the artist permission set so that those users are only able to access
specific devices that contain the graphics they work on.
Chapter 4 Adding Users and Groups 57
Page 58

 reviewer: This permission set is unable to create, delete, catalog, or edit any of the
assets within the Final Cut Server catalog. The reviewer permission set is only able to
see assets that have a status of Approved, Ready for Review, Rejected, or Completed.
 browser: This permission set is unable to create, delete, catalog, edit, edit details, or
copy any of the assets within the Final Cut Server catalog. The browser permission
set is only able to see assets that have a status of Approved.
You can create other permission sets using the Final Cut Server client’s Administration
window. See “Adding and Managing Permission Sets” on page 127 for more information.
Because a user can belong to multiple groups and each group can have a different
permission set, Final Cut Server includes the ability to set the priority level of each
permission set. The permission set with the highest priority is the one applied when
the user belongs to multiple groups.
Important: While it is normal to give permission sets with the broadest permissions the
higher priorities, it is not required.
To set the permission set priorities:
1 Click Set Priorities in the Permissions pane of Final Cut Server System Preferences.
A pane appears showing the permission sets arranged in order of their priority, with
the highest priority permission set (usually “admin”) at the top.
2 Drag the permission sets to change their order.
3 Click OK to close the pane.
You can also set the priorities of the permission sets in the Administration window’s
Permission Set pane. See “
58 Part I Installation and Configuration
Modify” on page 130 for more information.
Drag a permission set up
or down to set its priority
relative to the other
permission sets.
Click the Set Priorities
button to adjust the
permission set priorities.
Page 59

5 Using Device Setup Assistant
5
This chapter covers the following:
 Introduction to Devices (p. 59)
 About Creating Devices (p. 60)
 About the Default Devices (p. 61)
 Adding a Device (p. 62)
 Device Type Configurations (p. 68)
 Editing an Existing Device (p. 73)
 Deleting an Existing Device (p. 74)
Introduction to Devices
Devices are simply file storage locations that have been configured for Final Cut Server
to use to store and manage your assets and productions. The Final Cut Server installer
creates a number of devices, including several used for specialized functions such as
storing proxies and tracking asset versions. See “
for more information.
About the Default Devices” on page 61
In addition to these default devices, you will usually need to create additional devices
based on your system configuration. For example, if you have a volume that contains
your current assets, you can create a device that scans that volume and automatically
adds its assets to the Final Cut Server catalog. (Note that this process does not change
anything on a volume you make into a device; the volume’s assets and structure are
unchanged. The Final Cut Server catalog adds entries for each of the assets and suitable
proxy files are created and stored in the Proxy device.)
Using Device Setup Assistant you can add, remove, and configure devices that
Final Cut Server can use. Devices can be as simple as a folder on the Final Cut Server
computer, an FTP server, or an Apple Xsan volume.
59
Page 60

About Creating Devices
There are two methods you can use to add and modify devices within
Final Cut Server: using Device Setup Assistant in Final Cut Server System Preferences
and using the Devices pane of the client’s Administration window.
About Creating Devices Using Device Setup Assistant
Device Setup Assistant in Final Cut Server System Preferences is simple to use and includes
additional features, such as a scan and transcode settings configuration ability. Manually
configuring similar features would require you to use multiple Administration panes.
Device Setup Assistant also makes it much easier to install certain kinds of devices,
such as network devices and Xsan volumes, by simplifying the number of settings.
Additionally, Device Setup Assistant verifies all settings you make before allowing you
to continue to the next step. (Devices created with the Administration window are not
verified until you actually use them.)
The drawbacks of using Device Setup Assistant are that you do not have access to
some of the more esoteric settings and that you cannot configure several device types,
such as a device using a Contentbase file system or an edit-in-place device that does
not use an Xsan volume. However, you can modify a device created with Device Setup
Assistant in the Administration window, configuring the more esoteric settings.
Important: Contentbase devices do not appear in the Devices pane of Final Cut Server
System Preferences. All other devices, including those created by the installer and using
the client’s Administration window, appear in the Devices pane of Final Cut Server
System Preferences.
About Creating Devices Using the Administration Window
The Devices pane of the Administration window gives you access to more device
settings than Device Setup Assistant. Most users, however, do not require these
settings, although they can be useful in some situations. The Administration window is
the only place that you can configure devices using the Contentbase file system or
non-Xsan based edit-in-place devices.
Although you can configure network devices with the Administration window, it is
more difficult with its variety of settings.
See Chapter 12, “
Administration window for managing your devices. See “About Edit-in-Place Devices”
on page 172 for more information on edit-in-place devices.
Managing Devices,” on page 163 for information on using the
60 Part I Installation and Configuration
Page 61
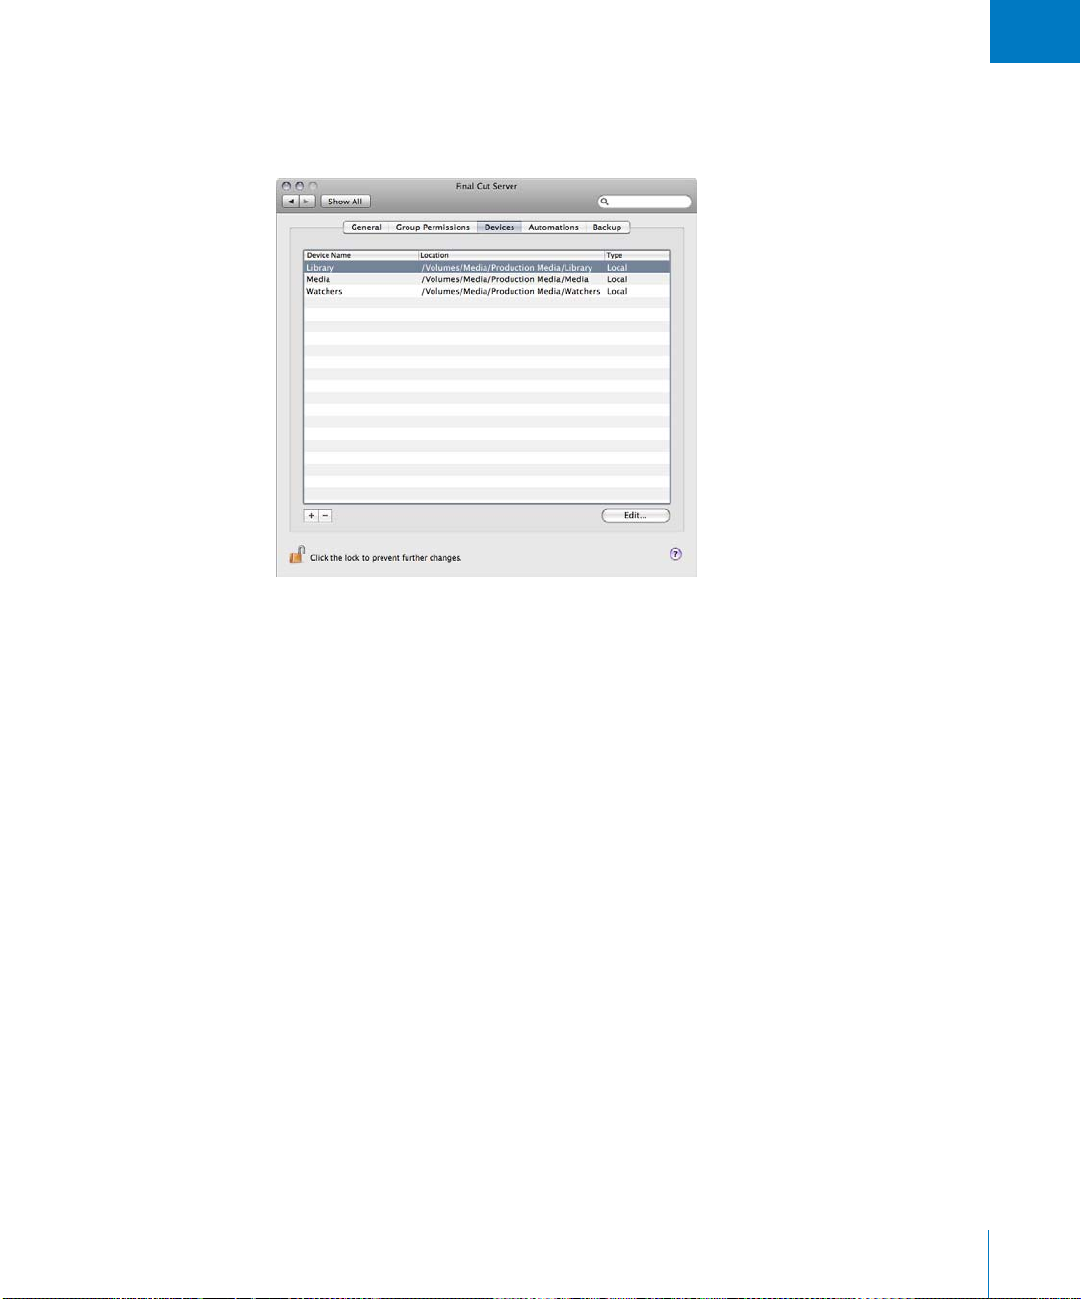
I
About the Default Devices
When you installed Final Cut Server, you entered a production media location. By default,
Final Cut Server creates three devices at that location: Library, Watchers, and Media.
The default Library, Watchers, and Media devices are actually just subfolders
Final Cut Server created in the production media location. Users can use these devices
as is; for example, they can add assets and productions to these devices.
The Watchers device is intended to be used for the automations created by the
installer. For example, you could add media to this folder or one of its subfolders and
an automation would notice the media and copy it to a different device, adding it to
the Final Cut Server catalog and transcoding it if needed. The default automations are
all configured to watch the folders within this device.
Chapter 5 Using Device Setup Assistant 61
Page 62

The Library and Media devices are intended to be used as general-purpose media
storage locations. The default automations are all configured to copy media to the
Library device.
Each of these devices has the following configurations:
 Scan settings allow you to have Final Cut Server automatically check the device for
new, changed, or deleted assets at regular intervals. Only the Media device can have
scan settings configured by the installer using the “Catalog Media device
automatically” setting. See “Starting the Final Cut Server Installer” on page 24 for
more information.
 Transcode settings allow you to choose a format to convert an asset to when it is
uploaded or copied to the device. The Watchers device has no transcode settings
assigned to it because it is not intended to be used as a destination when uploading or
copying assets in Final Cut Server—it is intended to be the source device for upload
operations. The Library and Media devices have all of the transcode settings assigned
to them, making copying or uploading assets to those devices flexible and easy.
You can use Device Setup Assistant to modify these devices to include scan and
transcode settings. You can also use Device Setup Assistant to modify the scan and
transcode settings of these and other devices you add to Final Cut Server using Device
Setup Assistant or the client’s Administration window. See “
on page 73 for more information.
Editing an Existing Device”
Adding a Device
Final Cut Server supports six types of devices when using Device Setup Assistant in
Final Cut Server System Preferences:
 Local: Local devices include drives that are connected directly to the Final Cut Server
computer. These can include additional internal hard disks as well as connected
FireWire or USB drives.
 Network AFP: These are network-connected shares using the Apple Filing Protocol (AFP).
 Network SMB/CIFS: These are network-connected shares using the Server Message
Block (SMB) and Common Internet File System (CIFS) protocols. These are usually
Windows-based servers.
 Network NFS: These are network-connected shares using the Network File System
(NFS) protocol.
 Network FTP: These are network-connected shares using the File Transfer Protocol (FTP).
 Xsan: These are devices that are located on an Apple Xsan storage area network.
Each device can have scan and transcode settings configured.
62 Part I Installation and Configuration
Page 63

I
Scan settings define how often Final Cut Server examines the device to see if any
content has changed. This is an optional setting.
Note: Scan settings you configure using Device Setup Assistant create one or more
schedules and one or more scan responses. These schedules and responses appear in
the Final Cut Server client’s Administration window’s Schedule and Response panes.
Important: Scan settings you configure using Device Setup Assistant apply to the
entire device—you cannot choose to only scan specific folders. You can create
schedules and scan responses with the Administration window that apply to specific
folders within a device or you can create devices using Device Setup Assistant from
those folders.
Transcode settings define the various video and audio formats that the device can use
when transcoding an asset. You must choose at least one transcode setting, although
one of the settings is No Conversion. These settings are made available when you
upload an asset to the device.
To add a device using Device Setup Assistant:
1 In Final Cut Server System Preferences, click Devices.
This pane lists the current devices.
Important: If you have created devices using the client’s Administration window, they
should appear in this list (except for Contentbase devices). If any are missing, you
should quit System Preferences, then open it again to refresh the list.
2 Click the lock and authenticate yourself as the administrator.
Chapter 5 Using Device Setup Assistant 63
Page 64

3 Click the Add (+) button.
Device Setup Assistant starts.
4 Select one of the three choices, then click Continue:
 Local: Select this when you are creating a device stored on a local drive.
 Network: Select this when you are creating a device stored on a networked device.
 Xsan: Select this when you are creating a device stored on an Xsan storage area network.
Depending on which of the above you selected, a pane appears to configure the
device. See “Device Type Configurations” on page 68 for specific details about each
device type.
5 Configure the Device Type pane, then click Continue.
The Archive Device pane appears.
64 Part I Installation and Configuration
Page 65

I
6 Click the Enable as an Archive Drive checkbox if you intend this device to be used as an
archive device.
Archive devices are used for long-term storage of assets and productions. They are
generally large or slow external disk drives or network connections that are connected
to the computer only when needed. When you archive an asset or production, its
media file is copied to the archive device and removed from its current device, freeing
up disk space on that device. The asset or production remains in the Final Cut Server
catalog and can be restored at a later date if necessary.
7 Click Continue.
 If you selected the Enable as Archive Device checkbox, the Conclusion pane appears,
as described in step 11.
 If you did not select the Enable as Archive Device checkbox, the Scan Settings pane
appears.
Chapter 5 Using Device Setup Assistant 65
Page 66

8 Configure the scan settings.
There are two types of scans you can configure: full and add only.
 Full scans examine the device for any changes, including any new, changed, or
removed files. All of these changes are then made to the Final Cut Server catalog. Full
scans are processor intensive and may require significant computer resources to run.
For that reason, they are usually set to run once a day or once a week, and usually at
an otherwise slow time, such as the default time of 12:00 AM.
 Add Only scans are not as thorough as full scans, locating only new and changed files
with a created or modified date between the last time this scan ran and the current
time (it will not see new files with created or modified dates older than when the
scan last ran; for example, files that you dragged to the device from the Finder).
These changes are then made to the Final Cut Server catalog. Because add only scans
are not as processor intensive as full scans, they are configured to run often, such as
at the default frequency of every 15 minutes.
Note: Device Setup Assistant requires you to configure a full scan before you can
configure an add only scan. See “
General Automation Tips” on page 195 for more
information you should be aware of when configuring scan responses.
Important: Scan responses created for a device using Device Setup Assistant will
have versioning disabled, regardless of whether version control was enabled when
you installed Final Cut Server. You can edit the response using the Final Cut Server
client’s Administration window.
9 Use the Metadata Set pop-up menu to choose a metadata set to assign to assets added
to the Final Cut Server catalog by these scans.
Metadata sets, which are comprised of metadata groups and fields, define the types of
metadata you can add to an asset. You can create custom metadata sets, groups, and
fields using the Final Cut Server client’s Administration window. See Chapter 11,
“Managing Metadata,” on page 135 for more information.
Important: You cannot assign a different metadata set to an asset later.
66 Part I Installation and Configuration
Page 67

I
10 Click Continue.
The Transcode Settings pane appears.
11 Select one or more transcoding settings for this device to use whenever an asset has to
be transcoded, then click Continue.
The No Conversion item is selected by default.
Note: You can manage the list of transcoding settings with the Transcode Settings
pane in the client’s Administration window. See Chapter 13, “Managing Transcode
Settings,” on page 187 for more information.
The Conclusion pane appears.
12 Verify the configuration settings for the device, then click Done to create the device.
Device Setup Assistant closes and the new device is added to the Devices pane of
Final Cut Server System Preferences.
Chapter 5 Using Device Setup Assistant 67
Page 68

Device Type Configurations
Device Setup Assistant shows different panes depending on the device type you
choose. See “
Local Devices
Local devices include drives that are connected directly to the Final Cut Server
computer. These can include additional internal hard disks as well as connected
FireWire or USB drives. Directly connected Xserve RAIDs are especially useful.
Important: It is strongly suggested that you do not create any devices on the server
computer’s startup disk. Devices contain large media files and can use all of the
available disk space on their hard disk, which causes serious issues if that hard disk is
also the startup disk.
Adding a Device” on page 62 for definitions of these device types.
The pane for local devices contains the following settings:
 Device Name: Enter a name for the device.
 Location: Enter a location for the device. This can be a folder on any internal disk
drive or external drive connected using FireWire or USB. Click Browse to locate the
drive and folder to use as the device.
68 Part I Installation and Configuration
Page 69

I
Network Devices
There are four types of network devices you can add. The Network Device Type pane
includes a Network Protocol pop-up menu for choosing the type of network drive to use.
Important: All AFP, SMB, and FTP network devices created with Device Setup Assistant
require you to use a password. You can create these devices without passwords using
the Administration window of the Final Cut Server client.
AFP and SMB Networks
The following pane appears with Apple Filing Protocol (AFP), Server Message Block
(SMB), and Common Interface File System (CIFS) network-connected shares.
Choose AFP or SMB/CIFS.
AFP and SMB/CIFS devices have the following settings:
 Device Name: Enter a name for the device.
 Network Protocol: Choose the type of network connection required for this device. In
this case, choose either AFP or SMB/CIFS to match your network connection.
 File Server: Enter the hostname of the server.
 Path: Enter the path of the server to use as the root path.
 User Name: Enter your user name in this field to log in automatically to the server on
every attempted server access, such as searching and copying.
 Password: Enter the password that goes with the above User Name entry. Leave this
field blank if the User Name field is blank.
Chapter 5 Using Device Setup Assistant 69
Page 70

SMB/CIFS devices have an additional setting:
 Workgroup: Enter the name of the workgroup.
The Workgroup field
appears when you
choose the SMB/CIFS
network protocol.
NFS Networks
The following pane appears with Network File System (NFS) protocol
network-connected shares.
NFS network devices have the following settings:
 Device Name: Enter a name for the device.
 Network Protocol: Choose the type of network connection required for this device. In
this case, choose NFS to match your network connection.
 File Server: Enter the hostname of the server.
 Mount Point: Enter the path that the server exports for use as the root path.
 Subpath: Enter a path to the folder this device is to use as its root path.
70 Part I Installation and Configuration
Choose NFS.
Page 71

I
FTP Networks
The following pane appears with File Transfer Protocol (FTP) network-connected shares.
Choose FTP.
FTP network devices have the following settings in its pane:
Â
Device Name:
Â
Network Protocol:
this case, choose FTP to match your network connection.
Â
File Server:
Â
Absolute Path:
with a forward slash ( / ), it is relative to the root folder of the server. If this path does
not start with a forward slash, it is relative to the default folder of the server the user
uses to log in (usually the user’s home folder).
Â
Use Passive FTP Mode:
Â
User Name:
every attempted FTP server access, such as searching and copying. Leave this field
blank to display the login page on every attempted FTP server access.
Â
Password:
field blank if the User Name field is blank.
Enter a name for the device.
Choose the type of network connection required for this device. In
Enter the hostname of the server.
Enter the path of the server to use as the root path. If this path starts
Select this checkbox to use passive mode FTP transfers.
Enter your user name in this field to log in automatically to the server on
Enter the password that goes with the above User Name entry. Leave this
Chapter 5
Using Device Setup Assistant
71
Page 72
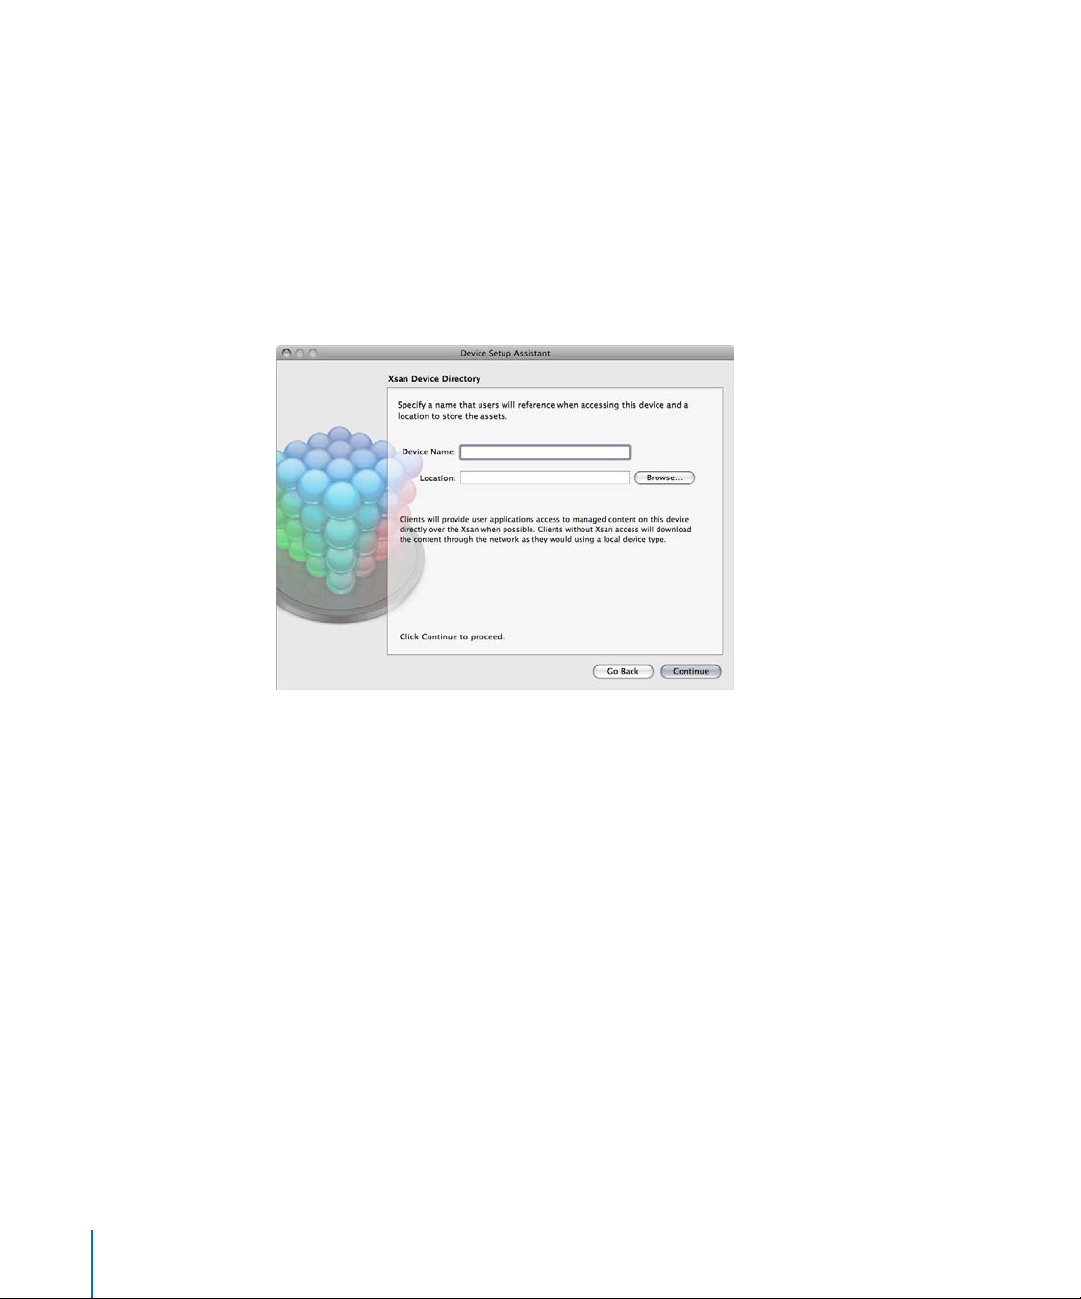
Xsan Devices
Apple Xsan storage area network (SAN) devices provide fast access to media files.
Xsan devices are automatically configured with an edit-in-place path. This allows
Final Cut Server clients with access to the same Xsan volume to have high
performance file transfers. Clients without access to the Xsan volume will experience
normal network performance for file transfers.
Important: Xsan volumes must be mounted locally on this server using the Xsan
Administrator application before it is possible to configure them as Final Cut Server
devices.
The Xsan Device Directory pane contains the following settings:
 Device Name: Enter a name for the device.
 Location: Enter a location for the device. Click Browse to locate the Xsan volume and
folder to use as the root of the device.
72 Part I Installation and Configuration
Page 73

I
Editing an Existing Device
You can edit the location, scan, and transcode settings of any devices that you create
with Device Setup Assistant. You can also edit the location and transcode settings and
add scan settings to devices created with the client’s Administration window.
Important: Not all device settings that are available in the client’s Administration
window are editable with Device Setup Assistant. Those unique settings are left as they
are by Device Setup Assistant.
To edit an existing device using System Preferences:
1 Click Devices in the Final Cut Server pane of System Preferences.
2 In the Devices pane, do one of the following:
 Double-click the device you want to change.
 Select the device, then click the Edit button.
Note: You must unlock System Preferences to activate the Edit button.
Important: If you have created devices using the client’s Administration window, they
should appear in the Devices pane list (except for Contentbase devices). If any are
missing, you can lock and then unlock the pane to refresh the list.
Device Setup Assistant appears, showing the Directory pane.
3 Configure the Directory pane and click Continue.
The Scan Settings pane appears.
4 Configure the Scan Settings pane and click Continue.
The Transcode Settings pane appears.
5 Select all of the transcode settings that you would like this device to support, then click
Continue.
The Summary pane appears, showing the changes you have made.
6 Click Done to apply the changes to the device.
Chapter 5 Using Device Setup Assistant 73
Page 74

Deleting an Existing Device
You can delete any of the existing devices by using the Delete button ( - ) of the
Final Cut Server System Preferences Devices pane.
Important: If you have created devices using the client’s Administration window, they
should appear in the Devices pane list (except for Contentbase devices). If any are
missing, you can lock and then unlock the pane to refresh the list.
To delete an existing device using System Preferences:
1 Select the device in the Devices pane.
2 Do one of the following:
 Press the Delete key.
 Click the Delete ( - ) button.
A dialog appears warning you that all pending jobs will be canceled and that this
deletion cannot be undone. Additionally, it lists how many responses and watchers are
going to be deleted in addition to the device.
3 Click OK.
The device is removed from the device list.
The following are some things to keep in mind when deleting a device:
 Deleting a device removes it and all of its assets from the Final Cut Server catalog.
This includes removing all proxy files from the Proxy device and versions from the
Version device.
Note: If the deleted device contained many assets that were in the Final Cut Server
catalog, it might take a significant amount of time for the delete operation to finish.
You cannot continue working with System Preferences until the delete completes.
 Deleting a device does not affect the actual contents of the device’s volume.
 If a job involving the device is in progress when you delete it, that job must be
completed before the device is actually deleted. (All other pending jobs are
canceled.) If you do not want to wait for the current job to finish, you can cancel it in
the client’s Search All Jobs window.
 If you used Device Setup Assistant to add scans to a device, the schedules and
responses created for those scans are also deleted when the device is deleted.
74 Part I Installation and Configuration
Page 75

I
 If you used the client’s Administration window to configure any schedules or
responses for a device, only the scan and copy responses that reference that device
are deleted when the device is deleted. You can use the client’s Administration
window to manually delete any schedules that were created for the deleted device.
 Any watchers that reference the device being deleted are also deleted. Any
responses that support the deleted watchers are not deleted, and will have to be
deleted manually using the client’s Administration window.
∏ Tip: To make it easier to know which responses, watchers, and devices are related to
each other, be sure to give them all names that make it easy to identify them.
Chapter 5 Using Device Setup Assistant 75
Page 76

Page 77

6 Using Automation Setup Assistant
6
This chapter covers the following:
 About Creating Automations (p. 77)
 About the Default Automations (p. 78)
 Creating Automations (p. 79)
 Editing an Existing Automation (p. 88)
 Deleting an Existing Automation (p. 89)
About Creating Automations
The Automations pane allows you to create, edit, and enable automated watchers
and subscriptions.
 Watchers are Final Cut Server items that you configure to monitor a device. When an
event occurs that it is watching for, such as when a media file is added to the device
or removed from it, the watcher executes a response such as copying the media file
to another location or sending an email.
 Subscriptions are Final Cut Server items that you configure to monitor metadata
changes. When an event occurs that the subscription is watching for, such as when
an asset has its current status changed to Ready for Review, the subscription
executes a response such as sending an email to the reviewer.
77
Page 78

Final Cut Server provides two methods for creating automations: using Automation
Setup Assistant (described in this chapter) and using the client’s Administration window.
About Creating Automations Using Automation Setup Assistant
Automation Setup Assistant makes it easy to create the most commonly used
automations. You can also modify any of the automations you create, including the
default automations created by the Final Cut Server installer.
About Creating Automations Using the Administration Window
The Final Cut Server client’s Administration window contains a set of panes that make it
possible to create highly complex automations. The drawback of this is that it is a bit
complicated to configure simple automations.
See Chapter 14, “Managing Automations,” on page 193 for detailed information.
About the Default Automations
The installer creates default watchers based on the customer profile you selected.
Following are two examples:
 Media to Library [Copy] watcher: This file system watcher monitors the Watchers
device’s Media folder (created by the installer) and automatically copies any new
assets in it to the Library device with no conversion. It also then deletes the assets
from the Watchers device’s Media folder.
These watchers are all based on subfolders in the Watchers device. The name of the
folder is listed first in the watcher’s name. Depending on the customer profile you
selected during installation, these folders can include Graphic and Media. These
watchers also apply suitable metadata sets to each folder’s assets.
All of these automations are configured to copy any media added to any of these
folders to the Library device with no transcoding of the media.
 Assets Ready for Review [Email] subscription: This metadata subscription monitors all
assets in the catalog and sends an email whenever any of the assets have their
metadata changed to the Ready for Review state. This subscription (and any others
using email responses that were created by the installer) uses the email addresses
you enter or email addresses entered as an asset’s required reviewers.
You can modify any of the default automations or create new ones using the
Automations pane. You can control whether these automations are active or not with
their On checkboxes (by default they are all disabled).
See “Editing an Existing Automation” on page 88 for information on editing an
automation.
78 Part I Installation and Configuration
Page 79

I
Creating Automations
There are two types of automations you can configure with Automation Setup
Assistant: a file system watcher that responds to any file changes to a specified location
and a metadata subscription that responds to specific metadata changes.
In each case, the response of the automation can be to copy a file to another location,
send an email to specified addresses, or archive a file.
To create a new automation:
1 Unlock the Final Cut Server pane of System Preferences.
2 Click Automations to show the Automations pane.
This pane lists the current watchers and subscriptions.
Important: If you have created watchers and subscriptions using the client’s
Administration window, they should appear in this list. If any are missing, you can lock
and then unlock the pane to refresh the list.
Chapter 6 Using Automation Setup Assistant 79
Page 80
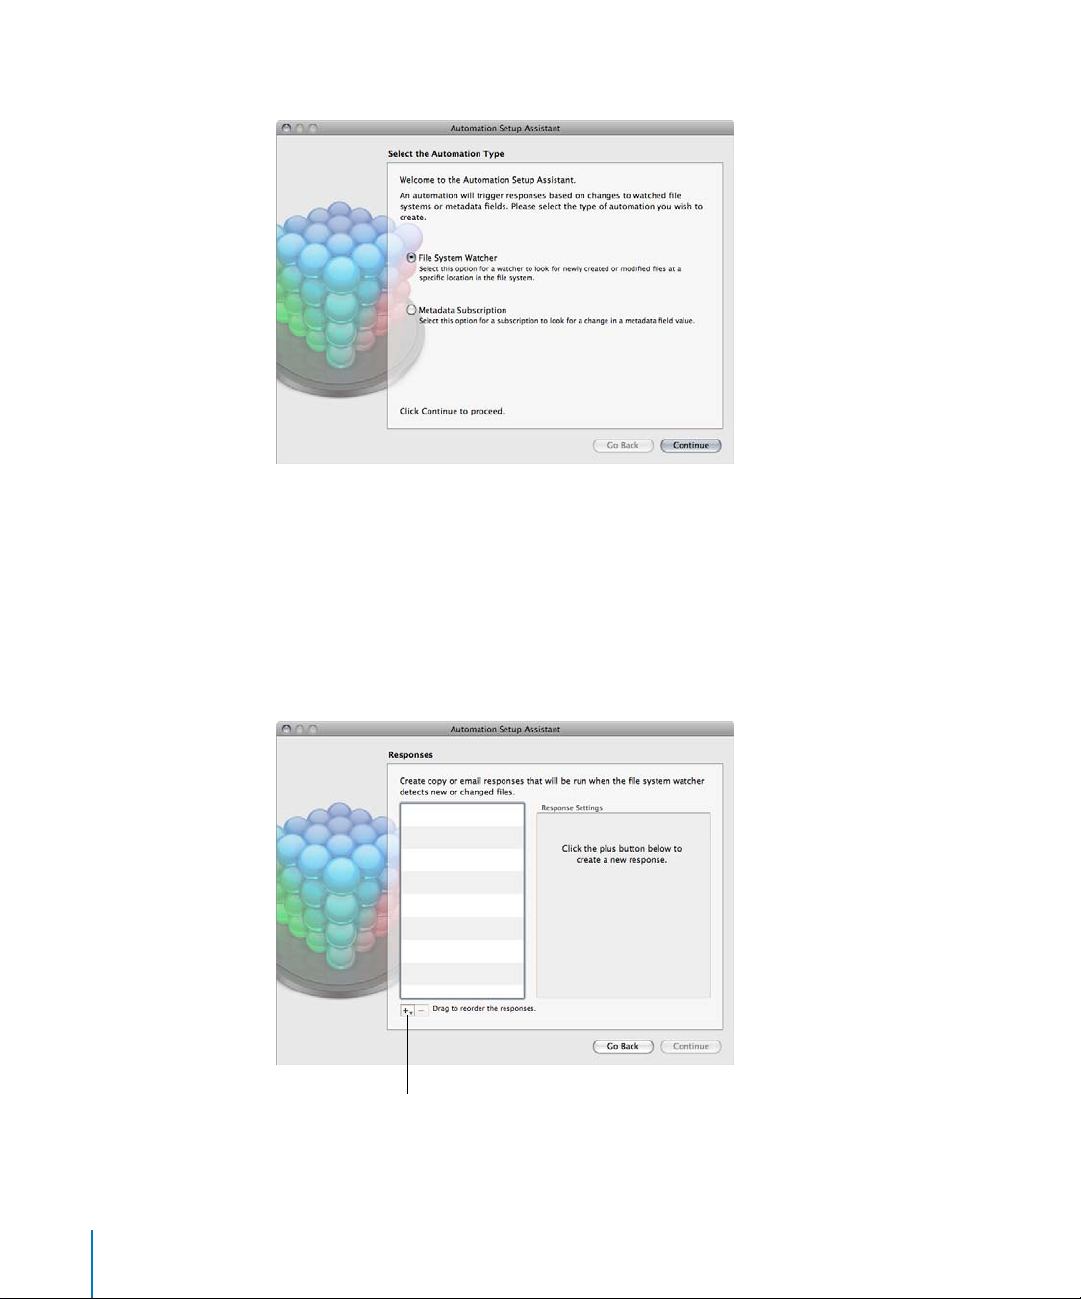
3 Click the Add (+) button to open Automation Setup Assistant.
4 Select either File System Watcher or Metadata Subscription, then click Continue.
A pane appears for you to set up the selected automation type. See “File System
Watcher Details” on page 82 and “Metadata Subscription Details” on page 83 for more
information about these two choices.
5 Configure the selected automation type, then click Continue.
The Responses pane appears. This pane is similar for both automation types. It is what
you use to add one or more responses to the automation.
Click the Add button to choose
the response type to use.
80 Part I Installation and Configuration
Page 81

I
6 Click the Add (+) button, then choose a response type to add to the automation:
 Copy Response: This response copies items from their current location to the location
specified in this response. You can also choose to transcode the items during the
copy. See “Copy Response Details” on page 85 for more information.
 Email Response: This response emails the addresses you enter. You add the email
addresses, the subject, and the body text. There are a variety of helpful codes you
can enter to automatically include asset names and other information. See “Email
Response Details” on page 86 for more information.
 Archive Response: This response archives the items. Archiving copies the asset’s
primary file to the selected archive device (if any archive devices have been
configured) and removes it from its current location. See “Archive Response Details”
on page 87 for more information.
 Delete Response: This response is usually used with watchers that also use a copy
response. Once the copy response copies the assets from the folder that the watcher
is monitoring, the delete response removes them from the watched folder. See
Delete Response Details” on page 88 for more information.
“
Note: If used, delete responses must be the last item in the Responses pane.
7 Click Continue once you have added and configured all of the responses you need.
The Summary pane appears.
8 Confirm that the settings are as intended, then click Done to close Automation Setup
Assistant and add the new automation to the list in the Automations pane.
Chapter 6 Using Automation Setup Assistant 81
Page 82

File System Watcher Details
Configuring the settings for a file system watcher involves choosing the device to
watch, entering a specific location on that device, and optionally adding media format
extensions to specifically watch for.
See “Creating Automations” on page 79 for information on opening Automation Setup
Assistant and getting to this pane by selecting File System Watcher.
To configure a file system watcher’s details:
1 Enter a name for the automation.
This is the name that will appear in the Watcher pane of the client’s Administration window.
2 Choose a device from the Device pop-up menu.
3 Select the Watch Subfolder checkbox if you want to specify a subfolder to be watched.
Leave this unselected if you want to scan only the root level of the device.
4 Enter a subfolder location on the device to watch (if applicable).
5 Optionally, click the Add (+) button to specify file types to watch for, based on
their extension.
6 Click Continue to go to the Responses pane.
See “Creating Automations” on page 79 for information on the Responses pane.
82 Part I Installation and Configuration
Page 83

I
Metadata Subscription Details
Configuring the settings for a metadata subscription automation involves choosing
whether to watch assets or productions and configuring specific rules to look for.
See “Creating Automations” on page 79 for information on opening Automation Setup
Assistant and getting to this pane by selecting Metadata Subscription.
To configure a metadata subscription automation:
1 Enter a name for the automation.
This is the name that will appear in the Subscription pane of the client’s
Administration window.
2 Select whether to watch assets or productions.
3 Configure the Metadata area to specify the metadata to watch for.
You can add multiple lines in the Metadata area to make the subscription very specific.
Click the Add (+) button to add an additional line or the Delete ( - ) button to remove a
line (when more than one line is present).
4 Click Continue.
The Responses pane appears. See “Creating Automations” on page 79 for information
on the Responses pane.
Chapter 6 Using Automation Setup Assistant 83
Page 84

Each line in the Metadata area contains at least two pop-up menus:
 The first pop-up menu in the line chooses the metadata field to watch. In general, you
cannot add multiple lines that have the same metadata field selected. The exception
is if one of the lines has its operator (the second pop-up menu) set to Changes.
 The second pop-up menu chooses the operator to use when monitoring the first
pop-up menu’s metadata field. This choice determines whether a third item appears
in the line, which can be a text entry field or a third pop-up menu.
For example, if you want the automation to watch for an asset whose status changes to
Approved, you can use two lines.
 Choose Status in the first line’s first pop-up menu, then choose Changes in the
second pop-up menu. This sets this automation to only activate if the Status
metadata field for an asset changes.
 Add a second line and choose Status in its first pop-up menu, choose Matches in the
second pop-up menu, and then choose Approved in the third pop-up menu.
This sets this automation to only notice assets whose status changes to Approved and
to ignore any assets previously set to Approved.
84 Part I Installation and Configuration
Page 85

I
Copy Response Details
You use a copy response when you want to copy the items identified by the
automation to a different location.
The settings for a copy response are as follows:
 Name: Enter the name of the response. This name will appear in the Responses pane
of the Administration window.
 Destination Device: Choose a device to copy the items to.
 Destination Subfolder: Click this checkbox to use the Browse button to choose a
Destination Device subfolder.
 Transcode source to: Choose a transcode setting to use during the copy. This list is
based on the transcode settings assigned to the device you choose.
 Metadata Set: Choose the metadata set to apply to the copied assets. Choose None to
have the media file copied but not added to the Final Cut Server catalog as an asset.
Metadata sets, which are comprised of metadata groups and fields, define the types
of metadata you can add to an asset. You can create custom metadata sets, groups,
and fields using the Final Cut Server client’s Administration window. See Chapter 11,
“Managing Metadata,” on page 135 for more information.
Important: If the destination device already contains a file with the same name as the
one being copied, copy responses by default will not overwrite that file, and instead,
will add a numbered extension to the new file’s name. Copy responses created using
the Final Cut Server client’s Administration window can optionally be set to overwrite
an existing file with the same name. See “About Copy Responses” on page 207 for
more information.
Chapter 6 Using Automation Setup Assistant 85
Page 86

Email Response Details
You use an email response when you want to send an email whenever the automation
has detected whatever it has been configured to detect.
The settings for an email response are as follows:
 Name: Enter the name of the response. This name will appear in the Responses pane
of the Administration window.
 To: Enter the email addresses to send the email to. Use a comma to separate
addresses; for example, rev1@apple.com,rev2@apple.com.
 From: Enter the email address to send the email from. This is the “reply to” address to
which the email recipient can send an email if necessary.
 Subject: Enter the email subject. You can enter codes to automatically add specific
information to the email’s subject.
 Body: Enter the email’s main text. You can enter codes to automatically add specific
information to the email.
 Insert Metadata Field: Choose a metadata field name from this pop-up menu to have
that field’s data added to the email. The fields are added as text in square brackets at
the insertion point’s location in this pane, with the actual field’s data being substituted
for that text when the email is actually created and sent.
For example, you can add the “Required reviewers” metadata field to the To entry (it
appears as [Required reviewers]); when the email is actually sent, all email addresses
added to the asset’s “Required reviewers” field are automatically entered in the To entry.
86 Part I Installation and Configuration
Page 87

I
Keep the following points in mind when using the Insert Metadata Field feature:
 You can add metadata fields to the To, Subject, and Body entries of the email.
 If the asset does not have any data for a metadata field added to the email, the email
includes the bracketed field name in the email in place of the data.
 You can create custom metadata fields that appear in the Insert Metadata Field
pop-up menu—all you have to do is add them to a metadata group using the
Administration window. The metadata fields that appear in this list are those that are
part of metadata groups in the Custom Metadata category (in other words, any
groups that can be added to a metadata set). See “Metadata Fields” on page 138 for
more information.
 In addition to choosing a metadata field from this pop-up menu, you can manually
type the metadata field’s name (enclosed in square brackets). Since these are
case-sensitive, be sure to exactly match the name of the metadata field.
Archive Response Details
You use an archive response when you want the identified items to be archived.
The settings for an archive response are as follows:
 Name: Enter the name of the response. This name will appear in the Responses pane
of the Administration window.
 Destination Archive Device: Choose an archive device from this pop-up menu.
 Destination Subfolder: Click this checkbox to use the Browse button to choose a
Destination Archive Device subfolder.
Chapter 6 Using Automation Setup Assistant 87
Page 88

Delete Response Details
You use a delete response when you want to remove assets from the watch folder after
they have been copied by a copy response.
There are no settings for a delete response.
Note: When used, delete responses must be the last item in the Responses pane.
Editing an Existing Automation
You can edit an existing watcher or subscription automation using Automation Setup
Assistant. This includes those created using Automation Setup Assistant and those
created using the client’s Administration window. For example, you may find that you
need to change an email address.
Important: If you have created watchers and subscriptions using the client’s
Administration window, they should appear in the Automations pane list. If any are
missing, you should quit System Preferences, then open it again to refresh the list.
88 Part I Installation and Configuration
Page 89

I
To edit an existing automation:
1 Authenticate yourself if necessary.
2 Do one of the following:
 Double-click an existing automation.
 Select an automation, then click the Edit button.
The automation opens in Automation Setup Assistant, where you can make any
needed changes.
Note: You cannot change the automation type (file system watcher or metadata
subscription).
Important: When editing an automation created using the client’s Administration
window, you will not be able to edit any responses assigned to it other than email,
copy, or archive responses. However, you can remove any response, whether it is
editable or not, from the automation.
Deleting an Existing Automation
You can delete any of the existing automations by using the Delete button ( - ) of the
Final Cut Server System Preferences Automations pane.
To delete an existing automation using System Preferences:
1 Select the automation in the Automations pane.
2 Do one of the following:
 Press the Delete key.
 Click the Delete ( - ) button.
A dialog appears warning you that this deletion cannot be undone. Additionally, it lists
how many items are going to be deleted.
3 Click OK.
The automation is removed from the device list.
Chapter 6 Using Automation Setup Assistant 89
Page 90

The following are some things to keep in mind when deleting an automation:
 When you delete an automation created using Automation Setup Assistant, any
responses created for that automation by Automation Setup Assistant are also
deleted. Any responses that you created and manually added to the automation
using the client’s Administration window are not deleted.
 When you delete an automation created using the client’s Administration window,
no responses are deleted.
90 Part I Installation and Configuration
Page 91

7 Backing Up Final Cut Server
7
This chapter covers the following:
 Introduction to Backing Up Your System (p. 91)
 Backup Strategies (p. 92)
 Backing Up Your Final Cut Server Catalog (p. 94)
 About the Backup Files (p. 95)
 Restoring Your Final Cut Server Catalog (p. 96)
Introduction to Backing Up Your System
Final Cut Server includes a backup feature that allows you to create a backup copy of
the Final Cut Server catalog. Being able to restore the catalog from the backup copy
can help you get your system running again should you need to reinstall
Final Cut Server.
The Backup pane makes it easy to manually or automatically make backup copies of
your Final Cut Server catalog.
Important: The backup feature only backs up the Final Cut Server catalog—it does not
back up any assets or projects stored on any of your devices.
91
Page 92

Backup Strategies
A Final Cut Server system is comprised of a lot of files stored on a variety of computers
and devices. Backing up an entire Final Cut Server system can be challenging,
especially when you consider the potentially large file sizes you may have to deal with.
Backing Up Devices
Backing up assets on your devices is straightforward. You can use any current backup
system to make copies of the assets. If you back up your devices as well as your
Final Cut Server catalog, it is a good idea to back them up at the same time. This
ensures the data in the catalog’s backup will match the assets in the device backups.
It is especially important to back up your Proxies and Version devices when you back up
your Final Cut Server catalog. Both of these devices contain special assets used by
Final Cut Server and both use the Contentbase file system. A suggested backup strategy
is to back up the Final Cut Server catalog and place its backup file on the same volume
as the Proxies and Version devices. As soon as the catalog is backed up, you can then
back up it and the two devices at the same time using your normal backup procedures.
Backing Up the Final Cut Server Catalog
Backing up your Final Cut Server catalog actually entails much more than just a file or
two. For that reason, Final Cut Server includes a backup feature that automates the
backup process.
The result of backing up your Final Cut Server catalog is a .zip file that contains a
snapshot of all aspects of your Final Cut Server catalog. This snapshot includes:
 All groups and their permissions
 All metadata for all assets and projects
 All automations, regardless of whether they were created with Automation Setup
Assistant or the client’s Administration window
 A list of all devices and their settings, regardless of whether they were created with
Device Setup Assistant or the client’s Administration window
 All log and job history entries
 All preference settings
92 Part I Installation and Configuration
Page 93

I
The goal of backing up your Final Cut Server catalog is to be able to return to a
known state should there be a catastrophic failure, such as a hard disk failure.
Following is an example of the steps you could take to recover from a hard disk
failure on your server computer.
Step 1: Reinstall Mac OS X on the computer
The first step toward recovering from a hard disk failure is to reinstall the
Mac OS X v10.5 Leopard or Mac OS X Server v10.5 Leopard operating system.
Step 2: Configure your groups as they were previously
Once restored, Final Cut Server will expect the same groups to be available that were in
use previously.
Step 3: Restore your Proxy and Version files
If you backed up the Proxy and Version files at the same time that you last backed up
the Final Cut Server catalog (as suggested previously), you need to restore these files.
These must appear exactly as they did when you last backed up Final Cut Server, in
exactly the same folder location relative to the hard disk’s root folder. Final Cut Server
automatically reconnects to these when its catalog is restored.
Step 4: Install Final Cut Server
You need to reinstall Final Cut Server from the original installation disc. Any settings
you configure during the installation process, such as the location for the proxy server,
are changed back to the previously backed up settings once you restore the
Final Cut Server catalog.
Important: The backup files are specific to the version of Final Cut Server being used
when the files are saved. Before you can restore a backup file, you must make sure that
the Final Cut Server version is exactly the same as when the backup file was created.
This may mean using Software Update after installing Final Cut Server from your
original installation disc.
Be sure to deselect the “Catalog Media device automatically” item in the
Final Cut Server installer’s Settings for Profile pane to ensure that no automations begin
running while you are in the process of restoring your catalog. See “
Final Cut Server Installer” on page 24 for more information.
Starting the
Step 5: Restore the previous Final Cut Server catalog
Once the Final Cut Server installation is finished, you can click the Restore button in the
Backup pane of Final Cut Server System Preferences. This configures Final Cut Server to
the same state it was in during that backup process.
Note: You may need to reset network passwords for devices that require them.
Chapter 7 Backing Up Final Cut Server 93
Page 94

Backing Up Your Final Cut Server Catalog
The backup feature is accessible through Final Cut Server System Preferences.
You have two options for backing up your Final Cut Server catalog: backing it up
immediately or scheduling regular backups.
To back up your Final Cut Server catalog immediately:
1 Select the Backup pane of Final Cut Server System Preferences.
2 Click the Back Up Now button.
A dialog appears in which you enter the filename and location for the backup file.
Important: It is strongly recommended that you do not choose a location for the
backup file that is on the same drive that Final Cut Server is installed on.
3 Click the Back Up button.
A compressed file with a “.zip” extension is created and saved at the specified location.
94 Part I Installation and Configuration
Page 95

I
To back up your Final Cut Server catalog using a schedule:
1 Select the Backup pane of Final Cut Server System Preferences.
2 Click the Add (+) button.
This adds a scheduled backup using the default settings.
3 Select the backup entry in the Scheduled Backups list and configure the settings as follows:
 Click Browse to open a dialog to choose the location for the backup file.
Important: It is strongly recommended that you do not choose a location for the
backup files that is on the same drive that Final Cut Server is installed on.
 Choose either Day (the catalog is backed up every day) or Week (the catalog is
backed up once a week) from the Every pop-up menu.
 Enter a time in the At field.
 If you chose to back up once a week, choose the day to back up on from the On
pop-up menu.
A compressed file named “Final Cut Server DB Backup on [selected folder] at [date and
time].zip” is created and saved at the specified location at the specified day and time.
Once a scheduled backup has run, the View Log button on the Backup pane becomes
available. You can click it to see a log of past scheduled backups.
About the Backup Files
Because the Final Cut Server backup files do not contain any actual media, they are
relatively small files.
It is strongly recommended that you back up the Proxies and Versions devices, along
with the Final Cut Server catalog backup file, shortly after you back up the
Final Cut Server catalog. These devices use the Contentbase file system format and rely
on Final Cut Server having an accurate catalog of their contents. Being able to restore
the devices and catalog from files created at the same time results in the
Final Cut Server catalog accurately matching up to these devices.
Note: It is also suggested that you back up the assets and projects on your other devices.
Chapter 7 Backing Up Final Cut Server 95
Page 96

Restoring Your Final Cut Server Catalog
While restoring your Final Cut Server catalog is easy to do, there are a number of things
to be aware of.
About Restoring Your Catalog
Restoring the catalog can actually be a destructive process.
 If you are restoring the catalog on a new Final Cut Server installation, there is no
practical existing catalog, and you can restore with no danger.
 If you are restoring over an existing catalog, the existing catalog is completely
deleted before the restore begins. If the restore files turn out to not contain what you
had hoped or do not work correctly, you can end up in worse shape than when you
started. For that reason, you are strongly encouraged to back up your existing
Final Cut Server catalog prior to restoring a previous backup file.
Before You Restore Your Catalog
Restoring your catalog may not be all you need to do to get your system working
again. If you are using restore to recover from a hard disk failure, you will need to
configure a few other areas for Final Cut Server to work correctly.
Users and Groups
You need to configure your computer’s users and groups. If your users and groups are
configured on a different computer, all you need to do is ensure this computer can
access that information. The restore function will attempt to assign the permission sets
to the same groups as when the backup file was created.
If your users and groups are configured locally on this computer, you need to
reconfigure them as they were when the backup file was created. Any groups that are
not available during the restore process will not be available to use Final Cut Server
until you manually add them in Final Cut Server System Preferences.
Devices
You should configure your computer to support any internal hard disks, Xsan systems,
RAIDs, network volumes, and external drives that Final Cut Server uses for its devices. If
any of the devices are on volumes that require a password, you will have to manually
configure those passwords using Device Setup Assistant after you have restored the
Final Cut Server backup file.
Note: Be aware that, after the restore is completed, any devices that have full scan
automations configured for them will try to perform those scans at their scheduled
time. If the device is not available and configured properly, this could lead to the scan
purging assets from the catalog.
96 Part I Installation and Configuration
Page 97

I
Restoring Your Catalog
Restoring your Final Cut Server catalog simply requires you to choose a backup file to
restore from.
To restore your catalog:
1 Select the Backup pane of Final Cut Server System Preferences.
2 Click the Restore button.
A file selection dialog appears.
3 Select the backup file to restore from and click the Restore button.
Important: Once you click the Restore button, you cannot cancel the process.
The Final Cut Server current catalog is deleted and the catalog saved with the backup
file is added.
Chapter 7 Backing Up Final Cut Server 97
Page 98

Page 99

8 Installing Final Cut Server Clients
This chapter covers the following:
 Introduction to the Final Cut Server Client (p. 99)
 Using Java Web Start (p. 100)
 About the Java Web Start Client Files (p. 103)
Introduction to the Final Cut Server Client
The Final Cut Server client is what users use to interact with the Final Cut Server
catalog. It also has an Administration window that provides additional
Final Cut Server system configuration controls (which are documented in Part II
of this manual, “General Administration”).
The Final Cut Server client is a Java application that can be run on Mac OS X,
Windows XP, and Windows Vista computers. You install the client using a Java Web
Start process by entering the network location of the Final Cut Server computer in a
web browser. The browser automatically downloads and installs the client.
8
Important: Although the Final Cut Server client can be run on both Mac OS X and
Windows computers, you may have issues with some QuickTime codecs. Several
QuickTime codecs are available in either a Mac OS X or Windows version, but not both.
This may lead to a situation where a media file is not recognized by the client’s computer
and cannot be played. For the best results, record in and encode with codecs supported
by all of the operating systems on which you plan to run Final Cut Server client.
99
Page 100

Using Java Web Start
Final Cut Server clients are installed using Java Web Start.
Important: If multiple users use the computer on which you are installing the
Final Cut Server client, each user will have to install his or her own copy of the client.
Installing the Client Using Java Web Start
To use the Java Web Start method, you must enter a URL in the computer’s browser.
The URL uses the format of http://hostname/FinalCutServer, where hostname is the IP
address or name of the computer on which you installed Final Cut Server.
To install the Final Cut Server client using Java Web Start:
1 Enter the URL for the Final Cut Server computer in the computer’s browser.
The browser displays a page with buttons you use to either start downloading the
Final Cut Server client or to get additional information about installing the client.
2 Click the Download button to begin downloading the client.
Note: If you are unable to install the Final Cut Server client, you can click the Help
button to have the browser display a page with additional installation information.
A file named finalcutserver.jnlp is copied to your download folder or your browser’s
temporary folder, depending on your browser and its settings. See “
Web Start Client Files” on page 103 for more information. Additionally, the browser
displays a page illustrating the client installation process.
Once the download is completed, a dialog appears asking you whether you trust the
downloaded application.
100 Part I Installation and Configuration
About the Java
 Loading...