

Page 1

Final Cut Pro 6
Working with High Definition
and Broadcast Formats
Page 2

K
Apple Inc.
Copyright © 2008 Apple Inc. All rights reserved.
Your rights to the software are governed by the
accompanying software license agreement. The owner
or authorized user of a valid copy of Final Cut Studio
software may reproduce this publication for the purpose
of learning to use such software. No part of this
publication may be reproduced or transmitted for
commercial purposes, such as selling copies of this
publication or for providing paid for support services.
The Apple logo is a trademark of Apple Inc., registered
in the U.S. and other countries. Use of the “keyboard”
Apple logo (Shift-Option-K) for commercial purposes
without the prior written consent of Apple may
constitute trademark infringement and unfair
competition in violation of federal and state laws.
Every effort has been made to ensure that the
information in this manual is accurate. Apple is not
responsible for printing or clerical errors.
Note:
Because Apple frequently releases new versions
and updates to its system software, applications, and
Internet sites, images shown in this book may be slightly
different from what you see on your screen.
Apple Inc.
1 Infinite Loop
Cupertino, CA 95014–2084
408-996-1010
www.apple.com
Apple, the Apple logo, DVD Studio Pro, Final Cut,
Final Cut Pro, Final Cut Studio, FireWire, iDVD, iTunes,
Mac, MacBook, Mac OS, PowerBook, and QuickTime are
trademarks of Apple Inc., registered in the U.S. and
other countries.
Cinema Tools and Finder are trademarks of Apple Inc.
Dolby Laboratories: Manufactured under license
from Dolby Laboratories. “Dolby,” “Pro Logic,” and the
double-D symbol are trademarks of Dolby Laboratories.
Confidential Unpublished Works, © 1992–1997
Dolby Laboratories, Inc. All rights reserved.
Intel, Intel Core, and Xeon are trademarks of Intel Corp.
in the U.S. and other countries.
Other company and product names mentioned herein
are trademarks of their respective companies. Mention
of third-party products is for informational purposes
only and constitutes neither an endorsement nor a
recommendation. Apple assumes no responsibility with
regard to the performance or use of these products.
Production stills from the film “Koffee House Mayhem”
provided courtesy of Jean-Paul Bonjour. “Koffee House
Mayhem” © 2004 Jean-Paul Bonjour. All rights reserved.
http://www.jbonjour.com
Production stills from the film “A Sus Ordenes”
provided courtesy of Eric Escobar. “A Sus Ordenes”
© 2004 Eric Escobar. All rights reserved.
http://www.kontentfilms.com
Page 3

1
Contents
Preface 9 About High Definition and Broadcast Formats
9
Overview of High Definition Video Formats
11
About the Apple ProRes 422 Codec
12
About the Apple Intermediate Codec
Chapter 1 13 Working with HDV
13
About HDV
14
HDV Formats Supported by Final Cut Pro
15
About MPEG Compression
17
Working with HDV in Final Cut Pro
17
Native HDV Editing Workflow
18
Steps for Native HDV Editing
19
Connecting an HDV Device to Your Computer
19
Choosing an Easy Setup
20
Logging and Capturing Native HDV Footage
28
Editing HDV Footage
29
Rendering and Conforming Long-GOP MPEG-2 Media
30
Using the Print to Video Command to Output HDV
32
Transcoded HDV Editing Workflow
32
Steps for Transcoded HDV Editing
32
Connecting an HDV Device to Your Computer
33
Choosing an Easy Setup
33
Capturing and Transcoding HDV Video
35
Editing Video Using Transcoded HDV Footage
35
Outputting HDV to Tape or Exporting to a QuickTime Movie
36
Exporting HDV for DVD Studio Pro
37
Using the Canon XL H1 HDV Camcorder
38
Using the Sony HVR-V1 HDV Camcorder
39
HDV Format Specifications
Chapter 2 43 Working with DVCPRO HD
43
About DVCPRO HD
44
DVCPRO HD Formats Supported by Final Cut Pro
3
Page 4

45
DVCPRO HD Frame Rates
48
Working with DVCPRO HD in Final Cut Pro
48
Connecting a DVCPRO HD Device to Your Computer
49
Choosing a DVCPRO HD Easy Setup
49
Logging and Capturing Your DVCPRO HD Footage
51
Editing DVCPRO HD Footage
52
Outputting Your DVCPRO HD Sequence
53
Using the DVCPRO HD Frame Rate Converter
53
Choosing an Intended Playback Rate
54
How DVCPRO HD Variable Frame Rate Recording Works
56
About the DVCPRO HD Frame Rate Converter
57
About the Frame Rate Converter Options
59
Using the Frame Rate Converter
59
Working with 24p DVCPRO HD
59
Working with 1080pA24 DVCPRO HD Video
61
Working with 720p24 DVCPRO HD Video
62
DVCPRO HD Format Specifications
Chapter 3 67 Working with IMX
67
About IMX
68
IMX Formats Supported by Final Cut Pro
68
About MXF
68
Working with IMX in Final Cut Pro
69
Transferring IMX Footage to Your Computer
69
Importing MXF-Wrapped IMX Media Files into Your Project
69
Choosing an IMX Easy Setup
Editing IMX Clips into a Sequence
69
69
Exporting IMX QuickTime Media Files
70
IMX Format Specifications
Chapter 4 73 Using the Log and Transfer Window
74
About File-Based Media
74
About the Log and Transfer Window
76
File-Based Media Terminology
78
Sample File-Based Media Workflow
80
Mounting Media Devices
80
Using Folders with Valid File-Based Media Folder Structure
80
Using the Browse Area
81
Controls in the Browse Area
83
Adding Volumes and Folders to the Browse Area
83
Selecting Clips in the Browse Area
84
Deleting Clips Directly from Storage Media
84
Using the Preview Area
4
Contents
Page 5

85
Transport Controls in the Preview Area
85
Restrictions During Preview
86
Using the Logging Area
86
Using Autofill Cache Logging Information
87
Incrementing Logging Fields
87
Setting Audio and Video Clip Import Settings
88
Using the Transfer Queue
88
Adding Clips to the Transfer Queue for Ingest
89
Organizing Clips in the Transfer Queue
89
Pausing and Stopping Ingest
89
Filenaming and Clip Naming During Ingest
90
Reingesting Clip Media
91
Working with Spanned Clips
92
Viewing Spanned Clips in the Browse Area
93
Archiving File-Based Media from Cards
93
Archiving to a Folder
94
Archiving to a Disk Image
95
Setting Log and Transfer Import Preferences
Chapter 5 97 Working with Panasonic P2 Cards
97
About Panasonic P2 Cards and Media Files
98
Working with Panasonic P2 Cards and Final Cut Pro
98
Recording Footage with a P2 Camcorder
99
Mounting P2 Cards, Disk Images, and Folders
10 2
Deleting P2 Clips Directly in the Log and Transfer Window
10 2
Restrictions During Preview
Removing Advanced Pull-Down and Duplicate Frames During Transfer
10 3
10 3
Working with Spanned Clips
10 4
Using Print to Video to Output to P2 Cards in the AG-HVX200 Camcorder
10 5
Capturing over FireWire as if a P2 Card Were a Tape in a VTR
10 7
Panasonic AG-HVX200 Camcorder Compatibility
10 9
Panasonic P2 Card Format Specifications
Chapter 6 111 Working with AVCHD
111
About AVCHD
111
AVCHD Formats Supported by Final Cut Pro
112
Working with AVCHD in Final Cut Pro
112
Transferring AVCHD Footage
112
Restrictions When Working with AVCHD
113
Restrictions During Preview
113
Choosing an AVCHD Destination Codec
11 4
AVCHD Format Specifications
Contents
5
Page 6

Chapter 7 117 Working with AVC-Intra
117
About AVC-Intra
117
AVC-Intra Formats Supported by Final Cut Pro
11 8
Working with AVC-Intra in Final Cut Pro
11 8
Restrictions When Working with AVC-Intra
11 8
Restrictions During Preview
11 8
Choosing an AVC-Intra Destination Codec
11 9
AVC-Intra Format Specifications
Chapter 8 121 Working with Sony XDCAM Formats
121
About XDCAM, XDCAM HD, and XDCAM EX
12 2
XDCAM Formats Supported in Final Cut Pro
12 2
XDCAM HD Formats Supported in Final Cut Pro
12 3
XDCAM EX Formats Supported in Final Cut Pro
12 4
Working with XDCAM, XDCAM HD, and XDCAM EX in Final Cut Pro
12 4
Installing Sony XDCAM Software
12 5
Connecting an XDCAM, XDCAM HD, or XDCAM EX Device to Your Computer
12 6
Ingesting XDCAM, XDCAM HD, or XDCAM EX Media
12 6
Choosing an Easy Setup and Editing XDCAM Media in Final Cut Pro
12 7
Choosing an Easy Setup and Editing XDCAM HD or XDCAM EX Media in Final Cut Pro
12 7 Rendering and Conforming XDCAM HD or XDCAM EX Media
12 7 Exporting Sequences to XDCAM, XDCAM HD, or XDCAM EX Media
12 8 XDCAM, XDCAM HD, and XDCAM EX Format Specifications
Chapter 9 131 Working with REDCODE RAW
131 About REDCODE RAW
13 2 About the RED ONE Camera
13 3 Working with REDCODE RAW in Final Cut Pro
13 4 Native REDCODE RAW Editing Workflow for Film
13 5 Transferring REDCODE RAW Media Files to Your Computer
13 6 Choosing the RED FCP Log and Transfer Plug-in for Transfer
13 6 Logging and Transferring REDCODE RAW Footage
13 6 Editing Video for Output to Color
13 6 Outputting to Color
13 7 Outputting DPX Files for Finishing
13 7 Transcoded REDCODE RAW Editing Workflow for Video
13 8 Transferring REDCODE RAW Media Files to Your Computer
13 9 Choosing the Apple ProRes 422 (HQ) Codec for Transcoding
13 9 Logging and Transferring REDCODE RAW Footage
13 9 Editing Video Using Transcoded REDCODE RAW Footage
14 0 Grading Your Transcoded Footage with Color
14 0 Outputting to Tape or Exporting to Compressor
141 REDCODE RAW Format Specifications
6
Contents
Page 7

Chapter 10 143 Working with Sony Video Disk Units
14 3 About Sony Video Disk Units
14 4 Importing Footage from a Sony Video Disk Unit
14 4 Setting Up a Sony Video Disk Unit
14 4 Importing DV Media from a Sony Video Disk Unit
Contents 7
Page 8

Page 9

About High Definition
and Broadcast Formats
More and more video formats are introduced every year.
Making Final Cut Pro the center of your post-production
workflow ensures that your suite is compatible with the
latest broadcast and high definition formats.
This chapter covers the following:
 Overview of High Definition Video Formats (p. 9)
 About the Apple ProRes 422 Codec (p. 11)
 About the Apple Intermediate Codec (p. 12)
Overview of High Definition Video Formats
Digital high definition (HD) formats are defined by their vertical resolutions (number of
lines), scanning methods (interlaced versus progressive), and frame or field rates. For
example, the 1080i60 format has 1080 lines per frame, uses interlaced scanning
(indicated by the i), and scans 59.94 fields per second. HD frame rates are compatible
with NTSC, PAL, or film.
Preface
Note: For comparison to HD formats, standard definition (SD) video formats are now
defined in similar terms. For example, 480i60 has 480 lines, interlaced scanning, and
59.94 fields per second (NTSC).
9
Page 10

The following table shows the HD formats in common use today.
NTSC-Compatible HD Formats
Format Description
1080i60 Has high-resolution frames, is able to capture fast movement, and
has reduced vertical resolution due to interlacing.
Easily downconverts to NTSC.
1080p30 Has high-resolution frames.
Movement is less smooth but resolution is higher than interlaced
formats in areas of movement.
720p60 Captures fast-action movement with clarity. However, still frames
have lower resolution than 1080-line still frames.
Is ideal for sports videography and commercial television.
Easily downconverts to NTSC.
720p30 Is a variant of 720p60 with a lower frame rate.
PAL-Compatible HD Formats
Format Description
1080i50 Has high-resolution frames, is able to capture fast movement, and
has reduced vertical resolution due to interlacing.
Easily downconverts to PAL.
1080p25 Has high-resolution frames.
Movement is less smooth but resolution is higher than interlaced
formats in areas of movement.
720p50 Captures fast-action movement with clarity. However, still frames
have lower resolution than 1080-line still frames.
Is ideal for sports videography and commercial television.
Easily downconverts to PAL.
720p25 Is a variant of 720p50 with a lower data rate.
Can be slowed down to 24 fps for film transfers or downconverted
to PAL.
Film-Compatible HD Formats
Format Advantages
1080p24 Has the resolution, scanning method, frame rate, and aspect ratio
closest to film.
720p24 Is the same as 1080p24, but with lower resolution.
Is ideal for a “film transferred to video” look.
10 Preface About High Definition and Broadcast Formats
Page 11

About the Apple ProRes 422 Codec
The Apple ProRes 422 codec is a high-quality 10-bit 4:2:2 video codec designed for
demanding post-production workflows. Both SD and HD resolutions are supported
at two quality levels—standard and high. All standard frame rates are available:
23.98, 25, 29.97, 50, and 59.94 fps. The standard-quality format is called Apple ProRes 422
and the high-quality format is called Apple ProRes 422 (HQ).
The following Apple ProRes 422 codec formats are available in both high and
standard quality.
Format Frame dimensions Frame rate Scanning method
1080i 1440 x 1080
1920 x 1080
1080p 1440 x 1080
1920 x 1080
720p 1280 x 720
960 x 720
486i (NTSC)
486p
576i (PAL)
576p
720 x 486 29.97 fps Interlaced
720 x 576 25 fps Interlaced
25, 29.97, and 30 fps Interlaced
23.98, 24, 25, 29.97, and
30 fps
23.98, 24, 25, 29.97, 30,
50, 59.94, and 60 fps
Progressive
Progressive
Progressive
Progressive
The Apple ProRes 422 codec uses variable bit rate (VBR) encoding. The actual bit rate
depends on the dimensions, frame rate, image complexity, and quality you are using.
The following table shows several sample bit rates.
Average bit rate
Format Frame dimensions
1080i60, 1080p30
720p60
1080p24 1920 x 1080 176 Mbps 117 Mbps
720p50 1280 x 720 184 Mbps 122 Mbps
720p30 1280 x 720 110 Mbps 73 Mbps
720p24 1280 x 720 88 Mbps 58 Mbps
486i60
486p30
576i50
576p25
1
247.5 Mbps is the maximum data rate allowed.
2
165 Mbps is the maximum data rate allowed.
1920 x 1080
1280 x 720
720 x 486 63 Mbps 42 Mbps
720 x 576 61 Mbps 41 Mbps
(high quality)
1
Mbps 1472 Mbps
220
Average bit rate
(standard quality)
Preface About High Definition and Broadcast Formats 11
Page 12

Here are some advantages of using the Apple ProRes 422 codec:
 Provides lower storage costs compared to the Uncompressed 8-bit and 10-bit codecs.
 Can be used to capture using a third-party video interface with SDI or HD-SDI inputs.
 Can be used to transcode formats that Final Cut Pro does not support natively.
 Can be used to render long-GOP MPEG-2 formats (such as HDV and XDCAM HD) to
avoid MPEG-2 reencoding artifacts before output.
 The Apple ProRes 422 codec used with video processing sequence settings set for
high-precision YUV rendering can be used for preview screenings (avoiding costly
film transfers) and for color grading.
 The Apple ProRes 422 (HQ) codec can be used for output to a high-end mastering
format or even for output to film on lower-budget productions.
The Apple ProRes 422 Codec Works with 8-Bit and 10-Bit Source Files
The Apple ProRes 422 codec always preserves the bit depth of your original source
files. This way, when you import a file using the Apple ProRes 422 codec, you don’t
have to first determine whether it is an 8-bit or 10-bit file—the Apple ProRes 422
codec can automatically handle either bit depth.
About the Apple Intermediate Codec
The Apple Intermediate Codec is a high-quality 8-bit 4:2:0 video codec used mainly as a
less processor-intensive way of working with long-GOP MPEG-2 footage such as HDV.
Format Frame dimensions Frame rate Scanning method
720p 1280 x 720 29.97 fps Progressive
1080i 1440 x 1080 25 and 29.97 fps Interlaced
1080p 1440 x 1080 23.98, 25, and 29.97 fps Progressive
12 Preface About High Definition and Broadcast Formats
Page 13

1 Working with HDV
Final Cut Pro supports native capturing, editing, and output
of HDV media. If you already have experience editing
DV footage, making the switch to HDV is simple.
This chapter covers the following:
 About HDV (p. 13)
 Native HDV Editing Workflow (p. 17)
 Transcoded HDV Editing Workflow (p. 32)
 Using the Canon XL H1 HDV Camcorder (p. 37)
 Using the Sony HVR-V1 HDV Camcorder (p. 38)
 HDV Format Specifications (p. 39)
1
About HDV
HDV is an HD format created by a consortium of manufacturers including Sony, Canon,
Sharp, and JVC. HDV allows you to record an hour of HD video with a consumer-priced
handheld camcorder on standard mini-DV videocassettes. You can connect an HDV
camcorder to your computer via FireWire, so you can capture and output just as you
would with a DV device.
HDV uses MPEG-2 compression to achieve a maximum video data rate of 25 Mbps,
which is the same as the DV data rate. This means you can fit the same amount of
video on your scratch disks as you can when using DV.
Although the HDV workflow is nearly identical to a typical DV workflow, a few
additional steps are required. This chapter describes the unique features of
Final Cut Pro that allow you to capture, edit, and output HDV video in its native format.
What Is ProHD?
ProHD extends the JVC 720p HDV format to support 24 fps video, professional
timecode options, and up to four audio channels.
13
Page 14

HDV Formats Supported by Final Cut Pro
Within the HDV specification, 1080-line and 720-line formats using several frame rates
are defined. Final Cut Pro supports the following HDV formats.
59.94 fps Formats
Final Cut Pro
Format
1080i60 HDV - 1080i60 1440 x 1080 25 Mbps
1080i60 (Canon) HDV - 1080i60
1080F30 (Canon) HDV - 1080p30
1080F24 (Canon) HDV - 1080p24
720p60 HDV - 720p60 1280 x 720 18.3 Mbps
720p30 HDV - 720p30 1280 x 720 18.3 Mbps
720p24 HDV - 720p24 1280 x 720 18.3 Mbps
Easy Setup
FireWire Basic
FireWire Basic
FireWire Basic
25 fps Formats
Final Cut Pro
Format
1080i50 HDV - 1080i50 1440 x 1080 25 Mbps
1080i50 (Canon) HDV - 1080i50
1080F25 (Canon) HDV - 1080p25
720p50 HDV - 720p50 1280 x 720 18.3 Mbps
720p25 HDV - 720p25 1280 x 720 18.3 Mbps
Easy Setup
FireWire Basic
FireWire Basic
Frame dimensions Video data rate
1440 x 1080 25 Mbps
1440 x 1080 25 Mbps
1440 x 1080 25 Mbps
Frame dimensions Video data rate
1440 x 1080 25 Mbps
1440 x 1080 25 Mbps
14 Chapter 1 Working with HDV
Page 15

Standard Definition Recording with an HDV Camcorder
In addition to recording HD video, most HDV camcorders can also record standard
definition DV video. You can capture, edit, and output this DV video just as you would
any other DV video.
Important: You should avoid recording DV and HDV video on the same tape. (You
should also avoid recording HDV footage using different frame sizes and frame rates
on the same tape.) This can cause problems during capture and playback.
An additional format defined within the HDV specification, known as SD, is available
on some JVC camcorders. Final Cut Pro does not support this format.
About MPEG Compression
HD video requires significantly more data than SD video. A single HD video frame can
require up to six times more data than an SD frame. To record such large images with
such a low data rate, HDV uses long-GOP MPEG compression. MPEG compression
reduces the data rate by removing redundant visual information, both on a per-frame
basis and also across multiple frames.
Note: HDV specifically employs MPEG-2 compression, but the concepts of long-GOP
and I-frame-only compression discussed below apply to all versions of the MPEG
standard: MPEG-1, MPEG-2, and MPEG-4 (including AVC/H.264). For the purposes of this
general explanation, the term MPEG here may refer to any of these formats.
Spatial (Intraframe) Compression
Within a single frame, areas of similar color and texture can be coded with fewer bits
than the original frame, thus reducing the data rate with a minimal loss in noticeable
visual quality. JPEG compression works in a similar way to compress still images.
Intraframe compression is used to create standalone video frames called I-frames
(short for intraframe).
Temporal (Interframe) Compression
Instead of storing complete frames, temporal compression stores only what has
changed from one frame to the next, which dramatically reduces the amount of data
that needs to be stored while still achieving high-quality images. Video is stored in
three types of frames: a standalone I-frame that contains a complete image, and then
predictive P-frames and bipredictive B-frames that store subsequent changes in the
image. Every half second or so, a new I-frame is introduced to provide a complete
image on which subsequent P- and B-frames are based. Together, a group of I-, P-, and
B-frames is called a group of pictures, or GOP. HDV uses a long-GOP pattern, which
means that there is at least one P- or B-frame for each I-frame.
Chapter 1 Working with HDV 15
Page 16

More About Long-GOP Video
The term long refers to the fact that P- and B-frames are used between I-frame
intervals. At the other end of the spectrum, the opposite of long-GOP MPEG is
I-frame-only MPEG, in which only I-frames are used. Formats such as IMX use
I-frame-only MPEG, which reduces temporal artifacts and improves editing
performance. However, I-frame-only formats have a significantly higher data rate
because each frame must store enough data to be completely self-contained.
Therefore, although the decoding demands on your computer are decreased, there
is a greater demand for scratch disk speed and capacity.
1080-line HDV media uses an open GOP structure, which means that B-frames in the
MPEG stream can be reliant on frames in adjacent GOPs. 720-line HDV media uses a
closed GOP structure, which means that each GOP is self-contained and does not rely
on frames outside the GOP.
For example, suppose you record some typical “talking head” footage, such as an
interview in which a seated person moves very little throughout the shot. Most of the
person’s body stays still, so most of the visual information is stored in an I-frame; the
subsequent P- and B-frames store only the changes from one frame to the next.
Because P- and B-frames depend on other frames to create a meaningful image, your
computer spends more processing power decoding HDV frames for display than it does
when displaying intraframe-only formats such as DV, uncompressed video, or the
Apple Intermediate Codec.
Transcoding HDV to Other Apple Codecs
Instead of working with native MPEG-2 HDV video, you can transcode your HDV video
to the Apple Intermediate Codec or Apple ProRes 422 codec during capture. For more
information about these codecs, see “About the Apple Intermediate Codec” on
page 12 and “About the Apple ProRes 422 Codec” on page 11.
Unlike MPEG-2 HDV, these Apple codecs do not use temporal compression, so every
frame can be decoded and displayed immediately, without first decoding other frames.
You can also capture and edit native HDV but render your footage using the
Apple ProRes 422 codec. For more information, see “Rendering HDV” on page 29.
16 Chapter 1 Working with HDV
Page 17

Working with HDV in Final Cut Pro
If you’ve previously worked with DV, you’ll find that the HDV workflow is similar.
However, the nature of MPEG-2 long-GOP editing can add significant rendering time
when editing native HDV. To avoid this, you may want to choose one of the other
HDV editing workflows.
There are three workflows for working with HDV footage in Final Cut Pro:
 Native MPEG-2 HDV capturing, editing, and rendering: For more information, see
“Native HDV Editing Workflow” on page 17.
 Transcoding, editing, and rendering using an alternative codec: For more information,
see “Transcoded HDV Editing Workflow” on page 32.
 Native MPEG-2 HDV capturing and editing, but rendering using the Apple ProRes 422
codec: For more information, see “Rendering HDV” on page 29.
Native HDV Editing Workflow
If you use this method, you capture, edit, and output your original MPEG-2 HDV data
throughout the entire process. This process is referred to as native editing because
Final Cut Pro works directly with the MPEG-2 data captured from your HDV tapes.
Native HDV playback is processor-intensive because displaying a single frame can
require decoding of several frames earlier or later in the video stream. As a result, you
may be able to play back fewer real-time effects when editing in this format. However,
there are many benefits to native HDV editing:
 Native HDV editing uses less disk space because long-GOP MPEG-2 HDV video has a
very low data rate.
 Outputting HDV to tape requires little processing before output because your video is
already in the native HDV format. Only segments of your sequence that contain cuts or
effects must be reencoded, or conformed, to create the proper HDV GOP pattern.
This workflow is useful for cuts-only edits that you want to quickly output back to tape,
or for export to other MPEG formats.
Chapter 1 Working with HDV 17
Page 18

Steps for Native HDV Editing
The steps for capturing, editing, and outputting HDV in Final Cut Pro are almost
identical to the workflow used for DV, but there are several important differences. The
differences between the HDV and DV workflows are highlighted in the steps below.
Step 1: Connect your HDV camcorder to your computer via FireWire
This step is similar to connecting a DV device via FireWire.
Step 2: Choose an HDV Easy Setup
Choose the HDV Easy Setup that corresponds to your HDV format.
Step 3: Log your footage and capture it to your scratch disk
This step is much like logging and capturing DV and other video formats. The
differences are:
 Some options and controls are different in the Log and Capture window when you
capture HDV. For example, you can resize the window in real time.
 When capturing HDV, scene detection is always enabled. A scene break is embedded
data on tape that indicates where the camcorder was stopped and then started
again. Whenever Final Cut Pro detects a scene break in your incoming HDV footage,
a new media file and corresponding clip are created.
Step 4: Edit your HDV clips into a sequence and add effects
Editing HDV is similar to editing other formats in Final Cut Pro. However, you cannot
view native MPEG-2 HDV video on an external HDV device connected via FireWire. You
can monitor HDV video via DV FireWire, a third-party video interface, or the Digital
Cinema Desktop Preview option.
Important: The only way to output HDV video to an HDV device via FireWire is to use
the Print to Video command.
Step 5: Output HDV back to tape, or export to a QuickTime movie
Before you can output or export your HDV sequence, Final Cut Pro needs to conform
any noncompliant GOPs to the correct I-, P-, and B-frame pattern. Conforming is a
necessary step for creating an acceptable MPEG-2 data stream for HDV devices.
Important: Conforming and rendering are not the same. Rendering calculates the
visual data for each frame, whereas conforming ensures that your sequence has the
proper GOP structure prior to output.
You can only output HDV footage to tape using the Print to Video command. The
Edit to Tape command is not supported for HDV media.
18 Chapter 1 Working with HDV
Page 19
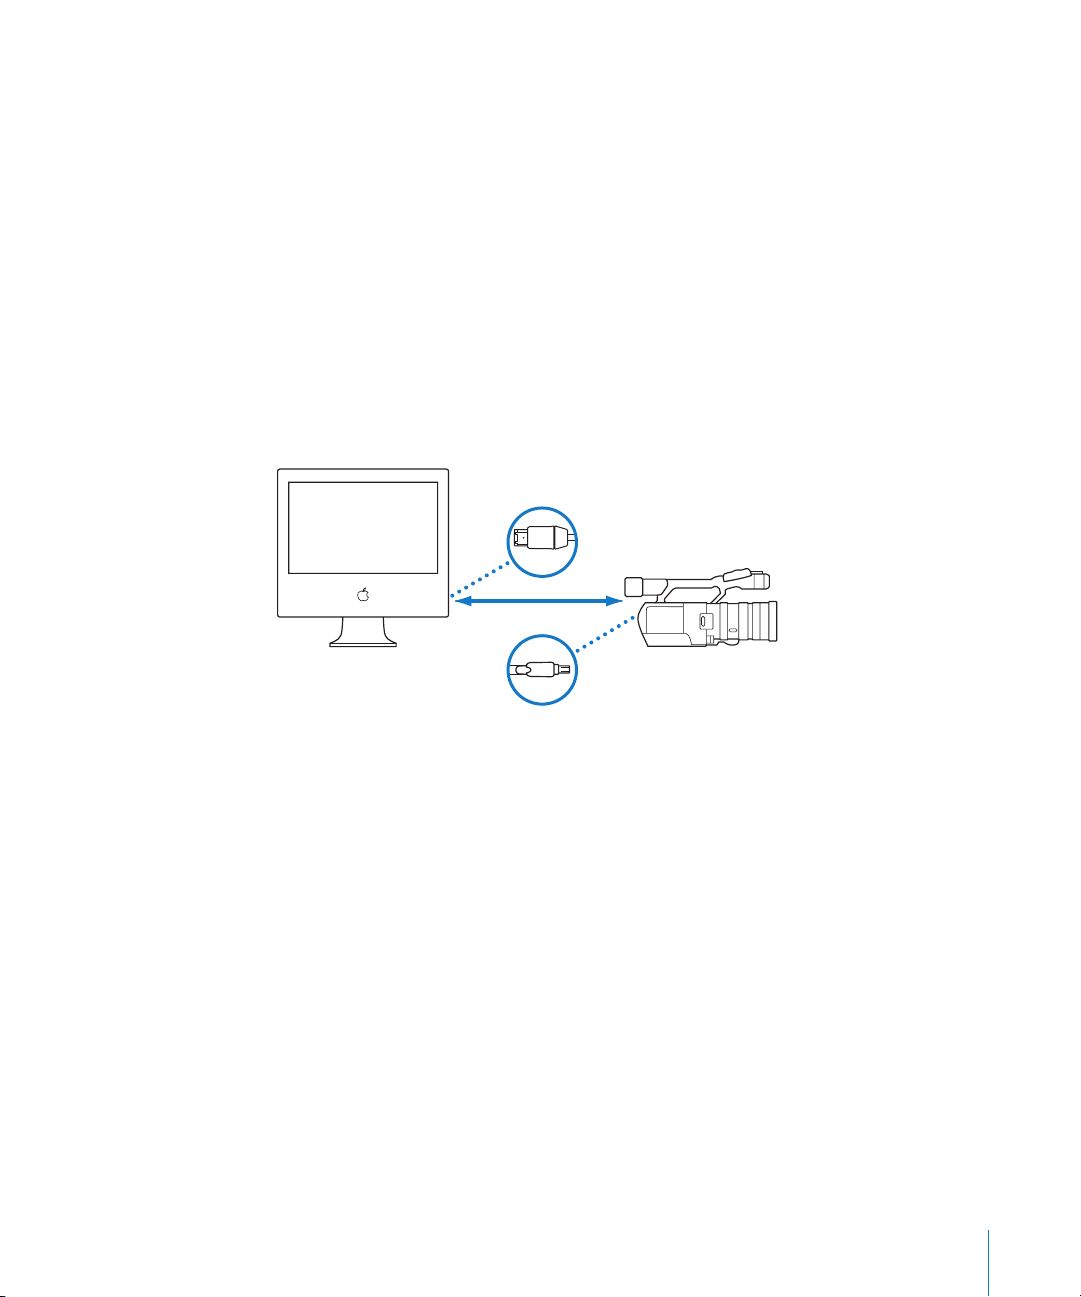
o camcord
Connecting an HDV Device to Your Computer
Once you have HDV footage on tape, you can connect your camcorder or VTR to your
computer to capture.
To connect your HDV camcorder or VTR to your computer:
1 Turn on your VTR or camcorder and switch it to VCR (or VTR) mode.
Note: On some camcorders, this mode may be labeled “Play.”
2 Connect the connector on one end of your FireWire cable to the FireWire port on
your camcorder.
3 Connect the connector on the other end of your FireWire cable to a FireWire 400 port
on your computer.
4 Make sure your camcorder is in HDV mode, not DV mode.
For more information, see the documentation that came with your HDV device.
6-pin connector
to computer
HDV camcorder
H
in VTR mode
FireWire
Computer
4-pin connector
t
er
Choosing an Easy Setup
Final Cut Pro has several native HDV Easy Setups available. Always choose the Easy Setup
that corresponds to your footage.
To choose an Easy Setup:
1 Choose Final Cut Pro > Easy Setup.
2 Choose HDV from the Format pop-up menu.
3 Choose “(all rates)” from the Rate pop-up menu.
4 Click the Use pop-up menu to see all of the Easy Setups related to your choice in the
Format pop-up menu.
You can further refine the list by choosing a specific frame rate from the Rate
pop-up menu.
Chapter 1 Working with HDV 19
Page 20

5 Choose an Easy Setup from the Use pop-up menu.
Important: Make sure to choose an Easy Setup that matches the format of your
HDV source tapes.
6 Click Setup.
The corresponding capture, sequence, and device control presets are loaded, as well
as A/V device settings.
Logging and Capturing Native HDV Footage
Once you’ve connected your camcorder and chosen the appropriate Easy Setup, you
can log and capture your footage. When you select a native HDV Easy Setup, the Log
and Capture window appears, specifically tailored for use with HDV.
For detailed instructions about logging and capturing, see the following chapters in the
Final Cut Pro 6 User Manual:
 Volume I, Chapter 15, “Overview of Logging and Capturing.”
 Volume I, Chapter 16, “Logging Clips.”
 Volume I, Chapter 17, “Capturing Your Footage to Disk.”
To open the Log and Capture window:
m Choose File > Log and Capture (or press Command-8).
The Log and Capture window appears.
About the Log and Capture Window
The Log and Capture window allows you to view your footage, set In and Out points,
enter log notes, select which tracks to capture, create clips, and capture media files.
Preview area
20 Chapter 1 Working with HDV
Logging, Clip Settings, and
Capture Settings tabs
Resize control
Log and capture buttons
Page 21

There are several areas in the Log and Capture window:
 Preview area: On the left is the area where you view video while logging clips. This
area contains transport controls, marking controls, and timecode fields. If device
control is not enabled, the transport controls do not appear.
 Tabs: On the right are the Logging, Clip Settings, and Capture Settings tabs.
 Log and capture buttons: You click one of these buttons when you are ready to log a
clip or capture media.
The resize control in the lower-right corner allows you to adjust the size of the Log and
Capture window. This option is available only when you select an HDV Easy Setup.
Preview Area
This section of the Log and Capture window lets you view video from tape while you
log and capture it. The video preview area remains black until your camcorder or deck
is turned on and a tape is playing in the device. The following controls appear if your
camcorder or deck is on and properly connected, and device control is enabled.
Timecode Duration field
Video preview area
Shuttle control
Clip In Point
Timecode field
Current Timecode
field
Clip Out Point
Timecode field
Device
status
Available space
and time
Transport
controls
Important: If your computer has a PCI graphics card installed and you are logging or
capturing HDV footage, Final Cut Pro does not preview video or audio in the Log and
Capture window. You can still log and capture, but you need to use your HDV camcorder
display to preview video.
Chapter 1 Working with HDV 21
Page 22

Video Preview Area
 Available space and time: Final Cut Pro displays the amount of available space on all
currently assigned scratch disks.
 Device status: Shows the readiness of camcorders and decks connected to your
computer and being controlled by Final Cut Pro. If you see “VTR OK,” your equipment
is connected and working properly.
 Timecode Duration field: Displays the duration, in timecode, between the current
tape In and Out points. If you enter a duration in this field, the Out point is adjusted.
 Current Timecode field: Displays the timecode number of the current frame of your
source tape. You can enter a timecode number in this field to navigate to that
timecode point on your tape.
∏ Tip: When using the Log and Capture window with a native HDV Easy Setup, you can
drag timecode values between the Log and Capture timecode fields by holding down
the Option key while you drag a timecode value from one field to another. Dragging
timecode from other windows is not supported.
Transport Controls
If you have device control, use these to control your camcorder or deck. These controls
are similar to controls in the Viewer and Canvas, except that they control playback of a
videotape instead of a media file.
Rewind
Play In to Out
Stop
22 Chapter 1 Working with HDV
Play
Fast-Forward
Play Around
Current Frame
Page 23

Shuttle Control
A shuttle control similar to the one in the Viewer and Canvas is also available for
navigating through the tape.
Shuttle control
In the Log and Capture window, you can use the J, K, and L keys for playback and
shuttling, just as you can in the Viewer and Canvas. For more information about using
the J, K, and L keys for playback, see the Final Cut Pro 6 User Manual, Volume I,
Chapter 6, “Viewer Basics.”
Note: Tape playback is not as efficient as playback from media files on your hard
disk. It takes a few seconds for a tape to cue to the proper frame or change playback
direction. The video frames and timecode displayed on the camcorder LCD screen may
differ from the frames you see in the video preview area. This is because Final Cut Pro
is decoding the MPEG-2 HDV in real time.
Marking Controls
Use these to set In and Out points for a clip on tape.
Clip In Point
Timecode field
Go to In Point
Clip Out Point
Timecode field
Go to Out Point
Mark In
Mark Out
 Mark In: Click this (or press I) to set the In point for a clip on tape.
 Clip In Point Timecode field: Shows the timecode value of the currently set In point.
 Go to In Point: Click this to cue the connected VTR to the currently set In point.
 Mark Out: Click this (or press O) to set the Out point for a clip on tape.
 Clip Out Point Timecode field: Shows the timecode value of the currently set Out point.
 Go to Out Point: Click this to cue the connected camcorder or VTR to the currently
set Out point.
Chapter 1 Working with HDV 23
Page 24

Tabs in the Log and Capture Window
The Log and Capture window has several tabs you can use for logging and capturing
your HDV footage.
Logging Tab
Use this tab to add descriptive information to each clip that you log, such as reel name,
scene/take number, log notes, markers, and so on. Much of this information can also be
added later in the Browser.
The Log Bin button
contains the name of the
currently selected
logging bin.
Select this option to
enable video capture.
Select this option to
enable audio capture.
Stereo/Mono control
New Bin button
Logging fields
Marker controls
Clip Settings Tab
Use this tab to select which video and audio tracks you capture from tape. You can
choose to capture video only, audio only, or both video and audio. You can also specify
which audio channels you capture.
Individual audio
channel meters
Capture Audio
Channel control
24 Chapter 1 Working with HDV
Page 25

When an HDV Easy Setup is chosen, only two audio channels are available for capture.
You can choose to capture one channel or you can capture both audio channels, either
as two discrete mono tracks or a single stereo pair.
Capture Settings Tab
Use this tab to specify scratch disks for capture. You can also specify scratch disk settings
by choosing Final Cut Pro > System Settings and then clicking the Scratch Disks tab.
Click here to open the
Scratch Disks tab.
Current scratch disk
capacity and Capture
Now settings are
shown here.
Log and Capture Buttons
As you log and capture, use the following log and capture buttons.
 Log Clip: Logs a single clip with the current logging information and clip settings.
 Capture Clip: Logs and captures a single clip with the current logging information,
clip settings, and capture settings.
 Capture Now: Captures the current video and audio input to a media file on disk until
you press the Escape key. No In or Out points are necessary. You can use this to
capture an entire tape in a single pass. When scene breaks are detected, new media
files and corresponding clips are created automatically.
 Capture Batch: Captures the selected clips in the Browser, or the clips in the currently
assigned logging bin.
Chapter 1 Working with HDV 25
Page 26

Capturing Footage with Start/Stop Indicators
When you capture HDV footage, you can control how media files are created when
start/stop indicators and timecode breaks are detected. This behavior is slightly
different from the way DV footage is handled:
 When you capture DV: Start/Stop indicators can be detected after capture if you
select the clip and choose Mark > DV Start/Stop Detect.
 When you capture HDV: You can control whether start/stop indicators create individual
media files by selecting or deselecting the “Create new clip on Start/Stop” checkbox in
the Clip Settings tab of the Log and Capture window.
In the General tab of the User Preferences window, the option you choose from the
“On timecode break” pop-up menu determines how timecode breaks affect capture,
but the Warn After Capture option is disregarded to avoid capturing media files that
contain breaks in the middle of an MPEG-2 GOP.
To choose how Final Cut Pro handles start/stop detection when capturing
HDV footage:
1 If you have not already done so, choose Final Cut Pro > Easy Setup, choose HDV from
the Format pop-up menu, and then choose an Easy Setup from the Use pop-up menu.
2 Choose File > Log and Capture (or press Command-8), then click Clip Settings.
3 Select or deselect the “Create new clip on Start/Stop” checkbox to turn start/stop
detection on or off:
 Start/Stop detection on: When the checkbox is selected, a new media file and
corresponding clip are created each time Final Cut Pro detects start/stop indicators
in the incoming HDV stream.
 Start/Stop detection off: When the checkbox is deselected, one continuous media file
and corresponding clip are created, and start/stop indicators are ignored.
Note: The option to turn off start/stop detection is not available when capturing
footage shot on a JVC HDV camcorder because the nature of the MPEG-2 stream
requires creation of a new media file at each start/stop indicator.
26 Chapter 1 Working with HDV
Page 27

To determine how timecode breaks are handled when you capture HDV footage:
1 Choose Final Cut Pro > User Preferences, then click the General tab.
2 Choose an option from the “On timecode break” pop-up menu:
 Make New Clip: This is the default option. Whenever a timecode break is detected
during capture, Final Cut Pro finishes writing the current media file to disk and then
begins capturing a new media file. A clip corresponding to the new media file is also
created in the Browser.
 Abort Capture: If you choose this option, Final Cut Pro stops capture immediately
when a timecode break is detected. All media captured before the timecode break
has frame-accurate timecode and is preserved. The resulting media files are saved
and the corresponding clips are placed in the Browser.
Depending on the signal on tape, you may see one of two messages when a
timecode break is detected:
 A “stream error” message
 A “timecode break error” message
 Warn After Capture: When you capture HDV, this option behaves identically to the
Abort Capture option.
How Clips Are Named When Start/Stop Indicators
and Timecode Breaks Are Detected
Filenames for new media files and clips generated by start/stop indicators and
timecode breaks are appended with a number to ensure they have unique names.
For example, suppose you are capturing a media file named Cafe Wide Shot when a
scene or timecode break is detected. At the break detection point, Final Cut Pro
begins capturing a new media file named Cafe Wide Shot-1. If there is already a
media file named Cafe Wide Shot-1, the new media file is named Cafe Wide Shot-2,
and so on.
Recapturing HDV Footage
Recapturing HDV footage is similar to recapturing other video formats. It is important
that your clips contain accurate timecode or you may have difficulty recapturing. For
more information about recapturing footage, see the Final Cut Pro 6 User Manual,
Volume I, Chapter 17, “Capturing Your Footage to Disk.”
Important: Some HDV camcorders do not record timecode, so recapturing media files
from tapes recorded by these camcorders may result in new media files with an offset
of one or two frames.
Chapter 1 Working with HDV 27
Page 28

Using an HDV Camcorder to Capture or Output DV Footage
You can use an HDV camcorder as a standard DV device. However, before doing this,
make sure that:
 The Log and Capture window is closed
 The camcorder is set to DV mode, not HDV mode
For more information, see the documentation that came with your camcorder.
 You choose the proper DV Easy Setup before opening the Log and Capture window
Editing HDV Footage
For the most part, editing HDV footage is identical to editing any other format in
Final Cut Pro. However, because of the GOP structure of MPEG-2 media, edits in HDV
sequences require some additional processing during playback and output. The
additional processing happens automatically, but it is a good idea to understand
why it is necessary.
About Long-GOP Editing and Rendering
When you edit two HDV clips together in a sequence, the GOP pattern is typically
broken. In particular, cutting an HDV clip can remove the I-frame that subsequent
P- and B-frames rely on for picture information. When this happens, Final Cut Pro must
preserve the I-frame for these other frames to refer to, even though the I-frame is no
longer displayed in the sequence. Final Cut Pro reconforms the broken GOPs in the
vicinity of the edit and leaves the subsequent GOPs unchanged.
This requires additional processing power and memory not necessary for I-frame-only
editing (such as DV editing). During playback, this process happens in real time. For
output and export, Final Cut Pro reencodes (or conforms) the areas of your sequence
that require new I-frames or GOPs.
Note: Some applications, such as DVD Studio Pro, support simple MPEG-2 editing, in
which you are allowed to cut only at GOP boundaries. Final Cut Pro allows you to cut
on any frame. Although you cannot set Final Cut Pro to edit on GOP boundaries only,
you can transcode your source files to the Apple ProRes 422 codec, ensuring
I-frame-only editing, or you can temporarily turn off the reconforming of the GOP
boundaries by deselecting one or more render status categories in the appropriate
Render submenu of the Sequence menu.
Improving HDV Rendering by Using the Apple ProRes 422 Codec
To save time during rendering, you can set up your native HDV sequence to render
using the Apple ProRes 422 codec. Using the Apple ProRes 422 codec also produces
high-quality 4:2:2 render files that, in some cases, may be higher quality than rendering
back to native HDV.
28 Chapter 1 Working with HDV
Page 29

Rendering and Conforming Long-GOP MPEG-2 Media
Before you can output or export a native HDV sequence, Final Cut Pro needs to process
your media in two ways:
 Render any applied transitions and effects, as well as any leader and trailer elements
included in the Print to Video dialog.
 Conform any noncompliant GOPs to the correct I-, P-, and B-frame pattern. Any
segments of your sequence that contain cuts, transitions, or other applied effects
must be conformed to standard MPEG-2 GOP structures before output, creating new
I-frames and GOP boundaries where necessary. Conforming also ensures that your
HDV sequence has the proper data rate for the HDV format you are outputting. The
time required for conforming depends on the number of edits and effects in
your sequence.
Note: Because HDV, XDCAM HD, and XDCAM EX constant bit rate (CBR) footage use an
identical format, the information in this section also applies when rendering XDCAM HD
and XDCAM EX footage.
Rendering HDV
When you render segments of an HDV sequence, you can choose to create render files
using either:
 Native MPEG-2 HDV
 The Apple ProRes 422 codec
To choose the render file format in an HDV sequence:
1 Select your sequence in the Browser or Timeline.
2 Choose Sequence > Settings, then click the Render Control tab.
3 From the Codec pop-up menu, choose one of the following options:
 Same as Sequence Codec: This option enables rendering with the native HDV codec
of your sequence.
 Apple ProRes 422 Codec: This option enables rendering with the Apple ProRes 422 codec.
Creating Render Files Using Native MPEG-2 HDV
Rendering native MPEG-2 HDV takes longer than rendering other formats because of
the interframe compression this format uses. The advantages to rendering natively are:
 Conforming and rendering for export or output to HDV tape happens faster because
the render files are already in the necessary format. If you aren’t outputting to an
HDV format, this may not be an advantage.
 Native HDV render files are smaller than those generated by other HD I-frame-only codecs.
However, if native rendering is slowing down the pace of your editing, you can choose
to render using the Apple ProRes 422 codec.
Chapter 1 Working with HDV 29
Page 30

Creating Render Files Using the Apple ProRes 422 Codec
To improve rendering performance while editing, you can render segments of your
native HDV, XDCAM HD, and XDCAM EX sequences using the Apple ProRes 422 codec.
Because Final Cut Pro supports mixed-format sequences, you can play back the entire
sequence, including the Apple ProRes 422 codec render files, in real time.
Conforming While Rendering in the Timeline
If you choose to use native HDV render files while you edit, your render files can be
conformed when they are rendered. You can generate properly conformed render files
for your sequence by enabling all options in the Render All, Render Selection, and
Render Only submenus of the Sequence menu.
For example, if you enable rendering for all render status categories in the Render
Selection submenu and then choose Sequence > Render Selection > Video, the render
files created for selected video items in the Timeline are conformed with proper GOP
structures. When you output to tape or export using the Export QuickTime Movie
command, these render files are already properly conformed, reducing the time
required for final rendering and conforming.
∏ Tip: You can disable conforming during rendering in the Timeline by deselecting one or
more render status categories in the appropriate Render submenu of the Sequence menu.
Using the Print to Video Command to Output HDV
You can only output HDV footage to tape using the Print to Video command. The Edit
to Tape command is not supported for HDV media.
To prepare for output, any effects in your HDV sequence need to be rendered, and then
the sequence must be conformed to create a proper MPEG-2 output stream. These
steps happen automatically when you begin a Print to Video operation.
During a Print to Video operation, Final Cut Pro renders and conforms video in a single
pass, storing properly conformed media within your sequence’s render files. As a result,
subsequent Print to Video operations don’t need to conform the video unless you make
changes to your sequence. However, leader and trailer elements, as well as gaps in your
sequence, are rendered and conformed each time you use the Print to Video command.
30 Chapter 1 Working with HDV
Page 31

To output your HDV sequence to tape:
1 Make sure your camcorder is properly connected to your computer via FireWire.
For more information, see “Connecting an HDV Device to Your Computer” on page 19.
2 Insert a DV tape into the HDV camcorder.
3 In the Browser, do one of the following:
 Select a sequence or clip.
 Double-click a sequence to open it in the Timeline.
 Double-click a clip to open it in the Viewer.
4 Choose File > Print to Video.
The Print to Video dialog appears.
5 Select any leader or trailer elements you want to include on your tape, as well as start,
end, and looping options.
∏ Tip: If you want Final Cut Pro to start recording automatically, select the Automatically
Start Recording checkbox.
6 Click OK.
If any segments of your sequence require rendering or conforming, Final Cut Pro
renders and conforms them now. A progress dialog appears indicating the amount of
time that remains until rendering and conforming are complete. Any segments of your
sequence where GOP boundaries were broken (such as the frames around edit points
or any frames with added filters, motion parameters, and so on) are conformed.
A second progress dialog briefly appears indicating the time it takes to process leader,
trailer, and gap elements in your sequence.
A dialog appears when your sequence is ready for output.
7 If you did not select the Automatically Start Recording checkbox in the Print to Video
dialog, press the record button on your camcorder or deck, then click OK.
If your tape is write-protected or if frames are dropped during the Print to Video
operation, a dialog appears allowing you to try the operation again.
Note: When using the Print to Video command with a JVC ProHD device, you can
output sequence timecode to tape. For more information about proper deck settings,
see the documentation included with your JVC device.
Chapter 1 Working with HDV 31
Page 32

Transcoded HDV Editing Workflow
When you edit using footage encoded with the Apple Intermediate Codec or
Apple ProRes 422 codec, you can edit just as you would with any other I-frame-only
encoded footage, such as DV or uncompressed video.
The disadvantage of this workflow is that more scratch disk capacity is required for
your footage, and you cannot output HDV to tape without first reencoding your entire
sequence back to native HDV. If your sequence is long, the reencoding process can be
time-consuming.
Steps for Transcoded HDV Editing
The transcoded HDV workflow is almost identical to the native HDV workflow except that
the resulting media files are larger and conforming and rendering can take much longer.
Step 1: Connect your HDV camcorder to your computer via FireWire
Step 2: Choose the appropriate Apple Intermediate Codec or Apple ProRes 422
codec HDV Easy Setup
Step 3: Capture your footage to disk
Step 4: Edit your transcoded clips into a sequence
Step 5: Reencode to HDV and output back to tape, or export to a QuickTime movie
Connecting an HDV Device to Your Computer
This step is identical to connecting your HDV camcorder for MPEG-2 HDV capture. For
details, see “Connecting an HDV Device to Your Computer” on page 19.
32 Chapter 1 Working with HDV
Page 33

Choosing an Easy Setup
Final Cut Pro includes Easy Setups for capturing and editing HDV transcoded to the
Apple Intermediate Codec or the Apple ProRes 422 codec.
To choose an Easy Setup for transcoding HDV:
1 Choose Final Cut Pro > Easy Setup.
2 Choose Apple Intermediate Codec from the Format pop-up menu.
Note: The Apple ProRes 422 Easy Setup option supports only 1080p24 HDV. You should
use this codec when you have 24 fps footage stored with 3:2 pull-down in a 1080i60
HDV signal.
3 Click the Use pop-up menu to see all of the Easy Setups related to your choice in the
Format pop-up menu.
You can further refine the list by choosing a specific frame rate from the Rate pop-up menu.
4 Choose an appropriate HDV - Apple Intermediate Codec Easy Setup from the Use
pop-up menu.
Important: Make sure to choose an Easy Setup that matches the format of your
HDV source tapes.
5 Click Setup.
The corresponding capture, sequence, and device control presets are loaded, as well
as A/V device settings.
Capturing and Transcoding HDV Video
Capturing and transcoding HDV video is very similar to capturing DV video using the
Capture Now feature. The main differences are:
 The Log and Capture window is not used.
 Capturing HDV video may not take place in real time because transcoding HDV
frames into the Apple Intermediate Codec or Apple ProRes 422 codec requires special
processing steps.
Chapter 1 Working with HDV 33
Page 34

To capture HDV footage to the Apple Intermediate Codec or Apple ProRes 422 codec:
1 Click in the Browser to make it active, then choose File > New Bin.
2 Control-click the bin, then choose Set Logging Bin from the shortcut menu.
Your captured clips will be placed in this bin.
3 Name the bin, then press Enter.
4 Choose File > Log and Capture (or press Command-8).
A Capture dialog appears instead of the Log and Capture window.
5 In the Capture dialog, enter a name for the clip, then click Capture.
The capture preview window appears and the camcorder begins playing back video from
its current position. The status area of the capture preview window displays the percentage
of real time in which the video is being transcoded from HDV to the target codec.
6 Press the Escape key to stop capturing.
The video playback on the camcorder stops immediately. The capture preview window
may lag behind, displaying where the video is in the encoding process. As these frames
are processed, the status area of the capture preview window displays the percentage
of frames left to process.
Note: Pressing the Escape key a second time stops the encoding process and cancels
the capture.
After the capture preview window closes, the captured clip appears in your logging bin.
Capturing Footage with Scene Breaks
When you capture HDV footage using the Apple Intermediate Codec or Apple ProRes 422
codec, Final Cut Pro detects any scene or timecode breaks on the tape introduced during
shooting. At each scene or timecode break, a new clip is created during capture. When
capture is completed, these clips appear in the logging bin, and the corresponding media
files are placed on your hard disk.
For example, suppose you begin capturing a clip named Cafe Entrance. When a scene
or timecode break is detected, Final Cut Pro stops writing the first media file and
begins writing a new file named Cafe Entrance-1. Subsequent breaks create media
files and clips named Cafe Entrance-2, Cafe Entrance-3, and so on.
34 Chapter 1 Working with HDV
Page 35

Editing Video Using Transcoded HDV Footage
Editing video transcoded to the Apple Intermediate Codec or Apple ProRes 422 codec
is the same as editing other formats in Final Cut Pro. However, you need to make sure
your scratch disk supports the data rate. For more information about the data rates of
these formats, see “HDV Format Specifications” on page 39 and “About the
Apple ProRes 422 Codec” on page 11.
Outputting HDV to Tape or Exporting to a QuickTime Movie
After you finish editing, you can output your movie to videotape using your camcorder
or export your sequence to a QuickTime movie. If you want to output your movie back
to tape, Final Cut Pro needs to reencode (or conform) the movie into MPEG-2 data
before outputting. Depending on the length of your sequence, this process can be
fairly time-consuming, because every frame in your sequence must be reencoded.
To output Apple Intermediate Codec or Apple ProRes 422 codec video to an
HDV videotape:
1 Make sure your HDV camcorder is properly connected to your computer and turned on
before you open Final Cut Pro.
2 Insert a DV tape into the HDV camcorder.
3 Click anywhere in the Timeline or Canvas to make it the active window.
4 Choose File > Print to Video (or press Control-M).
The Print to Video dialog appears.
5 If you want Final Cut Pro to start recording automatically, select the Automatically Start
Recording checkbox.
6 Select any leader or trailer elements you want to include on your tape, as well as start,
end, and looping options.
A progress bar shows the progress of encoding from the codec back to MPEG-2 HDV and
gives you a time estimate for when the encoding process will finish.
A dialog appears instructing you to press the record button on the camcorder.
7 Press the record button on your camcorder, then click OK.
If you selected the Automatically Start Recording option, the camcorder automatically
begins recording your program to tape.
The camcorder stops after the program is recorded to tape.
Chapter 1 Working with HDV 35
Page 36

To export your sequence to a QuickTime movie:
1 Open your Final Cut Pro sequence in the Timeline.
2 Choose File > Export > QuickTime Movie.
The Save dialog appears.
3 Enter a name and choose a location for the movie.
4 At the bottom of the dialog, make sure the Make Movie Self-Contained checkbox is
not selected.
5 If you need DVD chapter markers from your Final Cut Pro project to be exported to the
QuickTime movie, choose DVD Studio Pro Markers from the Markers pop-up menu.
6 Click Save.
You can use the Export Using Compressor command to create a high-quality MPEG-2
file for use in DVD Studio Pro. For more information, see the Compressor and
DVD Studio Pro documentation.
Exporting HDV for DVD Studio Pro
In some cases, using open GOP (1080-line) MPEG-2 media in DVD Studio Pro can
cause DVD decoder problems, especially at the start and end frames of media files. To
properly transfer open GOP MPEG-2 HDV media to DVD Studio Pro, you should export
your media from Final Cut Pro using the Export QuickTime Movie command. This
command conforms the beginning of the MPEG-2 media to a closed GOP structure,
which is compatible with DVD decoders.
36 Chapter 1 Working with HDV
Page 37

Using the Canon XL H1 HDV Camcorder
Final Cut Pro recognizes the Canon XL H1 HDV camcorder for most Final Cut Pro
operations, including Log and Capture and Print to Video.
To set up Final Cut Pro to capture from and output to the Canon XL H1 HDV camcorder:
1 Connect one end of a FireWire cable to a FireWire port on your computer, and the
other end to a FireWire port on your camcorder.
2 Choose Final Cut Pro > Easy Setup.
3 Choose HDV from the Format pop-up menu.
4 Choose “(all rates)” from the Rate pop-up menu.
5 From the Use pop-up menu, choose an Easy Setup that corresponds to your
Canon XL H1 HDV footage:
 HDV - 1080i60 FireWire Basic
 HDV - 1080i50 FireWire Basic
 HDV - 1080p30 FireWire Basic
 HDV - 1080p25 FireWire Basic
 HDV - 1080p24 FireWire Basic
6 Click Setup.
When using the Canon XL H1 HDV camcorder with Final Cut Pro, keep the following
in mind:
 Final Cut Pro captures the first two audio channels only, even though the camcorder
can record four channels. ( With the addition of a third-party HD-SDI video interface,
it is possible to capture four channels.)
 For proper detection of start/stop indicators, set the clock of the Canon XL H1 HDV
camcorder before recording any footage with it. (This is a one-time step for
new camcorders.)
Note: The Log and Capture window may be unresponsive when the FREERUN-PS
option is chosen on the Canon XL H1 HDV camcorder.
To change the FREERUN-PS setting on the camcorder:
1 Press the Menu button on the camcorder.
2 Within the camcorder menu, navigate to Signal Setup > Time Code > Count-Up, then
select Rec-Run.
Chapter 1 Working with HDV 37
Page 38

Using the Sony HVR-V1 HDV Camcorder
As of version 6.0.2, Final Cut Pro includes support for the Sony HVR-V1 HDV camcorder,
which records native 1080i50 and 1080i60 footage. As with other HDV tape-based
devices, you can capture natively or capture to either the Apple Intermediate Codec or
the Apple ProRes 422 codec. You can also output back to the Sony HVR-V1 HDV
camcorder using the Print to Video command.
The camera is also capable of recording 1080p24, 1080p25, and 1080p30 HDV formats
that are encoded in either the 1080i50 or the 1080i60 format. This means that the
capture of the HVR-V1 HDV 1080p24, 1080p25, or 1080p30 footage results in 1080i50
or 1080i60 footage on your hard disks. Adding effects to this type of progressively
scanned footage recorded within an interlaced format can potentially add interlacing
artifacts. To achieve 1080p24, 1080p25, or 1080p30 footage with true progressive
scanning, you must capture and transcode the HDV footage using the
Apple Intermediate Codec or the Apple ProRes 422 codec.
To natively capture 1080p25 or 1080p30 video, you should use the HDV 1080i50 and
HDV 1080i60 Easy Setups, respectively. Your footage will retain its progressive scanning
even though it will be stored in an interlaced format.
You can natively capture 1080p24 video using the 1080i60 Easy Setup, but your captured
footage will retain 3:2 pull-down in this case. For transcoded capture of 1080p24 footage
with 3:2 pull-down removed, use the Apple ProRes 422 codec Easy Setup.
The following table lists the recommended workflows for capturing from and
outputting to the Sony HVR-V1 HDV camcorder.
Format on tape Capture format
24p/60i 24p Apple Intermediate Codec
25p/50i 25p Apple Intermediate Codec
30p/60i 30p Apple Intermediate Codec
38 Chapter 1 Working with HDV
HVR-V1 recording
mode during output
24p/60i
or Apple ProRes 422 codec
25p/50i
or Apple ProRes 422 codec
30p/60i
or Apple ProRes 422 codec
Page 39

920
080
HDV Format Specifications
HDV has the following format specifications.
Storage Medium
HDV is recorded on standard mini-DV videocassette tapes or on a hard disk.
Video Standard
The HDV standards were jointly created by a consortium of manufacturers including
Sony, Canon, Sharp, and JVC. HDV supports 1080i, 1080p, and 720p HD standards.
Aspect Ratio
HDV has an aspect ratio of 16:9.
Frame Dimensions, Number of Lines, and Resolution
The HDV format supports two HD video resolutions:
 1080 lines: 1440 pixels per line,1080 lines (displayed with an aspect ratio of 16:9,
or 1920 x 1080); interlaced or progressive scan
 720 lines: 1280 pixels per line, 720 lines; progressive scan
The native and displayed pixel dimensions are shown below.
1
x 1
1440 x 1080
1280 x 720
1080 lines
720 lines
Frame Rate
Final Cut Pro supports the following HDV frame rates:
 NTSC-compatible frame rates: 29.97 fps, 59.94 fps (1080i60, 1080p30, 720p60, 720p30)
 PAL-compatible frame rates: 25 fps, 50 fps (1080i50, 1080p25, 720p50, 720p25)
 Film-compatible frame rate: 23.98 fps (1080p24, 720p24)
Scanning Method
HDV can record either interlaced or progressive scan images:
 1080 lines: Interlaced (1080i) or progressive (1080p)
 720 lines: Progressive
Color Recording Method
HDV records a 4:2:0 Y´C
(component) digital video signal. Each sample (pixel) has
BCR
a resolution of 8 bits.
Chapter 1 Working with HDV 39
Page 40

Data Rate
The following table lists the data rates for MPEG-2 HDV as well as HDV transcoded to
the Apple Intermediate Codec and Apple ProRes 422 codec. DV data rates are included
for comparison.
Format Native frame size Data rate
DV NTSC 720 x 480 3.6 MB/sec.
(equivalent to 12 GB/hr.)
DV PAL 720 x 576 3.6 MB/sec.
(equivalent to 12 GB/hr.)
MPEG-2 HDV 720p30 1280 x 720 2.5 MB/sec.
(equivalent to 9 GB/hr.)
MPEG-2 HDV 1080i60/50 1440 x 1080 3.3 MB/sec.
(equivalent to 12 GB/hr.)
Apple Intermediate Codec
HDV 720p30
Apple Intermediate Codec
HDV 1080i50
Apple Intermediate Codec
HDV 1080i60
Apple ProRes 422 codec
HDV 1080p24
1
Data rates for the Apple Intermediate Codec are variable; these figures are approximate and may vary according
to the complexity of your footage. Images with a lot of detail have a higher data rate, while images with less detail
have a lower data rate.
1
1280 x 720 7 MB/sec.
1
1440 x 1080 12 MB/sec.
1
1440 x 1080 14 MB/sec.
1440 x 1080 12.6 MB/sec.
(equivalent to 25 GB/hr.)
(equivalent to 42 GB/hr.)
(equivalent to 49 GB/hr.)
(equivalent to 45 GB/hr.)
Note: Although audio is compressed on an HDV tape, Final Cut Pro converts this signal
to an uncompressed format during capture. This means that the overall HDV data rate
on tape differs from the captured date rate.
40 Chapter 1 Working with HDV
Page 41

Video Compression
HDV uses MPEG-2 compression with a constant bit rate (CBR). I-, P-, and B-frames are
used, creating a long-GOP pattern.
MPEG-2 video and audio are composed of a hierarchy of data streams:
 Elementary stream: This can be a video, audio, subtitle, or other basic media stream.
Formats like HDV contain both video and audio elementary streams.
 Transport stream: A transport stream encapsulates elementary streams for real-time
distribution, such as television or Internet broadcast.
 Program stream: A program stream also encapsulates elementary streams for
content stored on media such as DVDs or hard disks.
HDV devices store and transmit elementary video and audio streams in an MPEG-2
transport stream. When you capture HDV video, Final Cut Pro automatically extracts the
elementary video and audio streams from the transport stream and stores the data in
tracks in a QuickTime media file.
Audio
HDV uses two audio tracks with a sample rate of 48 kHz and 16-bit resolution per sample.
The audio is encoded using the MPEG-1 Layer 2 format with a data rate of 384 kbps.
Timecode
The timecode format of an HDV camcorder matches the frame rate of the video format.
For example, 1080i50 footage uses 25 fps timecode.
Important: Some HDV camcorders do not record timecode, so you won’t be able to
precisely recapture any clips if you delete the corresponding media files.
Chapter 1 Working with HDV 41
Page 42

Page 43

2 Working with DVCPRO HD
In Final Cut Pro, you can natively capture, edit, and output
DVCPRO HD video using the built-in FireWire port on
your computer.
This chapter covers the following:
 About DVCPRO HD (p. 43)
 Working with DVCPRO HD in Final Cut Pro (p. 48)
 Using the DVCPRO HD Frame Rate Converter (p. 53)
 Working with 24p DVCPRO HD (p. 59)
 DVCPRO HD Format Specifications (p. 62)
2
About DVCPRO HD
DVCPRO HD is a high definition addition to the DV/DVCPRO format family, making it
simple to adapt your existing DV- and FireWire-based editing workflow to HD video.
43
Page 44

DVCPRO HD Formats Supported by Final Cut Pro
Final Cut Pro natively supports the following DVCPRO HD formats.
59.94 fps–Based Formats
Final Cut Pro
Format
1080i60 DVCPRO HD - 1080i60 1280 x 1080
1080p30 DVCPRO HD - 1080p30 1280 x 1080
1080pA24 DVCPRO HD - 1080pA24 1280 x 1080
720p60 DVCPRO HD - 720p60 960 x 720
720p30 DVCPRO HD - 720p30 960 x 720
720p24 DVCPRO HD - 720p24 960 x 720
Easy Setup
Sequence dimensions
and frame rate
29.97 fps
29.97 fps
23.98 fps
59.94 fps
29.97 fps
23.98 fps
50 fps–Based Formats
Final Cut Pro
Format
1080i50 DVCPRO HD - 1080i50 1440 x 1080
720p50 DVCPRO HD - 720p50 960 x 720
720p25 DVCPRO HD - 720p25 960 x 720
Easy Setup
Sequence dimensions
and frame rate
25 fps
50 fps
25 fps
Scanning
method
Interlaced
Progressive
Progressive
Progressive
Progressive
Progressive
Scanning
method
Interlaced
Progressive
Progressive
44 Chapter 2 Working with DVCPRO HD
Page 45

DVCPRO HD Frame Rates
DVCPRO HD supports frame rates compatible with both NTSC and PAL frame rates,
although most camcorders are designed to work with one or the other. For example,
the Panasonic AG-HVX200 camcorder records 1080i60 or 720p60 DVCPRO HD, and the
Panasonic AG-HVX200E camcorder (designed for PAL regions) records 1080i50 or
720p50 DVCPRO HD. 1080i footage is described by its field rate (60i or 50i), whereas
720p footage is described by its frame rate (60p or 50p).
Additional formats, such as 24p, can be achieved using pull-down (1080i) or duplicated
frames (720p). Variable frame rates for slow- and fast-motion effects are also possible in
the 720p format.
Note: 1080i60 and 720p60 DVCPRO HD actually operate at 59.94 fps, not 60 fps. See
“Setting System Frequency on a Panasonic Varicam Camcorder” on page 47 for an
exception to this rule.
1080pA24 DVCPRO HD
1080pA24 DVCPRO HD is recorded using the 1080i60 format with advanced pull-down
(2:3:3:2). This is the same method employed by the Panasonic AG-DVX100 camcorder.
For more information, see “Working with 1080pA24 DVCPRO HD Video” on page 59.
Note: You can also record the 1080p24 DVCPRO HD format using traditional 2:3:2:3
pull-down. Cinema Tools can remove this kind of pull-down, but Final Cut Pro cannot.
Don’t use this format unless you have a special reason for doing so. If you want to work
with 1080p24 footage, the 1080pA24 format is much easier to use.
Chapter 2 Working with DVCPRO HD 45
Page 46

720p60 DVCPRO HD
The 720p60 DVCPRO HD format supports 60, 30, and 24 fps recording. When you
choose a frame rate lower than 60 fps, the camera CCD captures images at the lower
rate but the recording rate stays fixed at 60 fps.
For example, if you record the 720p30 format, the camera CCD produces 30 unique
images per second, but each frame is recorded on tape twice. These duplicate frames
are digitally flagged during recording and must be removed during or after capture.
Capturing DVCPRO HD
Used frames
720p60
2 3 4 5 6 7 8 9 10 11 12 13 14 15 16 17 18 19 20 21 22 23 24 26 27 28 29 30 31 32 33 35 34 37 36 38 39 40 41 43 42 44 45 47 46 48 49 25 50 51 53 52 54 55 57 56 58 59 60 1
DVCPRO HD tape (59.94 fps)
2 3 4 5 6 7 8 9 10 11 12 13 14 15 16 17 18 19 20 21 22 23 24 26 27 28 29 30 31 32 33 35 34 37 36 38 39 40 41 43 42 44 45 47 46 48 49 25 50 51 53 52 54 55 57 56 58 59 60 1
Captured in Final Cut Pro (59.94 fps)
720p30
1 2 3 4 5 6 7 8 9 10 11 12 13 14 15 16 17 18 19 20 21 22 23 24 26 27 28 29 30 31 32 33 35 34 37 36 38 39 40 41 43 42 44 45 47 46 48 49 25 50 51 53 52 54 55 57 56 58 59 60
DVCPRO HD tape (59.94 fps)
Deleted frames
30 29 28 27 26 25 24 23 22 21 20 19 18 17 16 15 14 13 12 11 10 9 8 7 6 5 4 3 2 1
Captured in Final Cut Pro (29.97 fps)
720p24
1 2 3 4 5 6 7 8 9 10 11 12 13 14 15 16 17 18 19 20 21 22 23 24 26 27 28 29 30 31 32 33 35 34 37 36 38 39 40 41 43 42 44 45 47 46 48 49 25 50 51 53 52 54 55 57 56 58 59 60
DVCPRO HD tape (59.94 fps)
24 23 22 21 20 19 18 17 16 15 14 13 12 11 10 9 8 7 6 5 4 3 2 1
Captured in Final Cut Pro (23.98 fps)
Most capture presets for 720p DVCPRO HD enable the Remove Advanced Pulldown
and/or Duplicate Frames During Capture From FireWire Sources option to remove
redundant frames during capture. For information about modifying capture presets, see
the Final Cut Pro 6 User Manual, Volume IV, Chapter 25, “Capture Settings and Presets.”
When this checkbox is selected, your captured media files are smaller and ready to edit
at the proper frame rate.
Note: The 720p60 Easy Setup does not enable this option because no duplicate frames
are recorded at 60 fps.
For more information, see “Removing Duplicate Frames During Capture” on page 49.
46 Chapter 2 Working with DVCPRO HD
Page 47

720p50 DVCPRO HD
The 720p50 DVCPRO HD format supports 50 and 25 fps recording. When you record at
25 fps, the camera CCD captures images at the lower rate but the recording rate stays
fixed at 50 fps.
720pN DVCPRO HD Native Frame Rate Recording
Camcorders such as the Panasonic AG-HVX200 allow you to record 720p footage onto
P2 cards without duplicating frames. Because the footage is recorded at the intended
frame rate, this method is called native frame rate recording and is often indicated by the
letter N. For example, 720p60 camcorders can record 720pN30 and 720pN24 formats.
720p50 camcorders can record the 720pN25 format. For details about how to best ingest
these formats, see “Panasonic AG-HVX200 Camcorder Compatibility” on page 107.
720p DVCPRO HD Variable Frame Rate Recording
Some 720p DVCPRO HD camcorders allow you to create slow- and fast-motion effects
by recording at variable frame rates.
 720p60 camcorders can record frame rates between 4 and 60 fps.
 720p50 camcorders can record frame rates between 4 and 50 fps.
For example, you can create slow motion with the Panasonic Varicam camcorder by
setting an intended playback frame rate of 24 fps and then recording at 60 fps. When
60 fps footage is played at 24 fps, slow-motion effects are created. For more
information, see “Using the DVCPRO HD Frame Rate Converter” on page 53.
Setting System Frequency on a Panasonic Varicam Camcorder
The Panasonic Varicam camcorder can record at the standard NTSC-compatible
rate of 59.94 fps or at exactly 60 fps. Final Cut Pro only supports DVCPRO HD video
transfer via FireWire at 59.94 fps (or one of its variants, such as 29.97 or 23.98 fps).
If you want to capture DVCPRO HD footage via FireWire, make sure you record your
footage with the system frequency of your camcorder set to 59.94, not 60. For more
information, see the documentation included with the Panasonic Varicam camcorder.
Chapter 2 Working with DVCPRO HD 47
Page 48

Working with DVCPRO HD in Final Cut Pro
DVCPRO HD footage can be recorded on tape or on Panasonic P2 cards. This
chapter focuses on capturing DVCPRO HD footage from tape. For information about
transferring DVCPRO HD footage from a Panasonic P2 card, see Chapter 5, “Working
with Panasonic P2 Cards,” on page 97.
The steps for capturing, editing, and outputting DVCPRO HD video are almost identical
to the workflow used for DV. This section describes the basic DVCPRO HD workflow and
highlights unique facets of working with DVCPRO HD in Final Cut Pro.
Step 1: Connect your DVCPRO HD camcorder or deck to your computer via FireWire
Step 2: Choose a DVCPRO HD Easy Setup
Step 3: Log your footage and capture it to your scratch disk
Step 4: Edit your video clips into a sequence
Step 5: Output back to a DVCPRO HD or other HD video device, or export to
a QuickTime movie
Connecting a DVCPRO HD Device to Your Computer
Because DVCPRO HD is part of the DV/DVCPRO family of video formats, setting up
Final Cut Pro to capture, edit, and output DVCPRO HD is essentially the same as setting
up a system for any other kind of DV editing.
To set up your computer for DVCPRO HD capture and output:
m Connect your DVCPRO HD camcorder or deck to your computer using a 4-to-6-pin
or 6-to-6-pin FireWire cable.
For additional instructions on connecting a DV camcorder or deck to your computer, see
the Final Cut Pro 6 User Manual, Volume 1, Chapter 11, “Connecting DV Video Equipment.”
For information about mounting a Panasonic P2 card for use with the Log and Transfer
window, see “Mounting P2 Cards, Disk Images, and Folders” on page 99.
48 Chapter 2 Working with DVCPRO HD
Page 49

Choosing a DVCPRO HD Easy Setup
Final Cut Pro comes with several DVCPRO HD Easy Setups. Choose the Easy Setup that
matches your source footage on tape. The 720p30, 720p25, and 720p24 Easy Setups
remove duplicate frames during capture so that your media files have the proper frame
rate. For more information, see “Removing Duplicate Frames During Capture,” below.
To choose an Easy Setup:
1 Choose Final Cut Pro > Easy Setup.
2 Choose Panasonic DVCPRO HD from the Format pop-up menu.
3 Choose “(all rates)” from the Rate pop-up menu.
4 Click the Use pop-up menu to see all of the Easy Setups related to your choice in the
Format pop-up menu.
You can further refine the list by choosing a specific frame rate from the Rate
pop-up menu.
5 Choose an Easy Setup from the Use pop-up menu, then click Setup.
If you need to create a custom Easy Setup, see the Final Cut Pro 6 User Manual,
Volume IV, Chapter 24, “Audio/Video Settings and Easy Setups.”
Logging and Capturing Your DVCPRO HD Footage
You can log and capture DVCPRO HD footage in the same way you log and capture any
other DV source footage.
Removing Duplicate Frames During Capture
The 720p30, 720p25, and 720p24 DVCPRO HD capture presets enable the option that
removes duplicate progressive frames added by the camcorder. For more information,
see “720p60 DVCPRO HD” on page 46 and “720p50 DVCPRO HD” on page 47.
The 1080pA24 capture preset also enables the Remove Advanced Pulldown and/or
Duplicate Frames During Capture From FireWire Sources option so that unnecessary
fields are removed and your captured media file is 23.98 fps instead of 29.97 fps. For
more information, see the Final Cut Pro 6 User Manual, Volume IV, Chapter 25, “Capture
Settings and Presets.”
Chapter 2 Working with DVCPRO HD 49
Page 50
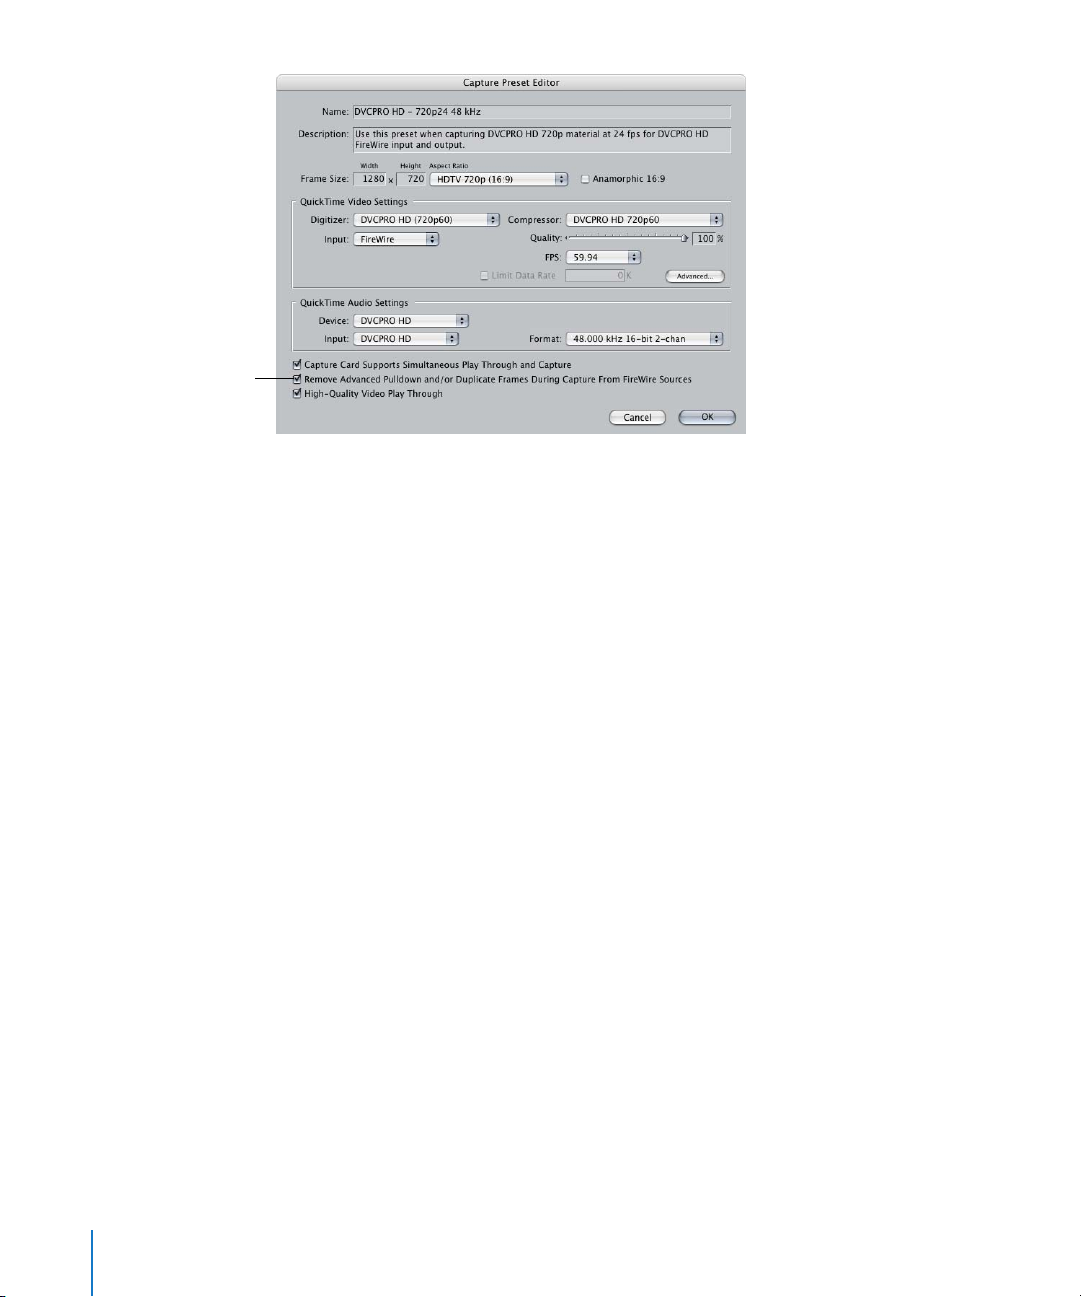
Select to remove
duplicate video frames
during capture.
About Timecode for 720p50 and 720p60 Formats
Although 720p HD formats can record at video frame rates of 60 fps, the timecode
recorded on tape is always 30 fps. How can 30 fps timecode account for every frame
when the video frame rate is 60 fps? Every two frames are represented by one
timecode number, and the second frame in the pair is uniquely flagged so it can be
differentiated in the timecode count. For example, the first two timecode numbers of
a 720p60 tape are indicated by the timecode numbers :00 and :00*, where the asterisk
indicates the second frame. Using this method, 60 frames can be uniquely addressed
using only 30 timecode numbers per second.
Note: Drop frame timecode is supported when capturing 720p60 DVCPRO HD.
About Device Control for 720p50 and 720p60 Devices
When you log, capture, or output 720p60 DVCPRO HD, the remote device control
displays the tape timecode, which is 30 fps. This means that you can only set In and
Out points with 30 fps timecode accuracy, even though the video frame rate is 60 fps.
Despite this minor restriction, you can still edit with 60 fps frame accuracy once you
capture your footage.
When you capture 720p60 DVCPRO HD media, Final Cut Pro converts the 30 fps
timecode on the source tape to a 60 fps timecode track within the QuickTime media
file. This timecode can be used to accurately recapture your media at a later time.
For more information about 60 fps timecode, see “Choosing Timecode Display Options
for 720p60 DVCPRO HD Media” on page 51.
Important: The rules above also apply to 720p50 DVCPRO HD and 25 fps timecode.
50 Chapter 2 Working with DVCPRO HD
Page 51

Editing DVCPRO HD Footage
You can edit DVCPRO HD footage just as you would DV footage. Several additional
options are available to support the unique frame rates of DVCPRO HD.
Choosing Timecode Display Options for 720p60 DVCPRO HD Media
Even though the timecode track of 720p60 DVCPRO HD QuickTime media files is always
running at 60 fps, you can choose whether the timecode fields in Final Cut Pro display
60 or 30 fps timecode.
 When editing 720p60 video: You can choose from two time display options.
 HH:MM:SS:FF: The timecode counts 60 frames per second, from :00 to :59.
 60 @ 30: Displays 59.94 and 60 fps video using 30 fps timecode. One timecode
number is used for every two video frames, and an asterisk is displayed on every
other frame. This timecode display matches the display on DVCPRO HD decks and is
useful when you are referring to log notes or EDLs generated with 30 fps timecode.
60 fps 60 @ 30 fps Frames
01:50:20:28
01:50:20:28*
01:50:20:29
01:50:20:29*
01:50:21:00
01:50:21:00*
01:50:20:56
01:50:20:57
01:50:20:58
01:50:20:59
01:50:21:00
01:50:21:01
 When editing 720p30 or 720p24 video: You can choose to display clip time instead of
source time. The clip time option displays timecode at the media file frame rate, not
the media file timecode track rate.
Important: These timecode display options do not change the timecode of your media
files; only the displayed timecode count is affected.
Chapter 2 Working with DVCPRO HD 51
Page 52

To set the timecode display for 720p60 video:
1 Open a 720p60 clip or sequence in the Viewer or Canvas.
2 Control-click a timecode field, then choose HH:MM:SS:FF (this will display 60 fps
timecode) or 60 @ 30 from the shortcut menu.
Note: The 60 @ 30 timecode display is available only when you are working with
59.94 fps or 60 fps media files and sequences.
To display clip time for a 720p30 or 720p24 clip:
1 Open a 720p30 or 720p24 clip in the Viewer.
2 Control-click the Current Timecode field, then choose Clip Time from the shortcut menu.
The Current Timecode field now displays timecode based on the frame rate of the
media file instead of the source timecode rate.
For more information about changing timecode display options, see the Final Cut Pro 6
User Manual, Volume II, Chapter 25, “Working with Timecode.”
Important: You can also view timecode for 720p50 video in two modes: HH:MM:SS:FF
or 50 @ 25.
Outputting Your DVCPRO HD Sequence
DVCPRO HD clips and sequences are recorded to tape via FireWire, in the same way as
any other DV media. For more information about editing to tape, see the Final Cut Pro 6
User Manual, Volume IV, Chapter 13, “Preparing to Output to Tape.”
Warning: Don’t record DVCPRO HD video to a tape that already has DVCPRO (25) or
DVCPRO 50 footage on it. Even though these formats can use the same tape stock,
the recording speeds are different.
Generating Color Bars and Tone for 1080i, 1080p, and 720p Video
Final Cut Pro includes bars and tone generators especially for use with 1080i, 1080p,
and 720p sequences. These bars and tone generators are available in the Video
Generators bin in the Effects tab of the Browser. For more information, see the
Final Cut Pro 6 User Manual, Volume III, Chapter 21, “Using Generator Clips.”
720p60 Output and Playback
When recording a 720p60, 720p30, or 720p24 clip or sequence to tape via FireWire,
Final Cut Pro automatically outputs 59.94 fps video, creating duplicate frames if necessary.
Likewise, 720p25 and 720p50 clips or sequences are always recorded to tape at 50 fps.
For more information about how DVCPRO HD flags 59.94 fps frames with duplicate
frame information, see “720p60 DVCPRO HD” on page 46.
52 Chapter 2 Working with DVCPRO HD
Page 53

Outputting Sequence Timecode Using DVCPRO HD
When you output a DVCPRO HD sequence or clip to a DVCPRO HD device via FireWire,
timecode is also output. This works during Print to Video and Edit to Tape operations,
as well as during normal playback when external video output via FireWire is enabled.
For more information, see the Final Cut Pro 6 User Manual, Volume IV, Chapter 14,
“Assemble and Insert Editing Using Edit to Tape.”
∏ Tip: You can also set a custom starting timecode number when you use the black and
code feature with DVCPRO HD tapes. For more information about using the black and
code feature in Final Cut Pro, see the Final Cut Pro 6 User Manual, Volume IV, Chapter 13,
“Preparing to Output to Tape.”
Note: Drop frame timecode is supported when you prepare a 720p tape with black
and timecode.
Using the DVCPRO HD Frame Rate Converter
Some 720p DVCPRO HD camcorders can record at variable frame rates, a feature once
exclusive to film cameras.
In film, the traditional frame rate is 24 fps, but many cameras can be “overcranked” or
“undercranked” to achieve slow- and fast-motion effects. The technique is straightforward:
the more frames you record per second, the longer it takes to play them back at 24 fps,
and therefore the slower the motion onscreen. The reverse is also true: the fewer frames
you record per second, the faster the motion when played back at 24 fps.
Choosing an Intended Playback Rate
Variable frame rate recording with DVCPRO HD works the same way it does with film,
except that the final playback rate varies (24, 25, 30, 50, or 60 fps) depending on your
final output format. During shooting, you need to have an intended playback rate in
mind to know what frame rate to record your footage at. For slow-motion effects, you
need to record at a frame rate higher than your intended playback rate. For fast motion,
shoot at a frame rate lower than your intended playback rate.
For example, if you shoot at 60 fps and play back your footage at 24 fps, the result will
be slow motion because the rate at which you recorded was higher than the final
playback rate. However, if you record at 24 fps and play back your footage at 24 fps,
your footage will play at normal speed.
Chapter 2 Working with DVCPRO HD 53
Page 54

How DVCPRO HD Variable Frame Rate Recording Works
In 720p DVCPRO HD variable frame rate recording, the camera CCD outputs a frame
rate while the recording rate is fixed at either 59.94 fps or 50 fps (depending on the
camcorder model).
A 720p60 camera CCD can generate between 4 and 60 images per second, while the
recording unit records at a constant rate of 60 fps (technically, 59.94 fps). When you
select any frame rate lower than 60 fps, some images from the CCD are recorded more
than once. These redundant frames are tagged for later removal using a special device
called a frame rate converter.
What Is a Frame Rate Converter?
A frame rate converter, or FRC, is hardware or software that converts the frame rate of
your footage by:
 Setting the rate of playback higher or lower, so that each frame lasts a longer or
shorter amount of time on the screen. By changing the duration that each frame is
shown onscreen compared to its recorded duration, you can speed up or slow down
the action in your media.
 Intelligently skipping redundant frames containing variable frame rate flags
Some frame rate converters can also do upconverting and downconverting, allowing
you to use 720p for variable speed cinematography and then transfer to 1080i or 480i
(standard definition).
How a Frame Rate Converter Works
On tape, variable frame rate video footage may look a bit strange—almost
stroboscopic— because many frames are repeated with the intention that they will be
removed. Once the frame rate converter removes the duplicate frames and only unique
frames remain, your footage plays back at the intended rate.
For example, if the camera is set to record 15 fps, three out of every four frames are
tagged as duplicates and the frame rate converter ignores or discards them. The frame
rate converter then converts the 15 fps footage to a new media file at a standard frame
rate such as 23.98, 29.97, or 59.94 fps.
54 Chapter 2 Working with DVCPRO HD
Page 55
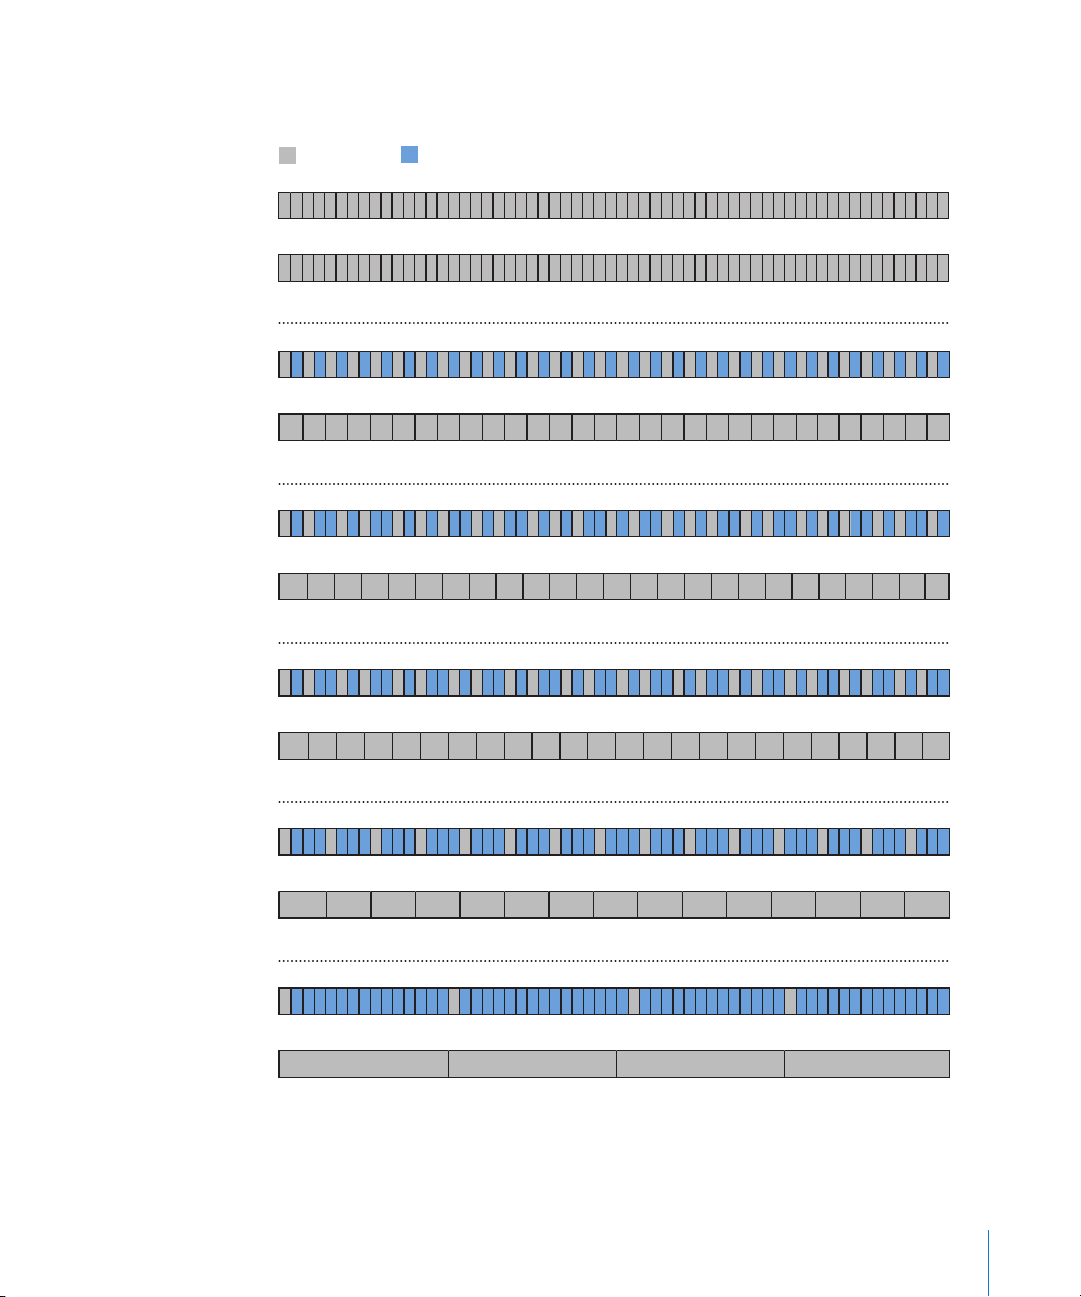
Several examples of 720p60 DVCPRO HD variable frame rate footage are shown below.
Recording Variable Frame Rates with DVCPRO HD 720p
Used frames
2 3 4 5 6 7 8 9 10 11 12 13 14 15 16 17 18 19 20 21 22 23 24 26 27 28 29 30 31 32 33 35 34 37 36 38 39 40 41 43 42 44 45 47 46 48 49 25 50 51 53 52 54 55 57 56 58 59 60 1
DVCPRO HD tape (60 fps)
2 3 4 5 6 7 8 9 10 11 12 13 14 15 16 17 18 19 20 21 22 23 24 26 27 28 29 30 31 32 33 35 34 37 36 38 39 40 41 43 42 44 45 47 46 48 49 25 50 51 53 52 54 55 57 56 58 59 60 1
After duplicate frame removal (60 fps)
1 2 3 4 5 6 7 8 9 10 11 12 13 14 15 16 17 18 19 20 21 22 23 24 26 27 28 29 30 31 32 33 35 34 37 36 38 39 40 41 43 42 44 45 47 46 48 49 25 50 51 53 52 54 55 57 56 58 59 60
DVCPRO HD tape (60 fps)
After duplicate frame removal (30 fps)
1 2 3 4 5 6 7 8 9 10 11 12 13 14 15 16 17 18 19 20 21 22 23 24 26 27 28 29 30 31 32 33 35 34 37 36 38 39 40 41 43 42 44 45 47 46 48 49 25 50 51 53 52 54 55 57 56 58 59 6 0
DVCPRO HD tape (60 fps)
After duplicate frame removal (25 fps)
Duplicate frames
30 29 28 27 26 25 24 23 22 21 20 19 18 17 16 15 14 13 12 11 10 9 8 7 6 5 4 3 2 1
24 25 23 22 21 20 19 18 17 16 15 14 13 12 11 10 9 8 7 6 5 4 3 2 1
1 2 3 4 5 6 7 8 9 10 11 12 13 14 15 16 17 18 19 20 21 22 23 24 26 27 28 29 30 31 32 33 35 34 37 36 38 39 40 41 43 42 44 45 47 46 48 49 25 50 51 53 52 54 55 57 56 58 59 60
DVCPRO HD tape (60 fps)
24 23 22 21 20 19 18 17 16 15 14 13 12 11 10 9 8 7 6 5 4 3 2 1
After duplicate frame removal (24 fps)
1 2 3 4 5 6 7 8 9 10 11 12 13 14 15 16 17 18 19 20 21 22 23 24 26 27 28 29 30 31 32 33 35 34 37 36 38 39 40 41 43 42 44 45 47 46 48 49 25 50 51 53 52 54 55 57 56 58 59 60
DVCPRO HD tape (60 fps)
15 14 13 12 11 10 9 8 7 6 5 4 3 2 1
After duplicate frame removal (15 fps)
2 3 4 5 6 7 8 9 10 11 12 13 14 15 16 17 18 19 20 21 22 23 24 26 27 28 29 30 31 32 33 35 34 37 36 38 39 40 41 43 42 44 45 47 46 48 49 25 50 51 53 52 54 55 57 56 58 59 60
1
DVCPRO HD tape (60 fps)
1 2 3 4
After duplicate frame removal (4 fps)
You can record variable frame rates with a 720p50 camcorder just as you would with a
720p60 camcorder, although the range of variable frame rates is between 4 and 50 fps.
Chapter 2 Working with DVCPRO HD 55
Page 56

About Native Variable Frame Rate Recording
Camcorders such as the Panasonic AG-HVX200 and AG-HVX200E aren’t limited by the
constraints of tape-based recording, so they can record native frame rates without
duplication of frames. For more information, see “720pN DVCPRO HD Native Frame
Rate Recording” on page 47.
If you record variable frame rates in these native frame rate modes, the camera can
display the results immediately without the use of a frame rate converter. For more
information, see the documentation included with the Panasonic AG-HVX200 camcorder.
About the DVCPRO HD Frame Rate Converter
The DVCPRO HD Frame Rate Converter in Final Cut Pro provides conversion options
formerly available only with expensive hardware. You can use the Frame Rate Converter
to create an output movie with a frame rate different from the original frame rate (for
example, convert 59.94 fps footage to 23.98 fps).
The Frame Rate Converter can create a new self-contained QuickTime movie or create a
QuickTime movie that actually refers to the frames of the original media file while
playing them back at a different rate.
The Frame Rate Converter only works with certain 720p DVCPRO HD formats and does
not process timecode or audio.
Original Media File Requirements
The Frame Rate Converter only processes media files that meet the following requirements:
 The media file must use the DVCPRO HD 720p60 or DVCPRO HD 720p50 codec.
 The media file must be captured or ingested at a frame rate of 59.94 or 50 fps.
To ensure that your media file contains the variable frame rate footage from the
camera, make sure that you are using a capture preset with the Remove Advanced
Pulldown and/or Duplicate Frames During Capture From FireWire Sources checkbox
unselected. For 720p60 footage, the easiest way to ensure you retain proper flags is to
capture footage using the DVCPRO HD - 720p60 capture preset.
56 Chapter 2 Working with DVCPRO HD
Page 57
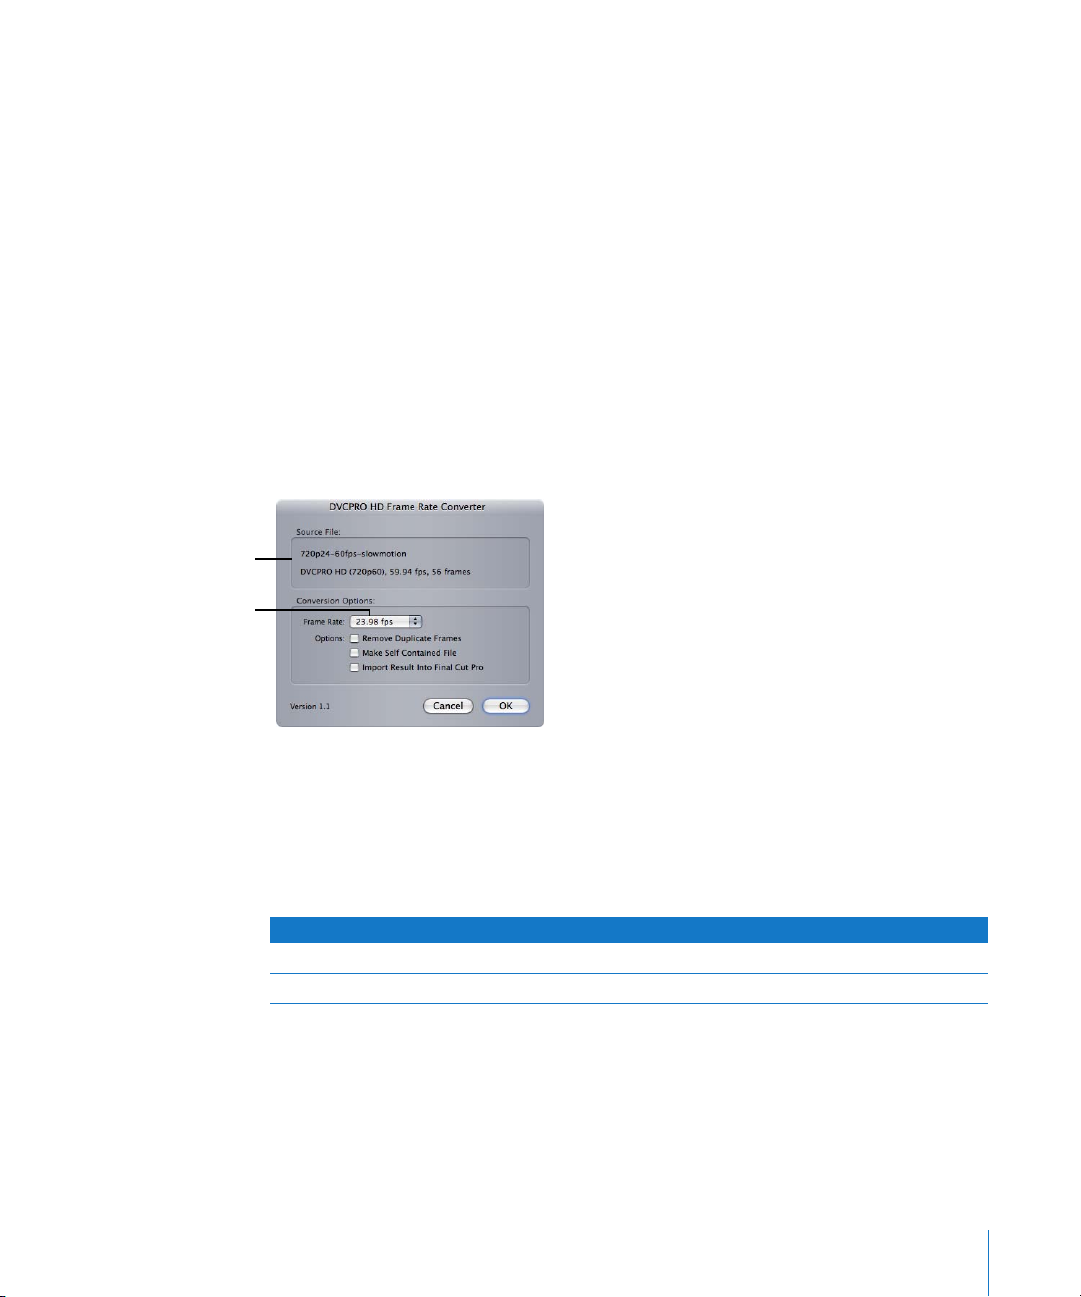
Source file name and
format description
Choose the intended
playback frame rate here.
Timecode and Audio Restrictions
The Frame Rate Converter does not include timecode or audio in the processed media
file. Although this may seem like a limitation, it is important to remember that the
primary purpose of timecode is to link your clip back to particular timecode addresses
on a videotape for recapturing. Because the frames of the processed media file do not
exactly correspond to the frames on the original tape, including the original timecode
would only lead to confusion. It’s best to consider your processed variable frame rate
media file as a completely new piece of media.
Audio is not affected or considered when shooting variable frame rate footage. Just as
with variable frame rate film cinematography, these shots are usually recorded MOS
(without sound), and sound is added later during post-production.
About the Frame Rate Converter Options
The options for the Frame Rate Converter are described below.
Frame Rate
The Frame Rate pop-up menu allows you to choose the intended playback rate of the
processed media file. For more information, see “Choosing an Intended Playback Rate”
on page 53.
The options available here depend on the frame rate of your source media.
Source frame rate Output frame rate options
59.94 fps 59.94, 29.97, and 23.98 fps
50 fps 50, 25, and 24 fps
Chapter 2 Working with DVCPRO HD 57
Page 58

Why Is There an Option to Convert 59.94 fps to 59.94 fps?
It may sound redundant to convert 59.94 fps to 59.94 fps. In fact, it is redundant
unless you have variable frame rate flags in your footage. For example, if you have
footage flagged as 10 fps, it contains a considerable number of duplicate frames.
These frames can be removed from the original footage while maintaining a final
frame rate of 59.94 fps. Because the media file now has fewer frames overall, the clip
is shorter and therefore faster. This would not be possible with the standard capture
preset options.
Note: You can also convert 50 fps footage to 50 fps. Again, your footage must have
variable frame rate flags or there will be no noticeable effect.
Remove Duplicate Frames
If the Remove Duplicate Frames checkbox is selected, the Frame Rate Converter removes
any flagged duplicate frames when creating the new file or processing the existing media
file (depending on whether the Make Self-Contained File checkbox is selected).
Make Self-Contained File
If this checkbox is selected, a new self-contained QuickTime media file is written to
disk. Select this option if you want the new media file to be completely independent of
the original file. You may want to do this if you plan to get rid of the original file, or if
you want to copy the new, processed file to another editing system.
Note: If you create a self-contained file, you need to have enough disk space for
another copy of the media file.
If this checkbox is unselected, a QuickTime reference movie is created. A QuickTime
reference movie refers to frames in the original media file. Reference movies are
incredibly small relative to the original media file because they don’t actually contain
any media (in the same way that a Final Cut Pro project file is small because it doesn’t
contain any of the media that it refers to). The disadvantage of this option is that
reference movies still require the original media file.
For more information, see the Final Cut Pro 6 User Manual, Volume IV, Chapter 17,
“Exporting QuickTime Movies.”
Import Result Into Final Cut Pro
If the Import Result Into Final Cut Pro checkbox is selected, the resulting media file is
imported into the current project. The imported clip uses the name you enter in the
Save Converted Media dialog.
58 Chapter 2 Working with DVCPRO HD
Page 59

Using the Frame Rate Converter
To convert a DVCPRO HD media file using the Frame Rate Converter:
1 Select a clip in the Browser that meets the Frame Rate Converter requirements (see
“Original Media File Requirements” on page 56).
2 In Final Cut Pro, choose Tools > DVCPRO HD Frame Rate Converter.
3 Select options for processing the media file.
For more information about the options, see “About the Frame Rate Converter Options”
on page 57.
4 Click OK.
5 In the Save Converted Media dialog, enter a filename, navigate to a location, then click OK.
The Frame Rate Converter first processes the source media file, removing tagged
duplicate frames (if the Remove Duplicate Frames option is selected). The Processing
Source Media progress window appears to show the status of processing.
Once processing is complete, the final converted movie file is written to disk as a new,
independent file (if the Make Self-Contained File checkbox is selected) or as a reference
movie file pointing to the relevant frames of the original media file.
If the Import Result Into Final Cut Pro option is selected, the converted media file is
imported into Final Cut Pro. The clip name is the same as the name you entered in the
Save Converted Media dialog. Note that the converted media filename and the
resulting clip name are typically not the same, so you need to be especially organized
when managing media files created by the Frame Rate Converter.
Working with 24p DVCPRO HD
DVCPRO HD supports several 24p recording modes, depending on the camcorder you
are using. For more information about 24p video, see the Final Cut Pro 6 User Manual,
Volume IV, Appendix C, “Working with 24p Video.”
Working with 1080pA24 DVCPRO HD Video
The steps below explain the workflow for capturing and outputting 1080pA24
(advanced pull-down) DVCPRO HD footage.
Note: To remove standard 3:2 (2:3:2:3) pull-down from 1080p24 footage, you need to
capture the footage as 1080i60 (29.97 fps) and then use Cinema Tools to remove
the pull-down.
Chapter 2 Working with DVCPRO HD 59
Page 60

Step 1: Shoot with advanced pull-down (23.98 fps at 29.97 fps)
Choose the 1080i/24PA recording mode on your camera. This creates 29.97 fps 1080i
video that contains 23.98 fps progressive frames using a 2:3:3:2 pull-down pattern.
Step 2: Remove 2:3:3:2 advanced pull-down from 24p video during capture
Choose the DVCPRO HD 1080pA24 Easy Setup, which enables the Remove Advanced
Pulldown and/or Duplicate Frames During Capture From FireWire Sources option.
Duplicate video fields are discarded during capture, resulting in a 24p (23.98 fps) media
file on disk after capture.
Note: You can also remove advanced pull-down while ingesting 1080pA24 or 480pA24
footage recorded on P2 cards. For more information, see “Setting Log and Transfer
Import Preferences” on page 95.
If you have already captured your video at 29.97 fps, you can remove duplicate fields
from your media files after capture.
To remove 2:3:3:2 advanced pull-down from your media files after capture:
m Select the 29.97 fps clips in the Browser, then choose Tools > Remove Advanced Pulldown.
Your media files will remain the same size, but they will be set to play back at 23.98 fps.
If no advanced pull-down flags are detected, the media files remain at 29.97 fps.
Step 3: Edit at 23.98 fps
You can edit your footage in a 23.98 fps sequence. To preview your video on an
external monitor while you are editing, you can choose one of several pull-down
options to convert the 23.98 fps video to 29.97 fps. The 2:2:2:4 option is the least
processor-intensive, but it should be used only for previewing.
For more information about real-time pull-down options, see the Final Cut Pro 6
User Manual, Volume IV, Appendix C, “Working with 24p Video.”
Step 4: Output back to 1080i60 video with advanced pull-down
After you finish editing your movie, you can output back to 1080i60 video by
introducing a pull-down pattern on the FireWire output. You can choose one of several
pull-down patterns, either from the RT pop-up menu in the Timeline or in the Playback
Control tab of the System Settings window. For output back to tape, you should choose
advanced pull-down (2:3:3:2) or normal telecine pull-down (2:3:2:3).
You can also export your movie to a 23.98 fps QuickTime movie or image sequence for
delivery to a video-to-film transfer lab.
60 Chapter 2 Working with DVCPRO HD
Page 61

Working with 720p24 DVCPRO HD Video
There are several methods for recording 720p24 DVCPRO HD footage, depending on
the camcorder you use.
720p60 DVCPRO HD Recorded at 23.98 fps
Duplicate frames are recorded and can be removed during capture (Panasonic
Varicam), during P2 card ingest (Panasonic AG-HVX200), or after capture using the
DVCPRO HD Frame Rate Converter. This format is also referred to as 720p24.
For more information, see “Removing Duplicate Frames During Capture” on page 49
and “Setting Log and Transfer Import Preferences” on page 95.
Note: The Panasonic Varicam camcorder can record 720p60 video with a frame rate
setting of 24 fps, but this format is not supported by Final Cut Pro. For more information,
see “Setting System Frequency on a Panasonic Varicam Camcorder” on page 47.
720p50 DVCPRO HD Recorded at 24 fps
Duplicate frames are recorded and can be removed during P2 card ingest with the
Log and Transfer window or using the DVCPRO HD Frame Rate Converter. For more
information, see “Setting Log and Transfer Import Preferences” on page 95.
Note: This format is only available using the Panasonic AG-HVX200E camcorder (PAL).
720pN24 DVCPRO HD (Native 24p)
DVCPRO HD 24 fps footage is recorded natively to a Panasonic P2 card and can be
ingested using the Log and Transfer window. For more information, see
“Panasonic AG-HVX200 Camcorder Compatibility” on page 107.
Note: This format is only available using the Panasonic AG-HVX200 camcorder (NTSC).
Chapter 2 Working with DVCPRO HD 61
Page 62

DVCPRO HD Format Specifications
DVCPRO HD is a 100 Mbps extension of the DVCPRO (25) and DVCPRO 50 formats, used
for capturing and editing high-quality HD video. Because DVCPRO HD is a DV format,
native FireWire capture and output is supported.
Storage Medium
DVCPRO, DVCPRO 50, and DVCPRO HD tapes use a metal particle (MP) tape formulation.
Some tape sizes are supported only by decks and not by cameras. As the data rate is
doubled from 25 Mbps (DV and DVCPRO) to 50 Mbps (DVCPRO 50) to 100 Mbps
(DVCPRO HD), the recording time is halved in each case. Therefore, a 63-minute DV tape
stores only 31 minutes of DVCPRO 50 footage, or 15 minutes of DVCPRO HD footage.
Warning: DV (sometimes referred to as mini-DV) and DVCAM use a metal evaporated
(ME) tape formula, whereas DVCPRO uses metal particle tape. When in doubt, always
use cassettes explicitly manufactured for the camera or VTR you intend to use.
You can also record DVCPRO, DVCPRO 50, and DVCPRO HD on P2 cards. For more
information, see “About Panasonic P2 Cards and Media Files” on page 97.
Video Standard
The SMPTE 370M-2006 specification defines the following DVCPRO HD formats.
Format Frame dimensions Frame rate Scanning method
1080i60 1280 x 1080 59.94 fps Interlaced
1080i50 1440 x 1080 50 fps Interlaced
720p60 960 x 720 59.94 fps Progressive
720p50 960 x 720 50 fps Progressive
Panasonic equipment and Final Cut Pro support additional frame rates within these
formats. For more information, see “Frame Rate” on page 63.
Aspect Ratio
Regardless of the specific resolution used, DVCPRO HD always captures and displays an
image with an aspect ratio of 16:9 (or 1.78).
62 Chapter 2 Working with DVCPRO HD
Page 63

920
080
Frame Dimensions, Number of Lines, and Resolution
DVCPRO HD supports three resolutions:
 1080i60: 1280 pixels per line, 1080 lines; interlaced (displayed at 16:9, or 1920 x 1080)
 1080i50: 1440 pixels per line, 1080 lines; interlaced (displayed at 16:9, or 1920 x 1080)
 720p60, 720p50: 960 pixels per line, 720 lines; progressive (displayed at 16:9, or
1280 x 720)
Final Cut Pro captures and processes DVCPRO HD using its native dimensions but
displays the image onscreen as you would expect 16:9 video to appear.
x 1
1920 x 1080
1280 x 1080
1
1440 x 1080
1280 x 720
960 x 720
1080i60, 1080p30,
1080pA24
1080i50
720p
Frame Rate
DVCPRO HD supports both NTSC and PAL frame rates:
 NTSC: 59.94 and 29.97 fps
 PAL: 50 and 25 fps
Note: The Panasonic Varicam camcorder has an option for true 60 fps recording (versus
59.94 fps), although Final Cut Pro does not support these rates when capturing via FireWire.
The 1080i60 format can record 24 fps progressive footage with standard pull-down
(2:3:2:3) or advanced pull-down (2:3:3:2).
Camcorders capable of recording 720p60 footage can also record 720p30 and 720p24
footage. Camcorders that support 720p50 can also record 720p25 footage. Tape-based
camcorders achieve these frame rates by duplicating frames and flagging them for
removal during capture (or with a frame rate converter). P2 camcorders such as the
Panasonic AG-HVX200 can record natively (without duplicate frames) to the 720pN30
and 720pN24 formats. The Panasonic AG-HVX200E camcorder supports 720pN25.
Some DVCPRO HD camcorders support variable frame rate recording in the
720p format. In this case, the video is actually recorded at 60 or 50 fps and duplicate
frames are flagged for removal during post-production. Duplicate frames can be
removed using a frame rate converter.
Chapter 2 Working with DVCPRO HD 63
Page 64

Scanning Method
DVCPRO HD can record either interlaced or progressive scan images, depending on the
frame size and format.
 1080 lines: Interlaced or progressive (via advanced pull-down)
 720 lines: Progressive only
Color Recording Method
DVCPRO HD records a 4:2:2 Y´CBCR (component) digital video signal. Each sample (pixel)
has a native resolution of 8 bits. FireWire transfers color natively at 8-bit color depth,
and HD SDI transfers each color sample as a 10-bit value.
Data Rate
The data rate of DVCPRO HD on tape is fixed at 100 Mbps, which is double the
DVCPRO 50 data rate and four times the rate of DVCPRO.
The table below compares the captured data rates for DVCPRO HD formats. These data
rates show video only.
Format Recorded data rate (Mbps) Captured data rate (MB/sec.)
1080i60 100 Mbps 14.4 MB/sec.
1080i50 100 Mbps 14.4 MB/sec.
720p60 100 Mbps 14.4 MB/sec.
720p50 100 Mbps 14.4 MB/sec.
720pN30 50 Mbps 7.2 MB/sec.
720pN25 50 Mbps 7.2 MB/sec.
720pN24 40 Mbps 5.76 MB/sec.
The actual disk space used during capture will vary slightly depending on the number
of audio channels captured. Each captured audio track adds an additional 0.34 MB/sec.
Because DVCPRO HD is compressed, an internal 7200 rpm parallel or serial ATA drive is
sufficient for capturing DVCPRO HD footage. FireWire drives are often sufficient as well.
64 Chapter 2 Working with DVCPRO HD
Page 65

Video Compression
DVCPRO HD uses a variation of the DV and DVCPRO 50 codecs. The compression ratio
is around 6.7:1.
Audio
The DVCPRO HD format supports up to eight audio tracks, though not all devices can
access every track. The sample rate is 48 kHz, using 16 bits per sample.
Timecode
On tape or P2 card, 1080i60, 1080p30, and 720p60 DVCPRO HD use 30 fps timecode.
1080i50 and 720p50 DVCPRO HD use 25 fps timecode. When recording 720p60
DVCPRO HD, each timecode number is used twice, with an asterisk used to distinguish
frame 1 and frame 2 of each timecode pair. This maintains backward compatibility with
SMPTE 30 fps timecode. When 720p60 footage is captured, the 30 fps timecode is
converted to 60 fps timecode. To view 30 fps timecode instead of the 60 fps timecode
in your media files, Final Cut Pro has a timecode display option called 60 @ 30 timecode.
Note: Final Cut Pro supports drop frame timecode for 720p formats.
Chapter 2 Working with DVCPRO HD 65
Page 66

Page 67

3 Working with IMX
3
Native IMX editing support makes Final Cut Pro a powerful
addition to any broadcast post-production environment.
This chapter covers the following:
 About IMX (p. 67)
 Working with IMX in Final Cut Pro (p. 68)
 IMX Format Specifications (p. 70)
About IMX
IMX is a high-quality, standard definition, MPEG-2-based video format created by Sony.
Both NTSC and PAL video standards are supported.
IMX is not bound to a particular tape format or transmission method; IMX can just as
easily be stored on tape, hard disk, or optical disc. In addition to standard video signal
transfers via analog component and SDI interfaces, SDTI and Ethernet interfaces can be
used to transfer native IMX data.
IMX bridges the gap between traditional video formats and computer-based
post-production systems by encapsulating video and audio data within an increasingly
popular data format known as MXF.
67
Page 68

IMX Formats Supported by Final Cut Pro
IMX can be recorded using NTSC or PAL video standards at three possible bit rates
(30, 40, and 50 Mbps). Final Cut Pro supports real-time editing and effects using the
30, 40, and 50 Mbps IMX formats.
Format Frame dimensions Data rate
IMX - NTSC 720 x 486 30, 40, and 50 Mbps
IMX - PAL 720 x 576 30, 40, and 50 Mbps
About MXF
Material eXchange Format (MXF) is a generic media container format for the video
industry. It is not a compression scheme or specific video type, but rather a container for
storage and transmission of video, audio, and associated metadata. An MXF container is
similar in concept to a QuickTime movie, which is a general-purpose media container that
can contain video and audio with various dimensions, codecs, sample rates, and so on.
For example, the IMX format stores MPEG-2-compressed video and audio within an MXF
container. However, because MXF is not codec-specific, it can contain video compressed
with other codecs as well, such as DVCAM. Panasonic P2 cards can store DV, DVCPRO,
DVCPRO 50, and DVCPRO HD data within an MXF wrapper. The MXF wrapper facilitates
transfer and storage of specialized media data within general-purpose computer systems
and across multiple media types.
Working with IMX in Final Cut Pro
There are several steps for importing and editing IMX video in Final Cut Pro. Because
IMX is an MXF-based format, you need third-party software to extract MPEG-2 IMX
media from its MXF container and store it in QuickTime media files.
Step 1: Transfer IMX footage to your computer
Step 2: Import MXF-wrapped IMX media files into your project
Step 3: Choose an IMX Easy Setup
Step 4: Edit your IMX clips into a sequence
Step 5: Export IMX QuickTime media files
68 Chapter 3 Working with IMX
Page 69

Transferring IMX Footage to Your Computer
IMX media is stored within MXF files, so the first step is to transfer the MXF files
containing your IMX media to your computer hard disk. Depending on the media
format you are using, you can use a Sony IMX VTR, XDCAM player, or any other device
that supports MXF file transfers. For more information about transferring IMX media to
your computer, see the documentation that came with your deck.
Importing MXF-Wrapped IMX Media Files into Your Project
Once you have MXF files on your hard disk, you need to extract the IMX MPEG-2 media
data and store it within QuickTime media files. This process requires a third-party
plug-in that extends the ability of Final Cut Pro to import MXF-encoded media. Once
your IMX media has been converted from MXF to QuickTime media files, you can
import the QuickTime media files into Final Cut Pro.
Choosing an IMX Easy Setup
After you convert MXF files to QuickTime media files containing IMX MPEG-2 media, you
need to choose a sequence preset (or corresponding Easy Setup) that is compatible with
your IMX format. Final Cut Pro includes Easy Setups for real-time editing using 30, 40, or
50 Mbps NTSC or PAL IMX media.
Editing IMX Clips into a Sequence
No special features or settings are necessary for editing IMX in Final Cut Pro. As with
any other format, you simply need to make sure your Easy Setup matches the format
of the footage you are editing.
Exporting IMX QuickTime Media Files
When you finish editing your sequence, you can export a QuickTime movie using the
corresponding NTSC or PAL IMX codec.
Chapter 3 Working with IMX 69
Page 70

IMX Format Specifications
IMX, also known as Betacam IMX or MPEG IMX, records SD NTSC and PAL video using
high-quality MPEG-2 compression.
Storage Medium
One of the features of the IMX format is that it is not restricted to a single media type. IMX
can be recorded on XDCAM, a Sony optical disc format, as well as the IMX tape format.
IMX VTRs bridge the gap between conventional tape decks and modern computer
editing systems with the following features:
 Playback of older video formats such as Betacam SP, Beta SX, and Digital Betacam.
These formats can be converted and output to MPEG IMX in real time.
Note: Not all IMX VTRs support playback and recording of all Betacam formats.
 IMX digital video file transfer via networking interfaces such as Ethernet and
TCP/IP protocols
Video Standard
IMX supports both SD NTSC and SD PAL.
Aspect Ratio
NTSC and PAL IMX both have an aspect ratio of 4:3.
Frame Dimensions, Number of Lines, and Resolution
IMX can store video at two possible resolutions: NTSC (525) and PAL (625). The numbers
refer to the number of analog lines of the corresponding video formats. However, many
of these analog lines are not used to store picture information. In Final Cut Pro, the
following frame dimensions are used:
 NTSC IMX: 720 pixels per line, 486 lines
 PAL IMX: 720 pixels per line, 576 lines
In both formats, standard definition rectangular pixels are used, just as with DV, DVD,
Digital Betacam, and other SD digital video formats.
Frame Rate
IMX supports NTSC and PAL frame rates of 29.97 fps and 25 fps, respectively.
Scanning Method
IMX supports interlaced recording.
70 Chapter 3 Working with IMX
Page 71

Color Recording Method
IMX records a 4:2:2 Y´CBCR (component) digital video signal. Each sample (pixel) has a
resolution of 8 bits.
Data Rate and Video Compression
IMX uses I-frame-only MPEG-2 compression. IMX is a restricted version of MPEG-2 4:2:2
Profile @ ML. The official SMPTE designation is D10, as specified in SMPTE standard 356M.
Three compression ratios are supported:
 30 Mbps: 5.6:1 compression
 40 Mbps: 4.2:1 compression
 50 Mbps: 3.3:1 compression
Audio
IMX supports two audio channel configurations:
 Four audio channels, sampled at 48 kHz with 24 bits per sample
 Eight audio channels, sampled at 48 kHz with 16 bits per sample
Timecode
IMX supports 30 and 25 fps timecode.
Chapter 3 Working with IMX 71
Page 72

Page 73

4 Using the Log and Transfer
Window
4
You can use the Log and Transfer window to view footage
recorded on file-based media and transfer it to your
scratch disk.
This chapter covers the following:
 About File-Based Media (p. 74)
 About the Log and Transfer Window (p. 74)
 File-Based Media Terminology (p. 76)
 Sample File-Based Media Workflow (p. 78)
 Mounting Media Devices (p. 80)
 Using the Browse Area (p. 80)
 Using the Preview Area (p. 84)
 Using the Logging Area (p. 86)
 Using the Transfer Queue (p. 88)
 Reingesting Clip Media (p. 90)
 Working with Spanned Clips (p. 91)
 Archiving File-Based Media from Cards (p. 93)
 Setting Log and Transfer Import Preferences (p. 95)
73
Page 74

About File-Based Media
Historically, video footage has been recorded on videotape. As digital acquisition
quickly replaces analog technology, camcorders are starting to record footage as files
on non-tape-based media such as hard disks, solid-state cards, and optical discs. For
convenience in terminology usage, non-tape-based media are referred to as file-based
media in this manual. Because of their nonlinear nature, file-based media provide clear
advantages over tape-based media:
 You can log clips while ingesting others at the same time. This is impossible using tape.
 File-based clips are defined at the time of recording, so it’s easy to review footage.
With tape, you have to define clips manually by setting In and Out points.
 No cueing or pre-roll time is necessary for viewing and ingesting footage.
 You can mount multiple volumes at the same time. With tape, you can only use one
at a time.
Today, some common file-based media formats include:
 DVCPRO HD and AVC-Intra (solid-state Panasonic P2 card)
 AVCHD (hard disk, miniDVD, Secure Digital card, and memory stick)
 Sony XDCAM, XDCAM HD (optical disc), XDCAM EX (SxS memory card)
 Sony Video Disk Unit devices (hard disk)
About the Log and Transfer Window
Final Cut Pro can transfer file-based media to your computer using the Log and Transfer
window. You can then edit the resulting media files just as you would edit media files in
any other format.
The Log and Transfer window is organized into four areas:
 Browse: Provides an overview of all mounted media volumes and the clips contained
within them.
 Preview: Allows you to view footage, set In and Out points, and add clips to the
Transfer Queue.
 Logging: Use this area to add descriptive information about clips before ingesting.
You can also click the Import Settings button in this area to select which video and
audio channels are ingested with each clip.
 Transfer Queue: Shows a status list of clips currently queued for ingest.
74 Chapter 4 Using the Log and Transfer Window
Page 75
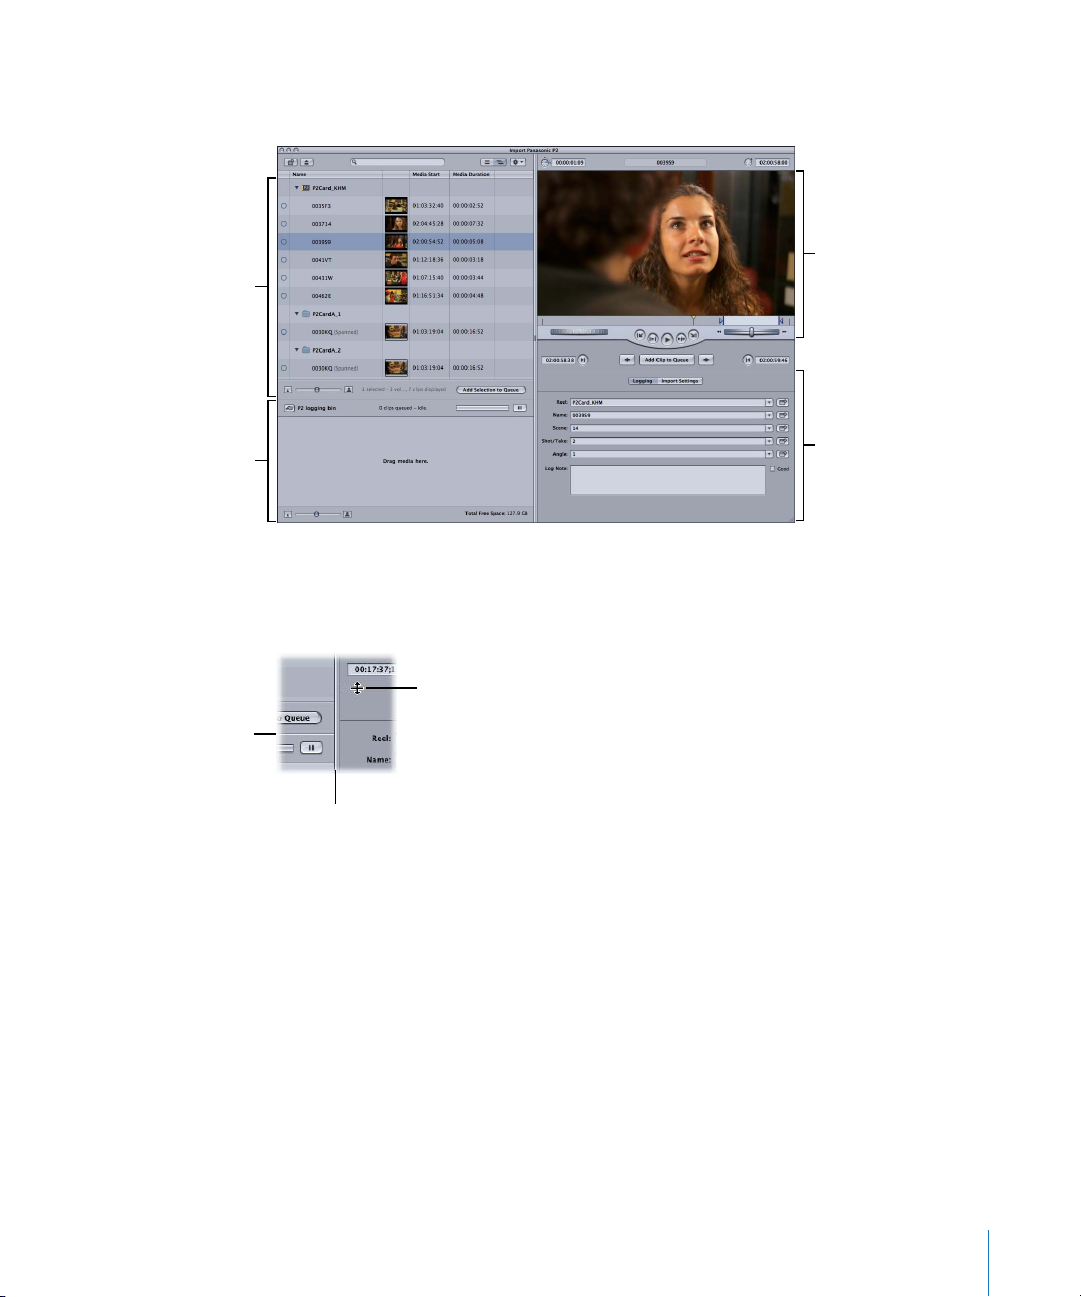
To open the Log and Transfer window:
m Choose File > Log and Transfer (or press Command-Shift-8).
Preview area
Browse area
Transfer Queue area
Vertical resize bar
Logging area
Note: The illustrations in this chapter show examples of the Log and Transfer window
ingesting P2 footage. The window may display slightly different features when
ingesting other video formats.
Vertical resize bar and
Resize pointer
Horizontal resize bar
To resize areas in the Log and Transfer window, do one of the following:
m Drag a horizontal or vertical resize bar.
m Double-click a horizontal or vertical resize bar to make the area disappear (or reappear
if it is already hidden).
Note: If you drag resize bars near the edge of the window, one or more areas may be
hidden, but the resize bars always remain visible.
Chapter 4 Using the Log and Transfer Window 75
Page 76

File-Based Media Terminology
When you ingest file-based media using the Log and Transfer window, it’s important to
know the following concepts and definitions:
 Ingest: A general term for the process of transferring video, audio, and metadata
from one media storage system to another. Depending on the context, ingest may
mean any of the following:
 Transferring data between different computer platforms or file systems, such as
between a P2 file system and Mac OS X
 Transferring data between different storage media, such as from tape to hard disk
(also known as capturing)
 Adding media files from your local scratch disk to a nonlinear editing system to
create clips that point to the media (also called importing)
 Converting media between different container file formats, such as from MXF files
to QuickTime files
 Transcoding video and audio data to different formats, such as from AVC-Intra
1080i footage to Apple ProRes 422 codec 1080i footage
 Log and Transfer window plug-in: A software plug-in that extends the capabilities of
the Log and Transfer window to preview and ingest specific media formats.
Final Cut Pro includes default plug-ins for formats such as the Panasonic P2 format,
but additional plug-ins can be installed as manufacturers introduce new formats.
 Storage media: File-based media where your footage is recorded. Examples include
Panasonic P2 cards, Sony SxS cards, hard disks, Sony Professional Discs, and
miniDVDs. A single unit of storage media (such as a Panasonic P2 card or a Sony
Professional Disc) is generically called a storage media unit.
 Media device: A camcorder, deck, card reader, or other device capable of reading and
writing to file-based storage media. These devices can usually be connected to a Mac
computer via a USB or FireWire cable.
Note: External hard drives are considered media devices whose storage media is
permanently installed.
 Media volume: A media device or an equivalent disk image mounted on the
Mac OS X desktop. The Log and Transfer window displays only media volumes whose
file and directory structures are recognized by the installed Log and Transfer window
plug-ins. This may be called a volume for short.
 Disk image: A file that stores a representation of a media volume. You can create a
disk image of a mounted volume using the Log and Transfer window or built-in
Mac OS X utilities.
76 Chapter 4 Using the Log and Transfer Window
Page 77

 Media volume name: The name of a mounted volume, disk image, or folder. If you have
write access to a media volume, you can change the volume name in the Finder.
 Media file: A file containing one or more video or audio tracks of sample data.
Media files contain your actual footage (also called content or essence). Associated
video and audio content (for example, interview footage including both image and
sound) may be stored together in a single file or as separate files. Separated video
and audio must be associated together via a metadata file (P2 cards have an XML
file for this purpose).
Many media files are stored in a general-purpose container format, such as QuickTime
or MXF, which then contains tracks or streams of video, audio, and metadata content.
AIFF, Wave, TIFF, and JPEG are also examples of types of media files.
 MXF: A media file standard for wrapping video or audio and associated metadata
into a single container file. An MXF file is similar to a QuickTime file; they are both file
formats for storing media and metadata about the media. For more information, see
“About MXF” on page 68.
 Metadata: Generally, secondary data describing the primary data. In the case of
media, the primary data is the video and audio samples themselves, and the
metadata is descriptive information attached to it, such as shooting time, GPS
coordinates, camera operator name, shot and take number, sample rate, video
codec used, and so on.
 Proxy media file: A low-resolution copy of a media file, usually stored as an MPEG-4
file. A proxy can be used for fast transfer and preview of footage. Not all formats
record proxy files.
 Clip: An object in Final Cut Pro that refers to—or points to—a media file on disk.
 Reel name: A property stored in each clip in your Final Cut Pro project to remind you
which media volume your clip’s original media is stored on. A clip’s reel name is
especially important when you are reingesting a clip and you need to find the
volume containing the original media.
 Spanned clip: A single clip that consists of two or more media files. Spanned clips are
created whenever you record a single shot that exceeds the capacity of your storage
media (or, in the case of P2 cards, if your footage exceeds 4 GB). In this case, the
camcorder seamlessly continues recording to a new media file on the next available
storage medium. For more information, see “Working with Spanned Clips” on page 91.
Chapter 4 Using the Log and Transfer Window 77
Page 78

Sample File-Based Media Workflow
The process of ingesting file-based footage is similar to importing tape-based media
using the Log and Capture window, although it is often much faster because you avoid
the inconveniences of tape. Here is a sample workflow to get you started with the Log
and Transfer window:
Step 1: Record footage
Step 2: Choose a scratch disk and logging bin
Step 3: Mount media volumes in the Log and Transfer window
Step 4: Choose a destination codec for formats not supported natively by Final Cut Pro
Step 5: Select clips in the Browse area
Step 6: View clips in the Preview area
Step 7: Add logging information in the Logging area
Step 8: Add clips to the Transfer Queue to ingest media
Here are the detailed steps describing the workflow above:
1 Record footage on file-based storage media using a device such as a Panasonic P2,
XDCAM, or AVCHD camcorder.
2 Connect your media device, containing your storage media, to your computer via
FireWire or USB.
In the Finder, the storage media should be recognized and should appear on the desktop.
3 Choose Final Cut Pro > System Settings, then click the Scratch Disks tab.
4 Choose a scratch disk to determine where ingested media will be stored.
5 In the Final Cut Pro Browser, choose a logging bin where ingested clips will be stored
in your project.
6 Choose File > Log and Transfer (or press Command-Shift-8).
Any mounted volumes appear in the Browse area.
7 If necessary, add additional file-based media folders from the Finder by doing one of
the following:
 Click the Add Folder button in the upper-left corner of the Browse area, choose a
folder, then click OK.
 Drag a folder from the Finder to the Browse area, then release the mouse button.
 From the Action pop-up menu in the upper-right corner of the Browse area, choose
Add Custom Path, choose a folder, then click OK.
78 Chapter 4 Using the Log and Transfer Window
Page 79

8 If the format you are ingesting is not natively supported by Final Cut Pro (such as
AVCHD or AVC-Intra), you need to choose a format to transcode your footage to. For
more information, see “Log and Transfer Plug-in Transcode Settings” on page 95.
9 Select a clip in the Browse area of the Log and Transfer window to view it in the
Preview area.
10 In the Preview area, set In and Out points to identify the media you want to ingest.
Note: Some formats do not support setting In and Out points.
11 Change the clip’s Reel property in the Browse area, Logging area, or Preview area.
By default, a clip’s Reel property is the same as the name of the volume where it is
stored. If the clip is part of a spanned clip, its Reel property defaults to Spanned Reel. If
you want, you can change a clip’s Reel property to a more memorable name. This is
useful if you want to reingest a clip’s media later and you need to remember where the
clip’s original media is stored. Changing a clip’s reel name is particularly important
when working with spanned clips. For more information, see “Choosing Reel Names
and Understanding Volume Names” on page 90.
12 Change the clip name to a more meaningful name than the default name assigned by
the camcorder.
13 Add descriptive information about each clip in the logging fields. These properties are
included with the clip when it is ingested and stored in the Browser.
14 Click Import Settings in the Logging area, then select the video and audio channels you
want to ingest. The number of audio channels available (usually two or four) depends
on how many channels the clip in the Browse area contains. You can group pairs of
audio channels as stereo or dual mono.
Note: Some formats are automatically mixed down to stereo. In these cases, you
cannot adjust audio settings in the Import Settings pane.
15 Do one of the following:
 In the Browse area, select one or more clips, then click Add Selection to Queue.
 In the Preview area, click Add Clip to Queue.
Note: When you click the Add Clip to Queue button, only the clip that appears in the
Preview area is added to the Transfer Queue.
For more ways to add clips to the Transfer Queue, see “Adding Clips to the Transfer
Queue for Ingest” on page 88.
16 Watch the Transfer Queue area to see the status of your ingested media.
Chapter 4 Using the Log and Transfer Window 79
Page 80

Mounting Media Devices
A file-based media device needs to be mounted on the desktop as a media volume
before you can ingest footage from the device. Most media devices can be set to a
special file access mode and then connected to your computer via FireWire or USB.
For details, see the documentation included with your particular media device. You can
also mount disk images of media volumes.
Important: Make sure you unmount any volumes before you physically remove storage
media or disconnect a media device from your computer.
To unmount a volume, do one of the following:
m In the Log and Transfer window, select a volume, then click the Eject button.
m In the Finder, select the mounted volume, then choose File > Eject (or press Command-E).
After unmounting the volume, you can remove the storage media or disconnect the
media device.
Using Folders with Valid File-Based Media Folder Structure
The Log and Transfer window can ingest media from any folder with a valid folder
structure. You can create these folders by copying them from their respective cards and
devices to your hard disk.
Important: Final Cut Pro recognizes compliant folders that include the original media
files, the descriptive metadata, and a corresponding set of XML clip files. If you need to
copy the contents of a file-based media device to a hard disk, duplicate the contents
without making any changes.
Using the Browse Area
The Browse area allows you to view the contents of any mounted volumes and select
clips to be ingested in the Transfer Queue. Valid volumes appear automatically in the
Browse area when you open the Log and Transfer window.
Note: The Log and Transfer window shows all available mounted volumes and folders
that were displayed last time the window was open.
80 Chapter 4 Using the Log and Transfer Window
Page 81
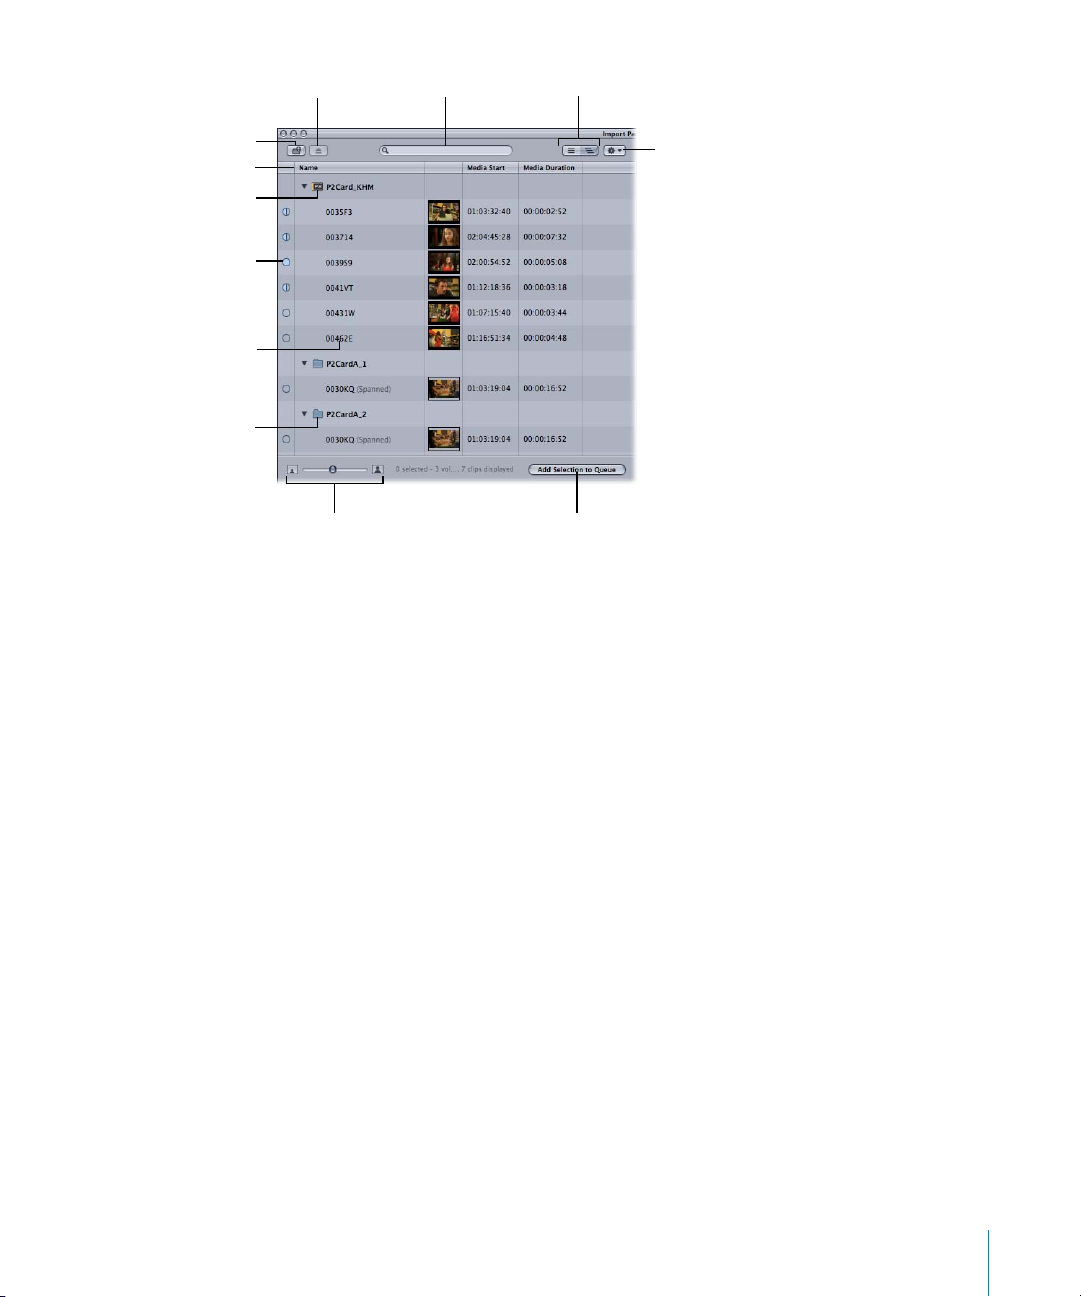
Add Folder button
Column headings
Mounted volume
Media map indicator
shows how much media
has been ingested.
Double-click a clip
property to modify it, or
press Enter.
Folder with valid
structure
Eject button
Thumbnail Resize slider
Search field
Flat List View and Hierarchical
List View buttons
Action pop-up menu
Click to add selected clips
to the Transfer Queue.
Controls in the Browse Area
The Browse area contains the following controls:
 Add Folder button: Click to add a folder with a valid file-based media folder structure
for a format such as P2, AVCHD, AVC-Intra, or XDCAM. You can also drag a folder from
the Finder to the Browse area.
 Eject button: Click to remove the currently selected volume or folder from the Browse
area. The selected volume is unmounted from the desktop in the Finder. Folders are
removed from the Browse area but are otherwise unaffected.
 Search field: An iTunes-like search field that limits which clips are displayed. All
columns are searched for matches even if some columns are not currently displayed.
For example, if you type “DV,” clips whose names contain “DV” are displayed, but so
are clips using DV and DVCPRO codecs. You can press Command-Control-S to
highlight the search field.
 The search field accepts three kinds of timecode delimiters—periods (.), semicolons
(;), and colons (:)—and does not distinguish between them during searches. For
example, you can find all clips containing “10;00” in a timecode field by entering
“10.00,” “10:00,” or “10;00.”
Chapter 4 Using the Log and Transfer Window 81
Page 82

 List view buttons: There are two ways to view the list of clips on mounted volumes:
 Hierarchical List view: View clips grouped by volume. In this view, you can click the
disclosure triangle next to a volume name to show or hide the clips contained
within. You can also select the volume and press the Right Arrow key to open it
and the Left Arrow key to close it. By default, this view shows columns for Name,
thumbnail images, Media Start, and Media Duration.
 Flat List view: View clips from all mounted volumes in a single list. Each clip’s
parent volume is specified in the Volume column. This view is unique because it
consolidates spanned clips into a single item. If you are working with spanned
clips, you should usually work in this view.
 Action pop-up menu: Contains commands to modify the current selection. This is also
where you access the Log and Transfer window preferences.
 Column headings: Columns display clip properties and metadata. You can use
column headings the following ways:
 Click a column heading to sort clips by this property. Click the column heading
again to reverse the sort order.
 Control-click and choose a column heading from the shortcut menu to show or
hide additional columns such as Format, Compressor, and Shooting Date.
 Reorder column headings by dragging them to the left or right.
 Clip properties: Most clip properties are read-only, but you can change some
properties, such as Name, Scene, Shot, In, and Out, by double-clicking them, pressing
Enter, or pressing Return. If a clip name is selected, you can press Tab to edit the
name of the next clip in the Browse area.
Changes to clip properties are temporarily stored within the current project, but clip
properties remain unchanged on the mounted volumes. This means that:
 Before ingesting a clip in the Log and Transfer window, you can revert back to a
clip’s original properties by Control-clicking the clip and choosing Revert to
Original Metadata from the shortcut menu.
 While logging clips to a new project in the Log and Transfer window, you won’t see
clip property modifications that you made while logging clips in other projects. In
other words, clip properties can only be modified on a per-project basis.
82 Chapter 4 Using the Log and Transfer Window
Page 83

 Media map indicators: Indicate how much of a clip’s media has been ingested into
the current project. Before you ingest any media into a project, all the media map
indicators are empty. If you ingest a portion of media from a clip on a volume, that
segment is added to the project as a clip, and the corresponding media map
indicator has a partially filled icon. If you create a new project or close the current
one, the media map indicator for that clip becomes empty again.
Media map indicators have three states:
 Empty: No media has been ingested.
 Partial: At least one frame, but not all frames, has been ingested.
 Complete: All of the media for the clip has been ingested.
 Thumbnail Resize slider: Adjust the slider to change the size of clip thumbnails. Click
the large or small thumbnail button to jump to the largest and smallest thumbnail
sizes, respectively.
 Add Selection to Queue button: Click this button to add the currently selected clips in
the Browse area to the Transfer Queue for ingest.
Adding Volumes and Folders to the Browse Area
Mounted volumes appear automatically in the Browse area when you open the Log and
Transfer window. You can add folders with valid folder structures by clicking the Add
Folder button and then choosing the folder that you want. You can also add a folder by
dragging it from the Finder to the Browse area.
Selecting Clips in the Browse Area
Final Cut Pro treats the selected clips in the Browse area as a continuous entity that you
can navigate through using the transport controls in the Preview area. For example, if
you have two clips selected in the Browse area, when the playhead reaches the end of
the first selected clip, it continues playing the second clip. For more information, see
“Transport Controls in the Preview Area” on page 85.
You can select clips in the Browse area by clicking anywhere in the row containing the
clip’s name. You can select a range of clips by clicking one clip and then Shift-clicking a
second clip. Command-click clips to add or remove them from the current selection.
You can select all clips in the Browse area by choosing Edit > Select All (or pressing
Command-A). You can deselect all clips by choosing Edit > Deselect All (or pressing
Command-Shift-A).
Chapter 4 Using the Log and Transfer Window 83
Page 84
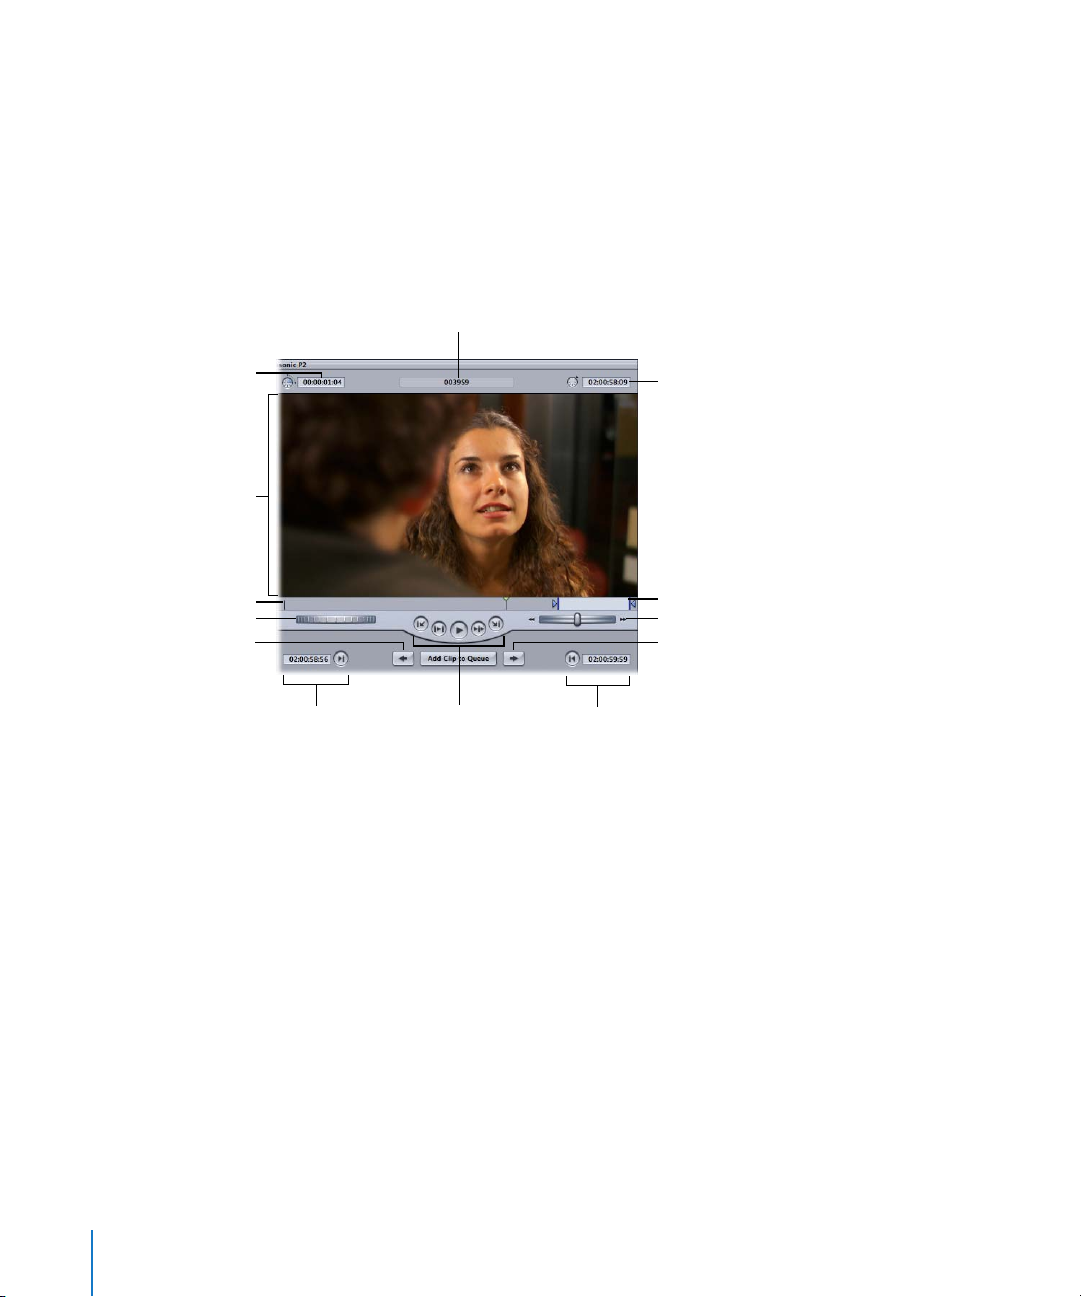
Deleting Clips Directly from Storage Media
For some types of storage media, you can delete clips directly from the storage media
using the Log and Transfer window. For more information, see “Deleting P2 Clips
Directly in the Log and Transfer Window” on page 102.
Using the Preview Area
The Preview area allows you to view your clips.
Clip name
Timecode Duration field
Image display area
Scrubber bar
Jog control
Previous Clip button
Current Timecode field
In and Out point markers
Shuttle control
Next Clip button
In point
controls
Transport
controls
Out point
controls
Note: When the format of a file-based media clip doesn’t allow the use of certain
features in the Preview area, the feature controls don’t appear in the window.
84 Chapter 4 Using the Log and Transfer Window
Page 85

Transport Controls in the Preview Area
The transport, navigation, and marking controls in the Preview area work in the same
way as the controls in the Viewer and Canvas. The same keyboard shortcuts, including
the J, K, and L keys for playback, also work. Looped playback can be turned on or off by
choosing View > Loop Playback (or by pressing Control-L).
You can press the Tab key to move through the fields in the Preview and Logging areas.
For more information about the controls in the Viewer, see the Final Cut Pro 6
User Manual, Volume I, Chapter 6, “Viewer Basics.”
Final Cut Pro treats all of the selected clips in the Browse area as a single continuous
entity when you are jogging, shuttling, using the J, K, and L keys, or clicking the
Previous Clip and Next Clip buttons. For example, when the playhead reaches the end
of a clip in the selection, the next selected clip is opened and playback continues.
However, if you enable looped playback (by choosing View > Loop Playback or by
pressing Control-L), playback is limited to the clip that appears in the Preview area.
The Previous Clip and Next Clip buttons navigate within the range of selected clips in
the Browse area. (However, if just one clip is selected, you can navigate through all of
the clips.)
To move from clip to clip within the selected clips in the Browse area, do one
of the following:
m Click the Previous Clip button (or press Command–Control–Left Arrow).
m Click the Next Clip button (or press Command–Control–Right Arrow).
To add the current clip to the Transfer Queue, do one of the following:
m Click the Add Clip to Queue button.
m Click in the image display area and drag the clip to the Transfer Queue.
m Press F2.
Restrictions During Preview
Some file-based media formats have specific limitations when playing back footage
directly from a mounted volume. See the following sections for detailed information:
 For information about P2 restrictions: See “Restrictions During Preview” on page 102.
 For information about AVCHD restrictions: See “Restrictions During Preview” on page 113.
 For information about AVC-Intra restrictions: See “Restrictions When Working with
AVC-Intra” on page 118.
Chapter 4 Using the Log and Transfer Window 85
Page 86
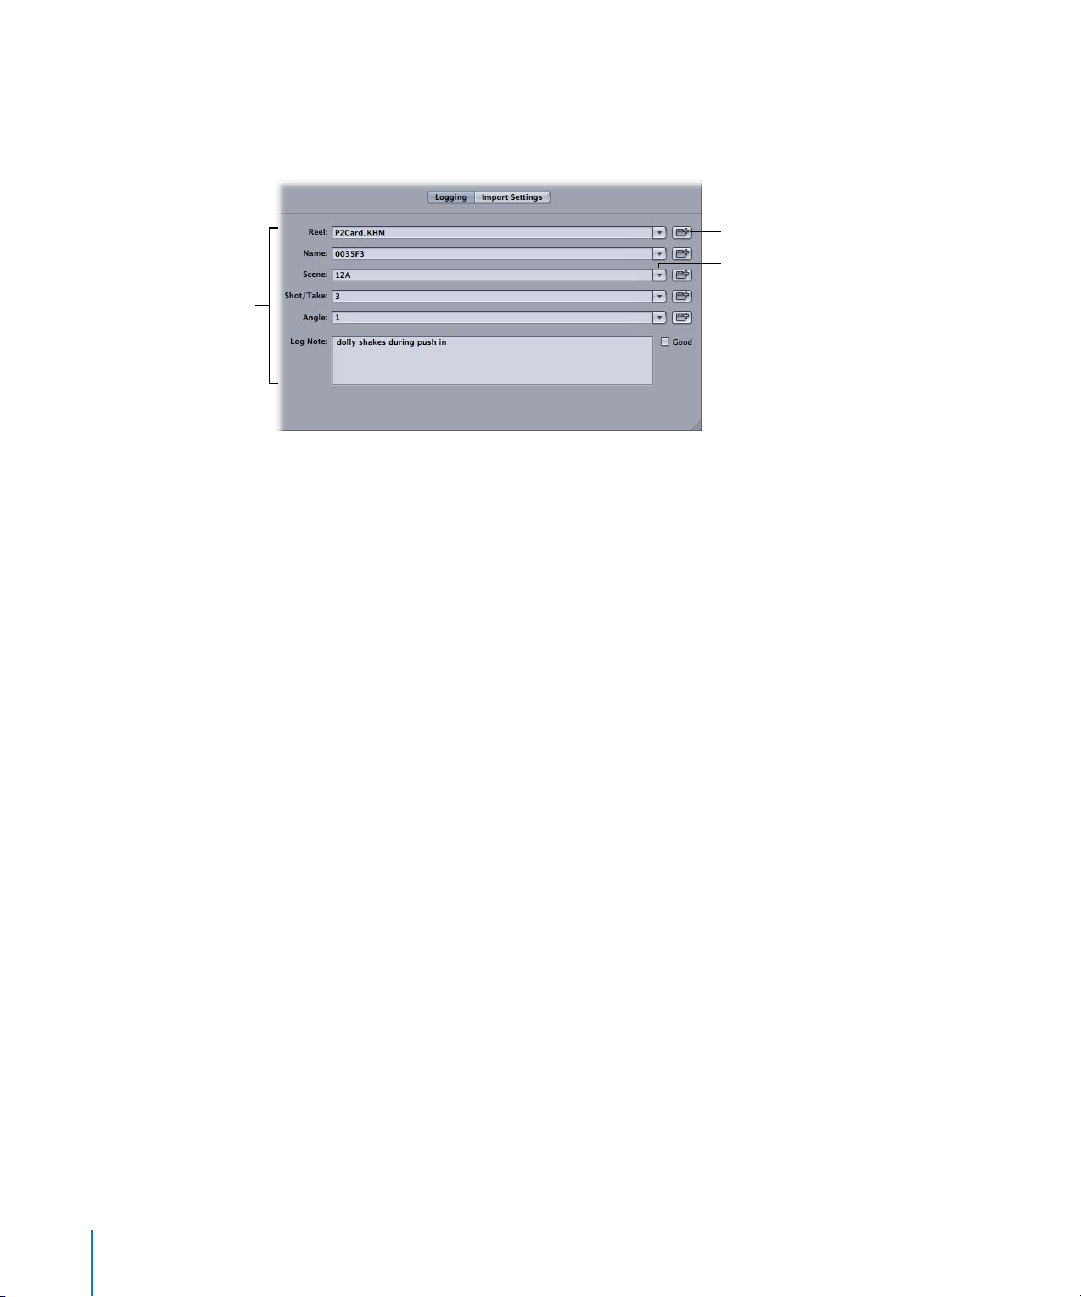
Using the Logging Area
You can use the Logging area to modify a clip’s reel name and other descriptive
information before ingesting. Data entered here is stored with project clips after ingest.
Increment button
Autofill pop-up menu
Logging fields
The fields here are identical to the logging fields in the Log and Capture window. Press
Tab to move from field to field, and press Shift-Tab to move through fields in reverse.
You can reset clip logging fields and metadata by Control-clicking one or more clips in
the Browse area and choosing Revert to Original Metadata from the shortcut menu.
The following clip properties are reset: Reel, Name, Scene, Shot/Take, Angle, Log Note,
In, Out, and the clip’s playhead position.
Using Autofill Cache Logging Information
Unlike the fields in the Log and Capture window, the fields in the Logging area retain
an autofill cache of previously logged information in each field so that you can enter
repetitive information more quickly.
Note: Final Cut Pro adds logging information to the autofill cache only when a clip
is ingested.
To enter previously logged data from the autofill cache:
m Choose previously entered logging data from the pop-up menu next to the logging field.
To empty the autofill cache so that previously logged data does not appear
in logging fields:
1 In the upper-right corner of the Browse area, choose Preferences from the Action
pop-up menu.
2 Click Clear Logging Autofill Cache.
86 Chapter 4 Using the Log and Transfer Window
Page 87
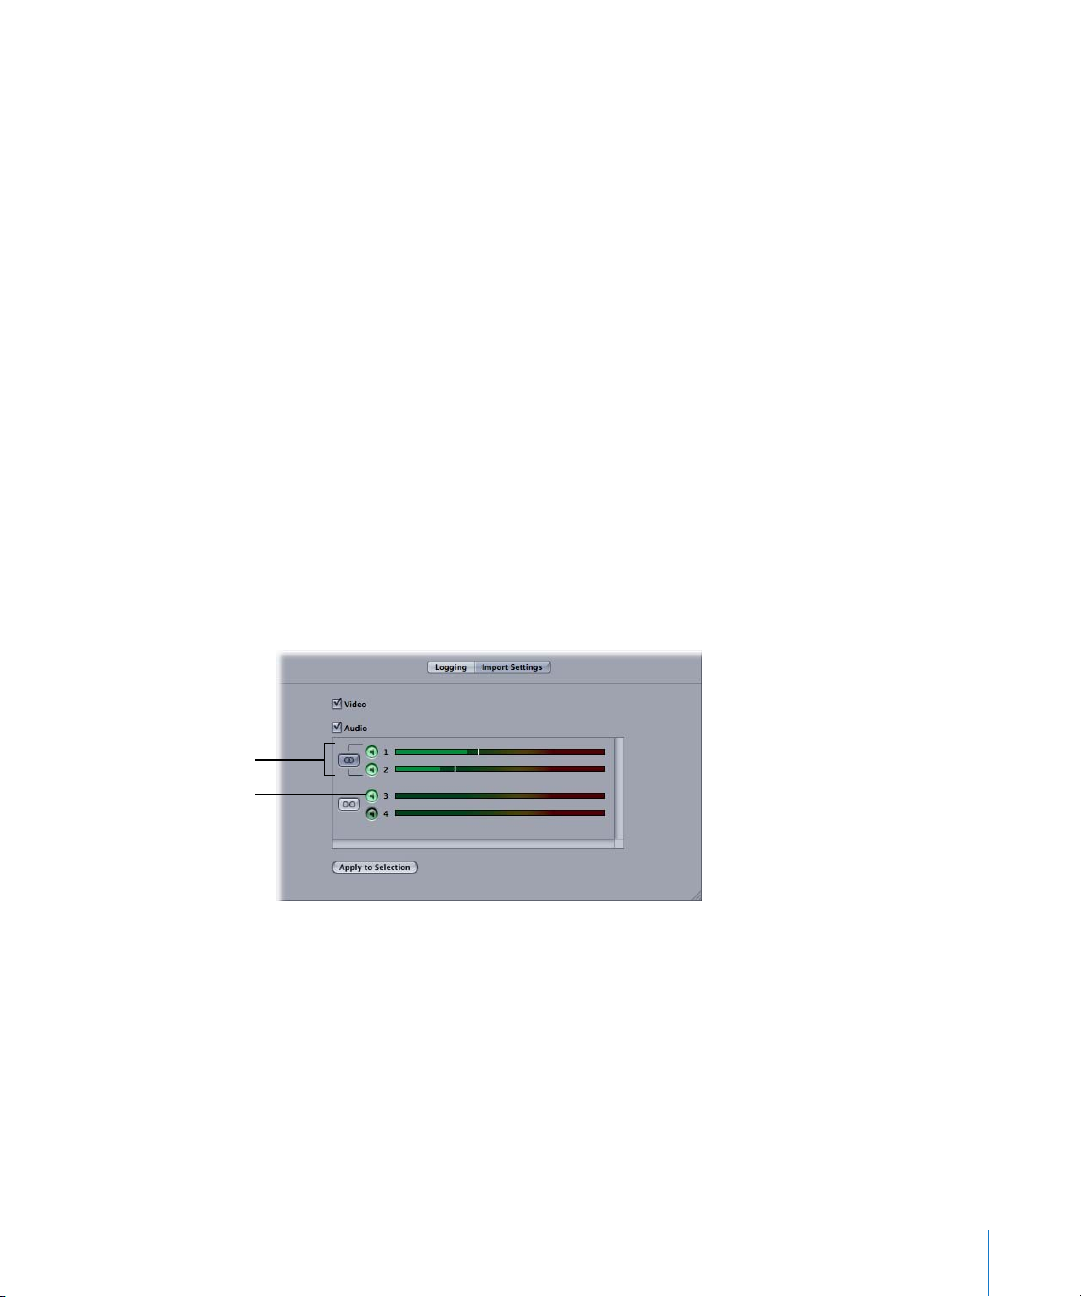
Incrementing Logging Fields
Most of the logging fields have an Increment button you can click to increase the value
of the last character of the clip name by one, according to the following rules:
 Any numbers at the end of a field are incremented by one.
 Any single letters at the end of a field are incremented alphabetically by one from
A to Z.
 Any single letters preceded by numbers are incremented alphabetically from A to Z.
After Z, the number increases by one and the letter starts over at A, and then the
cycle repeats.
 A number is appended to any fields ending with multiple letters, and is incremented
by one. For example, ABC is followed by ABC1, then ABC2, and so on.
Setting Audio and Video Clip Import Settings
You can open the Import Settings pane by clicking the Import Settings button in the
Logging area. Here you can specify whether video or audio is ingested, as well as the
number and grouping of the audio channels. Audio meters display audio input levels
on enabled channels.
Note: Some formats, such as AVCHD, are automatically mixed down to stereo. For these
formats, you cannot adjust audio settings.
Two audio channels
enabled and grouped as
a stereo pair
One mono channel
enabled
When a single clip is selected in the Browse area, clip import settings are applied
to that clip.
To apply import settings to multiple clips:
1 Shift-click or Command-click multiple clips in the Browse area to select them.
2 Enable video and audio channels in the Import Settings pane.
3 Click Apply to Selection, then click OK in the dialog that appears.
Chapter 4 Using the Log and Transfer Window 87
Page 88
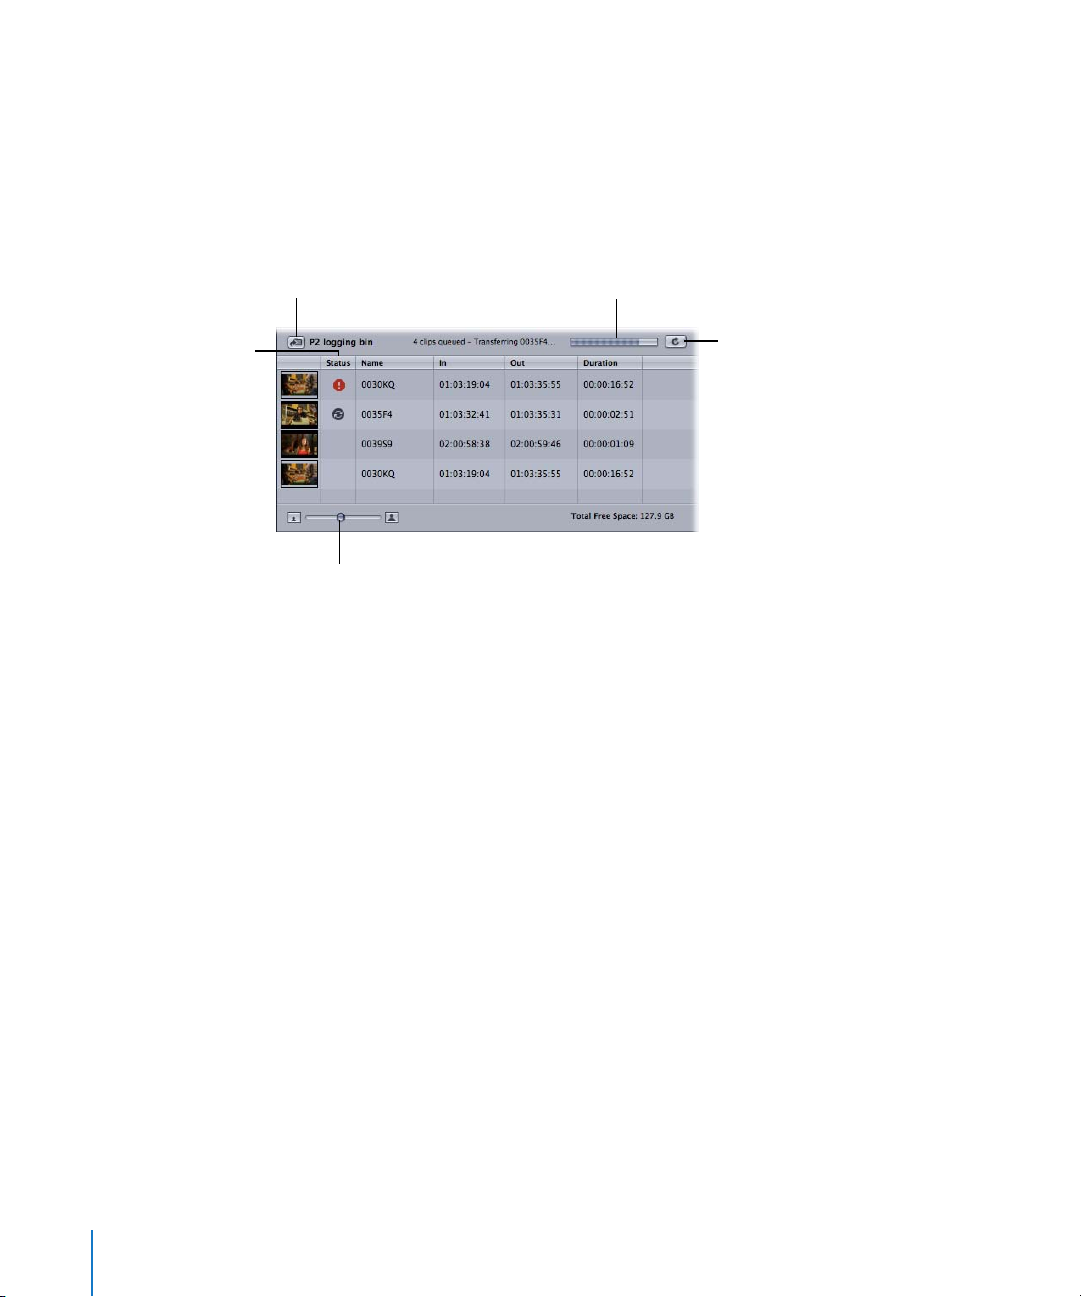
Using the Transfer Queue
The Transfer Queue shows a list of clips currently queued for ingest. The status of
each clip is shown and a progress bar indicates how much of a clip’s media has
already been ingested.
You can pause or restart ingest at any time by clicking the Pause button or by pressing
Command-Control-Q.
The Status column shows
the ingest status.
Click to reveal the current
logging bin in the Browser.
Thumbnail Resize slider
Progress bar
Pause button
Important: Ingesting clips always makes a copy of your media by extracting it from the
original storage media and copying it to a new QuickTime file on your scratch disk. For
example, if you ingest 4 GB of DVCPRO HD footage from a P2 folder on your hard disk,
an additional 4 GB of disk space is required for the QuickTime movie file. In cases where
your source footage is transcoded, the resulting QuickTime movie can be significantly
larger than the original.
Adding Clips to the Transfer Queue for Ingest
There are many ways to add clips to the Transfer Queue for ingest:
m In the Browse area, select one or more clips, then click Add Selection to Queue.
m Drag one or more clips from the Browse area to the Transfer Queue.
m Drag a volume from the Browse area to the Transfer Queue. All clips on the volume are
added to the Transfer Queue at once.
m In the Preview area, click the Add Clip to Queue button.
Note: When you click the Add Clip to Queue button, only the clip that appears in the
Preview area is added to the Transfer Queue.
m Click in the video image in the Preview area and drag the image to the Transfer Queue.
88 Chapter 4 Using the Log and Transfer Window
Page 89

You can also drag clips from the Log and Transfer window to your project in the
Browser. Those clips are automatically logged in the project and added to the Transfer
Queue, and their media is ingested.
Organizing Clips in the Transfer Queue
The Status column displays the ingest status of each clip in the Transfer Queue:
 Ingesting: A spinning disc indicates media is being transferred to your scratch disk.
 Paused: A still disc indicates the current clip is partially transferred.
 Error: An exclamation point indicates that ingest of the file failed. The source media
for this clip may have been unmounted or moved since the clip was added to the
Transfer Queue. Other errors, such as running out of disk space, may have occurred.
You can Control-click the clip that failed to ingest and use the shortcut menu to try
reingesting, or delete the clip and add it to the Transfer Queue again.
Clips are ingested one at a time in the order they appear. You can reorder clips by
dragging them above or below other clips. You can also stop the ingest of clips by
selecting them and deleting them from the Transfer Queue.
Pausing and Stopping Ingest
Final Cut Pro does not save partially ingested media. If the Transfer Queue is in the
process of ingesting a clip (or if a transfer is paused), Final Cut Pro warns you that you
will lose the partially ingested media if you do any of the following:
 Delete the clip from the Transfer Queue.
 Close the Log and Transfer window.
 Close the current Final Cut Pro project containing your logging bin.
 Quit Final Cut Pro.
Filenaming and Clip Naming During Ingest
When you add clips to the Transfer Queue, Final Cut Pro checks to see if a media file
with the same name already exists in the current scratch disk folder. If a media file with
the same name already exists, Final Cut Pro modifies the name of the media file and
the resulting clip in the project using the rules described in “Incrementing Logging
Fields” on page 87.
Chapter 4 Using the Log and Transfer Window 89
Page 90

Reingesting Clip Media
If a clip’s media files are deleted or lost, you can reingest the clip’s media at any time.
This process is equivalent to batch capturing when working with tape-based media.
However, ingested clips are tracked a bit differently than clips logged and captured
from tape.
In tape-based media workflows, the Reel, Media Start, and Media End properties describe
where a clip’s original source media is located on a tape. When you log a clip, you assign
its Reel property using the label written on the source tape so that you can find the clip
again later when recapturing. Final Cut Pro has no way of verifying whether you put in
the correct tape or not. If you insert the incorrect tape and Final Cut Pro finds matching
timecode, you could accidentally recapture the wrong footage.
Most ingested clips store a more robust media tracking identifier called a clip ID. Each
clip contains a unique clip ID number that is dedicated to only that clip. When you log
and ingest a clip, the clip ID is stored in the clip within your project.
When you want to reingest a clip, Final Cut Pro searches the current volumes in the Log
and Transfer window for a clip whose clip ID matches. If no clips have a matching clip ID,
Final Cut Pro tells you that the volume containing that clip is not mounted.
Choosing Reel Names and Understanding Volume Names
When you log clips in the Log and Transfer window, it is important to assign
memorable, meaningful reel names so that you can find volumes later for reingesting.
This is also especially important when you are ingesting spanned clips because a
spanned clip’s media comes from several volumes, and, by default, Final Cut Pro assigns
each clip the Reel property of Spanned Reel. You should try to assign a reel name that
describes each volume required for the spanned clip. For example, the reel name
10A_10B_10C could indicate that a clip requires three volumes: 10A, 10B, and 10C.
When warning you that the volume is missing, Final Cut Pro tells you the clip’s
assigned Reel property, not the volume name. While both reel name and volume
name are important for keeping track of your clips, Final Cut Pro does not make use
of them for reingesting. Instead, Final Cut Pro searches any mounted volumes for clips
that have clip ID numbers that match the clips you want to reingest. This means you
can reingest the clip from any volume as long as the volume contains a clip with the
matching clip ID.
90 Chapter 4 Using the Log and Transfer Window
Page 91

To reingest media for clips created in the Log and Transfer window:
1 In the Browser, select the clips whose media you want to reingest.
2 Do one of the following:
 Choose File > Batch Capture (or press Control-C).
 Make sure the Log and Transfer window is open, then drag selected clips from the
Browser to the Transfer Queue area.
3 In the dialog that appears, specify whether you want to reingest media for all selected
clips or only clips whose media files are offline, then click OK.
If Final Cut Pro cannot find media with a matching clip ID on the currently mounted
volumes, a warning appears reminding you of the clip’s Reel property. In this case,
locate the volume that contains the clip you want to reingest, add it to the Log and
Transfer window, and then repeat the steps above. For more information about adding
a volume to the Log and Transfer window, see “Adding Volumes and Folders to the
Browse Area” on page 83.
Important: Because it is so easy to make archived disk images and copied folders of
your cards, you can potentially add more than one volume containing the same clip to
the Browse area in the Log and Transfer window. This can cause unexpected results,
especially when viewing or ingesting spanned clips.
Working with Spanned Clips
A spanned clip is created any time you record a single shot that is larger than the
capacity of the current storage media unit or when the file size exceeds that allowed by
the device’s file system. For example, when a file on a P2 card exceeds a 4 GB limit, a
spanned clip is created. When this happens, the camcorder stops recording the current
media file and begins recording a new media file on a new storage media unit. The
result is a single shot that seamlessly comprises multiple media files.
Important: To ingest (or reingest) a spanned clip as a single media file, you need to
mount all of the volumes necessary for the clip. Mounting separate volumes at different
times may cause Final Cut Pro to capture only individual portions of a clip or prevent
you from capturing partial portions when other segments are missing.
Chapter 4 Using the Log and Transfer Window 91
Page 92

Viewing Spanned Clips in the Browse Area
The Browse area of the Log and Transfer window can display clips two ways: in
Hierarchical List view and Flat List view. The following example shows how a spanned
clip consisting of five clips (on five volumes) appears in both views.
In both views, segments of a spanned clip appear separately when the spanned clip is
missing segments from other volumes. However, when a spanned clip is complete, it is
displayed differently depending on the view you choose.
Incomplete spanned clip
in Hierarchical List view
Incomplete spanned clip
in Flat List view
In Flat List view, a complete spanned clip appears as a single item in the Browse area.
In Hierarchical List view, the same spanned clip appears within each volume that
contains one of the spanned clip’s segments.
Hierarchical List view displays
multiple, identical spanned clips.
Flat List view displays
a single spanned clip.
92 Chapter 4 Using the Log and Transfer Window
Page 93

To avoid confusion, it’s usually best to use Flat List view when ingesting spanned clips.
When a spanned clip is incomplete, you can ingest each segment as an individual
QuickTime media file and clip. However, when all segments of a spanned clip are
available, you can ingest all of the spanned clip’s media to a single QuickTime file.
∏ Tip: When logging spanned clips, assign reel names that indicate all volumes from
which a clip originated. For more information, see “Choosing Reel Names and
Understanding Volume Names” on page 90.
Archiving File-Based Media from Cards
Unlike tapes, which are cheap enough to archive permanently, cards are expensive to
use for long-term file storage. Therefore, you need to erase your cards to make room for
more recording. Before you erase your cards, you should archive their contents in case
you need the footage later.
To back up a card, you can erase it without losing your media in two ways:
m Copy the folder on the card to another hard disk.
m Create a disk image of the card that you can mount later as a volume.
Archiving to a Folder
You can copy the folder of a volume directly in the Finder, or you can use the Archive to
Folder command in the Browse area of the Log and Transfer window.
To create a copy of the folder of a volume using the Log and Transfer window:
1 In the Browse area, make sure the Hierarchical List View button is selected.
2 Select the volume you want to copy.
3 Do one of the following:
 Control-click the volume, then choose Archive to Folder from the shortcut menu.
 Choose Archive to Folder from the Action pop-up menu in the upper-right corner of
the Browse area.
4 Enter a name for the copied folder. By default, the name of the volume is used.
Chapter 4 Using the Log and Transfer Window 93
Page 94

Archiving to a Disk Image
The Archive to Disk Image command produces a readable, writable disk image that is
easily stored on other hard disks or disc media and can be easily opened to access the
archived content.
To create a disk image of a card:
1 In the Browse area, make sure the Hierarchical List View button is selected.
2 Select the card whose contents you want to archive.
3 Do one of the following:
 Control-click the card icon, then choose Archive to Disk Image from the shortcut menu.
 Choose Archive to Disk Image from the Action pop-up menu in the upper-right
corner of the Browse area.
4 Enter a name for the disk image file. By default, the name of the volume is used.
Important: The name you enter here is the name of the disk image (.dmg) file, not the
name of the disk image contained within it.
To rename a mounted volume of an archived disk image:
1 In the Log and Transfer window, select a volume and then choose Archive to Disk
Image from the Action pop-up menu in the Browse area.
A new disk image (.dmg) file is created on the desktop.
2 Switch to the Finder (press Command-Tab or click the Finder icon in the Dock).
3 Double-click the new disk image you just created to mount it on the desktop.
4 Select the mounted volume on the desktop, then press Enter to select the volume name.
5 Enter a new name for the mounted volume, then press Enter.
94 Chapter 4 Using the Log and Transfer Window
Page 95

Setting Log and Transfer Import Preferences
The Log and Transfer window has several preferences that you can access by choosing
Preferences from the Action pop-up menu in the Browse area:
 Remove Advanced Pulldown and Duplicate Frames
 Clear Logging Autofill Cache
 Log and Transfer Plug-in Transcode Settings
Remove Advanced Pulldown and Duplicate Frames
This option removes advanced pull-down and redundant (duplicate) frames recorded
in formats such as DVCPRO HD.
Clear Logging Autofill Cache
This option empties the cache of information previously entered in each logging field.
For more information, see “Using the Logging Area” on page 86.
Log and Transfer Plug-in Transcode Settings
For formats not natively supported by Final Cut Pro, you can choose a format to
transcode your footage to during ingest. The Log and Transfer window plug-in for each
storage media type (Panasonic P2, AVCHD, and so on) defines which formats are not
natively supported by Final Cut Pro and which destination codecs you can transcode
these formats to.
For example, the built-in P2 AVC-Intra plug-in allows you to transcode AVC-Intra
footage to Apple ProRes 422 or Apple ProRes 422 (HQ) footage.
To choose the destination codec for non-native footage transferred in the Log and
Transfer window:
1 In the Log and Transfer window, choose Preferences from the Action pop-up menu in
the upper-right corner of the Browse area.
2 In the dialog that appears, identify the plug-in and format you want to transcode,
choose a destination codec in the “Transcode to” column, then click OK.
Chapter 4 Using the Log and Transfer Window 95
Page 96

Page 97

5 Working with Panasonic P2 Cards
You can use the Log and Transfer window to view
footage recorded on Panasonic P2 cards and transfer
it to your computer.
This chapter covers the following:
 About Panasonic P2 Cards and Media Files (p. 97)
 Working with Panasonic P2 Cards and Final Cut Pro (p. 98)
 Using Print to Video to Output to P2 Cards in the AG-HVX200 Camcorder (p. 104)
 Capturing over FireWire as if a P2 Card Were a Tape in a VTR (p. 105)
 Panasonic AG-HVX200 Camcorder Compatibility (p. 107)
 Panasonic P2 Card Format Specifications (p. 109)
5
About Panasonic P2 Cards and Media Files
A P2 card (P2 stands for Professional Plug-in) is a compact, solid-state memory card
designed for professional video use. Since they have no moving parts, P2 cards are free
from many of the pitfalls associated with tape-based media, such as temperature and
moisture sensitivity, tangled tape, dropouts, and tedious logging and capturing.
Panasonic currently produces proprietary P2 cameras, decks, and card readers.
The original P2 card had a capacity of 2 GB, or roughly 8 minutes of DV 25 footage.
A fully loaded five-slot array could therefore hold 10 GB, or 40 minutes of DV 25
footage. Cards with 32 GB capacities are now available, and capacities are projected
to grow geometrically with each new P2 card release.
97
Page 98

The following definitions provide some shorthand for discussing P2 cards and media:
 P2 card: A solid-state memory card for recording DV, DVCPRO, DVCPRO 50,
DVCPRO HD, and AVC-Intra media within MXF container files.
 P2 device: A camcorder, deck, or card reader capable of reading and writing to a
P2 card. These devices can usually be connected to a Mac computer via a USB or
FireWire cable.
 P2 volume: Any P2 card or mounted disk image that contains a valid P2 directory
structure and MXF media files. For more information, see “Panasonic P2 Card Format
Specifications” on page 109.
 P2 folder: Any folder that contains a valid P2 directory structure and MXF media files.
For more information, see “Panasonic P2 Card Format Specifications” on page 109.
 P2 clip: An XML clip file and its associated MXF video and audio files, stored on a
P2 volume. P2 media files use the FAT32 file system and are therefore limited to 4 GB.
 P2 clip name: A simple clip name, usually six characters long, assigned automatically
by the P2 camcorder.
 P2 clip ID: A universally unique ID (UUID) number assigned to each clip recorded by a
P2 camcorder. This is also called global clip ID.
For more file-based media terminology, see “File-Based Media Terminology” on page 76.
Working with Panasonic P2 Cards and Final Cut Pro
Final Cut Pro allows you to ingest video and audio recorded on Panasonic P2 cards and
then edit the resulting media files just as you would edit media files in any other format.
Recording Footage with a P2 Camcorder
The Panasonic AG-HVX200 P2 camcorder, a widely used P2 device, supports a large
number of SD and HD video formats at various frame rates. The Panasonic AG-HVX200
camcorder can record on either tape or P2 cards, but some formats can only be recorded
on P2 cards. For a detailed list of formats supported by the Panasonic AG-HVX200
camcorder, see “Panasonic AG-HVX200 Camcorder Compatibility” on page 107.
98 Chapter 5 Working with Panasonic P2 Cards
Page 99

Mounting P2 Cards, Disk Images, and Folders
After you record footage on P2 cards, there are three ways to mount P2 cards in your
computer’s file system:
 Use a Panasonic P2 memory card reader connected to your Mac computer.
 Insert a P2 card into the PCMCIA slot on a PowerBook computer.
 Use a Panasonic AG-HVX200 camcorder connected via FireWire as a card reader.
Alternatively, you can:
 Mount archived disk images of P2 cards that you previously created with the Log and
Transfer window. For more information, see “Archiving File-Based Media from Cards”
on page 93.
 Ingest MXF media from any P2-compliant folder on a local or networked hard disk. For
more information, see “Using Folders with Valid P2 Card Folder Structure” on page 101.
You can also configure the Panasonic AG-HVX200 camcorder as a VTR and use the Log
and Capture window as though the P2 card were a tape in a video deck. This method is
slower than mounting P2 cards on the desktop, so it is rarely recommended. For more
information, see “Capturing over FireWire as if a P2 Card Were a Tape in a VTR” on
page 105.
Important: When you finish working with a P2 card, make sure you eject (unmount)
it from the Finder before physically removing it from the reader device.
Mounting P2 Cards Using a P2 Card Reader or Panasonic P2 Store Unit
You can use a Panasonic memory card reader or a Panasonic P2 store (AJ-PCS060G)
portable hard disk unit to import or copy P2 media.
To mount a P2 memory card using a P2 card reader:
1 Connect the P2 memory card device to your computer.
2 Insert a P2 memory card into one of the slots in the P2 memory card device.
Individual memory cards (or partitions on the P2 store portable hard disk unit) appear
on the desktop as mounted disks named NO NAME.
An individual P2
memory card appears
on the desktop.
Important: When you have finished, eject (unmount) the P2 card before disconnecting
the card reader, or before removing the card.
Chapter 5 Working with Panasonic P2 Cards 99
Page 100

Mounting P2 Cards Using a PowerBook PC Card (Cardbus) Slot
To mount a Panasonic P2 card in Mac OS X using the PC Card slot of a PowerBook, you
first need to download and install the P2 Driver Software from the Panasonic website:
https://eww.pavc.panasonic.co.jp/pro-av/support/desk/e/download.htm
Note: You may need to provide the serial number of one of your Panasonic P2 devices
to download the P2 Driver Software.
Carefully follow the installation instructions included with the P2 Driver Software.
Installing this driver requires you to restart your computer.
To mount a P2 card inserted in the PC Card slot of a PowerBook:
1 Make sure the P2 Driver Software from the Panasonic website is installed on the PowerBook.
2 Insert the P2 card containing the media you want to import into the PowerBook
PC Card slot.
The P2 card appears on the desktop as a mounted disk named NO NAME.
Note: You can rename the card after it is mounted in a PowerBook. To be safe, limit
P2 card names to alphanumeric characters (numbers and letters—no punctuation or
other symbols).
100 Chapter 5 Working with Panasonic P2 Cards
 Loading...