


Projector
ED-A101/ED-A111
User's Manual (detailed)
Operating Guide
Thank you for purchasing this projector.
 WARNING ►Before using this product, please read all manuals for this product. Be sure to read “Safety Guide” first. After reading them, store them in a safe place for future reference.
About this manual
Various symbols are used in this manual. The meanings of these symbols are described below.
 WARNING This symbol indicates information that, if ignored, could possibly result in personal injury or even death due to incorrect handling.
 CAUTION This symbol indicates information that, if ignored, could possibly result in personal injury or physical damage due to incorrect handling.
Please refer to the pages written following this symbol.
NOTE • The information in this manual is subject to change without notice.
•The manufacturer assumes no responsibility for any errors that may appear in this manual.
•The reproduction, transfer or copy of all or any part of this document is not permitted without express written consent.
Trademark acknowledgment
•Mac® is registered trademarks of Apple Inc.
•VESA and DDC are trademarks of Video Electronics Standard Association.
•Windows® is a registered trademark of Microsoft Corporation in the U.S. and/or other countries.
All other trademarks are the properties of their respective owners.
1
Contents
Contents
|
|
|
|
|
|
|
|
About this manual. . . . . . . |
|
. .1. |
PICTURE. . |
menu. . . . . . . . . . . . . 28 |
|||
Contents. . . . . . . . . . . . . . . . . . . 2 |
|
Brightness, Contrast, Gamma, |
|
|
|||
Projector features. . . . . . . |
|
. .3. |
. |
Color temp, Color, Tint, |
|
|
|
|
S.harpness, My memory |
|
|
||||
Preparations. . . . . . . . . . . 3. . |
. . . |
|
|
|
|||
Contents of package. . . . . . |
. |
3 |
IMAGE menu. . . . . . . . . . . . . . . 31 |
||||
Part names. . . . . . . . . . . . . . . . . 4 |
|
Aspect, Over scan, V position, |
|
|
|||
|
H position, H phase, H size, |
|
|
||||
Projector. . . . . . . . . . . |
|
. 4 |
|
|
|
||
|
|
Auto adjust execute |
|
|
|||
Control buttons. . . . . . . . |
. |
5 |
|
|
|
||
INPUT menu . . . . . . . . . . . . . . . 33 |
|||||||
Ports. . . . . . . . . . . . |
. |
5 |
|
Progressive, Video nr, Color space, |
|
||
Remote control. . . . . . . . |
. |
6 |
|
|
|||
|
Component, Video format, Frame lock, |
||||||
Setting up. . . . . . . . . . . . . . . . . . 7 |
|
||||||
|
Computer in, Resolution |
|
|
||||
Arrangement. . . . . . . . . . 7 |
SETUP menu. . . . . . . . . |
. .36. . . . |
|||||
Connecting with your devices. . . |
|
10 |
|
D-zoom, D-shift v, D-shift h, |
|
|
|
Connecting with a power supply. . |
|
12 |
|
Keystone |
, Keystone , Perfect fit, |
||
Using the security bar and slot. . |
. 13 |
|
Whisper, Mirror, Standby mode, |
|
|
||
Using the cable cover. . . . . . |
|
13 |
|
Monitor out |
|
|
|
Remote control. . . . . . . . |
. .14. . . |
|
|
|
|||
Preparing for the remote control. . |
|
14 |
AUDIO menu. . . . . . . . . . . . . . . 39 |
||||
|
|
Volume, Speaker, Audio |
|
|
|||
Changing the frequency of remote control signal. |
|
15 |
SCREEN menu. . . . . . . . |
. |
.40. . . . |
||
Power on/off . . . . . . . . . . . . . . . 16 |
|
Language, Menu position, Blank, |
|
|
|||
Turning on the power. . . . . . |
|
16 |
|
Start up, MyScreen, MyScreen Lock, |
|
|
|
Turn off the power. . . . . . . |
. 17 |
|
Message, Source name, Template |
|
|
||
Operating . . . . . . . . . . . . . . . . . 18 |
OPTION menu. . . . . . . . . . . . . . 44 |
||||||
Adjusting the volume. . . . . . |
. 18 |
|
Auto search, Auto on, Auto off, |
|
|
||
Temporarily muting the sound. . . |
|
18 |
|
Lamp time, Filter time, My button, |
|
|
|
Selecting an input signal. . . . . |
|
18 |
|
My source, Service, Security |
|
|
|
Searching an input signal. . . . |
. 19 |
C..C.. (Closed Caption) menu. . . 57 |
|||||
Selecting an aspect ratio. . . . . |
|
19 |
|
Display, Mode, Channel |
|
|
|
Adjusting the projection position. . |
|
20 |
Maintenance. . . . . . . . . . .58. . . . |
||||
Adjusting the zoom. . . . . . . |
|
20 |
|
Replacing the lamp. . . . . . |
. |
58 |
|
Adjusting the picture position. . . |
|
20 |
|
Maintaining the air-filter. . . . . |
|
. 60 |
|
Adjusting the focus. . . . . . . |
|
21 |
|
Caring for the mirror and lens. . |
. |
62 |
|
Using the automatic adjustment feature. |
|
21 |
|
Other care. . . . . . . . . . . 63 |
|||
Correcting the keystone distortions . |
|
22 |
Troubleshooting . . . . . . . . . . . . 64 |
||||
Using the magnify feature. . . . |
. 23 |
|
Related messages. . . . . . |
. |
64 |
||
Freezing the screen. . . . . . |
. 23 |
|
Regarding the indicator lamps. . |
|
. 65 |
||
Temporarily blanking the screen. . |
|
23 |
|
Shutting the projector down. . . |
|
. 66 |
|
Using the menu function. . . . . |
|
24 |
|
Resetting all settings. . . . . . |
|
. 66 |
|
EASY MENU.. .. .. .. .. .. .. .. .. .. .. .. .. .. .. 26 |
|
Phenomena that may be easy |
|
|
|||
Aspect, D-zoom, Keystone , |
|
|
|
to be mistaken for machine defects. . 67 |
|||
Keystone , Perfect fit, |
|
|
Specifications. . . . . . . . |
. |
.70. . . . |
||
Picture mode, Brightness, Contrast, |
|
|
|
|
|
|
|
Color, Tint, Sharpness, Whisper,
Mirror, Reset, Filter time,
Language, Go to Advanced Menu...
2
Projector features / Preparations
Projector features
This product realizes the large projection image of various image signals, even if in a small space. This product can offer you convenience and various uses by the following features.
üThe unique lens and mirror system realizes ultra short distance projection, which gives you more various way of use.
üThe motorized lens door offers you very simple use of the projector.
Preparations
Contents of package
Please see the “Checking the contents” section in the User’s Manual (concise) which is a book. Your projector should come with the items shown there. Contact immediately your dealer if anything is missing.
NOTE • Keep the original packing materials, for future reshipment. Be sure to use the original packing materials when moving the projector. Use special caution for the lens.
3

Part names
Part names
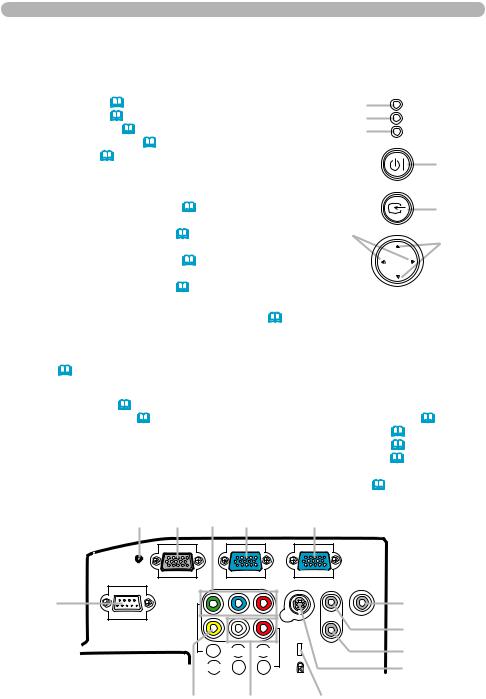
Projector
(1)Control buttons
(See the following page.)
(2)Lamp cover (58)
(3)Remote sensors (14)
(4)Speaker (39)
(5)Exhaust vents
(6)Lens door (16, 17, 62)
(7)Ports (5, 10)
(8)AC inlet (12)
(9)Power switch (16, 17)
(10)Security bar (13)
(11)Intake vents
(12)Filter unit (60, 70)
(13)Elevator feet (20)
(14)Internal threads
These are threads for optional mounting accessories.
(15)Lens (16, 62, 70)
(16)Mirror (16, 62)
(1)(6)
(2) |
|
|
|
(7) |
|
(3) |
(8) |
|
(4) |
||
(9) |
||
|
||
(5) |
(10) |
|
(12) |
(11) |
|
|
||
|
(5) |
|
(13) |
|
|
|
(14) |
(13)
(15) |
(6) |
(16) |
|
|
 (6)
(6)
 WARNING ►Be careful not to pinch your fi nger with the lens door, to prevent an injury.
►Never look into the projection lens or mirror while the projection lamp lights, since the projection lamp ray may cause a trouble on your eyes.
 CAUTION ►Do not touch the lamp cover or approach the exhaust vents while using the projector and for a while after use, to prevent a burn.
►Do not cover, block, or plug up the vents to keep normal ventilation. Do not place anything that can stick or be sucked to the vents, around the intake vents.
4
Part names
Control buttons
(1) |
LAMP indicator (&65, 66) |
|
|
|
|
(1) |
LAMP |
(2) |
TEMP indicator (&65, 66) |
|
|
|
|
(2) |
TEMP |
(3) |
POWER indicator (&16, 17, 65, 66) |
|
|
|
(3) |
POWER |
|
(4) |
STANDBY/ON button (&16, 17) |
|
|
|
|
STANDBY/ON |
|
(5) |
INPUT button (&18) |
|
|
|
|
|
(4) |
Buttons ◄/►/▲/▼ |
|
|
|
|
|
||
|
|
|
|
|
INPUT |
||
(6) |
FOCUS +/- buttons |
|
|
|
|
|
|
|
|
|
|
|
|
||
|
when no menu is displayed (&21), or |
|
|
|
(5) |
||
|
Cursor ◄, ► buttons |
|
|
|
(6) |
|
|
|
when a menu is displayed (&24). |
|
|
MENU |
|||
(7) |
MENU buttons |
|
|
|
|
|
(7) |
|
when no menu is displayed (&24), or |
|
FOCUS - |
+ FOCUS |
|||
|
Cursor ▲, ▼ buttons |
|
|
|
|
|
|
|
when a menu is displayed (&24). |
|
|
|
|
||
The ◄/►/▲/▼ buttons on the projector work only as |
|
|
|||||
the cursor buttons while the template is displayed (&43). |
|
|
|||||
Ports (&10, Technical's 3 to 6) |
|
|
|
|
|
||
(1) |
Shutdown switch (&17, 66) |
|
|
|
(7) VIDEO port |
|
|
(2) |
MONITOR OUT port (&38) |
|
|
|
(8) AUDIO IN3 (L,R) ports (&39) |
||
(3) |
Y, CB/PB, CR/PR |
|
|
|
(9) AUDIO OUT port (&39) |
||
|
(Component video) ports |
|
|
|
(10) AUDIO IN1 port (&39) |
||
(4) |
COMPUTER IN2 port |
|
|
|
(11) AUDIO IN2 port (&39) |
||
(5) |
COMPUTER IN1 port |
|
|
|
(12) S-VIDEO port |
|
|
(6) |
CONTROL port |
|
|
|
(13) Security slot (&13) |
||
|
(1) |
(2) |
(3) |
(4) |
(5) |
|
|
|
MONITOR OUT |
COMPUTER IN2 |
COMPUTER IN1 |
|
|
||
|
(6) |
|
|
|
1 |
|
(9) |
|
|
|
|
|
|
||
|
CONTROL |
|
|
|
S-VIDEO |
AUDIO |
(10) |
|
|
|
|
OUT |
|||
|
|
|
|
|
2 |
|
|
|
|
|
Y |
CB/PB CR/PR |
AUDIO IN |
|
(11) |
|
|
|
|
|
|||
|
|
|
VIDEO |
L R |
|
|
(12) |
|
|
|
|
AUDIO IN3 |
|
|
|
|
|
(7) |
|
(8) |
(13) |
|
|
5
Part names
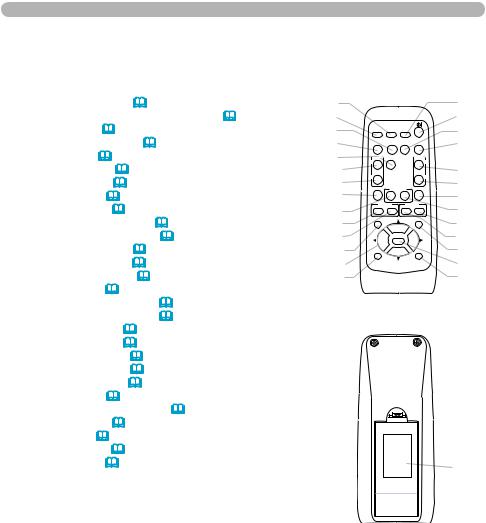
Remote control
(1) |
COMPUTER button (&18) |
(1) |
|
|
|
|
(2) |
|
(2) |
MY SOURCE/DOC.CAMERA button (&18, 46) |
(3) |
|
|
|
|
(4) |
|
(3) |
VIDEO button (&18) |
(5) |
VIDEO |
|
MY SOURCE/ |
|
(6) |
|
(4) |
STANDBY/ON button (&16, 17) |
(7) |
COMPUTER DOC.CAMERA |
|
(8) |
|||
ASPECT |
AUTO |
SEARCH |
BLANK |
|||||
(5) |
AUTO button (&21) |
(9) |
ON |
FREEZE |
|
VOLUME |
|
|
|
|
|
MAGNIFY |
|
|
|||
(6) |
SEARCH button (&19) |
(10) |
OFF |
|
|
|
(12) |
|
(7) |
ASPECT button (&19) |
(11) |
KEYSTONE |
MY BUTTON |
MUTE |
(13) |
||
(8) |
BLANK button (&23) |
(14) |
|
1 |
2 |
|
(15) |
|
(9) |
FREEZE button (&23) |
(16) |
- FOCUS + |
- D-ZOOM + |
(17) |
|||
(10) MAGNIFY - ON button (&23) |
(18) |
(21) |
||||||
POSITION |
|
|
MENU |
|||||
(11) MAGNIFY - OFF button (&15, 23) |
(19) |
|
ENTER |
|
(20) |
|||
(12) VOLUME + button (&18) |
(22) |
ESC |
|
|
RESET |
(23) |
||
(13) VOLUME – button (&15, 18) |
(24) |
|
|
|
|
(25) |
||
(14) KEYSTONE button (&22) |
(26) |
|
|
|
|
(27) |
||
(15)MUTE button (&18)
(16)MY BUTTON - 1 button (&46)
(17)MY BUTTON - 2 button (&46)
(18)FOCUS – button (&21)
(19)FOCUS + button (&21)
(20)D-ZOOM – button (&20)
(21)D-ZOOM + button (&20)
(22)POSITION button (&20, 23)
(23)MENU button (&24, 25)
(24)▲/▼/◄/► cursor buttons (&24, 25)
(25) ENTER button (&24, 25)
(26)ESC button (&15, 24, 25)
(27)RESET button (&15, 24, 25)
(28) Battery cover (&14) |
(28) |
Back of
the remote control
6
Setting up
Setting up
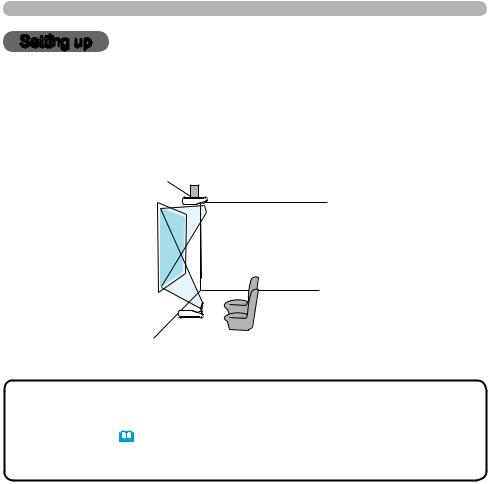
Arrangement
Install the projector in a stable, cool, dry and airy place, keeping a space of 30 cm or more between the sides of the projector and other objects such as walls. Refer to the following to decide the projection style. For the case of installation in a special state such as ceiling mount, the specified mounting accessories and service may be required. Before installing the projector, consult your dealer about your installation.
 (2) Ceiling mount
(1) Usual use
NOTE • When installing the projector, confirm that there is nothing that blocks the projection light between the projector and the screen.
•When installing the projector, check that the remote sensors are not exposed to any strong ray (14).
•Install the projector in the way specified in this manual. Otherwise the projection lamp may not light.
7
Setting up
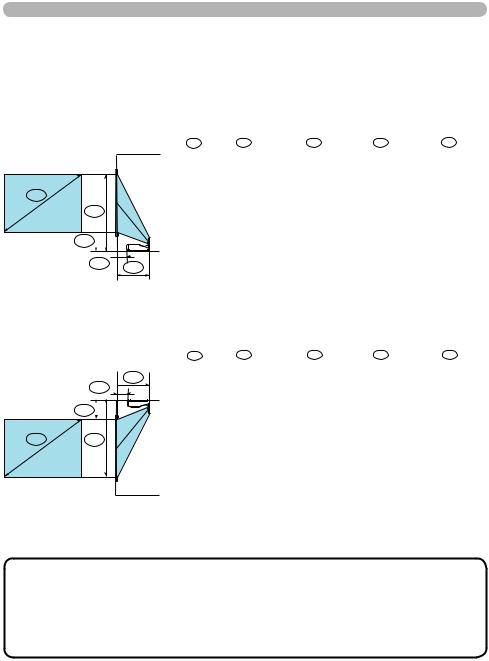
Arrangement (continued)
Refer to the following for the projection distance.
The values shown in the table are calculated for a full size screen: 1024x768.
(1)
A
C2
C1 
B1  B2
B2
(2)
B2
B1 
C1 
A C2
Table for 4:3 screen |
|
|
|
(±8%) |
||||||||
A |
B1 |
|
B2 |
|
C1 |
|
C2 |
|
||||
|
|
|
|
|
|
|
|
|
|
|
|
|
inch |
cm |
|
inch |
cm |
|
inch |
cm |
|
inch |
cm |
|
inch |
48 |
* 0.5 |
|
*(0.2) |
38.3 |
|
15 |
24.4 |
|
10 |
98.2 |
|
39 |
50 |
2.0 |
|
1 |
39.8 |
|
16 |
25.2 |
|
10 |
101.9 |
|
40 |
60 |
9.6 |
|
4 |
47.4 |
|
19 |
28.9 |
|
11 |
120.4 |
|
47 |
70 |
17.2 |
|
7 |
55.0 |
|
22 |
32.6 |
|
13 |
139.3 |
|
55 |
80 |
24.8 |
|
10 |
62.6 |
|
25 |
36.2 |
|
14 |
158.2 |
|
62 |
90 |
32.4 |
|
13 |
70.2 |
|
28 |
39.9 |
|
16 |
177.1 |
|
70 |
100 |
39.9 |
|
16 |
77.7 |
|
31 |
43.6 |
|
17 |
196.0 |
|
77 |
120 |
55.0 |
|
22 |
92.8 |
|
37 |
50.9 |
|
20 |
234.0 |
|
92 |
150 |
77.7 |
|
31 |
115.5 |
|
45 |
62.0 |
|
24 |
291.0 |
|
115 |
200 |
115.5 |
|
45 |
153.3 |
|
60 |
80.4 |
|
32 |
385.7 |
|
152 |
Table for 16:9 screen |
|
|
|
(±8%) |
||||||||
|
|
|
|
|
|
|
|
|
|
|
|
|
A |
B1 |
|
B2 |
|
C1 |
|
C2 |
|
||||
|
|
|
|
|
|
|
|
|
|
|
|
|
inch |
cm |
|
inch |
cm |
|
inch |
cm |
|
inch |
cm |
|
inch |
44 |
* 0.5 |
|
*(0.2) |
38.3 |
|
15 |
33.6 |
|
13 |
88.9 |
|
35 |
50 |
5.4 |
|
2 |
43.2 |
|
17 |
37.3 |
|
15 |
99.9 |
|
39 |
60 |
13.7 |
|
5 |
51.5 |
|
20 |
43.5 |
|
17 |
118.3 |
|
47 |
70 |
22.0 |
|
9 |
59.8 |
|
24 |
49.6 |
|
20 |
136.8 |
|
54 |
80 |
30.2 |
|
12 |
68.0 |
|
27 |
55.7 |
|
22 |
155.3 |
|
61 |
90 |
38.5 |
|
15 |
76.3 |
|
30 |
61.8 |
|
24 |
173.9 |
|
68 |
100 |
46.6 |
|
18 |
84.4 |
|
33 |
67.9 |
|
27 |
192.3 |
|
76 |
120 |
63.1 |
|
25 |
100.9 |
|
40 |
80.1 |
|
32 |
229.5 |
|
90 |
150 |
87.8 |
|
35 |
125.6 |
|
49 |
98.4 |
|
39 |
285.3 |
|
112 |
200 |
129.0 |
|
51 |
166.8 |
|
66 |
129.0 |
|
51 |
378.2 |
|
149 |
NOTE • It is recommended to adjust the screen size from 60 inch to 100 inch diagonal. The screen image adjusted out of this range, either smaller or larger, may be deteriorated.
• The screen position may be shifted after installation if the projector is suspended on a ceiling or somewhere, since the body of this projector is made of plastics. If readjustment is necessary, consult with your dealer or installater.
8

Setting up
Arrangement (continued)
 WARNING ►Place the projector in a stable horizontal position. If the projector falls or is knocked over it could cause injury and/or damage to the projector. Using a damaged projector could then result in fire and/or electric shock.
•Do not place the projector on an unstable, slanted or vibrational surface such as a wobbly or inclined stand.
•Do not place the projector on its side, front or rear position.
•Consult with your dealer before a special installation such as suspending from a ceiling or somewhere else.
►Place the projector in a cool place, and ensure that there is sufficient ventilation. The high temperature of the projector could cause fire, burns and/or malfunction of the projector.
•Do not stop-up, block or cover the projector's vents.
•Keep a space of 30 cm or more around the projector from other objects such as walls.
•Do not place the projector on metallic thing or anything weak in heat.
•Do not place the projector on carpet, cushions or bedding.
•Do not place the projector in direct sunlight or near hot objects such as heaters.
•Do not place anything near the lens door, lens, mirror, vents. or on the top of the projector.
•Do not place anything that may be sucked into or stick to the vents on the rear and bottom of the projector. This projector has some intake vents on the rear
and bottom.
►Do not place the projector anyplace where it may get wet. Getting the projector wet or inserting liquid into the projector could cause fire, electric shock and/or malfunction of the projector.
•Do not place the projector in a bathroom or the outdoors.
•Do not place anything containing liquid near the projector.
 CAUTION ►Avoid placing the projector in smoky, humid or dusty place. Placing the projector in such places could cause fire, electric shock and/or malfunction of the projector.
• Do not place the projector near humidifiers, smoking spaces or a kitchen. ►Position the projector to prevent light from directly hitting the projector's remote sensor.
9
Setting up
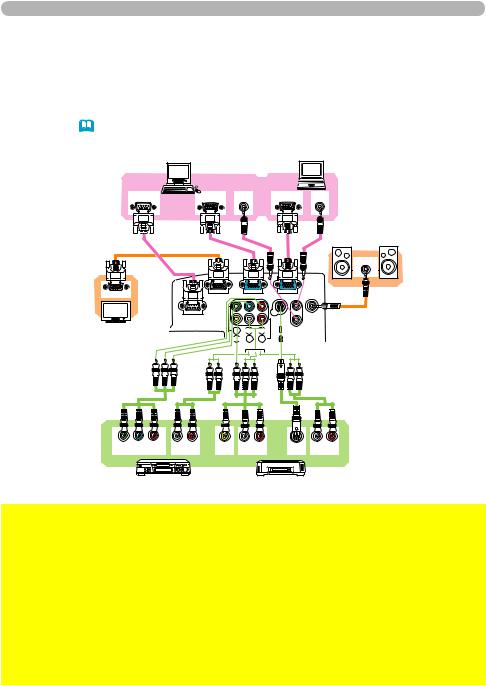
Connecting with your devices
Before connecting them, make sure that the devices are suitable to connect with this projector, and prepare the required signal cables and adapters. Consult your dealer if the accessory that is not included in this product is required. Refer to the
following for connection. If you want to use the cable cover, see the Using the cable cover (13).
PCs
RS-232C |
RGB OUT |
AUDIO |
RGB OUT |
AUDIO |
|
|
OUT |
|
OUT |
|
|
|
|
|
|
|
AUDIO IN |
Monitor |
RGB IN |
|
|
|
1 |
|
Speakers |
|
|
MONITOR OUT |
COMPUTER IN2 COMPUTER IN1 |
|
|
||
|
|
CONTROL |
|
|
S-VIDEO |
OUT |
(with an amplifier) |
|
|
|
|
|
|
AUDIO |
|
|
|
|
|
|
2 |
|
|
|
|
|
Y |
CB/PB CR/PR |
AUDIO IN |
|
|
|
|
|
VIDEO |
L R |
|
|
|
|
|
|
|
AUDIO IN3 |
|
|
|
Y |
CB/PB CR/PR |
L |
R |
VIDEO |
L |
R |
S-VIDEO |
L |
R |
COMPONENT VIDEO OUT |
AUDIO OUT |
OUT |
AUDIO OUT |
OUT |
AUDIO OUT |
||||
VCR/DVD players
 WARNING ►Use only the accessories contained in this product or recommended by your dealer. Do not modify the projector or accessories. ►For the cable with a ferrite core only at one end, connect the end with the core to the projector. The cables may be required a specific length or a ferrite core by the regulations.
►Be careful not to damage the cables. Route the cables so that they are not likely to be walked on or pinched by items placed upon or against them.
 CAUTION ►Do not connect or disconnect the projector with devices while they are connected to a power supply, except for the cases directed by the manuals.
►Be careful not to set a connector into a wrong port or with a wrong way.
(continued on next page)
10
Setting up
Connecting your devices (continued)
NOTE • Be sure to read the manuals for devices before connecting them to the projector, and make sure that all the devices are suitable to be connected with this product. Before connecting to a PC, check the signal level, the signal timing, and the resolution.
-Some signal may need an adapter to input this projector.
-Some PCs have multiple screen display modes that may include some signals which are not supported by this projector.
-Although the projector can display signals with resolution up to UXGA (1600X1200),
the signal will be converted to the projector’s panel resolution before being displayed. The best display performance will be achieved if the resolutions of the input signal and the projector panel are identical.
•While connecting, make sure that the shape of the cable's connector fits the port to connect with. And be sure to tighten the screws on connectors with screws.
•When connecting a laptop PC to the projector, be sure to activate the PC’s external RGB output. (Set the laptop PC to CRT display or to simultaneous LCD and CRT display.) For details on how this is done, please refer to the instruction manual of the corresponding laptop PC.
•When the picture resolution is changed on a PC depending on an input, automatic adjustment function may take some time and may not be completed. In this case, you may not be able to see a check box to select “Yes/No” for the new resolution on Windows. Then the resolution will go back to the original. It might be recommended to use other CRT or LCD monitors to change the resolution.
•In some cases, this projector may not display a proper picture or display any picture on screen. For example, automatic adjustment may not function correctly with some input signals. An input signal of composite sync or sync on G may confuse this projector, so the projector may not display a proper picture.
About Plug-and-Play capability
Plug-and-Play is a system composed of a PC, its operating system and peripheral equipment (i.e. display devices). This projector is VESA DDC 2B compatible. Plug-and- Play can be used by connecting this projector to a PC that is VESA DDC (display data channel) compatible.
•Take advantage of this feature by connecting an computer cable to the COMPUTER IN1 port (DDC 2B compatible). Plug-and-Play may not work properly if any other type of connection is attempted.
•Please use the standard drivers in your PC as this projector is a Plug-and-Play monitor.
11
Setting up
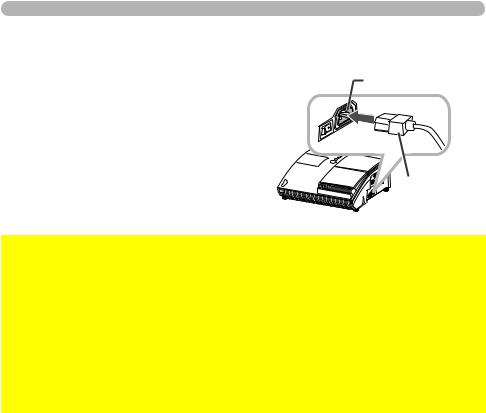
Connecting with a power supply
Before connection, confirm that the power outlet is suitable for this projector and the power cord.
Then follow the procedure below for connection.
1. Insert the end of the power cord with the socket into the AC inlet of the projector.
2. Plug the other end of the power cord into a power outlet.
AC Inlet
Power cord |
(with the socket) |
 WARNING ►Be careful of operation for a power supply not to cause an electric shock or a fire.
•Do not handle the power cord with the wet hand.
•Use this product with only the type of power supply indicated on the projector.
•Use a power outlet that is close to the projector and easily accessible.
•Connect firmly the power cord not to result in loose connection. Do not use a loose or unsound power outlet.
•Do not overload the outlet, since overloading can result in a risk of fire or electric shock.
•Use only the power cord contained in this product unless it is damaged. If it is damaged, consult your dealer to get new one. Do not modify the power cord.
12
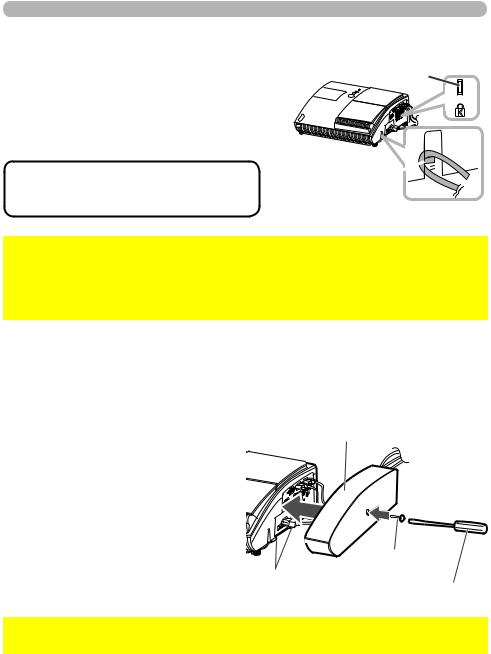
Using the security bar and slot
This projector has the security bar for a commercial anti-theft chain or wire up to 10 mm in diameter, and also the security slot for the Kensington lock.
For details, see the manual of the security tool.
NOTE • These are not provided as comprehensive theft preventions but supplemental measures.
Setting up
Security slot
Security bar 

 WARNING ►Do not place the anti-theft chain or wire near the projector’s exhaust vents, since the chain or wire heated by the hot exhaust gas may cause a burn.
►Do not use the security bar or slot for the purpose of fall prevention, since these are not designed for it.
Using the cable cover
Utilize the cable cover as the guard and blind for the connecting parts.
1.
2.
3.
4.
Connect the signal cables and the |
Cable cover |
power cord to the projector first. |
|
Attach the cable cover to the |
projector, uniting the interlocking |
parts. |
Tighten the screw to fix the cable cover.
Connect the other ends of the cables to other devices, and plug the power cord to the power outlet.
Screw
Interlocking parts
Screw driver
 CAUTION ►Be careful not to pinch the cables in the cable cover, to prevent damage to the cables.
13

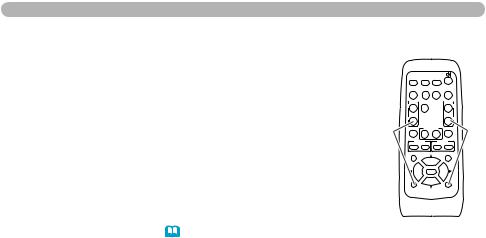
Remote control
Remote control
Preparing for the remote control
The accessory remote control needs batteries. Use the batteries included in this product or two new batteries of the specified type: HITACHI MAXELL, part number LR6 or R6P. Follow the following procedure.
1. Removecontrol. the battery cover in the back of the remote
2. Put the batteries into the battery holder, according to the polarity markings (+) and (-) inside the holder.
3. Put the battery cover back to the former state.
NOTE • Try changing the batteries when the |
Remote sensors |
|
remote control malfunctions. |
|
|
• This remote control works with the remote |
|
|
sensors on the projector using infrared light |
|
|
(Class 1 LED). The active sensor senses the |
|
|
remote control signal assigned within 60 degrees |
|
|
to right and left, and within 3 meters. |
|
|
• The remote control signal reflected in the |
|
|
screen or the like may be available. |
30º 30º |
|
• Prevent the remote sensors from being hit by |
3 m |
|
a strong ray. It may cause malfunction of the |
|
|
|
(approx.) |
|
projector and remote control. |
|
|
 WARNING ►Be careful of handling a battery, as a battery can cause explosion, cracking or leakage, which could result in a fire, an injury, and environment pollution.
•Use only the specified and new battery. Do not use a battery with damage, such as a scratch, a dent, rust or leakage. Do not mix a new battery with used one.
•When a battery leaked, wipe the leakage out well with a waste cloth. If the leakage adhered to your body, immediately rinse it well with water. When a battery leaked in the battery holder, replace the batteries after wiping the leakage out.
•Make sure the plus and minus terminals are correctly aligned when loading a battery.
•Do not work on a battery; for example recharging or soldering.
•Do not keep the batteries put into the remote control when the remote control is not used for a long while. Keep a battery in a dark, cool and dry place. Never expose a battery to a fire or water.
•Obey the local laws on disposing a battery.
14
Remote control
Changing the frequency of remote control signal
The accessory remote control has the two choices on signal |
|
|
|
|
|
|
frequency Mode 1:NORMAL and Mode 2:HIGH. If the remote |
|
VIDEO |
|
MY SOURCE/ |
|
|
control does not function properly, attempt to change the |
|
COMPUTER DOC.CAMERA |
|
|
||
|
MAGNIFY |
FREEZE |
SEARCH |
VOLUME |
|
|
signal frequency. |
|
ASPECT |
AUTO |
BLANK |
|
|
|
OFF |
|
|
|
|
|
|
|
ON |
|
|
|
|
In order to set the Mode, please keep pressing the |
(2) |
KEYSTONE |
1 |
2 |
|
(1) |
combination of two buttons listed below simultaneously for |
|
MY BUTTON |
MUTE |
|
||
|
- FOCUS + |
- D-ZOOM + |
|
|||
about 3 seconds. |
|
POSITION |
|
|
MENU |
|
ENTER
(1)Set to Mode 1:NORMAL... VOLUME- and RESET buttons
(2)Set to Mode 2:HIGH... MAGNIFY OFF and ESC buttons
ESC |
RESET |
Please remember that the REMOTE FREQ. in the SERVICE item of the OPTION menu (48) of the projector to be controlled should be set to the same mode as the remote control.
15
Power on/off
Power on/off
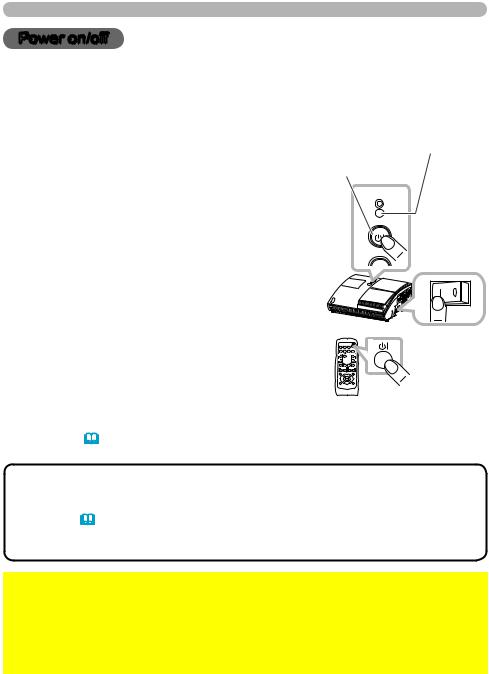
Turning on the power
Turn on the projector and the connected devices. Turn on the projector ahead of other connected devices, unless mentioned in the manuals.
For this projector, follow the procedure below.
1. Press the side marked " I " of the power switch, as the power-on position.
The POWER indicator lights up in orange.
●For a couple of seconds after the POWER indicator lights up, wait to use the control buttons (on the projector and remote control). The buttons may not work soon.
2.Confirm that there is nothing that the lens door hits while opening.
Then, press the STANDBY/ON button (on the projector or remote control).
The lens door opens, the projection lamp lights up, and the POWER indicator begins to blink green.
POWER indicator
STANDBY/ON button
 LAMP
LAMP
TEMP
 POWER
POWER
STANDBY/ON
Power switch
When the projector starts completely, the indicator |
STANDBY/ON button |
|
will turn steady green. |
||
|
To display the picture, select an input signal according to the section “Selecting an input signal” (18).
NOTE • When the AUTO ON of the OPTION menu is set to the TURN ON, and the power was turned off by the power switch last time, turning the power
switch on makes the projection lamp light on without pushing the STANDBY/ ON button (44).
• Install the projector in the way specified in this manual. Otherwise the projection lamp may not light.
 WARNING ►Never look into the projection lens or mirror while the projection lamp lights, since the projection lamp ray may cause a trouble on your eyes. ►Do not touch around the lamp cover and the exhaust vents during use or just after use, since it is too hot.
 CAUTION ►Be careful not to pinch your finger with the lens door, as it may cause an injury.
16
Power on/off
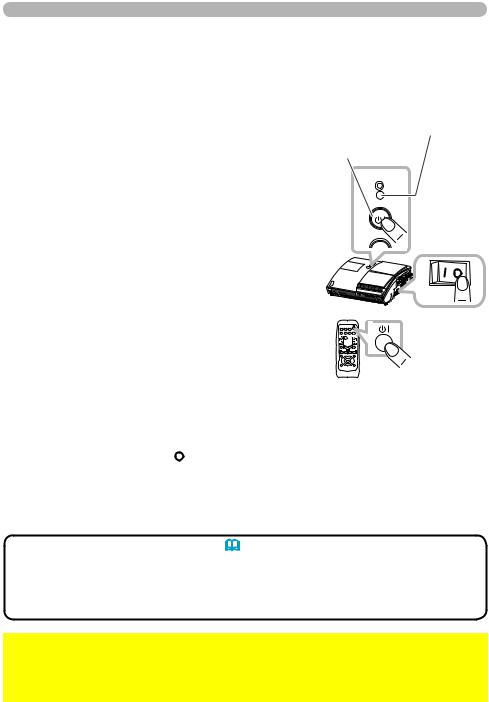
Turn off the power
Turn the projector off after turning off the other connected devices, unless mentioned in the manuals. For this projector, follow the procedure below.
1. Press the STANDBY/ON button (on the projector or remote control).
The “Power off?” dialog appears on the screen for about 5 seconds.
2. Confirm that there is nothing that the lens door hits while closing.
Then press the STANDBY/ON button again while the message appears.
The projection lamp goes off, the lens door closes, and the POWER indicator begins to blink orange.
●For cooling the projector down, wait for the POWER indicator to stop blinking and turn steady orange.
The projector can be turned off without waiting for cooling down. However, the manufacture recommends cooling the projector down enough.
Do not turn the projector on for about 10 minutes or more after turning it off to prevent shortening its life.
POWER indicator
STANDBY/ON button
 LAMP
LAMP
TEMP
 POWER
POWER
STANDBY/ON
Power switch
STANDBY/ON button
3. Press the side marked " " of the power switch, as the power-off position. The POWER indicator goes off.
When you will not use the projector for a long while, unplug and separate the power cord from the power outlet, for safety purposes.
NOTE • Use the shutdown switch (66) only when the projector is not turned off by normal procedure.
• Do not turn the projector on for about 10 minutes or more after turning it off. Turning the projector on again too soon could shorten the lifetime of some consumable parts of the projector.
 CAUTION ►Be careful not to pinch your finger with the lens door, to prevent an injury.
►Do not touch the lamp cover or approach the exhaust vents while using the projector and for a while after use, to prevent a burn.
17
Operating
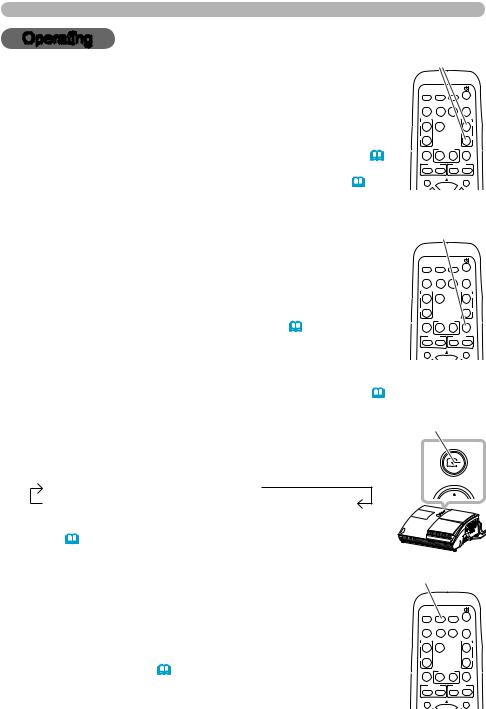
Operating
Adjusting the volume
VOLUME+/- button
1. Use the VOLUME +/VOLUME - buttons to adjust the volume.
A dialog will appear on the screen to aid you in adjusting the volume. If you do not do anything, the dialog will automatically disappear after a few seconds.
●When  is selected for current picture input port, the volume adjustment is disabled. Please see AUDIO item of AUDIO menu (39).
●When the projector is in the standby mode, the volume can be adjusted if  is not selected for the AUDIO OUT STANDBY of AUDIO (39).
MY SOURCE/
VIDEO COMPUTER DOC.CAMERA
ASPECT AUTO SEARCH BLANK
MAGNIFY FREEZE |
VOLUME |
ON |
|
OFF
KEYSTONE |
MY BUTTON |
MUTE |
|
|
1 |
|
2 |
- FOCUS + |
- D-ZOOM + |
||
POSITION |
|
|
MENU |
Temporarily muting the sound
1. Press MUTE button on the remote control.
A dialog will appear on the screen indicating that you have muted the sound.
To restore the sound, press the MUTE, VOLUME + or VOLUME - button. Even if you do not do anything, the dialog will automatically disappear after a few seconds.
●When  is selected for current picture input port, the sound is always muted. Please see AUDIO item of AUDIO menu (39).
●When the sound is muted while a signal from VIDEO(NTSC),
S-VIDEO(NTSC), COMPONENT(480i@60), COMPUTER IN1
(480i@60) or COMPUTER IN2(480i@60) port is selected, the C.C.
(Closed Caption) is automatically activated if the DISPLAY item of the C.C. menu is set to AUTO and the input signal supports the C.C. feature (57).
MUTE button
MY SOURCE/
VIDEO COMPUTER DOC.CAMERA
ASPECT AUTO SEARCH BLANK
MAGNIFY FREEZE |
VOLUME |
ON |
|
OFF
KEYSTONE |
MY BUTTON |
MUTE |
|
|
1 |
|
2 |
- FOCUS + |
- D-ZOOM + |
||
POSITION |
|
|
MENU |
Selecting an input signal
1. Press INPUT button on the projector.
Each time you press the button, the projector switches its input port from the current port as below.
INPUT button
INPUT
COMPUTER IN 1 |
COMPUTER IN 2 |
MENU |
|
||
VIDEO S-VIDEO COMPONENT (Y, CB/PB, CR/PR) |
|
|
●While TURN ON is selected for AUTO SEARCH item in OPTION menu (44), the projector will keep checking the ports in above order repeatedly till an input signal is detected.
1. |
Press COMPUTER button on the remote control. |
COMPUTER button |
Each time you press the button, the projector switches its input |
|
|
|
port from the current port as below. |
|
COMPUTER IN 1
 COMPUTER IN 2
●While TURN ON is selected for AUTO SEARCH item in OPTION
menu, the projector will keep checking every port sequentially till an input signal is detected (44). If COMPUTER button is pushed when VIDEO, S-VIDEO or COMPONENT port is selected, the projector will check COMPUTER IN1 port first.
(continued on next page)
18
MY SOURCE/
VIDEO COMPUTER DOC.CAMERA
ASPECT AUTO SEARCH BLANK
MAGNIFY FREEZE |
VOLUME |
ON |
|
OFF
KEYSTONE |
MY BUTTON |
MUTE |
|
|
1 |
|
2 |
- FOCUS + |
- D-ZOOM + |
||
POSITION |
|
|
MENU |
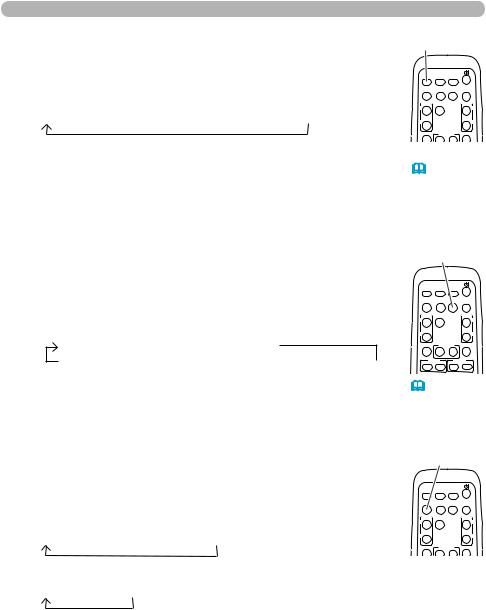
Selecting an input signal (continued)
1. Press VIDEO button on the remote control.
Each time you press the button, the projector switches its input port from the current port as below.
COMPONENT (Y, CB/PB, CR/PR) S-VIDEO VIDEO
Operating
VIDEO button
MY SOURCE/
VIDEO COMPUTER DOC.CAMERA
ASPECT AUTO SEARCH BLANK
MAGNIFY FREEZE |
VOLUME |
ON |
|
OFF
KEYSTONE |
MY BUTTON |
MUTE |
|
1 |
2 |
●While TURN ON is selected for AUTO SEARCH item in OPTION menu, the projector will keep checking every port sequentially till an input signal is detected (44). If VIDEO button is pushed when COMPUTER IN1 or COMPUTER IN2 port is selected, the projector will check COMPONENT port first.
Searching an input signal
1. Press SEARCH button on the remote control.
The projector will start to check its input ports as below in order to find any input signals.
When an input is found, the projector will stop searching and display the image. If no signal is found, the projector will return to the state selected before the operation.
SEARCH button
MY SOURCE/
VIDEO COMPUTER DOC.CAMERA
ASPECT AUTO SEARCH BLANK
MAGNIFY FREEZE |
VOLUME |
ON |
|
OFF
COMPUTER IN 1 COMPUTER IN 2
VIDEO S-VIDEO COMPONENT (Y, CB/PB, CR/PR) 
KEYSTONE |
MY BUTTON |
MUTE |
|
|
1 |
|
2 |
- FOCUS + |
- D-ZOOM + |
||
●While TURN ON is selected for AUTO SEARCH item in OPTION menu (44), the projector will keep checking the ports in above order repeatedly till an input signal is detected.
Selecting an aspect ratio
1. Press ASPECT button on the remote control.
Each time you press the button, the projector switches the mode for aspect ratio in turn.
For a computer signal
NORMAL 4:3 16:9 16:10
ASPECT button
MY SOURCE/
VIDEO COMPUTER DOC.CAMERA
ASPECT AUTO SEARCH BLANK
MAGNIFY FREEZE |
VOLUME |
ON |
|
OFF
KEYSTONE |
MY BUTTON |
MUTE |
|
1 |
2 |
For a video signal, s-video signal or component video signal
4:3 16:9 14:9
For no signal
4:3 (fixed)
●ASPECT button does not work when no proper signal is inputted.
●NORMAL mode keeps the original aspect ratio setting.
19
Operating
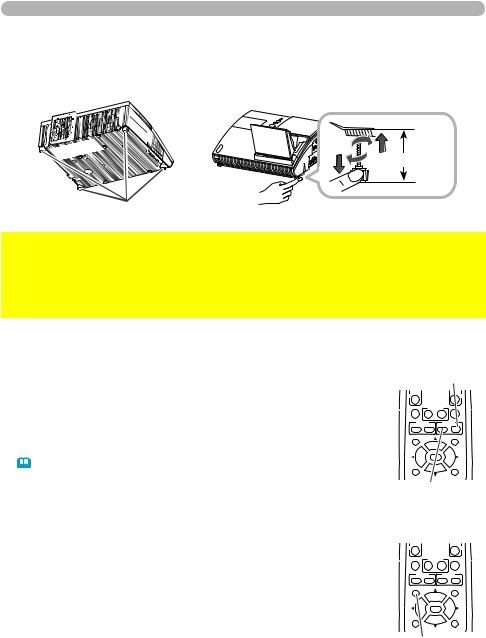
Adjusting the projection position
This projector has four elevator feet in the bottom. Use them to adjust the projection position.
max. 43 mm
Elevator feet
 CAUTION ►Do not lengthen the elevator feet to 43 mm or more. The foot lengthened exceeding the limit may come off from the projector, and result in an injury. ►Tilt the projector with these elevating feet only.
►Do not tilt the projector over 5 degrees, when it is suspended from a ceiling or somewhere.
Adjusting the zoom
Press the D-ZOOM + or D-ZOOM – button on the remote control to display D-ZOOM dialog on screen.
Use the D-ZOOM + and D-ZOOM – buttons to adjust the picture size. To fi nish the operation, do not touch these buttons for a few seconds until the dialog is disappeared.
D-ZOOM + button
OFF
KEYSTONE |
MY BUTTON |
|
|
1 |
2 |
- FOCUS + |
- D-ZOOM |
|
POSITION |
|
MENU |
●If you want to expand a part of the image, use the magnify function
(23).
Adjusting the picture position
Press the POSITION button on the remote control while no menu is on screen, to display the D-SHIFT dialog on screen. Use the ▲, ▼, ◄ and ► buttons to adjust the picture position. Press the POSITION button again to fi nish this operation.
●This is a function to shift the position of the shrunken picture by the zoom function.
●The function is not available, if any menu is displayed on screen.
●The function is not available, if the D-ZOOM is adjusted to 100 (full screen) on its dialog.
ESC |
RESET |
D-ZOOM – button
OFF
KEYSTONE |
MY BUTTON |
MUTE |
|
|
1 |
|
2 |
- FOCUS + |
- D-ZOOM + |
||
POSITION |
|
|
MENU |
|
ENTER |
|
|
ESC |
|
|
RESET |
POSITION button
20
Adjusting the focus
Press the FOCUS + or FOCUS – button on the remote control, or FOCUS + or FOCUS – button on the projector (5) while no menu is on screen, to display the FOCUS box on screen. Use the FOCUS + and FOCUS – buttons to adjust the screen focus. After the focus adjustment, wait for a while until the FOCUS box is disappeared, if you want to display any other menu on screen by pushing the MENU button on the projector.
●The ◄/►/▲/▼ buttons on the projector work only as the cursor buttons while the template is displayed (&43).
Operating
FOCUS + button
OFF
KEYSTONE |
MY BUTTON |
MUTE |
|
|
1 |
|
2 |
- FOCUS + |
- D-ZOOM + |
||
POSITION |
|
|
MENU |
|
ENTER |
|
|
ESC |
|
|
RESET |
FOCUS – button
Using the automatic adjustment feature
1. |
Press AUTO button on the remote control. |
AUTO button |
Pressing this button performs the following. |
|
For a computer signal
The vertical position, the horizontal position and the horizontal phase will be automatically adjusted.
Make sure that the application window is set to its maximum size prior to attempting to use this feature. A dark picture may still be incorrectly adjusted. Use a bright picture when adjusting.
MY SOURCE/
VIDEO COMPUTER DOC.CAMERA
ASPECT AUTO SEARCH BLANK
MAGNIFY |
FREEZE |
|
VOLUME |
ON |
|
|
|
OFF |
|
|
|
KEYSTONE |
MY BUTTON |
MUTE |
|
|
1 |
|
2 |
- FOCUS + |
- D-ZOOM + |
||
For a video signal and s-video signal
The video format best suited for the respective input signal will be selected
automatically. This function is available only when the AUTO is selected for the VIDEO FORMAT item in the INPUT menu (34). The vertical position and horizontal position will be automatically set to the default.
For a component video signal
The vertical position, horizontal position and horizontal phase will be automatically set to the default.
●The automatic adjustment operation requires approx. 10 seconds. Also please note that it may not function correctly with some input. When this function is performed for a video signal, a certain extra such as a line may appear outside a picture.
●The items adjusted by this function may vary when the FINE or DISABLE is selected for the AUTO ADJUST item of the SERVICE item in the OPTION menu (47).
21
Operating
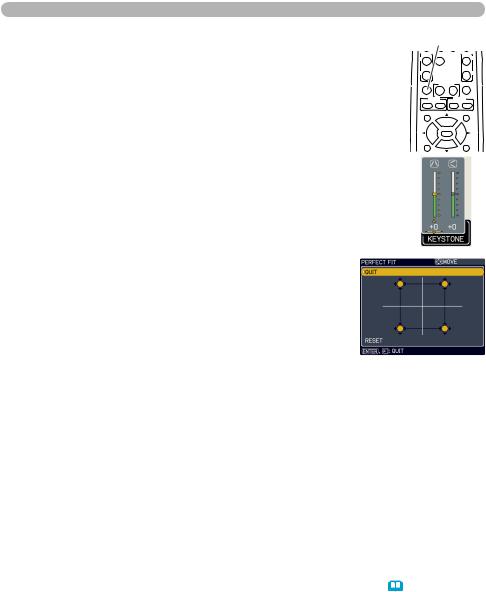
Correcting the keystone distortions
1. Press KEYSTONE button on the remote control. A dialog will appear on the screen to aid you in correcting the distortion.
KEYSTONE button
MAGNIFY |
FREEZE |
|
VOLUME |
ON |
|
|
|
OFF |
|
|
|
KEYSTONE |
MY BUTTON |
MUTE |
|
|
1 |
|
2 |
- FOCUS + |
- D-ZOOM + |
||
2. Use the ▲/▼ cursor buttons to select, MANUAL or PERFECT FIT operation, and press the ► button to perform the following.
(1)MANUAL displays a dialog for keystone correction. Use the ◄/► cursor buttons to select the direction
to correct ( or
or  ) then use the ▲/▼ buttons for adjustment.
(2)PERFECT FIT displays a dialog for the shape adjustment of the projected image in each of the corners.
1)Choose the corner to adjust using the ▲/▼/◄/► buttons and press the ENTER or INPUT button.
2)Use the ▲/▼/◄/► buttons to adjust the position of the corner.
Press the ENTER or INPUT button to exit the adjustment of the corner.
3)To adjust another corner, follow the same procedure from 1) above.
To reset the adjustment of all the corners, select RESET using the ▲/▼ buttons and press the ENTER or INPUT button.
POSITION |
MENU |
|
ENTER |
ESC |
RESET |
To close the dialog and complete this operation, press KEYSTONE button again. Even if you do not do anything, the dialog will automatically disappear after a few seconds.
●While the positions of the corners are adjusted with PERFECT FIT, keystone adjustment feature is unavailable. To correct the keystone distortion, reset the adjustment of all the corners.
●The adjustable range of this function will vary among inputs. For some input, this function may not work well.
●When the zoom adjustment is set to the TELE (telephoto focus), this function may be excessive. This function should be used when the zoom adjustment is set to the full WIDE (wide-angle focus) whenever possible.
●This function will be unavailable when Transition Detector is on (53).
22
 Loading...