

Page 1

Apple Fax
User’s Guide
Page 2

K Apple Computer, Inc.
© 1996 Apple Computer, Inc. and its licensors. All rights reserved.
© 1996 AirGo Communications, Inc. and Dayna Communications, Inc. All rights
reserved.
Under the copyright laws, this manual may not be copied, in whole or part, without
the written consent of Apple. Your rights to the software are governed by the
accompanying software license agreement.
The Apple logo is a trademark of Apple Computer, Inc., registered in the U.S. and
other countries. Use of the “keyboard” Apple logo (Option-Shift-K) for commercial
purposes without the prior written consent of Apple may constitute trademark
infringement and unfair competition in violation of federal and state laws.
Every effort has been made to ensure that the information in this manual is accurate.
Apple is not responsible for printing or clerical errors.
© 1996 Apple Computer, Inc.
1 Infinite Loop
Cupertino, CA 95014-6299
(408) 996-1010
Apple, the Apple logo, AppleScript, GeoPort, Macintosh, the Mac OS logo, PowerTalk,
PlainTalk and Power Macintosh are trademarks of Apple Computer, Inc., registered in
the U.S.A. and other countries.
Finder, the GeoPort logo, Mac, and System 7 are trademarks of Apple Computer, Inc.
Adobe, Acrobat, the Acrobat logo, Adobe Illustrator, Adobe Photoshop, and PostScript
are trademarks of Adobe Systems Incorporated or its subsidiaries and may be
registered in certain jurisdictions.
EasyReader, the Optical Character Recognition (OCR) software application included
with Apple Fax, uses a neural network recognition system developed by Mimetics.
Additional language dictionaries can be obtained by contacting Mimetics at the
following address:
Mimetics
5, Central Park
Avenue Sully Prud’homme
92298 Châtenay-Malabry
France
FastPrint is a trademark of Mimetics.
Hayes is a trademark of Hayes Microcomputer Products, Inc.
QuarkXPress is a registered trademark of Quark, Inc.
Touch-Tone is a trademark of Western Electric.
Simultaneously published in the United States and Canada.
Mention of third-party products is for informational purposes only and constitutes
neither an endorsement nor a recommendation. Apple assumes no responsibility with
regard to the performance or use of these products.
Page 3

CONTENTS
Preface How to use This Book xi
Part I
Chapter 1 Apple Fax Quick Start 1
Sending a fax 2
Faxing is like printing 2
Preparing your document 2
Setting preferences 3
Choosing Fax Sender or Fax Sender GX 6
Addressing your fax 7
Cover page information 9
Previewing your fax 10
Sending your fax 11
Monitoring the status of your fax 11
Apple Fax status information 11
Apple Telecom Status program 12
Fax log information 13
Receiving a fax 14
Preparing to receive faxes 14
Checking for received faxes 15
Viewing and printing a fax 15
Opening fax for viewing 16
Printing a fax 16
iii
Page 4

Quick Fax 17
Sending a single sheet Quick Fax 17
Adding enclosures 19
Addressing a Quick Fax 20
Chapter 2 Apple Fax Main Window 23
Accessing Apple Fax 24
Apple Fax main window 24
Outgoing view 25
Understanding the display information 25
Viewing recipient information 27
Deleting a fax that has been sent 28
Sorting faxes that have been sent 29
Readdress, Resend, and Merge 29
Opening and viewing a fax that has been sent 31
Incoming view 32
Understanding the display information 32
Editing the name of a received fax 33
Sorting faxes that have been received 33
Forwarding a fax that has been received 33
Deleting a fax that has been received 34
Opening and viewing a fax that has been received 35
Using the button bar 36
Quick Fax 37
Address Book 38
Log 39
Apple Telecom Status 40
Preferences 41
iv Contents
Page 5

Part II
Chapter 3 Fax Send Advanced Options 45
Sending faxes using Fax Sender 46
Choosing Fax Sender 46
Fax Sender Page Setup 48
Entering cover page information 50
Selecting a cover page 52
Preview options 53
Fax Sender Options 54
Setting send time 54
Setting your location 56
Using manual dialing 58
Sending faxes using Fax Sender GX 60
Choosing Fax Sender GX 60
Fax Sender GX Page Setup 61
Print dialog options 62
Addressing your fax 63
Print time and send time 64
Drag and drop fax send 64
Using Fax Sender GX on an AppleTalk network 65
Sharing a fax server 65
Sending a fax from a network client 66
Recipients and recipient lists 67
Contents
v
Page 6

Chapter 4 Fax Receive Advanced Options 71
Receiving a fax 72
Setting Apple Fax to receive 72
Checking for received faxes 73
Receiving manually 74
Opening a received fax document 75
Forwarding received faxes 76
Forwarding multiple faxes using Merge 77
Chapter 5 Viewing, Editing, and Printing
Faxes 79
Opening a fax 80
Viewing a fax 81
Moving around a document 81
Changing the page orientation 82
Scaling the view 83
Printing a fax 83
FastPrint 83
Editing a fax 84
Copying, cutting, or clearing a page 84
Pasting a page 85
Selecting a portion of a page 86
Converting a fax to a PICT file 87
vi Contents
Page 7

Optical Character Recognition 88
OCR Dictionaries 88
OCR tips 89
Working with OCR 89
Converting part of a document to text 90
Converting a page of a document to text 91
Converting a whole document to text 92
Chapter 6 Creating and Managing Cover
Pages 93
Customizing cover pages 94
Cover page fields and labels 94
Creating a new cover page 95
Using the tool bar 96
The Selection tool 96
The Text tool 96
The Field tool 96
The Scale tools 97
The Graphic tool 97
Customizing fields 98
Positioning and resizing fields 98
Modifying fields 99
Using the grid and aligning fields 100
Creating fields 103
Editing label text 104
Adding graphics 105
Installing cover pages 106
Removing cover pages 106
Contents
vii
Page 8

Chapter 7 Using the Apple Fax Log 107
Viewing the fax log 108
Fax log information 109
Printing the fax log 109
Saving the fax log 110
Clearing the fax log 111
Chapter 8 Apple Fax Preferences 113
Apple Fax Preferences 114
Accessing preferences 114
Notification preferences 115
Modem preferences 116
Log preferences 119
OCR preferences 121
Personal preferences 123
Reverting and saving preferences 124
viii Contents
Page 9

Chapter 9 Using Apple Fax Gateway 125
About Apple Fax Gateway 126
Configuring Apple Fax Gateway 127
Adding fax services to your Key Chain 127
Configuring fax services 128
Using Apple Fax Gateway 129
Sending fax documents 129
Adding fax addresses to your PowerTalk
information cards 130
Receiving fax documents with PowerTalk 132
Opening received fax documents 132
Problem alerts 133
Index 135
Contents
ix
Page 10

PREFACE
How to Use This Book
This manual provides complete information for operating
Apple Fax.
It is assumed that you are familiar with basic Macintosh
desktop operations. If not, refer to the Macintosh Guide in
the Guide menu (the Guide menu is the one with the
question mark icon), or the documentation that came with
your computer.
Part I
m Chapter 1 introduces the software for sending, receiving,
and managing faxes with your Macintosh computer. It guides
you through the steps for sending your first fax, getting
ready to receive faxes, and using the QuickFax feature.
Everything you need to get started is included in this
chapter.
m Chapter 2 provides more complete information on the
Apple Fax main window. It explains in detail all of the
interface elements of the main window and how they pertain
to managing faxes and accessing important parts of Apple
Fax and related programs.
xi
Page 11

Part II
m Chapter 3 covers fax send advanced features using
Fax Sender and Fax Sender GX, as well as managing
recipients and recipient lists using Apple Address Book.
m Chapter 4 covers fax receive advanced features.
m Chapter 5 covers viewing, editing, and printing faxes. It
also explains the use of the OCR (Optical Character
Recognition) feature for converting all or part of a received
fax to text.
m Chapter 6 covers creating and managing customized fax
cover pages.
m Chapter 7 covers the log of incoming and outgoing faxes
that Apple Fax maintains.
m Chapter 8 covers all of the Preferences settings and
options of the Apple Fax program.
m Chapter 9 covers the use of Apple Fax Gateway for
PowerTalk.
What You Need
To use Apple Fax you need
m System 7.1 or later
m a communications device compatible with Apple Fax
To use the drag and drop capabilities in Apple Phone you
also need
m System 7.5 or later, or the Macintosh Drag & Drop extension
for System 7.1.1 or 7.1.2
To send faxes to address book entries using Apple Fax you
also need
m Apple Address Book
xii
Preface
Page 12

Part I
Page 13

Page 14

CHAPTER
1
Apple Fax Quick Start
In this chapter
This chapter introduces you to the basic operation of Apple
Fax. It gives you step-by-step instructions for the most
commonly used functions, including
m sending a fax
m receiving and printing a fax
m using Quick Fax
Before you begin
Please make sure that your modem hardware is properly
installed. Depending on your configuration, installation may
need to be done by your Apple-authorized service provider.
You must also install the software before using it.
To understand the information presented in this chapter,
you should be familiar with the basic operation of your
Macintosh and should know how to print a document. Refer
to the Macintosh Guide in the Guide menu (the one with
the question mark) or the documentation that came with
your computer if you need help with these basic functions.
1
Page 15

Sending a fax
This section introduces Apple Fax and guides you through
the steps for sending a fax. If you follow these steps, you will
learn everything you need to know about basic fax send.
Advanced fax send features are covered in Chapter 4,
“Fax Send Advanced Options.”
Faxing is like printing
You can think of sending a fax as printing to a printer that is
connected to your computer by a telephone line. Any
document or window that can be printed by a program or by
the system can be sent as a fax. To send a document as a fax
you follow all of the same steps that you would to print it,
plus the additional step of identifying the recipient or
recipients and their fax numbers.
Preparing your document
Before sending a document as a fax, prepare it as you would
prepare it to print. You can use any program that prints,
such as a word processor, spreadsheet, or drawing program.
For your convenience, a sample document in SimpleText
format, named “My First Fax”, has been provided for you in
the Fax Folder inside the Telecom Applications folder on
your hard disk.
1 Open the Telecom Applications folder, then open the Fax
Folder, then open “My First Fax” by double-clicking it.
It opens as a SimpleText document.
2
Chapter 1
Page 16

Setting preferences
Before sending your first fax, you need to configure
Apple Fax for your modem. Once this is done, you won’t
have to worry about the basic modem preferences again
unless your modem configuration changes. The first time
you run Apple Fax a setup window automatically opens for
you to configure your modem.
To start Apple Fax
1 Choose Apple Telecom Status from the Apple (K) menu.
Apple Telecom Status opens.
Apple Fax icon
2 Click the Apple Fax icon, or choose Open Apple Fax from
the File menu.
Apple Fax opens and presents the setup window.
Apple Fax Quick Start
3
Page 17
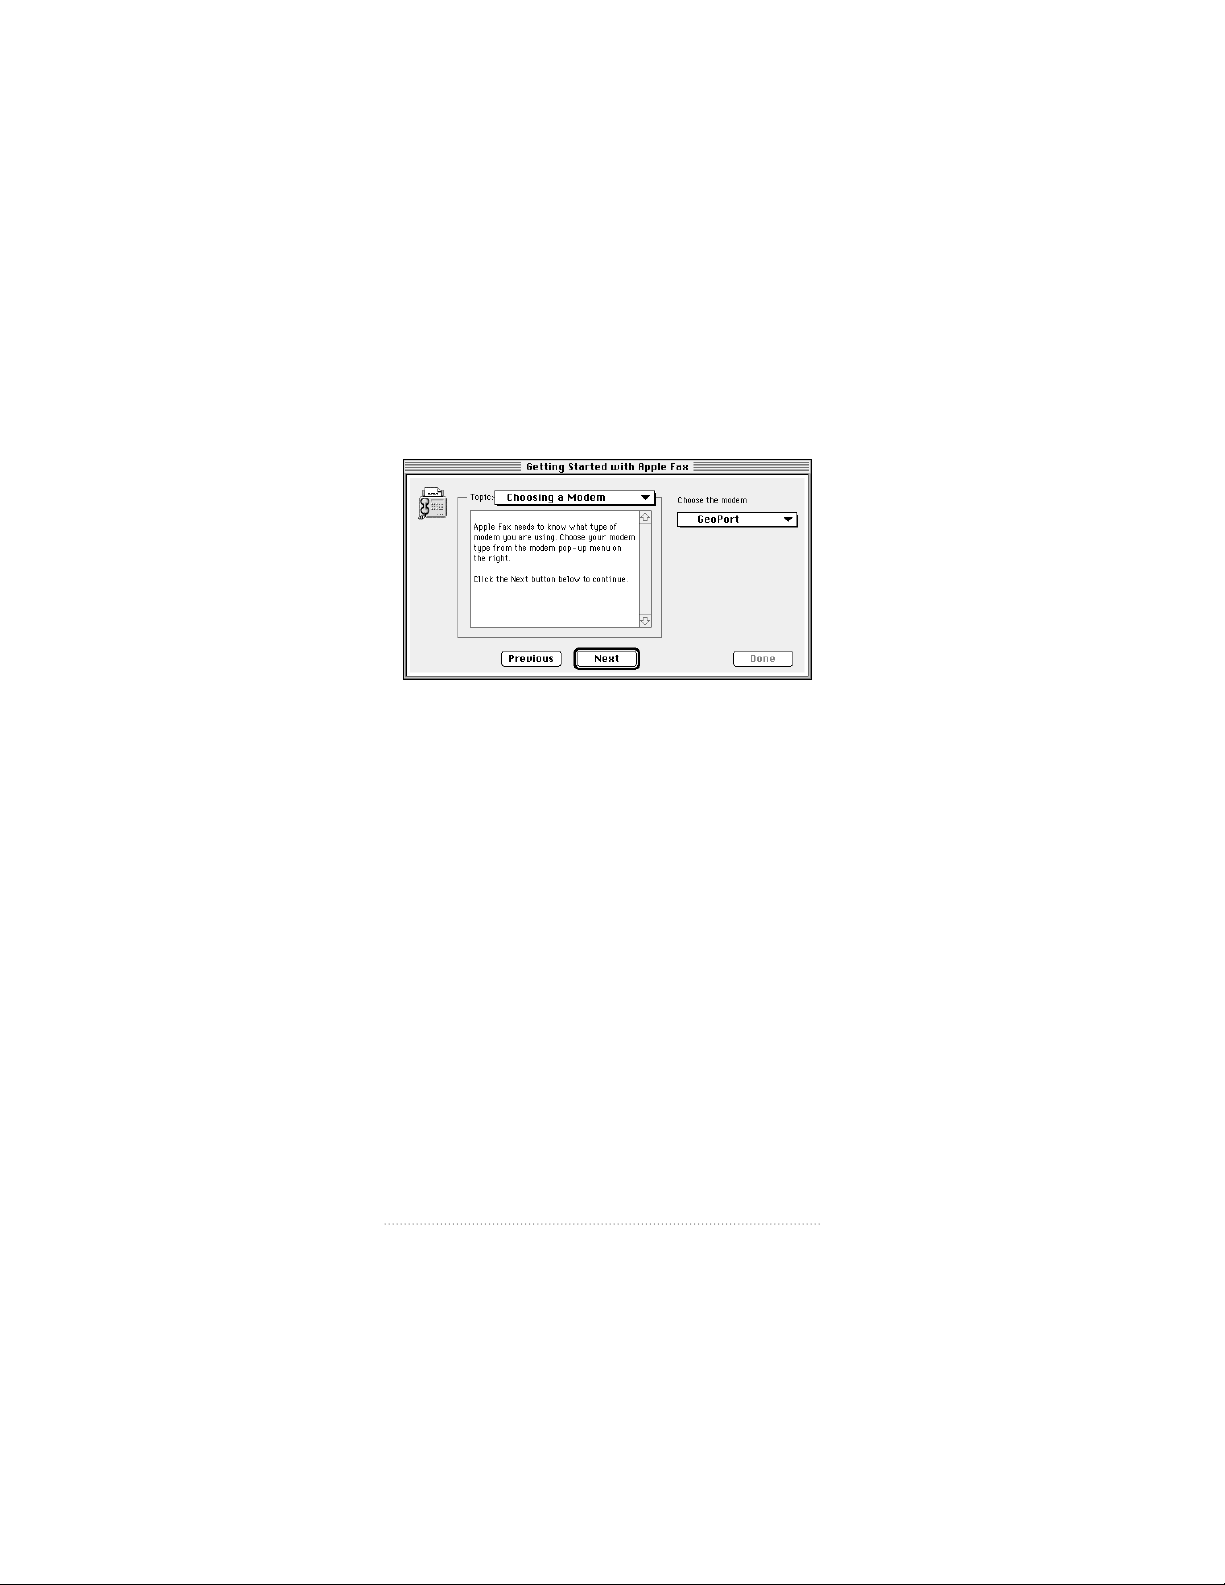
3 Read the introductory text, then click Next or select
“Choosing a Modem” from the Topics pop-up menu.
The “Choosing a Modem” panel appears
4 Choose your modem type from the modem pop-up menu,
then click Next.
Important If you choose a modem type that attaches to an
external serial port or PC card slot, be sure to set the port or
slot correctly in the control panel provided with your
modem (the Apple Serial Modem control panel, for
example). Unless the port is set correctly, Apple Fax will not
be able to communicate with your modem.
If you have an internal modem or a GeoPort Telecom
Adapter, there is no choice to make.
4
Chapter 1
Page 18

The “Changing your settings” panel appears.
5 The descriptive text explains how to change these and other
settings. Read it, then click Done to confirm your settings
and close the setup window.
These are the basic settings that you must make before you
can use Apple Fax to send and receive faxes.
See also: Chapter 8, “Apple Fax Preferences” for a complete
explanation of these and other preference options.
Apple Fax Quick Start
5
Page 19

Choosing Fax Sender or Fax Sender GX
Before sending your fax, you need to choose either Fax
Sender or Fax Sender GX, depending on your configuration,
to image and transmit your fax. Choosing Fax Sender or Fax
Sender GX is like choosing a printer.
1 Open the Chooser from the Apple (K) menu.
The Chooser appears.
2 From the panel on the left, select Fax Sender GX if you have
QuickDraw GX installed as part of your system. Otherwise,
select Fax Sender.
3 If you selected Fax Sender GX in step 2, click Create. This
creates a desktop printer icon for Fax Sender GX. You can
send documents as faxes by dragging and dropping them on
this icon.
See also: Chapter 4, “Fax Send Advanced Options” for a
complete explanation of this feature.
6
Chapter 1
Page 20

4 Close the Chooser. Fax Sender or Fax Sender GX is now
selected so that you can use the Print command to send
faxes.
Important As an alternative to the above method of
selecting Fax Sender, hold down the Control and Shift keys
while choosing Print from the File menu. This shortcut does
not deselect your regular printer; you return automatically to
your previous printer settings for printing after the fax is
sent. This shortcut works with Fax Sender in conjunction
with all other programs. It does not work for Fax Sender GX;
for Fax Sender GX, create a desktop printer icon instead.
5 Return to SimpleText to send the document“My First Fax”.
Addressing your fax
You can send a fax to one or more recipients. Using the
Apple Address Book program, you can create entries for
individuals, companies and groups. For example, if you have
a group of colleagues to whom you regularly send the same
faxes, you can create a distribution list (a group of individual
and company entries) and send a fax to everyone in the list
in a single step.
See also: Chapter 4, “Fax Send Advanced Options” and the
Apple Address Book User’s Guide for a complete explanation
of recipients, distribution lists, and interaction between
Apple Fax and the Apple Address Book.
Apple Fax Quick Start
7
Page 21

You can also send a fax to a recipient who does not have an
address book entry simply by typing the fax number into the
“Other Recipient Number” field of the Fax Sender print
dialog box. This is the method used in this example.
1 Choose Print from your program’s File menu.
The Fax Sender or Fax Sender GX print dialog box appears.
Both dialogs are shown below. If you are using Fax Sender,
skip ahead to step 3.
The Fax Sender print dialog box
The Fax Sender GX print dialog box
8
Chapter 1
Page 22

2 Make sure that Fax Sender GX is shown in the “Print To”
pop-up menu. If not, select it from the pop-up menu. For
now, just accept the default settings and click Fax.
The Fax Sender print dialog box appears.
See also: “Sending faxes using Fax Sender GX” in Chapter 3,
“Fax Send Advanced Options” for a complete explanation of
Page Setup and Print dialog box options.
3 Type the fax number of your recipient into the “Other
Recipient Number” field.
Cover page information
If you wish, you can include a cover page for your fax.
Several sample cover pages are automatically installed for
you when you install Apple Fax. You can create and install
your own customized cover pages if you wish. The cover
page information for the recipient is filled in automatically
from the recipient entries in the Apple Address Book.
Information about you, the sender, is filled in from the Apple
Fax Personal preferences.
See also: Chapter 3, “Fax Send Advanced Options” and
Chapter 6, “Creating and Managing Cover Pages” for a
complete explanation of cover page options and Chapter 8,
“Apple Fax Preferences” for an explanation of how to enter
the information about yourself.
1 If you want a cover page, select a cover page from the Cover
Page pop-up menu.
2 If you wish to include a note on the cover page, enter its
text in the Cover Page note field.
Cover pages may include a Note field for a brief (up to 255
characters), descriptive note about the contents of the fax.
Apple Fax Quick Start
9
Page 23

Previewing your fax
Before sending, you can preview your fax as it will appear on
your recipient’s fax machine.
1 Click the Preview button in the Fax Sender print dialog box.
You can preview your fax, move through the pages, and
change the scale according to your wishes.
See also: “Preview options” in Chapter 3, “Fax Send
Advanced Options” for more information on fax preview
options.
10
Chapter 1
Page 24

Sending your fax
You can send your fax from the preview dialog box or from
the Fax Sender print dialog box.
1 Click Send in either the preview dialog box or the Fax
Sender print dialog box.
Your fax, including the cover page, if any, is imaged. Then,
the recipient’s number is dialed and your fax is transmitted
when the remote fax machine answers.
Monitoring the status of your fax
Once you have have initiated the sending of your fax, you
can monitor its progress.
Apple Fax status information
Status information about sent faxes is given in Outgoing
view.
1 Click the Outgoing button in the main window to display
Outgoing view.
Apple Fax Quick Start
11
Page 25

You should see the fax you just sent at the top of the list.
(Faxes are normally displayed most recent first. You can
choose to display them according to other criteria, if you
like. See “Sorting faxes that have been sent” in Chapter 2.)
You can view its status in the Status column on the right side
of the window. The status is shown as either Sent or Failed
upon completion.
Apple Telecom Status program
If you wish to monitor the status of the modem in more
detail as it sends your fax, you can do so by opening and
viewing the Apple Telecom Status program.
1 Click the Telecom Status icon in the button bar in the Apple
Fax main window.
Telecom Status
The Apple Telecom Status program appears.
The information about your fax transmission is updated at
each stage of the process. The Apple Telecom Status
program and Apple Fax are designed to work together. You
can keep both of them open at the same time if you like.
12
Chapter 1
Page 26

Fax log information
You can access detailed information about sent and received
faxes using the fax log. Information about each transmission
or reception is stored in the fax log file.
To view the log information once your fax has been sent
1 Click the Log icon in the button bar in the Apple Fax
window.
Apple Fax log
The fax log appears.
The information for the fax you just sent appears at the top
of the list.
See also: Chapter 7, “Using the Apple Fax Log” for more
information on the log, and “Log preferences” in Chapter 8,
“Apple Fax Preferences” for more information on fax log
preference options.
Apple Fax Quick Start
13
Page 27

Receiving a fax
You can receive, view, edit, and print faxes using Apple Fax.
This section explains how to set your environment up for
receiving, how to check for received faxes, and how to open
and print a received fax.
Preparing to receive faxes
In order to receive a fax, you must either set Apple Fax and
your modem to answer incoming calls automatically (autoanswer) or carry out the steps to receive a fax manually. This
section explains how to receive faxes automatically, as this is
by far the most common method.
To have incoming fax calls answered automatically
1 Click the Incoming button to display Incoming view.
2 Set the Fax Answering button to on.
Incoming fax calls will now be handled automatically by
Apple Fax. Reception happens in the background, so the
Apple Fax window does not have to be in front, or even
open, in order to receive a fax.
14
Chapter 1
Page 28
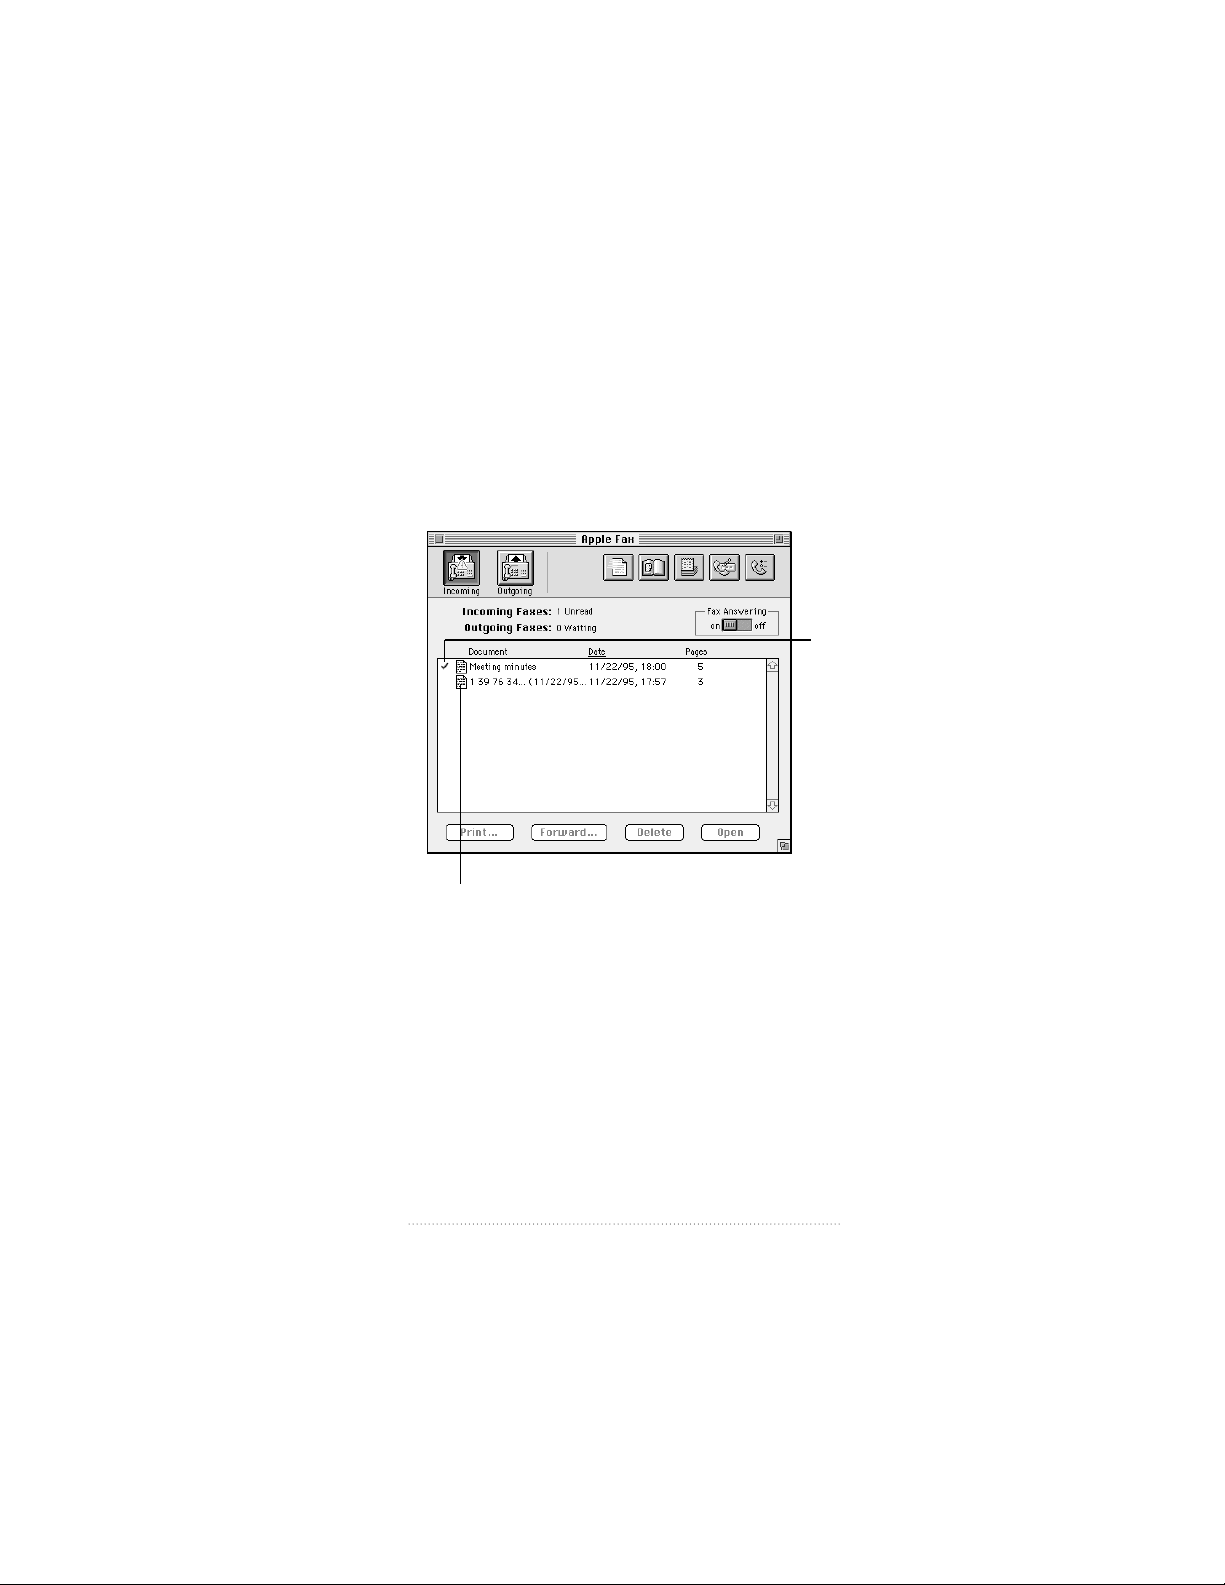
Checking for received faxes
When you look at Incoming view, received faxes are
displayed in the order in which they were received, with the
most recent at the top of the list. Faxes with a checkmark to
the left of their name have been read; those with no
checkmark are unread.
Read
Unread
Viewing and printing a fax
The Apple Fax main window is for managing sent and
received faxes. To view, edit, or print a received fax, open it
in a fax view window.
Apple Fax Quick Start
15
Page 29

Opening a fax for viewing
To open and view a received (or sent) fax
1 Select the fax you want to read from the list of received (or
sent) faxes.
2 Click Open.
You can also double-click the icon of the fax you want to
view.
The fax appears in a fax view window.
See also: Chapter 5, “Viewing, Editing, and Printing Faxes”
for a complete explanation of fax view windows and options.
Printing a fax
You can print a fax from the fax view window.
To print a fax that you have opened in a fax view window
1 Make sure that you have selected a printer in the Chooser
(not Fax Sender or Fax Sender GX).
2 Select Print from the File menu.
16
Chapter 1
Page 30

Quick Fax
In many cases you may want to send a quick note or memo,
essentially a cover sheet with some additional information in
the Note field. Quick Fax allows you to send a fax of this type
without preparing a document beforehand in a program
such as a word processor.
You can also add other documents as enclosures and send
them with your Quick Fax without opening the program that
created them (although it must be installed on your hard
disk). Sending a Quick Fax with an enclosure is the fastest
way to send a document when the program that created it is
not open.
Both of these types of Quick Fax are explained in the
following sections.
Sending a single sheet Quick Fax
To send a single sheet Quick Fax
1 Click the Quick Fax button in the Apple Fax window. (Quick
Fax is available in both the Outgoing and Incoming views.)
Quick Fax
Apple Fax Quick Start
17
Page 31

The Quick Fax window appears.
2 Enter the text you want to appear in the Subject field of the
cover page.
The Subject text you enter is also used to identify the fax in
Outgoing view in the Apple Fax main window.
3 Select the cover page you want to use for your Quick Fax
from the Cover Page pop-up menu.
4 Enter the fax number of your recipient in the “Other
recipient number” field if you don’t have an address book
entry for your recipient.
Addressing a Quick Fax to one or more recipients for whom
you have address book entries is discussed later in the
section “Addressing a Quick Fax”.
5 Enter the note or memo text that you want to appear in the
Note field of the cover page in the text field.
6 Click Send.
These are the only steps you need in order to send a single
sheet Quick Fax with your text in the Note field.
18
Chapter 1
Page 32

Adding enclosures
You can add documents created by a program such as a
word processor or paint program as enclosures to a Quick
Fax. When you enclose a document in a Quick Fax, Apple
Fax tells the program that created it to open it and print (fax)
it during the send process. You must have the program
installed on your hard disk in order to send its documents as
enclosures.
Quick Fax enclosures work with any program that supports
printing through the Print Apple Event. Most programs that
print support the Print Apple Event.
To add one or more enclosures to a Quick Fax
1 Click the Enclosures button in the Quick Fax window.
The file selection dialog box appears.
2 Navigate to the folder that contains the document you want
to enclose, if necessary.
3 Double-click the file that you want to enclose, or select it,
then click Add.
Apple Fax Quick Start
19
Page 33

You can repeat these steps for as many enclosures as you
wish. Each time you add a file, its name appears in the
enclosures list. To remove a file from the list, select it, then
click Remove.
The Quick Fax file selection dialog box supports Drag and
Drop. You can drag files from the Finder into the “Files to
add” field as an alternative to steps two and three.
4 When you have finished adding enclosures, click Done.
Addressing a Quick Fax
If you want to send a Quick Fax to a recipient or list of
recipients for whom you already have entries in your address
book, you can choose them from the recipients dialog box
instead of typing a number into the “Other recipient
number” field.
To address a Quick Fax to recipients from one or more
address books
1 Click the Recipients button in the Quick Fax window.
The Address Book dialog box appears.
Click here to
select another
address book.
2 If necessary, select the address book you want to use by
clicking the icon and choosing from the list of registered
address books.
20
Chapter 1
Page 34

3 For each recipient, select the corresponding entry in the
scrolling list, then click To.
4 When you have added all recipients to the list, click Done.
You can add new entries to the current address book by
clicking New; you can edit an existing entry by selecting it
and clicking Edit.
See also: Apple Address Book User’s Guide for a complete
explanation of creating, editing, and managing address
books.
Apple Fax Quick Start
21
Page 35

Page 36

CHAPTER
2
Apple Fax Main Window
In this chapter
This chapter covers the Apple Fax main window, which serves
as a central location for displaying information about faxes you
send and receive, managing faxes, and accessing frequently
used features of Apple Fax and related programs.
m Apple Fax main window
m Outgoing fax view
m Incoming fax view
m Managing faxes
m Using the button bar to access features of the Apple Fax
program and related programs
23
Page 37

Accessing Apple Fax
When you install the Apple Telecom software, the Installer
places Apple Fax in Fax Folder in the Telecom Applications
folder on your hard disk. You can start Apple Fax by doubleclicking its icon.
Apple Fax is also available from the Apple Telecom Status
program. For your convenience, Apple Telecom Status is
installed in the Apple (K) menu.
To access Apple Fax
1 Choose Apple Telecom Status from the Apple (K) menu.
2 Click the fax machine icon or choose Open Apple Fax from
the File menu.
Apple Fax main window
The Apple Fax main window presents two different views—
Outgoing and Incoming. You can switch between them by
clicking the Outgoing and Incoming buttons in the main
window. Depending on the view you choose, the buttons
and options available in the main window change. In either
view information about sent or received faxes is displayed.
The following sections cover both views, first Outgoing, then
Incoming.
You can resize the main window in the vertical direction, by
dragging the grow box in the lower right corner. Clicking the
zoom box in the upper right corner toggles the window size
between full screen and the smallest size you have used.
Clicking the close box in the upper left corner closes Apple
Fax main window. You can reopen it by selecting Apple Fax
from the Windows menu.
24
Chapter 2
Page 38

Outgoing view
Outgoing view shows you information about faxes you have
sent or those waiting to be sent. You can also access
information of about the recipient or recipients of any fax.
Understanding the display information
Faxes that have been sent or are waiting to be sent are
shown in the order that they were sent or are scheduled to
be sent, with the most recent first. You can view them in
reverse order, oldest first, if you wish. See “Sorting faxes that
have been sent” later in this chapter.
Apple Fax shows you the name, date and time, number of
pages, and status of each fax. The name, which you can edit
if you like, is the name of the document as it was sent with
Fax Sender or Fax Sender GX, or the text you entered in the
Subject field of a Quick Fax.
Apple Fax Main Window
25
Page 39

The status of a fax is Sent for a fax that has been sent
successfully, Deferred for a fax that is waiting to be sent at a
later time, or Failed, if the fax could not be sent for some
reason. For a Failed fax, Apple Fax shows you the number of
recipients to whom the fax could not be sent. For example,
Apple Fax shows a status of “1 of 3 failed” for a fax that you
sent to three recipients and was sent successfully to two of
them. In addition, the icon at the far left of the display is
different depending on the status.
Deferred fax
Failed fax
Successfully
sent fax
26
Chapter 2
Page 40

Viewing recipient information
In order to keep the status information from becoming
cluttered, information about the recipient or recipients is
hidden by default and shown only when you specifically
choose to do so.
To display recipient information about a fax in the list
1 Click on the small triangle to the left of the fax icon.
The recipient list for the fax opens and each recipient or
group of recipients to whom the fax was addressed is shown.
Apple Fax shows the name, fax number, and status for each
recipient on a separate line.
2 For a recipient that is a distribution list entry, click on the
small triangle to the left of the name to display each
recipient in the group individually.
3 To get more information about a recipient, double-click the
recipient, or select the recipient, then choose Recipient Info
from the Fax menu or click the Open button.
Apple Fax Main Window
27
Page 41

A recipient Info window appears.
For a fax that is waiting to be sent, you can edit the fax
number or the send time. You cannot change this
information for faxes that have already been sent.
Deleting a fax that has been sent
Fax documents that you send and receive are saved in a
special fax image format. You can keep as many sent and
received fax documents as you have disk space to hold.
However, you might want to delete faxes that you no
longer need.
To delete faxes from the list
1 Select the faxes you want to delete. You can select multiple
faxes by shift-clicking (hold down the Shift key as you click).
2 Click Delete.
A dialog box asks you to confirm.
3 Click OK.
The selected faxes are deleted. You can also delete a fax by
dragging it from the main window to the trash.
28
Chapter 2
Page 42

Sorting faxes that have been sent
You can sort the list of sent faxes by document name, date,
number of pages, or status. Date is the default sort criterion
and it is the one that you will likely use most of the time.
To choose a sort criterion
1 Click on a column name (Document, Date, Pages, or Status)
to sort the list by that criterion. To sort in reverse order,
from the end of the alphabet or oldest fax, for example,
option-click the appropriate column.
Readdress, Resend, and Merge
In Outgoing fax view, the button next to the Print button is
named Readdress, Resend, or Merge, depending on the
faxes selected from the list.
If you select a fax that is waiting to be sent, the button is
named Readdress. It lets you modify the recipient list for the
waiting fax before it is sent.
If you select a fax that has already been sent, the button is
named Resend. It lets you resend the fax to the same or
different recipients.
Apple Fax Main Window
29
Page 43

If you select multiple faxes, the button is named Merge. It
lets you combine several faxes into a single fax and send the
combined document to one or more recipients.
When you select one or more faxes and click Resend,
Readdress, or Merge, a window similar to the Quick Fax
window appears.
You can fill in or change the various options and then click
Resend, Readdress, or Merge.
30
Chapter 2
Page 44

Opening and viewing a fax that has been sent
You can open a sent fax into a fax view window for editing or
printing by selecting it and clicking Open or by
double-clicking it.
See also: Chapter 5, “Viewing, Editing, and Printing Faxes”
for more information.
Apple Fax Main Window
31
Page 45

Incoming view
Incoming view shows you information about faxes that you
have received.
Understanding the display information
Received faxes are shown in the order that they were
received, most recent first. You can view them in reverse
order, oldest first, if you wish. Apple Fax shows you the
document name, the date and time of reception, and the
number of pages for each received fax. Apple Fax names
received faxes using the sender information (provided by the
sending machine, also called station ID by some fax
machines) and the date.
32
Chapter 2
Page 46

Editing the name of a received fax
You can edit the name of a received fax by selecting the text
you want to edit and then typing the new information. Since
the sender information is often a phone number, this allows
you to change it to something more easily identifiable.
Sorting faxes that have been received
You can sort the list of received faxes by document name,
date received, or number of pages. Date is the default sort
criterion and it is the one that you will likely use most of
the time.
To choose a sort criterion
1 Click on a column name (Document, Date, or Pages) to sort
the list by that criterion. To sort in reverse order, optionclick the appropriate column.
Forwarding a fax that has been received
You can forward a fax that you have received by selecting it
and clicking Forward. The Forward button functions in a
similar manner to the Readdress, Resend, and Merge buttons
discussed in the section on Outgoing fax view.
To forward a fax
1 Select the fax you want to forward, then click Forward.
Apple Fax Main Window
33
Page 47

The Forward Fax window appears.
2 Enter the information you want, then click Forward.
Deleting a fax that has been received
Deleting received faxes works in the same way as deleting
sent faxes.
To delete faxes from the list
1 Select the faxes you want to delete. You can select multiple
faxes by shift-clicking (hold down the Shift key as you click).
2 Click Delete.
A dialog box asks you to confirm.
3 Click OK.
The selected faxes are deleted. You can also delete a fax by
dragging it from the main window to the trash.
34
Chapter 2
Page 48

Opening and viewing a fax that has been received
You can open a received fax into a fax view window for
editing or printing by selecting it and clicking Open or by
double-clicking it.
See also: Chapter 5, “Viewing, Editing, and Printing Faxes”
for more information.
Apple Fax Main Window
35
Page 49

Using the button bar
The Apple Fax main window contains a button bar that lets
you navigate easily to other parts of the program and links
Apple Fax to closely related programs, such as Apple Address
Book and Apple Telecom Status. It gives you a visual
reminder of several key fax-related functions and makes
them quickly accessible.
Apple Address Book
Telecom Status
Quick Fax
Apple Fax log
Each of the buttons in the button bar is explained in the
following sections.
36
Preferences
Chapter 2
Page 50

Quick Fax
The Quick Fax button opens the Quick Fax window.
See also: Chapter 1, “Apple Fax Quick Start” for a
step-by-step tutorial on sending a Quick Fax, with or without
enclosures.
Apple Fax Main Window
37
Page 51

Address Book
The Address Book button in the button bar opens the
Apple Address Book program, if it is not already open, and
brings it to the front. The Apple Address Book program
allows you to create entries for individuals, companies, and
distribution lists. It stores all of the necessary address,
phone, and fax information about them in a single place that
can be accessed by several different programs, including
Apple Fax.
See the Apple Address Book User’s Guide for a complete
explanation of all of the Address Book editing and
management options.
38
Chapter 2
Page 52

Log
The Log button lets you access the Apple Fax log. All
outgoing and incoming fax transmissions have entries in
the fax log.
See also: Chapter 7, “Apple Fax Log” for a complete
explanation of fax log options, and “Log preferences” in
Chapter 8, “Apple Fax Preferences” for more information on
setting log preferences.
Apple Fax Main Window
39
Page 53

Apple Telecom Status
The Apple Telecom Status button in the button bar opens
the Apple Telecom Status program, if it is not already open,
and brings it to the front. It gives detailed status information
about modem activity, which is updated continuously
according to the action in progress.
Shows Current status
Cancels
current activity
Opens Apple Phone Opens Apple Fax
Apple Telecom Status is a separate program. It is not part of
Apple Fax. You can leave it open even when the Apple Fax
main window is not open. This can save screen space; the
Apple Telecom Status program lets you check on fax activity,
so that you only open the Apple Fax main window when
needed. You can use Apple Telecom Status to open Apple
Fax or Apple Phone, or to cancel the current activity.
The Apple Telecom Status window can be shown in
expanded or collapsed view. To expand or collapse it, click
the zoom box in the upper right corner.
40
Chapter 2
Page 54

Preferences
The Preferences button lets you access the Preferences
window. You can use the preference settings to configure
Apple Fax for your particular environment and preferred way
of working.
See also: Chapter 8, “Apple Fax Preferences” for more
information on setting preferences.
Apple Fax Main Window
41
Page 55

Page 56

Part II
Page 57

Page 58

CHAPTER
3
Fax Send Advanced Options
In this chapter
Apple Fax contains many advanced features for sending faxes
using Fax Sender and Fax Sender GX. These features are
covered in this chapter, including
m sending faxes using Fax Sender
m sending faxes using Fax Sender GX
m recipients and recipient lists
45
Page 59

Sending faxes using Fax Sender
You can send any document that can be printed as a fax
using either Fax Sender or Fax Sender GX, depending on
your system configuration. If you have QuickDraw GX
installed as part of your system, you will send faxes using Fax
Sender GX, which is covered later in this chapter. Otherwise,
you will use Fax Sender, which is covered in this section. Fax
Sender and Fax Sender GX are system software that allow
you to send faxes, in the same way that you print
documents, from any program that supports printing.
Choosing Fax Sender
Before sending a fax using Fax Sender, you need to select
Fax Sender to image your document, just as you would a
printer. There are two ways to select Fax Sender.
To select Fax Sender temporarily (just for imaging and
transmitting the current document) without changing
anything in the Chooser
1 Hold down the Control and Shift keys while choosing Page
Setup or Print from the File menu of your program.
The Fax Sender page setup or print dialog box appears.
When you finish sending your fax, the printer or other
device that was previously selected in the Chooser remains
selected and will be used for subsequent printing.
Important This shortcut works only with Fax Sender. It
does not work with Fax Sender GX; to use Fax Sender GX,
create a desktop printer icon instead.
46
Chapter 3
Page 60

You can also make Fax Sender the selected output device,
just as you might select a printer. When Fax Sender is the
selected output device, each time you print from a program
or from the system your document is sent as a fax instead of
being printed.
To make Fax Sender the selected output device
1 Open the Chooser from the Apple (K) menu.
The Chooser appears.
2 Select Fax Sender from the upper left panel.
3 Close the Chooser.
Fax Sender remains selected until you choose another
device in the Chooser.
Note: If you plan to print to a printer and only occasionally
send faxes, you should leave your printer selected in the
Chooser and use the Control-Shift shortcut for selecting Fax
Sender when you want to send a fax.
Fax Send Advanced Options
47
Page 61

Fax Sender Page Setup
You select the options that are specific to imaging your
document as a fax, such as page size, orientation, and
quality, from the Fax Sender Page Setup dialog box.
To access the Fax Sender Page Setup dialog box
1 Make sure that Fax Sender is selected in the Chooser.
2 Select Page Setup from the File menu of your program.
As a shortcut for steps 1 and 2, hold down the Control and
Shift keys while choosing Page Setup from the File menu.
The Fax Sender Page Setup dialog box appears.
The page setup options are explained in Table 3-1.
48
Chapter 3
Page 62

Table 3-1 Fax Sender Page Setup options
OPTION RESULT
Orientation
Portrait Transmits the fax vertically.
Landscape Transmits the fax horizontally.
Reduce or Enlarge Reduces or enlarges the fax by the
percentage you indicate.
Image Quality
Fine Highest image quality, but longest to
send.
Standard Normal image quality. Fastest to send.
Bitmap Alignment Scales the Macintosh 72 dpi image so
that every pixel is matched evenly to
the fax machine resolution. Produces
the best quality image for bitmapped
documents, but enlarges the printed
image to 108% of actual size.
Fax Send Advanced Options
49
Page 63

Entering cover page information
You can include information about yourself, the sender,
along with the recipient information on the cover pages of
the faxes that you send. This information can include your
name, address, voice and fax numbers, fax header, subject,
and a text note for your fax. The fax header information,
sometimes referred to as the station ID, can be up to 20
characters long. It appears on each page of the faxes that you
send to fax machines or fax modems that support this
feature.
The information about you for cover pages is entered and
managed in the Apple Fax Personal preferences.
To enter cover page information
1 Choose Preferences from the Edit menu or the Windows
menu or click the Preferences button in the button bar.
The Preferences window appears.
2 Click Personal in the panel on the left to select the Personal
preferences.
The Personal preferences panel appears.
50
Chapter 3
Page 64

3 Enter the information about yourself as you would like it to
appear on the cover page of faxes you send.
4 Click OK to confirm your settings and close the Preferences
window.
The information that you enter here is automatically filled in
by Fax Sender or Fax Sender GX when you send faxes that
have cover pages.
Note: If you have already entered your personal information
into the Personal preferences of Apple Address Book, you do
not need to reenter it in the Apple Fax Personal preferences.
Apple Fax will use the information from the Apple Address
Book preferences. When you change the information in one
place, it is updated in the other.
Fax Send Advanced Options
51
Page 65

Selecting a cover page
You can choose a cover page to be sent with your fax, or you
can choose to have no cover page. Several sample cover
pages are provided for you; they are installed when you
install the Apple Fax program. In addition, you can create
and install as many customized cover pages as you like.
See also: Chapter 6, “Creating and Managing Cover Pages”
for a complete explanation of creating and managing cover
pages.
You can select a cover page from the Fax Sender dialog box
or Quick Fax window that appears whenever you send,
readdress, resend, merge, or forward fax documents.
Choose cover page
from this pop-up menu
To select a cover page for a fax document from the
Fax Sender dialog box or Quick Fax window
1 Select the cover page (or None, if you don’t want any cover
page) from the Cover Page pop-up menu.
All installed cover pages appear in the pop-up menu.
52
Chapter 3
Page 66

Preview options
You can preview any fax or Quick Fax document to see how
it will appear to the recipient when you send it.
To preview a fax from the Fax Sender dialog box or Quick
Fax window
1 Click Preview.
Your fax is imaged and displayed as it will appear when you
send it.
2 Use the scroll bar to navigate from page to page.
Fax Send Advanced Options
53
Page 67

3 Use the Scale icons in the lower left corner to set the
display size.
4 When you have finished previewing your fax, click Send to
send it as it is, or click Cancel.
Important If you click Cancel from a Quick Fax preview,
you return to the Quick Fax window. If you click Cancel from
a Fax Sender preview, you return to the program that
created the document you were previewing. You do not
return to the Fax Sender print dialog box.
Fax Sender Options
If you want to send your fax at a later time, you can set the
send time in the Fax Sender Options dialog box.
Setting send time
Fax Sender can send your fax immediately or at a later time
and date you specify. Send Immediately is the default since
you will probably most often want to send faxes immediately
once they are prepared and addressed. However, you may
want to set a specific send time if your recipient is in another
time zone or if you want to take advantage of reduced
long-distance toll charges during certain hours.
54
Chapter 3
Page 68

To set the send time for a fax from the Fax Sender dialog box
or Quick Fax window
1 Click Options.
The Options dialog box appears.
2 Click the Send At radio button.
3 Set the time and date you want by selecting what you want
to change and using the up and down arrows.
The time and date you set must be later than the current
time and date.
4 Click OK.
The Options dialog box closes and you return to the Fax
Sender dialog box or Quick Fax window.
5 Click Send.
Your fax is imaged when you click Send and placed into the
Waiting to be Sent folder. You can see in the main window
Outgoing fax view that your fax has a status of Deferred. At
the time you selected, the modem dials your recipient and
transmits your fax.
Important Your computer must be on at the
specified time.
Fax Send Advanced Options
55
Page 69

Setting your location
Apple Fax uses the Location preferences settings in Apple
Address Book to take into account where you are “dialing
from” when you make an outgoing call.
Let’s assume, for example, that you are sending a fax to a
number in New York City that is stored in your address book
as 1-212-324-1005. If you set your location to New York,
Apple Fax knows that the “1” and the “212” area code are
unnecessary and dials only the local number (324-1005). If
you are in New Orleans, Apple Fax dials “1”, then the “212”
area code for New York, then the local number. By the same
token, if you store a number in Paris as 33-1-45 75 09 85, this
entire number is dialed when your location is set to New
York. But, if you are in Paris (and set your location to Paris in
the address book), Apple Fax dials only the local number
(45 75 09 85).
The location feature lets you keep all necessary information
for each entry in your address book and uses intelligence
about your current location to dial only the numbers
necessary for a given call.
You could also create a location that has a special prefix,
such as 0 or 9, to get an outside line from an office.
You set your location in the Apple Address Book
Preferences. Apple Fax only uses the information
stored there.
56
Chapter 3
Page 70

To set your location
1 Click the Address Book button to open Apple Address Book.
Address Book
2 Choose Preferences from the Edit menu.
3 Click Locations to display the Locations panel.
4 Enter the desired location information.
5 Select your current location, then click Current.
6 Click OK to confirm your settings.
You need to remember to change the location when you
move from place to place in order to take advantage of
intelligent dialing.
Numbers that you type into the Other Recipient Number
field are dialed exactly as you enter them, regardless of the
location setting.
Important Changing your location for intelligent dialing
purposes does not change the settings or capabilities of your
modem. The country configuration of your modem is
dependent on the hardware, not on your location setting.
See also: Apple Address Book User’s Guide for more
information about setting the Location preferences.
Fax Send Advanced Options
57
Page 71

Using manual dialing
Apple Fax can send faxes using either automatic or manual
dialing. Most dedicated fax machines use automatic dialing.
This is the default method, since it is the setting you will
probably use most of the time. Automatic dialing offers the
convenience of using Apple Address Book and all of the
recipient and distribution list features of Apple Fax. When
you use manual dialing, you dial your recipient’s fax number
yourself using your handset.
You set the default dialing method in the Personal
preferences.
See also: Chapter 8, “Apple Fax Preferences” for a
description of how to set the Personal preferences.
Note: Manual dialing may not be available in certain
hardware configurations and in certain countries. To send a
fax using manual dial
1 Make sure that you have chosen Manual as the default
dialing method in the Personal Preferences.
2 Choose Print from the File menu.
The Fax Sender dialog box appears.
58
Chapter 3
Page 72

3 Choose a recipient or type a number in the “Other Recipient
Number” field.
4 Click Send.
After Fax Sender has prepared your fax for sending, a beep
and a blinking icon notifies you that your fax can now be
sent by dialing manually.
5 Select Apple Telecom Status from the Application menu.
The Manual Dial dialog box appears.
6 Follow the instructions in the Manual Dial dialog box.
m Dial your recipient’s fax number from your handset.
m Click Send when you hear your recipient’s fax tone.
Fax Send Advanced Options
59
Page 73

Sending faxes using Fax Sender GX
Choosing Fax Sender GX
1 Select Chooser from the Apple (K) menu.
The Chooser dialog appears.
2 Scroll, if necessary, in the upper left panel until Fax Sender
GX is visible.
3 Click the Fax Sender GX icon to select it.
4 Click the Create button in the lower right corner.
This creates a desktop printer icon for Fax Sender GX. Using
desktop printer icons for drag-and-drop printing is discussed
later in this chapter.
5 Click the close box in the upper left corner to close
the Chooser.
Documents printed by programs will now be sent as faxes by
Fax Sender GX.
60
Chapter 3
Page 74

Fax Sender GX Page Setup
Before sending your document, you need to select the
appropriate Page Setup options.
1 Select Page Setup from the File menu.
The Fax Sender GX Page Setup dialog box appears.
2 To see more options, click More Choices.
3 Select the Paper Type, Orientation, and Scale settings you
want. Be sure that Fax Sender GX is selected in the “Format
for” pop-up menu.
4 Click Format.
Fax Send Advanced Options
61
Page 75

Print dialog box options
You are now ready to send your fax.
1 Select Print from the File menu.
The Fax Sender GX print dialog box appears.
2 To see more options, click More Choices.
3 Select the General print icon in the upper left corner if it is
not already selected.
4 Be sure that Fax Sender GX is selected in the “Print to” pop-
up menu.
62
Chapter 3
Page 76

5 Select the fax quality (Fine, Standard, or Bitmap Alignment)
you want from the Quality pop-up menu.
See also: “Fax Sender Page Setup” earlier in this chapter for
an explanation of the quality settings.
6 Click Fax.
Fax Sender GX images your fax. When imaging is complete,
the Fax Sender print dialog box appears.
You still need to set the transmission options, such as the
recipient’s fax number and cover information.
Addressing your fax
1 Choose recipients, fill in cover information, and select
transmission time, if you want to send your fax at a later
time.
2 Once you have addressed your fax, Click Send.
If you have selected Send Immediately (the default setting)
in the Fax Sender Options dialog box, your modem dials and
transmits your fax.
Fax Send Advanced Options
63
Page 77

Print time and send time
QuickDraw GX allows you to set the print time by selecting
the Print Time panel in the Print dialog box. This feature is
more useful for printing than for faxing, since Fax Sender
already allows you to specify the send time.
The time you set here is the time at which your document is
passed to Fax Sender GX for processing. The send time that
you set in the Fax Sender Options dialog box is the time at
which the modem dials your recipient’s fax number and
transmits your fax over the phone line.
Important If you want to send your fax at a specified time,
you should set the time in the Fax Sender Options dialog
box rather than in the Print dialog box. Leave Print Now set
in the Print Time panel of the print dialog box.
Drag-and-drop fax send
One of the most powerful features of QuickDraw GX is
drag-and-drop printing. You create a desktop printer icon for
a printing device, then simply drag documents and drop
them onto the icon for printing. You can send faxes the
same way using Fax Sender GX.
64
Chapter 3
Page 78

If you followed the steps at the beginning of this chapter,
you have already created a desktop printer icon for Fax
Sender GX. Once you have created a desktop printer icon
for Fax Sender GX, you can simply drag a document and
drop it onto the Fax Sender GX icon to send the document
as a fax.
Sending a fax is just like printing, except that when you use
drag and drop to send a fax there is one additional
step—addressing your fax. When you drop a document onto
the Fax Sender GX desktop printer icon, the Fax Sender
dialog box appears, so that you can choose your recipient or
recipients just as you would ordinarily.
Using Fax Sender GX on an AppleTalk
network
Using Fax Sender GX, you can set up one machine on an
AppleTalk network to be a central server for sending faxes.
Other users on the network can then send faxes without
having the modem hardware installed in their computers.
In order to do this, the server must have the appropriate
modem hardware installed. Both the server and client
machines must have the Apple Fax software installed.
Sharing a fax server
Once you have created a desktop printer icon for Fax Sender
GX on the server, you can share access to it across the
AppleTalk network just as you might share a hard disk or
CD-ROM drive. See your Macintosh documentation for
details on the sharing process.
Fax Send Advanced Options
65
Page 79

If you are sharing your modem on an AppleTalk network, try
to minimize the time you spend previewing faxes. While you
are previewing, remote Fax Sender GX users are temporarily
blocked.
Sending a fax from a network client
Once a fax send server has been created and shared on your
AppleTalk network, other users on the network can access it
as a client, provided that they have the necessary access
privileges.
When these conditions are met, sending a fax as a network
client is no different from sending a fax from your local
Macintosh. The only exception is that you must select
Servers in the “Connect via” pop-up menu in the
Chooser dialog.
Important When a transmission problem occurs, the error
is reported on the server, that is, the Macintosh that has the
modem hardware installed. Therefore, if you send faxes as a
network client, you should check the fax log of the server
frequently to verify that your faxes have been sent correctly.
66
Chapter 3
Page 80

Recipients and recipient lists
Apple Fax offers a rich variety of features for sending faxes to
individuals and groups. If you frequently send faxes to the
same group of recipients, you can create a distribution list
entry that contains all of the individual or company entries in
the list and send a fax to all of them simply by dragging the
distribution list to the Recipients field of the Fax Sender
print dialog or Quick Fax window. You can also send the
same fax to individuals, companies, and distribution lists in
any combination by dragging their address book entries to
the Recipients field.
To address a fax to a list of individual, company, and
distribution list recipients
1 Prepare to send your fax by clicking the Quick Fax button or
by choosing Print from the File menu of another program.
Fax Sender or Fax Sender GX must be selected in the
Chooser, or you can hold down Control-Shift while choosing
Print if you are using Fax Sender.
Fax Send Advanced Options
67
Page 81

The Fax Sender or Quick Fax print dialog appears.
2 Click the Recipients button.
An Address Book dialog box appears, showing you a
scrolling list of the entries in the current address book.
Individual entry
68
Company entry
Chapter 3
Page 82

3 To choose a different address book, click the icon to the left
of the current address book name.
A file selection dialog box opens showing the last folder
selected.
4 Choose the address book that you want to use if it is shown.
Otherwise, click Browse to locate it in another folder.
5 For each individual, company, or distribution list entry you
want to receive your fax, either drag the entry from the
address book to the Recipients field of the print dialog box,
or select the entry, then click To.
You can also add new entries by clicking New and entering
the information for a new entry, and you can edit an entry by
selecting the entry and clicking Edit. Although the address
book entries are managed by the Apple Address Book
program, changes you make within Apple Fax are reflected
the next time you open the address book with the
Apple Address Book program.
Important Address books may be used by other programs.
Remember that any modification that you make will affect
other programs that share the address book you are editing.
Fax Send Advanced Options
69
Page 83

6 When you have added all of your recipients to the Recipients
field, click Done.
Your fax is now ready to send to each recipient, including all
of the entries that make up a distribution list entry, when
you click Send.
See also: Apple Address Book User’s Guide for a complete
explanation of creating, editing, and managing the address
books that are used by Apple Fax and other programs.
70
Chapter 3
Page 84

CHAPTER
4
Fax Receive Advanced Options
In this chapter
This chapter introduces you to the advanced options for fax
reception, including
m setting up to receive faxes automatically
m checking for received faxes
m receiving a fax manually
m opening a received fax document
m forwarding a received fax to another recipient
Before you begin
This chapter expands on the material presented in Chapter 1,
“Apple Fax Quick Start”, and introduces some additional
options for receiving faxes. In order to understand the
material presented in this chapter, you should already be
familiar with Chapter 1.
71
Page 85

Receiving a fax
Apple Fax allows you to receive faxes automatically or
manually, as well as to view, edit, and print them. You can
also convert a received fax document to text using optical
character recognition (OCR), and forward a received fax to
one or more recipients.
Setting Apple Fax to receive
You will probably most often want to receive faxes
automatically. When set to receive automatically, Apple Fax
functions like a dedicated fax machine as long as your
computer is turned on. You can receive faxes unattended
while you are away from your computer, and you can receive
them in the background while you are doing other work.
The Apple Fax window does not have to be in front, or even
open, in order to receive a fax.
In order to receive a fax automatically, you need to set
Apple Fax to answer incoming calls automatically (Fax
Answering on).
To set Apple Fax to receive faxes automatically
1 Click the Fax Answering button in the main window so that it
moves to the “on” position.
Apple Fax will now receive incoming faxes automatically,
even if the Apple Fax main window is not open or if you quit
the program.
72
Chapter 4
Page 86

Checking for received faxes
You can choose what Apple Fax does when you receive a fax.
According to the choice you make in the Notification
Preferences, Apple Fax can open the Apple Telecom Status
program when you receive a fax.
See also: “Notification preferences” in Chapter 8 for an
explanation of this option.
Even if you choose to have no notification for incoming
faxes, you can easily check to see if any have been received.
To check for received faxes
1 Click the Incoming button in the Apple Fax main window to
display Incoming view.
Received fax indicator
A blinking indicator in the Incoming button tells you that
you have received one or more new faxes.
Fax Receive Advanced Options
73
Page 87

Received faxes are displayed in a scrolling list, sorted
according to the criterion you choose. If you leave the
default, Date, your faxes are displayed in the order they were
received, most recent first. You can easily distinguished new,
unread faxes from faxes you have read because a checkmark
appears to the left of the icon of all faxes that have
been read.
Receiving manually
Apple Fax allows you to receive faxes manually if you need to
do so. Although you will ordinarily want to receive faxes
automatically, there may be circumstances that necessitate
receiving manually, such as if your telephone and computer
share the same line. In that case, you will want to answer
incoming calls yourself using the handset and receive
manually once you determine that the incoming call is a fax.
Manual reception is only available when Fax Answering is set
to off in the main window.
74
Chapter 4
Page 88

To receive a fax manually
1 Make sure that Fax Answering is set to off.
2 Answer the incoming call using the handset.
3 When your correspondent is ready to send you a fax, choose
Receive Manually from the Fax menu.
The Receive Fax dialog box appears.
4 When you hear the fax tone, click Receive.
When reception is complete, the fax appears in the list of
received faxes.
Opening a received fax document
To open a received fax document for viewing, editing, or
printing
1 Make sure you are viewing the main window display in
Incoming fax view (click Incoming, if necessary).
2 Select the fax you want to open from the list, then click
Open; or, double-click the fax you want to view.
The fax opens in a fax view window.
See also: Chapter 5, “Viewing, editing, and printing faxes” for
a complete explanation of all of the features available in fax
view windows.
Fax Receive Advanced Options
75
Page 89

Forwarding received faxes
You can easily forward a fax you have received to one or
more recipients. You can also merge several fax documents
and forward them as a single document. When you forward
faxes, they do not need to be imaged since they are already
in fax format. This makes forwarding a relatively quick
operation, certainly quicker than sending the document
from the program that created it.
To forward a received fax
1 Make sure you are viewing the main window display in
Incoming fax view (click Incoming, if necessary).
2 Select the fax you want to forward from the list, then click
Forward.
The Forward Fax window appears.
The options for forwarding a fax (cover information,
recipients, etc.) are the same as for sending a fax.
76
Chapter 4
Page 90

See also: Chapter 1, “Apple Fax Quick Start” and Chapter 4,
“Fax Send Advanced Options” for a complete explanation of
all of the features related to fax send (and fax forward).
Forwarding multiple faxes using Merge
If you select multiple received faxes in the main window list
by shift-clicking or command-clicking, the Forward button
becomes Merge. Merge works the same in Incoming fax view
as it does in Outgoing fax view. The documents you select
are merged into a single document and are forwarded to the
recipient or recipients you choose. Merge works just the
same as Forward, except that it combines multiple
documents.
Note: Forward and Merge forward the document or
documents you select with their original cover pages as well
as whatever new cover you choose in the Forward Fax or
Merge Fax window. If you want to forward or merge received
faxes without their original covers, remove the cover pages
by cutting or clearing them in a fax view window and saving
the documents before forwarding or merging them.
See also: Chapter 5, “Viewing, Editing, and Printing Faxes”
for an explanation of cutting and clearing pages from a fax.
Fax Receive Advanced Options
77
Page 91

Page 92

CHAPTER
5
Viewing, Editing, and Printing
Faxes
In this chapter
This chapter introduces you to the options for viewing and
editing fax documents that you receive, including
m opening a fax
m viewing a fax
m printing a fax
m editing the pages of a fax
m selecting part of a fax to paste into a graphics document
m converting a fax to PICT format
m Optical Character Recognition (OCR)
Before you begin
You should be familiar with the information in Chapters 1
and 4 on receiving faxes.
79
Page 93

Opening a fax
You can open a fax for viewing, editing, or printing in a fax
view window. Ordinarily you will want to view and print
received faxes, but all of the operations described here can
apply to sent faxes as well. You can open as many
documents as memory allows and move among them using
the Windows menu. Each document that you open appears
as an item in the Windows menu.
To open a fax document
1 Select the document in the list of faxes in the Apple Fax main
window, then click Open; or double-click the document.
80
Chapter 5
Page 94

Viewing a fax
Once you have opened a document, you can view it in several
different resolutions and in several orientations, as well as
navigate from page to page. Most of the operations for
changing the view are available from both the tool bar at the
top of the fax view window and from the FaxView menu.
Page navigation
Page orientation
View scale
Moving around a document
OCR
Use the scroll bars to position a page in the window and to
navigate between pages of a fax.
m To examine undisplayed portions of a page, use the vertical
and horizontal scroll bars at the right and bottom of the Fax
View window.
m To scroll pages, use the Next Page and Previous Page buttons
on the right side of the tool bar. The current page number is
shown as a pop-up menu between these buttons. Use the
buttons to move from page to page; use the pop-up menu to
go to a particular page.
Viewing, Editing, and Printing Faxes
81
Page 95

In addition to the paging buttons, the FaxView menu offers
commands for changing pages
m Previous Page allows you to move backward one page.
Next Page allows you to move forward one page.
m
m
Go To Page displays a dialog box for moving to a
specific page.
Changing the page orientation
The options in the tool bar and in the FaxView menu allow
you to view your fax in whatever orientation you prefer.
The four orientation tools in the tool bar have the same
functions as the orientation items in the FaxView menu.
Rotate left
Flip page
Rotate right
Flip all pages
To change the orientation, either click the appropriate tool
or choose the appropriate command from the FaxView
menu.
m Rotate left turns the current page 90 degrees
counterclockwise. (Option-click the tool to rotate all pages.)
m Rotate right turns the current page 90 degrees clockwise.
(Option-click the tool to rotate all pages.)
m Flip page rotates the current page 180 degrees.
m Flip All pages rotates all pages 180 degrees.
Your last orientation operation can be undone using the
Undo command in the Edit menu.
82
Chapter 5
Page 96

Scaling the view
You can view the currently displayed page at several
different scale settings—100%, 200%, 400%, and 800% of the
actual size—using the Zoom In and Zoom Out buttons in the
tool bar. The current scale is shown in a pop-up menu. Use
the Zoom In and Zoom Out buttons to go to the next larger
or smaller scale; use the pop-up menu to go directly to a
particular scale.
Zoom Out
Printing a fax
Zoom In
Scale pop-up menu
You print a fax the same way you print any document. See
“Print a Document” and “Printing Your Work” in the
Macintosh Guide in the Guide menu or the documentation
that came with your computer. Make sure the printer is
selected in the Chooser.
FastPrint
Apple Fax includes a FastPrint feature for printing fax
documents more quickly on PostScript printers. The speed
of printing can be significantly improved, but FastPrint
requires more memory (at least 1.5 Mb of additional
memory). You may need to increase the memory size
allocated to Apple Fax.
Viewing, Editing, and Printing Faxes
83
Page 97

To increase the Apple Fax memory partition
1 Select Apple Fax in the Finder.
2 Choose Get Info from the File menu (x-I).
3 Increase the number in the Preferred size field by at least
1500 K.
To enable FastPrint
1 Check the FastPrint checkbox in the Apple Fax print dialog
box.
Important FastPrint only works with PostScript printers.
Editing a fax
You may need to recorde pages, eliminate pages, or
combine pages from several faxes. Editing in fax view
windows is similar to editing in other applications such as
paint programs. Generally, edit operations in Apple Fax fax
view windows affect an entire page. The page is the basic
unit in a fax document. Because a fax is a graphic image, you
cannot edit the text as you can in a word processor.
Copying, cutting, or clearing a page
Entire pages can be copied or cut to the clipboard for later
use, or cleared from the document.
To copy, cut, or clear a page
1 Make sure you’re viewing the page you wish to work on.
2 Choose Copy (x-C), Cut (x-X), or Clear from the Edit
menu.
84
Chapter 5
Page 98

Copy places the current page on the clipboard. Cut places
the current page on the clipboard, removes it from the
document, and decreases the page count by one. Clear
removes the current page and decreases the page count by
one.
The clipboard holds one page at a time. Be sure to paste the
page into a Apple Fax or paint program document before
copying or cutting another page.
Pasting a page
You can paste a cut or copied fax page into any Apple Fax or
paint program document.
To paste a page
1 Select the page you want and cut or copy it to the clipboard.
2 Display the page that will follow the page you want to paste
in.
3 Choose Paste (x-V) from the Edit menu.
Notice that the page count increases by one page and that
Apple Fax places the page in front of the one previously
displayed.
Viewing, Editing, and Printing Faxes
85
Page 99

Selecting a portion of a page
Paste operations in Apple Fax only operate on entire pages.
However, you can select a portion of a page for pasting into
a document created by another graphics program. Apple Fax
provides a selection rectangle tool for selecting and copying
portions of documents.
1 Select the page you wish to copy from.
2 Move the pointer over the page.
Notice that the arrow pointer becomes a crosshair. It now
functions as a selection rectangle tool for selecting
rectangular areas.
3 Drag the selection rectangle tool across the image from the
upper left to the lower right, releasing the trackball or
mouse button when the image is enclosed.
A moving dashed line encloses the selected image.
4 Choose Copy Selection from the Edit menu.
Apple Fax places the selected image at current resolution in
PICT format in the clipboard.
5 Make your graphics program document the active window,
then choose Paste from the File menu.
The selected image appears in your document.
86
Chapter 5
Page 100

Converting a fax to a PICT file
Apple Fax allows you to save a fax in Apple Fax or in PICT file
format using the Save As command. Apple Fax documents
can be opened only by the Apple Fax program. PICT files can
be opened by many graphics programs. In other words, the
Save As command acts as a conversion tool for fax
documents.
1 Choose Save As from the File menu.
The Save As dialog box appears. Notice the Format pop-up
menu at the bottom of the dialog box.
2 Change the document type using the Format pop-up menu.
3 Rename the document if you wish, then click Save.
The current page is converted to PICT format and saved.
CONVERSION FILE FORMATS USE
Apple Fax Can only be opened by Apple Fax
PICT 72 dpi Standard PICT format
PICT 200 dpi High definition PICT format
Text (OCR) Text format
Viewing, Editing, and Printing Faxes
87
 Loading...