


R
CDE-7828E/ CDE-7826E
FM/AM Compact Disc Receiver
• OWNER'S MANUAL
Please read this manual to maximize your enjoyment of the outstanding performance and feature capabilities of the equipment, then retain the manual for future reference.
PWR
|
W |
E |
P |
O |
|
R
VOL•BAS• ■
T
R
E•
BAL•
FAD
A
U
D
I
O
CLOCK DISP |
35 WATTS x 4 AMPLIFIER |
|
MODE |
M.I.X. 1 |
RPT |
2 |
SCAN 3 |
|
|
|
DN |
UP |
|
|
|
|
|
|
|
LOUD |
|
|
|
|
|
|
||
|
|
CT 4 |
H |
5 |
M |
6 |
REPEAT |
M.I.X. |
|
|
D.A.P. |
ST |
|||||
C |
|
|
|
|
|
|
||
N |
|
|
|
|
|
|
|
DX SEEK |
O |
|
TUNE |
|
|
|
|
|
LOUD |
O |
|
|
|
|
|
|
||
T |
|
|
|
|
|
|
|
|
R |
|
A. MEMO |
|
|
|
|
|
|
L |
|
TUNER |
DISC |
|
|
|||
|
|
D.A.P. |
BAND |
|
|
|
CD RECEIVER CDE-7828E |
|
|
|
|
|
|
|
|||
35W x 4
(CDE-7828E)
1

English
2

English
Precautions
Warning
DO NOT DISASSEMBLE OR ALTER
Attempts to disassemble or alter may lead to an accident, fire and/or electric shock.
KEEP SMALL ARTICLES OUT OF THE REACH OF CHILDREN
Store small articles (screws, etc.) in places not accessible to children. If swallowed, consult a physician immediately.
USE THE CORRECT AMPERE RATING WHEN REPLACING FUSES
Replace fuses only with fuses of the same ampere rating. Failure to do so may result in a fire and/or damage to the vehicle.
HALT USE IMMEDIATELY IF A PROBLEM APPEARS
When problems appear, stop using the system immediately and contact the dealer from whom you purchased the equipment. Some problems which may warrant immediate attention include a lack of sound, noxious odors or smoke being emitted from the unit, or foreign objects dropped inside the unit.
DO NOT OPERATE THE REMOTE CONTROL WHILE DRIVING
Do not change settings while driving. If operation requiring a prolonged view of the display is required, stop the vehicle in a safe location before attempting operation.
3

English
Precautions
Caution
DO NOT RAISE THE VOLUME EXCESSIVELY
Keep the volume at a level where you can still hear outside noises while driving. Driving while unable to hear outside sounds could cause an accident.
DO NOT USE THIS EQUIPMENT OUTSIDE THE VEHICLE
Do not use this equipment for purposes other than those listed for a vehicle. Failure to do so may result in an electric shock or an injury.
KEEP FOREIGN OBJECTS OUT OF THE CD COMPARTMENT SLOT
Keep any foreign objects, including fingers, out of the CD compartment slot.
STOP THE VEHICLE BEFORE CARRYING OUT ANY OPERATION THAT COULD INTERFERE WITH YOUR DRIVING
If loading or unloading a CD interferes with your driving, stop the vehicle in a safe location before attempting operation.
4
Contents
English
Page |
|
|
6 ....................................................................... |
Precautions |
|
9 ................................................... |
Detachable Front Panel |
|
|
Basic Operation |
|
10 ...................................................... |
Initial System Start-up |
|
10 ............................................... |
Turning Power On and Off |
|
11 ............................................ |
Non Fading Pre-Out (N.F.P.) |
|
|
On and Off |
|
12 ........................................ |
Adjusting Volume/Bass/Treble/ |
|
|
Balance/Fader |
|
13 ................................................. |
Turning Loudness On/Off |
|
|
Radio Operation |
|
14 .................................................................. |
Manual Tuning |
|
15 .................................................... |
Automatic Seek Tuning |
|
16 .................................... |
Manual Storing of Station Presets |
|
17 .............................. |
Automatic Memory of Station Presets |
|
18 ..................................... |
Storing into Direct Access Preset |
|
|
(D.A.P.) Band |
|
19 ................................................. |
Tuning to Preset Stations |
|
|
CD Operation |
|
20 ...................................................... |
Inserting/Ejecting Disc |
|
20 .................................................... |
Normal Play and Pause |
|
21 ............................ |
Track/Elapsed Time Display Switching |
|
21 ......................................................... |
Music Sensor (Skip) |
|
22 ............................................ |
Fast Forward and Backward |
|
22 ...................................................................... |
Repeat Play |
|
23 ....................................................... |
M.I.X. (Random Play) |
|
23 .......................................................... |
Scanning Programs |
|
|
Clock Operation |
|
24 ................................................................ |
Displaying Time |
|
25 ..................................................................... |
Setting Time |
|
26 ......................................................................... |
Disc Care |
|
27 ........................................................ |
In Case of Difficulty |
|
30 ................................................................. |
Specifications |
5 |
English
Precautions
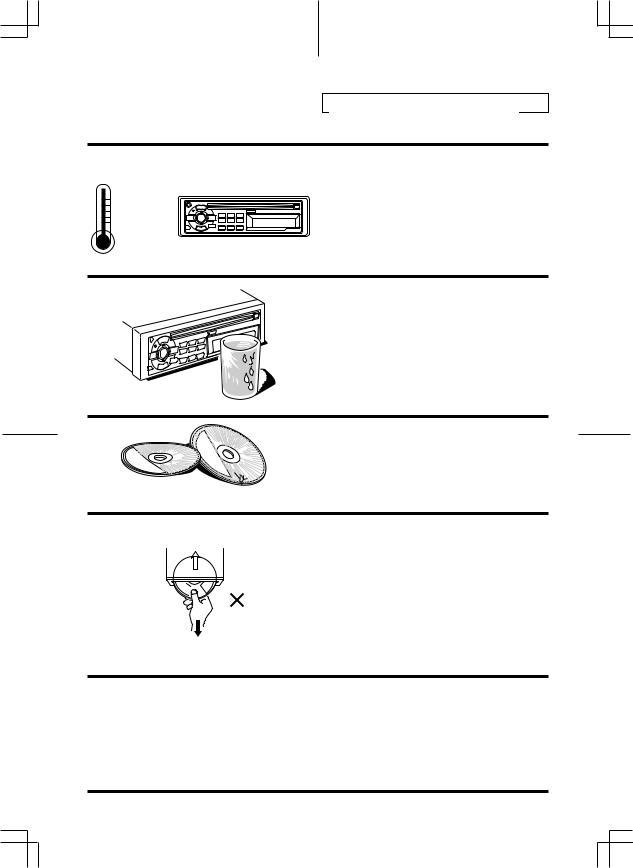
+60°C
–10°C
Thermal Protection Circuit
Be sure the temperature inside the vehicle is between +60°C (+140°F) and –10°C (+14°F) before attempting to play a disc. If the temperature is over +60°C (+140°F), the protection circuit functions to stop the CD player, and "---H" is displayed.
Moisture Condensation
You may notice the CD playback sound wavering due to condensation. If this happens, remove the disc from the player and wait about an hour for the moisture to evaporate.
Damaged Disc
Do not attempt to play cracked, warped, or damaged discs. Playing a bad disc could severely damage the playback mechanism.
Never attempt the Following
Do not grip or pull out the disc while it is being pulled back into the player by the automatic reloading mechanism.
Do not attempt to insert a disc into the unit when the unit power is off.
Maintenance
If you have problems, do not attempt to repair the unit yourself. Return it to your Alpine dealer or the nearest Alpine Service Station for servicing.
6

English
Precautions
Inserting Discs
Your player accepts only one disc at a time for playback. Do not attempt to load more than one disc.
Make sure the label side is facing up when you insert the disc. Your player will automatically eject any disc that is inserted incorrectly. If the player continues to eject a correctly inserted disc, push the Reset switch (located behind the detachable front panel) with a pointed object such as a ball-point pen.
Playing a disc while driving on a very bumpy road may result in skips, but this will not scratch the disc or damage the player.
Center Hole
Bumps
Center Hole |
New Disc |
|
|
|
Outside (Bumps) |
New Discs
As a protective measure, the CD player will automatically eject discs that have either been inserted incorrectly or have irregular surfaces. If a new disc is ejected immediately after loading, use your finger to feel around the outer edge of the CD and its center hole. If you feel any small bumps or irregularities, this could inhibit proper loading of the disc. To remove the bumps, rub the inside edge of the hole and outside edge of the disc with a ball-point pen or other such instrument, then insert the disc again.
7
English
Precautions
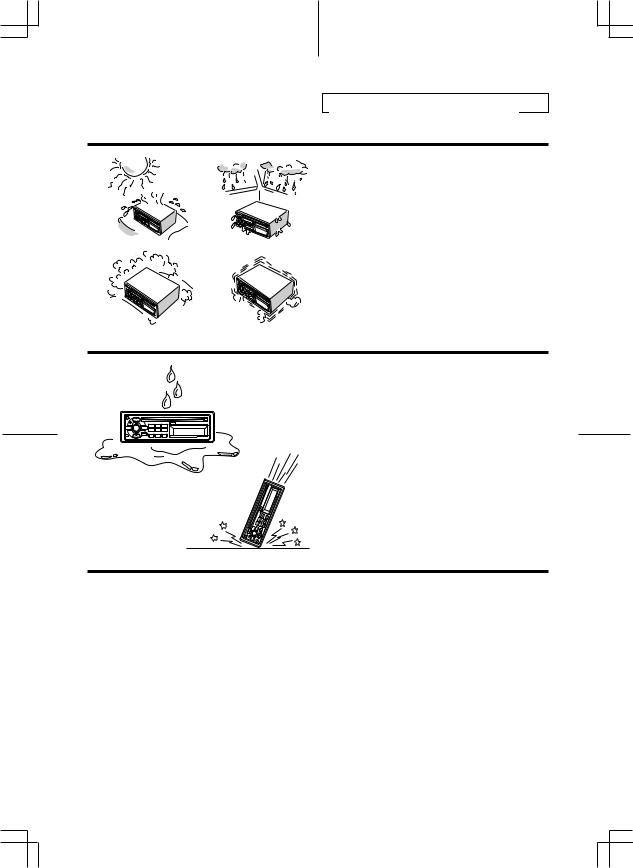
Installation Location
Make sure the CDE-7828E/CDE-7826E player/ receiver will not be exposed to:
•Direct sun and heat
•High humidity
•Excessive dust
•Excessive vibrations
Handling the Detachable
Front Panel
•Do not expose to rain or water.
•Do not drop or apply shock.
8

|
|
|
|
|
|
|
|
|
|
Detachable Front |
English |
|
|
|
|
|
|
|
|
|
|
|
|
Panel |
|
|
|
|
|
|
|
|
|
|
|
|
|
|
|
|
|
|
|
|
|
|
|
|
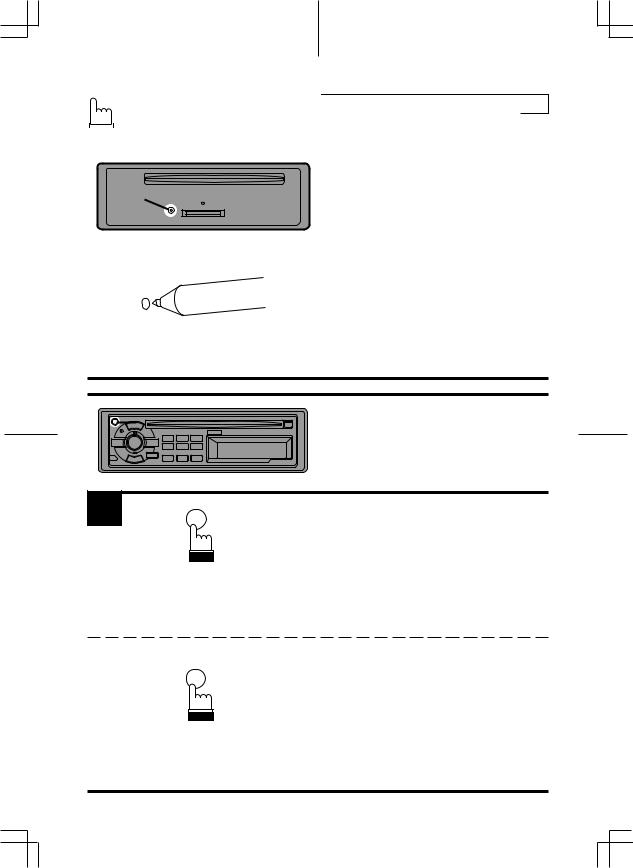
1
|
2 |
Detaching the Front Panel |
|
|
|
1 |
|
Press the PWR button to turn off the power. |
|
PWR |
|
|
|
|
2 |
|
Press the release button until the front panel |
|
pops out. |
|
3 |
|
Grasp the left side of the front panel and pull it |
|
out. |
Note: To protect the front panel, place it in the supplied carrying case.
Attaching the Front Panel
1. First, insert the right side of the front panel into the main unit. Align the 2 small holes on
the front panel with the 2 projections on the main unit.
2. Push the left side of the front panel until it
locks firmly into the main unit.
1
Note: Before attaching the front panel, make 2 sure that there is no dirt or dust on the
connector terminals and no foreign objects between the front panel and main unit.
9
 Basic OperationEnglish
|
|
|
|
|
|
|
|
|
|
|
|
|
1 |
Initial System Start-Up |
|
|
|
||
|
|
|
|
1 |
|
|
Immediately after installing or applying power to |
|
|
the unit, it should be initialized. To do this, first, |
|
remove the detachable front panel. Behind the front panel, to the left of the connector, is a small hole. Using a pencil or other pointed object, press the red Reset button mounted behind this hole to complete the initialization procedure.
|
1 |
|
Turning Power On and Off |
1 |
Press the PWR button to turn on the unit. |
PWR |
Note: The unit can be turned on by pressing any button except the eject ( h ) and CLOCK buttons, or by inserting a compact disc.
Press the PWR button again to turn off the unit.
PWR
10
 Loading...