


CDE-203BT

EN
FR
ES
DE
IT
SE
NL
RU
PL
FOR CAR USE ONLY/ POUR APPLICATION AUTOMOBILE UNIQUEMENT/ PARA USO EN
AUTOMÓVILES/ NUR FÜR AUTOMOBIL GEBRAUCH/ SOLO PER L’UTILIZZO IN
AUTOMOBILE/ ENDAST FÖR BILBRUK/ ALLEEN VOOR GEBRUIK IN DE AUTO/ ТОЛЬКО ДЛЯ
ИСПОЛЬЗОВАНИЯ В АВТОМОБИЛЯХ/ DO UŻYCIA TYLKO W SAMOCHODZIE
CD/USB RECEIVER WITH ADVANCED BLUETOOTH
CDE-203BT
CD/USB RECEIVER
CDE-201R
DIGITAL MEDIA RECEIVER WITH ADVANCED BLUETOOTH
UTE-200BT
• OWNER’S MANUAL
Please read before using this equipment.
• MODE D’EMPLOI
Veuillez lire avant d’utiliser cet appareil.
• MANUAL DE OPERACIÓN
Léalo antes de utilizar este equipo.
• BEDIENUNGSANLEITUNG
Lesen Sie diese Bedienungsanleitung bitte
vor Gebrauch des Gerätes.
• ISTRUZIONI PER L’USO
Si prega di leggere prima di utilizzare il
attrezzatura.
• ANVÄNDARHANDLEDNING
Innan du använder utrustningen bör du läsa
igenom denna användarhandledning.
• GEBRUIKERSHANDLEIDING
Lees deze aanwijzingen aandachtig alvorens
dit toestel te gebruiken.
• РУКОВОДСТВО ПО ЭКСПЛУАТАЦИИ
Прочтите настоящее руководство перед
началом использования оборудования.
• INSTRUKCJA OBSŁUGI
Prosimy zapoznać się z tą instrukcją przed
przystąpieniem do użytkowania urządzenia.
Printed in Thailand
68-40368Z03-C (Y-D)
2-EN
For safety, be sure to install this unit in the
dashboard of the car as the rear side of the
unit becomes hot during use.
For details, see “Connection/Installation”
(page32).
Hereby, Alpine Electronics (Europe) declares that
the radio equipment type CDE-203BT, CDE-201R,
UTE-200BT is in compliance with Directive
2014/53/EU.
The full text of the EU declaration of conformity
is available at the following internet address:
http://www.alpine.com/e/research/doc/
Information on Disposal of Old Electrical and
Electronic Equipment and Battery (applicable
for countries that have adopted separate
waste collection systems)
If you want to dispose this product, do not mix it
with general household waste. There is a
separate collection system for used electronic
products in accordance with legislation that
requires proper treatment, recovery and
recycling. Contact your local authority for details
in locating a recycle facility nearest to you.
Proper recycling and waste disposal will help
conserve resources whist preventing detrimental
effects on our health and the environment.
Warning if your car’s ignition has no ACC
position
Be sure to set the AUTO OFF function (page
20). The unit will shut off completely and
automatically in the set time after the unit is
turned off, which prevents battery drain. If
you do not set the AUTO OFF function, press
and hold
(power) until the display
disappears each time you turn the ignition off.
Disclaimer regarding services offered by
third parties
Services offered by third parties may be
changed, suspended, or terminated without
prior notice. Alpine does not bear any
responsibility in these sorts of situations.
Important notice
Caution
IN NO EVENT SHALL ALPINE BE LIABLE FOR ANY
INCIDENTAL, INDIRECT OR CONSEQUENTIAL
DAMAGES OR OTHER DAMAGES INCLUDING,
WITHOUT LIMITATION, LOSS OF PROFITS, LOSS
OF REVENUE, LOSS OF DATA, LOSS OF USE OF
THE PRODUCT OR ANY ASSOCIATED EQUIPMENT,
DOWNTIME, AND PURCHASER’S TIME RELATED
TO OR ARISING OUT OF THE USE OF THIS
PRODUCT, ITS HARDWARE AND/OR ITS
SOFTWARE.
Dear customer, this product includes a radio
transmitter.
According to UNECE Regulation no. 10, a vehicle
manufacturers may impose specific conditions
for installation of radio transmitters into vehicles.
Please check your vehicle operation manual or
contact the manufacturer of your vehicle or your
vehicle dealer, before you install this product into
your vehicle.
Emergency calls
This BLUETOOTH car handsfree and the
electronic device connected to the handsfree
operate using radio signals, cellular, and landline
networks as well as user-programmed function,
which cannot guarantee connection under all
conditions.

3-EN
Therefore do not rely solely upon any electronic
device for essential communications (such as
medical emergencies).
On BLUETOOTH communication
• Microwaves emitting from a BLUETOOTH
device may affect the operation of electronic
medical devices. Turn off this unit and other
BLUETOOTH devices in the following locations,
as it may cause an accident.
– where inflammable gas is present, in a
hospital, train, airplane, or petrol station
– near automatic doors or a fire alarm
• This unit supports security capabilities that
comply with the BLUETOOTH standard to
provide a secure connection when the
BLUETOOTH wireless technology is used, but
security may not be enough depending on the
setting. Be careful when communicating using
BLUETOOTH wireless technology.
• We do not take any responsibility for the
leakage of information during BLUETOOTH
communication.
If you have any questions or problems
concerning your unit that are not covered in this
manual, consult your nearest Alpine dealer.
IMPORTANT
Please record the serial number of your unit in the space provided below and keep it as a
permanent record.
SERIAL NUMBER:
ISO SERIAL NUMBER: AL
INSTALLATION DATE:
INSTALLATION TECHNICIAN:
PLACE OF PURCHASE:

4-EN
WARNING
WARNING
This symbol means important instructions.
Failure to heed them can result in serious
injury or death.
DO NOT OPERATE ANY FUNCTION THAT
TAKES YOUR ATTENTION AWAY FROM
SAFELY DRIVING YOUR VEHICLE.
Any function that requires your prolonged
attention should only be performed after
coming to a complete stop. Always stop the
vehicle in a safe location before performing
these functions. Failure to do so may result in
an accident.
KEEP THE VOLUME AT A LEVEL WHERE YOU
CAN STILL HEAR OUTSIDE NOISES WHILE
DRIVING.
Excessive volume levels that obscure sounds
such as emergency vehicle sirens or road
warning signals (train crossings, etc.) can be
dangerous and may result in an accident.
LISTENING AT LOUD VOLUME LEVELS IN A CAR
MAY ALSO CAUSE HEARING DAMAGE.
DO NOT DISASSEMBLE OR ALTER.
Doing so may result in an accident, fire or
electric shock.
USE ONLY IN CARS WITH A 12 VOLT
NEGATIVE GROUND.
(Check with your dealer if you are not sure.)
Failure to do so may result in fire, etc.
KEEP SMALL OBJECTS SUCH AS BATTERIES
OUT OF THE REACH OF CHILDREN.
Swallowing them may result in serious injury. If
swallowed, consult a physician immediately.
USE THE CORRECT AMPERE RATING WHEN
REPLACING FUSES.
Failure to do so may result in fire or electric
shock.
DO NOT BLOCK VENTS OR RADIATOR
PANELS.
Doing so may cause heat to build up inside
and may result in fire.
USE THIS PRODUCT FOR MOBILE 12V
APPLICATIONS.
Use for other than its designed application may
result in fire, electric shock or other injury.
DO NOT PLACE HANDS, FINGERS OR
FOREIGN OBJECTS IN INSERTION SLOTS OR
GAPS.
Doing so may result in personal injury or
damage to the product.
MAKE THE CORRECT CONNECTIONS.
Failure to make the proper connections may
result in fire or product damage.
BEFORE WIRING, DISCONNECT THE CABLE
FROM THE NEGATIVE BATTERY TERMINAL.
Failure to do so may result in electric shock or
injury due to electrical shorts.
DO NOT SPLICE INTO ELECTRICAL CABLES.
Never cut away cable insulation to supply
power to other equipment. Doing so will
exceed the current carrying capacity of the
wire and result in fire or electric shock.
DO NOT DAMAGE PIPE OR WIRING WHEN
DRILLING HOLES.
When drilling holes in the chassis for
installation, take precautions so as not to
contact, damage or obstruct pipes, fuel lines,
tanks or electrical wiring. Failure to take such
precautions may result in fire.
DO NOT USE BOLTS OR NUTS IN THE BRAKE
OR STEERING SYSTEMS TO MAKE GROUND
CONNECTIONS.
Bolts or nuts used for the brake or steering
systems (or any other safety-related system), or
tanks should NEVER be used for installations or
ground connections. Using such parts could
disable control of the vehicle and cause fire etc.
5-EN
DO NOT INSTALL IN LOCATIONS WHICH
MIGHT HINDER VEHICLE OPERATION, SUCH
AS THE STEERING WHEEL OR SHIFT LEVER.
Doing so may obstruct forward vision or
hamper movement etc. and results in serious
accident.
CAUTION
This symbol means important instructions.
Failure to heed them can result in injury or
material property damage.
HALT USE IMMEDIATELY IF A PROBLEM
APPEARS.
Failure to do so may cause personal injury or
damage to the product. Return it to your
authorized Alpine dealer or the nearest Alpine
Service Centre for repairing.
HAVE THE WIRING AND INSTALLATION
DONE BY EXPERTS.
The wiring and installation of this unit requires
special technical skill and experience. To ensure
safety, always contact the dealer where you
purchased this product to have the work done.
USE SPECIFIED ACCESSORY PARTS AND
INSTALL THEM SECURELY.
Be sure to use only the specified accessory
parts. Use of other than designated parts may
damage this unit internally or may not securely
install the unit in place. This may cause parts to
become loose resulting in hazards or product
failure.
ARRANGE THE WIRING SO IT IS NOT
CRIMPED OR PINCHED BY A SHARP METAL
EDGE.
Route the cables and wiring away from moving
parts (like the seat rails) or sharp or pointed
edges. This will prevent crimping and damage
to the wiring. If wiring passes through a hole in
metal, use a rubber grommet to prevent the
wire’s insulation from being cut by the metal
edge of the hole.
DO NOT INSTALL IN LOCATIONS WITH HIGH
MOISTURE OR DUST.
Avoid installing the unit in locations with high
incidence of moisture or dust. Moisture or dust
that penetrates into this unit may result in
product failure.

6-EN
Table of Contents
WARNING . . . . . . . . . . . . . . . . . . . . . . . . . . . . . . . . . . . . . 4
Guide to Parts and Controls . . . . . . . . . . . . . . . . . . . . 7
Getting Started
Detaching the Front Panel . . . . . . . . . . . . . . . . . . . . . 9
Resetting the Unit . . . . . . . . . . . . . . . . . . . . . . . . . . . . . 9
Setting the Clock . . . . . . . . . . . . . . . . . . . . . . . . . . . . . . 9
Preparing a BLUETOOTH Device
(CDE-203BT/ UTE-200BT only) . . . . . . . . . . . . . . . . . 10
Connecting a USB Device . . . . . . . . . . . . . . . . . . . . . 12
Connecting Other Portable Audio Device . . . . .12
Listening to the Radio
Listening to the Radio . . . . . . . . . . . . . . . . . . . . . . . . 12
Using Radio Data System (RDS) . . . . . . . . . . . . . . . 13
Playback
Playing a Disc (CDE-203BT/ CDE-201R only) . . . 14
Playing a USB Device . . . . . . . . . . . . . . . . . . . . . . . . .14
Playing a BLUETOOTH Device
(CDE-203BT/ UTE-200BT only) . . . . . . . . . . . . . . . . . 14
Searching and Playing Tracks . . . . . . . . . . . . . . . . . 15
Handsfree Calling
(via BLUETOOTH only)
(CDE-203BT/ UTE-200BT only)
Receiving a Call . . . . . . . . . . . . . . . . . . . . . . . . . . . . . . 16
Making a Call . . . . . . . . . . . . . . . . . . . . . . . . . . . . . . . . . 16
Available Operations during Call . . . . . . . . . . . . . . 17
Useful Functions
Adjusting Bass Level/ Mid Level/ Treble Level/
Subwoofer Level/ Balance (Between Left and
Right)/ Fader (Between Front and Rear) . . . . . . . 18
Setting the BASS ENGINE SQ . . . . . . . . . . . . . . . . . . 18
Using Siri Eyes Free
(CDE-203BT/ UTE-200BT only) . . . . . . . . . . . . . . . . . 18
Settings
Canceling the DEMO Mode . . . . . . . . . . . . . . . . . . .20
Basic Setting Operation . . . . . . . . . . . . . . . . . . . . . . . 20
General Setup (GENERAL) . . . . . . . . . . . . . . . . . . . . . 20
Audio Setup (AUDIO) . . . . . . . . . . . . . . . . . . . . . . . . . 21
Display Setup (DISPLAY) . . . . . . . . . . . . . . . . . . . . . . 21
BLUETOOTH Setup (BLUETOOTH)
(CDE-203BT/ UTE-200BT only) . . . . . . . . . . . . . . . . . 22
Additional Information
Updating the Firmware . . . . . . . . . . . . . . . . . . . . . . .23
Precautions . . . . . . . . . . . . . . . . . . . . . . . . . . . . . . . . . .23
Maintenance . . . . . . . . . . . . . . . . . . . . . . . . . . . . . . . . . 24
Specifications . . . . . . . . . . . . . . . . . . . . . . . . . . . . . . . . 25
Troubleshooting . . . . . . . . . . . . . . . . . . . . . . . . . . . . . 27
Messages . . . . . . . . . . . . . . . . . . . . . . . . . . . . . . . . . . . . 31
Connection/Installation
Cautions . . . . . . . . . . . . . . . . . . . . . . . . . . . . . . . . . . . . .32
Parts List for Installation . . . . . . . . . . . . . . . . . . . . . . 32
Connection . . . . . . . . . . . . . . . . . . . . . . . . . . . . . . . . . .33
Installation . . . . . . . . . . . . . . . . . . . . . . . . . . . . . . . . . . . 36
7-EN
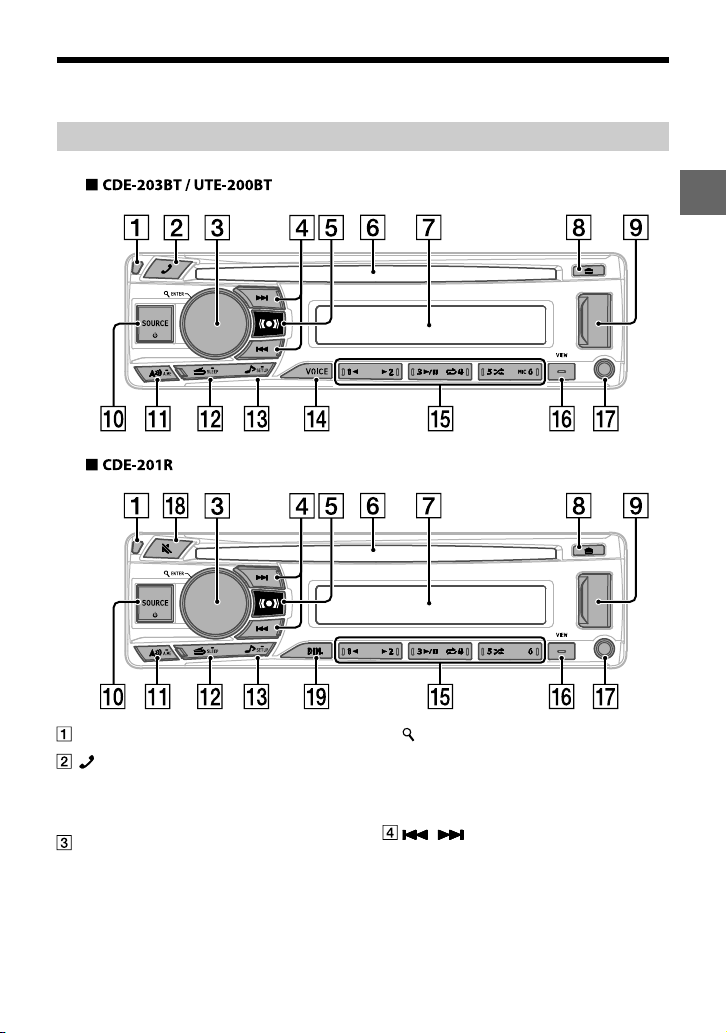
Guide to Parts and Controls
Main unit
Front panel release button
Enter the call menu. Receive/end a call.
Press and hold for more than 2 seconds to
switch the BLUETOOTH signal.
Control dial
Rotate to adjust the volume.
ENTER
Enter the selected item.
(browse) (pages 13, 15)
Enter the browse mode during playback.
(Not available when a USB device in Android
mode or iPod is connected.)
Select PTY in RDS.
/
Radio mode:
Tune in radio stations automatically. Press
and hold to tune manually.
Disc/USB Device mode:
Switch between previous/next song.
Press and hold for 2 seconds to fast-reverse/
fast-forward.
8-EN
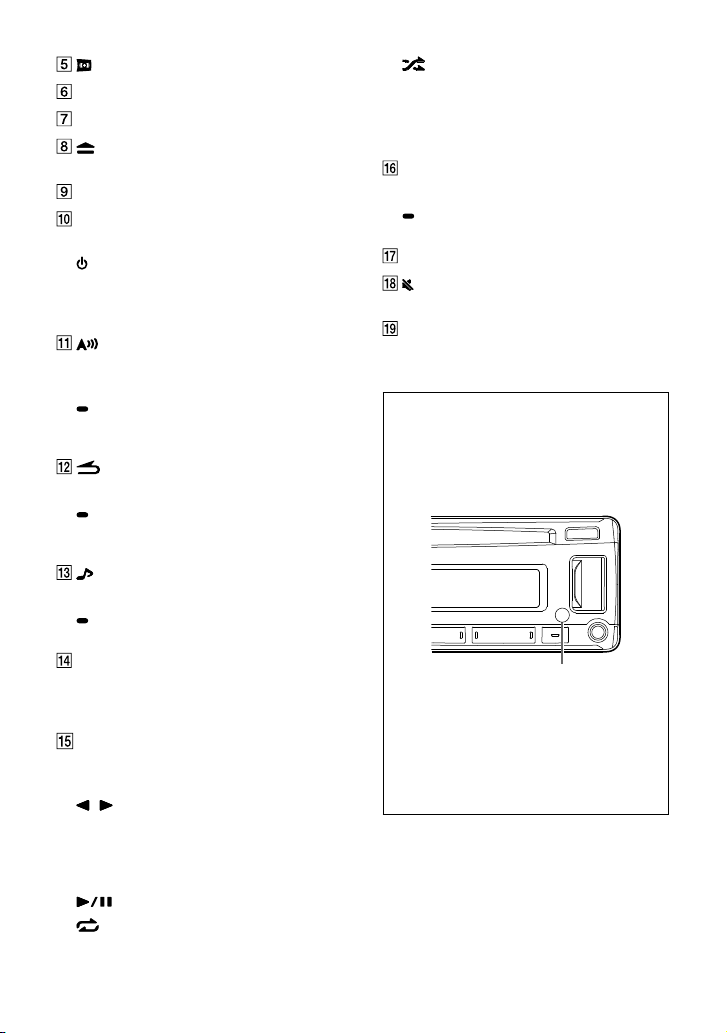
(page 18)
Disc slot (CDE-203BT/ CDE-201R only)
Display window
(disc eject) (CDE-203BT/ CDE-201R
only)
USB port
SOURCE
Change the source.
(power)
Turn on the power.
Press and hold for more than 2 seconds to
turn off the power and the display.
Press in the Radio mode to change the radio
band.
A.ME
Press and hold for more than 2 seconds in the
Radio mode to store stations automatically.
(back)
Return to the previous display.
SLEEP
Press and hold for 2 seconds to turn the
source off and display the clock.
(page 18)
Open audio setup mode directly.
SETUP
Press and hold to open the setup menu.
VOICE (pages 17, 18)
Press to activate voice dial, voice recognition
(Android™ smartphone only), or the Siri
function (iPhone only).
Number buttons (1 to 6)
Receive stored radio stations. Press and hold
to store stations.
/
Skip an album for audio device. Press and
hold to skip albums continuously.
(Not available when a USB device in Android
mode or iPod is connected.)
(play/pause)
(repeat)
(Not available when a USB device in Android
mode is connected.)
(shuffle)
(Not available when a USB device in Android
mode is connected.)
MIC (CDE-203BT/ UTE-200BT only) (page
17)
VIEW
Change display items.
(scroll)
Press and hold to scroll a display item.
AUX input jack
(MUTE)
Set the mute mode to on/off.
DIM.
Press to change the Dimmer function.
Controllable with Remote Control
This unit can be controlled with an optional
Alpine remote control. For details, consult
your Alpine dealer.
Point the optional remote control transmitter
at the remote control sensor.
Remote control sensor
Connectable to Remote Control Interface
Box
With an optional Alpine Steering Wheel
Remote Control Interface Box (not included),
this unit is controllable from the vehicles
steering wheel controls. For details, contact
your Alpine dealer.
9-EN
Getting Started
To cancel the demonstration (DEMO)
display, see page 20.
For the connection/installation, see page
32.
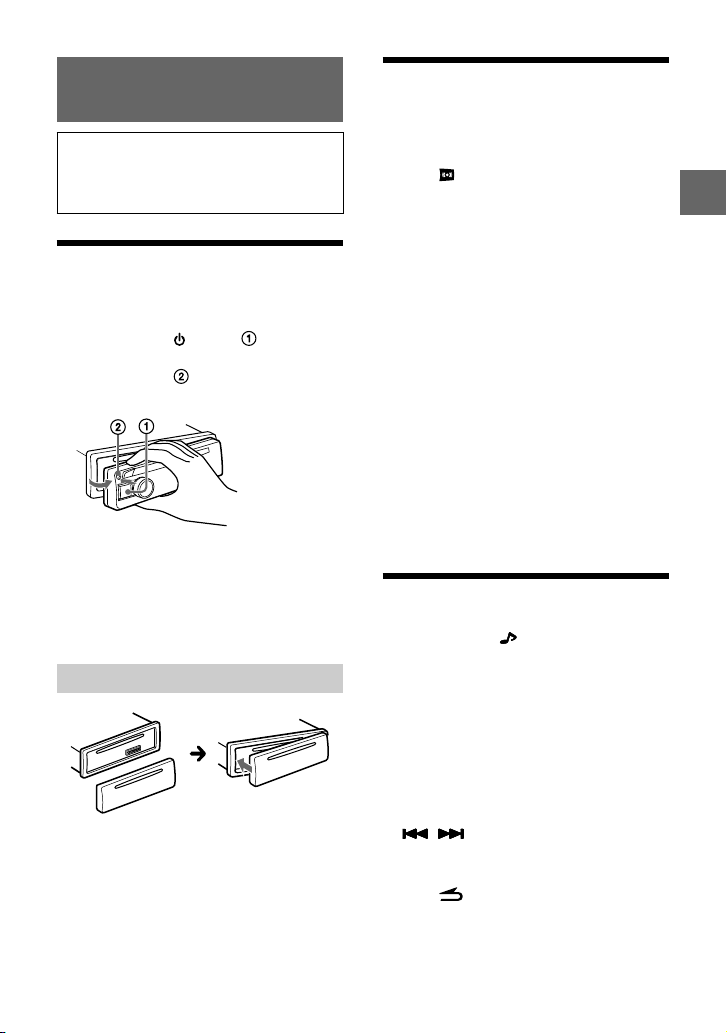
Detaching the Front Panel
You can detach the front panel of this unit to
prevent theft.
1 Press and hold (power) until the
unit turns off, press the front panel
release button
, then pull the panel
towards you to remove.
Caution alarm
If you turn the ignition switch to the OFF position
without detaching the front panel, the caution
alarm will sound for a few seconds. The alarm will
only sound if the built-in amplifier is used.
Attaching the front panel
Resetting the Unit
Before operating the unit for the first time, or
after replacing the car battery or changing
connections, you must reset the unit.
1 Press and Number button 6 for more
than 2 seconds.
Note
Resetting the unit will erase the clock setting and some
stored contents.
Setting the area/region
After resetting the unit, the area/region setting
display appears.
1 Press ENTER while [AREA] is displayed.
The area/region currently set appears.
2 Rotate the control dial to select [AREA EUROPE] or
[AREA RUSSIA], then press it.
3 Rotate the control dial to select [YES] or [NO], then
press it.
If the setting area/region is changed, the unit is reset,
then the clock is displayed.
This setting can be configured in the general
setup menu (page 20).
Setting the Clock
1 Press and hold /SETUP for at least 2
seconds, rotate the control dial to select
[GENERAL], then press it.
2 Rotate the control dial to select [CLOCK
ADJ], then press it.
The hour indication flashes.
3 Rotate the control dial to adjust the hour
and minute.
To move the digital indication, press
/ .
4 Press ENTER to set the hour and minute.
5 Press (back) twice.
The setup is complete.
To display the clock
Press VIEW.
10-EN
Preparing a BLUETOOTH Device
(CDE-203BT/ UTE-200BT only)
You can enjoy music, or perform handsfree
calling depending on the BLUETOOTH
compatible device such as a smartphone, cellular
phone and audio device (hereafter “BLUETOOTH
device” if not otherwise specified). For details on
connecting, refer to the operating instructions
supplied with the device.
Before connecting the device, turn down the
volume of this unit; otherwise, loud sound may
result.
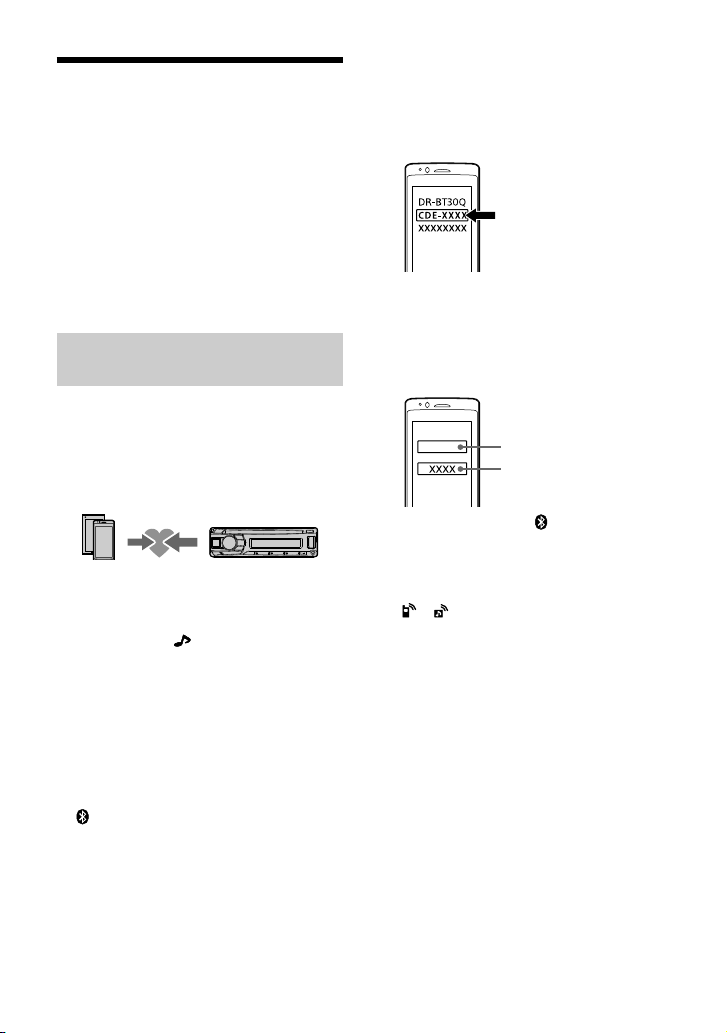
Pairing and connecting with a
BLUETOOTH device
When connecting a BLUETOOTH device for the
first time, mutual registration (called “pairing”) is
required. Pairing enables this unit and other
devices to recognize each other. This unit can
connect two BLUETOOTH devices (two cellular
phones, or a cellular phone and an audio device).
1 Place the BLUETOOTH device within
1 m (3 ft) of this unit.
2 Press and hold /SETUP for at least 2
seconds, rotate the control dial to select
[BLUETOOTH], then press it.
3 Rotate the control dial to select
[PAIRING], then press it.
4 Rotate the control dial to select [SET
DEVICE 1]
*
or [SET DEVICE 2]
*
, then press
it.
flashes while the unit is in pairing standby
mode.
* [SET DEVICE 1] or [SE T DEVICE 2] will be changed to
the paired device name after pairing is complete.
5 Perform pairing on the BLUETOOTH
device so it detects this unit.
6 Select [CDE-203BT] [UTE-200BT] (your
model name) shown in the display of the
BLUETOOTH device.
If your model name does not appear, repeat
from step 2.
7 If passkey
*
input is required on the
BLUETOOTH device, input [0000].
* Passkey may be called “Passcode,” “PIN code,” “PIN
number” or “Password,” etc., depending on the
device.
Input passkey
[0000]
When pairing is made, stays lit.
8 Select this unit on the BLUETOOTH
device to establish the BLUETOOTH
connection.
or lights up when the connection is
made.
Note
While connecting to a BLUETOOTH device, this unit
cannot be detected from another device. To enable
detection, enter the pairing mode and search for this unit
from another device.
To start playback
For details, see “Playing a BLUETOOTH Device
(CDE-203BT/ UTE-200BT only)” (page14).
To disconnect the paired device
Perform steps 2 to 4 to disconnect after this unit
and the BLUETOOTH device are paired.
11-EN
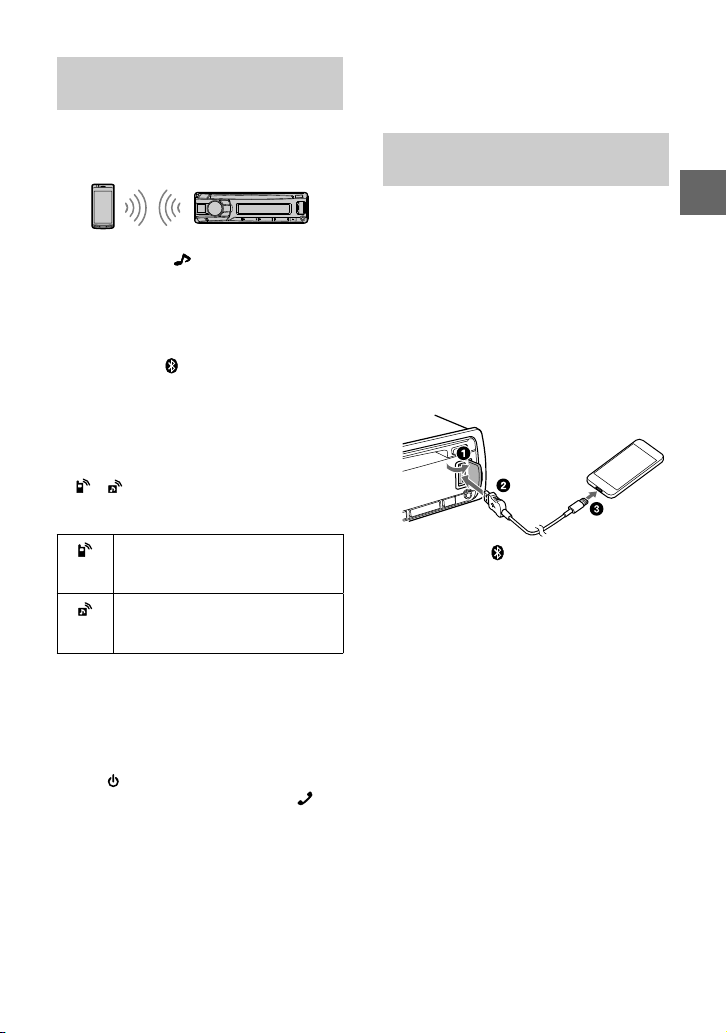
Connecting with a paired BLUETOOTH
device
To use a paired device, connection with this unit
is required. Some paired devices will connect
automatically.
1 Press and hold /SETUP for at least 2
seconds, rotate the control dial to select
[BLUETOOTH], then press it.
2 Rotate the control dial to select [BT IN],
then press it.
Make sure that lights up.
3 Activate the BLUETOOTH function on the
BLUETOOTH device.
4 Operate the BLUETOOTH device to
connect to this unit.
or lights up.
Icons in the display:
Lights up when handsfree calling is
available by enabling the HFP
(Handsfree Profile).
Lights up when the audio device is
playable by enabling the A2DP
(Advanced Audio Distribution Profile).
To connect the last-connected device from
this unit
Activate the BLUETOOTH function on the
BLUETOOTH device.
To connect with the audio device, press
SOURCE
to select [BT AUDIO].
To connect with the cellular phone, press
.
Note
While streaming BLUETOOTH audio, you cannot connect
from this unit to the cellular phone. Connect from the
cellular phone to this unit instead.
Tip
With BLUETOOTH signal on: when the ignition is turned
to on, this unit reconnects automatically to the last-
connected cellular phone.
To install the microphone
For details, see “Installing the microphone (CDE-
203BT/ UTE-200BT only)” (page36).
Connecting with an iPhone/iPod
(BLUETOOTH Auto Pairing)
When an iPhone/iPod with iOS5 or later installed
is connected to the USB port, the unit is paired
and connected with the iPhone/iPod
automatically.
To enable BLUETOOTH Auto Pairing, make sure
[AUTO PAIR] in [BLUETOOTH] is set to [ON] (page
22).
1 Activate the BLUETOOTH function on the
iPhone/iPod.
2 Connect an iPhone/iPod to the USB port.
Make sure that lights up on the display of
the unit.
Notes
• BLUETOOTH Auto Pairing is not possible if the unit is
already connected to two BLUETOOTH devices. In this
case, disconnect either device, then connect the
iPhone/iPod again.
• If BLUETOOTH Auto Pairing is not established, see
“Preparing a BLUETOOTH Device (CDE-203BT/ UTE-
200BT only)” (page10).
12-EN
Connecting a USB Device
1 Turn down the volume on the unit.
2 Connect the USB device to the unit.
To connect an iPod/iPhone, use the USB
connection cable for iPod (not supplied).
(CDE-203BT/ UTE-200BT only)
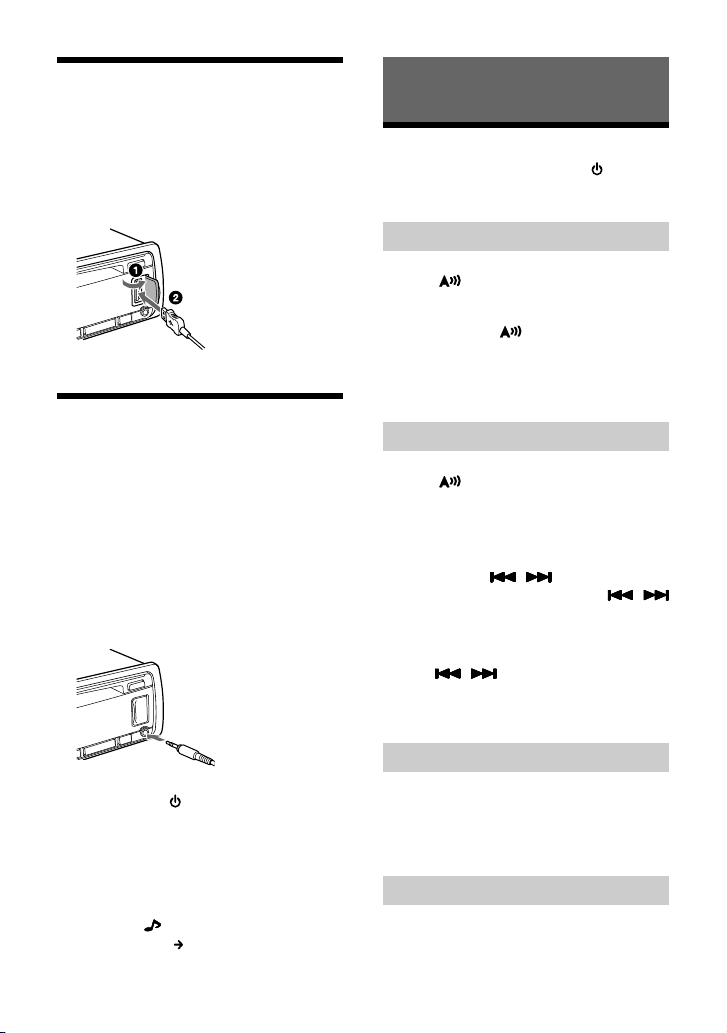
Connecting Other Portable Audio
Device
1 Turn off the portable audio device.
2 Turn down the volume on the unit.
3 Connect the portable audio device to the
AUX input jack (stereo mini jack) on the
unit with a connecting cord (not
supplied)
*
.
* Be sure to use a straight type plug.
4 Press SOURCE to select [AUX].
To match the volume level of the
connected device to other sources
Start playback of the portable audio device at a
moderate volume, and set your usual listening
volume on the unit.
Press and hold
/SETUP for at least 2 seconds,
then select [AUDIO]
[AUX VOL] (page 21).
Listening to the Radio
Listening to the Radio
To listen to the radio, press SOURCE to select
[TUNER].
Storing automatically
1 Press /A.ME to change the band (FM1,
FM2, FM3, MW or LW).
2 Press and hold /A.ME for at least 2
seconds.
The unit stores stations in order of frequency
on the number buttons.
Tuning
1 Press /A.ME to change the band (FM1,
FM2, FM3, MW or LW).
2 Perform tuning.
To tune manually
Press and hold
/ to locate the
approximate frequency, then press
/
repeatedly to finely adjust to the desired
frequency.
To tune automatically
Press
/ .
Scanning stops when the unit receives a
station.
Storing manually
1 While receiving the station that you want
to store, press and hold a number button
(1 to 6) until [MEM] appears.
Receiving the stored stations
1 Select the band, then press a number
button (1 to 6).
 Loading...