


User manual
For more information on using this tablet or for frequently asked questions, please visit www.alcatelonetouch.us.
www.alcatelonetouch.us

Table of Contents
1 Your tablet.......................................................................................... |
5 |
|
1.1 |
Keys and connectors................................................................................. |
5 |
1.2 |
Status bar...................................................................................................... |
7 |
1.3 |
Getting started............................................................................................ |
9 |
1.4 |
Home screen............................................................................................. |
11 |
2 |
Text input.......................................................................................... |
19 |
|
|
2.1 |
Using Onscreen Keyboard..................................................................... |
19 |
|
2.2 |
Swype Keyboard....................................................................................... |
19 |
|
2.3 |
Text editing................................................................................................ |
19 |
3 |
Contacts ........................................................................................... |
21 |
|
|
3.1 |
Consult your contacts............................................................................. |
21 |
|
3.2 |
Adding a contact....................................................................................... |
22 |
|
3.3 |
Managing contact groups........................................................................ |
23 |
|
3.4 |
Editing your contacts............................................................................... |
23 |
|
3.5 |
Contacts importing, exporting and sharing........................................ |
23 |
|
3.6 |
Accounts..................................................................................................... |
24 |
4 |
.................................................................................................. |
25 |
|
|
4.1 |
Gmail/Email ................................................................................................ |
25 |
|
4.2 ................................................................................................... |
Hangouts |
29 |
5 |
Calendar ..............................................................................& Time |
31 |
|
|
5.1 .................................................................................................... |
Calendar |
31 |
|
5.2 .......................................................................................................... |
Clock |
32 |
6 |
Getting ...........................................................................connected |
34 |
|
|
6.1 .................................................................... |
Connecting to the Internet |
34 |
|
6.2 ..................................................................................................... |
Chrome |
35 |
|
6.3 ...................................................... |
Connecting to Bluetooth ® devices |
39 |
|
6.4 ..................................................................... |
Connecting to a computer |
40 |
|
6.5 ................................................................ |
Sharing your tablet's internet |
41 |
|
6.6 ............................................. |
Connecting to virtual private networks |
41 |
7 |
Google ........................................................................PlayTM store |
43 |
|
|
7.1 ......................... |
Locate the item you want to download and install |
43 |
|
7.2 ............................................................................... |
Download and install |
44 |
|
7.3 ......................................................................... |
Manage your downloads |
45 |
8 |
Multimedia ..................................................................applications |
47 |
|
|
8.1 ...................................................................................................... |
Camera |
47 |
|
8.2 ....................................................................................................... |
Gallery |
48 |
|
8.3 ..................................................................................................... |
YouTube |
50 |
|
8.4 ........................................................................................................ |
Videos |
51 |
9 |
Google MapsTM ................................................................................. |
52 |
|
|
9.1 |
Get My Location....................................................................................... |
52 |
|
9.2 |
Search for a location................................................................................ |
53 |
|
9.3 |
Star a location........................................................................................... |
54 |
|
9.4 |
Get driving, public transportation or walking directions................ |
55 |
|
9.5 |
Arrangement of Layers............................................................................ |
56 |
10 Others |
............................................................................................... |
57 |
10.1 |
Calculator .................................................................................................. |
57 |
10.2 |
File Manager ............................................................................................. |
57 |
10.3 |
Sound Recorder ...................................................................................... |
57 |
10.4 |
Other applications.................................................................................... |
58 |
11 |
Settings ............................................................................................ |
59 |
|
|
11.1 |
Wireless & networks............................................................................... |
59 |
|
11.2 |
Device......................................................................................................... |
61 |
|
11.3 |
Personal...................................................................................................... |
63 |
|
11.4 |
System......................................................................................................... |
73 |
12 |
Accessories ...................................................................................... |
76 |
|
13 |
Troubleshooting .............................................................................. |
77 |
|
14 |
Safety information........................................................................... |
81 |
|
This device meets applicable national SAR limits of 1.6W/kg. SAR values can be found on page 88 of this user guide. When carrying the device or using it while worn on your body, either use an approved accessory such as a
holster or otherwise maintain a distance of 15 mm from the www.sar-tick.com body to ensure compliance with RF exposure requirements.
Note that the product may be transmitting even if you are not using it.
To prevent possible hearing damage, do not listen at high volume levels for long periods. Exercise caution when holding your device near your ear while the loudspeaker is in use.
The tablet contains magnets which may interfere with other devices and items (such as credit card, pacemakers, defibrillators, etc.). Please maintain at least 15 cm of separation between your tablet and the devices/items mentioned above.
3 |
4 |

1 Your tablet
1.1Keys and connectors
Rear panel |
Rear-facing |
|
Speaker |
||||
|
|
camera |
|
||||
|
|
|
|
|
|
|
|
|
|
|
|
|
|
|
|
|
|
|
|
|
|
|
|
Front panel
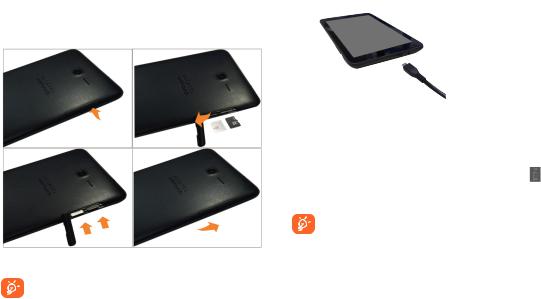
Micro-USB connector (for battery charging) Headset connector
Front-facing camera
SIM and |
microSDTM card |
compartments |
Back |
Home |
Microphone 

Power |
key |
Volume |
Up/ |
Down |
Touch |
screen |
Recent apps
Recent apps key
•Touch and hold to open a list of thumbnail images of applications you've worked with recently.
Home key
•While on any application or screen, touch to return to the Home screen.
Back key
•Touch to go back to the previous screen, or to close a dialog box, options menu, the notification panel, etc.
These keys are visible when the screen lights up.
Power key
•Press: Lock the screen/Light up the screen
•Press and hold: Power on or pop up the menu to get more options, such as Power off, Airplane mode, etc.
•Press and hold Power key and Volume down key to capture a screenshot.
Volume Keys
• In Music/Video/Streaming mode, adjust the media volume.
5 |
6 |
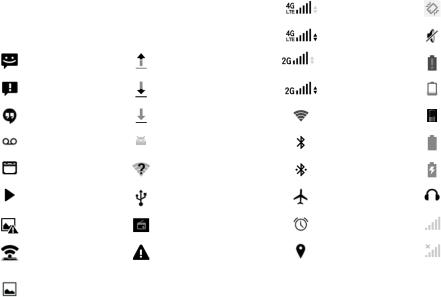
1.2Status bar
From status bar, you can view both phone status (to the right side) and notification information (to the left side).
Notification icons
|
New text or |
|
Uploading data |
|
|
multimedia message |
|
|
|
|
|
|
|
|
|
Problem with SMS or |
|
Downloading data |
|
|
MMS delivery |
|
|
|
|
|
|
|
|
|
Hangouts |
|
Download finished |
|
|
|
|
|
|
|
New voicemail |
|
System update |
|
|
|
|
available |
|
|
|
|
|
|
|
Upcoming event |
|
An open Wi-Fi |
|
|
|
|
network is available |
|
|
|
|
|
|
|
Song is playing |
|
Phone is connected via |
|
|
|
|
USB cable |
|
|
|
|
|
|
|
Screenshot error |
|
Radio is on |
|
|
|
|
|
|
|
USB tethering and |
|
Carrier |
data use |
|
portable hotspot is on |
|
threshold |
approaching |
|
|
|
or exceeded |
|
|
|
|
|
|
|
Screenshot captured |
|
|
|
|
|
|
|
|
Status icons
|
4G connected |
|
Vibrate mode |
|
|
|
|
|
4G in use |
|
Ringer is silenced |
|
|
|
|
|
2G connected |
|
Battery is very low |
|
|
|
|
|
2G in use |
|
Battery is low |
|
|
|
|
|
Connected to a Wi-Fi |
|
Battery is partially |
|
network |
|
drained |
|
|
|
|
|
Bluetooth is on |
|
Battery is full |
|
|
|
|
|
Connected to a |
|
Battery is charging |
|
Bluetooth device |
|
|
|
|
|
|
|
Airplane mode |
|
Headset connected |
|
|
|
|
|
Alarm is set |
|
No signal (gray) |
|
|
|
|
|
GPS is on |
|
No SIM card inserted |
|
|
|
(gray) |
|
|
|
|
7 |
8 |
1.3 Getting started |
Charging the battery |
1.3.1 Set-up
Inserting the micro SIM card & the microSD card
Before inserting/removing SIM or microSD card, you should ensure the tablet is off, to protect it from corruption or damage. In addition, regularly removing or inserting the SIM card or SD card may cause the tablet to restart.
To charge tablet, connect supplied USB cable and charger to tablet micro USB port and plug into electrical outlet.
•When using your tablet for the first time, fully charge battery (approximately 5 hours).
You are advised to fully charge the battery. Charging status ( ) is indicated by the percentage on screen while the tablet is powered off. The percentage increases as the tablet is charged.
To reduce power consumption and energy waste, when battery is fully charged, disconnect your charger from the plug; switch off Wi-Fi, GPS, Bluetooth or background-running applications when not in use; reduce the backlight time, etc.
9 |
10 |
1.3.2 Power on your tablet
Hold down the Power key until the tablet powers on, unlock your tablet (Swipe, Pattern, PIN, Password) if necessary and confirm. The Home screen is displayed.
If you do not know your PIN code or if you have forgotten it, contact your network operator. Do not store PIN code within your tablet, store information in a safe and accessible place.
Setting up your tablet for the first time
The first time you power on the tablet, you will be prompted to set the following options:
•On Welcome screen, select language and touch next icon 
 .
.
•Next, select Wi-Fi connection and setup, then touch NEXT or touch SKIP.
•Then enter your user name.You can also touch NEXT to get the next step.
•Then touch MORE->NEXT.
•Touch FINISH to complete the setup.
When the tablet is powered on, you can connect to a Wi-Fi network to sign into your Google account and to use features.
1.3.3 Power off your tablet
Hold down the Power key until the pop-up menu appears, select Shut down to confirm.
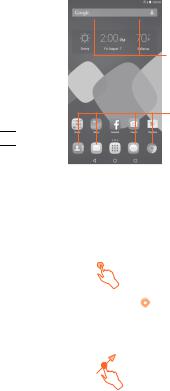
1.4Home screen
The Home screen extends on either side of the screen to allow more space for adding applications, shortcuts etc. Slide the Home screen to far left screen to launch favorite application (default will be Google Search App, to edit go to Settings/Display/Favorite application and select preferred app). Slide the Home screen right to view additional Home screens.The page indicators above the apps tray indicate which screen you are viewing.
11
|
|
|
Status bar |
|
|||
|
• Status/Notification indicators |
||
|
|
|
• Touch and drag down to open the |
|
|
|
Notifications panel. |
Search bar
•Touch to enter text search screen.
•Touch to enter voice search screen.
Favorite applications tray
•Touch to enter the application.
•Touch and hold to move or change applications.
 Applications icon
• Touch to open applications menu.
You can bring all the items (applications, shortcuts, folders and widgets) you love or use most frequently to your Home screen for quick access. Touch the Home key to get instant access to the Home screen.
1.4.1 Using the touchscreen
Touch
To access an application, touch it with your finger.
Touch and Hold 
Touch and hold the Home screen to get wallpapers, widgets and settings options.
Drag 
Place your finger on any item to drag it to another location.
12
Swipe 
Swipe the screen up and down or left and right to navigate through notifications panel, application screens, home screens, etc.
Flick
Flick your finger left and right across screens to move through screens faster.
Pinch/Spread
Place your index finger and thumb on the screen surface and draw them apart or together to scale an element on the screen.
Rotate 
Automatically change the screen orientation from portrait to landscape by turning the tablet sideways to have a better view.
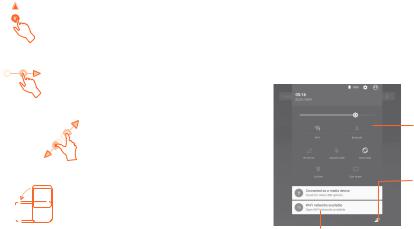
1.4.2 Status bar
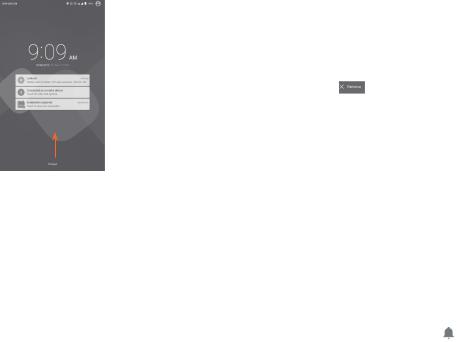
From status bar, you can view both tablet status on the right side and notification information on the left side. Touch and drag down the Status bar to open the Notifications panel and the Settings shortcut panel.Touch and drag up to close it.
Notifications panel
Touch and drag down the Status Bar to open the Notifications panel. Touch the notifications to view details or touch  on the bottom of Notifications panel to clear all notifications (ongoing notifications will remain).
13
Settings shortcut panel
In the Notifications panel, touch or swipe down the top gray bar to access the Settings shortcut panel. Touch Settings shortcut options displayed to enable/disable functions or to access full Settings menu touch Settings icon at top of panel.
 Touch to access Settings menu.
Settings shortcut panel.
Touch to clear all event–based notifications (other ongoing notifications will remain).
Notifications panel.
1.4.3 Search bar
The tablet provides a search function which can be used to locate information within applications, the tablet or the web.
14
Search by text
•Touch Search bar from the Home screen.
•Enter the text/phrase you want to search for.
• Touch |
on the keyboard to begin search. |
•Use bottom menu bar with filters to view search results from Web, Images, News, Maps, Shopping,Videos, Books,Apps, or Phone.
Search by voice
• Touch |
from Search bar to display a dialog screen. |
•Speak the word/phrase you want to search for. A list of search results will display for you to select from.
•Use bottom menu bar with filters to view search results from Web, Images, News, Maps, Shopping,Videos, Books,Apps, or Phone.
1.4.4 Lock/Unlock your screen
To protect your tablet and privacy, you can lock the tablet screen by choosing slide or creating a variety of patterns, PIN or password, etc.
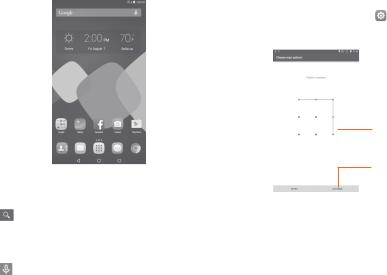
To create a screen unlock pattern (refer to 11.3.2 Security “Screen lock” section for detailed settings)
15
• Drag down the Status bar and open the Settings shortcut panel then touch the settings icon to enter Settings, then touch
Security/Screen lock/Pattern.
• Draw your own pattern.
Draw your unlock pattern
Touch to confirm by drawing pattern again
To create a screen unlock PIN/Password
•Touch Settings/Security/Screen lock /PIN or Password.
•Set your PIN or password.
To lock tablet screen
Press the Power key once to lock the screen.
To unlock tablet screen
Press the power key once to light up the screen, draw the unlock pattern you have created or enter PIN or password to unlock the screen.
If you have chosen Slide as the screen lock, slide the Home screen up with your finger to unlock the screen.
16
1.4.5 Personalize your Home screen
Adding Apps and Widgets
To add an application shortcut to Home screen touch the Applications
icon  , touch and hold an application to activate the Move mode, and drag the item to preferred Home screen.
To add a widget touch and hold an empty area on home screen and select WIDGETS from bottom menu. Touch and hold widget to activate the Move mode and drag the item to preferred Home screen.
While adding an application or widget shortcut to a Home screen, drag it to the top App info to view detailed information. If the application or widget is downloaded, drag it to the top Uninstall to unmount it directly.
Repositioning Apps and Widgets
Touch and hold the item to be repositioned to activate the Move 17
mode, drag the item to the desired position and then release.You can move items both on the Home screen and the Favorite tray. Hold the icon on the left or right edge of the screen to drag the item to another Home screen.
Removing Apps and Widgets
Touch and hold the item to be removed to activate the Move mode, drag the item up to the top of “ ”, and release after the item turns red.
Creating folders
To improve the organization of items (shortcuts or applications) on the Home screens and the Favorite applications tray, you can add them to a folder by stacking one item on top of another.To rename a folder, open folder, touch the folder’s title bar and input new name.
Wallpaper customization
Touch and hold an empty area on the Home screen, then touch WALLPAPERS from bottom menu to view available wallpapers. Touch Set Wallpaper at top of screen to set new wallpaper image. To access other images on tablet for wallpaper, while in wallpaper menu touch Pick image to access Gallery, Photos, File Manager and other options.
1.4.6 Volume adjustment
Using volume keys
Press Volume keys to adjust the volume.To activate the Silent mode,
press the Volume down key until volume bell icon is gray, you will be prompted to choose silent mode indefinitely or for set time.
Using Settings menu
Drag down the status bar to open the Settings shortcut panel and
touch the settings icon  to enter Settings, then touch Sound
& notification, you can set media, alarm and notification volumes. 18

2 Text input
2.1Using Onscreen Keyboard
Onscreen Keyboard settings
Touch the Application icon  from the Home screen, select Settings/Language & input. To change default keyboard, touch Current keyboard and select preferred keyboard, if you do not see preferred option, touch CHOOSE KEYBOARDS to see more options. To customize keyboard options, touch the keyboard name preferred from keyboard and input method options to see options. The following keyboards are available: Android Keyboard, Google Keyboard, Swype, and Google voice typing.
2.2Swype Keyboard
Touch to switch between "abc/Abc" mode;Touch & hold to switch between "abc/ ABC" mode.
Touch & hold to open |
|
|
|
|
|
|
|
|
|
||
|
Touch to switch between |
||||
keyboard settings. |
|
||||
|
different display of keyboard. |
||||
|
|
|
|||
Touch to |
switch between |
||||
symbol and numeric keyboard. |
|||||
2.3Text editing
You can edit the text you have entered.
•Touch and hold or double-tap within the text you would like to edit.
•Drag the tabs to change the high-lighted selection.
•Following options will show: SELECT ALL  , CUT
, CUT  COPY
COPY  , PASTE
  .
.
19
• Touch icon  when editing is completed, to exit out of edit mode.
You can also insert new text
•Touch where you want to type, or touch and hold a blank space, the cursor will blink and the tab will show. Drag the tab to move the cursor.
•If you have selected any text, touch the tab to show PASTE icon which allows you to paste any text you have previously copied.
20
3 Contacts
Contacts app provides quick access to all your contacts.
You can view and create contacts on your tablet and synchronize these with your Gmail contacts or other applications.
3.1 Consult your contacts |
|
|
Touch to search |
|||
|
|
|
|
|
|
|
|
|
|
|
|
|
in Contacts. |
|
|
|
|
|
|
|
|
|
|
|
|
||
Touch to |
|
|
Menu key |
|||
|
|
|||||
view contact |
|
|
|
|
|
|
|
|
|
|
|
|
|
information. |
|
|
|
|||
Touch to add a new contact.
Touch the Menu  key to display contacts options menu.
• |
Contacts to display |
Choose to show contacts from all |
|
|
locations on tablet or specific locations |
|
|
(e.g. tablet, Google, SD, etc.). |
• |
Import/Export |
Import or export contacts between |
|
|
Storage, SIM card, and SD card. |
• |
Accounts |
Manage the synchronization settings for |
|
|
different accounts. |
• |
Settings |
Set contacts display options. |
• |
Delete |
Select and delete unwanted contacts. |
• |
Share visible contacts |
Share visible with other contacts. |
3.2Adding a contact
Touch the icon  to create a new contact.
You are required to enter the contact's name and other contact information. By scrolling up and down the screen, you can move from one field to another easily.
Touch to save.
Touch to select a picture for the contact.
Touch to unfold the other predefined labels of this category.
If you want to add more information, touch ADD ANOTHER FIELD to add a new category.
When finished, touch  to save.
To exit without saving, you can touch Back key to return the previous menu.
Add to/remove from Favorites
To add a contact to Favorites, you can touch a contact to view details, then touch  to add the contact to Favorites (the star will
get becoming |
). |
|
To remove a contact from favorites, touch the star |
on contact |
|
details screen. |
|
|
21 |
22 |

3.3Managing contact groups
The contact group helps you to improve the organization of your contacts.You can add, remove and view groups in the GROUPS screen.
Touch the GROUPS to view local groups.To create a new group,
touch  to open options menu and select Add group, enter the new name and touch Done to confirm. If you have added accounts to your tablet, touch the GROUPS to view groups in accounts.
3.4Editing your contacts
To edit contact information, touch to choose a contact, then touch  on top of the screen,When finished, touch
  .
.
Delete contacts
To delete contacts, touch the Menu key  and select Delete from contacts screen, select the contacts you want to delete and then touch done.
The contact you have deleted will also be removed from other applications on the tablet or web the next time you synchronize your tablet.
3.5Contacts importing, exporting and sharing
This tablet enables you to import or export contacts between tablet and microSD card.
From Contacts screen, touch to open options menu, touch Import/Export, then select to import/export contacts from/to storage,Accounts, etc.
To import/export a single contact from/to mirco SD Card, choose an account and target SD card, select the contact you want to import/ export, and touch the icon  to confirm.
23
You can share a single contact or contacts with others by sending the contact's vCard to them via Bluetooth, Gmail, etc.
Touch a contact you want to share, touch the Menu key |
, and |
|
select Share from |
menu options, then select the application to |
|
perform this action. |
|
|
3.6Accounts
Contacts, data or other information can be synchronized from multiple accounts, depending on the applications installed on your tablet.
To add an account, drag down the status bar to open the Settings shortcut panel and touch  to enter Settings, then touch
Accounts/Add account.
You are required to select the kind of account you are adding, like Google, Email, etc.
As with other account set-ups,you need to enter detailed information, like username, password, etc.
To remove an account from tablet open Settings, touch Accounts then touch account you want to delete to access options under that account. Next touch the email address linked to account, once in account Sync menu, touch Menu key  and select Remove account, then confirm.
Turn on/off the sync & Auto-sync
Touch an account to enter the account screen, mark/unmark the checkbox(s) to turn on/off the account’s auto-sync.When
activated, all changes to information on the tablet or online will be automatically synchronized to each other.
Sync manually
You can also synchronize an account manually on Accounts screen, touch an account in the list, then touch the Menu key  and select Sync now.
24

4 Email
4.1Gmail/Email
The first time you set up your tablet, you can select to use an existing Gmail or to create a new Email account.
4.1.1 Gmail 
As Google's web-based email service, Gmail is configured when you first set up your tablet. Gmail on your tablet can be automatically synchronized with your Gmail account on the web. Unlike other kinds of email accounts, each message and its replies in Gmail
are grouped in your inbox as a single conversation; all emails are organized by labels instead of folders.
To create and send emails
•Touch the icon  from Inbox screen.
•Enter recipient(s)’s email address in To field, and if necessary, touch to add a copy or a blind copy to the message.
•Enter the subject and the content of the message.
•Touch  to add an attachment.
•Finally, touch the icon  to send.
•If you do not want to send the mail out right away, you can touch the Menu key  and select Save draft.To view the draft, touch the icon
  , then select Drafts.
If you do not want to send or save the mail, you can touch the Menu key  and then select Discard.
To add a signature to emails, touch the Menu key  and select Settings from inbox screen, choose an account, then touch
Signature.
25
To receive and read your emails
When a new email arrives, you will be notified by a ringtone or vibration, and an icon  will appear on Status bar.
Touch and drag down the Status bar to display the Notification panel, touch the new email to view it. Or you can also access the Gmail Inbox label and touch the new mail to read it.
You can search for an email by sender, receiver, subject, etc.
• Touch the icon from Inbox screen.
•Enter the keyword you want to search for in the searching box and touch  in the soft keyboard.
To reply or forward emails
• |
Reply |
When viewing an email, touch |
to reply the |
|
|
|
sender of this mail. |
|
|
• |
Reply all |
Touch |
and select "Reply |
all" to send |
|
|
|||
|
|
message to all people in a mail loop. |
||
• |
Forward |
Touch |
to forward the received mail to |
|
|
|
|||
other people.
•To assign a star or remove the star from the conversation
Managing Gmails by Labels
To conveniently manage conversations and messages, you can organize them using a Label.
To label a conversation when reading a conversation’s messages, touch the icon  and select the label to assign to the conversation.
To view conversations by labels when viewing your inbox or another conversation list, touch the icon  , then touch a label to view a list of
26

conversations with that label.
To manage labels, touch MANAGE LABELS from Labels screen.
Mark the checkbox to select email to activate batch mode, and generate the following option:
•Touch to archive the email message.To display the archived messages, you can touch in Inbox screen then touch All
mail.
Gmail settings
To manage Gmail settings, touch the Menu key and select Settings in Inbox screen.
General settings
•Gmail default Touch to Archive/delete message actions. action
•Swipe actions Mark the checkbox to archive when you
swipe the screenshot in conversation list.
• |
Sender image |
Mark the checkbox to show beside name in |
|
|
conversation list. |
• |
Reply all |
Mark the checkbox to make the default |
|
|
responding to messages. |
• |
Auto-fit |
Mark the checkbox to zoom in/out the |
|
messages |
messages to fit the screen. |
• |
Auto-advance |
Touch to select which screen to show after |
|
|
you delete or archive a conversation. |
• |
Confirm before |
Mark the checkbox to confirm before |
|
deleting |
deleting emails. |
|
|
27 |
• |
Confirm before |
Mark the checkbox to confirm before |
|
archiving |
archiving emails. |
• |
Confirm before |
Mark the checkbox to confirm before |
|
sending |
sending emails. |
Touch an account, the following settings will show:
• Inbox type To set this inbox as the default one or priority one.
• Inbox categories Touch to mark the checkbox to show/hide in the INBOX screen.
• Notifications Select to activate notification when a new email arrives.
•Inbox sound Touch to set Sound,Vibrate and Notify once.
•Signature To add a signature text to the end of each
|
mail you send. |
• Vacation |
Touch to set automatic reply. |
responder |
|
•Sync Gmail Touch to turn on/off Gmail sync.
•Days of mail to Touch to set the duration of days for mail
sync |
sync. |
• Manage labels Touch to open the Label screen, where you can manage synchronization and notifications.
•Download Mark the checkbox to auto download attachments attachments to recent messages via Wi-Fi.
• Images |
Mark the checkbox to show beside name in |
|
conversation list. |
|
28 |

4.1.2 Email 
Besides your Gmail account, you can also set up external POP3 or IMAP email accounts in your tablet.
To access this function, touch Email from Home screen.
An email wizard will guide you through the steps to set up an email account.
•Enter the email address and password of the account you want to set up.
•Touch Next. If the account you entered is not provided by your service provider in the device, you will be prompted to go to the email account settings screen to enter settings manually. Or you can touch Manual setup to directly enter the incoming and outgoing settings for the email account you are setting up.
•Enter the account name and display name in outgoing emails.
•To add another email account, you can touch Menu key  and Settings.Touch Add account on the left of the screen to create.
To create and send emails
•Touch the icon  from Inbox screen.
•Enter recipient(s) email address(es) in To field.
•If necessary, touch menu key  to select +CC/BCC to add a copy or a blind copy to the message.
•Enter the subject and the content of the message.
•Touch the  , then select Attach file to add an attachment.
• Finally, touch |
to send. |
•If you do not want to send the mail right away, you can touch Menu key  and Save draft or touch Back key to save a copy.
4.2Hangouts 
Google's instant messaging service, Hangouts, lets you communicate with your friends whenever they are connected to this service.
To access this feature and sign in, touch Application tab from the Home screen, then touch Hangouts. All friends added by using Hangouts from the web or tablet will be displayed in your friends list.
To sign out, touch the Menu key from Friends list to display options, then select Setting> Sign out.
4.2.1 Chatting with your friends
To start a chat, touch the name of a friend in your Friends list, then enter your message and finally touch  .
.
You can invite other friends to join in a group chat by touching the Menu key and selecting New group Hangout and then selecting the friend you want to add.
29 |
30 |
 Loading...