


 Loading...
Availableapplicationsandservicesaresubjecttochangeatanytime.

Table ofContents
Get Started |
1 |
Your Phone at a Glance |
1 |
Set Up Your Phone |
2 |
Activation and Service |
4 |
Create Your Account and Pick Your Plan |
4 |
Activate Your Phone |
5 |
Manage Your Account |
5 |
Re-Boost |
5 |
Additional Information |
5 |
Set Up Voicemail |
6 |
Phone Basics |
7 |
Your Phone’s Layout |
7 |
Turn Your Phone On and Off |
8 |
Navigate Through the Menus |
9 |
Status Bar |
9 |
Enter Text |
10 |
Keypad |
10 |
Phone Calls |
13 |
Make Phone Calls |
13 |
Call Using the Phone Dialer |
13 |
Call from Recent History |
13 |
Call from Contacts |
13 |
Call Using a Speed Dial Number |
14 |
Call Emergency Numbers |
14 |
Receive Phone Calls |
14 |
Voicemail |
15 |
Voicemail Setup |
15 |
Voicemail Notification |
15 |
Retrieve Your Voicemail Messages |
15 |
Phone Call Options |
16 |
In-call Options |
16 |
Caller ID |
17 |
Conference Calling |
17 |
Call Using a Speed Dial Number |
18 |
i

Recent History |
18 |
Contacts |
19 |
View Contacts |
19 |
Contacts List Options |
20 |
Add a Contact |
20 |
Create a Group |
21 |
Save a Phone Number |
22 |
Edit a Contact |
22 |
Add or Edit Information for a Contact |
22 |
Assign a Ringtone to a Contact |
22 |
Delete a Contact |
22 |
Remove a Member from a Group |
23 |
Assign a Speed Dial Number to a Contact |
23 |
Messaging |
24 |
Text and Multimedia Messaging |
24 |
Send a Text Message |
24 |
Send a Multimedia Message (MMS) |
25 |
Save and Resume a Draft Message |
25 |
New Messages Notification |
25 |
Manage Message Conversations |
25 |
Music |
27 |
Music Player |
27 |
Web and Data |
28 |
Launch a Web Connection |
28 |
Learn to Navigate the Browser |
28 |
Adjust Browser Settings |
28 |
Download Games, Ringtones, and More |
29 |
Access the Downloads Menus |
29 |
Camera and Video |
30 |
Open or Close the Camera |
30 |
Take a Picture |
30 |
Review Screen |
30 |
Record Videos |
30 |
View Pictures and Videos Using My Album |
31 |
Open or Close My Album |
31 |
View Pictures and Videos |
31 |
Watch Video |
32 |
Share Pictures and Videos |
32 |
ii

Send a Picture or Video by Multimedia Message |
32 |
Tools and Calendar |
33 |
Calendar |
33 |
Add an Event to the Calendar |
33 |
View an Event |
33 |
Edit/Delete an Event |
33 |
Alarm Clock |
33 |
Calculator |
34 |
Bluetooth |
34 |
Turn Bluetooth On or Off |
34 |
microSD Card |
34 |
Insert or remove a microSD Card |
34 |
View microSD Card Memory |
35 |
Format the microSD Card |
35 |
Use the Phone’s microSD Card as a USB Drive |
35 |
Transfer Files Between Your Phone and a Computer |
36 |
Settings |
37 |
Airplane Mode |
37 |
Display Settings |
37 |
Wallpaper Settings |
37 |
Storage Settings |
37 |
Phone Memory |
37 |
Location Services |
37 |
Lock Phone |
38 |
Language & Input Settings |
38 |
Language Settings |
38 |
Default Text Entry |
38 |
Reset Phone |
38 |
Accessibility Settings |
38 |
Regulatory Information |
40 |
Specific Absorption Rates (SAR) for Wireless Phones |
40 |
FCC Radio Frequency Emission |
40 |
Using Your Phone with a Hearing Aid Device |
40 |
Warning Statements |
42 |
Copyright Information |
43 |
Index |
44 |
iii
Get Started
The following topics give you all the information you need to set up your phone and service the first time.
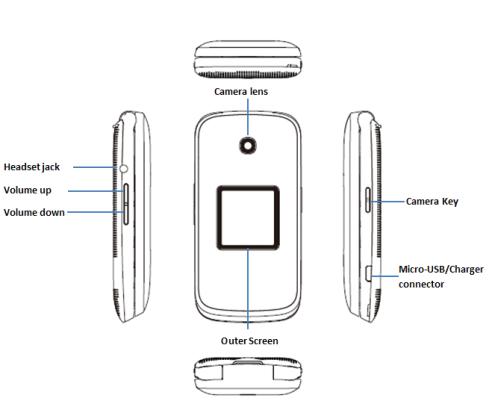
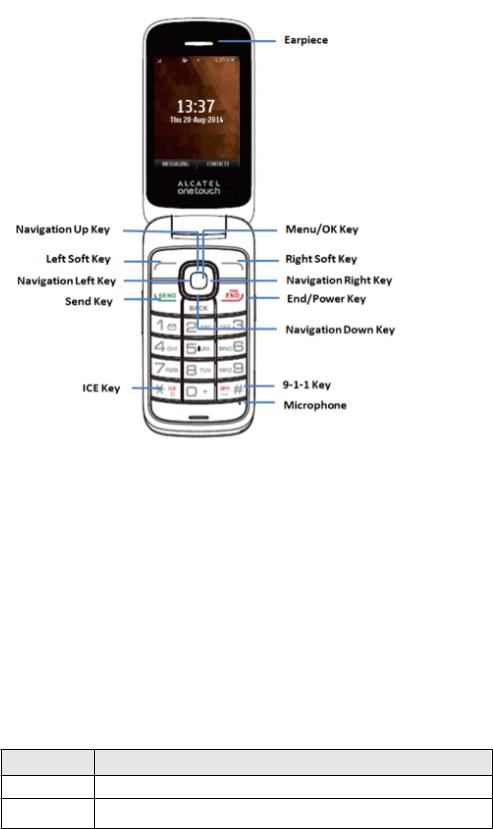
Your Phone at a Glance
The following illustrations outline your phone’s primary external features and buttons.
Get Started |
1 |

Set Up Your Phone
You must first install and charge the battery to begin setting up your phone.
Get Started |
2 |
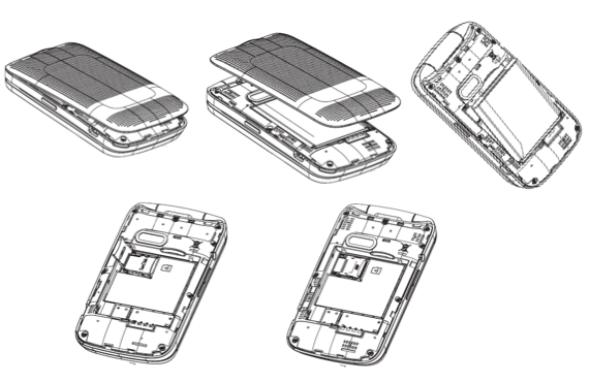
Install the Battery:
1.Remove the back cover using the notch in the bottom-left corner of the phone.
2.Insert the external microSD card into the slot with the gold contact facing down. To remove the external microSD card, gently press and slide it out.
3.Insert the battery into the battery compartment, making sure the connectors align. Gently press down to secure the battery.
Charge the Battery:
1. Insert the USB cable into the Charger/Accessory Jack on the bottom of the phone.
Get Started |
3 |
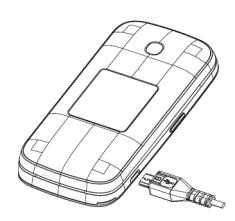
2.Insert the other end of the cable into the charging head, and then plug the charging head into an electrical outlet.
You are advised to fully charge the battery (  ). Charging status is indicated by the percentage on screen while the phone is powered off. The percentage increases as the phone is charged.
Note: The charging status bar will not float if your battery is extensively consumed. To reduce power consumption and energy waste, when battery is fully charged, disconnect your charger from the plug; switch off Wi-Fi, GPS, Bluetooth or background-running applications when not in use; reduce the backlight time, etc.
Activation and Service
Before using your phone, you must set up your service with Boost Mobile. You will need your phone’s serial number (MEID), printed on a sticker inside the battery compartment.
Create Your Account and Pick Your Plan
Set up your Boost Mobile account.
1.From your computer, visit boostmobile.com/activate.
2.Enter your phone’s MEID and click start activation process.
3.Your phone’s MEID (serial number) is printed on the sticker located on the back of your phone in the battery compartment. This number can also be found on the bottom panel of the phone’s package.
4.Follow the remaining instructions to choose your plan and select a payment method.
5.Follow the activation instructions below and you’ll be able to start using your phone.
Note: You can also activate by phone by calling 1-888-BOOST-4U (1-888-266-7848) from any other phone.
Get Started |
4 |
Activate Your Phone
After setting up your account on boostmobile.com, simply turn your device on. Your device is designed to activate automatically. If you are swapping from another Boost Mobile device to a new one, be sure to turn off the old device before swapping the serial number (MEID). Once the MEID swap is complete, turn on the new device and the programming information will be pushed to your device automatically.
Manage Your Account
Access information about your account. You can:
nCheck your minutes.
nRe-Boost® (add money to your account).
nChange plans.
nAnd more.
From Your Computer
n Log in with your wireless phone number and account PIN at boostmobile.com.
From Any Other Phone
n Boost Customer Care: 1-888-BOOST-4U (1-888-266-7848).
Re-Boost
Boost Mobile makes it easy to add money to your account. You decide exactly how and where you want to pay. Keep your account active by using your phone and adding money to your account.
Pay with Cash
Find an Authorized Re-Boost Retailer near you. Pick up a Re-Boost Card or recharge for as low as $10 at the register, where available.
Set Up Worry-Free Payments with Auto Re-Boost
It’s the easiest way to make sure your account stays on and active. Use a credit card, debit card or bank account—whatever’s best for you.
Visit boostmobile.com/reboost to get the details on all your Re-Boost options.
Additional Information
For more information about your Boost Mobile account, as well as other Boost Mobile services, visit us at: boostmobile.com.
Get Started |
5 |
Set Up Voicemail
You should set up your voicemail and personal greeting as soon as your phone is activated. Always use a password to protect against unauthorized access. Your phone automatically transfers all unanswered calls to your voicemail, even if your phone is in use or turned off.
1.From the home screen, press MESSAGING (Left Soft Key) > Voicemail > Call Voicemail.
2.Follow the system prompts to:
•Create your password.
•Record your name announcement.
•Record your greeting.
Important: Voicemail Password – It is strongly recommended that you create a password when setting up your voicemail to protect against unauthorized access. Without a password, anyone who has access to your phone is able to access your voicemail messages.
For more information about voicemail, see Voicemail.
Get Started |
6 |
Phone Basics
Your phone is packed with features that simplify your life and expand your ability to stay connected to the people and information that are important to you. The following topics will introduce the basic functions and features of your phone.
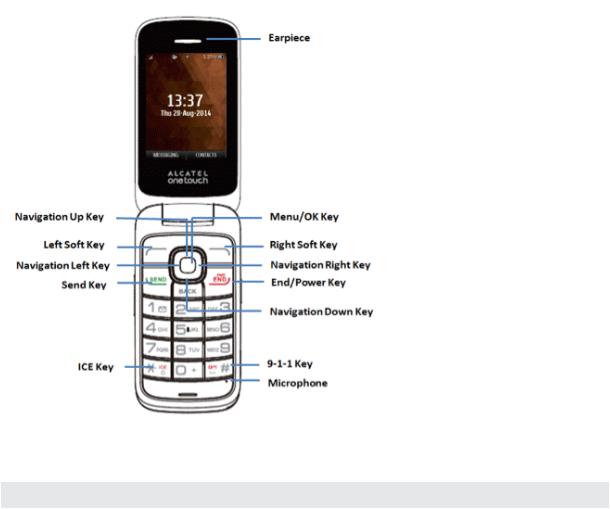
Your Phone’s Layout
The illustrations and descriptions below outline your phone’s basic layout.
PhoneBasics |
7 |
Key Functions
Item |
Function |
|
|
Menu/OK Key |
Enter main menu/ Confirm an option |
|
|
Navigation Keys |
Press to go left/right/up/down to confirm an option |
|
|
Left Soft Key |
Messaging |
|
|
Right Soft Key |
Contacts List |
|
|
Send Key |
Recent Call (home screen)/ Answer/Send a call |
|
|
End Key |
Power on/Power off/ End a call/ Back to the Home screen |
|
|
1 Key |
Long press to access Voicemail |
|
|
CAUTION! Inserting an accessory into the incorrect jack may damage the phone.
Turn Your Phone On and Off
The instructions below explain how to turn your phone on and off.
PhoneBasics |
8 |
Turn Your Phone On/Off
n Press and hold  .
.
Your screen remains blank while your phone is off (unless the battery is charging).
Navigate Through the Menus
The navigation keys on your phone lets you scroll through onscreen items. To navigate through a menu, press up or down using the navigation keys.
Select Menu Items
As you navigate through the menu, menu options are highlighted. Select any option by highlighting it and pressing. If the option is numbered, you can select it by pressing the corresponding number on the phone’s keypad.
Back Up Within a Menu
nTo go to the previous menu, press  .
.
nTo return to the home screen, press  .
.
Status Bar
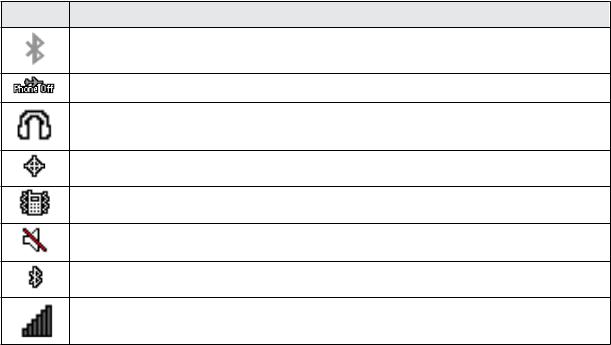
The status bar at the top of the home screen provides phone and service status information on the right side and notification alerts on the left.
Status Icons
Icon |
Status |
Bluetooth® active
Airplane Mode
Earphone
Location on
Vibrate
Silent
Bluetooth
Network (full signal)
PhoneBasics |
9 |
Icon |
Status |
Network (no signal)
Network (roaming)
3G (data service)
Alarm set
Battery (charging)
Battery (fully charged)
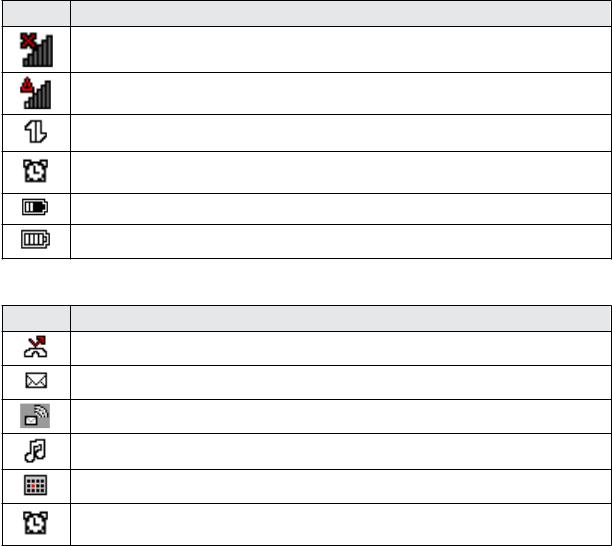
Notification Icons
Icon |
Notification |
Missed call
New message
New Voice Mail
Music playing
Event
Alarm
Enter Text
You can type on your phone using the keypad.
Keypad
Your phone provides a convenient keypad to enter letters, numbers, and symbols whenever you are prompted to enter text.
PhoneBasics |
10 |
1.From a screen where you can enter text, press OPTIONS (Right Soft Key) to change the text mode. (If you are in the message entry screen, press OPTIONS [Right Soft Key] > Text Mode.)
2.Select one of the following options:
•T9Word to enter text using a predictive text system that reduces the number of key presses required while entering a word.
•Abc to enter characters by using the alphabet mode.
•123 to enter numeric characters.
•Symbols to enter symbols.
•Smileys to enter smile icons.
•Text Settings to display the text entry settings menu (if applicable).
Number |
Function |
11, commonly-used symbols
2a, b, c, A, B, C, 2
PhoneBasics |
11 |
Loading...