

Page 1

QUICKSTART GUIDE
GUÍA DE INICIO RÁPIDO
GUIDE D'UTILISATION RAPIDE
KURZANLEITUNG
ENGLISH ( 1 – 4 )
ESPAÑOL ( 5 – 8 )
FRANÇAIS ( 9 – 12 )
GUIDA RAPIDA
ITALIANO ( 13 – 16 )
DEUTSCH ( 17 – 20 )
WWW.AKAIPRO.COM
Page 2

Page 3
BOX CONTENTS
• Miniak
• Gooseneck microphone
• Power adapter
• Quickstart Guide
• Reference Manual
• Safety Instructions & Warranty Information Booklet
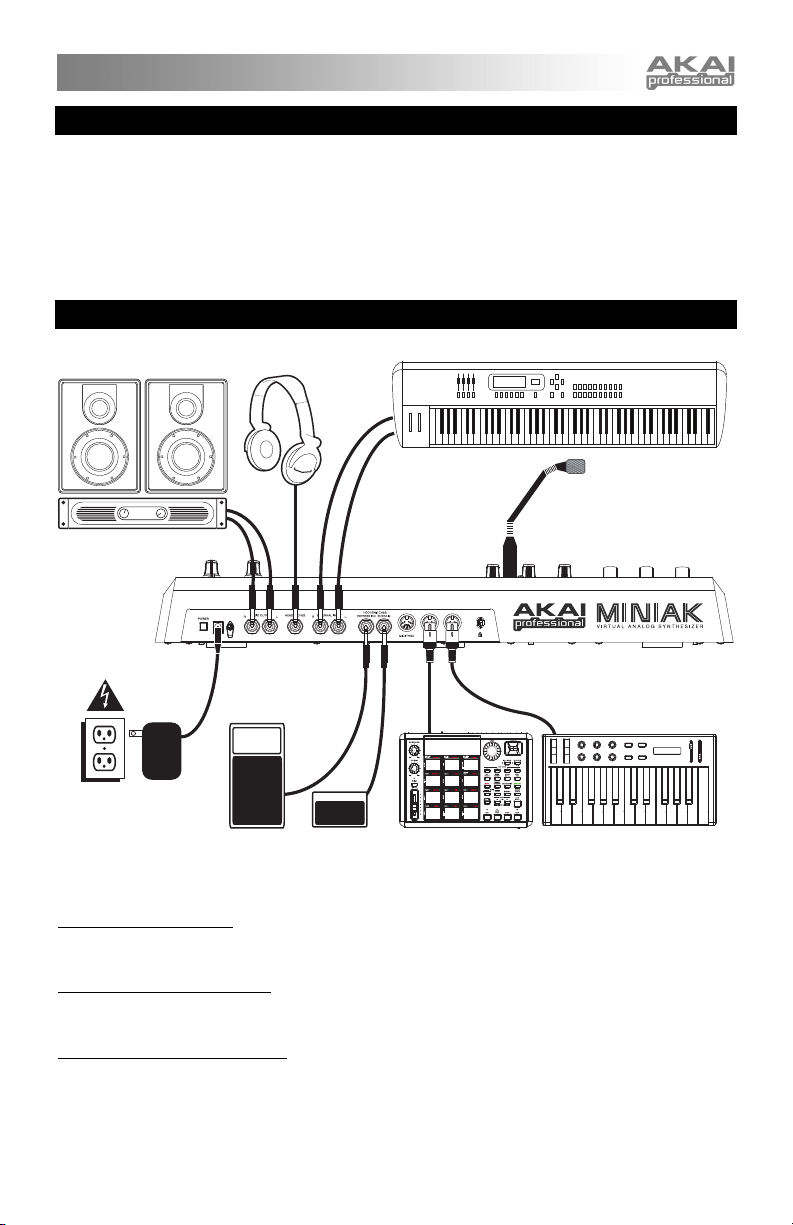
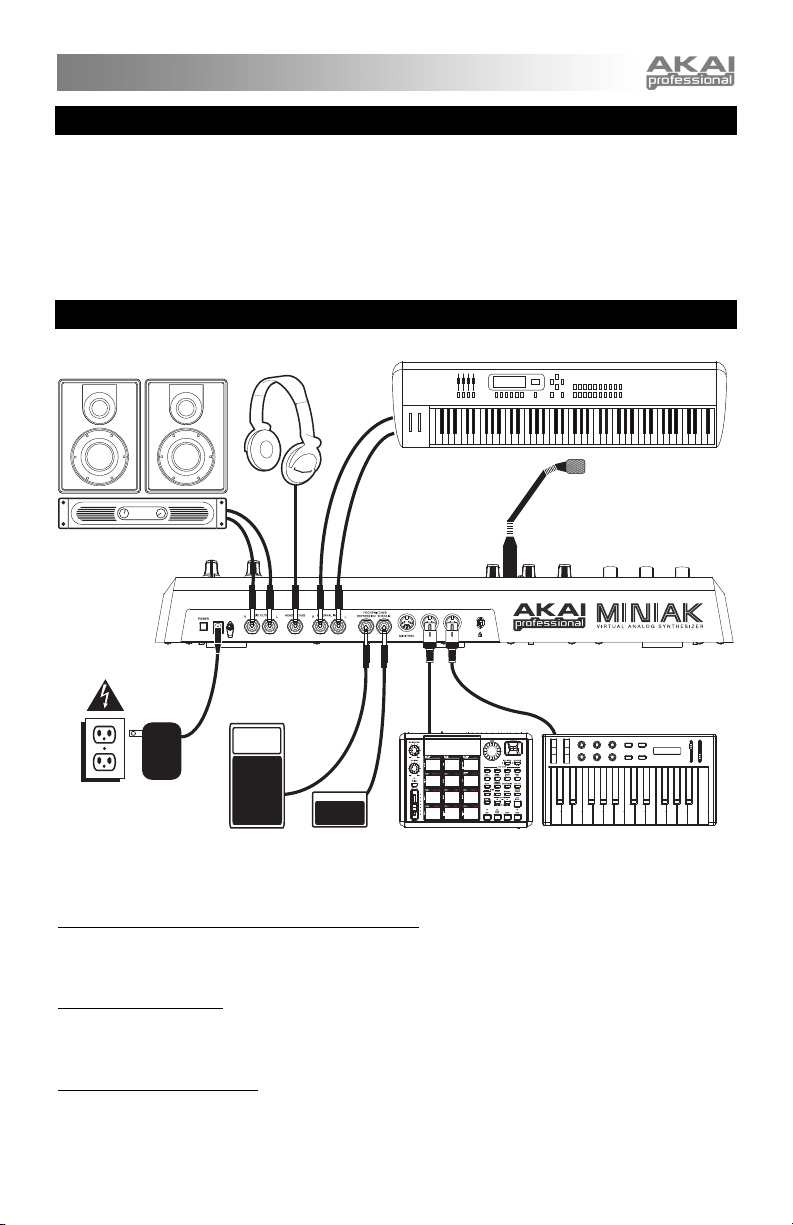
CONNECTION DIAGRAM
Stereo Amp
Headphones
External Instrument
Gooseneck
Microphone
Power
CONNECTING AC POWER
Before making any power connections, make sure the Miniak’s power switch is turned off. Then, plug the
power adapter into the Miniak’s power input and into a power outlet.
MAKING AUDIO CONNECTIONS
STEREO: Connect two cables from the Miniak’s left and right outputs to two inputs of an amp or mixer.
HEADPHONES: Plug a set of headphones into the headphone jack on the rear panel.
CONNECTING THE FOOT PEDALS
Connect a keyboard sustain pedal (not included) to the (SUSTAIN) input. When you turn the Miniak on, the
Miniak will automatically sense and calibrate itself to the pedal.
You can plug an optional continuous controller expression pedal into the (EXPRESSION) input.
Expression
Pedal
Footswitch
External Sound
Module
External MIDI Device
1
Page 4
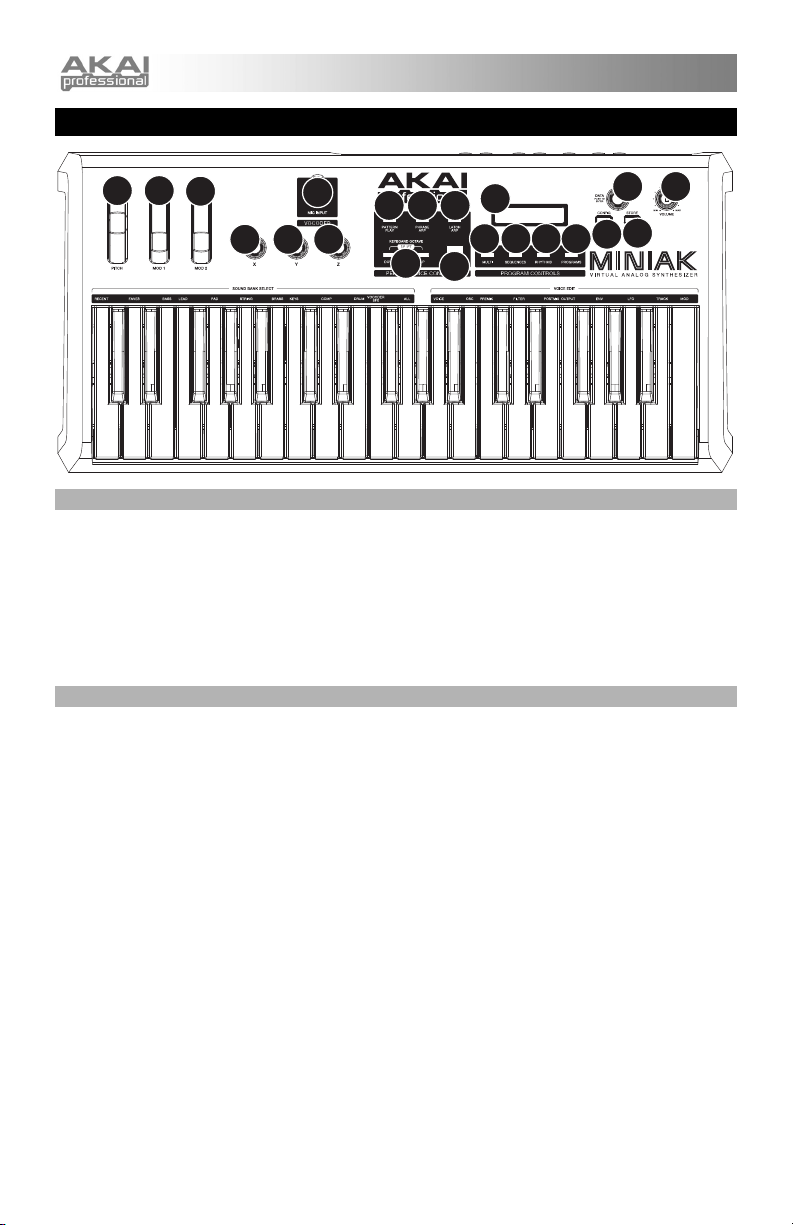
OVERVIEW OF THE CONTROLS
10111213
14 15
16 17
211
9
333
678
4
18
5
REAL-TIME CONTROLLERS
Despite its small size, the Miniak has six powerful real-time controllers. These controls put the incredible
expressivity of virtual analog synthesis at your fingertips.
1. (MOD1) and (MOD2) wheels: The (MOD1) wheel generally adds vibrato. (MOD2) most often sweeps
the filter.
2. (PITCH) wheel: The (PITCH) wheel typically raises or lowers the pitch by a whole step, allowing you to
gently or heavily detune your sound.
3. (X/Y/Z) knobs: The (X/Y/Z) knobs have different effects depending upon the program.
PERFORMANCE CONTROLS
The performance buttons are clustered together to the left of the display.
4. [OCTAVE]: Extend the Miniak’s playing range by using the two [OCTAVE] buttons. Each press of the
[DOWN] or [UP] button shifts the transposition by one octave. The appropriate button glows with
increasing intensity as the octave transposition increases.
5. [TAP TEMPO]: The [TAP TEMPO] LED always blinks at the current tempo. Tap this button at the
desired rate to determine the tempo. (For finer control, you can also hold down [TAP TEMPO] and turn
the control knob.)
6. [PHRASE ARP]: Use [PHRASE ARP] to capture and play back riffs that you play on the keyboard.
7. [LATCH ARP]: [LATCH ARP] acts like a sustain pedal. When [LATCH ARP] is selected, notes
continue to play even after you remove your hands from the keyboard. Press [LATCH ARP] a second
time to turn the function off.
8. [PATTERN PLAY]: [PATTERN PLAY] works along with Multis. When [PATTERN PLAY] is glowing,
the accompaniment feature is active, allowing you to trigger Sequences and Rhythms within Multi
Mode. When [PATTERN PLAY] is not glowing, all sequencing features are disabled, and the Miniak
only plays the keys you press.
9. MIC INPUT: Connect the included gooseneck microphone to this input. (Note that the microphone will
be bypassed when the left audio input is being used.)
2
Page 5
PROGRAM CONTROLS
The Program Control buttons access the Miniak’s four different modes: Programs, Rhythms, Sequences,
and Multi. Press one of the buttons to enter its mode. Then spin the DATA DIAL for different sounds.
10. PROGRAMS: Programs are the heart of the Miniak – its lead, bass, drum, pad, and other virtual analog
sounds. To jump to a Program category, hold down the [PROGRAMS] button while pressing the
appropriate white key on the keyboard. The "recent" category remembers the most recent Programs
you’ve used. Add a Program to the "faves" category by pressing the DATA DIAL twice.
11. RHYTHMS: Drum grooves comprised of one or more drum sounds, each playing its own rhythm. Play
the left side of the keyboard to hear the complete groove. Trigger individual drums using the keys on
the right side.
12. SEQUENCES: Melodic passages that you can compose and then trigger chromatically, beginning on
any key.
13. MULTI: The Miniak’s most powerful and sophisticated mode, simultaneously combining multiple
programs, rhythms, sequences, and more into powerful and expressive combinations.
DATA & VOLUME CONTROLS
14. DATA DIAL: This dial can also be used to increment and decrement values and settings.
15. VOLUME KNOB: Adjusts the Miniak's master volume level.
16. [CONFIG]: The Miniak’s configuration options. Global transposition and tuning, keyboard velocity
curve, MIDI settings, and more.
17. [STORE]: The [STORE] button lights when you have made edits. Press it to save your changes.
18. LCD: The display is used for navigating menus, displaying data, and affecting change on Miniak's
options and parameters.
SHORTCUTS
PRESS-AND-HOLD SHORTCUTS FOR THE PROGRAM CONTROLS
Hold down one of the [PROGRAMS], [RHYTHMS], [SEQUENCES] or [MULTI] buttons while playing the
keyboard to access various editing and selection shortcuts.
The text printed just above the keyboard provides a key to many of these shortcuts.
Select a category
Select a category for the most recent part
Select a category for the current Sequence's Program
(no shortcut)
Programs
Multi
Sequences
Rhythms
3
Edit this parameter for the current Program
Edit part A–G Edit beat A–C
(no shortcut)
Edit drum A–G
(no shortcut)
Page 6

MODE-JUMPING SHORTCUTS
Access each of these shortcuts by holding one of the [PROGRAMS], [RHYTHMS], [SEQUENCES] or
[MULTI] buttons and then pressing one of the other buttons.
[PROGRAMS]
[MULTI]
[SEQUENCES]
[RHYTHMS]
Press [MULTI]: set the most recent part’s Program.
Press [SEQUENCES]: set the Sequence’s Program.
Press [RHYTHMS]: set the most recent drum’s Program (for drum Programs only).
Press [PROGRAMS]: jump to the most recent part’s Program.
Press [SEQUENCES]: jump to the Sequence of the most recent part (if any).
Press [RHYTHMS]: jump to the Rhythm of the most recent beat (if any).
Press [PROGRAMS]: jump to the Sequence’s Program.
Press [MULTI]: set the most recent part’s Sequence.
Press [RHYTHMS]: (no shortcut).
Press [PROGRAMS]: jump to the Program of the most recent drum.
Press [MULTI]: set the most recent beat’s Rhythm.
Press [SEQUENCES]: (no shortcut).
OTHER SHORTCUTS
In most areas, pressing the control knob twice (double-click) restores the default value.
Button-specific shortcuts:
[OCTAVE]: Press both [OCTAVE] buttons simultaneously to return to the default octave range of C3 through
C6.
[TAP TEMPO]: Hold [TAP TEMPO] and turn the control knob for fine control over the tempo.
[PROGRAMS]: When editing a parameter, hold down the control knob and wiggle an (X/Y/Z) knob to assign
the knob to that parameter.
[MULTI]: For each part, hold down [MULTI] and move a slider or the pitch wheel to jump to the controller
assignment options for that part. Do the same with the (X/Y/Z) knobs.
EDITING ON THE MINIAK
Right out of the box, the Miniak offers all the great sounds and operation that most users will ever want. But,
if you’re a "power user," you’ll find a wealth of easy-to-access editing capabilities.
To dig deep into the Miniak’s capabilities, push the DATA DIAL to edit the parameters associated with the
current operating mode (Programs, Multi, Sequences, Rhythms, or Config). The current mode’s light will
glow red once you begin editing.
Turn the DATA DIAL to cycle through various parameters. Push
and turn the DATA DIAL to edit; push once more to accept your
changes.
Push the DATA DIAL twice in quick succession to reset a parameter to its default (factory) value.
For much more detail on editing, see the Reference Manual.
The [STORE] button lights when
you have made edits. Press it to
save your changes.
4
Page 7
CONTENIDO DE LA CAJA
• Miniak
• Micrófono cuello de cisne
• Adaptator de alimentación
• Guía de inicio rápido
• Manuale de referencia
• Folleto de información sobre la seguridad y la garantía
DIAGRAMA DE CONEXIÓN
Amplificador estéreo
Auriculares
Instrumento externo
Micrófono cuello
de cisne
Alimentación
CONEXION DE LA FUENTE DE CORRIENTE ALTERNA
Antes de realizar cualquier conexión eléctrica, asegúrese de que el interruptor de alimentación del Miniak
esté desconectado. Luego, conecte el adaptador de alimentación a la entrada de alimentación del Miniak y
a un tomacorriente.
CONEXIONES DE AUDIO
Estéreo. Conecte dos cables desde las salidas derecha e izquierda del Miniak a dos entradas de un
amplificador o mezclador.
Auriculares. Enchufe unos auriculares en el jack de auriculares situado en el panel trasero.
CONEXION DE LOS PEDALES
Conecte un pedal de sostenido del teclado (no incluido) a la entrada (SUSTAIN). Cuando encienda el
Miniak, el equipo detectará automáticamente el pedal y se calibrará para este último.
Puede enchufar un pedal de expresión opcional con controlador continuo en la entrada (EXPRESSION).
Pedal de
expresión
Interruptore
de pedal
Módulo de
sonido externo
Dispositivo MIDI externo
5
Page 8

DESCRIPCIÓN GENERAL DE LOS CONTROLES
10111213
14 15
16 17
211
9
333
678
4
18
5
CONTROLES DE TIEMPO REAL
A pesar de su pequeño tamaño, el Miniak cuenta con seis controladores potentes de tiempo real. Estos controles le
ponen al alcance de la mano la increíble expresividad de la síntesis analógica virtual.
1. Ruedas (MOD1) y (MOD2): La rueda (MOD1) normalmente agrega vibrato. (MOD2) suele barrer el filtro.
2. rueda (PITCH): La rueda (PITCH) típicamente aumenta o disminuye el pitch por un paso entero, lo que le
permite desafinar su sonido suavemente o en gran medida.
3. botones (X/Y/Z): Los botones (X/Y/Z) tienen diferentes efectos según el programa.
CONTROLES DE RENDIMIENTO
Los botones de rendimiento están agrupados a la izquierda de la pantalla.
4. [OCTAVE]: Extienda el rango de sonido del Miniak usando los dos botones [OCTAVE]. Cada vez que
presiona el botón [DOWN] o [UP] cambia la transposición en una octava. El botón correspondiente se ilumina
más fuerte cada vez que la transposición de octavas aumenta.
5. [TAP TEMPO]: El LED [TAP TEMPO] parpadea al tempo actual. Golpee este botón al ritmo deseado para
determinar el tempo. (Para un control más fino, puede mantener presionado [TAP TEMPO] y girar el BOTÓN
DATA.)
6. [PHRASE ARP]: Use [PHRASE ARP] para capturar y reproducir melodías que toque en el teclado.
7. [LATCH ARP]: [LATCH ARP] actúa como un pedal de sostenido. Cuando selecciona [LATCH ARP], las
notas continúan reproduciéndose después de que retire las manos del teclado. Presione [LATCH ARP] una
segunda vez para apagar esta función.
8. [PATTERN PLAY]: [PATTERN PLAY] funciona junto con los ajustes. Cuando [PATTERN PLAY] se ilumina,
la característica de acompañamiento está activa, lo que le permite disparar Secuencias y Ritmos dentro del
Modo de Multi. Cuando [PATTERN PLAY] no está iluminado, todas las características de secuencia están
deshabilitadas y el Miniak reproduce solamente los tonos que presione.
9. ENTRADA DE MICRÓFONO: Conecte a esta entrada el micrófono cuello de cisne incluido. (Tenga en cuenta
que se puentea el micrófono cuando se usa la entrada de audio izquierda.)
6
Page 9

CONTROLES DE PROGRAMA
Los botones de controles de programa acceden a los diferentes modos del Miniak: Programas, Ritmos, Secuencias,
y Multi. Presione uno de los botones para entrar en ese modo. Luego gire el BOTÓN DATA para obtener diferentes
sonidos.
10. PROGRAMS: Los Programas son el corazón del Miniak – sus sonidos de lead, bass, batería, pad y otros
sonidos virtuales análogos. Para saltar a una categoría de Programas, mantenga presionado el botón
[PROGRAMS] mientras presiona la tecla blanca correspondiente en el teclado. La categoría de recientes o
"recent" recuerda los Programas más recientes que ha usado. Agregue un Programa a la categoría de “faves”
(favoritos) presionando el BOTÓN DATA dos veces.
11. RHYTHMS: Ritmos groove de baterías que consisten de uno o más sonidos de baterías, cada una tocando su
propio ritmo.
12. SEQUENCES: Pasajes melódicos que puede componer y luego disparar cromáticamente, comenzando por
cualquier tono.
13. MULTI: El modo más sofisticado y más potente del Miniak, que combina simultáneamente Programas
múltiples, Ritmos, Patrones y más funciones en combinaciones potentes y expresivas.
Toque la parte izquierda del teclado para escuchar el sonido entero. Dispare baterías individuales usando las teclas
del lado derecho.
CONTROLES DE DATA Y VOLUMEN
14. BOTÓN DATA – Este botón también se puede usar para incrementar y disminuir valores y ajustes.
15. BOTÓN VOLUMEN – Ajusta el nivel de volumen maestro del Miniak.
16. [CONFIG]: Opciones de configuración del Miniak. Transposición global y afinamiento, curva de velocidad del
teclado, ajustes de MIDI y otras más.
17. [STORE]: El botón de almacenamiento [STORE] se ilumina cuando realiza ediciones. Presiónelo para
guardar sus cambios.
18. LCD: La pantalla se usa para navegar por los menús, mostrar datos y realizar cambios en las opciones y
parámetros del Miniak.
ATAJOS
PRESIONE Y MANTENGA PRESIONADO LOS ATAJOS PARA EL CIRCULO DE
CONTROLES DE PROGRAMA
Mantenga presionado uno de los botones de [PROGRAMS], [RHYTHMS], [SEQUENCES] o [MULTI] mientras toca
el teclado para acceder varios atajos de edición y selección.
El texto impreso justo arriba del teclado proporciona una tecla para varios de estos atajos.
Seleccione una categoría
Seleccione una categoría para la parte más reciente
Seleccione una categoría para el Programa actual de la Sequencia
(no hay atajo)
7
Programs
Multi
Sequences
Rhythms
Editar este parámetro para el Programa actual
Editar parte A–G
(no hay atajo)
Editar batería A-G
Editar batería
A–C
(no hay atajo)
Page 10

ATAJOS PARA SALTOS DE MODO
Acceda a cada uno de estos atajos manteniendo pulsado uno de los botones [PROGRAMS], [RHYTHMS],
[SEQUENCES] o [MULTI] y pulsando uno de los otros botones.
[PROGRAMS]
[MULTI]
[SEQUENCES]
[RHYTHMS]
Pulse [MULTI]: para establecer el Programa de la parte más reciente.
Pulse [SEQUENCES]: para establecer el Programa de la Secuencia.
Pulse [RHYTHMS]: para establecer el Programa de tambor más reciente (sólo para
programas de tambor).
Pulse [PROGRAMS]: para saltar al Programa de la parte más reciente.
Pulse [SEQUENCES]: para saltar al Secuencia de la parte más reciente (si existe).
Pulse [RHYTHMS]: para saltar al Ritmo del beat más reciente (si existe).
Pulse [PROGRAMS]: para saltar al Programa de Secuencias.
Pulse [MULTI]: para establecer el Programa de la parte más reciente.
Pulse [RHYTHMS]: (no hay atajo).
Pulse [PROGRAMS]: para saltar al Programa del tambor más reciente.
Pulse [MULTI]: para establecer el Ritmo del beat más reciente.
Pulse [SEQUENCES]: (no hay atajo).
OTROS ATAJOS
En la mayoría de las áreas, al pulsar la perilla de control dos veces (doble clic), se restaura el valor
predeterminado. Atajos específicos de botones:
[OCTAVE]: Pulse simultáneamente ambos botones [OCTAVE] para volver al rango de octavas por defecto
de Do central (C3) a Do de la 6ta octava (C6).
[TAP TEMPO]: Mantenga pulsado [TAP TEMPO] y gire la perilla de control para realizar el control fino del
tempo.
[PROGRAMS]: Cuando edite un parámetro, mantenga presionada la perilla de control y mueva una perilla
(X/Y/Z) para asignar la perilla a ese parámetro.
[MULTI]: Para cada parte, mantenga pulsado [MULTI] y mueva un cursor o la rueda de pitch para saltar a
las opciones de asignación del controlador correspondientes a esa parte. Haga lo mismo con las perillas
(X/Y/Z).
EDITAR DESDE EL MINIAK
Desde la caja, el Miniak ofrece todos los sonidos y la operación que la mayoría de usuarios desean siempre.
No obstante, si es un "usuario de potencia," encontrará una riqueza de capacidades de edición con fácil
acceso.
Para acceder todas las capacidades del Miniak, presione el BOTÓN
DATA para editar los parámetros asociados con el modo de
funcionamiento actual (Programas, Multis, Secuencias, Ritmos o
Config). La luz del modo actual se iluminará en rojo cuando
empiece a editar.
Gire el BOTÓN DATA para ciclar por los diversos parámetros. Presione y gire el BOTÓN DATA para editar;
presione otra vez para aceptar sus cambios.
Presione el BOTÓN DATA dos veces rápidamente para reajustar un parámetro a su valor predeterminado
de fábrica.
Para ver más detalles sobre la edición, consulte el manual de referencia.
8
El botón de almacenamiento
[STORE] se ilumina cuando
realiza ediciones. Presiónelo para
guardar sus cambios.
Page 11

CONTENU DE LA BOÎTE
• Miniak
• Microphone directionnel
• Câble d'alimentation
• Guide d'utilisation simplifié
• Guide de référence
• Le livret des consignes de sécurité et des informations concernant la garantie
SCHÉMA DE CONNEXION
Amplificateur stéréo
Casque d'écoute
Instrument externe
Microphone
directionnel
Alimentation
électrique
BRANCHEMENT ELECTRIQUE
Avant d'effectuer tout branchement, veuillez vous assurer que l'interrupteur d'alimentation du Miniak est hors
tension. Branchez ensuite l’adaptateur c.a. dans l’entrée d’alimentation du Miniak et ensuite dans une prise
d’alimentation murale.
CONNECTIQUE AUDIO
Stéréo. Branchez deux câbles des sorties gauches et droits du Miniak aux deux entrées d'un amplificateur
ou d’une console de mixage.
Casque d'écoute. Branchez un casque d'écoute dans la prise pour casque du panneau arrière.
BRANCHEMENT DE PEDALES
Branchez une pédale de soutien (non incluse) à l’entrée de soutien (SUSTAIN). Dès qu’il est mis sous
tension, le Miniak détecte automatiquement la pédale et procède au calibrage.
Il est aussi possible de brancher une pédale d’expression progressive dans l'entrée d’expression
(EXPRESSION).
Pédale
d'expression
Commutateur
au pied
Module de son
externe
Appareil MIDI externe
9
Page 12

SURVOL DES COMMANDES
10111213
14 15
16 17
211
9
333
678
4
18
5
COMMANDES EN TEMPS RÉEL
Malgré sa petite taille, le Miniak possède six contrôleurs en temps réel puissants. Ces commandes mettre
l'incroyable expressivité de la synthèse analogique virtuelle à votre portée.
1. Roue (MOD1) et (MOD2) : La roue (MOD1) ajoute généralement du vibrato. Le (MOD2) s’affaire
généralement au balayage du filtre.
2. Roue de tonalité (PITCH) : La roue de tonalité (PITCH) augmente ou diminue la tonalité d’un ton, vous
permettant de désaccorder légèrement ou grandement le son.
3. Boutons (X/Y/Z) : Les boutons (X/Y/Z) peuvent avoir différents effets en fonction du programme
sélectionné.
COMMANDES DE PERFORMANCE
Les touches de performance sont regroupées à la gauche de l’écran d’affichage.
4. [OCTAVE] : Augmentez le registre du Miniak à l'aide des deux touches [OCTAVE]. La transposition
est modifiée d’une octave chaque fois que le touches [DOWN] ou [UP] sont enfoncées. La touche
appropriée illumine avec plus d’intensité lorsque la transposition d’octave augmente.
5. [TAP TEMPO] : Le témoin DEL de la touch [TAP TEMPO] clignote toujours au tempo en cours.
Tapez cette touche au rythme désiré afin de régler le tempo. (Pour un réglage plus précis, il est
possible de maintenir enfoncée la touché [TAP TEMPO] et de toumer le BOUTON DATA.)
6. [PHRASE ARP] : Utilisez la touche [PHRASE ARP] pour mémoriser et faire rejouer des riffs que vous
jouez sur le clavier.
7. [LATCH ARP] : La touche [LATCH ARP] agit comme une pédale de soutien. Lorsque la touche
[LATCH ARP] est sélectionnée, des notes continuent à jouer même après que vous ayez cessé de
jouer sur le clavier. Appuyez de nouveau sur la touche [LATCH ARP] pour annuler la fonction.
8. [PATTERN PLAY] : Le témoin [PATTERN PLAY] fonctionne en combinaison avec les différents
réglages. Lorsque le témoin [PATTERN PLAY] est allumé, la fonction d’accompagnement est active
vous permettant de lancer des Enchaînements et des Rythmes en Mode Multi. Lorsque le témoin
[PATTERN PLAY] est éteint, toute fonction d’Enchaînement est désactivée et le Miniak ne joue que les
notes que vous pressez.
9. ENTRÉE MICRO : Cette entrée permet de brancher le microphone directionnel inclus. (Veuillez noter
que le microphone sera mis en mode dérivation lorsque l'entrée audio gauche est utilisée.)
10
Page 13

COMMANDES DE PROGRAMME
Les touches des commandes de programme accèdent aux modes différents du Miniak : Programs
(Programmes), Rhythms (rythmes), Sequences (séquences) et Multi. Appuyez sur la touche qui correspond
au mode que vous désirez utiliser. Faites tourner ensuite le BOUTON DATA pour des sons différents.
10. PROGRAMS : Les programmes sont le coeur du Miniak; lead, bass, drum, pad et autres sons
analogues virtuels. Pour changer de catégorie de programme, maintenez enfoncée la touche
[PROGRAMS] tout en enfonçant la note blanche appropriée sur le clavier. La dernière catégorie se
souvient des derniers programmes utilisés. Ajoutez un programme à la catégorie des favoris en
appuyant deux fois sur le BOUTON DATA.
11. RHYTHMS : Des séquences de batterie composées d’un ou de plusieurs sons de batterie, chacun
jouant à son propre rythme.
12. SEQUENCES : Des passages mélodieux que vous pouvez composer et ensuite lancer
chromatiquement à l’aide de n'importe quelle note.
13. MULTI : Le mode le plus puissant et sophistiqué du Miniak est d’utiliser simultanément de multiples
Programmes, Rythmes, Enchaînements et plus, dans des combinaisons puissantes et expressives.
Jouez le côté gauche du clavier pour écouter la séquence au complet. Lancer des séquences de
batterie individuelles à l'aide du côté droit du clavier.
COMMANDES DE DATA ET VOLUME
14. BOUTON DATA – Ce bouton permet également d’augmenter ou de diminuer les valeurs et les
réglages.
15. BOUTON VOLUME – Touche permettant d'ajuster le niveau du volume.
16. [CONFIG]: Les options de configuration du Miniak. La transposition et la syntonisation globale, la
vitesses du clavier, les paramètres MIDI, et plus.
17. [STORE]: La touche de mémorisation [STORE] s’allume lorsque vous effectuez des modifications.
Enfoncez-la pour sauvegarder les modifications.
18. ACL: Afficheur ACL utilisé pour la navigation des menus, affichage des données, des options et
paramètres du Miniak.
RACCOURCIS
DES TOUCHES DE RACCOURCI DE TYPE « ENFONCEZ ET MAINTENEZ » DES
COMMANDES DE PROGRAMME
Maintenez enfoncé un des boutons de programmes [PROGRAMS], de rythmes [RHYTHMS], de séquences
[SEQUENCES], ou de [MULTI] en jouant du clavier pour accéder à plusieurs raccourcis d’édition et de
sélection. Le texte écrit au-dessus du clavier vous offre une légende pour certains de ces raccourcis.
Sélectionner une catégorie
Programs
Sélectionner une catégorie pour la partie la plus
Sequences
Sélectionner une catégorie pour le Programme d'Enchaînement en cours
Rhythms
(aucun raccourci)
11
Modifier les paramètres du Programme en cours
Multi
Modifier partie A-G
(aucun raccourci)
Modifier batterie A-G
Modifier
batterie A-C
(aucun
raccourci)
Page 14

RACCOURCIS
Vous pouvez accéder aux raccourcis en maintenant les touches [PROGRAMS], [RHYTHMS],
[SEQUENCES] ou [MULTI] enfoncées tout en appuyant sur une des autres touches.
[PROGRAMS]
Appuyez sur [MULTI] : permet de régler le Programme de la partie la plus récente.
Appuyez sur [SEQUENCES] : permet de régler le Programme des Enchaînements
Appuyez sur [RHYTHMS] : permet de régler le Programme de batterie le plus récent (programme de
batterie seulement).
[MULTI]
Appuyez sur [PROGRAMS] : pour accéder directement au Programme de la partie la plus récente.
Appuyez sur [SEQUENCES] : pour accéder directement à l’Enchaînement de la partie la plus récente (s’il
y a lieu).
Appuyez sur [RHYTHMS] : pour accéder directement au Rythme du battement le plus récent (s’il y a lieu).
[SEQUENCES]
Appuyez sur [PROGRAMS] : pour accéder directement au Programme de l’Enchaînement.
Appuyez sur [MULTI] : pour régler le Programme de la partie la plus récente.
Appuyez sur [RHYTHMS] : (aucun raccourci).
[RHYTHMS]
Appuyez sur [PROGRAMS] : pour accéder directement au Programme de batterie le plus récent.
Appuyez sur [MULTI] : pour régler le Rythme le plus récent.
Appuyez sur [SEQUENCES] : (aucun raccourci).
AUTRES RACCOURCIS
Dans la plupart des cas, appuyer deux fois sur le bouton de commande (double-cliquer) permet de
réinitialiser les valeurs par défaut. Raccourcis spécifiques aux touches :
[OCTAVE] : Appuyez sur les deux touches [OCTAVE] simultanément afin de réinitialiser la plage d’octave
par défaut de C3 à C6.
[TAP TEMPO] : (Pour un réglage plus précis, maintenez la touche [TAP TEMPO] enfoncée et tournez le
bouton de commande.)
[PROGRAMS] : Lors de l'édition d'un paramètre, maintenez le bouton de commande enfoncé et tournez un
des potentiomètres rotatifs (X/Y/Z) afin d’assigner le paramètre à ce potentiomètre.
[MULTI] : Pour chaque partie, maintenez la touche [MULTI] et déplacez le potentiomètre ou tournez la
molette PITCH afin d’accéder aux options d’assignation du contrôleur pour cette partie. Faites de même pour
les potentiomètres rotatifs (X/Y/Z).
FAIRE DES MODIFICATIONS À L'AIDE DU MINIAK
Le Miniak offre tous les sons et fonctions extraordinaires que la plupart des utilisateurs désirent, et ce à la
portée de la main. Par contre, si vous êtes de ceux qui aiment expérimenter un peu plus, vous trouverez une
mine de fonctions d’édition.
Pour utiliser les fonctions plus poussées du Miniak, appuyez sur le
BOUTON DATA pour modifier les paramètres associés avec le mode
de fonctionnement en cours (Programs, Multis, Sequences, Rhythms
ou Multi). Le témoin du mode en cours s’illumine en rouge lorsque
vous procédez à des modifications.
Tournez le BOUTON DATA pour faire défiler les différents
paramètres. Appuyez puis tournez sur le BOUTON DATA pour éditer; appuyez à nouveau pour accepter les
modifications. Appuyez deux fois rapidement sur le BOUTON DATA pour remettre les valeurs d’usine du
paramètre.
Pour plus de détail sur la fonction d’édition, veuillez consulter le guide de référence.
La touche de mémorisation
[STORE] s’allume lorsque vous
effectuez des modifications.
Enfoncez-la pour sauvegarder les
modifications.
12
Page 15

CONTENUTI DELLA CONFEZIONE
• Miniak
• Microfono a collo d’oca
• Adattatore di alimentazione
• Guida rapida
• Manuale di riferimento
• Libretto di istruzioni di sicurezza e garanzia
SCHEMA DEI COLLEGAMENTI
Amp Stereo
Cuffie
Strumento Esterno
Microfono a
collo d’oca
Alimentazione
COLLEGAMENTO ALIMENTAZIONE CA
Prima di effettuare qualsiasi collegamento all'alimentazione, assicuratevi che l'interruttore di alimentazione
del Miniak sia spento. Quindi, inserire l’adattatore di alimentazione all'ingresso di alimentazione del Miniak e
ad una presa di corrente.
COLLEGAMENTI AUDIO
Stereo. Collegare due cavi a partire dalle uscite sinistra e destra del Miniak ai due ingressi di un amp o di un
mixer.
Cuffie. Inserire un set di cuffie nel jack cuffie situato sul pannello posteriore.
COLLEGAMENTO DEI FOOT PEDAL
Collegare un pedale di sostegno da tastiera (non incluso) all’ingresso (SUSTAIN). Al momento
dell’accensione del Miniak, il Miniak rileverà automaticamente il pedale e si calibrerà su di esso.
È inoltre possibile inserire un pedale di espressione a controllo continuo opzionale all’ingresso
(EXPRESSION).
d’espressione
Pedale
Interruttore
a pedale
Modulo sonoro
esterno
Dispositivo MIDI esterno
13
Page 16

PANORAMICA DEI COMANDI
10111213
14 15
16 17
211
9
333
678
4
18
5
COMANDI IN TEMPO REALE
Nonostante le sue dimensioni compatte, il Miniak è dotato di sei potenti comandi in tempo reale. Questi
comandi conferiscono alle vostre dita tutta l’eccezionale espressività della sintesi analogica virtuale.
1. Rotelle (MOD1) e (MOD2): La rotella (MOD1) solitamente aggiunge il vibrato. (MOD2) più spesso
spazza il filtro.
2. Rotella del (PITCH): La rotella del (PITCH) tipicamente aumenta o diminuisce l’intensità del pitch di
un’intera fase, consentendo di desintonizzare il suono delicatamente o pesantemente.
3. Manopole (X/Y/Z): Alle manopole (X/Y/Z) sono assegnati diversi effetti a seconda del programma.
COMANDI DI PRESTAZIONE
I tasti di prestazione sono raggruppati a sinistra del display.
4. [OCTAVE]: È possibile estendere l’ampiezza di riproduzione del Miniak servendosi dei due tasti
[OCTAVE]. Ad ogni pressione del tasto [DOWN] o [UP] si passa alla trasposizione di un’ottava. Il
giusto tasto si illumina sempre più all’aumentare della trasposizione delle ottave.
5. [TAP TEMPO]: Il LED [TAP TEMPO] lampeggia sempre al tempo corrente. Battere il pulsante al
tempo desiderato per determinare il tempo. (Per un controllo più fine, è anche possible mantenere la
pressione sul tasto [TAP TEMPO] e girare la MANOPOLA DATA.)
6. [PHRASE ARP]: Servirsi di [PHRASE ARP] per cogliere e riprodurre i riff che vengono suonati sulla
tastiera.
7. [LATCH ARP]: [LATCH ARP] funziona come un pedale di sostegno. Quando [LATCH ARP] è
selezionato, le note continuano a suonare anche dopo aver tolto le mani dalla tastiera. Premere
[LATCH ARP] una seconda volta per spegnere la funzione.
8. [PATTERN PLAY]: [PATTERN PLAY] funziona con le impostazioni. Quando [PATTERN PLAY] si
illumina, la funzione di accompagnamento è attiva, permettendovi di innescare Sequenze e Ritmi
all’interno della Modalità di Multi. Quando [PATTERN PLAY] non è illuminato, tutte le funzioni di
sequenziamento sono disabilitate, ed il Miniak suona unicamente i tasti che vengono premuti.
9. INGRESSO MIC: collegare il microfono a collo d’oca in dotazione a questo ingresso. (Va notato che il
microfono verrà bypassato quando viene utilizzata il ingresso audio di sinistra.)
14
Page 17

COMANDI DI PROGRAMMA
Il tasti del comandi di programma accedono alle diverse modalità del Miniak: Programs (programmi),
Rhythms (ritmi), Sequences (sequenze) e Multi. Premere uno dei tasti per entrare in quella determinata
modalità. Quindi far ruotare la MANOPOLA DATA per ricercare i diversi suoni.
10. PROGRAMS: I programmi sono il cuore del Miniak – i suoi ottoni, bassi, percussioni, pad, ed altri suoni
analogici virtuali. Per saltare ad una determinata categoria di Programma, mantenere la pressione sul
tasto [PROGRAMS] premendo contemporaneamente il tasto bianco adatto sulla tastiera. La categoria
"recent" ricorda i Programmi da voi utilizzati di recente. È possibile aggiungere un Programma alla
categoria "faves" (favoriti) premendo due volte il MANOPOLA DATA.
11. RHYTHMS: Groove di percussioni che comprendono uno o più suoni di percussioni che suonano
ciascuno al proprio Ritmo. Suonare la parte sinistra della tastiera per ascoltare l'interna gamma del
groove. Innescare le single percussioni servendovi dei tasti situati sul lato destroy.
12. SEQUENCES: Passaggi melodici che potete comporre ed avviare cromaticamente, iniziando con
qualsiasi tasto.
13. MULTI: La modalità più potente e sofisticata del Miniak, che combina simultaneamente programmi
multipli, ritmi, schemi e più, in combinazioni potenti ed espressive.
COMANDI DI DATA E VOLUME
14. MANOPOLA DATA – Questa rotella può a sua volta essere utilizzata per aumentare e diminuire i
valori e le impostazioni.
15. MANOPOLA VOLUME – Regola il livello del volume principale del Miniak.
16. [CONFIG]: Le opzioni di configurazione del Miniak. Trasposizione globale e sintonia, curva di velocità
della tastiera, impostazioni MIDI e molto altro.
17. [STORE]: Il tasto [STORE] si illumina in seguito all’apporto di modifiche. Premere questo tasto per
salvare le modifiche.
18. LCD: Il display serve per navigare tra i menu, visualizzare i dati ed apportare modifiche alle opzioni e ai
parametri del Miniak.
SCORCIATOIE
SCORCIATOIE "PREMI-E-MANTIENI" PER IL CERCHIO DELLA COMANDI DI PROGRAMMA
Mantenere la pressione su uno dei seguenti tasti: [PROGRAMS], [RHYTHMS], [SEQUENCES] o [MULTI]
suonando la tastiera per accedere a varie scorciatoie di editing e di selezione.
Il testo stampato al di sopra della tastiera fornisce una chiave a molte di queste scorciatoie.
Selezionare una categoria
Selezionare una categoria per la parte più recente
Selezionare una categoria all'interno del
Programma del Sequenza in corso
(nessuna scorciatoia)
Programs
Editare questo parametro per il Programma in corso
Multi
Editare parte A–G
Sequences
(nessuna scorciatoia)
Rhythms
Editare percussioni A–G
15
Editare
percussioni
A–C
(nessuna
scorciatoia)
Page 18

SCORCIATOIE PER IL PASSAGGIO DA UNA MODALITÀ ALL’ALTRA
Accedere a ciascuna di queste scorciatoie tenendo premuto uno dei tasti [PROGRAMS], [RHYTHMS],
[SEQUENCES] o [MULTI] (Programmi, Ritmi, Sequenze e Multi) e premendo quindi uno degli altri tasti.
[PROGRAMS] (programmi)
Premere [MULTI]: imposta il Programma della parte più recente.
Premere [SEQUENCES]: imposta il Programma del Sequenza.
Premere [RHYTHMS]: imposta il Programma di batteria più recente (unicamente per
[MULTI]
Premere [PROGRAMS]: passa al Programma più recente di quella parte.
Premere [SEQUENCES]: passa al Sequenza della parte più recente (se esistente).
Premere [RHYTHMS]: passa al Ritmo del beat più recente (se esistente).
[SEQUENCES] (sequenze)
Premere [PROGRAMS]: passa al Programma del Sequenza.
Premere [MULTI]: imposta il Sequenza della parte più recente.
Premere [RHYTHMS]: (nessuna scorciatoia).
[RHYTHMS] (ritmi)
Premere [PROGRAMS]: passa al Programma delle percussioni più recenti.
Premere [MULTI]: imposta il Ritmo del beat più recente.
Premere [SEQUENCES]: (nessuna scorciatoia).
programmi di batteria).
ALTRE SCORCIATOIE
Nella maggior parte delle aree, premendo due volte la manopola di controllo (doppio clic), viene ripristinato il
valore predefinito. Scorciatoie specifiche per ciascun pulsante:
[OCTAVE]: premere entrambi i tasti [OCTAVE] contemporaneamente per tornare alla gamma di ottave
predefinita da C3 a C6.
[TAP TEMPO]: tenere premuto [TAP TEMPO] e girare la manopola di controllo per una regolazione fine del
tempo.
[PROGRAMS]: quando si modifica un parametro, tenere premuta la manopola di controllo e muovere una
manopola (X/Y/Z) per assegnarla a quel parametro.
[MULTI]: per ciascuna parte, tenere premuto [MULTI] e muovere un cursore o la rotella del pitch per
passare alle opzioni di assegnazione del controller per quella determinata parte. Procedere allo stesso modo
con le manopole (X/Y/Z).
EDITARE CON IL MINIAK
Appena fuori dalla sua confezione, il Miniak offre tutti gli eccezionali suoni e le funzioni che la maggior parte
degli utenti possano desiderare. Ma, nel caso in cui siate un utente potente, troverete un’infinità di capacità di
editing di facile accesso.
Per indagare in profondità le capacità del Miniak, premere la
MANOPOLA DATA per editare i parametri associati alla modalità
operativa corrente (Programs, Multis, Sequences, Rhythms o Config).
La luce relativa alla modalità in corso di esecuzione diventerà rossa
quando inizierete le operazioni di editing.
Girare la MANOPOLA DATA per far scorrere i vari parametri. Premere e girare la MANOPOLA DATA per
editare; premere ulteriormente per accettare le modifiche .
Premere la MANOPOLA DATA due volte in successione rapida per resettare un parametro al suo valore
originario (di fabbrica).
Per ulteriori dettagli sull’editing, vedi il manuale di riferimento.
16
Il tasto [STORE] si illumina
quando sono state effettuate
modifiche. Premere questo tasto
per salvare le modifiche apportate.
Page 19

INHALT DER VERPACKUNG
• Miniak
• Schwanenhalsmikrophon
• Netzeil
• Kurzanleitung
• Anleitung
• Broschüre mit den Sicherheits- und Garantierichtlinien
ANSCHLUSSDIAGRAMM
Stereoverstärker
Kopfhörer
Externes Instrument
Schwanenhalsmikrophon
Netz
ANSCHLUSS AN DAS WECHSELSTROMNETZ
Stellen Sie sicher, dass vor jeglichem Anschluss an eine Stromquelle der Hauptschalter des Miniak
ausgeschaltet ist. Stecken Sie dann den Netzadapter in die Anschlussbuchse des Miniak und anschließend
an eine Netzsteckdose.
ANSCHLÜSSE ZUR TONWIEDERGABE
Stereo. Schließen Sie zwei Kabel von den linken und rechten Ausgängen des Miniak an zwei Anschlüsse
eines Verstärkers oder Mischpults an.
Kopfhörer. Schließen Sie einen Kopfhörer an die Kopfhörerbuchse an der Rückseite des Geräts an.
ANSCHLUSS DER FUßPEDALE
Schließen Sie ein Sustain-Pedal für das Keyboard (nicht beinhaltet) an den Sustain-Eingang an. Sobald Sie
den Miniak einschalten, wird dieser das Pedal erkennen und sich darauf abgleichen.
Sie können wahlweise ein Expression-Pedal als Continuous Controller an den Expression-Eingang
anschließen.
Expressionpedal
Pedalschalter
Externes
Soundmodul
Externes MIDI-Gerät
17
Page 20

ÜBERBLICK ÜBER DIE BEDIENELEMENTE
10111213
14 15
16 17
211
9
333
678
4
18
5
REAL-TIME CONTROLLER
Trotz seiner kleinen Größe hat der Miniak sechs leistungsfähige Echtzeit-Controller. Diese Steuerungen ermöglichen
es Ihnen, der virtuellen Analogsynthese eine unglaubliche Expressivität zu verleihen.
1. Rädern (MOD1) und (MOD2): Im allgemeinen fügt der (MOD1)-Rads Vibrato hinzu. (MOD2) tastet meist den
Filter ab.
2. (TONLAGE) Rad: Die typische Verwendung des (TONLAGE) Rads dient zur Hebung oder Senkung der
Tonlage um eine ganze Stufe, was es Ihnen ermöglicht, Ihren Sound sanft oder stark umzustimmen.
3. (X/Y/Z)-Regler: Die (X/Y/Z)-Regler haben verschiedene, vom jeweiligen Programm abhängige Effekte.
LEISTUNG-CONTROLLER
Die Leistungstasten sind als Gruppe zur Linken der Anzeige angeordnet.
4. [OCTAVE]: Erweitern Sie den Spielbereich des Miniak indem Sie die beiden [OCTAVE]-Tasten benutzen.
Jedes Drücken der [DOWN]- oder [UP]-Tasten führt zu einer Verlagerung um eine Oktave. Die entsprechende
Taste leuchtet mit zunehmender Stärke im gleichen Maß, wie die Verlagerung zunimmt.
5. [TAP TEMPO]: Das [TAP TEMPO]-LED blinkt immer im augenblicklichen Tempo. Um das Tempo zu
bestimmen, diese Taste im gewünschten Tempo antippen. (Zur Feineinstellung können Sie auch die [TAP
TEMPO]-Taste gedrückt halten und den DATAREGLER drehen.)
6. [PHRASE ARP]: Verwenden Sie [PHRASE ARP] um Riffs, welche Sie auf dem Keyboard spielen,
aufzunehmen und Wiederzugeben.
7. [LATCH ARP]: [LATCH ARP] funktioniert wie ein Sustain-Pedal. Wenn [LATCH ARP] gewählt wurde, werden
Noten sogar nachdem Sie das Keyboard nicht weiter betätigen weitergespielt. Drücken Sie [LATCH ARP] ein
zweites Mal, um diese Funktion auszuschalten.
8. [PATTERN PLAY]: [PATTERN PLAY] funktioniert zusammen mit Multis. Sobald [PATTERN PLAY]
aufleuchtet, ist die Begleitfunktion aktiv und ermöglicht es Ihnen, Sequenzen und Rhythmen innerhalb des
Multi-Modus auszulösen. Wenn [PATTERN PLAY] nicht aufleuchtet, bedeutet dies, dass sämtliche
Reihenfolgefunktionen ausgeschaltet sind und der Miniak spielt nur die Tasten, welche Sie drücken.
9. MIC INPUT: Dieser Eingang dient zum Anschluss des beiliegenden Schwanenhalsmikrophons. (Beachten Sie,
dass das Mikrophon bei Verwendung des linken Audioeingangs überbrückt wird.)
18
Page 21

PROGRAMME-CONTROLLER
Die Tasten des Programme-Controller ermöglichen Zugang zu den verschiedenen Betriebsarten des Miniak:
Programs (Programme), Rhythms (Rhythmen), Sequences (Sequenzen) und Multi. Drücken Sie eine der Tasten, um
diese Betriebsart abzurufen. Drehen Sie dann den DATAREGLER, um verschiedene Töne zu erzeugen.
10. PROGRAMS: Die Programme sind das Herzstück des Miniak - die Lead-, Bass-, Drum-, Pad- und andere
virtuelle Analogtöne. Um zu einer bestimmten Programmkategorie zu gelangen, halten Sie die [PROGRAMS]-
Taste gedrückt, während Sie die entsprechende weiße Taste auf dem Keyboard drücken. Die Kategorie
"Vorher" speichert die Programme, welche Sie kurz vorher benutzt haben. Fügen Sie ein Programm zur
Kategorie "Faves" hinzu, indem Sie den DATAREGLER zweimal drücken.
11. RHYTHMS: Schlagzeug-Kompositionen, welche aus einem oder mehreren Trommeltönen bestehen, wobei
jeder dieser in seinem eigenen Rhythmus spielt. Spielen Sie die linke Seite des Keyboards, um das gesamte
Stück zu hören. Rufen Sie individuelle Trommeln mit den Tasten auf der rechten Seite ab.
12. SEQUENCES: Melodische Passagen, welche Sie komponieren und dann, beginnend mit einem beliebigen
Ton, in Halbtönen fortschreitend abrufen können.
13. MULTI: Dies ist die stärkste und raffinierteste Betriebsart des Miniak, welche mehrere Programme, Rhythmen,
Tonmuster und weitere im Simultanbetrieb zu noch leistungs- und ausdrucksfähigeren Kombinationen
zusammenfügt.
DATA- UND LAUTSTÄRKE-CONTROLLER
14. DATAREGLER – Dieses Regler wird auch zum Ändern von Werten oder Einstellungen verwendet.
15. LAUTSTÄRKE-REGLER – Adjustiert die Master-Lautstärke des Miniak.
16. [CONFIG]: Die Konfigurationsoptionen des Miniak. Umfassende Verlagerungen und Einstellungen,
Geschwindigkeitsverlauf des Keyboards, MIDI-Einstellungen und mehr.
17. [STORE]: Die [STORE]-Taste leuchtet immer dann auf, wenn Sie editiert haben. Drücken Sie diese, um Ihre
Veränderungen abzuspeichern.
18. LCD: Das Display wird zur Navigation durch Menüs, zur Datenanzeige und zur Anzeige der Werteänderungen
der Optionen und Parameter des Miniak verwendet.
TASTENKOMBINATIONEN
SCHNELLBEDIENUNG DES PROGRAMME-CONTROLLER MIT DRÜCKEN UND FESTHALTEN
Halten Sie eine der Tasten [PROGRAMS], [RHYTHMS], [SEQUENCES] oder [MULTI] gedrückt, während Sie das
Keyboard bedienen, um auf verschiedene Editier- und Auswahlfunktionen zugreifen zu können.
Die sich über dem Keyboard befindliche Beschriftung dient als Anleitung für viele dieser Tastenkombinationen.
Kategorie auswählen
Kategorie für zuletzt gewählten Teil auswählen
Kategorie für das derzeitige Programmsequenz wählen
(keine Tastenkombination)
Programs
Multi
Sequences
Rhythms
19
Parameter für gewähltes Programm editieren
Teil A-G editieren
(keine Tastenkombination)
Edit drum A–G
Trommel A-C
editieren
(keine Tasten-
kombination)
Page 22

TASTENKOMBINATIONEN FÜR SCHNELLEN MODUSWECHSEL
Die nachstehenden Tastenkombinationen, bei denen eine der Tasten [PROGRAMS], [RHYTHMS], [SEQUENCES]
oder [MULTI] und eine weitere Taste gedrückt werden, gestatten schnelle Moduswechsel.
Mit [PROGRAMS]
[MULTI] drücken: Programm des kurz zuvor gespielten Stückes einstellen.
[SEQUENCES] drücken: Programmsequenz einstellen.
[RHYTHMS] drücken: kurz zuvor verwendetes Schlagzeugprogramm einstellen (nur für
Mit [MULTI]
[PROGRAMS] drücken: zum Programm des zuletzt gespielten Stückes navigieren.
[SEQUENCES] drücken: zum Programmsequenz des zuletzt gespielten Stückes navigieren (falls
[RHYTHMS] drücken: zum Rhythmus des letzten Takts navigieren (falls vorhanden).
Mit [SEQUENCES]
[PROGRAMS] drücken: zum Programmsequenz navigieren.
[MULTI] drücken: Sequenz des zuletzt gespielten Stückes einstellen.
[RHYTHMS] drücken: (keine gültige Tastenkombination).
Mit [RHYTHMS]
[PROGRAMS] drücken: zum Programm des zuletzt gespielten Schlagzeugs navigieren.
[MULTI] drücken: den Rhythmus des zuletzt verwendeten Takts einstellen.
[SEQUENCES] drücken: (keine gültige Tastenkombination).
Schlagzeugprogramme).
vorhanden).
ANDERE TASTENKOMBINATIONEN
Ein zweimaliges Drücken (Doppelklick) des Steuerreglers führt in den meisten Bereichen zur Rückstellung auf den
vom Werk eingestellten Wert. Tastenspezifische Kombinationen:
[OCTAVE]: Werden beide [OCTAVE]-Tasten gleichzeitig gedrückt, erfolgt die Rücksetzung auf den vom Werk
eingestellten Oktavbereich C3 bis C6.
[TAP TEMPO]: [TAP TEMPO] gedrückt halten und durch Drehen des Steuerreglers das Tempo feineinstellen.
[PROGRAMS]: Bei Änderung eines Parameters den Steuerregler gedrückt halten und durch Betätigen eines (X/Y/Z)-
Reglers diesen Regler dem Parameter zuordnen.
[MULTI]: Für jeden Abschnitt die [MULTI]-Taste herunterdrücken und mit dem Schieberegler oder dem Tonhöhenrad
zu den Optionen für die Steuerungsbelegung dieses Abschnitts navigieren. Das Gleiche kann mit den (X/Y/Z)-
Reglern gemacht werden.
EDITIEREN MIT DEM MINIAK
Kaum ausgepackt bietet der Miniak alle die coolen Sounds und Bedienfunktionen, welche die meisten Benutzer
wollen. Falls Sie jedoch ein professioneller Benutzer sind, werden Sie eine Vielfalt an leicht zu bedienenden
Editierfunktionen entdecken.
Um die gesamten Möglichkeiten des Miniak zu erschließen, drücken Sie
den DATAREGLER und können dann die mit dem augenblicklichen
Betriebsmodus (Programme, Multis, Konfiguration, Tonmuster oder
Rhythmen) in Verbindung stehenden Parameter editieren. Die
Leuchtanzeige des augenblicklichen Betriebsmodus wird in Rot
aufleuchten, sobald Sie mit dem Editieren beginnen.
Drehen Sie den DATAREGLER, um verschiedene Parameter zu durchlaufen. Drücken und drehen Sie den
DATAREGLER zum Editieren; zum Bestätigen Ihrer Änderungen drücken Sie diesen erneut.
Drücken Sie den DATAREGLER zweimal schnell hintereinander, um den Parameter auf den vom Werk eingestellten
Wert zurückzusetzen.
Wesentlich mehr Einzelheiten zum Editieren können aus der Anleitung entnommen werden.
Die [STORE]-Taste leuchtet
immer dann auf, wenn Sie Editiert
haben. Drücken Sie diese, um Ihre
Veränderungen abzuspeichern.
20
Page 23

TECHNICAL SPECIFICATIONS
Synthesis:
Polyphony:
Timbrality:
Oscillators:
Filters:
Modulation:
Effects:
Sequencing:
Program memory:
Velocity sensitive:
Keyboard:
External control:
Inputs:
Outputs:
Controls:
Pedal Inputs:
Virtual analog (subtractive), noise generator, FM
Up to 8 voices
Up to 8 parts
3 per voice with continuously variable waveshapes, sync, linear and exponential
FM, Ring Mod, routable modulation matrix per voice
2 multi-mode resonating filters per voice with 16 filter types
2 LFOs with multiple wave shapes, sample and hold, tracking generator, freelyroutable modulation matrix per voice
4 drive effects, 1 per part; master effects
Step sequencer, arpeggiator, drum machine/rhythm sequencer, and phrase
sequencer
Up to 1,000 programs and multi-timbral setups
Yes
37-key, semi-weighted
MIDI in/out/thru
2 balanced 1/4” TRS, mic
2 balanced 1/4” TRS, 1/4” TRS headphone
Pitch wheel, two assignable Q-Link modulation wheels, X, Y, and Z parameter
knobs, pattern play, phrase arpeggiator, latch arpeggiator, keyboard octave, tap
tempo, program controls, data push-knob, config, store, master volume
Assignable expression pedal, sustain pedal
7-51-0290-A
21
Page 24

WWW.AKAIPRO.COM
 Loading...