


user manual
Oven
EB SL70

2 electrolux
Electrolux. Thinking of you.
Share more of our thinking at www.electrolux.com
Contents
Operating Instructions............................ |
3 |
Safety instructions.................................. |
3 |
Description of the Appliance .................. |
4 |
Before Using for the first time................. |
8 |
Using the Oven ...................................... |
9 |
5
Cleaning and Care................................. |
24 |
What to do if …..................................... 29 |
|
Installation Instructions .......................... |
30 |
Disposal ................................................ |
32 |
Service .................................................. |
34 |
Subject to change without notice |
|
The following symbols are used in this user manual:
1Important information concerning your personal safety and information on how to avoid damaging the appliance.
3General information and tips
2Environmental information

electrolux 3
Operating Instructions
1 Safety instructions
Electrical safety
•This appliance must be only connected by a registered electrician.
•In the event of a fault or damage to the appliance: Take the fuses out or switch off.
•Repairs to the appliance must only be carried out by qualified service engineers. Considerable danger may result from improper repairs. If repairs become necessary, please contact our Customer Services or your dealer.
Child Safety
•Never leave children unsupervised when the appliance is in use.
•The appliance is fitted with a child safety device.
Safety during Operation
This appliance should be used only for the domestic cooking, roasting and baking of food.
•Be careful if connecting electrical appliances to sockets near this appliance. Electrical leads should not be allowed to come near the hotplates or to become caught under the hot oven door.
•Warning: Danger of burns! When in use, the oven interior surfaces become very hot.
•Warning: When cooking with the Steam function, do not under any circumstances open the oven door.
The escaping steam can cause moisture damage to furniture and cabinets. Avoid any direct contact with escaping steam.
•If you use alcohol in your cooking, a slightly flammable alcohol/air mixture may ensue. In this case, be careful when opening the door. Do not handle any sources of heat, sparks or naked flames when doing so.
3Information on acrylamides
According to the latest scientific knowledge, intensive browning of food, especially in products containing starch, can constitute a health risk due to acrylamides. Therefore we recommend cooking at the lowest possible temperatures and not browning foods too much.
How to avoid damage to the appliance
•Do not line the oven with aluminium foil and do not place baking trays, pots, etc. on the oven floor, as the heat that builds up will damage the oven enamel.
•Fruit juices dripping from the baking tray will leave stains, which you will not be able to remove. For very moist cakes, use a deep tray.
•Do not put any strain on the oven door when open.
•Never pour water directly into the oven when it is hot. This could cause damage to or discolouration of the enamel.
•Rough handling, especially around the edges of the front panel, can cause the glass to break.
•Do not store any flammable materials inside the oven. These could ignite when the oven is switched on.
•Do not store any moist foods inside the oven. This could damage the oven enamel.
3 Note on enamel coating
Changes in the colour of the oven’s enamel coating as a result of use do not affect the appliance’s suitability for normal and correct use. They therefore do not constitute a defect in the sense of the warranty law.
4 electrolux
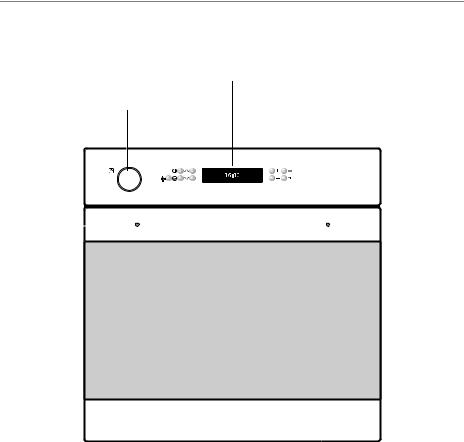
Description of the Appliance
General Overview
Oven displays
and Touch Control sensor fields
Water drawer
|
|
|
|
|
|
|
|
|
|
|
|
|
|
|
|
|
|
|
|
|
|
|
|
|
|
|
|
|
|
Door handle |
Oven door |
||||
3The oven switches off after 2 minutes, if no function is selected and is changed at the oven nothing.
electrolux 5
The electronic oven controls
Indicators
Menu option symbol |
Clock |
Heat indicator |
(with oven shelf level) |
|
|
|
|
|
|
|
|
|
|
|
|
|
|
|
|
|
|
|
|
|
|
|
|
|
|
|
|
|
|
|
|
|
|
|
|
|
|
|
|
|
|
|
|
|
|
|
|
|
|
|
|
|
|
|
|
|
|
|
|
|
|
|
|
|
|
|
|
|
|
|
|
|
|
|
|
|
|
|
|
|
|
|
|
|
|
|
|
|
|
|
|
|
|
|
|
|
|
|
|
|
|
|
|
|
|
|
|
|
|
|
|
|
|
|
|
|
|
|
|
|
|
|
|
|
|
|
|
|
|
|
|
|
|
|
|
|
|
|
|
|
|
|
|
|
|
|
|
|
|
|
|
|
|
|
|
|
|
|
|
|
|
|
|
|
|
|
|
|
|
|
|
|
|
Time functions |
Temperature |
||||||||
|
|
|
|
|
|
|
|
|
|
|
|
|
|
|
|
|
|
|
|
|
|
Weight |
|||
|
|
|
|
|
|
|
|
|
|
|
|
|
|
|
|
|
|
|
|
|
Meat core temperature |
||||
Symbols
Certain symbols are displayed in the displayed according to the function set.
|
|
Symbol |
Display |
Function |
||||
|
|
(Examples) |
||||||
|
|
|
|
|||||
|
|
|
|
|
|
|
|
|
|
|
Countdown timer |
4:30 |
|
The countdown timer is active. |
|||
|
|
|||||||
|
|
Time |
10:00 |
|
Indicates the current time set. |
|||
|
|
Duration |
1:00 |
|
Indicates the period of time required for the cooking process. |
|||
|
|
|||||||
|
|
|||||||
|
|
End Time |
14:05 |
|
Indicates the time at which the cooking process is com- |
|||
|
|
|||||||
|
|
|||||||
|
|
|
|
|
|
|
|
pleted. |
|
|
|
|
|
|
|
|
End time is calculated when Meatprobe inserted. |
|
|
|
|
|
|
|
|
|
|
|
Delay start |
0:45 |
|
Indicates the time from which the cooking process will run. |
|||
|
|
|
||||||
|
|
Temperature |
|
|
|
|
|
Indicates how far the oven has heated up. |
|
|
|
|
|
|
|
|
Rapid heat up is active (shortened heating up time). |
|
|
|
|
|
|
|
|
|
|
|
Weight |
|
|
1.5 kg |
Options: |
||
|
|
|
|
|
|
|
|
– Automatic weight is active. |
|
|
|
|
|
|
|
|
– Weight can be changed. |
|
|
Meatprobe |
|
|
75°C |
Options: |
||
|
|
|
|
|
|
|
|
– Meatprobe is plugged in |
|
|
|
|
|
|
|
|
– Meatprobe Automatic is active. |
|
|
|
|
|
|
|
|
– Core temperature can be changed. |
|
|
Heat+Hold |
|
|
80°C |
Heat+Hold is activated. |
||
|
|
|
|
|
|
|
|
|

6 electrolux
Touch Control sensor fields
The appliance is operated using Touch Control sensor fields. You control the functions by touching the sensor fields.
On/Off
When you are using the controls make sure that you only touch one sensor field. If your finger is applied too flat, a neighbouring sensor field could be touched as well.
Select
Set values options
|
|
|
|
|
|
|
|
|
|
|
|
|
|
|
|
|
|
|
|
|
|
|
|
|
|
|
|
|
|
|
|
|
|
|
|
|
|
|
|
|
|
|
|
|
|
|
|
|
|
|
|
|
|
|
|
|
|
|
|
|
|
|
|
|
|
|
|
|
|
Oven lighting |
Scroll |
|
|
Confirm |
|||||
|
|
|
|
|
|
|
|
||
|
|
Main menu |
|
|
|
|
|||
Sensor |
Function |
|
|
Comment |
|||||
field |
|
|
|||||||
|
|
|
|
|
|
||||
|
|
|
|
|
|
|
|
||
, |
|
|
|
To move down and up in the menu. |
When a function is active: |
||||
|
|
|
|
|
• Press once: Change to the higher menu (func- |
||||
|
|
|
|
|
|
tion remains active), after 5 seconds move again |
|||
|
|
|
|
|
|
into the active menu option |
|||
|
|
|
|
|
• Press twice: Up and down in the higher menu |
||||
|
|
|
|
|
|
(function switches off) |
|||
|
|
|
|
To display main menu. |
Functions set switch off |
||||
|
|
|
|
|
(except for countdown timer). |
||||
|
|
|
|
To confirm. |
|
|
|
|
|
|
|
|
|
To switch appliance on or off. |
|
|
|
|
|
|
|
|
|
|
|
|
|
|
|
|
|
|
|
To switch light on or off. |
Using this function you can light up the oven interior, |
||||
|
|
|
|
|
e.g. for cleaning. |
||||
|
|
|
|
To select time functions, additional |
|
|
|
|
|
|
|
|
|
functions and Meatprobe. |
|
|
|
|
|
, |
|
|
|
To set values (e.g. temperature, |
• |
To activate value: |
|||
|
|
|
|||||||
|
|
|
|
time, weight, degree of cooking). |
|
– |
Press once: Present symbol flashes |
||
|
|
|
|
|
• |
– |
Press twice: Value can be set |
||
|
|
|
|
|
To set values: |
||||
|
|
|
|
|
|
– |
Press once: To set value in single steps |
||
|
|
|
|
|
|
– |
Hold down key: To set value in fast steps |
||
|
|
|
|
|
• When setting a cook time or time the display can |
||||
|
|
|
|
|
|
be re-set to zero if and |
|
are pressed at the |
|
|
|
|
|
|
|
|
|||
|
|
|
|
|
|
same time. |
|||
|
|
|
|
|
|
|
|
|
|
electrolux 7
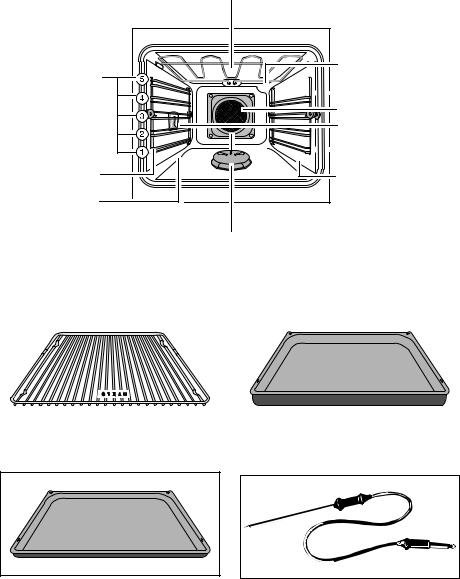
Oven Features
Top heat and heating elements
Oven lighting
Oven levels

 Meat probe socket
Fan
Oven lighting
 Rear wall heating Oven shelf runners,
  element/Fat filter
removable
Oven shelf runners,
removable
Bottom heat (not visible)
Steam generator/
Steam rosette
Oven accessories
Oven shelf |
Roasting pan (high-sided baking tray) |
|
|
|
|
For cookware, cake tins, roasts and grilled foods.
Baking tray
For baking and roasting or use as a pan to collect fat.
Meat probe
For cakes and biscuits. |
For determining exactly how far joints of |
|
meat are cooked. |
8 electrolux
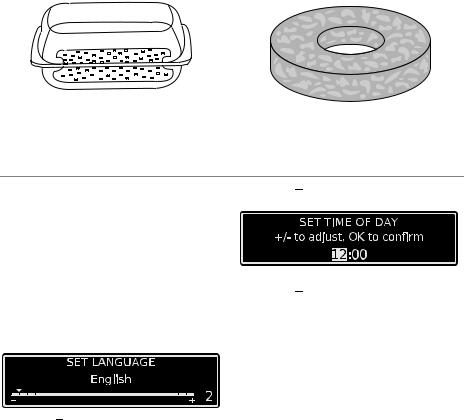
Glass cookware with 2 grill inserts |
QuickSponge 180 |
|
|
|
|
|
|
|
Extremely absorbent sponge for absorbing any residual water from the steam generator.
Before Using for the first time
3If you would like to change one of these base settings at a later date, please refer to the Basic Settings section.
Setting the language
1.When the appliance has been connected to the electrical supply, the following is shown in the display.
–the company logo
–the version of the software and the period of operation
–the message ”Set language”
2. Using or  , select the desired language.
3.Confirm selected language with  . From now on the texts in the display appear in the language set.
Setting contrast and brightness
3After you have set the language, the messages “Set contrast” and “Set brightness” are displayed.
The contrast and the brightness are set according to the language set (see section “Setting language”)
Setting the clock
After you have set the contrast and the brightness, the message ”Set Time of Day” is displayed.
4. Using or  set the hour of the current time.
5.Confirm with  .
.
6. Using or  set the minutes of the current time.
7.Confirm with  .
.
The appliance is now ready to use.
3The time only has to be set if the appliance is disconnected from the power supply for a long time.
Cleaning for the first time
Before you use the appliance for the first time, you should clean it thoroughly.
1Important: do not use sharp or abrasive cleaning materials. These could damage the surface.
3For metal fronts, use normal commercially available cleaning agents.
1.Open oven door.
2.Remove all accessories and side rails and clean with a warm solution of water and washing-up liquid.
3.Also wipe the oven out with a warm solution of water and washing-up liquid and then dry it.
4.Wipe the front of the appliance with a damp cloth.

electrolux 9
Using the Oven
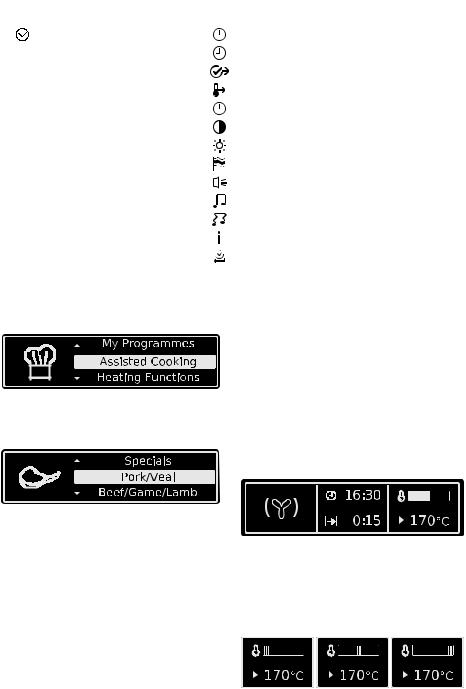
The menus in overview
Main menu |
|
|
Submenu |
|
|
|
|
|
|
Assisted Cooking |
|
|
Pork/Veal |
|
|
|
|
|
Beef/Game/Lamb |
|
|
|
|
Poultry |
|
|
|
|
Fish |
|
|
|
|
Cake |
|
|
|
|
Desserts |
|
|
|
|
Pizza/Pie/Bread |
|
|
|
|
Casseroles/Gratins |
|
|
|
|
Side Dishes |
|
|
|
|
Combi Steaming |
|
|
|
||
|
|
|
|
Convenience |
|
|
|
|
Specials |
Heating Functions |
|
|
Fan Cooking |
|
|
|
|
|
Moist Fan Cooking |
|
|
|
||
|
|
|
|
Conventional Cooking |
|
|
|
||
|
|
|
|
Pizza Setting |
|
|
|
|
Turbo Grill |
|
|
|
|
|
|
|
|
|
Economy Grill |
|
|
|
|
Dual Grill |
|
|
|
|
|
|
|
|
|
Bottom Heat |
|
|
|
|
Slow Cook |
|
|
|
|
Regenerating |
|
|
|
|
Quarter Steam + Heat |
|
|
|
|
Half Steam + Heat |
|
|
|
|
Full Steam |
My Programmes |
|
|
1- My Program |
|
|
|
|
|
2- My Program |
|
|
... |
||
|
|
|
|
Edit Programme Name |
Cleaning Menu |
|
|
Steam Cleaning |
|
|
|
|
|
Cleaning Assistant |
|
|
|
|
|
10 electrolux
Main menu |
Submenu |
|
|
Basic Settings |
Set Time of Day |
|
Time Indication |
|
Set+Go |
|
Heat+Hold |
|
Time Extension |
|
Display Contrast |
|
Display Brightness |
|
Set language |
|
Buzzer Volume |
|
Key Tones |
|
Alarm/Error Tones |
|
Service |
|
Factory Settings |
|
|
Operation of the menus
Example
1.Switch the appliance on with  .
.
You will find yourself in the main menu.
2.With  or
or  select the desired main menu.
3.Use  to move to the appropriated sub-menus.
The sub-menu selected is displayed.
3At every point you can get back to the the main menu with  .
.
3At the end of most menus there is the menu option Back.
You use this to go back to the higher menu.
3You can cancel a procedure by pressing
 .
.
Then you will find yourself back in the main menu.
3The oven adapts itself to the habits of the user and always starts at the appli-
cation last used (cooking assitant or oven function).
3Cooling fan
The fan switches on automatically in order to keep the appliance’s surfaces cool. When the oven is switched off, the fan continues to run to cool the appliance down, then switches itself off automatically.
Heat indicator
Heating up indicator
When an oven function has been switched on the bar that keeps getting longer indicates how far the oven has heated up.
Fast heating indicator
With some oven functions the heating up time is shortened by the automatic function Fast heating.
Until the set temperature is reached, a stiped bar goes from left to right in the heat indicator.

Residual heat indicator
After switching off the oven, the residual heat is displayed to the degree.
Displaying temperature to the degree
The temperature is displayed to the degree instead of the bar of the heating up indicator for 5 seconds during the heating up time.
Press  and at the same time.
3When the temperature set is reached, an audible signal sounds.
Inserting the Oven Shelf, Baking
Tray and Roasting Pan
3Shelf runner safety and anti-tip device
As a shelf runner safety device, all insertable components have a small curved indentation at the bottom on the right and left-hand edge.
Always insert insertable components so that this indentation is at the back of the oven interior. This indentation is also important for preventing the insertable components from tipping.
Inserting the baking tray or roasting pan
electrolux 11
Inserting the oven shelf:
Insert the oven shelf so that the feet point downwards.
Push the oven shelf between the guide bars of the selected oven level.
3The high rim around the oven shelf is an additional device to prevent cookware from slipping.
Inserting the oven shelf and roasting pan together
Lay the oven shelf on the roasting pan. Push the roasting pan between the guide bars of the selected oven level.
Push the baking tray or roasting pan between the guide bars of the selected oven level.
 Loading...