


SANTO 72348 KA
Electronic Refrigerator
Operating Instructions
818 33 28-00/7

Dear customer,
Before switching on your new refrigerator please read these operating instructions carefully. They contain important information for safe use, for installation and for care of the appliance.
Please keep these operating instructions for future reference. Pass them on to possible new owners of the appliance.
1 Notes which are important for your safety or for the proper functioning of the appliance are stressed with a warning triangle and/or with signal words (Warning!, Caution!, Important!). Please observe the following carefully.
01. This symbol and numbered instructions guide you step by step in the operation of the appliance.
2. .....
3 Supplementary information regarding operation and practical uses of the appliance appear after this symbol.
2 Tips and notes concerning economical and environmentally sound use of the appliance are marked with the cloverleaf.
Explanations of the technical terminology used in the operating instructions can be found at the end in the section "Technical Terminology".
The operating instructions contain instructions for the correction of possible malfunctions by the user in the section "What to do if ...". If these instructions should not be sufficient, please contact your local AEG Service Force Centre.
If you require assistance or advice on your appliance, please contact our Customer Care Department by letter or telephone:
|
Customer Care Department |
|
AEG Domestic Appliances |
|
55-77 High Street |
|
Slough |
|
Berkshire SL 1 1DZ |
Tel: |
08705 350350 |
Printed on paper manufactured with environmentally sound processes.
he who thinks ecologically acts accordingly ...
2 |
818 33 28-00/7 |

Contents |
|
Important Safety Instructions . . . . . . . . . . . . . . . . . . . . . . . . . . . . . . . . . . . . |
5 |
Environmental Information . . . . . . . . . . . . . . . . . . . . . . . . . . . . . . . . . . . . . . |
7 |
Packaging . . . . . . . . . . . . . . . . . . . . . . . . . . . . . . . . . . . . . . . . . . . . . . . . . . . . . . |
7 |
Old Appliances . . . . . . . . . . . . . . . . . . . . . . . . . . . . . . . . . . . . . . . . . . . . . . . . . . |
7 |
Appliance Transport . . . . . . . . . . . . . . . . . . . . . . . . . . . . . . . . . . . . . . . . . . . . |
7 |
Before Use . . . . . . . . . . . . . . . . . . . . . . . . . . . . . . . . . . . . . . . . . . . . . . . . . . . . . |
8 |
Packaging . . . . . . . . . . . . . . . . . . . . . . . . . . . . . . . . . . . . . . . . . . . . . . . . . . . . . . |
8 |
Fitting the Door Handles . . . . . . . . . . . . . . . . . . . . . . . . . . . . . . . . . . . . . . . . |
9 |
Installation . . . . . . . . . . . . . . . . . . . . . . . . . . . . . . . . . . . . . . . . . . . . . . . . . . . . |
10 |
Installation Location . . . . . . . . . . . . . . . . . . . . . . . . . . . . . . . . . . . . . . . . . . . . . |
10 |
The Refrigerator needs Ventilation . . . . . . . . . . . . . . . . . . . . . . . . . . . . . . . . . |
11 |
Appliance Alignment . . . . . . . . . . . . . . . . . . . . . . . . . . . . . . . . . . . . . . . . . . . . . |
11 |
Electrical Connection . . . . . . . . . . . . . . . . . . . . . . . . . . . . . . . . . . . . . . . . . . . . |
12 |
Installation of the carbon filter . . . . . . . . . . . . . . . . . . . . . . . . . . . . . . . . . . . . |
13 |
Reversing the Door . . . . . . . . . . . . . . . . . . . . . . . . . . . . . . . . . . . . . . . . . . . . . |
13 |
Description of the Appliance . . . . . . . . . . . . . . . . . . . . . . . . . . . . . . . . . . . . . |
16 |
Control Panel . . . . . . . . . . . . . . . . . . . . . . . . . . . . . . . . . . . . . . . . . . . . . . . . . . . |
17 |
Buttons for Adjusting the Temperature . . . . . . . . . . . . . . . . . . . . . . . . . . . . . |
17 |
Temperature Display . . . . . . . . . . . . . . . . . . . . . . . . . . . . . . . . . . . . . . . . . . . . . |
18 |
ALARM OFF button . . . . . . . . . . . . . . . . . . . . . . . . . . . . . . . . . . . . . . . . . . . . . . |
18 |
Prior to Initial Start–Up . . . . . . . . . . . . . . . . . . . . . . . . . . . . . . . . . . . . . . . . . |
18 |
Initial Start-Up . . . . . . . . . . . . . . . . . . . . . . . . . . . . . . . . . . . . . . . . . . . . . . . . . |
19 |
Temperature Adjustment . . . . . . . . . . . . . . . . . . . . . . . . . . . . . . . . . . . . . . . . |
19 |
COOLMATIC . . . . . . . . . . . . . . . . . . . . . . . . . . . . . . . . . . . . . . . . . . . . . . . . . . . . |
20 |
COOLMATIC button . . . . . . . . . . . . . . . . . . . . . . . . . . . . . . . . . . . . . . . . . . . . . . |
20 |
Quick chill . . . . . . . . . . . . . . . . . . . . . . . . . . . . . . . . . . . . . . . . . . . . . . . . . . . . . . |
20 |
"Open Door" Warning . . . . . . . . . . . . . . . . . . . . . . . . . . . . . . . . . . . . . . . . . . . |
21 |
Temperature warning . . . . . . . . . . . . . . . . . . . . . . . . . . . . . . . . . . . . . . . . . . . |
21 |
Switching the Appliance off . . . . . . . . . . . . . . . . . . . . . . . . . . . . . . . . . . . . . |
21 |
Holiday Mode . . . . . . . . . . . . . . . . . . . . . . . . . . . . . . . . . . . . . . . . . . . . . . . . . . |
22 |
818 33 28-00/7 |
3 |

Contents
Opening the Door . . . . . . . . . . . . . . . . . . . . . . . . . . . . . . . . . . . . . . . . . . . . . . |
22 |
Interior Fittings . . . . . . . . . . . . . . . . . . . . . . . . . . . . . . . . . . . . . . . . . . . . . . . . |
23 |
Storage Shelves . . . . . . . . . . . . . . . . . . . . . . . . . . . . . . . . . . . . . . . . . . . . . . . . . |
23 |
Salad Bin . . . . . . . . . . . . . . . . . . . . . . . . . . . . . . . . . . . . . . . . . . . . . . . . . . . . . . . |
23 |
Bottle Rack . . . . . . . . . . . . . . . . . . . . . . . . . . . . . . . . . . . . . . . . . . . . . . . . . . . . . |
24 |
Quick Chill Shelf . . . . . . . . . . . . . . . . . . . . . . . . . . . . . . . . . . . . . . . . . . . . . . . . |
24 |
Bottle and Can Holder . . . . . . . . . . . . . . . . . . . . . . . . . . . . . . . . . . . . . . . . . . . . |
24 |
Dismantling of the Bottle and Can Holder . . . . . . . . . . . . . . . . . . . . . . . . . . . |
25 |
Variable Inner Door . . . . . . . . . . . . . . . . . . . . . . . . . . . . . . . . . . . . . . . . . . . . . . |
25 |
Bottle Holder . . . . . . . . . . . . . . . . . . . . . . . . . . . . . . . . . . . . . . . . . . . . . . . . . . . |
25 |
Proper Storage . . . . . . . . . . . . . . . . . . . . . . . . . . . . . . . . . . . . . . . . . . . . . . . . . |
26 |
Hints and Tips . . . . . . . . . . . . . . . . . . . . . . . . . . . . . . . . . . . . . . . . . . . . . . . . . . |
27 |
Normal Operating Sounds . . . . . . . . . . . . . . . . . . . . . . . . . . . . . . . . . . . . . . . . |
27 |
Food Storage . . . . . . . . . . . . . . . . . . . . . . . . . . . . . . . . . . . . . . . . . . . . . . . . . . . |
27 |
Energy Saving Advice . . . . . . . . . . . . . . . . . . . . . . . . . . . . . . . . . . . . . . . . . . . . |
27 |
Defrosting . . . . . . . . . . . . . . . . . . . . . . . . . . . . . . . . . . . . . . . . . . . . . . . . . . . . . 28
Maintenance and Cleaning . . . . . . . . . . . . . . . . . . . . . . . . . . . . . . . . . . . . . . 28 Internal Cleaning . . . . . . . . . . . . . . . . . . . . . . . . . . . . . . . . . . . . . . . . . . . . . 28 External Cleaning . . . . . . . . . . . . . . . . . . . . . . . . . . . . . . . . . . . . . . . . . . . . . 28 Changing the carbon filter . . . . . . . . . . . . . . . . . . . . . . . . . . . . . . . . . . . . . . . . 29 Replacing the Light Bulb . . . . . . . . . . . . . . . . . . . . . . . . . . . . . . . . . . . . . . . . . . 30
What to do if ... . . . . . . . . . . . . . . . . . . . . . . . . . . . . . . . . . . . . . . . . . . . . . . . . 31
Regulations, Standards, Guidelines . . . . . . . . . . . . . . . . . . . . . . . . . . . . . . . 32
Technical Terminology . . . . . . . . . . . . . . . . . . . . . . . . . . . . . . . . . . . . . . . . . . 33
Guarantee Conditions . . . . . . . . . . . . . . . . . . . . . . . . . . . . . . . . . . . . . . . . . . . 34
Service & Spare Parts . . . . . . . . . . . . . . . . . . . . . . . . . . . . . . . . . . . . . . . . . . . 35
4 |
818 33 28-00/7 |

1 Important Safety Instructions
These warnings are provided in the interests of your safety. Ensure that you understand them all before installing or using this appliance. Your safety is of paramount importance. If you are unsure about any of the meanings of these warnings contact the Customer Care Department.
Prior to Installation
•Check the refrigerator for transport damage. Under no circumstances should a damaged appliance be installed! In the event of damage, please contact your retailer.
Installation
•This appliance is heavy. Care should be taken when moving it.
•It is dangerous to alter the specifications or attempt to modify this product in any way.
•Ensure that the appliance does not stand on the electrical supply cable. If the supply cable is damaged, it must be replaced by a Service Force engineer.
•Make sure that the power plug is not squashed or damaged by the back of the appliance. A damaged power plug may overheat and cause a fire.
•If the power plug socket is loose, do not insert the power plug. There is a risk of electric shock or fire.
•Any electrical work required to install this appliance should be carried out by a qualified electrician or competent person.
•Parts which heat up should not be exposed. Whenever possible, the back of the appliance should be close to a wall, but leaving the required distance for ventilation, as stated in the installation instructions.
•The appliance should be left for 2 hours after installation before it is turned on, in order to allow the refrigerant to settle.
Refrigerant
The refrigerant isobutane (R600a) is contained within the refrigerant circuit of the appliance, a natural gas with a high level of environmental compatibility, which is nevertheless flammable.
•During transportation and installation of the appliance, be certain that none of the components of the refrigerant circuit become damaged.
818 33 28-00/7 |
5 |

Important Safety Instructions
•If the refrigerant circuit should become damaged:
–avoid open flames and sources of ignition;
–thoroughly ventilate the room in which the appliance is situated.
Child Safety
•Do not allow children to tamper with the controls or play with the product.
•Keep packaging material away from children! (There is a risk of suffocation!)
During Use
•This appliance is designed for domestic use only, specifically for the storage of edible foodstuffs only. It is not intended for commercial or industrial use.
•Containers with flammable gases or liquids can leak at low temperatures. Do not store any containers with flammable materials such as, spray cans, fire extinguisher refill cartridges etc in the refrigerator.
•Manufacturers´ recommended storage times should be adhered to. Refer to relevant instructions.
Maintenance and Cleaning
•Before cleaning, always switch off the appliance and disconnect from the electrical supply.
•When unplugging always pull the plug from the mains socket, do not pull on the cable. Damage to the cable may cause a short circuit, fire and/or electric shock.
Servicing
•This product should be serviced by our authorised engineer and only genuine spare parts should be used.
•Under no circumstances should you attempt to repair the appliance yourself. Repairs carried out by inexperienced persons may cause injury or serious malfunctioning. Contact your local AEG Service Force Centre.
6 |
818 33 28-00/7 |
Environmental Information
Packaging
All transit packaging materials are environmentally compatible and can be reused. Wood is un-treated. The plastics can be recycled and are identified as follows:
>PE< for polyethylene, e.g. the outer covering and the bags in the interior.
>PS< for polystyrene foam, e.g. the pads, which are pure hydrocarbon compounds and can be recycled.
The carton parts are made from recycled paper. Please dispose of the packaging with due care for the environment.
Old Appliances
When disposing of your old appliance:
Make the appliance unusable by cutting off the cable and remove any door catches to ensure small children cannot be trapped inside.
Help to keep your country tidy - use an authorised disposal site.
Appliance Transport
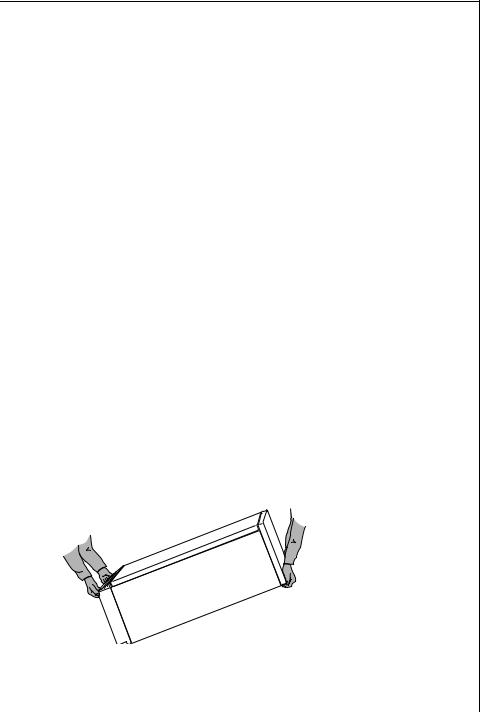
Two persons are required for transport of the appliance. There are two recessed handles at the front of the base and at the back of the appliance at the top for improved gripping.
01. Grip the appliance with the recessed handles positioned as in the drawing, and transport the appliance.
2.In order to push the appliance into its final position, press carefully at the top of the door and tip the appliance back slightly. The weight is then transferred to the back wheels and the appliance can be easily pushed.
818 33 28-00/7 |
7 |

Before Use
Packaging
01. Remove all adhesive tape and packaging from the interior of the appliance.
3 Any remnants of adhesive can be removed with white spirit.
2. Remove the transport protection pieces and pull off the adhesive tape.
3.Wash the inside of the appliance with lukewarm water with a little bicarbonate of soda added (5 ml to 0.5 litre of water). Do not use soap or detergent as the smell may linger. Dry the appliance thoroughly.
Remove the transport fittings from the storage shelves:
4. Slide the fittings securing the shelf forward to the thicker section on the edge of the storage shelf.
5. Slide the storage shelf far enough forward so that it can be hinged downwards and the fittings can be removed from the guides.
8 |
818 33 28-00/7 |

Fitting the Door Handles
1 Caution! Do not use excessive force and overtighten the screws (max. 2 Nm) as you may damage the door handles.
0 1. Screw the top handle bracket to the handle rod (1). Fit the bottom handle bracket on the lower left-hand side of the door (2).
2. Fit the top handle bracket on the top left-hand side of the door (3) and screw the handle rod to the bottom handle bracket (4).
818 33 28-00/7 |
9 |

Installation
Installation Location
The appliance should be installed in a well ventilated, dry room. Energy use is affected by the ambient temperature.
The appliance should therefore
–not be exposed to direct sunlight;
–not be installed next to radiators, cookers or other sources of heat;
–only be installed at a location whose ambient temperature
corresponds to the climate classification, for which the appliance is designed.
The climate classification can be found on the rating plate, which is located at the left on the inside of the appliance.
The following table shows which ambient temperature is correct for each climate classification:
Climate classification |
for an ambient temperature of |
SN |
+10 to +32 °C |
N |
+16 to +32 °C |
ST |
+18 to +38 °C |
T |
+18 to +43 °C |
|
|
10 |
818 33 28-00/7 |
Installation
The Refrigerator needs Ventilation
Air is fed under the door through the vent slots in the base and is exhausted upwards along the back wall. To ensure proper air circulation never cover or alter the vent openings.
Important! If the appliance is installed under a hanging cabinet, a clearance of at least 10 cm between the top of the appliance and the cabinet above it must be maintained.
Please check whether, after installing your appliance and especially after reversing the door, the door seal fits tightly. A badly fitting door seal may lead to heavy frosting and a higher power consumption (see also "Something not working“).
Appliance Alignment
01. The appliance must be level, please compensate for unevenness in the floor by turning the two adjustable feet at the front.
818 33 28-00/7 |
11 |

Installation
Electrical Connection
Any electrical work required to install this appliance should be carried out by a qualified electrician or competent person.
1 WARNING – THIS APPLIANCE MUST BE EARTHED
The manufacturer declines any liability should these safety measures not be observed.
Before switching on, make sure the electricity supply voltage is the same as that indicated on the appliance rating plate. The rating plate is inside, on the left.
The appliance is supplied with a 13 amp plug fitted. In the event of having to change the fuse in the plug supplied, a 13 amp ASTA approved (BS 1362) fuse must be used.
Important
The wires in the mains lead are coloured in accordance with the following code:
Green and Yellow |
Earth |
Blue |
Neutral |
Brown |
Live |
As the colours of the wires in the mains lead of this appliance may not correspond with the coloured
markings indentifying the terminals Blue in your plug, proceed as follows:
1.The wire coloured green and yellow must be connected to the
terminal marked with the letter “E“ or by the earth symbol  or coloured green and yellow.
Green
& Yellow
Brown
Cord Clamp
2.The wire coloured blue must be connected to the terminal “N“ or coloured black.
3.The wire coloured brown must be connected to the terminal marked “L“ or coloured red.
4.Upon completion there must be no cut, or stray strands of wire present and the cord clamp must be secure over the outer sheat.
1Warning! A cut-off plug inserted into a 13 amp socket is a serious safety (shock) hazard. Ensure that the cut-off plug is disposed of safely.
12 |
818 33 28-00/7 |
 Loading...