


S72300DSW1 |
NL Gebruiksaanwijzing |
2 |
|
ENUser manual |
14 |
|
FRNotice d'utilisation |
26 |
|
DEBenutzerinformation |
39 |
|
EL Οδηγίες Χρήσης |
52 |
|
IT Istruzioni per l’uso |
65 |

2www.aeg.com
INHOUD
1. VEILIGHEIDSVOORSCHRIFTEN . . . . . . . . . . . . . . . . . . . . . . . . . . . . . . . . . . . . . . . . . . . . . . . . 3 2. BESCHRIJVING VAN HET PRODUCT . . . . . . . . . . . . . . . . . . . . . . . . . . . . . . . . . . . . . . . . . . . 5 3. VOOR HET EERSTE GEBRUIK . . . . . . . . . . . . . . . . . . . . . . . . . . . . . . . . . . . . . . . . . . . . . . . . . 5 4. DAGELIJKS GEBRUIK . . . . . . . . . . . . . . . . . . . . . . . . . . . . . . . . . . . . . . . . . . . . . . . . . . . . . . . . 6 5. AANWIJZINGEN EN TIPS . . . . . . . . . . . . . . . . . . . . . . . . . . . . . . . . . . . . . . . . . . . . . . . . . . . . . 7 6. ONDERHOUD EN REINIGING . . . . . . . . . . . . . . . . . . . . . . . . . . . . . . . . . . . . . . . . . . . . . . . . . 8 7. PROBLEEMOPLOSSING . . . . . . . . . . . . . . . . . . . . . . . . . . . . . . . . . . . . . . . . . . . . . . . . . . . . . 10 8. TECHNISCHE INFORMATIE . . . . . . . . . . . . . . . . . . . . . . . . . . . . . . . . . . . . . . . . . . . . . . . . . . 11 9. MILIEUBESCHERMING . . . . . . . . . . . . . . . . . . . . . . . . . . . . . . . . . . . . . . . . . . . . . . . . . . . . . . 13
VOOR PERFECTE RESULTATEN
Bedankt dat u voor dit AEG product heeft gekozen. Dit apparaat is ontworpen om vele jaren uitstekend te presteren, met innovatieve technologieën die het leven gemakkelijker helpen maken – functies die gewone apparaten wellicht niet hebben. Neem een paar minuten de tijd om het door te lezen zodat u er optimaal van kunt profiteren.
Ga naar onze website voor:
Advies over gebruik, brochures, het oplossen van problemen en onderhoudsinformatie:
www.aeg.com
Registreer uw product voor een betere service:
www.aeg.com/productregistration
Koop accessoires, verbruiksartikelen en originele reserveonderdelen voor uw apparaat:
www.aeg.com/shop
KLANTENSERVICE
Wij raden altijd het gebruik van originele onderdelen aan.
Zorg er als u contact opneemt met de klantenservice voor dat u de volgende gegevens bij de hand hebt.
De informatie staat op het typeplaatje. model, productnummer, serienummer.
Waarschuwing - Belangrijke veiligheidsinformatie.
Algemene informatie en tips
Milieu-informatie
Wijzigingen voorbehouden.
NEDERLANDS 3
1.  VEILIGHEIDSVOORSCHRIFTEN
Lees zorgvuldig de meegeleverde instructies voor installatie en gebruik van het apparaat. De fabrikant is niet verantwoordelijk voor letsel en schade veroorzaakt door een foutieve installatie. Bewaar de instructies van het apparaat voor toekomstig gebruik.
1.1 Veiligheid van kinderen en kwetsbare mensen
WAARSCHUWING!
Gevaar voor verstikking, letsel of permanente invaliditeit.
•Dit apparaat kan worden gebruikt door kinderen van 8 jaar en ouder en door mensen met beperkte lichamelijke, zintuiglijke of verstandelijke vermogens of een gebrek aan ervaring en kennis, indien zij onder toezicht staan of instructies hebben gekregen over het veilig gebruiken van het apparaat van iemand die verantwoordelijk is voor hun veiligheid.
•Laat kinderen niet met het apparaat spelen.
•Houd alle verpakkingsmaterialen uit de buurt van kinderen.
•Reiniging en onderhoud mag niet worden uitgevoerd door kinderen zonder toezicht.
1.2 Montage
WAARSCHUWING!
Alleen een erkende installatietechnicus mag het apparaat installeren.
•Verwijder alle verpakkingsmaterialen.
•Installeer en gebruik geen beschadigd apparaat.
•Volg de installatie-instructies op die zijn meegeleverd met het apparaat.
•Wees voorzichtig met het verplaatsen van het apparaat, het is zwaar. Draag altijd veiligheidshandschoenen.
•Zorg ervoor dat rond het apparaat lucht kan circuleren.
•Wacht ten minste 4 uur alvorens het apparaat aan de netstroom aan te slui-
ten. Hierdoor kan de olie terug in de compressor stromen.
•Installeer het apparaat niet in de nabijheid van radiators, fornuizen, ovens of kookplaten.
•Enkel voor apparaten met een wateraansluiting: sluit het apparaat uitsluitend aan op een drinkwaterleiding.
•De achterzijde van het apparaat moet tegen de muur worden geplaatst.
•Installeer het apparaat niet op een plaats met direct zonlicht.
Aansluiting aan het elektriciteitsnet
WAARSCHUWING!
Gevaar voor brand en elektrische schokken.
•Dit apparaat moet worden geaard.
•Alle elektrische aansluitingen moeten door een gediplomeerd elektromonteur worden gemaakt.
•Controleer of de elektrische informatie op het typeplaatje overeenkomt met de stroomvoorziening. Zo niet, neem dan contact op met een elektromonteur.
•Gebruik altijd een correct geïnstalleerd, schokbestendig stopcontact.
•Gebruik geen meerwegstekkers en verlengsnoeren.
•Zorg dat u de elektrische onderdelen (hoofdstekker, kabel, compressor) niet beschadigt. Neem contact met de Servicedienst of een elektrotechnicus om de elektrische onderdelen te wijzigen.
•Steek de stekker pas in het stopcontact als de installatie is voltooid. Zorg ervoor dat het netsnoer na installatie bereikbaar is.
•De stroomkabel moet lager blijven dan het niveau van de stopcontact.
•Trek niet aan het aansluitnoer om het apparaat los te koppelen. Trek altijd aan de stekker.
4www.aeg.com
1.3Gebruik
•Dit apparaat is bedoeld voor huishoudelijk gebruik of gelijksoortige toepassingen zoals:
–Personeelskeukens in winkels, kantoren of andere werkomgevingen
–Boerderijen
–Door gasten in hotels, motels en andere woonomgevingen.
–Bed-and-breakfast accomodaties.
WAARSCHUWING!
Gevaar op letsel, brandwonden of elektrische schokken.
•Gebruik dit apparaat in een huishoudelijke omgeving.
•De specificatie van het apparaat mag niet worden veranderd.
•Plaats geen elektrische apparaten (bijv. ijsmachines) in het apparaat tenzij uitdrukkelijk geschikt verklaard door de fabrikant.
•Zorg ervoor dat u het koelcircuit niet beschadigt. Het bevat isobutaan (R600a), aardgas met een hoge ecologische compatibiliteit. Dit gas is ontvlambaar.
•Als er schade aan het koelcircuit optreedt, zorg er dan voor dat er zich geen vlammen en andere ontstekingsbronnen in de kamer bevinden. Ventileer de kamer goed.
•Zet geen hete items op de kunststofonderdelen van het apparaat.
•Plaats geen koolzuurhoudende dranken in het vriesvak. Dit zal extra druk in de drankfles veroorzaken.
•Bewaar geen ontvlambare gassen en vloeistoffen in het apparaat.
•Plaats geen ontvlambare producten of items die vochtig zijn door ontvlambare producten in, bij of op het apparaat.
•Raak de compressor of condensator niet aan. Ze zijn heet.
•Zorg ervoor dat u nooit met natte of vochtige handen items uit het vriesvak verwijderd of aanraakt.
•Wanneer u een ijslolly uit het apparaat neemt, eet deze dan niet onmiddellijk op. Wacht enkele minuten.
•Vries ontdooide voedingswaren nooit opnieuw in.
•Bewaar de voedingswaren volgens de instructies op de verpakking.
1.4 Onderhoud en reiniging
WAARSCHUWING!
Gevaar voor letsel en schade aan het apparaat.
•Schakel het apparaat uit en trek de stekker uit het stopcontact voordat u onderhoudshandelingen verricht.
•Gebruik geen waterstralen of stoom om het apparaat te reinigen.
•Maak het apparaat schoon met een vochtige, zachte doek. Gebruik alleen neutrale schoonmaakmiddelen. Gebruik geen schuurmiddelen, schuursponsjes, oplosmiddelen of metalen voorwerpen.
•Controleer regelmatig de afvoer van de koelkast en reinig deze indien nodig. Indien de afvoer verstopt is, zal er water op de bodem van het apparaat liggen.
•Het koelcircuit van dit apparaat bevat koolwaterstoffen. Enkel bevoegde personen mogen de eenheid onderhouden en herladen.
1.5 Binnenverlichting
•De gloeilampen of halogeenlampen in dit apparaat zijn uitsluitend bedoeld voor gebruik in huishoudelijke apparaten. Gebruik deze niet voor andere doeleinden.
1.6 Verwijdering
WAARSCHUWING!
Gevaar voor letsel of verstikking.
•Haal de stekker uit het stopcontact.
•Snij het netsnoer van het apparaat af en gooi dit weg.
•Verwijder de deurgreep om te voorkomen dat kinderen en huisdieren opgesloten raken in het apparaat.
•Het koelcircuit en de isolatiematerialen van dit apparaat zijn ozonvriendelijk.
•Het isolatieschuim bevat ontvlambare gassen. Neem contact met uw plaatselijke overheid voor informatie m.b.t. correcte afvalverwerking van het apparaat.
NEDERLANDS 5
•Veroorzaak geen schade aan het deel van de koeleenheid dat zich naast de warmtewisselaar bevindt.
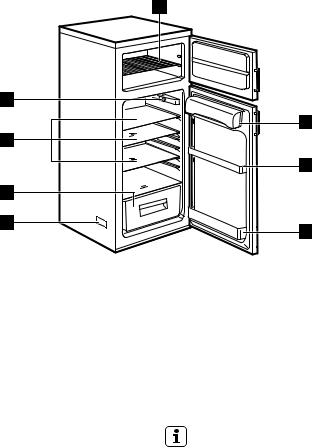
2. BESCHRIJVING VAN HET PRODUCT
1
8
|
2 |
7 |
|
|
3 |
6 |
|
5 |
4 |
|
1 |
Bakrooster |
6 |
Groentelade |
|
Botercompartiment |
|
Glazen legroosters |
2 |
7 |
||
|
Deurrooster |
|
Temperatuurknop en binnenverlich- |
3 |
8 |
||
|
Flessenrek |
|
ting |
4 |
|
||
|
|
||
|
Typeplaatje |
|
|
5 |
|
|
3. VOOR HET EERSTE GEBRUIK
3.1
1.Reinig de interne onderdelen van het apparaat en alle accessoires met warm water en een neutrale detergent.
2.Zorg ervoor dat het apparaat en de accessoires geheel droog zijn.
3.Steek de stekker in het stopcontact.
4.Activeer het apparaat en stel de temperatuur in.
Gebruik geen schuurmiddelen, schuursponsjes of solventen om het apparaat en de accessoires te reinigen.
6www.aeg.com
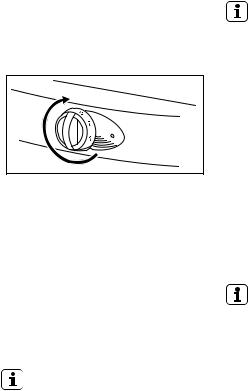
3.2Activering van het apparaat en het instellen van de temperatuur
Draai de temperatuurknop in wijzerzin om het apparaat te activeren en tegelijk de temperatuur in te stellen.
De cijfers op de knop verwijzen naar de verschillende koudestanden.
Draai aan de temperatuurknop om de instellingen te verlagen voor een minimale lage temperatuur.
Draai aan de temperatuurknop om hogere instellingen voor een maximale lage temperatuur.
We raden u aan om een gemiddelde koudestand te kiezen.
De volgende omstandigheden kunnen de temperatuurinstelling beïnvloeden.
•De kamertemperatuur en de plaats waar het apparaat geplaatst is.
•Hoe vaak de deur van het apparaat geopend wordt.
•De hoeveelheid voedsel in het apparaat.
4. DAGELIJKS GEBRUIK
4.1 Verse voedingswaren invriezen
De vriezer is geschikt voor het invriezen van verse voedingswaren en voor de bewaring van (diep)vriesvoeding.
Als de temperatuurknop op een gemiddelde stand ingesteld wordt, is het niet nodig om de instelling te wijzigen.
Als u het voedsel sneller wenst in te vriezen, stel de temperatuur dan in op een hogere stand. Op die manier kan de temperatuur van de koelkast dalen tot 0°C en meer. Als dit gebeurt, stel de temperatuurknop in op een lagere stand.
4.2 Het bewaren van ingevroren voedsel
Als het apparaat nieuw is of langdurig uitgeschakeld was, plaats dan niet onmiddellijk diepvriesvoeding in de vriezer. Stel de temperatuur in op de hoogste stand en laat het apparaat gedurende minimaal 2 uur werken.
Door een stroomstoring kan de vriezer ontdooien.
Als de stroom langer uitgeschakeld was dan de "Rijstijdwaarde" moet u het ontdooide voedsel onmiddellijk gebruiken of bereiden. Raadpleeg de "TECHNISCHE INFORMATIE" voor deze waarde.
U kunt de bereide voeding invriezen als ze is afgekoeld.
4.3 Ontdooien
Alvorens (diep)vriesvoeding te bereiden, moet u ze in de koelkast of bij kamertemperatuur ontdooien.
Het is mogelijk om kleine hoeveelheden bevrozen voedsel rechtstreeks uit de vriezer te bereiden, maar hierdoor wordt de bereidingsduur verlengd.
NEDERLANDS 7
4.4 Glazen legroosters
U kunt de glazen legroosters op verschillende hoogtes plaatsen.
4.5 Het plaatsen van de deurplateaus
U kunt het deurplateau op verschillende hoogten plaatsen.
1. Plaats het plateau in de richting van de pijlen tot het los laat.
2. Plaats het plateau in de nieuwe stand.
5. AANWIJZINGEN EN TIPS
5.1 Energie besparen
•Open de deur van de koelkast of de vriezer niet te dikwijls.
•Laat de deur van de koelkast of de vriezer niet langer dan nodig open staan.
•Als het apparaat permanent in werking is en er zich rijm aan de interne achterwand vormt, zijn dit mogelijke oorzaken:
–De temperatuurknop staat in de laagste stand.
–De kamertemperatuur is te hoog.
–Het apparaat zit te vol.
Stel de temperatuurknop in op een hogere stand. De automatische ont-
dooifunctie start en het energieverbruik daalt.
5.2 Koeling
•Zet geen warm voedsel in de koelkast. Wacht tot het is afgekoeld.
•Plaats geen dampende vloeistoffen in de koelkast.
•Doe alle voeding met een sterke smaak of geur in vershouddozen.
•Zorg ervoor dat er lucht rond het voedsel kan circuleren.
•Doe alle soorten vlees in vershoudzakjes. Plaats ze op het glazen rooster net boven de groentenlade. Bewaar vlees niet langer dan 2 dagen in de koelkast.
8www.aeg.com
•Dek bereid voedsel en koude gerechten af en plaats ze op een van de roosters.
•Was fruit en groenten en bewaar ze in de groentenlade.
•Bewaar boter en kaas in de speciale luchtdichte vakken, aluminiumfolie of vershoudzakjes.
•Zorg ervoor dat melkflessen gesloten zijn en bewaar ze in het flessenrek in de deur van het apparaat.
•Bewaar in de koelkast geen bananen, aardappelen, uien en look zonder verpakking.
•Verpak het voedsel in aluminiumfolie of in vershoudzakjes. Zorg ervoor dat de verpakking luchtdicht is.
•Bewaar geen vers voedsel bij ingevrozen voedsel. Hierdoor stijgt de temperatuur van de ingevroren voeding.
•De bewaringsduur van vette voeding is korter dan die van vetvrije of verarme voeding. Het zout beperkt de houdbaarheid van het voedsel.
•We raden aan om op elke verpakking de invriesdatum van het voedsel te noteren.
5.3 Invriezen
•Het classificatielabel geeft een indicatie van de maximale hoeveelheid voeding die de vriezer in 24 uur kan invriezen.
•De voeding is na 24 uur volledig ingevroren. Plaats tijdens deze periode geen ander voedsel in de vriezer.
•Plaats het voedsel in kleine hoveelheden in de vriezer. Hierdoor vriest het voedsel snel in en kan de benodigde hoeveelheid makkelijk ontdooid worden.
5.4 Het bewaren van ingevroren voedsel
•Als u ingevroren voedsel koopt, plaats dit dan zo snel mogelijk in de vriezer.
•Als u ingevroren voedsel ontdooit, moet u dit zo snel mogelijk bereiden. Het is niet mogelijk om eerder ingevroren voeding opnieuw in te vriezen.
•Zorg ervoor dat de uiterste houdbaarheidsdatum niet overschreden is. U vindt deze informatie op de verpakking van het voedsel.
6. ONDERHOUD EN REINIGING
LET OP!
Haal de stekker uit het stopcontact alvorens onderhoudswerkzaamheden te verrichten.
6.1 Reiniging
•Maak het apparaat en alle accessoires schoon.
•Reinig alle onderdelen van het apparaat en alle accessoires met warm water en een neutrale detergent. Zorg ervoor dat het apparaat en de accessoires geheel droog zijn.
•Reinig de pakking van de deur regelmatig. Neem contact op met de servi- ce-afdeling om een beschadigde pakking te vervangen.
•Maak de condensor (zwart rooster) van de grill en de compressor aan de ach-
terkant van het apparaat schoon met een borstel. Hierdoor daalt het energieverbruik en blijft het apparaat in goede conditie.
• Zorg ervoor dat u de leidingen of kabels nooit verplaatst of beschadigd, of eraan trekt.
•Zorg ervoor dat u het koelcircuit niet beschadigt.
•Reinig het apparaat niet met schuurmiddelen, schuursponsjes, solventen, geparfumeerde detergenten of boenmiddel.
Na het onderhoud, steek de stekker in het stopcontact.
NEDERLANDS 9
6.2 Automatische ontdooifunctie van de koelkast
|
|
|
|
|
Het verwijderen van rijm gebeurt auto- |
||
|
|
|
|
|
|||
|
|
|
|
|
matisch wanneer de motorcompressor |
||
|
|
|
|
|
tijdens de werking stopt. |
||
|
|
|
|
|
Het water wordt afgevoerd door het af- |
||
|
|
|
|
|
voergat en het water wordt verzameld in |
||
|
|
|
|
|
de opvangbak waar het verdampt. |
||
|
|
|
|
|
De opvangbak bevindt zich achter het |
||
|
|
|
|
|
apparaat, boven de motorcompressor. |
||
|
|
|
|
|
Het afvoergat bevindt zich achteraan in |
||
|
|
|
|
|
de koelkast. |
||
|
|
|
|
|
Om ervoor te zorgen dat er geen water |
||
|
|
|
|
|
in andere delen van de koelkast terecht- |
||
|
|
|
|
|
komt, zorg ervoor dat het afvoergat al- |
||
|
|
|
|
|
tijd schoon is. Gebruik het reinigingsge- |
||
|
|
|
|
|
reedschap in het afvoergat. |
||
|
|
|
|||||
6.3 De vriezer ontdooien |
4. |
Reinig en droog de vriezer. |
|||||
|
|
|
Er kan zich op de vriesroosters |
5. |
Steek de stekker in het stopcontact. |
||
|
|
|
6. |
Schakel het apparaat in. |
|||
|
|
|
en rond het bovenste deel rijm |
||||
|
|
|
7. |
Stel de temperatuur in op de hoog- |
|||
|
|
|
bevinden. |
||||
|
|
|
Ontdooi de vriezer wanneer de |
|
ste stand en laat het apparaat gedu- |
||
|
|
|
rijmlaag een dikte van 3 tot 5 mm |
|
rende minimaal 2 tot 3 uur werken. |
||
|
|
|
bereikt heeft. |
8. |
Plaats het voedsel terug in de vriezer. |
||
|
|
|
LET OP! |
6.4 Als het apparaat |
|||
|
|
|
Gebruik geen scherpe metalen |
||||
|
|
|
gedurende lange tijd niet |
||||
|
|
|
voorwerpen om de rijm te verwij- |
||||
|
|
|
deren. |
gebruikt zal worden |
|||
|
|
|
Gebruik geen mechanische ap- |
1. |
Schakel het apparaat uit en trek de |
||
|
|
|
paraten om de vriezer te ont- |
||||
|
|
|
dooien. |
2. |
stekker uit het stopcontact. |
||
1. Schakel het apparaat uit. |
Verwijder al het voedsel. |
||||||
3. |
Ontdooi het apparaat. |
||||||
2. Haal al het voedsel uit de vriezer. |
|||||||
4. |
Reinig en droog het apparaat en alle |
||||||
|
Wikkel het voedsel in krantenpapier |
||||||
|
|
accessoires. |
|||||
|
en houd het koel. |
|
|||||
|
5. |
Laat de deur open om onaangename |
|||||
3. Houd de deur van het apparaat open |
|||||||
|
geurtjes te voorkomen. |
||||||
|
tot het volledig ontdooid is. |
|
|||||
|
|
|
|||||
10www.aeg.com
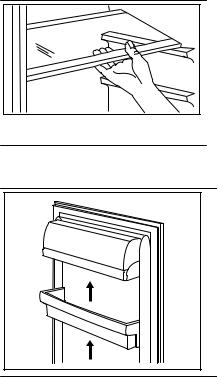
6.5Het lampje vervangen
1. Trek de stekker uit het stopcontact.
2. Verwijder de schroef van de afdekking van het lampje.
3. Haal de afdekking van het lampje
4. Vervang de oude lamp door een nieuwe. Gebruik uitsluitend lampen voor huishoudapparaten. De afdekking van de lamp vermeldt het maximale lampvermogen.
5. Plaats de afdekking van het lampje terug.
6. Steek de stekker in het stopcontact.
De gloeilampen of halogeenlampen in dit apparaat zijn uitsluitend bedoeld voor gebruik in huishoudelijke apparaten. Gebruik deze niet binnenhuisverlichting.
7. PROBLEEMOPLOSSING
WAARSCHUWING!
Trek de stekker uit het stopcontact alvorens de controle uit te voeren.
Voor problemen die niet in de tabel vermeld zijn, neem contact op met de service-afdeling.
Storing |
Mogelijke oplossing |
Het apparaat maakt la- |
Bepaalde geluiden zijn normaal als het apparaat in |
waai tijdens de werking. |
werking is. Raadpleeg de folder die bij het appa- |
|
raat geleverd wordt. |
Het apparaat werkt heleZorg ervoor dat het apparaat is ingeschakeld. |
|
maal niet. |
|
|
Zorg dat de stekker in het stopcontact zit. |
|
Controleer of er spanning is. Sluit een ander elek- |
|
trisch apparaat op het stopcontact aan. Om het |
|
stopcontact te repareren, neem contact op met |
|
een erkend elektrotechnicus. |
Het lampje brandt niet. |
Sluit en open de deur om ervoor te zorgen dat de |
|
lamp niet in de standby-stand staat. |
|
|
Het lampje is stuk. Vervang het lampje.
De compressor werkt conStel de temperatuurknop in op een lagere stand. tinu.
NEDERLANDS 11
Storing |
Mogelijke oplossing |
|
Zorg dat de deur van het apparaat is gesloten. |
|
Zorg ervoor dat u de deur van het apparaat niet te |
|
vaak opent en sluit. |
|
Zorg ervoor dat er geen warm voedsel in het ap- |
|
paraat staat. Wacht tot het is afgekoeld. |
|
Zorg ervoor dat de kamertemperatuur niet te |
|
hoog is. |
Er loopt water over de |
Dit is normaal als de automatische ontdooifuncties |
achterkant van de koel- |
in werking is. |
kast. |
|
Er bevindt zich water in de |
Controleer of het afvoergat niet verstopt is. |
koelkast. |
|
|
Zorg ervoor dat voedsel of verpakkingen niet ver- |
|
hinderen dat het water in de opvangbak stroomt. |
Er ligt water op de vloer. |
De dooiwaterafvoer loopt niet in de verdamperbak |
|
boven de compressor. |
|
Maak de dooiwaterafvoer vast op de verdamper- |
|
bak. |
De temperatuur in het ap- |
Stel de temperatuurknop in op een lagere stand. |
paraat is te laag |
|
De temperatuur in het ap- |
Stel de temperatuurknop in op een hogere stand. |
paraat is niet laag ge- |
|
noeg. |
|
|
Zorg dat de deur van het apparaat is gesloten. |
|
Zorg ervoor dat er geen warm voedsel in het ap- |
|
paraat staat. Wacht tot het voedsel koud is. |
|
Zorg ervoor dat het apparaat niet te vol zit. |
De temperatuur in de |
Zorg ervoor dat er koude luchtcirculatie is. |
koelkast is niet laag ge- |
|
noeg. |
|
Er is te veel rijmvorming. |
Zorg ervoor dat het voedsel in speciale bewaardo- |
|
zen of in de verpakking zit. |
|
Zorg dat de deur van het apparaat is gesloten. |
|
Stel de temperatuurknop in op een lagere stand. |
|
|
8.TECHNISCHE INFORMATIE
8.1Normale geluiden
Tijdens normaal gebruik hoort u geluiden (compressor, koelmiddelcirculatie).

12 |
www.aeg.com |
|
|
|
|
|
|
SSSRR |
|
|
|
|
R! |
CLICK! |
|
|
|
|
|
|
|
|
HISSS! |
BRRR! |
|
OK |
|
BLUBB! |
CRACK! |
|
|
|
||
|
|
|
|
|
|
SSSRRR! |
SSSRRR! |
CLICK! |
CLICK! |
|
HISSS! |
HISSS! |
BRRR! |
BRRR! |
|
|
|
||
|
BLUBB! |
BLUBB! |
CRACK! |
CRACK! |
8.2 Opstelling
Dit apparaat kan ook in een droge, goed geventileerde binnenruimte (garage of kelder) geïnstalleerd worden, maar voor de beste prestatie kunt u het apparaat
beter installeren op een plaats waar de omgevingstemperatuur overeenkomt met de klimaatklasse die staat aangegeven op het typeplaatje van het apparaat.
NEDERLANDS 13
Kli- |
Omgevingstemperatuur |
maat- |
|
klasse |
|
SN |
+10°C tot + 32°C |
N |
+16°C tot + 32°C |
ST* |
+16°C tot + 38°C |
T |
+16°C tot + 43°C |
|
|
8.3 Technische gegevens
Afmetingen |
Hoogte |
1404 mm |
|
Breedte |
545 mm |
|
Diepte |
604 mm |
Maximale bewaartijd bij |
|
19 h |
stroomuitval |
|
|
Voltage |
|
230 V |
Frequentie |
|
50 Hz |
|
|
|
Voor meer informartie, raadpleeg het classificatielabel en het energielabel.
9. MILIEUBESCHERMING
Recycle de materialen met het symbool  . Gooi de verpakking in een geschikte verzamelcontainer om het te recyclen.
Help om het milieu en de volksgezondheid te beschermen en recycle het afval van elektrische en
elektronische apparaten. Gooi apparaten gemarkeerd met het symbool  niet weg met het huishoudelijk afval. Breng het product naar het milieustation bij u in de buurt of neem contact op met de gemeente.

14 www.aeg.com
CONTENTS
1. SAFETY INSTRUCTIONS . . . . . . . . . . . . . . . . . . . . . . . . . . . . . . . . . . . . . . . . . . . . . . . . . . . . . 15 2. PRODUCT DESCRIPTION . . . . . . . . . . . . . . . . . . . . . . . . . . . . . . . . . . . . . . . . . . . . . . . . . . . . 17 3. BEFORE FIRST USE . . . . . . . . . . . . . . . . . . . . . . . . . . . . . . . . . . . . . . . . . . . . . . . . . . . . . . . . . 17 4. DAILY USE . . . . . . . . . . . . . . . . . . . . . . . . . . . . . . . . . . . . . . . . . . . . . . . . . . . . . . . . . . . . . . . . 18 5. HINTS AND TIPS . . . . . . . . . . . . . . . . . . . . . . . . . . . . . . . . . . . . . . . . . . . . . . . . . . . . . . . . . . . 19 6. CARE AND CLEANING . . . . . . . . . . . . . . . . . . . . . . . . . . . . . . . . . . . . . . . . . . . . . . . . . . . . . . 20 7. TROUBLESHOOTING . . . . . . . . . . . . . . . . . . . . . . . . . . . . . . . . . . . . . . . . . . . . . . . . . . . . . . . 21 8. TECHNICAL INFORMATION . . . . . . . . . . . . . . . . . . . . . . . . . . . . . . . . . . . . . . . . . . . . . . . . . 23 9. ENVIRONMENT CONCERNS . . . . . . . . . . . . . . . . . . . . . . . . . . . . . . . . . . . . . . . . . . . . . . . . . 25
FOR PERFECT RESULTS
Thank you for choosing this AEG product. We have created it to give you impeccable performance for many years, with innovative technologies that help make life simpler – features you might not find on ordinary appliances. Please spend a few minutes reading to get the very best from it.
Visit our website for:
Get usage advice, brochures, trouble shooter, service information:
www.aeg.com
Register your product for better service:
www.aeg.com/productregistration
Buy Accessories, Consumables and Original spare parts for your appliance: www.aeg.com/shop
CUSTOMER CARE AND SERVICE
We recommend the use of original spare parts.
When contacting Service, ensure that you have the following data available. The information can be found on the rating plate. Model, PNC, Serial Number.
Warning / Caution-Safety information
General information and tips
Environmental information
Subject to change without notice.
ENGLISH 15
1.  SAFETY INSTRUCTIONS
Before the installation and use of the appliance, carefully read the supplied instructions. The manufacturer is not responsible if an incorrect installation and use causes injuries and damages. Always keep the instructions with the appliance for future reference.
1.1 Children and vulnerable people safety
WARNING!
Risk of suffocation, injury or permanent disability.
•This appliance can be used by children aged from 8 years and above and persons with reduced physical, sensory or mental capabilities or lack of experience and knowledge if they have been given supervision or instruction for the operation of the appliance by a person who is responsible for their safety.
•Do not let children play with the appliance.
•Keep all packaging away from children.
•Cleaning and user maintenance shall not be made by children without supervision.
1.2 Installation
WARNING!
Only a qualified person must install this appliance.
•Remove all the packaging.
•Do not install or use a damaged appliance.
•Obey the installation instruction supplied with the appliance.
•Always be careful when you move the appliance because it is heavy. Always wear safety gloves.
•Make sure the air can circulate around the appliance.
•Wait at least 4 hours before connecting the appliance to the power supply. This is to allow the oil to flow back in the compressor.
•Do not install the appliance close to radiators or cookers, oven or hobs.
•Only for appliances with water connection: connect only to drinking water supply.
•The rear of the appliance must stand against the wall.
•Do not install the appliance where there is direct sunlight.
Electrical connection
WARNING!
Risk of fire and electrical shock.
•The appliance must be earthed.
•All electrical connections should be made by a qualified electrician.
•Make sure that the electrical information on the rating plate agrees with the power supply. If not, contact an electrician.
•Always use a correctly installed shockproof socket.
•Do not use multi-plug adapters and extension cables.
•Make sure not to cause damage to the electrical components (e.g. mains plug, mains cable, compressor). Contact the Service or an electrician to change the electrical components.
•Connect the mains plug to the mains socket only at the end of the installation. Make sure that there is access to the mains plug after the installation.
•The mains cable must stay below the level of the mains plug.
•Do not pull the mains cable to disconnect the appliance. Always pull the mains plug.
1.3 Use
•This appliance is intended to be used in household and similar applications such as:
–Staff kitchen areas in shops, offices and other working environments
–Farm houses
–By clients in hotels, motels and other residential type environments
16www.aeg.com
–Bed and breakfast type environments.
WARNING!
Risk of injury, burns, electrical shock or fire.
•Use this appliance in a household environment.
•Do not change the specification of this appliance.
•Do not put electrical appliances (e.g. ice cream makers) in the appliance unless they are stated applicable by the manufacturer.
•Be careful not to cause damage to the refrigerant circuit. It contains isobutane (R600a), a natural gas with a high level of environmental compatibility. This gas is flammable.
•If damage occurs to the refrigerant circuit, make sure that there are no flames and sources of ignition in the room. Ventilate the room.
•Do not let hot items to touch the plastic parts of the appliance.
•Do not put fizzy drinks in the freezer compartment. This will create pressure on the drink container.
•Do not store flammable gas and liquid in the appliance.
•Do not put flammable products or items that are wet with flammable products in, near or on the appliance.
•Do not touch the compressor or the condenser. They are hot.
•Do not remove or touch items from the freezer compartment if your hands are wet or damp.
•When you remove an ice lolly from the appliance, do not eat it immediately. Wait a few minutes.
•Do not freeze again food that has been thawed.
•Obey the storage instructions on the packaging of frozen food.
1.4 Care and Cleaning
•Before maintenance, deactivate the appliance and disconnect the mains plug from the mains socket.
•Do not use water spray and steam to clean the appliance.
•Clean the appliance with a moist soft cloth. Only use neutral detergents. Do not use abrasive products, abrasive cleaning pads, solvents or metal objects.
•Regularly examine the drain of the refrigerator and if necessary, clean it. If the drain is blocked, defrosted water collects in the bottom of the appliance.
•This appliance contains hydrocarbons in the cooling unit. Only a qualified person must do the maintenance and the recharging of the unit.
1.5 Internal light
•The type of light bulb or halogen lamp used for this appliance, is only for household appliances. Do not use it for house lighting.
1.6 Disposal
WARNING!
Risk of injury or suffocation.
•Disconnect the appliance from the mains supply.
•Cut off the mains cable and discard it.
•Remove the door catch to prevent children and pets to be closed in the appliance.
•The refrigerant circuit and the insulation materials of this appliance are ozone-friendly.
•The insulation foam contains flammable gas. Contact your municipal authority for information on how to discard the appliance correctly.
•Do not cause damage to the part of the cooling unit that is near the heat exchanger.
WARNING!
Risk of injury and damage to the appliance.

ENGLISH 17
2. PRODUCT DESCRIPTION
1
8
|
2 |
7 |
|
|
3 |
6 |
|
5 |
4 |
|
1 |
Wire shelf |
5 |
Rating plate |
|
Compartment for butter |
|
Vegetable drawer |
2 |
6 |
||
|
Door shelf |
|
Glass shelves |
3 |
7 |
||
|
Bottle shelf |
|
Temperature knob and internal light |
4 |
8 |
3. BEFORE FIRST USE
3.1
1.Clean the inner parts of the appliance and all the accessories with warm water and neutral detergent.
2.Make sure that the appliance and the accessories are fully dry.
3.Connect the mains plug to the mains socket.
4.Activate the appliance and set the temperature.
Do not use abrasive products, abrasive cleaning pads or solvents to clean the appliance and the accessories.
3.2 Activating the appliance and setting the temperature
Turn the temperature knob clockwise to activate the appliance and, at the same time, to set the temperature.
The numbers that are on the knob refer to different temperatures of cold.
Turn the temperature knob to lower settings to obtain minimum cold temperature.
18 www.aeg.com
Turn the temperature knob to higher settings to obtain maximum cold temperature.
We recommend that you set a medium cold temperature.
The conditions that follow can have an effect on the temperature setting.
•The room temperature and the location where the appliance is installed.
•How frequently the opening of the appliance door occurs.
•The quantity of food that is in the appliance.
4. DAILY USE
4.1 Freezing the fresh food
The freezer is applicable to freeze fresh food and for the storage of frozen food and of deep-frozen food.
If the temperature knob is set at a medium position, it is not necessary to change the setting.
If you want to freeze the food more quickly, set the temperature knob at a higher position. In this condition, the temperature of the fridge can decrease to 0 °C and more. If this occurs, set the temperature knob to a lower position.
4.2 Storage of frozen food
Do not put immediately frozen food in the freezer if the appliance is new or was deactivated for a period of time.
Set the temperature knob at the highest position and let the appliance operate for minimum 2 hours.
A power failure can cause the defrosting of the freezer.
If the power was off, for a period of time longer than the “Rising Time” value, you must use or cook immediately the defrosted food. Refer to “TECHNICAL INFORMATION” for the value. You can freeze the cooked food when it becomes cool.
4.3 Thawing
Before you cook frozen food or deepfrozen food, thaw the food in the fridge or at room temperature.
It is possible to cook small quantities of frozen food directly from the freezer, but this increases the cooking time.
4.4 Glass shelves
You can put the glass shelves at different heights.

ENGLISH 19
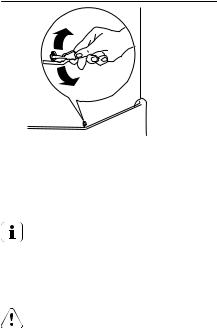
4.5 Positioning the door shelves
You can put the door shelf at different heights.
1. Pull the shelf in the direction of the arrows until it disengages.
2. Put the shelf in the new position.
5. HINTS AND TIPS
5.1 Energy saving
•Do not to open the door of the fridge or of the freezer frequently .
•Do not keep the door of the fridge or of the freezer open for more than the necessary time.
•If the appliance operates continuously and there is frost on the internal rear part, the cause can be:
–The temperature knob is set at the lowest position.
–The room temperature, where the appliance is installed, is too warm.
–The appliance is full.
Set the temperature knob at a higher position. The automatic defrosting starts and the energy consumption decreases.
•Put all types of meat in polythene bags. Put them on the glass shelf above the vegetable drawer. Do not keep the meat in the fridge for more than 2 days.
•Put a cover on cooked food and cold dishes and put them on one of the shelves.
•Wash fruit and vegetables and put them in the vegetable drawer.
•Put butter and cheese in special airtight containers, aluminium foil or polythene bags.
•Make sure that milk bottles have a cap and put them in the bottle shelf on the appliance door.
•Do not keep in the fridge bananas, potatoes, onions and garlic that are without packaging.
5.2 Refrigeration
•Do not put hot food in the fridge. Wait until it becomes cool.
•Do not put in the fridge liquids that evaporate.
•Put all the food, that has a strong flavour or odour, in containers.
•Make sure that there is air circulation around the food.
5.3 Freezing
•The rating plate gives the indication of the maximum quantity of food that the freezer can freeze in 24 hours.
•The freezing of the food is completed in 24 hours. Do not put other food in the freezer during this time.
•Put the food in small quantities in the freezer. This helps to freeze quickly the food and to thaw only the necessary quantity.
20www.aeg.com
•Wrap the food in aluminium foil or put it in polythene bags. Make sure that the packaging is airtight.
•Do not put fresh food together with frozen food. This to prevent the temperature of the frozen food to increase.
•The storage time for fat food is shorter than for non-fat food or for low-fat food. The salt decreases the storage time of the food.
•We recommend that you write, on each packaging, the date of when the food was frozen.
6. CARE AND CLEANING
CAUTION!
Before maintenance, disconnect the mains plug from the mains socket.
6.1 Cleaning
•Clean the appliance and the accessories regularly.
•Clean all the parts of the appliance and all the accessories only with warm water and neutral detergent. Make sure that the appliance and the accessories are fully dry.
•Clean the gasket of the door regularly. To replace a damaged gasket, contact the Service.
•Clean the grill of the condenser and the compressor, that are behind the
5.4 Storage of the frozen food
•When you buy frozen food, make sure that you put it in the freezer in a very short time.
•When you thaw frozen food, you must cook it in a very short time. It is not possible to freeze again food that was frozen before.
•Make sure that the use-by date is not expired. You can find the information on the packaging of the food.
appliance, with a brush. This helps to decreases the energy consumption and keeps the appliance in good conditions.
• Be careful not to pull, move or to cause damage to the pipes or the cables.
•Be careful not to cause damage to the cooling unit.
•Do not clean the appliance with abrasive products, abrasive cleaning pads, solvents, detergents with perfume or wax polish.
After maintenance, connect the mains plug to the mains socket.
6.2 Automatic defrosting of the fridge
The removal of frost occurs automatically when the motor compressor stops during operation.
The water drains out through the drain hole and collects in the water container where it evaporates.
The water container is behind the appliance, above the motor compressor.
The drain hole is in the fridge on the rear part.
To prevent water to collect in other parts of the fridge, make sure that the drain hole is always clean. Use the cleaning tool that is in the drain hole.
6.3 Defrosting of the freezer
There can be frost on the freezer shelves and around the top compartment.
Defrost the freezer when the layer of frost has a thickness of 3 or 5 mm.
CAUTION!
Do not use sharp metal tools to remove the frost.
Do not use mechanical devices to defrost the freezer.
1.Deactivate the appliance.
2.Remove all the food from the freezer. Wrap the food in newspaper and keep it at a cold temperature.
3.Keep the appliance door open until defrosting is completed.
4.Clean and fully dry the freezer.
5.Connect the mains plug to the mains socket.
6.5 Replacing the lamp
ENGLISH 21
6.Activate the appliance.
7.Set the temperature knob at the highest position and let the appliance operate for 2 or 3 hours with this setting.
8.Put back the food in the freezer.
6.4 When the appliance is not used for long periods
1.Deactivate the appliance and disconnect the mains plug from the mains socket.
2.Remove all the food.
3.Defrost the appliance.
4.Fully clean and dry the appliance and all the accessories.
5.Keep the doors open to prevent unpleasant smells.
1. Disconnect the mains plug from the mains socket.
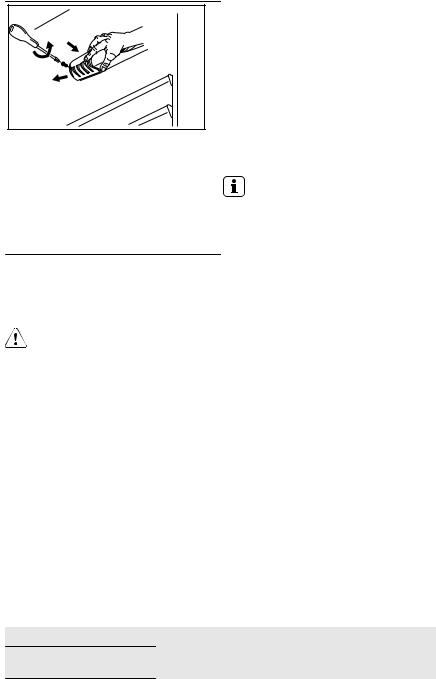
2. Remove the screw from the lamp cover.
3. Remove the lamp cover
4. Replace the old lamp with a new one. Use only lamps for household appliances. The lamp cover shows the maximum power of the lamp.
5. Install again the lamp cover.
6. Connect the mains plug to the mains socket.
The type of light bulb or halogen lamp used for this appliance, is only for household appliances. Do not use it for house lightning.
7. TROUBLESHOOTING
WARNING!
Disconnect the mains plug from the mains socket before you do the check.
For problems that are not in the table, contact the Service.

22 www.aeg.com
Problem |
Possible solution |
The appliance makes |
Some sounds are normal when the appliance is |
noise during operation. |
operating. Refer to the leaflet supplied with the |
|
appliance. |
The appliance does not |
Make sure that the appliance is activated. |
operate. |
|
|
Make sure that the mains plug is connected to the |
|
mains socket. |
|
Do a check and see if there is voltage. Connect a |
|
different appliance to the same mains socket. To |
|
repair a mains socket, contact a qualified electri- |
|
cian. |
The lamp does not come |
Close and open the door to make sure that the |
on. |
lamp is not in standby. |
|
The lamp is defective. Replace the lamp. |
The compressor operates |
Set the temperature knob at a lower position. |
continuously. |
|
|
Make sure that the appliance door is closed. |
|
Make sure not to open and close the appliance |
|
door too frequently. |
|
Make sure not to put hot food in the appliance. |
|
Wait until it becomes cool. |
|
Make sure that the room temperature is not too |
|
warm. |
Water collects on the rear |
It is normal that this occurs when the automatic de- |
plate of the fridge. |
frosting operates. |
Water collects in the |
Make sure that the drain hole is not clogged. |
fridge. |
|
|
Make sure that food or packaging do not prevent |
|
the water to collect in the water container. |
|
|
There is water on the floor.
The melting water outlet does not flow in the evaporative tray above the compressor.
Attach the melting water outlet to the evaporative tray.
The temperature in the |
Set the temperature knob to a lower position. |
appliance is too cold |
|
The temperature in the |
Set the temperature knob to a higher position. |
appliance is not sufficient- |
|
ly cold. |
|
|
Make sure that the appliance door is closed. |
|
Make sure not to put hot food in the appliance. |
|
Wait for the food to become cool. |
|
Make sure that the appliance is not too full. |
|
|
|
ENGLISH 23 |
|
|
Problem |
Possible solution |
The temperature in the |
Make sure that there is cold air circulation. |
fridge is not sufficiently |
|
cold. |
|
There is too much frost. |
Make sure that the food is closed in special con- |
|
tainers or packaging. |
|
Make sure that the appliance door is closed. |
|
Set the temperature knob to a lower position. |
|
|
8. TECHNICAL INFORMATION
8.1 Normal sounds
There are some sounds during normal running (compressor, refrigerant circulation).
24 |
www.aeg.com |
|
|
|
|
|
|
SSSRR |
|
|
|
|
R! |
CLICK! |
|
|
|
|
|
|
|
|
HISSS! |
BRRR! |
|
OK |
|
BLUBB! |
CRACK! |
|
|
|
||
|
|
|
|
|
|
SSSRRR! |
SSSRRR! |
CLICK! |
CLICK! |
|
HISSS! |
HISSS! |
BRRR! |
BRRR! |
|
|
|
||
|
BLUBB! |
BLUBB! |
CRACK! |
CRACK! |
8.2 Positioning
This appliance can be installed in a dry, well ventilated indoor (garage or cellar) also, but for optimum performance install this appliance at a location where
the ambient temperature corresponds to the climate class indicated on the rating plate of the appliance:
 Loading...