


IH EFA 1020.1
942490211
IH EFA 1030
942490212
Air Cleaning Center
Ceiling mounted, with cable suspension
With remote control
Installation and Instructions for Use
Effective |
Page 1 |

1. |
Hood body |
10. |
Heat detector |
2. |
Cable suspension |
11. |
Grease collector |
3. |
Cable support |
12. |
Halogen lamp 20 Watt |
4. |
Decorative disc |
13. |
Germicidal lamp (UV-C Lamp) EKL |
5. |
Hanger bolt |
14. |
Stainless steel filter 586x324 mm incl. |
6. |
Dowel |
|
activated carbon |
7. |
Metal filter with ionizer sheet, with |
15. |
Power cord outlet |
|
spring lock |
|
|
8.Cable for ionizer sheet
9.Receptacle for wire suspension
Page 2

EFA 1020.1/1030 Air Cleaning Center (Ceiling Mounted) with Cable Suspension
Installation Instructions3 – Instructions for Use
In order to be able to use your exhaust hood in the best possible manner, please read these intructions carefully and keep them in case they are needed.
1. Safety and General notes
∙The exhaust hood can only be connected to a properly installed power outlet or connected directly by a professional. The power outlet mus be as secure as possible directly in the junction box. The electrical data is found on the nameplate, after opening the grease collector (11), behind the stainless steel filter (14), in the interior of the device.
∙The connection and commissioning may only be carried out by a professional.
∙Never use the exhaust hood without a filter (7/14) and open grease collector (11).
∙Always use gas burners properly.
∙Accessible parts can become hot while cooking or when they are used with cooking utensils!
∙The gas burner flames must always be covered with cookware. Strong heat development of open flames could damage the exhaust hood.
∙The exhaust hood‘s power supply must be interrupted by pulling the plug before conducting any cleaning or maintenance work.
∙Flambee dishes must not be prepared under the exhaust hood. The open flame could cause a fire.
∙Never leave the pan unsupervised when frying food. The oil could start a fire.
∙Constant maintenance ensures perfect operation and optimal performance of the exhaust hood.
∙All contaminated surfaces should be cleaned of debris regularly. The filter must be removed and cleaned regularly. (see page 11).
∙Incorrect halogen lamps (12) could ruin the transformer.
∙The device can swing freely because it is attached to the ceiling with steel cables.
∙Do not allow the heat sensor to react to a flame.
∙Keep a minimum distance of 300 mm between the ceiling and the upper side of the hood.
∙Minimum dstance between the storage surface of the cooking vessels on the hob and the lowest part of the exhaust hood: This distance must be at least 65 cm if the exhaust hood is installed above a gas appliance. If the mounting instructions for the hob specify a greater distance, this distance is to be adhered to. This minimum distance also applies to electric stoves.
∙This unit must not be used by persons, including children with reduced physical, sensory or mental abilities, or by persons without experience and knowledge unless they are supervised by a person who is responsible for their safety and has been instructed on the use of this equipment.
∙Children must not be unsupervised in the vicinity of the unit and must not play with the unit under any circumstances.
∙Safety Shutdown:
If one or more filters are removed, the unit switches off automatically. The unit is operational once again only after the the correct positioning of the filter.
∙CAUTION: Accessible parts may become hot when used with cooking appliances.
!!! Operate this unit only with inserted filters (7/14) and a closed grease collector (11) !!!
!!! Do not operate this unit without a filter (7/14) (High voltage and UV-C radiation)
Do not look into the illuminated germicide lamp (13) !!!
Page 3

2. Before Installation
∙The following parts are in the package: hood body, stainless steel filter, accessory kit and cleaning kit (the cable suspensions are in the accessory kit).
∙Check that the exhaust hood was not damaged during transport. If there is any damage, the unit must not be installed.
∙Make sure that the installation and the electrical connections have been conducted by a qualified technician according to the specifications of the manufacturer and the official regulations.
∙Make sure that a 3-wire power cable is present on the site which comes from the ceiling on the right side behind the cable suspension.
Caution: The electrical connection must be performed by a licensed electrician. The plug must be accessible after installation. A Type 12 or Type 13 power outlet is to be provided. The connection cable is 2.4 metres long.
Caution: If the unit is to be used with as a fixed connection rather than with the plug, a separator belonging to that only must be available.
 Caution: The power supply to the hood must be unplugged before conducting maintenance work.
Page 4
3. Installation
Caution!! The connection to the 230 Volt network as well as the entire installation of the exhaust hood
5
must be at absolute zero potential and conducted by a professional.
1.Workflow:
Carry the middle of the cooktop to the ceiling.
2.Workflow:
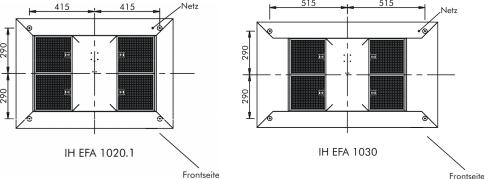
Draw four drill holes on the ceiling and then drill the four holes. (Sketch 1 = IH EFA 1020.1; Sketch 2 = IH EFA 1030)
Skizze 1
3. |
Workflow: |
|
Take four dowels, four hanger bolts and four decorative discs from the accessories kit. Insert |
the four |
dowels, screw in the four hanger bolts, and screw the four decorative discs onto the |
hanger bolts.
4.Workflow:
Now unpack the hood body.
5.Workflow:
Thread the cable suspension with the cable clamp from above into the hood body. Screw the cable clamp into the mounting and secure with the set screw. One mounting per cable suspension.
6.Workflow:
Now screw the four wire cables with the cable supports onto the hanger bolts. Now the steel cable can get twisted but it will ‘untwist‘ during workflow 7.
7.Workflow:
The wire cable relaxes and the length of the steel cable can be varied by exerting pressure onto the cable clamp. The hood can be aligned using a water level.
8.Workflow:
Fasten the power cord of the hood to the feed line on site.
9.Uncover the hood after installation only so that no dirt particles can reach the top of the hood. The unit can be uncovered again only once the kitchen has been completely set up and the final cleaning has taken place.
Page 5
 Loading...