


Chest Freezer
no frost
GB 2-19
SE 20-37
NO 38-55
DK 56-73
HU 74-91
makes life a little easier
820 41 77 45

2 electrolux cold
Contents
TECHNICAL SPECIFICATION . . . . . . . . . . . . . . . . . . . . . . . . . . . . . . . . . . . . .2 SAFETY INSTRUCTIONS . . . . . . . . . . . . . . . . . . . . . . . . . . . . . . . . . . . . . . . .5 Warnings and Guidelines . . . . . . . . . . . . . . . . . . . . . . . . . . . . . . . . . . . . . . . .5 THE NO-FROST (FROST FREE) SYSTEM . . . . . . . . . . . . . . . . . . . . . . . . . . . .7 DESCRIPTION OF THE APPLIANCE . . . . . . . . . . . . . . . . . . . . . . . . . . . . . . . .8 View of the appliance . . . . . . . . . . . . . . . . . . . . . . . . . . . . . . . . . . . . . . . . . . .8
INSTALLATION . . . . . . . . . . . . . . . . . . . . . . . . . . . . . . . . . . . . . . . . . . . . . . . .9 Position . . . . . . . . . . . . . . . . . . . . . . . . . . . . . . . . . . . . . . . . . . . . . . . . . .9
Electrical requirements . . . . . . . . . . . . . . . . . . . . . . . . . . . . . . . . . . . . . . . . . .9 Description of equipment . . . . . . . . . . . . . . . . . . . . . . . . . . . . . . . . . . . . . . . .9 Electrical Connection . . . . . . . . . . . . . . . . . . . . . . . . . . . . . . . . . . . . . . . . . . .9 HOW TO USE . . . . . . . . . . . . . . . . . . . . . . . . . . . . . . . . . . . . . . . . . . . . . . . .10 Temperature alarm . . . . . . . . . . . . . . . . . . . . . . . . . . . . . . . . . . . . . . . . . . . .10 Prior to putting into service . . . . . . . . . . . . . . . . . . . . . . . . . . . . . . . . . . . . . .10 Adjusting the temperature setting . . . . . . . . . . . . . . . . . . . . . . . . . . . . . . . . .10 Switching the equipment off . . . . . . . . . . . . . . . . . . . . . . . . . . . . . . . . . . . . .10 Freezing . . . . . . . . . . . . . . . . . . . . . . . . . . . . . . . . . . . . . . . . . . . . . . . . . . . .11 Conservation of frozen products . . . . . . . . . . . . . . . . . . . . . . . . . . . . . . . . . .12 Preparation of Ice cube maker . . . . . . . . . . . . . . . . . . . . . . . . . . . . . . . . . . .12 Replacement of electric bulbs . . . . . . . . . . . . . . . . . . . . . . . . . . . . . . . . . . .13 Packaging and positioning . . . . . . . . . . . . . . . . . . . . . . . . . . . . . . . . . . . . . .13 Capacity . . . . . . . . . . . . . . . . . . . . . . . . . . . . . . . . . . . . . . . . . . . . . . . . . . .13 Basket . . . . . . . . . . . . . . . . . . . . . . . . . . . . . . . . . . . . . . . . . . . . . . . . . . . . .14 The role of the pressure equalisation valve . . . . . . . . . . . . . . . . . . . . . . . . . .14
HELPFUL HINTS . . . . . . . . . . . . . . . . . . . . . . . . . . . . . . . . . . . . . . . . . . . . . . . . . .15 Normal operating sounds . . . . . . . . . . . . . . . . . . . . . . . . . . . . . . . . . . . . . . .15 Storage . . . . . . . . . . . . . . . . . . . . . . . . . . . . . . . . . . . . . . . . . . . . . . . . . . . .15 Freezing . . . . . . . . . . . . . . . . . . . . . . . . . . . . . . . . . . . . . . . . . . . . . . . . . . .15 MAINTENANCE . . . . . . . . . . . . . . . . . . . . . . . . . . . . . . . . . . . . . . . . . . . . . . .16 Cleaning . . . . . . . . . . . . . . . . . . . . . . . . . . . . . . . . . . . . . . . . . . . . . . . . . . .16 IF SOMETHING DOES NOT WORK . . . . . . . . . . . . . . . . . . . . . . . . . . . . . . . .17 In case of a power failure or breakdown . . . . . . . . . . . . . . . . . . . . . . . . . . . .17
Technical Specifications
Model |
|
ECS2070 |
ECS2370 |
ECS3070 |
Volume (gross) |
litres |
205 |
235 |
305 |
Volume (net) |
litres |
200 |
230 |
300 |
Height without/ with roller |
cm |
87,6/88,3 |
87,6/88,3 |
87,6/88,3 |
Width |
cm |
119 |
132,5 |
160 |
Depth |
cm |
66,5 |
66,5 |
66,5 |
Chest Freezer
no frost
Technical specification
Safety instructions
The not-frost (frost-free) system
Description of the appliance
Installation
How to use
Helpful hints
Mainntenance
If something does not work
p2
p5
p7
p8
p9
p10
p15
p16
p17
makes life a little easier

4 electrolux cold
Dear customer,
Before placing your new freezer into operation read these operating instructions carefully. They contain important information for safe use, for installation and for care of the appliance.
Notes which are important for your safety or for the proper functioning of the appliance are stressed with a warning triangle and / or with signal words ( Warning!,
Caution!, Important!). Please observe the following carefully.
This symbol and numbered instructions guide you step by step in the operation of the appliance.
Tips and notes concerning economical and environmentally sound use of the appliance are marked with the cloverleaf.
The operating instructions contain instructions for the correction of possible
malfunctions by the user in the section" What to do if …". If these instructions should not be sufficient, please contact your local Service.

Safety Instructions
Warnings and Guidelines
Important
It is vital that these instructions are kept with the freezer for future use. If the freezer is sold or given to another user, or if you move and leave the freezer behind, you must ensure that the instructions accompany the freezer to enable the next user to use the freezer correctly and read the relevant warings.
This freezer is only intended for the freezing and storage of food.
This freezer should only be operated by adults. Children must not be allowed to tamper with the control buttons or play with the freezer.
 Changes in the electrical mains system in connection with the installation of this freezer should always be carried out by an authorised electrician or competent person.
Do not under any circumstances attempt to repair the freezer yourself. Repairs carried out by untrained people may result in personal injury or serious malfunction of the freezer.
Service of the freezer should be carried out by an authorised service company, and only original spare parts should be used.
It is dangerous to alter the freezer specifications, or to change the freezer in any other way.
electrolux cold 5
 Make sure that the freezer is not placed on top of the mains cable.
 Do not re-freeze food once it has been defrosted.
 Observe the recommendations for storage carefully. See under "Helpful Hints".
 This freezer includes components that are heated during operation. Consequently, adequate ventilation must always be provided. If ventilation is insufficient defects may occur, resulting in the loss of food. See under "Installation".
 Do not place drinks in the freezer. Bottles and cans containing carbonated liquid or sparkling drinks are particularly prone to explosion, which may damage the freezer.
 This freezer is heavy. Take care when moving it.
 If the freezer is fitted with a lock to prevent tampering by children, the key must always be kept safely out of the reach of children, and far away from the freezer.
 Before disposing of an old freezer, make sure that the lock (if present) no longer works. This is to prevent accidents and avoid the danger of children getting locked inside.
 Make sure the power plug is not squashed or damaged by the back of the
freezer.
A damaged power plug may overheat and cause a fire.

6 electrolux cold
Do not place heavy articles or the freezer itself on the power cord. There is a risk of a short circuit and fire.
-Do not remove the power cord by pulling
on its lead, particularly when the freezer is being pulled out of its niche.
-Damage to the cord may cause a short-circuit, fire and/or electric shock.
-If the power cord is damaged, it must be replaced by a certified service agent or qualified service personnel.
If the power plug socket is loose, do not insert the power plug. There is a risk of electric shock or fire.
In the interests of the environment:
The symbol on the product or on its packaging indicates that this product may not be treated as household waste. Instead it shall be handed over to the applicable collection point for the recycling of electrical and electronic equipment. By ensuring this product is disposed of correctly, you will help prevent potential negative consequences for the environment and human health, which could otherwise be caused by inappropriate waste handling of this product. For more detailed information about recycling of this product, please contact your local city office, your household waste disposal service or the shop where you purchased the product.

electrolux cold 7
The no-frost (frost free) system
The no frost (frost free) system enables both the freezing of fresh foodstuff as well as storage of readily frozen foodstuff by cold air. An evaporator cools the air in the interior space of the appliances, which is circulated and uniformly distributed by a fan. This uniformly circulating air flow creates a dry climate, low temperature fluctuations and low temperature differences in the entire appliance interior. The moisture in the air condenses as frost on the evaporator. The evaporator thaws/defrosts automatically, as soon as this is necessary. The melted water is drained off outside to the compressor and evaporates throught the heat generated by the latter. Thus, the interior of the appliances and the stored cooled or frozen foodstuffs always remain fresh and icefree. Manual thawing/defrosting is not necessary.

8 electrolux cold
Description of the appliance
View of the appliance
Ice cube maker |
Ice cube maker holder |
Air outlets
Air inlets
Cold module
Lamp
Basket
Control panel
Installation
Position
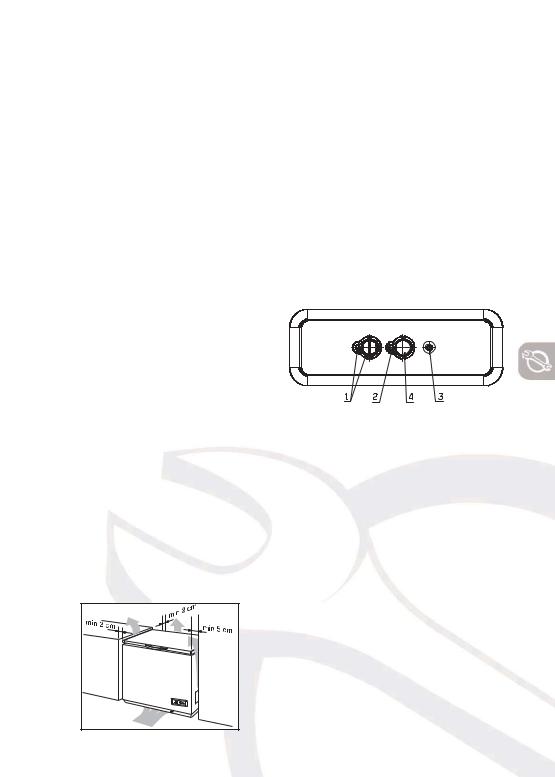
Place the freezer horizontally on a firm surface, resting on all wheels. Use a wooden block or similar object to compensate for any bumps/holes in the surface.
The room should be dry and adequately ventilated.
Temperatures of the external environment have an impact on the energy consumption of the freezer. Therefore:
-do not place the freezer in a position exposed to sunshine or beside a radiator oven, or any other source of heat.
-position it where the temperature of the environment corresponds to the climatic classification for which the freezer was designed.
classification Ambient temperature
|
limits |
SN |
From….to |
+10 to +32 C |
N+16 to +32 C
ST |
+18 to +38 C |
T+18 to +43 C
If the freezer has been handled in a vertical position it should be allowed to stand in normal position for about 12 hours before switching it on.
Please ensure that when the appliance is installed it is easily accessible for the engineer in the event of a breakdown.
Electrical requirements
Before switching on, make sure that the voltage of your electricity supply is the same as that indicated on the rating plate, located on the back of the cabinet.
electrolux cold 9
Warning:
This appliance must be earthed.
This appliance complies with the
following EC Directives: -73/23/EEC-Low-VoltageDirective -89/336/EEC -EMC Directive.
Testing has been carried out in accordance with EN 153 regarding the determination of freezer capacity,energy consumption and temperature rise time.
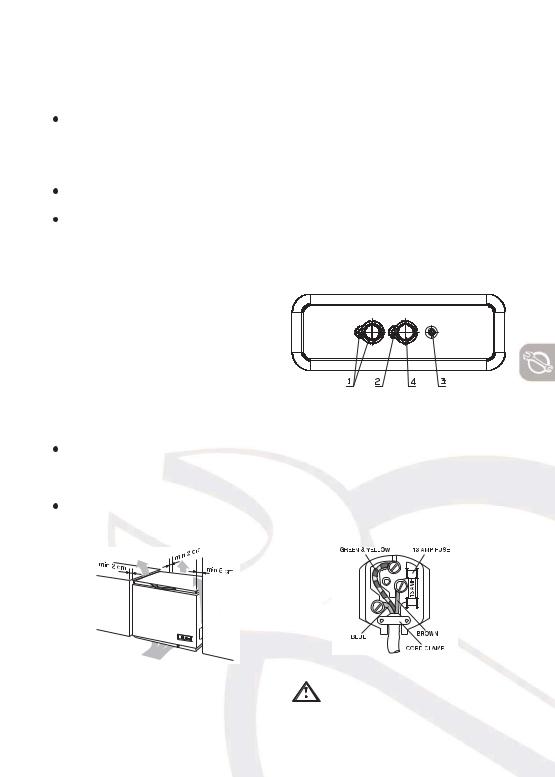
Description of equipment
Control panel:
1.Signal lamp of the control section (green).
2.Signal lamp (yellow) for quick freezing.
3.Acoustic alarm and alarm signal lamp (red).
4.Push button:
-for reset acoustic alarm
-for start quick freezing mode
-for stop quick freezing mode
Electrical Connection
Any electrical work required to install this appliance should be carried out by a qualified electrician or
competent person.
This appliance must be earthed.

10 electrolux cold
The manufacturer declines any liability should these safety measures not be observed.
Electrical Requirements
Before switching on, make sure the electricity supply voltage is the same as that indicated on the appliance rating plate.
The appliance is supplied with a 13amp plug fitted. In the event of having to change the fuse in the plug supplied, a 13amp ASTA approved (BS1362) fuse must be used.Should the plug need to be replaced for any reason. The wires in the mains lead are coloured in accordance with the following code:
Green and Yellow: |
Earth |
Blue: |
Neutral |
Brown: |
Live |
The wire coloured green and yellow must be connected to the terminal marked with the letter "E" or by the earth symbol
or coloured green and yellow.
The wire coloured blue must be connected to the terminal "N" or coloured black.
The wire coloured brown must be connected to the terminal marked "L" or coloured red.
Upon completion there must be no cut, or stray strands of wire present and the cord clamp must be secure over the outer sheath.
How to use
Temperature alarm
If the temperature in the freezer becomes too high, the acoustic alarm
sounds and the alarm signal lamp flashes.
The acoustic alarm signal sound and the red alarm signal lights up:
Press the button to stop the acoustic alarm signal. The red alarm lamp continues to flash until the freezer reaches the proper temperature.
on putting the equipment into service until the temperature necessary for safe food storage is maintained.
 after loading fresh food in a quantity exceeding the freezing capacity (see "Freezing")
 if the lid remains open for long time.
If there is a malfunction and the internol temperature cannot be maintained.
The acoustic alarm signal fails to sound and the red alarm indicator fails to light up:
if the power supply to the equipment fails
in the case that the electronic temperature controller has failed.
Prior to putting into service
Clean the inside of equipment and all the appliances prior to putting into service the first time (see chapter: "Maintenance")
Adjusting the temperature setting
Use a coin to turn the temperature control knob. This is to render it more difficult to change the setting inadvertently (protection against children`being able to tamper with the equipment).
Position "Off" means that the equipment is switched off.
Position "1" means that the inside temperature is at it's highest . Position "4" means that the inside temperature is at it's lowest . Recommended setting: "2" or "3".
Use a coin and turn the temperature control knob to position "2" or "3". The factors influencing the inside temperature are as follows:
ambient temperature
quantity of food to be conserved frequency and duration of opening the cover
Switching the freezer off
To put the freezer out of service, turn the temperature control knob
counterclockwise to"off" position. The green signal lamp is extinguished.
Putting the freezer out of service for prolonged time.
To put the freezer out of service, turn the temperature control knob counterclockwise to"off" position. The green signal lamp is extinguished. Then, disconnect the plug connector from the mains receptacle.
Disconnect the plug from mains or disconnect or remove the fuse. Clean thoroughly (see section Maintenance and Cleaning").
Leave the lid open to prevent any smell from being formed.
Freezing
Recommendation: for freezing fresh food, use the special basket. This enables the fresh food to be separated from those already
electrolux cold 11
frozen. Always take care of preventing the food already frozen from being thawed as a result of contact with fresh food. If freezing compartment is insufficient, part of goods can be placed in the large compartment of the cabinet on the left side of basket.
Attention!
Prior to freezing foods, the inner temperature of freezer should be -18OC or below.
Observe the freezing capacity indicat ed on the data label. The freezing capacity is the maximum quantity of fresh products that can be frozen with in 24 hours.
Any food once thawed must not be re-frozen without further processing (e.g. cooking)
In order to utilize the maximum freez ing capacity, depress the button (quick freezing) for 1 second 24 hours in advance of the time the freezing is planned to begin or 4 to 6 hours in advance if only a small quantity of goods is to be frozen. The yellow lamp is lit
It is not necessary to use button (quick freezing) for quantities not exceeding 1.5 kg.
Wrap the foods so they are airtight prior to freezing in order to prevent them from becoming dry, loosing their flavour or interacting with the flavour of other frozen foods.
Caution! Do not touch the frozen products with wet hands; otherwise your hands may stick to the frozen product as a result of freezing.
12 electrolux cold
Place the wrapped foods into the freezer. The products not frozen should not to be in contact with those already frozen in order to prevent the latter from hawed.
In order to freeze additional products, preserve the quick freezing setting. Alternatively, stop the quick freezing mode about 24 hours following the loading of goods (earlier in case of small quatities).
To do this, depress the
button (quick freezing) again. The yellow signal lamp extinguishes.
If the (quick freezing) button is not depressed to stop the quick freezing function, the equipment switched automatically to the normal mode after a 48-hour operation (the yellow signal lamp extinguishes). Then the equipment continues to operate in the mode determined by the setting of temperature control knob.
Advice:
For wrapping the goods to be frozen, use freezer bags, cling wrap specified for use in a freezer and good quality foil.
-special boxes suitable for frozen food
-Extra strength aluminium foil
For closing the bags and foils, use plastic clips, rubber bands or adhesive tapes.
Prior to closing, remove the air from the bags and foils; otherwise , the air causes the to dry out food and, in addition, occupies space.
Make small flat packages in order to
accelerate the freezing.
Do not fill the special boxes to the brim with ice cream or liquid due to the expantion occurring during freezing.
Conservation of frozen products
Attention! Prior to loading the freezer the first time with food already frozen, the temperature of -18 °C necessary for safe storage should be obtained.
Store only frozen foods that are wrapped in order to prevent them becoming dry, loosing their flavour or interacting with the flavour of
other frozen foods. Observe the period storage
recommended on pre-packed frozen food.
Store ice creams and high fat content foods in the lower part of freezer (near the bottom)
Cup of the ice cube maker
Load line
Load line of the ice cube maker

1.Fill the ice cube maker until the cubes will be full in the horizontal position or by the load line mark in the vertical position. After this close the ice cube maker with cap.
2.Place it in the freezer and leave to solidify holder in the lid of the.
3.To loosen the frozen cubes, either bend the ice cube tray or hold it under running water for a few seconds.
Important! Never try to free an ice tray that is frozen to the freezer compartment using pointed or sharp edged objects. Use a soft plastic scraper.
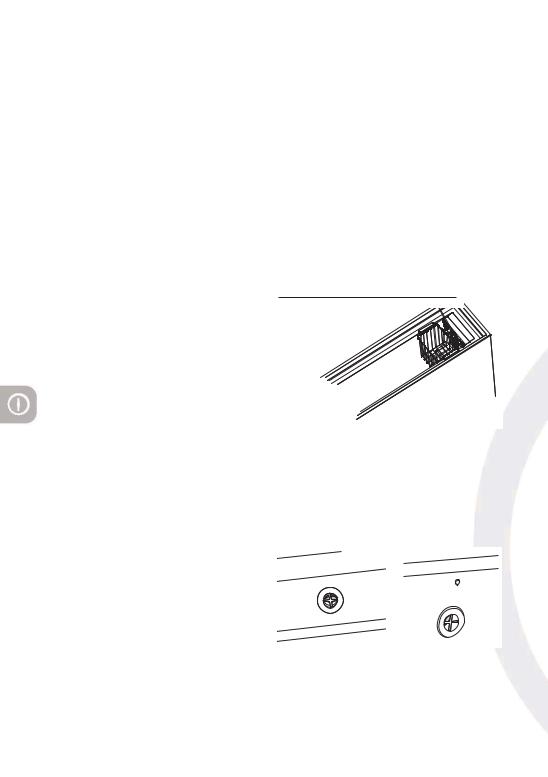
Replacement of electric bulbs
Warning! Risk of electric shock! Prior to replacement of electric bulbs, remove the plug from the mains socket or disconnect or unscrew the fuse or lodgement.
electrolux cold 13
1.Turn the temperature control knob counterclockwise to"off" position.
2.Remove mains plug
3.For replacement of the bulb press the cover hook and remove as shown
in the illustration
4.Replace defective light bulb.
5.Place the cover again.
Packaging and positioning
Food must be cold before freezing (no more than room temperature) Food must be packed in airtight and moisture -proof packaging to prevent it from drying out.
Place fresh food for freezing close to the cold sides of the freezer, making sure that it is not in contact
with frozen food already in the freezer. Never fill the freezer to more than loading line (arrow with dashed line) shown on the illustration.
See under "Helpful hints".
←
Capacity
Lamp
For the removal of the lampshade you have to push the hook by a screwdriver first, and than you can turn it out
Lamp specification: 220 to 240 V, max 15W bulb holder: E14
The freezing capacity of the freezer is stated in the data plate (kg/24 hours). Do not exceed the amount stated - if you do, the freezing capacity time will be extended. The data plate is located on the back of the cabinet.
14 electrolux cold
Important! The freezing capacity stated can be utilised to the full occasionally to freeze large amounts of fresh food. However, if the freezer is filled with large amounts of food for freezing every day, the capacity stated is reduced by about one-third.
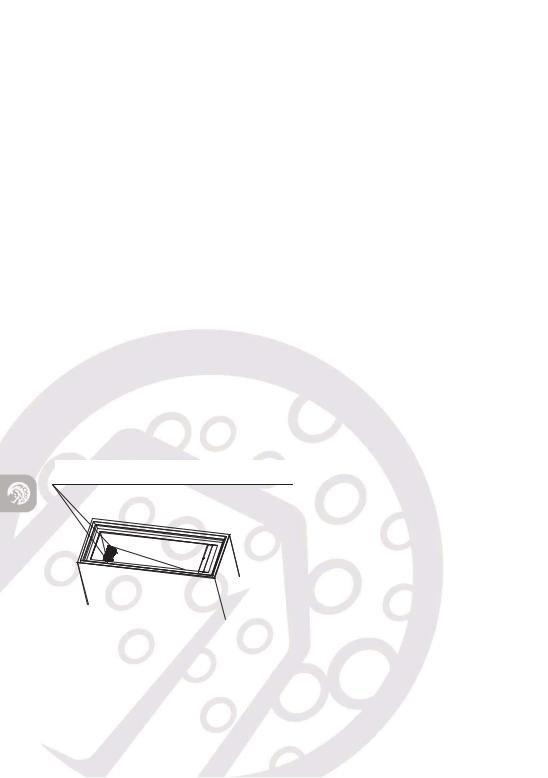
Basket
The basket is designed for fast freezing and protection for part of the lid (Air inlet). The handles can be placed in one position as shown in the drawings.
Important: Do not leave a space between the right side of the basket and Cold module.
Do not keep distance
between basket and cold modul
The role of the pressure
equalisation valve
The pressure equalisation valve installed in your freezer automatically eliminates the pressure difference which otherwise would make it very difficult or even impossible to open the lid.
It may be possible to hear the operation of the valve as the air flows in through the airing outlet in the rear wall of the cabinet.
For a safe operation, keep the two openings of the valve clear, do not cover them!

Helpful hints
Normal operating sounds
You may hear faint gurgling or bubbling sounds when the refrigerant is pumped through the coils or tubing at the rear, to the cooling plate/evaporator.
When the compressor is on, the refrigerant is being pumped round and you will hear a whirring sound or pulsating noise from the compressor. A thermostat controls the compressor and you will hear a faint click when the thermostat cuts in and out.
If the freezer has been switched off briefly, the compressor may not start immediately when the current is re-connected. This is quite normal.
Storage
Frozen food can be stored anywhere inside the freezer, but should be kept below the load line. Never exceed the maximum storage time for purchased frozen food. When you buy a frozen food, make sure that it has been stored at the correct temperature. Do not buy products which have wet or damaged packaging. Place purchased products in your freezer as quickly as possible. We recommend using an insulated bag to bring such products home with you. Never place bottles, warm objects, or fizzy drinks in the freezer.
electrolux cold 15
IMPORTANT! Do not push food together too much, try to allow air to circulate around each them.
Freezing
Only use fresh food of the best quality. Cool hot dishes to room temperature as quickly as possible before placing them in the freezer. Wrap food carefully in freezer foil, or use the special freezer boxes or bags which are on the market. Divide food into small portions before freezingthis ensure that the freezing is more rapid, and means that you only need to defrost the amount needed for immediate consumption.
Remember that defrosted food must not be re-frozen. However, cooked dishes which have been made using defrosted food may be frozen. Mark the freezer packaging with the date of freezing. We recommend keeping a record of the contents of your freezer. If freezing is too slow, the quality of the food being frozen deteriorates. Consequently, do not freeze larger amounts than is stated on the freezer's data plate. If you wish to freeze several days in a row the maximum freezing capacity stated per day is reduced by about one-third. As far as possible, keep the lid closed during freezing. If you inexperienced with home freezing, we recommend that you purchase a book containing advice and guidlines.
16 electrolux cold
Maintenance
Cleaning |
External cleaning |
|
Wash the outer cabinet with warm soapy |
Before any maintenance or cleaning |
water. Do NOT use abrasive products. |
work is carried out DISCONNECT the |
|
appliance from the ELECRICITY |
|
supply. |
|
Use a damp cloth to clean your freezer. |
|
Use hot water, and a mild, |
|
non-aromatic cleaning agent. |
|
Remove the vented floor, it like as |
|
shown on the illustration, and then |
|
cleaning, after the cleaning place the |
|
vented floor again. |
|
After cleaning the freezer, clean the |
|
basket, ice cube maker, before |
|
replacing them. |
|
For the removal of vented floor (with grid)
you have to pull out the grid and then you can turn it out.
Important! Never use strong cleaning agents, scouring powder or strongly aromatic cleaning agents to clean your freezer inside, since this will damage the inside and leave a strong smell.
electrolux cold 17
If something does not work
Check the following before making a request for service:
Defect: |
Check if: |
Possible cause: |
Action: |
Freezer not cold |
Green light not on |
Plug not connected |
Check plug and socket |
enough |
|
correctly |
|
|
|
Defect in switch or fuse |
Check fuse, call |
|
|
|
electrician |
|
|
Power failure |
Wait until current returns |
|
Green and red light on |
Fresh food recently |
Wait of couple of hours |
|
|
placed in freezer |
|
|
|
Air chanel blocked |
Clean the vented floor |
|
|
Lid open to long |
Wait of couple of hours |
|
Green light on, |
Thermostat set too warm |
Set thermostat colder |
|
red light not on |
|
|
Freezer too cold |
Yellow light on |
"Super" function active |
Press "Super" button |
|
|
|
out |
|
Yellow light not on |
Thermostat set too cold |
Set thermostat warmer |
|
|
|
|
If you are still unable to solve the problem, contact your local Service Force Centre
Do not attempt to repair the appliance yourself. Incorrect procedure may cause personal injury or lead to additional defects.
If the freezer has been switched off briefly, the compressor may not start immediately when the current is re-connected. This is quite normal. If it is quite normal for the freezer to seem warm on the outside occasionally, owing to the heat generated by the freezing process. This heat also helps to keep the appliance free
IN CASE OF A POWER FAILURE OR
BREAKDOWN
Providing the period of power failure or breakdown does not exceed the temperature rise there will be no risk of damage to the frozen food, providing you do not open the lid during this period
If the freezer is only half full or the lidid opened this will reduce the temperature rise time.

18 electrolux cold
Innehållsförteckning
TEKNISKA DATA . . . . . . . . . . . . . . . . . . . . . . . . . . . . . . . . . . . . . . . . . . . . .18 SÄKERHETSINFORMATION . . . . . . . . . . . . . . . . . . . . . . . . . . . . . . . . . . .20 Råd och varningar . . . . . . . . . . . . . . . . . . . . . . . . . . . . . . . . . . . . . . . . . . . .20
"NO-FROST" (FROST FREE) SYSTEMET . . . . . . . . . . . . . . . . . . . . . . . .22
BESKRIVNING AV FRYSBOXEN . . . . . . . . . . . . . . . . . . . . . . . . . . . . . . . .23 Frysboxens viktigaste delar . . . . . . . . . . . . . . . . . . . . . . . . . . . . . . . . . . .23 INSTALLATION . . . . . . . . . . . . . . . . . . . . . . . . . . . . . . . . . . . . . . . . . . . . . .24 Placering . . . . . . . . . . . . . . . . . . . . . . . . . . . . . . . . . . . . . . . . . . . . . . . . .24 Elektrisk anslutning . . . . . . . . . . . . . . . . . . . . . . . . . . . . . . . . . . . . . . . . . .24 Temperaturinställning . . . . . . . . . . . . . . . . . . . . . . . . . . . . . . . . . . . . . . . .24 ANVÄNDNING . . . . . . . . . . . . . . . . . . . . . . . . . . . . . . . . . . . . . . . . . . . . . . .25 Temperaturalarm . . . . . . . . . . . . . . . . . . . . . . . . . . . . . . . . . . . . . . . . . . .25 Före start . . . . . . . . . . . . . . . . . . . . . . . . . . . . . . . . . . . . . . . . . . . . . . . . .25 Temperaturreglerung . . . . . . . . . . . . . . . . . . . . . . . . . . . . . . . . . . . . . . . .25 Avstängning . . . . . . . . . . . . . . . . . . . . . . . . . . . . . . . . . . . . . . . . . . . . . . .25 Infrysning . . . . . . . . . . . . . . . . . . . . . . . . . . . . . . . . . . . . . . . . . . . . . . . . .26 Hållbarhet av färska varor . . . . . . . . . . . . . . . . . . . . . . . . . . . . . . . . . . . .27 Istärningslådor . . . . . . . . . . . . . . . . . . . . . . . . . . . . . . . . . . . . . . . . . . . . .27 Byte av lampan . . . . . . . . . . . . . . . . . . . . . . . . . . . . . . . . . . . . . . . . . . . . .28 Förpackning och placering i frysboxen . . . . . . . . . . . . . . . . . . . . . . . . . . .28 Infrysningskapcitet . . . . . . . . . . . . . . . . . . . . . . . . . . . . . . . . . . . . . . . . . .28 Korgen . . . . . . . . . . . . . . . . . . . . . . . . . . . . . . . . . . . . . . . . . . . . . . . . . . .29
RÅD OCH TIPS . . . . . . . . . . . . . . . . . . . . . . . . . . . . . . . . . . . . . . . . . . . . . .30
Normal användning . . . . . . . . . . . . . . . . . . . . . . . . . . . . . . . . . . . . . . . . .30 Frysförvaring . . . . . . . . . . . . . . . . . . . . . . . . . . . . . . . . . . . . . . . . . . . . . . .30 Infrysning av färska varor . . . . . . . . . . . . . . . . . . . . . . . . . . . . . . . . . . . . .30 SKÖTSEL . . . . . . . . . . . . . . . . . . . . . . . . . . . . . . . . . . . . . . . . . . . . . . . . . .31 Rengöring . . . . . . . . . . . . . . . . . . . . . . . . . . . . . . . . . . . . . . . . . . . . . . . . .31 OM NÅGOT INTE FUNGERAR . . . . . . . . . . . . . . . . . . . . . . . . . . . . . . . . .31 Strömavbrott eller funktionsstörning . . . . . . . . . . . . . . . . . . . . . . . . . . . . .32
Tekniska data
Model |
|
ECS3070 |
ECS2370 |
ESC 2070 |
|
Volym brutto |
litres |
305 |
235 |
205 |
|
Volym netto |
litres |
300 |
230 |
200 |
|
Höjd utan/med hjul |
cm |
87,6/88,3 |
87,6/88,3 |
87,6/88,3 |
|
Bredd |
cm |
160 |
132,5 |
119 |
|
Djup |
cm |
66,5 |
66,5 |
66,5 |
|

Chest Freezer
no frost
Tekniska data
Säkerhetsinformation
"NO-FROST" (frost free) systemet
Beskrivning av frysboxen
Installation
Användning
Råd och tips
Skötsel
Om något inte fungerar
20
23
25
26
27
28
33
34
35
makes life a little easier
20 electrolux cold
Kära Kunden!
Före installation och användning läs noga anvisningarna som innehåller viktiga informationer hur din nya frysbox fungerar och ska skötas-
Viktiga försäkringsoch användningsinformationer är märkt med Varning! / OBS! Läs dessa texter noggrannt.
Råd och tips vad gäller ekonomisk och miljövänlig användning är märkt med en klöver.
Här i bruksanvisningen finns en tabell som beskriver enklare fel och hur man kan åtgärda dem. Se "Om något inte fungerar". Om du kan inte avhjälpa felet enligt tabellen kontakta din lokala service.
electrolux cold 21
Säkerhetsinformation
Råd och varningar
OBS!
Förvara denna bruksanvisning så att den alltid finns tillhands för framtida bruk. Om frysboxen säljs, ges bort eller om du flyttar och lämnar den efter dig, se till att bruksanvisningen följer med frysboxen så att nästa användare kan läsa bruksanvisningen och använda boxen på rätt sätt.
Frysboxen är avsedd för infrysning och förvaring av matvaror
Frysboxen är avsedd att skötas av vuxna. Låt inte små barn leka med panelen eller själva boxen.
Förändringar i elsystemet eller anslutningen av frysboxen skall alltid utföras av person med tillräckliga kunskaper och som är behörig.
Försök aldrig att själv reparera frysboxen. Felaktiga reparationer kan orsaka skada både på frysboxen och på person och egendom.
Service skall utföras av auktoriserat serviceföretag och med original reservdelar. Se under "Service och reservdelar".
Det finns alltid risk för fara genom att själv ändra specifikationen eller genom förändringar av frysboxen på något annat sätt.
Kontrollera så att frysboxen inte står på anslutningssladden.
Frys inte in matvaror igen som redan varit
frysta och som har tinats. Läs rekommendationerna om
förpackning och förvaring av matvaror i frysboxen. Se under "Råd och tips". Frysboxen har komponenter som blir varma när den är igång. Se till att frysboxen har tillräcklig ventilation. Se under "Installation".
Förvara inte läsk eller andra mousserande drycker i frysen. Flaskor och burkar med kolsyra kan lätt explodera och förstöra både matvarorna och frysboxen. Frysboxen är tung. Var försiktig när den flyttas och använd skyddshandskar.
Om frysboxen är utrustad med l?sbart lock, förvara nyckeln så att barn inte kan leka med boxen.
Vid skrotning av frysboxen skall låset göras obrukbart för att förhindra olyckor. Som t.ex att barn inte skall kunna bli inlåsta i boxen.
Kontrollera att det finns anslutningsslad den på baksidan av frysboxen. Kontrollera att anslutningssladd och/eller stickkontakt inte kommer i kläm bakom frysboxen.
-En skadat sladd och/eller kontakt kan överhettas och orsaka brand
Kontrollera att frysboxen eller något annat inte står på anslutningssladden. Det kan orsaka kortslutning och risk för brand.
-Hantera anslutningssladden med största försiktighet. Tag inte ur stickkontakten genom att dra i sladden, speciellt om frysboxen ska dras fram ur en nisch.

22 electrolux cold
-Skador på sladden kan orsaka elektrisk stöt, kortslutning och risk för brand.
-Om anslutningssladden till produkten skadas Får den bytas endast av leverantören legitimerat serviceföretag
eller en behörig person för att undvika fara. Kontrollera att anslutningssladd och/eller stickkontakt inte kommer i kläm bakom frysboxen.
- En skadat sladd och/eller kontakt kan överhettas och orsaka brand
Anslut inte stickkontakten om vägguttaget sitter löst.
Skrotning av gamla frysbox
När det gäller kyl-och fysprodukter skall du kontakta din kommun eller återförsäljare för att få reda på var du kan lämna produkten för skrotning och återvinning.

electrolux cold 23
"NO-FROST" (frost free) systemet
"No-frost" (frost free) systemet gör det möjligt att både frysa in färska och förvara infrysta matvaror genom luftventilation. Evaporatorn kyler av luften i innersta rymden av boxen genom att luften cirkuleras och jämn fördelas med hjälp av en ventilator. Cirkulerande luftströmmen i innersta rymden av boxen skapar en tork klimat, låg temperatur fluktuation och låg temperatur skillnad. Fukten i luften kondenseras som frost på evaporatorn. Evaporatorn avfrostar systemet automatiskt om det är nödvändig. Smältvatten låter rinna av till kompressoren och dunstas bort genom värme av kompressoren. Så den innersta rymden av boxen och infrysta matvaror förblir friska och isfri. Manuell avfrysning är inte nödvändig.

24 electrolux cold
Beskrivning av frysboxen
Frysboxens viktigaste delar
Istärningslådor |
Fack för istärningslådorna |
Insläpp av luft
Utsläpp av luft
Kylenheten
Lampa
"Frost Free"-korgen
Panel
electrolux cold 25
Installation
Placering
Frysboxen skall st å i våg p å ett plant underlag, vilande p å alla fyra fötterna. Använd träklossar eller liknande för att kompensera eventuella ojämnheter i golvet.
Rummet ska vara torrt och normalt ventilerat.
Omgivningstemperaturen påverkar frysboxens energiförbrukning. Därför
-placera inte frysboxen i närheten av någon värmekälla som radiator eller spis och inte heller i direkt solljus.
-ställ frysboxen i en plats som uppfyller kraven av klimatklassen (se dataskylten)
Klimatklassen |
för omgivningstemperatur på |
|
SN |
+10 till +32 |
C |
N |
+16 till +32 |
C |
ST |
+18 till +38 |
C |
T |
+18 till +43 |
C |
Om frysboxen fraktats liggande ska den st å upprätt ca 12 timmar innan den startas.
För säkerhetens skull och bra service barhet ställ din frysbox på en tillgänglig plats.
Elektrisk anslutning
Före installationen se till dataskylten på baksidan av frysboxen.
OBS!
Frysboxen ska anslutas till ett jordat eluttag.
Produkten uppfyller kraven i följande EC-direktiv:
--72/23/EEC Lågspänningsdirektiv
-89/336/EEC -EMC direktiv
Mätningarna när det gäller energiförbrukningen, infrysningskapaciteten och uppvärmingstiden har gjorts enligt EN153.
Temperaturinställning
Knappar och indikeringslampor
1.Grön indikeringslampa. Lyser s å länge boxen är elektriskt ansluten.
2.Gul indikeringslampa. Lyser när infrysningen är igång.
3.Röd varningslampa.
4.Tryck på knappen för att
-stänga av ljudsignalen
-starta infrysningen
-stänga av infrysningen

26 electrolux cold
Användning
Temperaturalarm
IDen röda varningslampan blinkar och en ljudsignal startar
vid igångsättning tills temperaturen stabiliserats sig
en stor mängd matvaror har nyss lagts i boxen
locket har stått öppet för länge
Tryck på knappen för att stänga av ljudsignalen. Den röda varningslampan slocknar när temperaturen i boxen motsvarar den inställda temperaturen.
Ljudsignalen och röda varningslampan fungerar inte:
vid strömavbrott
när den elektroniska temperaturregulatorn inte fungerar.
Före start
Torka ur frysboxen innnan den startas. Se under "Underh?ll"
Temperaturreglering
Använd en mynt för att reglera temperaturen.
Position "Off": frysboxen är avstängd Position "1": temperaturen inuti boxen blir varmare
Position "4": temperaturen inuti boxen blir kallare Rekommendation: Position "2" och "3".
Ställ in termostatvredet med en mynt till position "2" eller "3".
Temperaturen i boxen påverkas av: omgivningstemperaturen mängden av infrysta varor
hur länge/hur många gånger locket är öppet
Avstängning
Stäng av frysboxen genom att ställa termostatvredet med hjälp av en mynt till position "Off". Gröna lampan slocknar. Avstängning för länge tid:
Stäng av frysboxen genom att ställa termostatvredet med hjälp av en mynt till position "Off".
Dra ut frysboxens stickpropp ur vägguttaget.
Rengör frysboxen (Se "Skötsel och Rengöring")
Lämna frysboxens lock öppet för att torka av.
 Loading...