


Aspire easyStore H340
User Guide
Copyright © 2009 Acer Incorporated
All Rights Reserved.
Aspire easyStore H340
User Guide
Changes may be made periodically to the information in this publication without obligation to notify any person of such revision or changes. Such changes will be incorporated in new editions of this manual or supplementary documents and publications. This company makes no representations or warranties, either expressed or implied, with respect to the contents hereof and specifically disclaims the implied warranties of merchantability or fitness for a particular purpose.
Record the model number, serial number, purchase date, and place of purchase information in the space provided below. The serial number and model number are recorded on the label affixed to your server. All correspondence concerning your unit should include the serial number, model number, and purchase information.
No part of this publication may be reproduced, stored in a retrieval system, or transmitted, in any form or by any means, electronic, mechanical, photocopy, recording, or otherwise, without the prior written permission of Acer Incorporated.
Aspire easyStore H340
Model Name :
Part Number:
Purchase Date:
Place of Purchase:
Acer and the Acer logo are registered trademarks of Acer Inc. Other company’s product names or trademarks are used herein for identification purposes only and belong to their respective companies.
iii
Safety instructions
Read these instructions carefully. Keep this document for future reference. Follow all warnings and instructions marked on the product.
Turning the product off before cleaning
Unplug this product from the wall outlet before cleaning. Do not use liquid cleaners or aerosol cleaners. Use a damp cloth for cleaning.
CAUTION for plug as disconnecting device
Observe the following guidelines when connecting and disconnecting power to the power supply unit:
Install the power supply unit before connecting the power cord to the AC power outlet.
Unplug the power cord before removing the power supply unit from the computer.
If the system has multiple sources of power, disconnect power from the system by unplugging all power cords from the power supplies.
CAUTION for Accessibility
Be sure that the power outlet you plug the power cord into is easily accessible and located as close to the equipment operator as possible. When you need to disconnect power to the equipment, be sure to unplug the power cord from the electrical outlet.
CAUTION for Listening
To protect your hearing, follow these instructions.
•Increase the volume gradually until you can hear clearly and comfortably.
•Do not increase the volume level after your ears have adjusted.
•Do not listen to music at high volumes for extended periods.
•Do not increase the volume to block out noisy surroundings.
•Decrease the volume if you can't hear people speaking near you.
iv
Warnings
•Do not use this product near water.
•Do not place this product on an unstable cart, stand or table. If the product falls, it could be seriously damaged.
•Slots and openings are provided for ventilation to ensure reliable operation of the product and to protect it from overheating. These openings must not be blocked or covered. The openings should never be blocked by placing the product on a bed, sofa, rug or other similar surface. This product should never be placed near or over a radiator or heat register, or in a built-in installation unless proper ventilation is provided.
•Never push objects of any kind into this product through cabinet slots as they may touch dangerous voltage points or short-out parts that could result in a fire or electric shock. Never spill liquid of any kind onto or into the product.
•To avoid damage of internal components and to prevent battery leakage, do not place the product on a vibrating surface.
•Never use it under sporting, exercising, or any vibrating environment which will probably cause unexpected short current or damage rotor devices, HDD, Optical drive, and even exposure risk from lithium battery pack.
•The bottom surface, areas around ventilation openings and AC adapter may get hot. To avoid injury, ensure they do not come in contact with yourskin or body.
•Your device and its enhancements may contain small parts. Keep them out of the reach of small children.
Using electrical power
•This product should be operated from the type of power indicated on the marking label. If you are not sure of the type of power available, consult your dealer or local power company.
•Do not allow anything to rest on the power cord. Do not locate this product where people will walk on the cord.
•If an extension cord is used with this product, make sure that the total ampere rating of the equipment plugged into the extension cord does not exceed the extension cord ampere rating. Also, make sure that the total rating of all products plugged into the wall outlet does not exceed the fuse rating.

v
•Do not overload a power outlet, strip or receptacle by plugging in too many devices. The overall system load must not exceed 80% of the branch circuit rating. If power strips are used, the load should not exceed 80% of the power strip's input rating.
•This product's power supply is equipped with a three-wire grounded plug. The plug only fits in a grounded power outlet. Make sure the power outlet is properly grounded before inserting the power supply plug. Do not insert the plug into a non-grounded power outlet. Contact your electrician for details.
Warning! The grounding pin is a safety feature. Using a power outlet that is not properly grounded may result in electric shock and/or injury.
Note: The grounding pin also provides good protection from unexpected noise produced by other nearby electrical devices that may interfere with the performance of this product.
•The system can be powered using a wide range of voltages; 100 to 240 V AC. The power cord included with the system meets the requirements for use in the country/region where the system was purchased. Power cords for use in other countries/regions must meet the requirements for that country/region. For more information on power cord requirements, contact an authorized reseller or service provider.
Product servicing
Do not attempt to service this product yourself, as opening or removing covers may expose you to dangerous voltage points or other risks. Refer all servicing to qualified service personnel.
Unplug this product from the wall outlet and refer servicing to qualified service personnel when:
•the power cord or plug is damaged, cut or frayed
•liquid was spilled into the product
•the product was exposed to rain or water
•the product has been dropped or the case has been damaged
•the product exhibits a distinct change in performance, indicating a need for service
•the product does not operate normally after following the operating instructions
vi
Note: Adjust only those controls that are covered by the operating instructions, since improper adjustment of other controls may result in damage and will often require extensive work by a qualified technician to restore the product to normal condition.
Disposal instructions
Do not throw this electronic device into the trash when discarding.
To minimize pollution and ensure utmost protection of the global environment, please recycle. For more information on the Waste from Electrical and Electronics Equipment (WEEE) regulations, visit http://global.acer.com/about/sustainability.htm
vii
Regulations and safety notices
FCC statement
This device has been tested and found to comply with the limits for a Class B digital device pursuant to Part 15 of the FCC rules. These limits are designed to provide reasonable protection against harmful interference in a residential installation. This device generates, uses, and can radiate radio frequency energy and, if not installed and used in accordance with the instructions, may cause harmful interference to radio communications.
However, there is no guarantee that interference will not occur in a particular installation. If this device does cause harmful interference to radio or television reception, which can be determined by turning the device off and on, the user is encouraged to try to correct the interference by one or more of the following measures:
•Reorient or relocate the receiving antenna
•Increase the separation between the device and receiver
•Connect the device into an outlet on a circuit different from that to which the receiver is connected
•Consult the dealer or an experienced radio/television technician for help
Notice: Shielded cables
All connections to other computing devices must be made using shielded cables to maintain compliance with FCC regulations.
Notice: Peripheral devices
Only peripherals (input/output devices, terminals, printers, etc.) certified to comply with the Class A limits may be attached to this equipment. Operation with noncertified peripherals is likely to result in interference to radio and TV reception.
Caution
Changes or modifications not expressly approved by the manufacturer could void the user’s authority, which is granted by the Federal Communications Commission, to operate this server.
Notice Canadian users
This Class B digital apparatus complies with Canadian ICES-003.

viii
Remarque à l'intention des utilisateurs canadiens
Cet appareil numérique de la classe B est conforme a la norme NMB-003 du Canada.
Compliant with Russian regulatory certification

ix
Acer Incorporated
333 West San Carlos St. San Jose,
CA 95110, U.S.A.
Tel: 254-298-4000
Fax: 254-298-4147
www.acer.com
Federal Communications Commission
Declaration of Conformity
This device complies with Part 15 of the FCC Rules. Operation is subject to the following two conditions: (1) This device may not cause harmful interference, and (2) This device must accept any interference received, including interference that may cause undesired operation.
The following local Manufacturer/Importer is responsible for this declaration:
Product: |
Server |
Model number: |
Aspire easyStore H340, Altos easyStore M2 |
Name of responsible party: |
Acer America Corporation |
Address of responsible party: |
333 West San Carlos St. |
|
San Jose, CA 95110 |
|
U.S.A. |
Contact person: |
Acer Representative |
Tel: |
254-298-4000 |
Fax: |
254-298-4147 |
|
|
x
Acer Incorporated
8F, 88, Sec.1, Hsin Tai Wu Rd., Hsichih
Taipei Hsien 221, Taiwan
Declaration of Conformity
We,
Acer Computer (Shanghai) Limited
8F, 88, Sec.1, Hsin Tai Wu Rd., Hsichih, Taipei Hsien 221, Taiwan
Contact Person: Mr. Easy Lai
Tel: 886-2-8691-3089 Fax: 886-2-8691-3120
E-mail: easy_lai@acer.com.tw
Hereby declare that: |
|
Product: |
Server |
Trade Name: |
Acer |
Model Number: |
Aspire easyStore H340, |
|
Altos easyStore M2 |
Is compliant with the essential requirements and other relevant provisions of the following EC directives, and that all the necessary steps have been taken and are in force to assure that production units of the same product will continue comply with the requirements.
EMC Directive 2004/108/EC as attested by conformity with the following harmonized standards:
•EN55022: 2006, AS/NZS CISPR22: 2006, Class B
•EN55024: 1998 + A1: 2001 + A2:2003
•EN55013:2001 + A1:2003 + A2:2006 (Applicable to product built with TV tuner module)
•EN55020:2007 (Applicable to product built with TV tuner module)
•EN61000-3-2: 2006, Class D
•EN61000-3-3: 1995 + A1: 2001+A2: 2005
Low Voltage Directive 2006/95/EC as attested by conformity with the following harmonized standard:
•EN60950-1: 2001 + A11: 2004
•EN60065: 2002 + A1: 2006 (Applicable to product built with TV tuner module)
xi
Council Decision 98/482/EC (CTR21) for panEuropean single terminal connection to the Public Switched Telephone Network (PSTN).
RoHS Directive 2002/95/EC on the Restriction of the Use of certain Hazardous Substances in Electrical and Electronic Equipment
The standards listed below are applied to the product if built with WLAN module or wireless keyboard and mouse.
R&TTE Directive 1999/5/EC as attested by conformity with the following harmonized standard:
•Article 3.1(a) Health and Safety
•EN60950-1:2001 + A11:2004
•EN50371:2002
•Article 3.1(b) EMC
•EN301 489-1 V1.6.1
•EN301 489-3 V1.4.1 (Applicable to non-bluetooth wireless keyboard mouse set)
•EN301 489-17 V1.2.1
•Article 3.2 Spectrum Usages
•EN300 440-2 V1.1.2 (Applicable to non-bluetooth wireless keyboard mouse set)
•EN300 328 V1.7.1
•EN301 893 V1.4.1 (Applicable to 5GHz high performance RLAN)
Year to begin affixing CE marking 2009.
January 7, 2009
Date
Easy Lai, Manager
Regulation Center, Acer Inc.
xii
1 Introduction
Features
Specifications
Overview
Front view
Rear view
System LED indicators
2 Setting up the system
Check package contents Select a location Recommended environment Connect the power cord Connect to the home network Power on the system
Install the Windows Home Server Connector on the first computer
Install the Windows Home Server Connector on the client computers
Connect to the Home Server Console
3 Windows Home Server Console
Computers & Backup User Accounts Shared Folders Server Storage Lights Out
McAfee Total Protection System Information Network Health Settings
General
Backup Passwords Media Sharing Remote Access Add-ins
Hardware Health and Performance Monitor IP Configuration
Lights Out
McAfee Total Protection Service Settings for DMS
1 |
Contents |
|
2
3
4
4
5
6
11
12
13
14
15
16
17
18
31
34
37
38
39
40
42
43
44
45
47
49
50
51
52
53
54
54
55
56
57
58
59
xiv |
|
Settings for iTunes Server |
60 |
Resources |
61 |
Shut Down |
61 |
4 Managing the server |
63 |
Create user accounts |
64 |
Add a shared folder |
69 |
Configure backup for home computers |
71 |
Back up the home server |
72 |
Configure the home server for remote access |
76 |
Access the Aspire easyStore H340 home page |
79 |
Access the shared folders on the home server |
81 |
Enable media sharing |
84 |
Enable Digital Media Server |
85 |
Enable iTunes service |
87 |
Stream audio |
88 |
Using the one-touch USB backup feature |
91 |
Set up Wake On LAN on the home server |
93 |
Set the home server uptime and down time |
96 |
Monitor server health and performance |
99 |
Set up email alerts |
100 |
Explore the Windows Home Server icon |
105 |
5 Configuring the hard disk drive |
107 |
Adding a hard disk drive |
107 |
Removing a hard disk drive |
112 |
Replacing a failed hard disk drive |
114 |
6 Troubleshooting |
117 |
First steps checklist |
117 |
Recovering or restoring the home server |
118 |
Restoring a home computer |
123 |
Restoring files from a backup |
125 |
Update your home server with Aspire easyStore H340 |
|
Software Update |
126 |
Specific problems and corrective actions |
131 |
1
1 Introduction
Thank you for choosing Aspire easyStore H340.
The Aspire easyStore H340 is a data storage and digital media content server for your digital home. Featuring an Intel® Atom™ processor, up to 2 GB memory, four-drive hot-swap bay*, Gigabit Ethernet, eSATA and four USB ports for extended storage, a USB backup port for backing up data from a USB storage device, and a recovery/reset button to recover from a system failure or reset the system to factory default.
Aspire easyStore H340 can store and share all your important data while simultaneously streaming digital media content to multiple applications including Apple iTunes or any Universal Plug and Play (UPnP) Audio/Video and Digital Living Network Alliance™ (DLNA) compliant device, such as PS3 or Xbox 360. It allows you to consolidate your content library yet maintain instant access to digital media.
*Only hard disk drives installed in the drive bays 2, 3, and 4 are hot-swappable. The system hard drive located on the 1st drive bay is not hot-swappable. See “Front view” on page 4 for the location of the drive bay.
2 |
1 Introduction |
Features
•Powerful processor with excellent file sharing performance.
•Fast network performance in the home is delivered through a Gigabit Ethernet connection.
•Equipped with Microsoft’s Windows Home Server operating system to help you centralize and connect your digital assets.
•Back up home computers daily. See “Configure backup for home computers” on page 71 for more information.
•Easily access your music, photos, and videos from virtually any Internet connected computer on a home network or while away from home. See “Access the shared folders on the home server” on page 81 for more information.
•One-touch USB backup feature enables quick and easy backup of your data from a USB storage device. See “Using the one-touch USB backup feature” on page 91 for more information.
•Easily add storage space to the home server. See “Adding a hard disk drive” on page 107 for more information.
•Windows Media Player and iTunes streaming support. See “Stream audio” on page 88 for more information.
•Remotely wakeup the home server. See “Set up Wake On LAN on the home server” on page 93.
3
Specifications
Processor |
Intel® Atom™ Processor |
Chipset |
Intel 945GC Express Chipset and ICH7R |
Drive storage |
Up to four 3.5-inch hot-swappable SATA hard disk drives |
|
(HDD) |
Memory |
Up to 2 GB DDR2 MHz unbuffered SDRAM |
Ethernet |
High performance (10/100/1000) Gigabit Ethernet port |
I/O ports |
USB 2.0 ports (1 front and 4 rear), Gigabit Ethernet port, |
|
eSATA port, recovery/reset button |
Power |
200 W, 100-240 V AC |
Server operating |
Windows Home Server |
system (OS) |
|
support |
|
Home computer OS |
Windows Vista 32-bit and 64-bit Edition |
support |
Windows XP 32-bit and 64-bit Edition |
Digital media |
Any DLNA certified device |
player support |
|
Digital media file |
• Music: MP3, WMA, WAV, AAC, AC3, FLAC, APE, OGG, |
support |
VOC, AIFF, AU, MID |
|
• Video: WMV, ASF, MOV, AVI, MPEG, 3GP, SWF, FLV, |
|
RMVB, RM, RA, RAM, MP4, MPG, MPE, M2V, TP, TS, |
|
MLV, MKV, DIVX |
|
• Photos: GIF, PNG, BMP, JPG, JEPG, ICO, TIFF, DXF, |
|
WMF, EMF, PICT, EPS, CDR |
Physical |
WxHxD: 200 x 180 x 212 mm |
dimensions |
Weight (without HDD): 4.5 kg |
|
(with 1 HDD): 5.1 kg |
4 |
1 Introduction |
Overview
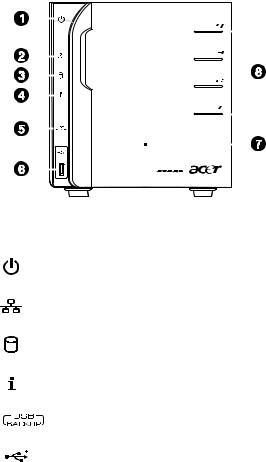
Front view
|
|
|
|
|
|
|
|
|
|
|
|
|
|
|
|
|
|
|
|
|
|
|
|
|
|
|
|
|
|
|
|
|
|
|
|
|
|
|
|
|
|
|
|
|
|
|
|
|
|
|
|
|
|
|
|
|
|
|
|
|
|
|
|
|
|
|
|
|
|
|
|
|
|
|
|
|
|
|
|
|
|
|
|
|
|
|
|
|
|
|
|
|
|
|
|
|
|
|
|
|
|
|
|
|
|
|
|
|
|
|
|
|
|
|
|
|
|
|
|
|
|
|
|
|
|
|
|
|
|
|
|
|
|
|
|
|
|
|
|
|
|
|
|
|
|
|
|
|
|
|
|
|
|
|
|
|
|
|
|
|
|
|
|
|
|
|
|
|
|
|
|
|
|
|
|
|
|
|
|
|
|
|
|
|
|
|
|
|
|
|
|
|
|
|
|
|
|
|
|
|
|
|
|
|
|
|
|
|
|
|
|
|
|
|
|
|
|
|
|
|
|
|
|
|
|
|
|
|
|
|
|
|
|
|
|
|
|
|
|
|
|
|
|
|
|
|
|
|
|
|
|
|
|
|
|
|
|
|
|
|
|
|
|
|
|
|
|
|
|
|
|
|
|
|
|
|
|
|
|
|
|
|
|
|
|
|
|
|
|
|
|
|
|
|
|
|
|
|
|
|
|
|
|
|
|
|
|
|
|
|
|
|
|
|
|
|
|
|
|
|
|
|
No. |
Icon |
|
|
|
Component |
|||||||||||||
|
|
|
|
|
|
|
|
|
|
|
|
|
|
|
|
|
|
|
1 |
|
|
|
|
|
Power button/power indicator |
||||||||||||
|
|
|
|
|
|
|
|
|
|
|
|
|
|
|
|
|
|
|
2 |
|
|
|
|
|
Network indicator |
||||||||||||
|
|
|
|
|
|
|
|
|
|
|
|
|
|
|
|
|
|
|
3 |
|
|
|
|
|
Hard disk drive (HDD) status indicator |
||||||||||||
|
|
|
|
|
|
|
|
|
|
|
|
|
|
|
|
|
|
|
4 |
|
|
|
|
|
System status indicator |
||||||||||||
|
|
|
|
|
|
|
|
|
|
|
|
|
|
|
|
|
|
|
5 |
|
|
|
|
|
USB backup button/USB backup indicator |
||||||||||||
|
|
|
|
|
|
|
|
|
|
|
|
|
|
|
|
|
|
|
6 |
|
|
|
|
|
USB 2.0 port |
||||||||||||
|
|
|
|
|
|
|
|
|
|
|
|
|
|
|
|
|
|
|
7 |
|
|
|
|
|
Front door |
||||||||||||
|
|
|
|
|
|
Open the door to access the hot-swappable HDDs |
||||||||||||
|
|
|
|
|
|
|
|
|
|
|
|
|
|
|
|
|
|
|
8 |
|
|
|
|
|
HDD access indicators |
||||||||||||
|
|
|
|
|
|
|
|
|
|
|
|
|
|
|
|
|
|
|
5
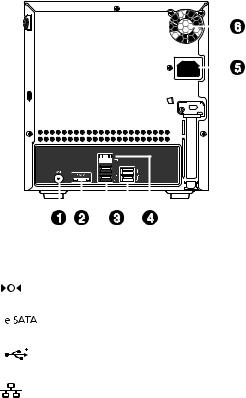
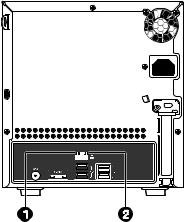
Rear view
|
|
|
|
|
|
|
|
|
|
|
|
|
|
|
|
|
|
|
|
|
|
|
|
|
|
|
|
|
|
|
|
|
|
|
|
|
|
|
|
|
|
|
|
|
|
|
|
|
|
|
|
|
|
|
|
|
|
|
|
|
|
|
|
|
|
|
|
|
|
|
|
|
|
|
|
|
|
|
|
|
|
|
|
|
|
|
|
|
|
|
|
|
|
|
|
|
|
|
|
|
|
|
|
|
|
|
|
|
|
|
|
|
|
|
|
|
|
|
|
|
|
|
|
|
|
|
|
|
|
|
|
|
|
|
|
|
|
|
|
|
|
|
|
|
|
|
|
|
|
|
|
|
|
|
|
|
|
|
|
|
|
|
|
|
|
|
|
|
|
|
|
|
|
|
|
|
|
|
|
|
|
|
|
|
|
|
|
|
|
|
|
|
|
|
|
|
|
|
|
|
|
|
|
|
|
|
|
|
|
|
|
|
|
|
|
|
|
|
|
|
|
|
|
|
|
|
|
|
|
|
|
|
|
|
|
|
|
|
|
|
|
|
|
|
|
|
|
|
|
|
|
|
|
|
|
|
|
|
|
|
|
|
|
|
|
|
|
|
|
|
|
|
|
|
|
|
|
|
|
|
|
|
|
|
|
|
|
|
|
|
|
|
|
|
|
|
|
|
|
|
|
|
|
|
|
|
|
|
|
|
|
|
|
|
|
|
|
|
|
|
|
|
|
|
|
|
|
|
|
|
|
|
|
|
|
|
|
|
|
|
|
|
|
|
|
|
|
|
|
|
|
|
|
|
|
|
|
|
|
|
|
|
|
|
|
|
|
|
|
|
|
|
|
|
|
|
|
|
|
|
|
|
|
|
|
|
|
|
|
|
|
|
|
|
|
|
|
|
|
|
|
|
|
|
|
|
|
|
|
|
|
|
|
|
|
|
|
|
|
|
|
|
|
|
|
|
|
|
|
|
|
|
|
|
|
|
|
|
|
|
|
|
|
|
|
|
|
|
|
|
|
|
|
|
|
|
|
|
|
|
|
|
|
|
|
|
|
|
|
|
|
|
|
|
|
|
|
|
|
No. |
Icon |
|
Component |
||||||||||||||||||||||||||
|
|
|
|
|
|
|
|
|
|
|
|
|
|
|
|
|
|
|
|
|
|
|
|
|
|
|
|
|
|
1 |
|
|
|
|
|
Recovery/reset button |
|||||||||||||||||||||||
|
|
|
|
|
|
|
|
|
|
|
|
|
|
|
|
|
|
|
|
|
|
|
|
|
|
|
|
|
|
2 |
|
|
|
|
|
eSATA port |
|||||||||||||||||||||||
|
|
|
|
|
|
|
|
|
|
|
|
|
|
|
|
|
|
|
|
|
|
|
|
|
|
|
|
|
|
3 |
|
|
|
|
|
USB port |
|||||||||||||||||||||||
|
|
|
|
|
|
|
|
|
|
|
|
|
|
|
|
|
|
|
|
|
|
|
|
|
|
|
|
|
|
4 |
|
|
|
|
|
Gigabit Ethernet port |
|||||||||||||||||||||||
|
|
|
|
|
|
|
|
|
|
|
|
|
|
|
|
|
|
|
|
|
|
|
|
|
|
|
|
|
|
5 |
|
|
|
|
|
Power connector |
|||||||||||||||||||||||
|
|
|
|
|
|
|
|
|
|
|
|
|
|
|
|
|
|
|
|
|
|
|
|
|
|
|
|
|
|
6 |
|
|
|
|
|
System fan |
|||||||||||||||||||||||
|
|
|
|
|
|
|
|
|
|
|
|
|
|
|
|
|
|
|
|
|
|
|
|
|
|
|
|
|
|

6 |
1 Introduction |
System LED indicators
Front panel LED indicators
The LED indicators mounted on the front panel provide information about the status of the system, its hard drives, and network
connection.
|
|
|
|
|
|
|
|
|
|
|
|
|
|
|
|
|
|
|
|
|
|
|
|
|
|
|
|
|
|
|
|
|
|
|
|
|
|
|
|
|
|
|
|
|
|
|
|
|
|
|
|
|
|
|
|
|
|
|
|
|
|
|
|
|
|
|
|
|
|
|
|
|
|
|
|
|
|
|
|
|
|
|
|
|
|
|
|
|
|
|
|
|
|
|
|
|
|
|
|
|
|
|
|
|
|
|
|
|
|
|
|
|
|
|
|
|
|
|
|
|
|
|
|
|
|
|
|
|
|
|
|
|
|
|
|
|
|
|
|
|
|
|
|
|
|
|
|
|
|
|
|
|
|
|
|
|
|
|
|
|
|
|
|
|
|
|
|
|
|
|
|
|
|
|
|
|
|
|
|
|
|
|
|
|
|
|
|
|
|
|
|
|
|
|
|
|
|
|
|
|
|
|
|
|
|
|
|
|
|
|
|
|
|
|
|
|
|
|
|
|
|
|
|
|
|
|
|
|
|
|
|
|
|
|
|
|
|
|
|
|
|
|
|
|
|
|
|
|
|
|
|
|
|
|
|
|
|
|
|
|
|
|
|
|
|
|
|
|
|
|
|
|
|
|
|
|
|
|
|
|
|
|
|
|
|
|
|
|
|
|
|
|
|
|
|
|
|
|
|
No. |
Indicator |
|
|
Color |
State |
Description |
|||||||||||||
|
|
|
|
|
|
|
|
|
|
|
|
|
|
|
|
|
|
|
|
1 |
Power |
|
|
Blue |
On |
System is connected to the power |
|||||||||||||
|
button |
|
|
|
|
|
|
|
supply and turned on and ready for |
||||||||||
|
|
|
|
|
|
|
|
|
|
use |
|||||||||
|
|
|
|
|
|
|
|
|
|
|
|
|
|
|
|
|
|
|
|
|
|
|
|
|
|
|
|
|
Random |
• System is booting |
|||||||||
|
|
|
|
|
|
|
|
|
blink |
• System is in S3 sleep state |
|||||||||
|
|
|
|
|
|
|
|
|
|
(suspend to memory) |
|||||||||
|
|
|
|
|
|
|
|
|
|
|
|
|
|
|
|
|
|
|
|
|
|
|
|
|
|
|
|
|
Off |
• System is not powered on |
|||||||||
|
|
|
|
|
|
|
|
|
|
• System initialize operation in |
|||||||||
|
|
|
|
|
|
|
|
|
|
progress |
|||||||||
|
|
|
|
|
|
|
|
|
|
|
|
|
|
|
|
|
|
|
|
2 |
Network |
|
|
Blue |
On |
Link between system and network |
|||||||||||||
|
|
|
|
|
|
|
|
|
|
|
|
|
|
|
|
|
|
|
|
|
|
|
|
|
|
|
|
|
Random |
Network access |
|||||||||
|
|
|
|
|
|
|
|
|
blink |
|
|
|
|
|
|
|
|
|
|
|
|
|
|
|
|
|
|
|
|
|
|
|
|
|
|
|
|
|
|
|
|
|
|
|
Red |
Off |
Network disconnected |
||||||||||||
|
|
|
|
|
|
|
|
|
|
|
|
|
|
|
|
|
|
|
|
7
No. |
Indicator |
Color |
State |
Description |
|
|
|
|
|
3 |
HDD status |
Purple |
On |
• System not initialized |
|
(4) |
|
|
• HDD is not mounted into the |
|
|
|
|
drive bay |
|
|
|
|
|
|
|
|
Random |
• HDD is mounted into the drive |
|
|
|
blink |
bay and is in the process of being |
|
|
|
|
manually added into the server |
|
|
|
|
storage |
|
|
|
|
• HDD is in the process of being |
|
|
|
|
removed from the server |
|
|
|
|
storage. |
|
|
|
|
For detailed instructions on how to |
|
|
|
|
add or remove a drive from the |
|
|
|
|
server storage, see “5 Configuring |
|
|
|
|
the hard disk drive” on page 107. |
|
|
|
|
|
|
|
Blue |
On |
HDD is mounted into the drive bay |
|
|
|
|
and added into the server storage |
|
|
|
|
For detailed instructions on how to |
|
|
|
|
add a drive into the server storage, |
|
|
|
|
see “Adding a hard disk drive” on |
|
|
|
|
page 107. |
|
|
|
|
|
|
|
Red |
Random |
• HDD failure |
|
|
|
blink |
• Windows Home Server cannot |
|
|
|
|
find HDD |
|
|
|
|
|
|
|
None |
Off |
No HDD mounted in the drive bay. |
|
|
|
|
|

8 |
|
|
|
|
1 Introduction |
|
|
|
|
|
|
No. |
Indicator |
Color |
State |
Description |
|
|
|
|
|
|
|
4 |
System status |
Blue |
Random |
• |
System is booting |
|
|
|
blink |
• System is shutting down |
|
|
|
|
|
|
|
|
|
|
On |
System initialize operation |
|
|
|
|
|
completed. |
|
|
|
|
|
|
|
|
|
Blue |
Random |
System is booting from a USB device |
|
|
|
and |
blink |
(Reserved for BIOS update while |
|
|
|
Purple |
|
boot block has been active) |
|
|
|
|
|
|
|
|
|
Red |
On |
May indicate the following states: |
|
|
|
|
|
• |
System failure |
|
|
|
|
• |
HDD failure |
|
|
|
|
• |
SATA controller failure |
|
|
|
|
• |
USB controller failure |
|
|
|
|
• |
LAN controller failure |
|
|
|
|
• |
FAN failure |
|
|
|
|
• |
Memory failure |
|
|
|
|
• Boot device not found |
|
|
|
|
|
|
|
|
|
|
Random |
System recovery or reset is in |
|
|
|
|
blink |
progress |
|
|
|
|
|
|
|
5 |
USB device |
Blue |
On |
• USB storage device is connected |
|
|
backup |
|
|
|
to the USB port |
|
|
|
|
• |
Backup completed |
|
|
|
|
|
|
|
|
|
Random |
System is backing up files from a |
|
|
|
|
blink |
USB storage device |
|
|
|
|
|
For detailed instructions on how to |
|
|
|
|
|
back up files from a USB storage |
|
|
|
|
|
device, see “Using the one-touch |
|
|
|
|
|
USB backup feature” on page 91. |
|
|
|
|
|
|
|
|
|
|
Off |
USB storage device unmounted |
|
|
|
|
|
|
|
6 |
HDD access |
Blue |
Blink |
HDD is in use |
|
|
|
|
|
|
|
|
|
|
Off |
No HDD activity |
|
|
|
|
|
|
|
9
Gigabit Ethernet port LED indicators
|
|
|
|
|
|
|
|
|
|
|
|
|
|
|
|
|
|
|
|
|
|
|
|
|
|
|
|
|
|
|
|
|
|
|
|
|
|
|
|
|
|
|
|
|
|
|
|
|
|
|
|
|
|
|
|
|
|
|
|
|
|
|
|
|
|
|
|
|
|
|
|
|
|
|
|
|
|
|
|
|
|
|
|
|
|
|
|
|
|
|
|
|
|
|
|
|
|
|
|
|
|
|
|
|
|
|
|
|
|
|
|
|
|
|
|
|
|
|
|
|
|
|
|
|
|
|
|
|
|
|
|
|
|
|
|
|
|
|
|
|
|
|
|
|
|
|
|
|
|
|
|
|
|
|
|
|
|
|
|
|
|
|
|
|
|
|
|
|
|
|
|
|
|
|
|
|
|
|
|
|
|
|
|
|
|
|
|
|
|
|
|
|
|
|
|
|
|
|
|
|
|
|
|
|
|
|
|
|
|
|
|
|
|
|
|
|
|
|
|
|
|
|
|
|
|
|
|
|
|
|
|
|
|
|
|
|
|
|
|
|
|
|
|
|
|
|
|
|
|
|
|
|
|
|
|
|
|
|
|
|
|
|
|
|
|
|
|
|
|
|
|
|
|
|
|
|
|
|
|
|
|
|
|
|
|
|
|
|
|
|
|
|
|
|
|
|
|
|
No. |
Indicator |
|
Color |
State |
Description |
|||||||||||||||||
|
|
|
|
|
|
|
|
|
|
|
|
|
|
|
|
|
|
|
|
|
|
|
1 |
Speed |
|
None |
Off |
10 Mbps connection |
|||||||||||||||||
|
indicator |
|
|
|
|
|
|
|
|
|
|
|
|
|
|
|
|
|
|
|
|
|
|
|
Green |
On |
100 Mbps connection |
||||||||||||||||||
|
|
|
||||||||||||||||||||
|
|
|
|
|
|
|
|
|
|
|
|
|
|
|
|
|
|
|
|
|
|
|
|
|
|
Amber |
On |
1000 Mbps connection |
|||||||||||||||||
|
|
|
|
|
|
|
|
|
|
|
|
|
|
|
|
|
|
|
|
|
|
|
2 |
Link/ |
|
Green |
On |
Network link is detected |
|||||||||||||||||
|
activity |
|
|
|
|
|
|
|
|
|
|
|
|
|
|
|
|
|
|
|
|
|
|
|
|
|
|
|
|
|
|
|
|
|
|
|
|
|
|
|
|
|
|
|
|
|
indicator |
|
|
|
|
|
|
Random |
Transmit or receive activity |
|||||||||||||
|
|
|
|
|
|
|
|
blink |
|
|
|
|
|
|
|
|
||||||
|
|
|
|
|
|
|
|
|
|
|
|
|
|
|
|
|
|
|
|
|
|
|
|
|
|
|
|
|
|
|
Off |
No network connection |
|||||||||||||
|
|
|
|
|
|
|
|
|
|
|
|
|
|
|
|
|
|
|
|
|
|
|
10 |
1 Introduction |
11
2 Setting up the system
Follow these steps to set up Aspire easyStore H340 to run in your home network.
•Check package contents
•Select a location for the home server
•Recommended environment
•Connect the power cord
•Connect to the home network
•Power on the system
•Install the Windows Home Server Connector on the first computer
•Install the Windows Home Server Connector on the client computers
•Connect to the Home Server Console
12 |
2 Setting up the system |
Check package contents
Check the following items from the package:
•Aspire easyStore H340 system
•Power cord
•Network cable
•Aspire easyStore H340 Installation discs
•Software Installation Disc
Use this disc to do the following:
-Install the Windows Home Server Connector software. Refer to “Install the Windows Home Server Connector on the first computer” on page 18 for detailed instructions.
-Install the Lights Out Client. Refer to “Set up Wake On LAN on the home server” on page 93.
-Update system driver, BIOS, and add-in softwares. Refer to “Update your home server with Aspire easyStore H340 Software Update” on page 126.
•Server Recovery Disc - Use this disc to recover your home server after a system failure or restore the home server to its factory default. Refer to “Recovering or restoring the home server” on page 118 for detailed instructions.
•PC Recovery Disc - Use this disc restore a home computer from a backup stored on your home server. Refer to “Restoring a home computer” on page 123 for detailed instructions.
•Quick Start Guide
•Warranty card
If any of the above items are damaged or missing, contact your reseller or retailer from which you purchased this product.
13
Select a location
Before unpacking and installing the system, select a suitable site for the system for maximum efficiency. Consider the following factors when choosing a site for the system:
•Near a grounded power outlet
•Clean and dust free
•Stable surface free from vibration
•Well-ventilated and away from sources of heat
•Secluded from electromagnetic fields produced by electrical devices such as air conditioners, radio, TV transmitters, etc.
14 |
2 Setting up the system |
Recommended environment
For best results, your computer should meet the following hardware and software requirements:
•Processor
•1 GHz Pentium 3, Pentium 4, AMD x64, or newer processor
•System memory
•512 MB or above
•Hard drives
•80 GB internal (ATA, SATA, or SCSI) as primary drive
•Operating system
•Windows Vista Home Basic
•Windows Vista Home N (EU only)
•Windows Vista Home Premium
•Windows Vista Business
•Windows Vista Business N (EU only)
•Windows Vista Enterprise
•Windows Vista Ultimate
•Windows XP Home with Service Pack 2 (SP2)
•Windows XP Professional with SP2
•Windows XP Media Center Edition 2005 with SP2 and Rollup 2
•Windows XP Media Center Edition 2004/2005 with SP2
•Windows XP Tablet Edition with SP2
•Web browsers
•Internet Explorer version 6.0, 7.0, or above
•Mozilla Firefox 1.5 or above
•Internet connection
•100 Mbps to 1000 Mbps Gigabit Ethernet connection
•Broadband connection (DSL or cable)
•Broadband router (DHCP enabled)
•Digital media player for streaming media files
•iTunes 7.1 or later
•Windows Media Player 10 or later
15
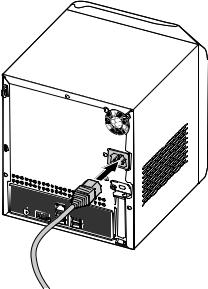
Connect the power cord
Plug the power cord into the power connector and the other end into an electrical outlet.

16 |
2 Setting up the system |
Connect to the home network
Important: Connect the Aspire easyStore H340 to your broadband router with a network cable. Wireless connection to your broadband router is not supported. However, home computers that are connected through a wireless connection is supported.
Connect one end of the network cable into the network port and the other end to a Gigabit Ethernet port on a broadband router.
 Loading...