

Page 1

Aspire E1-472/E1-470/
E1-430/E1-422
Quick Guide
Product registration
When using your product for the first time, it is recommended that you immediately
register it. This will give you access to some useful benefits, such as:
• Faster service from our trained representatives.
• Membership in the Acer community: receive promotions and participate in customer
surveys.
• The latest news from Acer.
Hurry and register, as other advantages await you!
How to register
To register your Acer product, please visit www.acer.com. Select your country, click
PRODUCT REGISTRATION and follow the simple instructions.
You will also be asked to register your product during the setup process, or you can
double-click the Registration icon on the desktop.
After we receive your product registration, you will be sent a confirmation email with
important data that you should keep in a safe place.
Obtaining Acer accessories
We are happy to inform you that Acer's warranty extension program and Notebook
accessories are available online. Come and visit our online shop and find what you need
at store.acer.com.
The Acer store is being progressively rolled out, and, unfortunately may not be available
in some regions. Please check back regularly to see when it will be available in your
country.
Page 2

© 05/2013. All Rights Reserved.
Aspire E1-472/E1-470/E1-430/E1-422
Quick Guide
This revision: May 2013
Model number:
Serial number:
Date of purchase:
Place of purchase:
ENVIRONMENT
Temperature:
- Operating: 5 °C to 35 °C
- Non-operating: -20 °C to 65 °C
Humidity (non-condensing):
- Operating: 20% to 80%
- Non-operating: 20% to 80%
Page 3

3
English
First things first
We would like to thank you for making an Acer notebook your choice for
meeting your mobile computing needs.
Your guides
To help you use your Acer notebook, we have designed a set of guides:
First off, the Setup Poster helps you get started with setting up your
computer.
The Quick Guide introduces you to the basic features and functions of your
new computer.
For more on how your computer can help you to be more productive, please
refer to the Aspire E1-472/E1-470/E1-430/E1-422 User’s Manual. The
Aspire E1-472/E1-470/E1-430/E1-422 User’s Manual contains useful
information applying to your new computer. It covers basic topics such as
using the keyboard and audio, etc.
This guide contains detailed information on such subjects as system utilities,
data recovery, expansion options and troubleshooting. In addition it contains
warranty information and the general regulations and safety notices for your
notebook.
Follow these steps to access it:
1 Type ‘User’ from Start.
2 Click on Acer User’s Manual.
Page 4
4
English
31
2
45
Your Acer notebook tour
Your Acer notebook tour
After setting up your computer as illustrated in the setup poster, let us show
you around your new Acer computer.
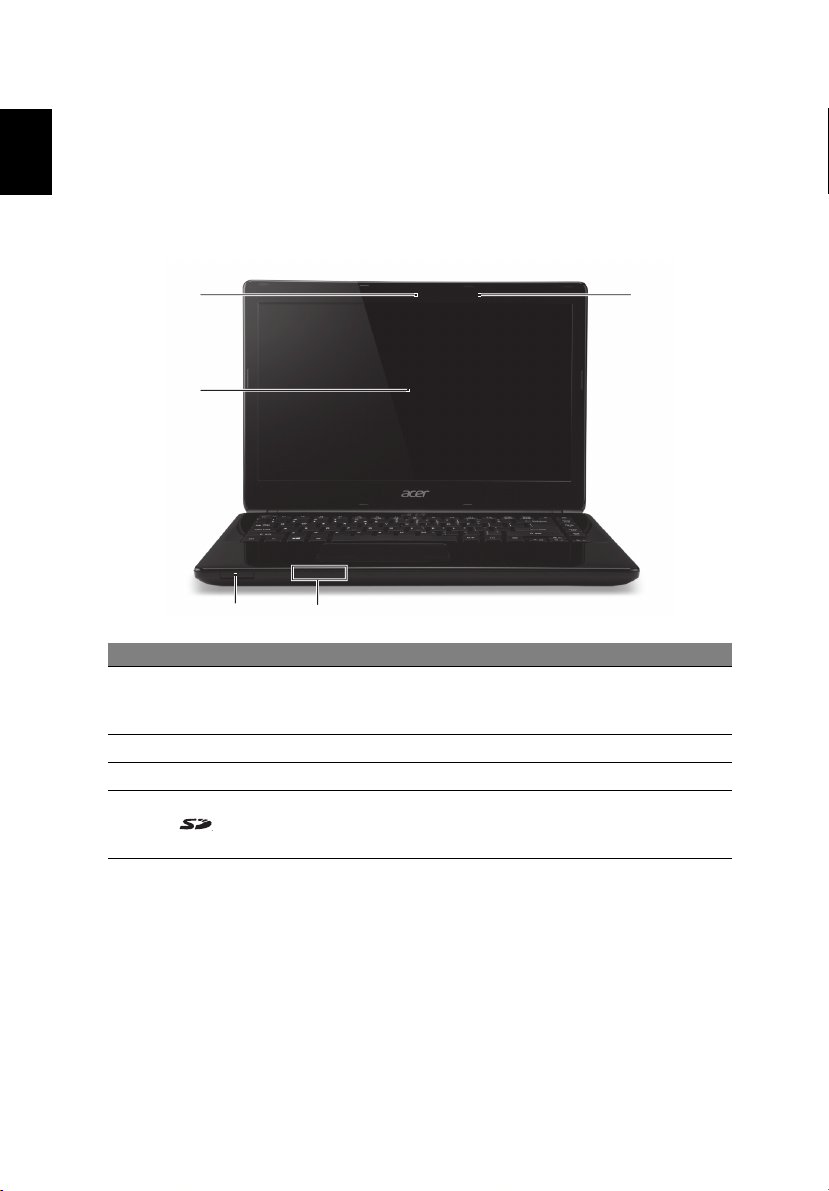
Screen view
# Icon Item Description
1 Webcam
2 Screen Displays computer output.
3 Microphone
4
SD card reader
Web camera for video communication.
A light next to the webcam indicates that the
webcam is active.
Accepts one Secure Digital (SD or SDHC)
d.
car
Note: Push to remove/install the card.
Page 5
English
1
2
3
4
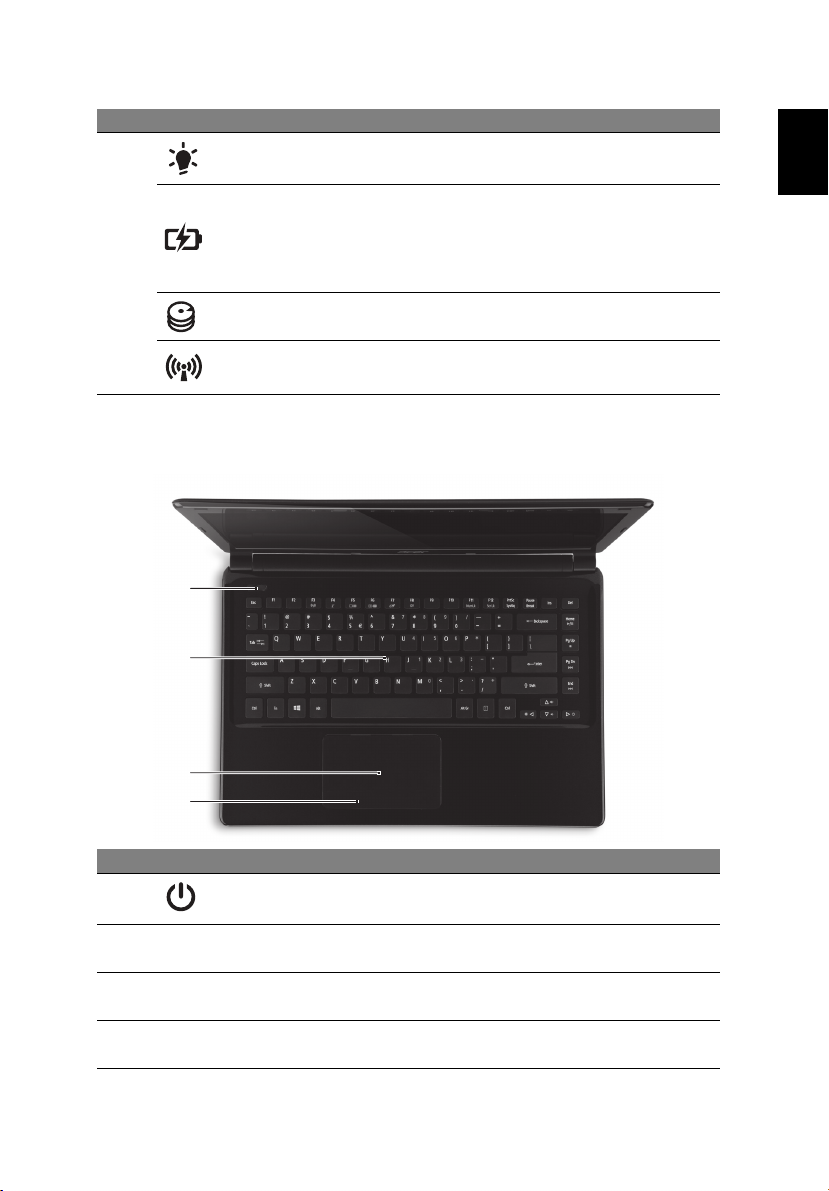
# Icon Item Description
Power indicator Indicates the computer's power status.
Indicates the computer's battery status.
Charging:
Battery indicator
5
HDD indicator Indicates when the hard disk drive is active.
is charging.
Fully charged: T
in.
5
The light is amber when the battery
he light is blue when plugged
Communication
indicator
Indicates the computer’s wireless connectivity
device status.
Keyboard view
# Icon Item Description
1
Power button Turns the computer on and off.
2 Keyboard
3 Touchpad
4
Click buttons (left
and r
ight)
For entering data into your computer.
See "Using the keyboard" on page 8.
Touch-sensitive pointing d
functions like a computer mouse.
The left and right side of the button function as
left and right selection buttons.
evice which
Page 6
6
English
1 2 3 4 5 6
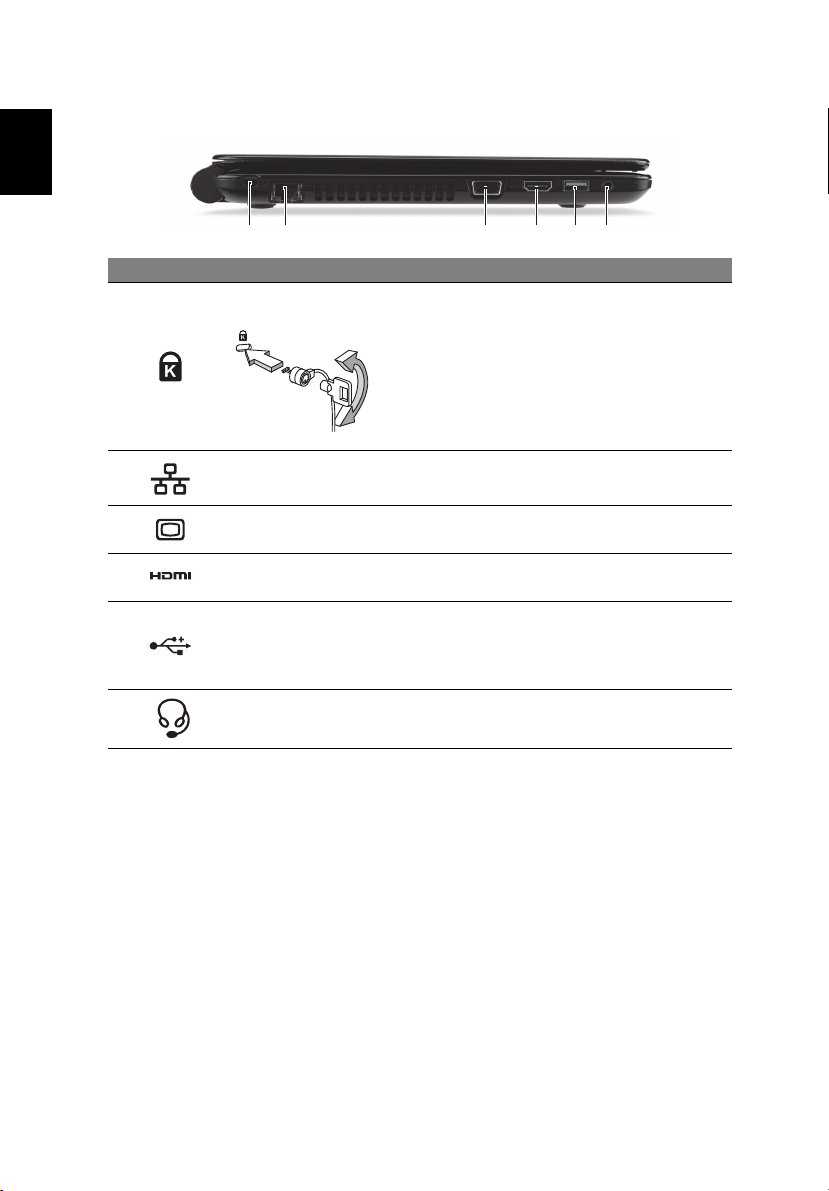
Left view
# Icon Item Description
Kensington lock slot
1
2
3
4
5
6
Ethernet (RJ-45) port
External display (VGA)
port
HDMI port
USB port
Headset/speaker jack
Connects to a Kensington-compatible
computer security lock.
Wrap the computer security lock cable around
an immovable object su
handle of a locked drawer.
Insert the lock into the notch and turn the key
to secure the lock.
Keyless models are a
Connects to an Ethernet 10/100/1000-based
k.
networ
Connects to a display device (e.g., external
monitor, LCD projector).
Supports high-definition digital video
nections.
con
Connects to USB devices.
If a port is black it is USB 2.0 compatible, if it
is blue it
is also USB 3.0 compatible (see
below).
Connects to audio devices (e.g., speakers,
phones) or a headset with microphone.
head
Your Acer notebook tour
ch as a table or
lso available.
Information on USB 3.0
• Compatible with USB 3.0 and earlier devices.
• For optimal performance, use USB 3.0-certified devices.
• Defined by the USB 3.0 specification (SuperSpeed USB).
Page 7
English
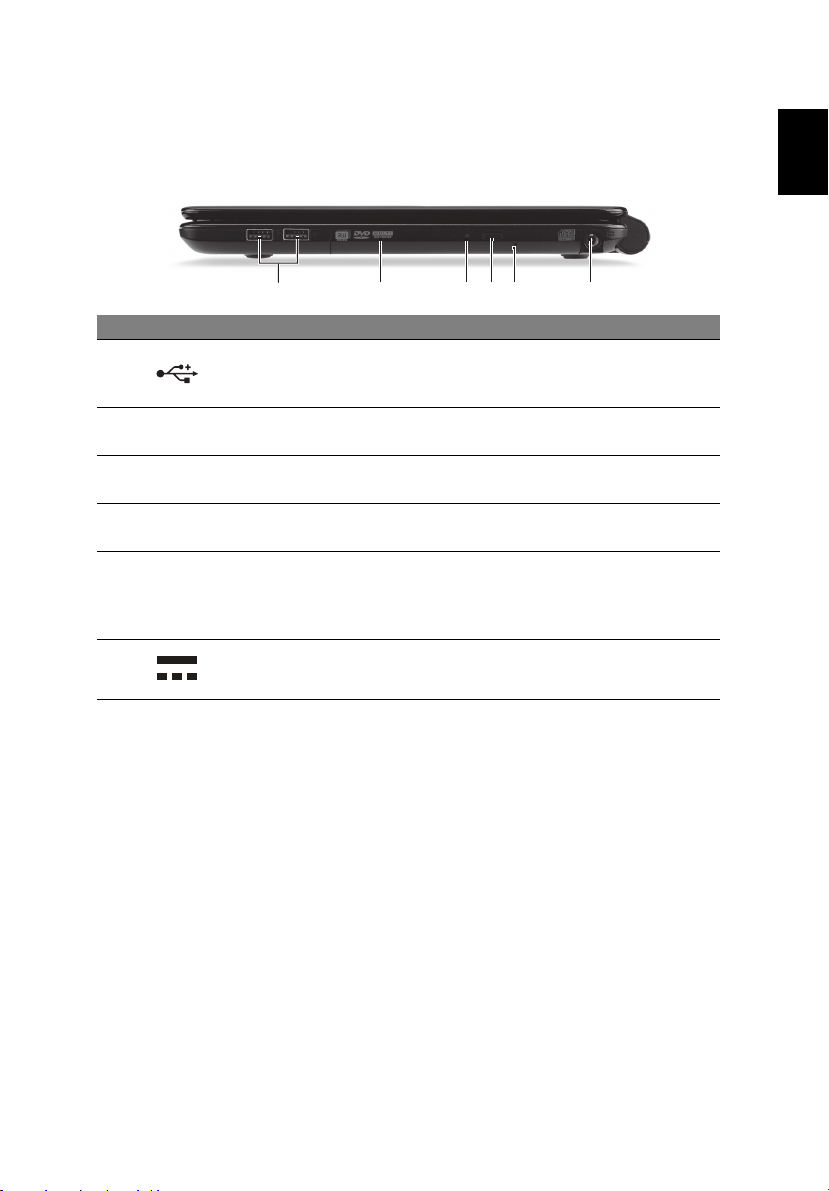
Right view
123 4 5 6
Note: Depending on configuration, your system may not be equipped with
an optical (CD/DVD) drive.
# Icon Item Description
Connect to USB devices.
1 USB ports
2 Optical drive
3
4
5 Emergency eject hole
Optical disk access
indicator
Optical drive eject
button
If a port is black it is USB 2.0 compatible,
if it is blue it is also USB 3.0 compatible.
Internal optical drive; accepts CDs or
DVDs.
Lights up when the optical drive is active.
Ejects the optical disk from the drive.
Ejects the optical drive tray when the
computer is turned off.
Carefully insert a straightened paper clip
to eject the optical drive tray.
7
6 DC-in jack Connects to an AC adapter.
Page 8
8
English
1
2
3
5
4
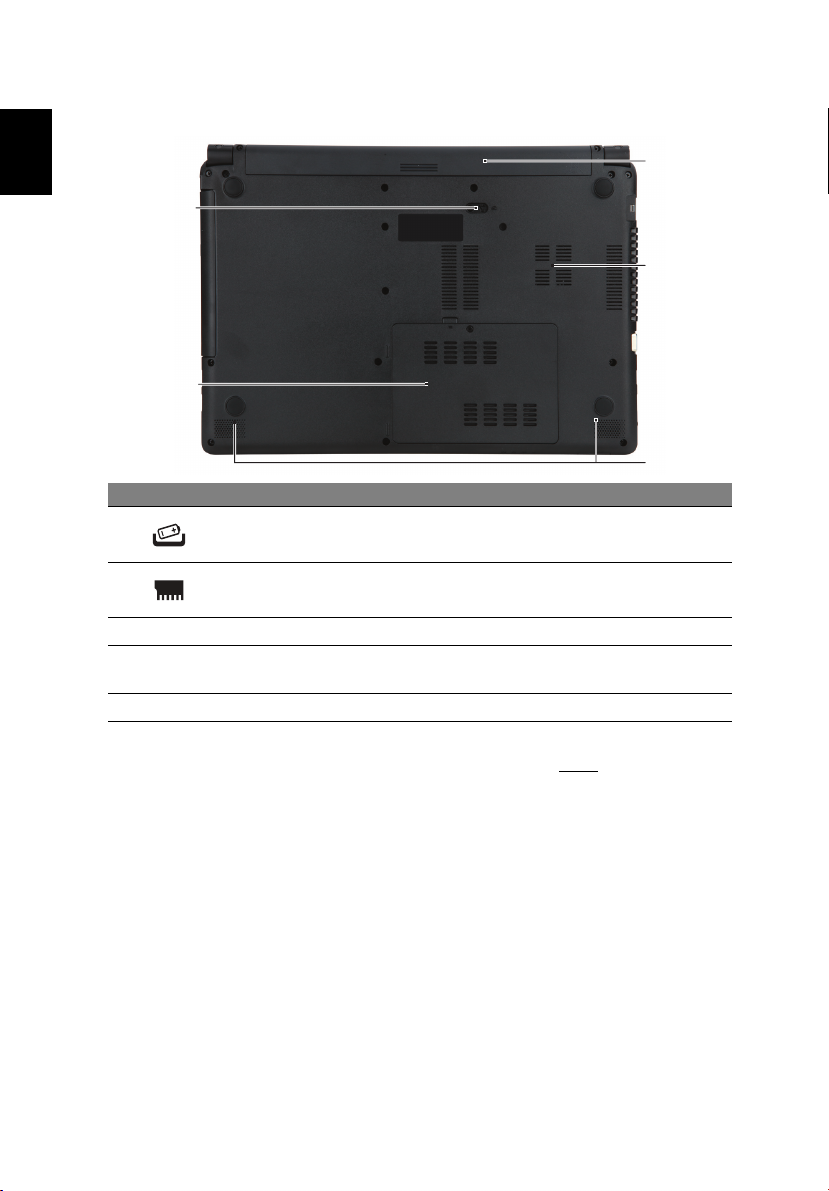
Base view
# Icon Item Description
1
Battery release latch
Releases the battery for removal. Insert a
able tool and slide to release.
suit
Using the keyboard
2
3 Speakers Deliver stereo audio output.
4
5 Battery bay Houses the computer's battery pack.
Note: For models with an AMD processor and a single memory module:
If you replace the memory module, the new module must go into the same
slot occupied by the module that was removed.
Memory compartment Houses the computer's main memory.
Ventilation and cooling
fan
Allows the computer to stay cool.
Do not cover or obstruct the openings.
Using the keyboard
Your computer has a compact keyboard with an embedded numeric keypad.
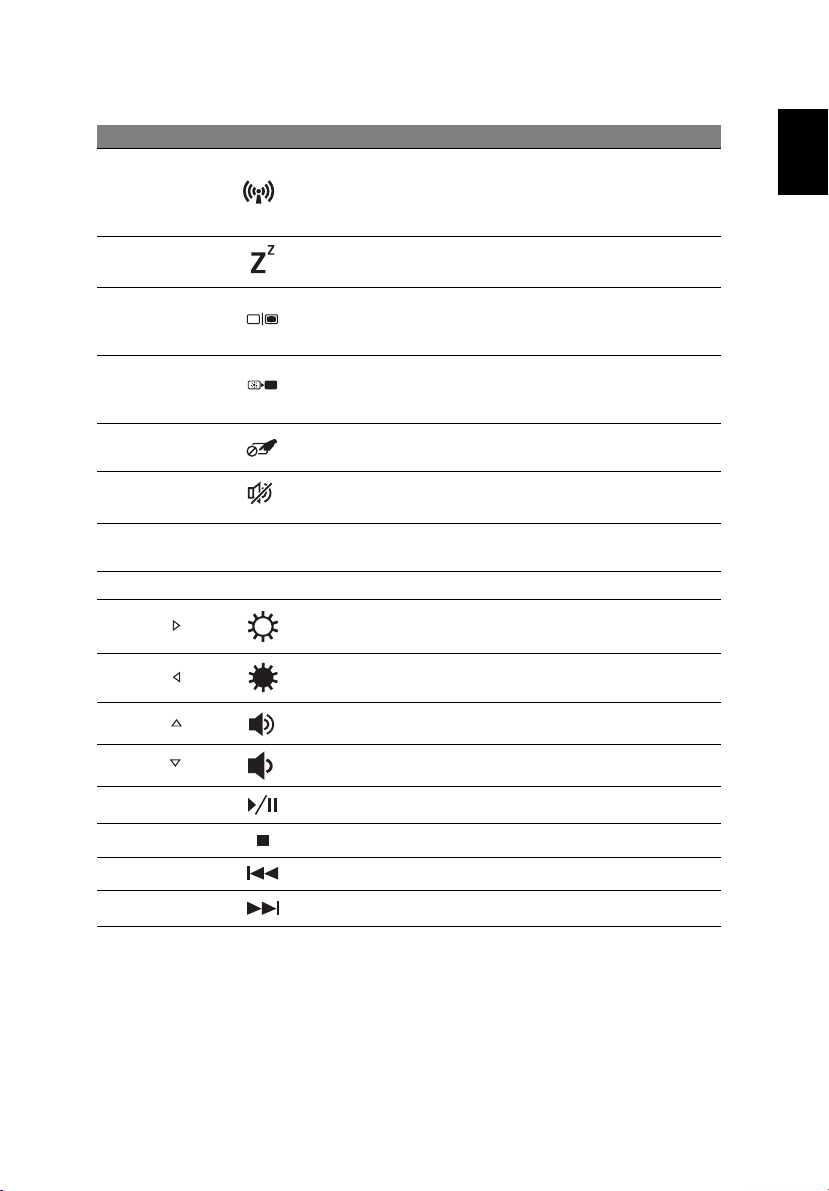
Hotkeys
The computer employs hotkeys or key combinations to access most of the
computer's controls like screen brightness and volume output.
To activate hotkeys, press and hold the <Fn> key before pressing the other
key in the hotkey combination.
Page 9
English
Hotkey Icon Function Description
Turns on / off the computer's network
<Fn> + <F3> Airplane mode
<Fn> + <F4> Sleep Puts the computer in Sleep mode.
<Fn> + <F5> Display toggle
<Fn> + <F6> Display off
<Fn> + <F7> Touchpad toggle
<Fn> + <F8> Speaker toggle Turns the speakers on and off.
devices.
(Network devices vary by
configuration.)
Switches display output between the
display screen, external monitor (if
connected) and both.
Turns the display screen backlight off
to save power. Press any key to
return.
Turns the built-in touchpad on and
off.
9
<Fn> + <F11> NumLk Number Lock
<Fn> + <F12> Scr Lk Scroll Lock Turns Scroll Lock on or off.
<Fn> + < > Brightness up Increases the screen brightness.
<Fn> + < >
<Fn> + < >
<Fn> + < >
<Fn> + <Home> Play/Pause Play or pause a selected media file.
<Fn> + <Pg Up> Stop Stop playing the selected media file.
<Fn> + <Pg Dn> Previous Return to the previous media file.
<Fn> + <End> Next Jump to the next media file.
Ver.: 01.01.02
Brightness down Decreases the screen brightness.
Volume up Increases the sound volume.
Volume down Decreases the sound volume.
Turns the embedded numeric
keypad on or off.
 Loading...