


 Loading...
SyncMaster 923NW / 2023 NW / 2223NW

Notational
Otherwise, it may result in death or personal injury.
Otherwise, it may result in personal injury or property damage.
Prohibited |
Important to read and understand at all times |
Do not disassemble |
Disconnect the plug from the outlet |
Do not touch |
Ground to prevent an electric shock |
|
|
Power
When not used for extended period of time, set your computer to DPM.
If using screen saver, set it to active screen mode.
The images here are for reference only, and are not applicable in all cases (or countries).
Do not use a damaged power cord or plug or a damaged or loose power outlet.
z Otherwise, this may result in electric shock or fire.
Do not touch the power plug with wet hands when removing or plugging the plug into the outlet.
z Otherwise, this may result in electric shock.
Make sure to connect the power cord to a grounded power outlet.
z Otherwise, it may result in electric shock or personal injury.
Ensure that the power plug is plugged into the power outlet firmly and correctly.
z Otherwise, this may result in fire.
Do not forcefully bend or pull the power plug and do not place any heavy material on it.
z Otherwise, this may result in fire.
Do not connect multiple appliances to the same power outlet.
z Otherwise, this may cause fire due to overheating.
 Do not disconnect the power cord while using the product.
z Otherwise, this may result in damage to the product due to electric shock.
 To disconnect the apparatus from the mains, the plug must be pulled out from the mains socket, therefore the mains plug shall be readily operable.
z This may cause electric shock or fire.
 Use only the power cord provided by our company. Do not use the provided power cord of another product.
z Otherwise, this may result in fire or electric shock.
Installation
Be sure to contact an authorized Service Center when installing your monitor in a location with heavy dust, high or low temperatures, high humidity, and exposed to chemical substances and where it operates for 24 hours such as at airports, train stations etc.
Failure to do so may cause serious damage to your monitor.
Do not drop the monitor when moving it.
z This may cause damage to the product or the person carrying it.
 Ensure that at least two persons lift and move the product.
zOtherwise, it may be dropped and cause personal injury, and/or damage the product.
When installing the product in a cabinet or rack, make sure that the front end of the bottom of the product does not project out.
zOtherwise, it may fall or cause personal injury.
zUse a cabinet or rack of a size appropriate to the product.
DO NOT PLACE CANDLES, MOSQUITO REPELLANT, CIGARETTES AND ANY HEATING APPLIANCES NEAR THE PRODUCT.
z Otherwise, this may result in fire.
Keep heating appliances as far away from the power cord or the product as possible.
z Otherwise, this may result in electric shock or fire.
Do not install it in a badly ventilated location such as a bookcase or closet.
z Otherwise, this may result in fire due to an increase in the internal temperature.
 Put down the monitor carefully.
z Failing to do so may damage the monitor.

Do not place the front of the product on the floor.
z Otherwise, this may result in damage to the screen display.
 Ensure that an authorized installation company installs the wall mount.
zOtherwise, it may fall and cause personal injury.
zMake sure to install the specified wall mount.
 Install your product in a well ventilated location. Ensure that there is a clearance of more than 10 cm from the wall.
z Otherwise, it may result in fire due to an increase in the internal temperature.
 Ensure that the packaging vinyl is kept away from children.
z Otherwise, it may result in serious harm (suffocation) if children play with it.
 If the height of your monitor is adjustable, do not place any object or part of your body on the stand when lowering it.
z This may cause damage to the product or the person carrying it.
Clean
When cleaning the monitor case or the surface of the TFT-LCD screen, wipe with a slightly moistened and soft fabric.
Do not spray cleaner directly onto the surface of the product.
zOtherwise, this may result in the discoloration and distortion of the structure and the screen surface may peel off.
Clean the product using a soft cloth with a monitor cleaner only. If you must use a cleaner other than the monitor cleaner, dilute it with water at a ratio of 1:10.
When cleaning the power plug pins or dusting the power outlet, clean it with a dry cloth.
z Otherwise, it may result in fire.
 When cleaning the product, make sure to disconnect the power cord.
z Otherwise, it may result in electric shock or fire.
 When cleaning the product, disconnect the power cord and clean it softly with a dry cloth.
z(Do not use chemicals such as wax, benzene, alcohol, thinner, mosquito repellant, lubricant, or cleaner.) These may change the appearance of the product surface and peel off the indication labels on the product.
 Since the product housing is easily scratched, make sure to use the specified cloth only.
zUse the specified cloth adding only a little water. As the product may be scratched if there is any foreign material on the cloth, make sure to shake it thoroughly before using it.
 When cleaning the product, do not spray water directly onto the main body of the product.
zEnsure that water does not enter the product and that it is not wet.
zOtherwise, this may result in electric shock, fire or a malfunction.
Others
The product is a high voltage product. Ensure that users do not disassemble, repair or modify the product themselves.
zOtherwise, this may result in electric shock or fire. If the product needs to be repaired, contact a Service Center.
 If there is a strange smell or a strange sound or smoke is coming from the product, disconnect the power plug immediately and contact a Service Center.
z Otherwise, this may result in electric shock or fire.
 Do not place this product in a location exposed to moisture, dust, smoke, water, or in a car.
z Otherwise, this may result in electric shock or fire.
 When you drop the product or the case is broken, turn the power off and disconnect the power cord. Contact a Service Center.
z Otherwise, this may result in electric shock or fire.
If thunder or lightening is occurring, do not touch the power cord or antenna cable.
z Otherwise, this may result in electric shock or fire.
Do not try to move the monitor by pulling only the wire or the signal cable.
zOtherwise, it may fall and result in electric shock, damage to the product or fire due to damage to the cable.
Do not lift or move the product back and forwards or right and left while only holding the power cord or signal cables.
zOtherwise, it may fall and result in electric shock, damage to the product or fire due to damage to the cable.
Make sure that the ventilating opening is not blocked by a table or curtain.
z Otherwise, it may result in fire due to an increase in the internal temperature.
Do not place any containers containing water, vases, flowerpots, medicines as well as any metal on the product.
zIf water or a foreign material enters the product, disconnect the power cord and contact a Service Center.
zThis may result in a product malfunction, electric shock, or fire.
Do not use or keep combustible spray or flammable material near the product.
z Otherwise, this may result in an explosion or fire.
 Do not insert any metal, such as chopsticks, coins, pins and steels, or inflammable objects, such as matches or paper, inside the product (through the ventilating openings, input and output terminals, etc).
zIf water or foreign material enters the product, disconnect the power cord and contact a Service Center.
zOtherwise, this may result in electric shock or fire.
 When using a fixed screen for a long time, an afterimage or stain may occur.
zIf you are not using your product for a long period of time, put it into sleep mode or use a moving screen saver.
 Set a resolution and frequency appropriate to the product.
z Otherwise, your eyesight may be damaged.
 If you continually move closer to the product screen, your eyesight may be failing.
 To ease eye strain, take at least a five-minute break after every hour of using the monitor.
 Do not install it in an unstable location such as an unstable rack or uneven surface or a location exposed to vibrations.
zOtherwise, it may fall and cause personal injury and/or damage the product.
zIf you use the product in a location exposed to vibrations, it may damage the product and result in fire.
 When moving the product, turn the power off and disconnect the power plug, antenna cable, and all the cables connected to the product.
z Otherwise, it may result in electric shock or fire.
 Ensure that children do not hang onto the product or climb up onto the product.
z The product may fall and cause personal injury or death.
 If you do not use the product for a long period of time, disconnect the power cord from the power outlet.
zOtherwise, this may result in overheating or fire due to dust, and may result in fire due to electric shock or leakage.
Do not place any heavy items or toys or confectionery, such as cookies etc. that may attract the attentions of children onto the product.
zYour children may hang onto the product causing it to fall and this may result in personal injury or death.
Do not turn the product upside down or move it while holding only the stand.
zOtherwise, it may fall and result in personal injury and/or damage to the product.
 Do not place the product in a location exposed to direct sunlight or near any heat such as a fire or heater.
z This may reduce the lifetime of the product, and may result in fire.
 Do not drop any objects onto the product or cause any impact to the product.
z Otherwise, this may result in electric shock or fire.
 Do not use a humidifier or kitchen table near the product.
z Otherwise, this may result in electric shock or fire.
 When there is a gas leak, do not touch the product or the power plug but ventilate immediately.
z If a spark occurs, it may cause an explosion or fire.
 If the product has been turned on for a long time, the display panel becomes hot. Do not touch it.
z Keep the small accessories in a location out of the reach of children.
 Be careful when adjusting the angle of the product or the height of the stand.
zThis may result in personal injury as your hand or fingers may become caught.
zAlso, if you tilt the product too far, it may fall and cause personal injury.
 Do not install the product in a location low enough for children to reach.
zOtherwise, it may fall and result in personal injury.
zSince the front part of the product is heavy, install the product on a level and stable surface.
 Do not put any heavy objects on the product.
z This may result in personal injury and/or damage to the product.
Good Postures When Using the Monitor
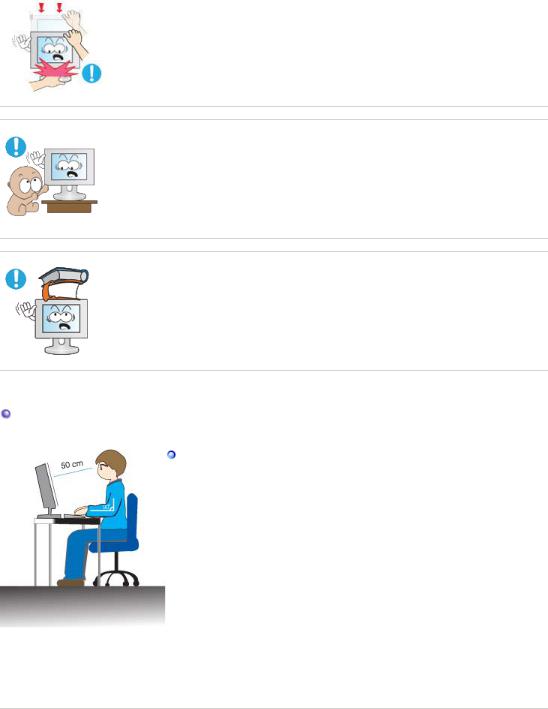
When using the product, use it in the correct position.
zKeep your back straight while looking at the product.
zThe distance between your eyes and the screen should be between 45 to 50 cm. Look at the screen from a slightly higher location than the height of the screen.
zWhen using the product, use it in the correct position.
zAdjust the angle so that light is not reflected on the screen.
zPlace your arms perpendicular to your sides and allow your arms to be level with the back of the hand.
zKeep your elbow at 90 degrees.
zKeep your knees at greater than 90 degrees, and keep your heels firmly on the floor. Keep your arms lower than your heart.
Please make sure the following items are included with your monitor.
If any items are missing, contact your dealer.
Contact a local dealer to buy optional items.
Unpacking
Without stand
Monitor
 With stand
Monitor & Simple Stand |
Bottom |
|
|
 Manual
Quick Setup Guide |
Warranty Card/ |
User's Guide, |
Registration Card |
Monitor Driver |
|
|
(Not available in all |
|
locations)
 Cable
Cable
D-sub Cable |
Power Cord |
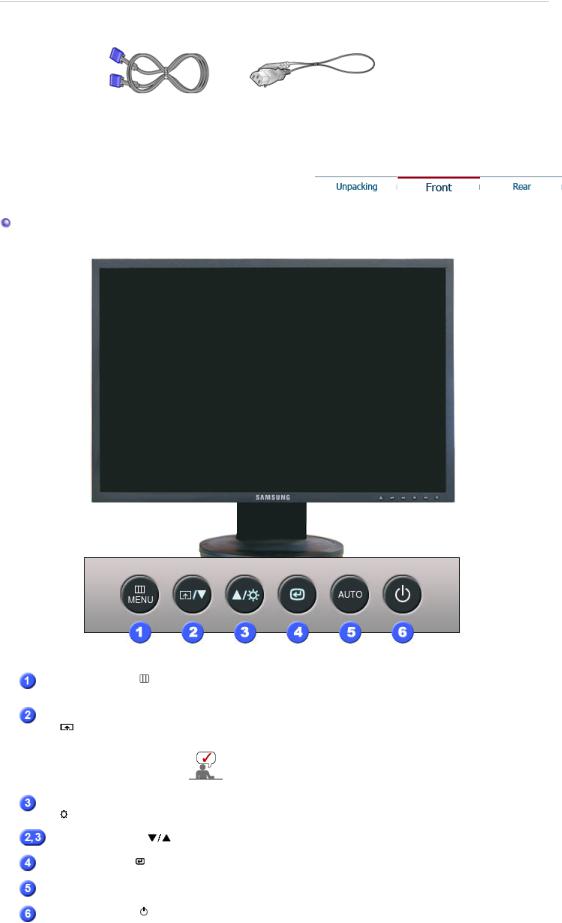
Front
MENU button [ ] |
Opens the OSD menu. Also use to exit the OSD menu or return to |
|
the previous menu. |
Customized Key |
You can customize key assignment for the Custom button |
[ ] |
according to your preferences. |
|
You can configure the customized key for a required |
|
function via Setup > Customized Key. |
Brightness button |
When OSD is not on the screen, push the button to adjust |
[ ] |
brightness. |
Adjust buttons [ ] |
Adjust items in the menu. |
Enter button [ ] |
Activates a highlighted menu item. |
AUTO button |
Use this button for auto adjustment. |
Power button [ ]/ |
Use this button for turning the monitor on and off./ |
Power indicator |
This light glows blue during normal operation, and blinks blue once |
|
as the monitor saves your adjustments. |
See PowerSaver described in the manual for further information regarding power saving functions. For energy conservation, turn your monitor OFF when it is not needed, or when
leaving it unattended for long periods.
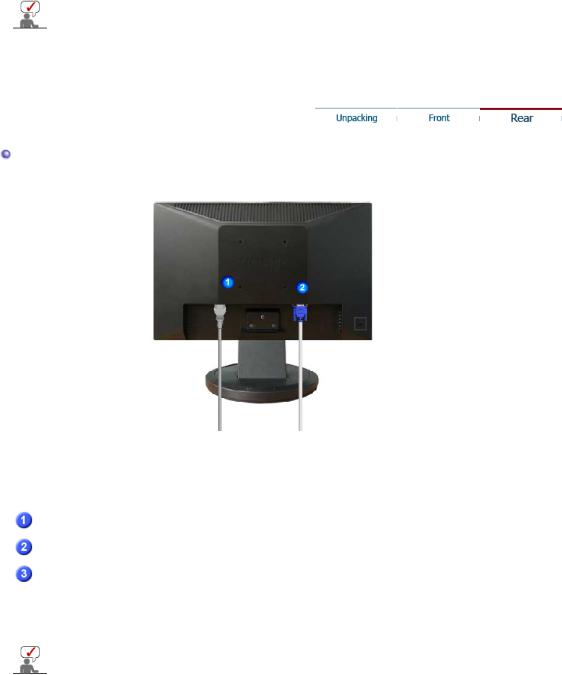
Rear
Simple stand
(The configuration at the back of the monitor may vary from product to product.)
POWER port |
Connect the power cord for your monitor to the power port on the back |
|
of the monitor. |
RGB IN port |
Connect the signal cable to the 15-pin, D-sub port on the back of your |
|
monitor. |
Kensington Lock |
The Kensington lock is a device used to physically fix the system |
|
when using it in a public place. (The locking device has to be |
|
purchased separately. ) |
|
For using a locking device, contact where you purchase it. |
See Connecting the Monitor for further information regarding cable connections.
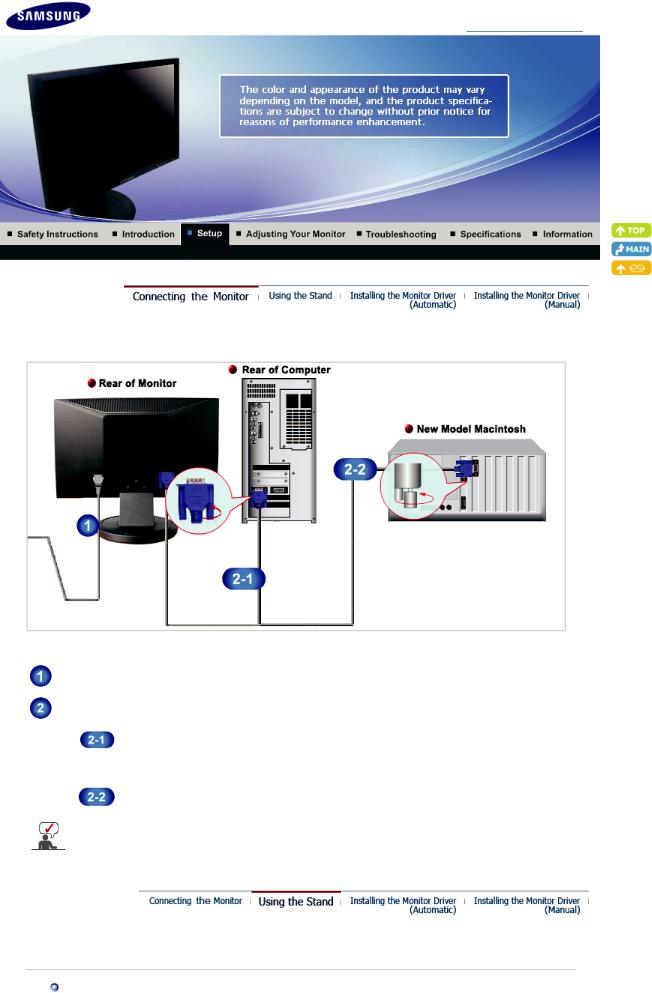
 Connecting the Monitor
Connect the power cord for your monitor to the power port on the back of the monitor. Plug the power cord for the monitor into a nearby outlet.
Use appropriate connection for your computer.
Using the D-sub (Analog) connector on the video card.
Connect the signal cable to the 15-pin, D-sub port on the back of your monitor.
 [ RGB IN ]
Connected to a Macintosh.
Connect the monitor to the Macintosh computer using the D-sub connection cable.
If the monitor and the computer are connected, you can turn them on and use them.
 Using the Stand
Monitor Assembly

Monitor and Bottom
 Attaching a Base
This monitor accepts a 75.0 mm x 75.0 mm VESA-compliant mounting interface pad.
Simple stand
 Monitor
 Mounting interface pad (Sold separately)
1.Turn off your monitor and unplug its power cord.
2.Lay the LCD monitor face-down on a flat surface with a cushion beneath it to protect the screen.
3.Remove four screws and then remove the stand from the LCD monitor.
4.Align the mounting interface pad with the holes in the rear cover mounting Pad and secure it with four screws that came with the arm-type base, wall mount hanger or other base.
zDo not use screws longer than the standard dimension, as they may damage the inside of the Monitor.
zFor wall mounts that do not comply with VESA standard screw specifications, the length of the screws may differ depending on their specifications.
zDo not use screws that do not comply with the VESA standard screw specifications.
Do not fasten the screws too tightly, as this may damage the product or cause the product to fall, leading to personal injury.
Samsung is not liable for these kinds of accidents.
zSamsung is not liable for product damage or personal injury when a non-VESA or non-specified wall mount is used or the consumer fails to follow the product installation instructions.
zTo mount the monitor on a wall, you should purchase the wall mounting kit that allows you to mount the monitor at least 10cm away from the wall surface.
zContact the nearest Samsung Service Center for more information. Samsung Electronics will
not be responsible for damages caused by using a base other than those specified. z Please use Wall Mount according to the International standards.
 Installing the Monitor Driver (Automatic)
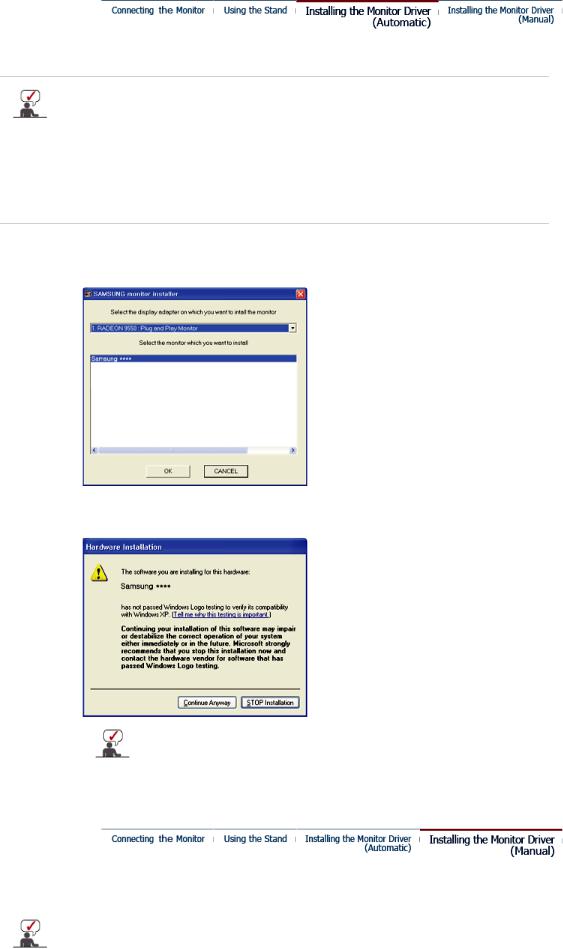
When prompted by the operating system for the monitor driver, insert the CD-ROM included with this monitor. Driver installation is slightly different from one operating system to another. Follow the directions appropriate for the operating system you have.
Prepare a blank disk and download the driver program file at the Internet web site shown below.
z Internet web site : http://www.samsung.com/ (Worldwide) http://www.samsung.com/monitor (U.S.A) http://www.sec.co.kr/monitor (Korea) http://www.samsungmonitor.com.cn/ (China)
1.Insert CD into the CD-ROM drive.
2.Click "Windows"
3.Choose your monitor model in the model list, then click the "OK" button.
4.If you can see following message window, then click the "Continue Anyway" button. Then click "OK" button. (Microsoft® Windows® XP Operating System)
This monitor driver is under certifying MS logo,and this installation don't damage your system.The certified driver will be posted on Samsung Monitor homepage http://www.samsung.com/
5. Monitor driver installation is completed.
 Installing the Monitor Driver (Manual)
Windows Vista | Windows XP | Windows 2000 | Windows ME | Windows NT | Linux
When prompted by the operating system for the monitor driver, insert the CD-ROM included with this monitor. Driver installation is slightly different from one operating system to another. Follow the directions appropriate for the operating system you have.
Prepare a blank disk and download the driver program file at the Internet web site shown below.
z Internet web site : http://www.samsung.com/ (Worldwide) http://www.samsung.com/monitor (U.S.A) http://www.sec.co.kr/monitor (Korea) http://www.samsungmonitor.com.cn/ (China)
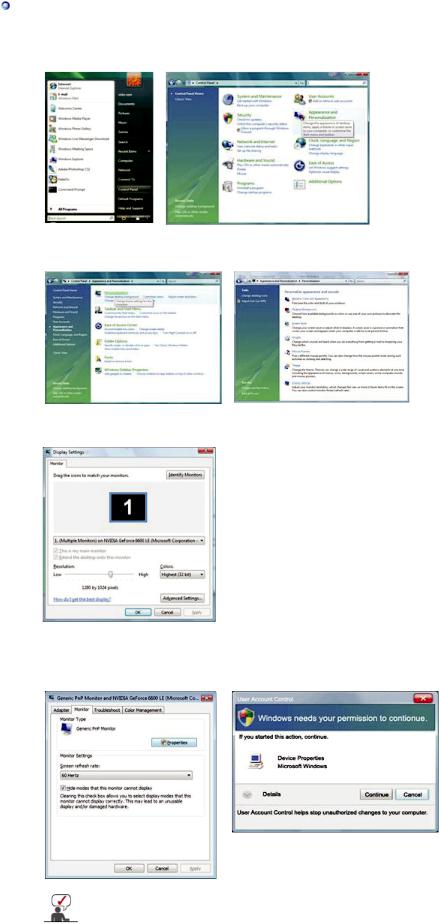
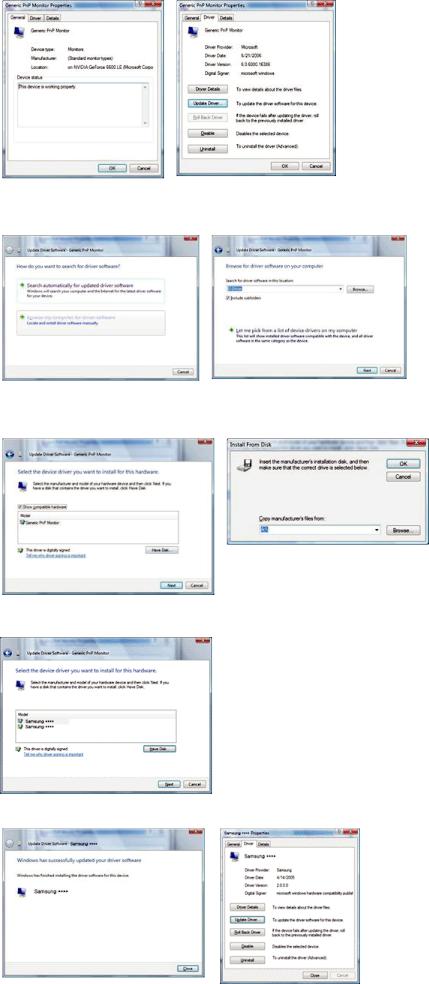
Microsoft® Windows Vista™ Operating System
1.Insert your Manual CD into your CD-ROM drive.
2.Click  (Start) and "Control Panel". Then, double-click on "Appearance and Personalization".
3. Click "Personalization" and then "Display Settings".
4. Click "Advanced Settings…".
5.Click "Properties" in the "Monitor" tab. If the "Properties" button is deactivated, it means the configuration for your monitor is completed. The monitor can be used as is.
If the message “Windows needs…” is displayed, as shown in the figure below, click "Continue".
This monitor driver is under certifying MS logo, and this installation doesn't damage your system.
The certified driver will be posted on Samsung Monitor homepage
http://www.samsung.com/
6. Click "Update Driver…" in the "Driver" tab.
7.Check the "Browse my computer for driver software" checkbox and click "Let me pick from a list of device drivers on my computer".
8.Click "Have Disk…" and select the folder (for example, D:\Drive) where the driver setup file is located, and click "OK".
9.Select the model that matches your monitor from the list of monitor models on the screen, and click "Next".
10. Click "Close"→ "Close" → "OK" → "OK" on the following screens displayed in sequence.

 Microsoft® Windows® XP Operating System
1.Insert CD into the CD-ROM driver.
2.Click "Start" —> "Control Panel" then click the "Appearance and Themes" Icon.
3. Click "Display" icon and choose the "Settings" tab then click "Advanced..".
4. Click the "Properties" button on the "Monitor" tab and select "Driver" tab.
5. Click "Update Driver.." and select "Install from a list or.." then click "Next" button.
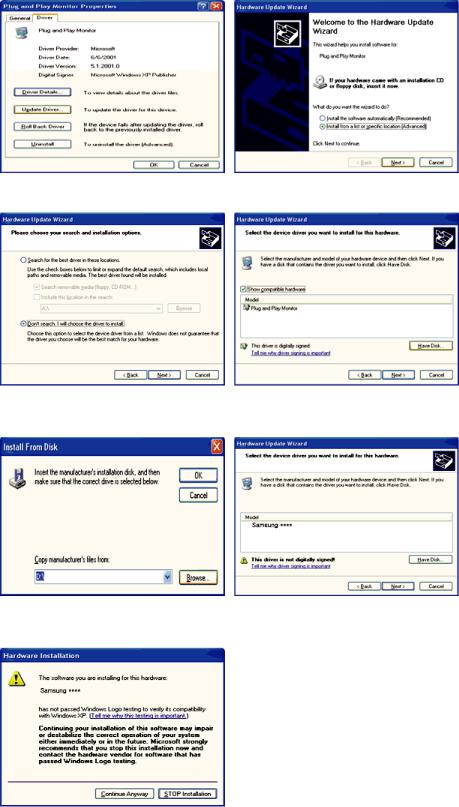
6. Select "Don't search ,I will.." then click "Next" and then click "Have disk".
7.Click the "Browse" button then choose A:(D:\Driver) and choose your monitor model in the model list and click the "Next" button.
8.If you can see following "Message" window, then click the "Continue Anyway" button. Then click "OK" button.
This monitor driver is under certified MS logo,and this installation doesn't damage your system.The certified driver will be posted on Samsung Monitor homepage.
http://www.samsung.com/
9. Click the "Close" button then click "OK" button continually.
10. Monitor driver installation is completed.
 Microsoft® Windows® 2000 Operating System
When you can see "Digital Signature Not Found" on your monitor, follow these steps.
1.Choose "OK" button on the "Insert disk" window.
2.Click the "Browse" button on the "File Needed" window.
3.Choose A:(D:\Driver) then click the "Open" button and then click "OK" button.
How to install
1.Click "Start" , "Setting" , "Control Panel".
2.Double click the "Display" Icon.
3.Choose the "Settings" tab and then click "Advanced..".
4.Choose "Monitor".
Case1: If the "Properties" button is inactive, it means your monitor is properly configured. Please stop installation
Case2: If the "Properties" button is active, click the "Properties" button then follow next steps continually.
5.Click "Driver" and then click on "Update Driver.." then click on the "Next" button.
6.Choose "Display a list of the known drivers for this device so that I can choose a specific driver" then click "Next" and then click "Have disk".
7.Click the "Browse" button then choose A:(D:\Driver).
8.Click the "Open" button, then click "OK" button.
9.Choose your monitor model and click the "Next" button then click "Next" button.
10.Click the "Finish" button then the "Close" button.
If you can see the "Digital Signature Not Found" window then click the "Yes"button. And click the "Finish" button then the "Close" button.
 Microsoft® Windows® Millennium Operating System
1.Click "Start" , "Setting" , "Control Panel".
2.Double click "Display" icon.
3.Select the "Settings" tab and click "Advanced Properties" button.
4.Select the "Monitor" tab.
5.Click the "Change" button in the "Monitor Type" area.
6.Choose "Specify the location of the driver".
7.Choose "Display a list of all the driver in a specific location.." then click "Next" button.
8.Click the "Have Disk" button
9.Specify A:\(D:\driver) then click "OK" button.
10.Select "Show all devices" and choose the monitor that corresponds to the one you connected to your computer and click "OK".
11.Continue choosing "Close" button and "OK" button until you close the Display Properties dialogue box.
 Microsoft® Windows® NT Operating System
1.Click Start, Settings, Control Panel, and then double-click Display icon.
2.In Display Registration Information window, click Settings Tab and then click All Display Modes.
3.Select a mode that you wish to use (Resolution, Number of colors and Vertical frequency) and then click OK.
Loading...