


EX Version 1.10

The symbols shown above are internationally accepted symbols that warn of potential hazards with electrical products. The lightning flash with arrowpoint in an equilateral triangle means that there are dangerous voltages present within the unit. The exclamation point in an equilateral triangle indicates that it is necessary for the user to refer to the owner’s manual.
These symbols warn that there are no user serviceable parts inside the unit. Do not open the unit. Do not attempt to service the unit yourself. Refer all servicing to qualified personnel. Opening the chassis for any reason will void the manufacturer’s warranty. Do not get the unit wet. If liquid is spilled on the unit, shut it off immediately and take it to a dealer for service. Disconnect the unit during storms to prevent damage.
U.K. MAINS PLUG WARNING
A moulded mains plug that has been cut off from the cord is unsafe. Discard the mains plug at a suitable disposal facility. NEVER UNDER ANY CIRCUMSTANCES SHOULD YOU INSERT A DAMAGED OR CUT MAINS PLUG INTO A 13 AMP POWER SOCKET. Do not use the mains plug without the fuse cover in place. Replacement fuse covers can be obtained from your local retailer. Replacement fuses are 13 amps and MUST be ASTA approved to BS1362.
WARNING
FOR YOUR PROTECTION, PLEASE READ THE FOLLOWING:
Water and Moisture: Appliance should not be used near water (e.g. near a bathtub, washbowl, kitchen sink, laundry tub, in a wet basement, or near a swimming pool, etc). Care should be taken so that objects do not fall and liquids are not spilled into the enclosure through openings.
POWER SOURCES: The appliance should be connected to a power supply only of the type described in the operating instructions or as marked on the appliance.
GROUNDING OR POLARIZATION: Precautions should be taken so that the grounding or polarization means of an appliance is not defeated.
POWER CORD PROTECTION: Power supply cords should be routed so that they are not likely to be walked on or pinched by items placed upon or against them, paying particular attention to cords at plugs, convenience receptacles, and the point where they exit from the appliance.
SERVICING: To reduce the risk of fire or electric shock, the user should not attempt to service the appliance beyond that described in the operating instructions. All other servicing should be referred to qualified service personnel.
CAUTION: To reduce the risk of fire replace only with same type fuse. ATTENTION: Utiliser un fusible de recharge de même type.
CAUTION: To reduce the risk of fire replace LAMP with manufacturers recommended part ( Refer to service literature)
ELECTROMAGNETIC
COMPATIBILITY
This unit conforms to the Product Specifications noted on the Declaration of Conformity. Operation is subject to the following two conditions:
•this device may not cause harmful interference, and
•this device must accept any interference received, including interference that may cause undesired operation. Operation of this unit within significant electromagnetic fields should be avoided.
•use only shielded interconnecting cables.
FCC COMPLIANCE
This equipment has been tested and found to comply with the limits for a Class B digital device, pursuant to Part 15 of the FCC Rules. These limits are designed to provide reasonable protection against harmful interference in a residential installation. This equipment generates, uses and can radiate radio frequency energy and, if not installed and used in accordance with the instructions, may cause harmful interference to radio communications. However, there is no guarantee that interference will not occur in a particular installation. If this equipment does cause harmful interference to radio or television reception, which can be determined by turning the equipment off and on, the user is encouraged to try to correct the interference by one or more of the following measures:
•Reorient or relocate the receiving antenna
•Increase the separation between the equipment and receiver that may cause undesired operation.
•Connect the equipment into an outlet on a circuit different from that to which the receiver is connected
•Consult the dealer or an experienced radio/TV technician for help.
SAFETY INSTRUCTIONS
Notice For Customers If Your Unit Is Equipped With A Power Cord. WARNING: THIS APPLIANCE MUST BE EARTHED.
The cores in the mains lead are coloured in accordance with the following code: GREEN and YELLOW - Earth White - Neutral Black - Live
As colours of the cores in the mains lead of this appliance may not correspond with the coloured markings identifying the terminals in your plug, proceed as follows:
•The core which is coloured green and yellow must be connected to the terminal in the plug marked with the letter E, or with the earth symbol, or coloured green, or green and yellow.
•The core which is coloured white must be connected to the terminal marked N or coloured black.
•The core which is coloured black must be connected to the terminal
marked L or coloured red.
This equipment may require the use of a different line cord, attachment plug, or both, depending on the available power source at installation. Connect this equipment only to the power source indicated on the equipment rear panel. If the attachment plug needs to be changed, refer servicing to qualified service personnel who should refer to the table below. The green/yellow wire shall be connected directly to the unit's chassis.
WARNING: If the ground is defeated, certain fault conditions in the unit or in the system to which it is connected can result in full line voltage between chassis and earth ground. Severe injury or death can then result if the chassis and earth ground are touched simultaneously.
|
DECLARATION OF CONFORMITY |
|
|
|
|||
|
|
|
|
|
Supplementary Information: |
|
|
|
Manufacturer’s Name: |
IVL Technologies Ltd. |
|
The product herewith complies with the requirements of the Low Voltage Directive |
|
||
|
|
per DigiTech specifications |
|
73/23/EEC and the EMC Directive 89/336/EEC (1989) as amended by the CE Marking |
|
||
|
Manufacturer’s Address: |
6710 Bertram Place |
|
Directive 93/68/EEC (1993). |
|
|
|
|
|
Victoria, B.C. |
|
|
|
|
|
|
|
Canada V8M 1Z6 |
|
IVL Technologies Ltd. |
|
|
|
|
declares that the products: |
|
|
|
6710 Bertram Place |
|
|
|
|
DigiTech Studio Vocalist EX Harmony Processor |
Victoria, B.C. |
|
|
||
|
|
|
|
|
Canada V8M 1Z6 |
|
|
|
conform to the following product specifications: |
|
February 26, 1996 |
|
|
||
|
|
|
|
|
Peter George, Vice President of Engineering |
|
|
|
Safety: |
EN 60065 |
EMC: |
EN 55022 (1987): |
|
|
|
|
|
IEC 65 (1993) |
|
CISPR 22 (1993) Class B |
European Contact: Your local DigiTech Sales and Service Office or |
|
|
|
|
Amendment 1 (1987) |
EN 50082-1 (1992) |
International Sales Office |
|
|
|
|
|
Amendment 2 (1989) |
|
3 Overlook Drive Unit #4 |
|
|
|
|
|
Amendment 3 (1992) |
|
Amherst, New Hampshire 03031, USA Tel (603) 672-4244 Fax (603) 672 4246 |
|
||
|
|
|
|
|
|
|
|
|
|
|
|
|
|
||
LITHIUM BATTERY WARNING |
ADVARSEL! Lithiumbatteri - Eksplosjonsfare. Ved utskifting benyttes |
AROITUS! Paristo voi räfähtää, jos se on virheellisesti asennettu. |
|||||
kun batteri som anbefalt av apparatfabrikanten. Brukt batteri returneres |
Vaihda paristo ainoastaan laitevalmistajan suosittelemaan tyyppin. |
||||||
CAUTION! This product contains a lithium battery. There is danger of |
apparatleverandøren. |
|
Hävitä käytetty paristovalmistajan ohjeiden mukaisesti. |
||||
explosion if battery is incorrectly replaced. Replace only with an Eveready |
ADVARSEL! Lithiumbatteri - Eksplosjonsfare ved fejlagtig håndtering. |
VARNING! Explosionsfar vid felaktigt batteribyte. Använd samma bat- |
|||||
CR2032 or equivalent. Make sure the battery is installed with the correct |
Udskiftning må kun ske med batteri av samme fabrikat og type. Levér |
terityp eller en ekvivalent typ som rekommenderas av apparattil- |
|||||
polarity. Discard used batteries according to manufacturer’s instructions. |
det brugte batteri tilbage til leverandøren. |
lverkaren. Kassera använt batteri enligt fabrikantens instruktion. |
|||||
|
|
|
|
|
|
|
|

TABLE OF CONTENTS |
|
|
AC Power & Safety Warnings |
. . . . . . . . . . . . . . . . . . . . . . . . . . . . . . . . . . . . . . . . . . . . . . .inside cover |
|
Program List |
. . . . . . . . . . . . . . . . . . . . . . . . . . . . . . . . . . . . . . . . . . . . . . . . . . . . . |
. . .2 |
Introduction |
. . . . . . . . . . . . . . . . . . . . . . . . . . . . . . . . . . . . . . . . . . . . . . . . . . . . . . |
. . 5 |
Setup |
Front Panel . . . . . . . . . . . . . . . . . . . . . . . . . . . . . . . . . . . . . . . . . . . . |
. . 6 |
|
Back Panel . . . . . . . . . . . . . . . . . . . . . . . . . . . . . . . . . . . . . . . . . . . . . |
. . 7 |
|
Audio Connection Examples . . . . . . . . . . . . . . . . . . . . . . . . . . . . . . |
. . 9 |
|
MIDI Connection Examples . . . . . . . . . . . . . . . . . . . . . . . . . . . . . . . |
. 10 |
Performance |
Setting Levels, Generating a Good Signal . . . . . . . . . . . . . . . . . . . . |
. 11 |
|
Loading Programs from the Front Panel,The LCD Display Window .12 |
|
|
The Harmony Controls, Understanding the Five Harmony Types: . |
. .13 |
|
Chordal, Scalic . . . . . . . . . . . . . . . . . . . . . . . . . . . . . . . . . . . . . . . . . |
. 14 |
|
Vocoder . . . . . . . . . . . . . . . . . . . . . . . . . . . . . . . . . . . . . . . . . . . . . . . |
.15 |
|
Chromatic, Pitch Correct, Changing Harmonies with the Softkeys |
. .16 |
Editing |
Using Styles, the Menu System . . . . . . . . . . . . . . . . . . . . . . . . . . . . . |
.17 |
|
Gender . . . . . . . . . . . . . . . . . . . . . . . . . . . . . . . . . . . . . . . . . . . . . . . . . |
19 |
|
Detune . . . . . . . . . . . . . . . . . . . . . . . . . . . . . . . . . . . . . . . . . . . . . . . . . |
20 |
|
Vibrato . . . . . . . . . . . . . . . . . . . . . . . . . . . . . . . . . . . . . . . . . . . . . . . . |
21 |
|
Scoop . . . . . . . . . . . . . . . . . . . . . . . . . . . . . . . . . . . . . . . . . . . . . . . . . . |
22 |
|
Timing . . . . . . . . . . . . . . . . . . . . . . . . . . . . . . . . . . . . . . . . . . . . . . . . . |
23 |
|
Mix . . . . . . . . . . . . . . . . . . . . . . . . . . . . . . . . . . . . . . . . . . . . . . . . . . . |
24 |
|
Harmony Editing, Changing Softkey Assignments . . . . . . . . . . . . . . . |
26 |
|
Editing Individual Harmony Styles . . . . . . . . . . . . . . . . . . . . . . . . . . |
27 |
|
Customizing A Harmony . . . . . . . . . . . . . . . . . . . . . . . . . . . . . . . . . . |
29 |
|
Naming Programs and Styles, Storing Your Edits . . . . . . . . . . . . . . . |
31 |
Utilities |
MIDI . . . . . . . . . . . . . . . . . . . . . . . . . . . . . . . . . . . . . . . . . . . . . . . . . . |
33 |
|
MIDI Selection of Key and Harmony . . . . . . . . . . . . . . . . . . . . . . . . . |
35 |
|
MIDI Keyboard Split Point, MIDI Song Utilities . . . . . . . . . . . . . . . . |
39 |
|
MIDI Program Dump Utilities . . . . . . . . . . . . . . . . . . . . . . . . . . . . . . . |
42 |
|
I/O Utilities, Initialization Utilities . . . . . . . . . . . . . . . . . . . . . . . . . . . |
45 |
|
Footswitch Utilities . . . . . . . . . . . . . . . . . . . . . . . . . . . . . . . . . . . . . . . |
47 |
|
User Utilities, Synthesizer Mode . . . . . . . . . . . . . . . . . . . . . . . . . . . . . |
48 |
|
Audio Utilities . . . . . . . . . . . . . . . . . . . . . . . . . . . . . . . . . . . . . . . . . . . |
49 |
Song Mode |
Playing, Creating, Editing, Naming, Arranging Songs . . . . . . . . . . . . |
52 |
Basic Harmony Concepts |
. . . . . . . . . . . . . . . . . . . . . . . . . . . . . . . . . . . . . . . . . . . . . . . . . . . . . . . |
58 |
Appendix 1 |
Specifications |
|
Appendix 2 - MIDI |
MIDI Implementation chart |
|
|
MIDI Messages |
|
|
MIDI SysEx Dump Formats |
|
|
MIDI SysEx Parameters |
|
|
Decimal / Binary / Hex equivalents |
|

Studio Vocalist EX Program List
# |
Program Name |
Program Type |
Hints |
|
1 |
SILKY THICKENER |
Auto Doubling |
Sing or play a vocal track. No front panel or MIDI input required |
|
2 |
STEREO DOUBLER |
|
Doubled voice left, input voice right |
|
3 |
MONO DOUBLER |
|
One double voice plus input voice panned center |
|
4 |
GROUP DOUBLER |
|
Loose, four voice doubling effect |
|
5 |
VOICE THICKENER |
|
A small amount of deep Gender without any pitch shift |
|
6 |
JUST THE GALS |
|
Octave down doubling with male Gender |
|
7 |
JUST THE GUYS |
|
Octave up doubling with female Gender |
|
8 |
GUYS AND GALS |
|
Upper and lower octave doubling - 100% wet |
|
9 |
MALE TO FEMALE |
Special Effects |
Male Gender and a bit of downward pitch shift. |
|
10 |
FEMALE TO MALE |
|
Female Gender and a bit of upward pitch shift |
|
11 |
BLOW ME DOWN |
|
Make sure to eat your spinach! |
|
12 |
CHER A LIKE |
|
Think Belinda or Buffy |
|
13 |
CYBERIAN ONE |
|
Robot-like effect. Press a note on the keyboard to change notes |
|
14 |
CYBERIAN TWO |
|
Robot-like effect. Press a note on the keyboard to change notes |
|
15 |
CYBERIAN THREE |
|
Press a note on the keyboard to activate the effect |
|
16 |
I CAN’T SING!!! |
|
Slow, wide vibrato. Betcha can’t sing in tune! |
|
17 |
ETHYL MERMAN |
|
Octave up with wide fast vibrato |
|
18 |
BARRY TONE |
|
Oooohhhhh Baaaaabbbbbyy. Octave down and male Gender |
|
19 |
HEARTBREAK HOTEL |
|
Shows the maximum voice delay |
|
20 |
UNDER THE BED |
|
Silly monsters |
|
21 |
OAKRIDGE |
Chordal Harmony |
Play chords on a MIDI keyboard or the front panel while you sing. |
|
22 |
STEVE ‘N’ EDIE |
|
The harmony voice pitches will follow your voice. |
|
23HEAVENLY
24ONE UP ON YA
25MIDGRADE
26TAKE SIX
27BARBER POLE
28FILL ‘ ER UP
29DEEP CHOIR
30DOUBLE UP
31 |
KEYBOARD:NOTES Vocoder |
Play individual notes or chords on a MIDI keyboard while you sing. |
32 |
KEYBOARD:FEMALE |
The harmony voices will not automatically follow your voice. |
33KEYBOARD:MALE
34KEYBOARD:ALVIN!
35 |
KEYBOARD:SCOOPS |
Keyboard velocity triggers a quick portamento into the note. |
36 |
KEYBOARD:LAYER |
Play one note only for thick effect |
37KEYBOARD:STEREO
38KEYBOARD:PLAIN
39 |
KEYBOARD:4CHANS |
|
Requires 4 MIDI channels to work. Enables multiple pitch bends |
40 |
KEYBOARD:TRANSP |
|
Allows you to trigger notes in any octave. Harmonies stay close. |
41 |
EVERLYS |
Scalic Harmony |
Select the key and scale of your song from the front panel. Once |
42 |
EAGLES |
|
you have set the key and scale there is no more button pushing |
43 |
MANHATTAN |
|
required beyond activating Bypass. The different Major and Minor |
44 |
DOOBIES |
|
scales offer slightly modified scales to accomodate different input |
45 |
THIRDS BELOW |
|
melodies and accompaniment. |
46NASHVILLE
47CLUSTER SIX
48DEEP SIX
49SUITE JUDY
50HUGE 4 PART
2
# Program Name |
Program Type |
Hints |
51 PCorr 1 Hit a note |
Pitch Correction |
52PCorr 2 Major scale
53PCorr 3 Minor scale
54PCorr 4 Nearest semi
55PCorr 5 1 semi bend
56PCorr 6 2 semi bend
57PCorr 7 Instant porta
58PCorr 8 Fast porta
59PCorr 9 Med porta
60PCorr 10 Slow porta
61 1UP + 2DN |
Chordal Harmony |
621UP + 2DN GEND
631UP + 2DN + BASS
641UP + 2DN + B / GEND
651UP + 3DN
661UP + 3DN / GEND
672UP + 1DN
682UP + 1DN / GEND
692UP + 1DN + BASS
702UP + 1DN + B / GEND
713UP + 1DN
723UP + 1DN / GEND
734UP
744UP 2FH, GENDER
752 OPEN
762 OPEN / GEND
772 OPEN + BASS
782 OPEN + B / GEND
792DN
802DN + BASS
Hit a note from the front panel or a MIDI keyboard while singing. Select the key from the front panel keyboard
“ “
Sing - all notes will be corrected
Use the pitch wheel on a MIDI keyboard
“ “
Hit a note from the front panel or a MIDI keyboard while singing.
““
““
““
These are extra Chordal harmonies for further experimentation. They work in the same way as programs 21 through 30.
81 |
3RD UP CORR |
Scalic Harmony |
These eight Scalic harmony programs offer pitch-corrected har- |
82 |
3RDS UP CORR |
|
monies. They work the same way as programs 41 through 50. |
83 |
3RD UP + DBL |
|
Programs with “DBL” in the title mean that your input voice is dou- |
84 |
3RDS UP + DBL |
|
bled. |
853RD DN CORR
863RDS DN CORR
873RD DN + DBL
883RDS DN + DBL
89 |
1 |
- 3 - 5 |
|
These ten Scalic harmony programs offer some more interesting |
|
90 |
1 |
- 3 - 5 GENDER |
arrangements and the choice between harmonies that are pitch- |
||
91 |
5 |
- 1 |
- 3 |
|
corrected or not. You can use the softkeys below the LCD to |
92 |
5 |
- 1 |
- 3 GENDER |
choose Major or Minor key. The abbreviations “st” and “sm” at the |
|
93 |
3 |
- 5 |
- 1 |
|
end of the second display line mean “stepped” (pitch-corrected) |
94 |
3 |
- 5 |
- 1 |
GENDER |
and “smooth (not pitch-corrected). |
951 - 3 - 5 - 7
961 - 3 - 5 - 7 GENDR
976 - 1 - 3
986 - 1 - 3 GENDER
99 BYPASS PROGRAM |
You can use this program optionally if: |
|
A) Your mic is connected to the Studio Vocalist EX |
|
B) You’re using a 100% wet program for example: BARRY TONE |
3
4

INTRODUCTION
Congratulations and thank you for purchasing the DigiTech Studio Vocalist EX. This product is the flagship of the DigiTech Vocalist line of products. It offers a clean and quiet audio path, excellent real time harmony voice generation and sturdy hardware design to provide years of trouble-free service.
Digitech Vocalist products have been used worldwide by virtually every segment of the audio recording and live performance areas. Vocalists are used in the CD recordings you buy, the films and videos you watch and the live concerts you attend.
The new programs in your Studio Vocalist EX are organized in useful groups and cover such uses as automatic doubling, special effects and various harmony generation modes. You can enlist varying degrees of musical intelligence to help you arrange harmony parts quickly and easily; from fully manual, where you pick each harmony note, to semi-manu- al where you play the chords of your song on a MIDI keyboard and the harmony follows automatically, to fully automatic where you enter the key and scale once and the rest is done for you.
We hope that you enjoy the many useful sounds the Studio Vocalist EX can produce.
The Studio Vocalist EX features include:
"Four Voices Plus You" vocal harmony
Assignable gender settings to add male or female characteristics
Humanization features to further increase realism
Front and back panel XLR microphone input
Convenient front panel keyboard for quick musical input
Selectable Quad (one-voice-per-output) or stereo output modes
Footswitch-controlled performance capability (Song Mode)
Complete MIDI system exclusive control
5

SETUP
Front Panel
1 |
2 |
3 |
|
4 |
|
|
|
|
|
|
|
|
|
|
|
|
|
|
|
|
|
|
|
|
|
|
|
|
|
|
|
|
|
|
|
|
|
|
|
|
|
|
|
|
|
|
|
|
|
|
|
|
|
|
|
|
|
|
|
|
|
|
|
|
|
|
|
|
|
|
|
|
|
|
|
|
|
|
|
|
|
|
|
|
|
|
|
|
|
|
|
|
|
|
|
|
|
|
|
|
|
|
|
|
|
|
|
|
|
|
|
|
|
|
|
|
|
|
|
|
|
|
|
|
|
|
|
|
|
|
|
|
|
|
|
|
|
|
|
|
|
|
|
|
|
|
|
|
|
|
|
|
|
|
|
|
|
|
|
|
|
|
|
|
|
|
|
|
|
|
|
|
|
|
|
|
|
|
|
|
|
|
|
|
|
|
|
|
|
|
|
|
|
|
|
|
|
|
|
|
|
|
|
|
|
|
|
|
|
|
|
|
|
|
|
|
|
|
|
|
|
|
|
|
|
|
|
|
|
|
|
|
|
|
|
|
|
|
|
|
|
|
|
|
|
|
|
|
|
|
|
|
|
|
|
|
|
|
|
|
|
|
|
|
|
|
|
|
|
|
|
|
|
|
|
|
|
|
|
|
|
|
|
|
|
|
|
|
|
|
|
|
|
|
|
|
|
|
|
5 |
6 |
7 |
8 |
9 |
1) LCD display |
|
Provides visual feedback of all operating modes including performance, editing |
||
|
|
and utility modes. |
|
|
2) LED displays |
|
The Input LED monitors the incoming signal from the Mic and Line inputs. The |
||
|
|
0dB LED lights 3 dB before the onset of clipping. |
|
|
|
|
The MIDI LED indicates that the Studio Vocalist EX is receiving MIDI. |
||
|
|
The Overflow LED indicates an overload of the digital signal processor. If it lights, |
||
|
|
reduce the input gain or front panel mixer faders. |
|
|
|
|
The Lock LED shows that the pitch detection circuitry has recognized the input |
||
|
|
pitch. |
|
|
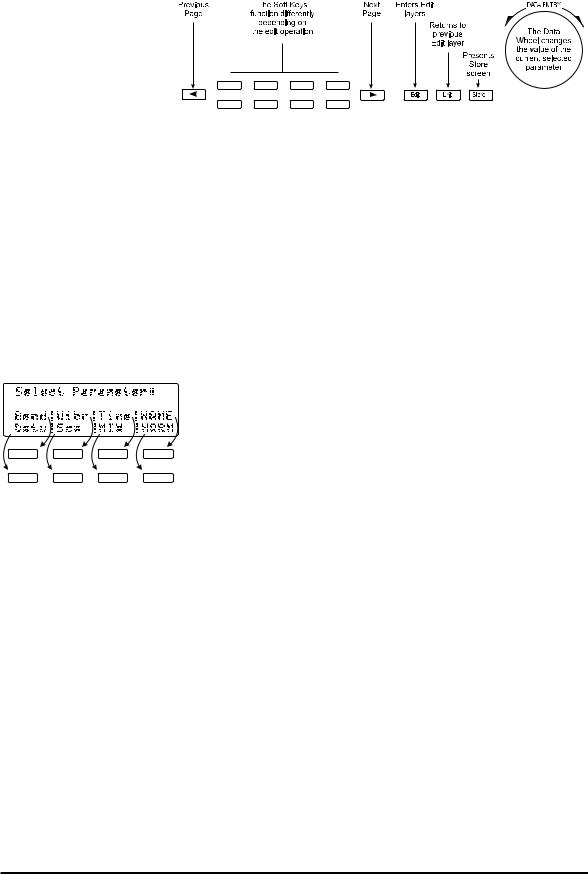
3) Data Wheel |
|
In Factory, User and Song modes, the Data Wheel selects and loads programs. In |
||
|
|
Edit mode, it increases or decreases the value of the selected parameter. |
||
4) Mode button group |
|
The Program button selects the program banks for performance or editing. |
||
|
|
Song mode is for editing and performance of “songs” which are sequences of chord |
||
|
|
changes, key types and variations triggered by MIDI, the front panel, or a footswitch. |
||
|
|
Utility mode allows access to system, MIDI, footswitch and user preference configu- |
||
|
|
rations. |
|
|
|
|
The Bypass button mutes the Harmony components from the mix, leaving the Lead |
||
|
|
Vocal and Reverb. Note that if the Lead level in a particular program is set to zero, |
||
|
|
Bypass will mute all sound. |
|
|
5) The Softkeys |
|
These keys perform different functions in each different mode; They select harmony |
||
|
|
variations in the Programs mode and configuration parameters in the Program or |
||
Song Edit and Utilities modes. For further information on how these relate to different Programs, see pages 13, 16 & 18.
The Left and the Right Arrow button become active when the ← and → characters are seen in the top corners of the LCD within Edit or Utility mode. Pressing either of the page buttons will present the next or previous editing screen.
6
6) Edit mode group |
The Edit button presents the parameter editing screens from within |
|
Factory, User and Song modes. |
|
The Exit button backtracks through successive menu layers in all |
|
editing and programming modes. |
|
The Store button offers the option of saving an edited program in |
|
the User bank. For more information on editing Programs, see the |
|
Editing chapter. |
7) Keyboard |
This one-octave keyboard allows you to input musical information such as |
|
Key and Chord root note. The keyboard can also be used to select a cue-in |
|
note, which is selectable from the Utilities menu. |
8) Level control section |
The Input control varies the input level for the microphone and line inputs. |
|
The raised bump in the control corresponds to 0 dB. |
|
The Output control varies the output level for both left and right outputs |
|
and the Headphone jack. The raised bump in the control corresponds to 0 |
|
dB at +4 dBu nominal, the professional standard for signal levels. If your |
|
mixer accepts semi-pro signal levels (-10 dBu) you should reduce this |
|
fader. |
9) Microphone Input |
The XLR-type input jack offers convenient access to the Microphone |
|
Input. The front and back mic inputs are summed but the Studio Vocalist |
|
EX can only accept one audio signal at a time. The Mic/Line button tog- |
|
gles between the mic and line inputs, and it will light showing the mic |
|
input is enabled. The +48v button turns the 48 volt phantom power to |
|
both the front and rear panel Mic input on and off. |
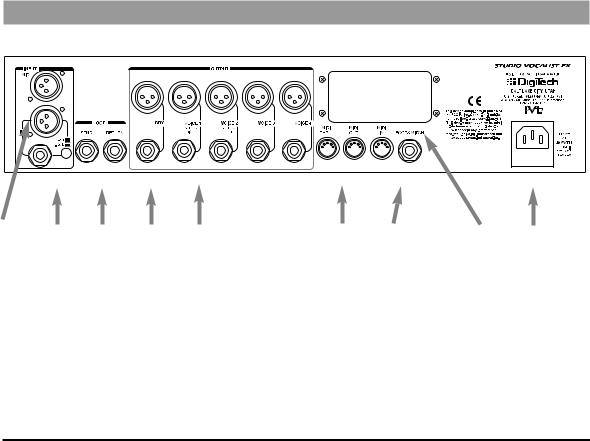
Back Panel
1 |
8 |
1) Mic input |
Balanced XLR jack for microphone-level signals. A cardoid, 1 kOhm- |
|
impedance type microphone is preferred. |
2) Line inputs |
These jacks accept mono line level audio from an external source. Both |
|
the 1/4” TRS (tip ring sleeve) and XLR jacks accept balanced or unbal- |
|
anced signals. |
The +4/-10 switch matches the Studio Vocalist EX’s line input level to the output level of your mixer. Consult your mixer manual to determine it’s output level. This is important to match correctly as excess noise or distortion can result.
7

3) Effects Send and Return |
These jacks allow an external processor such as a compressor, equalizer, |
|
exciter or de-esser to be inserted in the signal path between the mic |
|
preamp and the harmony circuitry. The Send is “normalled” meaning that |
|
if a jack is inserted, the signal path from the mic preamp is broken and |
|
must be returned through some device. |
4) “Dry” audio output |
This is the direct, unprocessed vocal signal after it has been amplified by |
|
the Mic preamp. No harmonies are produced from this output. When an |
|
external processor is inserted into the Send and Return loop, its output is |
|
produced here. |
5) Main voice outputs |
There are two configurations for these outputs: |
|
Stereo mode - Outputs 1 and 2 contain a mix of the the input and harmo- |
|
ny voices. Outputs 3 and 4 are muted. |
|
Quad mode - Each harmony voice is allocated its own output to allow |
|
individual external processing. The input voice is not mixed into any of |
|
these outputs. |
6) MIDI section |
The MIDI input receives MIDI control and program information from |
|
external MIDI devices such as keyboards and sequencers. |
|
The MIDI output transmits system, specific button pushes and program |
|
information which can be recorded and played back externally from a |
|
sequencer. It also can transmit bulk system exclusive data to allow back- |
|
up of user data on a MIDI sequencer or voice librarian. |
|
The MIDI Thru jack transmits an exact copy of any MIDI information |
|
received at the MIDI input. |
7) Footswitch jack |
1/4" stereo jack for a DigiTech FS-300 footswitch to provide remote con- |
|
trol of Bypass, Program and Song functions. |
8) Expansion port |
This removeable plate is to accomodate extra hardware for the optional |
|
digital I/O card. |
9) AC Power Jack and fuse |
This is a standard IEC receptacle for AC Mains power. The fuse is con- |
|
tained below the receptacle. It may be replaced only with a 250 mA, |
|
250V Slow Blow fuse. |
8
Audio Connection Examples
Basic Audio Setup
The drawing at left represents the simplest audio setup. You would most likely use this in live performance or if you are recording with a mixer that has a limited number of inputs.
Connect as follows:
•Connect the microphone to either the front or back Mic input. Press the "Mic" button on the front panel to enable.
•Connect audio outputs 1 and 2 to the inputs of your mixer. Ensure that the audio output mode is set to stereo. This is set in the Utilities menu under the Audio softkey. See page 49 of the Utilities section for further details.
Advanced Audio Setup #1
This setup offers expanded control of the harmony voices and allows external processing of the input voice. The signal processor connected to the loop send and return could perform compression, de-essing, or equalization for example. The individual harmony and dry voice outputs provide the ability to adjust pan, level, equalization and processing separately at the mixing console.
Connect as follows:
•Connect the microphone to either the front or back Mic input. Press the "Mic" button on the front panel to enable.
•Connect audio outputs from the dry voice and the four harmony voices to the inputs of your mixer. Ensure that the audio output mode is set to Quad. This is set in the Utilities menu under the Audio softkey. See page 45 in the Utilities section for further details.
•Connect the Loop Send of the Studio Vocalist EX to the input of the effect processor and the Loop Return to the output of the effect processor.
Advanced Audio Setup #2
This is the most likely studio arrangement. It allows you to use the microphone preamp in your console and provides the most flexible arrangement for pre and post effects generation. There is no dry voice output because that is connected directly through the board and monitoring and routing can be done there. The individual harmony outputs allow you to adjust pan, level, equalization and processing separately for each voice.
Connect as follows:
•Connect the microphone to your mixing console input.
•Connect the output from your console auxiliary send to the line input on the Studio Vocalist EX.
•Connect the four harmony voice outputs to inputs on your mixer. Confirm that the output mode is set to Quad. See page 45 in the Utilities section for further details.
•Connect the required dynamic (compression, limiting) or spatial (reverb, delay) effects processors to your mixing console auxiliary send and return loops.
9
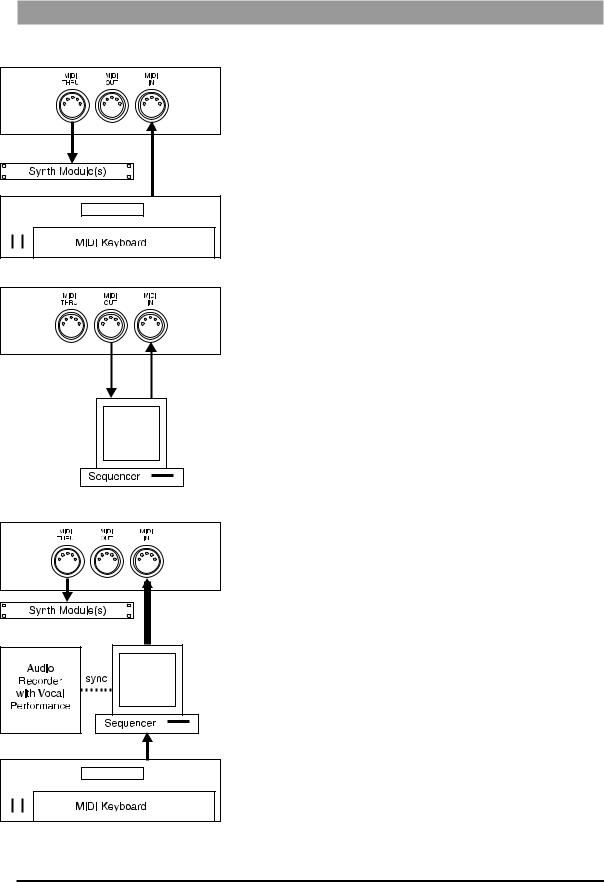
MIDI Connection Examples
Basic MIDI Setup
This setup could be used for a live performance or live recording situation. The Studio Vocalist EX can recognize the chords you play and output the appropriate harmony or you could use a Vocoder preset to play the exact harmony notes you need. These concepts are explained in greater detail later on in this manual.
Connect as follows:
• Connect the output of your controller keyboard to the MIDI in of the Studio Vocalist EX.
• Set your keyboard's MIDI transmit channel to 1 (the Studio Vocalist EX's default channel) or change the Studio Vocalist EX's MIDI receive channel to match your keyboard. See page 33 in the Utilities section for further details.
• Connect any MIDI sound modules to the MIDI thru jack.
Intermediate MIDI Setup
This configuration allows you to record key, chord and harmony style change keystrokes from the front panel into a sequencer for automated playback later. This could be useful for live vocal performances using sequenced backing tracks. You could also use the sequencer to back up your edited patches to disk. If you do extensive editing, it is very important to store backup copies of your work.
Connect as follows:
• Connect the MIDI output of the Studio Vocalist EX to the input of your sequencer or storage device.
•Connect the output of the sequencer or storage device to the Studio Vocalist EX's input.
•The patch dump from the Studio Vocalist EX to the storage
device must be initiated from the Studio Vocalist EX. The Studio Vocalist EX can receive a patch dump at any time. See page 42 in the Utilities section for further details.
Advanced MIDI Setup
The setup at left may be found in many audio and MIDI recording studios. The sequencer allows you to record and edit the keyboard performance that controls the harmony voices. Routing the vocal performance through the Studio Vocalist EX and controlling it with the sequencer allows you to “craft” exactly the harmony performance you want. Connect as follows:
• Connect the MIDI output of your keyboard to the input of the sequencer.
• Connect the MIDI output of the sequencer to the input of the Studio Vocalist EX.
• Connect your MIDI sound module(s) to the Studio Vocalist EX's Thru jack.
10

PERFORMANCE
This chapter discusses the main operating features of the Studio Vocalist EX. It begins with setting the correct levels and proceeds with discussions of the different harmony modes and their uses.
We assume that you have connected your Studio Vocalist EX according to the diagrams on the previous pages and that you are familiar with the other devices in your system.
Setting the Input and Output Levels
First, move the input and output level controls down to the bottom position.
Input Level
Sing into the microphone and turn up the Input Level control until the loudest passage you sing causes only brief peaks to register on the red 0dB LED. Too much input gain causes both the unprocessed (dry) vocal signal and the harmony voices to distort. Too little gain and the Studio Vocalist EX will not produce harmonies at all.
Output Level
Once you have set the input level, sing into your mic and bring the Output level fader up to the nominal level “bump” at halfway up the fader’s travel. This will set the output level to nominal +4 dB. If you are sending audio to a mixer input that operates at -10 dB, reduce this control according to the mixer’s input meters.
Generating a Good Signal
It is important that the singer perform as close as possible to the microphone in order to reduce unwanted harmonization of background noise. In a quiet studio environment this is less critical but on a loud stage, the singer’s voice must be considerably louder at the microphone than any other sounds.
It is also important to avoid using omnidirectional mics. They can pick up reflections and noise that disrupt the Studio Vocalist EX’s pitch detection. Use directional microphones only; these microphone’s pickup patterns are generally called “cardoid” or “hyper-cardoid”.
The Signal Lock LED turns on when the Studio Vocalist EX recognizes the pitch of the input signal. If this LED turns on weakly or flashes during sustained vocal notes, the input level must be increased either by singing louder or adjusting the Input Level control.
11
Loading Programs
The Studio Vocalist EX is shipped from the factory with the first factory program selected once it is powered up. Turn the Data Wheel knob to scroll through the different factory programs. Programs are loaded automatically as you turn the wheel. Programs can also be loaded via MIDI program change.
There are two banks of programs to choose from with 50 programs in each. The “Factory” or “User” button will light up when either of these banks are chosen. You can save edited programs into the User bank only. See “Storing your Edits” for further details.
The LCD Display Window
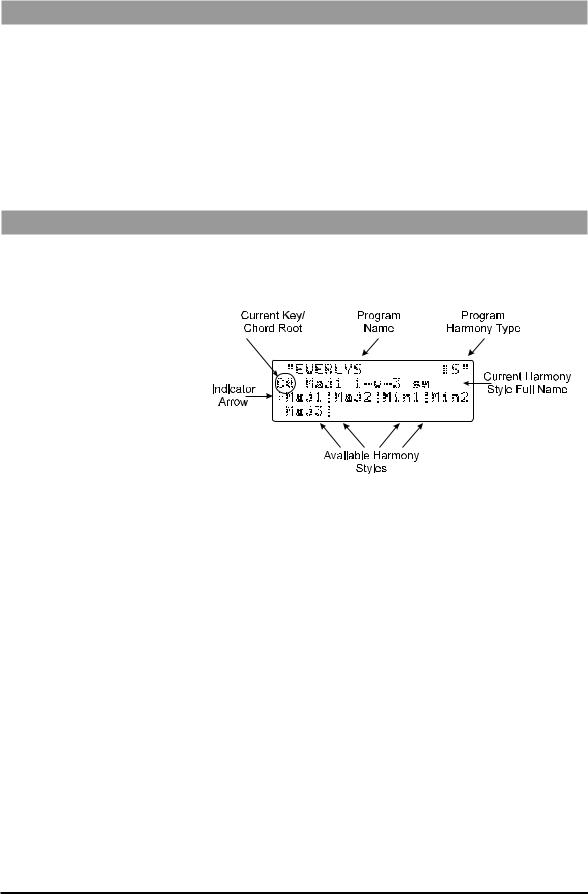
When you load a new program, the LCD displays information you will need in order to control the harmony voices. The following graphic shows these details:
Current Key/Chord Root
This two character field shows the current key or chord root note in
Scalic or Chordal harmony programs only.
Program Name
A name of up to 16 characters is shown here. There may be identical names in the User bank if edits have been made.
Program Harmony Type
In Scalic or Chordal harmony programs only, this character will be either an “:S” or a“:C”. The “S” shows that the program is based on a Scalic harmony, while the “C” shows that the program is built on a Chordal harmony.
Indicator Arrow
This shows which of the available Harmony Styles is currently loaded. It will move when you press the Softkeys to select another Harmony Style.
Available Harmony Styles
Each Program may have up to 8 different Harmony Style variations. These variations are based on the Harmony Type featured in the current program. Each “window” shows the first four characters of the style name. For more information see the section called “Understanding the Five Harmony Types”.
Current Harmony Style Full Name
This 16 character field shows the full name of the current Harmony Style.
12

The style naming conventions are are described in the “Understanding the
Five Harmony Types” section.
The Harmony Controls
Note: The first harmony style (top left softkey) is always loaded when a new program is loaded.
For musically correct harmonies to be generated automatically, you must provide the Studio Vocalist EX with some musical information. It’s just like when you are playing with other musicians; they need to know what chords you’re playing in order to stay “in key” with you. You can use either a MIDI keyboard or the one-octave keyboard and eight softkeys to provide this information.
When you load a Program based on Chordal or Scalic harmony, the eight softkeys may be used to call up a different harmony variations. Each Softkey corresponds to a harmony style on the LCD display (see example below).
Several different harmony styles are assigned to each program so that you don’t have to load a completely different program when, for example, you want to change from a major to a minor harmony.
Different Programs require different control input from you. For example, you can use the front panel keyboard (or MIDI keyboard notes) to choose the root note of the chord in a Chordal Program, the Key in a Scalic Program, or the actual harmony notes to be played in a Vocoder Program.
Understanding the Five Harmony Types
Each program is based on one of five basic harmony types. The differences lie in the control method you choose and the sound you are after.
The Studio Vocalist EX’s five basic harmony types are:
• |
Chordal |
These three Harmony types need musical |
• |
Scalic |
control from you as you are singing. |
|
||
• |
Vocoder |
|
13

• |
Chromatic |
These two Harmony types are for more |
|
|
specific uses. Chromatic doesn't require |
|
|
any special musical control. Used in Unison |
|
|
presets to thicken the sound of the Lead vocal. |
• |
Pitch Correct |
Pitch Correct can take input from a pitch bend |
|
|
wheel, front panel keyboard or a MIDI note. |
Chordal
You can tell a program is based on Chordal harmony when the upper right hand character of the display shows “:C”. You will also see first letter of the harmony style name shown in lower case letters (e.g. maj, min, maj7). To use a Chordal harmony program, you must input each chord in your song as it occurs. Chord input can come from chords you play on a MIDI keyboard or from the front panel harmony controls. The Studio Vocalist EX has intelligent MIDI chord recognition to interpret the chord inversions you play to produce correct harmonies.
A chord has two parts: the root note and the type. An example of this would be an A major 7th chord which has “A” as its root and “major 7th” as its type.
Uses: provides a constant chordal harmony “bed” that stays on the currently selected chord. Chordal harmonies automatically move harmony intervals so that they sound correct over your lead voice melody.
For examples of Chordal harmony, choose any of the Programs 21 through 30. Choose a root note on the front panel keyboard and sing. As you sing, use the softkeys to switch between major, minor and the other chord types, and listen to how the harmony voices change.
Style naming conventions: The first 3 to 4 characters of the name show the chord type such as maj, min, dom7 etc. The 2 to 7 characters following the chord type show the arrangement of the harmony voices above and below your voice. The number with an arrow beside it shows how many scale intervals away from the input note the harmony will be and whether it is above or below. The B character shows that a bass voice is present that will move less than the other voices. Fixed means that the harmony voices will move less too.
Scalic
You can tell a program is based on Scalic harmonies when the upper right hand character of the display shows “:S”. The first letter of the harmony style name is capitalized (e.g. Maj1 and Min1). Scalic harmony programs require that you to enter the key and scale which usually needs to be done only once at the beginning of your song. In western popular music, the chords often revolve around a single scale such as A major where “A” is the key and “major” is the scale around which all the chords of the song are centered.
14

Note: Scalic harmony programs that generate a single 3rd interval generally work for more songs than programs with a combined 3rd and 5th.
Programs based on Scalic harmony have a selection of different scales you can choose from by pressing the softkeys. For example, the “Everlys” program (#41) has 3 different major scales and two minors as do many of the other Scalic-based programs. The major scales differ only on the harmony note generated on the fifth note of the scale i.e. Maj1 generates a major chord, Maj2 generates a suspended chord and the Maj3 generates a minor chord. The two minor scales differ in that they generate a major chord on the fourth note (Min1) or a minor chord (Min2). This may seem a bit confusing so rely on your ears to make the appropriate choices.
Use: Scalic harmonies are more active in harmony motion where Chordal tends to be less so. Scalic programs sound the most natural for popular song harmony.
For examples of Scalic harmony, choose any of Programs 41 through 50, choose the key on the front panel keyboard and sing. Notice that as you sing up and down the melody, the Harmony voices stay very close to you.
Style naming conventions: The first 3 to 4 characters of the name show the scale type such as Major, Minor, Doriian etc. The next 3 to 5 characters show the voicing. For example: “v3355” as found in the Eagles program shows that your lead voice (v) has doubled 3rd and doubled 5th harmonies above it. Numbers to the right show harmonies above and numbers to the left show harmony voices below.
You may also see two additional characters “sm” and “st”. This displays the setting of the Bending parameter, which determines whether the harmony voices will follow the lead vocal sliding smoothly between notes (sm) or whether the harmony will not slide between notes but will jump from scale note to scale note in a stepped fashion (st).
For more information on Chordal and Scalic harmony, see the Basic Harmony Concepts chapter.
Vocoder
Vocoder mode is named after a completely different technology that functions in a similar way. It is not the familiar “robot voice” sound. The Studio Vocalist EX’s Vocoder mode does not feature intelligent harmony because you play the notes from a MIDI keyboard or the front panel keyboard that you want to hear as harmonies. Vocoder mode is probably the most flexible mode allowing you to weave intricate melody lines from your MIDI keyboard that can be recorded and edited in a MIDI sequencer like any other MIDI performance.
Use: Vocoder is for situations where neither a straight chord nor a parallel harmony line will do. Since you directly control the notes being “sung", you can create counter-melodies and harmonies that go in different directions. While it is more efficient to use a MIDI keyboard in Vocoder programs, the front panel keyboard is active in these programs as well.
For examples of Vocoder harmony, try Programs 31 through 40. Hold down any chord up to four notes on the front panel keyboard or a MIDI keyboard and sing. Keep in mind that no sound will come out unless you are holding down some keys. Change the chord, and the Harmony voices change. You don't even have to sing—talk into the mic as you play different notes on the keyboard.
15

Chromatic
Chromatic mode does not require the Studio Vocalist EX’s intelligent harmony because the harmony notes always remain a fixed interval away from the input note. This harmony type is used in programs that feature unison, octave, or fifth interval harmonies. You do not need to enter key information when you load Chromatic harmony programs.
Use: Chromatic Harmony is good for fattening up a vocal (live or recorded, solo or group) by doubling the Lead with unison Harmonies, and octave up or down harmonies.
For examples of Chromatic harmony, choose any of Programs 1 through 8.
Pitch Correct
Pitch Correct mode is not intended for harmony. It offers you a method of manipulating a singer’s pitch when needed. The Studio Vocalist EX has ten programs dedicated to Pitch Correction.
Use: Pitch Correct is used to force an out-of-tune vocal performance into the correct pitch. Use it to “rescue” a recorded track where the performance is good but some of the notes are out of tune.
For examples of Pitch Correct, choose Programs 51 through 60. The program list at the beginning of this manual provides more tips on setup.
Changing Harmonies with the Softkeys
The softkeys below the LCD are offered in factory programs that are based on Scalic and Chordal harmony. All other factory programs feature one softkey selection only. The top left softkey assignment is automatically loaded when you change programs.
In the Scalic harmony programs (#36 to 45) the softkeys allow you to select different Major or Minor scales to provide the correct harmony for your song. These scales have subtle differences that make a harmony sound acceptable or not. Once you have entered the key of your song with the front panel keyboard, you can try each scale to determine which is correct.
In the Chordal harmony programs (#16 to 25) the softkeys allow you to select chord types. While this more easily done with a MIDI keyboard, the softkeys allow easy access if no keyboard is available.
See “Harmony Editing” on page 26 for changing softkey assignments and creating new harmony styles.
16
EDITING
This chapter describes the general principles of editing in the Studio Vocalist EX and the individual editing modes in detail. To reduce the amount of redundant information, the general procedures, menu system and controls are described at the beginning of the chapter followed by detailed discussions of each of the edit parameters.
The Harmony editing screens are split up in successive layers of complexity. This is done to make this section easier to understand.
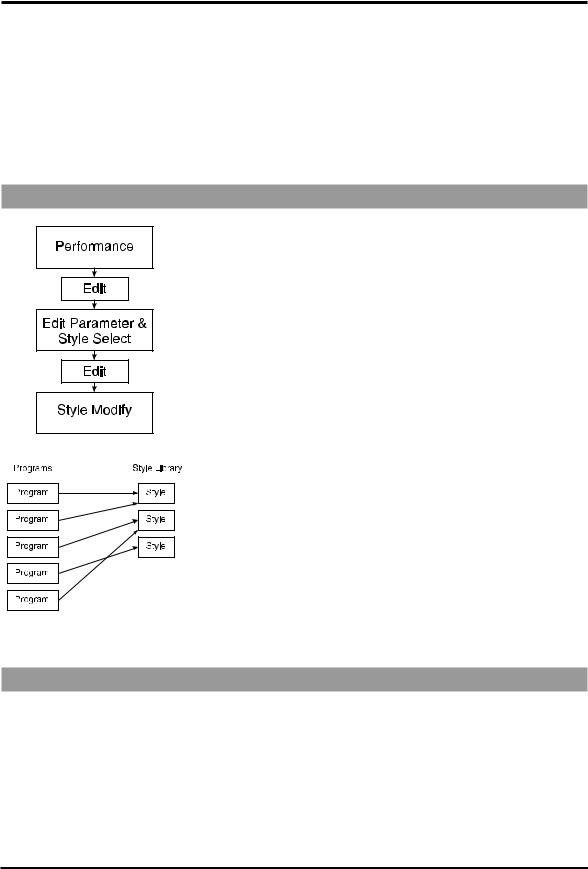
Using Styles to Simplify Editing
When you press the Edit button in Programs mode, you enter into an area that can be as simple or as flexible as you want. Modifying a program can be as easy as choosing a preprogrammed style or as involved as going into the deepest layer and adjusting a single parameter.
To simplify the editing process, we have reduced the number of individual parameter changes you need to make by introducing what we call “styles”. Styles simplify editing by collecting related parameters together in a group and giving them a name. For example, this is done so that it is not always necessary to change the vibrato depths on each of the four voices to add a little more vibrato overall.
The “humanizing” features: Gender, Detune, Vibrato and Scoop each have their own library of styles from which you can choose. Harmony uses a variation on the style concept which is described later in this chapter. The Mix and Program Name parameters do not use styles.
Editing a program in the Studio Vocalist EX can be done in either of two ways: you can change which style is assigned to the program or you can create a new style to assign to the program. In both cases you will be using the concept of a “library” all of the programs share from. If you do build up your own library of user styles, keep in mind that if you edit a user style that is shared by other programs these programs will be affected in the same way.
The factory styles have been constructed to give you a broad range of choices from which you can personalize your programs. You cannot permanently modify a factory style but you can make changes and save them to a new user style.
The Menu System and Editing Controls
The Studio Vocalist EX menu system is designed to allow easy access to all editable parameters in it. It is composed of several layers; each layer has decision branches leading to subsequent layers. We have deliberately limited the number of layers to encourage you to experiment without making you learn a complex menu system.
The controls used to navigate the menu system are shown in the graphic following:
17
The Edit Button
When pressed from Factoryor User Programs mode, the Edit button presents the Parameter/Style Select screen. Once a parameter is selected, another press of the Edit button enters the Style Modify screens.
When pressed from Songs mode, the Edit button presents the Arrangement screen. An additional press of the Edit button presents the Section editing screen. See page 54 in the Songs mode section for further details.
The Edit button will light indicating you have entered Program Edit or
Song Edit modes and it will stay lit as long as you are there.
The Soft Keys
In all modes, each layer of the menu system contains a different group of softkey assignments. They perform the following functions:
• to select the parameter you want to modify,
•to select the harmony voice you want to make a change to,
•increment or decrement the value of the selected parameter by one.
The Data Wheel
The Data Wheel changes the parameter you have selected. It is a detented (clicking) rotary encoder type with no start or stop point.
•At the top level of Factory or User modes, it is used to load programs.
•At the top level of Songs mode, it is used to load songs.
•In all Edit modes, it is used to increment or decrement the value of the selected parameter.
The Data Wheel has a speed-sensitive feature that can access a large number of individual steps without turning the wheel excessively.
The Left and Right Arrow Buttons
These buttons are active only when you see the ← and → characters displayed in the upper corners of the LCD. They allow you to access the various editing screens in Factory, User, Songs and Utilities modes.
Pressing the arrow buttons presents the next or previous edit screen.
Repeated presses loop around the available screens.
18
The Store Button
The Store button allows you to save any changes you have made to a program or style. You can also use it to copy programs and styles to other locations. Store can be pressed in any Studio Vocalist EX mode except for Utilities. Refer to the section on “Storing Your Edits” at the end of this chapter to save your changes.
The Exit Button
This button presents the previous menu layer screen. Pressing it repeatedly will backtrack through the menu layers to the last used mode.
Gender
The Gender styles introduce a unique harmonic character into the harmonies to add the qualities associated with male or female voices. This makes the harmonies sound more as if they are coming from a distinctly separate group of people rather than being multiples of you. The two editable parameters for Gender are Assignment and Setting.
Note: Each voice must have a Gender setting even if it is zero
Assignment
There are two Genders assignable for each program. You can assign a male Gender to a lower harmony and a female Gender to a higher harmony for instance. This can also be reversed for special effects.
To assign no Gender to voices, you must still assign Gender 1 or 2 to those voices and change the Gender setting to 0.
Setting
The Gender settings range from +50 to –50. The positive values shift the overtones higher for female characteristics and the negative values shift the overtones lower for male characteristics.
To assign no Gender to voices, you must still assign Gender 1 or 2 to those voices and change the Gender setting to 0.
To edit the Gender parameters:
1.Use the Data Wheel to select the program you want to edit and press the Edit button.
2.Press the softkey that corresponds to Gender. (Gend)
3.Select a different style preset using the Data Wheel. If you are satisfied with loading a different style, refer to the “Storing your Edits” section. Press the Edit button again to modify the current Gender style or, to create a new Gender style from scratch, load one of the blank styles (BlnkGend #) and then press the Edit button.
4.Press the softkeys below the LCD to select which voice you want to modify.
5.Turn the Data Wheel to change the Gender assignment for the selected voice. The softkeys can also be used for this purpose.
19

6.Press the Right Arrow button to go to the Gender settings screen. You will see the settings for Gender #1 on the left and #2 on the right.
7.Select which Gender setting you want to change with the softkeys and turn the Data Wheel to make the changes.
Detune
The Detune styles add a subtle “out-of-tuneness” to the harmony voices. Because human voices are never perfectly in tune, this function can “humanize” your harmonies. This feature also works well on programs where two, three or all four voices are singing the same note (unison), as the detuning produce a chorusing effect.
The editable parameters in a Detune style are: Amount, Randomness and
Pitch Randomize. These are set individually for each voice.
Amount
This sets the number of cents sharp or flat the harmony voices are. The amount is editable in 1 cent increments between 100 cents (1 semitone) above or below the input note.
Randomness
This makes every new harmony note have a slightly different detune amount. It is variable from zero to 25 cents in 1 cent increments. Randomness will only reduce the detune amount, not add to it - for example, a Detune amount of +12 cents with Randomness set to 6 cents would vary from +6 to +12 with each new note.
Pitch Randomize
Pitch Randomize further humanizes your harmonies by continuously varying the pitch through the duration of a note. You have a selection of low, medium or high settings.
To edit the Detune parameters:
1.Use the Data Wheel to select the program you want to edit and press the Edit button.
2.Press the softkey that corresponds to Detune (Detu).
3.Select a different style preset using the Data Wheel. If you are satisfied with loading a different style, refer to the “Storing your Edits” section on page 32. Press the Edit button again to modify the current Detune style or, to create a new Detune style from scratch, load one of the blank styles (BlnkDetu #) and then press the Edit button.
4.To modify the amount of Detune effect on the first voice, turn the Data Wheel. Press the softkeys below the other voices to select them for editing. The softkeys can also be used to change values.
5.To edit the Randomness parameter, press the Right Arrow button to move to the next edit screen. Select the voices with the softkeys and increase or decrease the amount of Randomness with the Data Wheel.
20

6.To edit the amount of Pitch Randomization, press the Right Arrow button. Turn the Data Wheel to adjust to the desired value.
Vibrato
Adding Vibrato to the Studio Vocalist EX’s harmonies is another way of adding realism. Vibrato is the regular modulation of a voice’s pitch that lends interest to an otherwise static note. You can edit five different vibrato parameters for each voice allowing you to construct the most realistic vibrato performance possible.
Depth
This varies the amount of pitch deviation above and below the root pitch of the harmony note. This varies in 1 cent increments between 0 and 100 cents.
Rate
This is the modulation speed of the vibrato. It is measured in Hertz (Hz: the number of cycles per second). This can be varied in tenths of one Hz between 0 and 9.9 Hz.
Type
This gives you a selection of four different vibrato waveforms. They are: sine wave, square wave, sawtooth up and sawtooth down.
Delay
This changes the time between when the Studio Vocalist EX produces a harmony note and the onset of vibrato. Vibrato does not immediately occur after the delay period; instead it increases gradually in intensity. It is edited in 20 millisecond increments from 0 to 2.5 seconds.
Randomness
Randomness applies random values to the combination of Depth and Rate. Each new note you sing will have a slightly faster or slower vibrato rate and slightly increased or decreased depth. This parameter is set from 1 to 10.
To edit the Vibrato parameters:
1.Use the Data Wheel to select the program you want to edit and press the Edit button.
2.Press the softkey that corresponds to Vibrato. (Vibr)
3.Select a different style preset using the Data Wheel. If you are satisfied with loading a different style, refer to the “Storing your Edits” section on page 30. Press the Edit button again to modify the current Vibrato style or, to create a new Vibrato style from scratch, load one of the blank styles (BlnkVibr #) and then press the Edit button.
4.To increase and decrease the Vibrato Depth on voice number one, turn the Data Wheel. Press the softkeys below the LCD to select
21
 Loading...