


 Loading...
Dell™ Inspiron™
Quick Reference Guide
Model: DCMF
w w w . d e l l . c o m | s u p p o r t . d e l l . c o m

Notes, Notices, and Cautions
NOTE: A NOTE indicates important information that helps you make better use of your computer.
NOTICE: A NOTICE indicates either potential damage to hardware or loss of data and tells you how to avoid the problem.
CAUTION: A CAUTION indicates a potential for property damage, personal injury, or death.
____________________
Information in this document is subject to change without notice. © 2008 Dell Inc. All rights reserved.
Reproduction of these materials in any manner whatsoever without the written permission of Dell Inc. is strictly forbidden.
Trademarks used in this text: Dell, the DELL logo, DellConnect, Inspiron, and YOURS IS HERE are trademarks of Dell Inc.; Intel, Celeron, Core, and Pentium are registered trademarks of Intel Corporation; AMD, AMD Athlon, and Phenom are trademarks of Advanced Micro Devices, Inc.; HyperTransport is a licensed trademark of the HyperTransport Technology Consortium; Microsoft, Windows, Windows Vista, and Windows Vista start button are either trademarks or registered trademarks of Microsoft Corporation in the United States and/or other countries; Bluetooth is a trademark owned by Bluetooth SIG, Inc. and is used by Dell Inc. under license; Blu-ray Disc is a trademark of Blu-ray Disc Association.
Other trademarks and trade names may be used in this document to refer to either the entities claiming the marks and names or their products. Dell Inc. disclaims any proprietary interest in trademarks and trade names other than its own.
Model: DCMF
June 2008 |
P/N MT480 |
Rev. A01 |

Contents
1 |
About Your Dell™ Inspiron™ 518/519 . . . . |
7 |
|
Front View . . . . . . . . . . . . . . . . . . . . . . |
7 |
|
Back View . . . . . . . . . . . . . . . . . . . . . . |
8 |
|
Back Panel Connectors. . . . . . . . . . . . . . . . |
9 |
2 |
Setting Up Your Computer . . . . . . . . . . . . |
11 |
|
Installing Your Computer in an Enclosure. . . . . . . . |
11 |
|
Connecting to the Internet . . . . . . . . . . . . . . . . |
13 |
|
Setting Up Your Internet Connection . . . . . . . . |
13 |
|
Transferring Information to a New Computer . . . . . . |
15 |
3Specifications . . . . . . . . . . . . . . . . . . . . . 17
4Troubleshooting . . . . . . . . . . . . . . . . . . . . 27
Troubleshooting Tools . . . . . . . . . . . . . . . . . . |
27 |
Beep Codes . . . . . . . . . . . . . . . . . . . . . |
27 |
System Messages . . . . . . . . . . . . . . . . . |
29 |
Troubleshooting Hardware Problems in the |
|
Windows Vista® Operating System . . . . . . . . |
31 |
Dell Diagnostics . . . . . . . . . . . . . . . . . . |
31 |
Contents 3

Solving Problems . . . . . . . . . . . . . . . . . . . . |
35 |
Power Problems . . . . . . . . . . . . . . . . . . |
35 |
Memory Problems . . . . . . . . . . . . . . . . . |
36 |
Lockups and Software Problems . . . . . . . . . . |
37 |
5 Reinstalling Your Operating System . . . |
41 |
Drivers . . . . . . . . . . . . . . . . . . . . . . . . . . |
41 |
What Is a Driver? . . . . . . . . . . . . . . . . . . |
41 |
Identifying Drivers . . . . . . . . . . . . . . . . . |
42 |
Reinstalling Drivers and Utilities . . . . . . . . . . |
42 |
Using the Drivers and Utilities media . . . . . . . . |
43 |
Restoring Your Operating System . . . . . . . . . . . . |
44 |
Using Microsoft Windows System Restore . . . . . |
45 |
Using Dell Factory Image Restore . . . . . . . . . |
46 |
Using the Operating System Media. . . . . . . . . |
47 |
6Finding Information . . . . . . . . . . . . . . . . 49
7Getting Help . . . . . . . . . . . . . . . . . . . . . . 51
Obtaining Assistance . . . . . . . . . . . . . . . . . . |
51 |
Technical Support and Customer Service . . . . . |
52 |
DellConnect™ . . . . . . . . . . . . . . . . . . . . |
52 |
Online Services . . . . . . . . . . . . . . . . . . . |
52 |
AutoTech Service . . . . . . . . . . . . . . . . . . |
53 |
Automated Order-Status Service . . . . . . . . . . |
53 |
Problems With Your Order . . . . . . . . . . . . . . . . |
53 |
Product Information . . . . . . . . . . . . . . . . . . . |
54 |
4 Contents

Returning Items for Warranty Repair or Credit . . . . . |
54 |
Before You Call . . . . . . . . . . . . . . . . . . . . . |
55 |
Contacting Dell . . . . . . . . . . . . . . . . . . . . . |
57 |
A Appendix . . . . . . . . . . . . . . . . . . . . . . . . . 59
FCC Notice (U.S. Only) . . . . . . . . . . . . . . . . . . |
59 |
FCC Class B . . . . . . . . . . . . . . . . . . . . . |
59 |
Macrovision Product Notice . . . . . . . . . . . . . . |
60 |
Index . . . . . . . . . . . . . . . . . . . . . . . . . . . . . . . 61
Contents 5

6 Contents
About Your Dell™ Inspiron™ 518/519
NOTE: For more information about the ports and connectors on your computer, see "Specifications" on page 17.
Front View
 1
1
13 |
|
|
2 |
|
3 |
12 |
4 |
|
|
11 |
5 |
|
|
10 |
6 |
|
7 |
|
9 |
|
8 |
|
|
|
|
1 |
USB 2.0 connectors (2) |
2 |
optical drive |
3 |
optical-drive panel |
4 |
optical-drive eject button |
5 |
USB 2.0 connectors (2) |
6 |
headphone connector |
7 |
microphone connector |
8 |
power button |
9 |
drive activity light |
10 |
front-panel door grip |
11 |
FlexBay drive |
12 |
optional optical-drive bay |
13Service Tag (located on top of the chassis towards the front)
About Your Dell™ Inspiron™ 518/519 |
|
7 |
|
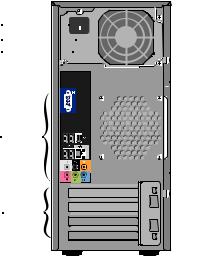
Back View
1 

 2
2


 3
3


 7
7
4

 6
6
5
|
|
|
|
|
|
|
|
|
|
|
|
1 |
power connector |
2 |
voltage selector switch |
3 |
power supply light |
4 |
back panel connectors |
5 |
expansion card slots (4) |
6 |
padlock rings |
7 |
security cable slot |
|
|
8 |
About Your Dell™ Inspiron™ 518/519 |
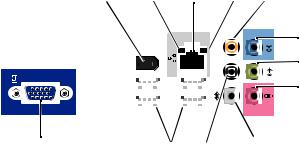
Back Panel Connectors
|
1 |
|
2 |
|
3 |
|
|
4 |
5 |
|
|||
|
|
|
|
|
|
|
|
|
|
|
|
|
6 |
|
|
|
|
|
|
|
|
|
|
|
|
|
|
|
|
|
|
|
|
|
|
|
|
|
|
|
7 |
|
|
|
|
|
|
|
|
|
|
|
|
|
|
|
|
|
|
|
|
|
|
|
|
|
|
|
8 |
|
|
|
|
|
|
|
|
|
|
|
|
|
|
|
|
|
|
|
|
|
|
|
|
|
|
|
|
|
|
|
|
|
|
|
|
|
|
|
|
|
|
|
|
|
|
|
|
|
|
|
|
|
|
|
|
|
|
|
|
|
|
|
|
|
|
|
|
|
|
|
|
|
|
|
|
|
|
|
|
|
|
|
|
|
|
|
|
|
|
|
|
|
|
|
|
|
|
|
12 |
|
|
11 |
10 |
|
9 |
|
|||||
|
|
|
|
|
|
|
|
|
|||||
1 |
IEEE 1394 connector |
2 |
link integrity light |
|
|
|
|||||||
3 |
network adapter connector |
4 |
network activity light |
|
|
||||||||
5 |
center/subwoofer connector |
6 |
line-in connector |
|
|
|
|||||||
7 |
front L/R line-out connector |
8 |
microphone |
|
|
|
|||||||
9 |
side L/R surround connector |
10 back L/R surround connector |
|||||||||||
11 |
USB 2.0 connectors (4) |
12 |
VGA video connector |
|
|
||||||||
About Your Dell™ Inspiron™ 518/519 |
|
9 |
|
10 |
About Your Dell™ Inspiron™ 518/519 |
Setting Up Your Computer
Installing Your Computer in an Enclosure
Installing your computer in an enclosure can restrict the airflow and impact your computer’s performance, possibly causing it to overheat. Follow the guidelines below when installing your computer in an enclosure:
NOTICE: The operating temperature specifications indicated in this manual reflects the maximum ambient operating temperature. The room ambient temperature needs to be a consideration when installing your computer in an enclosure. For example, if the ambient room temperature is at 25°C (77°F), depending on your computer’s specifications, you only have 5° to 10°C (9° to 18°F) temperature margin before you reach your computer’s maximum operating temperature. For details about your computer’s specifications, see "Specifications" on page 17.
•Leave a 10.2 cm (4 in) minimum clearance on all vented sides of the computer to permit the airflow required for proper ventilation.
•If your enclosure has doors, they need to be of a type that allows at least 30 percent airflow through the enclosure (front and back).
NOTICE: Do not install your computer in an enclosure that does not allow airflow. Restricting the airflow impacts your computer’s performance, possibly causing it to overheat.
Setting Up Your Computer |
|
11 |
|

•If your computer is installed in a corner on a desk or under a desk, leave at least 5.1 cm (2 in) clearance from the back of the computer to the wall to permit the airflow required for proper ventilation.
12 |
|
|
|
|
|
|
|
|
|
|
|
|
|
|
|
|
|
|
|
|
|
|
|
|
|
|
|
|
|
|
|
|
|
|
|
|
|
|
|
|
|
|
|
|
|
|
|
|
|
|
|
|
|
|
|
|
|
|
|
|
|
|
|
|
|
|
|
|
|
|
|
|
|
|
|
|
|
|
|
|
|
|
|
|
|
|
|
|
|
|
|
|
|
|
|
|
|
|
|
|
|
|
|
|
|
|
|
|
|
|
|
|
|
|
|
|
|
|
|
|
|
|
|
|
|
|
|
|
|
|
|
|
Setting Up Your Computer |
|
|
|
|
|||||
|
|
|
|
|
||||||

Connecting to the Internet
NOTE: ISPs and ISP offerings vary by country.
To connect to the Internet, you need a modem or network connection and an Internet service provider (ISP). Your ISP will offer one or more of the following Internet connection options:
•DSL connections that provide high-speed Internet access through your existing telephone line or cellular telephone service. With a DSL connection, you can access the Internet and use your telephone on the same line simultaneously.
•Cable modem connections that provide high-speed Internet access through your local cable TV line.
•Satellite modem connections that provide high-speed Internet access through a satellite television system.
•Dial-up connections that provide Internet access through a telephone line. Dial-up connections are considerably slower than DSL and cable (or satellite) modem connections.
•Wireless LAN connections that provide Internet access using Bluetooth® wireless technology.
If you are using a dial-up connection, connect a telephone line to the modem connector on your computer and to the telephone wall jack before you set up your Internet connection. If you are using a DSL or cable/satellite modem connection, contact your ISP or cellular telephone service for setup instructions.
Setting Up Your Internet Connection
To set up an Internet connection with a provided ISP desktop shortcut:
1Save and close any open files, and exit any open programs.
2Double-click the ISP icon on the Microsoft® Windows® desktop.
3Follow the instructions on the screen to complete the setup.
Setting Up Your Computer |
|
13 |
|

If you do not have an ISP icon on your desktop or if you want to set up an Internet connection with a different ISP, perform the steps in the following section that corresponds to the operating system your computer is using.
NOTE: If you are having problems connecting to the Internet, see your
Dell Technology Guide. If you cannot connect to the Internet but have successfully connected in the past, the ISP might have a service outage. Contact your ISP to check the service status, or try connecting again later.
NOTE: Have your ISP information ready. If you do not have an ISP, the Connect to the Internet wizard can help you get one.
1Save and close any open files, and exit any open programs.
2Click the Windows Vista start button™  , and click Control Panel.
3Under Network and Internet, click Connect to the Internet. The Connect to the Internet window appears.
4Click either Broadband (PPPoE) or Dial-up, depending on how you want to connect:
•Choose Broadband if you will use a DSL, satellite modem, cable TV modem, or Bluetooth wireless technology connection.
•Chose Dial-up if you will use a dial-up modem or ISDN.
NOTE: If you do not know which type of connection to select, click Help me choose or contact your ISP.
5Follow the instructions on the screen and use the setup information provided by your ISP to complete the setup.
6Save and close any open files, and exit any open programs.
7Click the Windows Vista start button  , and click Control Panel.
8Under Network and Internet, click Connect to the Internet. The Connect to the Internet window appears.
14 |
Setting Up Your Computer |

9Click either Broadband (PPPoE) or Dial-up, depending on how you want to connect:
•Choose Broadband if you will use a DSL, satellite modem, cable TV modem, or Bluetooth wireless technology connection.
•Chose Dial-up if you will use a dial-up modem or ISDN.
NOTE: If you do not know which type of connection to select, click Help me choose or contact your ISP.
10Follow the instructions on the screen and use the setup information provided by your ISP to complete the setup.
Transferring Information to a New Computer
You can use your operating system "wizards" to help you transfer files and other data from one computer to another—for example, from an old computer to a new computer. To transfer information to a new computer using the Windows Vista® wizard:
1Click the Windows Vista start button  , and then click Transfer files and settings→Start Windows Easy Transfer.
2In the User Account Control dialog box, click Continue.
3Click Start a new transfer or Continue a transfer in progress.
Follow the instructions provided on the screen by the Windows Easy Transfer wizard.
Setting Up Your Computer |
|
15 |
|
16 |
Setting Up Your Computer |

Specifications
NOTE: Offerings may vary by region. For more information regarding the configuration of your computer, click Start→Help and Support and select the option to view information about your computer.
Processor |
Inspiron 518 |
Inspiron 519 |
|
|
|
Type |
• Intel® Core™ 2 Quad processor |
• AMD Atholon™ 64/ LE/ |
|
• Intel Core 2 Duo processor |
64 X2/ X2 BE |
|
|
|
|
• Intel Pentium® Dual-Core |
• AMD Phenom™ X2/ X4/ |
|
processor |
X2 GE/ triple core |
|
|
|
|
• Intel Celeron® processor |
|
L2 cache |
At least 512 KB pipelined-burst, |
• Up to 2 MB for AMD |
|
eight-way set associative, |
Athlon 64 X2 dual-core |
|
writeback SRAM |
processors |
|
|
• Up to 512 KB for AMD |
|
|
Athlon 64 processors |
|
|
• Up to 4 MB for AMD |
|
|
Phenom processors |
DRAM bus width |
Not applicable |
64 bits per channel |
|
|
|
Computer Information |
Inspiron 518 |
Inspiron 519 |
|
|
|
System chipset |
Intel G33 and ICH9 |
AMD RS780 and SB700 |
RAID support |
RAID 1 (mirroring) |
Not applicable |
Data bus width |
64 bits |
Not applicable |
DRAM bus width |
64 bits |
Not applicable |
Processor address |
32 bits |
16 bit up/down |
bus width |
|
HyperTransport link |
Flash EPROM |
8 Mb |
8 Mb |
Specifications 17

Expansion Bus |
Inspiron 518 |
Inspiron 519 |
|
|
|
Bus type |
PCI 2.3 |
PCI 2.3 |
|
PCI Express 1.0A |
PCI Express 2.0 |
|
SATA 1.0 and 2.0 |
SATA 1.0 and 2.0 |
|
USB 2.0 |
USB 2.0 |
Bus speed |
|
|
PCI |
133 MB/s |
133 MB/s |
PCI Express |
x1 slot bidirectional speed |
x1 slot bidirectional speed |
|
— 500 MB/s |
—1 GB/s |
|
x16 slot bidirectional speed |
x16 slot bidirectional speed |
|
— 8 GB/s |
— 16 GB/s |
SATA |
1.5 Gbps and 3.0 Gbps |
1.5 Gbps and 3.0 Gbps |
USB |
• High speed — 480 Mbps |
• High speed — 480 Mbps |
|
• Full speed — 12 Mbps |
• Full speed — 12 Mbps |
|
• Low speed — 1.2 Mbps |
• Low speed — 1.2 Mbps |
PCI |
|
|
Connectors |
One |
One |
Connector size |
124 pins |
124 pins |
Connector data |
32 bits |
32 bits |
width (maximum) |
|
|
PCI Express |
|
|
Connector |
Two x1 |
Two x1 |
Connector size |
36 pins |
36 pins |
Connector data |
1 PCI Express lane |
1 PCI Express lane |
width (maximum) |
|
|
PCI Express |
|
|
Connector |
One x16 |
One x16 |
Connector size |
164 pins |
164 pins |
Connector data |
16 PCI Express lane |
16 PCI Express lane |
width (maximum) |
|
|
18 Specifications

Memory |
Inspiron 518/519 |
|
|
|
|
Memory module connector |
Four user-accessible DDR2 DIMM sockets |
|
Memory module capacities |
512 MB, 1 GB, and 2 GB |
|
Memory type |
667 MHz, 800 MHz Non-ECC DDR2 |
|
|
SDRAM |
|
Minimum memory |
512 MB |
|
Maximum memory |
4 GB |
|
|
|
|
Drives |
Inspiron 518/519 |
|
|
|
|
Externally accessible |
One 3.5-inch drive bay |
|
|
Two 5.25-inch drive bays |
|
Internally accessible |
Two 3.5-inch drive bays |
|
Available devices |
Two 3.5-inch SATA hard drives |
|
|
Two 5.25-inch SATA DVD-ROM/ DVD+/- |
|
|
RW super multi drive / Blu-ray Disc drive / |
|
|
Blu-ray Disc RW drive |
|
|
One 3.5-inch USB media card |
|
|
reader/Bluetooth media card reader |
|
Specifications 19

Connectors |
Inspiron 518/519 |
|
|
External connectors |
|
Audio |
ALC888 (7.1 Channel audio) |
|
Line-in connector — Use the blue line-in |
|
connector to attach a record/playback device |
|
such as a microphone, cassette player, CD |
|
player, or VCR. |
|
On computers with a sound card, use the |
|
connector on the card. |
|
Front L/R line-out connector — Use the |
|
green line-out connector to attach |
|
headphones and most speakers with |
|
integrated amplifiers. |
|
On computers with a sound card, use the |
|
connector on the card. |
|
Microphone connector — Use the pink |
|
connector to attach a personal computer |
|
microphone for voice or musical input into a |
|
sound or telephony program. |
|
On computers with a sound card, use the |
|
microphone connector on the card. |
|
Center/sub-woofer connector — Use the |
|
orange connector to attach the sub-woofer. |
|
Back L/R speakers connector — Use the black |
|
surround connector to attach multichannel- |
|
capable speakers. |
|
Side L/R surround connector — Use the gray |
|
connector to provide enhanced surround |
|
audio for computers with 7.1 speakers. |
|
On computers with a sound card, use the |
|
connector on the card. |
IEEE 1394 |
One 6-pin serial connector on the back-panel |
|
Use the IEEE 1394 connector for high-speed |
|
data devices such as digital video cameras |
|
and external storage devices. |
20 Specifications
Loading...