


40003485Eng.qxd 06/07/2005 10:25 Page 1
®
Instruction Book
Condenser Tumble Dryer
English Nederlands Italiano Português
40003485Eng.qxd 06/07/2005 18:28 Page 2
English . . . . . . . . . . . . . . . . . . . . . . . . . . . . . . . . . . . . . . . . . . . . 2 Nederlands . . . . . . . . . . . . . . . . . . . . . . . . . . . . . . . . . . . . . . . . 20 Italiano . . . . . . . . . . . . . . . . . . . . . . . . . . . . . . . . . . . . . . . . . . . 38 Português . . . . . . . . . . . . . . . . . . . . . . . . . . . . . . . . . . . . . . . . . 56
. . . . . . . . . . . . . . . . . . . . . . . . . . . . . . . . . . . . . . . . . . 74
Introduction . . . . . . . . . . . . . . . . . . . . . . . . . . . . . . . . . . . . . . . . . . . . . . . 3 Delivery information . . . . . . . . . . . . . . . . . . . . . . . . . . . . . . . . . . . . . . . . . . . . . 3 Unpacking the Product . . . . . . . . . . . . . . . . . . . . . . . . . . . . . . . . . . . 3 Safety reminders . . . . . . . . . . . . . . . . . . . . . . . . . . . . . . . . . . . . . . . . . . 4 Installation . . . . . . . . . . . . . . . . . . . . . . . . . . . . . . . . . . . . . . . . . . . . . . . . . . . . . 4 Use . . . . . . . . . . . . . . . . . . . . . . . . . . . . . . . . . . . . . . . . . . . . . . . . . . . . . . . . . . . 4 The Laundry . . . . . . . . . . . . . . . . . . . . . . . . . . . . . . . . . . . . . . . . . . . . . . . . . . . . 4 Environmental Issues . . . . . . . . . . . . . . . . . . . . . . . . . . . . . . . . . . . . . . . . . . . . . 5 GIAS Service . . . . . . . . . . . . . . . . . . . . . . . . . . . . . . . . . . . . . . . . . . . . . . . . . . . . 5 European directive 2002/96/EC . . . . . . . . . . . . . . . . . . . . . . . . . . . . . . . . . . . . . 5 Installation. . . . . . . . . . . . . . . . . . . . . . . . . . . . . . . . . . . . . . . . . . . . . . . . . 6 Electrical requirements . . . . . . . . . . . . . . . . . . . . . . . . . . . . . . . . . . . . . . . . . . . 6 Adjusting the feet . . . . . . . . . . . . . . . . . . . . . . . . . . . . . . . . . . . . . . . . . . . . . . . 6 Ventilation . . . . . . . . . . . . . . . . . . . . . . . . . . . . . . . . . . . . . . . . . . . . . . . . . 7 Preparing the load . . . . . . . . . . . . . . . . . . . . . . . . . . . . . . . . . . . . . . . . 8 Clothes preparation . . . . . . . . . . . . . . . . . . . . . . . . . . . . . . . . . . . . . . . . . . . . . . 8 Sorting the load. . . . . . . . . . . . . . . . . . . . . . . . . . . . . . . . . . . . . . . . . . . . . . . . . 9 Drying advice. . . . . . . . . . . . . . . . . . . . . . . . . . . . . . . . . . . . . . . . . . . . . 10 Do not tumble dry . . . . . . . . . . . . . . . . . . . . . . . . . . . . . . . . . . . . . . . . . . . . . . 10 Energy saving. . . . . . . . . . . . . . . . . . . . . . . . . . . . . . . . . . . . . . . . . . . . . . . . . . 10
Controls and indicators
Door and Filter . . . . . . . . . . . . . . . . . . . . . . . . . . . . . . . . . . . . . . . . . . . 12 Opening the door . . . . . . . . . . . . . . . . . . . . . . . . . . . . . . . . . . . . . . . . . . . . . . 12 Filter. . . . . . . . . . . . . . . . . . . . . . . . . . . . . . . . . . . . . . . . . . . . . . . . . . . . . . . . . 12 Filter care indicator . . . . . . . . . . . . . . . . . . . . . . . . . . . . . . . . . . . . . . . . . . . . . 12 Water container . . . . . . . . . . . . . . . . . . . . . . . . . . . . . . . . . . . . . . . . . . 13 To remove the container . . . . . . . . . . . . . . . . . . . . . . . . . . . . . . . . . . . . . . . . . 13 Condenser . . . . . . . . . . . . . . . . . . . . . . . . . . . . . . . . . . . . . . . . . . . . . . . . 14 To remove the condenser . . . . . . . . . . . . . . . . . . . . . . . . . . . . . . . . . . . . . . . . 14 Operation . . . . . . . . . . . . . . . . . . . . . . . . . . . . . . . . . . . . . . . . . . . . . . . . . 15
Cleaning and Routine Maintenance. . . . . . . . . . . . . . . . . . . . 16
Cleaning the dryer . . . . . . . . . . . . . . . . . . . . . . . . . . . . . . . . . . . . . . . . . . . . . . 16 Technical specifications . . . . . . . . . . . . . . . . . . . . . . . . . . . . . . . . . . . . . . . . . . 16 Troubleshooting. . . . . . . . . . . . . . . . . . . . . . . . . . . . . . . . . . . . . . . . . . 17 Customer Service. . . . . . . . . . . . . . . . . . . . . . . . . . . . . . . . . . . . . . . . . 18 Spares. . . . . . . . . . . . . . . . . . . . . . . . . . . . . . . . . . . . . . . . . . . . . . . . . . . . . . . . 18 GIAS Service . . . . . . . . . . . . . . . . . . . . . . . . . . . . . . . . . . . . . . . . . . . . . . . . . . . 18
2
40003485Eng.qxd 06/07/2005 10:25 Page 3
Introduction
Please read and follow these instructions carefully and operate the machine accordingly. This booklet provides important guidelines for safe use, installation, maintenance and some useful advice for best results when using your machine.
Keep all documentation in a safe place for future reference or for any future owners
Check that no damage has occurred to the machine during transit. If it has, call for service by GIAS.
Delivery information
Please check that the following items are delivered with the appliance:
●Instruction manual
●Guarantee card
●Energy label
Failure to comply with the above can compromise the safety of the appliance. You may be charged for a service call if a problem with your machine is caused by misuse.
Unpacking the product
Remove the machine from its packaging close to the final location of the machine.
1. Cut carefully around the base of the packaging and up one corner.
2.Remove the polythene sleeve and lift the dryer off the polystyrene base.
Dispose of the packaging safely. Make sure it is out of the reach of children, it is a potential source of danger.
3
40003485Eng.qxd 06/07/2005 10:25 Page 4
Safety reminders
Installation
●Check that the product has no visible signs of damage before use. If damaged do not use and please call GIAS Service.
●Do not use adapters, multiple connectors and/or extensions.
●This machine should not be installed in a bathroom or shower room.
●Never install the dryer against curtains and be sure to prevent items from falling or collecting behind the dryer.
Use
●WARNING Misuse of a tumble dryer may create a fire hazard.
●This machine is solely for domestic use, i.e. to dry household textiles and garments.
●This machine should only be used for its intended purpose as described in this manual. Ensure that the instructions for installation and use are fully understood before operating the appliance.
●Do not touch the appliance when hands or feet are damp or wet.
●Do not lean on the door when loading the machine or use the door to lift or move the machine.
●Do not allow children to play with the machine or its controls.
●WARNING Do not use the product if the fluff filter is not in position or is damaged; fluff could be ignited.
●WARNING Where the hot surface symbol  is located the temperature rise during operation of the tumble dryer may be in excess of 60 degrees C.
●Remove the plug from the electricity supply. Always remove the plug before cleaning the appliance.
●Do not continue to use this machine if it appears to be faulty.
●Lint and fluff must not be allowed to collect on the floor around the outside of the machine.
●The drum inside may be very hot. Always allow the dryer to complete the cool down period before removing the laundry.
The Laundry
●WARNING Do not tumble dry fabrics treated with dry cleaning fluids.
●WARNING Foam rubber materials can, under certain circumstances, when heated become ignited by spontaneous combustion. Foam plastic, foam rubber and rubber-like material are not suitable for tumble drying. Articles made from these materials MUST NOT be placed in the dryer.
●Always refer to the laundry care labels for directions on suitability for drying.
●Clothes should be spin dried or thoroughly wrung before they are put
4

40003485Eng.qxd 06/07/2005 10:25 Page 5
into the tumble dryer. Clothes that are dripping wet should NOT be put into the dryer.
●Lighters and matches must not be left in pockets and NEVER use flammable liquids near the machine.
●Glass fibre curtains should NEVER be put in this machine. Skin irritation may occur if other garments are contaminated with the glass fibres.
●Garments treated or contaminated with flammable cleaning sprays or liquids such as petrol, cooking oil or aerosol sprays MUST NOT be put in this machine.
Environmental Issues
●All packaging materials used are environmentally-friendly and recyclable. Please help dispose of the packaging via environmentally-friendly means. Your local council will be able to give you details of current means of disposal.
●To ensure safety when disposing of an old tumble dryer disconnect the mains plug from the socket, cut the mains power cable and destroy this together with the plug. To prevent children shutting themselves in the machine break the door hinges or the door lock.
GIAS Service
●To ensure the continued safe and efficient operation of this appliance we recommend that any servicing or repairs are only carried out by an authorised GIAS Service engineer.
European directive 2002/96/EC
This appliance is marked according to the European directive 2002/96/EC on Waste Electrical and Electronic Equipment (WEEE).
By ensuring this product is disposed of correctly, you will help prevent potential negative consequences for the environment and human health, which could otherwise be caused by inappropriate waste handling of this product.
The symbol on the product indicates that this product may not be treated as household waste. Instead it shall be handed over to the applicable collection point for the recycling of electrical and electronic equipment
Disposal must be carried out in accordance with local environmental regulations for waste disposal.
For more detailed information about treatment, recovery and recycling of this product, please contact your local city office, your household waste disposal service or the shop where you purchased the product.
If the appliance is not running properly or breaks down, switch it off and disconnect the plug from the socket.
Consult GIAS Service for possible repair.
5
40003485Eng.qxd 06/07/2005 10:25 Page 6
Installation
You may be charged for a service call if a problem with your machine is
caused by incorrect installation.
If the mains cord on this appliance is damaged, it must be replaced by a special cord which is ONLY obtainable from the GIAS spares service. It must be installed by a competent person.
Electrical requirements
Tumble dryers are supplied to operate at a voltage of 230V, 50 Hz single phase. Check that the supply circuit is rated to at least 16A.
Electricity can be extremely dangerous. This appliance must be earthed.
The socket outlet and the plug on the appliance must be of the same type.
Do not use multiple adapters and/or extension leads.
The plug should be accessible for disconnection after the appliance has been installed.
The wires in the mains lead are coloured in accordance with the following codes:
Blue |
NEUTRAL |
Brown |
LIVE |
Green and Yellow |
EARTH |
CE Appliance complies with European Directive 89/336/EEC, 73/23/EEC and subsequent amendments.
Do not plug the machine in and switch it on at the mains until the installation is completed.
For your safety, this dryer must be correctly installed.
If there is any doubt about installation, call GIAS Service for advice.
Adjusting the feet
Once the machine is in place the feet should be adjusted to ensure that the machine is level.
Adjust the four feet to ensure the machine is firm and level.
6

40003485Eng.qxd 06/07/2005 10:25 Page 7
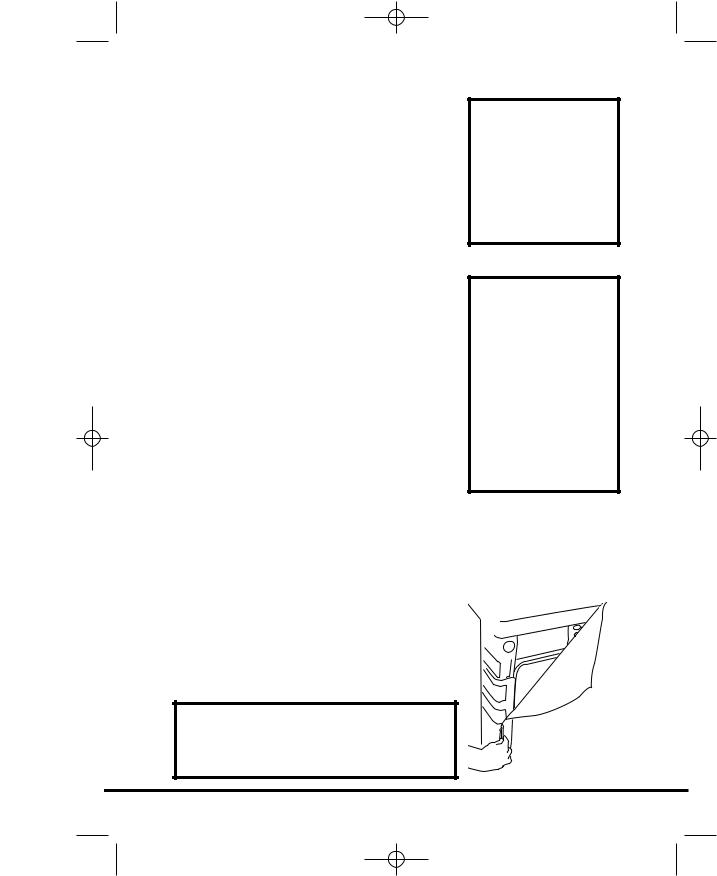
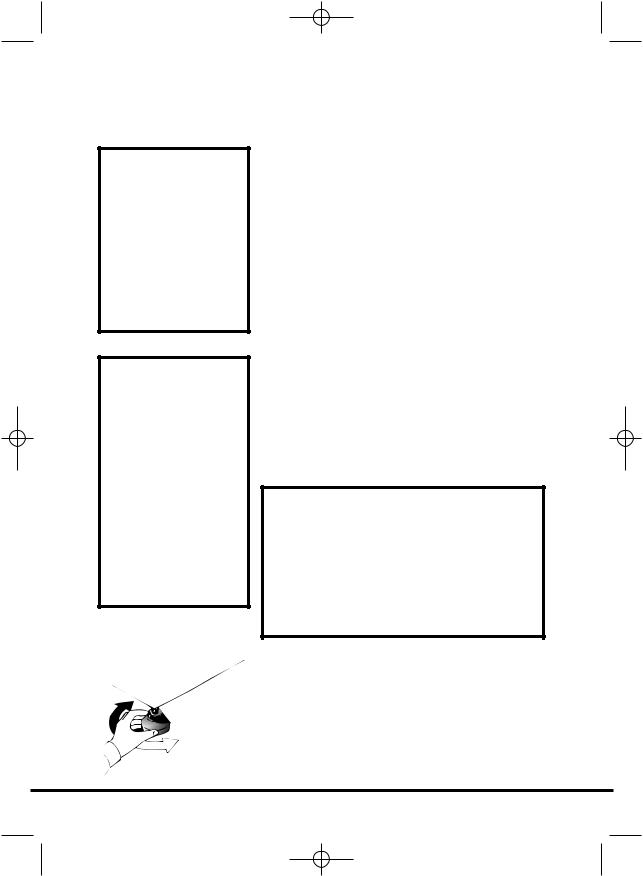
Ventilation
Adequate ventilation must be provided in the room where the tumble dryer is located to prevent gases from appliances burning other fuels, including open fires, being drawn into the room during operation of the tumble dryer.
●Exhaust air must not be discharged into a flue which is used for exhausting fumes from appliances burning gas or other fuels.
●Check regularly that the air flowing through the dryer is not restricted.
●Check the fluff filter after use, and clean, if necessary.
●The inlet and outlets should be kept free from obstructions. To ensure adequate ventilation the space between the bottom of the machine and the floor must not be obstructed. There should be a gap of at least 12mm between the machine and any obstructions.
●Prevent items from falling or collecting behind the dryer as these may obstruct the air inlet and outlet.
●NEVER install the dryer up against curtains.
 AIR INLET VENTS


 AIR OUTLETS
AIR OUTLETS IN THE BASE
7
40003485Eng.qxd 06/07/2005 10:25 Page 8
Preparing the load
Do not overload the drum, large items when wet can exceed the maximum admissible clothes load
(for example: sleeping bags, duvets).
Before using the tumble dryer for the first time:
●Please read this instruction book thoroughly.
●Remove all items packed inside drum.
●Wipe the inside of the drum and door with a damp cloth to remove any dust which may have settled in transit.
Clothes preparation
Make sure that the laundry you are going to dry is suitable for drying in a tumble dryer, as shown by the care symbols on each item.
Check that all fastenings are closed and that pockets are empty. Turn the articles inside out. Place clothes loosely in the drum to make sure that they don't get tangled.
Maximum drying weight
●Cottons Max. 7 kg
●Synthetics Max. 3 kg
8
40003485Eng.qxd 06/07/2005 10:25 Page 9
Sort the load as follows:
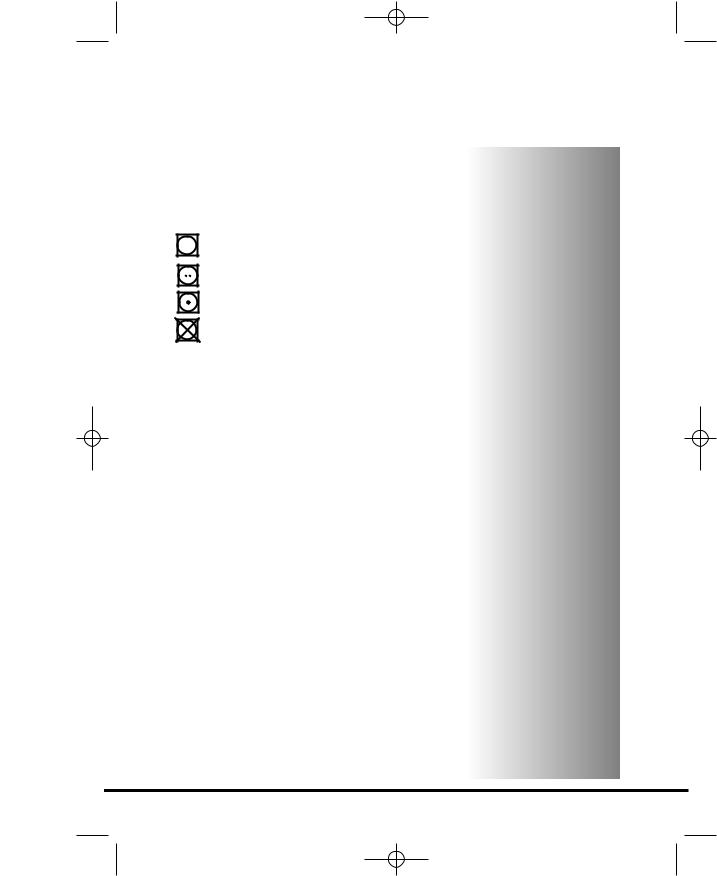
●By care symbols
These can be found on the collar or inside seam:
●
●
Suitable for tumble drying.
Tumble drying at high temperature.
Tumble drying at low temperature only.
Do not tumble dry.
If the item does not have a care label it must be assumed that it is not suitable for tumble drying.
By amount and thickness
Whenever the load is bigger than the dryer capacity, separate clothes according to thickness (e.g. towels from thin underwear).
By type of fabric
Cottons/linen: Towels, cotton jersey, bed and table linen.
Synthetics: Blouses, shirts, overalls, etc. made of polyester or polyamid, as well as for cotton/synthetic mixes.
●By drying level
Sort into: iron dry, cupboard dry, etc. For
delicate articles press the  button to select low drying temperature.
9
40003485Eng.qxd 06/07/2005 10:25 Page 10
Drying advice
IMPORTANT: Do not dry articles which have been treated with a dry cleaning fluid or rubber clothes (danger of fire or explosion).
During the last 15 minutes the load is always tumbled in cool air.
Do not tumble dry:
Woollens, silk, delicate fabrics, nylon stockings, delicate embroidery, fabrics with metallic decorations, garments with PVC or leather trimmings, training shoes, bulky items such as sleeping bags, etc.
Energy saving
Only put into the tumble dryer laundry which has been thoroughly wrung or spin-dried. The drier the laundry the shorter the drying time thus saving electricity.
ALWAYS
●Try to dry the maximum weight of laundry, this will save time and electricity.
●Check that the filter is clean before every drying cycle.
NEVER
●Exceed the maximum weight, this will waste time and electricity.
●Put dripping wet items into the tumble dryer, this may damage the appliance.
10
40003485Eng.qxd 06/07/2005 10:25 Page 11
Controls and indicators
ON BUTTON |
ACRYLICS/ |
FILTER CARE |
EMPTY WATER |
DRYING TIME |
|
SYNTHETICS |
INDICATOR |
INDICATOR |
SELECTOR |
|
BUTTON |
|
|
|
Control panel and indicator lights
'ON' Button and Indicator  – press to switch on, the indicator will light.
'ACRYLICS/SYNTHETICS' Button  – press to reduce the heat level for delicate items, press again to select high temperature.
HIGH heat setting LOW heat setting
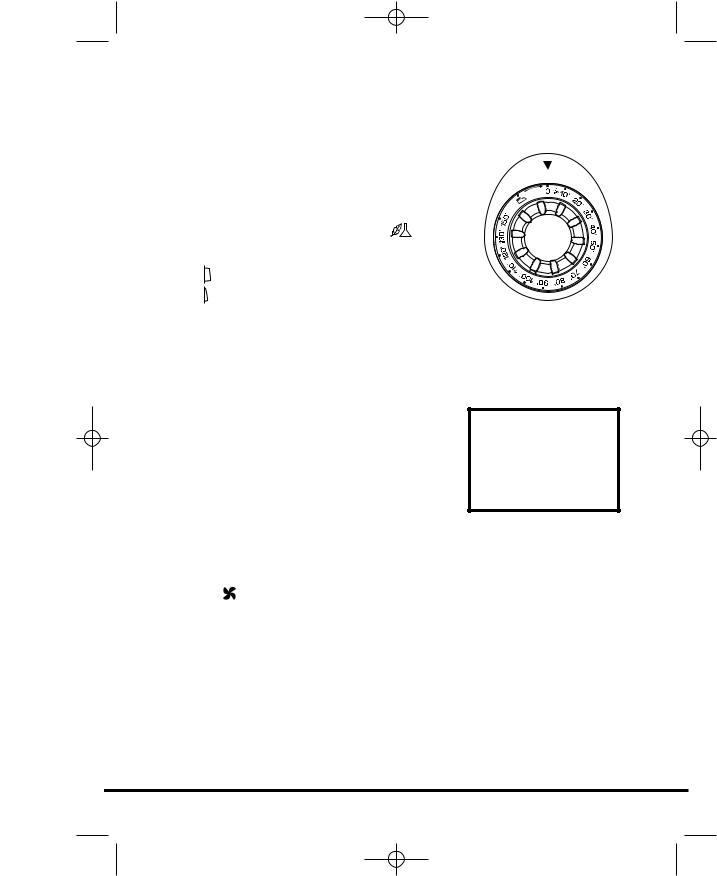
'DRYING TIME' Selector – selects the drying time or the Fast Iron option  .
.
'FILTER CARE' Indicator  – lights when the filter needs cleaning.
'EMPTY WATER' Indicator  – lights when the water container is full.
11
40003485Eng.qxd 06/07/2005 10:25 Page 12
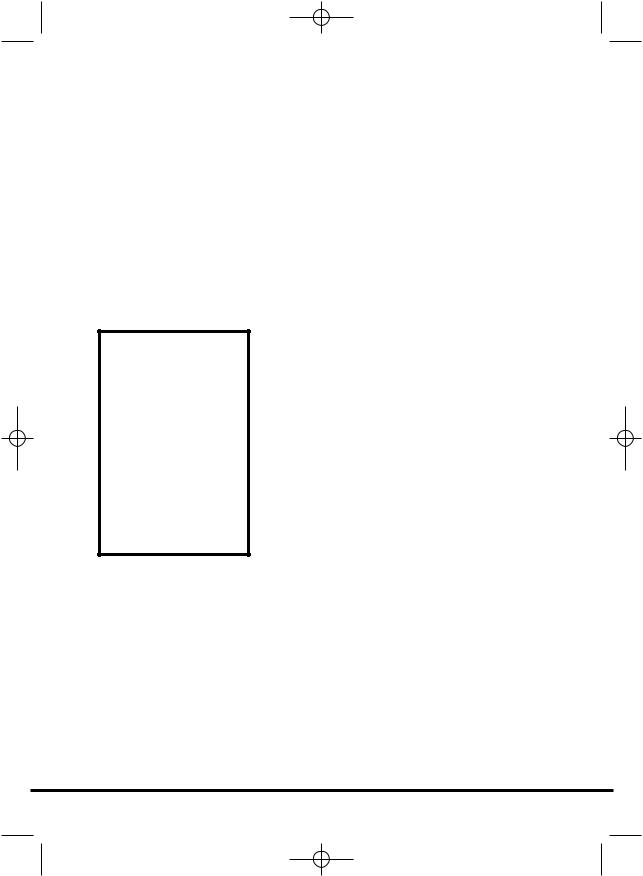
Door and Filter
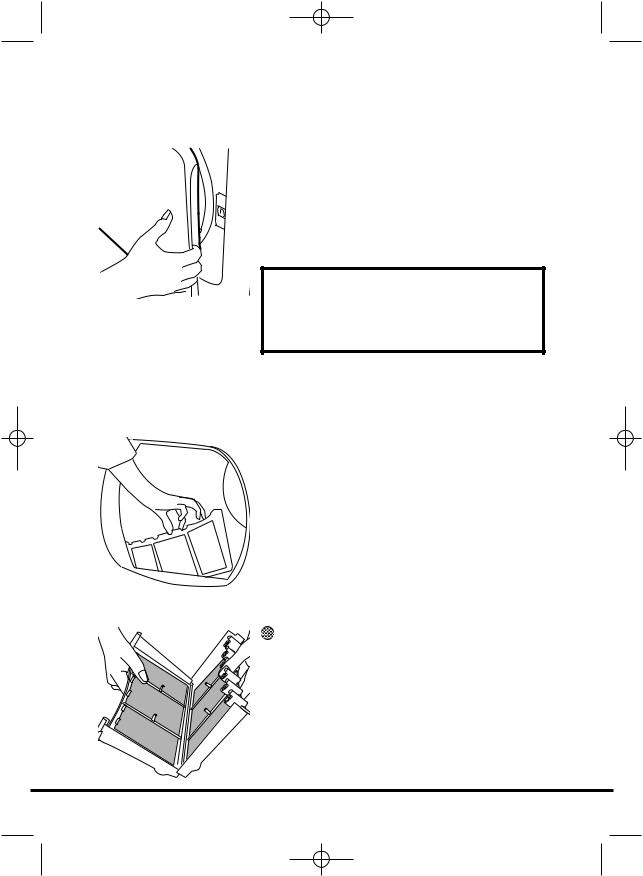
Opening the door
Pull on handle to open the door.
To restart the dryer, close the door and press  .
.
WARNING!
When the tumble dryer is in use the drum and door may be VERY HOT.
Filter
IMPORTANT: To maintain the efficiency of the dryer check that the fluff filter is clean before each drying cycle.
1.Pull the filter upwards.
2.Open filter as shown.
3.Gently remove lint using a soft brush or your fingertips.
4.Snap the filter together and push back into place.
Filter Care Indicator
lights when the filter needs cleaning.
If the laundry is not drying check that the filter is not clogged.
12

40003485Eng.qxd 06/07/2005 10:25 Page 13
Water Container
The water removed from the laundry during the drying cycle is collected in a container at the bottom of the dryer.
When the container is full the  indicator on the control panel will light, and the container MUST be emptied. However, we recommend that the container is emptied after each drying cycle.
NOTE: Very little water will collect during the first few cycles of a new machine as an internal reservoir is filled first.
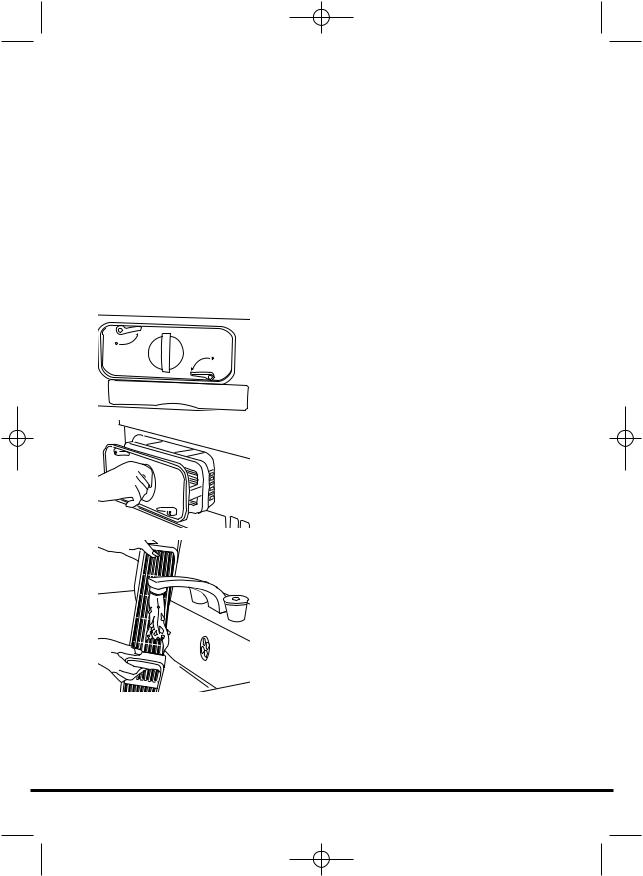
To remove the container
1.Gently pull the bottom of the kickplate so that it unclips from the dryer. The top section can then be unhinged allowing the kickplate to be completely removed.
2.Pull firmly on the handgrip and slide the water container out of the dryer.
Support the container with both hands. When full, the water container will weigh about 4kg.
3.Open the lid located on the top of the container and empty the water.
4.Refit the lid and slide the water container back into position. PUSH FIRMLY INTO
PLACE.
5.Refit the kickplate by engaging the hinges at the top and 'snapping' the lower clips into place.
13
40003485Eng.qxd 06/07/2005 10:25 Page 14
Condenser
Important: Always switch off and remove the plug from the electricity supply before cleaning the condenser.
To maintain the efficiency of the dryer regularly check that the condenser is clean.
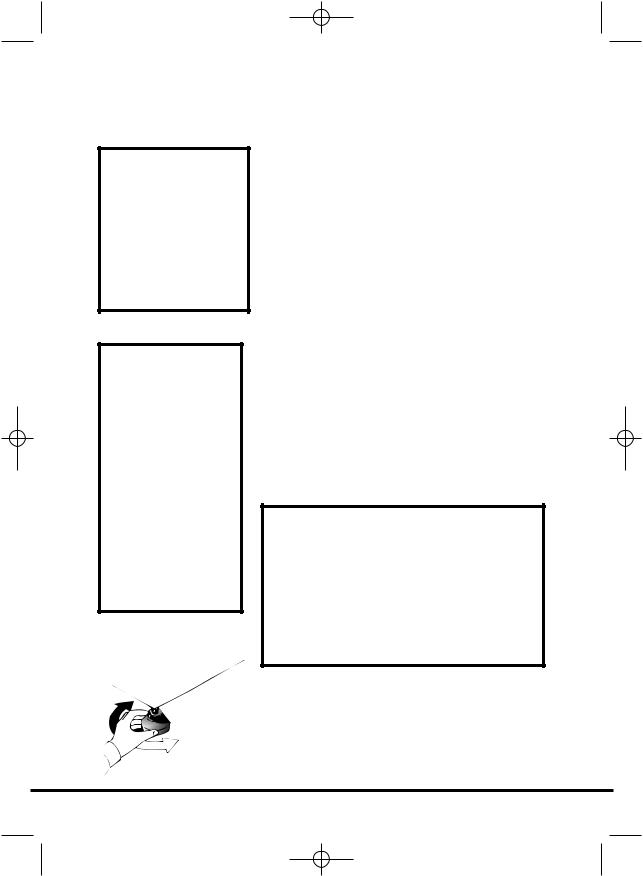
To remove the condenser
1.Remove the kickplate (see page 13).
2. Turn the two locking levers anti-clockwise and pull out the condenser.
3. Pull out the condenser unit.
4. Gently remove any dust or fluff with a cloth, then wash the unit by holding it under a running tap turning it so that water flows between the plates, to remove any dust or fluff.
5. Refit the condenser ensuring it is in the correct way (as indicated by the arrow) and pushed firmly into place. Lock the two levers by turning them clockwise.
6. Refit the kickplate.
14
40003485Eng.qxd 06/07/2005 10:25 Page 15
Operation
Refer to the Drying guide table or the fabric labels to select the most suitable programme.
●Open the door and load the drum with laundry. Ensure that garments do not hinder closure of the door.
● If drying delicate items press the button to reduce the heat level. Press again on completion, to select high temperature.
HIGH heat setting LOW heat setting
●Turn the 'DRYING TIME' Selector until the required drying time aligns with the dial.
●The  programme provides a conditioning and anti-crease function. The dryer will heat the load for 8 minutes followed by a 2 minute cool down period and is especially good for garments which may have been left for some time prior to ironing, in a linen basket for example. Garments may also become stiffened when dried outside on a washing line or inside on radiators. This process relaxes the creases in the fabric making ironing quicker and easier.
●Gently close the door pushing it slowly until you hear the door 'click' shut.
●Press the  button. The indicator will light and the drying cycle begins.
●The load is dried by tumbling in thermostatically controlled warm air. Cool
air is used for the last 15 minutes to reduce creasing and cool the load ready for handling.
●When the program is fully completed the drum will stop rotating and the dial will point to 0.
●Open the door and remove the load.
●Clean the filter and empty the water container after every drying cycle to ensure maximum dryer efficiency.
●Clean the condenser after approximately every 10 drying cycles to ensure maximum dryer efficiency.
WARNING!
The drum, door and load may be very hot.
15
40003485Eng.qxd 06/07/2005 10:25 Page 16
Cleaning and Routine
Maintenance
IMPORTANT
Always switch off and remove the plug from the electricity supply before
cleaning this appliance.
Cleaning the dryer
●Clean the filter and empty the water container after every drying cycle.
●Regularly clean the condenser.
●After each period of use, wipe the inside of the drum and leave the door open for a while to allow circulation of air to dry it.
●Wipe the outside of the machine and the door with a soft cloth.
●DO NOT use abrasive pads or cleaning agents.
●To prevent the door sticking or the build up of fluff periodically clean the inner door and gasket with a damp cloth.
For electrical data refer to the rating label on the front of the dryer cabinet (with the door open).
Technical specifications
Drum capacity |
115 litres |
Maximum load |
7 kg |
Height |
85cm |
Width |
60cm |
Depth |
60cm |
Energy Label Band |
C |
16

40003485Eng.qxd 06/07/2005 10:25 Page 17
Troubleshooting
What might be the cause of...
Defects you can remedy yourself
Before calling GIAS Service for technical advice please run through the following checklist. A charge will be made if the machine is found to be working or has been installed incorrectly or used incorrectly. If the problem persists after completing the recommended checks, please call GIAS Service, they may be able to assist you over the telephone.
Drying time is too long/clothes are not dry enough…
●Have you selected the correct drying time/programme?
●Were the clothes too wet? Were the clothes thoroughly wrung or spindried?
●Does the filter need cleaning?
●Does the condenser need cleaning?
●Is the dryer overloaded?
●Are the inlets, outlets and base of the dryer free from obstructions?
●Has the  option been selected from a previous cycle?
The dryer does not operate…
●Is there a working electricity supply to the dryer? Check using another appliance such as a table lamp.
●Is the plug properly connected to the mains supply?
●Is there a power failure?
●Has the fuse blown?
●Is the door fully closed?
●Is the dryer switched on, both at the mains supply and at the machine?
●Has the drying time or the programme been selected?
●Has the machine been switched on again after opening the door?
●Has the dryer stopped operating because the water tray is full and needs emptying?
The dryer is noisy…
●Switch off the dryer and contact GIAS Service for advice.
The Filter Care Indicator is on…
●Does the filter need cleaning?
●Does the condenser need cleaning?
Empty Water Indicator is on…
●Does the water container need emptying?
17
40003485Eng.qxd 06/07/2005 10:25 Page 18
Customer Service
Should there still be a problem with your dryer after completing all the recommended checks, please call GIAS Service for advice. They may be able to assist you over the telephone or arrange for a suitable appointment for an engineer to call under the terms of your guarantee. However, a charge may be made if any of the following applies to your machine:
●Is found to be in working order.
●Has not been installed in accordance with the installation instructions.
●Has been used incorrectly.
Spares
Always use genuine spares, available direct from
GIAS Service.
GIAS Service
For service and repairs call your local GIAS
Service engineer.
The manufacturer declines all responsibility in the event of any printing mistakes in this booklet. The manufacturer also reserves the right to make appropriate modifications to its products without changing the essential characteristics.
18
40003485Eng.qxd 06/07/2005 10:25 Page 19
19
40003485DUT.qxd 06/07/2005 18:49 Page 20
Inleiding. . . . . . . . . . . . . . . . . . . . . . . . . . . . . . . . . . . . . . . . . . . . . . . . . . . 21 Afleveringsinformatie . . . . . . . . . . . . . . . . . . . . . . . . . . . . . . . . . . . . . . . . . . . 21
Uitpakken van het product
Veiligheidsaanwijzingen . . . . . . . . . . . . . . . . . . . . . . . . . . . . . . . . 22 Installatie . . . . . . . . . . . . . . . . . . . . . . . . . . . . . . . . . . . . . . . . . . . . . . . . . . . . . 22 Gebruik . . . . . . . . . . . . . . . . . . . . . . . . . . . . . . . . . . . . . . . . . . . . . . . . . . . . . . 22 De was . . . . . . . . . . . . . . . . . . . . . . . . . . . . . . . . . . . . . . . . . . . . . . . . . . . . . . . 22 Het milieu . . . . . . . . . . . . . . . . . . . . . . . . . . . . . . . . . . . . . . . . . . . . . . . . . . . . 23 GIAS-Service . . . . . . . . . . . . . . . . . . . . . . . . . . . . . . . . . . . . . . . . . . . . . . . . . . . 23 Europese richtlijn 2002/96/EC . . . . . . . . . . . . . . . . . . . . . . . . . . . . . . . . . . . . . 23
Installatie . . . . . . . . . . . . . . . . . . . . . . . . . . . . . . . . . . . . . . . . . . . . . . . . . 24 Elektrische vereisten . . . . . . . . . . . . . . . . . . . . . . . . . . . . . . . . . . . . . . . . . . . . 24 De voeten verstellen . . . . . . . . . . . . . . . . . . . . . . . . . . . . . . . . . . . . . . . . . . . . 24
Ventilatie. . . . . . . . . . . . . . . . . . . . . . . . . . . . . . . . . . . . . . . . . . . . . . . . . . 25
Het wasgoed voorbereiden . . . . . . . . . . . . . . . . . . . . . . . . . . . . . 26 Voorbereiding van de kleren . . . . . . . . . . . . . . . . . . . . . . . . . . . . . . . . . . . . . . 26 Sorteren van het wasgoed. . . . . . . . . . . . . . . . . . . . . . . . . . . . . . . . . . . . . . . . 27
Droogadvies . . . . . . . . . . . . . . . . . . . . . . . . . . . . . . . . . . . . . . . . . . . . . . 28 Niet in de droogtrommel doen . . . . . . . . . . . . . . . . . . . . . . . . . . . . . . . . . . . 28 Energiebesparing . . . . . . . . . . . . . . . . . . . . . . . . . . . . . . . . . . . . . . . . . . . . . . 28
Bedieningsknoppen & indicatielampjes. . . . . . . . . . . . . . . . 29
Deur en filter . . . . . . . . . . . . . . . . . . . . . . . . . . . . . . . . . . . . . . . . . . . . . 30 De deur openen. . . . . . . . . . . . . . . . . . . . . . . . . . . . . . . . . . . . . . . . . . . . . . . . 30 Filter. . . . . . . . . . . . . . . . . . . . . . . . . . . . . . . . . . . . . . . . . . . . . . . . . . . . . . . . . 30 Filter Schoonmaken Indicatielampje . . . . . . . . . . . . . . . . . . . . . . . . . . . . . . . . 30
Watercontainer. . . . . . . . . . . . . . . . . . . . . . . . . . . . . . . . . . . . . . . . . . . 31 Om het reservoir te verwijderen . . . . . . . . . . . . . . . . . . . . . . . . . . . . . . . . . . . 31
Condensator . . . . . . . . . . . . . . . . . . . . . . . . . . . . . . . . . . . . . . . . . . . . . . 32 De condensator verwijderen . . . . . . . . . . . . . . . . . . . . . . . . . . . . . . . . . . . . . . 32
Bediening
Schoonmaken en Onderhoudsbeurten . . . . . . . . . . . . . . . . 34
Schoonmaken van de droger . . . . . . . . . . . . . . . . . . . . . . . . . . . . . . . . . . . . . 34 Technische specificaties . . . . . . . . . . . . . . . . . . . . . . . . . . . . . . . . . . . . . . . . . . 34
Storingen . . . . . . . . . . . . . . . . . . . . . . . . . . . . . . . . . . . . . . . . . . . . . . . . . 35
Klantenservice. . . . . . . . . . . . . . . . . . . . . . . . . . . . . . . . . . . . . . . . . . . . 36 Reserveonderdelen . . . . . . . . . . . . . . . . . . . . . . . . . . . . . . . . . . . . . . . . . . . . . 36 GIAS-Service . . . . . . . . . . . . . . . . . . . . . . . . . . . . . . . . . . . . . . . . . . . . . . . . . . . 36
20
40003485DUT.qxd 06/07/2005 16:00 Page 21
Inleiding
Lees deze instructies zorgvuldig door en gebruik deze machine op basis van deze aanwijzingen. Dit boekje geeft u naast belangrijke richtlijnen voor het veilige gebruik de veilige installatie en het veilige onderhoud van de machine ook enkele nuttige tips over hoe u de beste resultaten bekomt wanneer u met deze machine wast.
Bewaar alle documentatie op een veilige plek zodat u of de toekomstige eigenaars van de machine ze in de toekomst opnieuw kunnen raadplegen
Afleveringsinformatie
Controleer dat de volgende items samen met de wasmachine werden geleverd:
●Handleiding
●Garantiekaart
●Energiekeurmerk
Controleer of de machine schade heeft opgelopen tijdens het vervoer. Indien dit het geval is, neem dan contact op met GIAS.
Als u de bovenstaande aanwijzingen niet opvolgt, kan de veiligheid van de machine niet worden gegarandeerd. Indien het probleem met uw machine wordt veroorzaakt door misbruik, kunnen de kosten van de onderhoudsbeurt aan u worden doorberekend.
Uitpakken van het product
Verwijder de machine uit de verpakking op de plek waar u de machine wilt plaatsen.
1.Snij voorzichtig rond de voet van de verpakking en langs een hoek omhoog.
2.Verwijder de hoes van polyethyleen en til de droger van de polystyrene voet.
Gooi de verpakking veilig weg. Zorg dat de verpakking buiten bereik van kinderen blijft, het vormt een potentieel gevaar.
21
40003485DUT.qxd 06/07/2005 16:00 Page 22
Veiligheidsaanwijzingen
Installatie
●Controleer het apparaat op zichtbare beschadigingen vooraleer u het gebruikt. Gebruik het niet als het beschadigd is maar neem contact op met GIAS-Service.
●Gebruik geen adapters, meervoudige stekkers en/of verlengsnoeren.
●Dit apparaat mag niet worden geïnstalleerd in een badkamer of douchekamer.
●Installeer de droger nooit tegen gordijnen aan en zorg ervoor dat er geen artikelen achter de droger kunnen vallen en zich daar kunnen ophopen.
Gebruik
●WAARSCHUWING Misbruik van een droogtrommel kan brand veroorzaken.
●Deze machine is alleen voor huishoudelijk gebruik, m.a.w. voor het drogen van huishoudelijk textiel en kleding.
●Dit apparaat mag uitsluitend gebruikt worden voor het doel waarvoor het vervaardigd is, zoals dat in deze handleiding beschreven wordt. Verzeker u ervan dat u de instructies voor de installatie en het gebruik volledig begrijpt voordat u de machine gebruikt.
●Raak de machine niet aan als uw handen of voeten nat of vochtig zijn.
●Leun niet tegen de deur als u de machine laadt en gebruik de deur niet om de machine op te tillen of te verplaatsen.
●Sta niet toe dat kinderen met de machine of de bediening ervan spelen.
●WAARSCHUWING Gebruik het apparaat niet als de pluizenfilter niet geplaatst of beschadigd is; pluis kan ontbranden.
●WAARSCHUWING Op de plaats van het symbool voor warm oppervlak  kan de temperatuur tijdens het drogen tot meer dan 60 graden C stijgen.
●Haal de stekker uit het stopcontact. Haal altijd de stekker uit het stopcontact voordat u de machine schoonmaakt.
●Blijf deze machine niet gebruiken als ze een gebrek lijkt te hebben.
●Pluizen of dons mogen zich niet op de grond rondom de buitenkant van de machine ophopen.
●De trommel kan vanbinnen erg heet worden. Wacht altijd met het uithalen van het wasgoed tot de afkoelingsperiode van de droger voorbij is.
De was
●WAARSCHUWING Geen stoffen in de droogtrommel doen die met chemische reinigingsvloeistoffen zijn behandeld.
●WAARSCHUWING Materialen uit schuimrubber kunnen onder bepaalde omstandigheden, wanneer ze verhit worden, spontaan ontbranden. Schuimplastic, schuimrubber en rubberachtige materialen zijn niet geschikt om in de droogtrommel gedroogd te worden. Artikelen die van deze materialen gemaakt zijn MOGEN NIET in de droger gestopt worden.
●Bekijk altijd de wasvoorschriften op het wasgoed om te controleren of u het in de droger mag drogen.
22
40003485DUT.qxd 06/07/2005 16:00 Page 23
●Kleren moeten gecentrifugeerd of grondig uitgewrongen worden, voordat zij in de droogtrommel gestopt worden. Druipnatte kleren mogen NIET in de droger gestopt worden.
●Aanstekers en lucifers mogen niet in zakken blijven zitten en gebruik NOOIT ontvlambare vloeistoffen in de buurt van het apparaat.
●Glasvezelgordijnen mogen NOOIT in dit apparaat worden gestopt. Er kunnen zich huidirritaties voordoen als andere kledingstukken met de glasvezels in aanraking geweest zijn.
●Kledingstukken die behandeld of vervuild zijn met brandbare schoonmaakmiddelen of producten zoals benzine, bakolie of aërosols, MOGEN NIET in deze machine gedroogd worden.
Het milieu
●Alle verpakkingsmaterialen zijn milieuvriendelijk en recycleerbaar. Doe de verpakkingsmaterialen op een milieuvriendelijke manier van de hand. Uw gemeente kan u informeren over de beste manier om deze materialen weg te ruimen.
●Wanneer u een oude wasmachine van de hand doet, moet u voor alle veiligheid de stekker uit het stopcontact halen, het stroomsnoer afknippen en dit samen met de stekker vernietigen. Om te voorkomen dat kinderen zichzelf in de machine opsluiten, breekt u de scharnieren of het slot van de deur.
GIAS-Service
●Om te zorgen voor een continue veilige en efficiënte werking van dit apparaat, bevelen wij aan dat servicing of reparaties alleen worden uitgevoerd door een bevoegde GIAS onderhoudsmonteur.
Europese richtlijn 2002/96/EC
Dit apparaat voldoet aan de Europese richtlijnen 2002/96/EC voor elektrische en elektronische afval.
Door dit apparaat correct te verwijderen, helpt u het potentiële negatieve gevolg voor de omgeving en menselijke gezondheid te voorkomen, welke anders door onjuiste verwijdering zou kunnen worden veroorzaakt.
Het symbool op het product duidt aan dat dit product niet behandeld zal worden als huishuidelijk afval. In plaats daarvan zal het apparaat naar het verzamelpunt voor de recycling van elektrische en elektronische uitrusting gaan.
De verwijdering moet in overeenstemming met plaatselijke milieuvoorschriften voor afvalverwerking uitgevoerd worden.
Voor meer gedetailleerde informatie over de verwijderingvan dit product, neemt u contact op met uw gemeenlijke reinigingsdienst of de dealer waar u het apparaat heeft gekocht.
Als de machine niet correct functioneert of kapot gaat, schakel het dan uit en haal de stekker uit het stopcontact. Wendt u tot GIAS-Service voor reparaties.
23
40003485DUT.qxd 06/07/2005 16:00 Page 24
Installatie
Indien het probleem met uw machine wordt veroorzaakt door een verkeerde installatie, kunnen de kosten van de onderhoudsbeurt aan u worden doorberekend.
Als de stroomkabel van het toestel beschadigd is, dan moet hij vervangen worden door een speciaal snoer dat alleen bij servicedienst van Hoover verkrijgbaar is. De kabel moet door een bekwaam persoon worden geïnstalleerd.
Elektrische vereisten
Drogers worden geleverd om te kunnen werken op een voltage van 230V, 50 Hz monophase. Controleer of het voedingscircuit ten minste 16A bedraagt.
Elektriciteit kan erg gevaarlijk zijn. Deze machine moet geaard zijn.
Het stopcontact en de stekker van de machine moeten van hetzelfde soort zijn.
Gebruik geen meervoudige adapters en/of verlengsnoeren.
Nadat het apparaat is geïnstalleerd, moet de stekker bereikbaar blijven om uit het stopcontact te halen.
De draden in het stroomsnoer hebben de volgende kleuren:
Blauw |
NEUTRAAL |
Bruin |
ONDER STROOM |
Groen en Geel |
AARDVERBINDING |
CE apparaat voldoet aan de Europese richtlijn 89/336/EEC, 73/23/EEC en volgende aanvullingen.
Sluit de machine niet aan en start deze niet voordat de installatie is voltooid.
Voor uw veiligheid moet deze droger op de juiste manier worden geïnstalleerd.
Als er ook maar enige twijfel bestaat over de installatie, bel dan de GIAS-Service voor advies.
De voeten verstellen
Als de machine is geplaatst, moeten de voeten worden versteld zodat de machine waterpas staat.
Verstel de vier voeten zodat de machine stevig en waterpas staat.
24

40003485DUT.qxd 06/07/2005 16:00 Page 25
Ventilatie
Er moet voldoende ventilatie zijn in de kamer waar de droger staat om te voorkomen dat de dat gassen van andere apparaten die brandstof verbranden, waaronder een open haard, de kamer in worden gezogen als de droger wordt gebruikt.
●Afzuiglucht mag niet in een via een afvoer waarlangs uitlaatstoffen van mechanismen die gas of andere brandstoffen verbranden, worden afgevoerd.
●Controleer regelmatig dat de lucht die door de droger stroomt, niet geblokkeerd wordt.
●Controleer na gebruik de pluizenfilter en maak die indien nodig schoon.
●De aanvoeren en afvoeren moeten vrij gehouden worden van obstructies. Om te zorgen voor voldoende ventilatie moet de ruimte tussen de onderkant van de machine en de vloer vrij blijven. Er moet een opening van ten minste 12 mm zijn tussen de machine en enig obstakel.
●Voorkom dat artikelen achter de droger vallen of zich daar ophopen omdat deze de luchtaanvoer en afvoer kunnen belemmeren.
●Installeer de droger NOOIT tegen gordijnen aan.
 GATEN VOOR LUCHTAANVOER


 LUCHTUITVOER
LUCHTUITVOER AAN DE ONDERKANT
25
40003485DUT.qxd 06/07/2005 16:00 Page 26
Het wasgoed voorbereiden
Alvorens de droogtrommel voor de eerste keer te gebruiken:
●Lees deze handleiding a.u.b. aandachtig door.
●Verwijder alle artikelen die in de trommel zijn gepakt.
●Veeg de binnenkant van de trommel en de deur met een vochtige doek af om alle stof te verwijderen dat zich tijdens het vervoer kan hebben verzameld.
Overlaadt de trommel niet. Grote stukken kunnen wanneer ze nat zijn de maximaal toegelaten waslading overschrijden
(bijvoorbeeld:
slaapzakken, donsdekens).
Voorbereiding van de kleren
Zorg ervoor dat het wasgoed dat u wilt drogen, geschikt is voor het drogen in een droogtrommel, zoals wordt aangegeven door de wasvoorschriften op ieder artikel.
Controleer dat alle sluitingen dicht zijn en dat de zakken leeg zijn. Keer de kleren binnenstebuiten. Leg de kleren losjes in de trommel om ervoor te zorgen dat ze niet in elkaar verward raken.
Maximaal te drogen gewicht
●Katoen Max. 7 kg
●Synthetische stoffen Max. 3 kg
26

40003485DUT.qxd 06/07/2005 16:00 Page 27
Sorteer het wasgoed als volgt:
●Op wasvoorschrift
Deze vindt u in de kraag of in de binnennaad:
●
●
Kan in de droogtrommel gedroogd worden.
Drogen in de droogtrommel op hoge temperatuur.
Drogen in de droogtrommel alleen op lage temperatuur.
Niet in de droogtrommel drogen.
Als de stof geen wasvoorschrift heeft, kunt u er van uitgaan dat het niet geschikt is voor de droogtrommel.
Op hoeveelheid en dikte
Altijd wanneer de hoeveelheid wasgoed groter is dan de capaciteit van de droger, sorteer de kleren op dikte (b.v. handdoeken apart van dun ondergoed).
Op type stof
Katoen/linnen: Handdoeken, jersey katoen, beden tafellinnen.
Synthetische stoffen: Blouses, overhemden, overalls, enz. gemaakt van polyester of polyamide, evenals voor gemengd katoen/synthetisch.
●Op de temperatuur van het drogen
Sorteer op: strijkdroog, kastdroog, enz. Voor fijn
goed druk op de -knop om een lage droogtemperatuur in te stellen.
27

40003485DUT.qxd 06/07/2005 16:00 Page 28
Droogadvies
BELANGRIJK: Stop geen artikelen in de droogtrommel, die zijn behandeld met een chemische reinigingsvloeistof
en ook geen rubber kleren (gevaar voor brand of explosie).
Niet in de droogtrommel drogen:
Wol, zijde, fijn goed, nylon kousen, fijn borduurwerk, stoffen met metalen versieringen, kledingstukken met pvc of leren randen, trainingsschoenen, artikelen met een groot volume zoals slaapzakken, enz.
Energiebesparing
Stop alleen wasgoed in de droogtrommel dat grondig is uitgewrongen of gecentrifugeerd. Hoe droger het wasgoed, hoe korter de droogtijd waardoor elektriciteit wordt bespaard.
Gedurende de laatste 15 minuten draait de was altijd in koude lucht.
ALTIJD
●Probeer altijd om het maximale gewicht aan wasgoed te drogen, zo bespaart u tijd en elektriciteit.
●Controleer altijd voor iedere droogcyclus of de filter schoon is.
NOOIT
●Stop nooit meer dan het maximale gewicht in de droger, dit is verspilling van tijd en elektriciteit.
●Stop nooit druipnat wasgoed in de droogtrommel, dit kan het apparaat beschadigen.
28
 Loading...