


ZyXEL Communications P-2701RL, P-2702R User Manual

P-27xx Series
Models:
P-2701RL VoIP ATA / Gateway with Lifeline
P-2702R VoIP ATA / Gateway
Default Login Details
IP Address http://192.168.1.1
User Name admin
Password 1234
Firmware Version 1.01
Edition 1, 09/2010
www.zyxel.com
www.zyxel.com
Copyright © 2010
ZyXEL Communications Corporation


CHAPTER 1
Introduction
1.1 Overview
This guide helps you set up and use your ZyXEL Device (either the P-2702R VoIP
ATA / Gateway or the P-2701RL VoIP ATA / Gateway with Lifeline).
This guide contains the following sections:
SECTION PAGE DESCRIPTION
Installation
Requirements
Making Hardware
Connections
Initial Configuration 9 How to configure your ZyXEL Device to access the
5 A checklist of things you need before you install the
ZyXEL Device.
6 How to connect the ZyXEL Device to your network, your
computer and telephone(s).
Internet and make Voice over Internet (VoIP) phone
calls.
For the P-2701RL, it also explains how to set up regular
phone services that do not use the Internet.
Placing Phone Calls 15 How to make calls from the phone(s) connected to the
ZyXEL Device.
Advanced Phone
Configuration
Speed Dial Settings 24 How to create a list of speed dial numbers.
Dial Plan with URL 26 How to create a list of peer-to-peer call numbers.
Supported Phone
Functions
System Mode and
Accounts
Auto-Provision 33 How to save the ZyXEL Device auto-provisioning file
TR-069 Setting 34 How to configure the ZyXEL Device to be managed over
Troubleshooting 37 Possible solutions for any issues that may arise.
Specifications 43 Information about your ZyXEL Device’s physical
Features 44 Supported firmware specifications.
16 How to configure advanced VoIP options.
27 A table of the key combinations you can enter on your
phone's keypad to use certain features.
31 How to change your operating mode (router or bridge)
and system passwords.
and configure the ZyXEL Device to download the
configuration and firmware automatically from an autoprovisioning server.
the WAN by an Auto Configuration Server (ACS).
specifications
P-27XX Series User’s Guide
3

Chapter 1 Introduction
SECTION PAGE DESCRIPTION
Wall Mounting
Instructions
Safety Warnings 49 Using the ZyXEL Device safely.
Open Software
Announcements
Legal Information 51 Certifications, warranty and customer support
1.2 How It Works
The following figure shows how the ZyXEL Device works:
47 How to attach the ZyXEL Device to a wall.
49 Description of ZyXEL’s open software use and where to
download open source components modified by ZyXEL.
information.
A
D
C
E
B
• When you make a phone call over the Internet, you use a telephone (A) to dial
the number. The P-2701RL supports one telephone connection, and the P-2702R
supports two telephone connections.
The telephone is connected to your ZyXEL Device (C), which is connected to the
broadband modem or router that provides Internet access (D).
• When you want to use the Internet, you use your computer (B). Your computer
is connected to your ZyXEL Device (C), which is connected to the broadband
modem or router that provides Internet access (D).
4
You also use your computer to configure the ZyXEL Device.
• P-2701RL Only (E): Use your telephone (A) to make calls over the regular
telephone network (PSTN or Public Switched Telephone Network).
P-27XX Series User’s Guide

Important information about your ZyXEL Device:
Default Management IP Address 192.168.1.1
Default Subnet Mask 255.255.255.0
Default Admin User Name admin
Default Admin Password 1234
Default User Name user
Default User Password user
1.3 Installation Requirements
Make sure you h ave the followin g things before you set up your ZyXEL Device:
• Internet Account - Information provided by y our ISP (the c ompany that let s you
connect to the Internet). This information might include your user name,
password, and so on.
Chapter 1 Introduction
• VoIP Account - Information provided by your VoIP service provider (the
company that lets you make phone calls over the Internet). This information
might include your URI, number, and so on.
• Web Browser - Internet Explorer 6.0 or later or Firefox 1.5 or later with
JavaScript enabled.
P-27XX Series User’s Guide
5

Chapter 1 Introduction
1.4 Making Hardware Connections
The following shows you how to make the ZyXEL Device’s hardware connections.
Figure 1 P-2701RL Hardware Connections
Figure 2 P-2702R Hardware Connections
12345
2345
6
P-27XX Series User’s Guide

Chapter 1 Introduction
1 LINE (P-2701RL only): Use a telephone cable to connect the telephone jack (or
the TEL or PHONE jack on a splitter, if one is already installed) to this port.
2 PHONE 1 / PHONE 2: Use a telephone cable (and any telephone adaptor
provided with your ZyXEL Device) to connect your telephone to this port.
3 LAN: Use an Ethernet cable to connect your computer to this port.
4 WAN: Use an Ethernet cable to connect your broadband modem or router to this
port.
5 POWER: Use the power adaptor provided with your ZyXEL Device to connect an
appropriate power source to this jack.
On the front panel, the POWER light flashes green while your Z yXEL Device starts
up, and stays green once it is ready. The WAN and LAN lights turn on if the WAN
and LAN ports are properly connected. These lights flash when the ZyXEL Device
is sending or receiving data.
P-27XX Series User’s Guide
7

Chapter 1 Introduction
8
P-27XX Series User’s Guide

CHAPTER 2
Initial Configuration
This chapter shows you how to set up your ZyXEL Device by connecting to its
built-in Web Configurator with your computer.
2.1 The Web Configurator
The web configurator is an HTML-based management interface that allows easy
device setup and management via a web browser.
To connect to the Web Configurator:
1 Launch your web browser.
2 Enter http://192.168.1.1 as the address.
3 Enter the default administrator Username (admin) and Password (1234), then
click Login.
P-27XX Series User’s Guide
9

Chapter 2 Initial Configuration
4 Click Go to Wizard setup.
5 The Configuration Wizard opens.
2.2 The Connection Wizard
This section shows you how to configure your Internet connection settings using
the Connection Wizard.
Note: You must have an active Internet account with a service provider in order to
complete this section.
1 In the Wizard Setup screen, select Connection Wizard.
2 In the Welcome screen, click Next.
10
P-27XX Series User’s Guide

Chapter 2 Initial Configuration
3 In the Time Zone Setting screen, select Enable NTP Client Update if you want
to maintain the ZyXEL Device’s internal clock by synchronizing it with a time
server.
If you do this, choose a Time Zone and an NTP Server closest to your location
from their respective menus, then click Next to save your settings and go to the
next screen.
4 The WAN Interface Setting screen has different fields, depending on the type of
Internet access your ISP uses.
You can choose either Static IP, Dynamic IP, or PPPoE:
• Static IP means the ISP has assigned your Internet access account a single
IP address that will never change, regardless of whether you are online or
not. See Section 2.2.1 on page 12 for details.
• Dynamic IP allows the ISP to randomly assign your ZyXEL Device an IP
address each time it requests a WAN (or Internet) session. The IP address is
released as soon as the ZyXEL Device disconnects from the ISP. See Section
2.2.2 on page 12 for details.
• PPPoE emulates a standard dial-up connection over the Internet and requires
that each time the ZyXEL Device requests a WAN session you log in with your
ISP-assigned user name and password. See Section 2.2.3 on page 12 for
details.
Choose the setting required by your ISP then follow the instructions in the
appropriate section below. If you are not sure which setting to use then contact
your ISP.
P-27XX Series User’s Guide
11

Chapter 2 Initial Configuration
2.2.1 Static IP Connection Settings
Follow these steps if your ISP uses a static IP connection.
1 Select Static IP from the WAN Access Type menu. The screen changes to
provide options for this setting.
2 Enter the settings as provided by your ISP.
3 Click Finished to save your settings.
2.2.2 DHCP Connection Settings
Follow these steps if your ISP uses a dynamic IP connection.
1 Select Dynamic IP from the WAN Access Type menu.
2 Click Finished to save your settings.
2.2.3 PPPoE Connection Settings
Follow these steps if your ISP uses a PPPoE connection.
1 Select PPPoE from the WAN Access Type menu. The screen changes to provide
options for this setting.
12
P-27XX Series User’s Guide
2 Enter the User Name and Password assigned to you by your ISP.
3 Click Finished to save your settings.
2.2.4 Test Your Internet Connection
Open another tab in your web browser and go to any web site (for example,
http://www.zyxel.com).
If you cannot access after using the configuration settings provided by your ISP,
see Troubleshooting on page 37.
Chapter 2 Initial Configuration
2.3 The VoIP Setup Wizard
This section shows you how to configure your voice-over-Internet settings using
the VoIP Setup wizard.
Note: You must have Internet access and a VoIP account before you can complete
this section.
1 In the Wizard Setup screen, select VoIP Setup.
2 In the VoIP Configuration screen, enter the information provided by your VoIP
service provider.
If you have a VoIP account like “1234@VoIP-provider.com”, the SIP Number is
“1234”, and the SIP Service Domain is “V oIP-provid er.com” . If your VoIP service
provider did not provide information for any of the f ields in this screen, leave them
at their default settings.
P-27XX Series User’s Guide
13

Chapter 2 Initial Configuration
3 P-2702R Only: The Phone 2 SIP Settings screen appears next. If you want to
set up a second VoIP account, select Enable SIP then enter the information for
the second VoIP account as you did for the first one in step 2.
If you do not want to configure a second VoIP account at this time, you can do s o
later in the VoIP > SIP > SIP Settings screen of the advanced Web
Configurator.
4 Click Finish to save your settings.
2.3.1 Test Your VoIP Connection
After you finish configuring your VoIP account (s), the wizard tests your SIP
account settings then indicates whether or not they are valid. If they are not, try
re-configuring them.
If you still cannot access after usin g the settings provided by your VoIP service
provider see Troubleshooting on page 37.
14
P-27XX Series User’s Guide

CHAPTER 3
Phone Use and Configuration
This chapter describes basic phone setup and usage, as well as select advanced
VoIP configuration options for your ZyXEL Device.
3.1 PSTN Phone Set Up (P-2701RL Only)
When one of your VoIP accounts is registered, the ZyXEL Device normally uses the
Internet (VoIP) ra ther than the regular PSTN phone line to place and receive
phone calls.
However, if you connect the Line port to a regular PSTN phone jack, then
incoming PSTN calls w il l b e forwarded directly to the phone connected to your
ZyXEL Device’s Phone port.
3.2 Placing Phone Calls
Use the following sections to make outgoing calls from a phone attached to the
ZyXEL Device to another phone.
Follow these directions to make calls over the Internet:
• If you want to dial a SIP number that only uses numbers (for example,
“12345”), dial the number on your phone’s k eypad. You can also set up a speeddial entry, if you want, in the VoIP > Phone Book > Speed Dial screen. See
Section 3.4 on page 24 for more information.
• If you want to make a peer-to-peer call, set up a dial plan with URL entry first.
Use the VoIP > Phone Book > Dial Plan with URL screen. Then dial the preconfigured SIP number to make the call to a peer VoIP device directly. See
Section 3.5 on page 26 for more information.
• If you want to call a PSTN phone over the Internet, follow your VoIP provider’s
instructions.
P-27XX Series User’s Guide
15

Chapter 3 Phone Use and Configuration
3.3 Advanced Phone Configuration
Click VoIP > SIP to open the SIP Settings screen. This screen allows you to
manage up to two SIP accounts.
Figure 3 The SIP Settings Screen
16
To have the ZyXEL Device add a “user=phone” parameter to the SIP URI before
sending a SIP INVITE request, select the Enable option next to Set User Header
To Phone. This parameter indicates the user part of the SIP URI
(<user>@<sipserver>) the ZyXEL Device is calling is a valid telephone number.
If you need to send fax messages using T.38 and want to always use the same
port number for both transmitted and received T.38 packets, select Use Original
RTP Port. Otherwise, select Assign Port for Reinvite to have the ZyXEL Device
choose a port randomly for T.38 after the re-invite process.
Click Apply to save the changes you made in this screen.
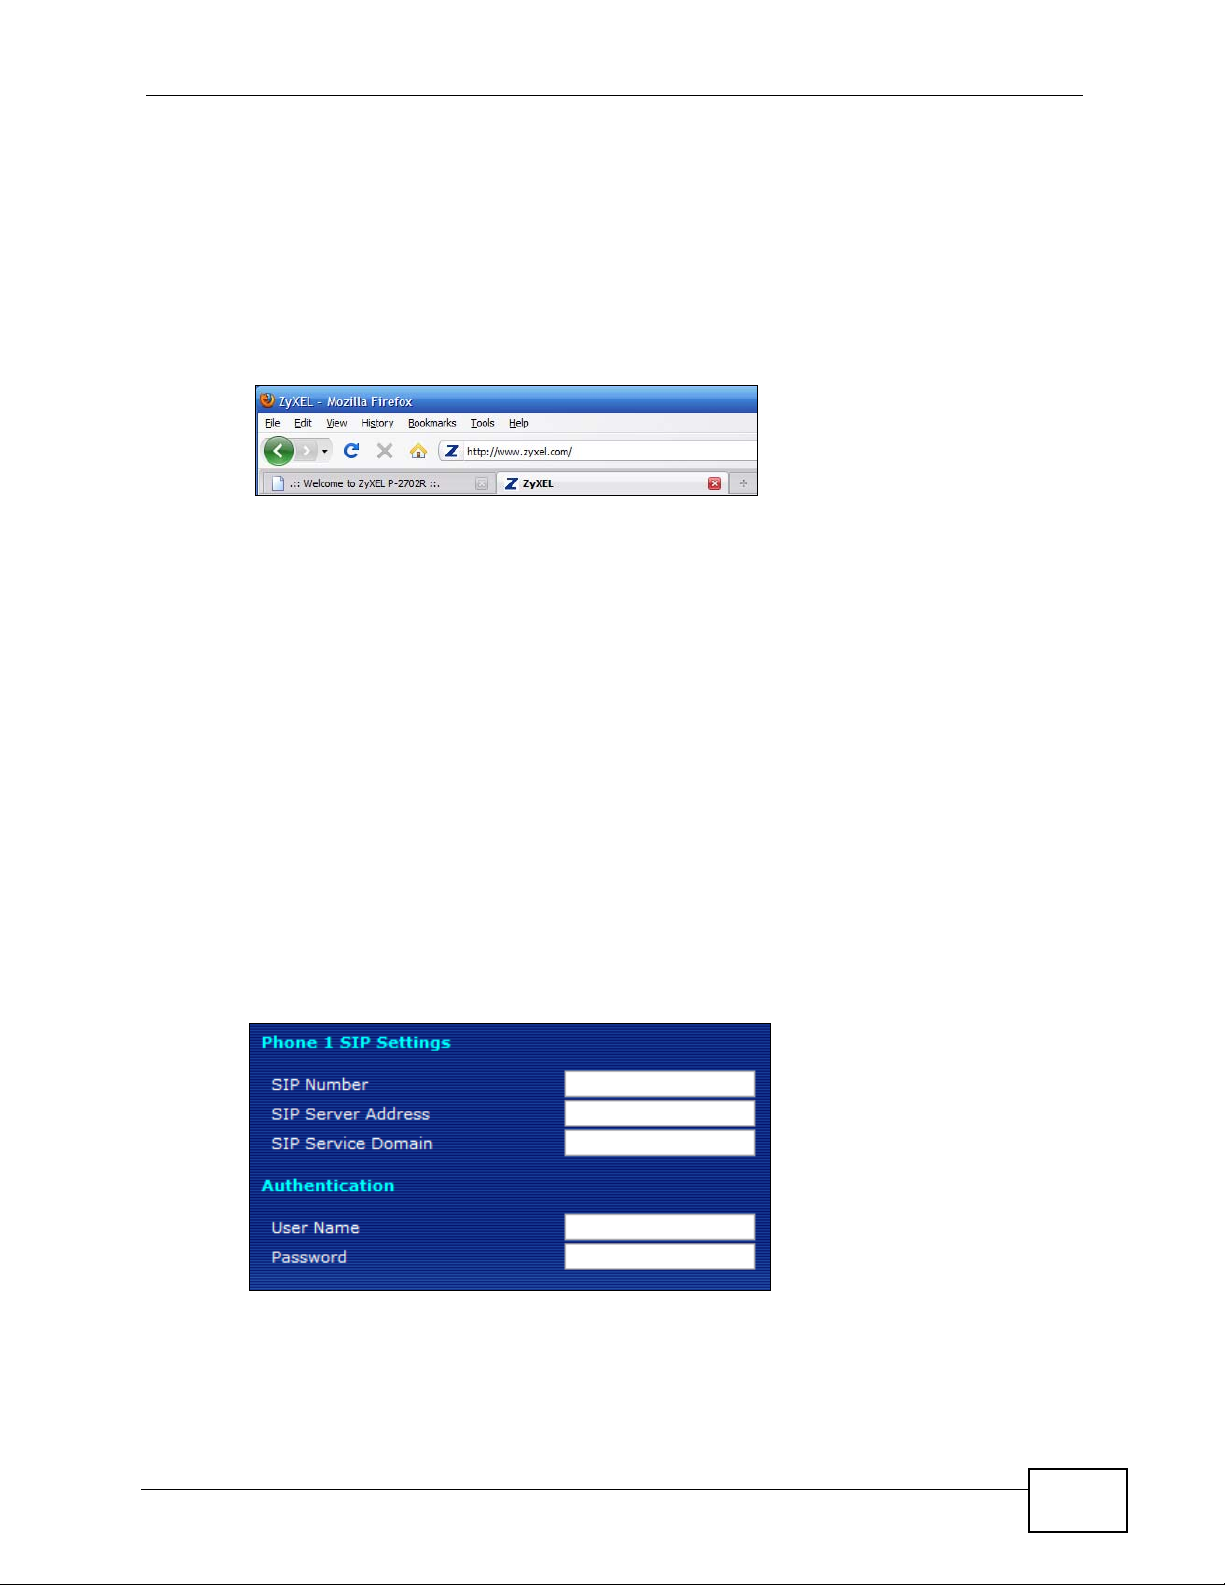
Select Active for the phone yo u want to configure, then click the Modify icon. The
Phone SIP Settings screen opens, where you can set up and maintain your SIP
account(s) in the ZyXEL Device. Your VoIP or Internet service provider should
provide you with your account information.
P-27XX Series User’s Guide
 Loading...