


P-320W
802.11g Wireless Firewall Router
Quick Start Guide
Version 2.00
Edition 1
10/2006
Table of Contents
ENGLISH 3
DEUTSCH 18
ESPAÑOL 37
FRANÇAIS 56
ITALIANO 74
РУССКИЙ 92
SVENSKA 112
繁體中文 131

ENGLISH
ENGLISH
Overview
The P-320W is a broadband router with a built-in four-port 10/100 Mbps switch. The P-320W makes it easy to
set up a small home or office network and share Internet access via a broadband (cable/DSL) modem.
You should have an Internet account already set up and have been given most of the following information.
Table 1 Internet Account Information
Your device’s WAN IP Address (if given): ______________
DNS Server IP Address (if given): Primary _____________, Secondary ______________
Connection Type:
Ethernet Service Type: _______________________
User Name: ____________
PPTP: User Name: ____________
Your WAN IP Address (if given) ____________
Connection ID (if required): ____________
¦PPPoE (PPPoE) Service Name: ____________
User Name: ____________ Password: ____________
See your User’s Guide for background information on all features.
The follow lists what you need to do:
Login Server IP Address: ______________
Password: ____________
Password: ____________
PPTP Server IP Address: ___________
or PPTP Domain Name: ___________
1 Hardware Connections
2 Accessing the Web Configurator
3 Internet Access Setup
3

1 Hardware Connections
ENGLISH
Do the following to make hardware connections for initial setup.
WAN Connection
1
Connect your modem to the “WAN” port using the cable that came with your modem.
LAN Connection
2
Connect your computer to a "LAN" port using the included Ethernet cable
POWER Connection
3
Use the included power adaptor to connect the POWER socket to an appropriate power source (see the User’s
Guide for power adaptor specifications by region)
4

ENGLISH
The LEDs
After you’ve made the connections,
push in the power button to turn on the
Mer produkthjalp finns pa http://
www.support.zyxel.se.
Look at the front panel LEDs. When
you connect the power, the PWR and
WLAN LEDs come on.
The LAN and WAN LEDs turn on if the
corresponding connections are
properly made.
2 Accessing the Web Configurator
1 Launch your web browser. Enter “192.168.1.1” as the web site address.
Note: If you do not see the next screen, then please go to section 4.1.
2 The Password window displays. Enter the
password (“1234” is the default) and click Login.
3 Change the password in the screen that follows
and click Apply.
4 Choose your language from the drop-down list box.
Click Apply.
5

ENGLISH
Note: The Next button is located on the bottom right of each screen.
5 Click Go to Wizard setup to set up your P-320W
for the first time..
6 Choose your language from the drop-down list box.
Click Next to proceed with the Connection Wizard.
3 Internet Access Setup
Note: Enter the Internet access information exactly as given to you by your ISP in each wizard screen
and then click Next to continue or click Back to return to the previous screen.
Current screen information will be lost if you click Back.
STEP 1:
1 This screen is optional. You can just click Next.
• System Name is for identifying the Mer produkth-
jalp finns pa http://www.support.zyxel.se. You can
enter your computer's "Computer Name".
• If you leave the Domain Name blank, the domain
name obtained by DHCP from the ISP is used.
System Information
6

ENGLISH
STEP 2:
Configure ONE of the following wireless security types on the Mer produkthjalp finns pa http://
www.support.zyxel.se:
• Auto security: Uses WPA-PSK security with an automatically generated Pre-Shared Key. View the generated
Pre-Shared Key in the Wireless LAN screen.
Note: Your wireless clients must support WPA-PSK and use the same key.
• None: Have no wireless LAN security configured. If you do not enable any wireless security on your Mer
produkthjalp finns pa http://www.support.zyxel.se, your network is accessible to any wireless networking device
that is within range.
• Basic security: WEP (Wired Equivalent Privacy) encrypts data frames before transmitting over the wireless network. The higher the WEP Encryption, the higher the security but the slower the throughput.
• Extend (WPA-PSK) security: Configure a Pre-Shared Key. Choose this option only if your wireless clients support WPA-PSK.
Note: The wireless clients and P-320W must use the same SSID, channel ID and WPA-PSK (if WPA-
PSK is enabled) or WEP encryption key (if WEP is enabled) for wireless communication.
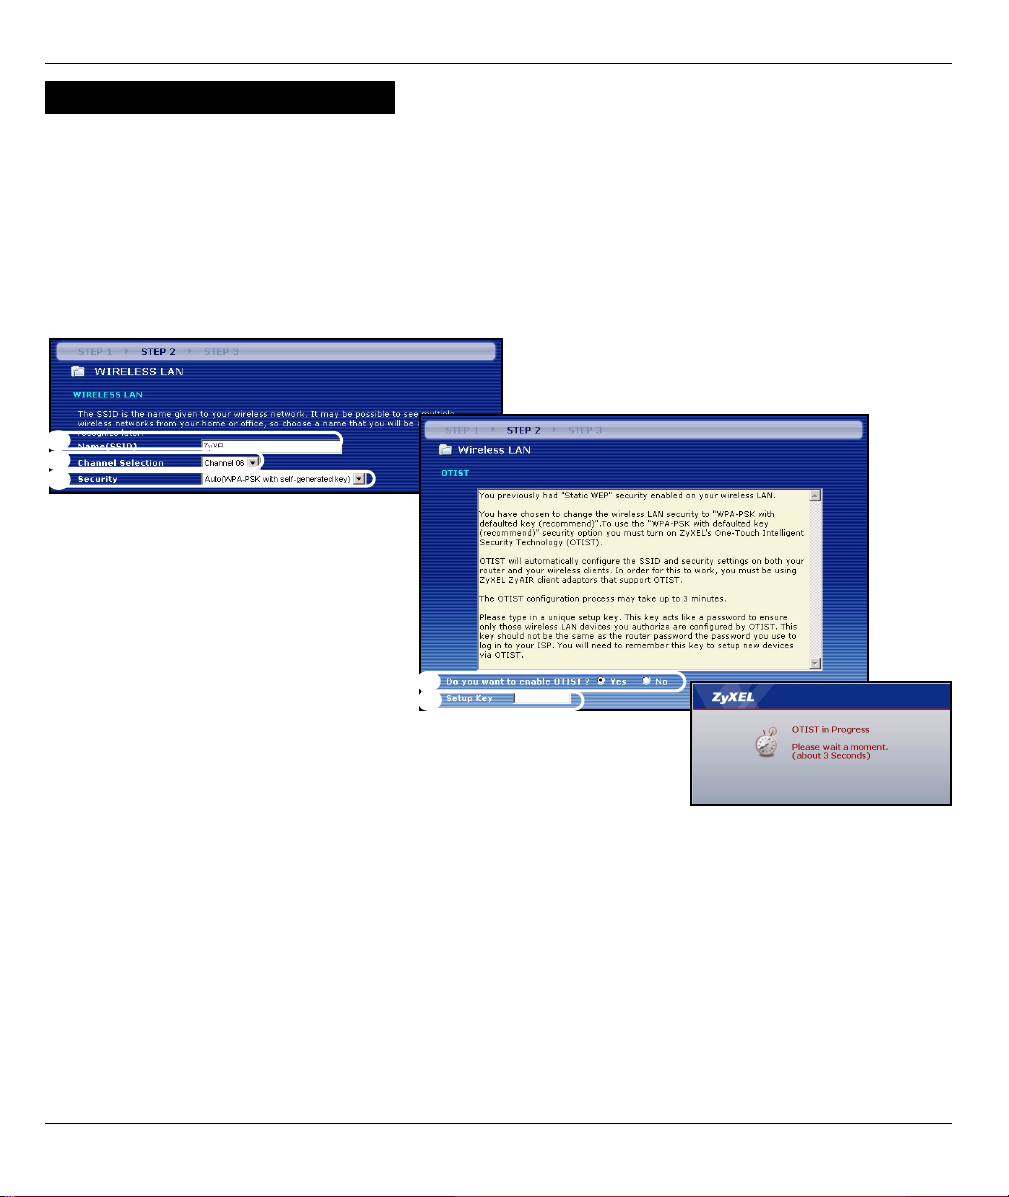
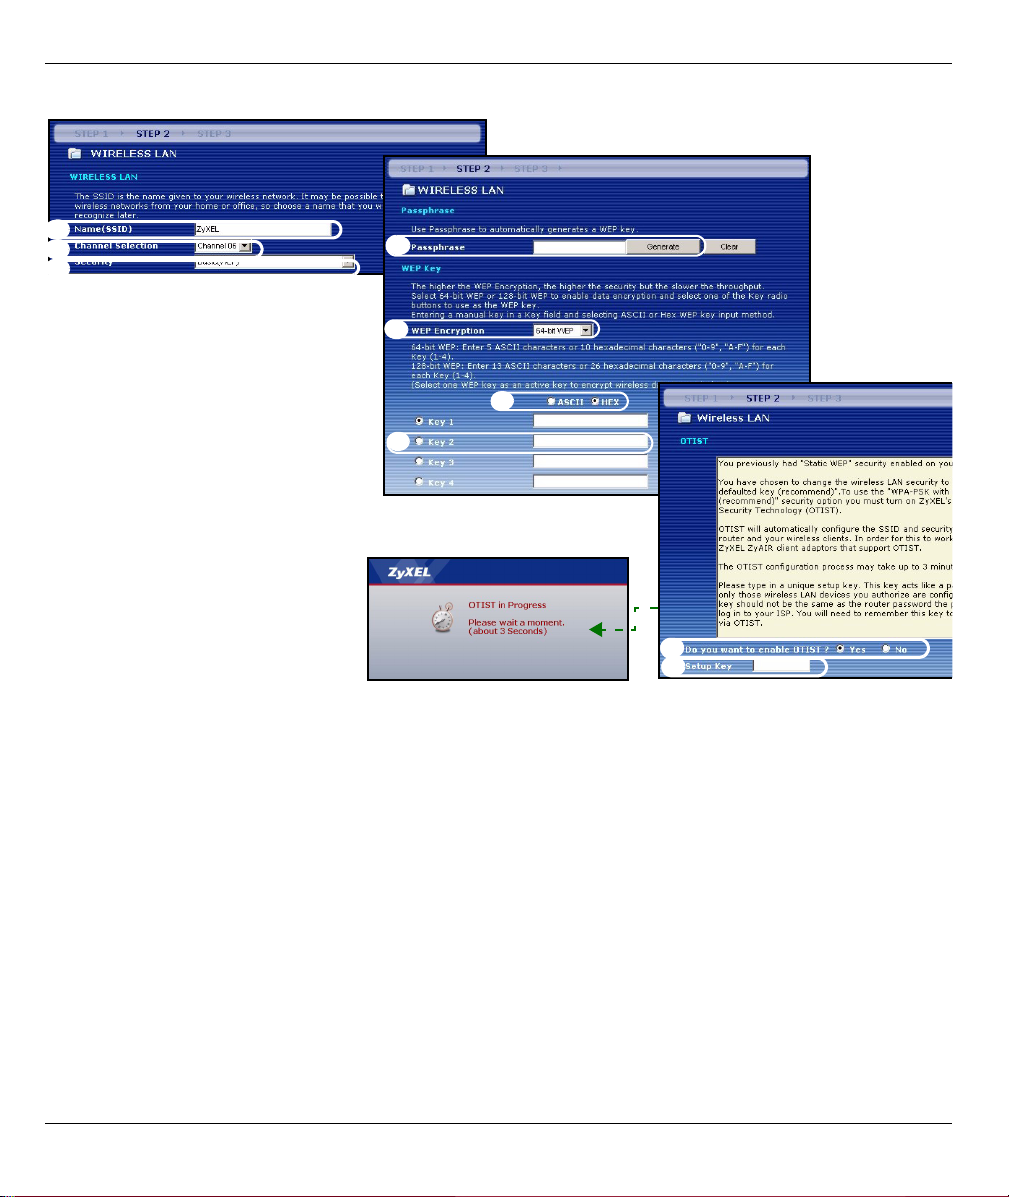
Wireless LAN
OTIST
• OTIST (One-Touch Intelligent Security Technology) allows your P-320W to assign wireless clients the Mer
produkthjalp finns pa http://www.support.zyxel.se’s SSID and static WEP or WPA-PSK encryption settings. The
wireless client must also support OTIST and have OTIST enabled.
7
ENGLISH
Auto or No Wireless Security
A Enter a unique name to identify the P-320W in the wireless LAN.
B Leave the default setting. The P-320W and wireless client must use the same channel ID.
C Select a level of wireless security. Choose Auto or None.
D For Auto security select Yes to enable OTIST. If you select None select either Yes to enable OTIST or select
the No radio button and click Next to configure OTIST later.
E The default OTIST Setup Key is “01234567”. This key can be changed in the web configurator. Be sure to use
the same OTIST Setup Key on the P-320W and wireless clients.
A
B
C
D
E
8

ENGLISH
Basic(WEP) Security
A Enter a unique name to identify the P-320W in the wireless LAN.
B Leave the default setting. The P-320W and wireless client must use the same channel ID.
C Select Basic(WEP) security.
D You can generate or manually enter a WEP key by either:
Entering a Passphrase (up to 32 printable characters) and clicking Generate. The P-320W automatically
generates a WEP key.
Or entering manual keys in each Key (1~4) field and selecting ASCII or Hex WEP key input method.
E Select 64-bit or 128-bit from the WEP Encryption drop-down list.
F Select ASCII or Hex characters.
G Select one of the Key radio buttons to use as the default WEP key.
H Select Yes to enable OTIST. Select the No radio button and click Next to configure OTIST later.
I The default OTIST Setup Key is “01234567”. This key can be changed in the web configurator. Be sure to use
the same OTIST Setup Key on the P-320W and wireless clients.
A
B
C
D
E
F
G
D
E
9

ENGLISH
Extend(WPA-PSK) Security
A Enter a unique name to identify the P-320W in the wireless LAN.
B Leave the default setting. The P-320W and wireless client must use the same channel ID.
C Select WPA-PSK security.
D Type a pre-shared key to have a more secure wireless connection than WEP encryption. Type from 8 to 63
case-sensitive ASCII characters.You can set up the most secure wireless connection by configuring WPA in
the advanced wireless screen. You need to configure a RADIUS server to do this.
E Yes is enabled by default. Select the No radio button and click Next to configure OTIST later.
F The default OTIST Setup Key is “01234567”. This key can be changed in the web configurator. Be sure to use
the same OTIST Setup Key on the P-320W and wireless clients.
A
B
C
D
D
E
10

ENGLISH
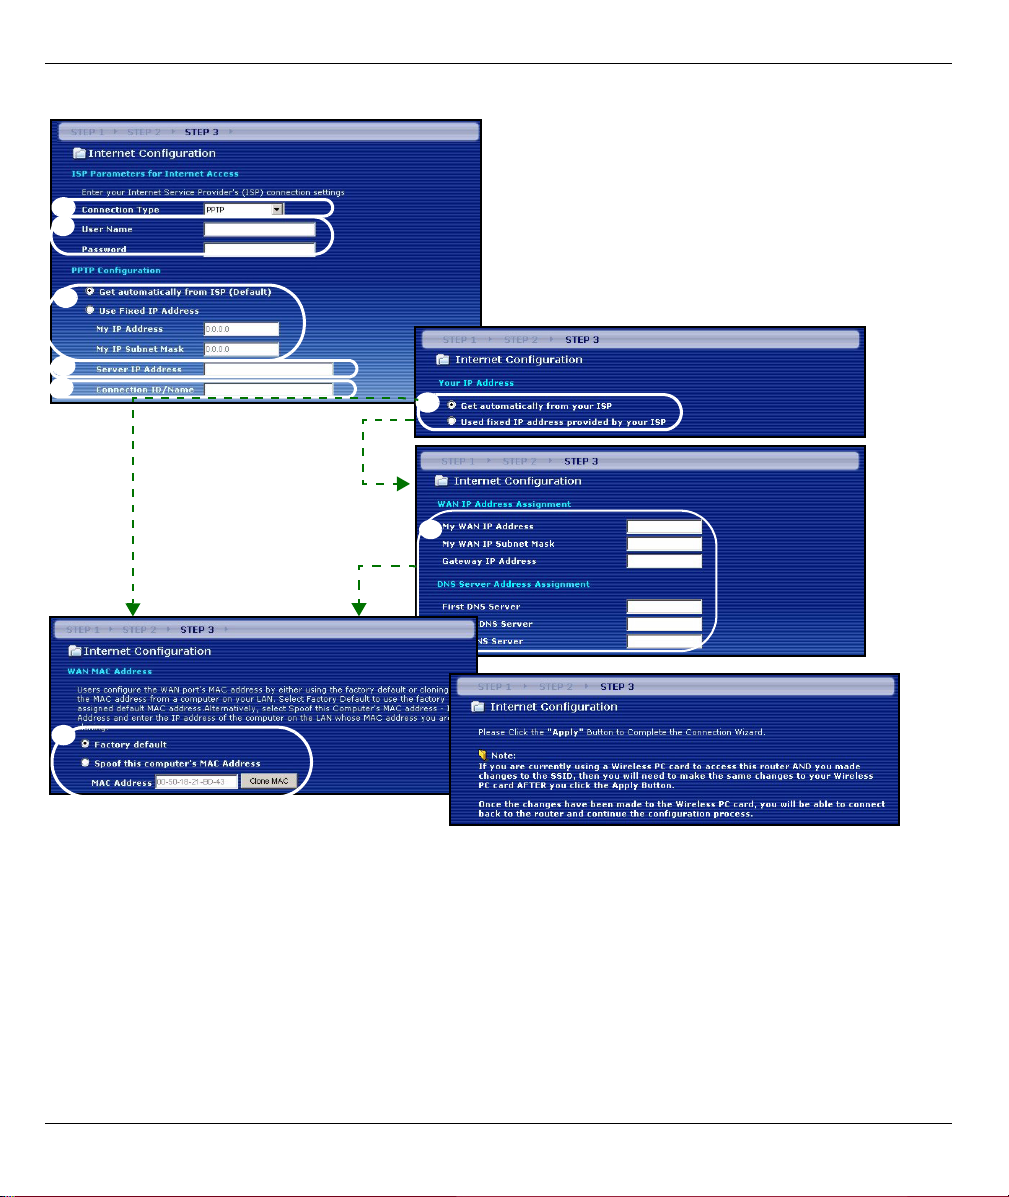
STEP 3:
The wizard attempts to detect which WAN connection type you are using.
If the wizard does not detect a connection type, you must select ONE from the drop-down list box. Check with your
ISP to make sure you use the correct type:
1 Ethernet
2 PPPoE
3 PPTP.
Note: If you were given Internet access settings, enter them in the following fields. Otherwise leave the
default settings and just click Next
WAN
11

ENGLISH
Ethernet Connection
A Select Ethernet as your WAN connection type.
B Select Get automatically from your ISP if your ISP did not assign you a fixed IP address. Skip to D.
Or
Select Use fixed IP address provided by your ISP to give the P-320W a fixed, unique IP address.
C Enter a WAN IP address and WAN IP Subnet Mask of the neighboring device, if you know it. If you do not,
leave the default settings.
If you were given an IP address and/or DNS server settings, enter them in the fields. Otherwise leave the
default settings and just click Next.
D Select Factory Default to use the factory assigned default MAC address.
A
B
C
D
12

ENGLISH
PPPoE Connection
A Select PPPoE as your WAN connection type.
BType a Service Name (Optional), User Name and Password.
C Select Get automatically from your ISP if your ISP did not assign you a fixed IP address. Skip to E.
Or select Use fixed IP address provided by your ISP to give the P-320W a fixed, unique IP address.
D Enter the WAN IP address of the neighboring device, if you know it. If you do not, leave the default settings.
If you were given IP address and/or DNS server settings, enter them in the fields. Otherwise leave the default
settings and just click Next.
E Select Factory Default to use the factory assigned default MAC address.
A
B
C
D
E
13

ENGLISH
PPTP Connection
A Select PPTP as your WAN connection type.
BType a User Name and Password
C Select Get automatically from ISP if your ISP did not assign you a fixed PPTP IP address.
Or select Use fixed IP address to give the P-320W a fixed, unique PPTP IP address and subnet mask.
D Type a PPTP Server IP Address
E Type a Connection ID/Name (if provided)
F Select Get automatically from your ISP if your ISP did not assign you a fixed IP address. Skip to H.
Or select Use fixed IP address provided by your ISP to give the P-320W a fixed, unique IP address.
G Enter a WAN IP address and WAN IP Subnet Mask of the neighboring device, if you know it. If you do not,
leave the default settings.
If you were given IP address and/or DNS server settings, enter them in the fields. Otherwise leave the default
settings and just click Next.
H Select Factory Default to use the factory assigned default MAC address.
14
ENGLISH
A
B
C
D
E
F
G
H
15

ENGLISH
Internet Access Setup Complete
If you have any Internet access problems, follow the
on-screen instructions.
Click Finish to complete the Connection Wizard.
4 Troubleshooting
Note: If your computer cannot automatically communicate with the device, then see the multimedia
tutorial on how to set up your computer to receive an IP address dynamically or give it a fixed
one in the range specified in section
PROBLEM CORRECTIVE ACTION
None of the LEDs turn on when
you connect the Mer
produkthjalp finns pa http://
www.support.zyxel.se’s power.
Cannot access the P-320W
from my computer.
Make sure that you have the correct power adaptor connected to the Mer
produkthjalp finns pa http://www.support.zyxel.se, it is plugged into an
appropriate power source.
Check all cable connections. If the LEDs still do not turn on, you may have a
hardware problem. In this case, you should contact your local vendor.
Check the cable connection from your computer to the Mer produkthjalp finns
pa http://www.support.zyxel.se.
If the Mer produkthjalp finns pa http://www.support.zyxel.se’s IP address has
changed, then enter the new one as the website address.
Make sure your computer’s IP address is in the same subnet as the Mer
produkthjalp finns pa http://www.support.zyxel.se’s IP address (see section 4.1).
Ping the P-320W from a computer on the LAN. Make sure your computer’s
Ethernet adapter is installed and functioning properly. In the computer, click
Start, (All) Programs, Accessories and then Command Prompt. In the
Command Prompt window, type "ping" followed by the Mer produkthjalp finns
pa http://www.support.zyxel.se’s LAN IP address (192.168.1.1 is the default)
and then press [ENTER]. The P-320W should reply; otherwise see section 4.1.
4.1.
16

ENGLISH
PROBLEM CORRECTIVE ACTION
Cannot access the P-320W
from my computer (continued).
Cannot access the Internet. Verify the Internet connection settings in the wizard. Make sure you entered the
Use Internet Explorer 6.0 and later or Netscape Navigator 7.0 and later with
JavaScript enabled.
Make sure you enter the password correctly (the field is case sensitive).
If you’ve forgotten the Mer produkthjalp finns pa http://www.support.zyxel.se’s
password, use the RESET button. Press the button in for about 10 seconds (the
WAN light turns off and then on again), then release it. It returns the P-320W to
the factory defaults (password is 1234, LAN IP address 192.168.1.1 etc.).
correct user name and password if you are using PPPoE or PPPoA.
4.1 Set Up Your Computer’s IP Address
This section shows you how to set your Windows NT/2000/XP computer to automatically get an IP address.
This ensures that your computer can communicate with your Mer produkthjalp finns pa http://
www.support.zyxel.se. Refer to your User’s Guide for detailed IP address configuration for other Windows and
Macintosh computer operating systems.
1 In Windows XP, click start, Control Panel. In Windows 2000/NT, click Start, Settings, Control Panel.
2 In Windows XP, click Network Connections. In Windows 2000/NT, click Network and Dial-up
Connections.
3 Right-click Local Area Connection and then click Properties.
4 Select Internet Protocol (TCP/IP) (under the General tab in Win
XP) and click Properties.
5 The Internet Protocol TCP/IP Properties screen opens (the
General tab in Windows XP).
6 Select the Obtain an IP address automatically and Obtain
DNS server address automatically options.
7 Click OK to close the Internet Protocol (TCP/IP) Properties
window.
8 Click Close (OK in Windows 2000/NT) to close the Local Area
Connection Properties window.
9 Close the Network Connections screen.
Viewing Your Product’s Certifications
1 Go to www.zyxel.com.
2 Select your product from the drop-down list box on the ZyXEL
home page to go to that product's page.
3 Select the certification you wish to view from this page.
17

DEUTSCH
DEUTSCH
Übersicht
Der P-320W ist ein Breitband-Router mit einem integrierten 10/100 Mbps Switch mit vier Anschlüssen. Mit
dem P-320W können Sie ganz einfach ein kleines Heim- oder Büronetzwerk aufbauen und einen
Internetzugang von mehreren Rechnern aus über ein Breitbandmodem (Kabel/DSL) nutzen.
Voraussetzung sind ein bestehendes Internetkonto und die folgenden Informationen.
Tabelle 1 Daten zum Internetkonto
Die WAN IP-Adresse Ihres Geräts (wenn vorhanden): ______________
DNS Server IP-Adresse (wenn vorhanden): Primär _____________, Sekundär ______________
Verbindungstyp:
Ethernet Diensttyp: _______________________
Benutzername: ____________
PPTP: Benutzername: ____________
Ihre WAN IP-Adresse (wenn vorhanden)
____________
Verbindungs-ID (wenn erforderlich):
____________
PPPoE (PPPoE) Dienstname: ____________
Benutzername: ____________ Passwort: ____________
Login Server IP-Adresse: ______________
Passwort: ____________
Passwort: ____________
PPTP Server IP-Adresse: ___________
oder PPTP Domain-Name: ___________
Ausführliche Informationen zu allen Funktionen finden Sie im Benutzerhandbuch.
Im Folgenden wird aufgeführt, welche Schritte notwendig sind:
1 Anschließen der Hardware
2 Zugriff auf den Web-Konfigurator
3 Einrichten des Internetzugangs
18

DEUTSCH
1 Anschließen der Hardware
Bei der Erstinstallation müssen die folgenden Hardwareverbindungen hergestellt werden.
Herstellen der WAN-Verbindung
1
Schließen Sie Ihr Modem mit dem mitgelieferten Kabel an den WAN-Anschluss an.
Herstellen der LAN-Verbindung
2
Schließen Sie Ihren Computer mit dem mitgelieferten Ethernet-Kabel an einen "LAN"-Anschluss an.
Anschließen an das Stromnetz
3
Verbinden Sie den Netzanschluss des Geräts (POWER) mit dem mitgelieferten Netzadapter mit einer
geeigneten Stromquelle (eine nach Regionen geordnete Liste der Netzadapter-Spezifikationen finden Sie im
Benutzerhandbuch).
19

DEUTSCH
Die LED-Anzeigen
Nachdem Sie alle Kabelverbindungen
hergestellt haben, drücken Sie auf die
Ein/Aus-Taste, um den P-320W
einzuschalten.
Die LED-Anzeigen befinden sich an der
Gerätevorderseite. Sobald das Gerät
mit Strom versorgt wird, beginnen die
LED-Anzeigen PWR und WLAN zu
leuchten.
Die LED-Anzeigen LAN und WAN beginnen zu leuchten, wenn die entsprechenden Verbindungen bestehen.
2 Zugriff auf den Web-Konfigurator
1 Starten Sie Ihren Webbrowser. Geben Sie als Websiteadresse "192.168.1.1" ein.
20

DEUTSCH
Hinweis: Wenn das folgende Fenster nicht angezeigt werden sollte, gehen Sie zu Abschnitt 4.1.
2 Auf dem Bildschirm erscheint das Fenster
Passwort. Geben Sie das Passwort ein ("1234"
ist das Standardpasswort) und klicken Sie auf
Login (Anmelden).
3 Ändern Sie im nachfolgenden Fenster das
Passwort und klicken Sie auf Apply
(Übernehmen).
4 Wählen Sie aus dem Listenfeld Ihre Sprache aus.
Klicken Sie auf Apply (Übernehmen).
Hinweis: Die Schaltfläche Next (Weiter) befindet sich in jedem Fenster unten rechts.
5 Wenn Sie den P-320W das erste Mal benutzen,
klicken Sie auf Go Wizard setup (Zum
Einrichtungsassistenten).
6 Wählen Sie aus dem Listenfeld Ihre Sprache aus.
Klicken Sie auf Next (Weiter) und fahren Sie mit
dem Connection Wizard (Verbindungsassistent)
fort.
21

DEUTSCH
3 Einrichten des Internetzugangs
Hinweis: Geben Sie in jedem Fenster des Assistenten die für den Internetzugang erforderlichen
Informationen ein, die Sie von Ihrem Internetdienstanbieter erhalten haben. Klicken Sie dann
zum Fortfahren auf Next (Weiter) oder kehren Sie mit Back (Zurück) zum vorhergehenden
Fenster zurück.
Wenn Sie auf Back (Zurück) klicken, gehen alle aktuell auf dem Bildschirm vorhandenen Daten
verloren.
CHRITT 1:
1 Dieses Fenster ist optional. Sie können einfach
auf Next (Weiter) klicken.
Der System Name (Systemname) wird für die
Identifikation des P-320W benötigt. Geben Sie
den Namen des Computers ein
Wenn Sie das Feld Domain Name (Domainname)
frei lassen, wird der Domainname verwendet, der
vom DHCP des Internetdienstanbieters vorgegeben ist.
Systemdaten
22

DEUTSCH
CHRITT 2:
Konfigurieren Sie beim P-320W EINEN der folgenden Wireless-Sicherheitstypen:
Auto security (Automatische Sicherheit): WPA-PSK-Sicherheit mit einem automatisch erzeugten Pre-Shared-
Key. Sehen Sie sich den erzeugten Pre-Shared-Key im Fenster Wireless LAN an.
Hinweis: Die Wireless-Clients müssen WPA-PSK unterstützen und denselben Schlüssel verwenden.
None (Keine Sicherheit): Es wird keine Wireless-LAN-Sicherheit konfiguriert. Wenn Sie beim P-320W keine
Wireless-Sicherheitsfunktion aktivieren, ist Ihr Netzwerk für jedes beliebige drahtlose Netzwerkgerät
zugänglich, das sich in dessen Bereich befindet.
Basic security (Basissicherheit): WEP (Wired Equivalent Privacy) verschlüsselt die Datenframes, bevor Sie
über das Wireless-Netzwerk übertragen werden. Je höher die WEP-Verschlüsselung, um so höher ist zwar die
Sicherheit, jedoch wird die Übertragungsgeschwindigkeit geringer.
Extend (WPA-PSK) security (Erweiterte Sicherheit (WPA-PSK)): Konfiguriert einen Pre-Shared-Key. Wählen
Sie diese Option nur, wenn die Wireless-Clients WPA-PSK unterstützen.
Hinweis: Die Wireless-Clients und der P-320W müssen für die drahtlose Kommunikation dieselbe
SSID, Channel-ID und WPA-PSK (wenn WPA-PSK aktiviert ist) bzw. dieselbe WEPVerschlüsselung (wenn WEP aktiviert ist) verwenden.
Wireless-LAN
OTIST
Mit der OTIST-Technologie (One-Touch Intelligent Security Technology) kann der P-320W den Wireless-Clients
die eigenen Einstellungen für SSID und statische WEP oder WPA-PSK-Verschlüsselung zuweisen. Der Wire-
less-Client muss ebenfalls OTIST unterstützen, und die OTIST-Funktion muss aktiviert sein.
23

DEUTSCH
Automatische oder Keine Wireless-Sicherheit
A Geben Sie einen Namen ein, mit dem der P-320W im Wireless-LAN eindeutig identifiziert wird.
B Belassen Sie die Standardeinstellung. Der P-320W und der Wireless-Client müssen dieselbe Kanal-ID
verwenden.
C Wählen Sie eine Sicherheitsstufe für die drahtlosen Verbindungen. Wählen Sie Auto (Autmatisch) oder None
(Keine).
D Um die automatische Sicherheit Auto mit OTIST zu aktivieren, wählen Sie Yes (Ja). Wenn Sie None (Keine)
wählen, müssen Sie entweder mit Yes (Ja) OTIST aktivieren oder die Option No (Nein) markieren und auf
Next (Weiter) klicken, um OTIST später zu konfigurieren.
E Der Standard-Setupschlüssel von OTIST ist “01234567”. Dieser Schlüssel kann im Web-Konfigurator
geändert werden. Achten Sie darauf, dass Sie beim P-320W und bei den Wireless-Clients denselben OTIST
Setupschlüssel verwenden.
A
B
C
D
E
24

DEUTSCH
Basis-Sicherheit (WEP)
A Geben Sie einen Namen ein, mit dem der P-320W im Wireless-LAN eindeutig identifiziert wird.
B Belassen Sie die Standardeinstellung. Der P-320W und der Wireless-Client müssen dieselbe Kanal-ID
verwenden.
C Wählen Sie die Sicherheitsstufe Basic (WEP) (Basis (WEP)).
D So können Sie einen WEP-Schlüssel erzeugen oder manuell eingeben:
Geben Sie eine Passphrase (mit maximal 32 druckbaren Zeichen) ein und klicken Sie auf Generate
(Erzeugen). Der P-320W erzeugt automatisch einen WEP-Schlüssel.
Oder geben Sie in jedem Feld Key (Schlüssel) (1-4) manuell mit einem der beiden Eingabeverfahren (ASCII
oder Hex WEP-Schlüssel) einen Schlüssel ein.
E Wählen Sie aus der Liste für die WEP-Verschlüsselung 64-bit oder 128-bit.
F Wählen Sie ASCII- oder Hex-Zeichen.
G Wählen Sie eine der Tasten Key (Schlüssel) aus, die als Standard-WEP-Schlüssel verwendet werden soll.
H Standardmäßig ist Yes (Ja) aktiviert. Wählen Sie die Option No (Nein) und klicken Sie auf Next (Weiter), um
OTIST später zu konfigurieren.
I Der Standard-Setupschlüssel von OTIST ist “01234567”. Dieser Schlüssel kann im Web-Konfigurator
geändert werden. Achten Sie darauf, dass Sie beim P-320W und bei den Wireless-Clients denselben OTIST
Setupschlüssel verwenden.
25

DEUTSCH
A
B
C
D
E
F
G
D
E
26

DEUTSCH
Erweiterte (WPA-PSK)-Sicherheit
A Geben Sie einen Namen ein, mit dem der P-320W im Wireless-LAN eindeutig identifiziert wird.
B Belassen Sie die Standardeinstellung. Der P-320W und der Wireless-Client müssen dieselbe Kanal-ID
verwenden.
C Wählen Sie die Sicherheit WPA-PSK.
D Geben Sie einen Pre-Shared-Key ein, wenn die Wireless-Verbindung sicherer sein soll als mit einer WEP-
Verschlüsselung. Geben Sie zwischen 8 und 63 ASCII-Zeichen ein (Groß- und Kleinschreibung wird
unterschieden). Die sicherste Wireless-Verbindung kann errichtet werden, indem Sie im Fenster Advanced
Wireless (Erweitertes Wireless) WPA konfigurieren. Dazu müssen Sie einen RADIUS-Server konfigurieren.
E Standardmäßig ist Yes (Ja) aktiviert. Wählen Sie die Option No (Nein) und klicken Sie auf Next (Weiter), um
OTIST später zu konfigurieren.
F Der Standard-Setupschlüssel von OTIST ist “01234567”. Dieser Schlüssel kann im Web-Konfigurator
geändert werden. Achten Sie darauf, dass Sie beim P-320W und bei den Wireless-Clients denselben OTIST
Setupschlüssel verwenden.
A
B
C
D
D
E
27

DEUTSCH
SCHRITT 3:
Der Assistent versucht zu ermitteln, welche Art von WAN-Verbindung Sie verwenden.
Wenn der Assistent keinen Verbindungstyp erkennen kann, müssen Sie aus dem Listenfeld EINEN auswählen.
Prüfen Sie bei Ihrem Internetdienstanbieter, ob Sie den richtigen Typ verwenden:
1 Ethernet
2 PPPoE
3 PPTP
Hinweis: Wenn Ihnen Zugangseinstellungen für das Internet vorgegeben wurden, geben Sie diese in
die folgenden Felder ein. Anderenfalls werden die Standardeinstellungen belassen. Klicken Sie
auf Next (Weiter).
WAN
28

DEUTSCH
Ethernet-Verbindung
A Wählen Sie als Ihren WAN-Verbindungstyp Ethernet.
B Wählen Sie Get automatically from your ISP (Automatisch vom Internetdienstanbieter beziehen), wenn Sie
von Ihrem Internetdienstanbieter keine feste IP-Adresse zugewiesen bekommen haben. Weiter mit D.
Oder
Wählen Sie Use fixed IP address provided by your ISP (Vom Internetdienstanbieter vorgegebene feste IP-
Adresse verwenden), um dem P-320W eine feste und eindeutige IP-Adresse zu geben.
C Geben Sie eine WAN IP-Adresse und die WAN IP Subnet-Mask des benachbarten Geräts ein, wenn Sie diese
zur Hand haben. Wenn nicht, belassen Sie die Standardeinstellungen.
Wenn Sie die IP-Adresse und/oder DNS-Servereinstellungen kennen, geben Sie diese in die Felder ein.
Anderenfalls werden die Standardeinstellungen belassen. Klicken Sie auf Next (Weiter).
D Wählen Sie Factory Default (Standardwerte), um die werkseitig festgelegte Standard-MAC-Adresse zu
verwenden.
A
B
C
D
29

DEUTSCH
PPPoE-Verbindung
A Wählen Sie als Ihren WAN-Verbindungstyp PPPoE.
B Geben Sie Service Name (Servicename) (optional), User Name (Benutzername) und Password (Passwort)
ein.
C Wählen Sie Get automatically from your ISP (Automatisch vom Internetdienstanbieter beziehen), wenn Sie
von Ihrem Internetdienstanbieter keine feste IP-Adresse zugewiesen bekommen haben. Weiter mit E.
Wählen Sie Use fixed IP address provided by your ISP (Vom Internetdienstanbieter vorgegebene feste IP-
Adresse verwenden), um dem P-320W eine feste und eindeutige IP-Adresse zu geben.
D Geben Sie die WAN IP-Adresse des benachbarten Geräts ein, wenn Sie sie kennen. Wenn nicht, belassen Sie
die Standardeinstellungen.
Wenn Sie die IP-Adresse und/oder DNS-Servereinstellungen kennen, geben Sie diese in die Felder ein.
Anderenfalls werden die Standardeinstellungen belassen. Klicken Sie auf Next (Weiter).
E Wählen Sie Factory Default (Standardwerte), um die werkseitig festgelegte Standard-MAC-Adresse zu
verwenden.
30

DEUTSCH
A
B
C
D
E
31

DEUTSCH
PPTP-Verbindung
A Wählen Sie als Ihren WAN-Verbindungstyp PPTP.
B Geben Sie User Name (Benutzername) und Password (Passwort) ein.
C Wählen Sie Get automatically from your ISP (Automatisch vom Internetdienstanbieter beziehen), wenn Sie
von Ihrem Internetdienstanbieter keine feste PPTP IP-Adresse zugewiesen bekommen haben.
Oder wählen Sie Use fixed IP address (Feste IP-Adresse verwenden), um dem P-320W eine feste und
eideutige PPTP IP-Adresse sowie Subnet-Mask zuzuweisen.
D Geben Sie eine PPTP Server IP-Adresse ein
E Geben Sie Verbindungs-ID/-Name ein (wenn vorhanden)
F Wählen Sie Get automatically from your ISP (Automatisch vom Internetdienstanbieter beziehen), wenn Sie
von Ihrem Internetdienstanbieter keine feste IP-Adresse zugewiesen bekommen haben. Weiter mit H.
Wählen Sie Use fixed IP address provided by your ISP (Vom Internetdienstanbieter vorgegebene feste IP-
Adresse verwenden), um dem P-320W eine feste und eindeutige IP-Adresse zu geben.
G Geben Sie eine WAN IP-Adresse und die WAN IP Subnet-Mask des benachbarten Geräts ein, wenn Sie diese
zur Hand haben. Wenn nicht, belassen Sie die Standardeinstellungen.
Wenn Sie die IP-Adresse und/oder DNS-Servereinstellungen kennen, geben Sie diese in die Felder ein.
Anderenfalls werden die Standardeinstellungen belassen. Klicken Sie auf Next (Weiter).
H Wählen Sie Factory Default (Standardwerte), um die werkseitig festgelegte Standard-MAC-Adresse zu
verwenden.
32

DEUTSCH
A
B
C
D
E
F
G
H
33

DEUTSCH
Einrichten des Internetzugangs fertig stellen
Wenn beim Zugriff auf das Internet Probleme
auftreten sollten, befolgen Sie die Anweisungen auf
dem Bildschirm.
Klicken Sie auf Finish (Fertig stellen).
4 Fehlerbehebung
Hinweis: Wenn Ihr Computer nicht automatisch mit dem Gerät kommunizieren kann, können Sie im
Multimedia-Lernprogramm erfahren, wie der Computer eingerichtet werden muss, damit er eine
IP-Adresse dynamisch empfangen kann. Sie können ihm auch eine feste IP-Adresse
entsprechend der Anleitung im Abschnitt
PROBLEM LÖSUNGSMÖGLICHKEIT
Beim Einschalten des P-320W
leuchtet keine der LEDAnzeigen.
Ich kann von meinem Computer
aus nicht auf den P-320W
zugreifen.
Stellen Sie sicher, dass der richtige Netzadapter am P-320W angeschlossen ist
und dass eine geeignete Stromquelle verwendet wird.
Prüfen Sie alle Kabelverbindungen. Wenn die LED-Anzeigen auch dann nicht
leuchten, besteht möglicherweise ein Problem mit der Hardware. In diesem Fall
sollten Sie sich an einen Fachhändler wenden.
Prüfen Sie die Kabelverbindung zwischen Computer und Mer produkthjalp finns
pa http://www.support.zyxel.se.
Die IP-Adresse des P-320W hat sich geändert. Geben Sie die neue Adresse
als Website-Adresse ein.
Stellen Sie sicher, dass sich die IP-Adresse des Computers im selben Subnetz
wie die des P-320W befindet (siehe Abschnitt 4.1).
Wählen Sie den P-320W mit einem Ping von einem Computer des LAN aus an.
Stellen Sie sicher, dass der Ethernet-Adapter des Computers angeschlossen ist
und richtig funktioniert. Klicken Sie am Computer auf Start, (Alle) Programme,
Zubehör und dann Eingabeaufforderung. Geben Sie im Fenster der
Eingabeaufforderung "ping" und die LAN IP-Adresse des P-320W
(192.168.1.1 ist die Standardadresse) ein und drücken Sie auf [ENTER]. Der P320W sollte nun reagieren. Anderenfalls lesen Sie nach im Abschnitt 4.1.
4.1 geben.
34

DEUTSCH
PROBLEM LÖSUNGSMÖGLICHKEIT
Ich kann von meinem Computer
aus nicht auf den P-320W
zugreifen (Fortsetzung).
Ich kann nicht auf das Internet
zugreifen.
Verwenden Sie den Internet Explorer 6.0 und neuere Versionen oder den
Netscape Navigator 7.0 und neuere Versionen mit aktiviertem JavaScript.
Stellen Sie sicher, dass das Passwort richtig eingegeben wurde (beachten Sie
Groß- und Kleinbuchstaben).
Wenn Sie das Passwort für den P-320W vergessen haben sollten, drücken Sie
auf die Taste RESET. Drücken Sie etwa 10 Sekunden lang auf die Taste (bis die
LED-Anzeige SYS blinkt) und lassen Sie sie dann los. Der P-320W wird dann
auf die Standardeinstellungen zurück gesetzt (Passwor:1234, LAN IP-Adresse:
192.168.1.1 etc.).
Prüfen Sie im Assistenten die Einstellungen für die Internetverbindung. Stellen
Sie sicher, dass Sie, wenn Sie PPPoE oder PPPoA verwenden, den richtigen
Benutzernamen und das richtige Passwort eingegeben haben.
4.1 Einrichten der IP-Adresse des Computers
In diesem Abschnitt wird beschrieben, wie Sie Ihren Computer einrichten müssen, damit er bei Windows
2000, Windows NT und Windows XP eine IP-Adresse empfangen kann. Nur auf diese Weise kann Ihr
Computer mit dem P-320W kommunizieren.
1 Klicken Sie bei Windows XP auf Start, Systemsteuerung.
Klicken Sie bei Windows 2000/NT auf Start, Einstellungen, Systemsteuerung.
2 Klicken Sie bei Windows XP auf Netzwerkverbindungen.
Klicken Sie bei Windows 2000/NT auf Netzwerk und DFÜ-Verbindungen.
3 Klicken Sie mit der rechten Maustaste auf LAN-Verbindung und dann auf Eigenschaften.
4 Wählen Sie Internetprotokoll (TCP/IP) (bei Windows XP auf der Registerkarte Allgemein) und klicken
Sie auf Eigenschaften.
35

DEUTSCH
5 Das Fenster Eigenschaften von Internetprotokoll
(TCP/IP) erscheint (bei Windows XP auf der
Registerkarte Allgemein).Wählen Sie IP-Adresse
automatisch beziehen und DNS-Serveradresse
automatisch beziehen.
6 Klicken Sie auf OK, um das Fenster Eigenschaften
von Internetprotokolle (TCP/IP) zu schließen.
7 Klicken Sie auf Schließen (bei Windows 2000/NT auf
OK), um das Fenster Eigenschaften von LANVerbindung zu schließen.
8 Schließen Sie das Fenster Netzwerkverbindungen.
4.2 Schritte zum Ansehen der Produktzertifizierung(en)
1 Besuchen Sie www.zyxel.com.
2 Wählen Sie auf der ZyXEL-Homepage aus der Liste der Produkte Ihr Produkt aus.
3 Wählen Sie auf dieser die Zertifizierung aus, die Sie gerne angezeigt haben möchten.
36

ESPAÑOL
ESPAÑOL
Descripción
El P-320W es un router de banda ancha con un switch incorporado de 10/100 Mbps con cuatro puertos. El P320W hace fácil la configuración de una red doméstica o de oficina y el acceso compartido a Internet a través
de módem de banda ancha (cable/DSL).
Debe tener una cuenta de Internet ya configurada y la mayor parte de la siguiente información.
Tabla 1 Información de la cuenta de Internet
Su dirección IP WAN del dispositivo (si se ha facilitado): ______________
Dirección IP del servidor DNS (si se ha facilitado): Primario _____________, Secundario ______________
Tipo de conexión:
Ethernet Tipo de servicio: _______________________
Nombre de usuario: ____________
PPTP: Nombre de usuario: ____________
Su dirección IP WAN del dispositivo (si se ha
facilitado) ______________
ID de conexión (si es necesario): ____________
PPPoE Nombre del servicio (PPPoE): ____________
Nombre de usuario: ____________ Contraseña: ____________
Dirección IP del servidor de acceso:
______________
Contraseña: ____________
Contraseña: ____________
Dirección IP del servidor PPTP: ___________
o nombre del dominio PPTP: ___________
Consulte su Guía del usuario para información previa sobre todas las características.
A continuación se detalla lo que necesita hacer:
1 Conexiones del hardware
2 Acceder al configurador Web
3 Configuración del acceso a Internet
37

1 Conexiones del hardware
ESPAÑOL
Realice lo siguiente para crear conexiones de hardware para la configuración inicial.
Conexión WAN
1
Conecte su módem al puerto “WAN” usando el cable que venía con su módem.
Conexión LAN
2
Conecte su ordenador a un puerto "LAN" usando el cable Ethernet incluido
Conexión de ALIMENTACIÓN
3
Utilice el adaptador de corriente incluido para conectar el zócalo POWER (ALIMENTACIÓN) a una fuente de
alimentación apropiada (consulte la Guía del usuario para especificaciones sobre el adaptador de corriente por
regiones).
38

ESPAÑOL
Los LEDs
Tras realizar las conexiones, pulse el
botón de encendido para encender el
Mer produkthjalp finns pa http://
www.support.zyxel.se.
Mire a los LEDs del panel frontal.
Cuando conecte la alimentación, los
LEDs PWR y WLAN se encenderán.
Los LEDs LAN y WAN se encenderán si se realizan correctamente las conexiones correspondientes.
2 Acceder al configurador Web
1 Abra su explorador de web. Introduzca “192.168.1.1” como dirección del sitio web.
Nota: Si no ve la siguiente pantalla, vaya a la sección 4.1.
2 Aparecerá la pantalla Password (Contraseña).
Introduzca la contraseña ("1234" es la
predeterminada) y haga clic en Login (Acceso).
3 Cambie la contraseña en la pantalla siguiente y
haga clic en Apply (Aplicar).
4 Elija su idioma en el cuadro de la lista desplegable.
Haga clic en Apply (Aplicar).
39

ESPAÑOL
Nota: El botón Next (Siguiente) está situado en la parte inferior derecha de cada pantalla.
5 Haga clic en Go to Wizard setup (Ir al Asistente
de configuración) para configurar su P-320W por
primera vez.
6 Elija su idioma en el cuadro de la lista desplegable.
Haga clic en Next (Siguiente) para proceder con
Connection Wizard (Asistente para la conexión).
3 Configuración del acceso a Internet
Nota: Introduzca la información de acceso a Internet facilitada por su ISP en cada pantalla del
asistente y luego haga clic en Next (Siguiente) para continuar o haga clic en Back (Atrás) para
regresar a la pantalla anterior.
La información de la pantalla actual se perderá si hace clic en Back (Atrás).
PASO 1:
Información del sistema
1 Esta pantalla es opcional. Puede hacer clic en
Next (Siguiente).
• System Name (Nombre del sistema) es para
identificar el Mer produkthjalp finns pa http://
www.support.zyxel.se. Puede introducir el "Computer Name" (Nombre de ordenador) de su ordenador.
• Si deja el Domain Name (Nombre de dominio)
en blanco, se utilizará el nombre de dominio
obtenido por el DHCP desde el ISP.
40

ESPAÑOL
PASO 2:
Configure UNO de los siguientes tipos de seguridad en el Mer produkthjalp finns pa http://
www.support.zyxel.se:
• Seguridad Auto (Automática): Utiliza la seguridad WPA-PSK con una clave pre-compartida generada
automáticamente. Vea la clave pre-compartida en la pantalla Wireless LAN (LAN inalámbrica).
Nota: Sus clientes inalámbricos deben soportar WPA-PSK y utilizar la misma clave.
• None (Ninguna): No tiene seguridad LAN inalámbrica configurada. Si no activa ninguna seguridad inalámbrica
en su Mer produkthjalp finns pa http://www.support.zyxel.se, su red es accesible desde cualquier dispositivo de
red inalámbrico dentro del alcance.
• Seguridad Basic (Básica): WEP (Wired Equivalent Privacy) cifra los cuadros de datos antes de transmitir por
la red inalámbrica. Cuanto mayor sea el cifrado WEP, mayor será la seguridad pero menor la velocidad.
• Seguridad Extend (Extendida) (WPA-PSK): Configura una clave pre-compartida. Elija esta opción sólo si sus
clientes inalámbricos soportan WPA-PSK.
Nota: Los clientes inalámbricos y el P-320W deben usar el mismo SSID, ID de canal y WPA-PSK (si
WPA-PSK está activado) o la clave de cifrado WEP (si WEP está activado) para la comunicación
inalámbrica.
LAN inalámbrica
OTIST
• OTIST (One-Touch Intelligent Security Technology - Tecnología de Seguridad Inteligente de Un Toque) permite
a su P-320W asignar a clientes inalámbricos el SSID del P-320W y configuración de cifrado de WEP estática
o WPA-PSK. El cliente inalámbrico también debe soportar OTIST y tener activado OTIST.
41

ESPAÑOL
Seguridad Wireless (Inalámbrica) Auto (Automática) o No
A Introduzca un nombre único para identificar al P-320W en la LAN inalámbrica.
B Deje la configuración predeterminada. El P-320W y el cliente inalámbrico deben usar el mismo ID de canal.
C Seleccione un nivel de seguridad inalámbrico. Elija Auto (Automático) o None (Ninguno).
D Para la seguridad Auto (Automática), seleccione Yes (Sí) para habilitar OTIST. Si selecciona None (Ninguna)
seleccione el botón redondo Yes (Sí) para habilitar OTIST o seleccione No y haga clic en Next (Siguiente)
para configurar OTIST más tarde.
E La Setup Key (Clave de configuración) OTIST predeterminada es "01234567" Esta clave puede cambiarse
en el configurador web. Asegúrese de utilizar la misma Setup Key (Clave de configuración) OTIST en el P320W y en los clientes inalámbricos.
A
B
C
D
E
42

ESPAÑOL
Seleccione seguridad Básica (WEP)
A Introduzca un nombre único para identificar al P-320W en la LAN inalámbrica.
B Deje la configuración predeterminada. El P-320W y el cliente inalámbrico deben usar el mismo ID de canal.
C Seleccione seguridad Básica (WEP).
D Puede generar o introducir manualmente una clave WEP de los siguientes modos:
Introduciendo una Passphrase (Frase secreta) (hasta 32 caracteres imprimibles) y haciendo clic en
Generate (Generar). El P-320W generará automáticamente una clave WEP.
O introduciendo claves manuales en cada campo de Key (clave) (1~4) y seleccionando el método de
introducción de clave WEP ASCII o Hex.
E Seleccione 64-bit o 128-bit en la lista desplegable de cifrado WEP.
F Seleccione caracteres ASCII o Hex.
G Seleccione uno de los botones redondos Key (Clave) para usarla como clave WEP predeterminada.
H Yes (Sí) está activado por defecto. Seleccione el botón redondo No y haga clic en Next (Siguiente) para
configurar OTIST más tarde.
I La Setup Key (Clave de configuración) OTIST predeterminada es "01234567" Esta clave puede cambiarse
en el configurador web. Asegúrese de utilizar la misma Setup Key (Clave de configuración) OTIST en el P320W y en los clientes inalámbricos.
43

ESPAÑOL
A
B
C
D
E
F
G
D
E
44

ESPAÑOL
Extienda la seguridad (WPA-PSK)
A Introduzca un nombre único para identificar al P-320W en la LAN inalámbrica.
B Deje la configuración predeterminada. El P-320W y el cliente inalámbrico deben usar el mismo ID de canal.
C Seleccione seguridad WPA-PSK.
D Escriba una clave pre-compartida para tener una conexión inalámbrica más segura que el cifrado WEP.
Escriba de 8 a 63 caracteres ASCII con distinción entre mayúsculas y minúsculas. Puede ajustar la conexión
inalámbrica más segura configurando WPA en la pantalla inalámbrica avanzada. Necesita configurar un
servidor RADIUS para hacerlo.
E Yes (Sí) está activado por defecto. Seleccione el botón redondo No y haga clic en Next (Siguiente) para
configurar OTIST más tarde.
F La Setup Key (Clave de configuración) OTIST predeterminada es "01234567" Esta clave puede cambiarse
en el configurador web. Asegúrese de utilizar la misma Setup Key (Clave de configuración) OTIST en el P320W y en los clientes inalámbricos.
A
B
C
D
D
E
45

ESPAÑOL
PASO 3:
El asistente intentará detectar qué tipo de conexión WAN está utilizando.
Si el asistente no detecta un tipo de conexión, deberá seleccionar UNO en el cuadro de la lista desplegable.
Consulte a su ISP para comprobar que utiliza el tipo correcto:
1 Ethernet
2 PPPoE
3 PPTP.
Nota: Si se le ha facilitado una configuración de acceso a Internet, introdúzcala en los campos
siguientes. De lo contrario, deje los valores predeterminados y haga clic en Next (Siguiente)
WAN
46

ESPAÑOL
Conexión Ethernet
A Seleccione Ethernet como tipo de conexión WAN.
B Seleccione Get automatically from your ISP (Obtener automáticamente de su ISP) si su ISP no le asignó
una dirección IP fija. Salte a D.
O
Seleccione Use fixed IP address provided by your ISP (Utilizar la dirección IP fija facilitada por su ISP)
para dar al P-320W una dirección IP única y fija.
C Introduzca la WAN IP address (Dirección IP WAN) y la WAN IP Subnet Mask (Máscara de subred IP WAN) del
dispositivo vecino, si la conoce. De lo contrario, deje la configuración predeterminada.
Si se le ha facilitado la dirección IP y/o la configuración del servidor DNS, introdúzcalos en los campos. De lo
contrario, deje los valores predeterminados y haga clic en Next (Siguiente).
D Seleccione Factory Default (Predeterminado de fábrica) para utilizar la dirección MAC predeterminada
asignada de fábrica.
47

ESPAÑOL
A
B
C
D
48

ESPAÑOL
Conexión PPPoE
A Seleccione PPPoE como tipo de conexión WAN.
BEscriba el Service Name (Nombre de servicio) (Opcional), User Name (Nombre de usuario) y Password
(Contraseña).
C Seleccione Get automatically from your ISP (Obtener automáticamente de su ISP) si su ISP no le asignó
una dirección IP fija. Salte a E.
O seleccione Use fixed IP address provided by your ISP (Utilizar la dirección IP fija facilitada por su ISP)
para dar al P-320W una dirección IP única y fija.
D Introduzca una WAN IP address (Dirección IP WAN) del dispositivo vecino, si la conoce. De lo contrario, deje
la configuración predeterminada.
Si se le ha facilitado la dirección IP y/o la configuración del servidor DNS, introdúzcalos en los campos. De lo
contrario, deje los valores predeterminados y haga clic en Next (Siguiente).
E Seleccione Factory Default (Predeterminado de fábrica) para utilizar la dirección MAC predeterminada
asignada de fábrica.
49

ESPAÑOL
A
B
C
D
E
50

ESPAÑOL
Conexión PPTP
A Seleccione PPTP como tipo de conexión WAN.
BEscriba un User Name (Nombre de usuario) y Password (Contraseña)
C Seleccione Get automatically from your ISP (Obtener automáticamente de su ISP) si su ISP no le asignó
una dirección IP PPTP fija.
O seleccione Use fixed IP address (Utilizar dirección IP fija) para dar al P-320W una dirección IP PPTP
única y fija y una máscara de subred.
D Escriba una dirección IP del servidor PPTP
E Escriba un Connection ID/Name (ID de conexión/Nombre) (si se le ha facilitado)
F Seleccione Get automatically from your ISP (Obtener automáticamente de su ISP) si su ISP no le asignó
una dirección IP fija. Salte a H.
O seleccione Use fixed IP address provided by your ISP (Utilizar la dirección IP fija facilitada por su
ISP) para dar al P-320W una dirección IP única y fija.
G Introduzca la WAN IP address (Dirección IP WAN) y la WAN IP Subnet Mask (Máscara de subred IP WAN)
del dispositivo vecino, si la conoce. De lo contrario, deje la configuración predeterminada.
Si se le ha facilitado la dirección IP y/o la configuración del servidor DNS, introdúzcalos en los campos. De lo
contrario, deje los valores predeterminados y haga clic en Next (Siguiente).
H Seleccione Factory Default (Predeterminado de fábrica) para utilizar la dirección MAC predeterminada
asignada de fábrica.
51

ESPAÑOL
A
B
C
D
E
F
G
H
52

ESPAÑOL
Configuración del acceso a Internet completada
Si tiene algún problema de acceso a Internet, siga
las instrucciones en pantalla.
Haga clic en Finalizar.
4 Solución de problemas
Nota: Si su ordenador no puede comunicarse automáticamente con el dispositivo, entonces consulte
el tutorial multimedia para ver cómo configurar su ordenador para recibir una dirección IP
dinámica o darle una fija en el rango especificado en la sección
PROBLEMA SOLUCIÓN
Ninguno de los LEDs se
enciende al conectar la
alimentación del Mer
produkthjalp finns pa http://
www.support.zyxel.se.
No se puede acceder al P320W desde mi ordenador.
Asegúrese de haber conectado el adaptador de alimentación correcto al P320W y de haberlo enchufado en una fuente de alimentación apropiada.
Compruebe todas las conexiones de los cables. Si los LEDs todavía no se
encienden, puede que tenga un problema de hardware. En este caso, debería
contactar con su vendedor local.
Compruebe la conexión de los cables de su ordenador al Mer produkthjalp finns
pa http://www.support.zyxel.se.
Si la dirección IP del P-320W ha cambiado, introduzca la nueva como dirección
de sitio web.
Compruebe que la dirección IP del ordenador esté en la misma subred que la
dirección IP del P-320W (ver sección 4.1).
Realice un ping al P-320W desde un ordenador en la LAN. Compruebe que el
adaptador Ethernet de su ordenador esté instalado y funcione correctamente.
En el ordenador, haga clic en Inicio, (Todos los) programas, Accesorios y
luego en Símbolo del sistema. En la ventana del Símbolo del sistema,
escriba "ping" seguido por la dirección IP LAN del P-320W (192.168.1.1 es la
predeterminada) y pulse [ENTRAR]. El P-320W debería responder; si no lo
hace, consulte la sección 4.1.
4.1.
53

ESPAÑOL
PROBLEMA SOLUCIÓN
No se puede acceder al P320W desde mi ordenador
(continuación).
No puedo acceder a Internet. Verifique la configuración de la conexión a Internet en el asistente. Asegúrese
Utilice Internet Explorer 6.0 o superior o Netscape Navigator 7.0 o superior con
JavaScript activado.
Asegúrese de haber introducido la contraseña correctamente (el campo
distingue mayúsculas y minúsculas).
Si ha olvidado la contraseña del Mer produkthjalp finns pa http://
www.support.zyxel.se, utilice el botón RESET . Mantenga pulsado el botón
durante unos 10 segundos (o hasta que el LED SYS comience a parpadear), a
continuación suéltelo. Esto devuelve al P-320W los valores predeterminados
de fábrica (la contraseña es 1234, la dirección IP LAN 192.168.1.1, etc.).
de haber introducido el nombre de usuario y contraseña correctos si utiliza
PPPoE o PPPoA.
4.1 Configurar la dirección IP de su ordenador
Esta sección le explica cómo configurar su ordenador para recibir una dirección IP en Windows 2000,
Windows NT y Windows XP. Esto asegura que su ordenador pueda conectarse con su Mer produkthjalp finns
pa http://www.support.zyxel.se.
1 En Windows XP, haga clic en Inicio, Panel de control.
En Windows 2000/NT, haga clic en Inicio, Configuración, Panel de control.
2 En Windows XP, haga clic en Conexiones de red.
En Windows 2000/NT, haga clic en Conexiones de red y marcación.
3 Haga clic con el botón derecho en Conexión de área local y haga clic en Propiedades.
54

ESPAÑOL
4 Seleccione Protocolo Internet (TCP/IP) (en la ficha General en Windows XP) y haga clic en
Propiedades.
5 Se abrirá la pantalla Propiedades de Protocolo
Internet TCP/IP (la ficha General en Windows XP).
Seleccione las opciones Obtener una dirección IP
automáticamente y Obtener la dirección del
servidor DNS automáticamente.
6 Haga clic en Aceptar para cerrar la ventana
Propiedades de Protocolo Internet (TCP/IP).
7 Haga clic en Cerrar (Aceptar en Windows 2000/NT)
para cerrar la ventana Propiedades de conexión de
área local.
8 Cierre la pantalla Conexiones de red.
Procedimiento para ver la(s) certificación(es) del producto
1 Vaya a www.zyxel.com.
2 Seleccione su producto de la lista desplegable en la página inicial de ZyXEL para ir a la página de ese
producto.
3 Seleccione la certificación que desee visualizar en esta página.
55

FRANÇAIS
FRANÇAIS
Présentation
Le P-320W est un routeur à large bande avec un commutateur 10/100 Mbps à quatre ports intégré. Le P320W facilite l'installation d'un petit réseau domestique ou d'entreprise et permet de partager l'accès à
Internet via un modem large bande (câble/DSL).
Vous devez déjà avoir un compte Internet installé et avoir reçu la plupart des informations suivantes.
Table 1 Informations sur le compte Internet
L'adresse IP WAN de votre périphérique (si fournie) : ______________
Adresse IP du Serveur DNS (si fournie) : Principale _____________, Secondaire ______________
Type de connexion :
Ethernet Type de service : _______________________
Nom d'utilisateur : ____________
PPTP : Nom d'utilisateur : ____________
Votre adresse IP WAN (si fournie)
____________
ID de connexion (si nécessaire) : ____________
PPPoE Nom du service (PPPoE) : ____________
Nom d'utilisateur : ____________ Mot de passe : ____________
Adresse IP de connexion du serveur :
______________
Mot de passe : ____________
Mot de passe : ____________
Adresse IP du serveur PPTP : ___________
ou nom de domaine PPTP : ___________
Voir votre guide de l'utilisateur pour les informations d'arrière-plan sur toutes les fonctionnalités.
Voici la liste de ce que vous devez faire :
1 Connexions matérielles
2 Accéder au configurateur Web
3 Installation de l'accès à Internet
56

1 Connexions matérielles
FRANÇAIS
Procédez comme suit pour effectuer les connexions matérielles pour l'installation initiale.
Connexion WAN
1
Connectez votre modem au port “WAN” à l'aide du câble fourni avec votre modem.
Connexion par réseau local
2
Connectez votre ordinateur à un port "LAN" à l'aide du câble Ethernet fourni
Connexion de l'alimentation
3
Utilisez l'adaptateur d'alimentation fourni pour connecter le socket POWER à une source d'alimentation
appropriée (voir le guide de l'utilisateur pour les spécifications sur l'adaptateur d'alimentation par région).
57

FRANÇAIS
Les LED
Après avoir effectué les connexions,
appuyez sur le bouton d'alimentation
pour allumer le Mer produkthjalp finns
pa http://www.support.zyxel.se.
Observez les LED du panneau avant.
Quand vous connectez l'alimentation,
les LED PWR et WLAN s'allument.
Les LED LAN et WAN s'allument si les connexions correspondantes sont correctement effectuées.
2 Accéder au configurateur Web
1 Lancez votre navigateur Web. Entrez “192.168.1.1” comme adresse de site Web.
Remarque : Si vous ne voyez pas l'écran suivant, allez à la section 4.1 .
2 La fenêtre Password (Mot de passe) s'affiche.
Entrez le mot de passe ("1234" est la valeur par
défaut) et cliquez sur Login (Connexion).
3 Changez le mot de passe dans l'écran suivant et
cliquez sur Apply (Appliquer).
4 Choisissez votre langue dans la liste déroulante.
Cliquez sur Apply (Appliquer).
58

FRANÇAIS
Remarque : Le bouton Next (Suivant) est situé en bas à droite de chaque écran.
5 Cliquez sur Go to Wizard setup (Aller à
Installation de l'assistant) pour paramétrer votre
P-320W pour la première fois.
6 Choisissez votre langue dans la liste déroulante.
Cliquez sur Next (Suivant) pour continuer avec
l'Assistant de connexion.
3 Installation de l'accès à Internet
Remarque : Saisissez les informations d'accès à Internet exactement telles qu'elles sont fournies par
votre fournisseur d'accès à Internet (FAI) dans chaque écran de l'assistant et cliquez ensuite sur
Next (Suivant) pour continuer ou cliquez sur Back (Retour) pour retourner à l'écran précédent.
Les informations d'écran actuelles seront perdues si vous cliquez sur Back (Retour).
ETAPE 1:
1 Cet écran est optionnel. Cliquez simplement sur
Next (Suivant).
• System Name (Le nom du système) sert à identi-
fier le Mer produkthjalp finns pa http://www.support.zyxel.se. Vous pouvez saisir le "Nom
d'ordinateur" de votre ordinateur.
• Si vous laissez Domain Name (le nom de
domaine) vide, le nom de domaine obtenu par
DHCP de l'FAI est utilisé.
Informations du système
59

FRANÇAIS
ETAPE 2:
Configurez UN des types de sécurité sans fil suivants sur le Mer produkthjalp finns pa http://
www.support.zyxel.se.
• Sécurité Auto : Utilisez la sécurité WPA-PSK avec une clé prépartagée générée automatiquement. Visualisez
la clé prépartagée dans l'écran LAN sans fil.
Remarque : Vos clients sans fil doivent supporter WPA-PSK et utiliser la même clé.
• Aucune : Si vous ne configurez aucune sécurité sans fil sur votre Mer produkthjalp finns pa http://www.sup-
port.zyxel.se, votre réseau est accessible à tout périphérique de réseau sans fil se trouvant à portée.
• Sécurité de base : WEP (Wired Equivalent Privacy) crypte les trames de données avant de les transmettre sur
le réseau sans fil. Plus le cryptage WEP est élevé, meilleure sera la sécurité mais plus le débit sera lent.
• Sécurité (WPA-PSK) étendue : Configurer une clé prépartagée. Choisissez cette option seulement si vos cli-
ents sans fil supportent WPA-PSK.
Remarque : Les clients sans fil et P-320W doivent utiliser la même SSID, ID de canal et WPA-PSK (si
WPA-PSK est activé) ou la clé de cryptage WEP (si WEP est activé) pour la communication
sans fil.
LAN dans gil
OTIST
• OTIST (One-Touch Intelligent Security Technology) permet à votre P-320W d'attribuer la SSID du P-320W aux
clients sans fil et les paramètres de cryptage WEP statique ou WPA-PSK. Le client sans fil doit aussi supporter
OTIST et avoir OTIST activé.
60

FRANÇAIS
61

FRANÇAIS
Sécurité sans filautomatique ou désactivée
A Saisissez un nom unique pour identifier le P-320W dans le LAN sans fil.
B Laisser le paramètre par défaut. Le P-320W et le client sans fil doivent utiliser la même ID de canal.
C Sélectionnez un niveau de sécurité sans fil. Choisissez Auto (Auto) ou None (Aucun).
D Pour la sécurité Auto (Auto) sélectionnez Yes (Oui) pour activer OTIST. Si vous sélectionnez None (Aucun)
sélectionnez soit Yes (Oui) pour activer OTIST ou sélectionnez la case d'option No (Non) et cliquez sur Next
(Suivant) pour configurer OTIST plus tard.
E Setup Key (Clé d'installation) d'OTIST par défaut est "01234567". Cette clé peut être modifiée dans le
configurateur Web. Vérifiez que vous utilisez la même Setup Key (Clé d'installation) OTIST sur le P-320W et
les clients sans fil.
A
B
C
D
E
62

FRANÇAIS
Sécurité de base (WEP)
A Saisissez un nom unique pour identifier le P-320W dans le LAN sans fil.
B Laisser le paramètre par défaut. Le P-320W et le client sans fil doivent utiliser la même ID de canal.
C Sélectionnez la sécurité Basic (sécurité de base WEP).
D Vous pouvez générer ou entrer manuellement une clé WEP de l'une des manières suivantes :
En entrant une Passphrase (phrase de passe) (jusqu'à 32 caractères imprimables) et en cliquant sur
Generate (Générer). Le P-320W génère automatiquement une clé WEP.
Ou en entrant les clés manuelles dans chaque champ de Key (clé) (1~4) et en sélectionnant la méthode
d'entrée de clé WEPASCII ou Hex.
E Sélectionnez 64 bits ou 128 bits dans la liste déroulante de cryptage WEP.
F Sélectionnez les caractères ASCII ou Hex.
G Sélectionnez une des cases d'options de clé à utiliser comme Key (clé) WEP par défaut.
H Yes (Oui) est activé par défaut. Sélectionnez la case d'option No (Non) et cliquez sur Next (Suivant) pour
configurer OTIST plus tard.
I La Setup Key (Clé d'installation) d'OTIST par défaut est "01234567". Cette clé peut être modifiée dans le
configurateur Web. Vérifiez que vous utilisez la même Setup Key (Clé d'installation) OTIST sur le P-320W et
les clients sans fil.
63
FRANÇAIS
A
B
C
D
E
F
G
D
E
64

FRANÇAIS
Sécurité (WPA-PSK) étendue
A Saisissez un nom unique pour identifier le P-320W dans le LAN sans fil.
B Laisser le paramètre par défaut. Le P-320W et le client sans fil doivent utiliser la même ID de canal.
C Sélectionnez la sécurité WPA-PSK.
D Tapez une clé prépartagée pour avoir une connexion sans fil plus sécurisée que le cryptage WEP. Tapez de 8
à 63 caractères ASCII en respectant la casse. Vous pouvez installer la connexion sans fil la plus sécurisée en
configurant WPA dans l'écran sans fil avancé. Pour cela vous devez configurer un serveur RADIUS.
E Yes (Oui) est activé par défaut. Sélectionnez la case d'option No (Non) et cliquez sur Next (Suivant) pour
configurer OTIST plus tard.
F La Setup Key (Clé d'installation) d'OTIST par défaut est "01234567". Cette clé peut être modifiée dans le
configurateur Web. Vérifiez que vous utilisez la même Setup Key (Clé d'installation) OTIST sur le P-320W et
les clients sans fil.
A
B
C
D
D
E
65

FRANÇAIS
ETAPE 3:
L'assistant essaie de détecter le type de connexion WAN que vous utilisez.
Si l'assistant ne détecte pas de type de connexion, vous devez en sélectionner UN dans la liste déroulante.
Vérifiez auprès de votre ISP pour être sûr d'utiliser le type correct :
1 Ethernet
2 PPPoE
3 PPTP.
Remarque : Si vous avez obtenu les paramètres d'accès Internet, saisissez-les dans les champs
suivants. Sinon laissez les paramètres par défaut et cliquez simplement sur Next (Suivant)
WAN
66

FRANÇAIS
Connexion Ethernet
A Sélectionnez Ethernet comme type de connexion WAN.
B Sélectionnez Get automatically from your ISP (Obtenir automatiquement du FAI) si votre FAI ne vous a pas
attribué une adresse IP fixe. Passez à D.
Ou
Sélectionnez Use fixed IP address provided by your ISP (Utiliser une adresse IP fixe fournie par votre FAI)
pour donner au P-320W une adresse IP fixe et unique.
C Saisissez une adresse IP WAN et un masque de sous-réseau d'IP WAN du périphérique de voisinage, si vous
les connaissez. Si vous ne les connaissez pas, laissez les paramètres par défaut.
Si vous avez reçu une adresse IP et/ou des paramètres de serveur DNS, entrez-les dans les champs. Sinon
laissez les paramètres par défaut et cliquez simplement sur Next (Suivant).
D Sélectionnez Factory Default (Par défaut d'usine) pour utiliser l'adresse MAC par défaut d'usine.
A
B
C
D
67

FRANÇAIS
Connexion PPPoE
A Sélectionnez PPPoE comme type de connexion WAN.
BTapez un Service Name (nom de service) (optionnel), User Name (nom d'utilisateur) et Password (mot de
passe).
C Sélectionnez Get automatically from your ISP (Obtenir automatiquement du FAI) si votre FAI ne vous a pas
attribué une adresse IP fixe. Passez à E.
Ou sélectionnez Use fixed IP address provided by your ISP (Utiliser une adresse IP fixe fournie par votre
FAI) pour donner au P-320W une adresse IP fixe et unique.
D Entrez une WAN IP address (adresse IP WAN) du périphérique de voisinage, si vous la connaissez. Si vous
ne le connaissez pas, laissez les paramètres par défaut.
Si vous avez reçu une adresse IP et/ou des paramètres de serveur DNS, entrez-les dans les champs. Sinon
laissez les paramètres par défaut et cliquez simplement sur Next (Suivant).
E Sélectionnez Factory Default (Par défaut d'usine) pour utiliser l'adresse MAC par défaut d'usine.
A
B
C
D
E
68

FRANÇAIS
Connexion PPTP
A Sélectionnez PPTP comme type de connexion WAN.
BTapez un User Name (nom d'utilisateur) et Password (un mot de passe)
C Sélectionnez Get automatically from ISP (Obtenir automatiquement du FAI) si votre FAI ne vous a pas
attribué une adresse PPTP IP fixe.
Ou sélectionnez Use fixed IP address (Utiliser une adresse IP fixe) pour donne au P-320W une adresse IP
PPTP fixe et unique et un masque de sous-réseau.
D Tapez une Server IP Address (adresse IP) de serveur PPTP
E Tapez une Connection ID/Name (ID/Nom de connexion) (si fourni)
F Sélectionnez Get automatically from your ISP (Obtenir automatiquement du FAI) si votre FAI ne vous a pas
attribué une adresse IP fixe. Passez à H.
Ou sélectionnez Use fixed IP address provided by your ISP (Utiliser une adresse IP fixe fournie par votre
FAI) pour donner au P-320W une adresse IP fixe et unique.
G Saisissez une WAN IP address (adresse IP WAN)et un WAN IP Subnet Mask (masque de sous-réseau d'IP
WAN) du périphérique de voisinage, si vous le connaissez. Si vous ne le connaissez pas, laissez les
paramètres par défaut.
Si vous avez reçu une adresse IP et/ou des paramètres de serveur DNS, entrez-les dans les champs. Sinon
laissez les paramètres par défaut et cliquez simplement sur Next (Suivant).
H Sélectionnez Factory Default (Par défaut d'usine) pour utiliser l'adresse MAC par défaut attribuée en
usine.
69

FRANÇAIS
A
B
C
D
E
F
G
H
70

FRANÇAIS
Installation de l'accès à Internet terminée
Si vous rencontrez des problèmes pour accéder à
Internet, suivez les instructions sur l'écran.
Cliquez sur Finish (Terminer).
4 Dépannage
Remarque : Si votre ordinateur ne peut pas communiquer automatiquement avec le périphérique,
reportez-vous alors au didacticiel multimédia sur la manière de paramétrer votre ordinateur afin
de recevoir une adresse IP dynamique ou lui en donner une fixe dans la plage spécifiée dans la
section 4.1.
PROBLÈME ACTION CORRECTIVE
Aucune des LED ne s'allume
quand vous connectez
l'alimentation du Mer
produkthjalp finns pa http://
www.support.zyxel.se.
Impossible d'accéder au P320W à partir de mon
ordinateur.
Vérifiez que l'adaptateur d'alimentation adéquat est connecté au P-320W et
qu'il est branché à une source de courant appropriée.
Vérifiez toutes les connexions câblées. Si les LED ne s'allument toujours pas,
cela signifie que vous avez peut-être un problème matériel. Dans ce cas-là,
vous devez contacter votre revendeur local.
Vérifiez la connexion du câble entre votre ordinateur et le Mer produkthjalp finns
pa http://www.support.zyxel.se.
Si l'adresse IP du P-320W a changé, entrez alors la nouvelle comme adresse
du site Web.
Vérifiez que l'adresse IP de votre ordinateur se trouve dans le même sousréseau que l'adresse IP du P-320W (voir la section 4.1).
Envoyez la commande Ping au P-320W à partir d'un ordinateur du réseau.
Vérifiez que l'adaptateur Ethernet de votre ordinateur est installé et fonctionne
correctement. Sur l'ordinateur, cliquez sur Start (Démarrer), All (Tous)
Programs (Programmes), Accessoires et ensuite sur Command Prompt
(Invite de commande). Dans la fenêtre Command Prompt (Invite de
commande), tapez "ping" suivi de l'adresse IP LAN du P-320W (192.168.1.1 est
l'adresse par défaut) et appuyez ensuite sur [ENTER]. Le P-320W devrait
répondre, sinon reportez-vous à la section 4.1.
71

FRANÇAIS
PROBLÈME ACTION CORRECTIVE
Impossible d'accéder au P320W à partir de mon
ordinateur (suite).
Impossible d'accéder à Internet. Vérifiez les paramètres de connexion Internet dans l'assistant. Vérifiez que vous
Utilisez Internet Explorer 6.0 et plus récent ou Netscape Navigator 7.0 et plus
récent avec JavaScript activé.
Faites attention à entrer correctement le mot de passe (le champ respecte la
casse)
Si vous avez oublié le mot de passe du Mer produkthjalp finns pa http://
www.support.zyxel.se, utilisez le bouton RESET. Appuyez sur le bouton
pendant environ 10 secondes (jusqu'à ce que la LED SYS commence à
clignoter), puis relâchez-le. Il rétablit le P-320W aux valeurs par défaut d'usine
(le mot de passe est 1234, adresse IP réseau 192.168.1.1 etc.).
avez entré le nom d'utilisateur et le mot de passe corrects si vous utilisez
PPPoE ou PPPoA.
4.1 Paramétrez l'adresse IP de votre ordinateur
Cette section vous indique comment paramétrer votre ordinateur pour recevoir une adresse IP dans Windows
2000, Windows NT et Windows XP. Cela assure que votre ordinateur peut communiquer avec votre Mer
produkthjalp finns pa http://www.support.zyxel.se.
1 Dans Windows XP, cliquez sur Start (Démarrer), Control Panel (Panneau de configuration).
Dans Windows 2000/NT, cliquez sur Start (Démarrer), Settings (Paramètres), Control Panel (Panneau de
configuration).
2 Dans Windows XP, cliquez sur Network Connections (Connexion réseau).
Dans Windows 2000/NT, cliquez sur Network and Dial-up Connection (Connexions réseau et accès à
distance).
3 Cliquez avec le bouton droit de la souris sur Local Area Connection (Connexion de réseau local) et
cliquez sur Properties (Propriétés).
4 Sélectionnez Protocole Internet (TCP/IP) (dans l'onglet General (Général) dans Windows XP) et cliquez
sur Properties (Propriétés).
72

FRANÇAIS
5 L'écran Internet Protocol (TCP/IP) Properties
(Propriétés du protocole Internet TCP/IP) s'ouvre
(l'onglet General (Général) dans Windows XP).
Sélectionnez les options Obtain an IP address
automatically (Obtenir automatiquement une adresse
IP) et Obtain DNS server adress automatically
(Obtenir automatiquement une adresse de serveur
DNS).
6 Cliquez sur OK pour fermer la fenêtre de Internet
protocol Properties (Propriétés (TCP/IP) de protocole
Internet).
7 Cliquez sur Close (Fermer) (OK dans Windows 2000/
NT) pour fermer la fenêtre de Local Area Connection
Properties (Propriétés de connexion au réseau local).
8 Fermez l'écran de Network Connections (Connexion
réseau).
4.2 Procédure pour afficher la (les) certification(s) d'un produit
1 Allez sur www.zyxel.com.
2 Sélectionnez votre produit dans la boîte de la liste déroulante dans la page d'accueil de ZyXEL pour aller à
la page de ce produit.
Sélectionnez la certification que vous désirez consulter.
73

ITALIANO
ITALIANO
Cenni generali
P-320W è un broadband router che incorpora uno switch a quattro porte 10/100 Mbps. Il P-320W semplifica la
configurazione di una piccola rete domestica o per un piccolo ufficio e consente di condividere l'accesso a
Internet attraverso un model a banda larga (via cavo/xDSL).
È necessario disporre di un account Internet già configurato e disporre della maggior parte delle seguenti
informazioni.
Tabella 1 Informazioni sull'account Internet
Indirizzo IP WAN del proprio dispositivo (se fornito): ______________
Indirizzo IP del server DNS (se fornito): Primario _____________, Secondario ______________
Tipo di connessione:
Ethernet Tipo di servizio: _______________________
Nome utente: ____________
PPTP: Nome utente: ____________
Il proprio indirizzo IP WAN (se fornito):
______________
ID di connessione (se richiesto): ____________
PPPoE Nome di servizio (PPPoE): ____________
Nome utente: ____________ Password: ____________
Indirizzo IP del server di login: ______________
Password: ____________
Password: ____________
Indirizzo IP del server PPTP: ______________
oppure il nome di dominio PPTP: ___________
Vedere la Guida dell'utente per le informazioni basilari su tutte le funzionalità.
Nell'elenco seguente sono riportate le operazioni che occorre eseguire:
1 Collegamenti hardware
2 Accesso allo strumento di configurazione Web
3 Configurazione dell'accesso a Internet
74

1 Collegamenti hardware
ITALIANO
Di seguito sono illustrati i collegamenti hardware per l'installazione iniziale.
Collegamento WAN
1
Collegare il modem alla porta “WAN” utilizzando il cavo fornito a corredo con il modem.
Collegamento LAN
2
Collegare il computer alla porta "LAN" utilizzando un cavo Ethernet fornito a corredo.
Collegamento POWER
3
Utilizzare l'alimentatore incluso per collegare la presa POWER a una sorgente di alimentazione appropriata
(vedere la Guida dell'utente per le specifiche terniche dell'alimentatore relative al proprio paese).
75

ITALIANO
Indicatori LED
Dopo aver eseguito i collegamenti,
premere il pulsante di accensione per
accendere il Mer produkthjalp finns pa
http://www.support.zyxel.se.
Sul pannello frontale sono presenti
alcuni LED. Quando si collega
l'alimentazione, i LED PWR e WLAN si
accendono.
I LED LAN e WAN si accendono se i relativi collegamenti sono stati eseguiti correttamente.
2 Accesso allo strumento di configurazione Web
1 Avviare il browser. Immettere 192.168.1.1 nella barra degli indirizzi.
Nota: Se non viene visualizzata la schermata successiva, passare alla sezione 4.1.
2 Viene visualizzata la finestra Password.
Immettere la password (la password predefinita è
1234) e fare clic su Login (accedi).
3 Modificare la password nella schermata
seguente e fare clic su Apply (applica).
4 Selezionare la lingua desiderata dall'elenco a
discesa. Fare clic su Apply (applica).
76

ITALIANO
Nota: In basso a destra di ogni schermata è presente il pulsante Next (avanti).
5 Fare clic su Go Wizard setup (Configurazione
guidata) per eseguire la prima configurazione del
Mer produkthjalp finns pa http://
www.support.zyxel.se.
6 Selezionare la lingua desiderata dall'elenco a
discesa. Fare clic su Next (avanti) per procedere
con Connection Wizard (Connessione guidata).
3 Configurazione dell'accesso a Internet
Nota: Immettere le informazioni e i parametri Internet esattamente come sono stati forniti dal proprio
ISP nelle varie schermate e quindi fare clic su Next (avanti) per continuare oppure su Back
(indietro) per tornare alla schermata precedente.
Facendo clic su Back (indietro) le informazioni presenti nella schermata corrente vengono perse.
FASE 1:
1 Questa schermata è opzionale. È unicamente
possibile fare clic su Next (avanti).
• System Name (nome di sistema) consente di
indentificare il Mer produkthjalp finns pa http://
www.support.zyxel.se. È possibile immettere il
"Nome computer" del proprio PC.
• Lasciando vuoto il campo Domain Name, viene
utilizzato il nome di dominio ottenuto dal DHCP
dell'ISP.
Informazioni sul sistema
77

ITALIANO
FASE 2:
Configurare UNO dei seguenti tipi di protezione wireless sul Mer produkthjalp finns pa http://
www.support.zyxel.se:
• Protezione Auto: utilizza la protezione WPA-PSK con una chiave condivisa in precedenza generata automati-
camente. Visualizzare la chiave condivisa in precedenza generata nella schermata Wireless LAN.
Nota: I client wireless devono supportare WPA-PSK e utilizzare la stessa chiave.
• Nessuna: nessuna protezione LAN wireless configurata. Se non si ailita alcuna protezione wireless sul Mer
produkthjalp finns pa http://www.support.zyxel.se, la rete sarà accessibile a qualsiasi periferica wireless di rete
che si trova nel campo della portata.
• Protezione di Base: WEP (Wired Equivalent Privacy) esegue la crittografia dei frame di dati prima di trasmet-
terli sulla rete wireless. Maggiore è la crittografia WEP, maggiore è la protezione a costo di una minore velocità
di trasferimento dati.
• Protezione Estesa (WPA-PSK): configura una chiave condivisa in precedenza. Scegliere questa opzione solo
se i client wireless supportano WPA-PSK.
Nota: I client wireless e il P-320W devono utilizzare lo stesso SSID, ID di canale e WPA-PSK (se è
abilitato WPA-PSK) o la chiave di crittografia WEP (se è abilitato WEP) per la comunicazione
wireless.
LAN Wireless
OTIST
• OTIST (One-Touch Intelligent Security Technology) consente al P-320W di assegnare ai client wireless il SSID
del P-320W e le impostazione di crittografia WPA-PSK o WEP statiche. Anche il client wireless deve sup-
portare OTIST e avere abilitato OTIST.
78

ITALIANO
Protezione wireless Automatica o Nessuna
A Immettere un nome univoco per identificare il P-320W nella LAN wireless.
B Lasciare l'impostazione predefinita. Il P-320W e il client wireless devono utilizzare lo stesso ID di canale.
C Selezionare un livello di protezione wireless. Scegliere Automatico o Nessuno.
D Per la protezione Auto selezionare Yes (sì) per attivare OTIST. Se si seleziona None (nessuno), utilizzare il
pulsante di opzione per selezionare Yes (sì) per attivare OTIST oppure No e quindi fare clic su Next (avanti)
per configurare OTIST in un secondo momento.
E La Setup Key (chiave di impostazione) OTIST predefinita è 1234567 Questa chiave può essere modificata
nello strumento di configurazione Web. Accertarsi di utilizzare la stessa Setup Key (chiave di impostazione)
OTIST sul P-320W e sui client wireless.
A
B
C
D
E
79

ITALIANO
Protezione Base (WEP).
A Immettere un nome univoco per identificare il P-320W nella LAN wireless.
B Lasciare l'impostazione predefinita. Il P-320W e il client wireless devono utilizzare lo stesso ID di canale.
C Selezionare la protezione Base(WEP).
D È possibile generare o immettere manualmente una chiave WEP mediante una delle seguenti opzioni:
Immettendo una Passphrase (fino a 32 caratteri stampabili) e facendo clic su Generate (genera). Il P-320W
genera automaticamente una chiave WEP.
Oppure immettendo le chiavi manuali in tutti i campi Key (chiave, da 1 a 4) e selezionando il metodo di
immissione chiave WEP ASCII oppure Hex.
E Selezionare 64 bit o 128 bit dall'elenco a discesa WEP Encryption (crittografia WEP).
F Scegliere i caratteri ASCII o Hex.
G Selezionare uno dei pulsanti di opzione Key (chiave) da utilizzare come chiave WEP predefinita.
H L'impostazione predefinita è Sì. Selezionare il pulsante di opzione No e fare clic su Avanti per configurare
OTIST in seguito.
I La Setup Key (chiave di impostazione) OTIST predefinita è 1234567 Questa chiave può essere modificata
nello strumento di configurazione Web. Accertarsi di utilizzare la stessa Setup Key (chiave di impostazione)
OTIST sul P-320W e sui client wireless.
80

ITALIANO
A
B
C
D
E
G
F
D
E
81

ITALIANO
Protezione Estesa (WPA-PSK)
A Immettere un nome univoco per identificare il P-320W nella LAN wireless.
B Lasciare l'impostazione predefinita. Il P-320W e il client wireless devono utilizzare lo stesso ID di canale.
C Scegliere la protezione WPA-PSK.
D Immettere una chiave condivisa in precedenza per avere una connessione wireless più sicura rispetto alla
crittografia WEP. Immettere da 8 a 63 caratteri ASCII con distinzione tra maiuscole e minuscole. È possibile
impostare una connessione wireless più sicura configurando WPA nella schermata wireless avanzata. È
necessario configurare un server RADIUS per fare ciò.
E L'impostazione predefinita è Sì. Selezionare il pulsante di opzione No e fare clic su Avanti per configurare
OTIST in seguito.
F La Setup Key (chiave di impostazione) OTIST predefinita è 1234567 Questa chiave può essere modificata
nello strumento di configurazione Web. Accertarsi di utilizzare la stessa Setup Key (chiave di impostazione)
OTIST sul P-320W e sui client wireless.
A
B
C
D
D
E
82

ITALIANO
FASE 3:
La procedura guidata tenta di rilevare quale tipo di connessione WAN si sta utilizzando.
Se la procedura guidata non rileva un tipo di connessione, è necessario selezionarne UNA dall'elenco a discesa.
Chiedere al proprio ISP il tipo di connessione corretta:
1 Ethernet
2 PPPoE
3 PPTP.
Nota: Se sono state fornite le impostazioni di accesso Internet, immettere i campi seguenti. In caso
contrario, lasciare le impostazioni predefinite e fare solo clic su Next (Avanti).
WAN
83

ITALIANO
Collegamento Ethernet
A Scegliere Ethernet come tipo di connessione WAN.
B Selezionare Ottieni automaticamente dall'ISP se l'ISP non ha assegnato un indirizzo IP statico. Passare alla
sezione D.
Oppure
Selezionare Utilizza indirizzo IP fisso fornito dall'ISP per fornire al P-320W un indirizzo IP statico univoco.
C Immettere un indirizzo IP WAN e la subnet mask IP della LAN del dispositivo di rete (se conosciuti). Se non si
conoscono le impostazioni, lasciare le impostazioni predefinite.
Se è stato fornito un indirizzo IP e/o le impostazioni del server DNS, immetterle nei campi. In caso contrario,
lasciare le impostazioni predefinite e fare clic su Next (Avanti).
D Selezionare Predefinito di fabbrica per utilizzare l'indirizzo MAC predefinito assegnato in fabbrica.
A
B
C
D
84

ITALIANO
Collegamento PPPoE
A Selezionare PPPoE utilizzando il tipo di connessione WAN.
BImmettere Nome del servizio (opzionale), Nome utente e Password.
C Selezionare Ottieni automaticamente dall'ISP se l'ISP non ha assegnato un indirizzo IP statico. Passare alla
sezione E.
Oppure selezionare Utilizza indirizzo IP fisso fornito dall'ISP per fornire al P-320W un indirizzo IP statico
univoco.
D Immettere l'indirizzo IP WAN del dispositivo di rete (se conosciuto). Se non si conoscono le impostazioni,
lasciare le impostazioni predefinite.
Se è stato fornito un indirizzo IP e/o le impostazioni del server DNS, immetterle nei campi. In caso contrario,
lasciare le impostazioni predefinite e fare clic su Next (Avanti).
E Selezionare Predefinito di fabbrica per utilizzare l'indirizzo MAC predefinito assegnato in fabbrica.
85

ITALIANO
A
B
C
D
E
86

ITALIANO
Collegamento PPTP
A Selezionare PPTP utilizzando il tipo di connessione WAN.
BImmettere Nome utente e Password
C Selezionare Ottieni automaticamente dall'ISP se l'ISP non ha assegnato un indirizzo IP PPTP statico.
Oppure selezionare Utilizza indirizzo IP fisso per fornire al P-320W un indirizzo IP statico univoco.
D Immettere un indirizzo IP del server PPTP
E Immettere ID connessione/Nome (se forniti)
F Selezionare Ottieni automaticamente dall'ISP se l'ISP non ha assegnato un indirizzo IP statico. Passare alla
sezione H.
Oppure selezionare Utilizza indirizzo IP fisso fornito dall'ISP per fornire al P-320W un indirizzo IP statico
univoco.
G Immettere un indirizzo IP WAN e la subnet mask IP della LAN del dispositivo di rete (se conosciuti). Se non si
conoscono le impostazioni, lasciare le impostazioni predefinite.
Se è stato fornito un indirizzo IP e/o le impostazioni del server DNS, immetterle nei campi. In caso contrario,
lasciare le impostazioni predefinite e fare clic su Next (Avanti).
H Selezionare Predefinito di fabbrica per utilizzare l'indirizzo MAC predefinito assegnato in fabbrica.
87

ITALIANO
A
B
C
D
E
F
G
H
88

ITALIANO
La configurazione dell'accesso a Internet viene completata
Se si verificano problemi con l'accesso a Internet,
seguire le istruzioni visualizzate a shermo.
Fare clic su Fine.
4 Risoluzione dei problemi
Nota: Se il computer non riesce a comunicare automaticamente con il dispositivo, consultare il tutorial
multimediale relativo a come configurare il computer per ricevere dinamicamente un indirizzo IP
o per impostarne uno fisso nella gamma specificata nella sezione
PROBLEMA AZIONE CORRETTIVA
Nessuno dei LED si accende
quando collego l'alimentazione
del Mer produkthjalp finns pa
http://www.support.zyxel.se.
Impossibile accedere allo P320W dal mio computer.
Assicurarsi di aver collegato l'alimentatore corretto al P-320W e che sia stata
utilizzata una sorgente di alimentazione appropriata.
Controllare tutti i collegamenti dei cavi. Se i LED continuano a non accendersi,
potrebbe esserci un guasto hardware. In questo caso, è opportuno rivolgersi al
rivenditore locale.
Controllare il collegamento dei cavi tra il computer e il Mer produkthjalp finns pa
http://www.support.zyxel.se.
Se l'indirizzo IP del P-320W è cambiato, immettere l'indirizzo nuovo nella barra
degli indirizzi.
Assicurarsi che l'indirizzo IP del computer sia nella stessa subnet dell'indirizzo
IP del P-320W (vedere la sezione 4.1).
Eseguire il ping del P-320W da un computer della LAN. Assicurarsi che la
scheda Ethernet del computer sia installata e correttamente funzionante. Nel
computer, fare clic su Start, (Tutti i) Programmi, Accessori e quindi Prompt
dei comandi. Nella finestra Prompt dei comandi, digitare "ping" seguito
dall'indirizzo IP LAN del P-320W (192.168.1.1 è l'indirizzo predefinito) e quindi
premere [Invio]. Se il P-320W non risponde, vedere la sezione 4.1.
4.1.
89

ITALIANO
PROBLEMA AZIONE CORRETTIVA
Impossibile accedere allo P320W dal mio computer
(continua).
Impossibile accedere a Internet. Verificare le impostazioni Internet nella procedura guidata. Assicurarsi di
Utilizzare Internet Explorer 6.0 o versione successiva oppure Netscape
Navigator 7.0 o versione successiva con JavaScript abilitato.
Assicurarsi di immettere correttamente la password (il campo fa distinzione tra
maiuscole e minuscole).
Se si è dimenticata la password del Mer produkthjalp finns pa http://
www.support.zyxel.se, utilizzare il pulsante RESET. Premere il pulsante per
circa 10 secondi (oppure finché il LED SYS non inizia a lampeggiare), quindi
rilasciarlo. Questa operazione riporta il P-320W ai valori predefiniti (la password
è 1234, l'indirizzo IP LAN è 192.168.1.1, e così via).
immettere il corretto nome utente e la corretta password se si utilizza PPPoE o
PPPoA.
4.1 Impostare l'indirizzo IP del computer
Questa sezione spiega come configurare il computer per ricevere un indirizzo IP in Windows 2000, Windows
NT e Windows XP. In questo modo ci si assicura che il computer possa comunicare con lo Mer produkthjalp
finns pa http://www.support.zyxel.se.
1 In Windows XP, fare clic su Start, Pannello di controllo.
In Windows 2000/NT, fare clic su Start, Impostazioni, Pannello di controllo.
2 In Windows XP, fare clic su Connessioni di rete.
In Windows 2000/NT, fare clic su Reti e connessioni remote.
3 Fare clic con il pulsante destro del mouse su Connessione alla rete locale e scegliere Proprietà.
90

ITALIANO
4 Selezionare Protocollo Internet (TCP/IP) (sotto la
scheda Generale in Windows XP) e fare clic su
Proprietà.
5 Si apre la schermata Protocollo Internet TCP/IP -
Proprietà (la scheda Generale in Windows XP).
Selezionare le opzioni Ottieni automaticamente un
indirizzo IP e Ottieni automaticamente l'indirizzo
del server DNS.
6 Fare clic su OK per chiudere la finestra Protocollo
Internet (TCP/IP) - Proprietà.
7 Fare clic su Chiudi (OK in Windows 2000/NT) per
chiudere la finestra Connessione alla rete locale -
Proprietà.
8 Chiudere la schermata Connessioni di rete.
4.2 Procedura per visualizzare le certificazioni di un prodotto
1 Aprire la pagina www.zyxel.com.
2 Selezionare il prodotto dall'elenco di riepilogo a discesa nella Home Page di ZyXEL per passare alla
pagina del prodotto in questione.
3 Selezionare da questa pagina la certificazione che si desidera visualizzare.
91

РУССКИЙ
РУССКИЙ
Обзор
P-320W - это широкополосный маршрутизатор со встроенным четырехпортовым коммутатором 10/100
Мбс. Маршрутизатор P-320W позволяет с легкостью создавать небольшую домашнюю или офисную
сеть с распределением доступа в Интернет через широполосный (кабель/DSL) модем.
Вы должны иметь уже настроенное соединение с Интернет и получить всю информацию, приведенную
ниже:
Таблица 1 Параметры соединения с Интернет
WAN IP Address [ГВС IP Адрес] (если предоставлен): ______________
DNS Server IP Addres[IP Адрес DNS сервера] (если предоставлен): Первичный _____________,
Вторичный ______________
Connection Type[Тип соединения]:
Ethernet Service Type[Тип службы]:
_______________________
User Name[Имя пользователя]: ____________
PPTP User Name[Имя пользователя]: ____________
Your WAN IP Address[Ваш ГВС IP Адрес]
(если предоставлен) ____________
Connection ID[Имя соединения] (если
предоставлено): ____________
¦PPPoE (PPPoE) Service Name[(PPPoE)Имя службы]:
____________
User Name[Имя пользователя]: ____________
Login Server IP Address [IP-адрес сервера
доступа]
Password[Пароль]: ____________
Password[Пароль]: ____________
PPTP Server IP Address[IP Адрес PPTP-
сервера]: ___________
или PPTP Domain Name[Имя PPTP Домена]:
___________
Password[Пароль]: ____________
В вашем Руководстве пользователя вы можете найти всю необходимую справочную информацию.
Далее следуют инструкции, которые вы должны выполнить:
1 Подключение оборудования
2 Доступ к Web конфигуратору
3 Настройка доступа в Интернет
92

1 Подключение оборудования
РУССКИЙ
Для подключения оборудования и начала установки нужно выполнить следующие операции.
Подключение WAN(ГВС)
1
Подключите ваш модем к порту “WAN”, используя кабель, который поставляется вместе с модемом.
Подключение LAN(ЛВС)
2
Подключите ваш модем к порту “LAN”, используя прилагаемый кабель Ethernet.
Подключение ПИТАНИЯ
3
Подключите прилагаемый сетевой адаптер к СЕТЕВОЙ розетке, соответствующей электрической сети
(см. спецификации сетевых адаптеров в зависимости от региона в Руководстве пользователя)
93

РУССКИЙ
Индикаторы
После подсоединения, нажмите на
кнопку питания, чтобы включить
маршрутизатор Mer produkthjalp finns
pa http://www.support.zyxel.se.
Посмотрите на индикаторы передней
панели. При подключении к сети
питания индикаторы PWR и WLAN
загораются.
Индикаторы LAN и WAN
включаются, если были правильно
выполнены соотвествующие
подключения.
2 Доступ к Web конфигуратору
1 Запустите ваш web-броузер. Введите адрес web-сайта “192.168.1.1”.
94

РУССКИЙ
Примечание: Если вы не увидите следующего окна, то, пожалуйста, перейдите к изучению
секции
4.1.
2 Появится окно Password[Пароль]. Введите
пароль (по умолчанию “1234”) и щелкните на
кнопке Login [Вход].
3 Измение пароль в появившемся окне и
щелкните на кнопке Apply[Применить].
4 Выберите язык из выпадающего списка.
Нажмите Apply[Применить].
Примечание: Кнопка Next (Далее) расположена в нижнем правом углу каждого окна.
5 Щелкните Go to Wizard setup [Запустить
Мастер настройки] для первичной настройки
параметров маршрутизатора Mer produkthjalp
finns pa http://www.support.zyxel.se.
6 Выберите язык из выпадающего списка.
Нажмите Next [Далее] для перехода к
следующему окну Connection Wizard [Мастера
сетевого подключения].
95

РУССКИЙ
3 Настройка доступа в Интернет
Примечание: В каждом окне Мастера введите параметры доступа в Интернет именно в таком
виде, в каком их вам предоставил ваш провайдер, после чего нажмите Next [Далее] для
продолжения или Back [Назад] для возврата в предыдущее окно.
Если вы нажмете кнопку Back [Назад]., то вся текущая информация в окне будет утеряна.
ЭТАП 1:
1 Это окно необязательное. Вы можете просто
нажать Next [Далее].
• System Name [Системное имя] используется
для идентификации Mer produkthjalp finns pa
http://www.support.zyxel.se. Вы можете ввести
выше "Имя компьютера".
• Если вы оставите пустым поле Domain Name
[Имя домена], то будет использоваться имя
домена, полученное DHCP от провайдера.
ЭТАП 2:
Настройте на P-320W ОДИН из приведенных ниже типов безопасности беспроводной сети:
• Auto [Авто] безопасность: Использует стандарт безопасности WPA-PSK с автоматическим
генерированием заранее заданных ключей (Pre-Shared Key). Заранее заданный ключ можно
просмотреть в окне Wireless LAN (Беспроводная ЛВС).
Примечание: Ваши беспроводные клиенты обязательно должны поддерживать стандарт WPA-
PSK и использовать тот же ключ.
Системная информация
Беспроводная LAN(ЛВС)
• None [Нет]: Безопасность беспроводной ЛВС отключена. Если безопасность беспроводной ЛВС в
маршрутизаторе P-320W не была установлена, ваша сеть доступна для любого беспроводного
устройства в радиусе действия сети.
• Basic [Базовая] безопасность: Технология WEP (Секретность на уровне проводной связи) обеспечивает
шифрование пакетов данных для их передачи через бепроводную сеть. Чем выше уровень WEPшифрования, тем выше безопасность, но ниже пропускная способность сети.
96

РУССКИЙ
• Extend [Расширенная](WPA-PSK) безопасность: Настройка заранее заданного ключа (Pre-Shared
Key). Выбирайте эту опцию только если ваши беспроводные клиенты поддерживают WPA-PSK.
Примечание: Беспроводные клиенты и P-320W обязательно должны использовать одинаковый
SSID, ID канала и WPA-PSK (если WPA-PSK активирована) или ключ кодировки WEP (если
WEP активирована) для беспроводного соединения..
OTIST
• Интеллектуальная технология автонастройки безопасности (OTIST) позволяет маршрутизатору P-320W
передавать беспроводным клиентам SSID вместе со статическим ключом WEP или настройки
кодирования WPA-PSK. Беспроводной клиент также должен поддерживать автонастройку безопасности
OTIST; функция OTIST должна быть включена.
Беспроводная безопасность
A Введите уникальное имя-идентификатор для P-320W в беспроводной ЛВС.
B Оставьте установки по умолчанию. P-320W и беспроводные клиенты должны использовать один и то
же ID канала.
C Выберите уровень безопасности в беспроводных сетях. Выберите Auto[Авто] или None [Нет].
D Для режима безопасности Auto [Авто] нажмите Yes [Да] для включения функции OTIST. При выборе
режима None [Нет], выберите опцию Yes [Да] для включения функции OTIST либо селективную кнопку
No [Нет] и нажмите Next [Далее], если вы собираетесь конфигурировать функцию OTIST позднее.
E Setup Key[Установочный ключ] OTIST "по умолчанию" - “01234567”. Веб-интерфейс настройки
маршрутизатора позволяет изменить значение этого ключа. Убедитесь, что маршрутизатор и
беспроводные клиенты имеют одинаковые установочные ключи OTIST (Setup Key).
97

РУССКИЙ
A
B
C
D
E
98

РУССКИЙ
Basic(WEP)
A Введите уникальное имя-идентификатор для P-320W в беспроводной ЛВС.
B Оставьте установки по умолчанию. P-320W и беспроводные клиенты должны использовать один и то
же ID канала.
C Выберите Basic [Базовую](WEP) безопасность.
D Вы можете создать или ввести вручную ключ WEP одним из способов:
Введите Passphrase [Фразу доступа] (до 32 печатуемых символов) нажмите Generate [Создать].
Маршрутизатор P-320W автоматически сгенерирует WEP-ключ.
Или введите вручную ключи в каждом поле Key [Ключ] (1~4) и выберите метод ввода ключа: ASCII или
шестнадцатеричный.
E Выберите 64-bit или 128-bit из выпадающего списка WEP Encryption [Кодирование WEP].
F Выберите символы ASCII или шестнадцатеричные.
G Выберите одну из позиций селективной кнопки Key [Ключ] для использования по умолчанию для WEP
ключа.
H Выберите Yes [Да] для включения функции OTIST. Выберите позицию No [Нет] или нажмите Next
[Далее], если вы собираетесь конфигурировать функцию OTIST позднее.
I Setup Key[Установочный ключ] OTIST "по умолчанию" - “01234567”. Веб-интерфейс настройки
маршрутизатора позволяет изменить значение этого ключа. Убедитесь, что маршрутизатор и
беспроводные клиенты имеют одинаковые установочные ключи OTIST (Setup Key).
99

РУССКИЙ
н
A
B
C
D
E
F
G
D
E
Extend(WPA-PSK)[Расшире
A Введите уникальное имя-идентификатор для P-320W в беспроводной ЛВС.
B Оставьте установки по умолчанию. P-320W и беспроводные клиенты должны использовать один и то
же ID канала.
C Выберите WPA-PSK безопасность.
D Наберите заранее заданный ключ для усиления безопасности беспроводного соединения по
сраdнению с кодировкой WEP. Введите от 8 до 63 ASCII символов с учетом регистра. Вы можете
настроить наиболее безопасное беспроводное соединение путем настройки WPA в окне расширенных
настроек беспроводной сети. При этом необходимо сконфигурировать RADIUS сервер.
E По умолчанию устанавливается Yes [Да]. Выберите позицию No [Нет] или нажмите Next [Далее], если
вы собираетесь конфигурировать функцию OTIST позднее.
F Setup Key[Установочный ключ] OTIST "по умолчанию" - “01234567”. Веб-интерфейс настройки
маршрутизатора позволяет изменить значение этого ключа. Убедитесь, что маршрутизатор и
беспроводные клиенты имеют одинаковые установочные ключи OTIST (Setup Key).
100

РУССКИЙ
A
B
C
D
D
E
ЭТАП 3:
Мастрер попытается определить, какой тип соединения с ГВС вы используете.
Если Мастер не определит тип соединения, вы обязаны выбрать ОДИН из типов в выпадающем списке. У
своего провайдера вы можете узнать тип соединения, который вы используете:
1 Ethernet
WAN (ГВС)
101
 Loading...