


N220
Wireless N-lite USB Adapter
Version 1.0
Edition 1, 07/2010
www.zyxel.com
www.zyxel.com
Copyright © 2010
ZyXEL Communications Corporation


About This User's Guide
About This User's Guide
Intended Audience
This manual is intended for people who want to configure the N220 using the
ZyXEL utility.
Tips for Reading User’s Guides On-Screen
When reading a ZyXEL User’s Guide On-Screen, keep the following in mind:
• If you don’t already have the latest version of Adobe Reader, you can download
it from http://www.adobe.com.
• Use the PDF’s bookmarks to quickly navigate to the areas that interest you.
Adobe Reader’s bookmarks pane opens by default in all ZyXEL User ’s Guide
PDFs.
• If you know the page number or know vaguely which page-range you want to
view, you can enter a number in the toolbar in Reader, then press [ENTER] to
jump directly to that page.
• Type [CTRL]+[F] to open the Adobe Reader search utility and enter a word or
phrase. This can help you quickly pinpoint the information you require. You can
also enter text directly into the toolbar in Reader.
• To quickly move around within a page, press the [SP ACE] bar. This turns your
cursor into a “hand” with which you can grab the page and move i t around freely
on your screen.
• Embedded hyperlinks are actually cross-references to related text. Click them to
jump to the corresponding section of the User’s Guide PDF.
Related Documentation
•Quick Start Guide
The Quick Start Guide is designed to help you get up and running right away. It
contains information on setting up your network and configuring for Internet
access.
• Online Help
Embedded web help for descriptions of individual screens and supplementary
information.
• Support Disc
Refer to the included CD for support documents.
N220 User’s Guide
3

About This User's Guide
Customer Support
Should problems arise that cannot be solved by using this manual, please contact
your vendor for customer service. Please have the following information ready
when you contact the vendor.
• Product model and serial number.
• Date that you received your device.
• Brief description of the problem and the steps you took to solve it.
4
N220 User’s Guide

Document Conventions
Document Conventions
Warnings and Notes
These are how warnings and notes are shown in this User’s Guide.
Warnings tell you about things that could harm you or your N220.
Note: Notes tell you other important information (for example, other things you may
need to configure or helpful tips) or recommendations.
Syntax Conventions
• The N220 may be referred to as the “N220”, the “device”, the “system” or the
“product” in this User’s Guide.
• Product labels, screen names, field labels and field choices are all in bold font.
• A key stroke is denoted by square brackets and uppercase text, for example,
[ENTER] means the “enter” or “return” key on your keyboard.
• “Enter” means for you to type one or more characters and then press the
[ENTER] key. “Select” or “choose” means for you to use one of the predefined
choices.
• A right angle bracket ( > ) within a screen name denotes a mouse click. For
example, Maintenance > Log > Log Setting means you first click
Maintenance in the navigation panel, then the Log sub menu and finally the
Log Setting tab to get to that screen.
• Units of measurement may denote the “metric” value or the “scientific” value.
For example, “k” for kilo may denote “1000” or “1024”, “M” for mega may
denote “1000000” or “1048576” and so on.
• “e.g.,” is a shorthand for “for instance”, and “i.e.,” means “that is” or “in other
words”.
N220 User’s Guide
5
Document Conventions
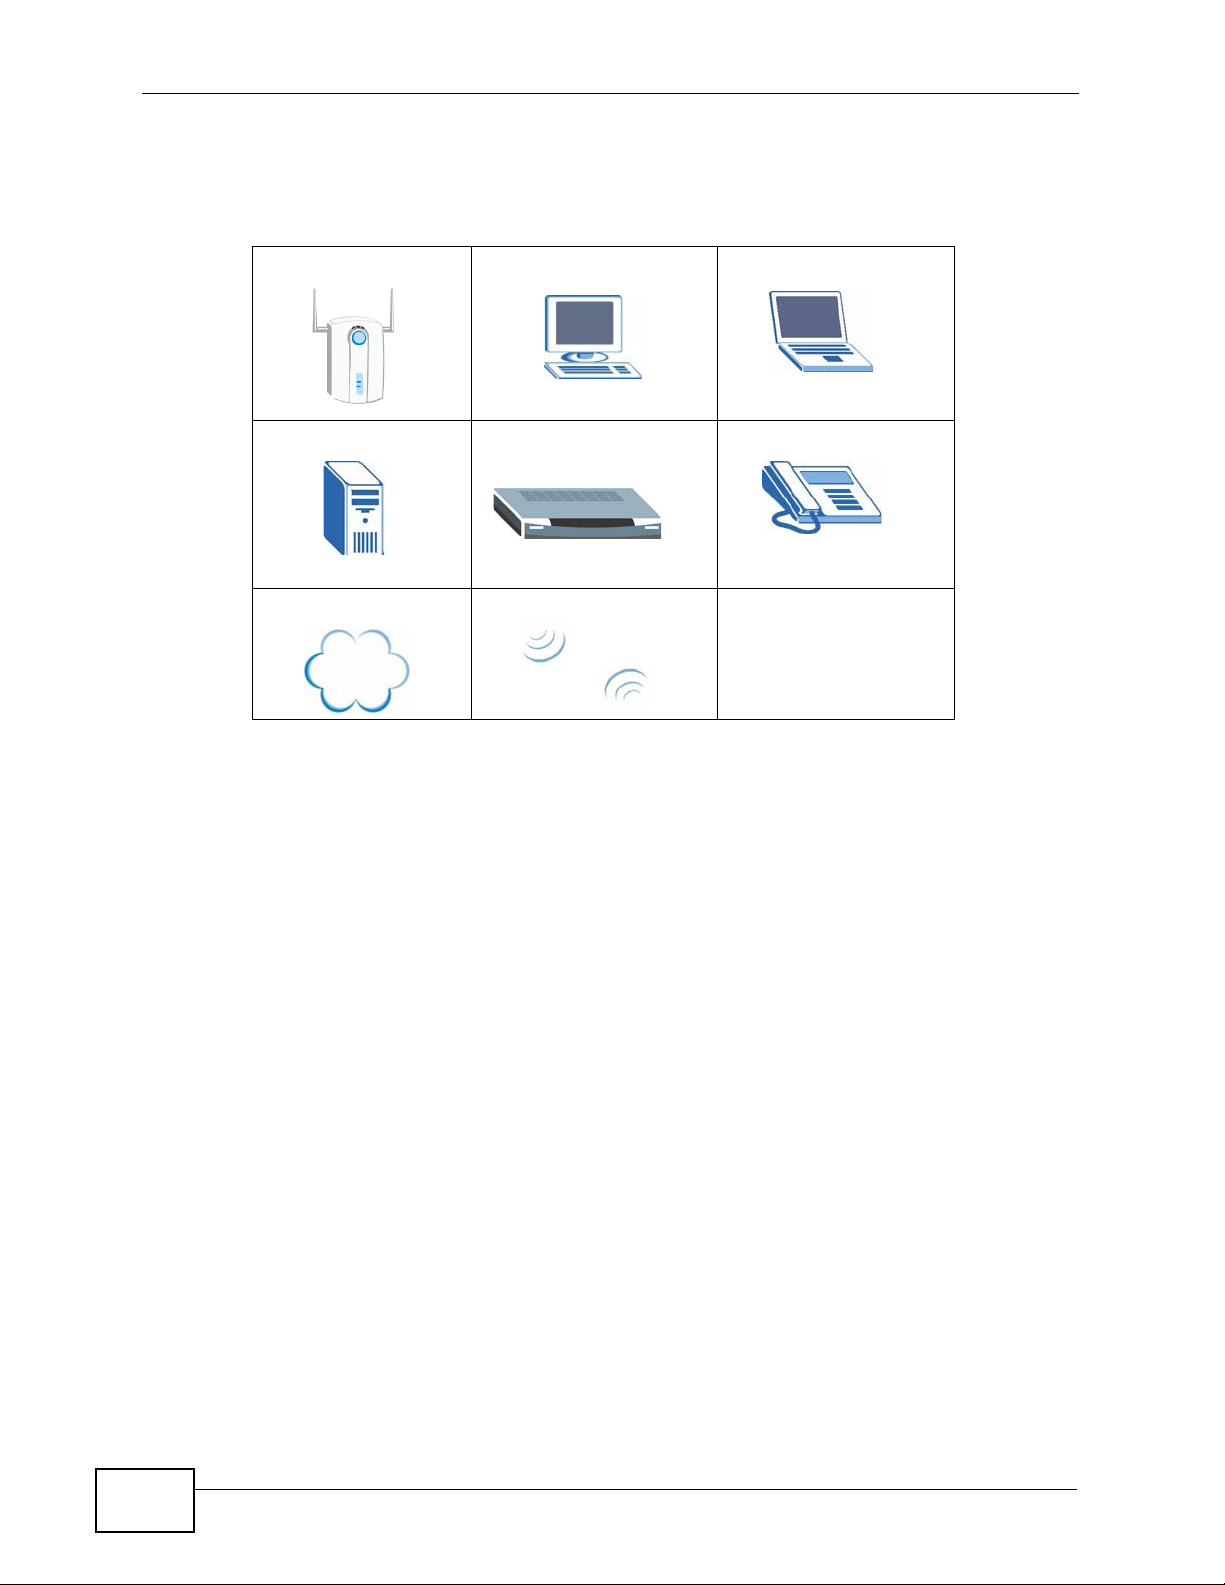
Icons Used in Figures
Figures in this User’s Guide may use the following generic icons.
Wireless Access Point Computer Notebook computer
Server Modem Telephone
Internet Wireless Signal
6
N220 User’s Guide

Safety Warnings
Safety Warnings
• Do NOT use this product near water, for example, in a wet basement or near a swimming
pool.
• Do NOT expose your device to dampness, dust or corrosive liquids.
• Do NOT store things on the device.
• Do NOT install, use, or service this device during a thunderstorm. There is a remote risk
of electric shock from lightning.
• Connect ONLY suitable accessories to the device.
• Ground yourself (by properly using an anti-static wrist strap, for example) whenever
working with the device’s hardware or connections.
• ONLY qualified service personnel should service or disassemble this device.
• Antenna Warning! This device meets ETSI and FCC certification requirements when using
the included antenna(s). Only use the included antenna(s).
Your product is marked with this symbol, which is known as the WEEE mark.
WEEE stands for Waste Electronics and Electrical Equipment. It means that
used electrical and electronic products should not be mixed with general waste.
Used electrical and electronic equipment should be treated separately.
N220 User’s Guide
7

Safety Warnings
8
N220 User’s Guide

Contents Overview
Contents Overview
Introduction and Configuration ............................................................................................15
Getting Started ...........................................................................................................................17
Tutorial ...................................................... ............................................. .................................... 23
Wireless LANs ............. ... .... ... ... ... .... ... ................................................................ .... ... ................37
Station Mode ..............................................................................................................................49
AP Mode ....................................................................................................................................75
Maintenance ..............................................................................................................................85
Troubleshooting and Specifications ....................................................................................89
Troubleshooting ..................................................... .................................................................... 91
Product Specifications ............................................................................................................... 95
Appendices and Index ...........................................................................................................99
N220 User’s Guide
9

Contents Overview
10
N220 User’s Guide

Table of Contents
Table of Contents
About This User's Guide..........................................................................................................3
Document Conventions............................................................................................................5
Safety Warnings ........................................................................................................................7
Contents Overview ...................................................................................................................9
Table of Contents....................................................................................................................11
Part I: Introduction and Configuration................................................. 15
Chapter 1
Getting Started........................................................................................................................17
1.1 Overview ............. ................................................................. ... ... .......................................... 17
1.1.1 What You Need to Know .................. ... ... ... .... ... ... ... .... ... ... .......................................... 17
1.1.2 Before You Begin ............................. ... ... ... .... ... ... ... .... ... ............................................. 18
1.2 About Your N220 ............................................................................................................... 18
1.2.1 Hardware .......................... ... ... ................................................................. ... ... .............18
1.3 Application Overview ............. ................................................................. ... ... .... ... ... ... ... ....... 19
1.3.1 Infrastructure ....................... ... ... ... ................................................................. ... ... ....... 19
1.3.2 Ad-Hoc ................................ ... ... ... .... ... ... .................................................................... 20
1.4 Hardware and Utility Installation ..........................................................................................20
1.4.1 ZyXEL Utility Icon .......................................................................................................20
1.5 Configuration Methods .......................................... ... ... ... .... ... ... .......................................... 21
1.5.1 Enabling Windows Wireless Configuration ................................................................21
1.5.2 Accessing the ZyXEL Utility ...................................................................................... 21
Chapter 2
Tutorial.....................................................................................................................................23
2.1 Overview ............. ................................................................. ... ... .......................................... 23
2.1.1 What You Can Do in This Tutorial .............................................................................. 23
2.1.2 What You Need to Know .................. ... ... ... .... ... ... ... .... ... ... .......................................... 23
2.1.3 Before You Begin ............................. ... ... ... .... ... ... ... .... ... ............................................. 24
2.2 Connecting to an AP using Wi-Fi Protected Setup (WPS) .................................................. 24
2.2.1 Push Button Configuration (PBC) .................................................... ... .... ... ... ... ... .... ... 24
2.2.2 PIN Configuration ....................................................... ... ... ... ... .... ... ... ..........................25
2.3 Connecting to an AP Without Using WPS ........................................................................... 29
N220 User’s Guide
11

Table of Contents
2.3.1 Manually Connecting to a Wireless LAN ................................................................... 29
2.3.2 Creating and Using a Profile ...................................... ... ... ... ....................................... 31
2.4 Configuring the N220 as an AP ................. ... ... ... .... ... ... ... .................................................... 34
Chapter 3
Wireless LANs.........................................................................................................................37
3.1 Overview ............. ................................................................. ... ... .......................................... 37
3.1.1 What Yo u Can Do in This Section .............................................................................. 37
3.1.2 What You Need to Know .................. ... ... ... .... ... ... ... .... ... ... .......................................... 37
3.1.3 Before You Begin ............................. ... ... ... .... ... ... ... .... ... ............................................. 38
3.2 Wireless LAN Overview ............................................ ... ... .................................................... 38
3.3 Wireless LAN Security ........................................... ... ... ....................................................... 39
3.3.1 User Authentication and Encryption ................................................. ... .... ... ................39
3.4 WiFi Protected Setup ........................................................................................................... 41
3.4.1 Push Button Configuration ............................ ... ... ... .... ................................................ 42
3.4.2 PIN Configuration ....................................................... ... ... ... ... .... ... ... ..........................42
3.4.3 How WPS Works ........................................................................................................ 44
3.4.4 Limitations of WPS ................................................. .... ... ... ... ....................................... 47
Chapter 4
Station Mode............................................................................................................................49
4.1 Overview ............. ................................................................. ... ... .......................................... 49
4.1.1 What Yo u Can Do in This Section .............................................................................. 49
4.1.2 What You Need to Know .................. ... ... ... .... ... ... ... .... ... ... .......................................... 49
4.1.3 Before You Begin ............................. ... ... ... .... ... ... ... .... ... ............................................. 50
4.2 ZyXEL Utility Screen Summary ...........................................................................................50
4.3 The Link Info Screen ..........................................................................................................51
4.3.1 Trend Chart ......................... ... ... ... .... ... ... .................................................................... 53
4.4 The Site Survey Screen ..................................................................................................... 54
4.4.1 Security Settings ............................. ... ................................................................ .... ...55
4.4.2 Summary Screen ................................................... .... ... ... .......................................... 61
4.5 The Profile Screen ..............................................................................................................62
4.5.1 Adding a New Profile ..................................................................................... ... ... .... ... 63
4.6 The Adapter Screen ................................................. ... ... .... ... ... ... ... .... ... ... ... .... ...................68
4.6.1 WPS: PBC (Push Button Configuration) ....................................... ... ... .... ... ... ... ... .... ... 69
4.6.2 WPS: PIN - Use this Device’s PIN ............................. ... ... ... ... .... ... ... ... .... ...................69
4.6.3 WPS: PIN - Use the PIN from the AP or Wireless Router .......................................... 70
4.7 Security Settings in Windows Vista ................ ... .... ... ... ... .... ... ... ... ... .... ... ............................. 71
4.7.1 Using PEAP in Vista ...................................................................................................72
4.7.2 Using TLS in Vista .................... ... .... ... .......................................................................73
Chapter 5
AP Mode...................................................................................................................................75
12
N220 User’s Guide

Table of Contents
5.1 Overview ............. ................................................................. ... ... .......................................... 75
5.1.1 What Yo u Can Do in This Section .............................................................................. 76
5.1.2 What You Need to Know .................. ... ... ... .... ... ... ... .... ... ... .......................................... 76
5.1.3 Before You Begin ............................. ... ... ... .... ... ... ... .... ... ............................................. 76
5.2 AP Mode Screen Summary ................................................................................................. 77
5.3 The Link Info Screen ..........................................................................................................77
5.4 The Configuration Screen ...................................................................................................78
5.4.1 Security Settings ............................. ... ................................................................ .... ...80
5.5 The MAC Filter Screen ........................................................................................................82
Chapter 6
Maintenance............................................................................................................................85
6.1 Overview ............. ................................................................. ... ... .......................................... 85
6.1.1 What Yo u Can Do in This Section .............................................................................. 85
6.1.2 What You Need to Know .................. ... ... ... .... ... ... ... .... ... ... .......................................... 85
6.1.3 Before You Begin ............................. ... ... ... .... ... ... ... .... ... ............................................. 85
6.2 The About Screen ..................... ... ... ... ................................................................. ... ... ... ....... 86
6.3 Uninstalling the ZyXEL Utility .......................................... .................................................... 86
6.4 Upgrading the ZyXEL Utility ................................................................................................87
Part II: Troubleshooting and Specifications........................................ 89
Chapter 7
Troubleshooting......................................................................................................................91
7.1 Power, Hardware Connections, and LEDs .......................................................................... 91
7.2 Accessing the ZyXEL Utility ................................................................................................. 92
7.3 Link Quality ............................................ .... ... ....................................................................... 92
7.4 Problems Communicating with Other Computers ............................................................... 93
Chapter 8
Product Specifications...........................................................................................................95
Part III: Appendices and Index.............................................................. 99
Appendix A Setting Up Your Computer’s IP Address...........................................................101
Appendix B Wireless LANs ..................................................................................................131
Appendix C Windows Wireless Management ......................................................................147
Appendix D Wireless for Windows 7 ....................................................................................173
N220 User’s Guide
13

Table of Contents
Appendix E Legal Information ..............................................................................................179
Index.......................................................................................................................................183
14
N220 User’s Guide

PART I
Introduction and
Configuration
Getting Started (17)
Tutorial (23)
Wireless LANs (37)
Station Mode (49)
AP Mode (75)
Maintenance (85)
15

16

CHAPTER 1
Getting Started
1.1 Overview
The ZyXEL N220 wireless N-lite USB adapter brings you a better Internet
experience over existing 802.11 networks. With data r ates of up to 150 Mb ps, you
can enjoy a breathtaking high-speed connection at home or in the office. It is an
excellent solution for daily activities such as file transfers, music downloading,
video streaming and online gaming.
This section includes:
• About Your N220 on page 18
• Application Overview on page 19
• Hardware and Utility Installation on page 20
• Configuration Methods on page 21
1.1.1 What You Need to Know
The following terms and concepts may help as you read through this section, and
subsequently as you read through the rest of the User’s Guide.
Access Point
An Access Point (AP) is a network device that acts as a bridge between a wired
and a wireless network. Outside of the home or office, APs can most often be
found in coffee shops, bookstores and other businesses that offer wireless
Internet connectivity to their customers.
Infrastructure
An infrastructure network is one that seamlessly combines both wireless and
wired components. One or more APs often serve as the bridge between wireless
and wired LANs.
N220 User’s Guide
17
Chapter 1 Getting Started
Ad-Hoc
An Ad-Hoc wireless LAN is a self-contained group of computers connected
wirelessly and which is independent of any other networks and Access Points.
1.1.2 Before You Begin
• Read the Quick Start Guide for information on making hardware connections
and using the ZyXEL utility to connect your N220 to a network.
1.2 About Your N220
Your N220 is an IEEE 802.11n compliant wireless LAN adapter. It can als o connect
to IEEE 802.11b/g wireless networks. The N220 is WPS (Wi-Fi Protected Setup)
compliant. WPS allows you to easily connect to another WPS-enabled device.
The N220 is a USB adapter which connects to an empty USB port on your
computer.
See your N220’s Quick Start Guide for installation instructions, and see the section
on product specifications in this User’s Guide for detailed information.
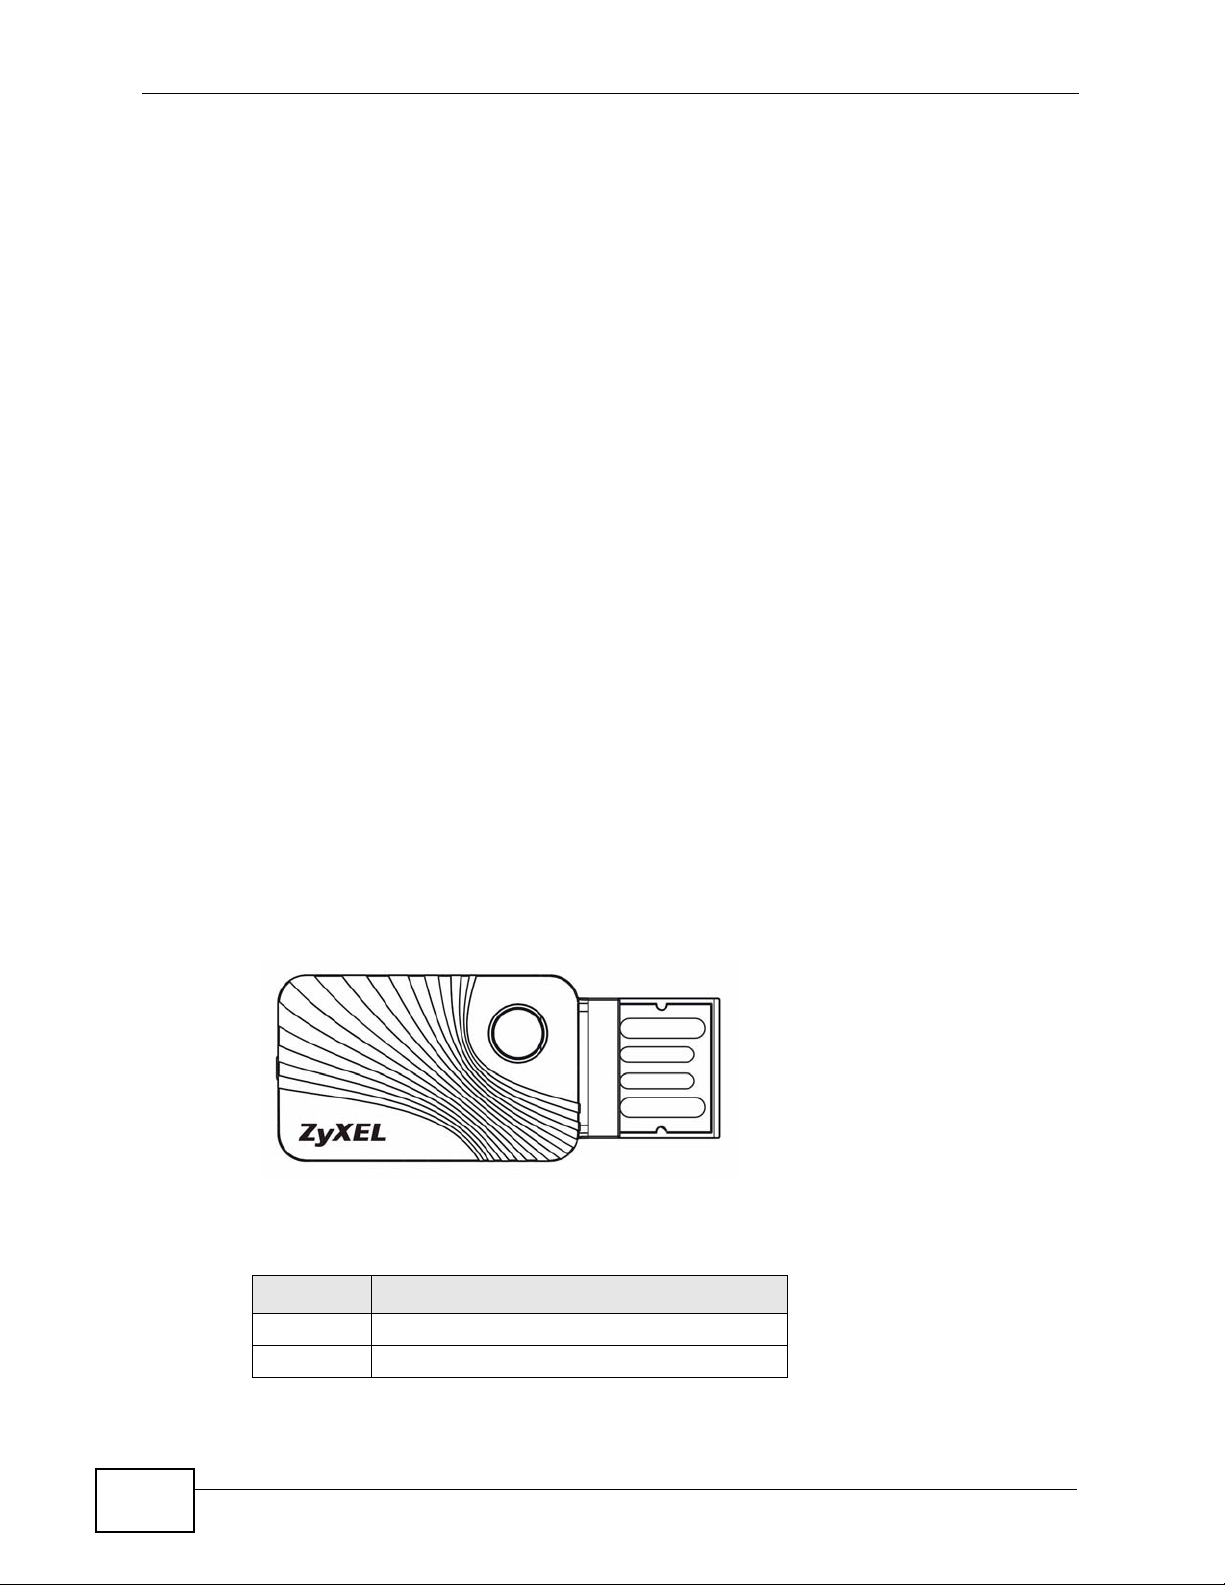
1.2.1 Hardware
This section describes the N220’s physical appearance.
Figure 1 The N220
The following table describes the N220.
Table 1 N220 External View
LABEL DESCRIPTION
A LED and also a WPS button
BUSB connector
A
B
18
N220 User’s Guide

The following table describes the operation of the N220’s LEDs.
Table 2 N220 LEDs
LED COLOR STATUS DESCRIPTION
Orange Slow
Blinking
Rapid
Blinking
Off The N220 is turned off.
The N220 is turned on, connected to an AP, and is not
transmitting or receiving data.
The N220 is turned on, connected to an AP, and is
transmitting or receiving data. It also blinks when the
WPS feature is being used or a WPS connection is being
initiated.
1.3 Application Overview
This section describes some network applications for the N220. You can either set
the network type to Infrastructure and connect to an AP or use Ad-Hoc mode
and connect to a peer computer (another wireless device in Ad-Hoc mode).
Chapter 1 Getting Started
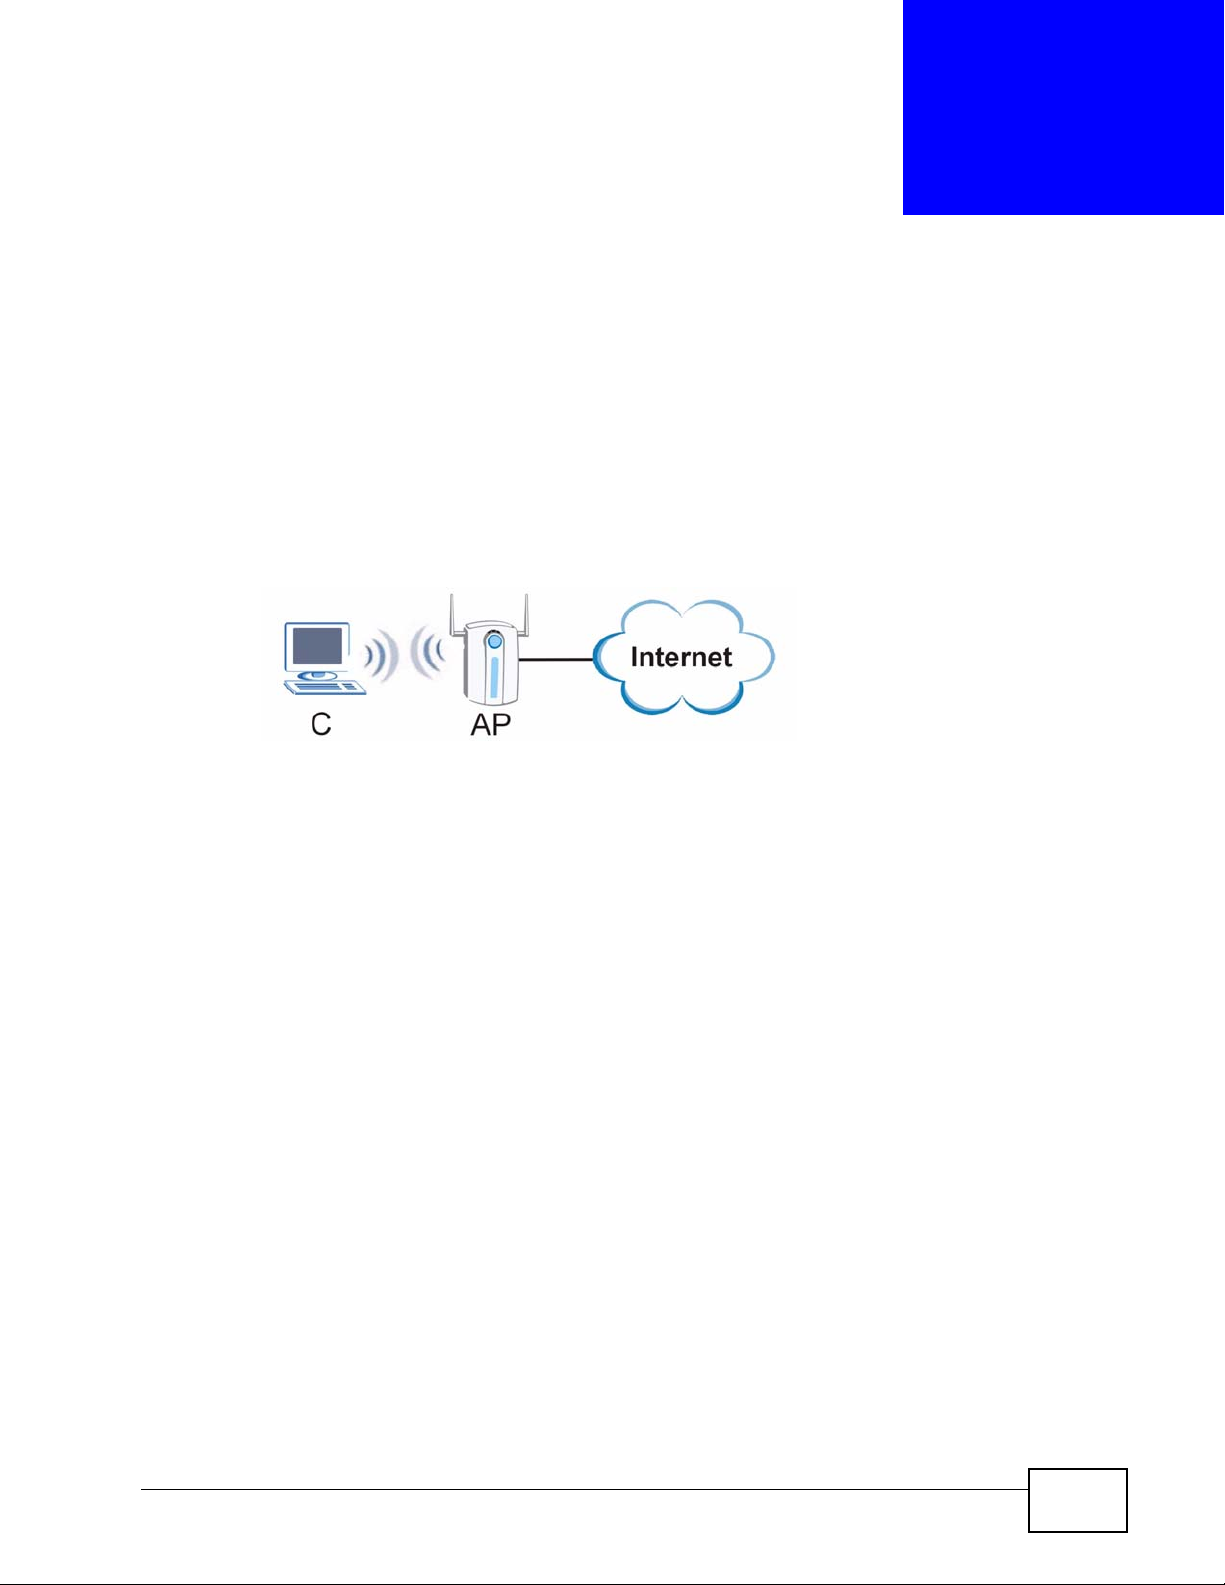
1.3.1 Infrastructure
To connect to a network via an access point (AP), set the N220 network type to
Infrastructure (see Chapter 4 on page 62). Through the AP, you can access the
Internet or the wired network behind the AP.
Figure 2 Application: Infrastructure
N220 User’s Guide
19
Chapter 1 Getting Started
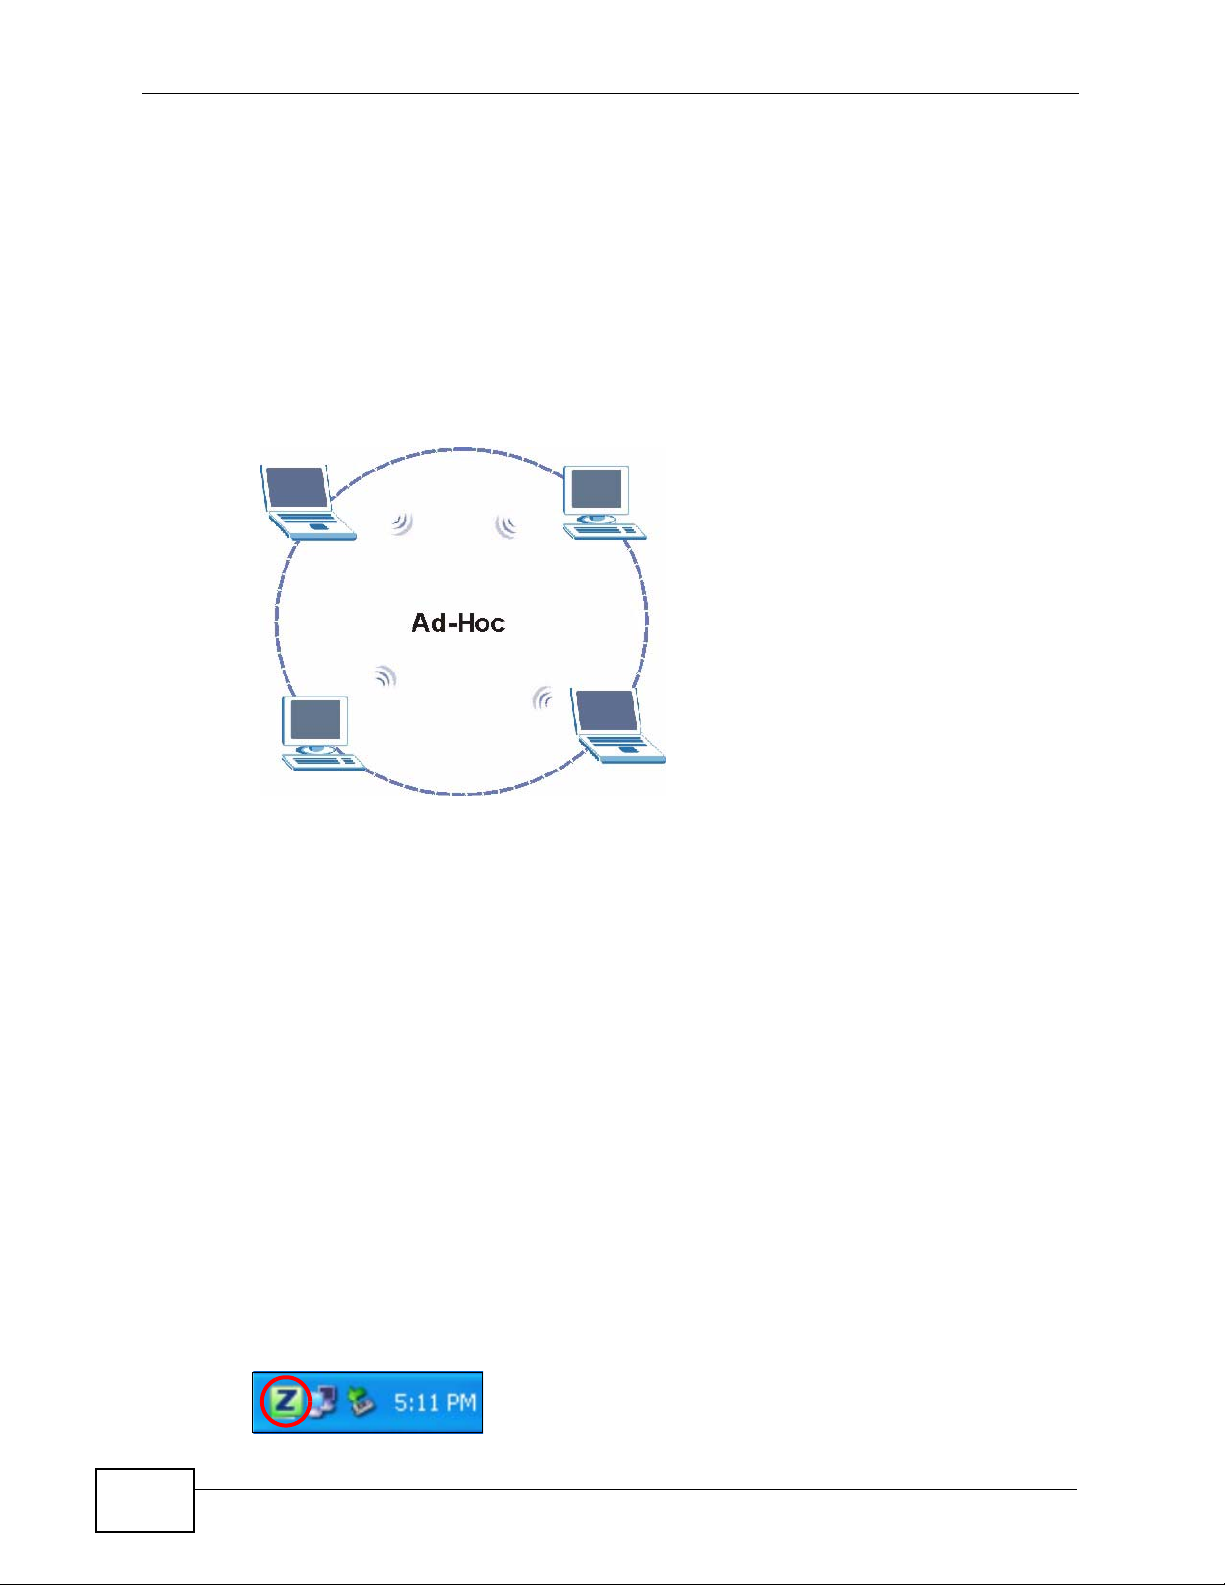
1.3.2 Ad-Hoc
T o set up a small independent wireless workgroup without an AP, use Ad-Hoc (see
Chapter 4 on page 62).
Ad-Hoc does not require an AP or a wired network. Two or more wireless clients
communicate directly with each other.
Note: Wi-Fi Protected Setup (WPS) is not available in ad-hoc mode.
Figure 3 Application: Ad-Hoc
1.4 Hardware and Utility Installation
Follow the instructions in the Quick Start Guide to install the ZyXEL utility and
make hardware connections.
1.4.1 ZyXEL Utility Icon
After you install and start the ZyXEL utility, an icon for the ZyXEL utility appears in
the system tray.
Note: The ZyXEL utility system tray icon displays only when the N220 is installed
properly.
Note: When you use the ZyXEL utility, it automatically disables Wireless Zero
Configuration (WZC) in Windows XP.
Figure 4 ZyXEL Utility: System Tray Icon
20
N220 User’s Guide
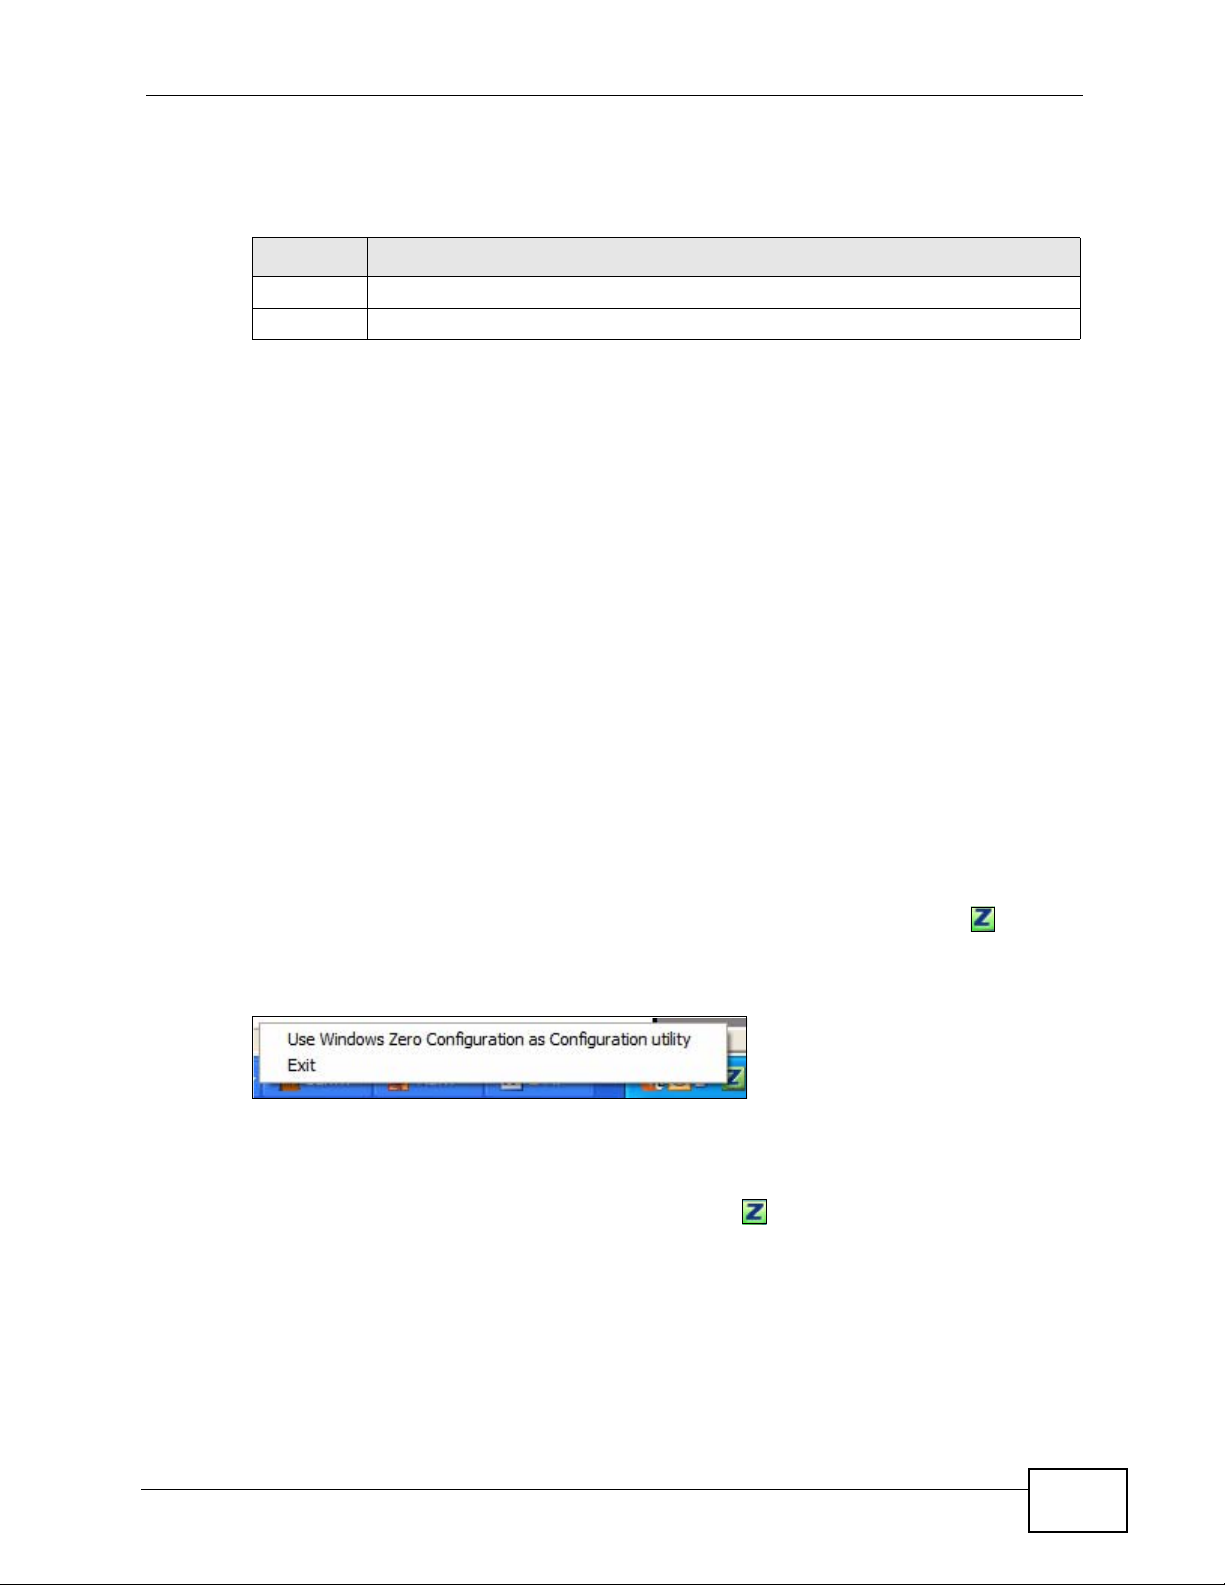
The color of the ZyXEL utility system tray icon indicates the status of the N220.
Refer to the following table for details.
Table 3 ZyXEL Utility: System Tray Icon
COLOR DESCRIPTION
Red The N220 is not connected to a wireless network.
Green The N220 is connected to a wireless network.
1.5 Configuration Methods
To configure your N220, use one of the following applications:
• Wireless Zero Configuration (WZC, the Windows XP wireless configuration tool)
or WLAN AutoConfig (the Windows Vista wireless configuration tool).
• The ZyXEL utility.
Chapter 1 Getting Started
Note: Do NOT use Windows XP’s Wireless Zero Configuration tool at the same time
you use the ZyXEL utility.
1.5.1 Enabling Windows Wireless Configuration
Note: When you use the ZyXEL utility, it automatically disables Windows XP’s
wireless configuration tool.
If you want to use the Windows XP wireless configuration tool to configure the
N220, you need to disable the ZyXEL ut ility. Right-click the utility icon ( ) in the
system tray and select Exit.
Figure 5 Enable WZC
Refer to the appendices for information on how to use the Windows wireless
configuration tool to manage the N220.
To reactivate the ZyXEL utility, double-click the ( ) icon on your desktop or click
Start > (All) Programs > Wireless N-lite USB Adapter Utility > Wireless N
USB Adapter Utility.
1.5.2 Accessing the ZyXEL Utility
Double-click on the ZyXEL wireless LAN utility icon in the system tray to open the
ZyXEL utility.
N220 User’s Guide
21

Chapter 1 Getting Started
The ZyXEL utility screens are similar in all Microsoft Windows versions . Screens for
Windows XP are shown in this User’s Guide.
Note: Click the icon (located in the top right corner) to display the online help
window.
22
N220 User’s Guide
CHAPTER 2
Tutorial
2.1 Overview
This tutorial shows you how to join a wireless infrastructure network using the
ZyXEL utility. The wireles s client is labeled C and the Access Point is labeled AP.
Figure 6 Infrastructure Network
2.1.1 What You Can Do in This Tutorial
• Connect securely either to an infrastructure AP using the WPS protocol. See
Section 2.2 on page 24 for details.
• Connect securely to an infrastructure AP using many of the strongest and most
common encryption protocols. See Section 2.3 on page 29 for details.
• Save a your settings so that you can later connect again to an infrastructure AP
with a single click. See Section 2.3.2 on page 31 for details.
• Configure your N220 as an Access Point (AP), allowing other devi ces to connect
to it and share its network connections. See Section 2.4 on page 34 for details.
2.1.2 What You Need to Know
The following term may help as you read through this section.
WPS
Wi-Fi Protected Setup (WPS) is a security protocol that lets two or more devices
connect securely to one another with a minimum amount of hassle on your part. It
most cases, establishing a secure connection with another WPS device is as easy
as pushing a button.
N220 User’s Guide
23

Chapter 2 Tutorial
2.1.3 Before You Begin
• Make sure that you have already familiarized yourself with the N220’s features
and hardware, as described in Chapter 1 on page 17.
• You should have valid login information for an existing network Access Point,
otherwise you may not be able to make a network connection right away.
2.2 Connecting to an AP using Wi-Fi Protected Setup (WPS)
This section gives you an example of how to set up your wireless network using
WPS. This example uses the N220 as the wireless client, and ZyXEL’s NBG334W as
the Access Point (AP).
Note: The Access Point must be a WPS-aware device.
There are two WPS methods for creating a secure connection. This tutorial shows
you both.
• Push Button Configuration (PBC) - create a secure wireless network simply
by pressing a button. See Section 2.2.1 on page 24.This is the easier method.
• PIN Configuration - create a secure wireless network simply by entering a
wireless client's PIN (Personal Identification Number) in the N220’s interface.
See Section 2.2.2 on page 25. This is the more secure method, since one devi ce
can authenticate the other.
2.2.1 Push Button Configuration (PBC)
1 Make sure that your access point is turned on and that it is within range of the
computer with the N220 installed.
2 Make sure that you have installed the N220’s driver and utility on your computer.
3 In the N220’s utility, click the Adapter tab, enable WPS and select PBC (Push
Button Configuration). In the screen that appears, click Start.
24
4 Log into the AP’s web configurator and locate its WPS settings section. On the
NBG334W, press the Push Button button in the Network > Wireless Client >
WPS Station screen.
Note: It doesn’t matter which button is pressed first. You must press the second
button within two minutes of pressing the first one.
N220 User’s Guide
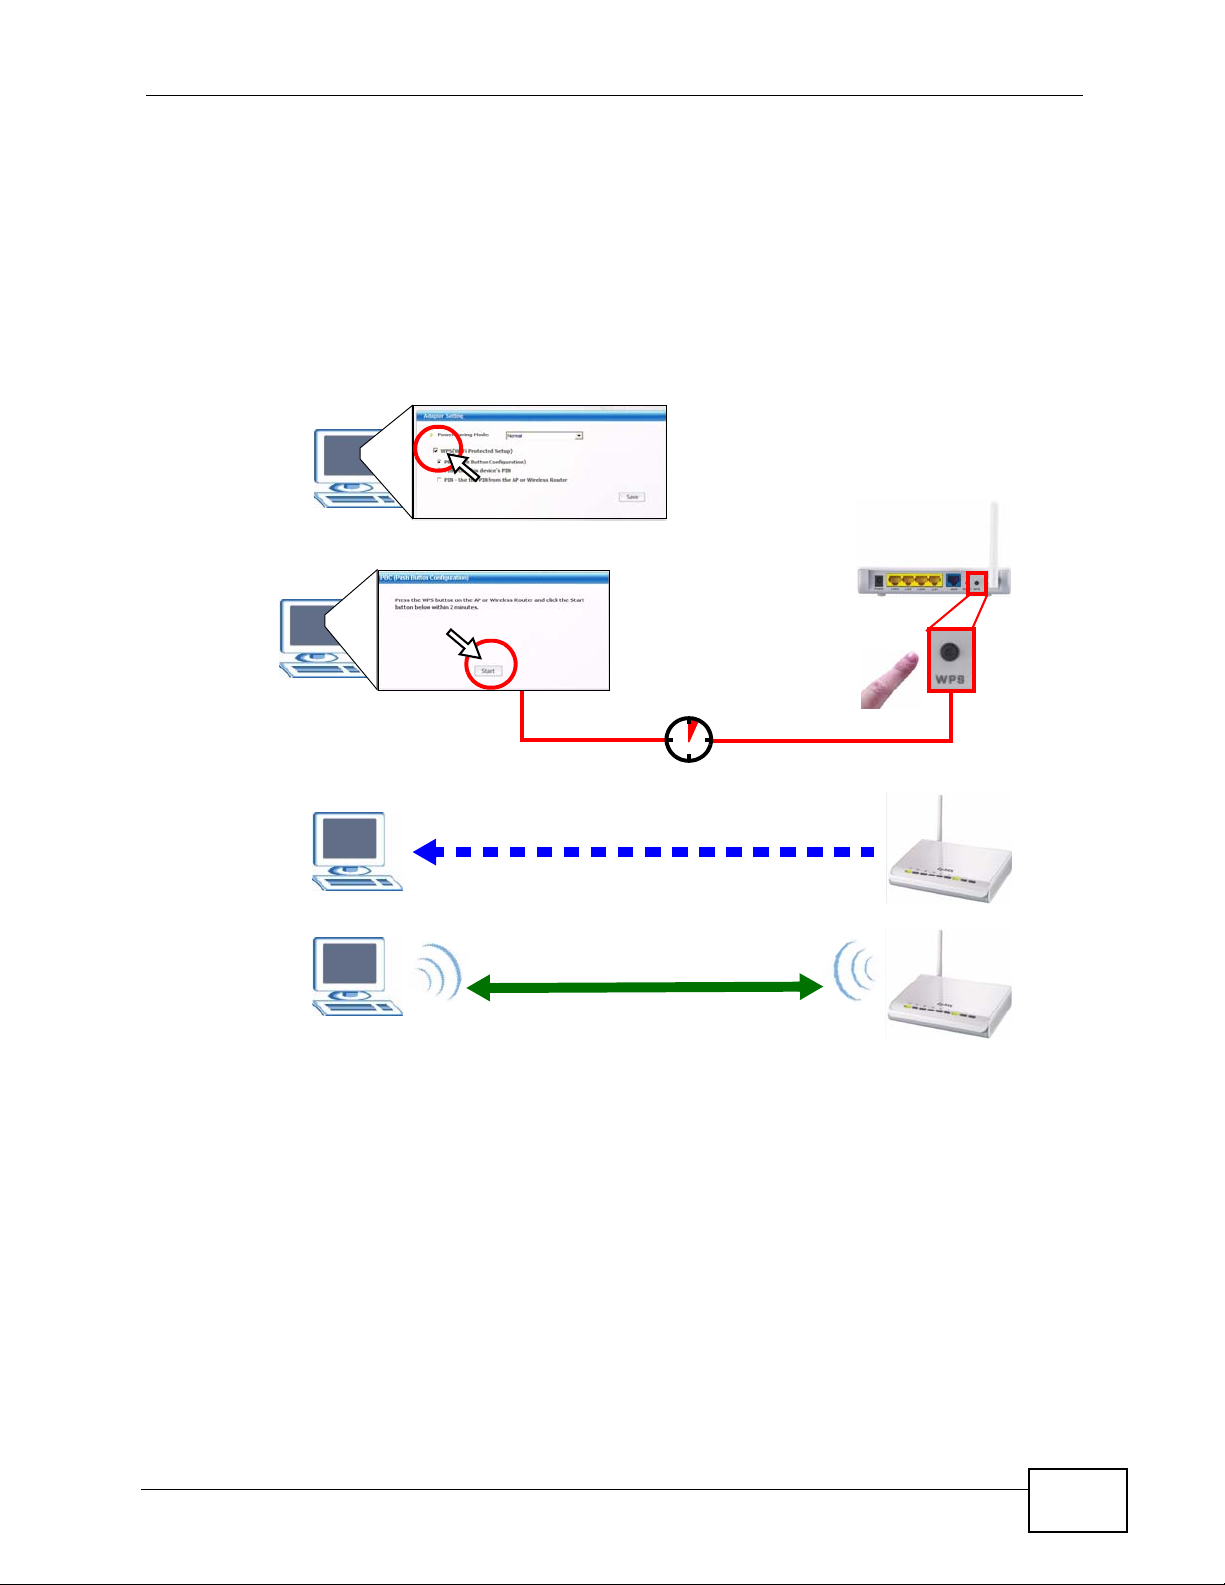
Chapter 2 Tutorial
The AP sends the proper configuration settings to the N220. This may take up to
two minutes. Then the N220 is able to communicate with the AP securely.
The following figure shows you an example to set up wireless network and security
by pressing a button on both the AP (the NBG334W in this example) and the
N220.
Figure 7 Example WPS Process: PBC Method
You
SECURITY INFO
COMMUNICATION
AP
WITHIN 2 MINUTES
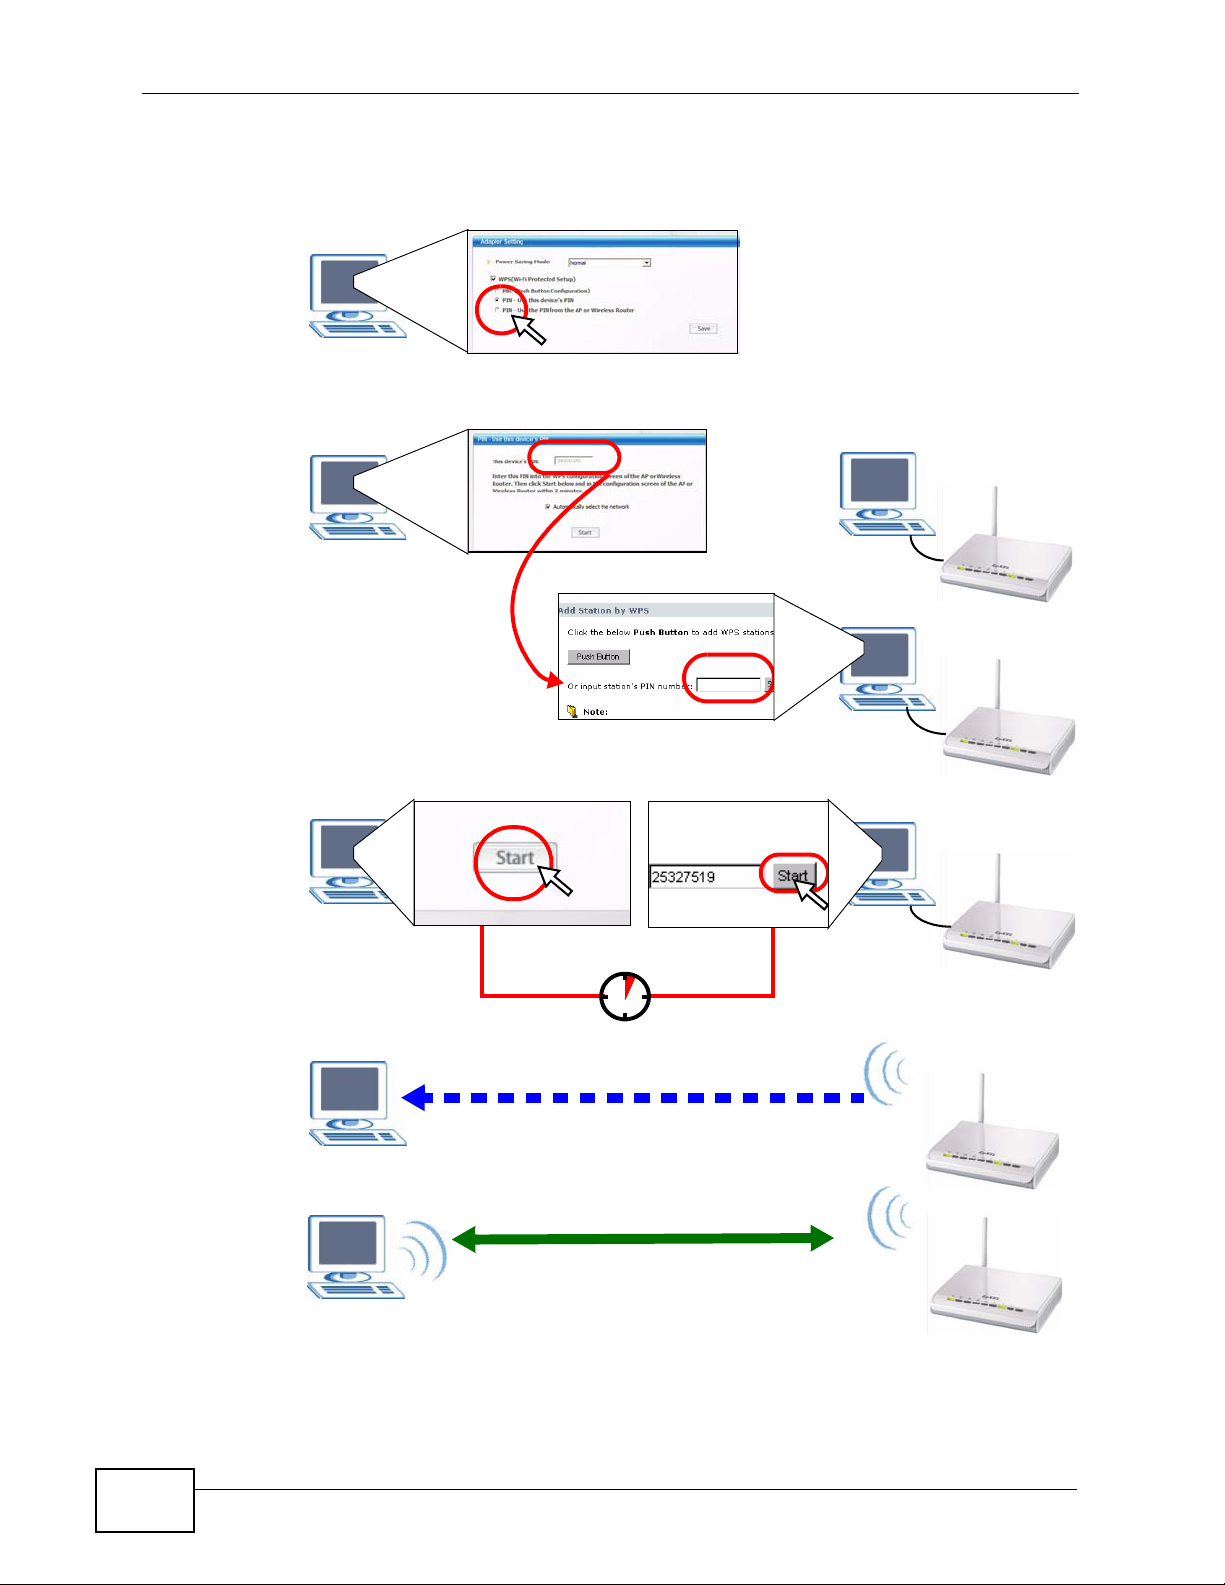
2.2.2 PIN Configuration
When you use the PIN configuration method, you need to use both the N220’s
utility and the AP’s configuration interface.
1 In the N220’s Adaptor tab, select WPS and PIN - Use this Device’s PIN. Note
down the PIN in the screen that appears.
2 Enter the PIN number in the AP’s configuration interface. In the NBG334W, use the
PIN field in the Network > Wireless LAN > WPS Station screen.
N220 User’s Guide
25

Chapter 2 Tutorial
3 Click the Start buttons on both the N220 utility screen and the AP’s configuration
utility (the WPS Station screen on the NBG334W) within two minutes.
The NBG334W authenticates the wireless client and sends the proper
configuration settings to the wireless client. This may take up to two minutes.
Then the wireless client is able to communicate with the NBG334W securely.
26
N220 User’s Guide

Chapter 2 Tutorial
The following figure shows you the example of configuring the wireless network
and security on the N220 and the AP (ZyXEL’s NBG334W in this example) by using
the PIN method.
N220 User’s Guide
27
Chapter 2 Tutorial
Figure 8 Example WPS Process: PIN Method
You
AP
28
WITHIN 2 MINUTES
Authentication by PIN
SECURITY INFO
COMMUNICATION
N220 User’s Guide
Chapter 2 Tutorial
2.3 Connecting to an AP Without Using WPS
There are three ways to connect the wireless client (the N220) to a network
without using WPS.
• Configure nothing and leave the wireless client to automatically scan for and
connect to any available network that has no wireless security configured.
• Manually connect to a network (see Section 2.3.1 on page 29).
• Configure a profile to have the wireless client automatically connect to a specific
network or peer computer (see Section 2.3.2 on page 31).
2.3.1 Manually Connecting to a Wireless LAN
This example illustrates how to manually connect your wireless cli ent to an access
point (AP) configured for WPA- PSK security and connected to t he Internet. Before
you connect to the access point, you must know its Service Set IDentity (SSID)
and WPA-PSK pre-shared k ey. In this example, the AP’s SSID is “SSID_Example3”
and its pre-shared key is “ThisismyWPA-PSKpre-sharedkey”.
After you install the ZyXEL utility and then insert the wireless client, follow the
steps below to connect to a network using the Site Survey screen.
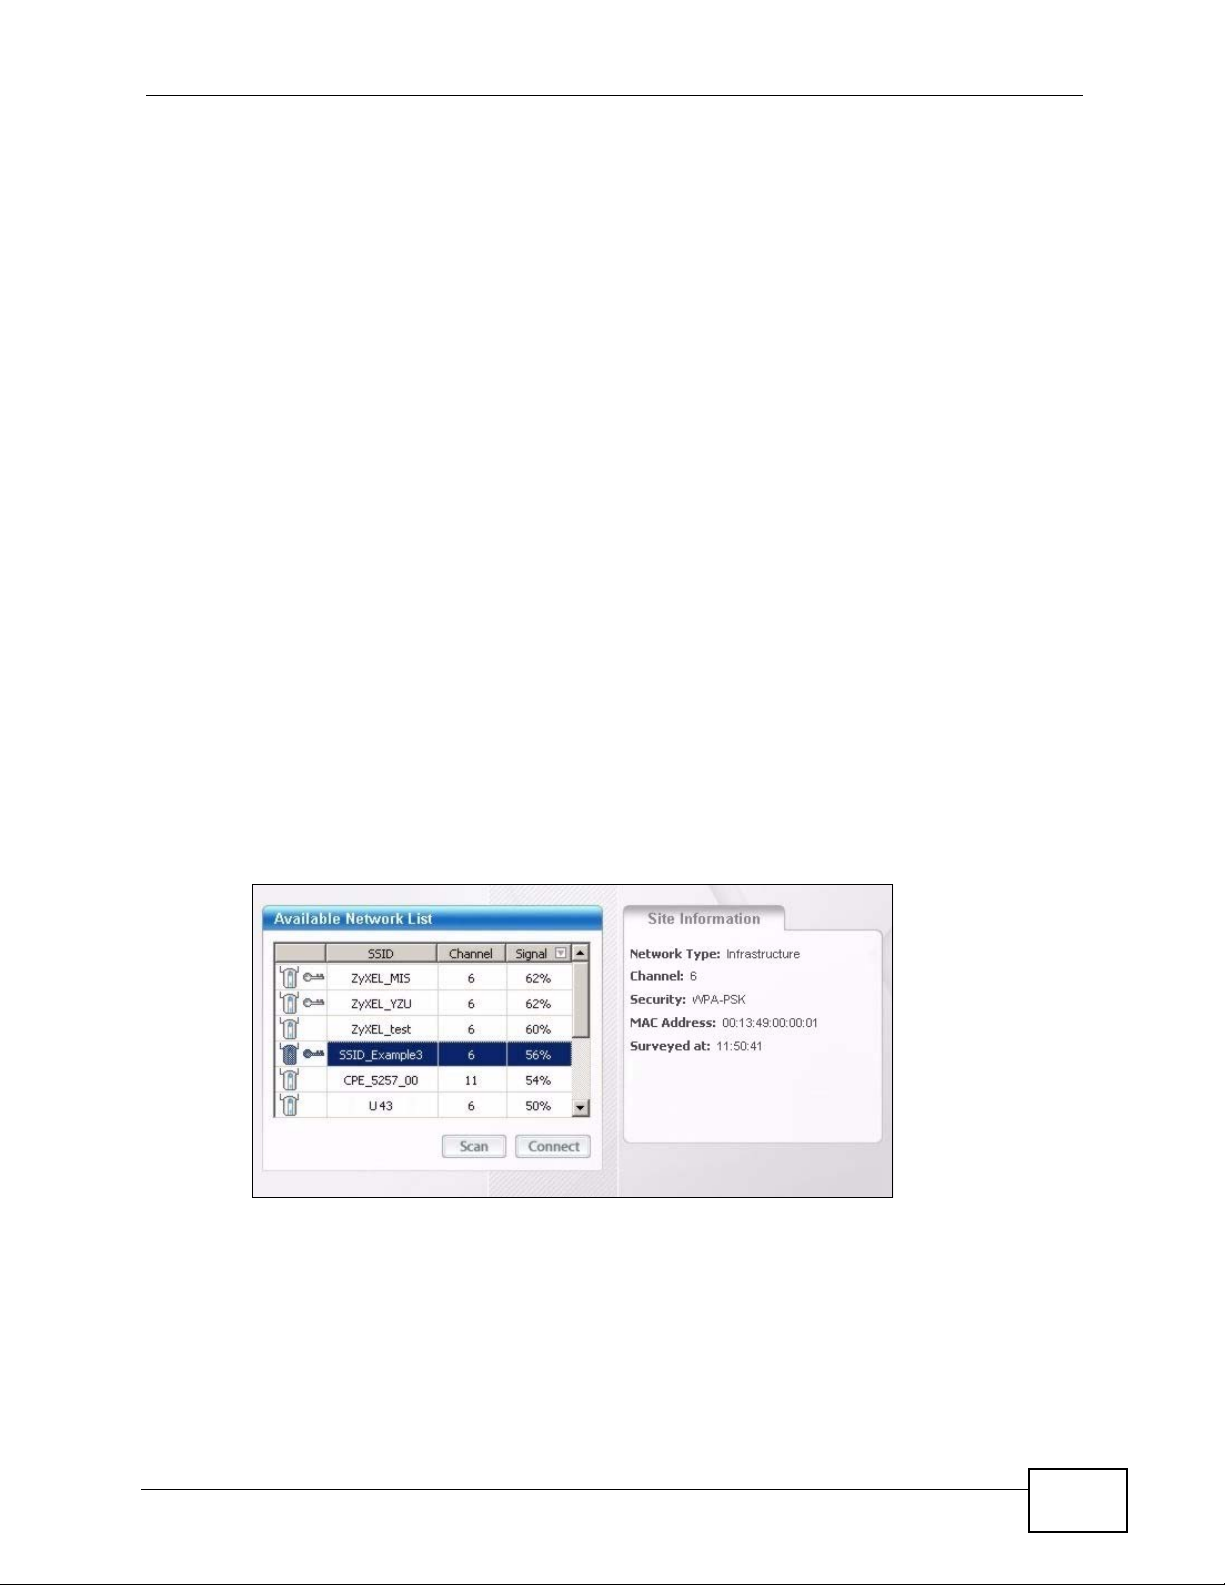
1 Open the ZyXEL utility and click the Site Survey tab to open the screen shown
next.
Figure 9 ZyXEL Utility: Site Survey
2 The wireless client automatically searches for available wireless networks. Click
Scan if you want to search again. If no entry displays in the Available Network
List, that means there is no wireless network available with i n range. Make su re
the AP or peer computer is turned on, or move the wireless client closer to the AP
or peer computer. See Table 4.4 on page 54 for detailed field descriptions.
N220 User’s Guide
29

Chapter 2 Tutorial
3 To connect to an AP or peer computer, either click an entry in the list and then
click Connect or double-click an entry (SSID_Example3 in this example).
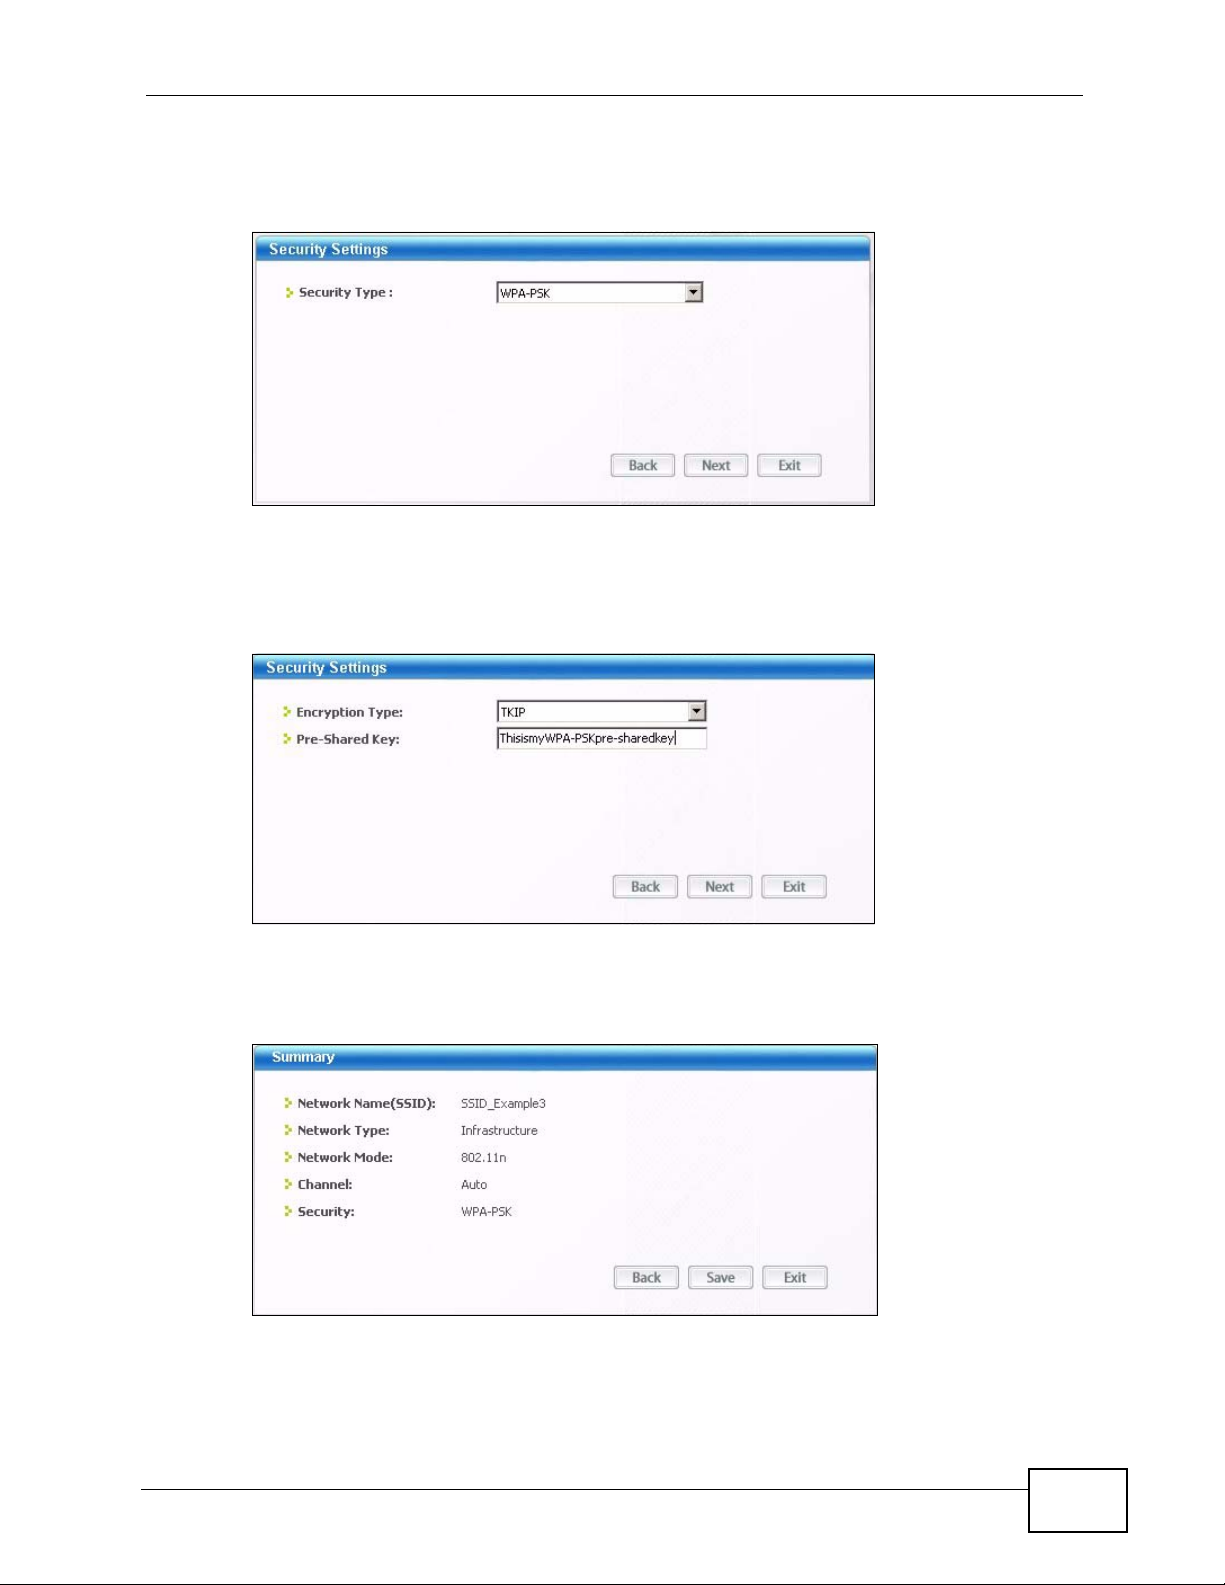
4 When you try to connect to an AP with secu ri ty configured, a window will pop up
prompting you to specify the security settings. Enter the pre-shared k ey and leave
the encryption type at the default setting.
Use the Next button to move on to the next screen. You can use the Back button
at any time to return to the previous screen, or the Exit button to return to the
Site Survey screen.
Figure 10 ZyXEL Utility: Security Settings
5 The Summary window appears. Check your settings and click Save to continue.
Figure 11 ZyXEL Utility: Summary
30
N220 User’s Guide

Chapter 2 Tutorial
6 The ZyXEL utility returns to the Link Info screen while it connects to the wireless
network using your settings. When the wireless link is established, the ZyXEL
utility icon in the system tray turns green and the Link Info screen displays
details of the active connection. Check the network information in the Link Info
screen to verify that you have successfully connected to the selected network. If
the wireless client is not connected to a network, the fields in this screen remain
blank. See Table 4.3 on page 51 for detailed field descriptions.
Figure 12 ZyXEL Utility: Link Info
7 Open your Internet browser and enter http://www.zyxel.com or the URL of any
other web site in the address bar. If you are able to access the web site, your
wireless connection is successfully configured. If you cannot access the web site,
check the Troubleshooting section of this User's Guide or contact your network
administrator if necessary.
2.3.2 Creating and Using a Profile
A profile lets you automatically connect to the same wireless network every time
you use the ZyXEL utility. You can also configure different profiles for different
networks, for example if you connect a notebook computer to wireless networks at
home and at work.
This example illustrates how to set up a profile and connect the wireless client to
an access point configured for WP A-PSK secu rity. In this example, the AP’ s SSID is
“SSID_Example3” and its pre-shared key is “ThisismyWPA-PSKpre-sharedkey”.
You have chosen the profile name “PN_Example3”.
N220 User’s Guide
31

Chapter 2 Tutorial
1 Open the ZyXEL utility and click the Profile tab to open the screen as shown. Click
Add to configure a new profile.
Figure 13 ZyXEL Utility: Profile
2 The Add New Profile screen appears. The wireless client automatically searches
for available wireless networks, which are display ed in the Scan Info box. Y ou can
also configure your profile for a wireless network that is not in the list.
Figure 14 ZyXEL Utility: Add New Profile
32
3 Give the profile a descriptive name (of up to 32 printable ASCII characters). Select
Infrastructure and either manually enter or select the AP's SSID in the Scan
Info table and click Select.
N220 User’s Guide
Chapter 2 Tutorial
4 Choose the same encryption method as the AP to which you want to connect (In
this example, WPA-PSK).
Figure 15 ZyXEL Utility: Profile Security
5 This screen varies depending on the encryption method you selected in the
previous screen. In this example, enter the pre-shared key and leave the
encryption type at the default setting.
Figure 16 ZyXEL Utility: Profile Encryption
6 Verify the profile settings in the ready-only screen. Click Save to save and go to
the next screen.
Figure 17 ZyXEL Utility: Profile Summary
N220 User’s Guide
33

Chapter 2 Tutorial
7 Click Activate Now to use the new profile immediately. Otherwise, click the
Activate Later button to go back to the Profile List screen.
If you clicked Activate Later you can sele ct the profile from the list in the Profile
screen and click Connect to activate it.
Note: Only one profile can be activated and used at any given time.
Figure 18 ZyXEL Utility: Profile Activate
8 When you activate the new profile, the ZyXEL utility goes to the Link Info screen
while it connects to the AP using your settings. When the wireless link is
established, the ZyXEL utility icon in the system tray turns green and the Link
Info screen displays details of the active connection.
9 Make sure the selected AP in the active profile is on and connected to the Internet.
Open your Internet browser, enter http://www.zyxel.com or the URL of any other
web site in the address bar and press ENTER. If you are able to access the web
site, your new profile is successfully configured.
10 If you cannot access the Internet, go back to the Profile screen. Select the profile
you are using and click Edit. Check the details you entered previously. Also, refer
to the Troubleshooting section of this User's Guide or contact your network
administrator if necessary.
2.4 Configuring the N220 as an AP
In access point mode, your N220 allows you to set up your wireless network
without using a dedicated AP. See Chapter 5 on page 75 for more information.
After you install the ZyXEL Utility and then connect the N220 to your computer,
follow the steps below to set up your N220 as an AP.
34
N220 User’s Guide

Chapter 2 Tutorial
1 Select AP Mode in the main ZyXEL Utility screen. The AP Mode version of the
default Link Info screen displays.
Figure 19 ZyXEL Utility - AP Mode
2 Under Status, you can view the current settings on the N220. In the Association
List, you can see if any wireless clients have connected to your N220.
Figure 20 ZyXEL Utility - AP Mode: Link Info
3 If you want to change the access point’s SSID and enable wireless security for
your N220, click the Configuration tab. See Section 5.4.1 on page 80 for detail ed
field descriptions found on this screen.
Figure 21 ZyXEL Utility - AP Mode: Configuration
N220 User’s Guide
35

Chapter 2 Tutorial
36
N220 User’s Guide

CHAPTER 3
Wireless LANs
3.1 Overview
This section provides background information on wireless Local Area Networks.
3.1.1 What You Can Do in This Section
• Connect securely to an AP using many of the strongest and most common
encryption protocols. See Section 3.3 on page 39 for details.
• Connect securely either to an AP or computer-to-computer using WPS. See
Section 3.4 on page 41 for details.
3.1.2 What You Need to Know
The following terms and concepts may help as you read through this section.
Server
When two or more devices are connected digitally to form a network, the one that
distributes data to the other devices is known as the “server”. A RADIUS (Remote
Authentication Dial-In User Service) is a kind of server that manages logins and
logout, among other things, for the network to which it is connected.
Client
When two or more devices are connected digitally to form a network, the one that
contacts and obtains data from a server is known as the “client”. Each client is
designed to work with one or more specific kinds of servers, and each server
requires a specific kind of client . Wireless adapters are clients that connect to a
network server through an AP.
Authentication
Authentication is the process of confirming a client’s or user’ s digital identit y when
they connect to a network. Turning off authentication means disabling all security
protocols and opening your network to anyone with the means to connect to it.
N220 User’s Guide
37
Chapter 3 Wireless LANs
Encryption
The process of taking data and encoding it, usually using a mathematical formula,
so that it becomes unreadable unless decrypted with the proper code or pass
phrase.
3.1.3 Before You Begin
• You should have valid login information for an existing network Access Point,
otherwise you may not be able to make a network connection right away.
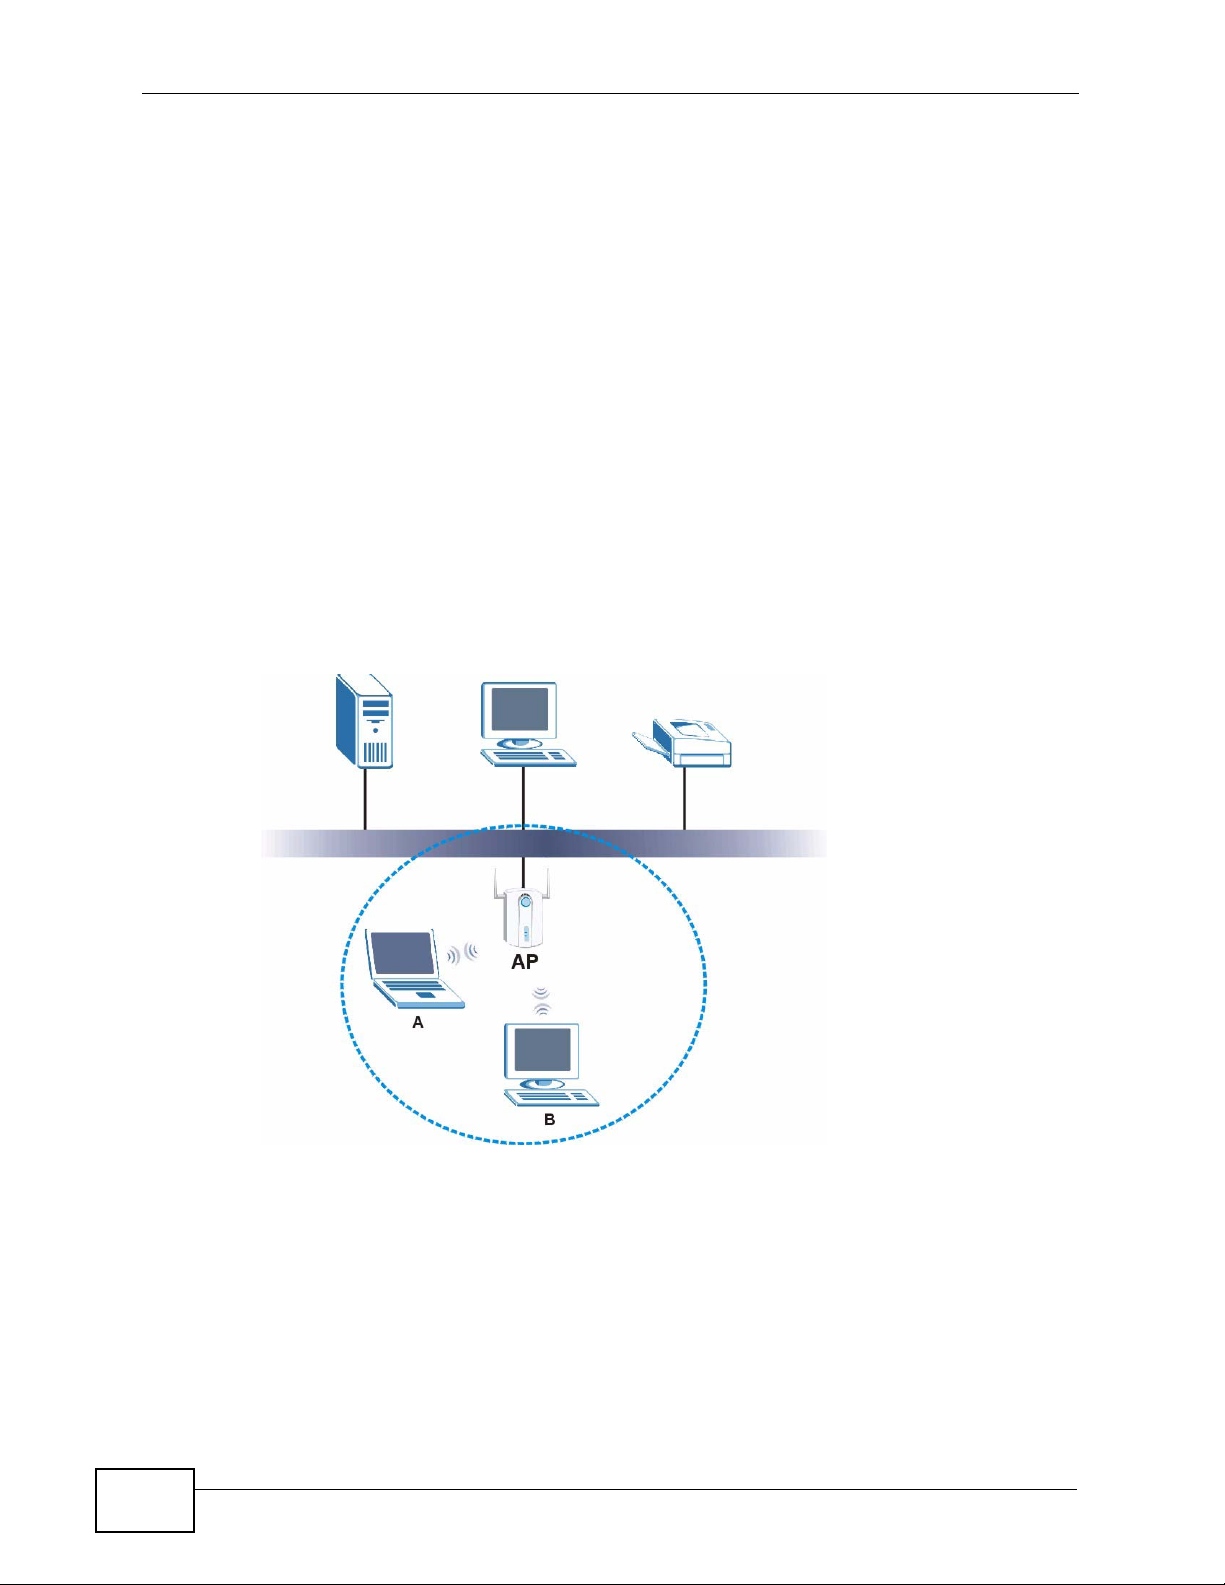
3.2 Wireless LAN Overview
The following figure provides an example of a wireless network with an AP. See
Figure 3 on page 20 for an Ad Hoc network example.
Figure 22 Example of a Wireless Network
38
The wireless network is the part in the blue circle. In this wireless network,
devices A and B are called wireless clients. The wireless clients use the access
point (AP) to interact with other devices (such as the printer) or with the Internet
Every wireless network must follow these basic guidelines.
• Every device in the same wireless network must use the same SSID.
The SSID is the name of the wireless network. It stands for Service Set IDentity.
N220 User’s Guide

• If two wireless networks overlap, they should use a different channel.
Like radio stations or television channels, each wireless network uses a specific
channel, or frequency, to send and receive information.
• Every device in the same wireless network must use security compatible with
the AP or peer computer.
Security stops unauthorized devices from using the wireless net work. It can also
protect the information that is sent in the wireless network.
3.3 Wireless LAN Security
Wireless LAN security is vital to your network to protect wireless communications.
If you do not enable any wireless security on your N220, the N220’s wireless
communications are accessible to any wireless networking device that is in the
coverage area.
Chapter 3 Wireless LANs
Note: You can use only WEP encryption if you set the N220 to Ad-hoc mode.
See the appendices for more detailed information about wireless security.
3.3.1 User Authentication and Encryption
You can make every user log in to the wireless network before they can use it.
This is called user authentication. However, every wireless client in the wireless
network has to support IEEE 802.1x to do this.
Wireless networks can use encryption to protect the informat ion that is sent in the
wireless network. Encryption is like a secret code. If you do not know the secret
code, you cannot understand the message.
3.3.1.1 WEP
3.3.1.1.1 Data Encryption
WEP (Wired Equivalent Privacy) encryption scr ambles all data packets tr ansmitted
between the N220 and the AP or other wireless stations to keep network
communications private. Both the wireless stations and the access points must
use the same WEP key for data encryption and decryption.
There are two ways to create WEP keys in your N220.
N220 User’s Guide
39

Chapter 3 Wireless LANs
• Automatic WEP key generation based on a “password phrase” called a
passphrase. The passphrase is case sensitive. You must use the same
passphrase for all WLAN adapters with this feature in the same WLAN.
For WLAN adapters without the passphrase feature, you can still take advantage
of this feature by writing down the four automatically generated WEP keys from
the Security Settings screen of the ZyXEL utility and entering them manually
as the WEP keys in the other WLAN adapter(s).
•Enter the WEP keys manually.
Your N220 allows you to configure up to four 64-bit or 128-bit WEP keys. Only
one key is used as the default key at any one time.
3.3.1.1.2 Authentication Type
The IEEE 802.11b/g standard describes a simple authentication method between
the wireless stations and AP. Three authentication types are defined: Auto, Open
and Shared.
• Open mode is implemented for ease-of-use and when security is not an issue.
The wireless station and the AP or peer computer do not share a secret key.
Thus the wireless stations can associate with any AP or peer computer and listen
to any transmitted data that is not encrypted.
• Shared mode involves a shared secret key to authenti cate the wireless station
to the AP or peer computer. This requires you to enable the wireless LAN
security and use same settings on both the wireless station and the AP or peer
computer.
• Auto authentication mode allows the N220 to switch between the open system
and shared key modes automatically. Use the auto mode if you do not know the
authentication mode of the other wireless stations.
3.3.1.2 IEEE 802.1x
The IEEE 802.1x standard outlines enhanced security methods for both the
authentication of wireless stations and encryption key management.
Authentication can be done using an external RADIUS server.
3.3.1.2.1 EAP Authentication
EAP (Extensible Authentication Protocol) is an authentication protocol that runs on
top of the IEEE 802.1x transport mechanism in order to support multiple types of
user authentication. By using EAP to in teract with an EAP-compatible RADIUS
server, an access point helps a wireless station and a RADIUS server perform
authentication.
40
The type of authentication you use depends on the RADIUS server and an
intermediary AP(s) that supports IEEE 802.1x. The N220 supports EAP-TLS, EAPTTLS (at the time of writing, TTLS is not available in Windows Vista) and EAPPEAP. Refer to Appendix B on page 131 for descriptions.
N220 User’s Guide

For EAP-TLS authentication type, you must first have a wired connection to the
network and obtain the certificate(s) from a certificate authority (CA). Certificates
(also called digital IDs) can be used to authenticate users and a CA issues
certificates and guarantees the identity of each certificate owner.
3.3.1.3 WPA and WPA2
Wi-Fi Protected Access (WPA) is a subset of the IEEE 802.11i standard. WPA2
(IEEE 802.11i) is a wireless security standard that defines stronger encryption,
authentication and key management than WPA.
Key differences between WPA(2) and WEP are improved data encryption and user
authentication.
Both WPA and WPA2 improve data encryption by using Temporal Key Integrity
Protocol (TKIP), Message Integrity Check (MIC) and IEEE 802.1x. WPA and WPA2
use Advanced Encryption Standard (AES) in the Counter mode with Cipher block
chaining Message authentication code Protocol (CCMP) to offer stronger
encryption than TKIP.
Chapter 3 Wireless LANs
If both an AP and the wireless clients support WPA2 and you have an external
RADIUS server, use WPA2 for stronger data encryption. If you don't have an
external RADIUS server, you should use WPA2-PSK (WPA2-Pre-Shared Key) that
only requires a single (identical) password entered into each access point, wireless
gateway and wireless client. As long as the passwords match, a wireless client will
be granted access to a WLAN.
If the AP or the wireless clients do not support WPA2, just use WPA or WPA-PSK
depending on whether you have an external RADIUS server or not.
Select WEP only when the AP and/or wireless clients do not support WP A or WPA2.
WEP is less secure than WPA or WPA2.
3.4 WiFi Protected Setup
Your N220 s upports WiFi Protected S etup (WPS), whic h is an easy w ay to s et up a
secure wireless network. WPS is an industry standard specification, defined by the
WiFi Alliance.
WPS allows you to quickly set up a wireless network with strong security, without
having to configure security settings manually. Each WPS connection works
between two devices. Both devices must support WPS (check each device’s
documentation to make sure).
N220 User’s Guide
41

Chapter 3 Wireless LANs
Depending on the devices you have, you can either press a button (on the device
itself , or in its configuration utility) or enter a PIN (a unique P ersonal Identification
Number that allows one device to authenticate the other) in each of the two
devices. When WPS is activated on a device, it has two minutes to find another
device that also has WPS activated. Then, the two devices connect and set up a
secure network by themselves.
3.4.1 Push Button Configuration
WPS Push Button Configuration (PBC) is in itiated by pressing a button on each
WPS-enabled device, and allowing them to connect automatically. You do not need
to enter any information.
Not every WPS-enabled device has a physical WPS button. Some may have a WPS
PBC button in their configuration utilities instead of or in addition to the physical
button.
Take the following steps to set up WPS using the button.
1 Ensure that the two devices you want to set up are within wireless range of one
another.
2 Look for a WPS button on each device. If the device does not have one, log into its
configuration utility and locate the button (see the device’s User’ s Guide for how to
do this - for the N220, see Section 4.6.1 on page 69).
3 Press the button on one of the devices (it doesn’t matter which).
4 Within two minutes, press the button on the other device. The registrar sends the
network name (SSID) and security key throug h an secure connection to the
enrollee.
If you need to make sure that WPS worked, check the list of associated wireless
clients in the AP’s configuration utility. If you see the wireless client in the list,
WPS was successful.
3.4.2 PIN Configuration
Each WPS-enabled device has its own PIN (Personal Identification Number). This
may either be static (it cannot be changed) or dynamic (in some devices you can
generate a new PIN by clicking on a button in the configuration interface).
42
Use the PIN method instead of the push-button configuration (PBC) method if you
want to ensure that the connection is esta blished between the devices you specify,
not just the first two devices to activate WPS in r ange of each other. However, y ou
N220 User’s Guide

Chapter 3 Wireless LANs
need to log into the configuration interfaces of both devices to use the PIN
method.
When you use the PIN method, you must enter the PIN from one device (usually
the wireless client) into the second device (usually the Access Point or wireless
router). Then, when WPS is activated on the first device, it presents its PIN to the
second device. If the PIN matches, one device sends the network and security
information to the other, allowing it to joi n th e network.
Take the following steps to set up a WPS connection between an access point or
wireless router (referred to here as the AP) and a client device using the PIN
method.
1 Ensure WPS is enabled on both devices.
2 Access the WPS section of the AP’s configuration interface. See the device’ s User’ s
Guide for how to do this.
3 Look for the client’s WPS PIN; it will be displayed either on the device, or in the
WPS section of the client’s configuration interface (see the device’s User’s Guide
for how to find the WPS PIN - for the N220, see Section 4.6 on page 68).
4 Enter the client’s PIN in the AP’s configuration interface.
Note: If the client device’s configuration interface has an area for entering another
device’s PIN, you can either enter the client’s PIN in the AP, or enter the AP’s
PIN in the client - it does not matter which.
5 Start WPS on both devices within two minutes.
Note: Use the configuration utility to activate WPS, not the push-button on the device
itself.
6 On a computer connected to the wireless client, try to connect to the Internet. If
you can connect, WPS was successful.
If you cannot connect, check the list of associated wireless clients in the AP’s
configuration utility. If you see the wireless client in the list, WPS was successful.
N220 User’s Guide
43

Chapter 3 Wireless LANs
The following figure shows a WPS-enabled wireless client (installed in a notebook
computer) connecting to the WPS-enabled AP via the PIN method.
Figure 23 Example WPS Process: PIN Method
ENROLLEE
REGISTRAR
WPS
This device’s
WPS PIN: 123456
WPS
Enter WPS PIN
from other device:
3.4.3 How WPS Works
WPS
START
WITHIN 2 MINUTES
SECURE EAP TUNNEL
SSID
WPA(2)-PSK
COMMUNICATION
WPS
START
44
When two WPS-enabled devices connect, each device must assume a specific role.
One device acts as the registrar (the device that supplies network and security
settings) and the other device acts as the enrollee (the device that receives
network and security settings. The registrar creates a secure EAP (Extensible
Authentication Protocol) tunnel and sends the network name (SSID) and the WPAPSK or WPA2-PSK pre-shared key to the enrollee. Whether WPA-PSK or WP A2-PSK
is used depends on the standards supported by the devices. If the registrar is
N220 User’s Guide

Chapter 3 Wireless LANs
already part of a network, it sends the existing information. If not, it generates
the SSID and WPA(2)-PSK randomly.
The following figure shows a WPS-enabled client (installed in a notebook
computer) connecting to a WPS-enabled access point.
Figure 24 How WPS works
ACTIVATE
WPS
WITHIN 2 MINUTES
WPS HANDSHAKE
SECURE TUNNEL
SECURITY INFO
COMMUNICATION
ACTIVATE
WPS
REGISTRARENROLLEE
The roles of registrar and enrollee last only as long as the WPS setup process is
active (two minutes). The next time you use WPS, a different device can be the
registrar if necessary.
The WPS connection process is like a handshake; only two devices participate in
each WPS transaction. If you want to add more devices you should repeat the
process with one of the existing networked devices and the new device.
Note that the access point (AP) is not always the registrar, and the wireless client
is not always the enrollee. All WPS-certified APs can be a registrar, and so can
some WPS-enabled wireless clients.
By default, a WPS devices is “unconfigured”. This means that it is not part of an
existing network and can act as either enrollee or registrar (if it supports both
functions). If the registrar is unconfigured, the security settings it transmits to the
enrollee are randomly-generated. Once a WPS-enabled device has connected to
another device using WPS, it becomes “configured”. A configured wireless client
can still act as enrollee or registrar in subsequent WPS connections, but a
configured access point can no longer act as enrollee. It will be the registrar in all
N220 User’s Guide
45

Chapter 3 Wireless LANs
subsequent WPS connections in which it is involved. If you want a configured AP to
act as an enrollee, you must reset it to its factory defaults.
3.4.3.1 Example WPS Network Setup
This section shows how security settings are distributed in an example WPS setup.
The following figure shows an example network. In step 1, both AP1 and Client 1
are unconfigured. When WPS is activated on both, they perform the handshake. In
this example, AP1 is the registrar, and Client 1 is the enrollee. The registrar
randomly generates the security information to set up the network, since it is
unconfigured and has no existing information.
Figure 25 WPS: Example Network Step 1
SECURITY INFO
CLIENT 1
REGISTRARENROLLEE
AP1
In step 2, you add another wireless client to the network. You know that Client 1
supports registrar mode, but it is better to use AP1 for the WPS handshake with
the new client since you must connect to the access point anyway in order to use
the network. In this case, AP1 must be the registrar, since it is configured (it
already has security information for the network). AP1 supplies the existing
security information to Client 2.
Figure 26 WPS: Example Network Step 2
REGISTRAR
EXISTING CONNECTION
CLIENT 1
ENROLLEE
O
F
N
I
Y
T
I
R
U
C
E
S
AP1
46
CLIENT 2
N220 User’s Guide

Chapter 3 Wireless LANs
In step 3, you add another access point (AP2) to your network. AP2 is out of
range of AP1, so you cannot use AP1 for the WPS handshake with the new access
point. However, you know that Client 2 supports the registrar function, so you use
it to perform the WPS handshake instead.
Figure 27 WPS: Example Network Step 3
EXISTING CONNECTION
N
O
I
CLIENT 1
REGISTRAR
CLIENT 2
T
C
E
N
N
O
C
G
N
I
T
S
I
X
E
AP1
3.4.4 Limitations of WPS
WPS has some limitations of which you should be aware.
• WPS works in Infrastructure networks only (where an AP and a wireless client
communicate). It does not work in Ad-Hoc networks (where there is no AP).
• When you use WPS, it works between two devices only. You cannot enroll
multiple devices simultaneously, you must enroll one after the other.
For instance, if you have two enrollees and one registrar you must set up the
first enrollee (by pressing the WPS button on the registr ar and the first enrollee,
for example), then check that it successfully enroll ed , then set up the second
device in the same way.
• WPS works only with other WPS-enabled devices. However, you can still add
non-WPS devices to a network you already set up using WPS.
S
E
C
U
R
I
T
Y
I
N
F
O
ENROLLEE
AP1
WPS works by automatically issuing a randomly-generated WPA-PSK or WPA2PSK pre-shared key from the registrar device to the enrollee devices (see
Section 4.4.1.3 on page 57 for information on pre-shared keys). Whether the
network uses WPA-PSK or WPA2-PSK depends on the device. You can check the
N220 User’s Guide
47

Chapter 3 Wireless LANs
configuration interface of the registrar device to discov er the key the net work is
using (if the device supports this feature). Then, you can enter the key into the
non-WPS device and join the network as normal (the non-WPS device must also
support WPA-PSK or WPA2-PSK).
• When you use the PBC method, there is a short period (from the moment you
press the button on one device to the moment you press the button on the
other device) when any WPS-enabled device could join the network. This is
because the registrar has no way of identifying the “correct” enrollee, and
cannot differentiate between your enrollee and a rogue device. This is a possible
way for a hacker to gain access to a network.
You can easily check to see if this has happened. WPS works between only two
devices simultaneously, so if another device has enrolled your device will be
unable to enroll, and will not have access to the network. If this happens, open
the access point’s configuration interface and look at the list of associated
clients (usually displayed by MAC address). It does not matter if the access
point is the WPS registrar, the enrollee, or was not involved in the WPS
handshake; a rogue device must still associate with the access point to gain
access to the network. Check the MAC addresses of your wireless clients
(usually printed on a label on the bottom of the device). If there is an unknown
MAC address you can remove it or reset the AP.
48
N220 User’s Guide

CHAPTER 4
Station Mode
4.1 Overview
This section shows you how to configure your N220 using the ZyXEL utility in
Windows.
Note: Some features available in Windows XP or Windows 2000 are not available in
Windows Vista.
4.1.1 What You Can Do in This Section
•On the Link Info screen, you can see your current connection details, monitor
signal strength and quality, and more. See Section 4.3 on page 51 for details.
•On the Site Survey screen, you can connect to any available unsecured
wireless network in range of the N220, or open the security settings screen for
any secured wireless network in range. See Section 4.4 on page 54 for details.
•On the Profile screen, you can create, delete and manage your wireless
network profiles. See Section 4.5 on page 62 for details.
•On the Adapter screen, you can configure the N220 hardware, such as
activating WPS mode or its power saving feature. See Section 4.6 on page 68
for details.
4.1.2 What You Need to Know
The following terms and concepts may help as you read through this section.
Wired Equivalent Privacy (WEP)
WEP (Wired Equivalent Privacy) encrypts data transmitted between wired and
wireless networks to keep the transmission private. Although one of the original
wireless encryption protocols, WEP is also the weakest. Many people use it strictly
to deter unintentional usage of their wireless network by outsiders.
Wi-fi Protected Access (WPA)
Wi-Fi Protected Access (WPA) is a subset of the IEEE 802.11i standard. It
improves data encryption by using Temporal Key Integrity Protocol (TKIP),
N220 User’s Guide
49
Chapter 4 Station Mode
Message Integrity Check (MIC) and IEEE 802.1x. WPA uses Advanced Encryption
Standard (AES) in the Counter mode with Cipher block chaining Message
authentication code Protocol (CCMP) to offer stronger encryption than TKIP. WPA
applies IEEE 802.1x and Extensible Authentication Protocol (EAP) to authenticate
wireless clients using an external RADIUS database. The WPA protocol affords
users with vastly stronger security than the WEP protocol. It comes in two
different varieties: WPA and WPA2. Always try to use WPA2 as it implements the
full version of the security standard while WPA does not.
Pre-Shared Key (PSK)
A pre-shared key is a password shared between the server and the client that
unlocks the algorithm used to encrypt the data traffic between them. Without the
proper password, the client and the server cannot communicate.
Extensible Authentication Protocol (EAP)
An enhanced security framework designed to improve an existing security
protocol, such as WPA-PSK or WPA2-PSK.
4.1.3 Before You Begin
• Make sure the ZyXEL utility is already installed. See the Quick Start Guide for
more.
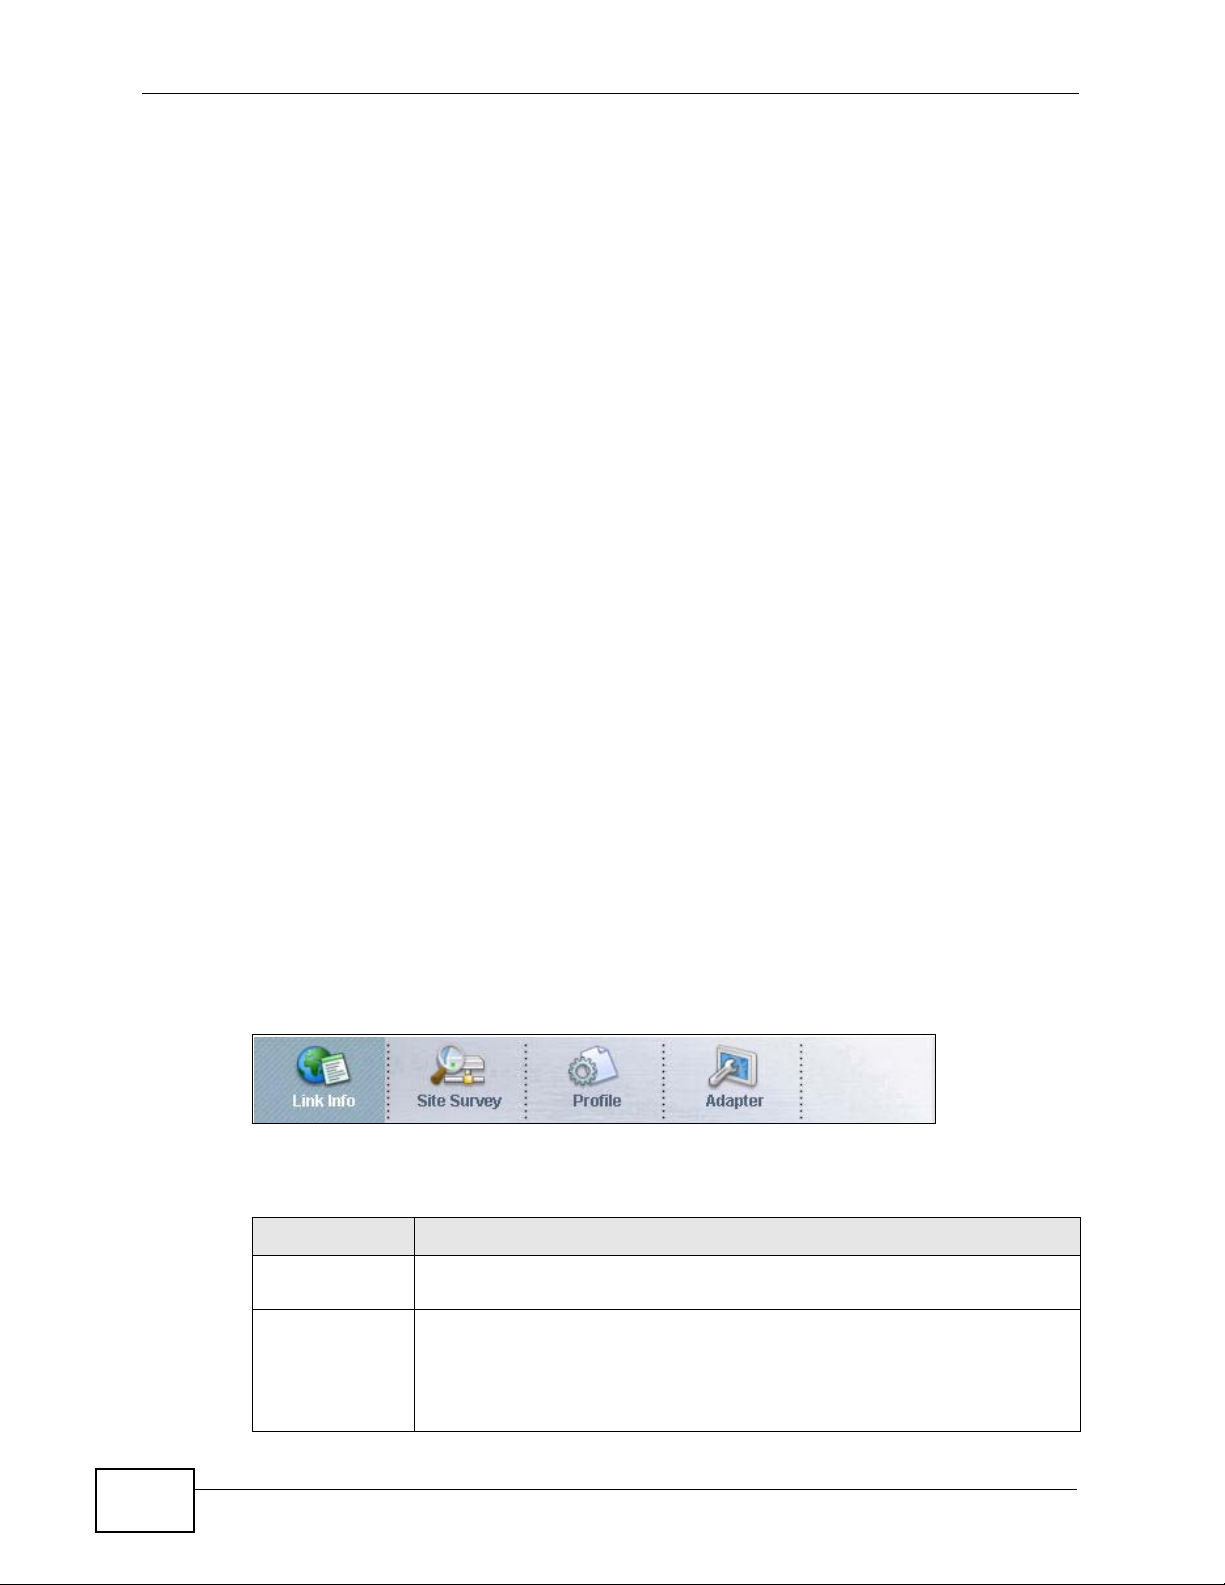
4.2 ZyXEL Utility Screen Summary
This section describes the ZyXEL utility screens.
Figure 28 ZyXEL Utility Menu Summary
The following table describes the menus.
Table 4 ZyXEL Utility Menu Summary
TAB DESCRIPTION
Link Info Use this screen to see your current connection status, configuration and
data rate statistics.
Site Survey Use this screen to:
50
• scan for a wireless network.
• configure wireless security (if activated on the selected network).
• connect to a wireless network.
N220 User’s Guide
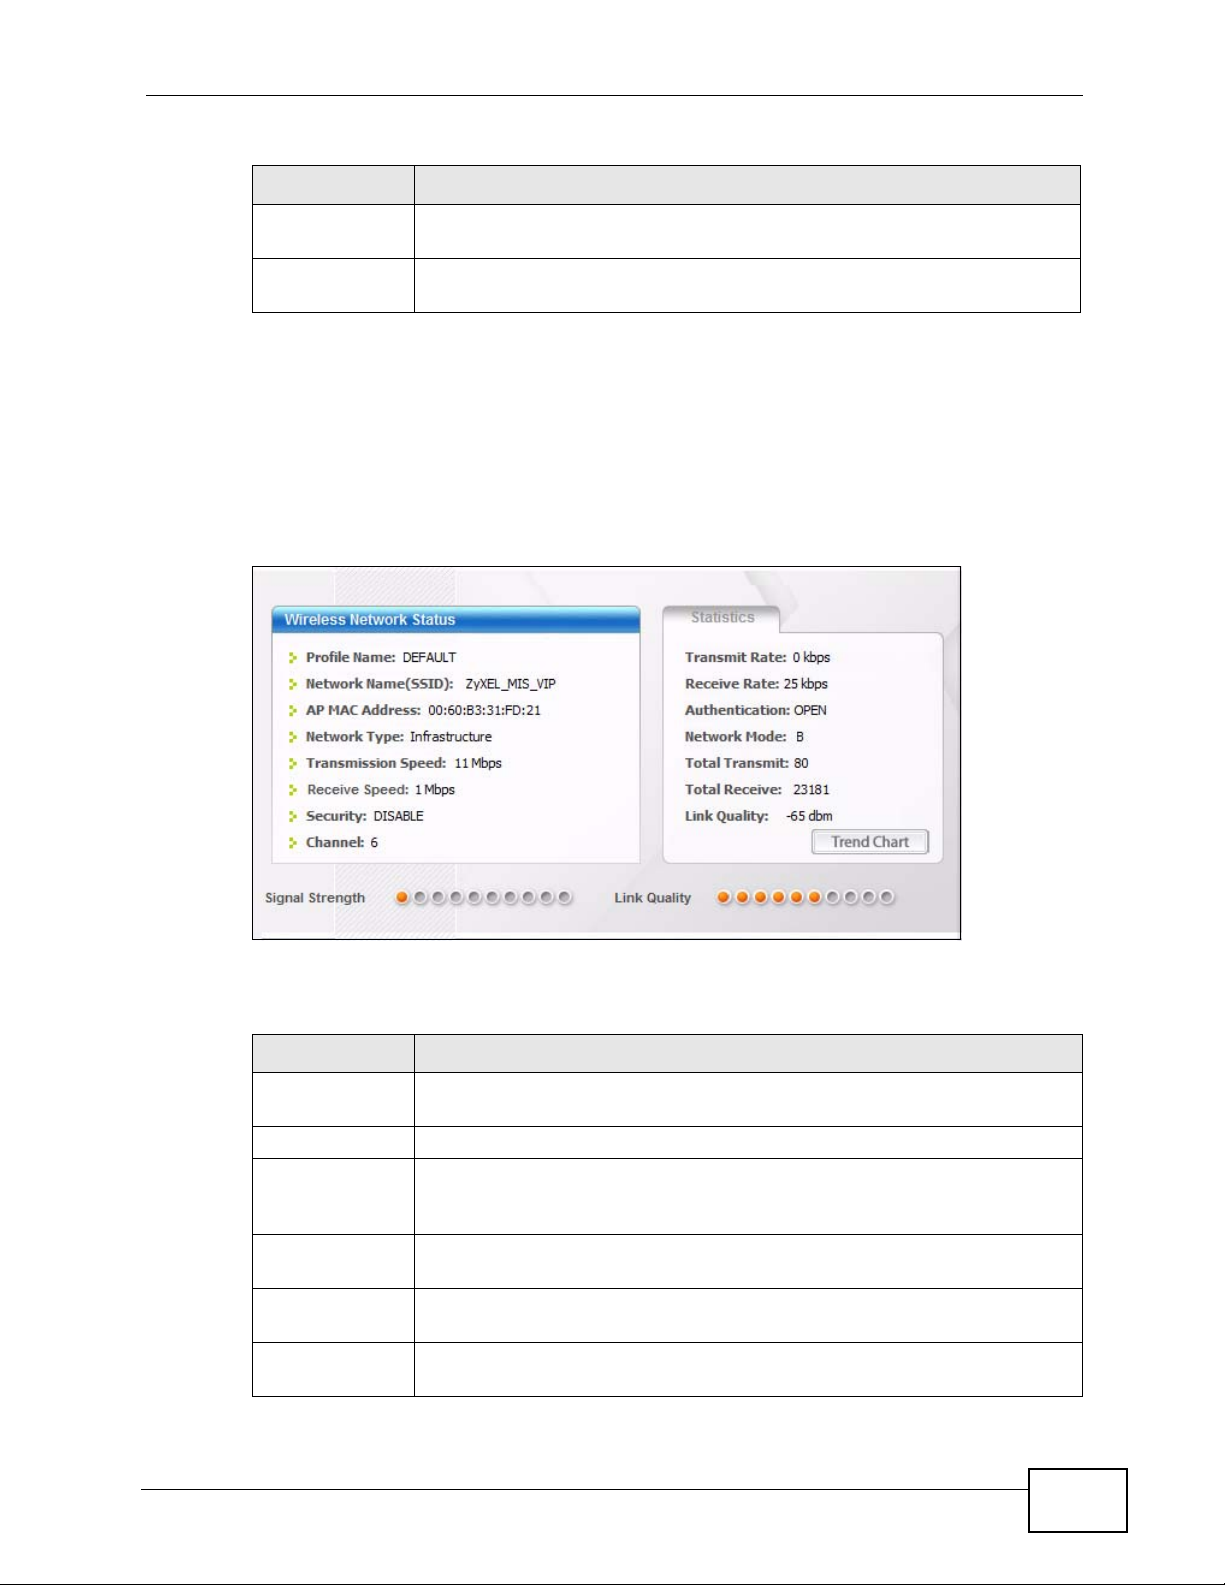
Table 4 ZyXEL Utility Menu Summary
TAB DESCRIPTION
Profile Use this screen to add, delete, edit or activate a profile with a set of
wireless and security settings.
Adapter Use this screen to configure preamble type, enable power saving and
use WiFi Protected Setup (WPS).
4.3 The Link Info Screen
When the ZyXEL utility starts, the Link Info screen displays, showing the current
configuration and connection status of your N220.
Figure 29 Link Info
Chapter 4 Station Mode
The following table describes the labels in this screen.
Table 5 Link Info
LABEL DESCRIPTION
Wireless
Network Status
Profile Name This is the name of the profile you are currently using.
Network
Name
(SSID)
AP MAC
Address
Network
Type
Transmission
Speed
N220 User’s Guide
The SSID identifies the wireless network to which a wireless station is
associated. This field displays the name of the wireless device to which
the N220 is associated.
This field displays the MAC address of the AP or peer computer to which
the N220 is associated.
This field displays the network type (Infrastructure or Ad-Hoc) of the
wireless network.
This field displays the current transmission speed of the N220 in
megabits per second (Mbps).
51

Chapter 4 Station Mode
Table 5 Link Info (continued)
LABEL DESCRIPTION
Receive
Speed
Security This field displays whether data encryption is activated (WEP / 802.1x
Channel This field displays the radio channel the N220 is currently using.
Statistics
Transmit
Rate
Receive Rate This field displays the current data receiving rate in kilobits per second
Authenticati
on
Network
Mode
Total
Transmit
Total
Receive
Link Quality This field displays the signal strength of the N220.
Trend Chart Click this button to display the real-time statistics of the data rate in
Signal Strength The status bar shows the strength of the signal. The signal strength
Link Quality The status bar shows the quality of wireless connection. This refers to
This field displays the current receive speed of the N220 in megabits per
second (Mbps).
/ WPA /WPA-PSK / WPA2 / WPA2-PSK) or inactive (DISABLE).
This field displays the current data transmission rate in kilobits per
second (Kbps).
(Kbps).
This field displays the authentication method of the N220.
This field displays the wireless standard used by the selected wireless
device. It shows B for 802.11b, G for 802.11g or N for 802.11n.
This field displays the total number of data frames transmitted.
This field displays the total number of data frames received.
kilobits per second (Kbps).
mainly depends on the antenna output power and the distance between
your N220 and the AP or peer computer.
the percentage of packets transmitted successfully. If there are too
many wireless stations in a wireless network, collisions may occur which
could result in a loss of messages even though you have high signal
strength.
52
N220 User’s Guide
4.3.1 Trend Chart
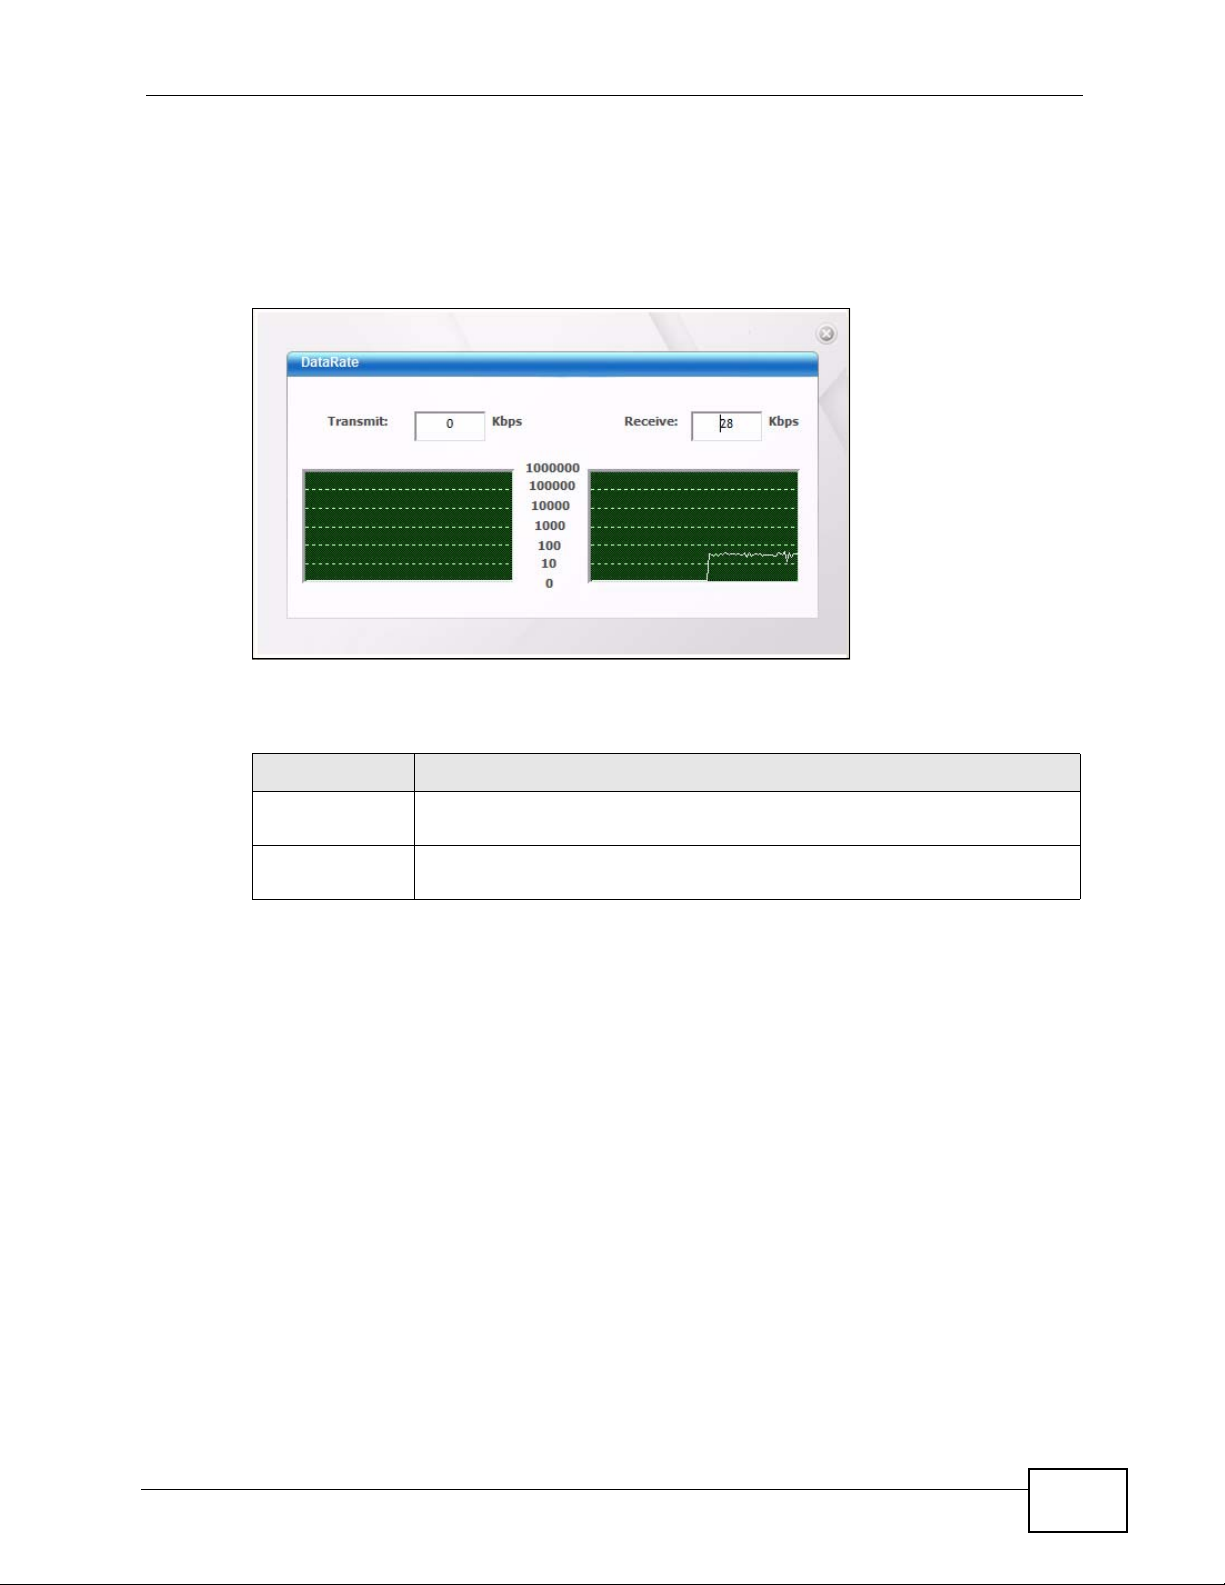
Click Trend Chart in the Link Info screen to display a screen as shown below.
Use this screen to view real-time data traffic statistics.
Figure 30 Link Info: Trend Chart
Chapter 4 Station Mode
The following table describes the labels in this screen.
Table 6 Link Info: Trend Chart
LABEL DESCRIPTION
Transmit This field displays the current data transmission rate in kilobits per
second (Kbps).
Receive This field displays the current data reception rate in kilobits per second
(Kbps).
N220 User’s Guide
53
Chapter 4 Station Mode
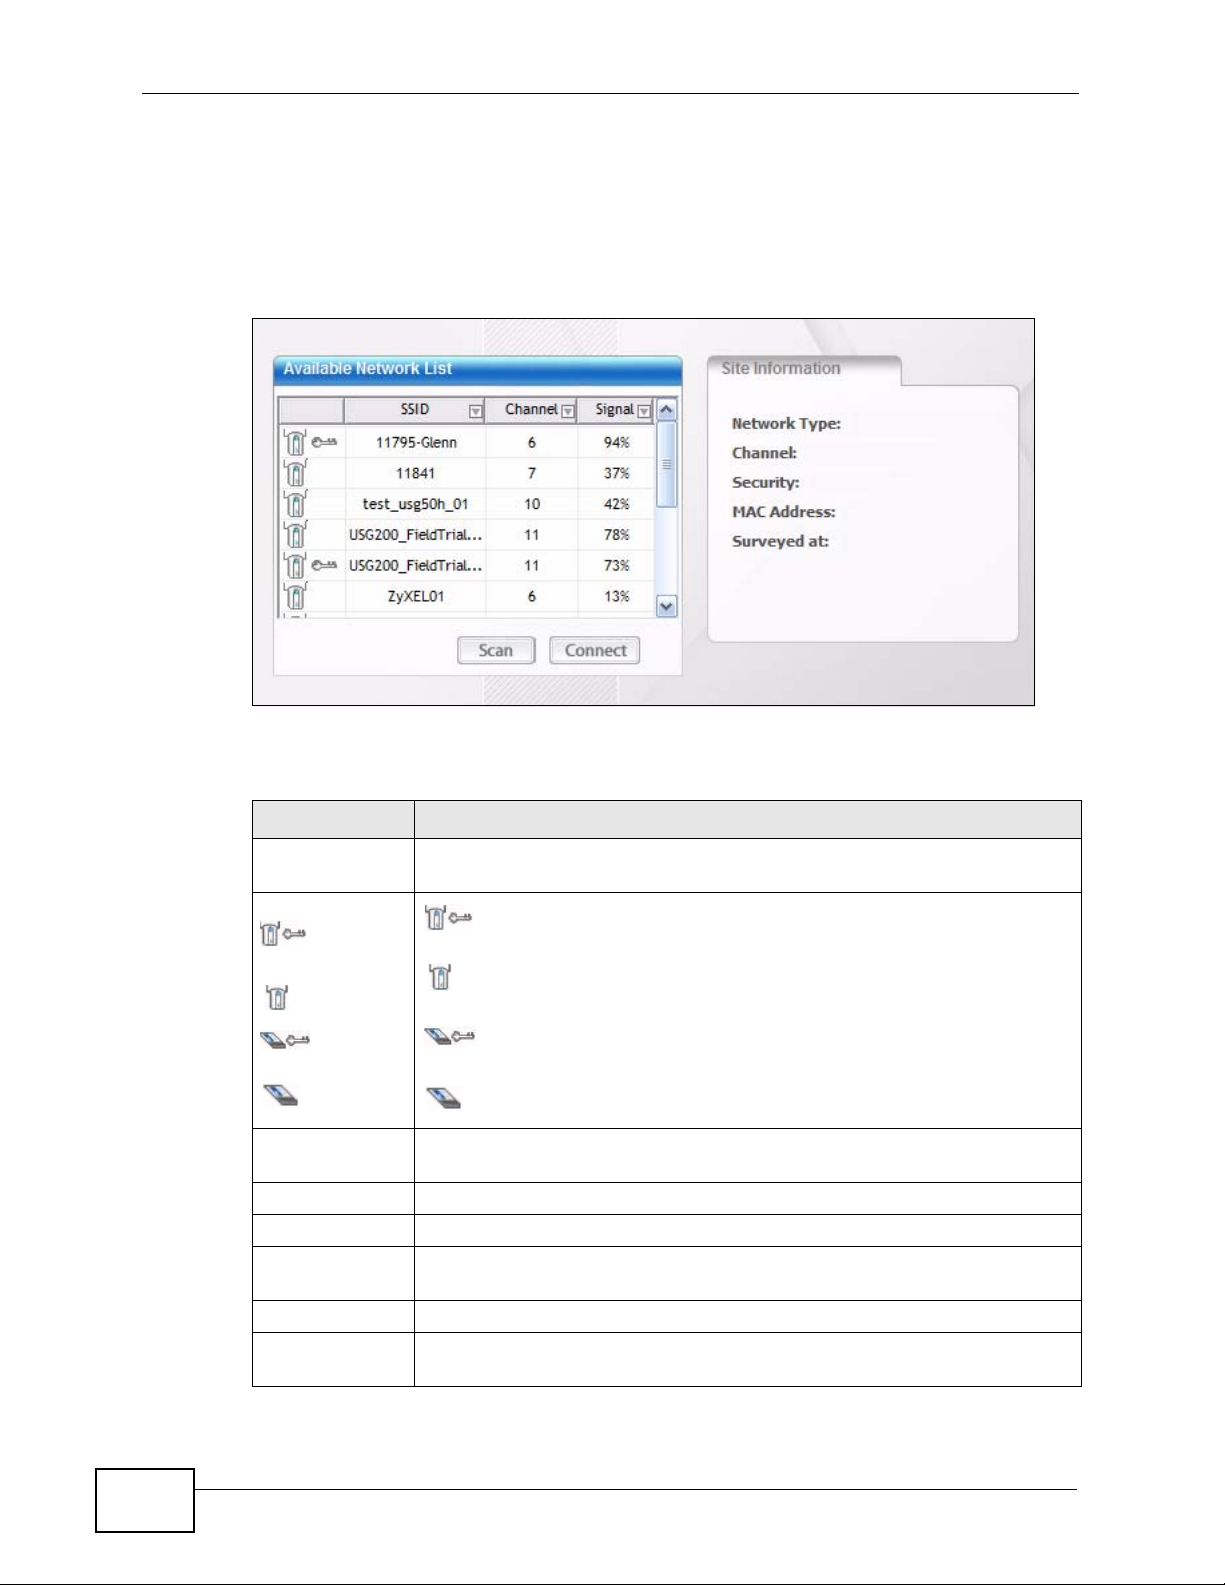
4.4 The Site Survey Screen
Use the Site Survey screen to scan for and connect to a wireless network
automatically.
Figure 31 Site Survey
The following table describes the labels in this screen.
Table 7 Site Survey
LABEL DESCRIPTION
Available
Network List
,
,
or
SSID This field displays the SSID (Service Set IDentifier) of each wireless
Channel This field displays the channel number used by each wireless device.
Signal This field displays the signal strength of each wireless device.
Scan Click Scan to search for available wireless devices within transmission
Connect Click Connect to associate to the selected wireless device.
Site
Information
Click a column heading to sort the entries.
denotes that the wireless device is in infrastructure mode and
the wireless security is activated.
denotes that the wireless device is in infrastructure mode but the
wireless security is deactivated.
denotes that the wireless device is in Ad-Hoc mode and the
wireless security is activated.
denotes that the wireless device is in Ad-Hoc mode but the
wireless security is deactivated.
device.
range.
Click an entry in the Available Network List table to display the
information of the selected wireless device.
54
N220 User’s Guide

Table 7 Site Survey (continued)
LABEL DESCRIPTION
Network Type This field displays the network type (Infrastructure or Ad Hoc) of the
wireless device.
Channel This field displays the channel number used by each wireless device.
Security This field shows whether data encryption is activated (WEP, WPA,
WPA-PSK, WPA2, WPA2-PSK or 802.1x) or inactive (DISABLE).
MAC address This field displays the MAC address of the wireless device.
Surveyed at This field displays the time when the wireless device was scanned.
4.4.1 Security Settings
When you configure the N220 to connect to a network with wireless security
activated and the security settings are disabled on the N220, the screen varies
according to the encryption method used by the selected network.
4.4.1.1 Security Type Selection
Chapter 4 Station Mode
When you choose to connect to a network that has security, you are presented
with is a security selection screen. Choose the security of the network you are
attempting to join.
Figure 32 Security Setting Selection
The following table describes the labels in this screen.
Table 8 Security Setting: WEP
LABEL DESCRIPTION
Security Type Select the security type that matches the security setting of the
network you’re trying to join.
Back Click Back to go to the Site Survey screen to select and connect to
N220 User’s Guide
The options are: WEP, WPA, WPA2, WPA-PSK, WPA2-PSK, and
802.1x.
another network.
55
Chapter 4 Station Mode
Table 8 Security Setting: WEP (continued)
LABEL DESCRIPTION
Next Click Next to confirm your selections and advance to the Security
Settings screen that corresponds to the one you select here.
Exit Click Exit to return to the Site Survey screen without saving.
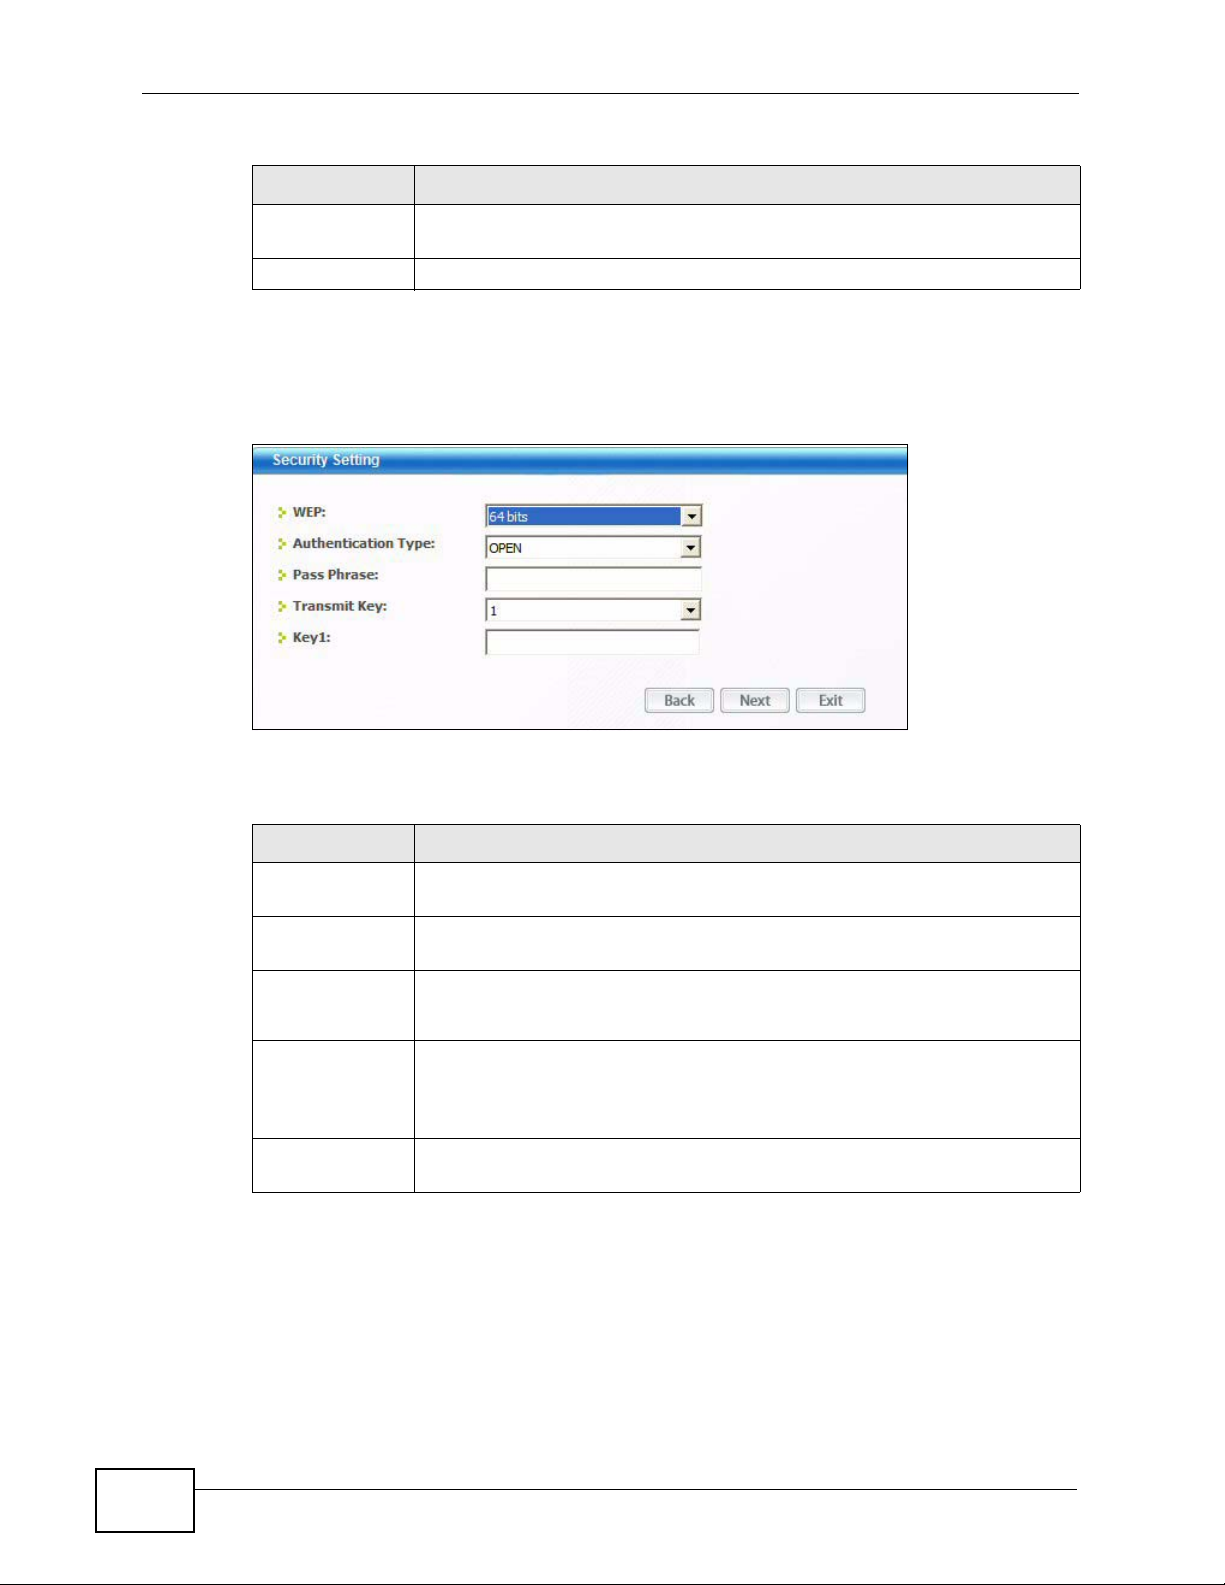
4.4.1.2 WEP Encryption
Configure WEP security in this screen.
Figure 33 Security Setting: WEP
The following table describes the labels in this screen.
Table 9 Security Setting: WEP
LABEL DESCRIPTION
Security
Settings
WEP Select 64 Bits or 128 Bits to activate WEP encryption and then fill in
the related fields.
Authentication
Type
Pass Phrase Enter a passphrase of up to 32 case-sensitive printable characters. As
T r ansmit Key Select a default WEP key to use for data encryption. The key displays in
Select an authentication method. Choices are Open and Shared.
Refer to Section 3.3.1.1.2 on page 40 for more information.
you enter the passphrase, the N220 automatically generates four
different WEP keys and displays the first in the key field below. Refer to
Section 3.3.1.1.1 on page 39 for more information.
the adjacent field.
56
N220 User’s Guide
Chapter 4 Station Mode
Table 9 Security Setting: WEP (continued)
LABEL DESCRIPTION
Key x (where x
is a number
between 1 and
4)
Select this option if you want to manually enter the WEP keys. Enter the
WEP key in the field provided.
If you select 64 Bits in the WEP field.
Enter either 10 hexadecimal digits in the range of “A-F”, “a-f” and
“0-9” (for example, 11AA22BB33) for HEX key type.
or
Enter 5 ASCII characters (case sensitive) ranging from “a-z”, “A-Z”
and “0-9” (for example, MyKey) for ASCII key type.
If you select 128 Bits in the WEP field,
Enter either 26 hexadecimal digits in the range of “A-F”, “a-f” and
“0-9” (for example, 00112233445566778899AABBCC) for HEX key
type
or
Enter 13 ASCII characters (case sensitive) ranging from “a-z”, “A - Z ”
and “0-9” (for example, MyKey12345678) for ASCII key type.
Note: The values for the WEP keys must be set up exactly the
same on all wireless devices in the same wireless LAN.
ASCII WEP keys are case sensitive.
Back Click Back to go to the Site Survey screen to select and connect to
another network.
Next Click Next to confirm your selections and advance to the Summary
screen. Refer to Section 4.4.2 on page 61.
Exit Click Exit to return to the Site Survey screen without saving.
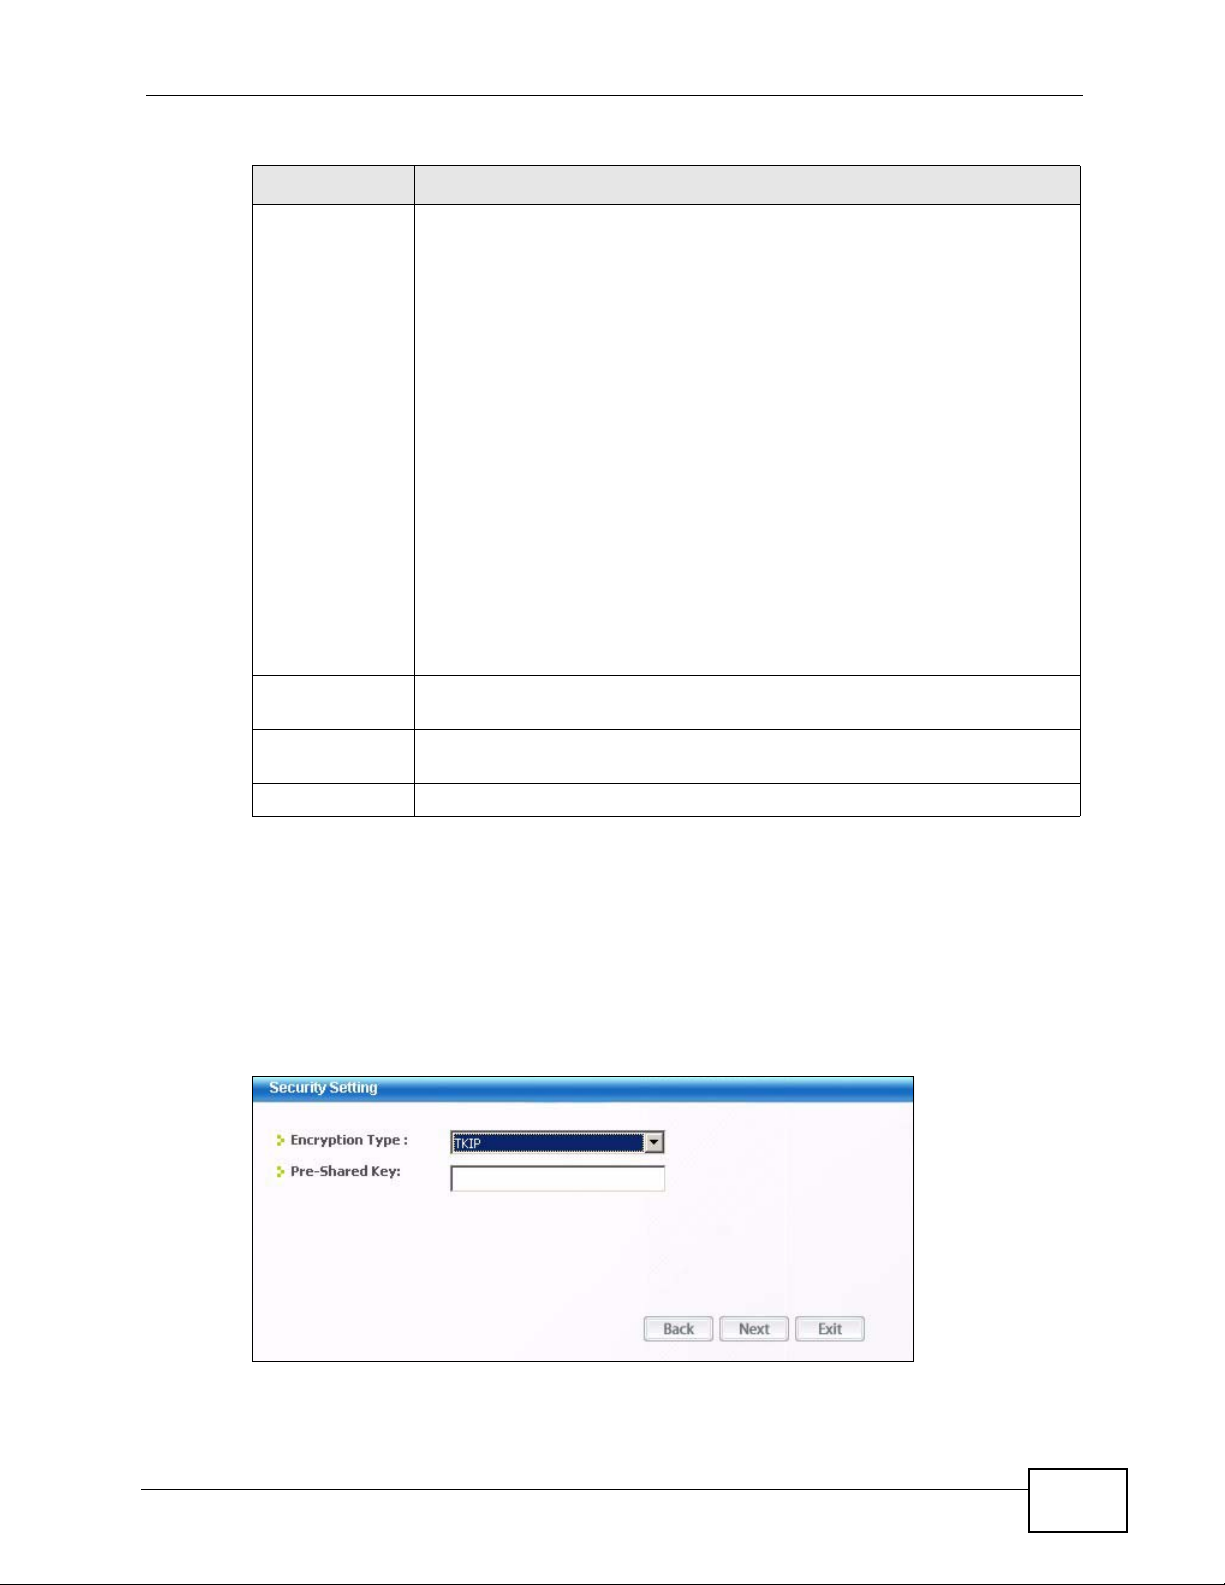
4.4.1.3 WPA-PSK/WPA2-PSK
Configure WPA-PSK/WPA2-PSK security in this screen.
Note: The procedure to configure WPA or WPA2 is different in Windows Vista. See
Section 4.7 on page 71 for information on setting up your N220 to use WPA or
WPA2 in Vista.
Figure 34 Security Setting: WPA-PSK/WPA2-PSK
N220 User’s Guide
57

Chapter 4 Station Mode
The following table describes the labels in this screen.
Table 10 Security Setting: WPA-PSK/WPA2-PSK
LABEL DESCRIPTION
Encryption Type The encryption mechanisms used for WPA/WPA2 and WPA-PSK/WPA2-
Pre-Shared Key Type a pre-shared key (same as the AP or peer device) of between 8
Back Click Back to go to the Site Survey screen to select and connect to
Next Click Next to confirm your selections and advance to the Summary
Exit Click Exit to return to the Site Survey screen without saving.
PSK are the same. The only difference between the two is that WPA-
PSK/WPA2-PSK uses a simple common password, instead of user-
specific credentials.
Select the encryption type (TKIP or AES) for data encryption.
Refer to Section 3.3.1.3 on page 41 for more information.
and 63 case-sensitive ASCII characters (including spaces and symbols)
or 64 hexadecimal characters.
another network.
screen. Refer to Section 4.4.2 on page 61.
4.4.1.4 WPA/WPA2
The screen that displays when you select WPA or WPA2 differs, depending on the
EAP Type you select (TLS, PEAP or TTLS).
Figure 35 Security Settings: WPA/WPA2
58
N220 User’s Guide

Chapter 4 Station Mode
The following table describes the labels in this screen.
Table 11 Security Setting: WPA/WPA2
LABEL DESCRIPTION
Encryption Type The encryption mechanisms used for WPA/WPA2 and WPA-PSK/WPA2-
PSK are the same. The only difference between the two is that WPA-
PSK/WPA2-PSK uses a simple common password, instead of user-
specific credentials.
Select the encryption type (TKIP or AES) for data encryption.
Refer to Section 3.3.1.3 on page 41 for more information.
EAP Type The type of authentication you use depends on the RADIUS server or
AP.
Select an authentication method from the drop down list. Options are
TLS, PEAP and TTLS (at the time of writing, TTLS is not available in
Windows Vista).
Login Name Enter a user name.
This is the user name that you or an administrator set up on a RADIUS
server.
Password This field is not available when you select TLS in the EAP Type field.
Enter the password associated with the user name above.
Certificate This field is only available when you select TLS in the EAP Type field.
Click Browse to select a certificate.
Note: You must first have a wired connection to a network and
obtain the certificate(s) from a certificate authority (CA).
Consult your network administrator for more information.
PEAP Inner EAP This field is only available when you select PEAP in the EAP Type field.
The PEAP method used by the RADIUS server or AP for client
authentication is MS CHAP v2.
TTLS Protocol This field is available only when you select TTLS in the EAP Type field.
Select a TTLS protocol that the RADIUS server uses. Options are CHAP,
MS-CHAP, MS-CHAP-V2 and PAP.
Note: This feature is not available on Windows Vista.
Back Click Back to go to the Site Survey screen to select and connect to
another network.
Next Click Next to confirm your selections and advance to the Summary
screen. Refer to Section 4.4.2 on page 61.
Exit Click Exit to return to the Site Survey screen without saving.
4.4.1.5 IEEE 802.1x
Configure IEEE 802.1x security with various authentication methods in this
screen.
N220 User’s Guide
59

Chapter 4 Station Mode
Note: The procedure to configure 802.1x is different in Windows Vista. See Section
4.7 on page 71 for information on setting up your N220 to use 802.1x in Vista.
Figure 36 Security Setting: 802.1x
The following table describes the labels in this screen.
Table 12 Security Settings: IEEE 802.1x
LABEL DESCRIPTION
Encryption Type Select WEP if the access point is configured to use 802.1x with WEP
encryption. A dynamic WEP key is generated automatically.
Otherwise, select NONE (at the time of writing, this is not available in
Windows Vista).
EAP Type The type of authentication you use depends on the RADIUS server or
AP.
Select an authentication method from the drop down list. Options are
TLS, PEAP and TTLS (at the time of writing, TTLS is not available in
Windows Vista).
Login Name Enter a user name.
This is the user name that you or an administrator set up on a RADIUS
server.
Password This field is not available when you select TLS in the EAP Type field.
Enter the password associated with the user name above.
Certificate This field is only available when you select TLS in the EAP Type field.
Click Browse to select a certificate.
Note: You must first have a wired connection to a network and
obtain the certificate(s) from a certificate authority (CA).
Consult your network administrator for more information.
TTLS Protocol This field is available only when you select TTLS in the EAP Type field.
Select a TTLS protocol that the RADIUS server uses. Options are CHAP,
MS-CHAP, MS-CHAP-V2 and PAP.
60
Note: This feature is not available on Windows Vista.
N220 User’s Guide

Table 12 Security Settings: IEEE 802.1x
LABEL DESCRIPTION
PEAP Inner EAP This field is only available when you select PEAP in the EAP Type field.
The PEAP method used by the RADIUS server or AP for client
authentication is MS CHAP v2.
Validate Server
Certificate
(Click to
Enable)
Back Click Back to go to the Site Survey screen to select and connect to
Next Click Next to confirm your selections and advance to the Summary
Exit Click Exit to return to the Site Survey screen without saving.
Select this option to validate a server’s certificate when you select
PEAP in the EAP Type field.
another network.
screen. Refer to Section 4.4.2 on page 61.
4.4.2 Summary Screen
Use this screen to confirm and save the security settings.
Chapter 4 Station Mode
Figure 37 Summary Screen
The following table describes the labels in this screen.
Table 13 Summary Screen
LABEL DESCRIPTION
Network Name
(SSID)
Network Type This field displays the network type (Infrastructure or Ad-Hoc) of the
Channel This field displays the channel number used by the profile.
Security This field shows whether data encryption is activated (WEP, WPA,
Back Click Back to return to the previous screen.
This field displays the SSID previously entered.
wireless device.
WPA-PSK, WPA2, WPA2-PSK, 802.1x) or inactive (DISABLE).
N220 User’s Guide
61

Chapter 4 Station Mode
Table 13 Summary Screen
LABEL DESCRIPTION
Save Click Save to save the changes back to the N220 and display the Link
Info screen.
Exit Click Exit to discard changes and return to the Site Survey screen.
4.5 The Profile Screen
A profile is a set of wireless parameters that you need to connect to a wireless
network. With a profile activated, each time you start the N220, it automatically
scans for the specific SSID and joins that network with the pre-defined wireless
security settings. If the specified network is not available, the N220 cannot
connect to a network.
If you do not configure and activate a profile, each time you start the N220, the
N220 uses the default profile to connect to any available network that has no
security enabled.
The default profile is a profile that allows you to connect to any SSID that has no
security enabled.
Click the Profile tab in the ZyXEL utility program to display the Profile screen as
shown next.
The profile function allows you to save the wireless network settings in this
screen, or use one of the pre-configured network profiles.
Figure 38 Profile
62
N220 User’s Guide

Chapter 4 Station Mode
The following table describes the labels in this screen.
Table 14 Profile
LABEL DESCRIPTION
Profile List Click a column heading to sort the entries.
denotes that the wireless device is in infrastructure mode and
,
,
or
Profile Name This is the name of the pre-configured profile.
SSID This is the SSID of the wireless network to which the selected profile
associate.
Connect To use and activate a previously saved network profile, select a pre-
configured profile name in the table and click Connect.
Add To add a new profile into the table, click Add.
Delete To delete an existing wireless network configuration, select a profile in
the table and click Delete.
Edit To edit an existing wireless network configuration, select a profile in the
table and click Edit.
Profile Info The following fields display detailed information of the selected profile in
the Profile List table.
Network Type This field displays the network type (Infrastructure or Ad-Hoc) of the
profile.
SSID This field displays the network’s Service Set IDentity (the name of the
network).
Channel This field displays the channel number used by the profile.
Security This field shows whether data encryption is activated (WEP, WPA,
WPA-PSK, WPA2, WPA2-PSK or 802.1x) or inactive (DISABLE).
Transmit Rate This field displays the transmission speed of the selected profile in
megabits per second (Mbps).
the wireless security is activated.
denotes that the wireless device is in infrastructure mode but the
wireless security is deactivated.
denotes that the wireless device is in Ad-Hoc mode and the
wireless security is activated.
denotes that the wireless device is in Ad-Hoc mode but the
wireless security is deactivated.
4.5.1 Adding a New Profile
Follow the steps below to add a new profile.
N220 User’s Guide
63

Chapter 4 Station Mode
1 Click Add in the Profile screen. An Add New Profile screen displays as shown
next.
Figure 39 Profile: Add a New Profile
The following table describes the labels in this screen.
Table 15 Profile: Add a New Profile
LABEL DESCRIPTION
Add New Profile
Profile Name Enter a descriptive name in this field.
SSID Select an available wireless device in the Scan Info table and click
Select, or enter the SSID of the wireless device to which you want to
associate in this field manually. Otherwise, enter Any to have the N220
associate to any AP or roam between any infrastructure wireless
networks.
Network Type Select Infrastructure to associate to an AP. Select Ad-Hoc to
associate to a peer computer.
Next Click Next to go to the next screen.
Exit Click Exit to go back to the previous screen without saving.
Scan Info This table displays the information of the available wireless networks
within the transmission range.
denotes that the wireless device is in infrastructure mode and
,
,
or
the wireless security is activated.
denotes that the wireless device is in infrastructure mode but the
wireless security is deactivated.
denotes that the wireless device is in Ad-Hoc mode and the
wireless security is activated.
64
denotes that the wireless device is in Ad-Hoc mode but the
wireless security is deactivated.
SSID This field displays the SSID (Service Set IDentifier) of each AP or peer
device.
N220 User’s Guide
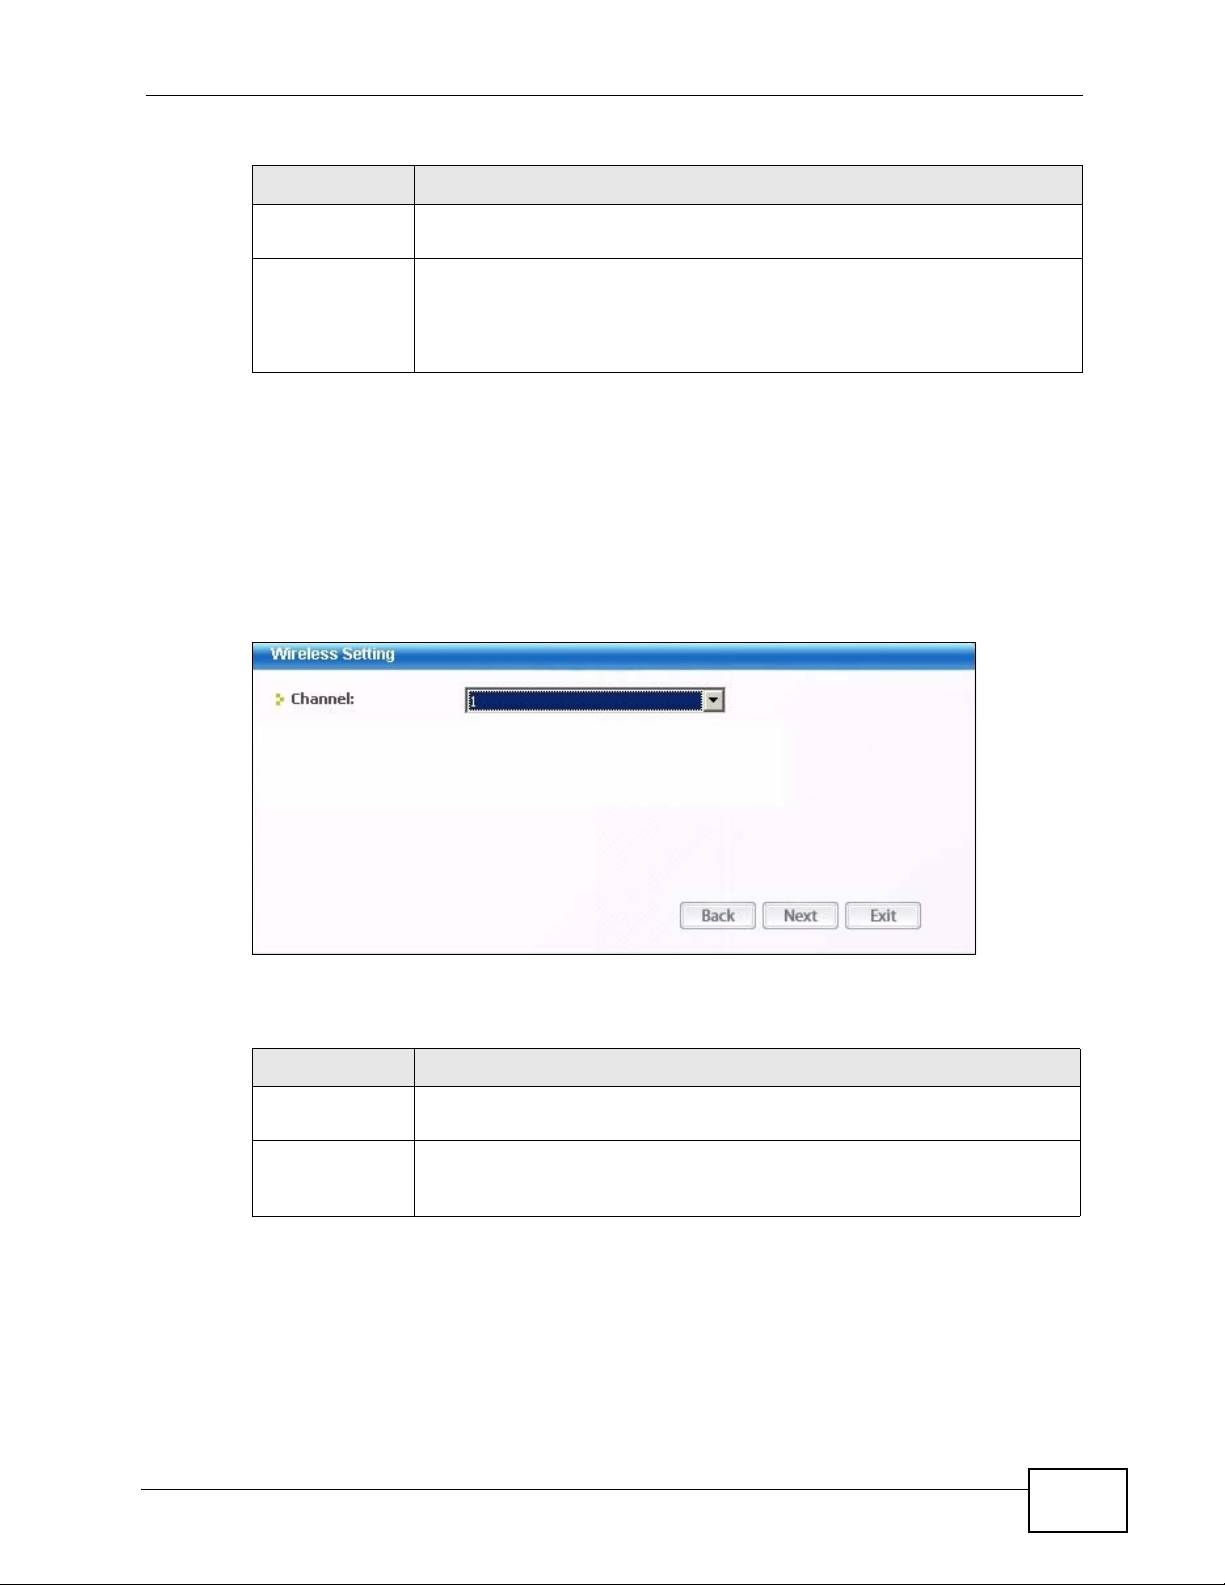
Chapter 4 Station Mode
Table 15 Profile: Add a New Profile (continued)
LABEL DESCRIPTION
Scan Click Scan to search for available wireless devices within transmission
range.
Select Select an available wireless device in the table and click Select to add it
to this profile.
Whenever you activate this profile, the N220 associates to the selected
wireless network only.
2 If you select the Infrastructure network type in the previous screen, skip to step
3. If you select the Ad-Hoc network ty pe in the previous screen, a screen displays
as follows. Select a Channel number and Wireless Mode and click Next to
continue.
Note: To associate to an ad-hoc network, you must use the same channel a s the peer
computer.
Figure 40 Profile: Wireless Settings
The following table describes the labels in this screen.
Table 16 Profile: Wireless Settings
LABEL DESCRIPTION
Wireless
Settings
Channel Select a channel number from the drop-down list box. To associate to
N220 User’s Guide
an ad-hoc network, you must use the same channel as the peer
computer.
65

Chapter 4 Station Mode
3 If you selected Infrastructure network type in the first screen, select WEP,
WPA, WPA2, WPA-PSK, WPA2-PSK or 802.1x from the drop-down list box to
enable data encryption. If you selected Ad-Hoc network type in the first screen,
you can use only WEP encryption method. Otherwise, select DISABLE to allow
the N220 to communicate with the access points or other peer wireless computers
without any data encryption, and skip to step 5.
Figure 41 Profile: Wireless Settings
4 The screen varies depending on the encryption method you select in the previous
screen. The settings must be exactly the same on the AP or other peer wireless
computers as they are on the N220. Refer to Secti on 5.4.1 on page 80 for detailed
information on wireless security configuration.
Figure 42 Profile: Security Settings
66
N220 User’s Guide

Chapter 4 Station Mode
5 This read-only screen shows a summary of the new profile settings. V erify that the
settings are correct. Click Save to save and go to the next screen. Click Back to
return to the previous screen. Otherwise, click Exit to go back to the Profile
screen without saving.
Figure 43 Profile: Confirm New Settings
6 To use this network profile, click the Activate Now button. Otherwise, click the
Activate Later button. You can activate only one profile at a time.
Note: Once you activate a profile, the ZyXEL utility will use that profile the next time it
is started.
Figure 44 Profile: Activate the Profile
N220 User’s Guide
67
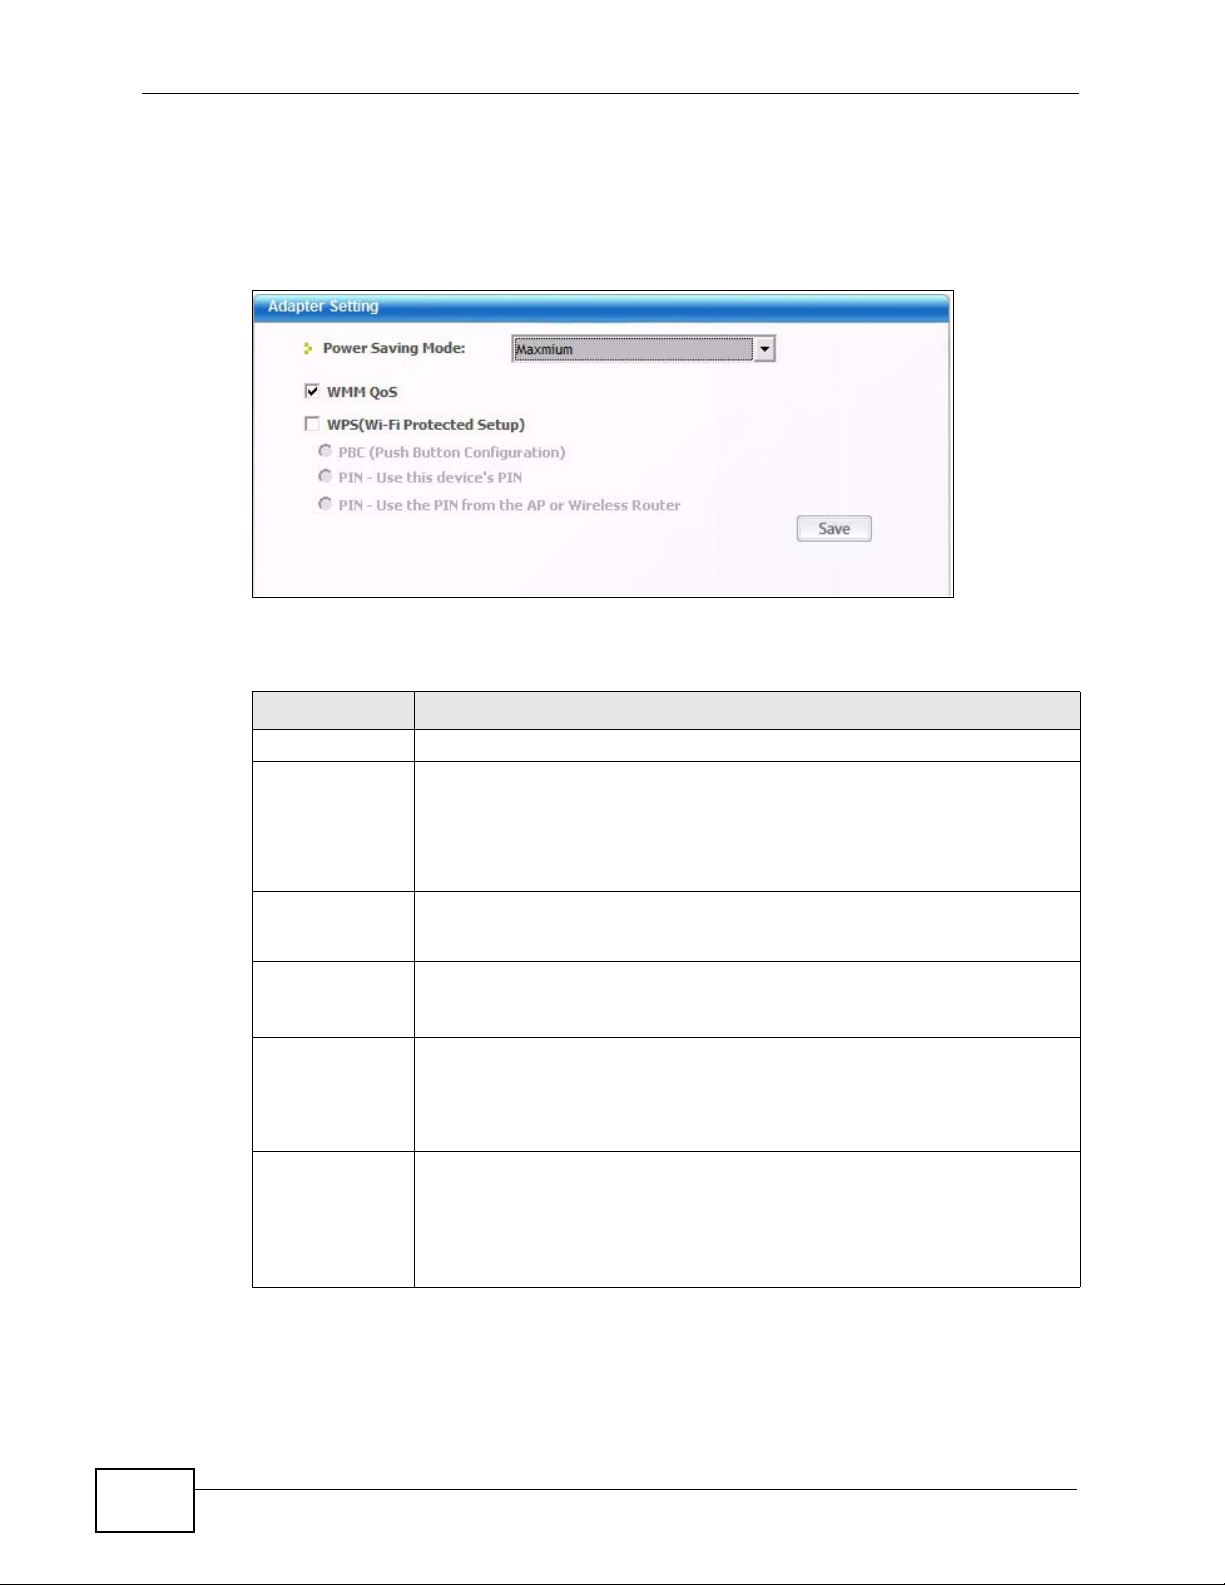
Chapter 4 Station Mode
4.6 The Adapter Screen
To set the other advanced features on the N220, click the Adapter tab.
Figure 45 Adapter
The following table describes the labels in this screen.
Table 17 Adapter
LABEL DESCRIPTION
Adapter Setting
Power Saving
Mode
WMM QoS Select this to enable Wi-fi MultiMedia Quality of Service on the N220.
WPS (WiFi
Protected
Setup)
PBC (Push
Button
Configuratio
n)
PIN - Use
This Device’s
PIN
Select Maximum or Normal to save power. This forces the N220 to go
to sleep mode when it is not transmitting data.
When you select Off , the N220 will never go to sleep mode.
At the time of writing, this field is not available in Windows Vista.
At the time of writing, this field is not available in Windows Vista.
Select this to enable Wi-fi Protected Setup on the N220.
Select this to use the PBC (Push-Button Configuration) WPS mode.
When you use the PBC mode you do not use a PIN.
When you select this, the PBC (Push Button Configuration screen
appears (see Section 4.6.1 on page 69).
Select this to use the PIN (Personal Identification Number) WPS mode.
Use this option when you want to enter the N220’s PIN in another WPS-
enabled device.
When you select this, the PIN - Use this Device’s PIN screen appears
(see Section 4.6.2 on page 69).
68
N220 User’s Guide
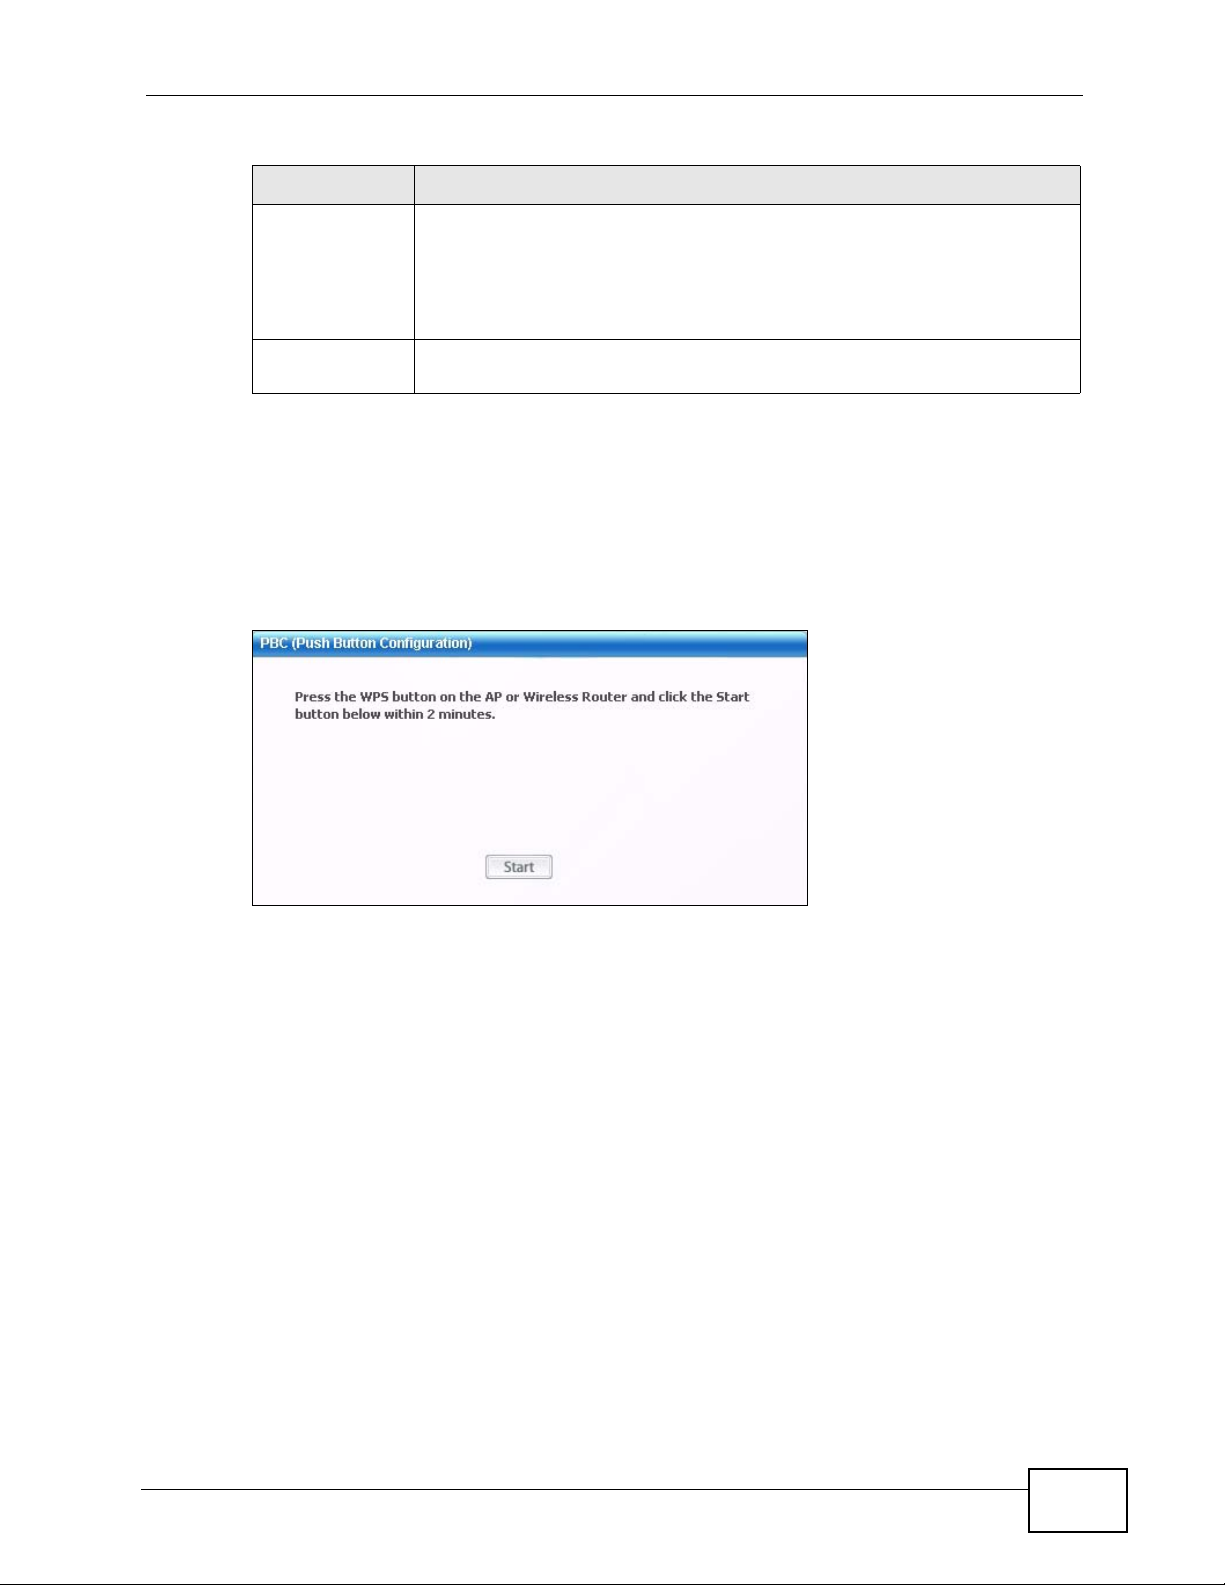
Table 17 Adapter (continued)
LABEL DESCRIPTION
PIN - Use
the PIN
From the AP
or Wireless
Router
Save Click Save to save the changes to the N220 and return to the Link Info
Select this to use the PIN (Personal Identification Number) WPS mode.
Use this option when you want to enter the PIN from another WPS-
enabled device in the N220.
When you select this, the PIN - Use the PIN From the AP or
Wireless Router screen appears (see Section 4.6.3 on page 70).
screen.
4.6.1 WPS: PBC (Push Button Configuration)
This screen allows you to use the WPS Push Button Configuration mode. See
Section 3.4.1 on page 42 for more information. Select WPS and PBC (Push
Button Configuration) in the Adapter screen. The following screen displays.
Figure 46 WPS: PBC (Push Button Configuration)
Chapter 4 Station Mode
Press Start when you want to begin the WPS process. You must also press the
button on the other device within two minutes.
4.6.2 WPS: PIN - Use this Device’s PIN
This screen allows you to use the WPS Pe r s o nal Identification Number mode, by
entering the N220’s unique PIN in the configuration utility of the other WPSenabled device. See Section 3.4.2 on page 42 for more information. Select WPS
N220 User’s Guide
69
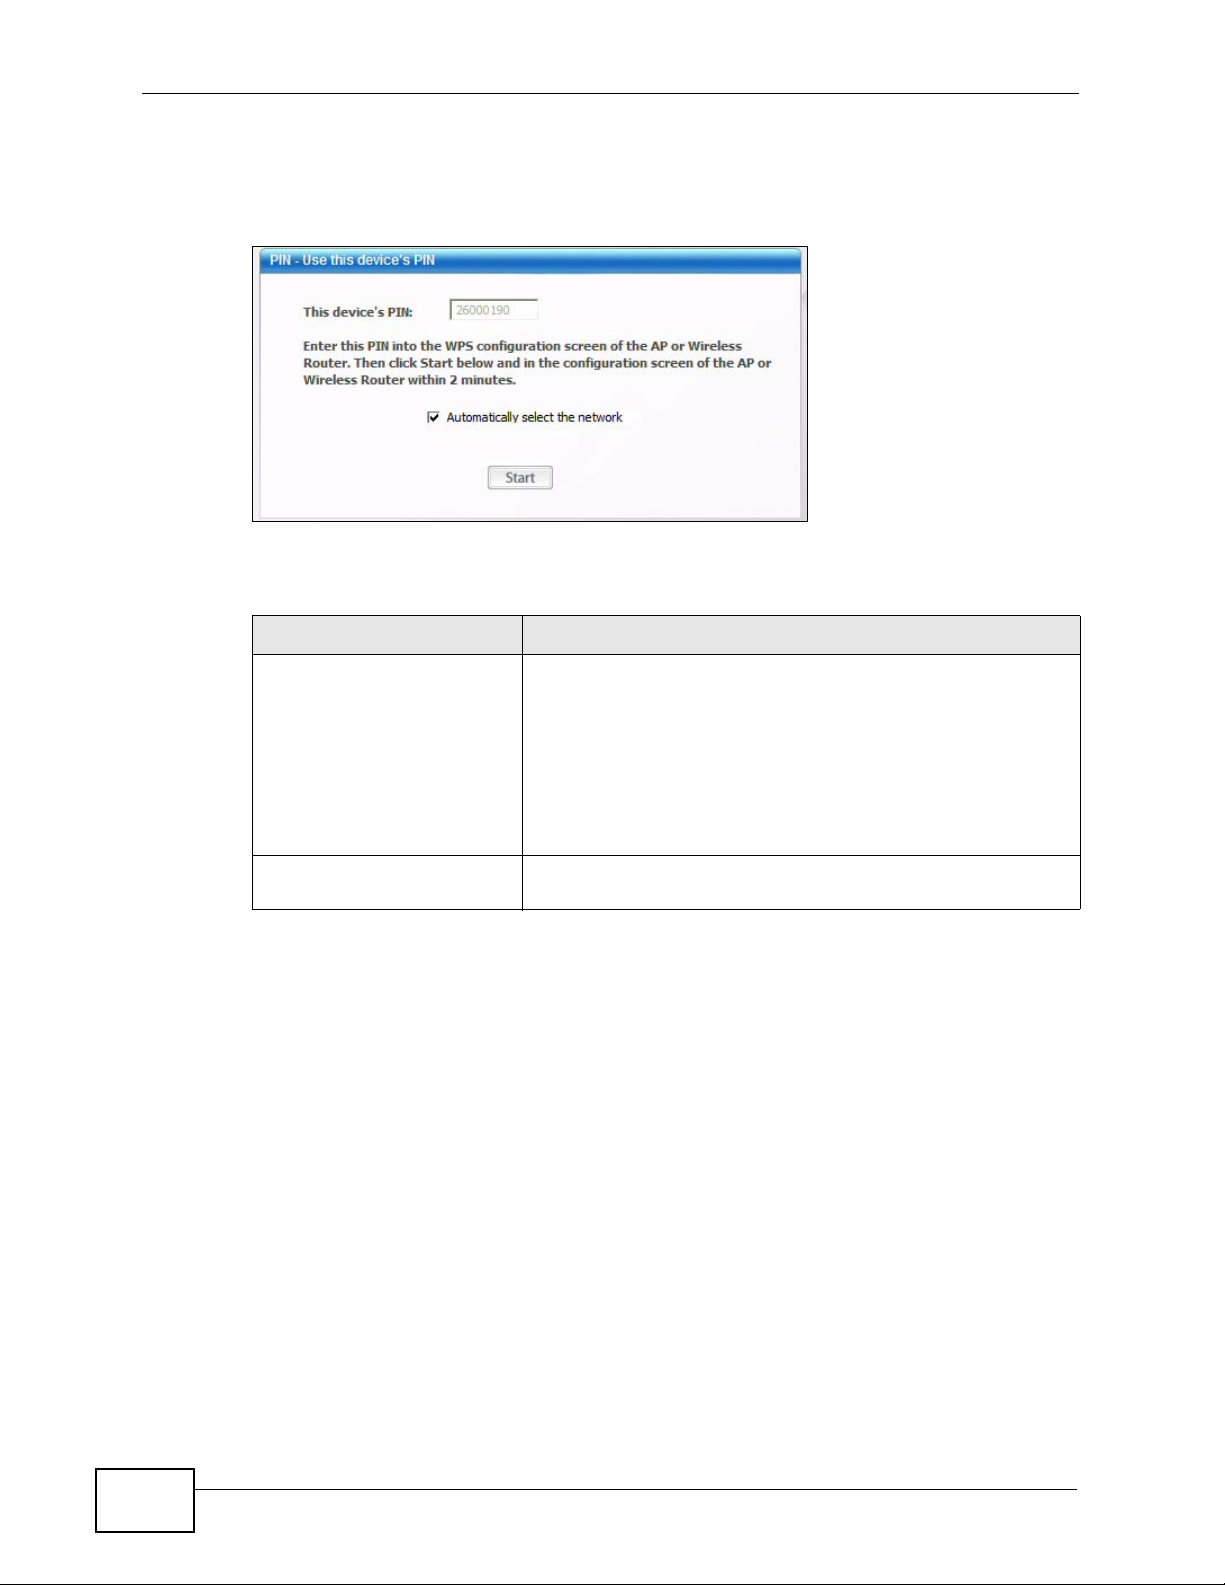
Chapter 4 Station Mode
and PIN - Use this Device’s PIN in the Adapter screen. The following screen
displays.
Figure 47 WPS: PIN - Use this Device’s PIN
The following table describes the labels in this screen.
Table 18 WPS: PIN - Use this Device’s PIN
LABEL DESCRIPTION
This device’s PIN This is the N220’s Personal Identification Number (PIN).
This field is read-only. Enter the number that displays in
this field into the configuration interface of the other WPSenabled device.
Note: Each time this screen displays, the PIN is
different. The PIN is valid for only one WPS
transaction.
Start Click this to start WPS. You must start WPS on the other
WPS-enabled device within two minutes.
4.6.3 WPS: PIN - Use the PIN from the AP or Wireless Router
This screen allows you to use the WPS Pe r s o nal Identification Number mode, by
entering the PIN from another WPS-enabled device into the N220’s utility. See
Section 3.4.2 on page 42 for more information. Select WPS and PIN - Use the
70
N220 User’s Guide
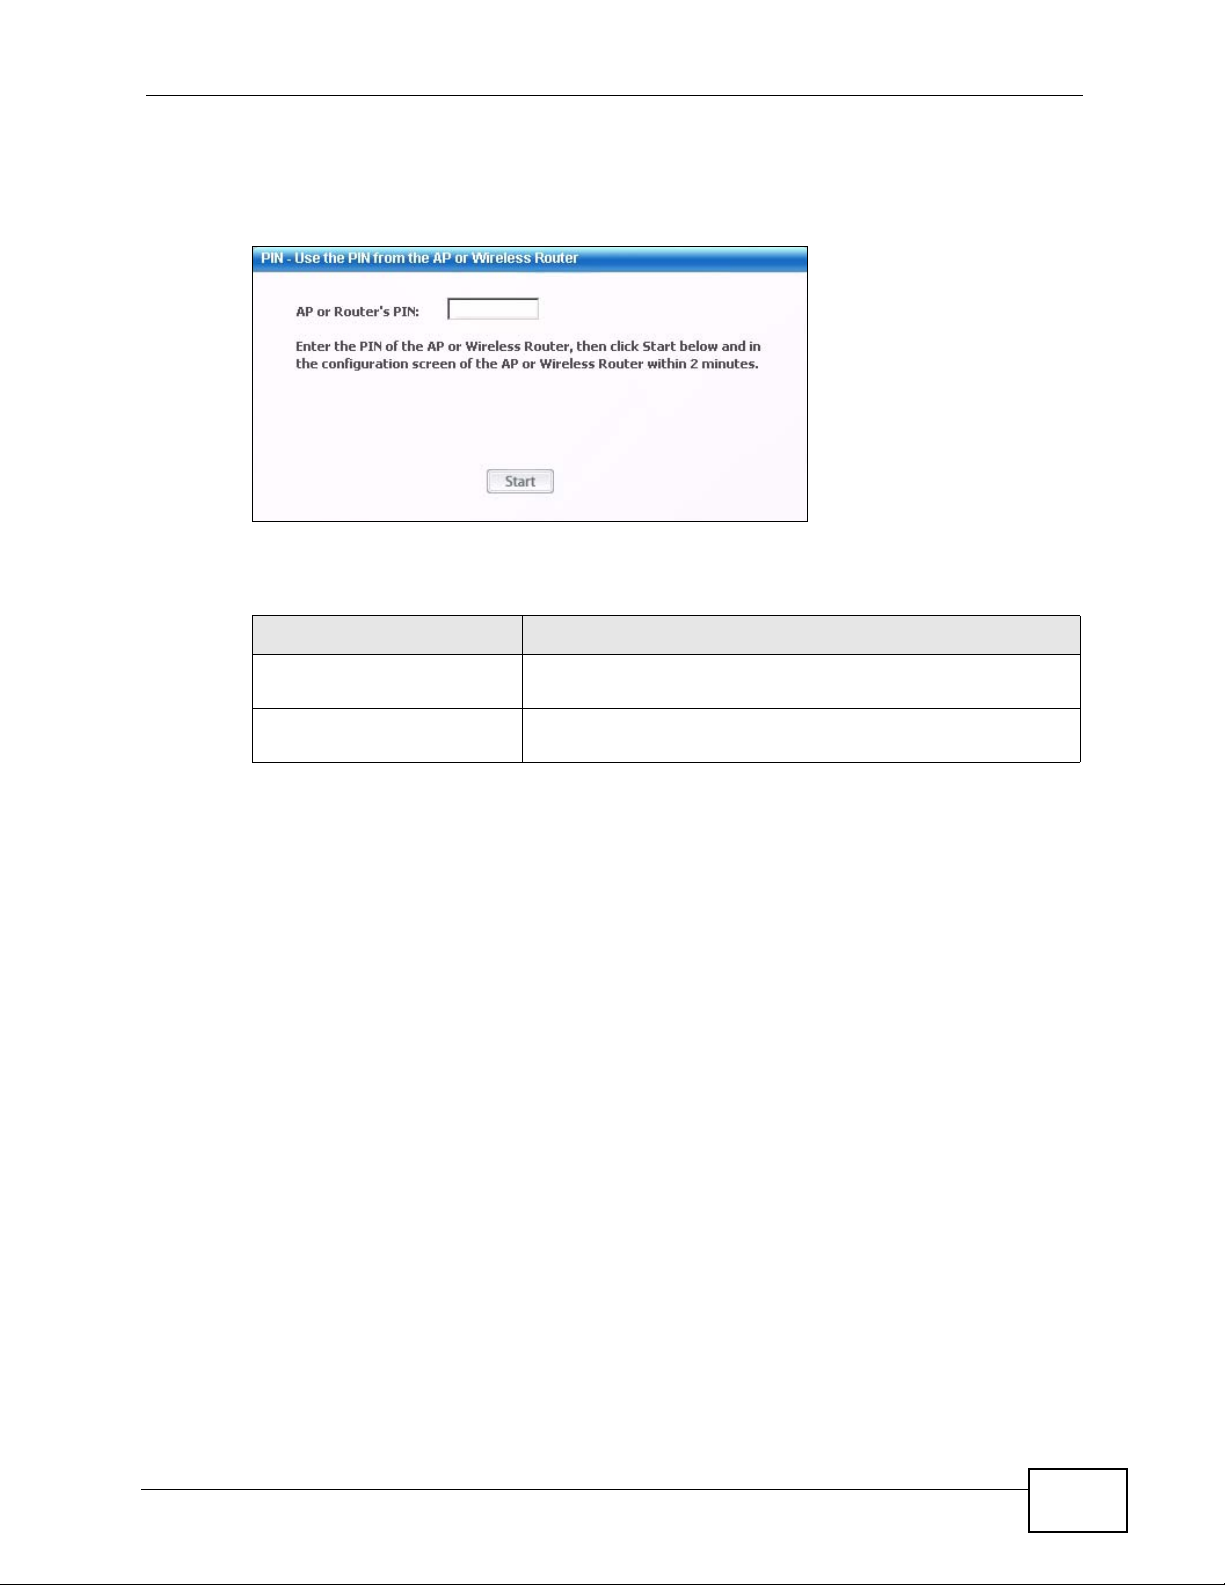
Chapter 4 Station Mode
PIN from the AP or Wireless Router in the Adapter screen. The following
screen displays.
Figure 48 WPS: PIN - Use the PIN from the AP or Wireless Router
The following table describes the labels in this screen.
Table 19 WPS: PIN - Use the PIN from the AP or Wireless Router
LABEL DESCRIPTION
AP or Router’s PIN Enter the PIN from your AP or wireless router in this field
before you click Start.
Start Click this to start WPS. You must start WPS on the other
WPS-enabled device within two minutes.
4.7 Security Settings in Windows Vista
When you use the N220 in Windows Vista, the procedure for setting up WPA,
WPA2 and 802.1x security settings is different from that of other operating
systems (other security types are not affected).
The procedures for setting up WPA, WPA2 or 802.1x in Vista are the same.
However, the procedure differs depending on whether you use PEAP (Protected
Extensible Authentication Protocol) or TLS (Transport Layer Security) encryption.
Consult your network administrator if you are unsure which type of encryption to
use.
See Section 4.7.1 on page 72 to use PEAP, or see Section 4.7.2 on page 73 to use
TLS.
Note: TTLS (Tunneled TLS) is not available when using Windows V i st a, at the time of
writing.
N220 User’s Guide
71
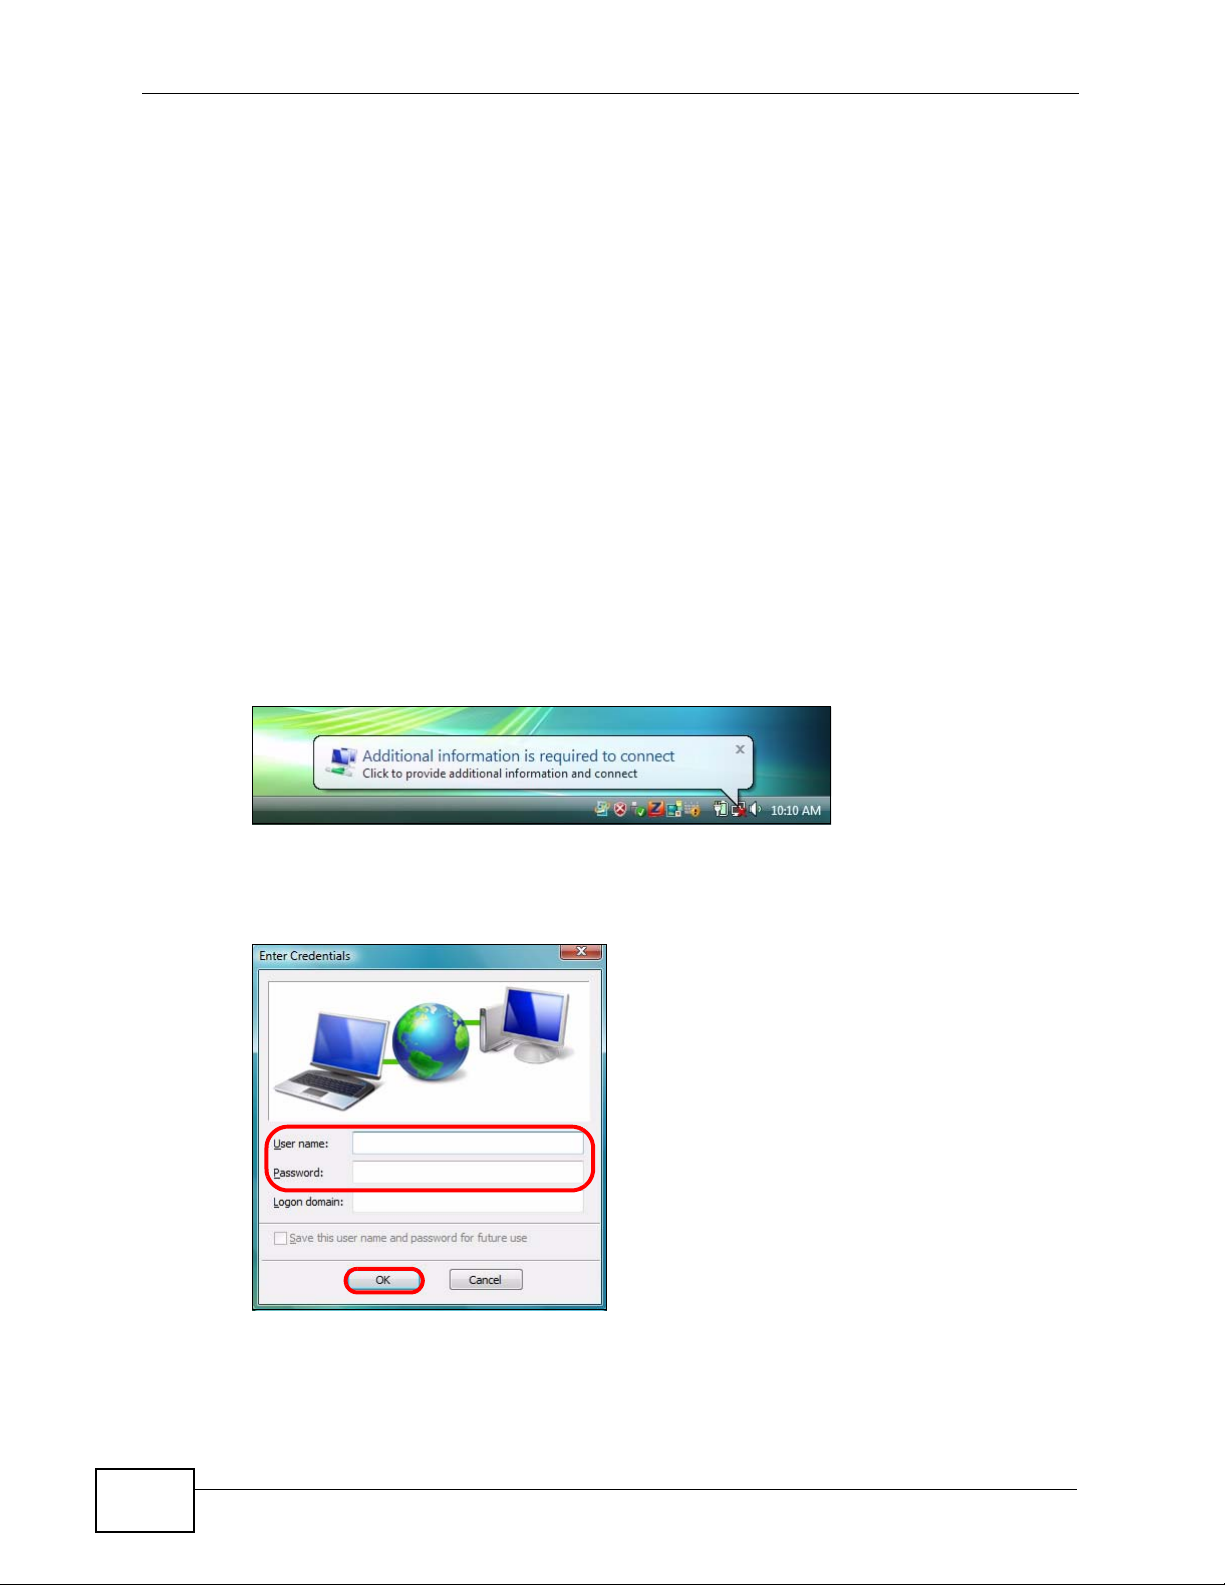
Chapter 4 Station Mode
4.7.1 Using PEAP in Vista
Take the following steps to set up WPA, WPA2 or 802.1x security using PEAP in
Windows Vista.
1 Either select the AP to which you want to connect in the Site Survey screen (see
Section 4.4 on page 54), or configure a profile in the normal way (see Section 4.5
on page 62).
2 In the WPA, WPA2 or 802.1x security screen (see Section 4.4.1.4 on page 58
and Section 4.4.1.5 on page 59), select PEAP as the EAP Type. Note that the
Login Name and Password fields are greyed-out (not available).
3 Click Next.
4 In the Summary screen that appears, clic k Save.
5 A message similar to the following appears in the bottom-right of your screen.
Click the message.
Figure 49 Vista Security: Additional Information Required
6 The Enter Credentials screen displays. Enter your User name and Password
for the network to which you want to connect.
Figure 50 Vista Security: Enter Credentials
72
Note: If you are not sure what to enter, contact your network administrator.
N220 User’s Guide
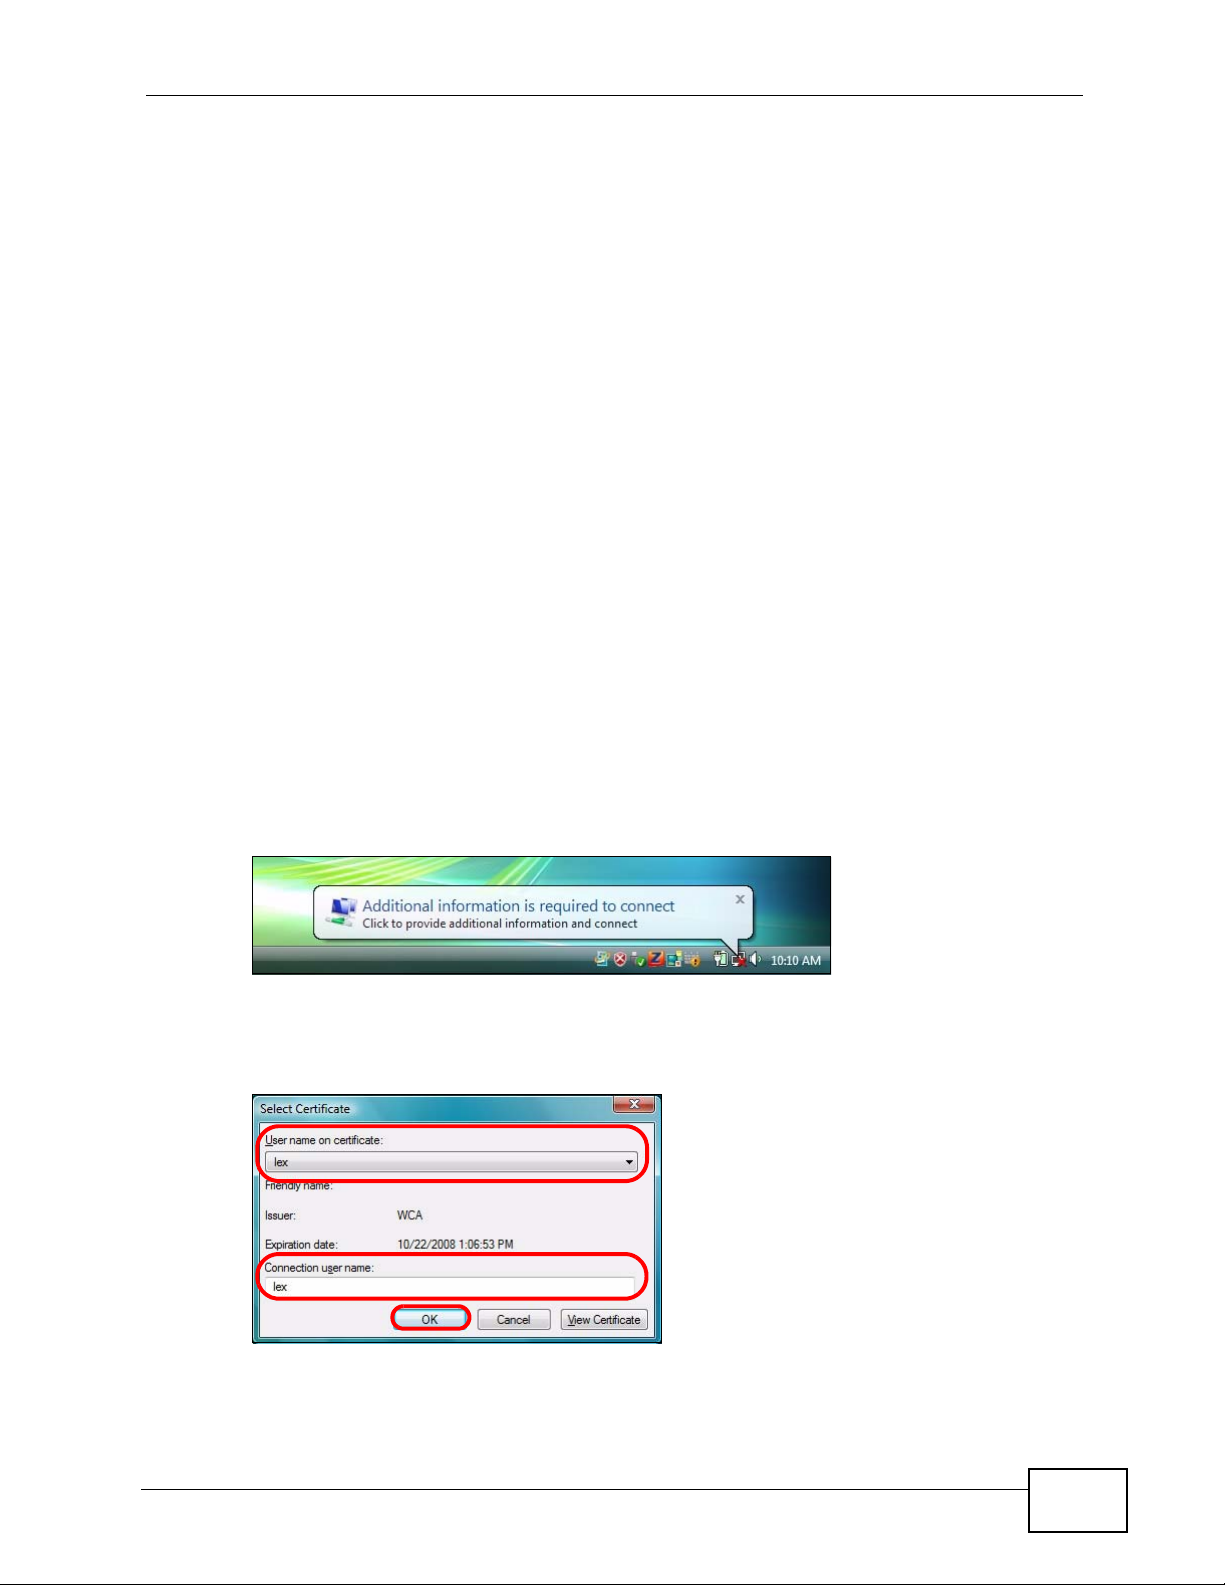
7 Click OK. The Enter Credentials screen disappears and the N220 tries to connect
to the network. The ZyXEL utility’s Link Info screen displays, showing the
connection status (see Section 4.3 on page 51). If the Link Info screen displays
an active c onnection, you have successfully completed the procedure.
4.7.2 Using TLS in Vista
Take the following steps to set up WPA, WPA2 or 802.1x security using TLS in
Windows Vista.
1 Either select the AP to which you want to connect in the Site Survey screen (see
Section 4.4 on page 54), or configure a profile (see Section 4.5 on p age 62) in the
normal way.
2 In the WPA, WPA2 or 802.1x security screen, select TLS as the EAP Type. Note
that the Login Name, Certificate and Validate Server Certificate fields are
greyed-out (not available).
Chapter 4 Station Mode
3 Click Next.
4 In the Summary screen, click Save.
5 A message similar to the following appears in the bottom-right of your screen.
Click the message.
Figure 51 Vista Security: Additional Information Required
6 The Select Certificate screen displays. Select the certificate you want to use in
order to authenticate with the server, and enter your user name.
Figure 52 Vista Security: Select Certificate
Note: If you do not have the right certificate, or are not sure which certificate you
N220 User’s Guide
should use, contact your network administrator.
73

Chapter 4 Station Mode
7 Click OK. The Select Certificate screen disappears and the N220 tries to connect
to the network. The ZyXEL utility’s Link Info screen displays, showing the
connection status (see Section 4.3 on page 51). If the Link Info screen displays
an active c onnection, you have successfully completed the procedure.
74
N220 User’s Guide

CHAPTER 5
AP Mode
5.1 Overview
This section shows you how to configure your N220 in AP Mode using the
Windows version of the ZyXEL Utility.
Note: Some features available in Windows XP or Windows 2000 are not available in
Windows Vista.
AP Mode allows you to set up a wireless network without using a pre-existing AP.
The following figure shows a sample AP network set up.
Figure 53 AP Network Example .
Here, the N220 is installed on computer A and set to operate in access point
mode. Computer A provides an Internet connection to the wireless LAN, so
wireless stations B and C can access the Internet.
Select the AP Mode option the ZyXEL Utility to have the device function as an
access point.
Figure 54 ZyXEL Utility: Setting AP Mode .
N220 User’s Guide
75

Chapter 5 AP Mode
5.1.1 What You Can Do in This Section
•On the Link Info screen, you can see your AP’s current transmission and
security status See Section 5.3 on page 77 for details.
•On the Configuration screen, you can set up the broadcast parameters for
your access point as well as its security options. See Section 5.4 on page 78 for
details.
•On the MAC Filter screen, you can configure the N220 to give exclusive access
to devices or exclude specific devices from connecting to the AP. See Section
5.5 on page 82 for details.
5.1.2 What You Need to Know
The following terms and concepts may help as you read through this section.
MAC Address
On a local area network (LAN) or other network, the MAC address is a computer's
unique hardware number. On an Ethernet LAN, it's the same as your Ethernet
address. The MAC layer frames data for transmission over the network, then
passes the frame to the physical layer interface where it is transmitted as a
stream of bits.
See Also...
The terms and concepts introduced in Chapter 4 on page 49 apply to this chapter
as well.
5.1.3 Before You Begin
Make sure the ZyXEL Utility is already installed. See the Quick Start Guide for
more.
To bridge your wired and wireless network using the N220, the following
requirements must be met:
• The N220 must be installed on a computer connected to the wired network.
• Either bridge the two interfaces (wireless and wi red) on the computer (using the
Configuration screen) or configure network sharing.
• Set the wireless station’s IP address to be dynamic if you want the wireless
stations to access the wired network or the Internet through the N220. Refer to
Appendix A on page 101 for how to configure your computer’s IP address.
76
N220 User’s Guide

5.2 AP Mode Screen Summary
This section describes the ZyXEL Utility screens while in AP Mode.
Figure 55 ZyXEL Utility Menu Summary
The following table describes the menus.
Table 20 ZyXEL Utility Menu Summary
TAB DESCRIPTION
Link Info Use this screen to see your current connection status, configuration and
data rate statistics.
Configuration Use this screen to configure wireless LAN settings.
MAC Filter Use this screen to configure which computer(s) you want access to the
wireless LAN through the N220.
Chapter 5 AP Mode
5.3 The Link Info Screen
When you enter AP Mode, the Link Info screen displays, showing the current
configuration and connection status of your N220 access point.
Figure 56 Link Info
N220 User’s Guide
77

Chapter 5 AP Mode
The following table describes the labels in this screen.
Table 21 Link Info
LABEL DESCRIPTION
Status
SSID This field displays the name that identifies your N220 in the wireless
Current
Channel
Transmission Rate
Security This field shows whether data encryption is activated (WEP, WPA,
MAC This field displays the MAC address of the N220.
Output
Power
Association List This table lists the wireless clients that are currently connected to the
LAN network.
This field displays the radio channel the N220 is currently using.
This field displays the current transmission rate of the N220 in megabits
per second (Mbps).
WPA2, WPA-PSK or WPA2-PSK) or inactive (DISABLE).
This field shows the strength of the N220’s antenna gain or transmission
power.
N220.
denotes a wireless client without wireless security.
denotes a wireless client with wireless security enabled.
MAC Address This field displays the MAC addresses of a wireless client that is cur-
rently connected to the N220.
Refresh Click Refresh to update this screen.
5.4 The Configuration Screen
The Configuration screen allows you to set up the broadcast parameters for your
access point as well as its security options.
Figure 57 The Configuration Screen
78
N220 User’s Guide

Chapter 5 AP Mode
The following table describes the labels in this screen.
Table 22 Configuration
LABEL DESCRIPTION
Wireless Settings
SSID Enter a name for your AP This name is broadcast to all wireless-capable
devices in range and can be used to connect to your AP.
You can enter up to 32 printable ASCII characters in this field.
Hide SSID Select this option to keep your AP’s SSID private. Only users who
explicitly enter the SSID name in their connection window while con-
necting will be able to “see” it.
While effective at deterring the casual user from inadvertantly connect-
ing to your AP, it is the weakest of all wireless security. Anyone with a
basic sniffer program will be able to detect the channel.
Wireless
Mode
Channel Select a channel on which on broadcast your AP’s wireless signal.
Output
Power
Bridge Select the check box and an Ethernet adapter (network interface card
This displays a list of available wireless modes. As of this writing, the
N220 only supports 2.4 GHz.
If there are a high number of APs broadcast within range of one
another, try to use a channel that is either not in use or that has the
fewest number of broadcasters. Too many APs using the same channel
can interfere with one another.
Set this field if you need to conserve power consumption (especially for
notebook computers). This control changes the strength of the N220’s
antenna gain or transmission power. Antenna gain, listed here as a per-
centage, is the increase in coverage. Higher antenna gain impr oves the
range of the signal for better communications.
• 100% - Sets the antenna gain at maximum output power. This has
the highest level of power consumption. If you are using the N220 on
a notebook computer running on battery power, then using this
power setting will drain the battery the fastest.
• 75% - Sets the antenna gain to medium-high output power. This is
a decent comprimise between signal strength and power consumption.
• 50% - Sets the antenna gain to medium output power. The range is
reduced but the power consumption is much less.
• 25% - Sets the antenna gain to low output power. This significantly
reduces the transmission range but save considerable power.
•Lowest - Sets the antenna gain to minimal output power. You are
trading decent transmission range for significant power savings.
(NIC)) on your computer from the drop-down list box. This allows you
to connect your wireless network to the specified wired network.
Security type Select a security type for your AP. Options are DISABLE, WEP, WPA-
Save Click to save the changes.
Cancel Click to discard the changes.
N220 User’s Guide
Note: This feature is not supported in Windows 2000.
PSK and WPA2-PSK.
79
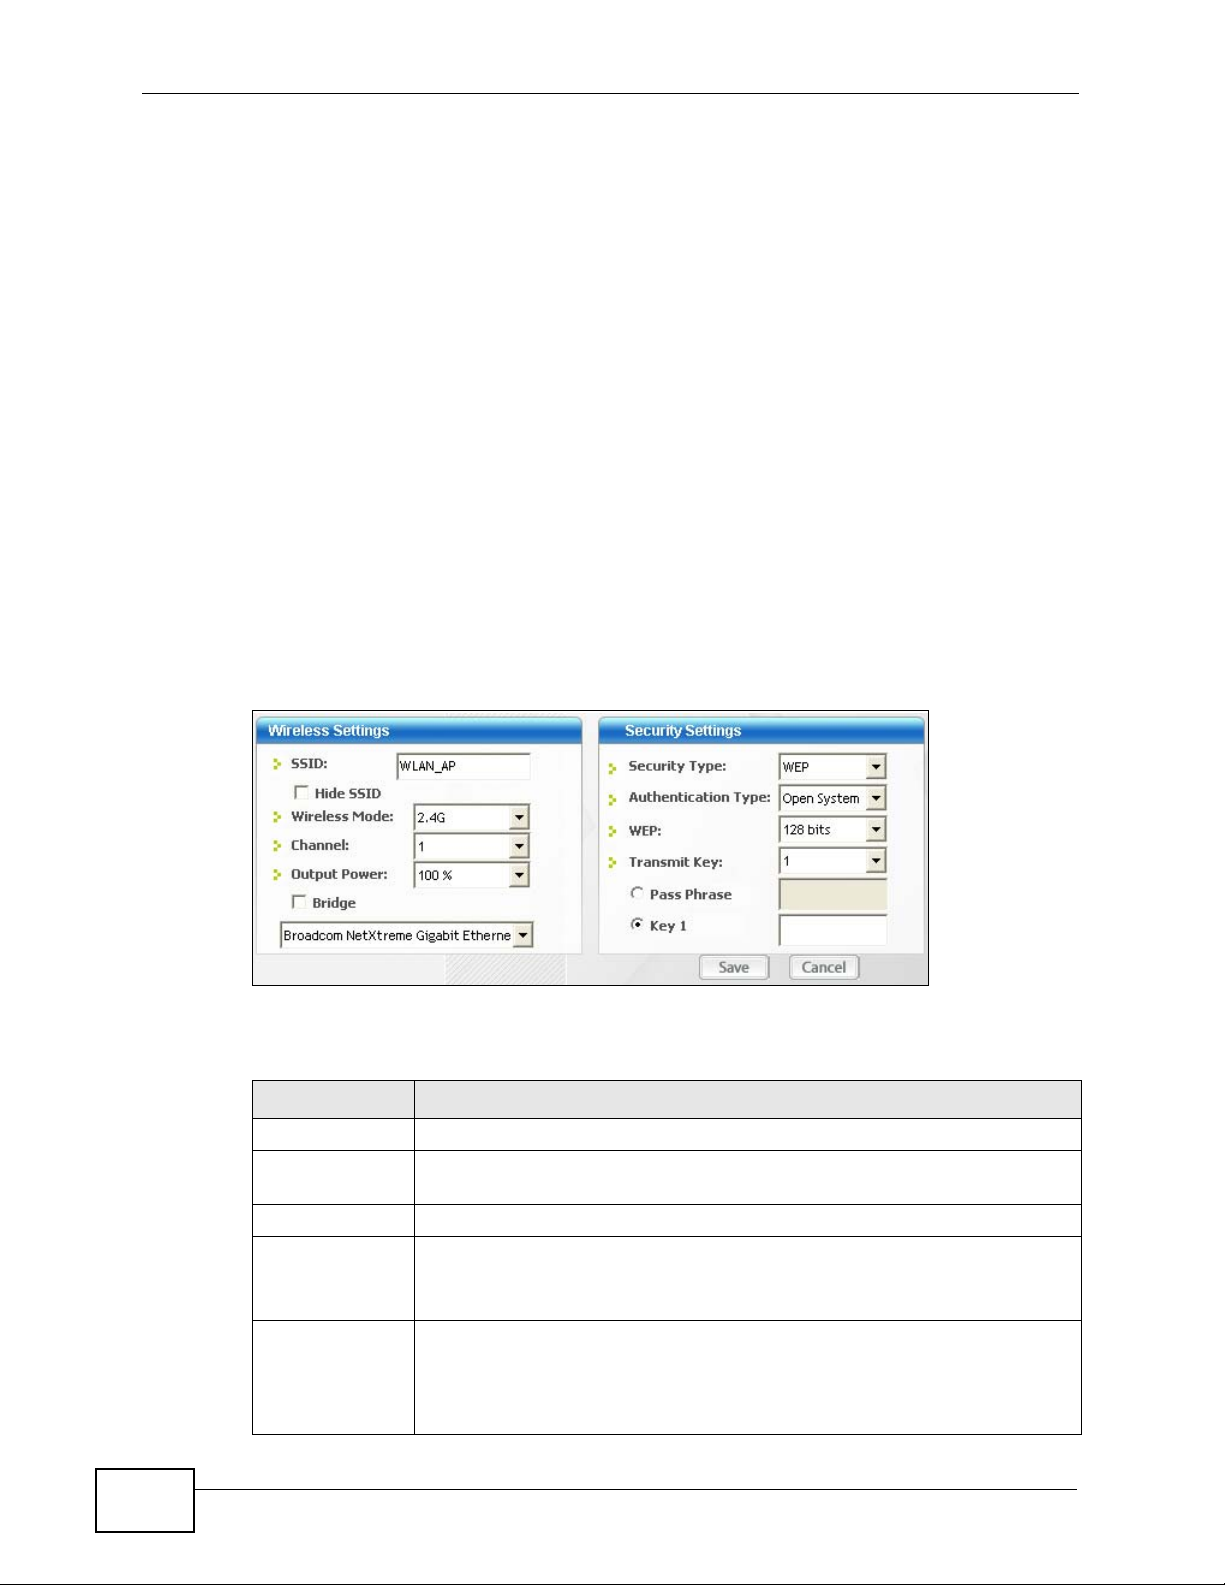
Chapter 5 AP Mode
5.4.1 Security Settings
When you configure the N220 to act as an AP and wireless security is activated,
the Configuration screen varies according to the encryption method used by
your network.
5.4.1.1 Disable
This option indicates that no security services are enabled. An yone within r ange of
your AP can connect to it without having to enter a pre-shared key.
Note: When security settings are disabled in AP Mode and if you have a shared
Internet connection via the Bridge feature (see page 79) or any shared folders
on the computer that is hosting the AP, they will be available to anyone who is
connected.
5.4.1.2 WEP Encryption
Configure WEP security with these options.
Figure 58 Security Setting: WEP
The following table describes the labels in this screen.
Table 23 Security Setting: WEP
LABEL DESCRIPTION
Security type Select WEP to enable this encryption type.
Authentication
Type
WEP Select 64 Bits or 128 Bits for your WEP encryption type.
Transmit Key Select a default WEP key to use for data encryption.
Select an authentication method. Choices are Open System and
Shared Key.
80
Note: This feature is not available in Windows Vista.
Pass Phrase If you select this transmit key option, enter a passphrase of up to 32
case-sensitive printable characters.
As you enter the passphrase, the N220 automatically generates four dif-
ferent transmit keys and displays the first in the key field below.
N220 User’s Guide
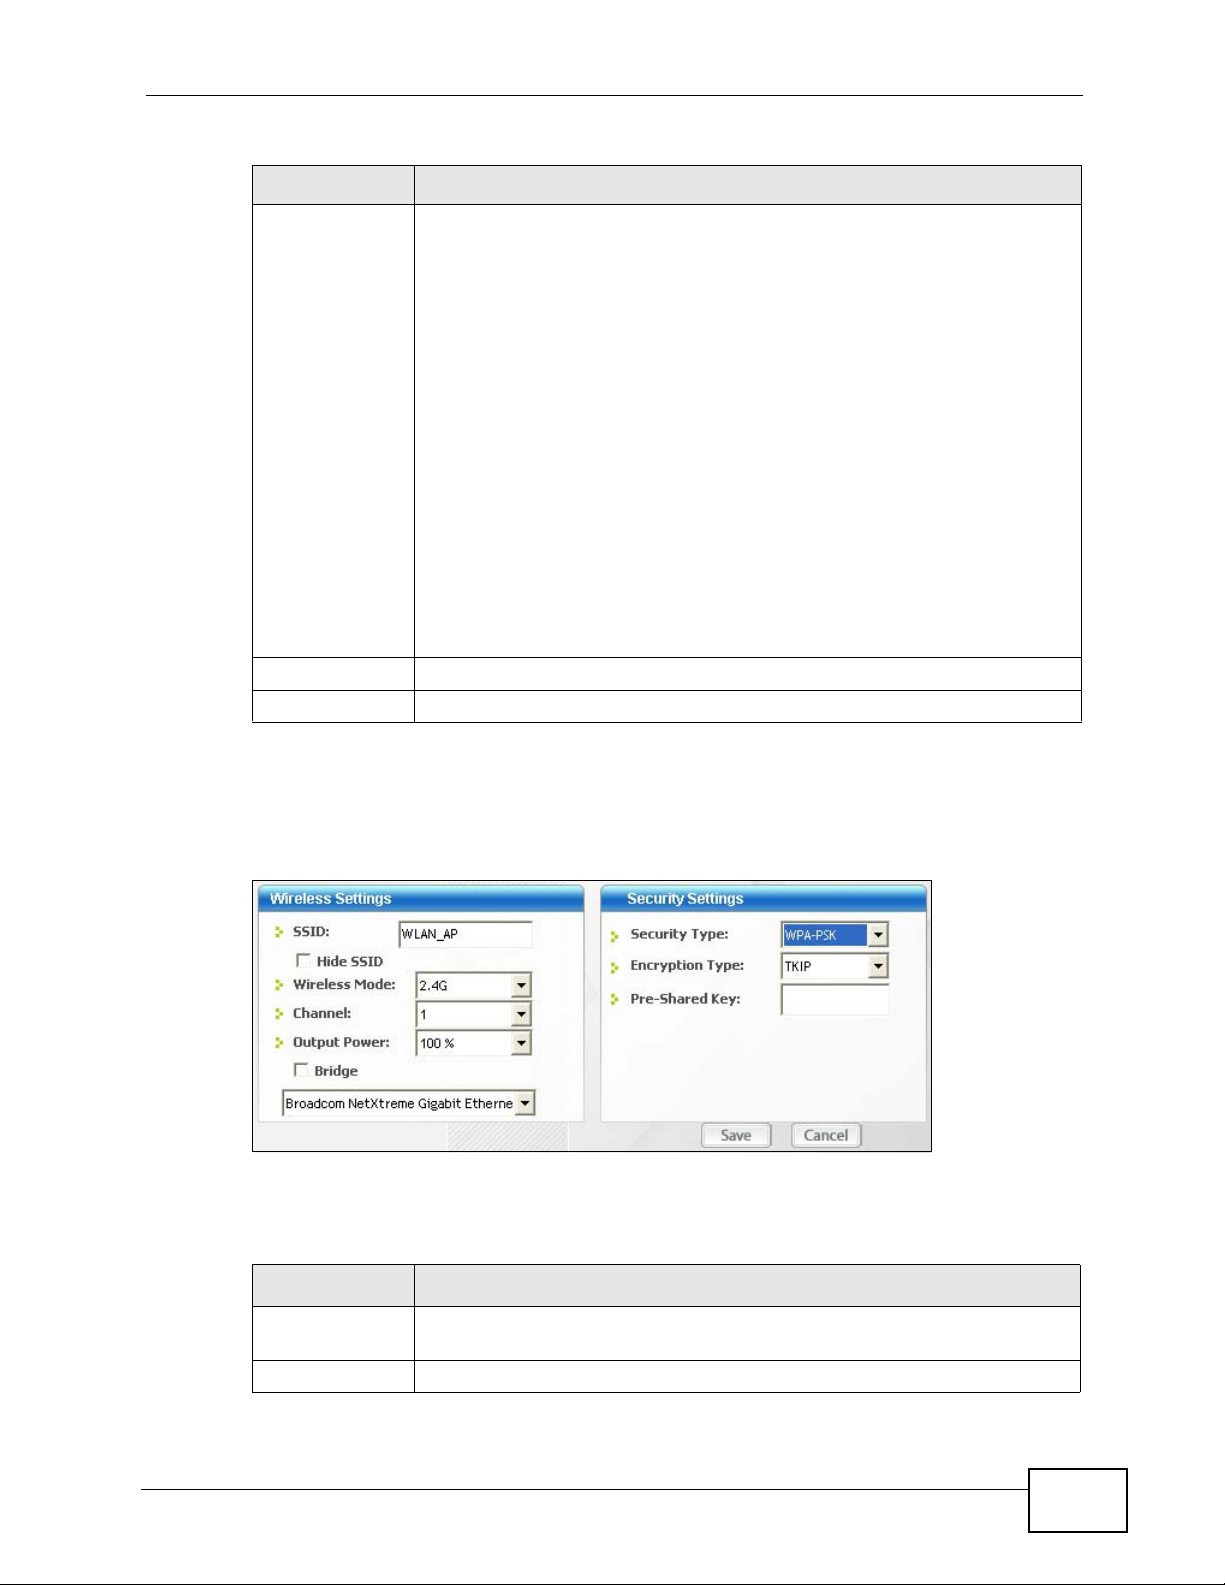
Chapter 5 AP Mode
Table 23 Security Setting: WEP (continued)
LABEL DESCRIPTION
Key 1-4 Select this option if you want to manually enter a transmit key. Enter
the key in the field provided.
If you select 64 Bits in the WEP field.
Enter either 10 hexadecimal digits in the range of “A -F”, “a-f” and “09” (for example, 11AA22BB33) for HEX key type.
or
Enter 5 ASCII characters (case sensitive) ranging from “a-z”, “A-Z”
and “0-9” (for example, MyKey) for ASCII key type.
If you select 128 Bits in the WEP field,
Enter either 26 hexadecimal digits in the range of “A -F”, “a-f” and “09” (for example, 00112233445566778899AABBCC) for HEX key type
or
Enter 13 ASCII characters (case sensitive) ranging from “a-z”, “A- Z ”
and “0-9” (for example, MyKey12345678) for ASCII key type.
Note: The values for the WEP keys must be set up exactly the
same on all wireless devices in the same wireless LAN.
ASCII WEP keys are case sensitive.
Save Click to save the changes.
Cancel Click to discard the changes.
5.4.1.3 WPA-PSK/WPA2-PSK
Configure WPA-PSK and WPA2-PSK security with these options.
Figure 59 Security Setting: WPA-PSK/WPA2-PSK
The following table describes the labels in this screen.
Table 24 Security Setting: WPA-PSK/WPA2-PSK
LABEL DESCRIPTION
Security Type Select either WPA-PSK or WPA2-PSK to enable these encryption
types.
Encryption Type Select the encryption type (TKIP or AES) for data encryption.
N220 User’s Guide
81
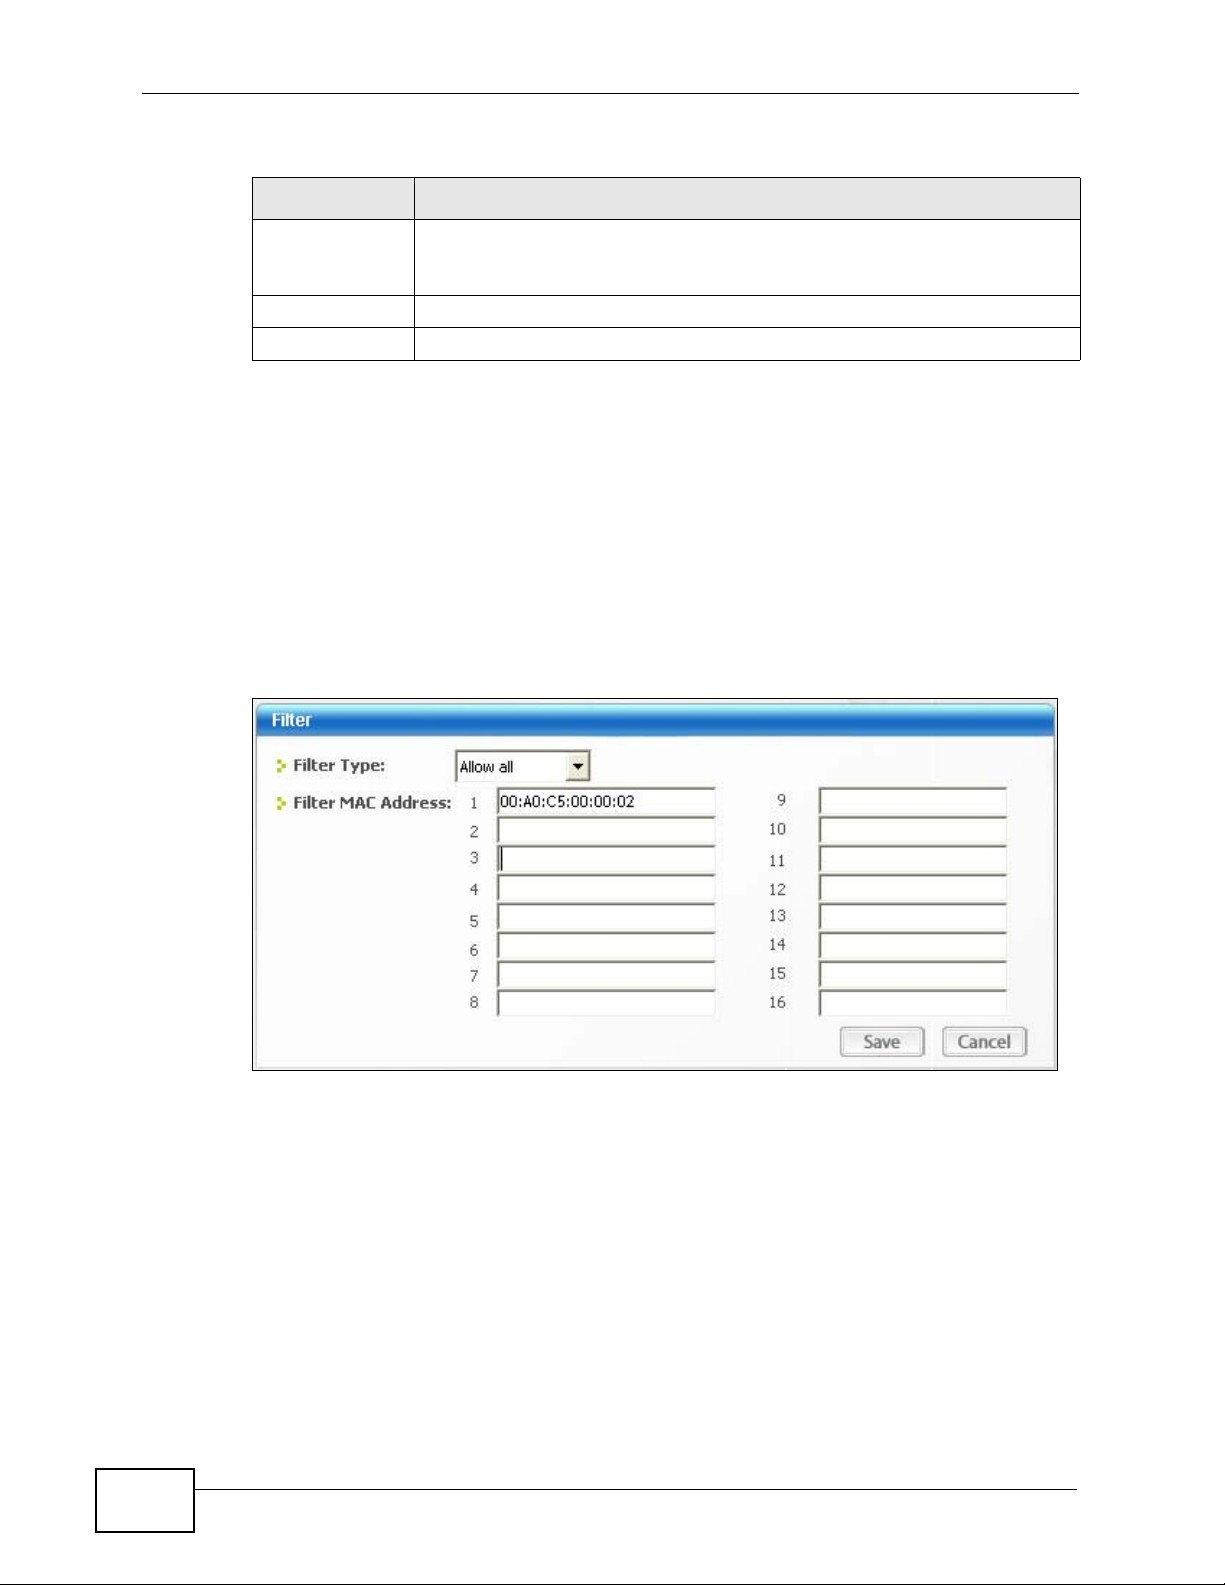
Chapter 5 AP Mode
Table 24 Security Setting: WPA-PSK/WPA2-PSK
LABEL DESCRIPTION
Pre-Shared Key Type a pre-shared key (same as the AP or peer device) of between 8
and 63 case-sensitive ASCII characters (including spaces and symbols)
or 64 hexadecimal characters.
Save Click to save the changes.
Cancel Click to discard the changes.
5.5 The MAC Filter Screen
The MAC Filter screen allows you to configure the N220 to give exclusive access
to devices (Allow all) or exclude devices from connecting to the N220 (Reject
all). The MAC address is assigned at the factory and consists of six pairs of
hexadecimal characters, for example, 00:A0:C5:00:00:02. You need to know the
MAC address of the device(s) to configure this screen.
Figure 60 The MAC Filter Screen
82
N220 User’s Guide

Chapter 5 AP Mode
The following table describes the labels in this screen.
Table 25 MAC Filter
LABEL DESCRIPTION
Filter Type Define the filter action for the list of MAC addresses in the MAC address
filter table.
Select Disable to deactivate the MAC filter feature.
Select Reject all to block access to the N220, MAC addresses not listed
will be allowed to access the N220.
Select Allow all to permit access to the N220, MAC addresses not listed
will be denied access to the N220.
Filter MAC
Address 1-16
Save Click to save the changes.
Cancel Click to discard the changes.
Specify the MAC address(es) of the wireless station(s) that is allowed or
denied association to the N220.
Enter six pairs of hexadecimal digits (separated by colons) in the range
of “A-F”, “a-f” and “0-9” (for example, 00:A0:C5:00:00:02).
If you enter an invalid MAC address, once you click Save to save the
values, a warning screen will be displayed.
N220 User’s Guide
83

Chapter 5 AP Mode
84
N220 User’s Guide

CHAPTER 6
Maintenance
6.1 Overview
This section describes how to uninstall or upgrade the ZyXEL utility.
6.1.1 What You Can Do in This Section
• Learn which version of the ZyXEL utility and device driv er you’re currently using.
See Section 6.2 on page 86 for details.
• Remove the ZyXEL utility from your computer. See Section 6.3 on page 86 for
details.
• Upgrade the ZyXEL uti lity. See Section 6.4 on page 87 for details.
6.1.2 What You Need to Know
The following term may help as you read through this section.
Device driver
A system file that lets other programs interact with a piece of hardware, or
“device.” You should never try to locate and install or uninstall device drivers
yourself since they are modi fi c a ti ons to an operating system at the core (or
“kernel”) level. Doing so could irreparably damage your installation.
6.1.3 Before You Begin
• Disconnect the N220 if you are going to uninstal l or upgrade the ZyXEL utility,
save your work in any other open programs, and then close them.
N220 User’s Guide
85
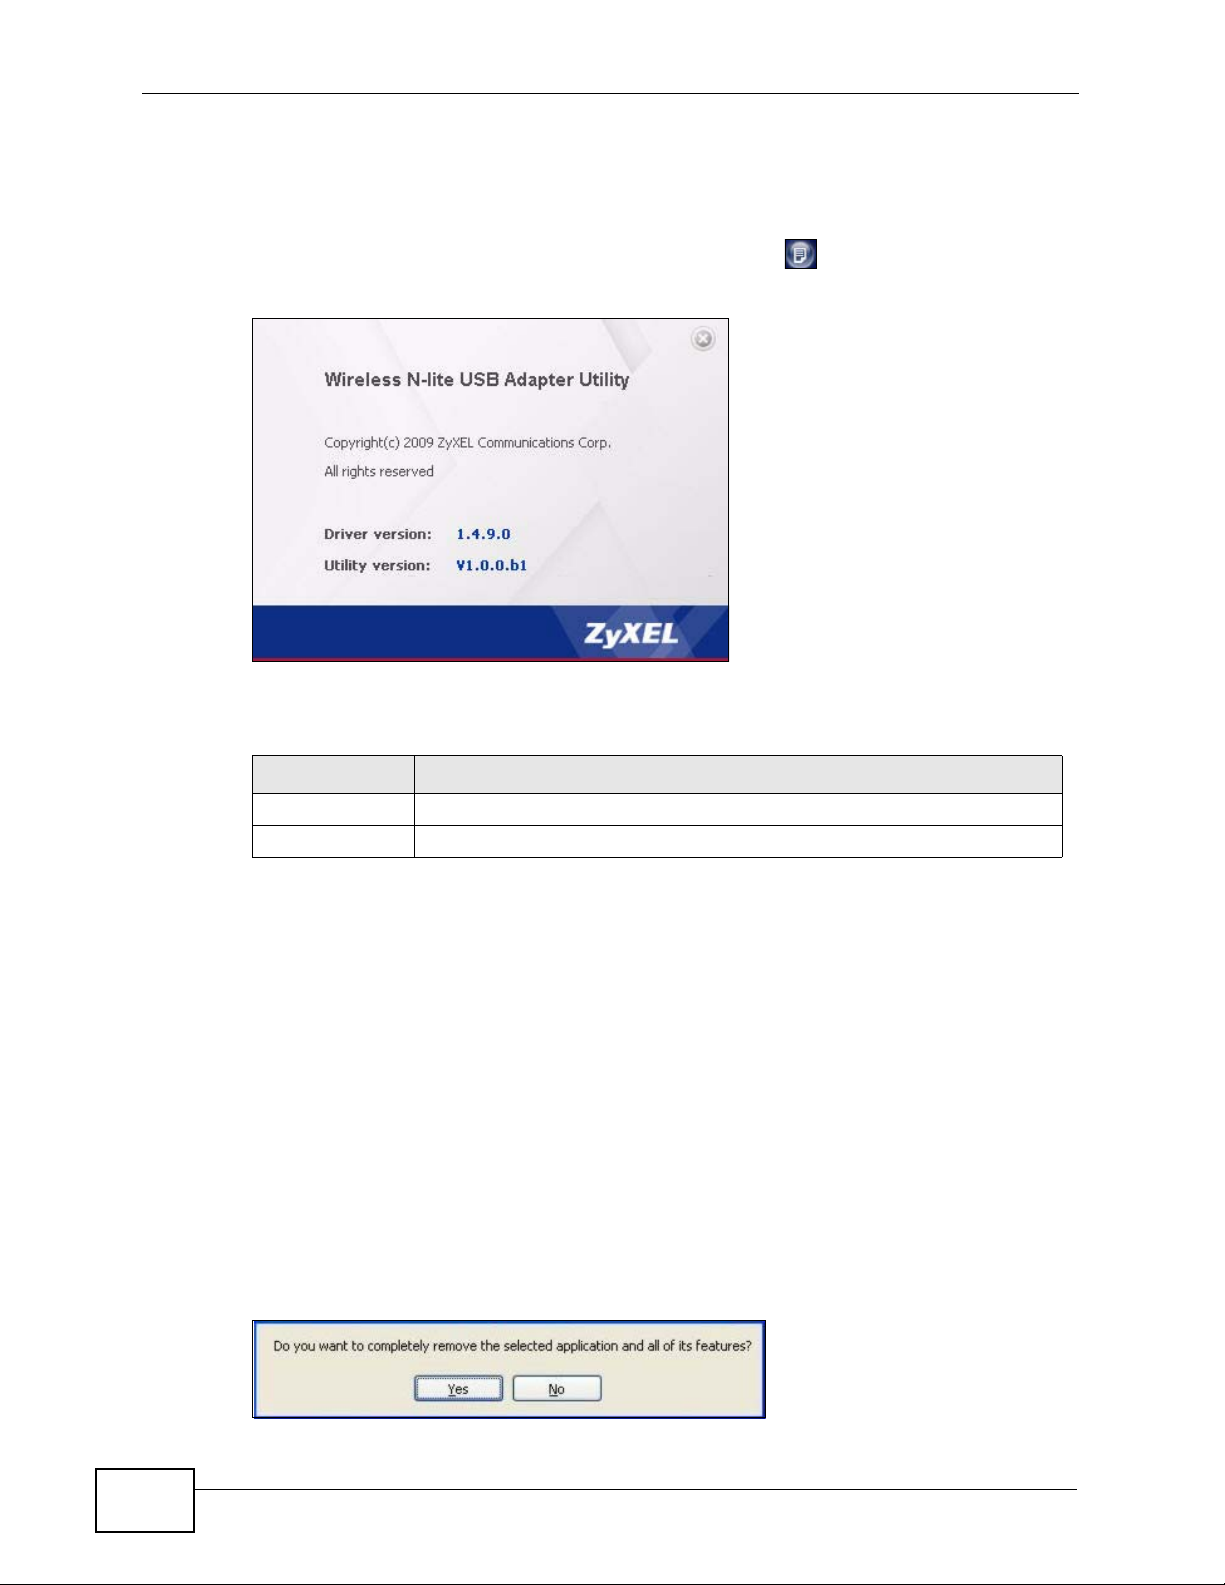
Chapter 6 Maintenance
6.2 The About Screen
The About screen displays driver and utility version numbers of the N220. To
display the screen as shown below, click the About ( ) button.
Figure 61 About
The following table describes the read-only fields in this screen.
Table 26 About
LABEL DESCRIPTION
Driver Version This field displays the version number of the N220 driver.
Utility Version This field displays the version number of the ZyXEL utility.
6.3 Uninstalling the ZyXEL Utility
Follow the steps below to remove (or uninstall) the ZyXEL utility from your
computer.
Note: Before you uninstall the ZyXEL utility, take note of your current wireless
configurations.
1 Click Start > (All) Programs > Wireless N-lite USB Adapter Utility >
Uninstall Wireless N-lite USB Adapter Utility.
2 When prompted, click OK or Yes to remove the driver and the utility software.
86
Figure 62 Uninstall: Confirm
N220 User’s Guide
Chapter 6 Maintenance
3 Click Finish to complete uninstalling the softw are and restart the computer when
prompted.
Figure 63 Uninstall: Finish
6.4 Upgrading the ZyXEL Utility
Note: Before you uninstall the ZyXEL utility, take note of your current wireless
configurations.
To perform the upgrade, follow the steps below.
1 Download the latest version of the utility from the ZyXEL web site and save the file
on your computer.
2 Fol low the steps in Section 6.3 on page 86 to remove the current ZyXEL utility
from your computer.
3 Restart your computer when prompted.
4 Disconnect the N220 from your computer.
5 Double-click on the setup program for the new utility to start the ZyXEL utility
installation.
6 Insert the N220 and check the version numbers in the About screen to make sure
the new utility is installed prop erl y.
N220 User’s Guide
87

Chapter 6 Maintenance
88
N220 User’s Guide

PART II
Troubleshooting
and Specifications
Troubleshooting (91)
Product Specifications (95)
89

90

CHAPTER 7
Troubleshooting
This chapter offers some suggestions to solve problems you might encounter. The
potential problems are divided into the following categories.
• Power, Hardware Connections, and LEDs
• Accessing the ZyXEL Utility
• Link Quality
• Problems Communicating with Other Computers
7.1 Power, Hardware Connections, and LEDs
The N220 does not turn on. None of the LEDs turn on.
1 Make sure the N220 is correctly installed (refer to your Quick Start Guide).
2 Restart the computer to which the N220 is attached.
3 If the problem continues, contact the vendor.
One of the LEDs does not behave as expected.
1 Make sure you understand the normal behavior of the LED. See Section 1.2 on
page 18.
2 Check the hardware connection. See the Quick Start Guide and Section 1.2 on
page 18.
3 Restart the computer to which the N220 is attached.
4 If the problem continues, contact the vendor.
N220 User’s Guide
91

Chapter 7 Troubleshooting
7.2 Accessing the ZyXEL Utility
I cannot access the ZyXEL Utility
1 Make sure the N220 is properly inserted and the LEDs are on. Refer to the Quick
Start Guide for information on how to properly connect the N220.
2 Use the Device Manager to check for possible hardware conflicts. Click Start >
Settings > Control Panel > System > Hardware > Device Manager. Verify
the status of the N220 under Network Adapter (steps may vary depending on
the version of Windows).
3 Install the N220 on another computer.
4 If the error persists, you may have a hardware problem. In this case, you should
contact your vendor.
7.3 Link Quality
The link quality and/or signal strength is poor.
1 Scan for and connect to another AP with a better link quality using the Site
Survey screen.
2 Move your computer closer to the AP or the peer computer(s) within the
transmission range.
3 There may be too much radio interference (for example from a microwave oven,
or another AP using the same channel) around your wireless network. Lower the
output power of each AP.
4 Make sure there are not too many wireless stations connected to a wireless
network.
92
N220 User’s Guide

Chapter 7 Troubleshooting
7.4 Problems Communicating with Other Computers
The computer with the N220 installed cannot communicate with the other
computer(s).
In Infrastructure Mode
• Make sure that the AP and the associated computers are turned on and working
properly.
• Make sure the N220 computer and the associated AP use the same SSID.
• Change the AP and the associated wireless clients to use another radio channel
if interference is high.
• Make sure that the computer and the AP share the same security option and
key. Verify the settings in the Profile Security Setting screen.
• If you are using WPA(2) or WPA(2)-PSK security, try changing your encryption
type from TKIP to AES or vice versa.
In Ad-Hoc Mode
• Verif y that the peer computer(s) is turned on.
• Make sure the N220 computer and the peer computer(s) are using the same
SSID and channel.
• Make sure that the computer and the peer computer(s) share the same security
settings.
• Change the wireless clients to use another radio channel if interference is high.
N220 User’s Guide
93

Chapter 7 Troubleshooting
94
N220 User’s Guide

CHAPTER 8
Product Specifications
Table 27 Product Specifications
PHYSICAL AND ENVIRONMENTAL
Product Name N220 Wireless N-lite USB Adapter
Interface USB 2.0
Standards IEEE 802.11b
IEEE 802.11g
IEEE 802.11n
Operating Frequency 2.4GHZ
Antenna Type Chip
Operating Temperature 0 - 50 degrees Celsius
Storage Temperature -30 - 70 degrees Celsius
Operating Humidity 20 - 90% (non-condensing)
Storage Humidity 10 - 90% (non-condensing)
Voltage 5V
Power Saving Mode Yes
Current Consumption Transmit: <300 mA
Receive: <160 mA
Device Weight 3 g
Device Dimensions 18 mm (L) x 6 mm (W) x 36 mm (H)
RADIO SPECIFICATIONS
N220 User’s Guide
95

Chapter 8 Product Specifications
Table 27 Product Specifications (continued)
Transmit Power
802.11b:
(+/- 1.5 dB)
Receiver Sensitivity 802.11b: 11Mbps at -82dBm
1/2/5.5/11M: 18.5 dBm
802.11g:
54/48M: 15dBm
24/36M: 15dBm
12/18M: 16dBm
6/9M: 16.5 dBm
802.11n:
@ HT20
MCS0~MCS07: 15.5 dBm
@ HT40
MCS0~MCS07: 15.5 dBm
802.11g: 54Mbps at -68dBm
802.11n: HT20 at -64dBm
HT40 at -62dBm
WIRELESS STANDARDS
IEEE 802.11b Dynamically shifts between 11, 5.5, 2, and 1 Mbps network
speed.
Operation Frequency 2.412GHz~2.472GHz
Operation Channels N. America &Taiwan
2.412GHz~ 2.462GHz 1-11
Euro ETSI
2.412GHz~ 2.472GHz 1-13
IEEE 802.11g Dynamically shifts between 54, 48, 36, 24, 18, 12, 9 and 6
Mbps network speed.
Operation Frequency 2.412GHz~2.472GHz
Operation Channels N. America &Taiwan
2.412GHz~ 2.462GHz 1-11
Euro ETSI
2.412GHz~ 2.472GHz 1-13
IEEE 802.11n
Downstream data rate 150 Mbps
Upstream data rate 150 Mbps
Operation Frequency 2.412GHz~ 2.472GHz 1-13
96
N220 User’s Guide

Chapter 8 Product Specifications
Table 27 Product Specifications (continued)
Operation Channels N. America & Taiwan HT20
2.412GHz~ 2.462GHz 1-11
N. America & Taiwan HT40
2.422GHz~ 2.452GHz 3-9
Euro ETSI HT20
2.412GHz~ 2.472GHz 1-13
Euro ETSI HT40
2.422GHz~ 2.462GHz 3-11
Networking Mode Infrastructure, Ad-Hoc, SoftAP Support
Approvals Safety
European Union: EN60950-1 (CE-LVD)
EMI
United States: FCC Part 15B Class B
Canada: ICES-003
European Union: CE EN 55022 Class B
Australia: C-Tick
EMS
European Union: CE EN55024
RF
United States: FCC Part 15C
Canada: RSS-210
European Union: CE EN 300 328
Taiwan: NCC LP0002
Wi-Fi Certification
11 b/g/n WPA/WPA2/WPS
Microsoft Certification
WHQL: Windows 7 (32- and 64-bit), Windows Vista (32and 64-bit), Windows XP (32- and 64-bit), Windows
2000
SOFTWARE SPECIFICATIONS
Device Drivers Windows 7 (32- and 64-bit)
Windows Vista (32- and 64-bit)
Windows XP (32- and 64-bit)
Windows 2000
Mac OS X (10.3/10.4/10.5)
WIRELESS FEATURES
Wireless Security WEP 64bit, 128bit, WPA, WPA-PSK, WPA2, WPA2-PSK
802.1x (EAP-TLS, EAP-TTLS, EAP-PEAP), WPS.
N220 User’s Guide
Note: EAP-TTLS is not supported in Windows Vista
97

Chapter 8 Product Specifications
Table 27 Product Specifications (continued)
Wireless QoS Wi-Fi Multi Media (WMM)
Wi-Fi Protected Setup
(WPS)
Other WMM power-saving support
Push button configuration
Use device's PIN
Use AP or Router's PIN
Compatible with Windows Zero Configuration
98
N220 User’s Guide

PART III
Appendices and
Index
Note: The appendices provide general
information. Some details may not
apply to your N220.
Setting Up Your Computer’s IP Address
(101)
Wireless LANs (131)
Windows Wireless Management (147)
Wireless for Windows 7 (173)
Legal Information (179)
Index (183)
99

100
 Loading...