

Page 1

NWA-3500
802.11a/b/g Wireless Access Point
Quick Start Guide
Version 3.60
01/2010
Edition 3
Table of Contents
ENGLISH 3
DEUTSCH 17
ESPAÑOL 33
FRANÇAIS 47
ITALIANO 61
РУССКИЙ 77
SVENSKA 91
简体中文
繁體中文 117
105
Copyright © 2010. All rights reserved.
Page 2

Page 3
ENGLISH
ENGLISH
Overview
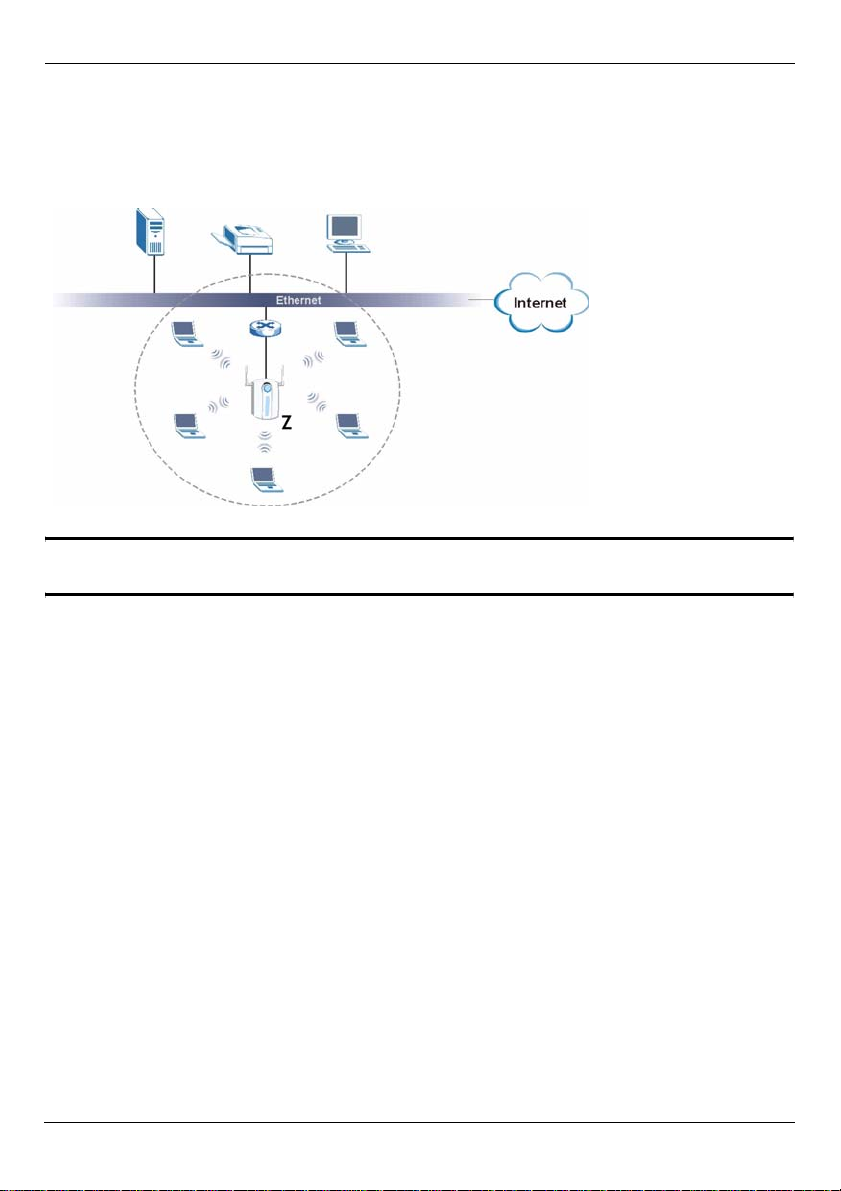
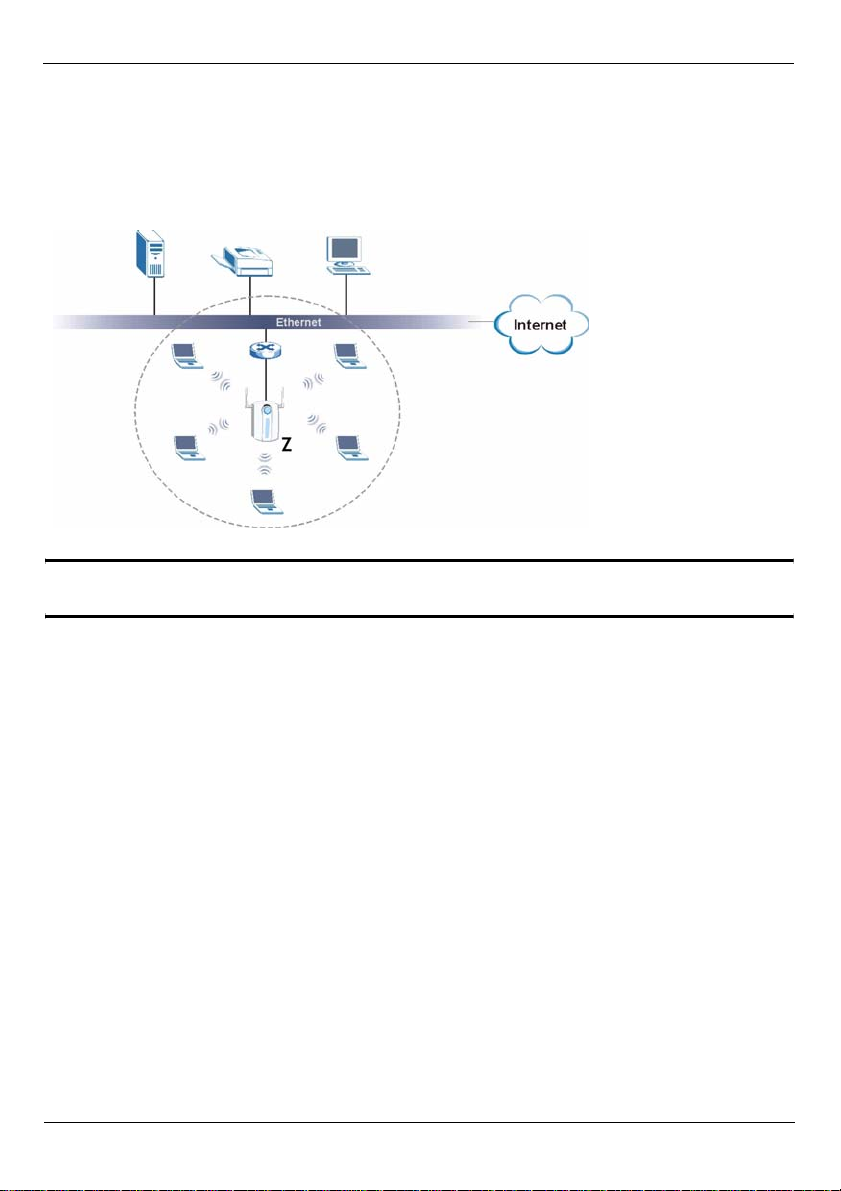
This Quick Start Guide shows how to set up and configure the NWA-3500 (Z in the figure)
to allow wireless clients to securely access your wired network. See your User’s Guide for
more information.
" You may need your Internet access information.
To set up your wireless network you need to:
1 Connect the Hardware
2 Access the Web Configurator
3 Configure the NWA-3500
4 Install the Hardware
5 Set Up Power over Ethernet (Optional)
3
Page 4
ENGLISH
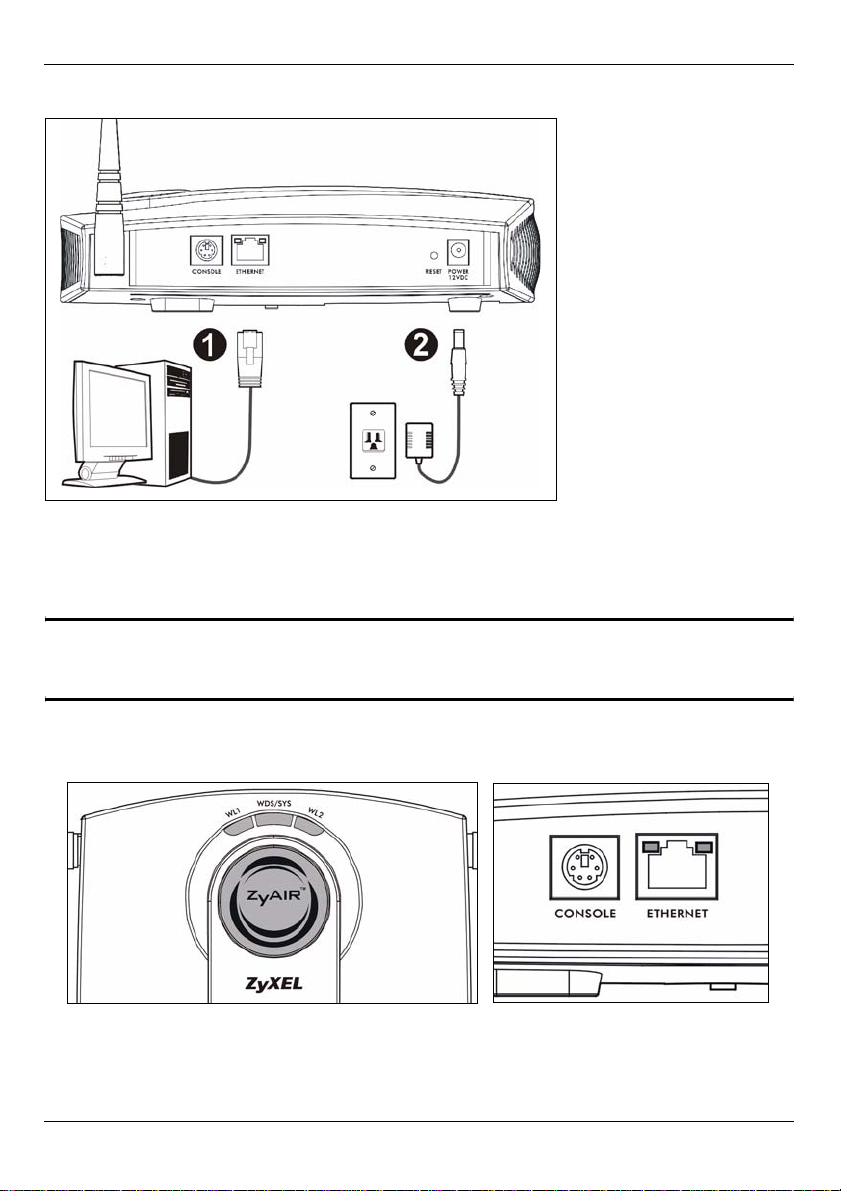
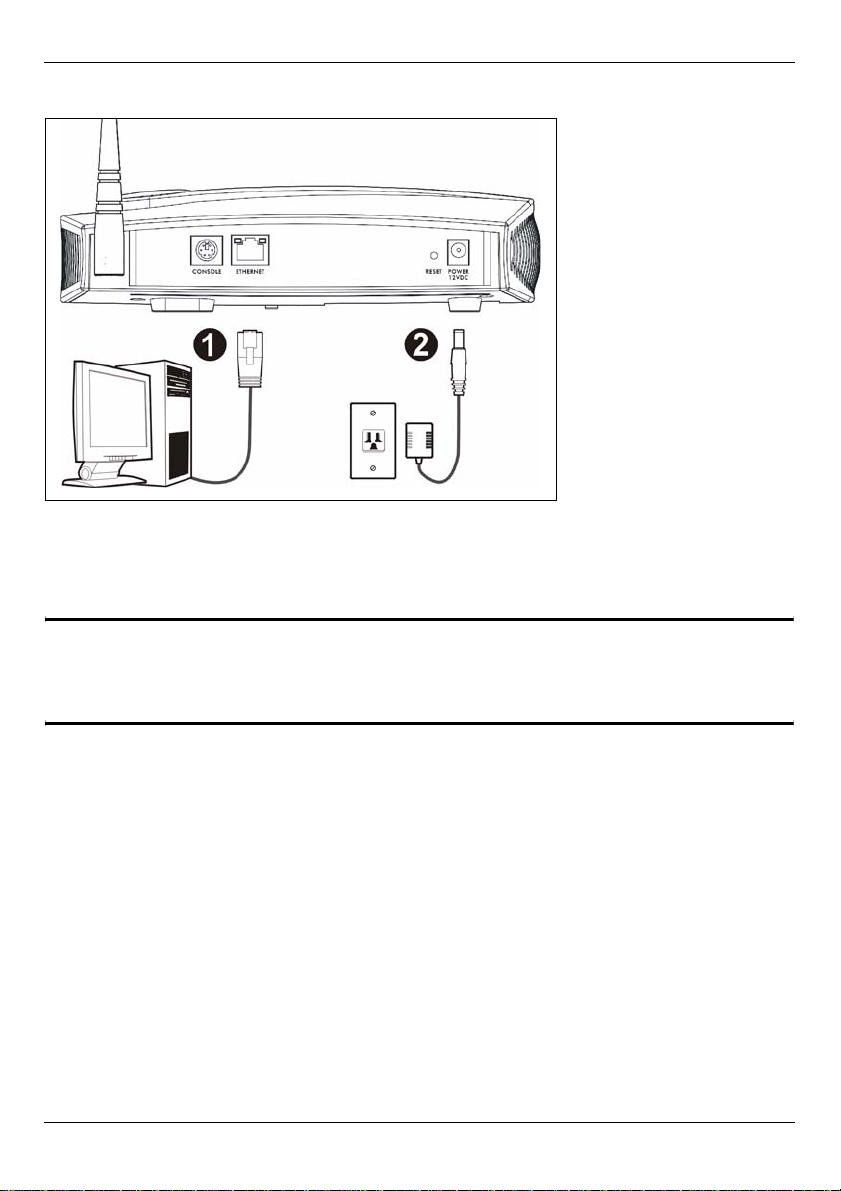
1 Connect the Hardware
1 Using an Ethernet cable, connect the ETHERNET port to a computer for initial
configuration.
2 Connect the POWER 12VDC socket to a power source using only the included power
adaptor.
" Connect the NWA-3500’s ETHERNET port to an Ethernet jack with network
access after you have completed the initial configuration.
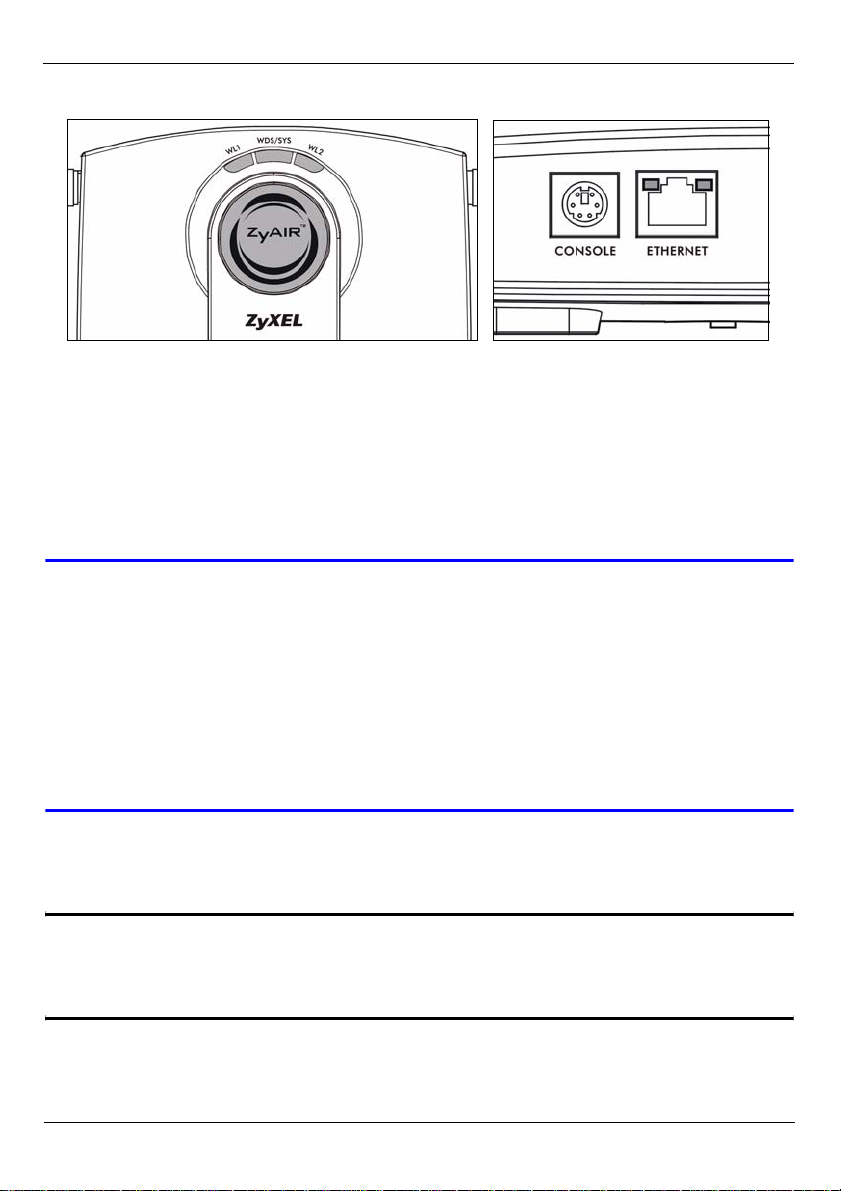
1.1 LEDs
The WDS/SYS LED blinks red while the NWA-3500 is starting up. When the NWA-3500 is
ready, the ZyAIR LED turns on and blinks when there is traffic.
4
Page 5

ENGLISH
One of the ETHERNET LEDs on the RJ-45 ETHERNET port turns on if the ETHERNET port
is properly connected, and blinks when there is traffic. The green ETHERNET LED turns on
if the connection is at 10Mbps, and the yellow ETHERNET LED turns on if the connection
is at 100Mbps.
V If the ZyAIR LED does not turn on, make sure you are using the correct
power adaptor and that the power adaptor is plugged into an appropriate
power supply. Unplug the power adaptor and plug it in again. If the error
persists, you may have a hardware problem. In this case, you should
contact your vendor.
If neither ETHERNET LED turns on, check the cable connection to the
NWA-3500’s ETHERNET port. Ensure your computer’s network card is
working properly.
2 Access the Web Configurator
" Use Internet Explorer 6.0 and later or Netscape Navigator 7.0 and later
versions with JavaScript enabled and pop-up blocking disabled.
2.1 Set Up Your Computer’s IP Address
" Note down your computer’s current IP settings before you change them.
First, set your computer to use a static IP address in the 192.168.1.3 - 192.168.1.254
range with a subnet mask of 255.255.255.0. This ensures that your computer can
communicate with your NWA-3500. See your User’s Guide for information on setting up
your computer’s IP address.
5
Page 6
ENGLISH
2.2 Log Into the Web Configurator
" Even though you can connect to the NWA-3500 wirelessly, it is
recommended that you connect your computer to the ETHERNET port for
initial configuration.
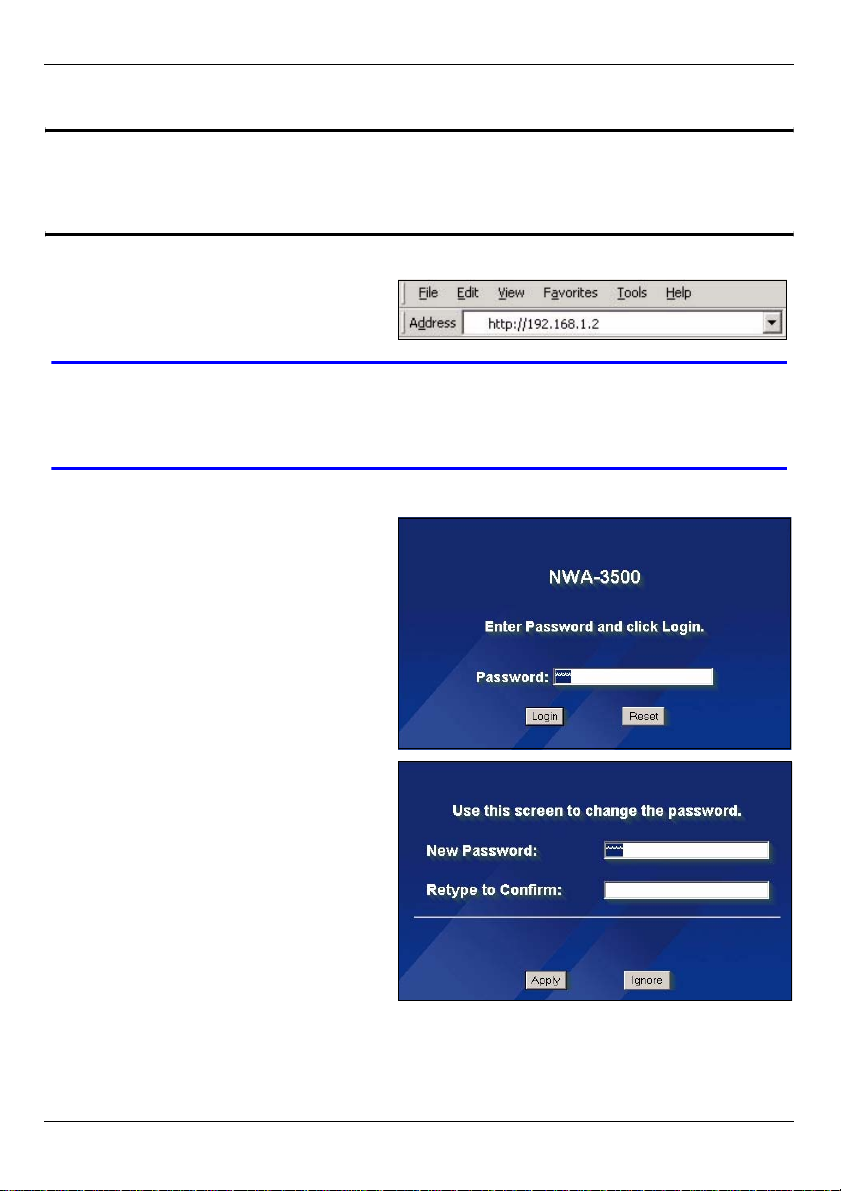
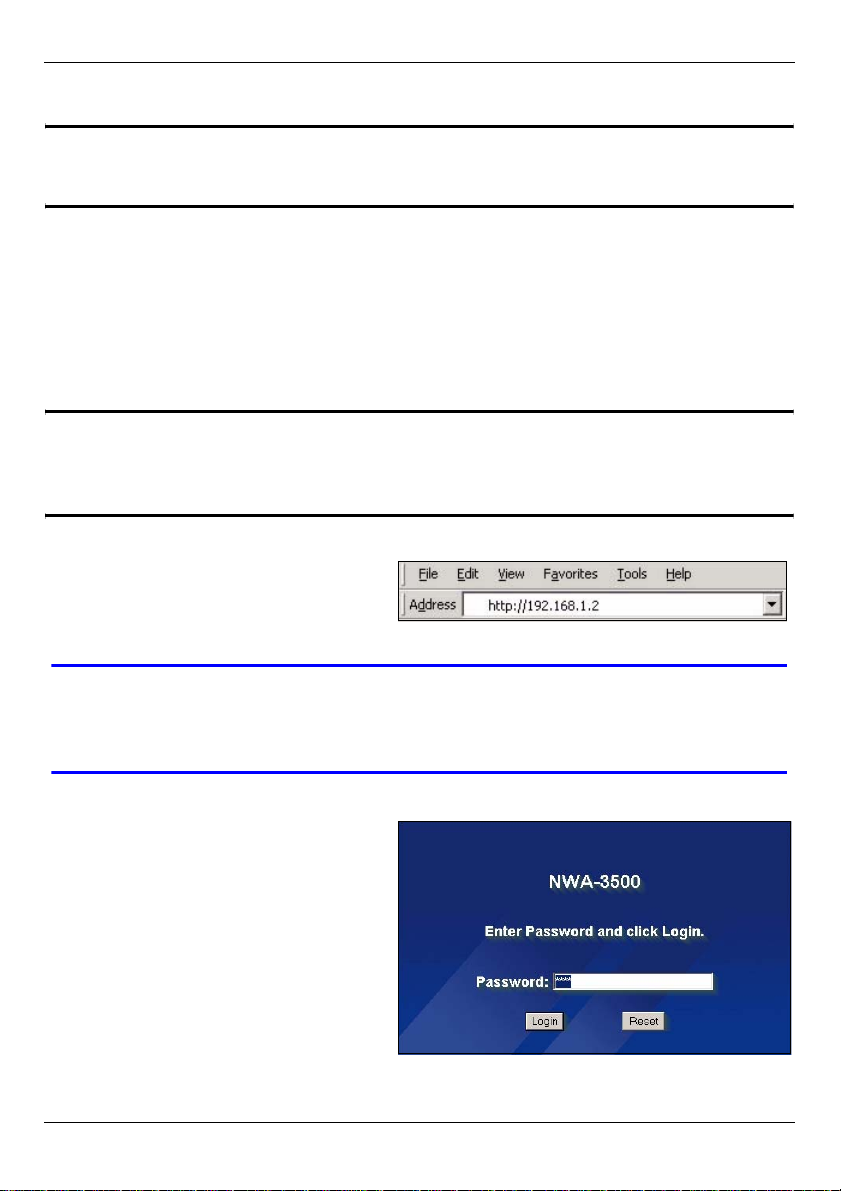
1 Launch your web browser. Enter
192.168.1.2 (the NWA-3500’s
default IP address) as the address.
V If you cannot access the Web configurator, make sure the IP addresses
and subnet masks of the NWA-3500 and the computer are in the same IP
address range (see Section 2.1).
2 Click Login (the default password
1234 is already entered).
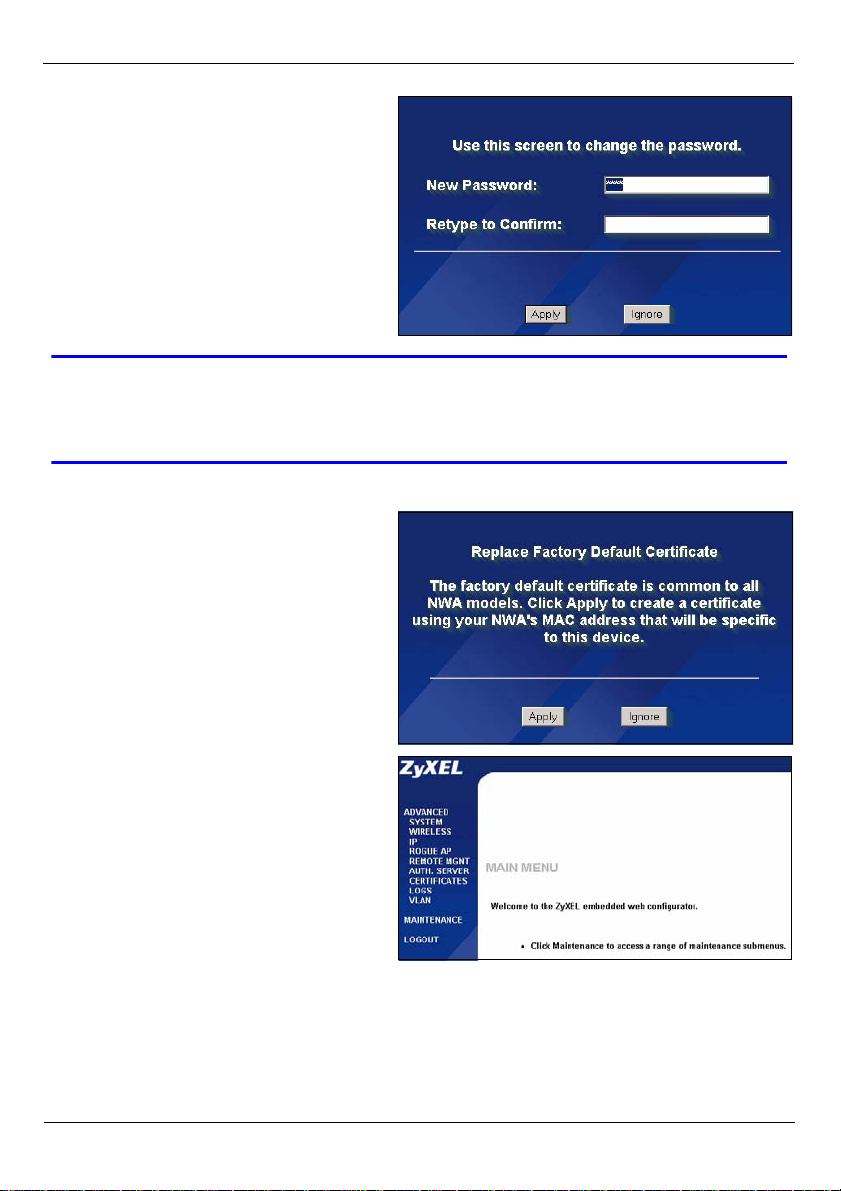
3 Change the login password by
entering a new password and
clicking Apply. Be sure to record the
new password and keep it in a safe
place.
6
Page 7
ENGLISH
V If you change the password and then forget it, you will need to reset the
NWA-3500. Refer to the User’s Guide for how to use the RESET button.
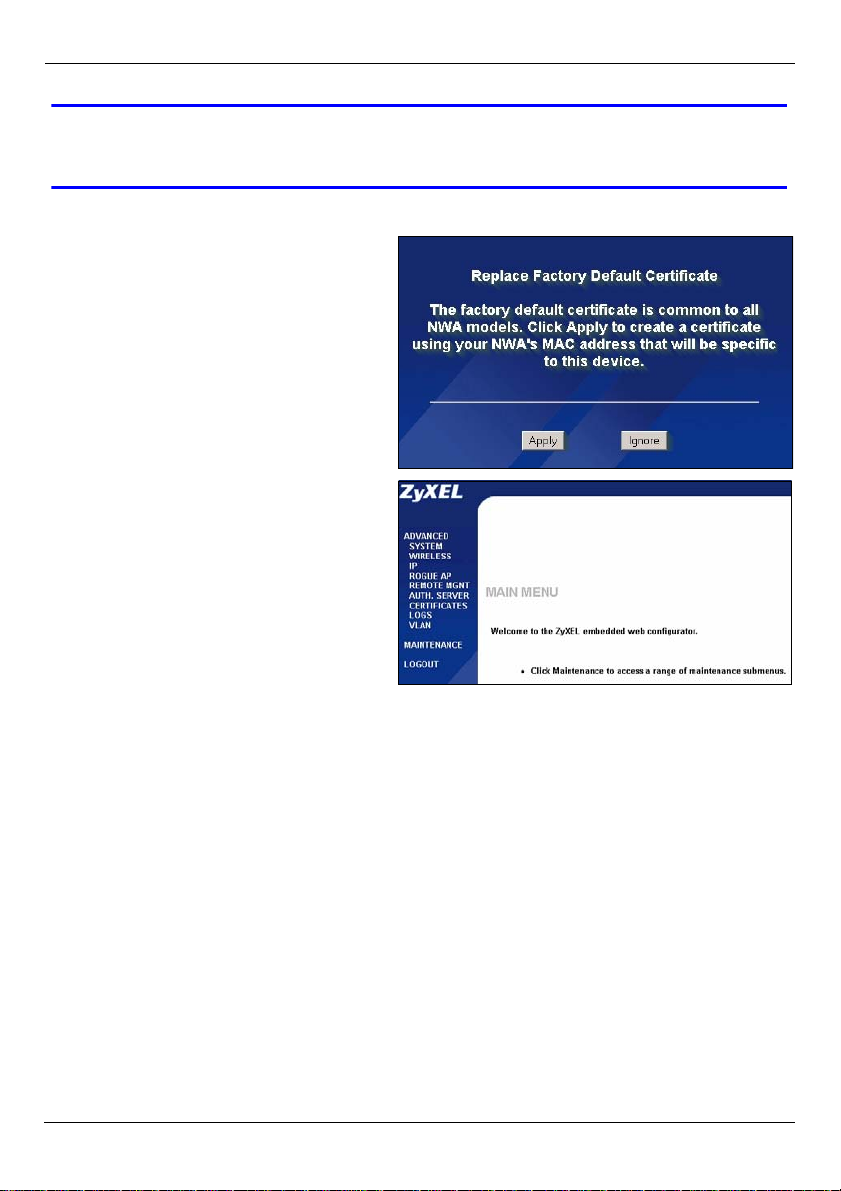
4 Click Apply to replace the factory
default certificate for added security;
alternatively click Ignore to proceed
if you do not want to change the
certificate now.
5 The MAIN MENU screen appears.
7
Page 8

ENGLISH
3 Configure the NWA-3500
3.1 Configure System Settings
1 Click SYSTEM in the navigation panel.
2 The SYSTEM > General screen appears.
System Name is for identifying the NWA-3500 on your network. Choose a distinctive
name, or leave this at its default.
Domain Name: Enter a domain name if your ISP requires one for authentication.
Otherwise you can leave it blank or set to whatever may have displayed automatically.
DNS Server(s): if your ISP gave you specific DNS (Domain Name System) settings,
select User-Defined and enter them here. Otherwise, leave these fields at their defaults.
3 Click Apply.
8
Page 9
ENGLISH
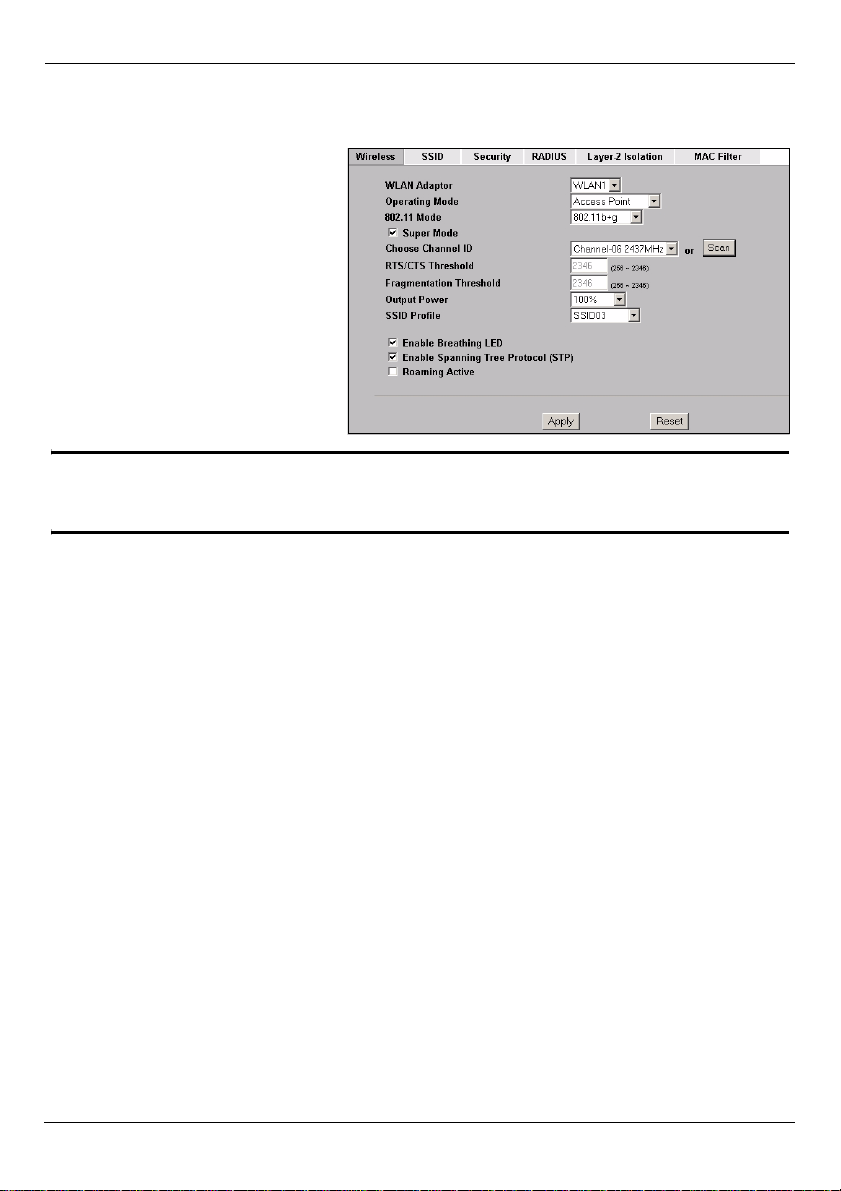
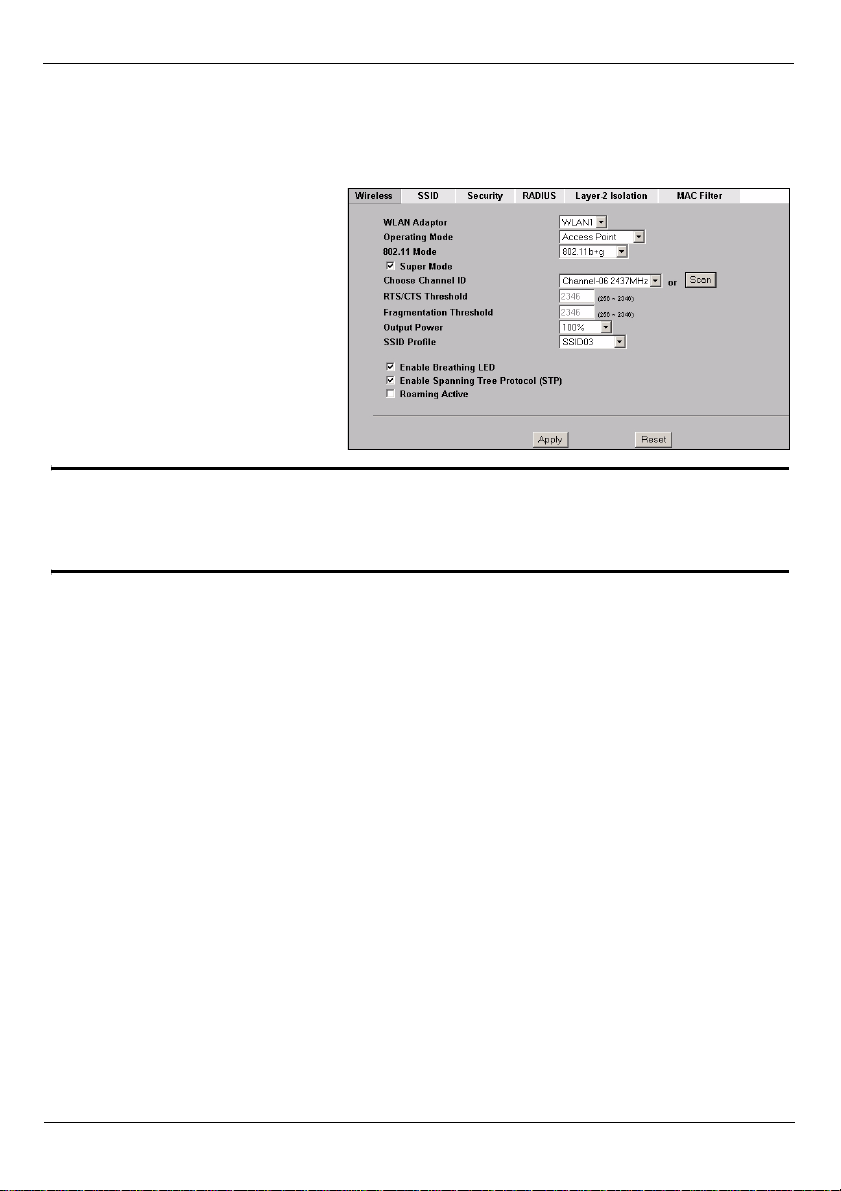
Configure Wireless Settings
1 Click WIRELESS in the
navigation panel. The
following screen appears.
" The wireless stations and the NWA-3500 must use the same SSID,
channel ID and encryption settings for wireless communication.
WLAN Adaptor: Ensure that WLAN1 is selected.
Operating Mode: Ensure that Access Point mode is selected.
802.11 Mode: Select the wireless standard you want your network to use. If all the
wireless clients support IEEE 802.11a, select 802.11a. Otherwise, select 802.11b+g.
Choose Channel ID: Select the wireless channel you want your network to use. To have
the NWA-3500 automatically select a channel, click Scan instead.
SSID Profile: Select the SSID profile you want to configure for network access from the
drop-down list box. This example uses the SSID03 profile.
2 Click Apply to save your settings.
9
Page 10

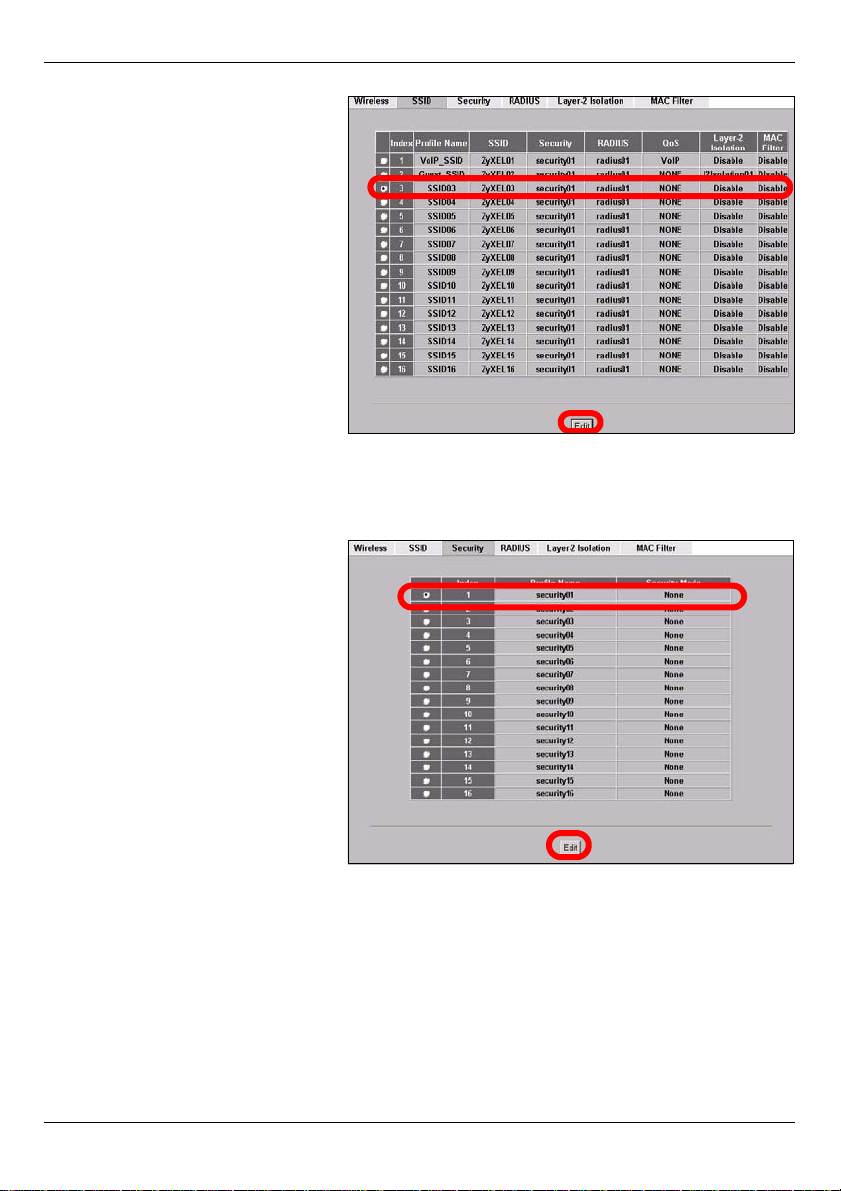
3 Click the SSID tab. The
following screen appears.
Ensure the settings for SSID03
are at their default values.
The default SSID (the name of
the network) is ZyXEL03, its
default Security setting is
Security01. Layer 2 Isolation
and MAC Filter are set to
Disable by default.
If you want to change the SSID
profile’s settings, select SSID03
and click Edit.
4 Click the Security tab. Ensure
that Security01 is selected
and click Edit.
If you don’t configure wireless
security, then anyone can
access your network.
ENGLISH
10
Page 11
ENGLISH
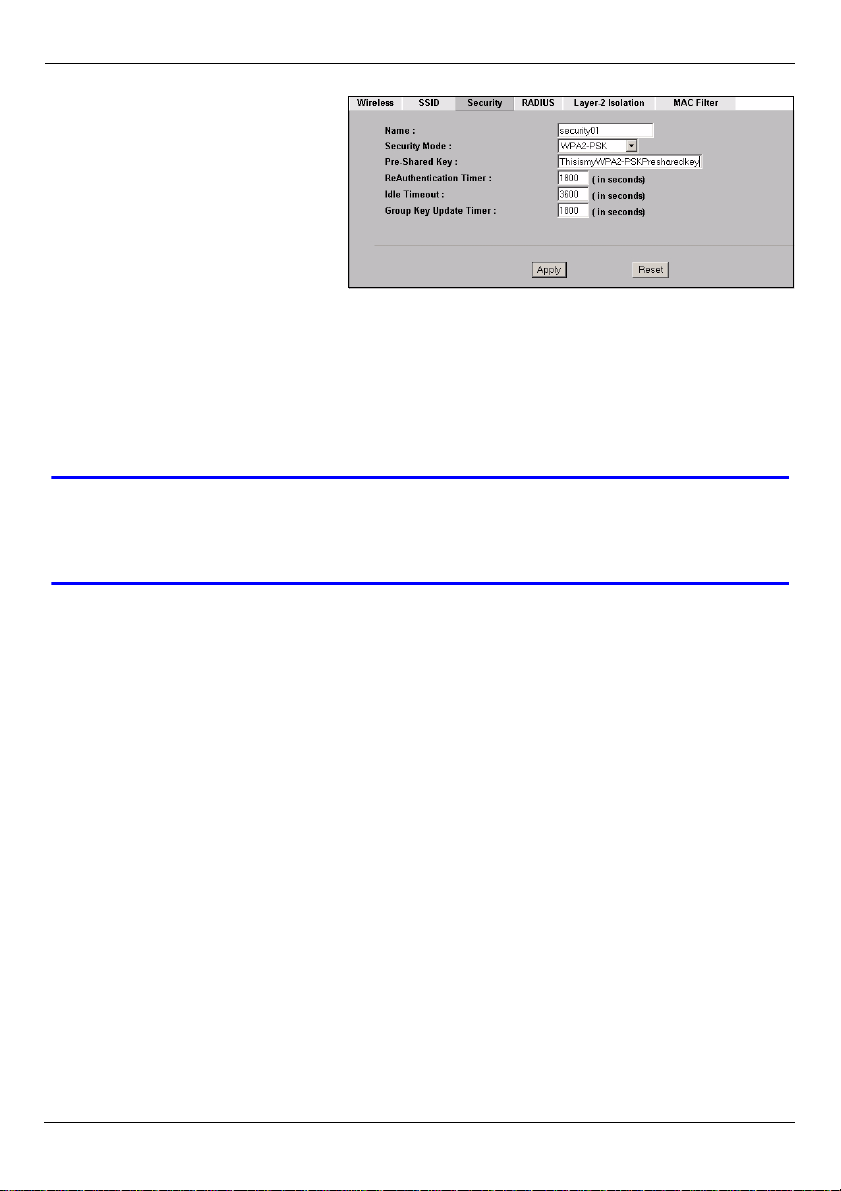
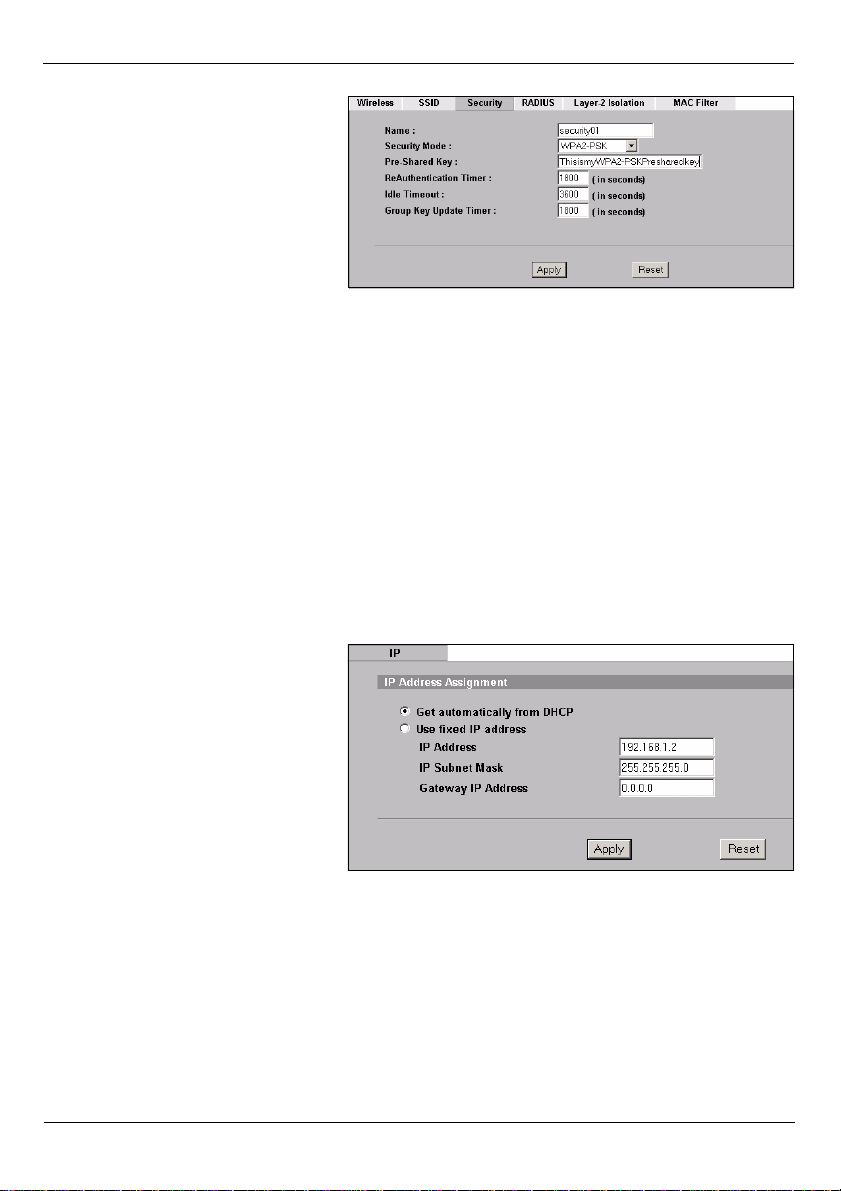
5 This is where you can enter
the security settings for your
wireless network. The fields
you fill in differ according to
the type of security you select
in the Security Mode field.
Select None if you do not wish
to use wireless security.
This example uses WPA2-PSK
security, in which all wireless
clients must use the same preshared key to join the network.
Ensure that all your wireless
clients support the type of
security you set. Click Apply
when you have finished.
V If the wireless clients cannot communicate with the network, ensure that
the clients and the NWA-3500 are using the same wireless security
settings.
11
Page 12

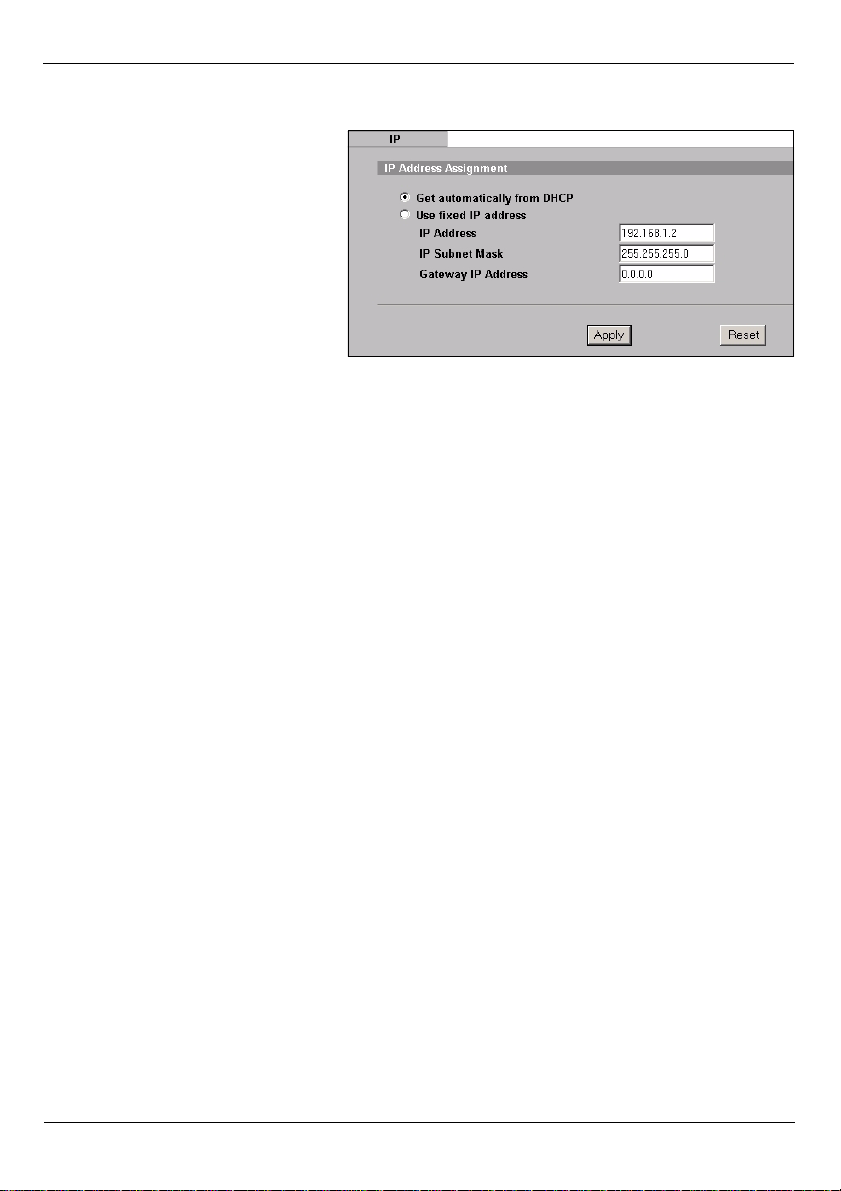
3.2 Configure IP Settings
1 You need to set your NWA-
3500’s IP address to be in the
same subnet as your network.
Click IP in the navigation
panel.
Select Get automatically from
DHCP if you want to have a
DHCP server on your network
assign an IP address to the
NWA-3500.
If you have a specific IP address
to use, select Use fixed IP
address and enter it along with
the subnet mask and gateway
IP address.
Click Apply. The NWA-3500
now uses the new IP settings;
you can no longer connect to
the NWA-3500 using the default
IP address.
ENGLISH
" If you change the NWA-3500’s IP address, you must use the new IP
address when you next access the web configurator. If you select Get
automatically from DHCP, check your DHCP server to determine the IP
address it assigns to the NWA-3500. Refer to your DHCP server’s
documentation for more information.
2 If you changed your computer’s IP address in Section 2.1, return it to its previous
setting.
3 Change the wireless settings in the wireless stations to match those of the NWA-
3500. Refer to your wireless adapter’s documentation.
The NWA-3500 is now ready to connect to your switch or router. You can do this now, or
once you have attached the antennas and mounted the NWA-3500.
12
Page 13
ENGLISH
V If the NWA-3500 cannot communicate with the network, ensure that the
NWA-3500 is using an IP address on the same subnet as the switch /
router.
4 Install the Hardware
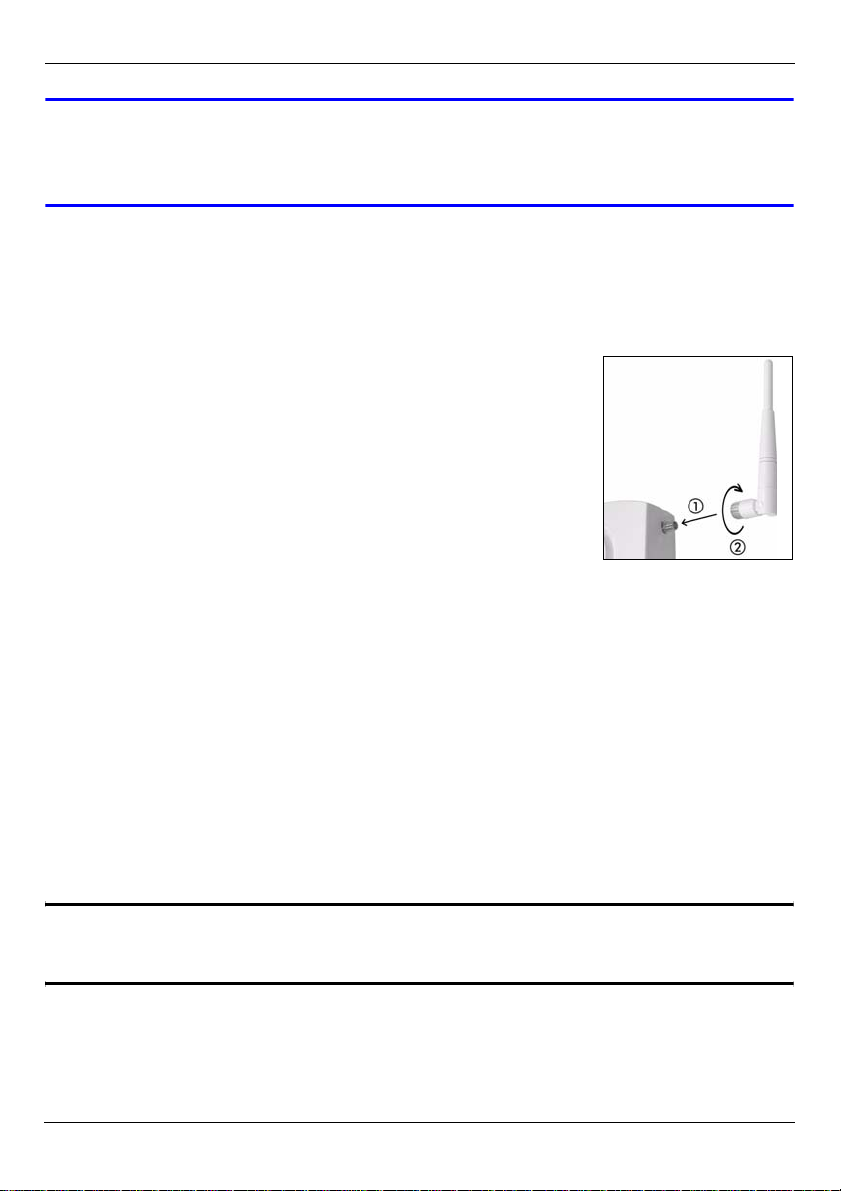
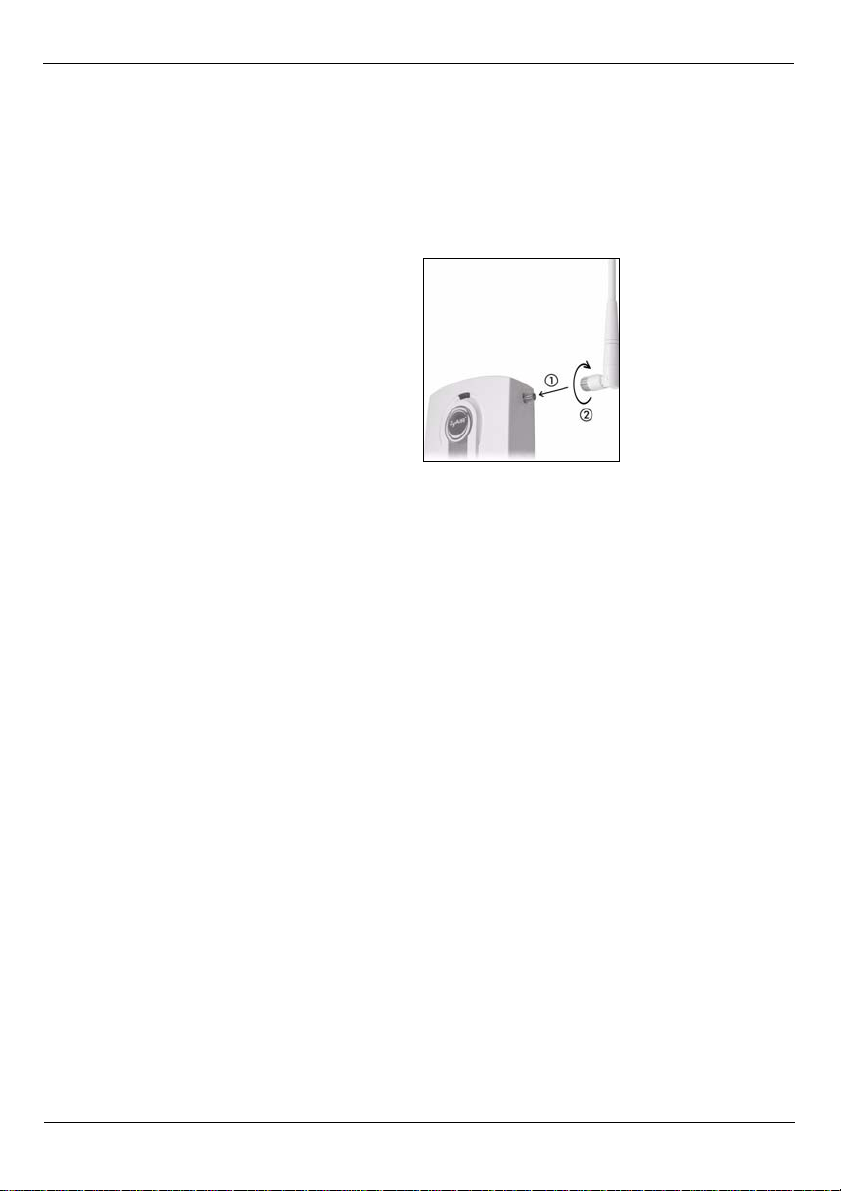
4.1 Attaching Antennas
Screw the antennas clockwise onto the antenna connectors on
the sides of your NWA-3500. The antennas should be
perpendicular to the ground and parallel to each other.
Make sure the antennas are securely screwed onto the antenna
connectors.
4.2 Hardware Mounting
In general, the best location for the access point is at the center of your intended wireless
coverage area. For better performance, mount the NWA-3500 high up in an area that is
free of obstructions.
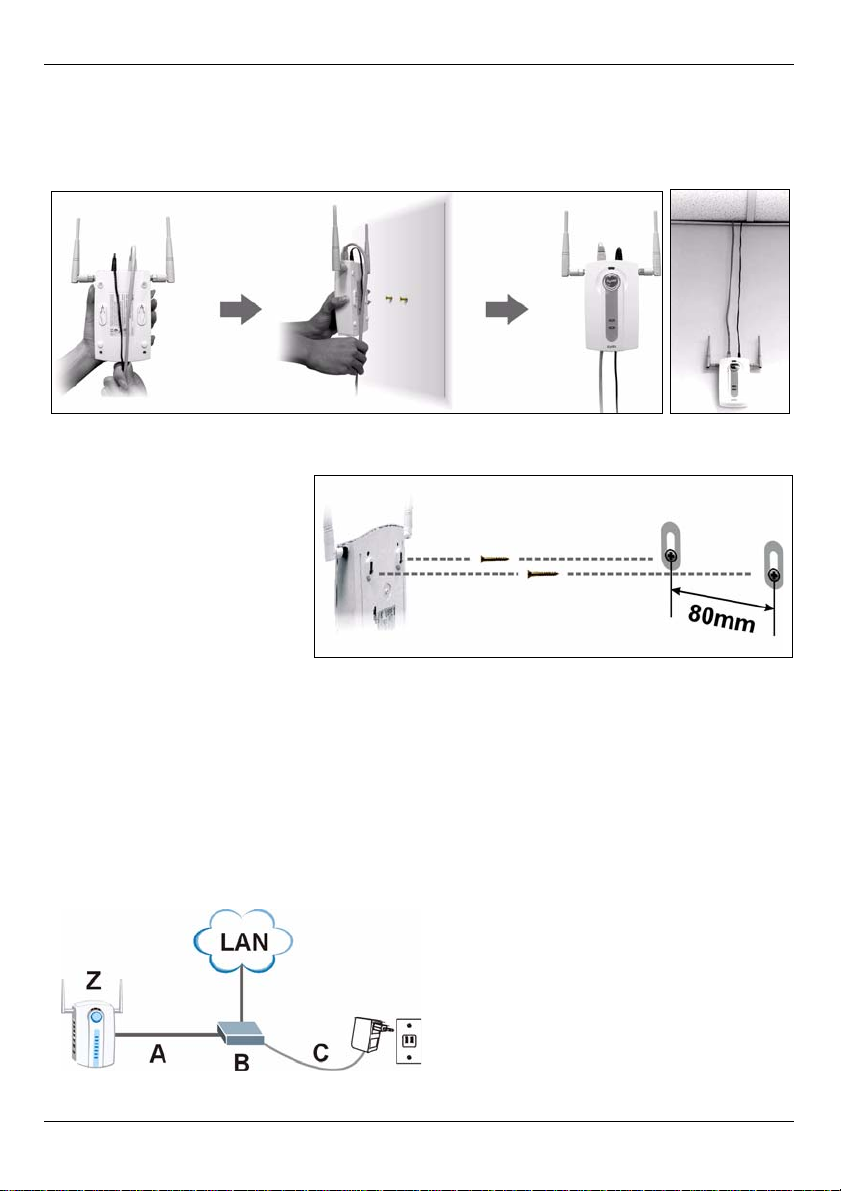
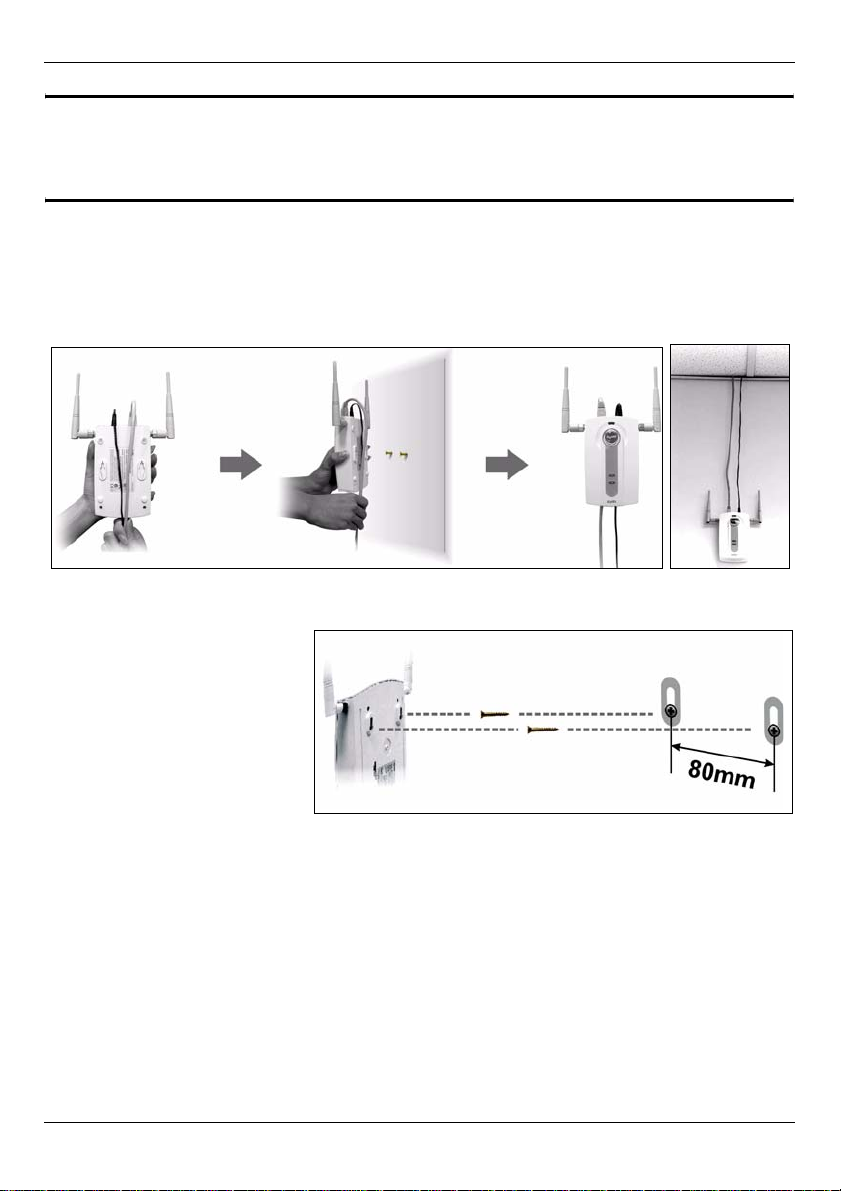
Wall-mounting
Do the following to attach your NWA-3500 to a wall.
1 Screw two screws (not included) into the wall 80mm apart (see the figure in step 3).
Use screws with 6mm ~ 8mm (0.24" ~ 0.31") wide heads. Do not screw the screws all
the way in to the wall; leave a small gap between the head of the screw and the wall.
The gap must be big enough for the screw heads to slide into the screw slots and the
connection cables to run down the back of the NWA-3500.
" Make sure the screws are securely fixed to the wall and strong enough to
hold the weight of the NWA-3500 with the connection cables.
2 Adjust the cables.
13
Page 14
ENGLISH
Run the connection cables down the back of the NWA-3500 as shown in the following
figure.
OR:
Run the connection cables upward and along the edge of the ceiling.
3 Align the holes on the back
of the NWA-3500 with the
screws on the wall. Hang
the NWA-3500 on the
screws.
5 Set Up Power over Ethernet (Optional)
Power over Ethernet (PoE) is the ability to provide power to your NWA-3500 via an 8-pin
CAT 5 Ethernet cable, eliminating the need for a nearby power source.
A PoE injector (not included) is also needed to supply the Ethernet cable with power. This
feature allows increased flexibility in the location of your NWA-3500.
In the following figure, Z is your NWA-3500, A is the CAT 5 Ethernet cable, B is the PoE
injector and C is the power cable.
14
Page 15

ENGLISH
" You can connect the NWA-3500 to PoE via the ETHERNET port AND to a
power source via the POWER 12VDC port. If you do so, do not disconnect
the ETHERNET port before you disconnect the POWER 12VDC port. This
causes the NWA-3500 to restart.
6 Procedure to View a Product’s Certification(s)
1 Go to www.zyxel.com.
2 Select your product from the drop-down list box on the ZyXEL home page to go to that
product's page.
3 Select the certification you wish to view from this page.
15
Page 16

ENGLISH
16
Page 17
DEUTSCH
DEUTSCH
Übersicht
In dieser Kurzanleitung erfahren Sie, wie der NWA-3500 (im Beispiel unten mit einem Z
gekennzeichnet) installiert und konfiguriert wird, damit Wireless-Clients sicher auf Ihr
kabelgebundenes Netzwerk zugreifen können. Weitere Informationen finden Sie im
Benutzerhandbuch.
" Halten Sie die Daten für Ihren Internetzugang bereit.
Um das Drahtlosnetzwerk einzurichten, müssen Sie:
1 Die Hardware anschließen.
2 Auf den Web-Konfigurator zugreifen.
3 Den Internetzugriff konfigurieren.
4 Die Hardware installieren.
5 Power-over-Ethernet einrichten (optional).
17
Page 18
DEUTSCH
1 Anschließen der Hardware
1 Verbinden Sie für die Erstkonfiguration den ETHERNET-Anschluss mit einem Ethernet-
Kabel mit dem Computer.
2 Verbinden Sie die 12VDC-Netzanschlussbuchse POWER das Gerät mit dem
mitgelieferten Netzadapter an das Stromnetz an.
" Nachdem Sie die Erstkonfiguration durchgeführt haben, verbinden Sie den
ETHERNET-Anschluss des NWA-3500 mit einem Ethernetanschluss mit
Netzwerkverbindung.
18
Page 19
DEUTSCH
1.1 LED-Anzeigen
Während der NWA-3500 hochfährt, blinkt die WDS/SYS-LED rot. Wenn der NWA-3500
betriebsbereit ist, beginnt die ZyAIR-LED zu leuchten. Bei Datenverkehr blinkt sie.
Eine der ETHERNET-LEDs am RJ-45 ETHERNET-Anschluss beginnt zu leuchten, wenn
der ETHERNET-Anschluss richtig verbunden ist. Bei Datenverkehr blinkt sie. Die grüne
ETHERNET-LED beginnt bei einer Datenübertragung von 10 Mbps zu leuchten. Bei
100 Mbps beginnt die gelbe ETHERNET-LED zu leuchten.
V Wenn die LED-Anzeige ZyAIR nicht leuchtet, prüfen Sie, ob der richtige
Netzadapter verwendet wird und ob der Adapter an eine funktionierende
Steckdose angeschlossen wurde. Trennen Sie den Netzadapter ab und
schließen Sie ihn wieder an. Wenn der Fehler weiterhin besteht, gibt es
möglicherweise ein Problem mit der Hardware. In diesem Fall sollten Sie
sich an den Händler wenden, bei dem Sie das Gerät erworben haben.
Wenn keine der ETHERNET-LEDs leuchtet, prüfen Sie die
Kabelverbindungen am ETHERNET-Anschluss des NWA-3500.
2 Zugreifen auf den Web-Konfigurator
" Verwenden Sie den Internet Explorer 6.0 oder den Netscape Navigator 7.0
und neuere Versionen davon mit aktiviertem JavaScript und aktivierter
Pop-up-Funktion.
19
Page 20
DEUTSCH
2.1 Einrichten der IP-Adresse des Computers
" Notieren Sie sich die aktuellen IP-Einstellungen des Computers, bevor Sie
sie ändern.
Richten Sie den Computer zunächst so ein, dass er eine statische Adresse im Bereich
192.168.1.3 bis 192.168.1.254 mit der Subnetz-Maske 255.255.255.0 verwendet. Nur auf
diese Weise kann Ihr Computer mit dem NWA-3500 kommunizieren. Informationen zum
Einrichten der IP-Adresse des Computers finden Sie im Benutzerhandbuch.
2.2 Anmelden beim Web-Konfigurator
" Auch wenn Sie eine drahtlose Verbindung zum NWA-3500 herstellen
können, wird empfohlen, das Gerät für die Erstkonfiguration über den
ETHERNET-Anschluss an den Computer anzuschließen.
1 Starten Sie Ihren Webbrowser.
Geben Sie als Adresse 192.168.1.2
(die Standard-IP-Adresse des NWA-
3500) ein.
V Wenn Sie nicht auf den Web-Konfigurator zugreifen können, prüfen Sie,
ob die IP-Adressen und Subnetz-Masken des NWA-3500 und des
Computers im selben IP-Adressbereich liegen (siehe Abschnitt 2.1).
2 Klicken Sie auf Login (Anmelden)
(das Standardkennwort 1234 ist
bereits vorgegeben).
20
Page 21
DEUTSCH
3 Ändern Sie das Kennwort, indem Sie
ein neues Kennwort eingeben und
auf Apply (Übernehmen) klicken.
Notieren Sie sich das neue Kennwort
und bewahren Sie die Notiz an
einem sicheren Ort auf.
V Wenn Sie das neue Kennwort vergessen haben, muss der NWA-3500
zurückgesetzt werden. Lesen Sie im Benutzerhandbuch nach, wie die
RESET-Taste verwendet wird.
4 Klicken Sie auf Apply
(Übernehmen), um das werkseitig
eingerichtete Standardzertifikat für
zusätzliche Sicherheit zu ersetzen.
Sie können jedoch auch auf Ignore
(Ignorieren) klicken, um fortzufahren,
wenn Sie das Zertifikat jetzt nicht
ändern möchten.
5 Das Fenster MAIN MENU
(Hauptmenü) erscheint.
21
Page 22

DEUTSCH
3 Konfigurieren des NWA-3500
3.1 Konfigurieren der Systemeinstellungen
1 Klicken Sie in der Navigationsleiste auf SYSTEM (System).
2 Das Fenster SYSTEM > General (System > Allgemein) erscheint.
Der System Name (Systemname) identifiziert den NWA-3500 in Ihrem Netzwerk.
Wählen Sie einen Namen oder belassen Sie diesen als Standard.
Domain Name (Domainname): Geben Sie einen Domainnamen ein, wenn Ihr
Internetdienstanbieter diesen für die Authentifizierung benötigt. Sie können dieses Feld
auch frei lassen oder den Eintrag belassen, der automatisch angezeigt wurde.
DNS Server(s) (DNS-Server): Wenn Ihnen Ihr Internetdienstanbieter bestimmte DNSEinstellungen (Domain Name System) vorgegeben hat, wählen Sie die Option User-
Defined (Benutzerdefiniert), und geben Sie sie hier ein.
22
Page 23
DEUTSCH
3 Klicken Sie auf Apply (Übernehmen).
Konfigurieren der Drahtloseinstellungen
1 Klicken Sie in der
Navigationsleiste auf
WIRELESS (Drahtlos). Das
folgende Fenster erscheint.
" Die Drahtlosstationen und der NWA-3500 müssen für die
Drahtloskommunikation dieselbe SSID, dieselbe Kanal-ID und dieselben
Verschlüsselungseinstellungen verwenden.
WLAN Adaptor (WLAN-Adapter): Wählen Sie die Option WLAN1.
Operating Mode (Betriebsmodus): Wählen Sie als Betriebsmodus die Option Access
Point.
802.11 Mode (802.11-Modus): Wählen Sie den Drahtlosstandard, den Ihr Netzwerk
verwenden soll. Wenn alle Wireless-Clients IEEE 802.11a unterstützten, wählen Sie
802.11a. Anderenfalls wählen Sie 802.11b+g.
Choose Channel ID (Kanal-ID wählen): Wählen Sie den Drahtloskanal, den Ihr Netzwerk
verwenden soll. Damit der NWA-3500 automatisch einen Kanal wählt, klicken Sie auf
Scan (Suchlauf).
SSID Profile (SSID-Profil): Wählen Sie aus dem Listenfeld das SSID-Profil aus, das Sie
für Ihren Netzwerkzugriff konfigurieren möchten. In diesem Beispiel wird das Profil
SSID03 eingerichtet.
2 Klicken Sie auf Apply (Übernehmen), um die Einstellungen zu speichern.
23
Page 24
3 Klicken Sie auf die
Registerkarte SSID. Das
folgende Fenster erscheint.
Wählen Sie bei SSID03 die
Standardeinstellungen.
Die Standard-SSID (der Name
des Netzwerks) ist ZyXEL03,
die Standardeinstellung bei
Security (Sicherheit) ist
Security01 (Sicherheit01).
Layer 2 Isolation (Layer-2-
Isolierung) und MAC Filter sind
standardmäßig auf Disable
(Deaktivieren) eingestellt.
Wenn Sie die Einstellungen des
SSID-Profils ändern möchten,
wählen Sie SSID03, und
klicken Sie auf Edit
(Bearbeiten).
4 Klicken Sie auf die
Registerkarte Security
(Sicherheit). Wählen Sie die
Option Security01, und klicken
Sie auf Edit (Bearbeiten).
DEUTSCH
24
Page 25
5 Hier können Sie die
Sicherheitseinstellungen für
Ihr Drahtlosnetzwerk
eingeben. Je nachdem,
welchen Sicherheitstyp Sie im
Feld Security Mode
(Sicherheitsmodus) wählen,
werden andere Felder
angezeigt. Wählen Sie None
(Keine), wenn Sie keinen
Sicherheitsmodus verwenden
möchten.
In diesem Beispiel wird der
Sicherheitsmodus WPA2-PSK
verwendet. Damit die WirelessClients auf das Netzwerk
zugreifen können, müssen sie
denselben PSK-Schlüssel
verwenden.
Stellen Sie sicher, dass alle
Wireless-Clients den gewählten
Sicherheitstyp unterstützen.
Klicken Sie abschließend auf
Apply (Übernehmen).
6 Klicken Sie in der
Navigationsleiste auf IP.
Wenn Sie eine IP-Adresse
haben, wählen Sie die Option
Use fixed IP address (Feste
IP-Adresse verwenden) und
geben Sie sie zusammen mit
der Subnetz-Maske und der
Gateway-IP-Adresse ein.
Anderenfalls wählen Sie Get
automatically from DHCP
(Automatisch vom DHCP
laden). Klicken Sie auf Apply
(Übernehmen).
DEUTSCH
25
Page 26

DEUTSCH
V Wenn die Wireless-Clients nicht mit dem Netzwerk kommunizieren
können, stellen Sie sicher, dass die Clients und der NWA-3500 dieselben
Sicherheitseinstellungen verwenden.
26
Page 27
DEUTSCH
3.2 Konfigurieren der IP-Einstellungen
1 Wählen Sie die IP-Adresse
des NWA-3500 so, dass sie im
selben Subnetz liegt wie das
Netzwerk. Klicken Sie in der
Navigationsleiste auf IP.
Wenn Sie möchten, dass ein
DHCP-Server des Netzwerks
dem NWA-3500 eine IPAdresse zuweist, wählen Sie
Get automatically from DHCP
(Automatisch vom DHCP
beziehen).
Wenn Sie eine bestimmte IPAdresse haben, wählen Sie die
Option Use fixed IP address
(Feste IP-Adresse verwenden)
und geben Sie sie zusammen
mit der Subnetz-Maske und der
Gateway-IP-Adresse ein.
Klicken Sie auf Apply
(Übernehmen). Der NWA-3500
verwendet nun die neuen IPEinstellungen. Es ist nicht mehr
möglich, mit dem NWA-3500
eine Verbindung mit der
Standard-IP-Adresse
herzustellen.
27
Page 28

DEUTSCH
" Wenn Sie die IP-Adresse des NWA-3500 ändern, müssen Sie beim
nächsten Zugriff auf den Web-Konfigurator die neue IP-Adresse
verwenden. Wenn Sie Get automatically from DHCP (Automatisch vom
DHCP beziehen) wählen, müssen Sie beim DHCP-Server nachsehen,
welche IP-Adresse er dem NWA-3500 zuweist. Weitere Informationen
dazu finden Sie in der Dokumentation des DHCP-Servers.
2 Wenn Sie bei Abschnitt 2.1 die IP-Adresse des Computers geändert haben, werden
die ursprünglichen Einstellungen wiederhergestellt.
3 Ändern Sie die Drahtlosparameter der Drahtlosstationen, damit diese mit denen des
NWA-3500 übereinstimmen. Lesen Sie dazu die Dokumentation des
Drahtlosadapters.
Der NWA-3500 kann jetzt eine Verbindung zu Ihrem Switch oder Router herstellen. Das
können Sie bereits jetzt tun oder wenn Sie die Antennen angebracht und den NWA-3500
installiert haben.
V Wenn der NWA-3500 nicht mit dem Netzwerk kommunizieren kann, stellen
Sie sicher, dass der NWA-3500 eine IP-Adresse verwendet, die sich im
selben Subnetz wie der Switch/Router befindet.
28
Page 29
DEUTSCH
4 Installieren der Hardware
4.1 Anschließen der Antennen
Führen Sie die nachfolgend beschriebenen Schritte aus, um die mitgelieferten Antennen
anzuschließen.
1 Die Antennenanschlüsse befinden sich
an beiden Seiten des NWA-3500.
2 Schrauben Sie die Antennen im
Uhrzeigersinn in die
Antennenanschlüsse. Die Antennen
müssen senkrecht zum Boden und
parallel zueinander stehen.
Stellen Sie sicher, dass die Antennen fest
in die Anschlüsse eingeschraubt sind.
4.2 Aufstellen/Montieren der Hardware
Im allgemeinen ist die Mitte des Bereichs, der für die Drahtlosverbindungen vorgesehen
ist, die günstigste Position für den Access Point. Eine bessere Leistungsfähigkeit kann
erreicht werden, wenn Sie den NWA-3500 in der Höhe montieren und die
Datenübertragung durch keine Hindernisse gestört wird.
Frei stehend
Stellen Sie den NWA-3500 auf eine flache, ebene Unterlage (auf einen Tisch oder in ein
Regal), die den NWA-3500 mit den Anschlusskabeln tragen kann.
An einer Wand montiert
Führen Sie die nachfolgenden Schritte aus, um den NWA-3500 an einer Wand zu
montieren.
1 Verwenden Sie eine Stelle an einer Wand, die sehr hoch liegt und an der die
Datenübertragung nicht durch Hinernisse gestört werden kann.
2 Schrauben Sie zwei Schrauben (nicht mitgeliefert) in einem Abstand von 80 mm in die
Wand. Sie können die Zeichnung am Ende dieses Handbuchs verwenden, damit die
Schraublöcher den richtigen Abstand haben. Verwenden Sie Schrauben mit 6 - 8 mm
breiten Köpfen (0,24 - 0,31"). Schrauben Sie die Schrauben nicht vollständig in die
Wand. Lassen Sie einen kleinen Abstand zwischen Schraubenkopf und Wand. Der
Abstand muss so groß sein, dass Sie den NWA-3500, dessen Schraublöcher sich an
der Rückseite befinden, in den Schraubköpfen einhängen können.
29
Page 30
DEUTSCH
" Stellen Sie sicher, dass die Schrauben fest in der Wand eingeschraubt und
stark genug sind, um das Gewicht des NWA-3500 mit den Anschlusskabeln
zu tragen.
3 Richten Sie die Kabel.
Führen Sie die Anschlusskabel entlang der Rückseite des NWA-3500 (siehe Abbildung).
ODER:
Führen Sie die Anschlusskabel nach oben entlang der Decke.
4 Richten Sie die
Montagelöcher an der
Rückseite des NWA-3500
an den Schrauben in der
Wand aus. Hängen Sie den
NWA-3500 in die
Schrauben ein.
5 Power over Ethernet (PoE)
Power over Ethernet (PoE) ist die Fähigkeit, den NWA-3500 über ein 8-poliges CAT 5
Ethernet-Kabel mit Strom zu versorgen, sodass keine zusätzliche Stromquelle benötigt
wird.
30
Page 31

DEUTSCH
Um das Ethernet-Kabel (A) mit Strom (C) zu versorgen, wird zudem ein Einspeise- oder
PoE-Gerät (B) (nicht im Lieferumfang enthalten) benötigt. Dieses Leistungsmerkmal
erhöht die Flexibilität in der Positionswahl des NWA-3500 (Z).
" Sie können den NWA-3500 über den ETHERNET-Anschluss mit der PoE-
Funktion mit Strom versorgen UND ihn direkt über den Anschluss
POWER 12VDC mit einer Stromquelle verbinden. In diesem Fall müssen
Sie das Kabel erst vom ETHERNET-Anschluss und dann erst vom POWER
12VDC-Anschluss abtrennen. Das führt dazu, dass der NWA-3500 neu
gestartet wird.
6 Schritte zum Ansehen von Produktzertifizierung(en)
1 Besuchen Sie www.zyxel.com.
2 Wählen Sie auf der ZyXEL-Homepage aus der Liste der Produkte Ihr Produkt aus.
3 Wählen Sie auf dieser die Zertifizierung aus, die Sie gerne angezeigt haben möchten.
31
Page 32

DEUTSCH
32
Page 33

ESPAÑOL
ESPAÑOL
Vista previa
Esta Guía de instalación rápida le muestra cómo instalar y configurar el NWA-3500
(marcado como Z en el ejemplo de abajo) para permitir a los clientes inalámbricos acceder
de forma segura a su red inalámbrica. Vea su Guía del usuario para más información.
" Puede que necesite su acceso a Internet para más información.
Para configurar su red inalámbrica necesitará:
1 Conectar el hardware.
2 Acceder al configurador Web.
3 Configurar el acceso a Internet.
4 Instalar el Hardware.
5 Configurar Power over Ethernet (opcional).
33
Page 34

ESPAÑOL
1 Conectar el hardware
1 Con un cable Ethernet, conecte el puerto ETHERNET a un ordenador para la
configuración inicial.
2 Conecte el zócalo POWER 12VDC a una toma de corriente utilizando únicamente el
adaptador de corriente incluido.
" Conecte el puerto ETHERNET del NWA-3500 a una clavija Ethernet con
acceso a la red tras haber completado la configuración inicial.
1.1 LEDs
El LED WDS/SYS parpadea en rojo mientras el NWA-3500 está arrancando. Cuando el
NWA-3500 está listo, el LED ZyAIR se enciende y parpadea cuando hay tráfico.
34
Page 35

ESPAÑOL
Uno de los LEDs ETHERNET del puerto RJ-45 ETHERNET se enciende si el puerto
ETHERNET está correctamente conectado y parpadea cuando hay tráfico. El LED verde
ETHERNET se enciende si la conexión es a 10Mbps y el LED amarillo ETHERNET se
enciende si la conexión es a 100Mbps.
V Si el LED ZyAIR no se enciende, asegúrese de utilizar el adaptador de
corriente correcto y de que el adaptador de corriente esté enchufado en
una toma de corriente apropiada. Desenchufe el adaptador de corriente y
vuelva a enchufarlo. Si el error persiste, puede que tenga un problema de
hardware. En este caso, debería contactar con el vendedor.
Si ningún LED ETHERNET se enciende, compruebe la conexión del cable
al puerto NWA-3500 ETHERNET.
2 Acceder al Configurador Web
" Utilice Internet Explorer 6.0 o superior o Netscape Navigator 7.0 o una
versión superior con JavaScript activado y el bloqueo de anuncios
desactivado.
2.1 Configurar la dirección IP de su ordenador
" Apunte la configuración IP actual de su ordenador antes de cambiarla.
Primero, ajuste su ordenador para utilizar una dirección IP estática dentro del rango
192.168.1.3 - 192.168.1.254 con una máscara de subred 255.255.255.0. Esto asegura
que su ordenador pueda comunicarse con su NWA-3500. Consulte su Guía del usuario
para información sobre la configuración de la dirección IP de su ordenador.
35
Page 36

ESPAÑOL
2.2 Acceda al Configurador Web
" Aunque puede conectarse al NWA-3500 de forma inalámbrica, se
recomienda que conecte su ordenador al puerto ETHERNET para la
configuración inicial.
1 Abra su explorador de web. Escriba
192.168.1.1 (la dirección IP
predeterminada del NWA-3500)
como dirección.
V Si no puede acceder al configurador Web, compruebe que las direcciones
IP y máscaras de subred del NWA-3500 y del ordenador estén en el
mismo rango de dirección IP (ver Sección 2.1).
2 Haga clic en Login (Acceso) (la
contraseña predeterminada 1234 ya
está introducida).
3 Cambie la contraseña de acceso
introduciendo una nueva contraseña
y haciendo clic en Apply (Aplicar).
Asegúrese de grabar la nueva
contraseña y guardarla en un lugar
seguro.
36
Page 37

ESPAÑOL
V Si cambia la contraseña y la olvida, necesitará reiniciar el NWA-3500.
Consulte la Guía del usuario para cómo utilizar el botón RESET.
4 Haga clic en Apply (Aplicar) para
cambiar el certificado
predeterminado de fábrica para
mayor seguridad; por otro lado, haga
clic en Ignore (Ignorar) para
proceder si no desea cambiar el
certificado en este momento.
5 Aparecerá la pantalla MAIN MENU
(MENÚ PRINCIPAL).
37
Page 38

ESPAÑOL
3 Configure el NWA-3500
3.1 Ajustar la configuración del sistema
1 Haga clic en SYSTEM (SISTEMA) en el panel de navegación.
2 Aparecerá la pantalla SYSTEM > General.
System Name (Nombre del sistema) es para identificar el NWA-3500 en su red. Elija
un nombre identificativo o deje el predeterminado.
Domain Name (Nombre de dominio): Escriba un nombre de dominio si su ISP requiere
uno para la autenticación. O bien puede dejarlo en blanco o ajustar lo que haya aparecido
automáticamente.
DNS Server(s) (Servidor(es) DNS): Si su ISP le ha facilitado una configuración DNS
(Domain Name System) específica, seleccione User-Defined (Definido por el usuario) y
escríbala aquí.
38
Page 39

ESPAÑOL
3 Haga clic en Apply (Aplicar).
Ajustar la configuración inalámbrica
1 Haga clic en WIRELESS
(INALÁMBRICO) en el panel
de navegación. Aparecerá la
siguiente pantalla.
" Las estaciones inalámbricas y el NWA-3500 deben utilizar la misma
configuración SSID, ID de canal y cifrado para la comunicación
inalámbrica.
WLAN Adaptor
Operating Mode (Modo de operación): Asegúrese de haber seleccionado el modo
Access Point (Punto de acceso).
802.11 Mode (Modo 802.11): Seleccione el estándar inalámbrico que desee que utilice
su red. Si todos los clientes inalámbricos soportan IEEE 802.11a, seleccione 802.11a. De
lo contrario, seleccione 802.11b+g.
Choose Channel ID (Elegir ID de canal): Seleccione el canal inalámbrico que desee que
su red utilice. Para que el NWA-3500 seleccione automáticamente un canal, haga clic en
Scan (Escanear).
SSID Profile (Perfil SSID): Seleccione el perfil SSID que desee configurar para el acceso
a la red en la lista desplegable. Este ejemplo utiliza el perfil SSID03.
2 Haga clic en Apply (Aplicar) para guardar su configuración.
(Adaptador WLAN): Asegúrese de que WLAN1 esté seleccionado.
39
Page 40

3 Haga clic en la ficha SSID.
Aparecerá la siguiente
pantalla.
Asegúrese de que la
configuración de SSID03 tenga
sus valores predeterminados.
El SSID (nombre de la red)
predeterminado es ZyXEL03,
su configuración de Security
(Seguridad) predeterminada es
Security01. Layer 2 Isolation
(Aislamiento de capa 2) y MAC
Filter (Filtro MAC) están
ajustados a Disable
(Desactivado) por defecto.
Si desea cambiar la
configuración del perfil SSID,
seleccione SSID03 y haga clic
en Editar.
4 Haga clic en la ficha Security
(Seguridad). Asegúrese de
que Security01 esté
seleccionado y haga clic en
Edit (Editar).
ESPAÑOL
40
Page 41

ESPAÑOL
5 Aquí es donde puede
introducir la configuración de
seguridad para su red
inalámbrica. Los campos que
rellene se diferencian según el
tipo de seguridad que
seleccione en el campo
Security Mode (Modo de
seguridad). Seleccione None
(Ninguno) si no desea utilizar la
seguridad inalámbrica.
Este ejemplo utiliza seguridad
WPA2-PSK, en la que todos los
clientes inalámbricos deben
utilizar la misma clave precompartida para unirse a la red.
Asegúrese de que todos los
clientes inalámbricos soporten
el tipo de seguridad ajustado.
Haga clic en Apply (Aplicar)
cuando haya finalizado.
V Si los clientes inalámbricos no pueden comunicarse con la red, asegúrese
de que los clientes y el NWA-3500 utilicen la misma configuración de
seguridad inalámbrica.
41
Page 42

Ajustar la configuración IP
1 Necesita configurar la
dirección IP de su NWA-3500
para que estén en la misma
subred que su red. Haga clic
en IP en el panel de
navegación.
Seleccione Get automatically
from DHCP (Obtener
automáticamente de DHCP) si
desea que un servidor DHCP
de su red asigne una dirección
IP al NWA-3500.
Si tiene una dirección IP
específica para usar, seleccione
Use fixed IP address (Utilizar
dirección IP fija) e introdúzcala
junto con su máscara de subred
y puerta de enlace IP.
Haga clic en Apply (Aplicar). El
NWA-3500 ahora utiliza la
nueva configuración IP; no
puede conectarse más al NWA3500 utilizando la dirección IP
predeterminada.
ESPAÑOL
" Si cambia la dirección IP de su NWA-3500, deberá utilizar la nueva
dirección IP la próxima vez que acceda al configurador Web. Si
selecciona Get automatically from DHCP (Obtener automáticamente de
DHCP) compruebe que su servidor DHCP determina la dirección IP que
asigna al NWA-3500. Consulte la documentación de su servidor DHCP
para más información.
2 Si ha cambiado la dirección IP de su ordenador en Sección 2.1, devuélvale su
configuración predeterminada.
3 Cambie la configuración inalámbrica en las estaciones inalámbricas para que
coincida con la del NWA-3500. Consulte la documentación de su adaptador
inalámbrico.
42
Page 43

ESPAÑOL
El NWA-3500 ya está listo para conectarse a su switch o router. Puede hacerlo ahora o
una vez colocadas las antenas y montado el NWA-3500.
V Si el NWA-3500 no puede comunicarse con la red, compruebe que el
NWA-3500 utiliza una dirección IP en la misma subred que el switch /
router.
4 Instalar el Hardware
4.1 Conectar las antenas
Siga estos pasos para conectar las antenas incluidas.
1 Localice los conectores de la antena en
los laterales de su NWA-3500.
2 Atornille las antenas en sentido horario
en los conectores para antenas. Las
antenas deberían estar perpendiculares
al suelo y paralelas entre ellas.
Asegúrese de que las antenas estén
bien atornilladas en los conectores
para antena.
4.2 Instalación del montaje para hardware
En general, la mejor ubicación para el punto de acceso es en el centro del área de
cobertura. Para un mejor rendimiento, monte el NWA-3500 hacia arriba sin obstrucciones.
Libre y de pie
Coloque su NWA-3500 en una superficie plana, nivelada (en una mesa o estante) lo
suficientemente fuerte como para soportar el peso del NWA-3500 con sus cables de
conexión.
Montaje en pared
Siga estos pasos para montar su NWA-3500 en una pared.
1 Localice una posición alta en la pared libre de obstáculos.
43
Page 44

ESPAÑOL
2 Conecte dos tornillos (no incluidos) en la pared separados por 80mm. Puede usar el
diagrama al final de esta guía para ayudarle a marcar los agujeros de los tornillos
correctamente. Use los tornillos con cabezas de 6mm a 8mm (0.24" a 0.31") de ancho.
No inserte los tornillos hasta el fondo en la pared. Deje un pequeño espacio entre la
cabeza del tornillo y la pared. El hueco debe ser lo suficientemente grande para que
las cabezas de los tornillos puedan entrar en las ranuras de los tornillos y los cables de
conexión quepan a través de la parte posterior del NWA-3500.
" Compruebe que los tornillos estén bien fijos en la pared y sean lo
suficientemente fuertes como para soportar el peso del
cables de conexión.
3 Ajuste los cables.
Pase los cables de conexión por la parte posterior del NWA-3500 hacia abajo como
aparece en la siguiente figura.
O:
Pase los cables de conexión por la parte posterior hacia arriba o por el borde del techo.
NWA-3500 con los
4 Alinee los agujeros en la
parte posterior del NWA3500 con los tornillos en la
pared. Cuelgue el NWA3500 con los tornillos.
44
Page 45

ESPAÑOL
5 Corriente sobre Ethernet (PoE)
La Corriente sobre Ethernet (PoE) es la capacidad de suministrar alimentación a su NWA3500 a través de un cable Ethernet CAT 5 de 8 contactos, eliminando la necesidad de una
toma de corriente cercana.
También necesitará un dispositivo inyector o PoE (B) (no incluido) para suministrar
corriente (C) al cable Ethernet (A). Esta característica permite una mayor flexibilidad para
la ubicación de su NWA-3500 (Z).
" Puede conectar el NWA-3500 a PoE a través del puerto ETHERNET Y a
una fuente de alimentación a través del puerto POWER 12VDC. Si lo hace,
no desconecte el puerto ETHERNET antes de desconectar el puerto
POWER 12VDC. Esto provoca que el NWA-3500 se reinicie.
6 Procedimiento para ver la(s) certificación(es) del
producto
1 Vaya a www.zyxel.com.
2 Seleccione su producto de la lista desplegable en la página inicial de ZyXEL para ir a la
página de ese producto.
3 Seleccione la certificación que desee visualizar en esta página.
45
Page 46

ESPAÑOL
46
Page 47

FRANÇAIS
FRANÇAIS
Présentation
Ce guide de mise en route rapide indique comment installer et configurer le NWA-3500
(marqué d'un Z dans l'exemple ci-dessous) pour permettre aux clients sans fil d’accéder
en toute sécurité à votre réseau câblé. Consultez votre Guide de l'utilisateur pour plus
d'informations.
" Vous aurez peut-être besoin de vos informations d'accès à Internet.
Pour installer votre réseau sans fil, vous devez :
1 Connecter le matériel.
2 Accédez au configurateur Web.
3 Configurer l'accès à Internet.
4 Installer le matériel.
5 Installer l’alimentation électrique par câble Ethernet (PoE) (facultative).
47
Page 48

FRANÇAIS
1 Connecter le matériel
1 Utilisez un câble Ethernet, connectez le port ETHERNET à un ordinateur pour effectuer
la configuration initiale.
2 Connectez la prise d’POWER 12VDC à une source de courant en utilisant uniquement
l’adaptateur d’alimentation fourni.
" Connectez le port ETHERNET du NWA-3500 à une prise Ethernet avec
accès au réseau après avoir terminé la configuration initiale.
1.1 LED
La LED WDS/SYS clignote en rouge lors du redémarrage du NWA-3500. Quand le NWA3500 est prêt, la LED ZyAIR s'allume et clignote lors de trafic.
48
Page 49

FRANÇAIS
Une des LED ETHERNET du port RJ-45 ETHERNET s'allume si le port ETHERNET est
correctement connecté et clignote lors du trafic. La LED ETHERNET verte s'allume si la
connexion est à 10Mbps, et la LED ETHERNET jaune s'allume si la connexion est à
100Mbps.
V Si la LED ZyAIR ne s'allume pas, vérifiez que vous utilisez l’adaptateur
d’alimentation correct et que l’adaptateur d’alimentation est branché dans
une prise de courant appropriée. Débranchez l’adaptateur d’alimentation et
rebranchez-le. Si l'erreur persiste, il est possible que vous ayez un
problème matériel. Dans ce cas, vous devez contacter votre vendeur.
Si aucune LED ETHERNET ne s'allume, vérifiez la connexion du câble au
port ETHERNET du NWA-3500.
2 Accéder au configurateur Web.
" Utilisez Internet Explorer 6.0 et plus récent ou Netscape Navigator 7.0 et
des versions plus récentes avec JavaScript activé et le bloqueur de
fenêtres publicitaires intempestives désactivé.
2.1 Paramétrez l'adresse IP de votre ordinateur
" Notez les paramètres IP actuels de votre ordinateur avant de les modifier.
Paramétrez d'abord votre ordinateur pour qu'il utilise une adresse IP statique dans la
plage 192.168.1.3 à 192.168.1.254 avec un masque de sous-réseau de 255.255.255.0.
Cela permet d'assurer que votre ordinateur peut communiquer avec votre NWA-3500.
Consultez votre guide de l'utilisateur pour les informations sur le paramétrage de l'adresse
IP de votre ordinateur.
49
Page 50

FRANÇAIS
2.2 Ouvrez une session dans le configurateur Web
" Même si vous pouvez vous connecter au NWA-3500 sans fil, il est
recommandé de connecter votre ordinateur au port ETHERNET pour la
configuration initiale.
1 Lancez votre navigateur web. Entrez
192.168.1.2 (l'adresse IP par défaut
du NWA-3500) comme adresse.
V Si vous ne pouvez pas accéder au Configurateur Web, vérifiez que les
adresses IP et les masques de sous-réseau du NWA-3500 et de
l’ordinateur sont dans la même plage d’adresse IP (voir la Section 2.1).
2 Cliquez sur Login (Ouvrir une
session) (le mot de passe par défaut
1234 est déjà entré).
3 Changez le mot de passe
d'ouverture de session en entrant un
nouveau mot de passe et cliquez sur
Apply (Appliquer). Prenez soin
d'enregistrer le nouveau mot de
passe et conservez-le dans un
endroit sûr.
50
Page 51

FRANÇAIS
V Si vous changez le mot de passe et que vous l'oubliez, vous devrez
réinitialiser le NWA-3500. Reportez-vous au Guide de l’utilisateur pour la
manière d’utiliser le bouton RÉINITIALISER.
4 Cliquez sur Apply (Appliquer) pour
remplacer le certificat d'usine par
défaut pour renforcer la sécurité ;
vous pouvez aussi cliquer sur Ignore
(Ignorer) pour continuer si vous ne
voulez pas changer le certificat
maintenant.
5 L’écran MAIN MENU (MENU
PRINCIPAL) apparaît.
51
Page 52

FRANÇAIS
3 Configurer le NWA-3500
3.1 Configurer les paramètres du système
1 Cliquez sur System (SYSTÈME) dans le panneau de navigation.
2 L'écran System (SYSTÈME) >General (Général) apparaît.
System Name (Nom du système) sert à identifier le NWA-3500 sur votre réseau.
Choisissez un nom distinctif, ou laissez celui-ci à sa valeur par défaut.
Domain Name (Nom de domaine) : Entrez un nom de domaine si votre FAI en demande
un pour authentification. Autrement vous pouvez le laisser vide ou sur ce qui pourrait être
affiché automatiquement.
DNS Server(s) (Serveur(s) DNS) : Si votre FAI vous a attribué des paramètres DNS
(Domain Name System) spécifiques, sélectionnez User-Defined (Personnalisé) et
entrez-les ici.
52
Page 53

FRANÇAIS
3 Cliquez sur Apply (Appliquer).
Configurer les paramètres sans fil
1 Cliquez sur WIRELESS
(SANS FIL) dans le panneau
de navigation. L’écran suivant
apparaît.
" Les stations sans fil et le NWA-3500 doivent utiliser le même SSID, ID de
canal et paramètres de cryptage pour la communication sans fil.
WLAN Adaptor (Adaptateur WLAN) : Vérifiez que WLAN1 est sélectionné.
Operating Mode (Mode de fonctionnement) : Vérifiez que Access Point (le mode
Point d'accès) est sélectionné.
802.11 Mode (Mode 802.11) : Sélectionnez le standard sans fil à utiliser par votre
réseau. Si tous les clients sans fil prennent en charge IEEE 802.11a, sélectionnez
802.11a. Autrement, sélectionnez 802.11b+g.
Choose Channel ID (Choisissez l'ID du canal) : Sélectionnez le canal sans fil à utiliser
par votre réseau. Pour que le NWA-3500 sélectionne automatiquement un canal, cliquez
sur Scan (Balayer) à la place.
SSID Profile (Profil SSID) : Sélectionnez le profil SSID que vous voulez configurer pour
l'accès au réseau dans la liste déroulante. Cet exemple utilise le profil SSID03.
2 Cliquez sur Apply (Appliquer) pour enregistrer vos paramètres.
53
Page 54

3 Cliquez sur l'onglet SSID.
L’écran suivant apparaît.
Le SSID03 (le nom du réseau)
par défaut le SSID03 est
ZyXEL03 et son paramètre de
Security (Sécurité) par défaut
est Security01 (Security01).
Si les paramètres sont différent,
ou si vous voulez changer le
SSID, sélectionnez SSID03 et
cliquez sur Edit (Editer) pour
changer les paramètres.
4 Cliquez sur l’onglet Security
(Sécurité). Vérifiez que
Security01 est sélectionné et
cliquez sur Edit (Editer).
FRANÇAIS
54
Page 55

5 C'est l'endroit où vous pouvez
enter les paramètres de
sécurité pour votre réseau
sans fil. Les champs que vous
avez remplis diffèrent en
fonction des types de sécurité
que vous sélectionnez dans le
champ Security Mode (Mode
Sécurité). Sélectionnez None
(Aucun) si vous ne voulez pas
utiliser la sécurité sans fil.
Cet exemple utilise la sécurité
WPA2-PSK, dans lequel tous
les clients sans fil doivent
utiliser la même clé prépartagée
pour accéder au réseau.
Vérifiez que tous les clients
sans fil prennent en charge le
type de sécurité que vous avez
définie. Cliquez sur Apply
(Appliquer) quand vous avez
terminé.
FRANÇAIS
V Si les clients sans fil ne peuvent pas communiquer avec le réseau, vérifiez
que les clients et le NWA-3500 utilisent les mêmes paramètres de
sécurité sans fil.
55
Page 56

FRANÇAIS
3.2 Configurer les paramètres IP
1 Vous devez paramétrer
l'adresse IP de votre NWA3500 afin qu'elle se trouve
dans le même masque de
sous-réseau que votre réseau.
Cliquez sur IP dans le
panneau de navigation.
Sélectionnez Get
automatically from DHCP
(Obtenir automatiquement à
partir de DHCP) si vous voulez
qu'un serveur DHCP sur votre
réseau attribue une adresse IP
au NWA-3500.
Si vous avez une adresse IP
spécifique à utiliser,
sélectionnez Use fixed IP
address (Utiliser une adresse
IP fixe) et entrez-la avec le
masque de sous-réseau et
l’adresse IP de passerelle.
Cliquez sur Apply (Appliquer).
Le NWA-3500 utilise
maintenant les nouveaux
paramètres d'IP; vous ne
pouvez plus vous connecter au
NWA-3500 en utilisant l'adresse
IP par défaut.
56
Page 57

FRANÇAIS
" Si vous changez l’adresse IP du NWA-3500, vous devrez utiliser la
nouvelle adresse IP la prochaine fois que vous accéderez au
configurateur web. Si vous sélectionnez Get automatically from DHCP
(Obtenir automatiquement à partir de DHCP), consultez votre serveur
DHCP pour déterminer l'adresse IP qu'il a attribuée au NWA-3500.
Consultez la documentation de votre serveur DHCP pour plus
d'informations.
2 Si vous avez modifié l'adresse IP de votre ordinateur dans la Section 2.1, rétablissez-
la à sa valeur précédente.
3 Changez les paramètres sans fil dans les stations sans fil pour qu’ils correspondent à
ceux du NWA-3500. Consultez la documentation de votre adaptateur sans fil.
Le NWA-3500 est maintenant prêt à se connecter à votre commutateur ou routeur. Vous
pouvez le faire dès maintenant, ou une fois que vous aurez installé les antennes et monté
le NWA-3500.
V Si le NWA-3500 ne peut pas communiquer avec le réseau, vérifiez que le
NWA-3500 utilise une adresse IP se trouvant sur le même sous-réseau que
le commutateur / routeur.
57
Page 58

FRANÇAIS
4 Installer le matériel
4.1 Connecter les antennes
1 Localisez les connecteurs des antennes
sur les côtés de votre NWA-3500.
2 Vissez les antennes dans le sens des
aiguilles d’une montre sur les
connecteurs de l’antenne. Les antennes
doivent être perpendiculaires au sol et
parallèles entre elles.
Vérifiez que les antennes sont
correctement vissées sur les
connecteurs d’antenne.
4.2 Installation de montage matériel
En général, le meilleur emplacement pour le point d’accès est au centre de votre zone de
couverture sans fil. Pour obtenir de meilleures performances, montez le NWA-3500 sur un
point élevé et sans obstructions.
Auto-stable
Placez votre NWA-3500 sur une surface plane, de niveau (sur un bureau ou une étagère)
assez solide pour supporter le poids du NWA-3500 avec les câbles de connexion.
Montage mural
Suivez les étapes suivantes pour fixer votre NWA-3500 à un mur.
1 Repérez une position élevée sur le mur ne comportant pas d’obstructions.
2 Connectez deux vis (non fournies) dans le mur à 80mm l’une de l’autre. Vous pouvez
utiliser le schéma à la fin de ce guide pour vous aider à marquer correctement les trous
de vis. Utilisez des vis de 6mm ~ 8mm (0,24" ~ 0,31") à grande tête. Ne vissez pas les
vis sur toute leur longueur dans le mur. Laissez un petit espace entre la tête de la vis et
le mur. L’espace doit être assez grand pour permettre aux têtes de vis de glissez dans
les logements de vis et faire passer les câbles de connexion vers le bas au dos du
NWA-3500.
" Vérifiez que les vis sont correctement fixées au mur et assez solides pour
supporter le poids du NWA-3500 avec les câbles de connexion.
3 Ajustez les câbles.
58
Page 59

FRANÇAIS
Faites passer les câbles de connexion derrière le dos du NWA-3500 comme indiqué sur
l’image suivante.
OU :
Faites passer les câbles de connexion vers le haut et le long du bord du plafond.
4 Alignez les trous au dos du
NWA-3500 avec les vis sur
le mur. Suspendez le
NWA-3500 aux vis.
5 PoE (Alimentation électrique par câble Ethernet)
PoE (Power over Ethernet) est la possibilité de fournir l’alimentation à votre NWA-3500 via
un câble Ethernet CAT 5 8 broches, éliminant la nécessité d’une prise courant proche.
Un injecteur ou matériel PoE (B) (non fourni) est aussi requis pour alimenter (C) le câble
Ethernet (A). Cette fonctionnalité augmente aussi la flexibilité dans l’emplacement de votre
NWA-3500 (Z).
59
Page 60

FRANÇAIS
" Vous pouvez connecter le NWA-3500 à PoE via le port ETHERNET ET à
une source d'alimentation via le port POWER 12VDC. Dans ce cas, ne
déconnectez pas le port ETHERNET avant de déconnecter le port POWER
12VDC. Cela entraîne le redémarrage du NWA-3500.
6 Procédure pour afficher la (les) certification(s) d'un
produit
1 Allez à www.zyxel.com.
2 Sélectionnez votre produit sur la liste du menu déroulant de la page d'accueil de ZyXEL
pour accéder à la page de ce produit.
3 Sélectionnez la certification que vous désirez consulter dans cette page.
60
Page 61

ITALIANO
ITALIANO
Cenni generali
La presente guida introduttiva fornisce informazioni sull'impostazione e la configurazione
di NWA-3500 (contrassegnato Z nell'esempio sotto) per consentire ai clienti wireless di
accedere in modo sicuro alla rete cablata. Consultare la propria Guida utente per ulteriori
informazioni.
" È possibile che occorra reperire le informazioni sul proprio accesso a
Internet.
Per configurare la rete wireless è necessario:
1 Collegare l'hardware.
2 Accedere allo strumento di configurazione Web.
3 Configurare l'accesso a Internet.
4 Installare l'hardware.
5 Configurazione di Power over Ethernet (opzionale).
61
Page 62

ITALIANO
1 Collegamento dell'hardware
1 Per mezzo di un cavo Ethernet, collegare la porta ETHERNET ad un computer per la
configurazione iniziale.
2 Collegare la porta POWER 12VDC a una sorgente di alimentazione utilizzando
esclusivamente l'alimentatore fornito in dotazione.
" Collegare la porta ETHERNET di NWA-3500 a un jack Ethernet con
accesso alla rete dopo aver completato la configurazione iniziale.
1.1 LED
Il LED WDS/SYS lampeggia di colore rosso mentre NWA-3500 si sta accendendo. Quando
NWA-3500 è pronto, il LED ZyAIR si accende e lampeggia quando c'è traffico.
62
Page 63

ITALIANO
Uno dei LED ETHERNET sulla porta ETHERNET RJ-45 si accende se la porta ETHERNET
è correttamente collegata, lampeggiando quando c'è traffico dati. Il LED ETHERNET verde
si accende se il collegamento è a 10 Mbps, mentre il LED ETHERNET giallo si accende se
il collegamento è a 100 Mbps.
V Se il LED ZyAIR non si accende, assicurarsi di utilizzare l’alimentatore
corretto e che l’alimentatore sia collegato ad una presa di corrente attiva.
Scollegare l’alimentatore e ricollegarlo. Se l'errore persiste, è possibile che
vi sia un problema hardware. In questo caso, è opportuno contattare il
rivenditore.
Se nessuno dei LED ETHERNET si accende, controllare il collegamento
dei cavi alla porta ETHERNET del NWA-3500.
2 Accedere allo strumento di configurazione Web
" Utilizzare Internet Explorer 6.0 o versione successiva oppure Netscape
Navigator 7.0 o versione successiva con JavaScript abilitato e bloccaggio
dei pop-up disabilitato.
2.1 Impostare l'indirizzo IP del computer
" Annotare le impostazioni IP correnti del computer prima di cambiarle.
Configurare dapprima il computer a utilizzare un indirizzo IP statico nell'intervallo
192.168.1.3 - 192.168.1.254 con una subnet mask uguale a 255.255.255.0. In questo
modo si garantisce che il computer possa comunicare con NWA-3500. Vedere la Guida
dell'utente per informazioni sulla configurazione delle impostazioni IP del computer.
63
Page 64

ITALIANO
2.2 Eseguire il login nello strumento di configurazione Web
" sebbene sia possibile eseguire il collegamento a NWA-3500 in modalità
wireless, si consiglia di collegare il computer alla porta ETHERNET per la
configurazione iniziale.
1 Avviare il browser. Immettere
192.168.1.2 (l'indirizzo IP predefinito
di NWA-3500) nella barra
dell'indirizzo.
V Se non è possibile accedere allo strumento di configurazione Web,
verificare che gli indirizzi IP e le subnet mask di NWA-3500 e del
computer siano nel medesimo intervallo di indirizzi IP (vedere Sezione
2.1).
2 Fare clic su Login (Login) (la
password predefinita 1234 è già
immessa).
3 Cambiare la password di accesso
immettendo una nuova password e
facendo clic su Appy (applica).
Registrare la nuova password e
conservarla in un luogo sicuro.
64
Page 65

ITALIANO
V Se la password viene cambiata e la si dimentica, sarà necessario
resettare NWA-3500. Fare riferimento alla Guida utente per informazioni
sull’uso del pulsante RESET.
4 Fare clic su Apply (applica) per
sostituire il certificato predefinito di
fabbrica per una maggiore
sicurezza. In alternativa fare clic su
Ignore (ignora) per procedere se
non si desidera cambiare ora il
certificato.
5 Appare la schermata del MAIN
MENU (MENU PRINCIPALE).
2.3 Log Into the Web Configurator
" Even though you can connect to the NWA-3500 wirelessly, it is
recommended that you connect your computer to the ETHERNET port for
initial configuration.
1 Launch your web browser. Enter
192.168.1.2 (the NWA-3500’s
default IP address) as the address.
65
Page 66

ITALIANO
V If you cannot access the Web configurator, make sure the IP addresses
and subnet masks of the NWA-3500 and the computer are in the same IP
address range (see Sezione 2.1).
2 Click Login (the default password
1234 is already entered).
3 Change the login password by
entering a new password and
clicking Apply. Be sure to record the
new password and keep it in a safe
place.
V If you change the password and then forget it, you will need to reset the
NWA-3500. Refer to the User’s Guide for how to use the RESET button.
66
Page 67

4 Click Apply to replace the factory
default certificate for added security;
alternatively click Ignore to proceed
if you do not want to change the
certificate now.
5 The MAIN MENU screen appears.
ITALIANO
67
Page 68

ITALIANO
3 Configurare NWA-3500
3.1 Configura le impostazioni del sistema
1 Fare clic su SYSTEM (SISTEMA) nel pannello di navigazione.
2 Appare la schermata SYSTEM (SISTEMA) > Genera (Generale).
System Name (nome sistema) consente di identificare NWA-3500 sulla rete.
Scegliere un nome distintivo o lasciare quello predefinito.
Domain Name (Nome dominio): immettere un nome di dominio se il proprio ISP ne
richiede uno per l'autenticazione. In caso contrario è possibile lasciare il campo vuoto o
lasciare l’impostazione predefinita.
DNS Server(s) (Server DNS): se l'ISP fornisce impostazioni DNS (Domain Name
System) specifiche, scegliere User-Defined (definite dall'utente) ed immettere qui tali
impostazioni.
68
Page 69

ITALIANO
3 Fare clic su Apply (Applica).
Configura impostazioni Wireless
1 Fare clic su WIRELESS
(WIRELESS) nel pannello di
navigazione. Appaiono le
schermate seguenti.
" Le stazioni wireless e NWA-3500 devono utilizzare lo stesso SSID, ID di
canale e impostazione di crittografia per consentire la comunicazione
wireless.
WLAN Adaptor (adattatore WLAN): Assicurarsi che sia selezionato WLAN1.
Operating Mode (Modalità operative): verificare che sia selezionata la modalità Access
Point.
802.11 Mode (Modalità 802.11): selezionare lo standard wireless che si desidera
utilizzare per la rete. Se tutti i client wireless supportano IEEE 802.11a, selezionare
802.11a. In caso contrario, selezionare 802.11b+g.
Choose Channel ID (Scegli ID canale): scegliere il canale wireless che si desidera
utilizzare per la rete. Per consentire a NWA-3500 si selezionare automaticamente un
canale, fare clic su Scan (Cerca).
SSID Profile (Profilo SSID): selezionare dall'elenco a discesa il profilo SSID che si
desidera configurare per l'accesso alla rete. In questo esempio è utilizzato il profilo
SSID03.
2 Fare clic su Apply (Applica) per salvare le impostazioni.
69
Page 70

3 Selezionare la scheda SSID.
Appaiono le schermate
seguenti.
Verificare che le impostazioni
per SSID03 siano ai rispettivi
valori predefiniti.
Il SSID (il nome della rete)
predefinito è ZyXEL03,
l'impostazioni Security
(sicurezza) predefinita è
Security01. Layer 2 Isolation
(isolamento Livello 2) e MAC
Filter (filtro MAC) sono
impostati su Disable
(disabilitato) per impostazione
predefinita.
Per cambiare le impostazioni
del profilo SSID, scegliere
SSID03 e fare clic su Edit
(modifica)
4 Fare clic sulla scheda Security
(Sicurezza). Verificare che sia
selezionata l'impostazione
Security01 e fare clic su Edit
(Modifica).
ITALIANO
70
Page 71

ITALIANO
5 In questo campo è possibile
immettere le impostazioni di
sicurezza della rete wireless. I
campi compilati variano a
seconda del tipo di sicurezza
selezionata nel campo
Security Mode (Modalità di
sicurezza). Selezionare None
(Nessuno) se non si desidera
utilizzare la sicurezza wireless.
Questo esempio utilizza la
sicurezza WPA2-PSK, nella
quale tutti i clienti wireless
devono utilizzare la stessa
chiave pre-shared per unirsi alla
rete.
Verificare che tutti i client
wireless supportino il tipo di
sicurezza impostata. Fare clic
su Apply (Applica) una volta
terminato.
V Se i client wireless non possono comunicare con la rete, verificare che i
client e NWA-3500 utilizzino le stesse impostazioni di sicurezza wireless.
71
Page 72

3.2 Configura impostazioni IP
1 È necessario impostare
l'indirizzo IP di NWA-3500 per
essere nella stessa subnet
della rete. Fare clic su IP nel
pannello di navigazione.
Selezionare Get automatically
from DHCP (ottieni
automaticamente da DHCP) per
consentire a un server DHCP
presente in rete di assegnare un
indirizzo IP a NWA-3500.
Se si dispone di un indirizzo IP
specifico da utilizzare,
selezionare Use fixed IP
address (utilizza indirizzo IP
fisso) e specificarlo unitamente
al subnet mask e all’indirizzo IP
gateway.
Fare clic su Apply (applica)
NWA-3500 ora utilizza le nuove
impostazioni IP. Non sarà più
possibile connettersi a NWA3500 utilizzando l'indirizzo IP
predefinito.
ITALIANO
" Se si cambia l'indirizzo IP di NWA-3500, è necessario utilizzare il nuovo
indirizzo IP quando si desidera accedere allo strumento di configurazione
Web. Selezionando Get automatically from DHCP (ottieni
automaticamente da DHCP), controllare il server DHCP per determinare
l'indirizzo IP assegnato a NWA-3500. Per ulteriori informazioni vedere la
documentazione del server DHCP.
2 Se si cambia l'indirizzo IP del computer in Sezione 2.1, tornare alla sua impostazione
precedente.
3 Modificare i parametri wireless nelle stazioni wireless per farle corrispondere a quelle
di NWA-3500. Fare riferimento alla documentazione dell’adattatore wireless.
NWA-3500 è ora pronto a connettersi allo switch o al router. Questa operazione può
essere eseguita subito, dopo aver collegato le antenne e montato NWA-3500.
72
Page 73

ITALIANO
V Se NWA-3500 non può comunicare con la rete, verificare che NWA-3500
stia utilizzando un indirizzo IP sulla stessa subnet dello switch / router.
4 Installazione dell'hardware
4.1 Collegamento delle antenne
Seguire le istruzioni presentate di seguito per eseguire il collegamento alle antenne in
dotazione.
1 Individuare le prese delle antenne
presso i lati di NWA-3500.
2 Individuare le prese delle antenne
presso i lati di NWA-3500. Le antenne
devono essere perpendicolari al suolo e
parallele una con l’altra.
assicurarsi che le antenne siano
accuratamente serrate sulle apposite
prese.
4.2 Montaggio dell’hardware
In generale, la posizione migliore per il punto di accesso è al centro dell’area di copertura
wireless. Per prestazioni ottimali, montare il dispositivo NWA-3500 in posizione
soprelevata, senza ostacoli. Per prestazioni ottimali, montare il dispositivo NWA-3500 in
posizione soprelevata, senza ostacoli.
Posizione libera
Posizionare il dispositivo NWA-3500 su una superficie piana e stabile (una scrivania o una
mensola), forte abbastanza da sostenere il peso del dispositivo con i cavi di connessione.
Montaggio a muro
Seguire i seguenti punti per applicare NWA-3500 ad una parete.
1 Individuare una posizione elevata sul muro che sia esente da ostacoli.
2 Inserire due viti (non in dotazione) nella parete a 80mm si distanza. È possibile
utilizzare lo schema al termine della presente guida per facilitare il contrassegno dei
73
Page 74

ITALIANO
fori delle viti. Usare viti con testa da 6mm ~ 8mm. Non serrare le viti fino in fondo nella
parete. Lasciare un piccolo spazio tra la testa della vite e il muro. Lo spazio deve
essere abbastanza grande da consentire alle teste delle viti di scorrere nelle apposite
fessure e ai cavi di connessione di scorrere lungo la parte posteriore di NWA-3500.
" assicurarsi che le viti siano saldamente fissate alla parete e che siano
abbastanza robuste per sostenere il peso di
collegamento.
3 Regolare i cavi.
Far scorrere i cavi di collegamento lungo la parte posteriore di NWA-3500 come mostrato
nella figura seguente.
oppure
far scorrere i cavi di collegamento verso l’alto e lungo il bordo della parte superiore.
NWA-3500 con i cavi di
4 Allineare i fori presso la
parte posteriore di NWA3500 con le viti sulla
parete. Appendere NWA3500 sulle viti.
5 Power over Ethernet (PoE)
Power over Ethernet (PoE) consente di fornire elettricità a NWA-3500 per mezzo di un
cavo Ethernet CAT 5 a 8 poli, eliminando la necessità di disporre di una sorgente di
alimentazione nelle vicinanze.
74
Page 75

ITALIANO
Un iniettore o un dispositivo PoE (B) (non in dotazione) è necessario per fornire corrente
(C) al cavo Ethernet (A). Questa funzionalità consente una maggiore flessibilità per il
posizionamento del dispositivo NWA-3500 (Z).
" Non è possibile collegare NWA-3500 a PoE tramite la porta ETHERNET
nonché a una sorgente di alimentazione tramite la porta POWER 12VDC.
Se si opera in questo modo, non scollegare la porta ETHERNET prima di
aver scollegato la porta POWER 12VDC. Ciò causa il riavvio di NWA-3500.
6 Procedura per visualizzare le certificazioni di un
prodotto
1 Aprire la pagina www.zyxel.com.
2 Selezionare il prodotto dall'elenco di riepilogo a discesa nella Home Page di ZyXEL per
passare alla pagina del prodotto in questione.
3 Selezionare da questa pagina la certificazione che si desidera visualizzare.
75
Page 76

ITALIANO
76
Page 77

РУССКИЙ
РУССКИЙ
Обзор
В кратком руководстве пользователя будет рассказано, как подключить и настроить
NWA-3500 (помеченный Z в приведенном ниже примере) для безопасного доступа
беспроводных клиентов к проводной сети. Обратитесь к полной версии руководства
для получения дополнительной информации.
" Вам может понадобиться ваша информация для доступа к сети
Интернет.
В этом руководстве будет описано, как:
1 Подключить оборудование
2 Войти в веб-конфигуратор
3 Настроить доступ к сети Интернет
4 Установить оборудование
5 Настроить подачу питания через Ethernet (при необходмимости)
77
Page 78

РУССКИЙ
1 Подключение оборудования
1 При помощи кабеля Ethernet подключите порт ETHERNET к вашему компьютеру
чтобы получить возможность конфигурировать устройство.
2 Подключите питание к разъему POWER 12VDC, используя для этого входящий в
комплект поставки сетевой адаптер.
" После выполнения начальной настройки подключите порт ETHERNET
вашего NWA-3500 к разъему Ethernet, который имеет доступ к сети.
78
Page 79

РУССКИЙ
1.1 Светодиодные индикаторы
Индикатор WDS/SYS мигает красным светом при перезапуске NWA-3500. Когда NWA3500 готов к работе, то загорается индикатор ZyAIR, который мигает при передаче
данных.
Индикаторы на порту ETHERNET RJ-45 включаются при подключении кабеля к порту
ETHERNET и начинают мигать при передаче данных. Зеленый индикатор включается
при подключении со скоростью передачи 10 Мб/с, а желтый индикатор - при
подключении со скоростью 100 Мб/с.
V Если индикатор ZyAIR не включился, проверьте тип сетевого
адаптера и параметры электросети. Отключите из розетки сетевой
адаптер и снова его включите. Если устройство не работает должным
образом, возможно, это связано с неисправностью оборудования. В
этом случае вам следует обратиться в службу технической поддержки
ZyXEL.
Если не горит ни один из светодиодных индикаторов ETHERNET,
проверьте надежность подключений и состояние Ethetnet-кабеля.
2 Доступ к веб-конфигуратору
" Используйте Internet Explorer версии 6.0 и выше или Netscape
Navigator версии 7.0 и выше с активированным JavaScript и
отключенной блокировкой всплывающих окон.
79
Page 80

РУССКИЙ
2.1 Установка IP-адреса вашего компьютера
" Запишите текущие настройки IP вашего компьютера перед их
изменением.
Вначале установите на вашем компьютере использование статического IP-адреса в
пределах диапазона 192.168.1.3 - 192.168.1.254 с маской подсети 255.255.255.0. Это
гарантирует, что ваш компьютер сможет соединяться с NWA-3500. Информация о
настройке IP-адреса вашего компьютера приведена в полной версии руководства
пользователя.
2.2 Доступ к веб-конфигуратору
" Даже если вы можете подключить NWA-3500 по беспроводной сети,
для начальной настройки рекомендуется подключить ваш компьютер к
порту ETHERNET.
1 Запустите ваш веб-браузер.
Введите 192.168.1.2 (IP-адрес
NWA-3500 по умолчанию) в строке
адреса.
V Если вы не можете войти в веб-конфигуратор, проверьте IP-адрес и
маску подсети NWA-3500 и компьютера. Они должны находиться в
одной подсети (см. пункт 2.1).
2 Щелкните на кнопке Login (Вход)
(пароль по умолчанию - 1234 - уже
введен).
80
Page 81

РУССКИЙ
3 Измените пароль входа в систему,
введя новый, и нажмите на Apply
(Применить). Запишите новый
пароль и храните его в надежном
месте.
V Если вы изменили пароль, а потом его забыли, то вам придется
выполнить возврат NWA-3500 к настройкам по умолчанию. О том, как
использовать кнопку RESET (СБРОС) можно прочитать в полной
версии руководства пользователя.
4 Щелкните на Apply (Применить),
чтобы изменить заводскую
установку сертификата для
улучшения безопасности. Если вы
не хотите изменять сертификат
сейчас, щелкните на Ignore
(Пропустить).
5 Появится окно MAIN MENU
(ГЛАВНОЕ МЕНЮ).
81
Page 82

РУССКИЙ
3 Конфигурирование NWA-3500
3.1 Настройка системных параметров
1 Щелкните на SYSTEM (СИСТЕМА) на панели навигации.
2 Появится окно SYSTEM (СИСТЕМА) > General (Общие).
82
Page 83

РУССКИЙ
System Name (Системное имя) используется для идентификации NWA-3500 в
вашей сети. Введите необходимое имя устройства, или оставьте предложенное
по умолчанию.
Domain Name (Имя домена): Введите имя домена, если ваш провайдер требует
этого для аутентификации. Если имя домена не требуется, можно оставить поле
пустым или с предложенным по умолчанию значением.
DNS Server(s) (DNS сервер(ы)): Если ваш провайдер предоставил вам
определенную настройку DNS (Система доменных имен), выберите User-Defined
(Определяется пользователем) и введите предоставленное значение.
3 Нажмите Apply (Применить).
Настройка параметров беспроводной сети
1 Щелкните на WIRELESS
(БЕСПРОВОДНАЯ СЕТЬ) на
панели навигации. Появится
следующее окно.
83
Page 84

РУССКИЙ
" Для успешного соединения беспроводная станция и NWA-3500
должны иметь одинаковые SSID, идентификатор канала и настройки
шифрования.
WLAN Adaptor (Выбор радиоинтерфейса): Убедитесь, что выбран WLAN1
(Радиоинтерфейс 1).
Operating Mode (Режим работы): Убедитесь, что выбран режим Access Point
(Точка доступа).
802.11 Mode (Режим 802.11): Выберите стандарт беспроводной сети, который вы
хотите использовать. Если беспроводные клиенты поддерживают IEEE 802.11a, то
выберите 802.11a. Иначе, выберите 802.11b+g.
Choose Channel ID (Выберите идентификатор канала): Выберите беспроводной
канал, который вы хотите использовать для создания сети. Для того, чтобы NWA-
3500 выбирала канал автоматически, щелкните на кнопке Scan (Сканирование).
SSID Profile (Профиль SSID): Выберите профиль SSID, конфигурацию которого вы
хотите установить, из выпадающего списка. В этом примере используется профиль
SSID03 .
2 Нажмите Apply (Применить), чтобы сохранить настройки.
3 Щелкните на вкладке SSID.
Появится следующее окно.
Убедитесь, что настройки
SSID03 установлены в
значения по умолчанию.
В качестве SSID по
умолчанию (имя сети)
установлено ZyXEL03. Его
настройкой Security
(Безопасность) по умолчанию
является Security01. По
умолчанию параметры Layer
2 Isolation (Блокировка 2
уровня) и MAC Filter (Фильтр
МАС-адреса) установлены в
состояние Disable
(Отключены).
Если вы хотите изменить
настройки профиля SSID,
выберите SSID03 и щелкните
на кнопке Edit (Изменить).
84
Page 85

4 Щелкните на вкладке
Security (Безопасность).
Убедитесь, что выбрана
Security01, и щелкните на
Edit (Редактировать).
5 Здесь вы можете ввести
настройки безопасности
вашей беспроводной сети.
Вносимые вами изменения в
настройки должны
соответствовать типу
безопасности, выбранному в
поле Security Mode (Режим
безопасности). Выберите
None (Нет)
использовать беспроводную
безопасность.
В этом примере используется
стандарт безопасности
WPA2-PSK, в котором все
беспроводные клиенты для
подключения к сети должны
использовать
предварительно заданный
ключ.
Убедитесь, что все ваши
беспроводные клиенты
поддерживают выбранный
вами тип безопасности.
Щелкните Apply (Применить)
по окончании внесения
изменений.
, если вы не хотите
РУССКИЙ
85
Page 86

РУССКИЙ
V Если беспроводные клиенты не могут соединиться с сетью,
убедитесь, что они используют одинаковые с NWA-3500 настройки
беспроводной безопасности.
86
Page 87

РУССКИЙ
3.2 Конфигурирование настроек IP
1 Вы должны установить на
вашем NWA-3500 IP-адрес с
маской подсети вашей сети.
Щелкните на IP на
навигационной панели.
Выберите Get automatically
from DHCP (Получать
автоматически от DHCP)
если вы хотите, чтобы IPадрес для вашего NWA-3500
предоставлял DHCP-сервер
вашей сети.
Если вы хотите использовать
определенный IP, выберите
Use fixed IP address
(Использовать
фиксированный IP-адрес) и
введите его вместе с маской
подсети и IP-адресом шлюза.
Нажмите Apply (Применить).
Теперь ваш NWA-3500
использует новые настройки
IP; вы не можете больше
подключаться к NWA-3500,
используя IP-адрес по
умолчанию.
,
" Если вы изменяете IP-адрес NWA-3500, то следует использовать
именно его для дальнейшего конфигурирования устройства. Если вы
выбираете Get automatically from DHCP (Получать автоматически от
DHCP), проверьте назначение DHCP-сервером IP-адреса для NWA-
3500. Дополнительные сведения приведены в документации к
серверу DHCP.
2 Если вы изменили IP-адрес вашего компьютера в пункте 2.1, верните его к
предыдущей настройке.
3 Измените настройки беспроводных станций так, чтобы они совпадали с
настройками NWA-3500. Обратитесь к документации для вашего беспроводного
адаптера.
87
Page 88

РУССКИЙ
Ваш NWA-3500 теперь готов к подключению к модему или маршрутизатору. Вы
можете сделать это прямо сейчас или после установки антенн и монтажа NWA-3500.
V Если NWA-3500 не может подключиться к сети, убедитесь, что NWA-
3500 использует IP-адрес с той же маской подсети, что и у модема /
маршрутизатора.
4 Установка оборудования
4.1 Подключение антенн .
1 Закручивайте антенны по часовой
стрелке в разъемы по бокам NWA-
3500. Антенны должны располагаться
вертикально и параллельно друг
другу.
Убедитесь, что они закреплены
надежно.
4.2 Монтаж оборудования
Лучше всего устанавливать точку доступа в центре зоны, в которой необходимо
обеспечить покрытие беспроводной сети. Для достижения наилучшей
производительности установите NWA-3500 повыше, в свободном от возможных
помех месте.
Незакрепленное положение
Положите NWA-3500 на плоскую горизонтальную поверхность (например, стол или
полку), достаточно прочную для веса NWA-3500 вместе с соединительными
проводами.
Крепление на стену
Для того, чтобы прикрепить NWA-3500 к стене выполните, следующие операции.
1 Ввинтите в стену два шурупа (не поставляются) на расстоянии 80 мм друг от
друга (см. схему в шаге 3). Используйте шурупы с шириной головки 6мм ~ 8мм. Не
вкручивайте шурупы до упора, оставьте промежуток между головкой шурупа и
стеной.
88
Page 89

РУССКИЙ
Этот промежуток должен быть достаточным для того, чтобы шурупы вошли в
разъемы на корпусе, а соединительные провода проходили сзади NWA-3500.
" Проверьте надежность крепления шурупов в стене и их способность
выдержать вес NWA-3500 вместе с соединительными проводами.
2 Подключите кабели.
Пропустите соединительные кабели сзади NWA-3500 как показано на иллюстрации
ниже.
ЛИБО:
Пропустите соединительные кабели вверх и проложите их вдоль потолка.
3 Совместите отверстия на
задней части NWA-3500 с
шурупами в стене.
Подвесьте NWA-3500 на
шурупах.
5 Подача питания через Ethernet (при
необходимости).
Питание через Ethernet (PoE) - это возможность обеспечения вашего NWA-3500
питанием через 8-жильный кабель CAT 5 Ethernet, при использовании которого нет
необходимости в источнике питания.
89
Page 90

РУССКИЙ
Для подведения питания к кабелю Ethernet вам также понадобится инжектор PoE (не
поставляется). Эта функция позволяет упростить размещение вашего NWA-3500.
На нижеприведенной иллюстрации: Z - это ваш NWA-3500, A - это кабель CAT 5
Ethernet, B - это инжектор PoE и C - это сетевой кабель питания.
" Вы можете подключить NWA-3500 к PoE через порт ETHERNET И и к
источнику питания через порт POWER 12VDC (12В постоянного тока).
При этом не стоит отключать порт ETHERNET до отключения порта
POWER 12VDC (12В постоянного тока). Это приведет к перезапуску
NWA-3500.
6 Процедура просмотра сертификата (сертификатов)
продукта
1 Посетите сайт www.zyxel.ru.
2 Выберите ваш продукт из выпадающего списка на домашней странице ZyXEL и
перейдите на его страницу.
3 Выберите на этой странице нужный вам сертификат
.
90
Page 91

SVENSKA
SVENSKA
Översikt
Denna snabbstartguide visar hur du installerar och konfigurerar NWA-3500 (märkt Z i
exemplet nedan) så att trådlösa klienter kan få åtkomst till ditt kabelnätverk på ett säkert
sätt. Se bruksanvisningen för mer information.
" Eventuellt behöver du din Internet-anslutningsinformation.
När du ska installera ditt trådlösa nätverk måste du:
1 Ansluta maskinvara.
2 Få åtkomst till webbkonfigurator.
3 Konfigurera Internet-åtkomst.
4 Installera maskinvara.
5 Installera Power over Ethernet (valfritt).
91
Page 92

SVENSKA
1 Ansluta maskinvara
1 Använd en Ethernet-sladd och anslut ETHERNET-porten till en dator för inledande
konfiguration.
2 Anslut uttaget POWER 12VDC till en strömkälla. Använd enbart den medföljande
strömadaptern.
" Anslut NWA-3500:s ETHERNET-port till ett Ethernet-uttag med
nätverksåtkomst när du har slutfört den inledande konfigurationen.
1.1 Indikatorlampor
Indikatorlampan WDS/SYS blinkar röd då NWA-3500 startar upp. När NWA-3500 är klar,
tänds indikatorlampan ZyAIR LED och blinkar när det är trafik.
92
Page 93

SVENSKA
En av indikatorlamporna ETHERNET på RJ-45 ETHERNET-porten tänds om ETHERNET-
porten är rätt ansluten, och blinkar när det är trafik. Den gröna indikatorlampan
ETHERNET tänds om anslutningen är på 10Mbps, och den gula indikatorlampan
ETHERNET tänds om anslutningen är på 100Mbps.
V Om indikatorlampan ZyAIR inte tänds, kontrollera att du använder rätt
strömadapter och att strömadaptern är ansluten till en lämplig strömkälla.
Koppla ur strömadaptern och anslut den sedan igen. Om felet kvarstår, kan
det bero på ett maskinvaruproblem. I sådant fall bör du kontakta din
återförsäljare.
Om ingen av indikatorlamporna ETHERNET tänds, kontrollera
sladdanslutningen till NWA-3500:s ETHERNET-port.
2 Få åtkomst till webbkonfigurator
" Använd Internet Explorer version 6.0 och senare eller Netscape Navigator
version 7.0 och senare med JavaScript aktiverat och popup-blockering
inaktiverad.
2.1 Ställa in datorns IP-adress
" Skriv ner datorns befintliga IP-inställningar innan du ändrar dem.
Först måste du ställa in datorn att använda en statisk IP-adress i intervallet 192.168.1.3 -
192.168.1.254 med en subnetmask på 255.255.255.0. Detta säkerställer att din dator kan
kommunicera med NWA-3500. Se din bruksanvisning för information om hur du ställer in
datorns IP-adress.
93
Page 94

SVENSKA
2.2 Logga in i webbkonfigurator
" Även om du kan ansluta NWA-3500 trådlöst, rekommenderas du att
ansluta din dator till ETHERNET-porten för inledande konfiguration.
1 Starta din webbläsare. Ange
192.168.1.2 (NWA-3500:s standard-
IP-adress) som adress.
V Om du inte lyckas få åtkomst till webbkonfiguratorn, kontrollera att IP-
adresser och subnetmask för NWA-3500 och datorn finns i samma IPadressintervall (se Section 2.1).
2 Klicka på Login (standardlösenordet
1234 är redan angivet).
3 Ändra inloggningslösenordet genom
att ange ett nytt lösenord och klicka
på Apply (verkställ). Var noga med
att anteckna det nya lösenordet och
att förvara det på ett säkert ställe.
94
Page 95

SVENSKA
V Om du ändrar lösenordet och sedan glömmer bort det, måste du
återställa NWA-3500. Se bruksanvisningen angående hur du använder
knappen RESET (återställ).
4 Klicka på Apply (verkställ) för att
byta ut fabrikens standardcertifikat
för ökad säkerhet; alternativt kan du
klicka på Ignore (ignorera) för att
fortsätta pm du inte vill ändra
certifikatet nu.
5 Skärmen MAIN MENU (huvudmeny)
visas.
95
Page 96

SVENSKA
3 Konfigurera NWA-3500
3.1 Konfigurera systeminställningar
1 Klicka på SYSTEM i navigationspanelen.
2 Skärmen SYSTEM > General (system - allmänt) visas.
System Name (systemnamn) identifierar NWA-3500 i ditt nätverk. Välj ett distinkt
namn, eller låt standardnamnet stå kvar.
Domain Name (domännamn): Ange ett domännamn om din Internet-leverantör (ISP)
fordrar ett sådant för autentisering. I annat fall kan du låta detta vara tomt eller ställa in det
på det som kan ha visats automatiskt.
DNS Server(s) (DNS-server(servrar): Om din ISP gett dig specifika DNS-inställningar
(domännamnsystem), välj User-Defined (användardefinierad) och ange dem här.
3 Klicka på Apply (verkställ).
96
Page 97

SVENSKA
Konfigurera trådlösa inställningar
1 Klicka på WIRELESS (trådlös)
i navigationspanelen. Följande
skärm visas.
" De trådlösa stationerna och NWA-3500 måste använda samma SSID,
kanal-ID och krypteringsinställningar för trådlös kommunikation.
WLAN-adapter: Kontrollera att WLAN1 är valt.
Operating Mode (driftläge): Kontrollera att läget Access Point (åtkomstpunkt) är valt.
802.11 Mode (802.11-läge): Välj den trådlösa standard som du vill att ditt nätverk ska
använda. Om alla de trådlösa klienterna stöder IEEE 802.11a, välj 802.11a. I annat fall
ska du välja 802.11b+g.
Choose Channel ID (välj kanal-ID): Välj den trådlösa kanal som du vill att ditt nätverk ska
använda. Om du vill låta NWA-3500 välja en kanal automatiskt, klickar du i stället på
Scan (sök).
SSID Profile (SSID-profil): Välj den SSID-profil du vill konfigurera för nätverksåtkomst
från rullgardinslistrutan. I detta exempel används profilen SSID03.
2 Klicka på Apply (verkställ) för att spara dina inställningar.
97
Page 98

3 Klicka på fliken SSID. Följande
skärm visas.
Kontrollera att inställningarna
för SSID03 har sina
standardvärden.
Standard-SSID (namnet på
nätverket) är ZyXEL03, dess
standardinställning för Security
(säkerhet) är Security01. Layer
2 Isolation (lager 2-isolering)
och MAC Filter är inställda på
Disable (inaktivera) som
standard.
Om du vill ändra SSIDprofilinställningar, välj SSID03
och klicka på Edit (redigera).
4 Klicka på fliken Security
(säkerhet). Kontrollera att
Security01 är valt och klicka
på Edit (redigera).
SVENSKA
98
Page 99

SVENSKA
5 Här kan du ange
säkerhetsinställningar för ditt
trådlösa nätverk. Vilka fält du
fyller i beror på vilken typ av
säkerhet du valt i fältet
Security Mode
(säkerhetsläge). Välj None
(inget) om du inte vill använda
trådlös säkerhet.
I detta exempel används
säkerheten WPA2-PSK, enligt
vilken alla trådlösa klienter
måste använda samma fördelade nyckel för att ansluta sig
till nätverket.
Kontrollera att alla dina trådlösa
klienter stöder den säkerhetstyp
du ställt in. Klicka på Apply
(verkställ) när du är klar.
V Om de trådlösa klienterna inte kan kommunicera med nätverket,
kontrollera att klienterna och NWA-3500 använder samma trådlösa
säkerhetsinställningar.
Konfigurera IP-inställningar
99
Page 100

3.2
1 Du måste ställa in NWA-
3500:s IP-adress på samma
subnet som ditt nätverk. Klicka
på IP i navigationspanelen.
Välj Get automatically from
DHCP (hämta automatiskt från
DHCP) om du vill låta en DHCPserver i ditt nätverk tilldela en
IP-adress till NWA-3500.
Om du ska använda en specifik
IP-adress, välj Use fixed IP
address (använd fast IPadress) och ange den samt
subnetmask och gateway-IPadress.
Klicka på Apply (verkställ). Nu
använder NWA-3500 de nya IPinställningarna, och du kan inte
längre ansluta till NWA-3500
med standard-IP-adressen.
SVENSKA
" Om du ändrar NWA-3500:s IP-adress, måste du använda den nya IP-
adressen nästa gång du vill få åtkomst till webbkonfiguratorn. Om du
väljer Get automatically from DHCP (hämta automatiskt från DHCP),
kontrollera din DHCP-server för att avgöra vilken IP-adress den tilldelar till
NWA-3500. Se bruksanvisningen till din DHCP-server för mer information.
2 Om du ändrade datorns IP-adress i Section 2.1, återgå till dess föregående inställning.
3 Ändra de trådlösa inställningarna i de trådlösa stationerna så att de matchar de som
finns i NWA-3500. Se dokumentationen till din trådlösa adapter.
Nu är NWA-3500 klar att anslutas till din switch eller router. Du kan göra det nu eller när du
har anslutit antennerna och monterat NWA-3500.
V Om NWA-3500 inte kan kommunicera med nätverket, kontrollera att NWA-
3500 använder en IP-adress i samma subnet som din switch/router.
100
 Loading...